pytest(12)-Allure常用特性allure.attach、allure.step、fixture、environment、categories
上一篇文章pytest Allure生成测试报告我们学习了Allure中的一些特性,接下来继续学习其他常用的特性。
allure.attach
allure.attach用于在测试报告中添加附件,补充测试结果。附件格式可以是txt、jpg等,附件内容通常是测试数据、截图等。
allure.attach提供了两种方法:allure.attach(),allure.attach.file()
allure.attach()
作用:在测试报告中生成指定内容、名称、类型的附件
语法:allure.attach(body, name=None, attachment_type=None, extension=None)
参数说明:
body,需要显示的内容,也可以理解为写入附件的内容name,附件名称attachment_type,附件类型,如csv、jpg、html 等,由allure.attachment_type提供extension:附件扩展名,不常用
allure.attach.file()
作用:向测试用例中上传附件
语法:allure.attach.file(source, name=None, attachment_type=None, extension=None)
参数说明:source为文件路径,其他参数与allure.attach()参数一致。
在UI自动化测试中,会经常用到这个方法来上传用例执行的截图。
示例
test_login.py:
import allure
import pytest
import requests
import json

data = [("lilei", "123456"), ("hanmeimei", "888888"), ("xiaoming", "111111")]
ids = ["username:{}-password:{}".format(username, password) for username, password in data]

@allure.epic("xx在线购物平台接口测试")
@allure.feature("登录模块")
class TestLogin:

    @allure.story("用户登录")
    @allure.title("登录")
    @pytest.mark.parametrize("username, password", data, ids=ids)
    def test_login(self, username, password):
        headers = {"Content-Type": "application/json;charset=utf8"}
        url = "http://127.0.0.1:5000/login"
        _data = {
            "username": username,
            "password": password
        }
        allure.attach(
            body="用户名-{},密码-{}".format(username, password),
            name="登录参数",
            attachment_type=allure.attachment_type.TEXT
        )
        res = requests.post(url=url, headers=headers, json=_data).text
        res = json.loads(res)
        assert res['code'] == 1000

    @allure.story("用户退出登录")
    @allure.title("退出登录")
    def test_logout(self):
        '''这条测试用例仅仅只是为了举例说明allure.attach.file的使用'''
        print("退出登录,并截图")
        # 截图路径
        testcase_path = os.path.dirname(os.path.dirname(os.path.abspath(__file__)))
        source_path = testcase_path + "/screenshot/logout.jpg"
        allure.attach.file(
            source=source_path,
            name="退出登录后截图",
            attachment_type=allure.attachment_type.JPG
        )
        assert True
上述代码中使用了@pytest.mark.parametrize(),Allure能够很好的支持@pytest.mark.parametrize()进行参数化。
run.py:
if __name__ == '__main__':
    pytest.main(['testcase/test_login.py', '-s', '-q', '--alluredir', './result'])
    os.system('allure generate ./result -o ./report --clean')
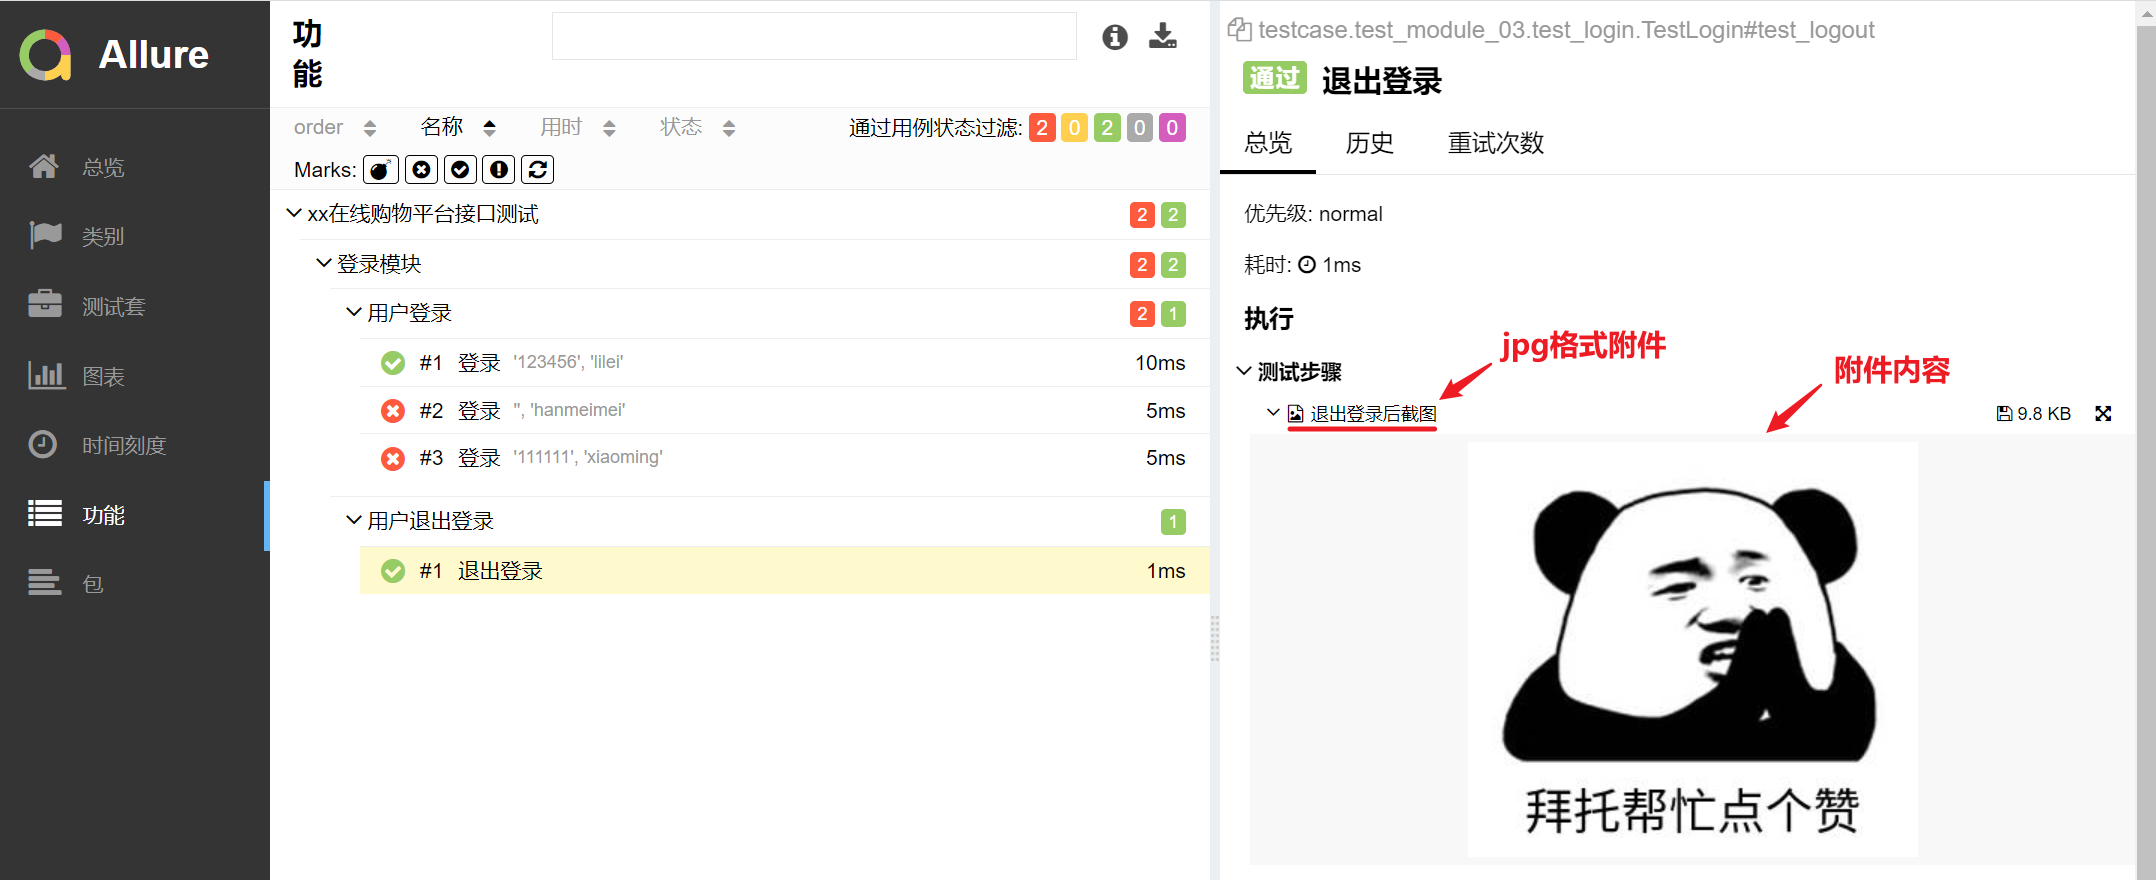
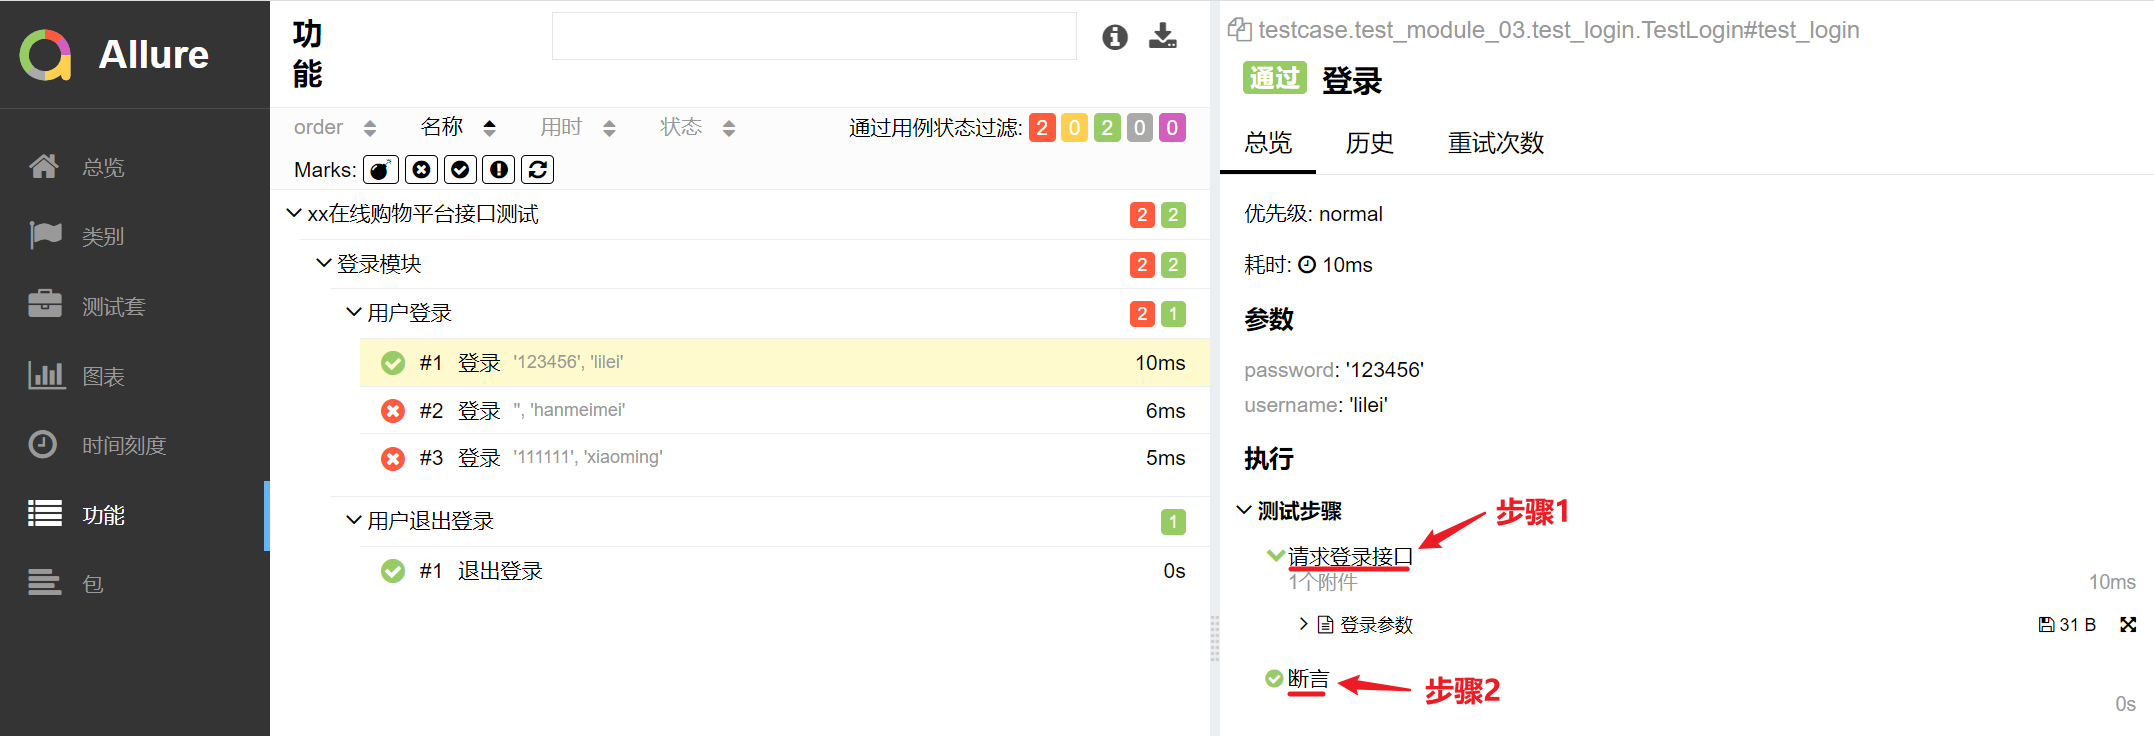
运行run.py,测试报告结果展示如下:
allure.attach()结果:

allure.attach.file()结果:

从结果可以看出来,两种方法都在报告中对应的测试用例中展示了附件内容。
从allure.attach()结果还可以看出来,Allure能够很好的支持@pytest.mark.parametrize()进行参数化。
with allure.step
上一篇文章我们使用了装饰器@allure.step()标记函数使之成为测试步骤,而在测试函数/方法中,我们还可以通过with allure.step()的方式标记测试步骤。
它们之间的区别在于,@allure.step()用于标记通用函数,当这个被标记的函数被调用后,会插入步骤说明并展示在Allure报告中。
而with allure.step()则是将普通的代码标记为测试步骤,执行到这段代码时则会在Allure报告中展示步骤说明。
我们在上面代码的基础上,加入with allure.step(),示例如下:
import allure
import pytest
import requests
import json


data = [("lilei", "123456"), ("hanmeimei", "888888"), ("xiaoming", "111111")]
ids = ["username:{}-password:{}".format(username, password) for username, password in data]

@allure.epic("xx在线购物平台接口测试")
@allure.feature("登录模块")
class TestLogin:

    @allure.story("用户登录")
    @allure.title("登录")
    @pytest.mark.parametrize("username, password", data, ids=ids)
    def test_login(self, username, password):
        headers = {"Content-Type": "application/json;charset=utf8"}
        url = "http://127.0.0.1:5000/login"
        _data = {
            "username": username,
            "password": password
        }
        # 第一步,请求登录接口
        with allure.step("请求登录接口"):
            allure.attach(
                body="用户名-{},密码-{}".format(username, password),
                name="登录参数",
                attachment_type=allure.attachment_type.TEXT
            )
            res = requests.post(url=url, headers=headers, json=_data).text
            res = json.loads(res)
        # 第二步,获取返回参数进行断言
        with allure.step("断言"):
            assert res['code'] == 1000
测试报告结果展示如下:

代码中插入的测试步骤如上图中的标记所示。
fixture
pytest的fixture函数可以实现setup、teardown的功能,而Allure会跟踪每个fixture的调用情况,详细显示调用了哪些fixture和参数以及调用顺序。
我们在上面代码的基础上,加入fixture函数,示例如下:
import allure
import pytest
import requests
import json

@pytest.fixture(scope="class", autouse=True)
def fixture_demo(request):
    print("连接数据库")
    def finalizer():
        print("关闭数据库")
    request.addfinalizer(finalizer)


data = [("lilei", "123456"), ("hanmeimei", "888888"), ("xiaoming", "111111")]
ids = ["username:{}-password:{}".format(username, password) for username, password in data]

@allure.epic("xx在线购物平台接口测试")
@allure.feature("登录模块")
class TestLogin:

    @allure.story("用户登录")
    @allure.title("登录")
    @pytest.mark.parametrize("username, password", data, ids=ids)
    def test_login(self, username, password):
        headers = {"Content-Type": "application/json;charset=utf8"}
        url = "http://127.0.0.1:5000/login"
        _data = {
            "username": username,
            "password": password
        }
        # 第一步,请求登录接口
        with allure.step("请求登录接口"):
            allure.attach(
                body="用户名-{},密码-{}".format(username, password),
                name="登录参数",
                attachment_type=allure.attachment_type.TEXT
            )
            res = requests.post(url=url, headers=headers, json=_data).text
            res = json.loads(res)
        # 第二步,获取返回参数进行断言
        with allure.step("断言"):
            assert res['code'] == 1000
测试报告结果展示如下:

从结果可以看出来,Allure测试报告展示了用例调用的fixture函数信息。多个fixture函数被调用及其执行顺序的展示,这里不做过多说明。
environment
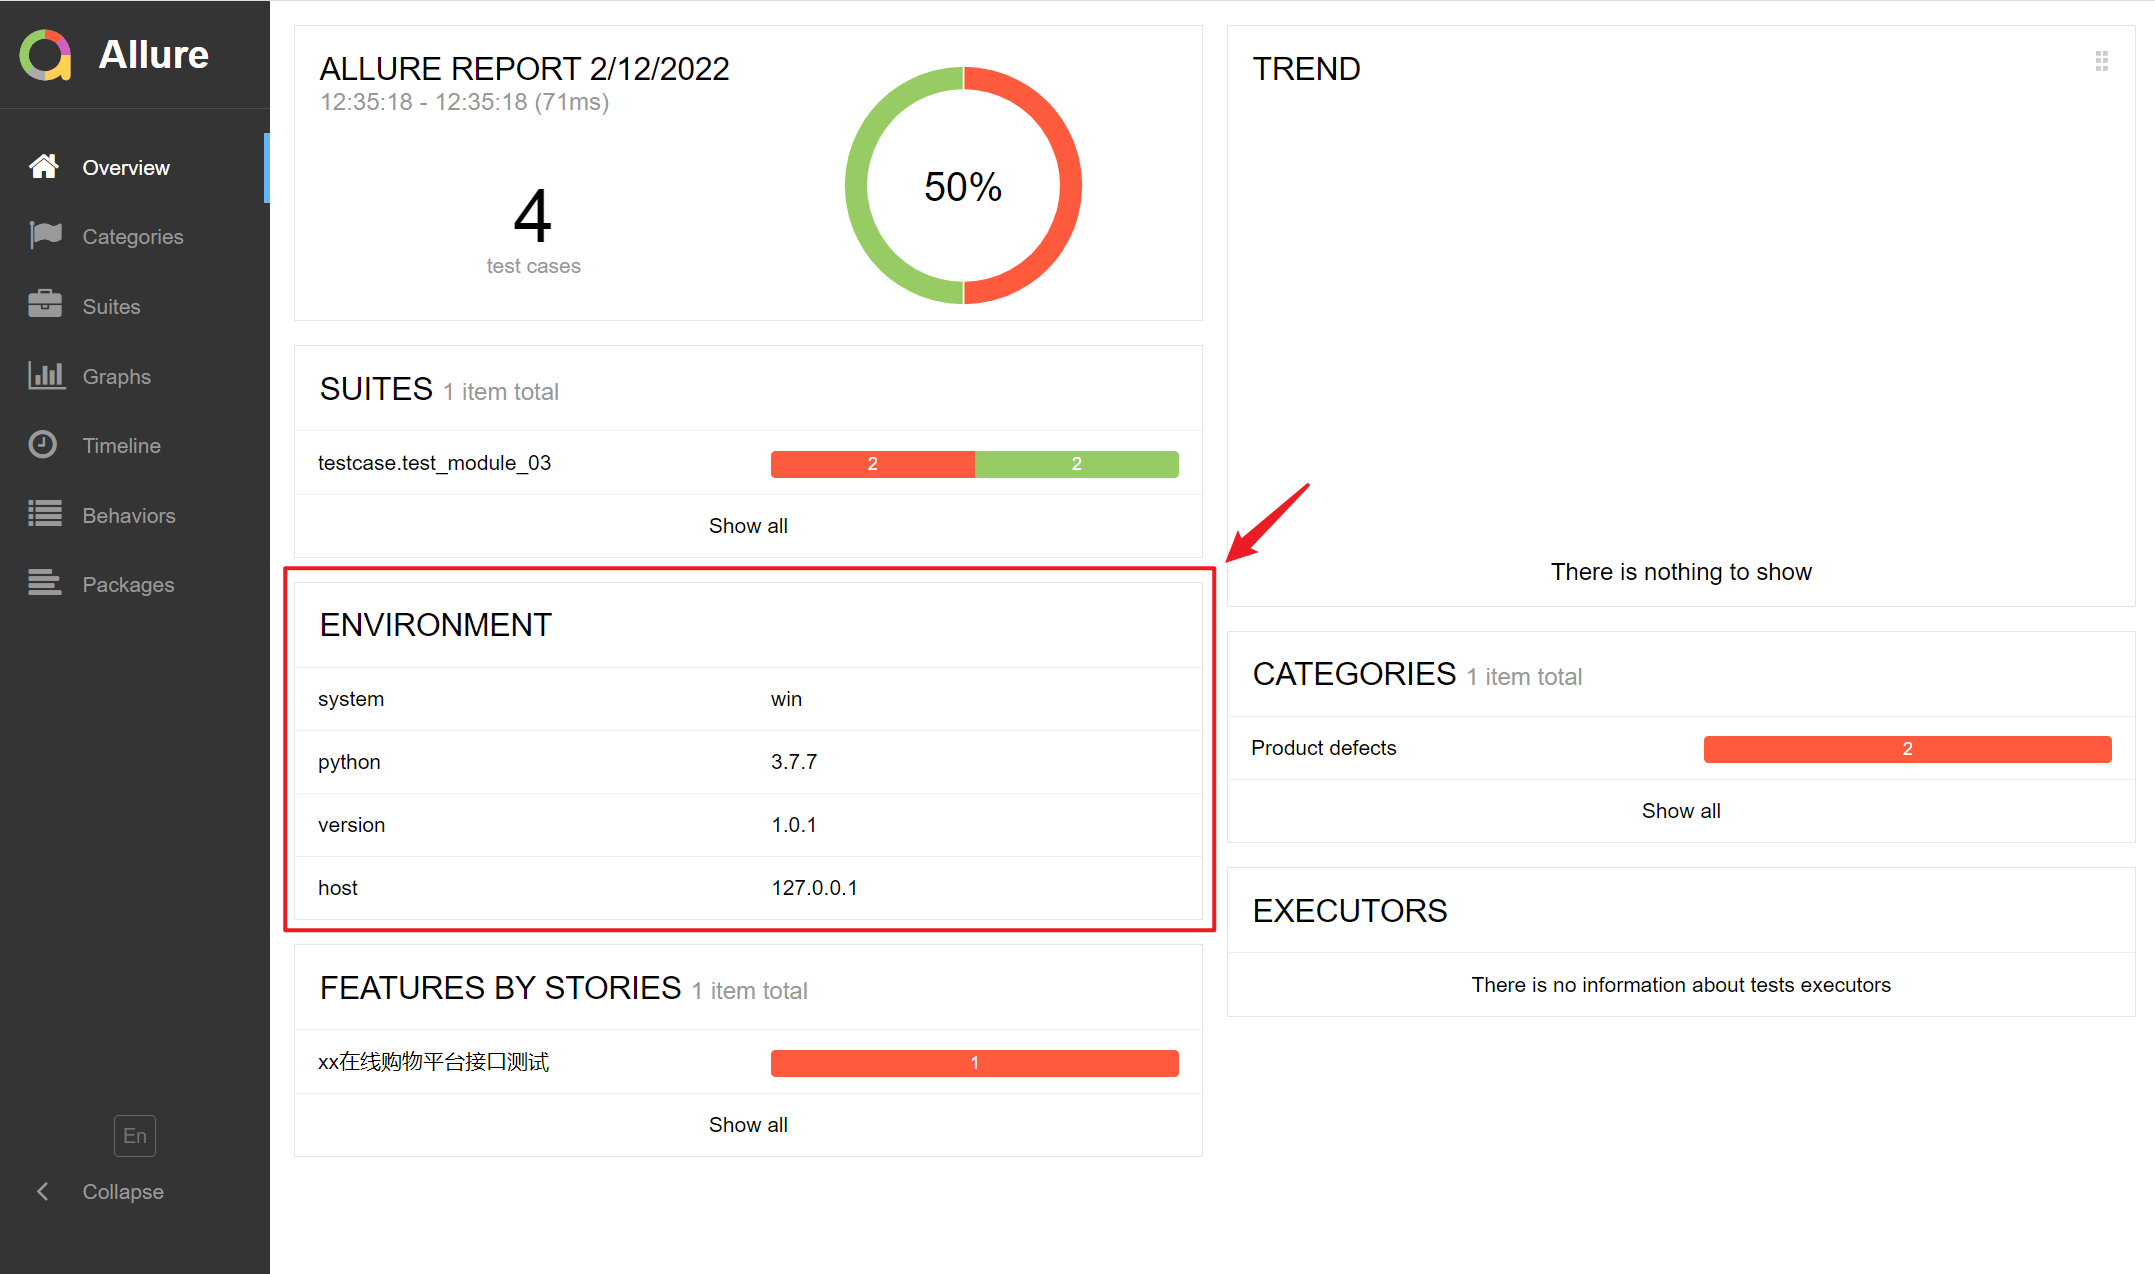
在Allure报告的首页可以展示此次测试执行的环境信息 (如测试环境、测试人员、被测系统版本号、系统配置环境等),这需要通过创建environment.properties或environment.xml进行配置,并把文件放置在--alluredir指定的文件夹中 (博主这里即result文件夹)。
environment.properties示例如下:
system=win
python=3.7.7
version=1.0.1
host=127.0.0.1
或environment.xml
<environment>
    <parameter>
        <key>system</key>
        <value>win</value>
    </parameter>
    <parameter>
        <key>python</key>
        <value>3.7.7</value>
    </parameter>
    <parameter>
        <key>version</key>
        <value>1.0.1</value>
    </parameter>
    <parameter>
        <key>host</key>
        <value>127.0.0.1</value>
    </parameter>
</environment>
生成报告后首页展示ENVIRONMENT信息如下:

categories
Allure报告中有一栏叫Categories,即分类,用于展示测试结果,默认只显示两类缺陷结果:
- Product defects 产品缺陷(测试结果:failed)
- Test defects 测试缺陷(测试结果:error/broken)
如下图所示

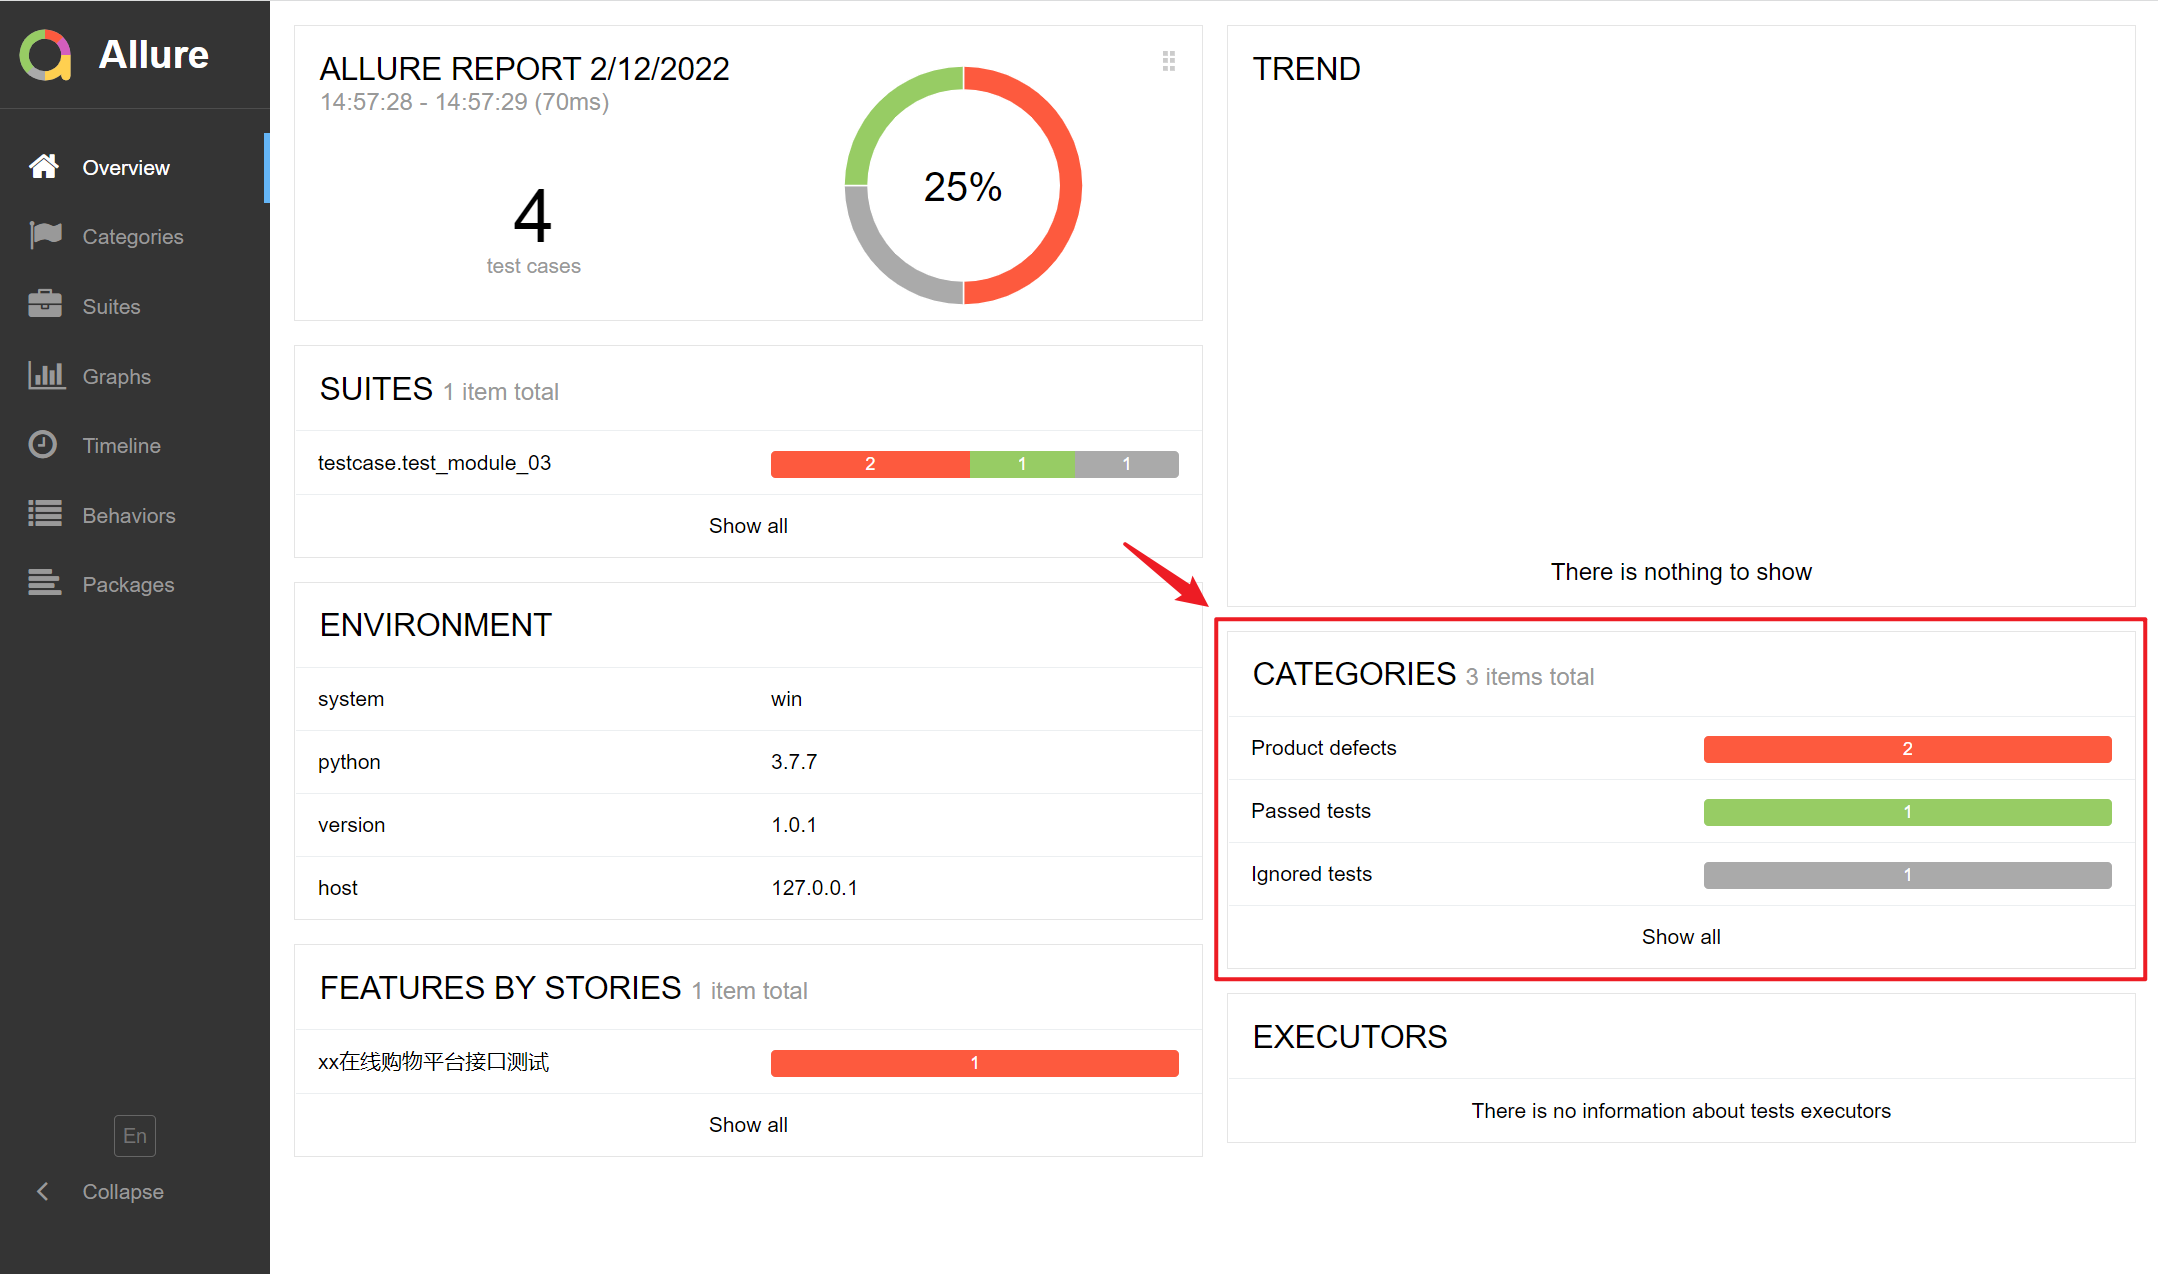
如果想要缺陷分类显示更丰富,我们可以通过创建categories.json文件进行自定义缺陷分类,并把文件放置在--alluredir指定的文件夹中 (即同environment.properties放在同一目录中)。
categories.json示例如下:
[
  {
    "name": "Passed tests",
    "matchedStatuses": ["passed"]
  },
  {
    "name": "Ignored tests",
    "matchedStatuses": ["skipped"]
  },
  {
    "name": "Infrastructure problems",
    "matchedStatuses": ["broken", "failed"],
    "messageRegex": ".*bye-bye.*"
  },
  {
    "name": "Outdated tests",
    "matchedStatuses": ["broken"],
    "traceRegex": ".*FileNotFoundException.*"
  },
  {
    "name": "Product defects",
    "matchedStatuses": ["failed"]
  },
  {
    "name": "Test defects",
    "matchedStatuses": ["broken"]
  }
]
参数说明:
- name:分类名称
- matchedStatuses:测试用例的运行状态,默认["failed", "broken", "passed", "skipped", "unknown"]
- messageRegex:测试用例运行的错误信息,默认是 .* ,通过正则去匹配
- traceRegex:测试用例运行的错误堆栈信息,默认是 .* ,同样通过正则去匹配
执行后会在报告的Categories中展示,首页CATERORIES栏展示如下:

Categories页面展示:

总结
Allure中常用的特性大致就这些,以上仅为简单示例,大家可根据自身项目的需要按需选择使用。Allure提供的特性当然也不止这些,如果感兴趣大家可以查看Allure官方文档了解更多。


 浙公网安备 33010602011771号