

Centos7安装mysql5.7
前言
linux环境(Minimal Install)
$ cat /etc/redhat-release
CentOS Linux release 7.5.1804 (Core)
安装和配置步骤
- 配置yum源
MySQL官网下载YUM的RPM安装包,http://dev.mysql.com/downloads/repo/yum/ - 下载mysql源安装包
$ wget -i http://dev.mysql.com/get/mysql57-community-release-el7-7.noarch.rpm - 安装mysql
$ yum -y install mysql57-community-release-el7-7.noarch.rpm - 检查 yum 源是否安装成功
$ yum repolist enabled | grep "mysql.-community."
mysql-connectors-community| MySQL Connectors Community|21
mysql-tools-community|MySQL Tools Community|38
mysql57-community|MySQL 5.7 Community Server|130
如上所示,则表示安装成功 - 安装mysql
$ yum install mysql-community-server - 设置开机启动
$ systemctl enable mysqld
$ systemctl daemon-reload - 查看服务状态并启动
$ systemctl status mysqld
$ systemctl start mysqld - 修改root初始密码
MySQL 5.7 启动后,在 /var/log/mysqld.log 文件中给 root 生成了一个默认密码。通过下面的方式找到 root 默认密码,然后登录 mysql 进行修改:
$ grep 'temporary password' /var/log/mysqld.log
[Note] A temporary password is generated for root@localhost:默认密码 - 登录mysql修改初始密码
$ mysql -u root -p
Enter password:默认密码(暗文)
mysql> ALTER USER 'root'@'localhost' IDENTIFIED BY '新密码';
注意:MySQL 5.7 默认安装了密码安全检查插件(validate_password),默认密码检查策略要求密码必须包含:大小写字母、数字和特殊符号,并且长度不能少于 8 位。
通过 MySQL 环境变量可以查看密码策略的相关信息:
mysql> SHOW VARIABLES LIKE 'validate_password%'; 如下图:
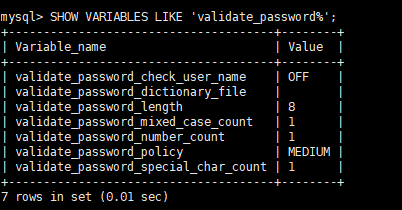
10.密码策略说明
validate_password_policy:密码策略,默认为MEDIUM策略
validate_password_dictionary_file:密码策略文件,策略为STRONG才需要
validate_password_length:密码最少长度
validate_password_mixed_case_count:大小写字符长度,至少1个
validate_password_number_count :数字至少1个
validate_password_special_char_count:特殊字符至少1个
上述参数是默认策略MEDIUM的密码检查规则。
| 策略 | 检查规则 |
|---|---|
| 0 or LOW | Length |
| 1 or MEDIUM | Length; numeric, lowercase/uppercase, and special characters |
| 2 or STRONG | Length; numeric, lowercase/uppercase, and special characters; dictionary file |
- 修改密码策略(不建议)
在/etc/my.cnf文件添加validate_password_policy配置,指定密码策略
选择0(LOW),1(MEDIUM),2(STRONG)其中一种,选择2需要提供密码字典文件
validate_password_policy=0
如果不需要密码策略,添加my.cnf文件中添加如下配置禁用即可
validate_password = off - 配置默认编码为utf8
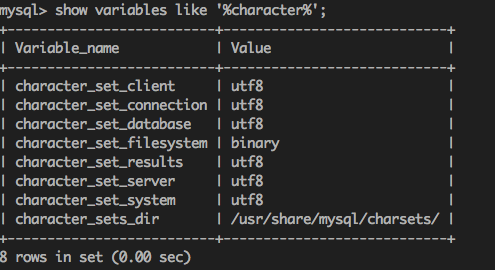
修改/etc/my.cnf配置文件,在[mysqld]下添加编码配置,如下所示:
[mysqld]
character_set_server=utf8
init_connect='SET NAMES utf8'
重启mysql服务 $systemctl restart mysqld 查看数据库默认编码如下图
- 默认配置文件路径
配置文件:/etc/my.cnf
日志文件:/var/log//var/log/mysqld.log
服务启动脚本:/usr/lib/systemd/system/mysqld.service
socket文件:/var/run/mysqld/mysqld.pid - 添加远程登录用户(非root)
默认只允许root帐户在本地登录,如果要在其它机器上连接mysql,必须修改root允许远程连接,或者添加一个允许远程连接的帐户,为了安全起见,我添加一个新的帐户:
mysql> grant all privileges on . to test@"%" identified by 'Test@!xxx' with grant option;

- 开启3306端口
$ sudo firewall-cmd --zone=public --add-port=3306/tcp --permanent
$ sudo firewall-cmd --reload
16.服务重启
$ systemctl restart mysqld
- 附mysql登录退出命令
登录mysql:输入mysql -uroot -p -P3306 -h127.0.0.1
表示超级用户名root,密码稍后输入,端口号3306(不输入P默认为3306),
主机地址127.0.0.1(若使用本机作为主机,h默认127.0.0.1)
mysql退出三种方法:
mysql > exit;
mysql > quit;
mysql > \q;

 浙公网安备 33010602011771号