
git服务器搭建
1、 首先检查电脑是否已安装git远程服务,如没有Git服务请执行第三步
rpm -qa git
2、 如果执行完第一步发现系统安装了git 服务,请执行此步骤
[root@iZbp159egvvktszc82dr5xZ ~]# yum remove git
Loaded plugins: fastestmirror
Resolving Dependencies
--> Running transaction check
---> Package git.x86_64 0:1.8.3.1-23.el7_8 will be erased
--> Processing Dependency: git = 1.8.3.1-23.el7_8 for package: perl-Git-1.8.3.1-23.el7_8.noarch
--> Running transaction check
---> Package perl-Git.noarch 0:1.8.3.1-23.el7_8 will be erased
--> Finished Dependency Resolution

Dependencies Resolved

====================================================================================================
 Package               Arch                Version                         Repository          Size
====================================================================================================
Removing:
 git                   x86_64              1.8.3.1-23.el7_8                @base               22 M
Removing for dependencies:
 perl-Git              noarch              1.8.3.1-23.el7_8                @base               57 k

Transaction Summary
====================================================================================================
Remove  1 Package (+1 Dependent package)

Installed size: 22 M
Is this ok [y/N]: y
Downloading packages:
Running transaction check
Running transaction test
Transaction test succeeded
Running transaction
  Erasing    : perl-Git-1.8.3.1-23.el7_8.noarch                                                 1/2
  Erasing    : git-1.8.3.1-23.el7_8.x86_64                                                      2/2
  Verifying  : git-1.8.3.1-23.el7_8.x86_64                                                      1/2
  Verifying  : perl-Git-1.8.3.1-23.el7_8.noarch                                                 2/2

Removed:
  git.x86_64 0:1.8.3.1-23.el7_8

Dependency Removed:
  perl-Git.noarch 0:1.8.3.1-23.el7_8

Complete!
3、 创建Git安装目录
mkdir -v /usr/local/git
4、 下载Git源码安装包
最新版本地址:https://github.com/git-for-windows/git/releases/
wget https://codeload.github.com/git/git/tar.gz/v2.17.1
5、 解压Git源码包
tar -zxvf git-2.17.1.tar.gz
[root@iZbp159egvvktszc82dr5xZ git]# ls
git-2.17.1  git-2.17.1.tar.gz
6、 进入解压后的目录开始进行编译操作,并指定Git安装路径
[root@iZbp159egvvktszc82dr5xZ git]# cd git-2.17.1
[root@iZbp159egvvktszc82dr5xZ git-2.17.1]# make prefix=/usr/local/git all
重新编译的过程可能遇到的错误
在使用命令 make 重新编译 Git 的某些源文件时,你可能会遇到以下这些错误:
错误 1 - FATAL ERROR: OPENSSL/SSL.H: NO SUCH FILE OR DIRECTORY
GIT_VERSION = 2.27.0
make: curl-config: Command not found
    * new build flags
    CC fuzz-commit-graph.o
In file included from commit-graph.h:4:0,
                 from fuzz-commit-graph.c:1:
git-compat-util.h:297:25: fatal error: openssl/ssl.h: No such file or directory
 #include <openssl/ssl.h>
                         ^
compilation terminated.
make: *** [fuzz-commit-graph.o] Error 1
1234567891011
使用包管理器查看与 openssl 相关的信息:
# rpm --query --all | grep openssl
openssl-libs-1.0.2k-19.el7.x86_64
openssl-1.0.2k-19.el7.x86_64
xmlsec1-openssl-1.2.20-7.el7_4.x86_64
1234
这是缺少 openssl-devel 导致的,执行命令 yum install --assumeyes openssl-devel 安装即可。
错误 2 - FATAL ERROR: CURL/CURL.H: NO SUCH FILE OR DIRECTORY
... 省略部分信息
In file included from http.c:2:0:
http.h:6:23: fatal error: curl/curl.h: No such file or directory
 #include <curl/curl.h>
                       ^
compilation terminated.
make: *** [http.o] Error 1
1234567
使用包管理器查看与 curl 相关的信息:
# rpm --query --all | grep curl
curl-7.29.0-54.el7.x86_64
libcurl-7.29.0-54.el7.x86_64
python-pycurl-7.19.0-19.el7.x86_64
1234
这是缺少 curl-devel 导致的,执行命令 yum install --assumeyes curl-devel 安装即可。
错误 3 - FATAL ERROR: EXPAT.H: NO SUCH FILE OR DIRECTORY
... 省略部分信息
http-push.c:22:19: fatal error: expat.h: No such file or directory
 #include <expat.h>
                   ^
compilation terminated.
make: *** [http-push.o] Error 1
123456
使用包管理器查看与 expat 相关的信息:
# rpm --query --all | grep expat
expat-2.1.0-10.el7_3.x86_64
12
这是缺少 expat-devel 导致的,执行命令 yum install --assumeyes expat-devel 安装即可。
7、当Git源码编译操作完成后,执行安装操作
[root@iZbp159egvvktszc82dr5xZ git-2.17.1]# make prefix=/usr/local/git install
8、安装完Git 服务后,配置环境变量
vim /etc/profile
添加如下字段:
export GIT_HOME=/usr/local/git
export PATH=$PATH:${GIT_HOME}/bin

配置完成后,重载配置文件:
source /etc/profile
9、验证Git 版本号
[root@iZbp159egvvktszc82dr5xZ git-2.17.1]# git --version
git version 2.17.1
10、将git设置为默认路径,不然后面克隆时会报错
[root@iZbp159egvvktszc82dr5xZ git-2.17.1]# ln -s /usr/local/git/bin/git-upload-pack /usr/bin/git-upload-pack
[root@iZbp159egvvktszc82dr5xZ git-2.17.1]# ln -s /usr/local/git/bin/git-recive-pack /usr/bin/git-recive-pack
至此,Git就安装完成。
11、创建一个git用户组和用户,用来运行git服务
# groupadd git
# useradd git -g git
# passwd git  #参数是用户名
# su - git  //切换git用户
【注】最好切换到git用户 不然后面新建的git仓库都要改权限
11、创建证书登录
在Git服务器上首先需要将/etc/ssh/sshd_config中将RSA认证打开
[root@iZbp159egvvktszc82dr5xZ git-2.17.1]# vim /etc/ssh/sshd_config
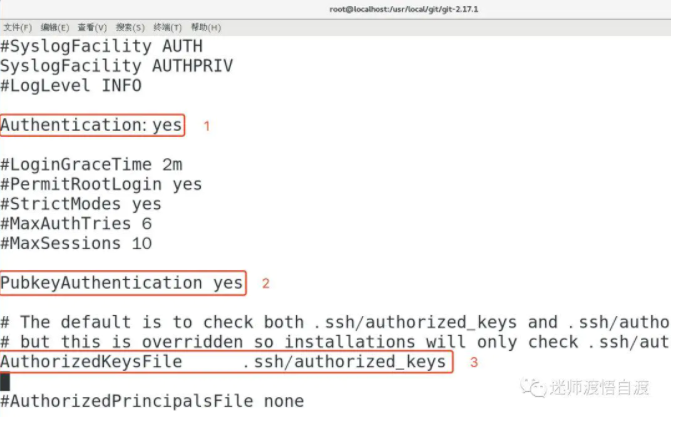
这里我们可以看到公钥存放在 .ssh/authorized_keys 文件中。
所以我们在/home/git下创建.ssh目录,然后创建authorized_keys文件,并将刚生成的公钥导入进去。
# cd /home/git/
# mkdir .ssh #新建文件夹
# chmod 700 .ssh
# touch .ssh/authorized_keys  #新建文件
# chmod 600 .ssh/authorized_keys
[root@iZbp159egvvktszc82dr5xZ git]# ls -al
total 36
drwx------  4 git  git  4096 Sep  6 14:50 .
drwxr-xr-x. 4 root root 4096 Sep  6 13:46 ..
-rw-------  1 git  git   611 Sep  7 08:56 .bash_history
-rw-r--r--  1 git  git    18 Apr  1  2020 .bash_logout
-rw-r--r--  1 git  git   193 Apr  1  2020 .bash_profile
-rw-r--r--  1 git  git   231 Apr  1  2020 .bashrc
drwxrwxr-x  4 git  git  4096 Sep  6 14:30 data
drwx------  2 git  git  4096 Sep  6 14:50 .ssh
-rw-------  1 git  git   889 Sep  6 14:50 .viminfo
12、将客户端公钥写入到authorized_keys文件中
12.1生成公钥
12.2写入服务器
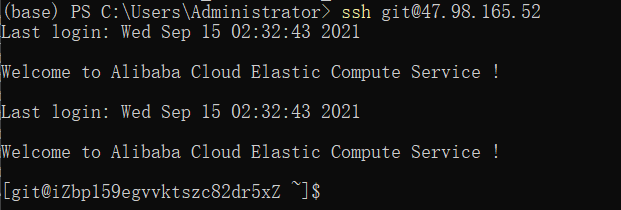
windows默认生成在C:\Users\Administrator.ssh文件夹中,将id_rsa.pub文件内容vim authorized_keys,保存退出
此时,使用windows终端,即可用SSH直连服务器
13、创建裸仓库
完成以上操作后,在服务端创建git仓库的目录:
[root@localhost ~]# mkdir /data/gitroot
[root@localhost ~]# cd /data/gitroot
[root@localhost /data/gitroot]#
[root@localhost /data/gitroot]# git init --bare sample.git
Initialized empty Git repository in /data/gitroot/sample.git/
##初始化空的 Git 版本库于 /data/gitroot/sample.git/
[root@localhost /data/gitroot]# ls
sample.git
[root@localhost /data/gitroot]# chown -R git.git sample.git

 浙公网安备 33010602011771号