LAMP部署wordpress和linux网络日志
一、部署分离的LAMP,部署到二台服务器上,php加载xcache模块。
1、需要部署两台主机,安装php+xcache的主机不支持centos8。
2、在centos7上部署apache+php,使用yum方式安装,同时安装后面需要的软件包。
[root@websrv ~]#um -y install https://mirrors.tuna.tsinghua.edu.cn/remi/enterprise/remi-release-7.rpm
[root@websrv ~]#yum -y install php56-php php56-php-mysqlnd php56-php-devel  gcc
[root@websrv ~]#systemctl enable --now httpd
Created symlink from /etc/systemd/system/multi-user.target.wants/httpd.service to /usr/lib/systemd/system/httpd.service.
3、编写一个php测试代码,测试php是否正常工作。
[root@websrv ~]#vim /var/www/html/test.php
<?php
        phpinfo();
?>

4、下载并解压缩安装包,开始编译安装xcache。
[root@websrv ~]#tar xf xcache-3.2.0.tar.gz
[root@websrv ~]#cd xcache-3.2.0
[root@websrv ~/xcache-3.2.0]#/opt/remi/php56/root/usr/bin/phpize
Configuring for:
PHP Api Version:         20131106
Zend Module Api No:      20131226
Zend Extension Api No:   220131226
[root@websrv ~/xcache-3.2.0]./configure --enable-xcache --with-php-config=/opt/remi/php56/root/usr/bin/php-config
[root@websrv ~/xcache-3.2.0]#make -j 4 && make install

[root@websrv ~/xcache-3.2.0]#cat xcache.ini >> /opt/remi/php56/root/etc/php.ini
[root@websrv ~/xcache-3.2.0]#cp xcache.ini /etc/php.d/
[root@websrv ~/xcache-3.2.0]#systemctl restart httpd
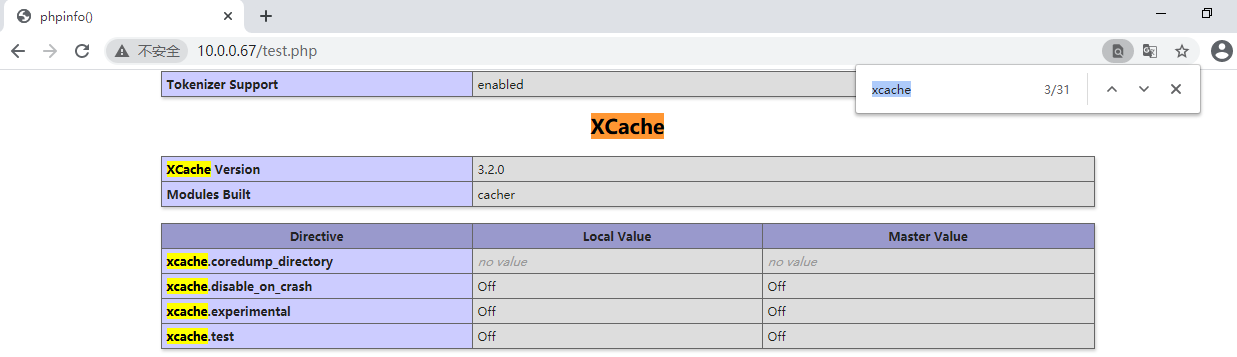
5、浏览器访问php测试页面,可以看到xcache已经成功启用。
6、在另一台主机上安装mysql8.0.21,并启动服务。
[root@centos08 ~]#yum -y install mysql-server
[root@centos08 ~]#systemctl enable --now mysqld
Created symlink /etc/systemd/system/multi-user.target.wants/mysqld.service → /usr/lib/systemd/system/mysqld.service.
[root@centos08 ~]#mysql
Welcome to the MySQL monitor.  Commands end with ; or \g.
Your MySQL connection id is 8
Server version: 8.0.21 Source distribution

Copyright (c) 2000, 2020, Oracle and/or its affiliates. All rights reserved.

Oracle is a registered trademark of Oracle Corporation and/or its
affiliates. Other names may be trademarks of their respective
owners.

Type 'help;' or '\h' for help. Type '\c' to clear the current input statement.

mysql>
7、创建账户并授权。
mysql> create user 'test'@'10.0.0.%' identified by '123456';
Query OK, 0 rows affected (0.01 sec)
mysql> GRANT ALL PRIVILEGES ON *.* TO 'test'@'10.0.0.%' WITH GRANT OPTION;
Query OK, 0 rows affected (0.01 sec)
8、编辑mysql的配置文件,添加以下内容。
#修改默认字符集为utf8,并重启服务,否则连接数据库时会报错
[root@centos08 ~]#vim /etc/my.cnf.d/mysql-server.cnf
[client]
default-character-set=utf8
[mysql]
default-character-set=utf8
[mysqld]
collation-server = utf8_unicode_ci
character-set-server = utf8

[root@centos08 ~]#systemctl restart mysqld
9、测试apache使用mysql扩展连接数据库。
[root@websrv ~]#vim /var/www/html/testdb2.php
<?php
  $conn=mysqli_connect('10.0.0.8','test','123456');
  if(!$conn){
     echo "连接mysql错误!\n";
   }else{
     echo "连接mysql成功!\n";
 }
?>
[root@websrv ~]#curl 10.0.0.67/testdb2.php
连接mysql成功!
10、测试apache使用mysqli扩展连接数据库。
[root@websrv ~]#vim /var/www/html/testdb.php
<?php
$mysqli=new mysqli("10.0.0.8", "test", "123456");
if(mysqli_connect_errno()){
 echo "mysqli方式连接错误!";
 $mysqli=null;
 exit; }
 echo "mysqli方式连接成功!";
$mysqli->close();
?>
[root@websrv ~]#curl 127.0.0.1/testdb.php
mysqli方式连接成功!
二、部署wordpress论坛,并实现正常访问登录论坛。
1、部署两台服务器,apache和php使用一台,mysql使用一台,均使用centos8。
2、yum方式安装apcahe和php软件。
[root@websrv ~]yun -y install httpd php-fpm php-json php-mysqlnd
3、下载wordpress,并解压缩到网站目录里,修改wordpress所有者。
[root@websrv /var/www/html]#tar xf wordpress-5.6-zh_CN.tar.gz
[root@websrv /var/www/html]#setfacl -R -m u:apache:rwx /var/www/html/wordpress/
4、在数据库主机上安装mysql8.0.22。
[root@mysql ~]#yum install mysql-server
5、创建wordpress数据库和账号并授权。
mysql>  create database wordpress;
Query OK, 1 row affected (0.02 sec)
mysql> create user 'wp'@'10.0.0.%' identified by '123456';
Query OK, 0 rows affected (0.01 sec)
mysql> grant all on wordpress.* to 'wp'@'10.0.0.%';
Query OK, 0 rows affected (0.00 sec)
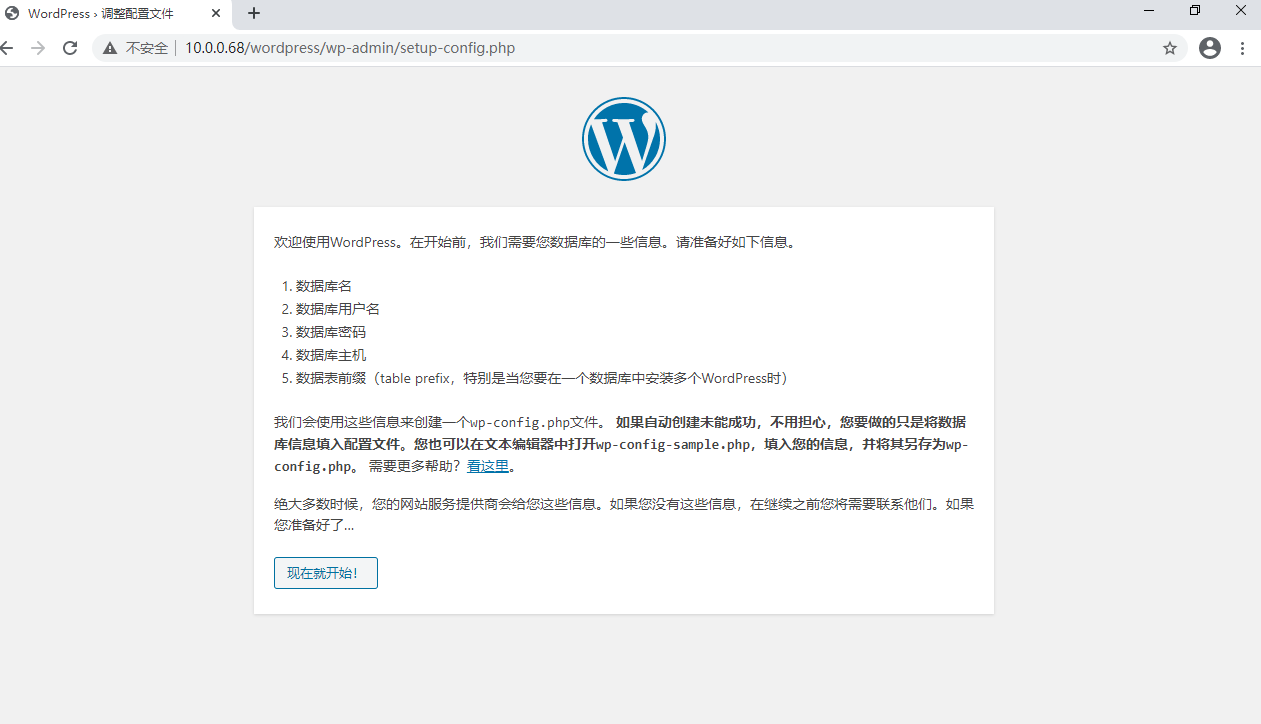
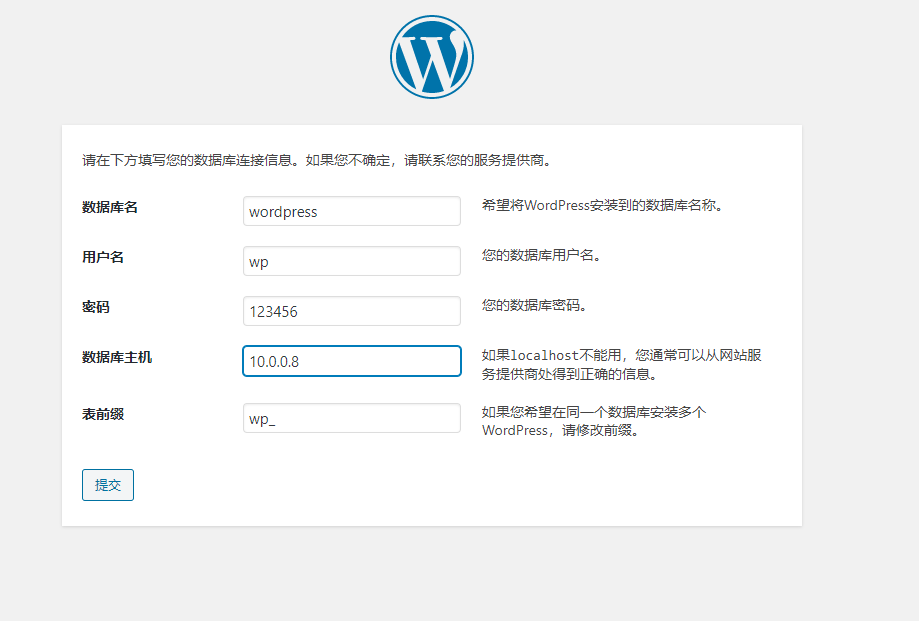
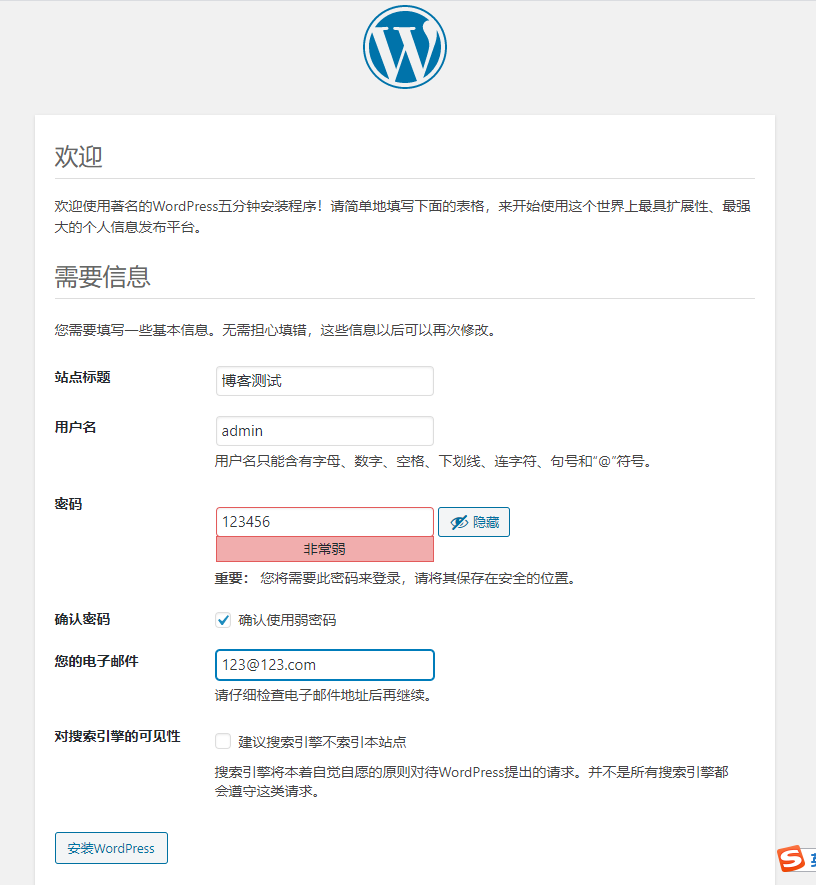
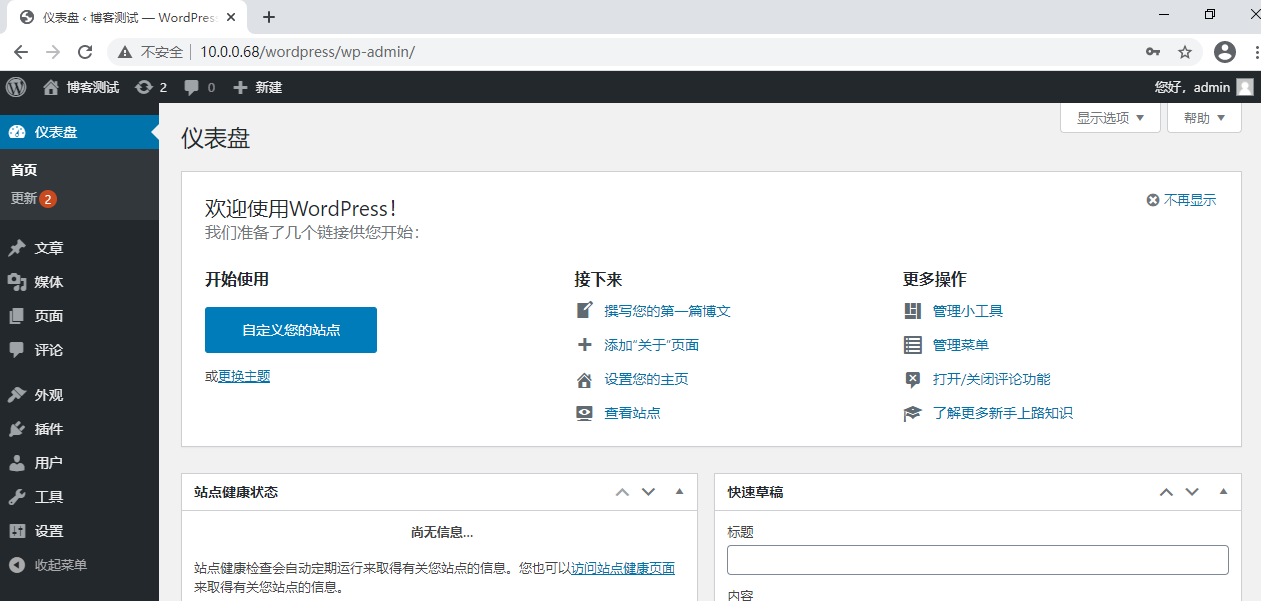
6、使用浏览器访问,初始化设置后即可登录使用。
7、测试访问速度。
[root@websrv ~]#ab -c 10 -n 100 http://10.0.0.68/wordpress/index.php/2021/01/09/hello-world/
This is ApacheBench, Version 2.3 <$Revision: 1843412 $>
Copyright 1996 Adam Twiss, Zeus Technology Ltd, http://www.zeustech.net/
Licensed to The Apache Software Foundation, http://www.apache.org/

Benchmarking 10.0.0.68 (be patient).....done


Server Software:        Apache/2.4.37
Server Hostname:        10.0.0.68
Server Port:            80

Document Path:          /wordpress/index.php/2021/01/09/hello-world/
Document Length:        14623 bytes

Concurrency Level:      10
Time taken for tests:   7.494 seconds
Complete requests:      100
Failed requests:        0
Total transferred:      1508200 bytes
HTML transferred:       1462300 bytes
Requests per second:    13.34 [#/sec] (mean)
Time per request:       749.367 [ms] (mean)
Time per request:       74.937 [ms] (mean, across all concurrent requests)
Transfer rate:          196.55 [Kbytes/sec] received
8、处理速度较慢,安装opcache进行加速,再次测速,速度提升明显。
[root@websrv ~]#yum install php-opcache
[root@websrv ~]#systemctl restart php-fpm
[root@logsrv ~]#ab -c 10 -n 100 http://10.0.0.68/wordpress/index.php/2021/01/09/hello-world/
This is ApacheBench, Version 2.3 <$Revision: 1843412 $>
Copyright 1996 Adam Twiss, Zeus Technology Ltd, http://www.zeustech.net/
Licensed to The Apache Software Foundation, http://www.apache.org/

Benchmarking 10.0.0.68 (be patient).....done


Server Software:        Apache/2.4.37
Server Hostname:        10.0.0.68
Server Port:            80

Document Path:          /wordpress/index.php/2021/01/09/hello-world/
Document Length:        14623 bytes

Concurrency Level:      10
Time taken for tests:   1.627 seconds
Complete requests:      100
Failed requests:        0
Total transferred:      1508200 bytes
HTML transferred:       1462300 bytes
Requests per second:    61.48 [#/sec] (mean)
Time per request:       162.659 [ms] (mean)
Time per request:       16.266 [ms] (mean, across all concurrent requests)
Transfer rate:          905.48 [Kbytes/sec] received
三、收集apache访问日志,并实现图形化展示。
1、需要三台主机,数据库服务器、日志服务器+apache+php一台、需要收集的apache一台。
2、安装mysql数据库服务器。
[root@mysql ~]#yum -y install mysql-server
[root@mysql ~]#systemctl enable --now mysqld
3、日志服务器上安装rsyslog-mysql,并将mysql-createDB.sql复制到mysql数据库服务器上。
[root@logsrv ~]#yum install rsyslog-mysql
[root@logsrv ~]#scp /usr/share/doc/rsyslog/mysql-createDB.sql 10.0.0.8:/data
4、登录数据库,导入mysql-createDB.sql,创建账户并授权。
mysql> source /data/mysql-createDB.sql
Query OK, 1 row affected (0.01 sec)

Database changed
Query OK, 0 rows affected (0.02 sec)

Query OK, 0 rows affected (0.02 sec)

mysql> create user  'rsyslog'@'10.0.0.%' IDENTIFIED BY '123456';
Query OK, 0 rows affected (0.00 sec)

mysql> GRANT ALL ON Syslog.* TO 'rsyslog'@'10.0.0.%'
    -> ;
Query OK, 0 rows affected (0.00 sec)
5、配置日志服务器,使其可以接收远程主机发送的日志,并将日志发送到mysql数据库中。
[root@logsrv ~]#vim /etc/rsyslog.conf
在#### MODULES ####语句下面添加
module(load="ommysql")

在# for parameters see http://www.rsyslog.com/doc/imudp.html语句下添加
module(load="imudp") # needs to be done just once
input(type="imudp" port="514")

在# for parameters see http://www.rsyslog.com/doc/imtcp.html语句下添加
module(load="imtcp") # needs to be done just once
input(type="imtcp" port="514")

#在 Save boot messages also to boot.log语句下面添加
local6.*            /var/log/access.log

#在RULES语句按格式添加下面行,设置将local6.info的日志发送到数据库,数据库账号等信息要按前面设置的填写。
#### RULES ####
#facility.priority   :ommysql:DBHOST,DBNAME,DBUSER,PASSWORD
local6.info :ommysql:10.0.0.8,Syslog,rsyslog,123456

#重启rsyslog服务
[root@httpd ~]#systemctl restart rsyslog.service
7、日志服务器安装apache+php软件包。
[root@logsrv ~]#yum -y install httpd php-fpm php-mysqlnd php-gd
[root@logsrv ~]#systemctl restart httpd php-fpm
8、日志服务器安装LogAnalyzer。
[root@logsrv ~]#wget http://download.adiscon.com/loganalyzer/loganalyzer-4.1.11.tar.gz

[root@logsrv ~]#tar xf loganalyzer-4.1.11.tar.gz
[root@logsrv ~]#cd loganalyzer-4.1.11
[root@logsrv ~]#mv loganalyzer-4.1.11/src/ /var/www/html/log
[root@logsrv ~]#touch /var/www/html/log/config.php
[root@logsrv ~]#chmod 666 /var/www/html/log/config.php
9、被收集日志的apcahe服务器上修改httpd.conf配置文件,生成local6.info的日志。
可收集多台服务器,均按此设置即可。
[root@websrv ~]#vim /etc/httpd/conf/httpd.conf
#修改#CustomLog "logs/access_log" combined为
CustomLog "|/usr/bin/logger -p local6.info" combined
10、被收集日志的apcahe服务器上修改rsyslog.conf配置文件,使local6.info的日志发送到日志服务器。
[root@websrv ~]#vim /etc/rsyslog.conf
#添加以下行
local6.info                          @10.0.0.68
11、重启apache和rsyslog服务。
[root@websrv ~]#systemctl restart httpd rsyslog
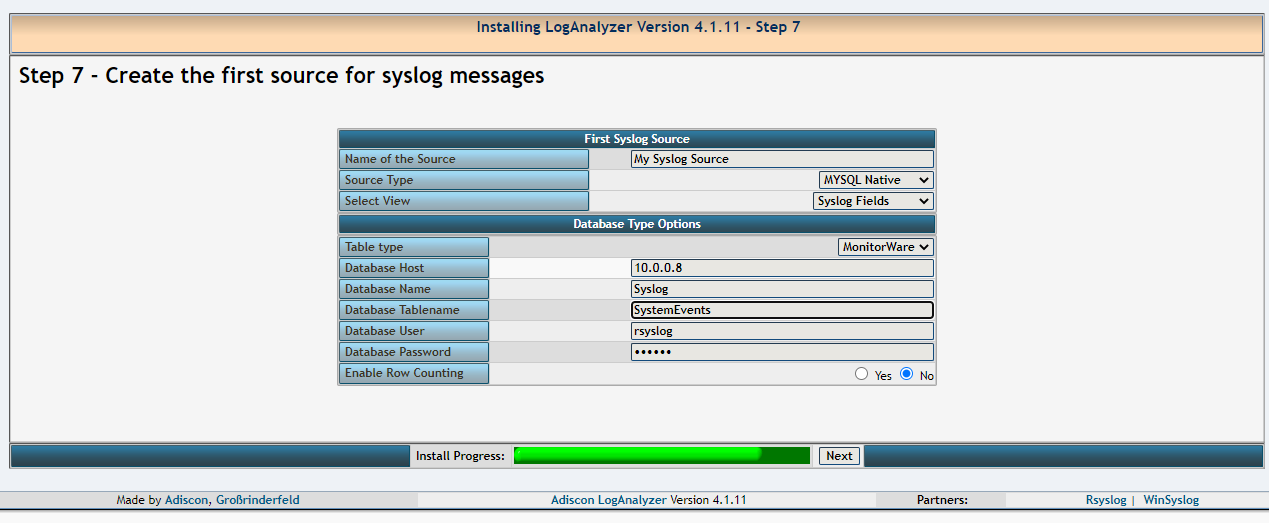
12、访问日志服务器http://10.0.0.68/log/进行初始化。
点here开始初始化

填写正确的信息,数据库信息注意大小写。
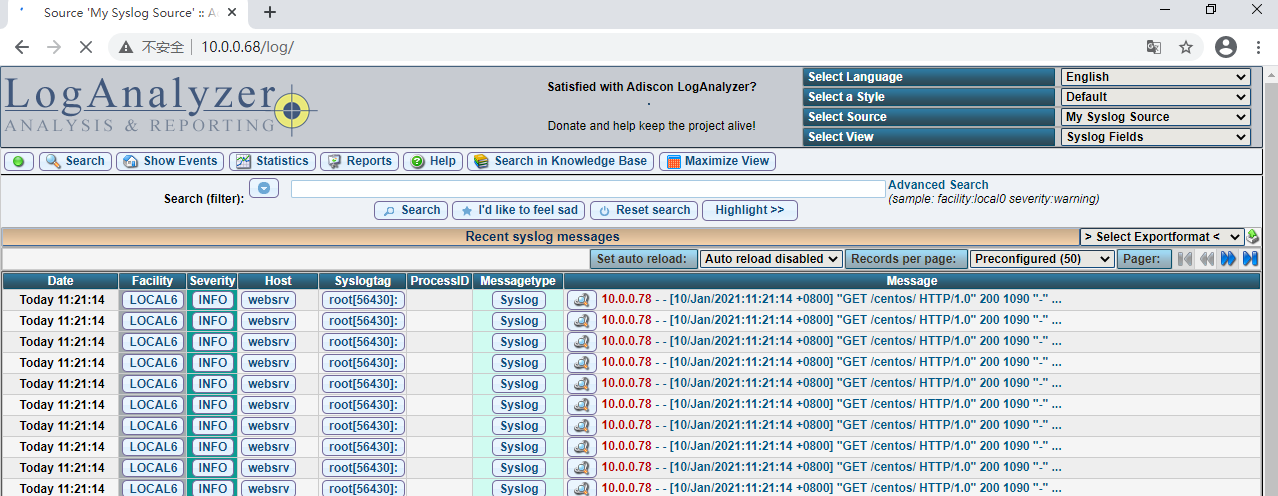
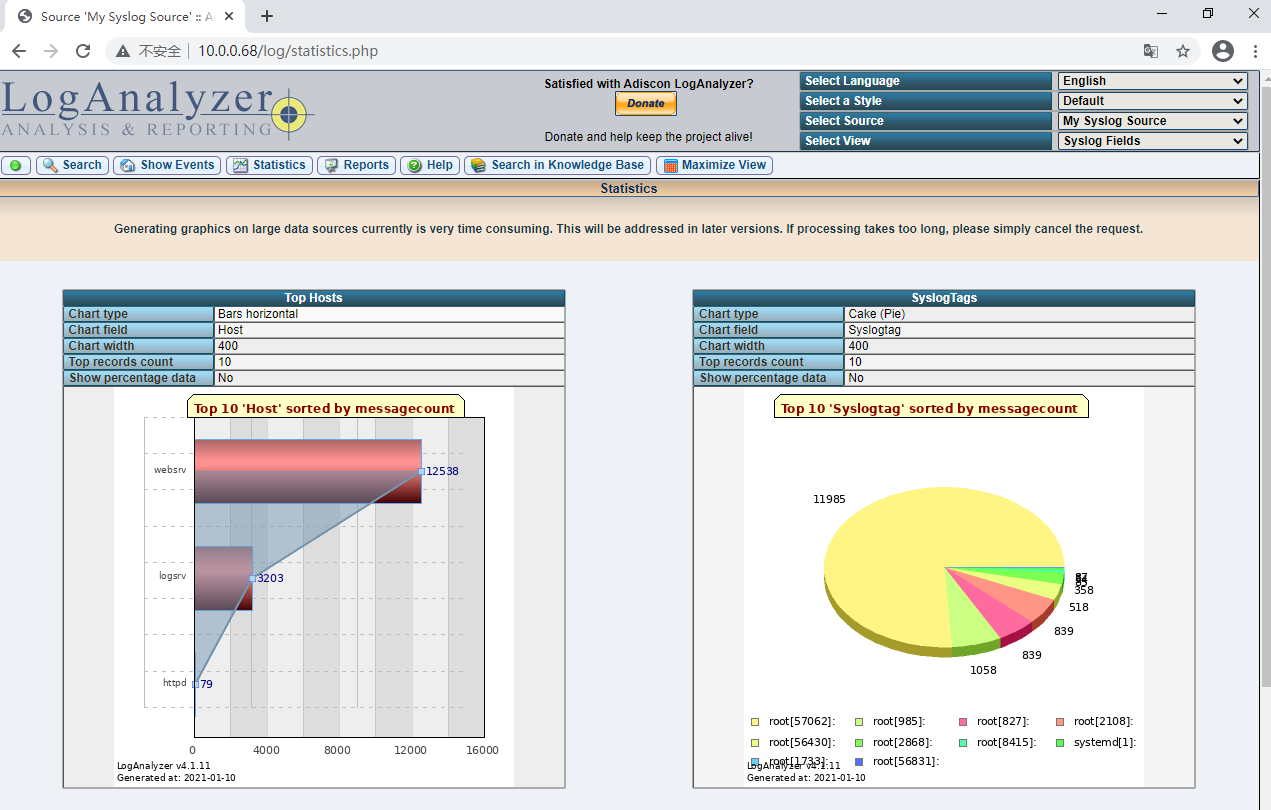
13、访问日志服务器查看日志。
14、安全加强,如需重新配置LogAnalyzer,将此文件清空并设置666权限即可。
[root@logsrv ~]#chmod 644 /var/www/html/log/config.php

 浙公网安备 33010602011771号