框架源码系列六:Spring源码学习之Spring IOC源码学习
Spring 源码学习过程:

一、搞明白IOC能做什么,是怎么做的
1. 搞明白IOC能做什么?
IOC是用为用户创建、管理实例对象的。用户需要实例对象时只需要向IOC容器获取就行了,不用自己去创建,从而达到与具体类解耦。
2. IOC是怎么做到的,即它的实现步骤是怎么样的?

2.1 用户配置bean定义
我们使用Spring IOC时有几种方式来配置bean定义呢?
xml的方式:
    <bean id="abean" class="com.study.spring.samples.ABean">
        <constructor-arg type="String" value="abean01"></constructor-arg>
        <constructor-arg ref="cbean"></constructor-arg>
    </bean>
    <bean id="cbean" class="com.study.spring.samples.CBean">
        <constructor-arg type="String" value="cbean01"></constructor-arg>
    </bean>
注解方式:
package com.study.spring.samples;

import com.study.spring.context.config.annotation.Autowired;
import com.study.spring.context.config.annotation.Component;
import com.study.spring.context.config.annotation.Qualifier;
import com.study.spring.context.config.annotation.Value;

@Component(initMethodName = "init", destroyMethodName = "destroy")
public class ABean {

    private String name;

    private CBean cb;

    @Autowired
    private DBean dbean;

    @Autowired
    public ABean(@Value("leesmall") String name, @Qualifier("cbean01") CBean cb) {
        super();
        this.name = name;
        this.cb = cb;
        System.out.println("调用了含有CBean参数的构造方法");
    }

    public ABean(String name, CCBean cb) {
        super();
        this.name = name;
        this.cb = cb;
        System.out.println("调用了含有CCBean参数的构造方法");
    }

    public ABean(CBean cb) {
        super();
        this.cb = cb;
    }
}
Java-based容器配置方式:
@Configuration
public class AppConfig {

    @Bean
    public MyService myService() {
        return new MyServiceImpl();
    }

}
上面的AppConfig类等价于:
<beans>
    <bean id="myService" class="com.acme.services.MyServiceImpl"/>
</beans>
想了解java容器配置的朋友请看这篇文章:
2.2 IOC容器加载bean定义
用户以上面的三种方式配置bean定义以后,Spring IOC容器怎么来加载用户的bean定义呢,这就需要我们来告诉它了
xml的方式告诉Spring IOC容器怎么加载bean定义:
        //类路径下加载xml配置文件创建bean定义
        ApplicationContext context = new ClassPathXmlApplicationContext("application.xml");

        //文件系统下加载xml配置文件创建bean定义
        ApplicationContext context1 = new FileSystemXmlApplicationContext("e:/study/application.xml");

        //通用的xml方式加载xml配置文件创建bean定义
        ApplicationContext context3 = new GenericXmlApplicationContext("file:e:/study/application.xml");
注解方式告诉Spring IOC容器怎么加载bean定义:
xml方式指定注解要扫描的基础包:
    <beans>
        <context:component-scan base-package="com.study" />
    </beans>
注解方式指定注解要扫描的基础包:
import org.springframework.context.annotation.Bean;
import org.springframework.context.annotation.ComponentScan;
import org.springframework.context.annotation.Configuration;

@Configuration
@ComponentScan(basePackages="com.study")
public class AppConfig {

    @Bean
    public MyService myService() {
        return new MyServiceImpl();
    }

}
也可在代码中通过API指定注解扫描的基础包:
        // 扫描注解的方式创建bean定义
        ApplicationContext ctx= new AnnotationConfigApplicationContext();
        ctx.scan("com.study");
        ctx.refresh();
        MyService myService = ctx.getBean(MyService.class);
Java-based容器配置告诉Spring IOC容器怎么加载bean定义:
使用AnnotationConfigApplicationContext告诉Spring IOC容器怎么加载bean定义配置
跟实例化一个ClassPathXmlApplicationContext时将Spring XML文件用作输入相似,在实例化一个AnnotationConfigApplicationContext时能够使用@Configuration类作为输入。这就等等于Spring容器全然零XML配置:
public static void main(String[] args) {
    ApplicationContext ctx = new AnnotationConfigApplicationContext(AppConfig.class);
    MyService myService = ctx.getBean(MyService.class);
    myService.doStuff();
}
AnnotationConfigApplicationContext不局限于仅仅使用@Configuration类。不论什么@Component或JSR-330注解的类都能够作为AnnotationConfigApplicationContext构造器的输入:
public static void main(String[] args) {
    ApplicationContext ctx = new AnnotationConfigApplicationContext(MyServiceImpl.class, Dependency1.class, Dependency2.class);
    MyService myService = ctx.getBean(MyService.class);
    myService.doStuff();
}
使用无參的构造器实例化AnnotationConfigApplicationContext,然后使用register()方法对容器进行配置。这样的方式在以编程方式构造一个AnnotationConfigApplicationContext时非常实用:
public static void main(String[] args) {
    ApplicationContext ctx = new AnnotationConfigApplicationContext();
    ctx.register(AppConfig.class, OtherConfig.class);
    ctx.register(AdditionalConfig.class);
    ctx.refresh();
    MyService myService = ctx.getBean(MyService.class);
    myService.doStuff();
}
启用scan(String…)的组件扫描:
import org.springframework.context.annotation.Bean;
import org.springframework.context.annotation.ComponentScan;
import org.springframework.context.annotation.Configuration;

@Configuration
@ComponentScan(basePackages="com.study")
public class AppConfig {

    @Bean
    public MyService myService() {
        return new MyServiceImpl();
    }

}
scan方法扫描:
public static void main(String[] args) {
    ApplicationContext ctx = new AnnotationConfigApplicationContext();
    ctx.scan("com.study");
    ctx.refresh();
    MyService myService = ctx.getBean(MyService.class);
}
二、搞明白Spring IOC的从整体到部分

IOC整体是由以上几部分组成起来工作的
三、找到Spring IOC入口,先理清楚主干流程,然后再去研究各个流程的细节
我们从上面的使用示例,很清楚地看到,我们使用Spring IOC,只需要使用Spring提供的ApplicationContext这个API。ApplicationContext就是IOC容器。ApplicationContext就是Spring IOC的入口,源码的学习就从它开始!
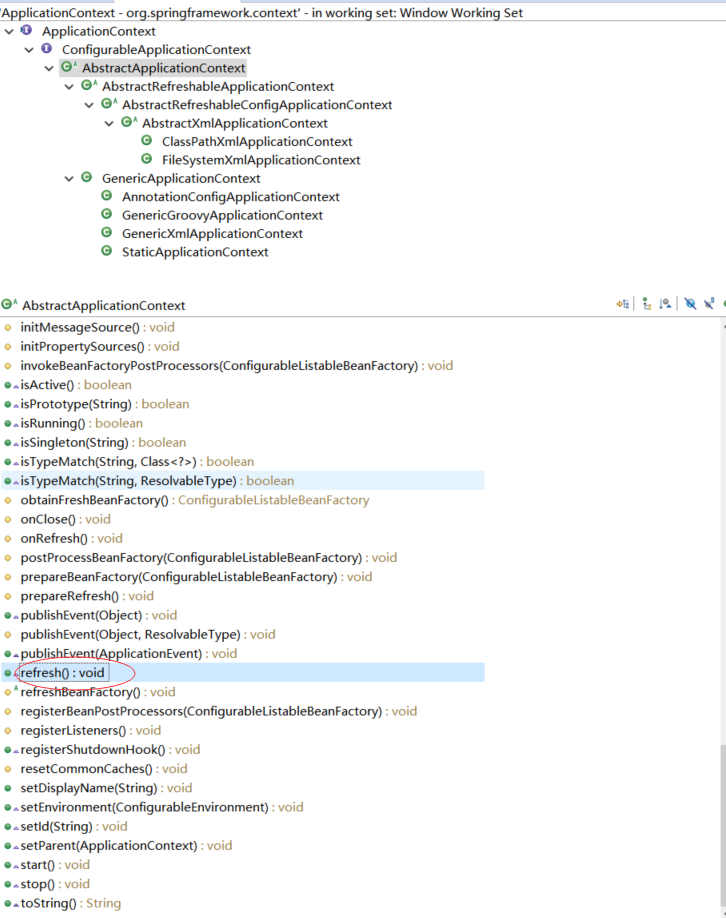
1. ApplicationContext是什么
首先来了解ApplicationContext都是什么,即它都有哪些角色、责任。它通过继承很多接口而有很多角色。
ApplicationContext继承的接口(角色)如下:

每个角色拥有的职责(方法):
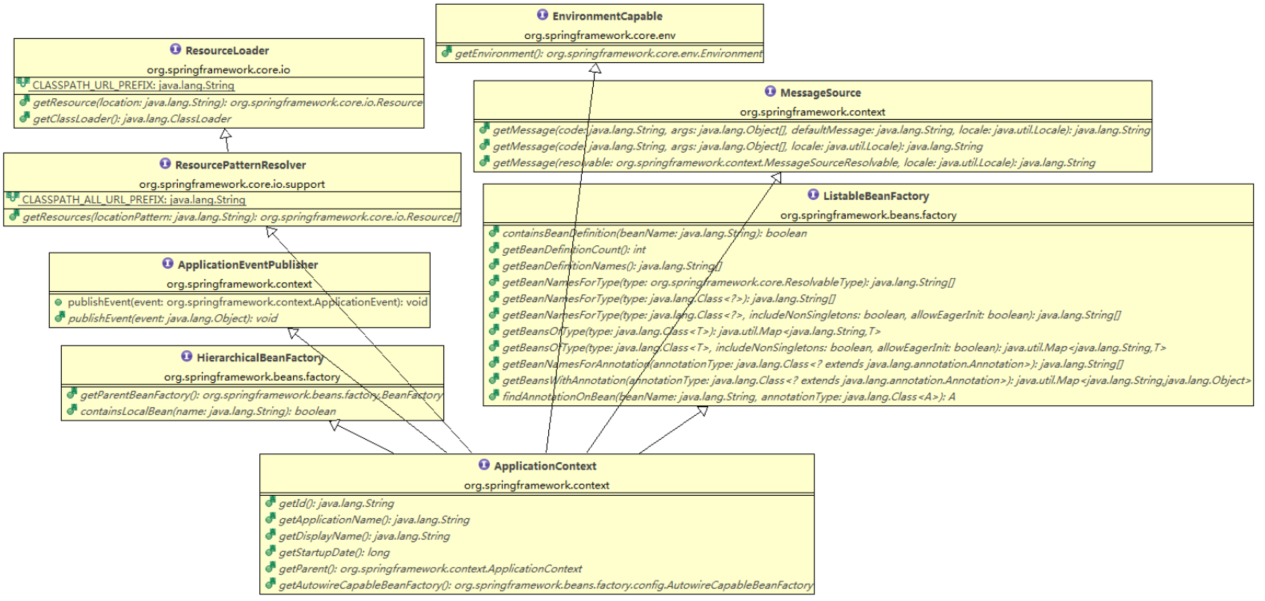
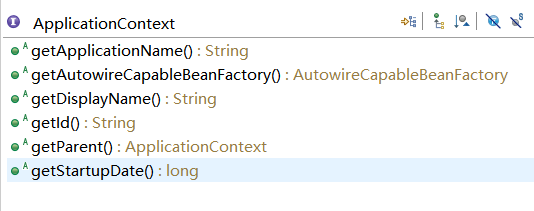
再来了解 ApplicationContext 自己中定义的方法:
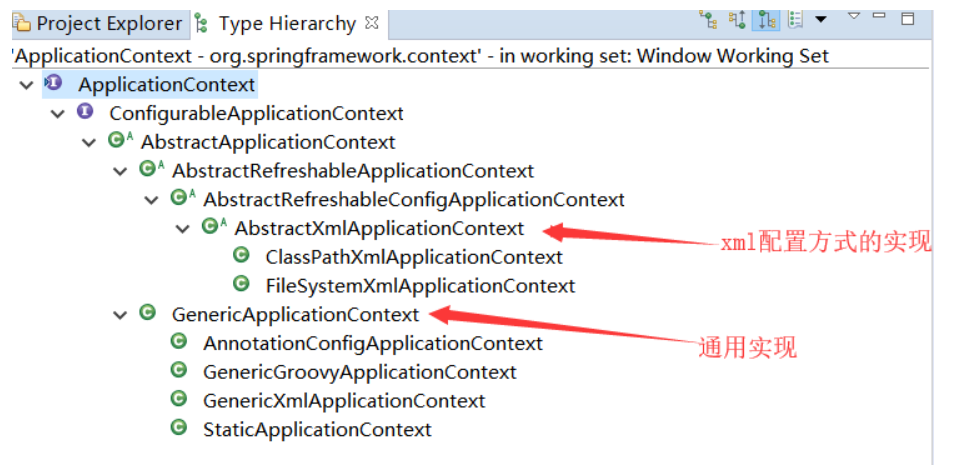
2. Application的子实现

说明:
从 AbstarctApplicationContext 之后分为两类:xml 配置方式的实现和通用实现。它们的基本使用示例如下:
package com.study.leesmall.spring;

import org.springframework.beans.factory.xml.XmlBeanDefinitionReader;
import org.springframework.context.ApplicationContext;
import org.springframework.context.annotation.AnnotationConfigApplicationContext;
import org.springframework.context.annotation.Bean;
import org.springframework.context.annotation.ClassPathBeanDefinitionScanner;
import org.springframework.context.annotation.Configuration;
import org.springframework.context.support.ClassPathXmlApplicationContext;
import org.springframework.context.support.FileSystemXmlApplicationContext;
import org.springframework.context.support.GenericApplicationContext;
import org.springframework.context.support.GenericXmlApplicationContext;

import com.study.leesmall.spring.service.Abean;
import com.study.leesmall.spring.service.CombatService;

//Spring不同的方式创建bean实例使用代码示例
@Configuration
public class TestApplication {

    public static void main(String[] args) {

        //类路径下加载xml配置文件创建bean定义
        ApplicationContext context1 = new ClassPathXmlApplicationContext("application.xml");
        CombatService cs = context1.getBean(CombatService.class);
        cs.doInit();
        cs.combating();

        //文件系统下加载xml配置文件创建bean定义
        ApplicationContext context2 = new FileSystemXmlApplicationContext("e:/study/application.xml");
        cs = context2.getBean(CombatService.class);
        cs.doInit();
        cs.combating();

        //通用的xml方式加载xml配置文件创建bean定义
        ApplicationContext context3 = new GenericXmlApplicationContext("file:e:/study/application.xml");
        cs = context3.getBean(CombatService.class);
        cs.doInit();
        cs.combating();

        // 扫描注解的方式创建bean定义
        ApplicationContext context4 = new AnnotationConfigApplicationContext(TestApplication.class);
        CombatService cs2 = context4.getBean(CombatService.class);
        cs2.combating();

        //通用的方式加载xml配置文件或者扫描指定包下的类创建bean定义
        System.out.println("------------------------------------------------------");
        GenericApplicationContext context5 = new GenericApplicationContext();
        new XmlBeanDefinitionReader(context5).loadBeanDefinitions("classpath:application.xml");
        new ClassPathBeanDefinitionScanner(context5).scan("com.study.leesmall.spring.service");
        // 一定要刷新
        context5.refresh();
        cs2 = context5.getBean(CombatService.class);
        cs2.combating();
        Abean ab = context5.getBean(Abean.class);
        ab.doSomething();
    }

    @Bean
    public CombatService getCombatService() {
        return new CombatService(120);
    }
}
接下来,可以打开每个子去了解它们分别加入了什么、实现了什么?
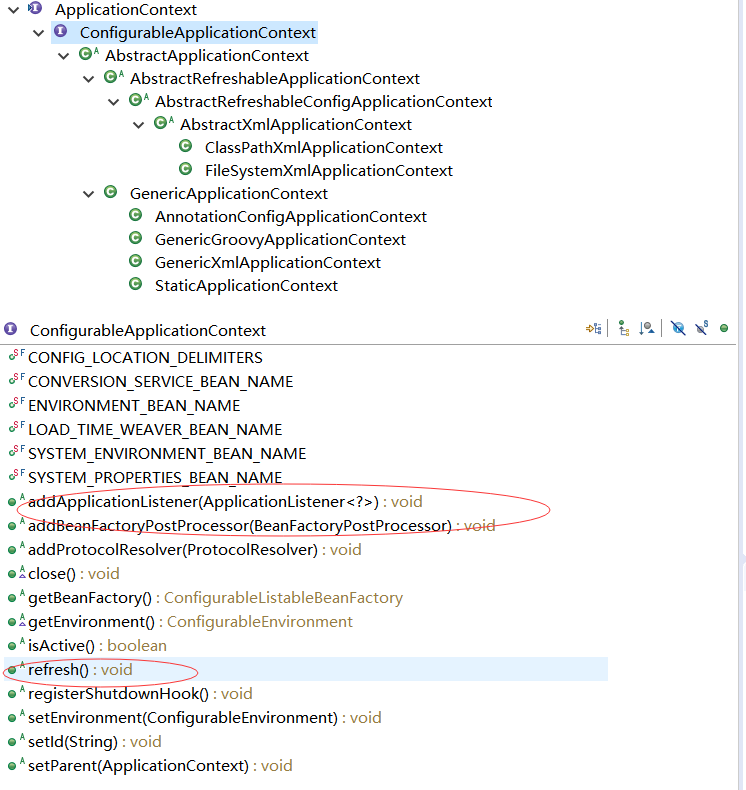
1)ConfigurableApplicationContext 加入了什么:
说明:
void addApplicationListener(ApplicationListener<?> listener):这个方法添加监听 在这里可以进行发布订阅监听的工作
void addBeanFactoryPostProcessor(BeanFactoryPostProcessor postProcessor):这个方法可以对bean工厂进行获取前后的AOP增强
void refresh() throws BeansException, IllegalStateException:这个方法是用来刷新IOC容器的,当往IOC容器里面注册了新的Bean定义时,调用这个方法去创建bean实例
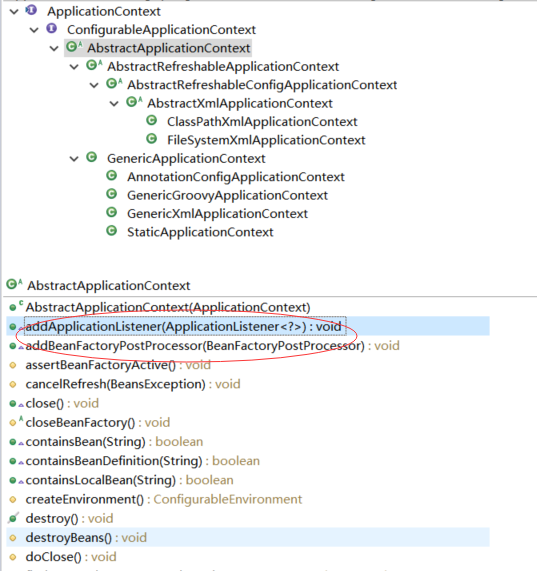
2)AbstractApplicationContext里面对前面的接口就开始有具体的实现了,比如addApplicationListener、addBeanFactoryPostProcessor、refresh等等
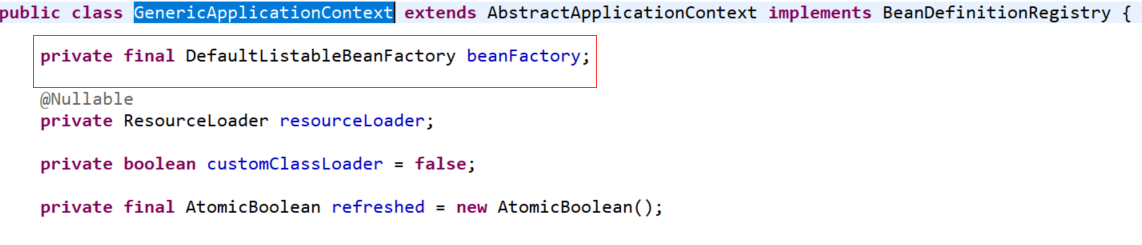
3)通用的实现GenericApplicationContext
public class GenericApplicationContext extends AbstractApplicationContext implements BeanDefinitionRegistry {

    private final DefaultListableBeanFactory beanFactory;

    @Nullable
    private ResourceLoader resourceLoader;

    private boolean customClassLoader = false;

    private final AtomicBoolean refreshed = new AtomicBoolean();
它实现了BeanDefinitionRegistry接口,该接口定义了bean定义信息的注册行为。即我们可以直接往GenericApplicationContext中注册bean定义。
了解一下BeanDefinitionRegistry中定义的行为:

都有谁实现了 BeanDefinitionRegistry 接口:

GenericApplicationContext中持有DefaultListableBeanFactory,GenericApplicationContext的bean定义注册委托给了持有的DefaultListableBeanFactory
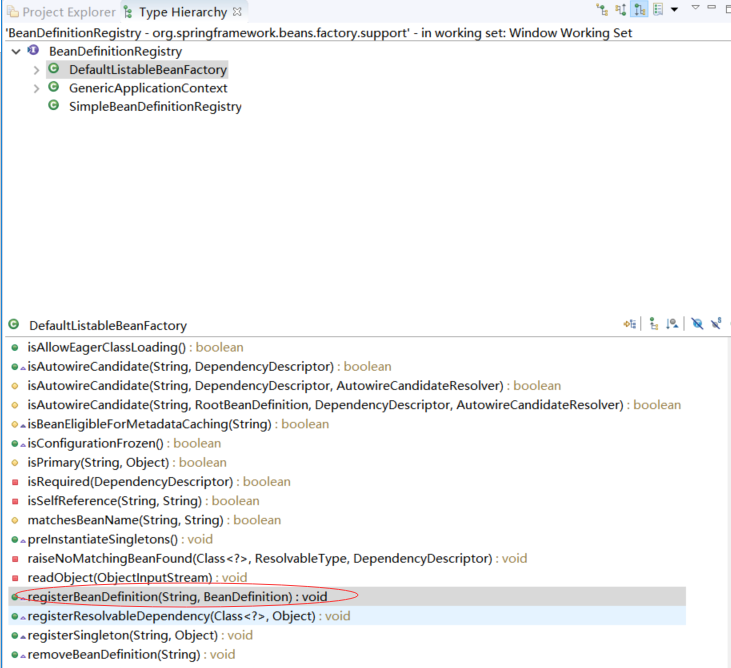
org.springframework.beans.factory.support.DefaultListableBeanFactory.registerBeanDefinition(String, BeanDefinition)对应代码:


    @Override
    public void registerBeanDefinition(String beanName, BeanDefinition beanDefinition)
            throws BeanDefinitionStoreException {

        Assert.hasText(beanName, "Bean name must not be empty");
        Assert.notNull(beanDefinition, "BeanDefinition must not be null");

        if (beanDefinition instanceof AbstractBeanDefinition) {
            try {
                ((AbstractBeanDefinition) beanDefinition).validate();
            }
            catch (BeanDefinitionValidationException ex) {
                throw new BeanDefinitionStoreException(beanDefinition.getResourceDescription(), beanName,
                        "Validation of bean definition failed", ex);
            }
        }

        BeanDefinition existingDefinition = this.beanDefinitionMap.get(beanName);
        if (existingDefinition != null) {
            if (!isAllowBeanDefinitionOverriding()) {
                throw new BeanDefinitionOverrideException(beanName, beanDefinition, existingDefinition);
            }
            else if (existingDefinition.getRole() < beanDefinition.getRole()) {
                // e.g. was ROLE_APPLICATION, now overriding with ROLE_SUPPORT or ROLE_INFRASTRUCTURE
                if (logger.isInfoEnabled()) {
                    logger.info("Overriding user-defined bean definition for bean '" + beanName +
                            "' with a framework-generated bean definition: replacing [" +
                            existingDefinition + "] with [" + beanDefinition + "]");
                }
            }
            else if (!beanDefinition.equals(existingDefinition)) {
                if (logger.isDebugEnabled()) {
                    logger.debug("Overriding bean definition for bean '" + beanName +
                            "' with a different definition: replacing [" + existingDefinition +
                            "] with [" + beanDefinition + "]");
                }
            }
            else {
                if (logger.isTraceEnabled()) {
                    logger.trace("Overriding bean definition for bean '" + beanName +
                            "' with an equivalent definition: replacing [" + existingDefinition +
                            "] with [" + beanDefinition + "]");
                }
            }
            this.beanDefinitionMap.put(beanName, beanDefinition);
        }
        else {
            if (hasBeanCreationStarted()) {
                // Cannot modify startup-time collection elements anymore (for stable iteration)
                synchronized (this.beanDefinitionMap) {
                    this.beanDefinitionMap.put(beanName, beanDefinition);
                    List<String> updatedDefinitions = new ArrayList<>(this.beanDefinitionNames.size() + 1);
                    updatedDefinitions.addAll(this.beanDefinitionNames);
                    updatedDefinitions.add(beanName);
                    this.beanDefinitionNames = updatedDefinitions;
                    if (this.manualSingletonNames.contains(beanName)) {
                        Set<String> updatedSingletons = new LinkedHashSet<>(this.manualSingletonNames);
                        updatedSingletons.remove(beanName);
                        this.manualSingletonNames = updatedSingletons;
                    }
                }
            }
            else {
                // Still in startup registration phase
                this.beanDefinitionMap.put(beanName, beanDefinition);
                this.beanDefinitionNames.add(beanName);
                this.manualSingletonNames.remove(beanName);
            }
            this.frozenBeanDefinitionNames = null;
        }

        if (existingDefinition != null || containsSingleton(beanName)) {
            resetBeanDefinition(beanName);
        }
    }
接下来看GenericApplicationContext的两个子AnnotationConfigApplicationContext和GenericXmlApplicationContext:
AnnotationConfigApplicationContext:
了解它的构造方法、register 方法
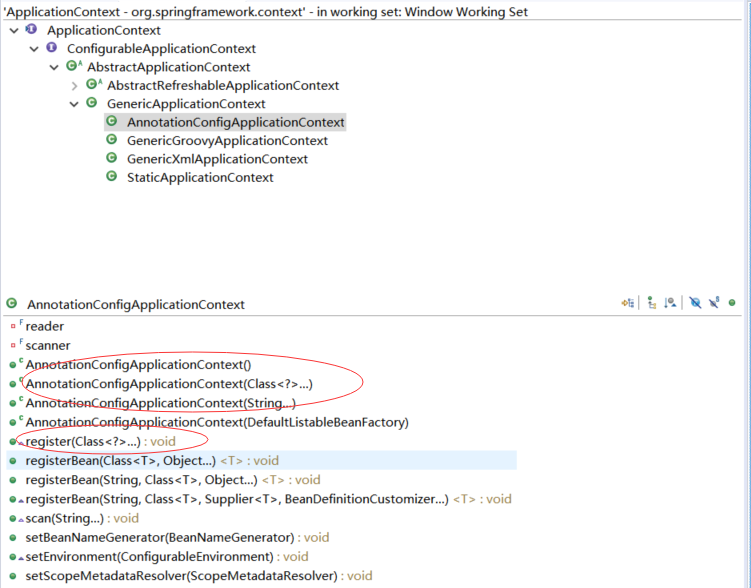
构造方法:
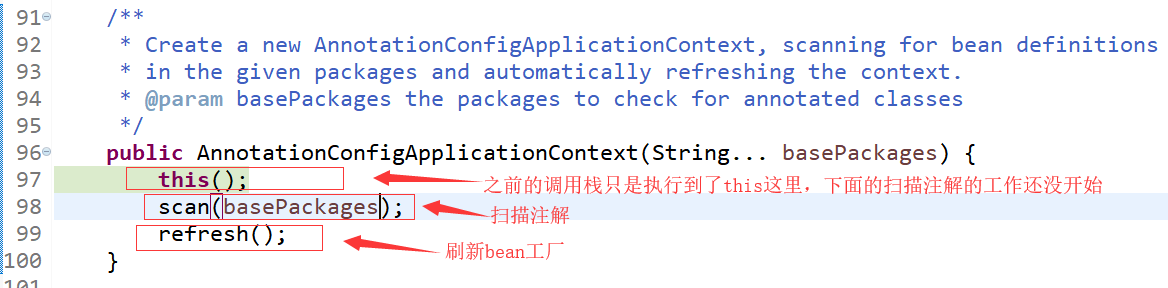
    /**
     * Create a new AnnotationConfigApplicationContext that needs to be populated
     * through {@link #register} calls and then manually {@linkplain #refresh refreshed}.
     */
    public AnnotationConfigApplicationContext() {
        this.reader = new AnnotatedBeanDefinitionReader(this);
        this.scanner = new ClassPathBeanDefinitionScanner(this);
    }

    /**
     * Create a new AnnotationConfigApplicationContext with the given DefaultListableBeanFactory.
     * @param beanFactory the DefaultListableBeanFactory instance to use for this context
     */
    public AnnotationConfigApplicationContext(DefaultListableBeanFactory beanFactory) {
        super(beanFactory);
        this.reader = new AnnotatedBeanDefinitionReader(this);
        this.scanner = new ClassPathBeanDefinitionScanner(this);
    }

    /**
     * Create a new AnnotationConfigApplicationContext, deriving bean definitions
     * from the given annotated classes and automatically refreshing the context.
     * @param annotatedClasses one or more annotated classes,
     * e.g. {@link Configuration @Configuration} classes
     */
    public AnnotationConfigApplicationContext(Class<?>... annotatedClasses) {
        this();
        register(annotatedClasses);
        refresh();
    }

    /**
     * Create a new AnnotationConfigApplicationContext, scanning for bean definitions
     * in the given packages and automatically refreshing the context.
     * @param basePackages the packages to check for annotated classes
     */
    public AnnotationConfigApplicationContext(String... basePackages) {
        this();
        scan(basePackages);
        refresh();
    }
从构造函数可以看到要完成注解的扫描是通过注解bean定义读取器AnnotatedBeanDefinitionReader和扫描器ClassPathBeanDefinitionScanner完成的
GenericXmlApplicationContext :
了解它的构造方法、load 方法
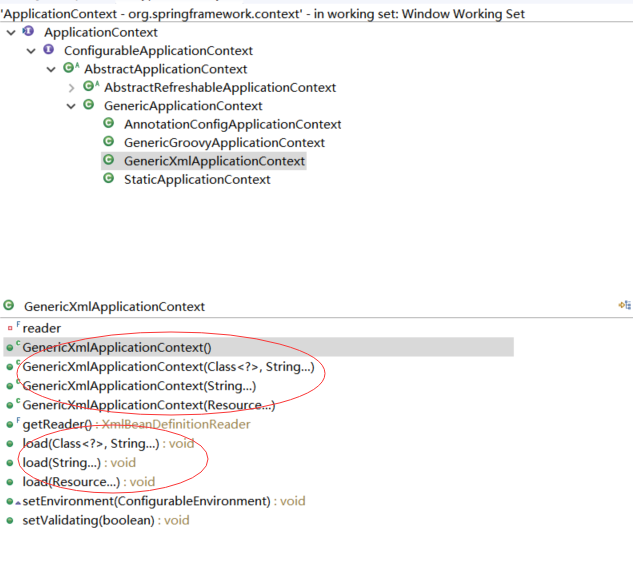
构造方法:
    /**
     * Create a new GenericXmlApplicationContext that needs to be
     * {@link #load loaded} and then manually {@link #refresh refreshed}.
     */
    public GenericXmlApplicationContext() {
    }

    /**
     * Create a new GenericXmlApplicationContext, loading bean definitions
     * from the given resources and automatically refreshing the context.
     * @param resources the resources to load from
     */
    public GenericXmlApplicationContext(Resource... resources) {
        load(resources);
        refresh();
    }

    /**
     * Create a new GenericXmlApplicationContext, loading bean definitions
     * from the given resource locations and automatically refreshing the context.
     * @param resourceLocations the resources to load from
     */
    public GenericXmlApplicationContext(String... resourceLocations) {
        load(resourceLocations);
        refresh();
    }

    /**
     * Create a new GenericXmlApplicationContext, loading bean definitions
     * from the given resource locations and automatically refreshing the context.
     * @param relativeClass class whose package will be used as a prefix when
     * loading each specified resource name
     * @param resourceNames relatively-qualified names of resources to load
     */
    public GenericXmlApplicationContext(Class<?> relativeClass, String... resourceNames) {
        load(relativeClass, resourceNames);
        refresh();
    }
从构造函数可以看出GenericXmlApplicationContext 能从不同的输入中加载bean定义
四、细节分析
从前面的分析,已经对Spring IOC的整体由哪些部分组成有一个了解了,下面就深入去分析各个部分是怎么实现的
1. Bean定义加载和解析
ApplicationContext如何加载、解析Bean定义的。读源码,我们不光是了解一下这个过程,更重要的是看它是如何设计接口、类来配合解决这个问题的,以及有哪些扩展点、灵活之处。
1.1 xml文件的bean配置的加载和解析
xml配置方式的bean定义获取过程:

首先,你自己一定要思考清楚这个。然后才去看源码,不然你都不知道它在干嘛。
第一次来学习spring的源码,该怎么来看源码呢?
一行一行看,理解每一行?这肯定行不通。
对于未知的代码,我们并不清楚它的接口、类结构,方法设计。那怎么看呢?
首先找准一个你熟悉的过程点,比如上面的过程中,我们比较熟悉xml解析,那xml解析的代码你是可以看懂的。
然后以debug的方式开启发现之旅,从入口处开始一步一步往里跟,直到看到找准的点的代码。这时一定要记住这个点在哪个类中。下次就可以直接在这里打断点了。然后要把一路跟过来的调用栈截图存下来。这个调用栈将是我们重要的分析作者是如何设计接口、类的源泉。
第一次总是困难的,但之后就轻松了
开始吧,从这里出发,断点这行,调试运行
ApplicationContext context = new ClassPathXmlApplicationContext("application.xml");
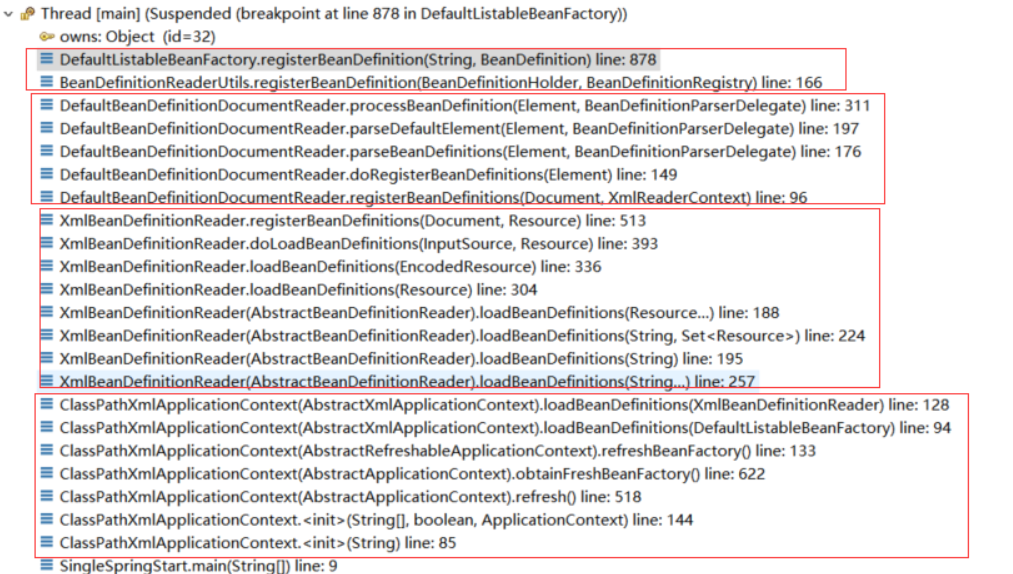
通过艰辛之旅,我们得到了调用栈:
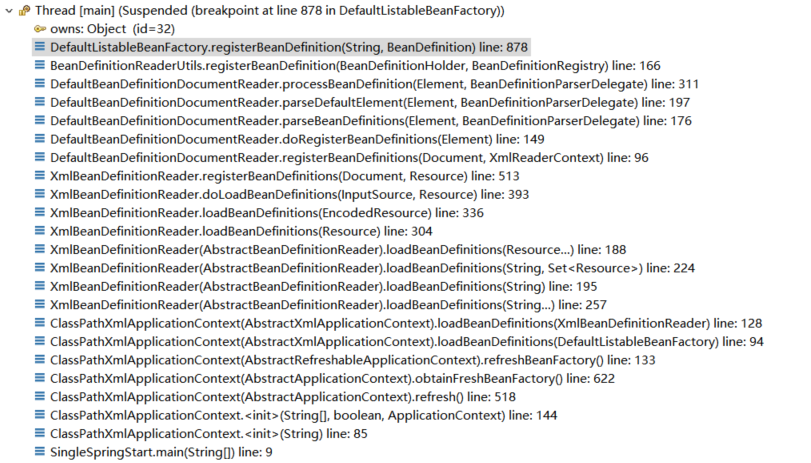
在这里我们也可以有捷径获得这个调用栈,如果你够细心,会联想:
我们知道IOC容器的工作过程是加载xml、解析xml得到bean定义、把bean定义注册到bean工厂里面、bean工厂根据bean定义创建bean实例,最终目的是注册bean定义到bean工厂创建bean实例,那么我们就根据ClassPathXmlApplicationContext的继承体系先找到哪个类里面持有bean工厂,找到持有bean工厂的地方以后先看有没有注册bean定义相关的方法,根据继承体系寻找,最终发现在父类AbstractRefreshableApplicationContext里面持有Bean工厂DefaultListableBeanFactory:
    /** Bean factory for this context. */
    @Nullable
    private DefaultListableBeanFactory beanFactory;
通过在AbstractRefreshableApplicationContext里面查找,没有找到注册bean定义相关的方法,那么我们就看DefaultListableBeanFactory的里面有没有注册bean定义相关的方法,最终发现DefaultListableBeanFactory里面果然有注册bean定义的方法registerBeanDefinition
    @Override
    public void registerBeanDefinition(String beanName, BeanDefinition beanDefinition)
            throws BeanDefinitionStoreException {
通过查看DefaultListableBeanFactory继承体系,我们可以看到DefaultListableBeanFactory实现了BeanDefinitionRegistry这个接口来实现bean定义注册

那么我们就在registerBeanDefinition(String beanName, BeanDefinition beanDefinition)方法里面打个断点,然后debug运行前面的示例代码到这里:

这样我们就能快速的拿到整个调用栈,而不用一步一步的去debug代码了:
那么怎么来具体分析调用栈呢?
主要看调用栈(看从开始到注册bean定义这件事情)用到了哪些类的哪些方法,看传参。工作是如何分配、分工协作完成的。
看传参重点是看输入的参数(如xml配置文件的路径)在这些类中是怎么变化的(代码的本质其实就是对输入数据的各种处理得到最终想要的结果),从而知道每一个类是干什么用的。分析完整个调用栈以后,想要了解哪一部分就点击对应的调用栈去分析就行了。
从调用栈可以看到要加载xml、解析xml获取bean定义、注册bean定义到bean工厂这些事由以下4个部分组成:
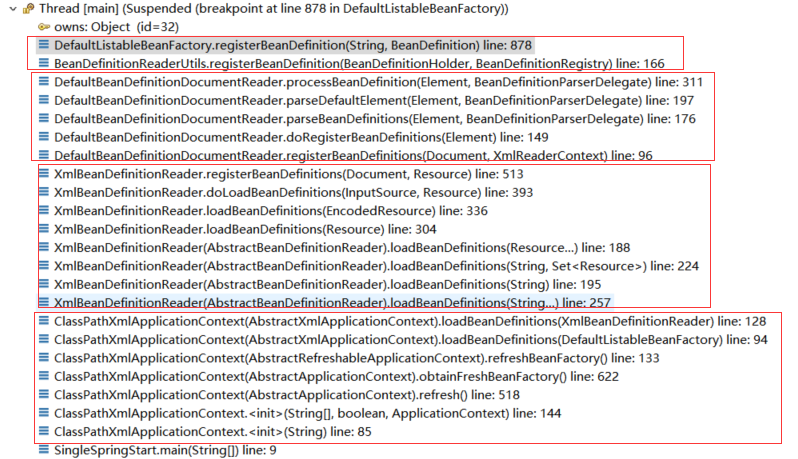
说明:
方法里面含有<init>的表示是在构造函数进行初始化,方法里面带有(AbstractApplicationContext).refresh()的表示调用的是AbstractApplicationContext父类的refresh()方法,其他的类似
从方法和参数上我们可以看出这4部分分别是做什么:
第一部分:初始化IOC容器,创建了内部的BeanFactory,然后将加载xml的工作委托给了XmlBeanDefinitionReader。
第二部分:XmlBeanDefinitionReader完成了对输入数据:字符串——>Resource——>EncodedResource——>InputSource——>Document的转变。
第三部分:DefaultBeanDefinitionDocumentReader完成对Document中元素的解析,获得Bean定义等信息。
第四部分:就是简单的完成bean定义的注册。
接下来,你就可以针对每一部分去看你感兴趣的处理逻辑、数据结构了。
比如:你可能对第三部分Document中元素的解析很感兴趣,想搞清楚它是如何解析xml文档中的各种标签元素的。
1.1.1 xml元素的解析
从第三部分的调用栈上,我们可以看到如下变化:

1——>2 :Document ——>Element

看 doRegisterBeanDefinitions 方法:

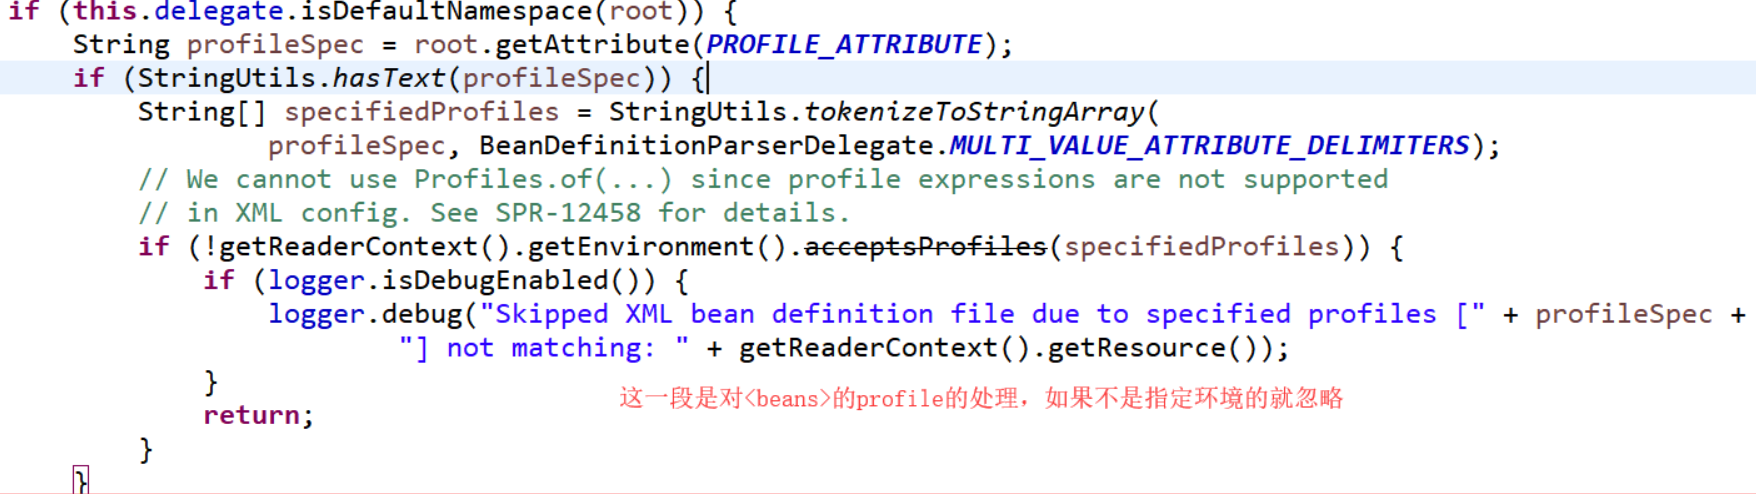

接下来看在 parseBeanDefinitions 方法中是如何来处理里面<beans>的元素的:
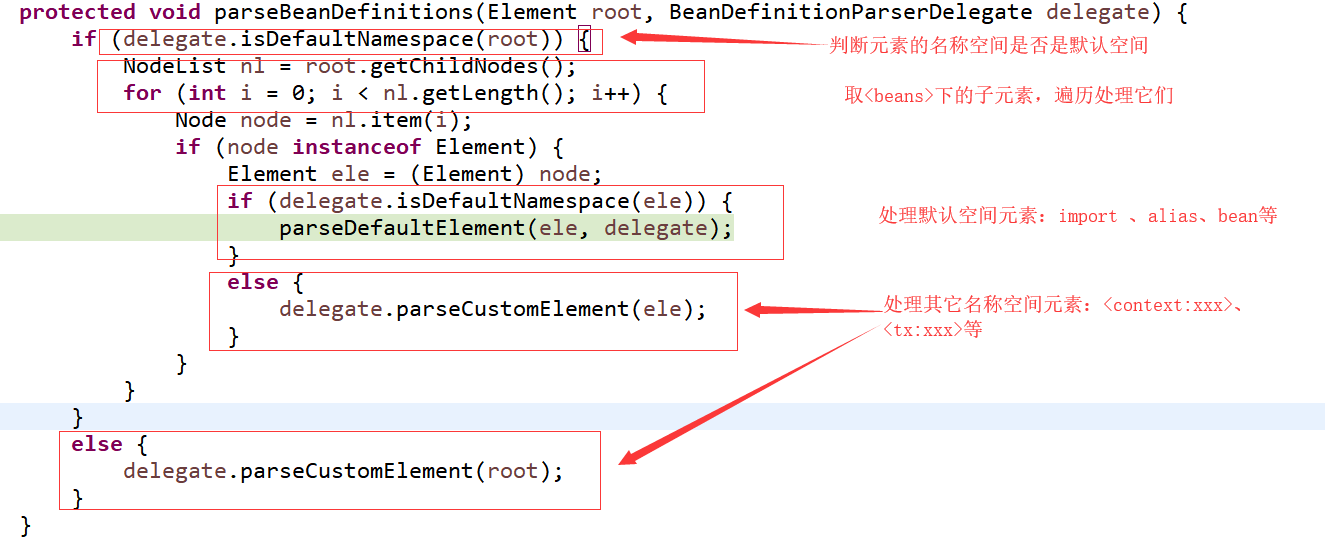
至于它是如何解析bean的不重要,很简单的。我们重点关心的是它是如何处理其他名称空间元素的,因为这里是个变化点:其他模块所需要的标签各异,表示的信息也不同,它也不知道其他模块会有哪些标签。
它是如何做到以不变应万变的?看下面的xml配置示例:
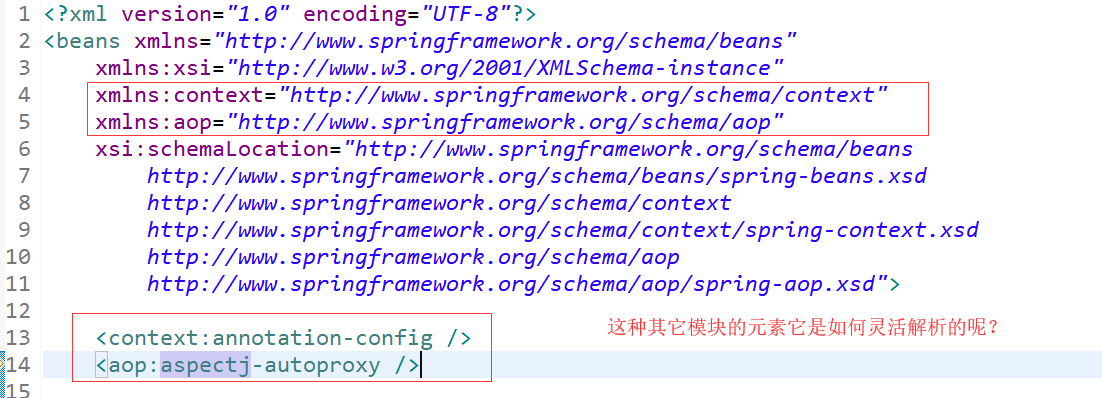
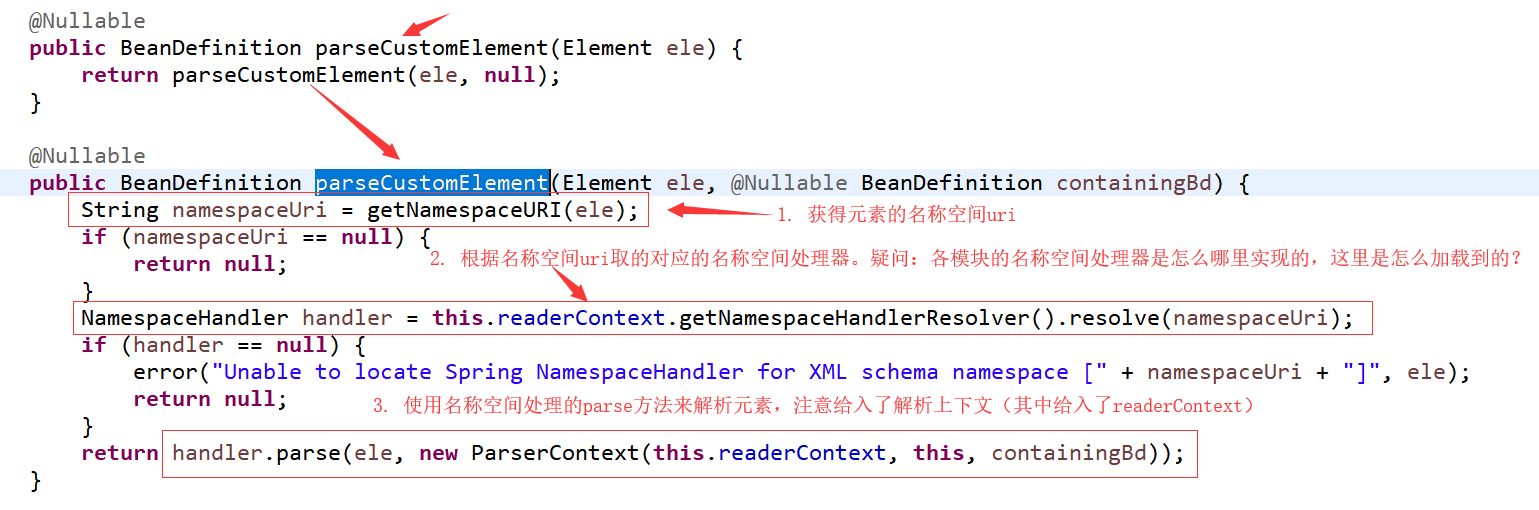
就来看 parseCustomElement方法:
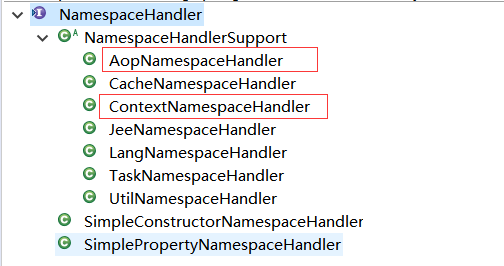
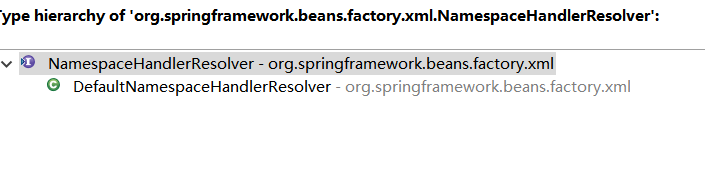
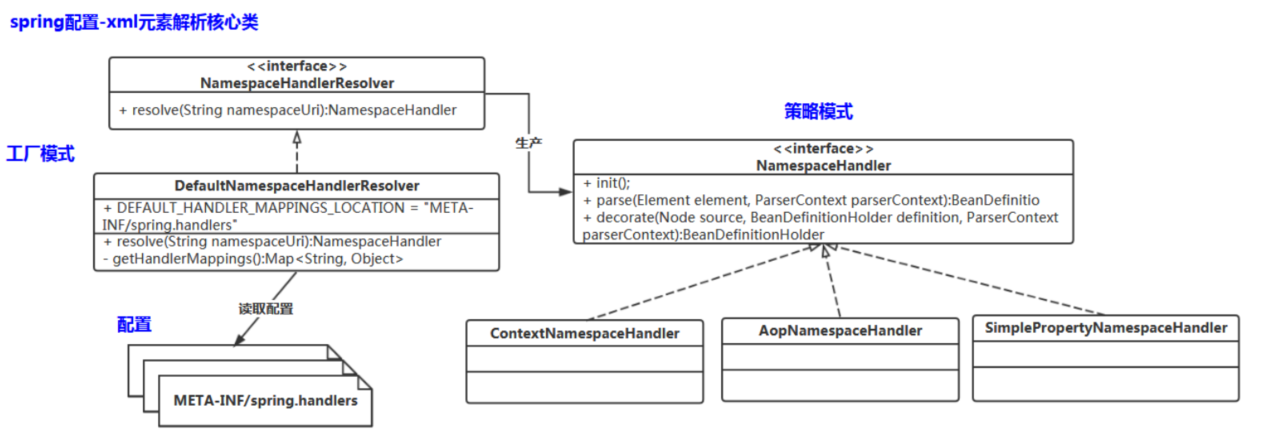
先来看一下 NamespaceHandler 的继承体系:
NamespaceHandler 里面定义的方法:
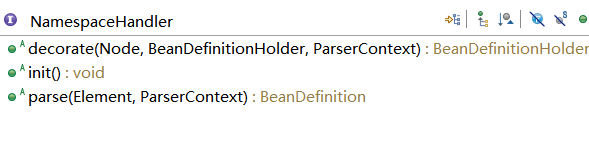
请详细看NamespaceHandler的接口注释,方法注释说明了方法的用法。
问题:名称空间对应的处理器在不同的模块实现,这里是如何加载到的?如事务处理的根本就不在现在的这里。那就要去看图中的这条语句的方法调用了:
进入resolve 方法

它是一个接口,那这里用的是它的什么实现类对象呢?
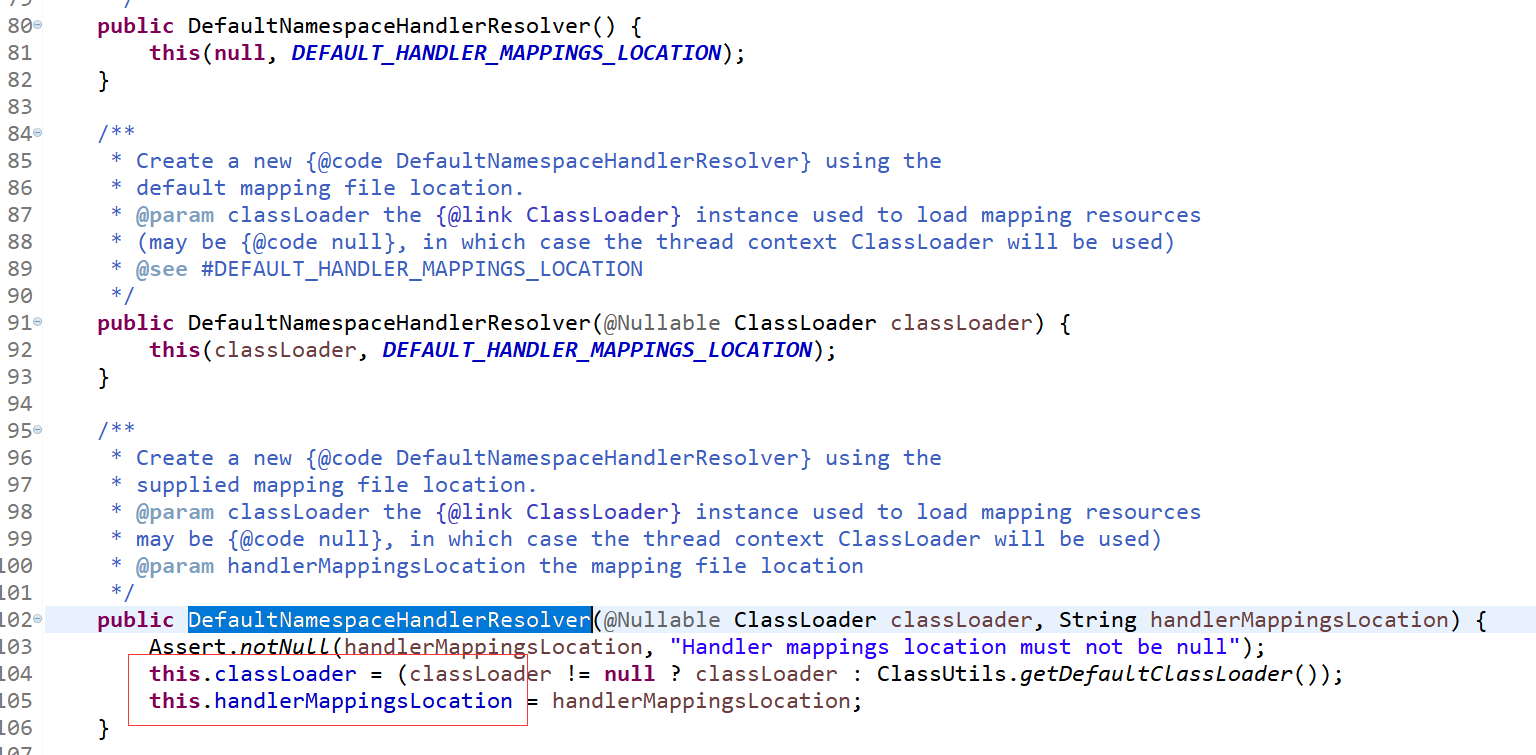
我们看到有两个属性classLoader,handlerMappingsLocation。从handlerMappingsLocation这个名字能知道这是处理器与名称空间的映射的配置所在的地址。从前两个构造方法,我们看到它给入了一个常量的地址值:

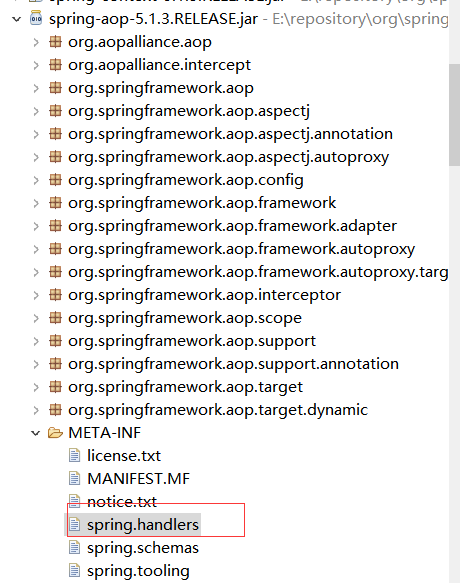
可大胆推测它是要到类目录下去找这个文件。看下我们的 spring 的模块 jar 包下有没有这个文件

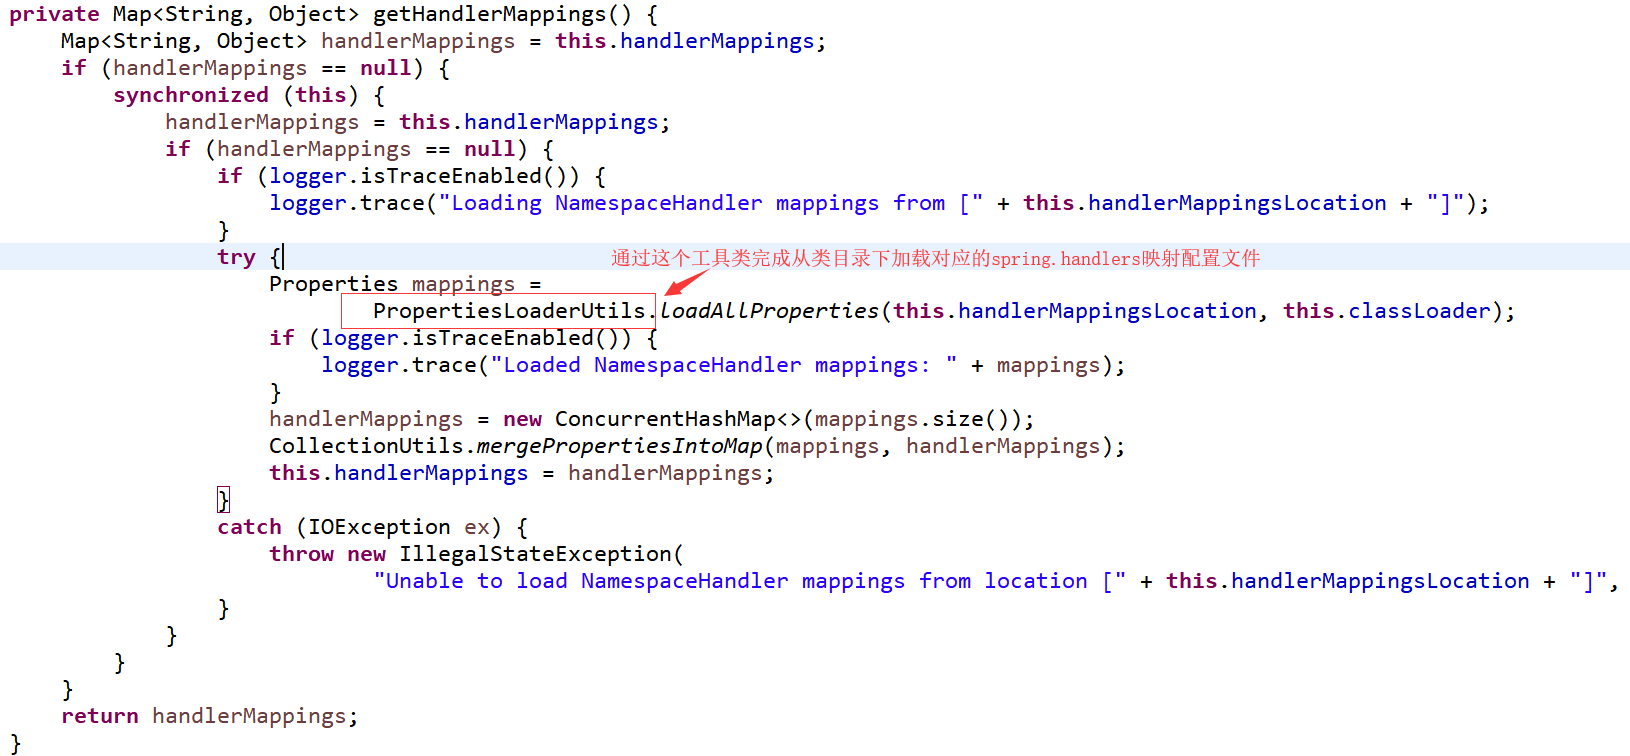
接下来来看下 resolve 方法:

请把NamespaceHandler、NamespaceHandlerResolver的类图画出来。思考一下这里有用到什么设计原则、设计模式?【很重要】
扩展:
1)如果你需要加一个自己开发的模块(含自定义的bean定义标签)到spring中,你是否可以做到了。
请看我的文章:
中的dubbo框架是如何跟spring进行整合的
2)spring标签处理这里的设计:模块之间可以灵活组合,配置在各自的模块中,即插即用。你是否可以把它应用到你的系统设计上。
策略模式跟工厂模式的组合使用
那么通用的实现 GenericXmlApplicationContext 加载xml、获取bean定义、注册bean定义的调用栈是否也是一样的呢?
ClassPathXmlApplicationContext加载xml、获取bean定义、注册bean定义:
        //类路径下加载xml配置文件创建bean定义
        ApplicationContext context1 = new ClassPathXmlApplicationContext("application.xml");
断点在DefaultListableBeanFactory中的注册方法上:
GenericXmlApplicationContext 加载xml、获取bean定义、注册bean定义:
        //通用的xml方式加载xml配置文件创建bean定义
        ApplicationContext context3 = new GenericXmlApplicationContext("file:e:/study/application.xml");
断点还是在DefaultListableBeanFactory中的注册方法上:
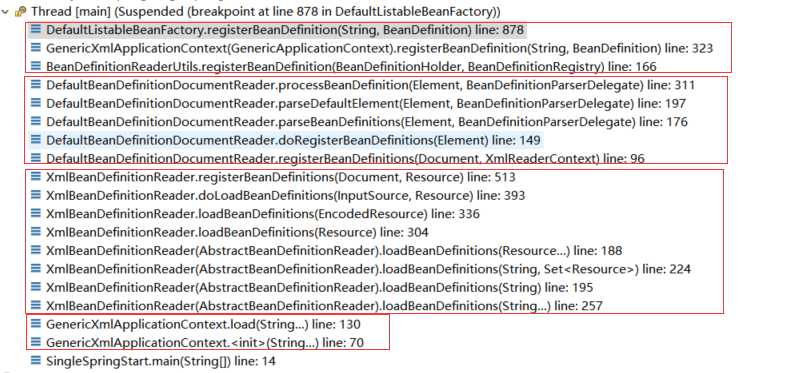
经过对比:
ClassPathXmlApplicationContext和GenericXmlApplicationContext 加载xml、获取bean定义、注册bean定义的过程是一样的
1.2 bean工厂DefaultListableBeanFactory
经过前面的分析,我们发现bean定义都是注册到DefaultListableBeanFactory中。接下来就来认识一下它
在ApplicationContext的两类实现中,通过查看继承体系我们都可以看到ApplicationContext中持有DefaultListableBeanFactory:
xml配置方式的实现的父类:

通用实现:
下面我们来看一下ApplicationContext和BeaFatory的关系

1.3 注解方式的bean配置的加载和解析
入口:
        // 扫描注解的方式创建bean定义
        AnnotationConfigApplicationContext context4 = new AnnotationConfigApplicationContext("com.study.leesmall.spring.service");
断点还是在DefaultListableBeanFactory中的注册方法上:

debug到上面的断点以后拿到的调用栈:

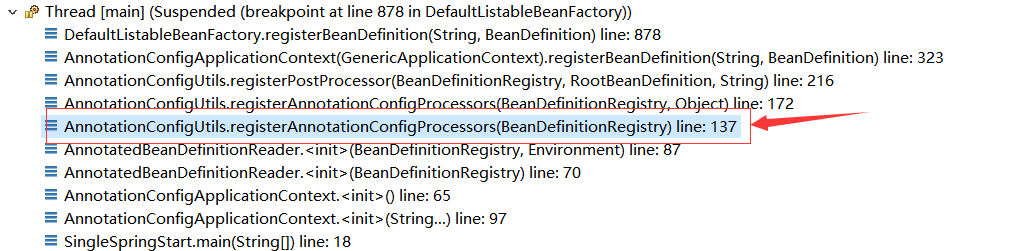
在这个调用栈中,我们并发没有看到它做包扫描的相关工作。从下往上看这个执行栈,点第2个执行栈看代码:
它现在是在做一些初始化的准备处理,从这里我们获知,它做了registerAnnotationConfigProcessors。从名字上理解就是注册了一些注解配置的处理器。到底是一些什么processors,点方法进去看看:

注册各种processor
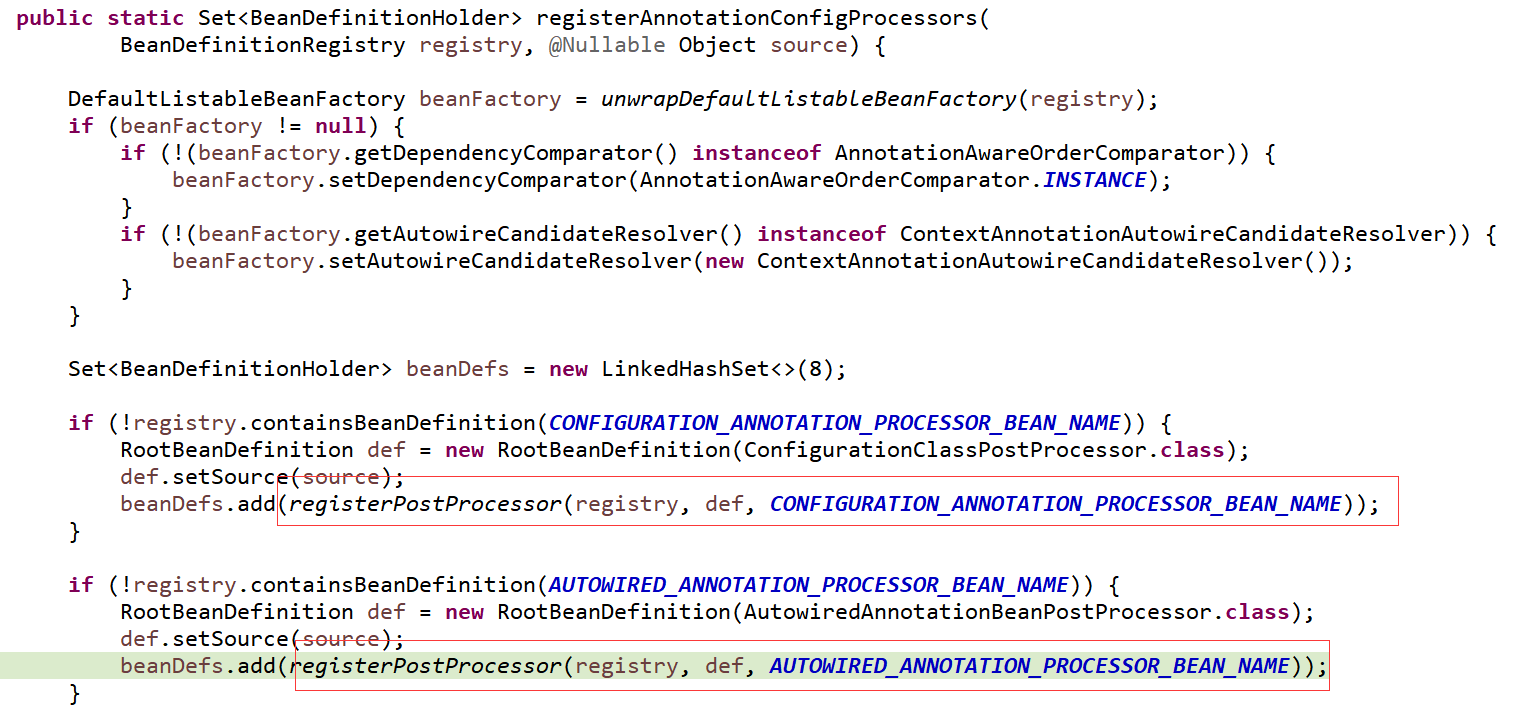
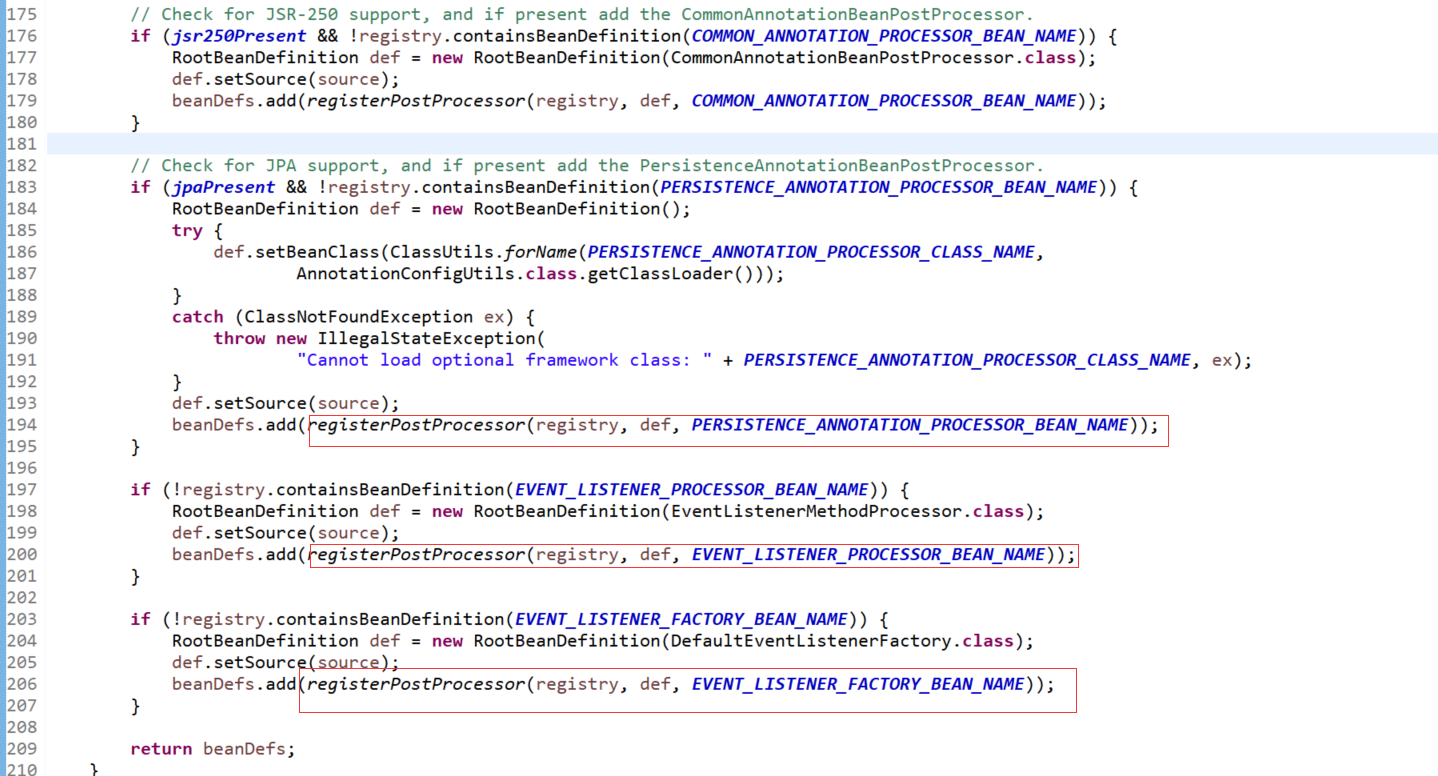
它注册了很多的processor,都是些什么Processor?点第一个的类名进去看看

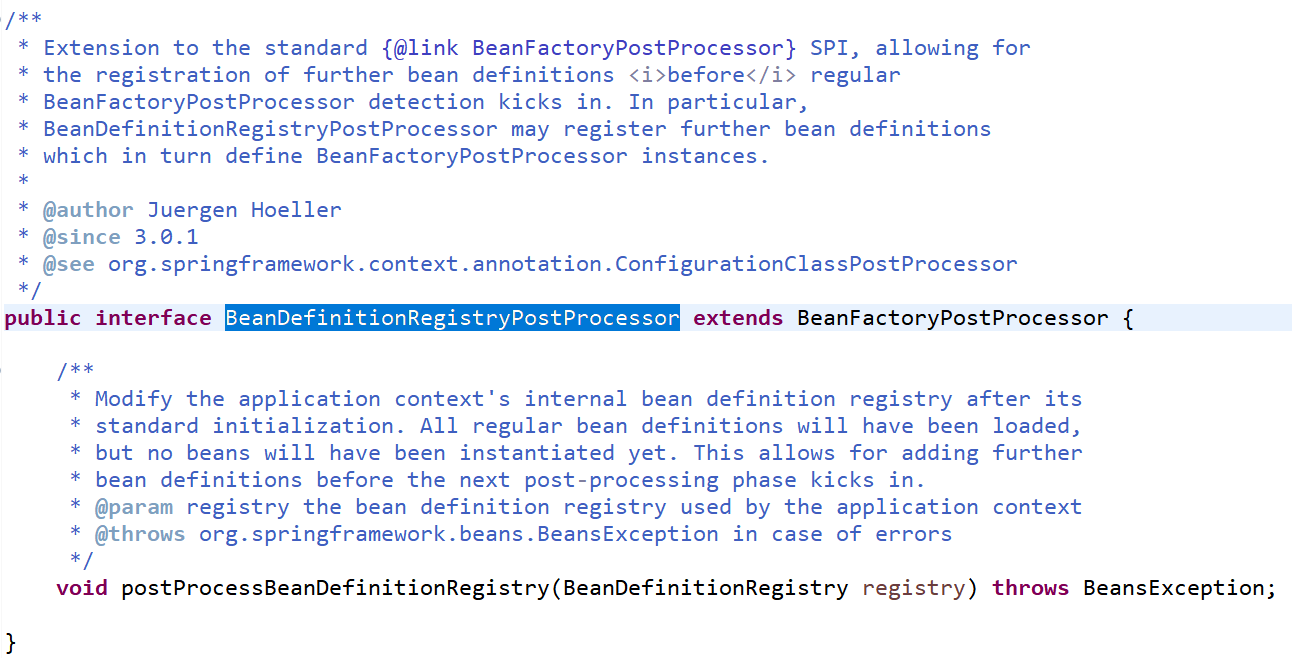
BeanDefinitionRegistryPostProcessor扩展了BeanFactoryPostProcessor,增加了BeanDefinitionRegistry位置的处理,即它可以提前对注册好的BeanDefinitionRegistry进行前置处理。
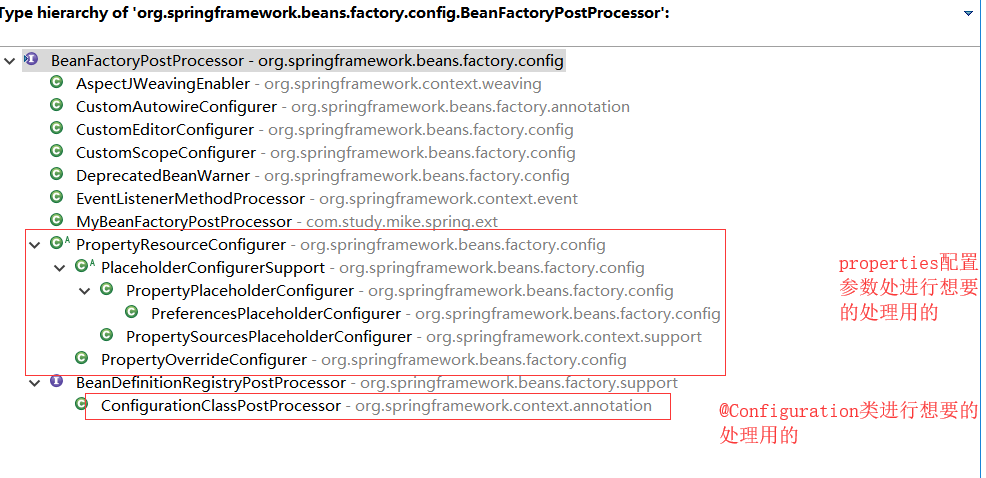
下面我们来看一下BeanFactoryPostProcessor:

来看看BeanFactoryPostProcessor有哪些实现:
这是springIOC中给我们提供的又一个【扩展点】,让我们可以在beanFactory开始创建Bean实例前对beanFactory进行一些处理!!!
使用示例如下:
    <bean class="org.springframework.beans.factory.config.PropertyPlaceholderConfigurer">
        <property name="locations" value="classpath:application.properties"/>
    </bean>
扩展一个自己的BeanFactoryPostProcessor:
package com.study.leesamll.spring.ext;

import org.springframework.beans.BeansException;
import org.springframework.beans.factory.config.BeanFactoryPostProcessor;
import org.springframework.beans.factory.config.ConfigurableListableBeanFactory;
import org.springframework.stereotype.Component;

@Component
public class MyBeanFactoryPostProcessor implements BeanFactoryPostProcessor {

    @Override
    public void postProcessBeanFactory(ConfigurableListableBeanFactory beanFactory) throws BeansException {
        System.out.println(this + "  扩展一个自己的BeanFactoryPostProcessor");
    }

}
入口:
        // 扫描注解的方式创建bean定义
        AnnotationConfigApplicationContext context4 = new AnnotationConfigApplicationContext("com.study.mike.spring.service");
        context4.close();
BeanFactoryPostProcessor的类图

1.3.1 扫描包获取bean定义的过程是怎样的?
前面我们分析到,注解方式是在scan方法开始进行扫描的

那么我们就在这个方法的这里再打个断点,记住之前的bean工厂注册方法里面的断点保留,debug调试看一下调用栈
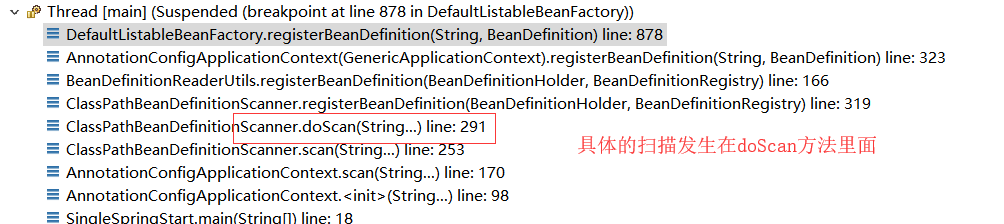
从调用栈上我们可看到有哪些类参与进来,在哪里发生的什么。
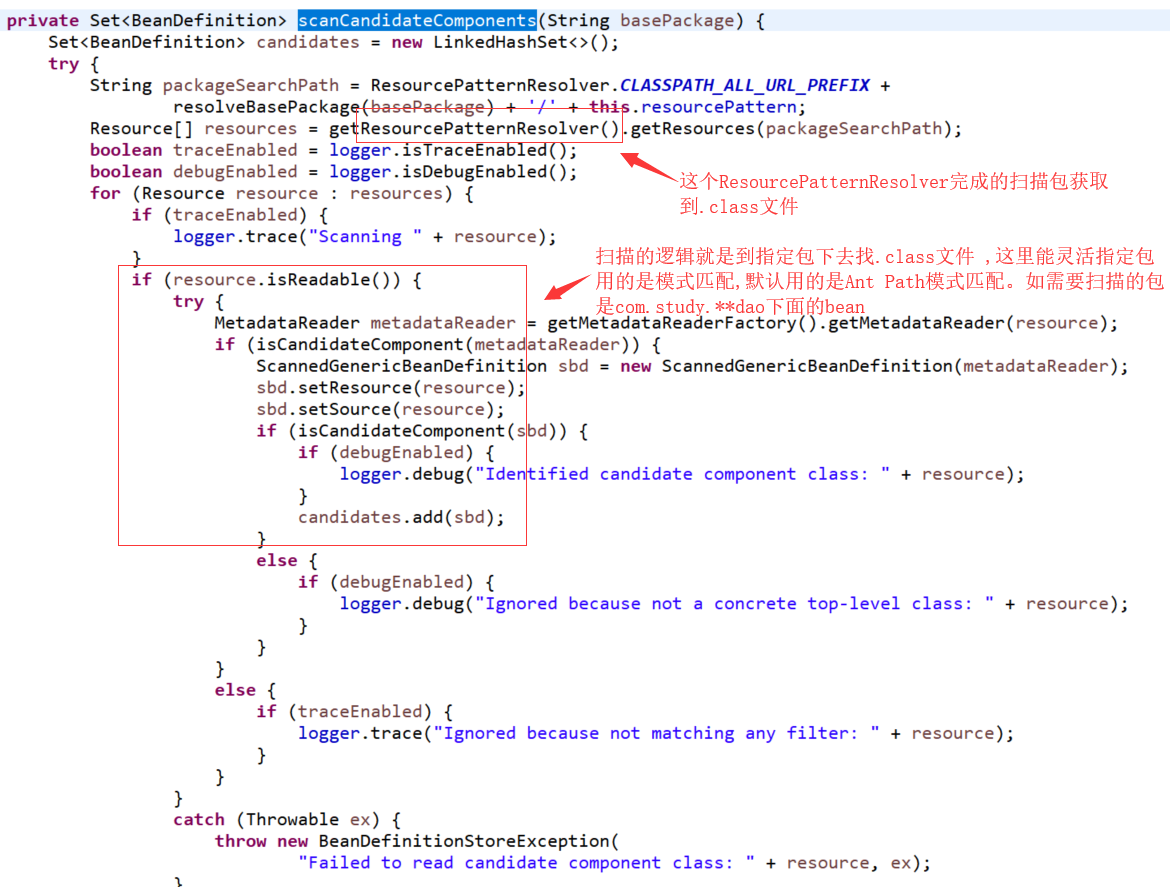
下面来看一下是怎么扫描的:

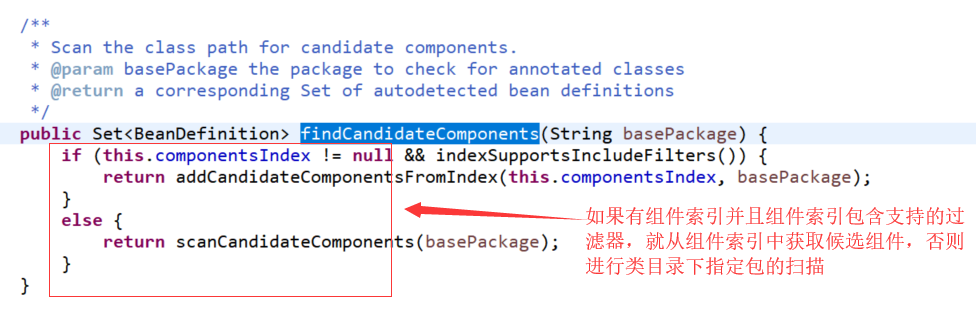
下面来看一下扫描候选组件的方法:
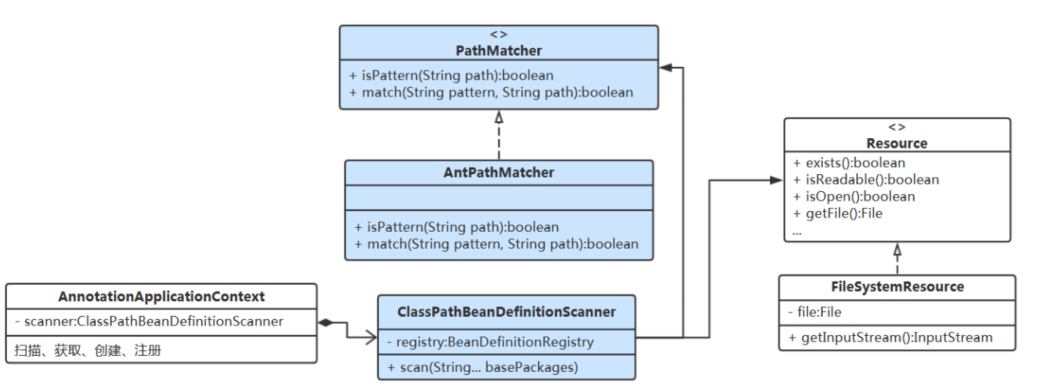
类图如下:
参考文章:
完整代码获取地址:https://github.com/leeSmall/FrameSourceCodeStudy/tree/master/spring-source-study

 浙公网安备 33010602011771号