
目录:
四、scrapy框架之递归解析、五大核心组件工作流程、post请求
五、scrapy框架之日志等级、请求传参、提高scrapy工作效率的方法
六、scrapy框架之scrapy下载中间件、UA池、代理池
一.Scrapy简介
Scrapy是一个为了爬取网站数据,提取结构性数据而编写的应用框架,非常出名,非常强悍。所谓的框架就是一个已经被集成了各种功能(高性能异步下载,队列,分布式,解析,持久化等)的具有很强通用性的项目模板。对于框架的学习,重点是要学习其框架的特性、各个功能的用法即可。
二.环境安装及基本使用


Linux:

      pip3 install scrapy


Windows:

      a. pip3 install wheel

      b. 下载twisted http://www.lfd.uci.edu/~gohlke/pythonlibs/#twisted

      c. 进入下载目录,执行 pip3 install Twisted‑17.1.0‑cp35‑cp35m‑win_amd64.whl

      d. pip3 install pywin32

      e. pip3 install scrapy
scrapy -h                      # 帮助命令

进入对应项目
scrapy shell 网址            # 进入shell模式
scrapy bench                 # 可以测试每分钟能爬多少个网页,可以测试电脑性能
scrapy list                     # 查看该项目下有哪些可用的爬虫文件
scrapy check 爬虫文件     # 检测爬虫文件是否正确


Scrapy Shell
我们想要在爬虫中使用xpath、beautifulsoup、正则表达式、css选择器等来提取想要的数据。但是因为scrapy是一个比较重的框架。每次运行起来都要等待一段时间。因此要去验证我们写的提取规则是否正确,是一个比较麻烦的事情。因此Scrapy提供了一个shell,用来方便的测试规则。当然也不仅仅局限于这一个功能。

打开Scrapy Shell:
打开cmd终端,进入到Scrapy项目所在的目录,然后进入到scrapy框架所在的虚拟环境中,输入命令scrapy shell [链接]。就会进入到scrapy的shell环境中。在这个环境中,你可以跟在爬虫的parse方法中一样使用了。


response.urljoin(url='xxx')   将xxx构建成一个完整的url


.extract() 相当于 .getall()
.extract_first() 相当于 .get()


执行scrapy项目时,需要在终端输入 scrapy crawl 爬虫名称
也可以在项目目录下新建一个start.py文件,在其中写入以下代码, 执行项目时只需执行start.py文件即可:
from scrapy import cmdline
cmdline.execute(‘scrapy crawl 爬虫名称’.split())  #相当于 cmdline.execute([‘scrapy', 'crawl', '爬虫名称’])
基础使用
1.创建项目:scrapy startproject 项目名称
     project_name/
         scrapy.cfg:
         project_name/
             __init__.py
             items.py
             pipelines.py
             settings.py
             spiders/
                 __init__.py

      scrapy.cfg   项目的主配置信息。(真正爬虫相关的配置信息在settings.py文件中)
      items.py     设置数据存储模板,用于结构化数据,如:Django的Model
      pipelines    数据持久化处理
      settings.py  配置文件,如:递归的层数、并发数,延迟下载等
      spiders      爬虫目录,如:创建文件,编写爬虫解析规则
2.创建爬虫应用程序:
cd project_name(进入项目目录)
scrapy genspider 应用名称 爬取网页的起始url (例如:scrapy genspider qiubai www.qiushibaike.com)
3.编写爬虫文件:在步骤2执行完毕后,会在项目的spiders中生成一个应用名的py爬虫文件,文件源码如下:
# -*- coding: utf-8 -*-
import scrapy

class QiubaiSpider(scrapy.Spider):
    name = 'qiubai' #应用名称
    #允许爬取的域名(如果遇到非该域名的url则爬取不到数据)
    allowed_domains = ['https://www.qiushibaike.com/']
    #起始爬取的url
    start_urls = ['https://www.qiushibaike.com/']

     #访问起始URL并获取结果后的回调函数,该函数的response参数就是向起始的url发送请求后,获取的响应对象.该函数返回值必须为可迭代对象或者NUll
     def parse(self, response):
        print(response.text) #获取字符串类型的响应内容
        print(response.body)#获取字节类型的相应内容
4.设置修改settings.py配置文件相关配置:
5.执行爬虫程序:scrapy crawl 应用名称
执行爬虫程序:
     scrapy crawl 爬虫名称 :该种执行形式会显示执行的日志信息
       scrapy crawl 爬虫名称 --nolog:该种执行形式不会显示执行的日志信息
# 将糗百首页中段子的内容和标题进行爬取

# -*- coding: utf-8 -*-
import scrapy

class QiubaiSpider(scrapy.Spider):
    name = 'qiubai'
    allowed_domains = ['https://www.qiushibaike.com/']
    start_urls = ['https://www.qiushibaike.com/']

    def parse(self, response):
        #xpath为response中的方法,可以将xpath表达式直接作用于该函数中
        odiv = response.xpath('//div[@id="content-left"]/div')
        content_list = [] #用于存储解析到的数据
        for div in odiv:
            #xpath函数返回的为列表,列表中存放的数据为Selector类型的数据。我们解析到的内容被封装在了Selector对象中,需要调用extract()函数将解析的内容从Selecor中取出。
            author = div.xpath('.//div[@class="author clearfix"]/a/h2/text()')[0].extract()
            content=div.xpath('.//div[@class="content"]/span/text()')[0].extract()

            #将解析到的内容封装到字典中
            dic={
                '作者':author,
                '内容':content
            }
            #将数据存储到content_list这个列表中
            content_list.append(dic)

        return content_list
三、scrapy框架持久化存储
1.基于终端指令的持久化存储
- 保证爬虫文件的parse方法中有可迭代类型对象(通常为列表or字典)的返回,该返回值可以通过终端指令的形式写入指定格式的文件中进行持久化操作。
  执行输出指定格式进行存储:将爬取到的数据写入不同格式的文件中进行存储
        scrapy crawl 爬虫名称 -o xxx.json
        scrapy crawl 爬虫名称 -o xxx.xml
        scrapy crawl 爬虫名称 -o xxx.csv
2.基于管道的持久化存储
scrapy 爬取 boss直聘 数据 持久化存储 简单示例:
# -*- coding: utf-8 -*-
import scrapy

from bossPro.items import BossproItem
class BossSpider(scrapy.Spider):
    name = 'boss'
    # allowed_domains = ['www.xxx.com']
    start_urls = ['https://www.zhipin.com/job_detail/?query=python%E7%88%AC%E8%99%AB&scity=101010100&industry=&position=']

    url = 'https://www.zhipin.com/c101010100/?query=python爬虫&page=%d&ka=page-2'
    page = 1
    #解析+管道持久化存储
    def parse(self, response):
        li_list = response.xpath('//div[@class="job-list"]/ul/li')
        for li in li_list:
            job_name = li.xpath('.//div[@class="info-primary"]/h3/a/div/text()').extract_first()
            salary = li.xpath('.//div[@class="info-primary"]/h3/a/span/text()').extract_first()
            company = li.xpath('.//div[@class="company-text"]/h3/a/text()').extract_first()

            #实例化一个item对象
            item = BossproItem()
            #将解析到的数据全部封装到item对象中
            item['job_name'] = job_name
            item['salary'] = salary
            item['company'] = company

            #将item提交给管道
            yield item

        if self.page <= 3:
            print('if 执行!!!')
            self.page += 1
            new_url = format(self.url%self.page)
            print(new_url)
            #手动请求发送
            yield scrapy.Request(url=new_url,callback=self.parse)
ITEM_PIPELINES = {
    'bossPro.pipelines.BossproPipeline': 300,
    'bossPro.pipelines.mysqlPileLine': 301,
   #'bossPro.pipelines.redisPileLine': 302,
}
# -*- coding: utf-8 -*-

# Define here the models for your scraped items
#
# See documentation in:
# https://doc.scrapy.org/en/latest/topics/items.html

import scrapy


class BossproItem(scrapy.Item):
    # define the fields for your item here like:
    # name = scrapy.Field()
    job_name = scrapy.Field()
    salary = scrapy.Field()
    company = scrapy.Field()
# -*- coding: utf-8 -*-

# Define your item pipelines here
#
# Don't forget to add your pipeline to the ITEM_PIPELINES setting
# See: https://doc.scrapy.org/en/latest/topics/item-pipeline.html

import pymysql
from redis import Redis


class BossproPipeline(object):
    fp = None
    def open_spider(self, spider):
        print('开始爬虫......')
        self.fp = open('./boss.txt','w',encoding='utf-8')
    def close_spider(self, spider):
        print('结束爬虫......')
        self.fp.close()
    #爬虫文件每向管道提交一次item,则该方法就会被调用一次.
    #参数:item 就是管道接收到的item类型对象

    def process_item(self, item, spider):
        #print(item)
        self.fp.write(item['job_name']+':'+item['salary']+':'+item['company']+'\n')
        return item #返回给下一个即将被执行的管道类


class mysqlPileLine(object):
    conn = None
    cursor =None
    def open_spider(self,spider):
        self.conn = pymysql.Connect(host='127.0.0.1',port=3306,user='root',password='',db='scrapy',charset="utf8")
        print(self.conn)
    def process_item(self, item, spider):
        self.cursor = self.conn.cursor()
        # print(item)
        #print('insert into boss values ("%s","%s","%s")'%(item['job_name'],item['salary'],item['company']))
        try:
            print('insert into boss values ("%s","%s","%s")'%(item['job_name'],item['salary'],item['company']))
            self.cursor.execute('insert into boss values ("%s","%s","%s")'%(item['job_name'],item['salary'],item['company']))
            self.conn.commit()
        except Exception as e:
            print(e)
            self.conn.rollback()
    def close_spider(self,spider):
        self.cursor.close()
        self.conn.close()


class redisPileLine(object):
    conn = None
    def open_spider(self,spider):
        self.conn = Redis(host='127.0.0.1',port=6379)
        print(self.conn)
    def process_item(self, item, spider):
        # print(item)
        dic = {
            'name':item['job_name'],
            'salary':item['salary'],
            'company':item['company']
        }
        self.conn.lpush('boss',dic)
scrapy框架中已经为我们专门集成好了高效、便捷的持久化操作功能,我们直接使用即可。要想使用scrapy的持久化操作功能,我们首先来认识如下两个文件:
    items.py:数据结构模板文件。定义数据属性。
    pipelines.py:管道文件。接收数据(items),进行持久化操作。

  持久化流程:
        1.爬虫文件爬取到数据后,需要将数据封装到items对象中。
        2.使用yield关键字将items对象提交给pipelines管道进行持久化操作。
        3.在管道文件中的process_item方法中接收爬虫文件提交过来的item对象,然后编写持久化存储的代码将item对象中存储的数据进行持久化存储
        4.settings.py配置文件中开启管道
scrapy框架持久化存储示例:将糗事百科首页中的段子和作者数据爬取下来,然后进行持久化存储
- 爬虫文件:qiubaiDemo.py
# -*- coding: utf-8 -*-
import scrapy
from secondblood.items import SecondbloodItem

class QiubaidemoSpider(scrapy.Spider):
    name = 'qiubaiDemo'
    allowed_domains = ['www.qiushibaike.com']
    start_urls = ['http://www.qiushibaike.com/']

    def parse(self, response):
        odiv = response.xpath('//div[@id="content-left"]/div')
        for div in odiv:
            # xpath函数返回的为列表,列表中存放的数据为Selector类型的数据。我们解析到的内容被封装在了Selector对象中,需要调用extract()函数将解析的内容从Selecor中取出。
            author = div.xpath('.//div[@class="author clearfix"]//h2/text()').extract_first()
            author = author.strip('\n')#过滤空行
            content = div.xpath('.//div[@class="content"]/span/text()').extract_first()
            content = content.strip('\n')#过滤空行

            #将解析到的数据封装至items对象中
            item = SecondbloodItem()
            item['author'] = author
            item['content'] = content

            yield item#提交item到管道文件(pipelines.py)
- items文件:items.py
import scrapy


class SecondbloodItem(scrapy.Item):
    # define the fields for your item here like:
    # name = scrapy.Field()
    author = scrapy.Field() #存储作者
    content = scrapy.Field() #存储段子内容
- 管道文件:pipelines.py
# -*- coding: utf-8 -*-

# Define your item pipelines here
#
# Don't forget to add your pipeline to the ITEM_PIPELINES setting
# See: https://doc.scrapy.org/en/latest/topics/item-pipeline.html


class SecondbloodPipeline(object):
    #构造方法
    def __init__(self):
        self.fp = None  #定义一个文件描述符属性
  #下列都是在重写父类的方法:
    #开始爬虫时,执行一次
    def open_spider(self,spider):
        print('爬虫开始')
        self.fp = open('./data.txt', 'w')

   #因为该方法会被执行调用多次,所以文件的开启和关闭操作写在了另外两个只会各自执行一次的方法中。
    def process_item(self, item, spider):
        #将爬虫程序提交的item进行持久化存储
        self.fp.write(item['author'] + ':' + item['content'] + '\n')
        return item

    #结束爬虫时,执行一次
    def close_spider(self,spider):
        self.fp.close()
        print('爬虫结束')
- 配置文件:settings.py
#开启管道
ITEM_PIPELINES = {
    'secondblood.pipelines.SecondbloodPipeline': 300, #300表示为优先级,值越小优先级越高
}
2.1 基于mysql的管道存储
上述案例中,在管道文件里将item对象中的数据值存储到了磁盘中,如果将item数据写入mysql数据库的话,只需要将上述案例中的管道文件修改成如下形式:
- pipelines.py文件
# -*- coding: utf-8 -*-

# Define your item pipelines here
#
# Don't forget to add your pipeline to the ITEM_PIPELINES setting
# See: https://doc.scrapy.org/en/latest/topics/item-pipeline.html

#导入数据库的类
import pymysql
class QiubaiproPipelineByMysql(object):

    conn = None  #mysql的连接对象声明
    cursor = None#mysql游标对象声明
    def open_spider(self,spider):
        print('开始爬虫')
        #链接数据库
        self.conn = pymysql.Connect(host='127.0.0.1',port=3306,user='root',password='123456',db='qiubai')
    #编写向数据库中存储数据的相关代码
    def process_item(self, item, spider):
        #1.链接数据库
        #2.执行sql语句
        sql = 'insert into qiubai values("%s","%s")'%(item['author'],item['content'])
        self.cursor = self.conn.cursor()
        #执行事务
        try:
            self.cursor.execute(sql)
            self.conn.commit()
        except Exception as e:
            print(e)
            self.conn.rollback()

        return item
    def close_spider(self,spider):
        print('爬虫结束')
        self.cursor.close()
        self.conn.close()
- settings.py
ITEM_PIPELINES = {
    'qiubaiPro.pipelines.QiubaiproPipelineByMysql': 300,
}
2.2 基于redis的管道存储
上述案例中,在管道文件里将item对象中的数据值存储到了磁盘中,如果将item数据写入redis数据库的话,只需要将上述案例中的管道文件修改成如下形式:
# -*- coding: utf-8 -*-

# Define your item pipelines here
#
# Don't forget to add your pipeline to the ITEM_PIPELINES setting
# See: https://doc.scrapy.org/en/latest/topics/item-pipeline.html

import redis

class QiubaiproPipelineByRedis(object):
    conn = None
    def open_spider(self,spider):
        print('开始爬虫')
        #创建链接对象
        self.conn = redis.Redis(host='127.0.0.1',port=6379)
    def process_item(self, item, spider):
        dict = {
            'author':item['author'],
            'content':item['content']
        }
        #写入redis中
        self.conn.lpush('data', dict)
        return item
ITEM_PIPELINES = {
    'qiubaiPro.pipelines.QiubaiproPipelineByRedis': 300,
}
- 面试题:如果最终需要将爬取到的数据值一份存储到磁盘文件,一份存储到数据库中,则应该如何操作scrapy?

- 答:管道文件中的代码为

#该类为管道类,该类中的process_item方法是用来实现持久化存储操作的。
class DoublekillPipeline(object):

    def process_item(self, item, spider):
        #持久化操作代码 (方式1:写入磁盘文件)
        return item

#如果想实现另一种形式的持久化操作,则可以再定制一个管道类:
class DoublekillPipeline_db(object):

    def process_item(self, item, spider):
        #持久化操作代码 (方式1:写入数据库)
        return item

 在settings.py开启管道操作代码为:

#下列结构为字典,字典中的键值表示的是即将被启用执行的管道文件和其执行的优先级。
ITEM_PIPELINES = {
   'doublekill.pipelines.DoublekillPipeline': 300,
    'doublekill.pipelines.DoublekillPipeline_db': 200,
}

#上述代码中,字典中的两组键值分别表示会执行管道文件中对应的两个管道类中的process_item方法,实现两种不同形式的持久化操作。
四、scrapy框架之递归解析、五大核心组件工作流程、post请求
1.递归爬取解析多页页面数据
- 需求:将糗事百科所有页码的作者和段子内容数据进行爬取切持久化存储
- 需求分析:每一个页面对应一个url,则scrapy工程需要对每一个页码对应的url依次发起请求,然后通过对应的解析方法进行作者和段子内容的解析。
实现方案:
1.将每一个页码对应的url存放到爬虫文件的起始url列表(start_urls)中。(不推荐)
2.使用Request方法手动发起请求。(推荐)
代码展示:
# -*- coding: utf-8 -*-
import scrapy
from qiushibaike.items import QiushibaikeItem
# scrapy.http import Request
class QiushiSpider(scrapy.Spider):
    name = 'qiushi'
    allowed_domains = ['www.qiushibaike.com']
    start_urls = ['https://www.qiushibaike.com/text/']

    #爬取多页
    pageNum = 1 #起始页码
    url = 'https://www.qiushibaike.com/text/page/%s/' #每页的url

    def parse(self, response):
        div_list=response.xpath('//*[@id="content-left"]/div')
        for div in div_list:
            #//*[@id="qiushi_tag_120996995"]/div[1]/a[2]/h2
            author=div.xpath('.//div[@class="author clearfix"]//h2/text()').extract_first()
            author=author.strip('\n')
            content=div.xpath('.//div[@class="content"]/span/text()').extract_first()
            content=content.strip('\n')
            item=QiushibaikeItem()
            item['author']=author
            item['content']=content

            yield item #提交item到管道进行持久化

         #爬取所有页码数据
        if self.pageNum <= 13: #一共爬取13页(共13页)
            self.pageNum += 1
            url = format(self.url % self.pageNum)

            #递归爬取数据:callback参数的值为回调函数(将url请求后,得到的相应数据继续进行parse解析),递归调用parse函数
            yield scrapy.Request(url=url,callback=self.parse)
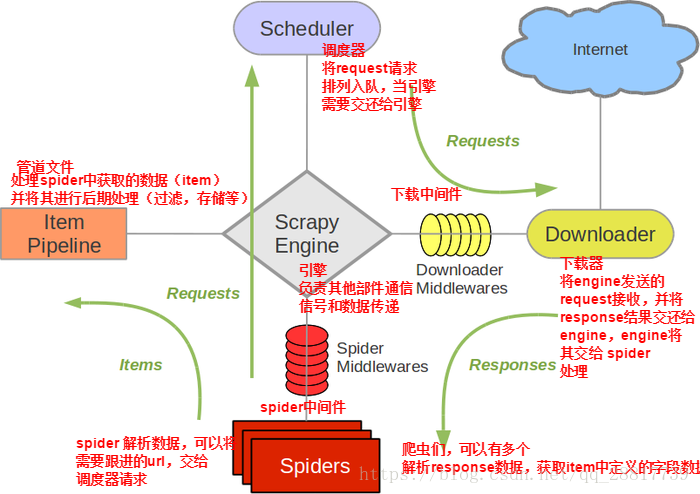
2.五大核心组件工作流程:

- 引擎(Scrapy)
用来处理整个系统的数据流处理, 触发事务(框架核心) - 调度器(Scheduler)
用来接受引擎发过来的请求, 压入队列中, 并在引擎再次请求的时候返回. 可以想像成一个URL(抓取网页的网址或者说是链接)的优先队列, 由它来决定下一个要抓取的网址是什么, 同时去除重复的网址 - 下载器(Downloader)
用于下载网页内容, 并将网页内容返回给蜘蛛(Scrapy下载器是建立在twisted这个高效的异步模型上的) - 爬虫(Spiders)
爬虫是主要干活的, 用于从特定的网页中提取自己需要的信息, 即所谓的实体(Item)。用户也可以从中提取出链接,让Scrapy继续抓取下一个页面 - 项目管道(Pipeline)
负责处理爬虫从网页中抽取的实体,主要的功能是持久化实体、验证实体的有效性、清除不需要的信息。当页面被爬虫解析后,将被发送到项目管道,并经过几个特定的次序处理数据。
3.post请求发送
- 问题:在之前代码中,我们从来没有手动的对start_urls列表中存储的起始url进行过请求的发送,但是起始url的确是进行了请求的发送,那这是如何实现的呢?
- 解答:其实是因为爬虫文件中的爬虫类继承到了Spider父类中的start_requests(self)这个方法,该方法就可以对start_urls列表中的url发起请求:
【注意】该方法默认的实现,是对起始的url发起get请求,如果想发起post请求,则需要子类重写该方法。
-方法: 重写start_requests方法,让其发起post请求:
五、scrapy框架之日志等级、请求传参、提高scrapy爬取效率的方法
1.Scrapy的日志等级
- 在使用scrapy crawl spiderFileName运行程序时,在终端里打印输出的就是scrapy的日志信息。
- 日志信息的种类:
ERROR : 一般错误
WARNING : 警告
INFO : 一般的信息
DEBUG : 调试信息
- 设置日志信息指定输出:
在settings.py配置文件中,加入
LOG_LEVEL = ‘指定日志信息种类’ 即可。
LOG_FILE = 'log.txt' 则表示将日志信息写入到指定文件中进行存储。
2.请求传参
- 在某些情况下,我们爬取的数据不在同一个页面中,例如,我们爬取一个电影网站,电影的名称,评分在一级页面,而要爬取的其他电影详情在其二级子页面中。这时我们就需要用到请求传参。
- 案例1:爬取https://www.4567tv.tv/frim/index1.html 中的电影名称和导演 简单示例
# -*- coding: utf-8 -*-
import scrapy
from moviePro.items import MovieproItem

class MovieSpider(scrapy.Spider):
    name = 'movie'
    # allowed_domains = ['www.xxx.com']
    start_urls = ['https://www.4567tv.tv/frim/index1.html']
    #解析详情页中的数据
    def parse_detail(self,response):
        #response.meta返回接收到的meta字典
        item = response.meta['item']
        actor = response.xpath('/html/body/div[1]/div/div/div/div[2]/p[3]/a/text()').extract_first()
        item['actor'] = actor

        yield item

    def parse(self, response):
        li_list = response.xpath('//li[@class="col-md-6 col-sm-4 col-xs-3"]')
        for li in li_list:
            item = MovieproItem()
            name = li.xpath('./div/a/@title').extract_first()
            detail_url = 'https://www.4567tv.tv'+li.xpath('./div/a/@href').extract_first()
            item['name'] = name
            #meta参数:请求传参.meta字典就会传递给回调函数的response参数
            yield scrapy.Request(url=detail_url,callback=self.parse_detail,meta={'item':item})
# -*- coding: utf-8 -*-

import scrapy


class MovieproItem(scrapy.Item):
    # define the fields for your item here like:
    name = scrapy.Field()
    actor = scrapy.Field()
# -*- coding: utf-8 -*-


class MovieproPipeline(object):
    def process_item(self, item, spider):
        print(item)
        return item
BOT_NAME = 'moviePro'
USER_AGENT = 'Mozilla/5.0 (Windows NT 6.1; Win64; x64) AppleWebKit/537.36 (KHTML, like Gecko) Chrome/72.0.3626.119 Safari/537.36'

SPIDER_MODULES = ['moviePro.spiders']
NEWSPIDER_MODULE = 'moviePro.spiders'

ROBOTSTXT_OBEY = False

ITEM_PIPELINES = {
   'moviePro.pipelines.MovieproPipeline': 300,
}

# 日志等级
#LOG_LEVEL = 'ERROR'
LOG_FILE = './log.txt'
- 案例2:爬取www.id97.com电影网,将一级页面中的电影名称,类型,评分一级二级页面中的上映时间,导演,片长进行爬取。
爬虫文件:
# -*- coding: utf-8 -*-
import scrapy
from moviePro.items import MovieproItem

class MovieSpider(scrapy.Spider):
    name = 'movie'
    allowed_domains = ['www.id97.com']
    start_urls = ['http://www.id97.com/']

    def parse(self, response):
        div_list = response.xpath('//div[@class="col-xs-1-5 movie-item"]')

        for div in div_list:
            item = MovieproItem()
            item['name'] = div.xpath('.//h1/a/text()').extract_first()
            item['score'] = div.xpath('.//h1/em/text()').extract_first()
            #xpath(string(.))表示提取当前节点下所有子节点中的数据值(.)表示当前节点
            item['kind'] = div.xpath('.//div[@class="otherinfo"]').xpath('string(.)').extract_first()
            item['detail_url'] = div.xpath('./div/a/@href').extract_first()
            #请求二级详情页面,解析二级页面中的相应内容,通过meta参数进行Request的数据传递
            yield scrapy.Request(url=item['detail_url'],callback=self.parse_detail,meta={'item':item})

    def parse_detail(self,response):
        #通过response获取item
        item = response.meta['item']
        item['actor'] = response.xpath('//div[@class="row"]//table/tr[1]/a/text()').extract_first()
        item['time'] = response.xpath('//div[@class="row"]//table/tr[7]/td[2]/text()').extract_first()
        item['long'] = response.xpath('//div[@class="row"]//table/tr[8]/td[2]/text()').extract_first()
        #提交item到管道
        yield item
items文件:
# -*- coding: utf-8 -*-

# Define here the models for your scraped items
#
# See documentation in:
# https://doc.scrapy.org/en/latest/topics/items.html

import scrapy


class MovieproItem(scrapy.Item):
    # define the fields for your item here like:
    name = scrapy.Field()
    score = scrapy.Field()
    time = scrapy.Field()
    long = scrapy.Field()
    actor = scrapy.Field()
    kind = scrapy.Field()
    detail_url = scrapy.Field()
管道文件:
# -*- coding: utf-8 -*-

# Define your item pipelines here
#
# Don't forget to add your pipeline to the ITEM_PIPELINES setting
# See: https://doc.scrapy.org/en/latest/topics/item-pipeline.html

import json
class MovieproPipeline(object):
    def __init__(self):
        self.fp = open('data.txt','w')
    def process_item(self, item, spider):
        dic = dict(item)
        print(dic)
        json.dump(dic,self.fp,ensure_ascii=False)
        return item
    def close_spider(self,spider):
        self.fp.close()
3.如何提高scrapy的爬取效率
增加并发:
    默认scrapy开启的并发线程为32个,可以适当进行增加。在settings配置文件中修改CONCURRENT_REQUESTS = 100值为100,并发设置成了为100。

降低日志级别:
    在运行scrapy时,会有大量日志信息的输出,为了减少CPU的使用率。可以设置log输出信息为INFO或者ERROR即可。在配置文件中编写:LOG_LEVEL = ‘INFO’

禁止cookie:
    如果不是真的需要cookie,则在scrapy爬取数据时可以进制cookie从而减少CPU的使用率,提升爬取效率。在配置文件中编写:COOKIES_ENABLED = False

禁止重试:
    对失败的HTTP进行重新请求(重试)会减慢爬取速度,因此可以禁止重试。在配置文件中编写:RETRY_ENABLED = False

减少下载超时:
    如果对一个非常慢的链接进行爬取,减少下载超时可以能让卡住的链接快速被放弃,从而提升效率。在配置文件中进行编写:DOWNLOAD_TIMEOUT = 10 超时时间为10s
测试案例:爬取校花网校花图片 www.521609.com
# -*- coding: utf-8 -*-
import scrapy
from xiaohua.items import XiaohuaItem

class XiahuaSpider(scrapy.Spider):

    name = 'xiaohua'
    allowed_domains = ['www.521609.com']
    start_urls = ['http://www.521609.com/daxuemeinv/']

    pageNum = 1
    url = 'http://www.521609.com/daxuemeinv/list8%d.html'

    def parse(self, response):
        li_list = response.xpath('//div[@class="index_img list_center"]/ul/li')
        for li in li_list:
            school = li.xpath('./a/img/@alt').extract_first()
            img_url = li.xpath('./a/img/@src').extract_first()

            item = XiaohuaItem()
            item['school'] = school
            item['img_url'] = 'http://www.521609.com' + img_url

            yield item

        if self.pageNum < 10:
            self.pageNum += 1
            url = format(self.url % self.pageNum)
            #print(url)
            yield scrapy.Request(url=url,callback=self.parse)
# -*- coding: utf-8 -*-

# Define here the models for your scraped items
#
# See documentation in:
# https://doc.scrapy.org/en/latest/topics/items.html

import scrapy


class XiaohuaItem(scrapy.Item):
    # define the fields for your item here like:
    # name = scrapy.Field()
    school=scrapy.Field()
    img_url=scrapy.Field()
# -*- coding: utf-8 -*-

# Define your item pipelines here
#
# Don't forget to add your pipeline to the ITEM_PIPELINES setting
# See: https://doc.scrapy.org/en/latest/topics/item-pipeline.html

import json
import os
import urllib.request
class XiaohuaPipeline(object):
    def __init__(self):
        self.fp = None

    def open_spider(self,spider):
        print('开始爬虫')
        self.fp = open('./xiaohua.txt','w')

    def download_img(self,item):
        url = item['img_url']
        fileName = item['school']+'.jpg'
        if not os.path.exists('./xiaohualib'):
            os.mkdir('./xiaohualib')
        filepath = os.path.join('./xiaohualib',fileName)
        urllib.request.urlretrieve(url,filepath)
        print(fileName+"下载成功")

    def process_item(self, item, spider):
        obj = dict(item)
        json_str = json.dumps(obj,ensure_ascii=False)
        self.fp.write(json_str+'\n')

        #下载图片
        self.download_img(item)
        return item

    def close_spider(self,spider):
        print('结束爬虫')
        self.fp.close()
USER_AGENT = 'Mozilla/5.0 (Macintosh; Intel Mac OS X 10_12_0) AppleWebKit/537.36 (KHTML, like Gecko) Chrome/68.0.3440.106 Safari/537.36'

# Obey robots.txt rules
ROBOTSTXT_OBEY = False

# Configure maximum concurrent requests performed by Scrapy (default: 16)
CONCURRENT_REQUESTS = 100
COOKIES_ENABLED = False
LOG_LEVEL = 'ERROR'
RETRY_ENABLED = False
DOWNLOAD_TIMEOUT = 3
# Configure a delay for requests for the same website (default: 0)
# See https://doc.scrapy.org/en/latest/topics/settings.html#download-delay
# See also autothrottle settings and docs
# The download delay setting will honor only one of:
#CONCURRENT_REQUESTS_PER_DOMAIN = 16
#CONCURRENT_REQUESTS_PER_IP = 16
DOWNLOAD_DELAY = 3
六、scrapy框架之scrapy下载中间件、UA池、代理池
1.下载中间件
框架图:
下载中间件(Downloader Middlewares) 位于scrapy引擎和下载器之间的一层组件。
- 作用:
(1)引擎将请求传递给下载器过程中, 下载中间件可以对请求进行一系列处理。比如设置请求的 User-Agent,设置代理等
(2)在下载器完成将Response传递给引擎中,下载中间件可以对响应进行一系列处理。比如进行gzip解压等。
我们主要使用下载中间件处理请求,一般会对请求设置随机的User-Agent ,设置随机的代理。目的在于防止爬取网站的反爬虫策略。
2.UA池:User-Agent池
- 作用:尽可能多的将scrapy工程中的请求伪装成不同类型的浏览器身份。
- 操作流程:
1.在下载中间件中拦截请求
2.将拦截到的请求的请求头信息中的UA进行篡改伪装
3.在配置文件中开启下载中间件
代码展示:
#导包
from scrapy.contrib.downloadermiddleware.useragent import UserAgentMiddleware
import random
#UA池代码的编写(单独给UA池封装一个下载中间件的一个类)
class RandomUserAgent(UserAgentMiddleware):

    def process_request(self, request, spider):
        #从列表中随机抽选出一个ua值
        ua = random.choice(user_agent_list)
        #ua值进行当前拦截到请求的ua的写入操作
        request.headers.setdefault('User-Agent',ua)


user_agent_list = [
        "Mozilla/5.0 (Windows NT 6.1; WOW64) AppleWebKit/537.1 "
        "(KHTML, like Gecko) Chrome/22.0.1207.1 Safari/537.1",
        "Mozilla/5.0 (X11; CrOS i686 2268.111.0) AppleWebKit/536.11 "
        "(KHTML, like Gecko) Chrome/20.0.1132.57 Safari/536.11",
        "Mozilla/5.0 (Windows NT 6.1; WOW64) AppleWebKit/536.6 "
        "(KHTML, like Gecko) Chrome/20.0.1092.0 Safari/536.6",
        "Mozilla/5.0 (Windows NT 6.2) AppleWebKit/536.6 "
        "(KHTML, like Gecko) Chrome/20.0.1090.0 Safari/536.6",
        "Mozilla/5.0 (Windows NT 6.2; WOW64) AppleWebKit/537.1 "
        "(KHTML, like Gecko) Chrome/19.77.34.5 Safari/537.1",
        "Mozilla/5.0 (X11; Linux x86_64) AppleWebKit/536.5 "
        "(KHTML, like Gecko) Chrome/19.0.1084.9 Safari/536.5",
        "Mozilla/5.0 (Windows NT 6.0) AppleWebKit/536.5 "
        "(KHTML, like Gecko) Chrome/19.0.1084.36 Safari/536.5",
        "Mozilla/5.0 (Windows NT 6.1; WOW64) AppleWebKit/536.3 "
        "(KHTML, like Gecko) Chrome/19.0.1063.0 Safari/536.3",
        "Mozilla/5.0 (Windows NT 5.1) AppleWebKit/536.3 "
        "(KHTML, like Gecko) Chrome/19.0.1063.0 Safari/536.3",
        "Mozilla/5.0 (Macintosh; Intel Mac OS X 10_8_0) AppleWebKit/536.3 "
        "(KHTML, like Gecko) Chrome/19.0.1063.0 Safari/536.3",
        "Mozilla/5.0 (Windows NT 6.2) AppleWebKit/536.3 "
        "(KHTML, like Gecko) Chrome/19.0.1062.0 Safari/536.3",
        "Mozilla/5.0 (Windows NT 6.1; WOW64) AppleWebKit/536.3 "
        "(KHTML, like Gecko) Chrome/19.0.1062.0 Safari/536.3",
        "Mozilla/5.0 (Windows NT 6.2) AppleWebKit/536.3 "
        "(KHTML, like Gecko) Chrome/19.0.1061.1 Safari/536.3",
        "Mozilla/5.0 (Windows NT 6.1; WOW64) AppleWebKit/536.3 "
        "(KHTML, like Gecko) Chrome/19.0.1061.1 Safari/536.3",
        "Mozilla/5.0 (Windows NT 6.1) AppleWebKit/536.3 "
        "(KHTML, like Gecko) Chrome/19.0.1061.1 Safari/536.3",
        "Mozilla/5.0 (Windows NT 6.2) AppleWebKit/536.3 "
        "(KHTML, like Gecko) Chrome/19.0.1061.0 Safari/536.3",
        "Mozilla/5.0 (X11; Linux x86_64) AppleWebKit/535.24 "
        "(KHTML, like Gecko) Chrome/19.0.1055.1 Safari/535.24",
        "Mozilla/5.0 (Windows NT 6.2; WOW64) AppleWebKit/535.24 "
        "(KHTML, like Gecko) Chrome/19.0.1055.1 Safari/535.24"
]
3.代理池
- 作用:尽可能多的将scrapy工程中的请求的IP设置成不同的。
- 操作流程:
1.在下载中间件中拦截请求
2.将拦截到的请求的IP修改成某一代理IP
3.在配置文件中开启下载中间件
代码展示:
#批量对拦截到的请求进行ip更换
#单独封装下载中间件类
class Proxy(object):
    def process_request(self, request, spider):
        #对拦截到请求的url进行判断(协议头到底是http还是https)
        #request.url返回值:http://www.xxx.com
        h = request.url.split(':')[0]  #请求的协议头
        if h == 'https':
            ip = random.choice(PROXY_https)
            request.meta['proxy'] = 'https://'+ip
        else:
            ip = random.choice(PROXY_http)
            request.meta['proxy'] = 'http://' + ip

#可被选用的代理IP
PROXY_http = [
    '153.180.102.104:80',
    '195.208.131.189:56055',
]
PROXY_https = [
    '120.83.49.90:9000',
    '95.189.112.214:35508',
]
# -*- coding: utf-8 -*-
import scrapy


class TestSpider(scrapy.Spider):
    name = 'test'
    # allowed_domains = ['www.xxx.com']
    start_urls = ['https://www.baidu.com/s?wd=ip']

    def parse(self, response):
        print(response)
# -*- coding: utf-8 -*-

from scrapy import signals
import random

class MiddleproDownloaderMiddleware(object):
    user_agent_list = [
        "Mozilla/5.0 (Windows NT 6.1; WOW64) AppleWebKit/537.1 "
        "(KHTML, like Gecko) Chrome/22.0.1207.1 Safari/537.1",
        "Mozilla/5.0 (X11; CrOS i686 2268.111.0) AppleWebKit/536.11 "
        "(KHTML, like Gecko) Chrome/20.0.1132.57 Safari/536.11",
        "Mozilla/5.0 (Windows NT 6.1; WOW64) AppleWebKit/536.6 "
        "(KHTML, like Gecko) Chrome/20.0.1092.0 Safari/536.6",
        "Mozilla/5.0 (Windows NT 6.2) AppleWebKit/536.6 "
        "(KHTML, like Gecko) Chrome/20.0.1090.0 Safari/536.6",
        "Mozilla/5.0 (Windows NT 6.2; WOW64) AppleWebKit/537.1 "
        "(KHTML, like Gecko) Chrome/19.77.34.5 Safari/537.1",
        "Mozilla/5.0 (X11; Linux x86_64) AppleWebKit/536.5 "
        "(KHTML, like Gecko) Chrome/19.0.1084.9 Safari/536.5",
        "Mozilla/5.0 (Windows NT 6.0) AppleWebKit/536.5 "
        "(KHTML, like Gecko) Chrome/19.0.1084.36 Safari/536.5",
        "Mozilla/5.0 (Windows NT 6.1; WOW64) AppleWebKit/536.3 "
        "(KHTML, like Gecko) Chrome/19.0.1063.0 Safari/536.3",
        "Mozilla/5.0 (Windows NT 5.1) AppleWebKit/536.3 "
        "(KHTML, like Gecko) Chrome/19.0.1063.0 Safari/536.3",
        "Mozilla/5.0 (Macintosh; Intel Mac OS X 10_8_0) AppleWebKit/536.3 "
        "(KHTML, like Gecko) Chrome/19.0.1063.0 Safari/536.3",
        "Mozilla/5.0 (Windows NT 6.2) AppleWebKit/536.3 "
        "(KHTML, like Gecko) Chrome/19.0.1062.0 Safari/536.3",
        "Mozilla/5.0 (Windows NT 6.1; WOW64) AppleWebKit/536.3 "
        "(KHTML, like Gecko) Chrome/19.0.1062.0 Safari/536.3",
        "Mozilla/5.0 (Windows NT 6.2) AppleWebKit/536.3 "
        "(KHTML, like Gecko) Chrome/19.0.1061.1 Safari/536.3",
        "Mozilla/5.0 (Windows NT 6.1; WOW64) AppleWebKit/536.3 "
        "(KHTML, like Gecko) Chrome/19.0.1061.1 Safari/536.3",
        "Mozilla/5.0 (Windows NT 6.1) AppleWebKit/536.3 "
        "(KHTML, like Gecko) Chrome/19.0.1061.1 Safari/536.3",
        "Mozilla/5.0 (Windows NT 6.2) AppleWebKit/536.3 "
        "(KHTML, like Gecko) Chrome/19.0.1061.0 Safari/536.3",
        "Mozilla/5.0 (X11; Linux x86_64) AppleWebKit/535.24 "
        "(KHTML, like Gecko) Chrome/19.0.1055.1 Safari/535.24",
        "Mozilla/5.0 (Windows NT 6.2; WOW64) AppleWebKit/535.24 "
        "(KHTML, like Gecko) Chrome/19.0.1055.1 Safari/535.24"
    ]
    # 可被选用的代理IP
    PROXY_http = [
        'http://153.180.102.104:80',
        'http://195.208.131.189:56055',
    ]
    PROXY_https = [
        'https://120.83.49.90:9000',
        'https://95.189.112.214:35508',
    ]

   #拦截所有未发生异常的请求
    def process_request(self, request, spider):

        #使用UA池进行请求的UA伪装
        # print('this is process_request')
        request.headers['User-Agent'] = random.choice(self.user_agent_list)
        # print(request.headers['User-Agent'])

        return None

    #拦截所有的响应
    def process_response(self, request, response, spider):

        return response

    #拦截到产生异常的请求
    def process_exception(self, request, exception, spider):

        # 使用代理池进行请求代理ip的设置
        # print('this is process_exception!')
        if request.url.split(':')[0] == 'http':
            request.meta['proxy'] = random.choice(self.PROXY_http)
        else:
            request.meta['proxy'] = random.choice(self.PROXY_https)
        return request
ROBOTSTXT_OBEY = True

DOWNLOADER_MIDDLEWARES = {
   'middlePro.middlewares.MiddleproDownloaderMiddleware': 543,
}

LOG_LEVEL = 'ERROR'
七、scrapy框架中selenium的使用
在通过scrapy框架进行某些网站数据爬取的时候,往往会碰到页面动态数据加载的情况发生,如果直接使用scrapy对其url发请求,是绝对获取不到那部分动态加载出来的数据值。但是通过观察我们会发现,通过浏览器进行url请求发送则会加载出对应的动态加载出的数据。那么如果我们想要在scrapy也获取动态加载出的数据,则必须使用selenium创建浏览器对象,然后通过该浏览器对象进行请求发送,获取动态加载的数据值。
1.案例分析:
- 需求:爬取网易新闻的国内板块下的新闻数据
- 需求分析:当点击国内超链进入国内对应的页面时,会发现当前页面展示的新闻数据是被动态加载出来的,如果直接通过程序对url进行请求,是获取不到动态加载出的新闻数据的。则就需要我们使用selenium实例化一个浏览器对象,在该对象中进行url的请求,获取动态加载的新闻数据。
2.selenium在scrapy中使用的原理分析:
当引擎将国内板块url对应的请求提交给下载器后,下载器进行网页数据的下载,然后将下载到的页面数据,封装到response中,提交给引擎,引擎将response再转交给Spiders。Spiders接收到的response对象中存储的页面数据里是没有动态加载的新闻数据的。要想获取动态加载的新闻数据,则需要在下载中间件中对下载器提交给引擎的response响应对象进行拦截,且对其内部存储的页面数据进行篡改,修改成携带了动态加载出的新闻数据,然后将被篡改的response对象最终交给Spiders进行解析操作。
3.selenium在scrapy中的使用流程:
- 重写爬虫文件的构造方法,在该方法中使用selenium实例化一个浏览器对象(因为浏览器对象只需要被实例化一次)
- 重写爬虫文件的closed(self,spider)方法,在其内部关闭浏览器对象。该方法是在爬虫结束时被调用
- 重写下载中间件的process_response方法,让该方法对响应对象进行拦截,并篡改response中存储的页面数据
- 在配置文件中开启下载中间件
4.代码展示:
- 爬虫文件:
class WangyiSpider(RedisSpider):
    name = 'wangyi'
    #allowed_domains = ['www.xxxx.com']
    start_urls = ['https://news.163.com']
    def __init__(self):
        #实例化一个浏览器对象(实例化一次)
        self.bro = webdriver.Chrome(executable_path='/Users/bobo/Desktop/chromedriver')

    #必须在整个爬虫结束后,关闭浏览器
    def closed(self,spider):
        print('爬虫结束')
        self.bro.quit()
- 中间件文件:
from scrapy.http import HtmlResponse
    #参数介绍:
    #拦截到响应对象(下载器传递给Spider的响应对象)
    #request:响应对象对应的请求对象
    #response:拦截到的响应对象
    #spider:爬虫文件中对应的爬虫类的实例
    def process_response(self, request, response, spider):
        #响应对象中存储页面数据的篡改
        if request.url in['http://news.163.com/domestic/','http://news.163.com/world/','http://news.163.com/air/','http://war.163.com/']:
            spider.bro.get(url=request.url)
            js = 'window.scrollTo(0,document.body.scrollHeight)'
            spider.bro.execute_script(js)
            time.sleep(2)  #一定要给与浏览器一定的缓冲加载数据的时间
            #页面数据就是包含了动态加载出来的新闻数据对应的页面数据
            page_text = spider.bro.page_source
            #篡改响应对象
            return HtmlResponse(url=spider.bro.current_url,body=page_text,encoding='utf-8',request=request)
        else:
            return response
- 配置文件:
DOWNLOADER_MIDDLEWARES = {
    'wangyiPro.middlewares.WangyiproDownloaderMiddleware': 543,

}
八、scrapy框架之CrawlSpider的使用
提问:如果想要通过爬虫程序去爬取”糗百“全站数据新闻数据的话,有几种实现方法?
方法一:基于Scrapy框架中的Spider的递归爬取进行实现(Request模块递归回调parse方法)。
方法二:基于CrawlSpider的自动爬取进行实现(更加简洁和高效)。
1.CrawlSpider简介
CrawlSpider其实是Spider的一个子类,除了继承到Spider的特性和功能外,还派生出了其自己独有的更加强大的特性和功能。其中最显著的功能就是”LinkExtractors链接提取器“。Spider是所有爬虫的基类,其设计原则只是为了爬取start_url列表中网页,而从爬取到的网页中提取出的url进行继续的爬取工作使用CrawlSpider更合适。
2.CrawlSpider的使用
2.1.创建scrapy工程:scrapy startproject projectName
2.2.创建爬虫文件:scrapy genspider -t crawl spiderName www.xxx.com
--此指令对比以前的指令多了 "-t crawl",表示创建的爬虫文件是基于CrawlSpider这个类的,而不再是Spider这个基类。
2.3.观察生成的爬虫文件
# -*- coding: utf-8 -*-
import scrapy
from scrapy.linkextractors import LinkExtractor
from scrapy.spiders import CrawlSpider, Rule


class ChoutidemoSpider(CrawlSpider):
    name = 'choutiDemo'
    #allowed_domains = ['www.chouti.com']
    start_urls = ['http://www.chouti.com/']

    rules = (
        Rule(LinkExtractor(allow=r'Items/'), callback='parse_item', follow=True),
    )

    def parse_item(self, response):
        i = {}
        #i['domain_id'] = response.xpath('//input[@id="sid"]/@value').extract()
        #i['name'] = response.xpath('//div[@id="name"]').extract()
        #i['description'] = response.xpath('//div[@id="description"]').extract()
        return i

  - 2,3行:导入CrawlSpider相关模块

  - 7行:表示该爬虫程序是基于CrawlSpider类的

  - 12,13,14行:表示为提取Link规则

  - 16行:解析方法

  CrawlSpider类和Spider类的最大不同是CrawlSpider多了一个rules属性,其作用是定义”提取动作“。在rules中可以包含一个或多个Rule对象,在Rule对象中包含了LinkExtractor对象。
2.3.1 LinkExtractor:链接提取器。
LinkExtractor(
allow=r'Items/',# 满足括号中“正则表达式”的值会被提取,如果为空,则全部匹配。
deny=xxx, # 满足正则表达式的则不会被提取。
restrict_xpaths=xxx, # 满足xpath表达式的值会被提取
restrict_css=xxx, # 满足css表达式的值会被提取
deny_domains=xxx, # 不会被提取的链接的domains。
)
- 作用:提取response中符合规则的链接。
2.3.2 Rule : 规则解析器。根据链接提取器中提取到的链接,根据指定规则提取解析器链接网页中的内容。
Rule(LinkExtractor(allow=r'Items/'), callback='parse_item', follow=True)
- 参数介绍:
参数1:指定链接提取器
参数2:指定规则解析器解析数据的规则(回调函数)
参数3:是否将链接提取器继续作用到链接提取器提取出的链接网页中。当callback为None,参数3的默认值为true。
2.3.3 rules=( ):指定不同规则解析器。一个Rule对象表示一种提取规则。
2.3.4 CrawlSpider整体爬取流程:
a)爬虫文件首先根据起始url,获取该url的网页内容
b)链接提取器会根据指定提取规则将步骤a中网页内容中的链接进行提取
c)规则解析器会根据指定解析规则将链接提取器中提取到的链接中的网页内容根据指定的规则进行解析
d)将解析数据封装到item中,然后提交给管道进行持久化存储
# -*- coding: utf-8 -*-
import scrapy
from scrapy.linkextractors import LinkExtractor
from scrapy.spiders import CrawlSpider, Rule


class ChoutiSpider(CrawlSpider):
    # name = 'chouti'
    # # allowed_domains = ['www.xxx.com']
    # start_urls = ['https://dig.chouti.com/r/scoff/hot/1']
    #
    # #连接提取器:
    # #allow:表示的就是链接提取器提取连接的规则(正则)
    # link = LinkExtractor(allow=r'/r/scoff/hot/\d+')
    #
    # rules = (
    #     #规则解析器:将链接提取器提取到的连接所对应的页面数据进行指定形式的解析
    #     Rule(link, callback='parse_item', follow=True),
    #     # 让连接提取器继续作用到链接提取器提取到的连接所对应的页面中
    # )
    #
    # def parse_item(self, response):
    #     print(response)

    name = 'qiubai'
    # allowed_domains = ['www.xxx.com']
    start_urls = ['https://www.qiushibaike.com/pic/']

    # 连接提取器:
    # allow:表示的就是链接提取器提取连接的规则(正则)/pic/page/3?s=5172496
    link = LinkExtractor(allow=r'/pic/page/\d+\?s=\d+')
    link1 = LinkExtractor(allow=r'/pic/$')
    # link1 = LinkExtractor(allow=r'')  # 表示匹配页面中所有的链接
    rules = (
        # 规则解析器:将链接提取器提取到的连接所对应的页面数据进行指定形式的解析
        Rule(link, callback='parse_item', follow=True),
        # 让连接提取器继续作用到链接提取器提取到的连接所对应的页面中

        Rule(link1, callback='parse_item', follow=True),
    )

    def parse_item(self, response):
        print(response)
2.4.简单代码实战应用
爬取糗事百科糗图板块的所有页码数据
# -*- coding: utf-8 -*-
import scrapy
from scrapy.linkextractors import LinkExtractor
from scrapy.spiders import CrawlSpider, Rule


class CrawldemoSpider(CrawlSpider):
    name = 'qiubai'
    #allowed_domains = ['www.qiushibaike.com']
    start_urls = ['https://www.qiushibaike.com/pic/']

    #连接提取器:会去起始url响应回来的页面中提取指定的url
    link = LinkExtractor(allow=r'/pic/page/\d+\?') #s=为随机数
    link1 = LinkExtractor(allow=r'/pic/$')#爬取第一页
    #rules元组中存放的是不同的规则解析器(封装好了某种解析规则)
    rules = (
        #规则解析器:可以将连接提取器提取到的所有连接表示的页面进行指定规则(回调函数)的解析
        Rule(link, callback='parse_item', follow=True),
        Rule(link1, callback='parse_item', follow=True),
    )

    def parse_item(self, response):
        print(response)
2.4.1 爬虫文件:
# -*- coding: utf-8 -*-
import scrapy
from scrapy.linkextractors import LinkExtractor
from scrapy.spiders import CrawlSpider, Rule
from qiubaiBycrawl.items import QiubaibycrawlItem
import re
class QiubaitestSpider(CrawlSpider):
    name = 'qiubaiTest'
    #起始url
    start_urls = ['http://www.qiushibaike.com/']

    #定义链接提取器,且指定其提取规则
    page_link = LinkExtractor(allow=r'/8hr/page/\d+/')

    rules = (
        #定义规则解析器,且指定解析规则通过callback回调函数
        Rule(page_link, callback='parse_item', follow=True),
    )

    #自定义规则解析器的解析规则函数
    def parse_item(self, response):
        div_list = response.xpath('//div[@id="content-left"]/div')

        for div in div_list:
            #定义item
            item = QiubaibycrawlItem()
            #根据xpath表达式提取糗百中段子的作者
            item['author'] = div.xpath('./div/a[2]/h2/text()').extract_first().strip('\n')
            #根据xpath表达式提取糗百中段子的内容
            item['content'] = div.xpath('.//div[@class="content"]/span/text()').extract_first().strip('\n')

            yield item #将item提交至管道
2.4.2 item文件:
# -*- coding: utf-8 -*-

# Define here the models for your scraped items
#
# See documentation in:
# https://doc.scrapy.org/en/latest/topics/items.html

import scrapy


class QiubaibycrawlItem(scrapy.Item):
    # define the fields for your item here like:
    # name = scrapy.Field()
    author = scrapy.Field() #作者
    content = scrapy.Field() #内容
2.4.3 管道文件:
# -*- coding: utf-8 -*-

# Define your item pipelines here
#
# Don't forget to add your pipeline to the ITEM_PIPELINES setting
# See: https://doc.scrapy.org/en/latest/topics/item-pipeline.html

class QiubaibycrawlPipeline(object):

    def __init__(self):
        self.fp = None

    def open_spider(self,spider):
        print('开始爬虫')
        self.fp = open('./data.txt','w')

    def process_item(self, item, spider):
        #将爬虫文件提交的item写入文件进行持久化存储
        self.fp.write(item['author']+':'+item['content']+'\n')
        return item

    def close_spider(self,spider):
        print('结束爬虫')
        self.fp.close()
九、基于scrapy-redis两种形式的分布式爬虫
redis分布式部署
- 为什么原生的scrapy不能实现分布式?
    - 调度器不能被共享
    - 管道无法被共享

- scrapy-redis组件的作用是什么?
    - 提供了可以被共享的调度器和管道

- 分布式爬虫实现流程
1.环境安装: pip install scrapy-redis
2.创建工程  scrapy startproject 项目名称
3.创建爬虫文件:RedisCrawlSpider  RedisSpider
    - scrapy genspider -t crawl 爬虫文件名 www.xxx.com
4.对爬虫文件中的相关属性进行修改:
    - 导包:  from scrapy_redis.spiders import RedisCrawlSpider
    - 将当前爬虫文件的父类设置成  RedisCrawlSpider
    - 将起始url列表替换成  redis_key = 'xxx' (xxx表示调度器队列的名称)
5.在配置文件中进行配置:
    5.1- 使用组件中封装好的可以被共享的管道类:
        ITEM_PIPELINES = {
                'scrapy_redis.pipelines.RedisPipeline': 400
            }
    5.2- 配置调度器(使用组件中封装好的可以被共享的调度器)
        # 增加了一个去重容器类的配置, 作用使用Redis的set集合来存储请求的指纹数据, 从而实现请求去重的持久化
        DUPEFILTER_CLASS = "scrapy_redis.dupefilter.RFPDupeFilter"
        # 使用scrapy-redis组件自己的调度器
        SCHEDULER = "scrapy_redis.scheduler.Scheduler"
        # 配置调度器是否要持久化, 也就是当爬虫结束了, 要不要清空Redis中请求队列和去重指纹的set。如果是True, 就表示要持久化存储, 就不清空数据, 否则清空数据(要不要断点续爬,增量式)
        SCHEDULER_PERSIST = True

     5.3- 指定存储数据的redis:
        REDIS_HOST = 'redis服务的ip地址'
        REDIS_PORT = 6379
        REDIS_ENCODING = ‘utf-8’
     REDIS_PARAMS = {‘password’:’123456’}

     5.4- 配置redis数据库的配置文件(redis/redis.windows.conf)
        - 取消保护模式:  protected-mode no
        - bind绑定:   #bind 127.0.0.1

     5.5- 启动redis

6.执行分布式程序(进入到爬虫文件目录后执行)
    scrapy runspider 爬虫文件名.py     # 程序会卡住,listen到redis-cli中的url后才会继续执行

7.向调度器队列中扔入一个起始url:
    在redis-cli中执行:   lpush xxx url   # xxx即redis_key的值,表示调度器队列的名称
分布式爬取抽屉简单示例:
# -*- coding: utf-8 -*-
import scrapy
from scrapy.linkextractors import LinkExtractor
from scrapy.spiders import CrawlSpider, Rule
from scrapy_redis.spiders import RedisCrawlSpider
from redisChoutiPro.items import RedischoutiproItem
class ChoutiSpider(RedisCrawlSpider):
    name = 'chouti'
    # allowed_domains = ['www.xxx.com']
    # start_urls = ['http://www.xxx.com/']
    redis_key = 'chouti'  #调度器队列的名称
    rules = (
        Rule(LinkExtractor(allow=r'/all/hot/recent/\d+'), callback='parse_item', follow=True),
    )

    def parse_item(self, response):
        div_list = response.xpath('//div[@class="item"]')
        for div in div_list:
            title = div.xpath('./div[4]/div[1]/a/text()').extract_first()
            author = div.xpath('./div[4]/div[2]/a[4]/b/text()').extract_first()
            item = RedischoutiproItem()
            item['title'] = title
            item['author'] = author

            yield item
import scrapy


class RedischoutiproItem(scrapy.Item):

    title = scrapy.Field()
    author = scrapy.Field()
BOT_NAME = 'redisChoutiPro'
SPIDER_MODULES = ['redisChoutiPro.spiders']
NEWSPIDER_MODULE = 'redisChoutiPro.spiders'


ROBOTSTXT_OBEY = False
USER_AGENT = 'Mozilla/5.0 (Windows NT 6.1; Win64; x64) AppleWebKit/537.36 (KHTML, like Gecko) Chrome/72.0.3626.119 Safari/537.36'


ITEM_PIPELINES = {
    'scrapy_redis.pipelines.RedisPipeline': 400
}

# 增加了一个去重容器类的配置, 作用使用Redis的set集合来存储请求的指纹数据, 从而实现请求去重的持久化
DUPEFILTER_CLASS = "scrapy_redis.dupefilter.RFPDupeFilter"
# 使用scrapy-redis组件自己的调度器
SCHEDULER = "scrapy_redis.scheduler.Scheduler"
# 配置调度器是否要持久化, 也就是当爬虫结束了, 要不要清空Redis中请求队列和去重指纹的set。如果是True, 就表示要持久化存储, 就不清空数据, 否则清空数据
SCHEDULER_PERSIST = True  #数据指纹

REDIS_HOST = '127.0.0.1'
REDIS_PORT = 6379
REDIS_ENCODING = ‘utf-8’
1.scrapy框架是否可以自己实现分布式?
- 不可以。原因有二。
其一:因为多台机器上部署的scrapy会各自拥有各自的调度器,这样就使得多台机器无法分配start_urls列表中的url。(多台机器无法共享同一个调度器)
其二:多台机器爬取到的数据无法通过同一个管道对数据进行统一的数据持久存储。(多台机器无法共享同一个管道)
2.基于scrapy-redis组件的分布式爬虫
- scrapy-redis组件中为我们封装好了可以被多台机器共享的调度器和管道,我们可以直接使用并实现分布式数据爬取。
- 两种实现方式:
1.基于该组件的RedisSpider类
2.基于该组件的RedisCrawlSpider类
3.分布式实现流程:上述两种不同方式的分布式实现流程是统一的
- 3.1 下载scrapy-redis组件:pip install scrapy-redis
- 3.2 redis配置文件的配置:
- 3.3 修改爬虫文件中的相关代码:
- 将爬虫类的父类修改成基于RedisSpider或者RedisCrawlSpider。注意:如果原始爬虫文件是基于Spider的,则应该将父类修改成RedisSpider,如果原始爬虫文件是基于CrawlSpider的,则应该将其父类修改成RedisCrawlSpider。
- 注释或者删除start_urls列表,且加入redis_key属性,属性值为scrpy-redis组件中调度器队列的名称
- 3.4 在配置文件中进行相关配置,开启使用scrapy-redis组件中封装好的管道
- 3.5 在配置文件中进行相关配置,开启使用scrapy-redis组件中封装好的调度器
-3.6 在配置文件中进行爬虫程序链接redis的配置:
- 3.7 开启redis服务器:redis-server 配置文件
- 3.8 开启redis客户端:redis-cli
- 3.9 运行爬虫文件:scrapy runspider SpiderFile
- 3.10 向调度器队列中扔入一个起始url(在redis客户端中操作):lpush redis_key属性值 起始url
十、增量式爬虫
当我们在浏览相关网页的时候会发现,某些网站定时会在原有网页数据的基础上更新一批数据,例如某电影网站会实时更新一批最近热门的电影。小说网站会根据作者创作的进度实时更新最新的章节数据等等。那么,类似的情景,当我们在爬虫的过程中遇到时,我们是不是需要定时更新程序以便能爬取到网站中最近更新的数据呢?
1.增量式爬虫
- 概念:通过爬虫程序监测某网站数据更新的情况,以便可以爬取到该网站更新出的新数据。
- 如何进行增量式的爬取工作:
- 在发送请求之前判断这个URL是不是之前爬取过
- 在解析内容后判断这部分内容是不是之前爬取过
- 写入存储介质时判断内容是不是已经在介质中存在
- 分析:
不难发现,其实增量爬取的核心是去重, 至于去重的操作在哪个步骤起作用,只能说各有利弊。在我看来,前两种思路需要根据实际情况取一个(也可能都用)。第一种思路适合不断有新页面出现的网站,比如说小说的新章节,每天的最新新闻等等;第二种思路则适合页面内容会更新的网站。第三个思路是相当于是最后的一道防线。这样做可以最大程度上达到去重的目的。
- 分析:
- 去重方法
- 将爬取过程中产生的url进行存储,存储在redis的set中。当下次进行数据爬取时,首先对即将要发起的请求对应的url在存储的url的set中做判断,如果存在则不进行请求,否则才进行请求。
- 对爬取到的网页内容进行唯一标识的制定,然后将该唯一表示存储至redis的set中。当下次爬取到网页数据的时候,在进行持久化存储之前,首先可以先判断该数据的唯一标识在redis的set中是否存在,在决定是否进行持久化存储。
2.项目案例
- 需求:爬取4567tv网站中所有的电影详情数据。
# -*- coding: utf-8 -*-
import scrapy
from scrapy.linkextractors import LinkExtractor
from scrapy.spiders import CrawlSpider, Rule

from redis import Redis
from incrementPro.items import IncrementproItem
class MovieSpider(CrawlSpider):
    name = 'movie'
    # allowed_domains = ['www.xxx.com']
    start_urls = ['http://www.4567tv.tv/frim/index7-11.html']

    rules = (
        Rule(LinkExtractor(allow=r'/frim/index7-\d+\.html'), callback='parse_item', follow=True),
    )
    #创建redis链接对象
    conn = Redis(host='127.0.0.1',port=6379)
    def parse_item(self, response):
        li_list = response.xpath('//li[@class="p1 m1"]')
        for li in li_list:
            #获取详情页的url
            detail_url = 'http://www.4567tv.tv'+li.xpath('./a/@href').extract_first()
            #将详情页的url存入redis的set中
            ex = self.conn.sadd('urls',detail_url)
            if ex == 1:
                print('该url没有被爬取过,可以进行数据的爬取')
                yield scrapy.Request(url=detail_url,callback=self.parst_detail)
            else:
                print('数据还没有更新,暂无新数据可爬取!')

    #解析详情页中的电影名称和类型,进行持久化存储
    def parst_detail(self,response):
        item = IncrementproItem()
        item['name'] = response.xpath('//dt[@class="name"]/text()').extract_first()
        item['kind'] = response.xpath('//div[@class="ct-c"]/dl/dt[4]//text()').extract()
        item['kind'] = ''.join(item['kind'])
        yield item
# -*- coding: utf-8 -*-

# Define your item pipelines here
#
# Don't forget to add your pipeline to the ITEM_PIPELINES setting
# See: https://doc.scrapy.org/en/latest/topics/item-pipeline.html

from redis import Redis
class IncrementproPipeline(object):
    conn = None
    def open_spider(self,spider):
        self.conn = Redis(host='127.0.0.1',port=6379)
    def process_item(self, item, spider):
        dic = {
            'name':item['name'],
            'kind':item['kind']
        }
        print(dic)
        self.conn.lpush('movieData',dic)
        return item
- 需求:爬取糗事百科中的段子和作者数据。
# -*- coding: utf-8 -*-
import scrapy
from scrapy.linkextractors import LinkExtractor
from scrapy.spiders import CrawlSpider, Rule
from incrementByDataPro.items import IncrementbydataproItem
from redis import Redis
import hashlib
class QiubaiSpider(CrawlSpider):
    name = 'qiubai'
    # allowed_domains = ['www.xxx.com']
    start_urls = ['https://www.qiushibaike.com/text/']

    rules = (
        Rule(LinkExtractor(allow=r'/text/page/\d+/'), callback='parse_item', follow=True),
        Rule(LinkExtractor(allow=r'/text/$'), callback='parse_item', follow=True),
    )
    #创建redis链接对象
    conn = Redis(host='127.0.0.1',port=6379)
    def parse_item(self, response):
        div_list = response.xpath('//div[@id="content-left"]/div')

        for div in div_list:
            item = IncrementbydataproItem()
            item['author'] = div.xpath('./div[1]/a[2]/h2/text() | ./div[1]/span[2]/h2/text()').extract_first()
            item['content'] = div.xpath('.//div[@class="content"]/span/text()').extract_first()

            #将解析到的数据值生成一个唯一的标识进行redis存储
            source = item['author']+item['content']
            source_id = hashlib.sha256(source.encode()).hexdigest()
            #将解析内容的唯一表示存储到redis的data_id中
            ex = self.conn.sadd('data_id',source_id)

            if ex == 1:
                print('该条数据没有爬取过,可以爬取......')
                yield item
            else:
                print('该条数据已经爬取过了,不需要再次爬取了!!!')
# -*- coding: utf-8 -*-

# Define your item pipelines here
#
# Don't forget to add your pipeline to the ITEM_PIPELINES setting
# See: https://doc.scrapy.org/en/latest/topics/item-pipeline.html

from redis import Redis
class IncrementbydataproPipeline(object):
    conn = None

    def open_spider(self, spider):
        self.conn = Redis(host='127.0.0.1', port=6379)

    def process_item(self, item, spider):
        dic = {
            'author': item['author'],
            'content': item['content']
        }
        # print(dic)
        self.conn.lpush('qiubaiData', dic)
        return item

 浙公网安备 33010602011771号