springboot启动流程(三)Environment简介
所有文章
https://www.cnblogs.com/lay2017/p/11478237.html
简介
上一篇文章中,我们简单了解了一下SpringApplication的run方法的代码逻辑。其中的prepareEnvironment方法正如它的方法名表示的意思一样,为当前应用准备一个Environment对象,也就是运行环境。在阅读prepareEnvironment代码之前,我们先了解一下Environment。
组成
首先,Environment是Spring3.1才提供的一个接口。它是对当前运行的应用程序的环境的抽象,下面我们了解一下它的组成。
Environment由两部分组成
1)profiles
profile中文直译是"概述"、"简介"、"轮廓"的意思,但在使用spring开发应用程序的时候,我们对profile的认识更亲切的是用在划分多环境的时候。
通常,我们会将profile划分成如:开发、测试、预生产、生产环境。每个环境会有有些bean不同、配置不同等。每个profile将有相应的bean和配置与之匹配,那么当我们切换profile的时候自然也就切换了相应的bean和配置文件,从而达到在不同环境中快速切换避免不断修改的问题。
这也就是spring的java doc里面描述的"logical group"的意思。
2)properties
properties的概念想必我们已经非常熟悉了,在java中properties代表着key-value的键值对象集合。Environment内部设计了key-value结构的对象来存储相应的键值。
综上所述,Environment中包含着用于切换环境的profile,还包含着存储键值对的properties。
核心uml类图
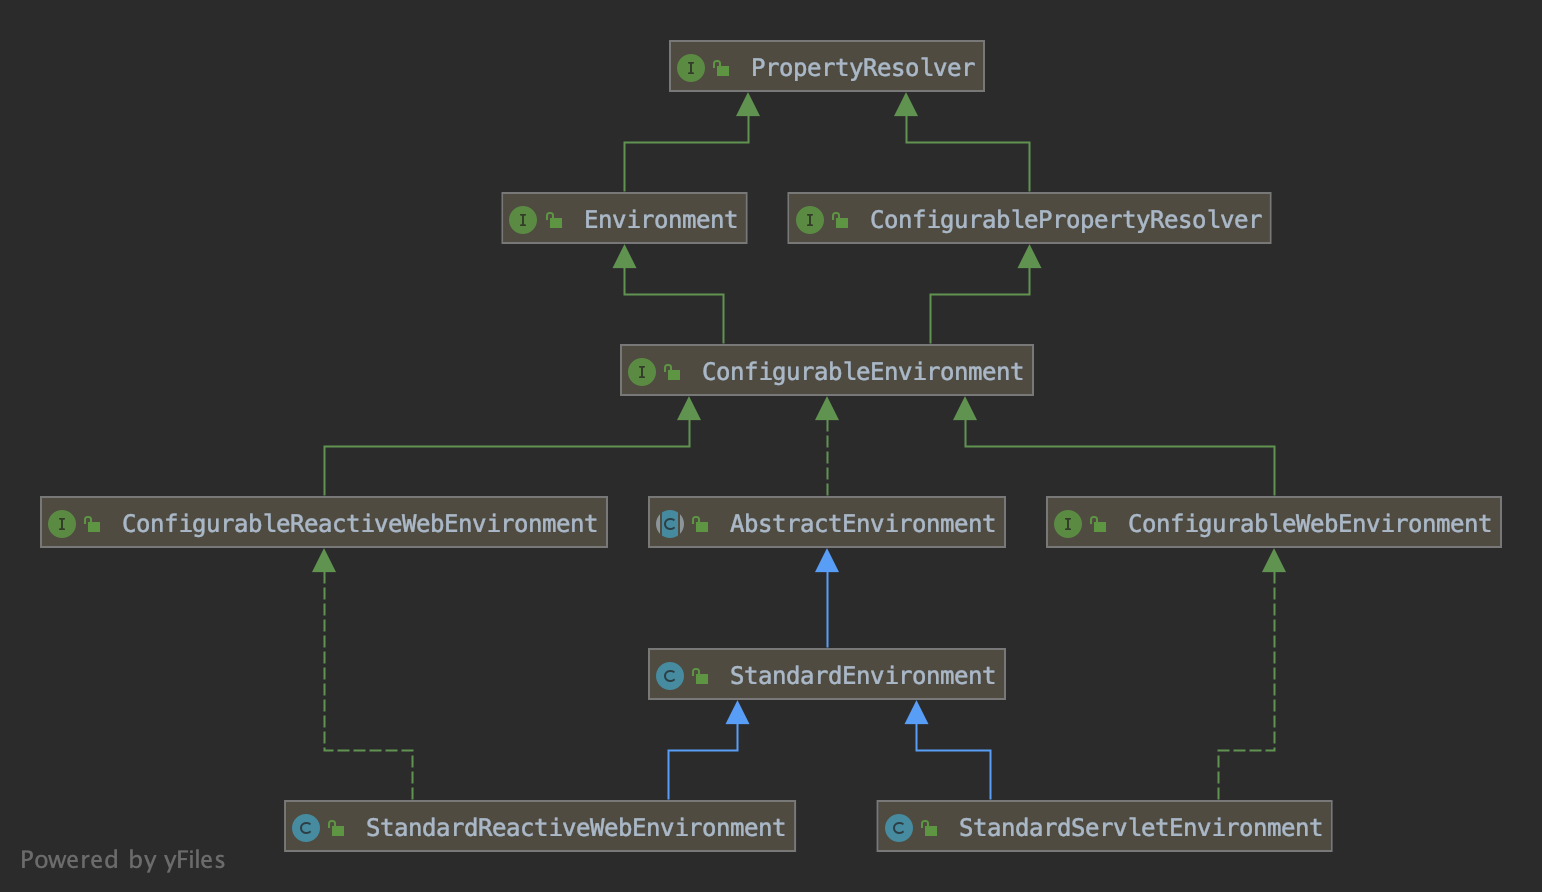
上面的内容中,我们了解了Environment的组成部分包括profile和properties。spring在对Environment进行设计的时候也把这两个部分进行了隔离。
如上图所示,PropertyResolver包含了properties相关的操作,如:getProperty(String key),Environment继承于PropertyResolver同时也就将properties的相关能力给组合了进来。
Environment的则包含了profile的相关操作,如:getActiveProfiles()。
如果查看PropertyResolver和Environment接口的方法,我们就会发现这两个接口都只是包含了如getter方法的获取操作,并没有setter样子的操作。这或许也意味着spring希望在程序的开发运行过程中,Environment尽量是维持稳定的,而不是不断地被修改、变化。
那么在程序启动过程中势必要对Environment进行配置,因此我们会看到多个继承自Environment和PropertyResolver接口地子接口,如:ConfigurableEnvironment和ConfigurablePropertyResolver。
再往下看,AbstractEnvironment显然包含了Environment设计地大部分实现,而从StandardEnvironment再往下走了两个分支,也就是针对reactive和Servlet的Environment实现。
到这里,我们基本了解了Environment主要的相关接口设计,设计路线也比较简单。
profile和properties的数据结构
前面的两个部分,我们了解了Environment包含profile和properties。也知道了Environment相关接口也主要是根据profile和properties来设计的。但是我们并不知道具体的实现里面profile和properties的数据结构是怎么样的。
从uml类图中,我们清晰地看到Environment的具体实现是在AbstractEnvironment这个抽象类中。我们可以直接打开这个类
profile数据结构
AbstractEnvironment类中包含着profile的成员变量
private final Set<String> activeProfiles = new LinkedHashSet<>();

private final Set<String> defaultProfiles = new LinkedHashSet<>(getReservedDefaultProfiles());
profile的存储结构看起来相对简单,就是两个set集合,每个profile就是单纯的一个String类型的字符串表示而已。
activeProfiles表示的是当前应用中"激活"的profile集合,比如我当profile=test的时候表示当前环境是测试环境。
而defaultProfiles则表示的是默认的profile集合,也就是说如果没有任何指定的profile,那么就会采用默认的。
properties数据结构
我们再看看AbstractEnvironment中properties的数据结构
private final MutablePropertySources propertySources = new MutablePropertySources();
前面我们一直提到,properties是一种key-value的键值对存储的集合。那么也就是说MutablePropertySources这个类实现了这个概念。
我们先看看MutablePropertySources的继承结构是怎么样的
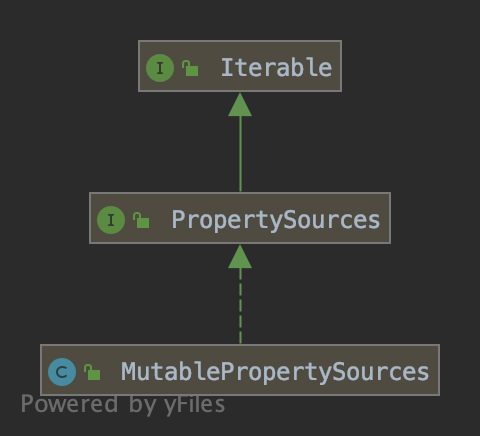
看起来很简单的设计路线,Iterable接口表明MutablePropertySources像集合一样是可以迭代的,我们可以大胆猜测其内部就是组成了一个集合。Iterable往下,就是PropertySources,这个接口表示的是PropertySource类的集合,也就是说被迭代的元素就是PropertySource。MutablePropertySources则直接继承于PropertySources。
那么,我们基本可以想得到PropertySource这个类就是properties概念得设计,是我们主要得关注对象。
现在让我们打开MutablePropertySources看看PropertySource的具体结构
public class MutablePropertySources implements PropertySources {

    private final List<PropertySource<?>> propertySourceList = new CopyOnWriteArrayList<>();

    // 省略
}
跟我们想象得差不多,就是一个PropertySource类的集合作为成员组合在MutablePropertySources中。
我们继续跟进PropertySource这个类,更多得了解一下
public abstract class PropertySource<T> {

    protected final String name;

    protected final T source;

    // 省略
}
看起来就是一个key-value的数据结构是吗?这里请注意!跟我们想象的稍微有点不同,举例说明
我们创建了一个config.properties文件,内容如
username=test
password=a123456
那么当config.properties这个文件被加载到内存中,并作为一个PropertySource存在的时候,name=config而非name=username或者password。也就是说,加载config.properties这样的资源,泛型T将会是一个Map集合,而Map集合包含着config.properties文件中所有的键值对。
另外,我们注意到PropertySource是一个抽象类。spring将会针对资源的不同来源而使用不同的实现,例如上例中的config.properties加载到内存作为Properties对象添加的,就是PropertySource的其中一个实现类PropertiesPropertySource。
还有诸如
1)来自命令行的配置:CommandLinePropertySource
2) 来自Servlet的配置:ServletConfigPropertySource、ServletContextPropertySource
等
下面是一张PropertySource的层级图

prepareEnvironment创建Environment
上部分的内容包括了不少介绍的内容,下面我们简单看看SpringApplication的run方法中包含的prepareEnvironment方法,跟进方法
private ConfigurableEnvironment prepareEnvironment(
        SpringApplicationRunListeners listeners,
        ApplicationArguments applicationArguments
        ) {
    // 创建一个Environment对象
    ConfigurableEnvironment environment = getOrCreateEnvironment();
    // 配置Environment对象
    configureEnvironment(environment, applicationArguments.getSourceArgs());
    // 触发监听器(主要是触发ConfigFileApplicationListener,这个监听器将会加载如application.properties/yml这样的配置文件)
    listeners.environmentPrepared(environment);
    bindToSpringApplication(environment);
    if (!this.isCustomEnvironment) {
        environment = new EnvironmentConverter(getClassLoader()).convertEnvironmentIfNecessary(environment,
                deduceEnvironmentClass());
    }
    ConfigurationPropertySources.attach(environment);
    return environment;
}
该方法核心内容包括三部分
1)创建一个Environment对象
2)配置Environment对象
3)触发ConfigFileApplicationListener监听器(加载application.properties/yml将再后续文章中说明)
getOrCreateEnvironment
我们跟进getOrCreateEnvironment方法看看创建过程
private ConfigurableEnvironment getOrCreateEnvironment() {
    if (this.environment != null) {
        return this.environment;
    }
    switch (this.webApplicationType) {
    case SERVLET:
        return new StandardServletEnvironment();
    case REACTIVE:
        return new StandardReactiveWebEnvironment();
    default:
        return new StandardEnvironment();
    }
}
在第一篇文章中,我们提到SpringApplication在deduceFromClassPath方法中会推断出WebApplicationType具体的枚举实例,代表了当前应用的类型。
getOrCreateEnvironment方法中根据WebApplicationType类型选择具体的Environment类型,也就是我们提到过的Servlet类型、Reative类型或者非Web应用类型。
configureEnvironment
protected void configureEnvironment(ConfigurableEnvironment environment, String[] args) {
    if (this.addConversionService) {
        ConversionService conversionService = ApplicationConversionService.getSharedInstance();
        environment.setConversionService((ConfigurableConversionService) conversionService);
    }
    // 添加初始的properties(注意:当前并未加载如application.properties/yml的properties)
    configurePropertySources(environment, args);
    // 添加初始的profile(注意:当前并未加载如application.properties/yml配置profile)
    configureProfiles(environment, args);
}
总结
本文,我们大体地讲解了Environment的接口设计、profile和properties的数据结构设计。再从prepareEnvironment方法中看到了Environment是根据webApplicationType匹配后创建的。到这里,Environment相关的内容简单介绍就结束了,我们也初步地为spring地Context创建了一个Environment的对象。

 浙公网安备 33010602011771号