构建第一个Netty应用:Echo服务器与客户端
1. 构建第一个Netty应用:Echo服务器与客户端
1.1. 简单的 Echo 服务器
这里,我们直接使用Netty作为独立的进程启动
1.1.1. Netty 依赖
maven依赖如下:
<dependency>
  <groupId>io.netty</groupId>
  <artifactId>netty-all</artifactId>
  <version>4.2.7.Final</version>
</dependency>
1.1.2. Netty Server
这里我们直接通过Netty监听8080端口,作为服务端启动:
- EchoServer.java
import com.huawei.athena.netty.handler.EchoServerHandler;
import io.netty.bootstrap.ServerBootstrap;
import io.netty.channel.ChannelFuture;
import io.netty.channel.ChannelInitializer;
import io.netty.channel.ChannelOption;
import io.netty.channel.EventLoopGroup;
import io.netty.channel.nio.NioEventLoopGroup;
import io.netty.channel.socket.SocketChannel;
import io.netty.channel.socket.nio.NioServerSocketChannel;
import io.netty.handler.logging.LogLevel;
import io.netty.handler.logging.LoggingHandler;
import lombok.extern.slf4j.Slf4j;

import java.util.concurrent.atomic.AtomicBoolean;

@Slf4j
public class EchoServer {
    private final int port = 8080;
    private EventLoopGroup bossGroup;
    private EventLoopGroup workerGroup;
    private ChannelFuture serverChannelFuture;
    private final AtomicBoolean running = new AtomicBoolean(false);

    public void start() {
        if (!running.compareAndSet(false, true)) {
            log.info("the server is running");
            return;
        }
        // 创建事件循环组
        bossGroup = new NioEventLoopGroup();  // 用于接受连接
        workerGroup = new NioEventLoopGroup(); // 用于处理连接

        try {
            ServerBootstrap b = new ServerBootstrap();
            b.group(bossGroup, workerGroup)
                    .channel(NioServerSocketChannel.class) // 使用NIO传输通道
                    .option(ChannelOption.SO_BACKLOG, 100)
                    .handler(new LoggingHandler(LogLevel.INFO))
                    .childHandler(new ChannelInitializer<SocketChannel>() {
                        @Override
                        public void initChannel(SocketChannel ch) {
                            ch.pipeline().addLast(new EchoServerHandler());
                        }
                    })
                    .option(ChannelOption.SO_BACKLOG, 128)          // 服务器套接字选项
                    .childOption(ChannelOption.SO_KEEPALIVE, true); // 客户端套接字选项

            // 绑定端口并开始接收连接
            serverChannelFuture = b.bind(port).sync();
            log.info("Echo服务器启动,监听端口: {}", port);

            // 等待服务器套接字关闭
        } catch (InterruptedException e) {
            log.error("can't start the netty server, ", e);
            stop();
        }
    }

    public void stop() {
        if (!running.compareAndSet(true, false)) {
            log.info("the server is running");
            return;
        }
        log.info("Shutting down Echo server...");
        // 先关闭服务器通道
        if (serverChannelFuture != null) {
            serverChannelFuture.channel().close().awaitUninterruptibly();
        }

        // 优雅关闭EventLoopGroup
        if (workerGroup != null) {
            workerGroup.shutdownGracefully();
        }
        if (bossGroup != null) {
            bossGroup.shutdownGracefully();
        }

        log.info("Echo server shutdown complete");
    }
}
1.1.3. 服务端回显处理
这里,我们实现了一个简单的业务逻辑,即收到客户端的数据后,不做任何处理,直接原样发送给客户端:
import io.netty.channel.ChannelHandler.Sharable;
import io.netty.channel.ChannelHandlerContext;
import io.netty.channel.ChannelInboundHandlerAdapter;

@Sharable
public class EchoServerHandler extends ChannelInboundHandlerAdapter {

    @Override
    public void channelRead(ChannelHandlerContext ctx, Object msg) {
        ctx.write(msg);
    }

    @Override
    public void channelReadComplete(ChannelHandlerContext ctx) {
        ctx.flush();
    }

    @Override
    public void exceptionCaught(ChannelHandlerContext ctx, Throwable cause) {
        cause.printStackTrace();
        ctx.close();
    }
}
1.1.4. 主程序
public class NettyApp {
    public static void main(String [] args) {
        new EchoServer().start();
    }
}
1.1.5. 验证
服务端启动进程NettyApp后,我们可以通过telnet命令与服务器交互:
telnet localhost 8008
如果一切正常,当你启动服务器后,在控制台上输入字符后,你应该能看到它原样的输出,类似如下打印:
12233445566778899
1.2. 简单的 Echo 客户端
1.2.1. Echo 客户端
这里我们为了介绍Netty的客户端的编程方式,我们使用Netty来构建一个Echo客户端应用程序,其代码如下:
import io.netty.bootstrap.Bootstrap;
import io.netty.channel.*;
import io.netty.channel.nio.NioEventLoopGroup;
import io.netty.channel.socket.SocketChannel;
import io.netty.channel.socket.nio.NioSocketChannel;
import io.netty.handler.codec.string.StringDecoder;
import io.netty.handler.codec.string.StringEncoder;
import io.netty.util.CharsetUtil;

import java.io.BufferedReader;
import java.io.InputStreamReader;

public class EchoClient {
    private final String host;
    private final int port;

    public EchoClient(String host, int port) {
        this.host = host;
        this.port = port;
    }

    public void start() throws Exception {
        EventLoopGroup group = new NioEventLoopGroup();

        try {
            Bootstrap bootstrap = new Bootstrap();
            bootstrap.group(group)
                    .channel(NioSocketChannel.class)
                    .handler(new ChannelInitializer<SocketChannel>() {
                        @Override
                        protected void initChannel(SocketChannel ch) throws Exception {
                            ChannelPipeline pipeline = ch.pipeline();
                            pipeline.addLast(new StringDecoder(CharsetUtil.UTF_8));
                            pipeline.addLast(new StringEncoder(CharsetUtil.UTF_8));
                            pipeline.addLast(new EchoClientHandler());
                        }
                    })
                    .option(ChannelOption.TCP_NODELAY, true);

            // 连接服务器
            ChannelFuture future = bootstrap.connect(host, port).sync();
            System.out.println("连接到Echo服务器 " + host + ":" + port);

            // 从控制台读取输入
            Channel channel = future.channel();
            BufferedReader reader = new BufferedReader(new InputStreamReader(System.in));

            while (true) {
                String input = reader.readLine();
                if (input == null || "quit".equalsIgnoreCase(input)) {
                    break;
                }
                channel.writeAndFlush(input);
            }

            // 等待连接关闭
            channel.closeFuture().sync();
        } finally {
            group.shutdownGracefully();
        }
    }

    // 客户端处理器
    private static class EchoClientHandler extends ChannelInboundHandlerAdapter {

        @Override
        public void channelRead(ChannelHandlerContext ctx, Object msg) throws Exception {
            String message = (String) msg;
            System.out.println("服务器响应: " + message);
        }

        @Override
        public void exceptionCaught(ChannelHandlerContext ctx, Throwable cause) throws Exception {
            cause.printStackTrace();
            ctx.close();
        }

        @Override
        public void channelActive(ChannelHandlerContext ctx) throws Exception {
            System.out.println("已连接到服务器");
        }

        @Override
        public void channelInactive(ChannelHandlerContext ctx) throws Exception {
            System.out.println("与服务器断开连接");
        }
    }

    public static void main(String[] args) throws Exception {
        String host = "localhost";
        int port = 8080;

        if (args.length > 0) {
            host = args[0];
        }
        if (args.length > 1) {
            port = Integer.parseInt(args[1]);
        }

        new EchoClient(host, port).start();
    }
}
1.2.2. 验证方式
为了测试服务器和客户端,测试步骤如下:
-
先启动Echo服务器;
-
再启动Echo客户端;
-
等待客户端启动后,在客户端控制台上输入任意字符串;
客户端会接收控制台输入,并将客户端控制台的输入字符串发送到服务器,服务器接收到后,再原样发送回客户端。
程序运行的示例如下:
已连接到服务器
连接到Echo服务器 localhost:8080
123
服务器响应: 123
321
服务器响应: 321
2. 程序架构
2.1. 架构原理
整体的架构原理如下:
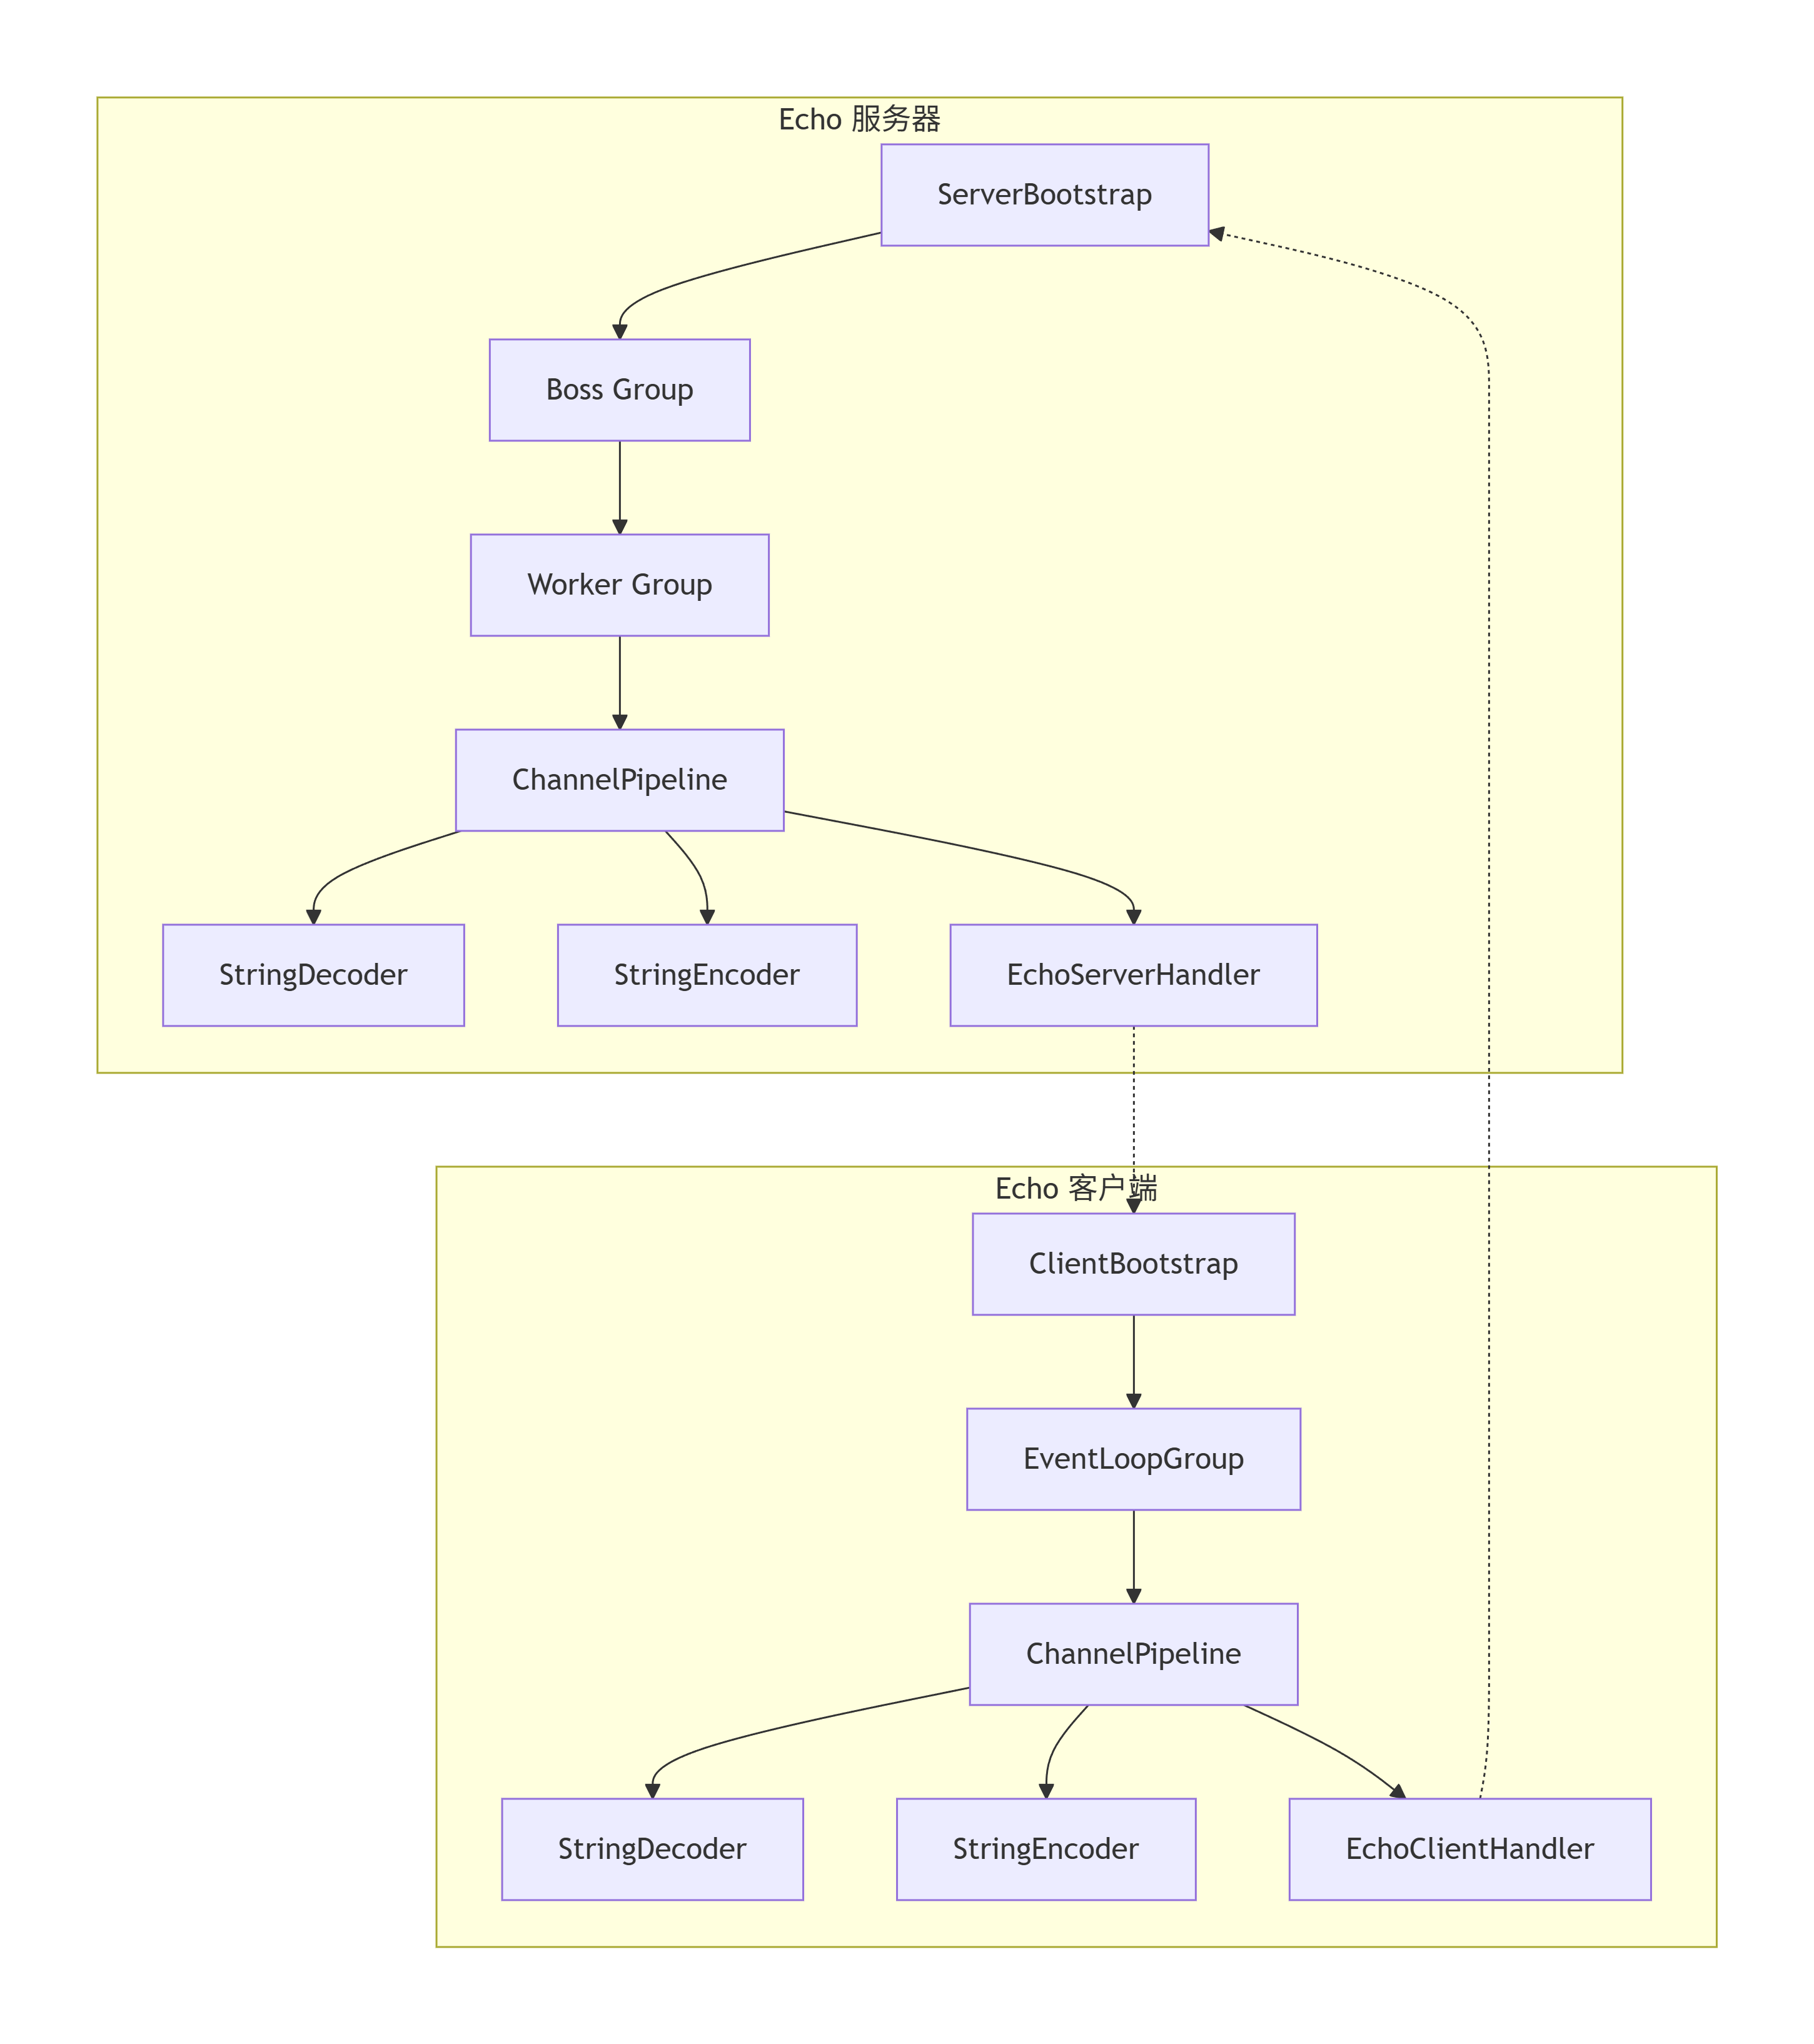
图中的虚线代表数据流的走向。
这里我们简单介绍一下服务器和客户端的核心组件:
-
服务器端组件:
-
ServerBootstrap: 服务器启动引导类
-
Boss Group: 接受客户端连接(1个线程)
-
Worker Group: 处理网络I/O(多个线程)
-
ChannelPipeline: 处理器链
-
ChannelHandler: 业务逻辑处理器
-
-
客户端组件:
-
Bootstrap: 客户端启动引导类
-
EventLoopGroup: 处理所有I/O操作
-
ChannelPipeline: 与服务器相同的处理器链结构
-
这里我们就不详细展开了,后面的章节,会深入地介绍这些核心组件。
2.2. 通信时序
这个简单的Echo示例的交互时序如下:
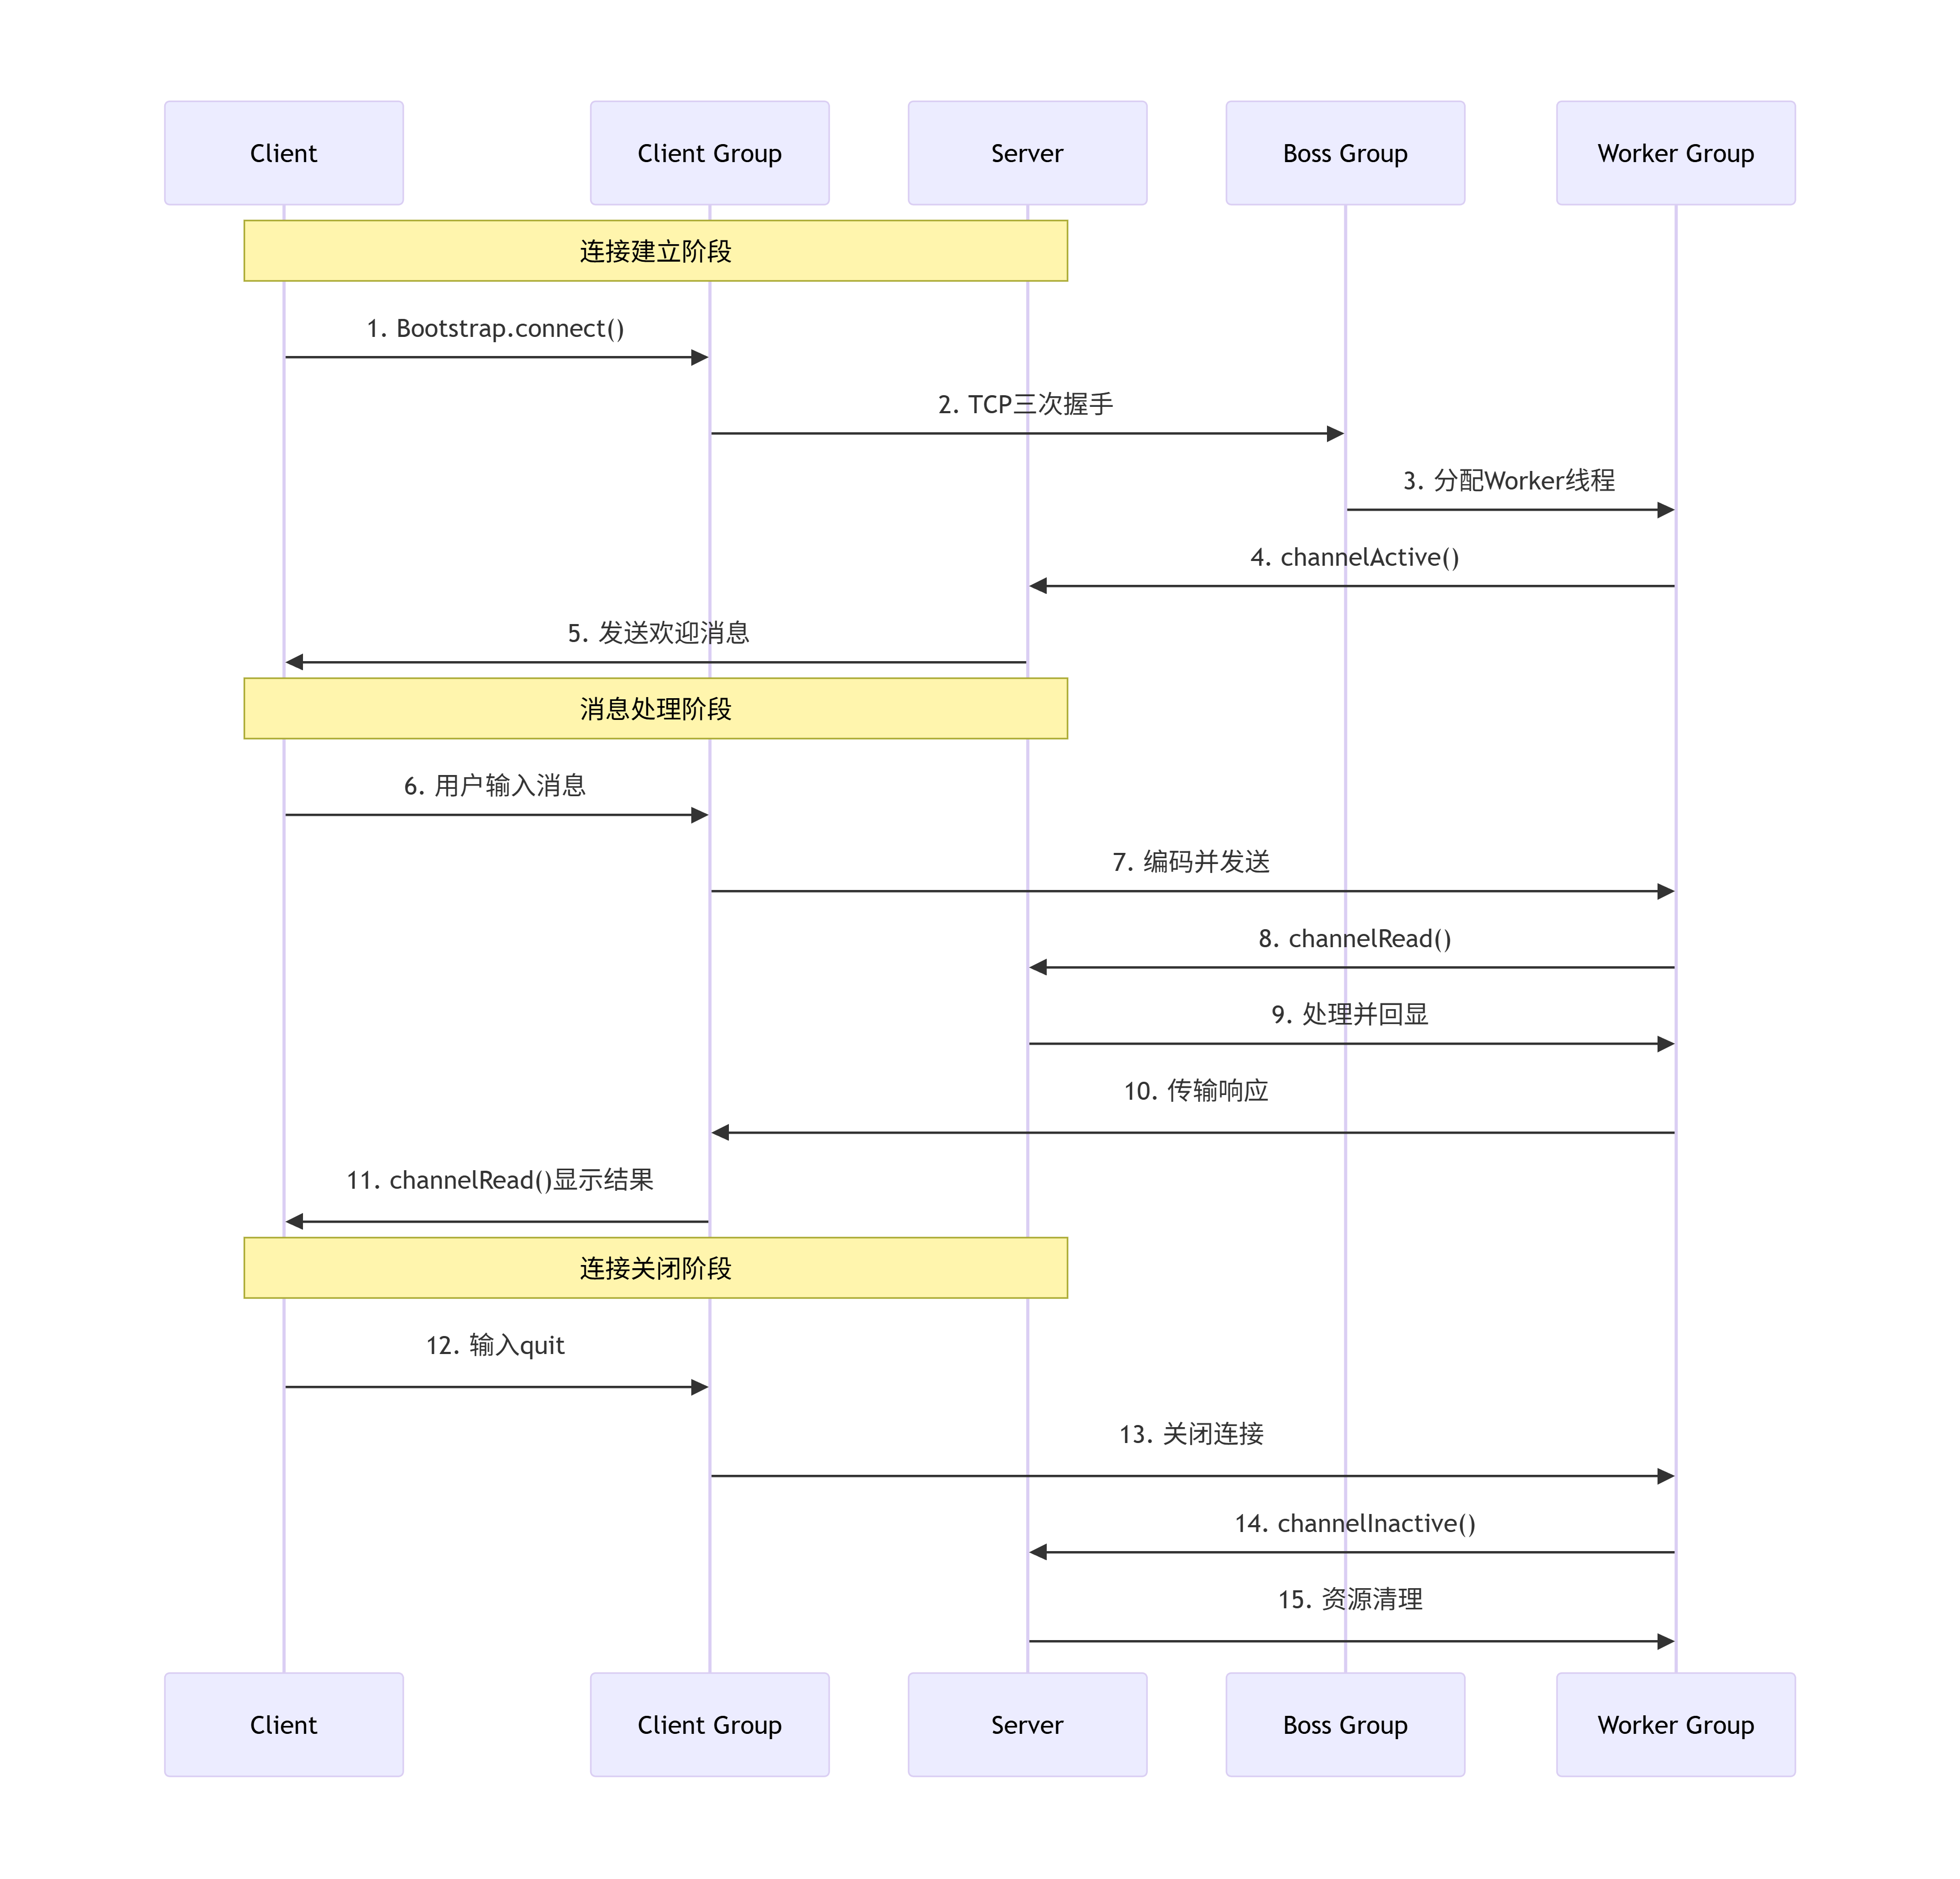
这里,我们只需要知道,服务器启动后,当客户端运行后,就会立即与服务器建立一个TCP的长连接,后续的消息发送都在这条长连接上进行,服务端由EchoServerHandler处理客户端的网络数据(原样返回客户端的消息),这样,我们就在客户端能接收到服务器的回显内容了。
这里,需要注意的是,每一个新的TCP连接建立后,Netty都会重新创建一个新的 Channel Pipeline 用于处理网络数据。
3. 总结
这个示例简单展示了 Netty 基于事件驱动和 Reactor 模式的高性能网络编程原理,通过清晰的组件分离和流水线处理机制,实现了高效可靠的网络通信。

 浙公网安备 33010602011771号