RocketMq单机节点安装
1、下载
下载地址:http://rocketmq.apache.org/release_notes/
执行命令:
wget http://mirrors.tuna.tsinghua.edu.cn/apache/rocketmq/4.6.0/rocketmq-all-4.6.0-bin-release.zip
unzip  rocketmq-all-4.6.0-bin-release.zip
2、创建RocketMQ存储文件的目录,执行如下命令:
#存储RocketMQ数据文件目录
mkdir /usr/local/rocketmq/store
#存储RocketMQ消息信息
mkdir /usr/local/rocketmq/store/commitlog
#存储消息的队列数据
mkdir /usr/local/rocketmq/store/consumequeue
#存储消息的索引数据
mkdir /usr/local/rocketmq/store/index
#存储RocketMQ日志目录
mkdir /usr/local/rocketmq/logs
3. RocketMQ配置文件
vim /usr/local/rocketmq/rocketmq-4.6.0/conf/broker.conf
# Licensed to the Apache Software Foundation (ASF) under one or more
# contributor license agreements.  See the NOTICE file distributed with
# this work for additional information regarding copyright ownership.
# The ASF licenses this file to You under the Apache License, Version 2.0
# (the "License"); you may not use this file except in compliance with
# the License.  You may obtain a copy of the License at
#
#     http://www.apache.org/licenses/LICENSE-2.0
#
#  Unless required by applicable law or agreed to in writing, software
#  distributed under the License is distributed on an "AS IS" BASIS,
#  WITHOUT WARRANTIES OR CONDITIONS OF ANY KIND, either express or implied.
#  See the License for the specific language governing permissions and
#  limitations under the License.

# 所属集群名字
brokerClusterName = rocketmq-cluster
# broker名字
brokerName = broker-a
# 0 表示 master, > 0 表示slave
brokerId = 0


# nameServer地址.多个分号分割
namesrvAddr=127.0.0.1:9876
# 在发送消息时,自动创建服务器不存在的topic,默认创建的队列数
defaultTopicQueueNums=16
# 是否允许 broker 自动创建topic,建议线下开启,线上关闭
autoCreateTopicEnable=true
# 是否允许 broker 自动创建订阅组,建议线下开启,线上关闭
autoCreateSubscriptionGroup=true
# broker 对外服务的监听端口
listenPort=10911
brokerIP1=127.0.0.1

# 删除文件时间点, 默认为凌晨 4点
deleteWhen=04
# 文件保留时间, 默认72小时
fileReservedTime=72

# commitLog每个文件的大小默认1G
mapedFileSizeCommitLog=1073741824
# ConsumeQueue每个文件默认存30W条,根据业务情况调整
mapedFileSizeConsumeQueue=300000
# destroyMapedFileIntervalForcibly=120000
# redeleteHangedFileInterval=120000
# 检测物理文件磁盘空间
diskMaxUsedSpaceRatio=88


# 存储路径
storePathRootDir=/usr/local/rocketmq/store
# commitLog 存储路径
storePathCommitLog=/usr/local/rocketmq/store/commitlog
# 消费队列存储路径存储路径
storePathConsumeQueue=/usr/local/rocketmq/store/consumequeue
# 消息索引存储路径
storePathIndex=/usr/local/rocketmq/store/index
# checkpoint 文件存储路径
storeCheckpoint=/usr/local/rocketmq/store/checkpoint
# abort 文件存储路径
abortFile=/usr/local/rocketmq/store/abort
# 限制的消息大小
maxMessageSize=65536


#flushCommitLogLeastPages=4
#flushConsumeQueueLeastPages=2
#flushCommitLogThoroughInterval=10000
#flushConsumeQueueThoroughInterval=60000


# Broker 的角色
# - ASYNC_MASTER  异步复制Master
# - SYNC_MASTER  同步双写Master
# - SLAVE
brokerRole=ASYNC_MASTER
# 刷盘方式
# - ASYNC_FLUSH  异步刷盘
# - SYNC_FLUSH  同步刷盘
flushDiskType=ASYNC_FLUSH

#checkTransactionMessageEnable=false
# 发消息线程池数量
#sendMessageThreadPoolNums=128
# 拉消息线程池数量
#pullMessageThreadPoolNums=128
4、进入conf目录,替换所有xml中的${user.home},保证日志路径正确
sed -i 's#${user.home}#/usr/local/rocketmq#g' *.xml
注意:sed -i在这里起一个批量替换的作用
sed -i 's#原字符串#新字符#g' 替换的文件
5. 修改启动脚本参数(根据实际情况来调)
vim  /usr/local/rocketmq/rocketmq-4.6.0/bin/runbroker.sh
JAVA_OPT="${JAVA_OPT} -server -Xms512m -Xmx512m -Xmn256m"

vim  /usr/local/rocketmq/rocketmq-4.6.0/bin/runserver.sh
JAVA_OPT="${JAVA_OPT} -server -Xms512m -Xmx512m -Xmn256m XX:PermSize=128m -XX:MaxPermSize=320m"
6、启动
先启动namesrv
nohup sh mqnamesrv &
再启动broker
nohup sh mqbroker -c /usr/local/rocketmq/rocketmq-4.6.0/conf/broker.conf &
7、jps查看是否启动成功

8、关闭
sh mqshutdown namesrv

sh mqshutdown broker
9、RocketMQ监控平台部署
1、下载
https://github.com/apache/rocketmq-externals
2、解压,修改配置
首先解压并进入解压后rockemq-externals-master目录rocketmq-externals-master/rocketmq-externals-master/rocketmq-console/src/main/resources,修改目录下application.properties配置文件内容如下图:
rocketmq.config.namesrvAddr=127.0.0.1:9876

rocketmq.config.isVIPChannel=false

rocketmq.config.dataPath=/usr/local/rocketmq/store
3、编译
命令:mvn clean package “-Dmaven.test.skip=true”
4、启动
启动:java -jar rocketmq-console-ng-1.0.1.jar
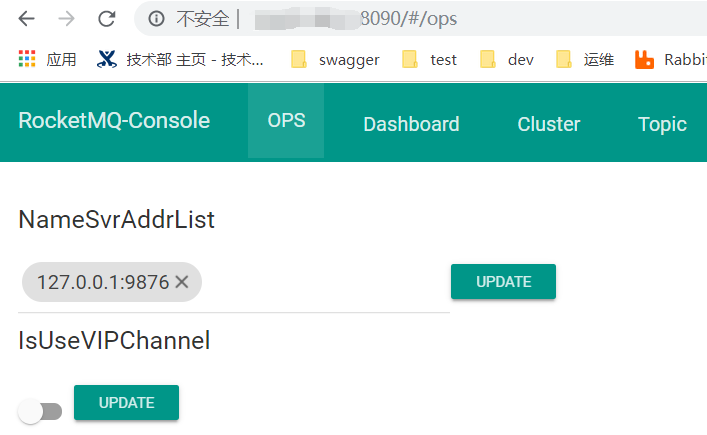
端口号可以在上述配置中修改,访问控制台如下图,单机版搭建成功。
❤本博客只适用于研究学习为目的,大多为学习笔记,如有错误欢迎指正,如有误导敬请谅解(本人尽力保证90%的验证和10%的猜想)。
❤如果这篇文章对你有一点点的帮助请给一份推荐! 谢谢!你们的鼓励是我继续前进的动力。

 浙公网安备 33010602011771号