ssm笔记
Mybatis
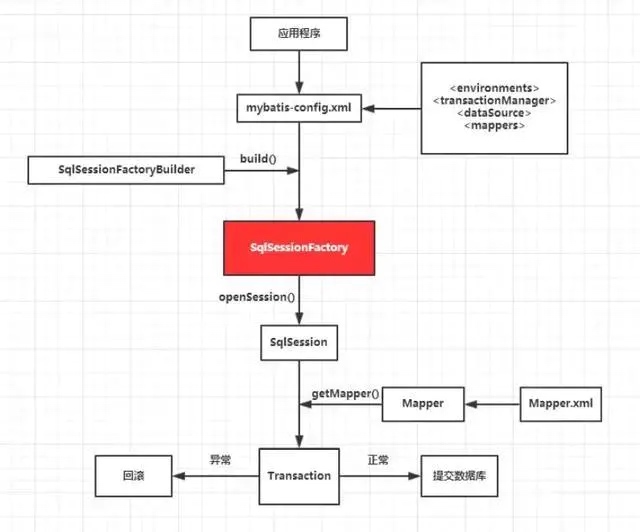
工作原理
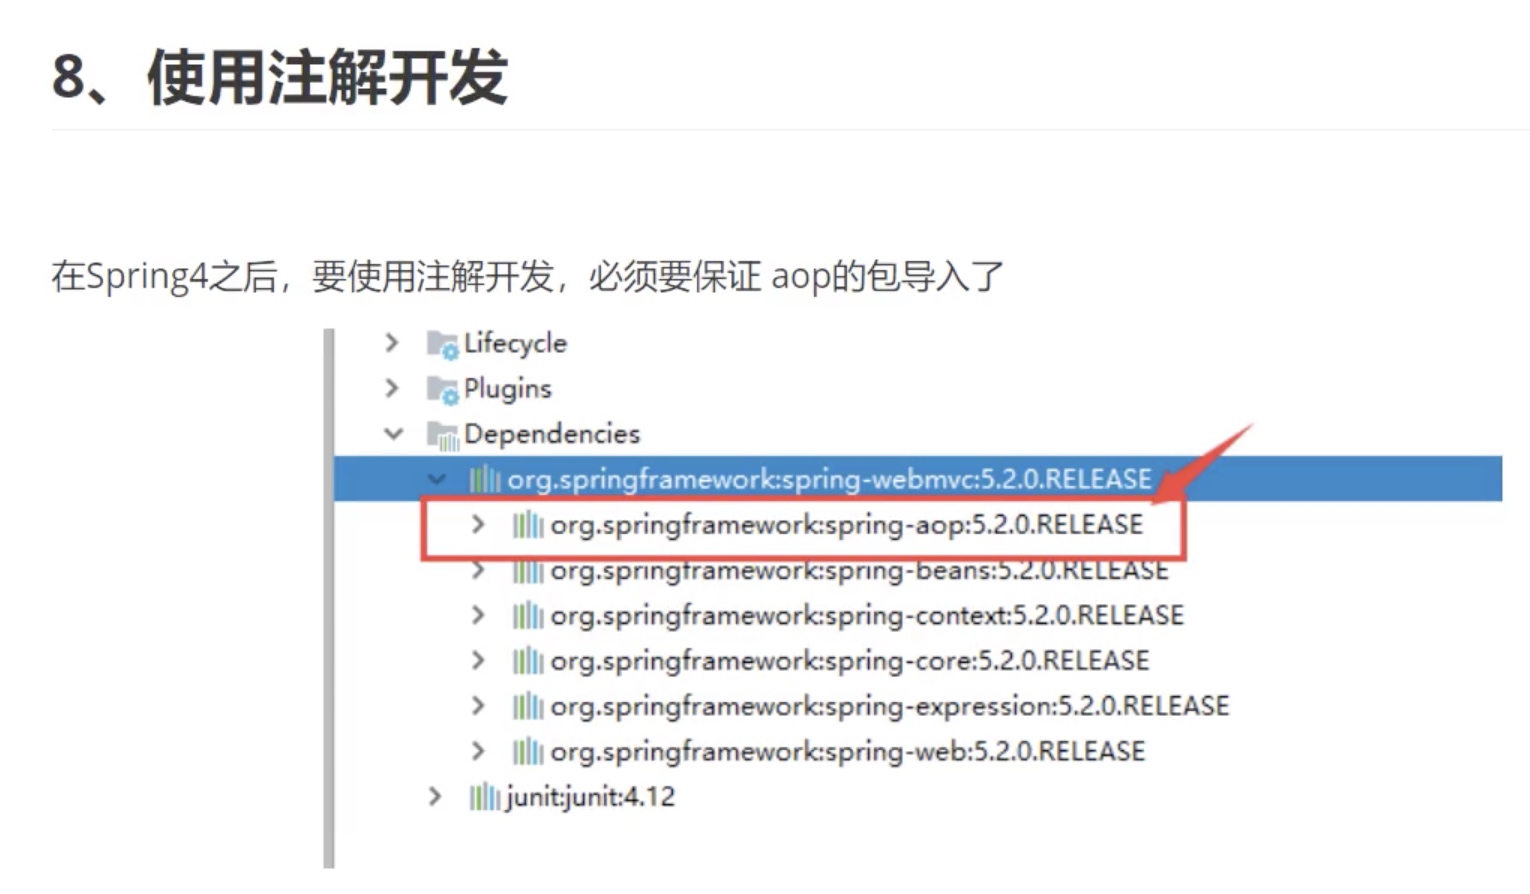
注意点
1.mybatis-config.xml 中需要配置mapper映射
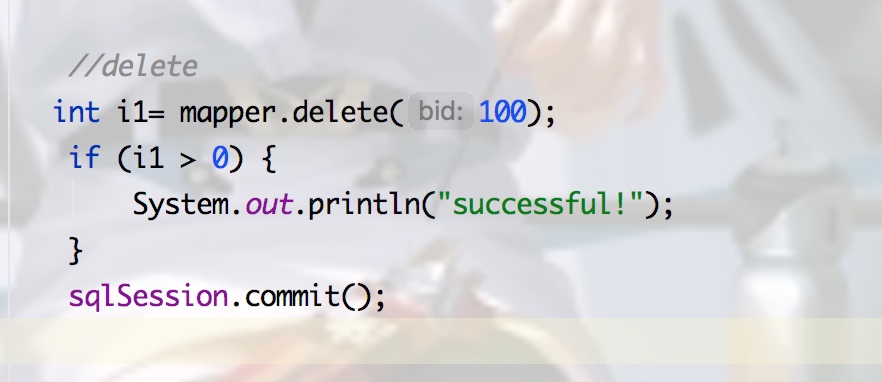
2.增删改都需要事务 所以需要commit
3.xml文件放在java下加载不到 target下没有 这是maven的问题,添加以下的:
<!--    //build中配置resources 防止资源导出失败-->
    <build>
        <resources>
            <resource>
                <directory>src/main/java</directory>
                <includes>
                    <include>**/*.xml</include>
                    <include>**/*.properties</include>
                </includes>
                <filtering>true</filtering>
            </resource>
            <resource>
                <directory>src/main/resources</directory>
                <includes>
                    <include>**/*.xml</include>
                    <include>**/*.properties</include>
                </includes>
                <filtering>true</filtering>
            </resource>
        </resources>
    </build>
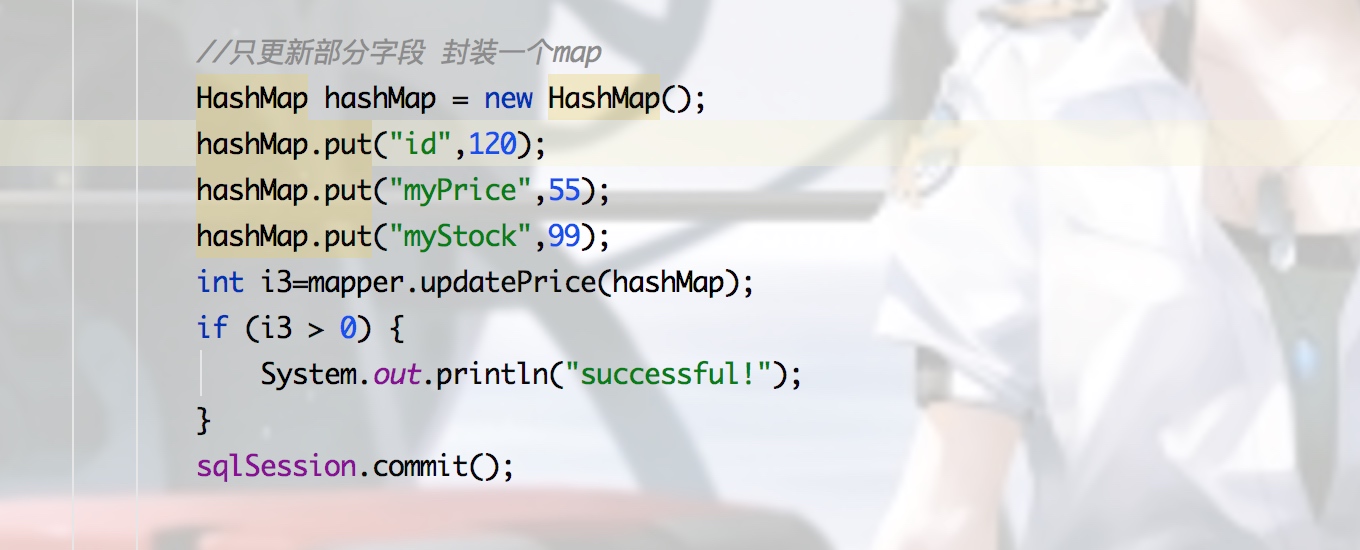
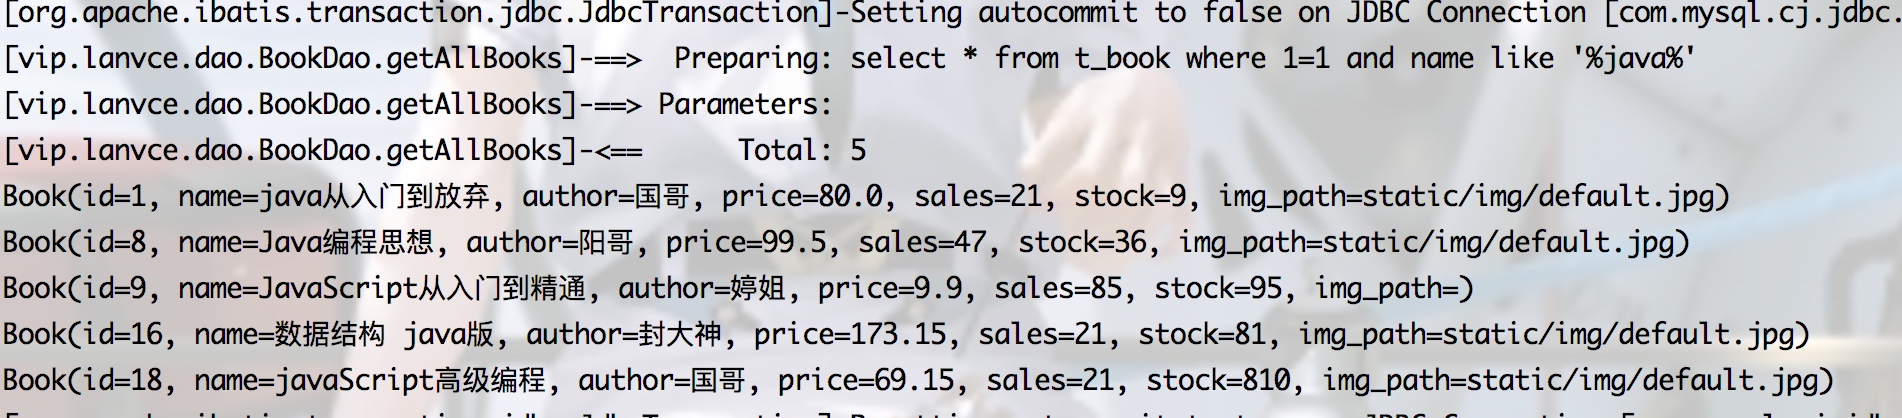
4.只修改部分字段 可以用map封装
5.模糊查询 like
1)在java中传通配符

2)在sql中拼接
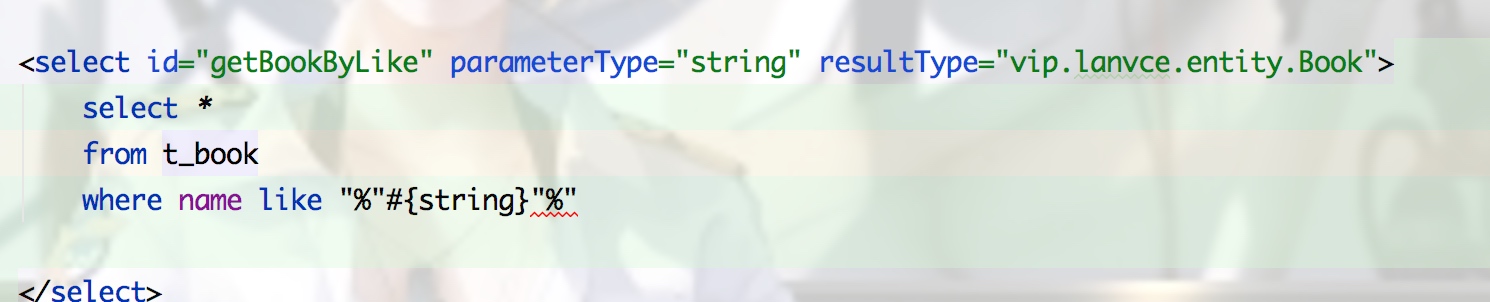
3.sql中使用concat函数

核心配置文件
1.resultMap 属性名和字段名不一致使用
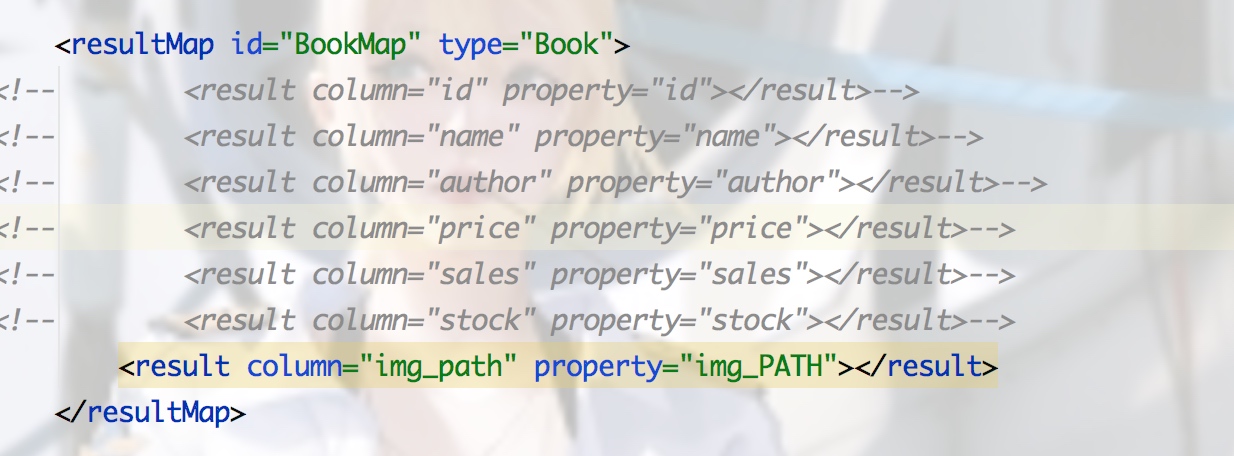
可以只写不一样的
2.openSession()传参数为true 即可autoCommit
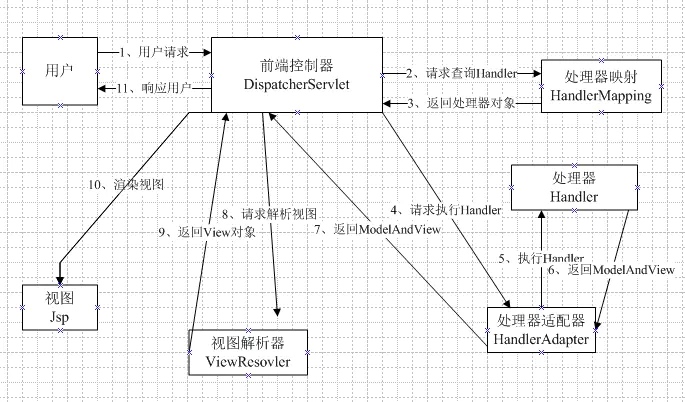
工作流程

多对一查询
1.使用子查询嵌套
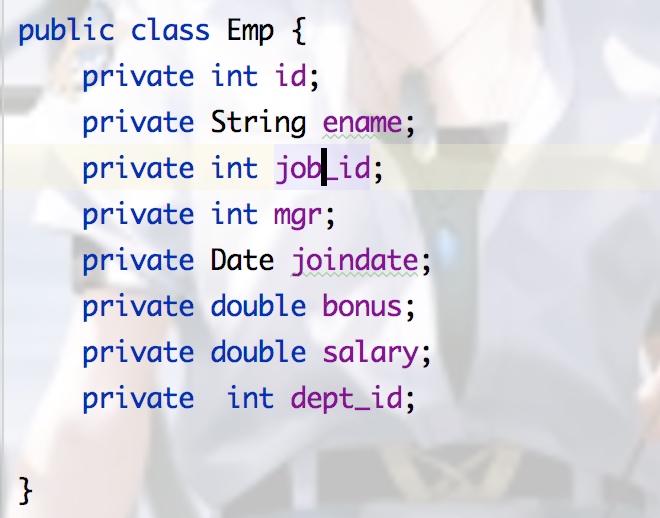
其中emp表的dept_id为dept外键
entity如下:


public class Dept {
    private int id;
    private String dname;
    private String loc;


}


public class Emp {
    private int id;
    private String ename;
    private int job_id;
    private int mgr;
    private Date joindate;
    private double bonus;


    private Dept dept_info;


}
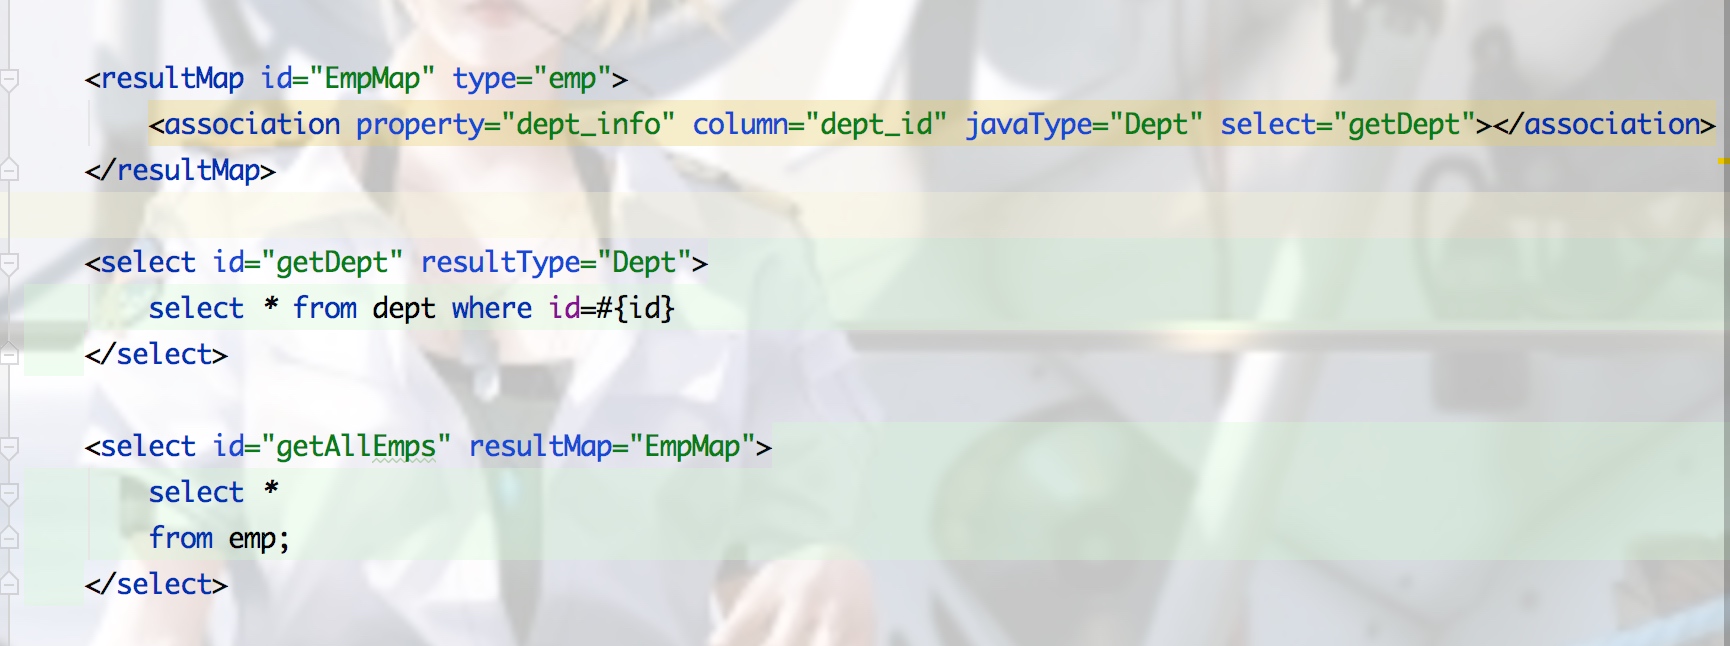
//注意是javaType 不是jdbcType
    <resultMap id="EmpMap" type="emp">
        <association property="dept_info" column="dept_id" javaType="Dept" select="getDept"></association>
    </resultMap>

    <select id="getDept" resultType="Dept">
        select * from dept where id=#{id}
    </select>

    <select id="getAllEmps" resultMap="EmpMap">
        select *
        from emp;
    </select>
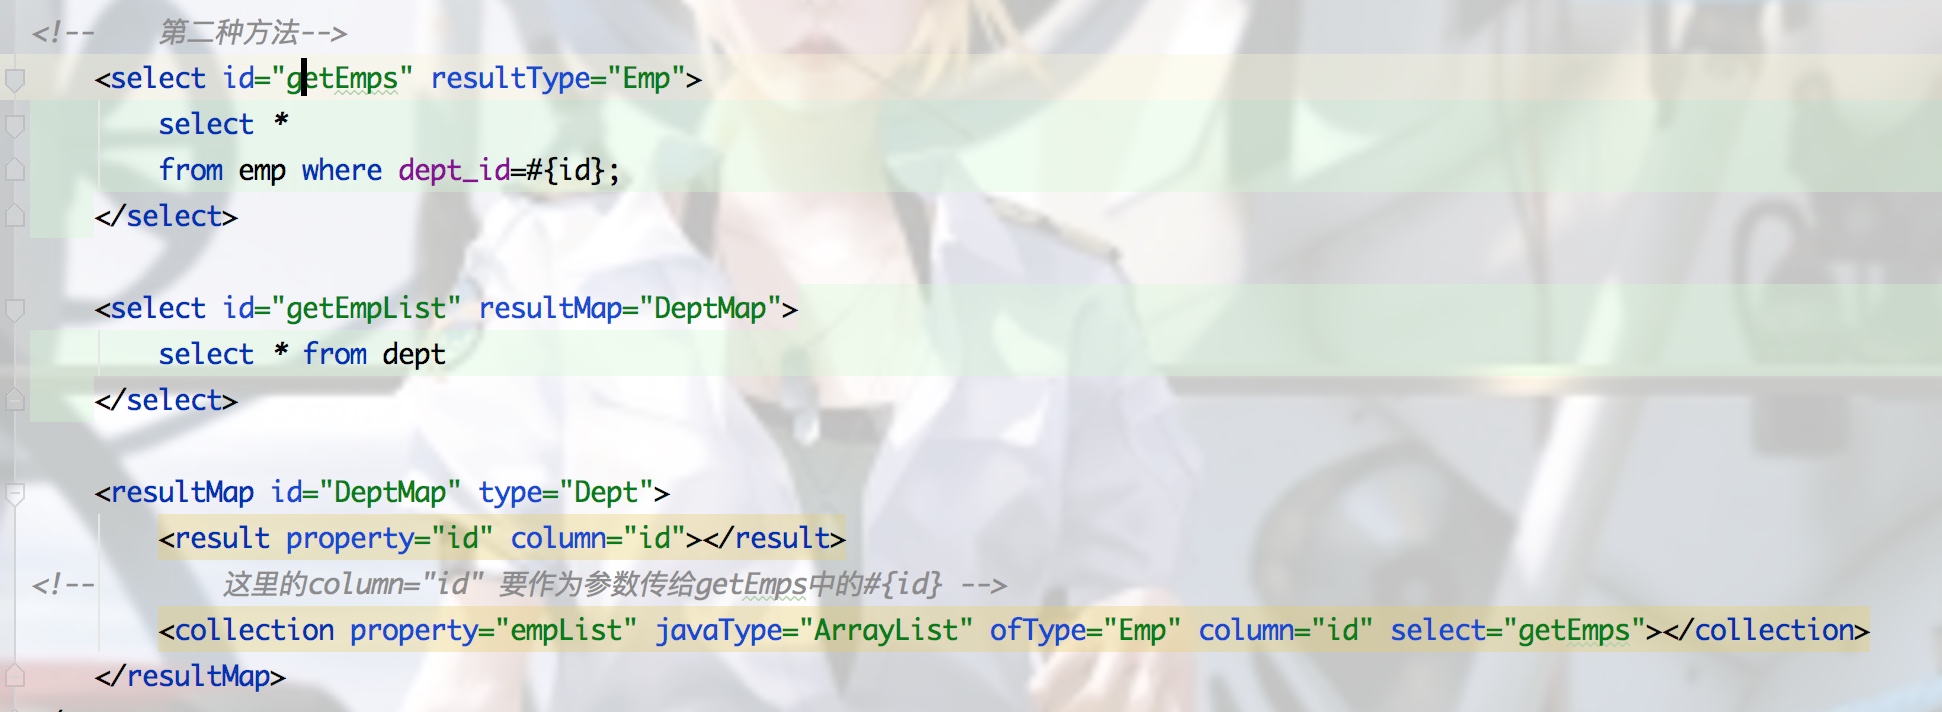
2.先查出所有结果 然后进行嵌套映射
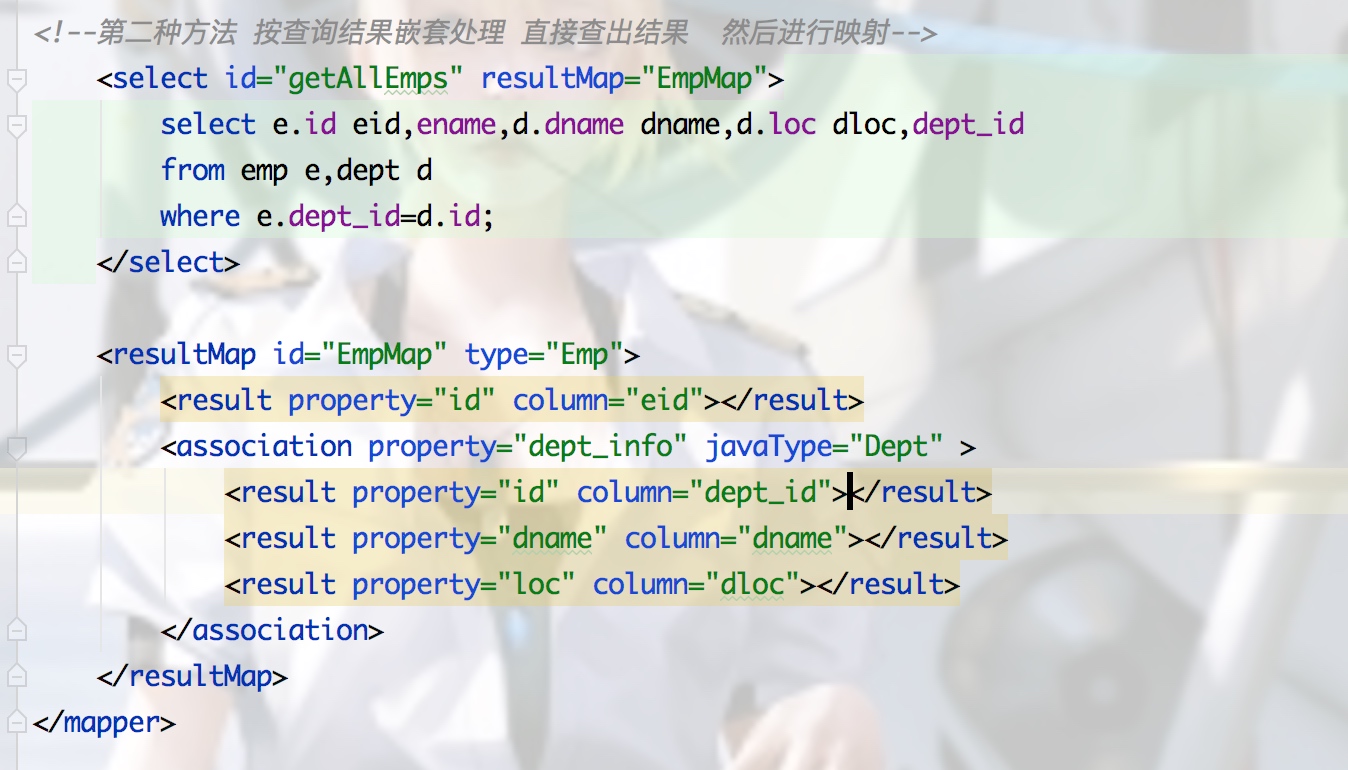
<!--第二种方法 按查询结果嵌套处理 直接查出结果  然后进行映射-->
    <select id="getAllEmps" resultMap="EmpMap">
        select e.id eid,ename,d.dname dname,d.loc dloc,dept_id
        from emp e,dept d
        where e.dept_id=d.id;
    </select>

    <resultMap id="EmpMap" type="Emp">
        <result property="id" column="eid"></result>
        <association property="dept_info" javaType="Dept" >
            <result property="id" column="dept_id"></result>
            <result property="dname" column="dname"></result>
            <result property="loc" column="dloc"></result>
        </association>
    </resultMap>
一对多查询
1.查询出所有结果 按结果封装嵌套

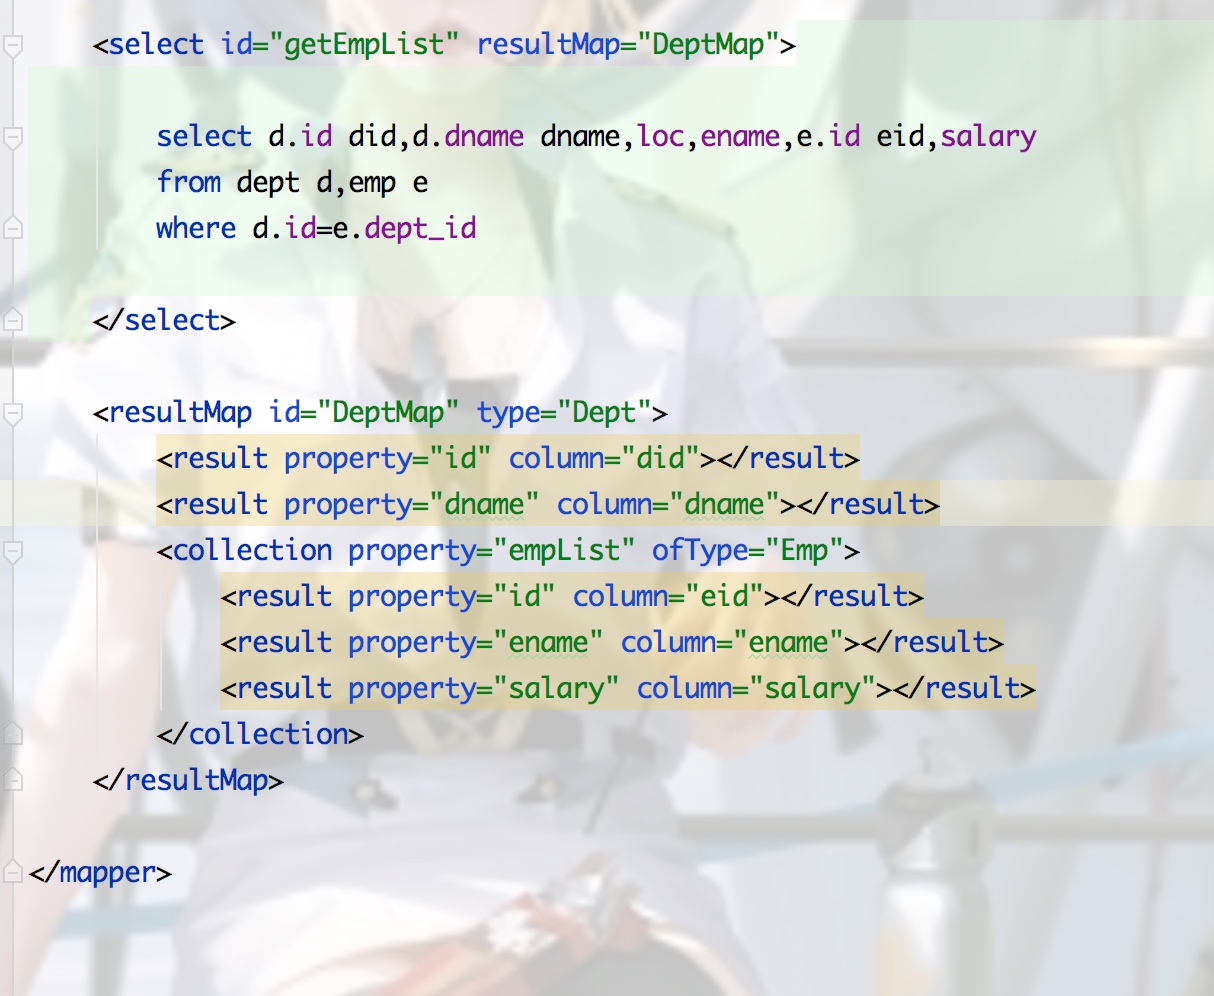
2.按查询嵌套封装
这个sql等价于 select * from emp where dept_id=(select id from dept),只不过括号中的语句是通过先select * from dept ,然后再取column=“id”这个字段
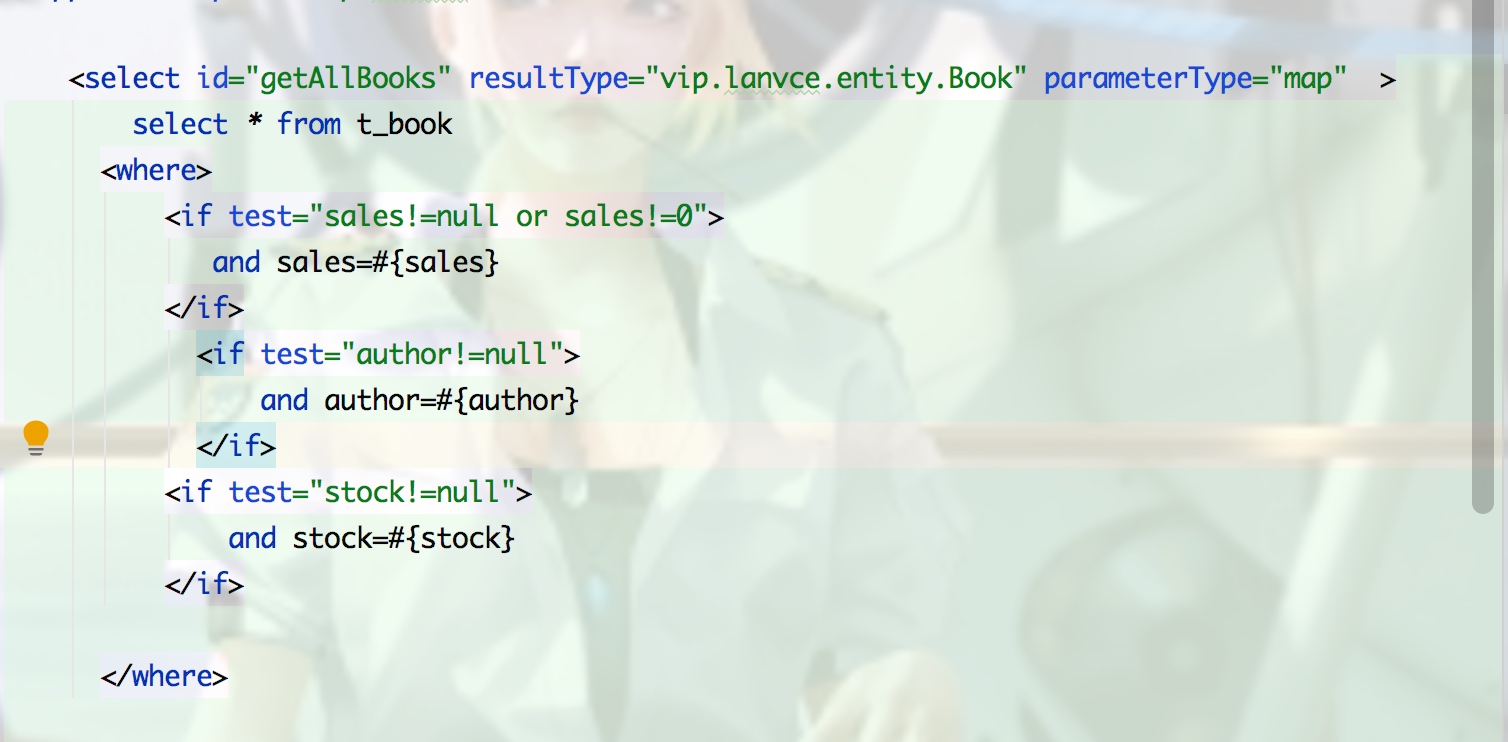
动态sql
注意:下面标签中的判断是判断map传过来值是否为null或者空串 而不是数据库中字段
1.if 判断条件是否成立
where 元素只会在子元素返回任何内容的情况下才插入 “WHERE” 子句。而且,若子句的开头为 “AND” 或 “OR”,where 元素也会将它们去除。
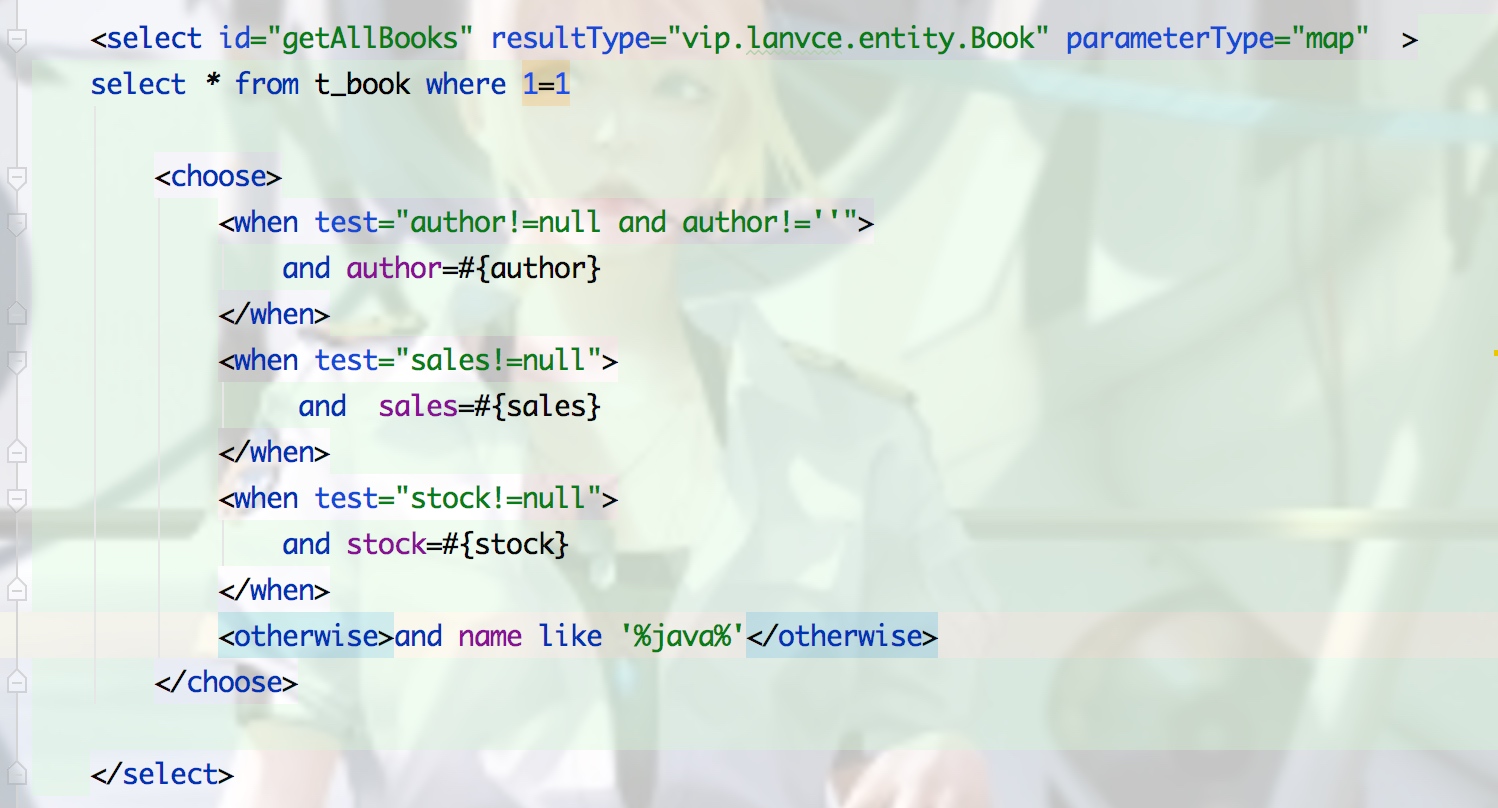
2.choose when otherwise
只会选择一个条件,满足就跳出choose标签,和switch类似,如下三个参数都为null,前三条件都不满足,则执行optherwise

3.set 类似where
<update id="updateAuthorIfNecessary">
  update Author
    <set>
      <if test="username != null">username=#{username},</if>
      <if test="password != null">password=#{password},</if>
      <if test="email != null">email=#{email},</if>
      <if test="bio != null">bio=#{bio}</if>
    </set>
  where id=#{id}
</update>
4.trim
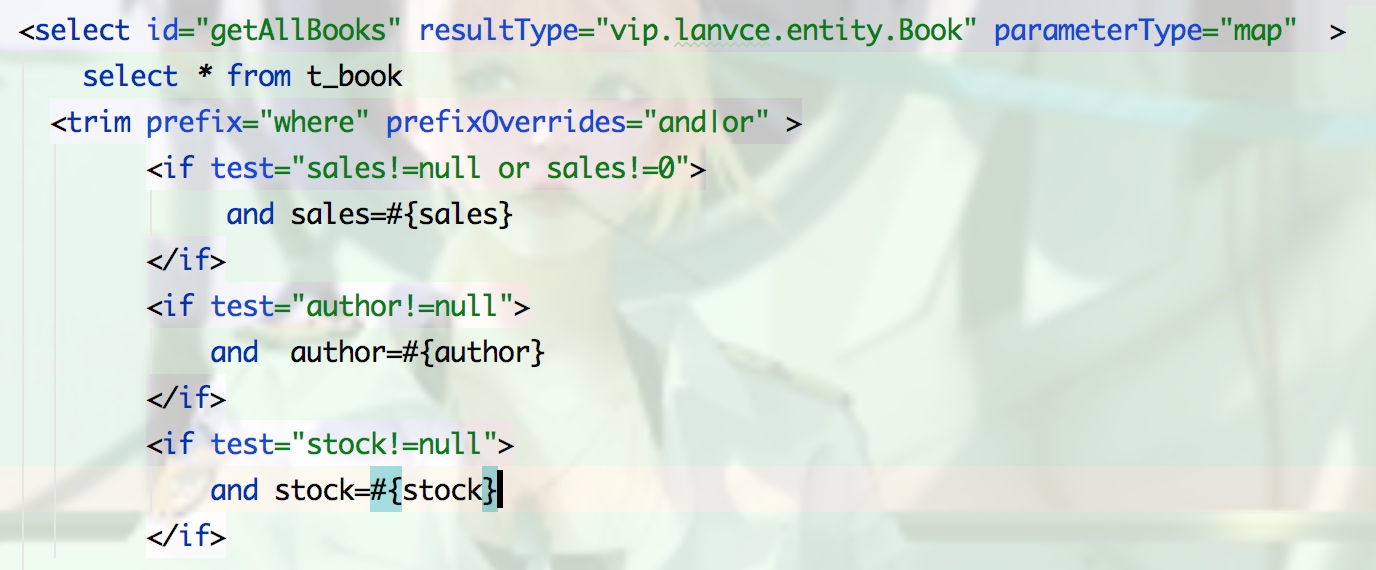
prefix只是前面加个前缀where prefixOverrides只是去掉后面语句的第一个and或者是or
suffix和suffixOverrides同理

5.foreach


6.sql标签 可以提取出公共的语句 然后用include标签引用
缓存
1.一级缓存
sqlSession级别缓存,默认开启,以及缓存就是一个map,一次会话,当会话关闭sqlSession.close()后不存在,
缓存失效情况:
1.查询不同的东西
 2.手动清理缓存
  sqlSession.cleancache()
 3.增删改查肯定会刷新缓存 因为可能会改原来的数据
 4.不同mapper之间去查
2.二级缓存
定义:二级缓存也叫全局缓存,是基于namespace级别的缓存,一个名称空间,对应一个二级缓存
工作机制:
1)一个会话查询一条数据,这个数据就会被放在当前会话的以及缓存中
2)如果会话关闭,这个一级缓存就没有了,但是我们想要的是,会话关闭了,一级缓存数据会保存到二级缓存中
3)新的会话查询信息,就可以存二级缓存中取数据
4)不同的mapper查出的数据会放在自己对应的缓存中(map)中
步骤:
1.开启全局缓存
<setting name="cacheEnabled" value="true"/>
2.在要使用二级缓存的mapper中开启
<cache/>

自定义参数:
<cache
  eviction="FIFO"
  flushInterval="60000"
  size="512"
  readOnly="true"/>


  可用的清除策略有:
LRU – 最近最少使用:移除最长时间不被使用的对象。
FIFO – 先进先出:按对象进入缓存的顺序来移除它们。
SOFT – 软引用:基于垃圾回收器状态和软引用规则移除对象。
WEAK – 弱引用:更积极地基于垃圾收集器状态和弱引用规则移除对象。
3.测试
问题:对象需要序列化
小结:只要开启了二级缓存,在同一个mapper下就有效果
所有数据都会先放在一级缓存中,只有当会话提交或者关闭,才会将数据放到二级缓存中
缓存原理
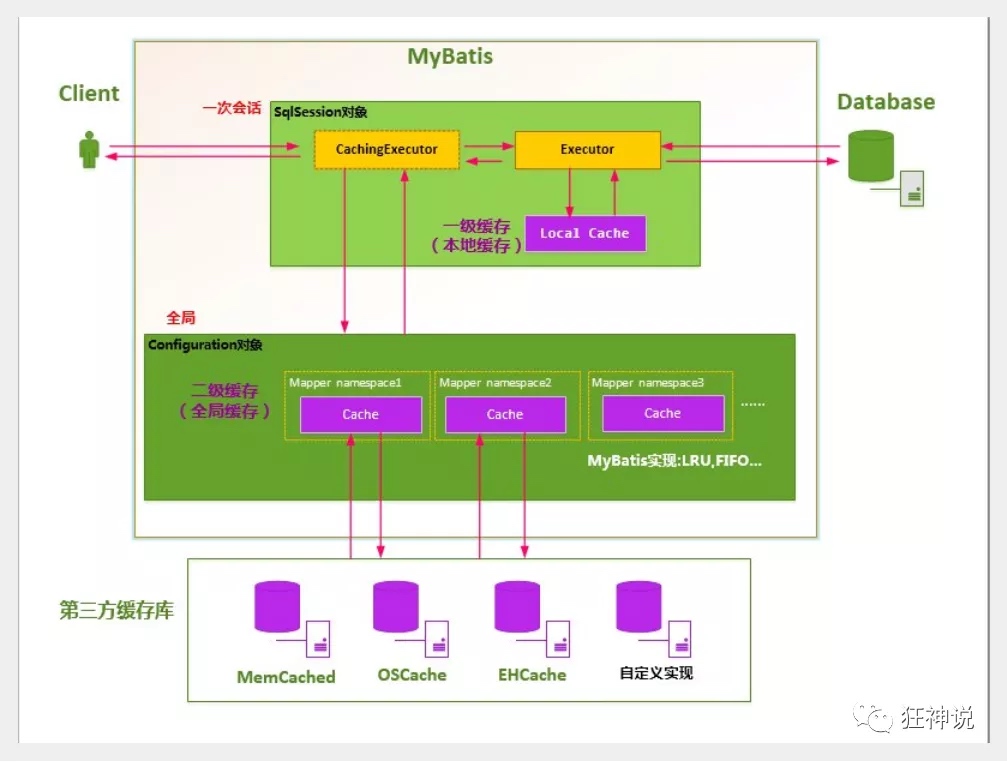
先访问二级缓存,如果没有再找一级缓存
Spring
IOC
控制反转IoC(Inversion of Control),是一种设计思想,DI(依赖注入)是实现IoC的一种方法
依赖注入
1.构造器注入


1.通过无参构造器注入
2.有参数构造:
1)通过下标index
2)通过type
3)直接通过变量名name
c名称空间注入,对应构造器注入

在配置文件加载的时候,所有bena被注册的时候就已经被实例化了
2.set注入
p名称空间注入 对于set注入

3.接口注入
4.静态工厂注入
5.实例方法注入
bean的配置
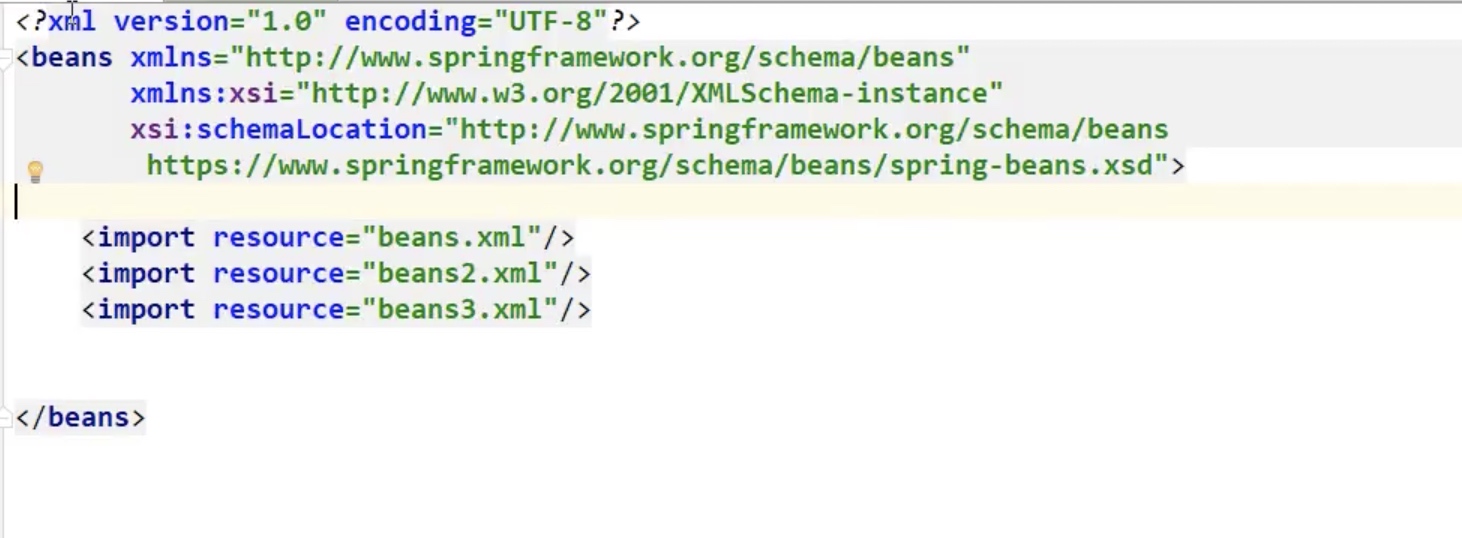
1.别名 alias bean标签中的name也是别名,而且可以多个
2.import 可以合并多个bean
bean作用域
1.singleton:这种bean范围是默认的,这种范围确保不管接受到多少个请求,每个容器中只有一个bean的实例,单例的模式由bean factory自身来维护。

2.prototype:原形范围与单例范围相反,为每一个bean请求提供一个实例。

3.request:在请求bean范围内会每一个来自客户端的网络请求创建一个实例,在请求完成以后,bean会失效并被垃圾回收器回收。

4.Session:与请求范围类似,确保每个session中有一个bean的实例,在session过期后,bean会随之失效。

5.global-session:global-session和Portlet应用相关。当你的应用部署在Portlet容器中工作时,它包含很多portlet。如果你想要声明让所有的portlet共用全局的存储变量的话,那么这全局变量需要存储在global-session中。

全局作用域与Servlet中的session作用域效果相同。
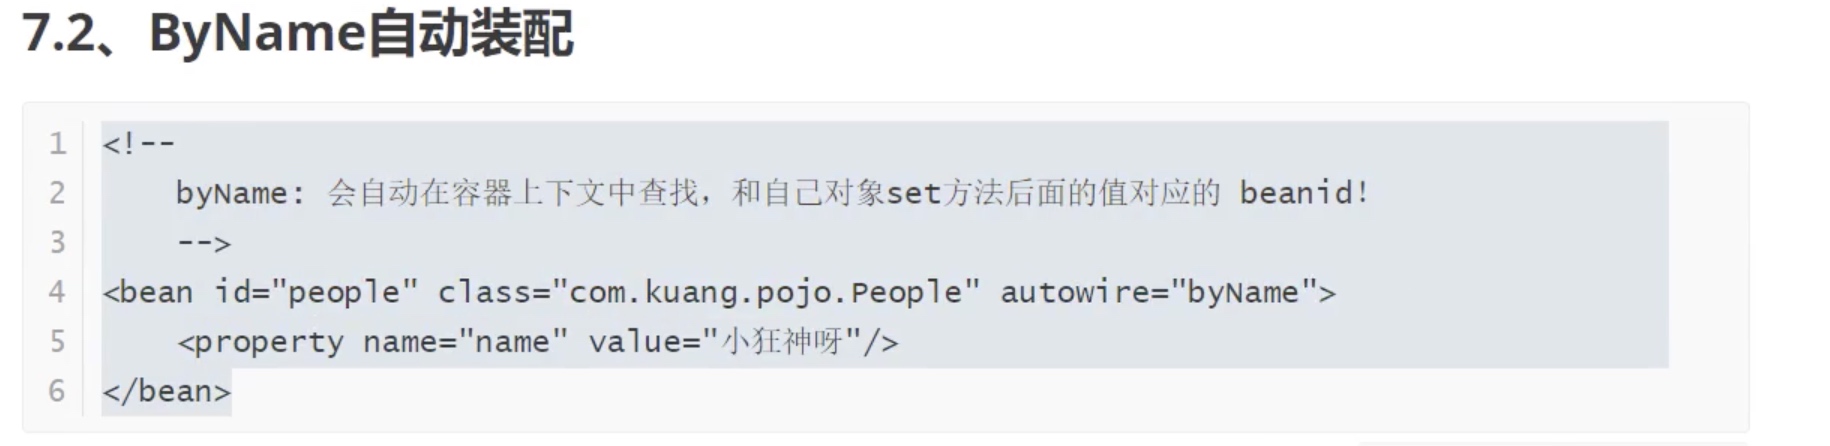
自动装配方式

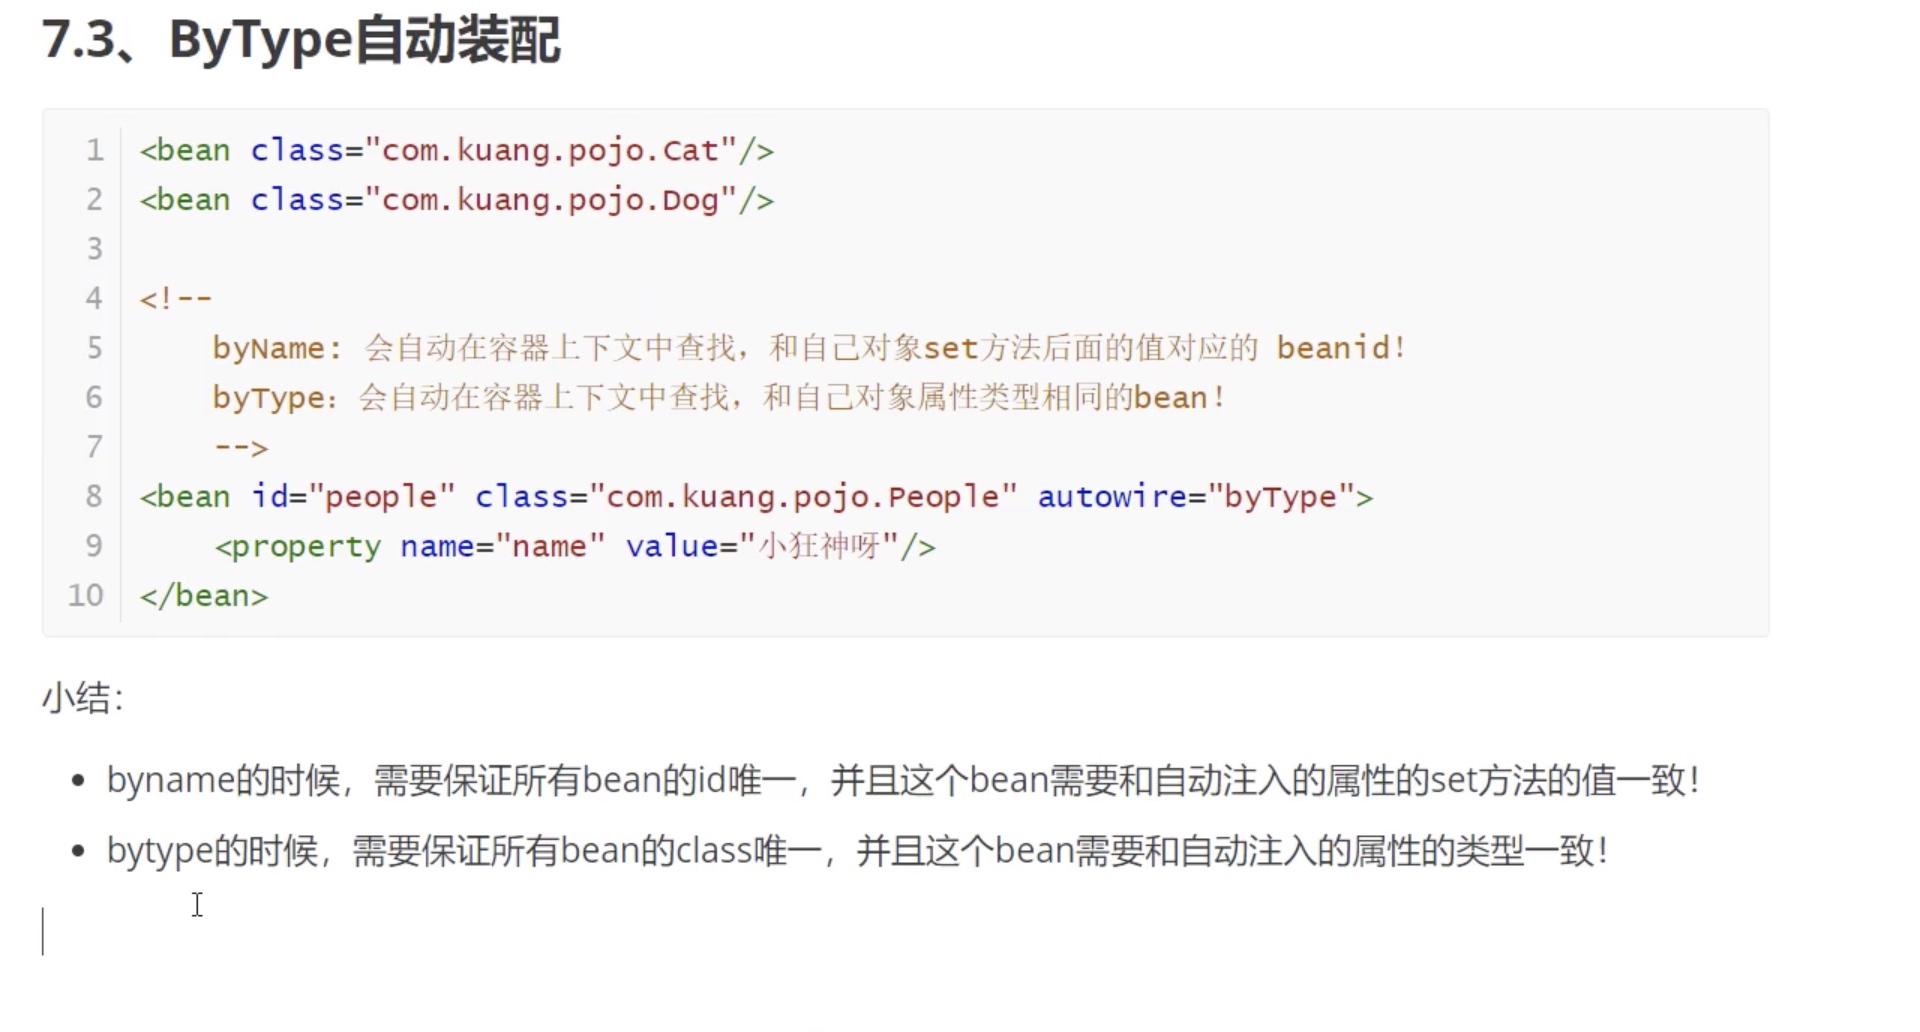
基于xml的装配:
1.ByName装配
2.ByType装配
3.constructor
就是通过构造器来将类型与参数相同的bean进行装配
构造器的自动装配和byType模式类似,但是仅仅适用于与有构造器相同参数的bean,如果在容器中没有找到与构造器参数类型一致的bean,那么将会抛出异常。
4.autodetect
是constructor与byType的组合,会先进行constructor,如果不成功,再进行byType.
该模式自动探测使用构造器自动装配或者byType自动装配。首先,首先会尝试找合适的带参数的构造器,如果找到的话就是用构造器自动装配,如果在bean内部没有找到相应的构造器或者是无参构造器,容器就会自动选择byTpe的自动装配方式。
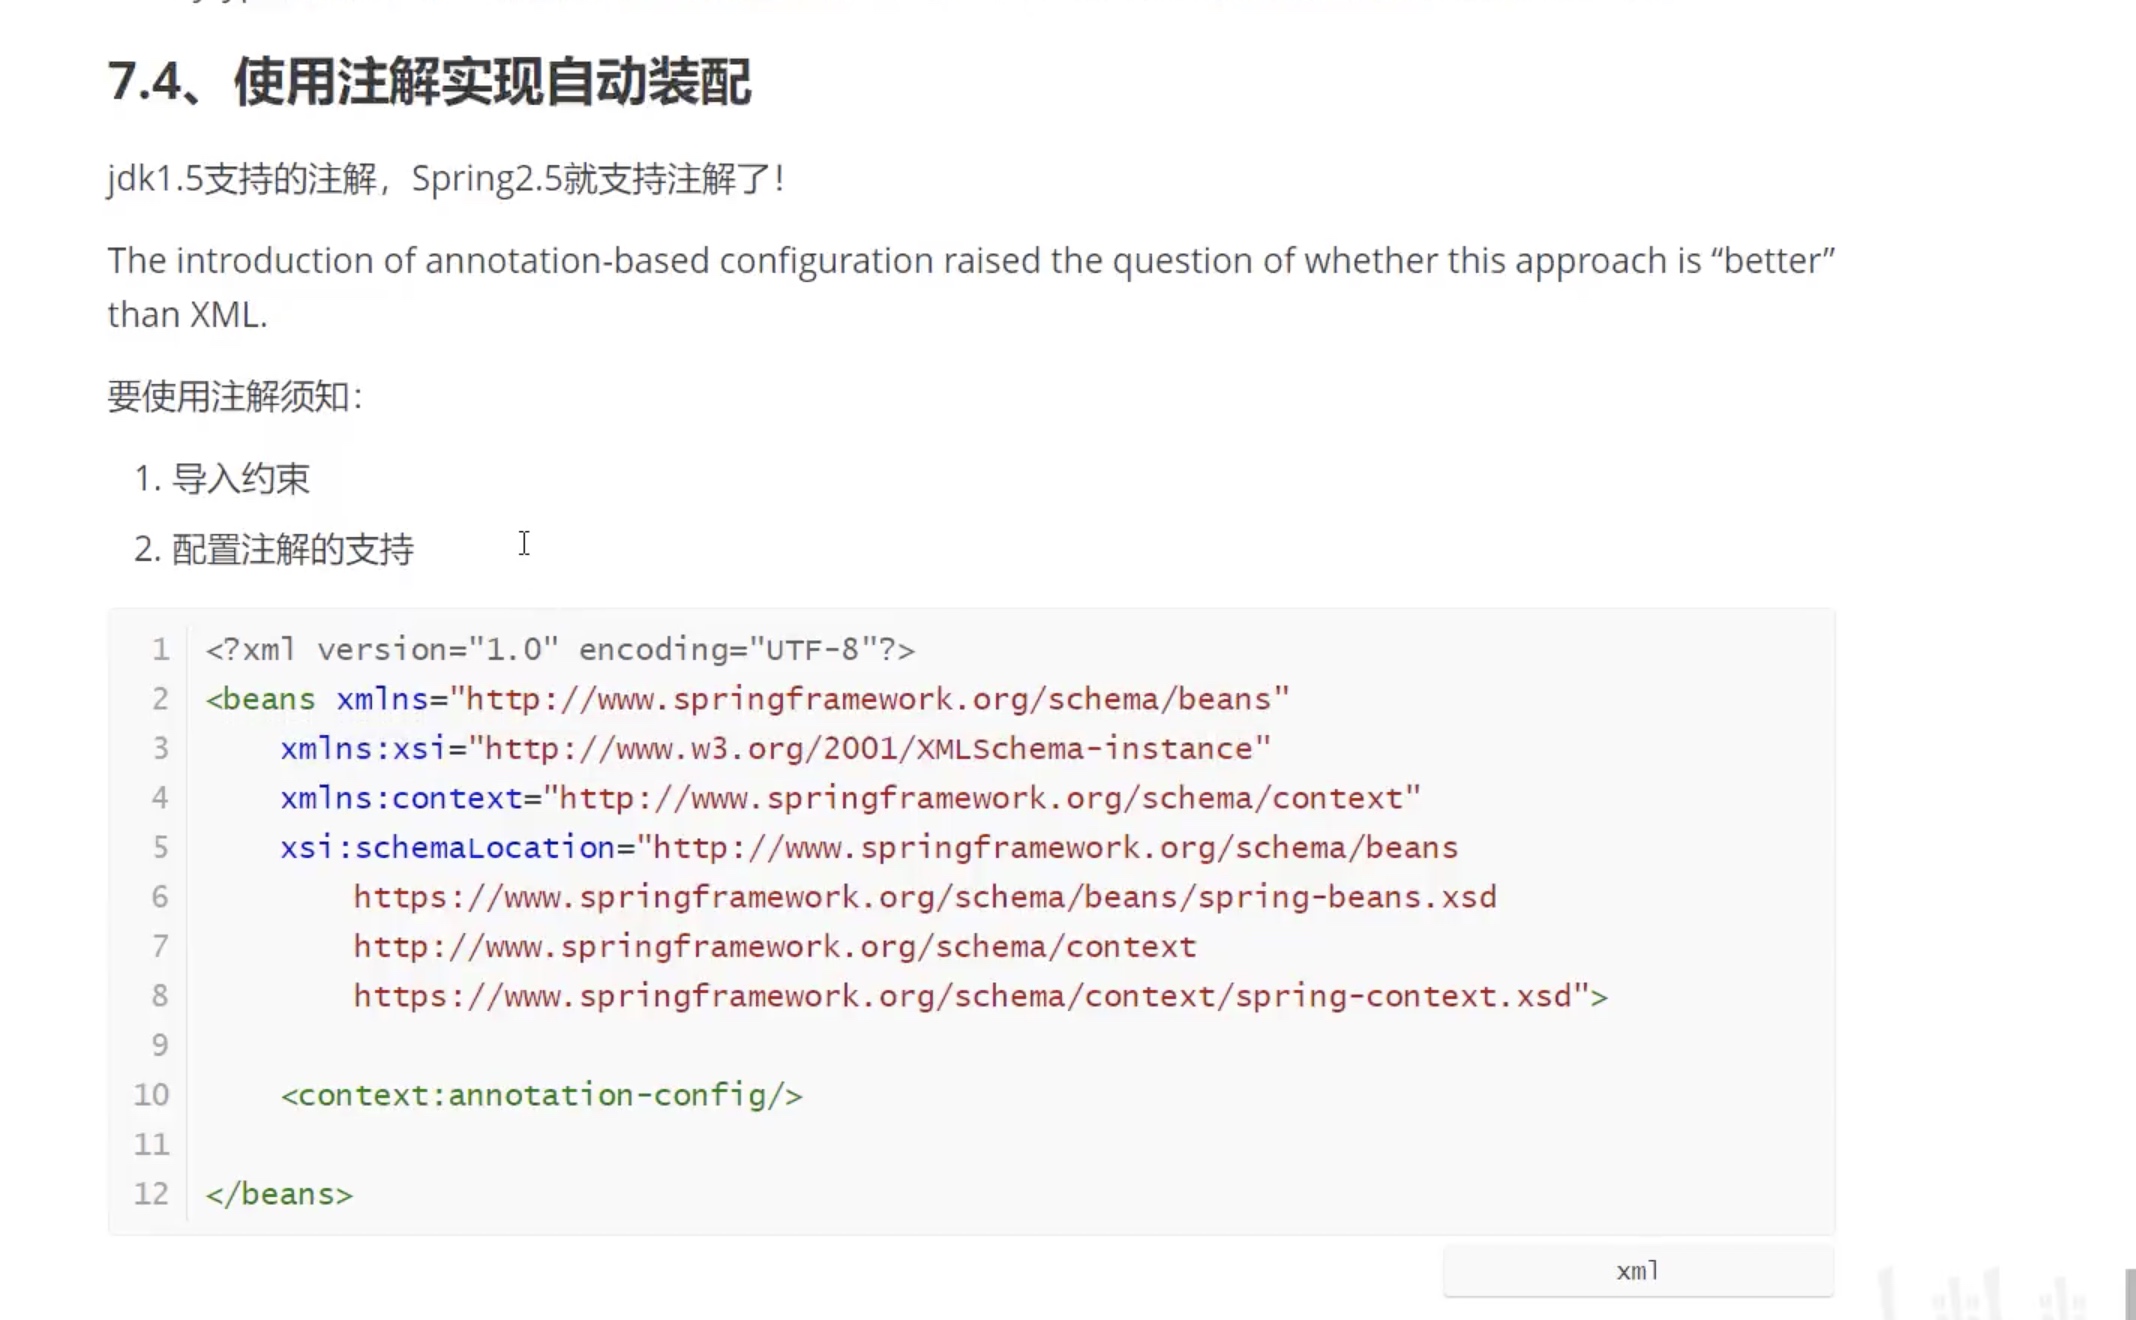
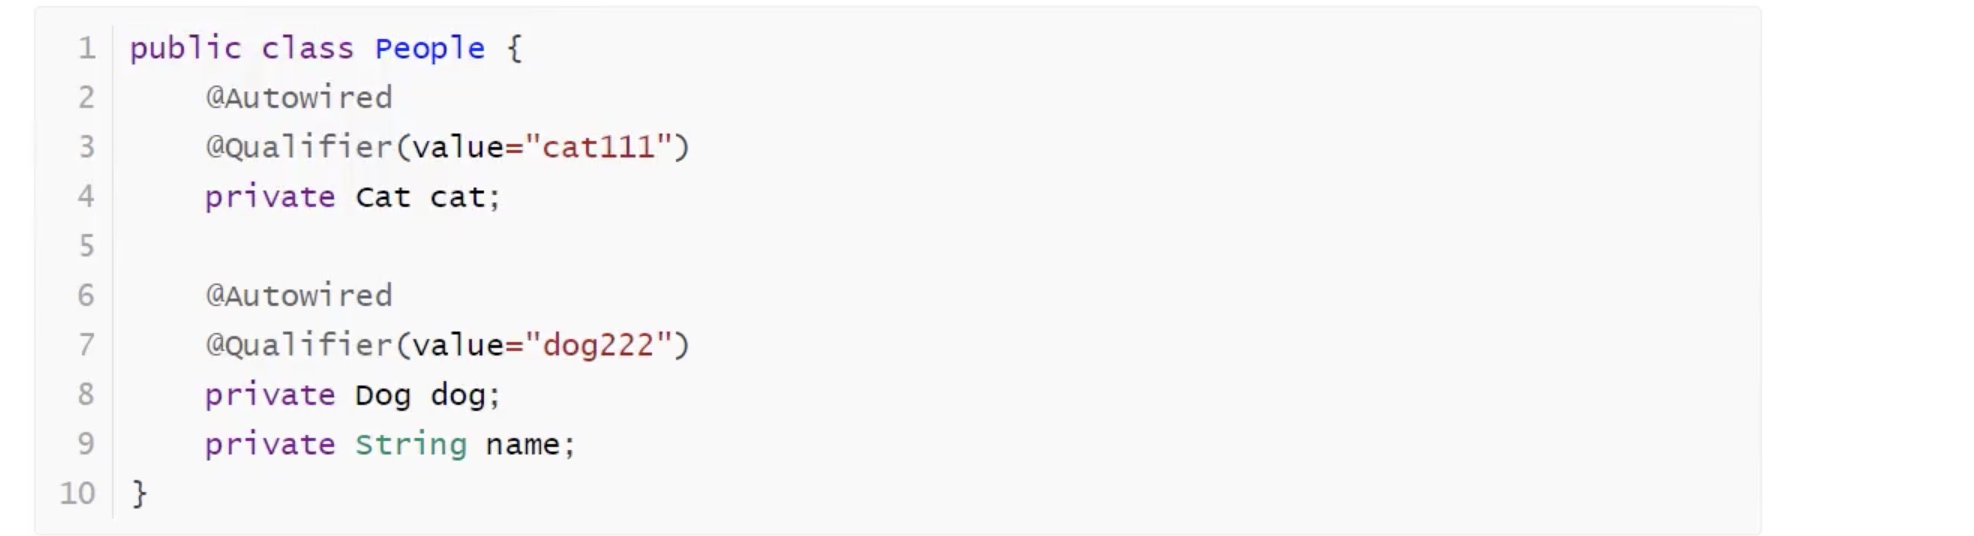
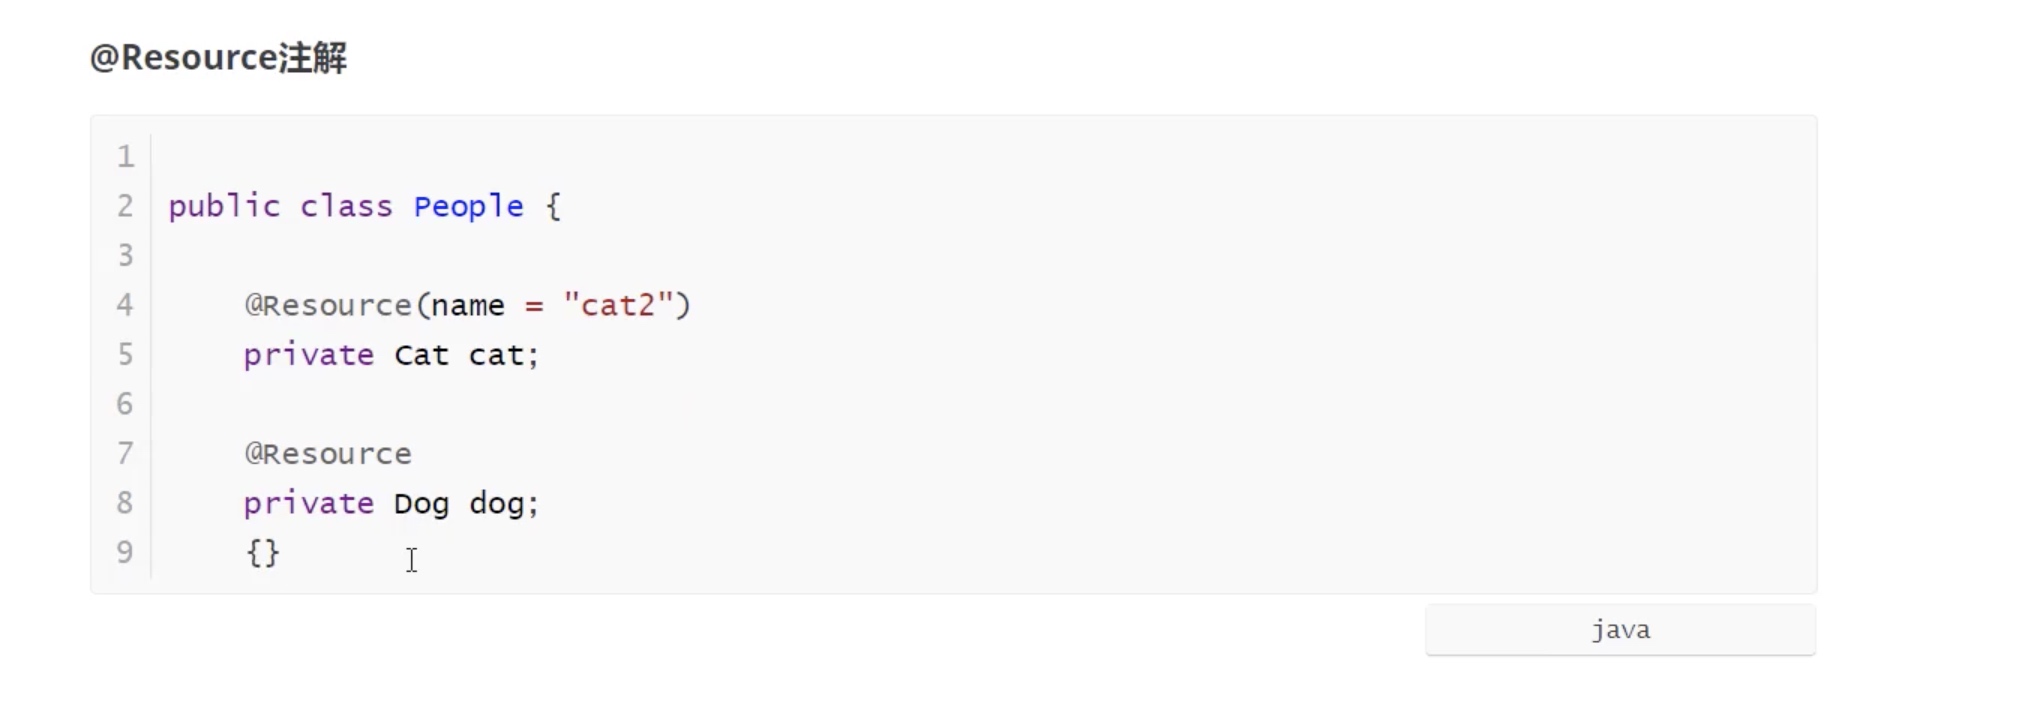
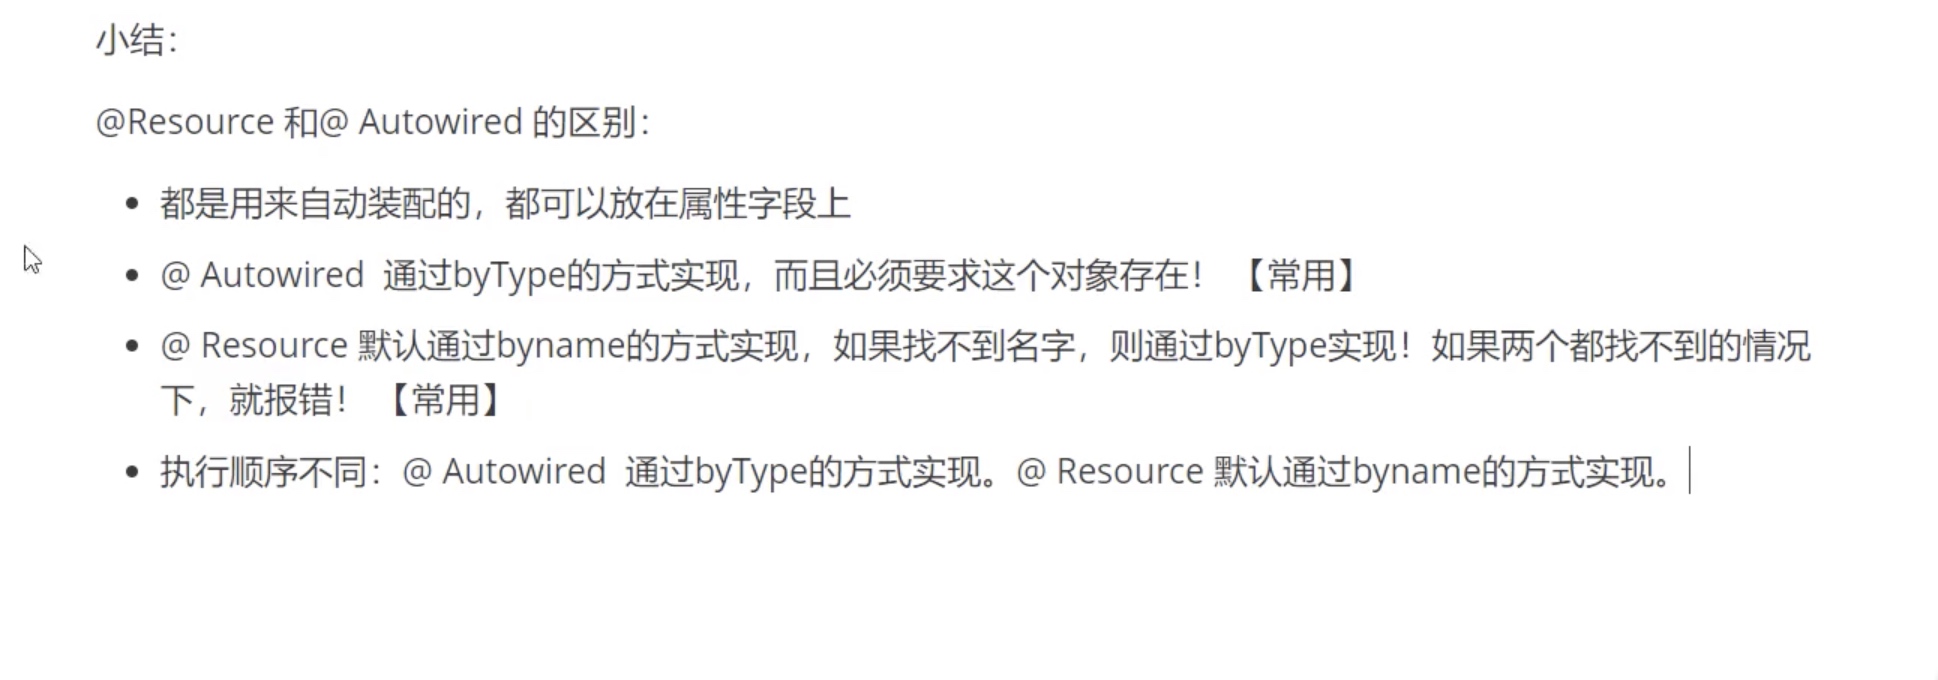
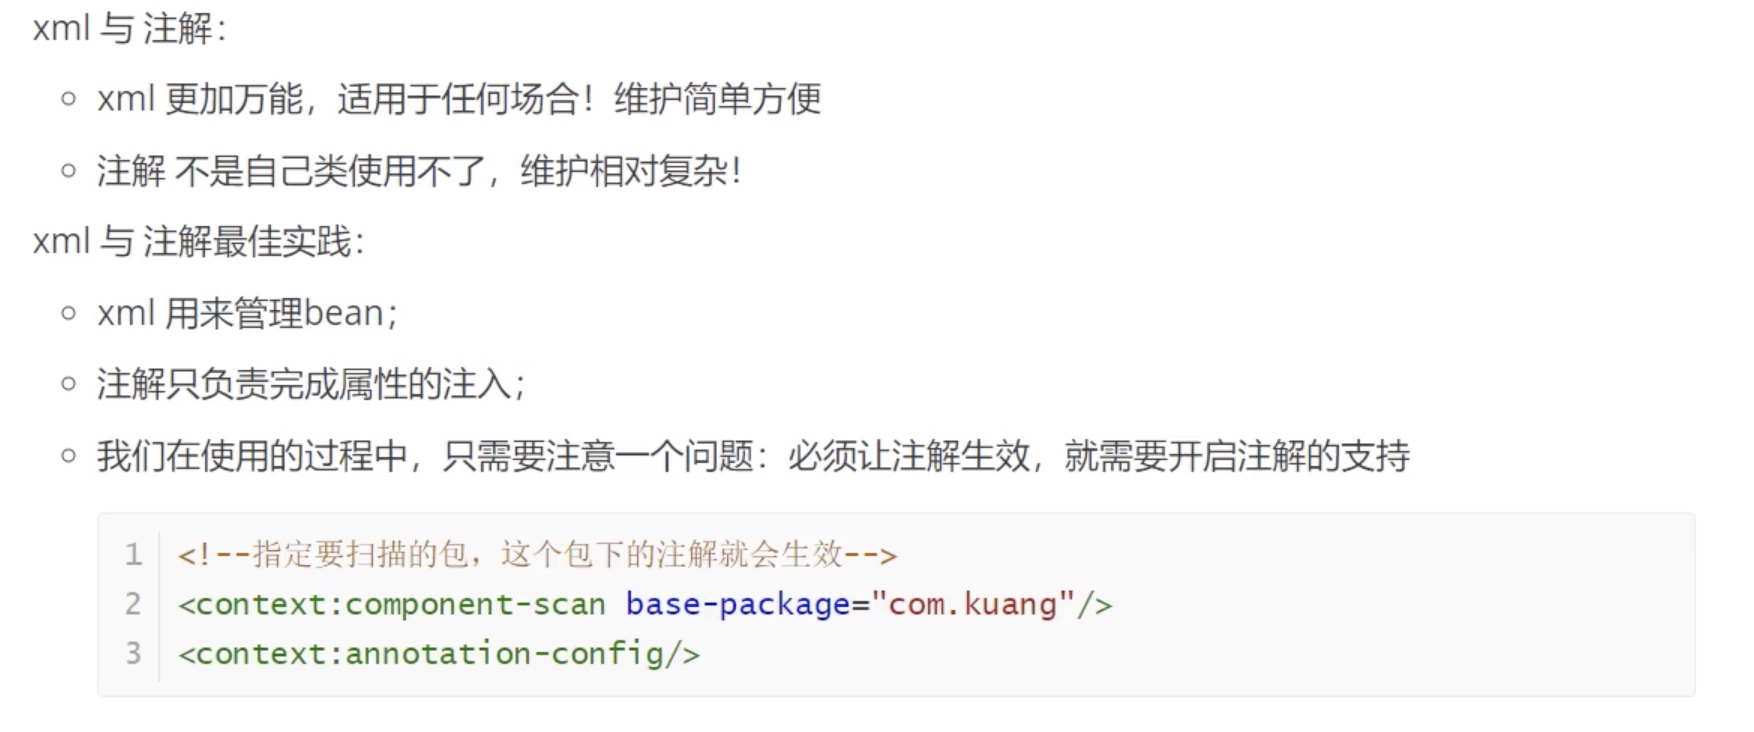
基于注解的:
byName
byType
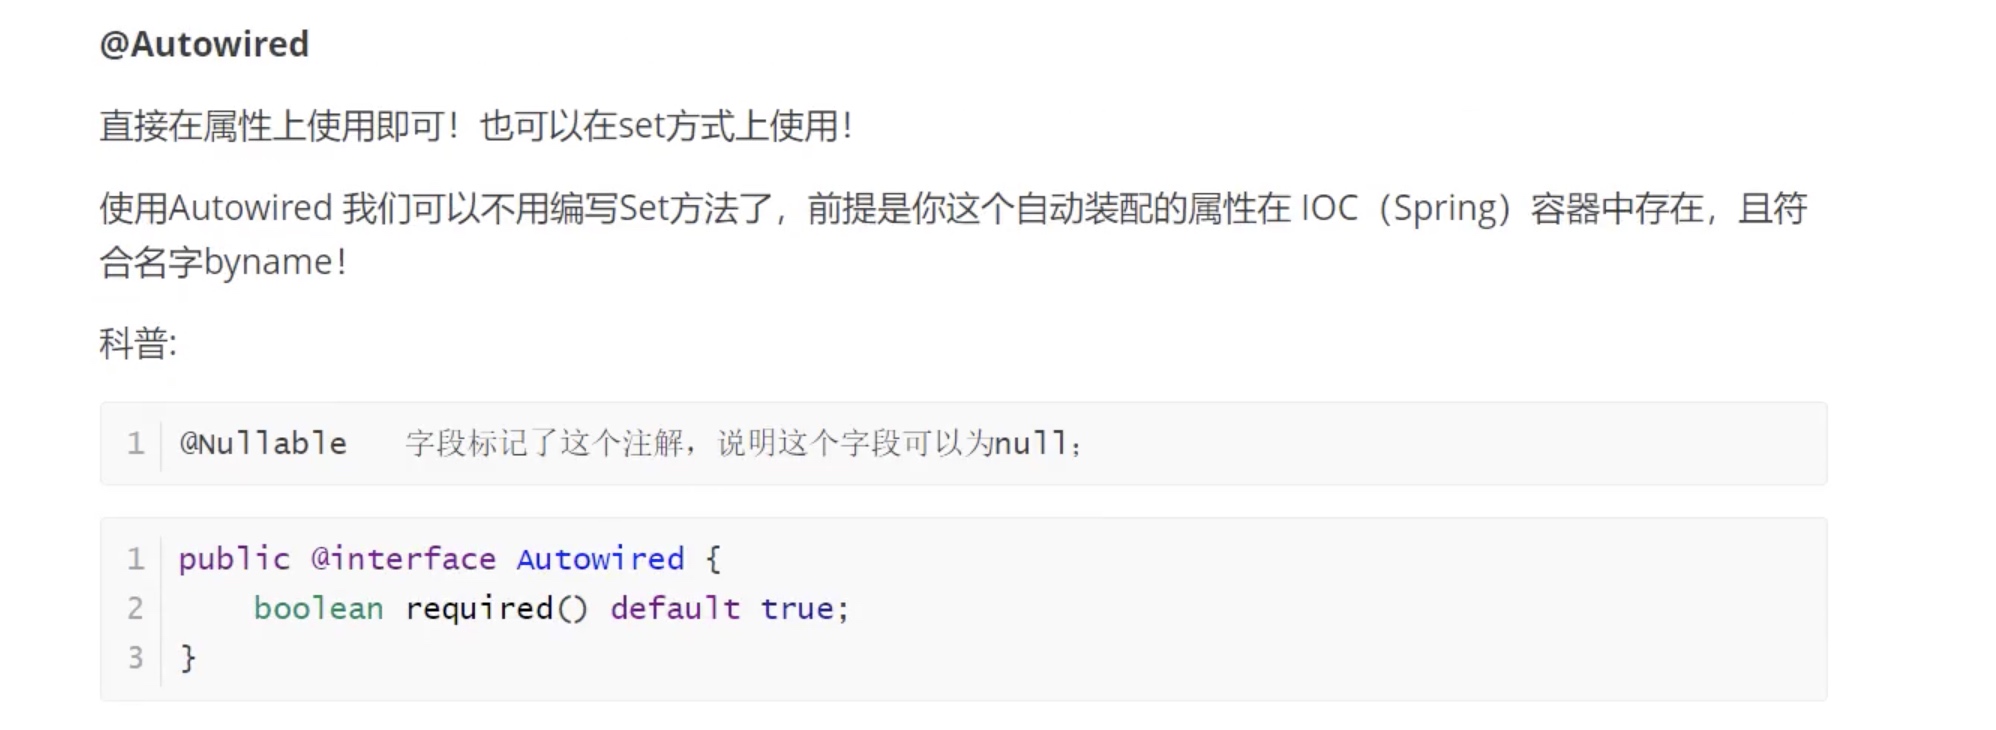

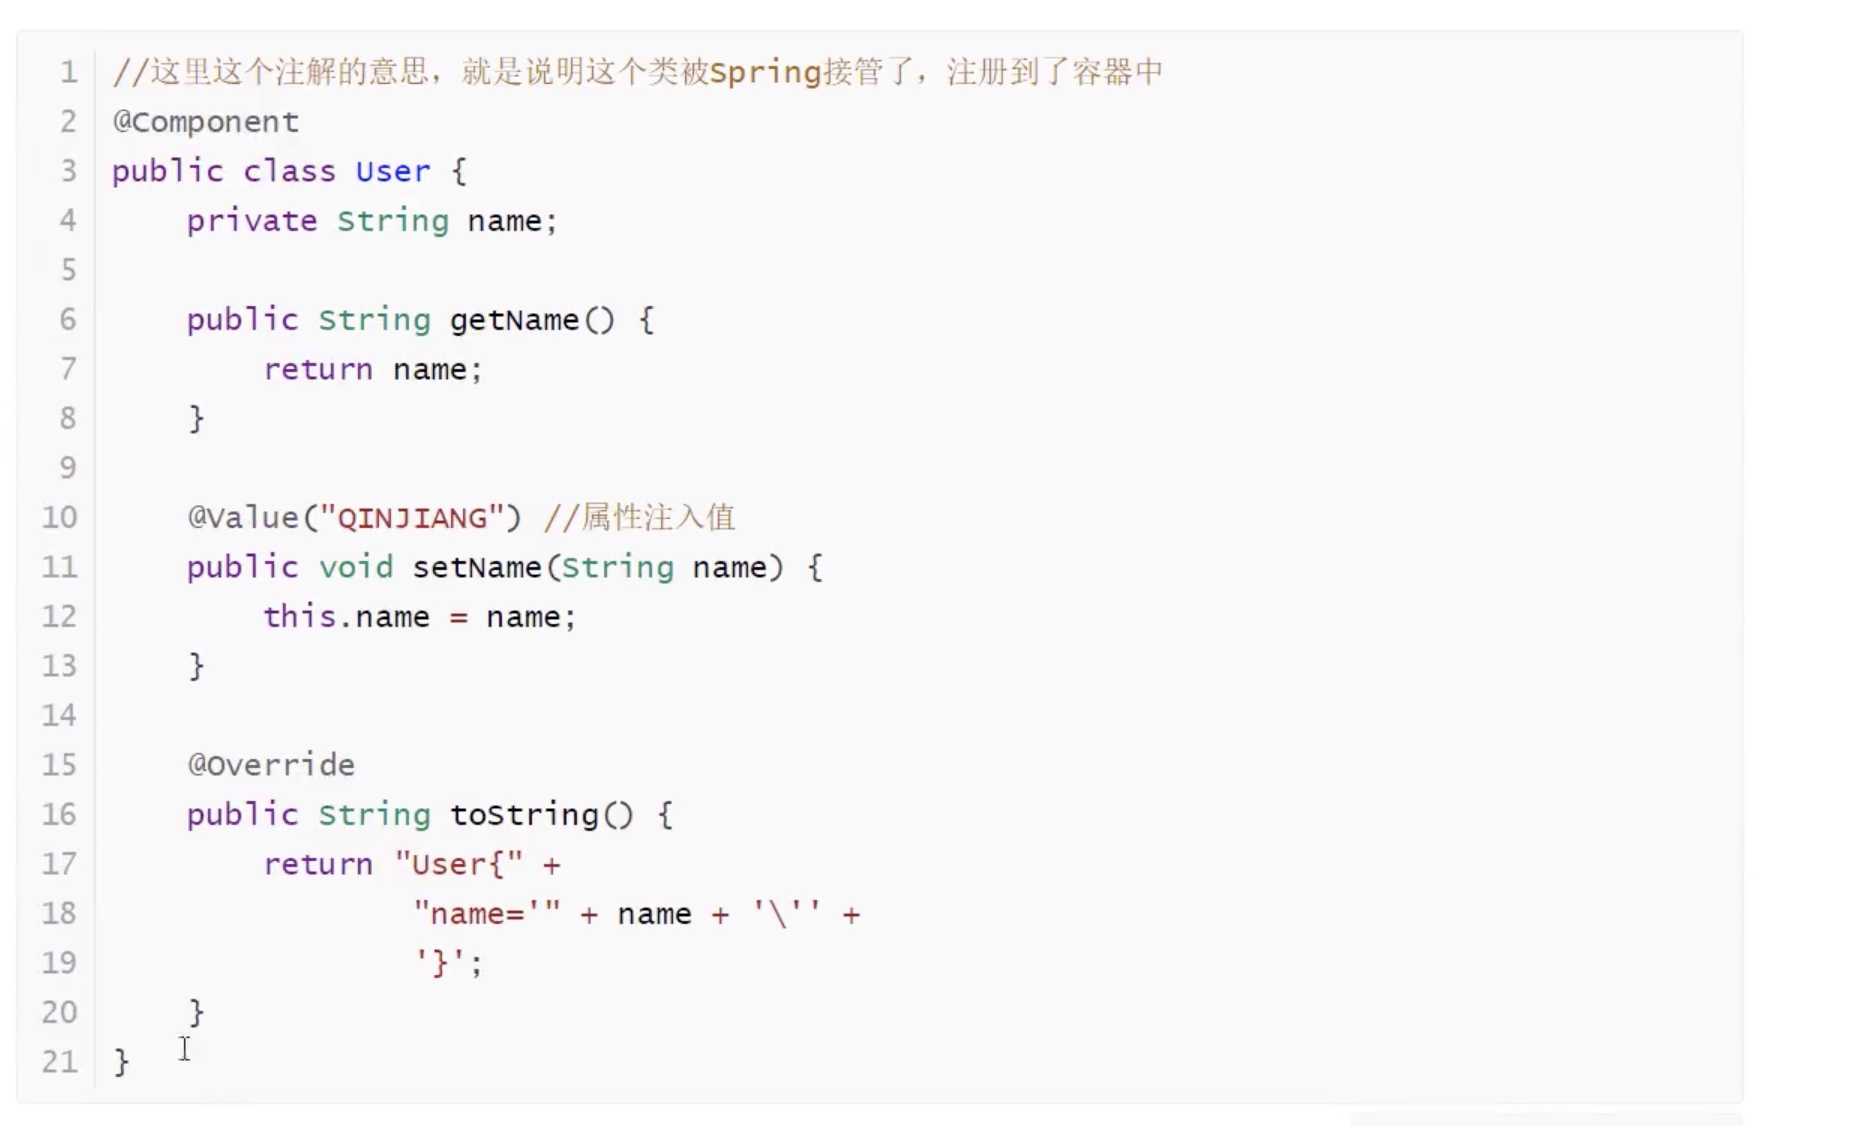
1.bean
2.属性
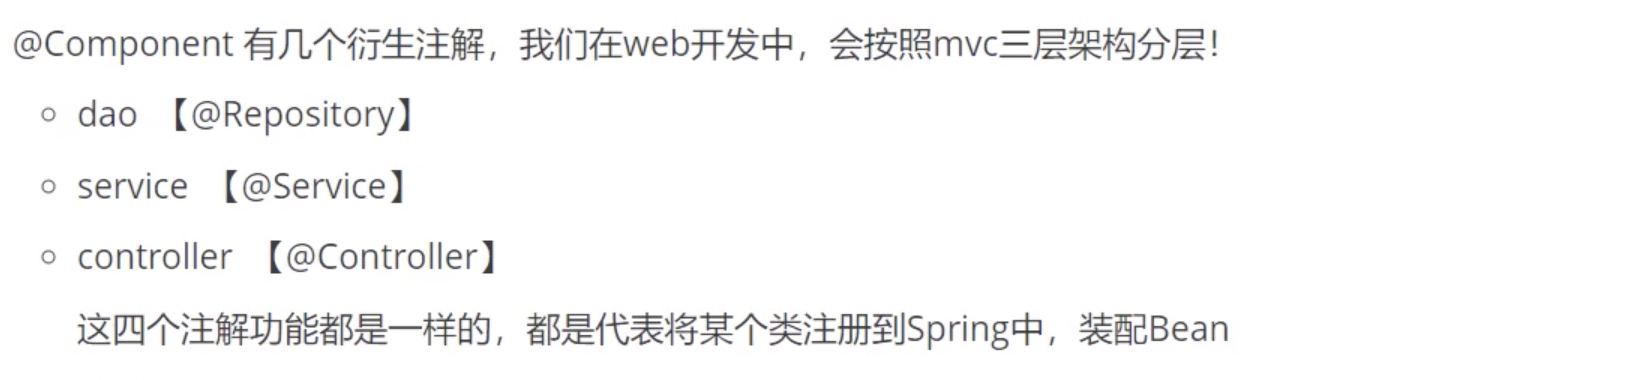
3.衍生注解
4.自动装配

5.作用域
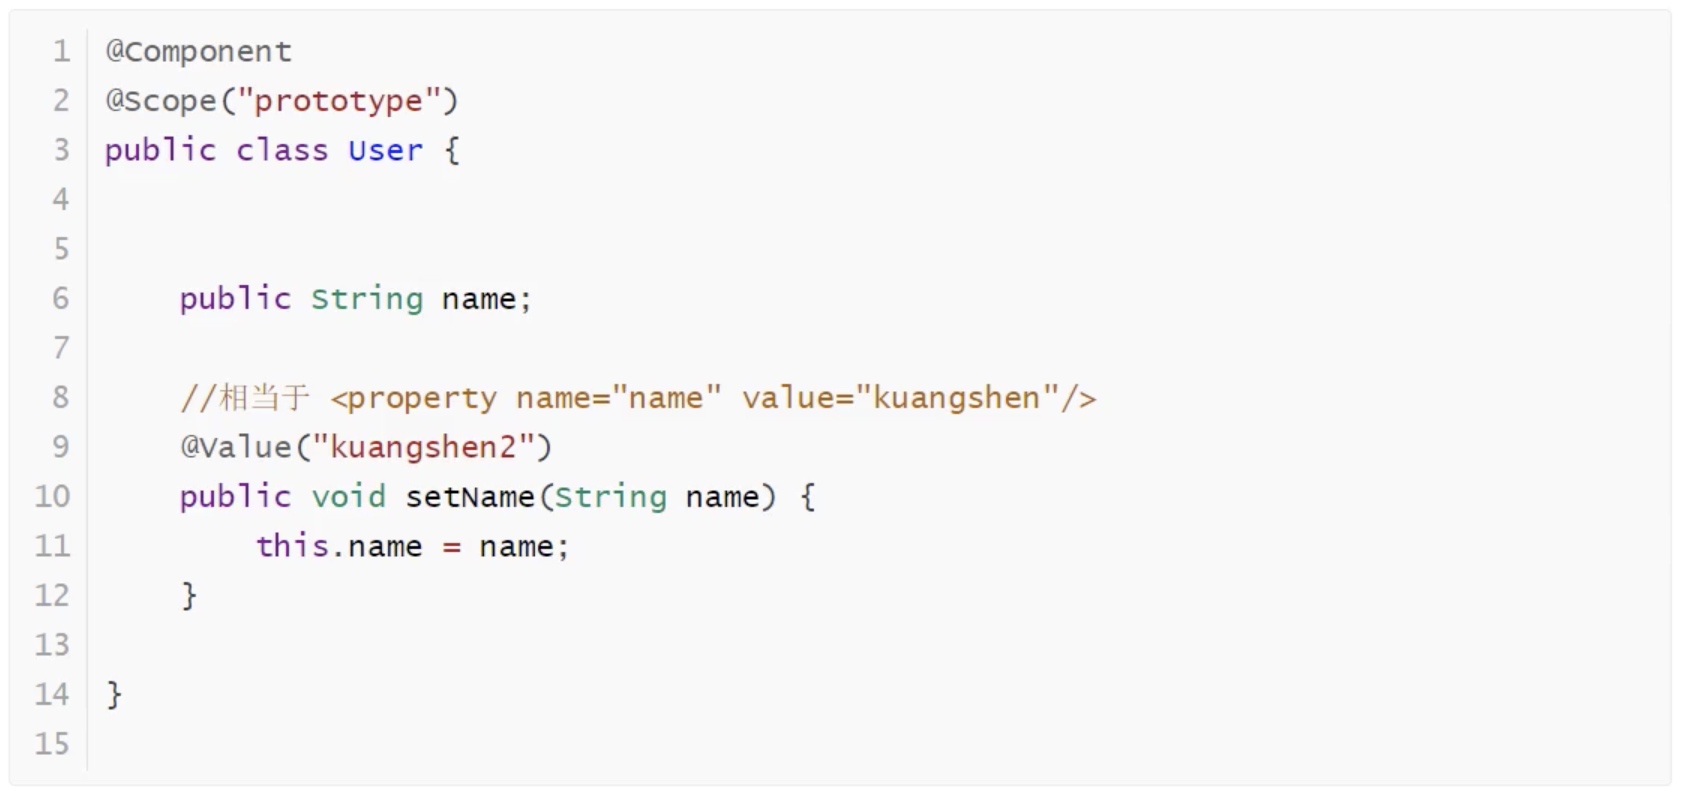
6.小结

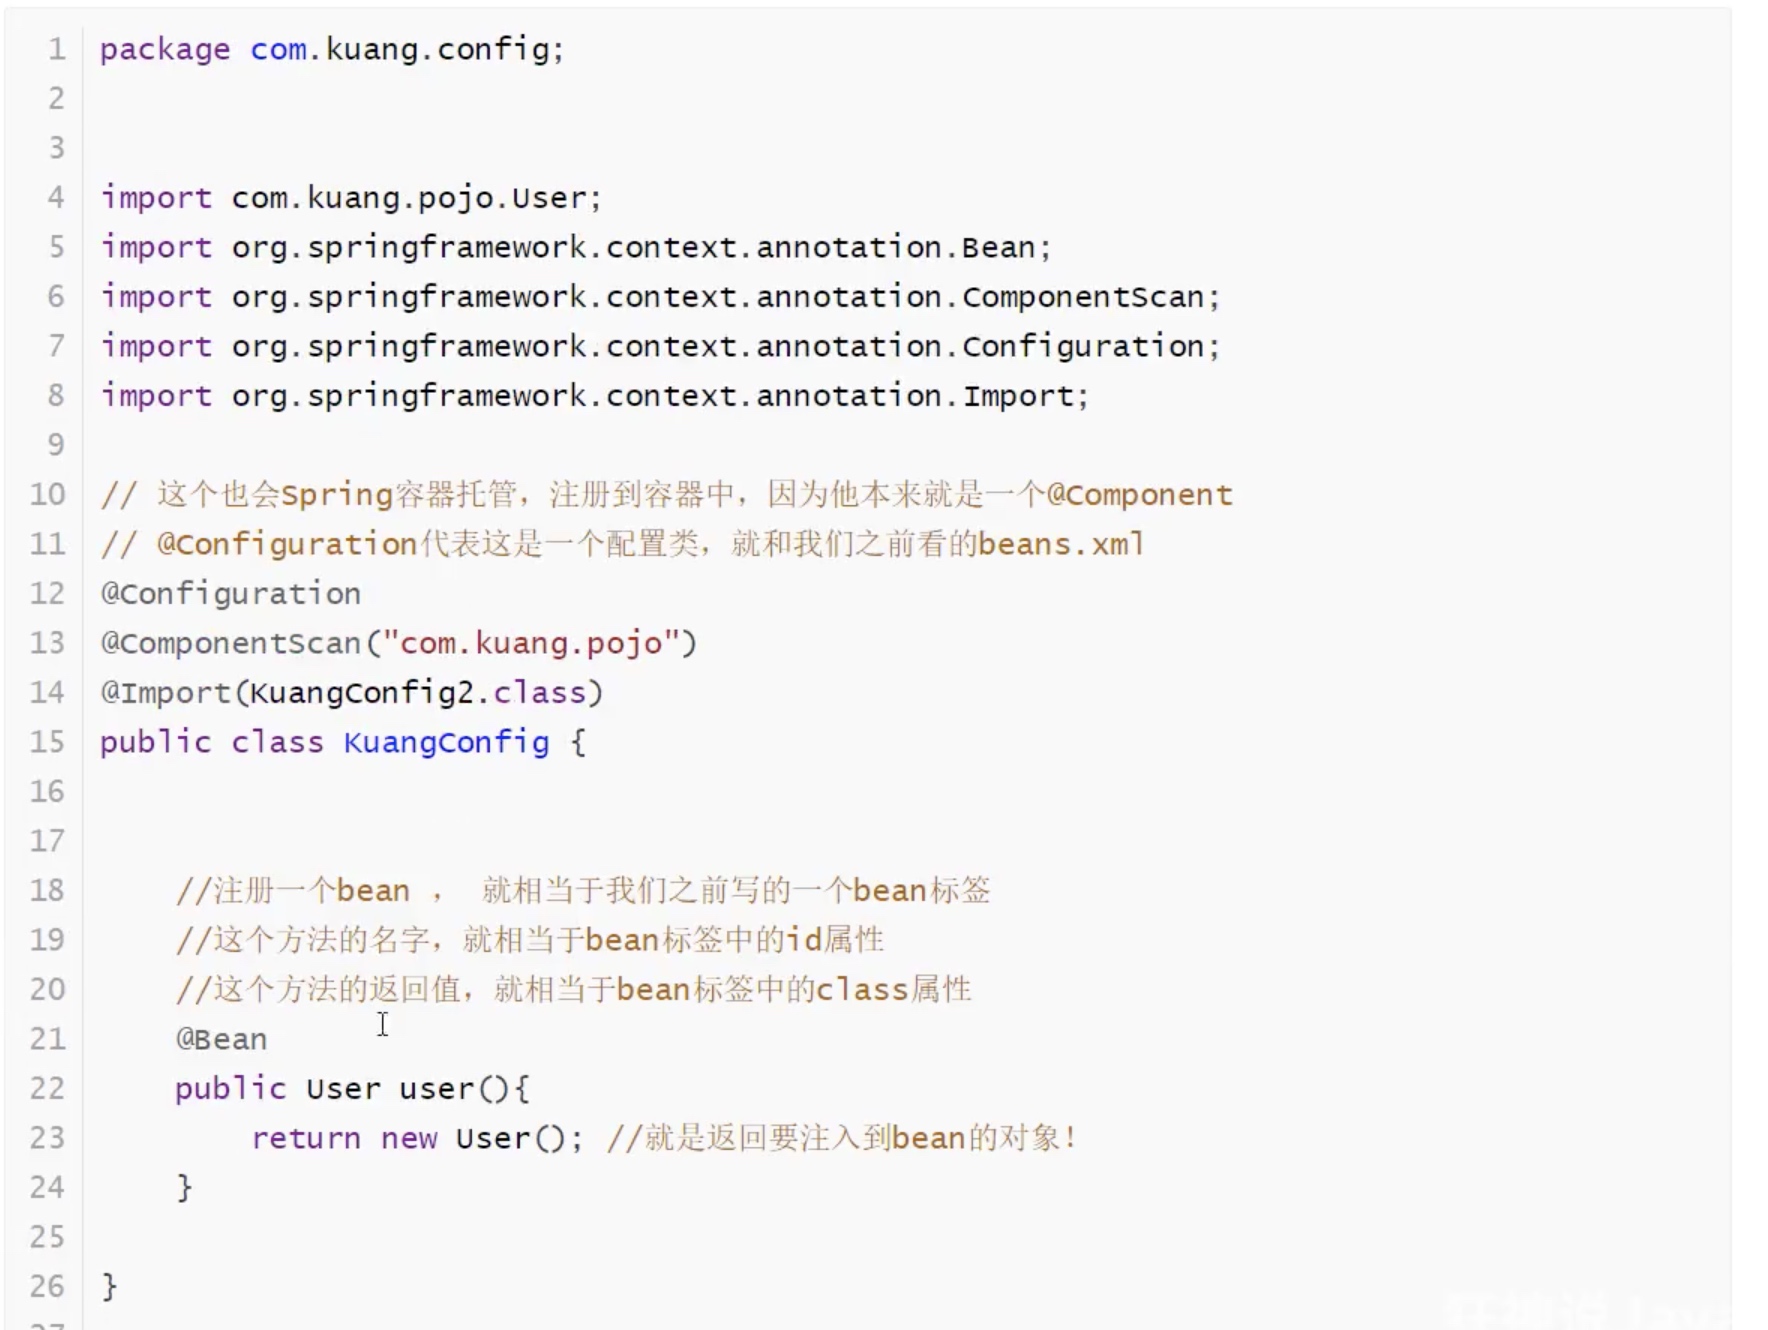
实体类:
配置类:
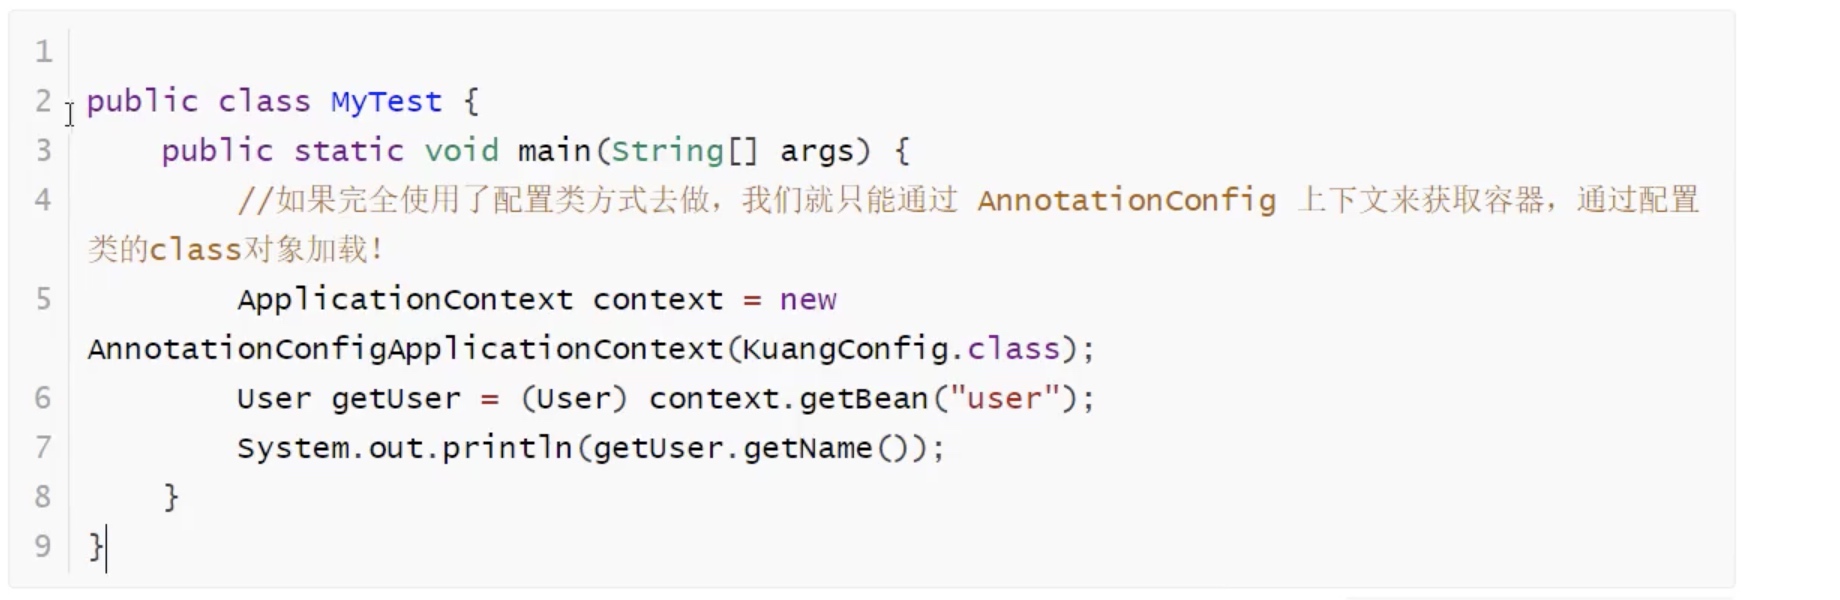
测试类:
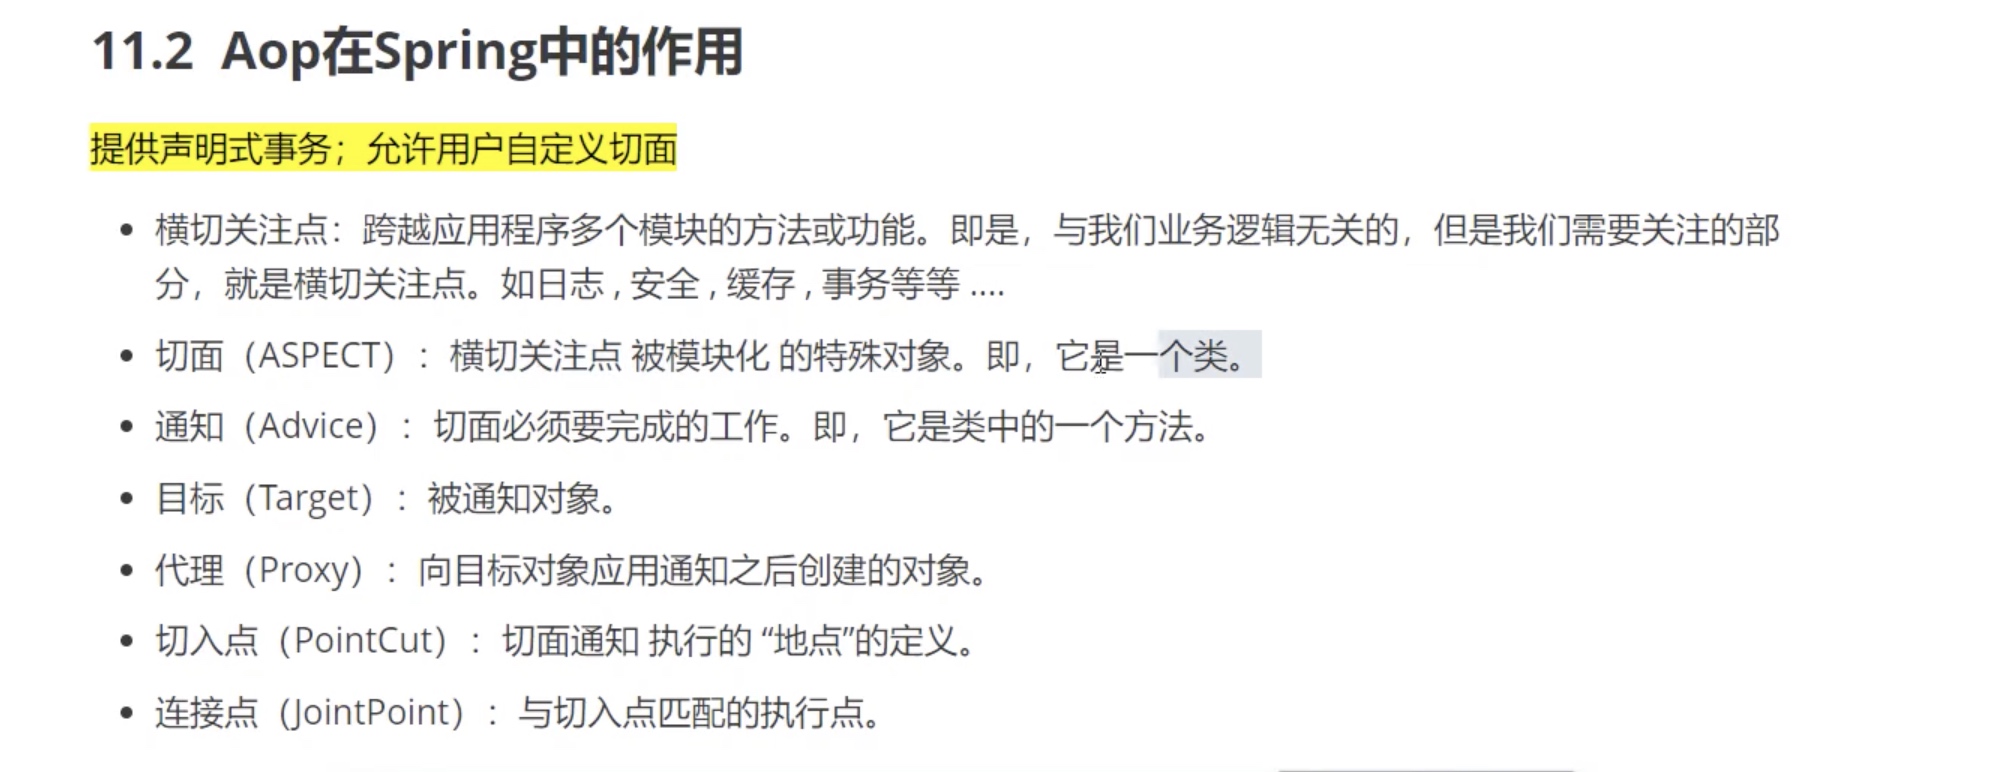
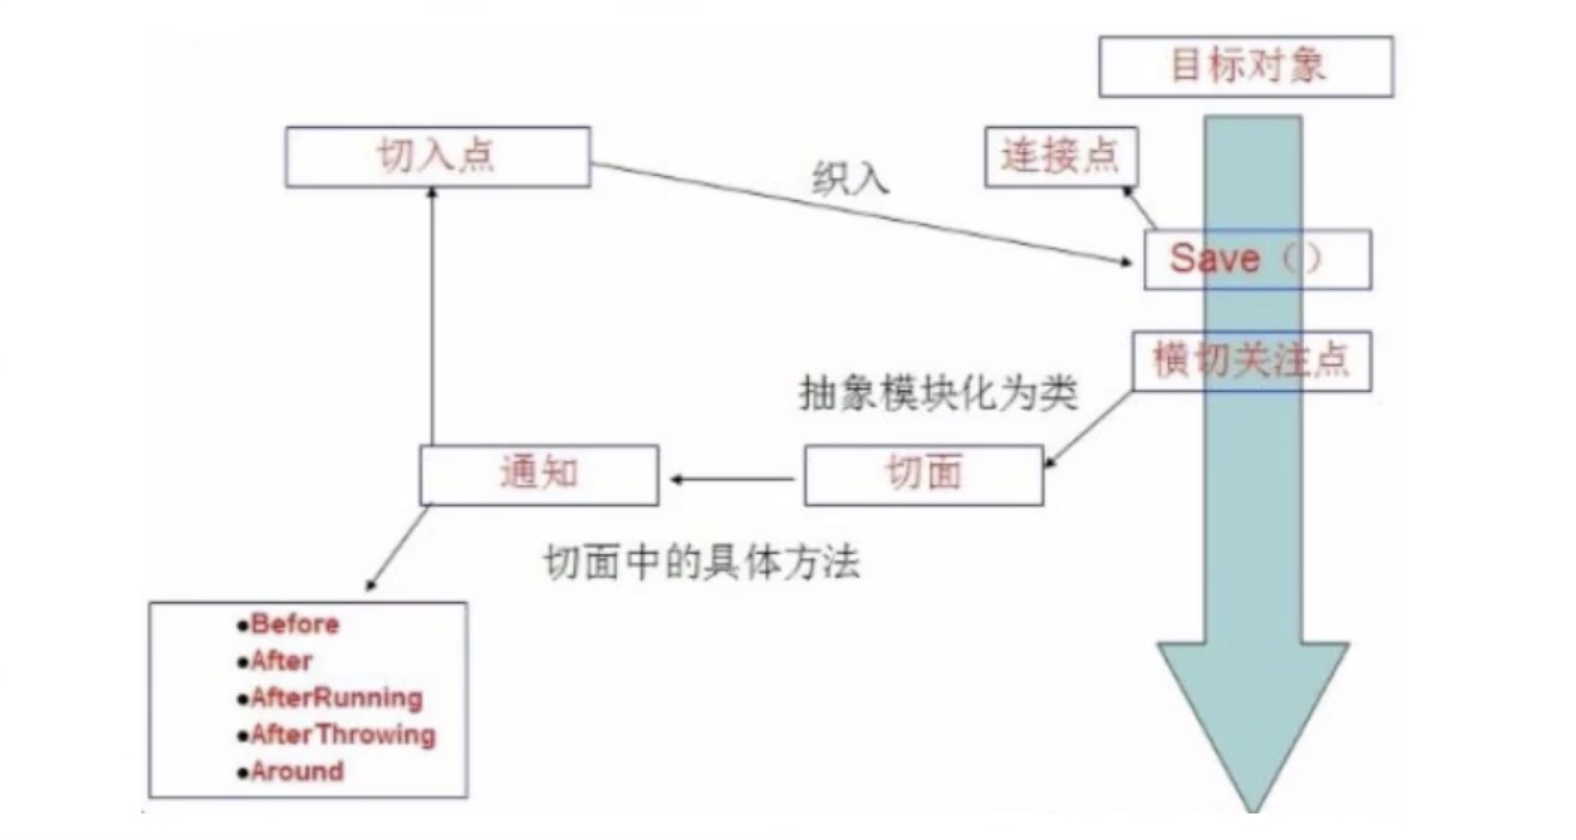
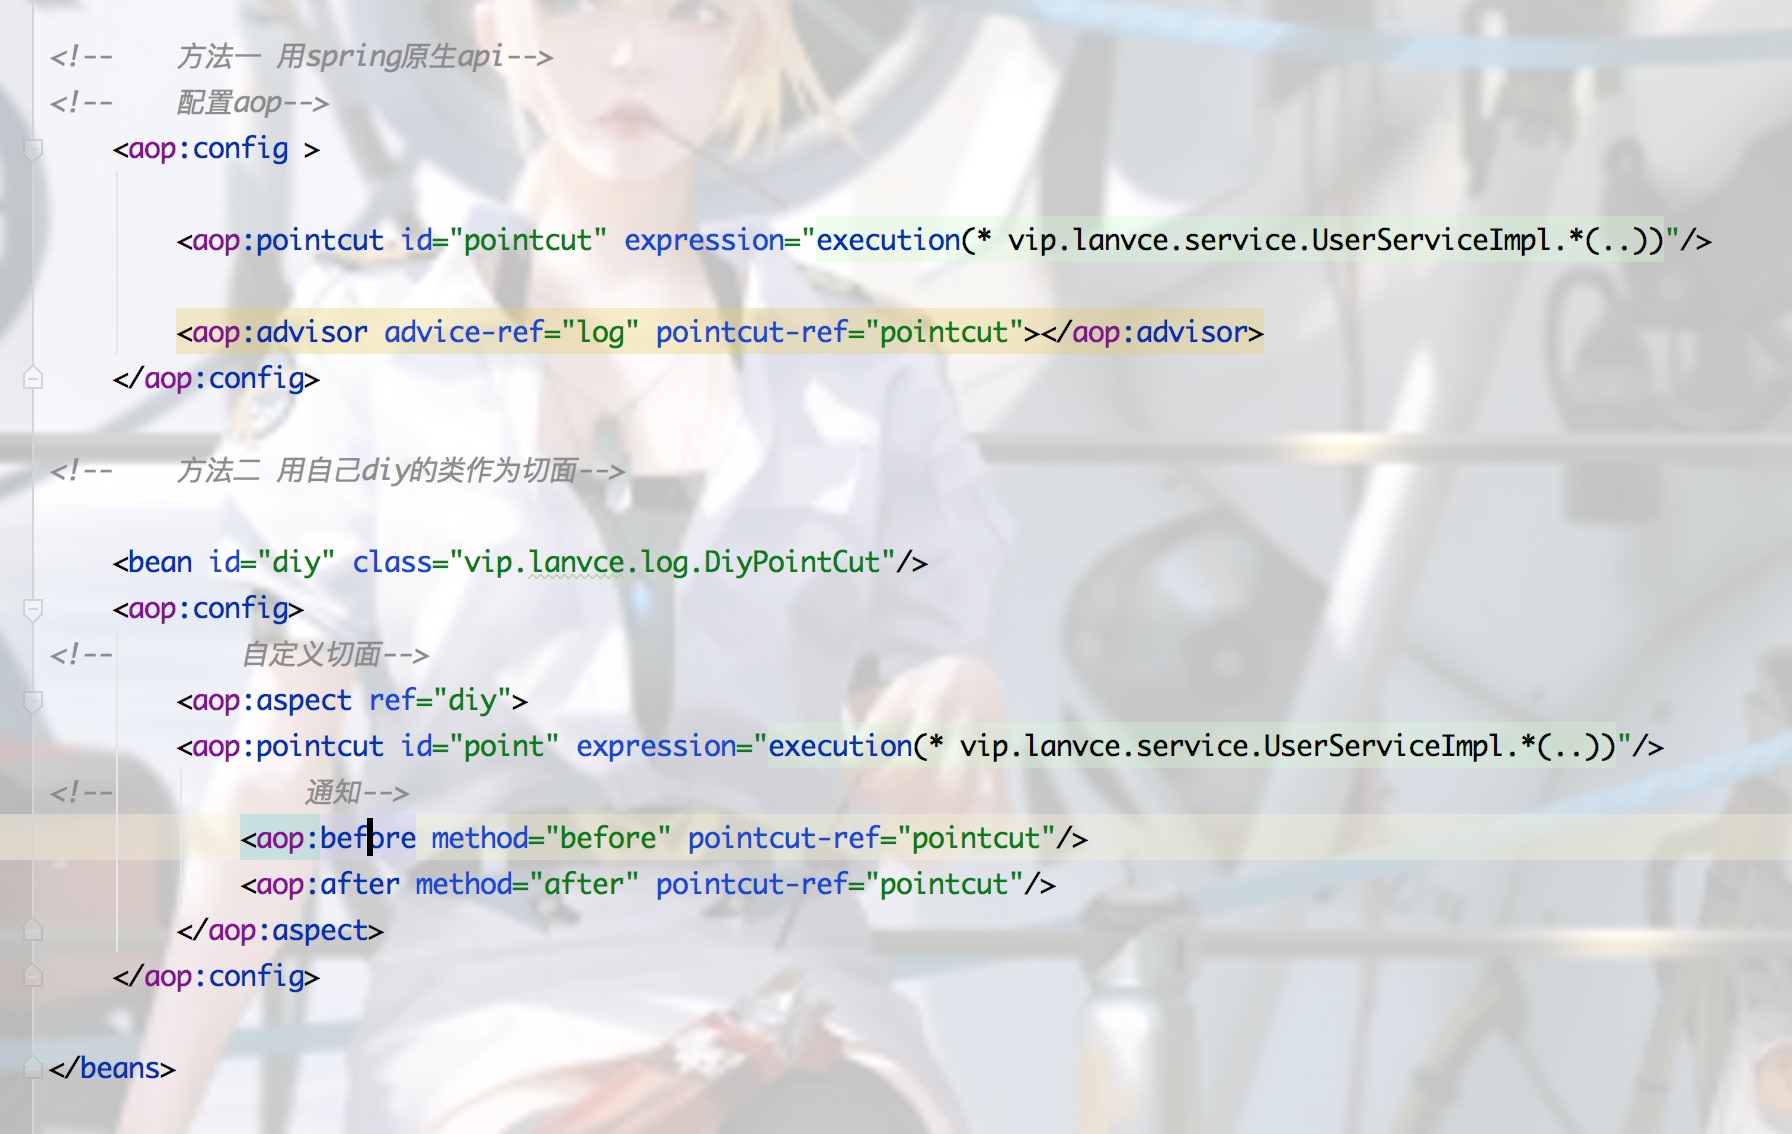
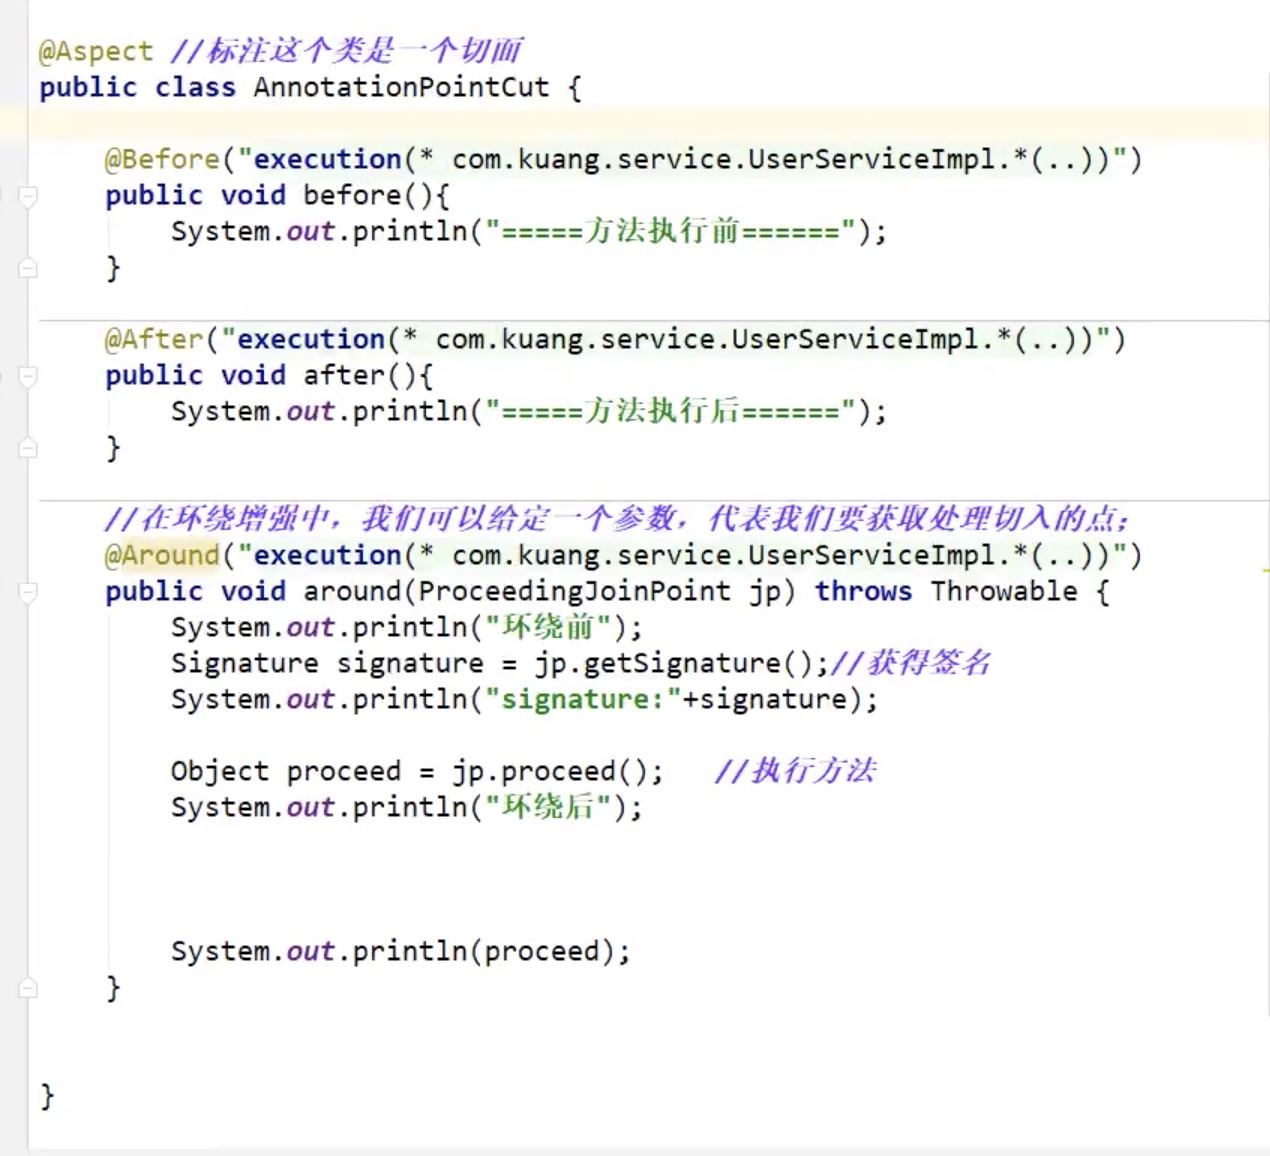
Aop

Spring整合mybatis
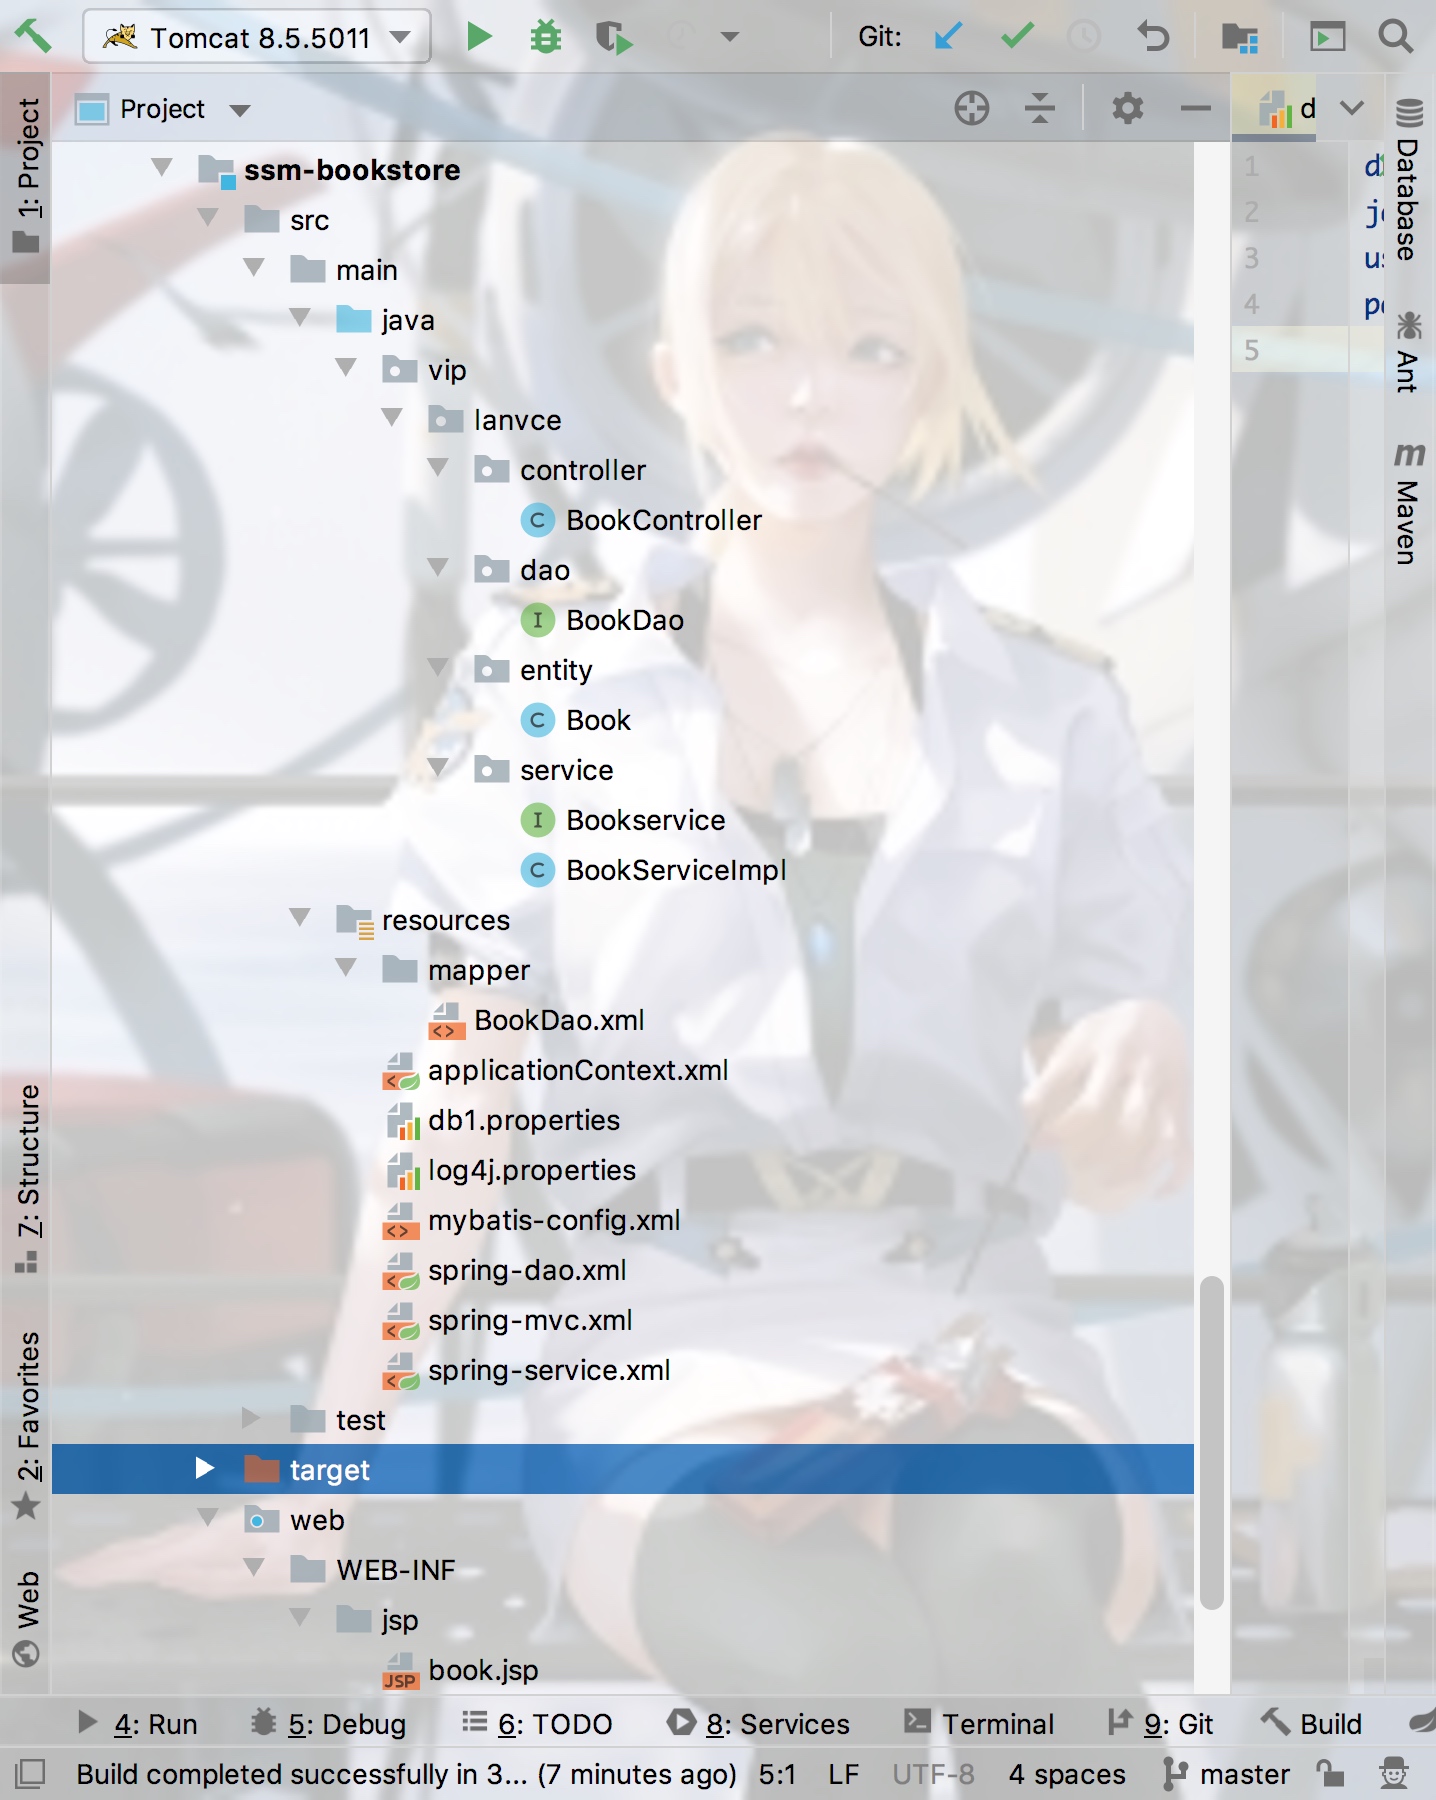
整个目录结构:
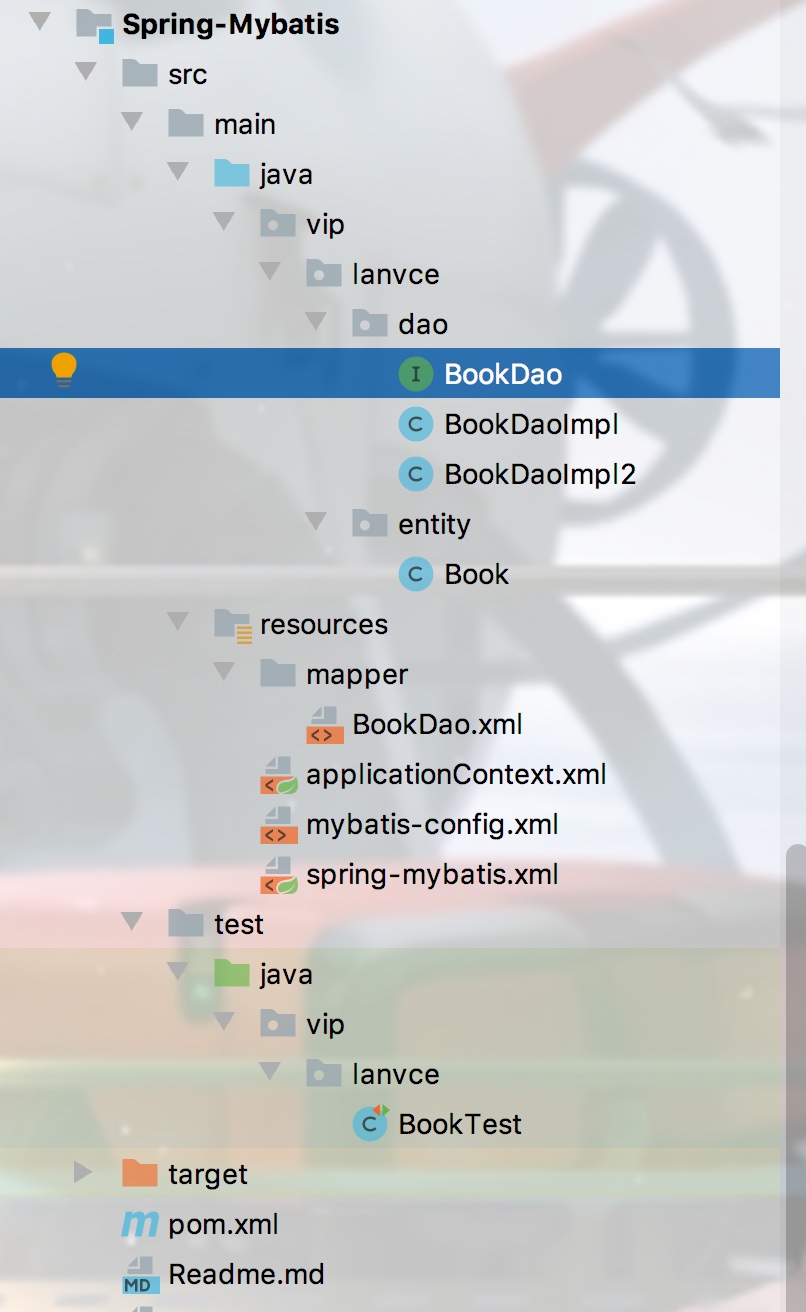
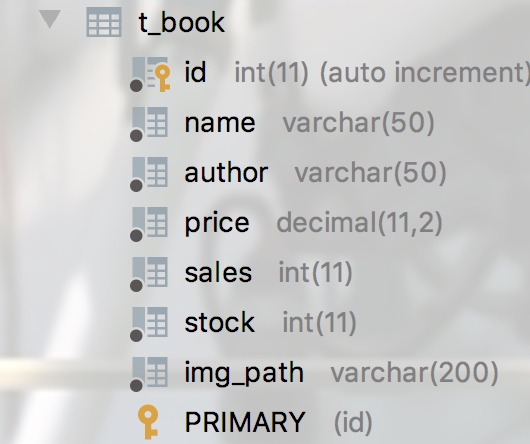
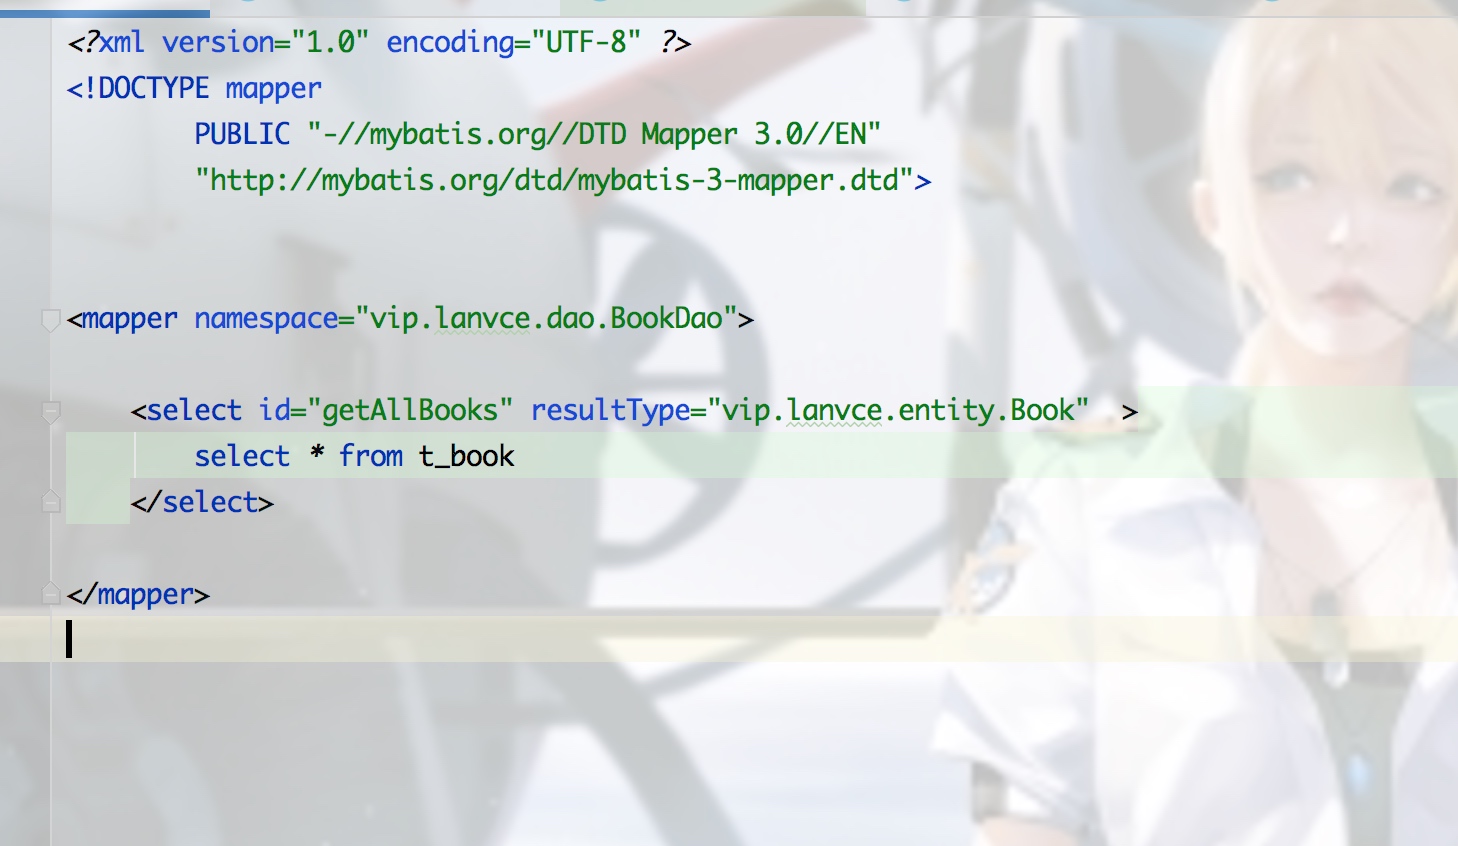
实例的BookDao.xml:
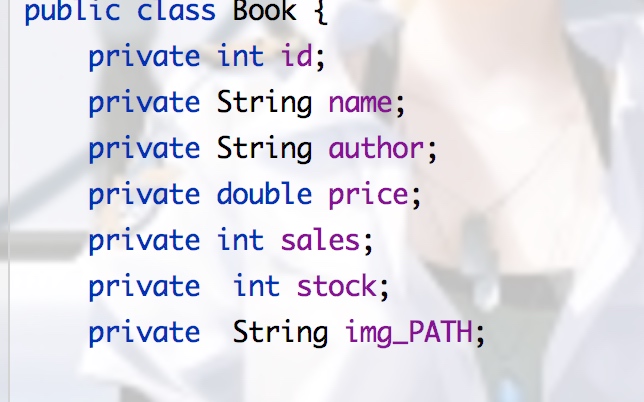
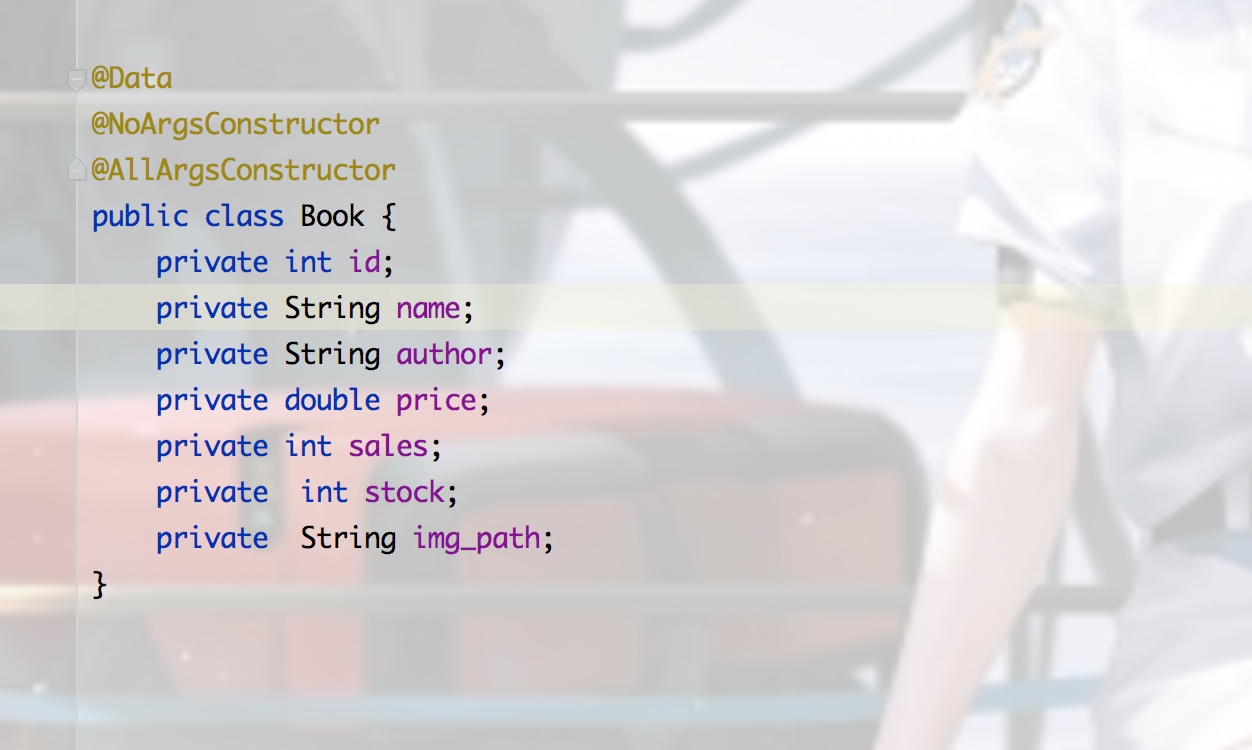
entity Book:
方式一:
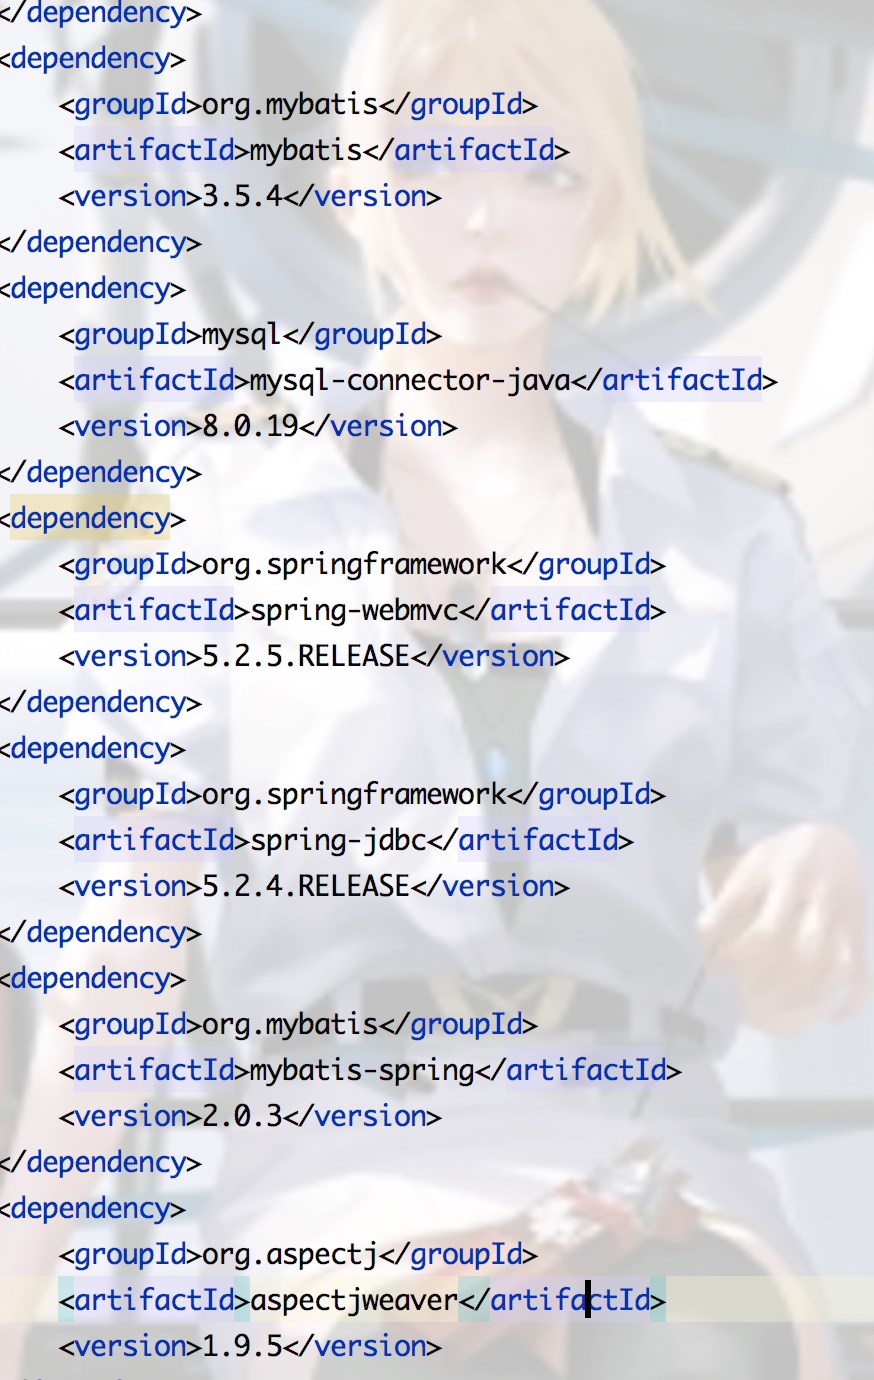
1.引入依赖
2.创建spring-mybatis.xml

<?xml version="1.0" encoding="UTF-8"?>
<beans xmlns="http://www.springframework.org/schema/beans"
xmlns:xsi="http://www.w3.org/2001/XMLSchema-instance"
xmlns:p="http://www.springframework.org/schema/p"
xmlns:c="http://www.springframework.org/schema/c"
xsi:schemaLocation="http://www.springframework.org/schema/beans
https://www.springframework.org/schema/beans/spring-beans.xsd">
<!-- 使用spring的数据源替换mybatis的数据源-->
<!-- 这里使用spring提供的jdbc rg.springframework.jdbc.datasource.DriverManagerDataSource"-->
<bean id="dataSource" class="org.springframework.jdbc.datasource.DriverManagerDataSource">
<property name="url" value="jdbc:mysql://localhost:3306/bookstore?useSSL=true&userUnicode=true&characterEncoding=UTF-8"/>
<property name="driverClassName" value="com.mysql.jdbc.Driver"/>
<property name="username" value="root"/>
<property name="password" value="mzs199847"/>
</bean>
<bean id="sqlSessionFactory" class="org.mybatis.spring.SqlSessionFactoryBean">
<property name="dataSource" ref="dataSource"/>
<!-- 绑定mybatis配置文件-->
<property name="configLocation" value="classpath:mybatis-config.xml"/>
<property name="mapperLocations" value="mapper/*.xml"/>
</bean>
<!-- sqlsessionTemplate-->
<bean id="sqlSession" class="org.mybatis.spring.SqlSessionTemplate">
<!-- 没有set方法注入 使用构造器注入sqlsessionFactory-->
<constructor-arg index="0" ref="sqlSessionFactory"/>
</bean>
</beans>
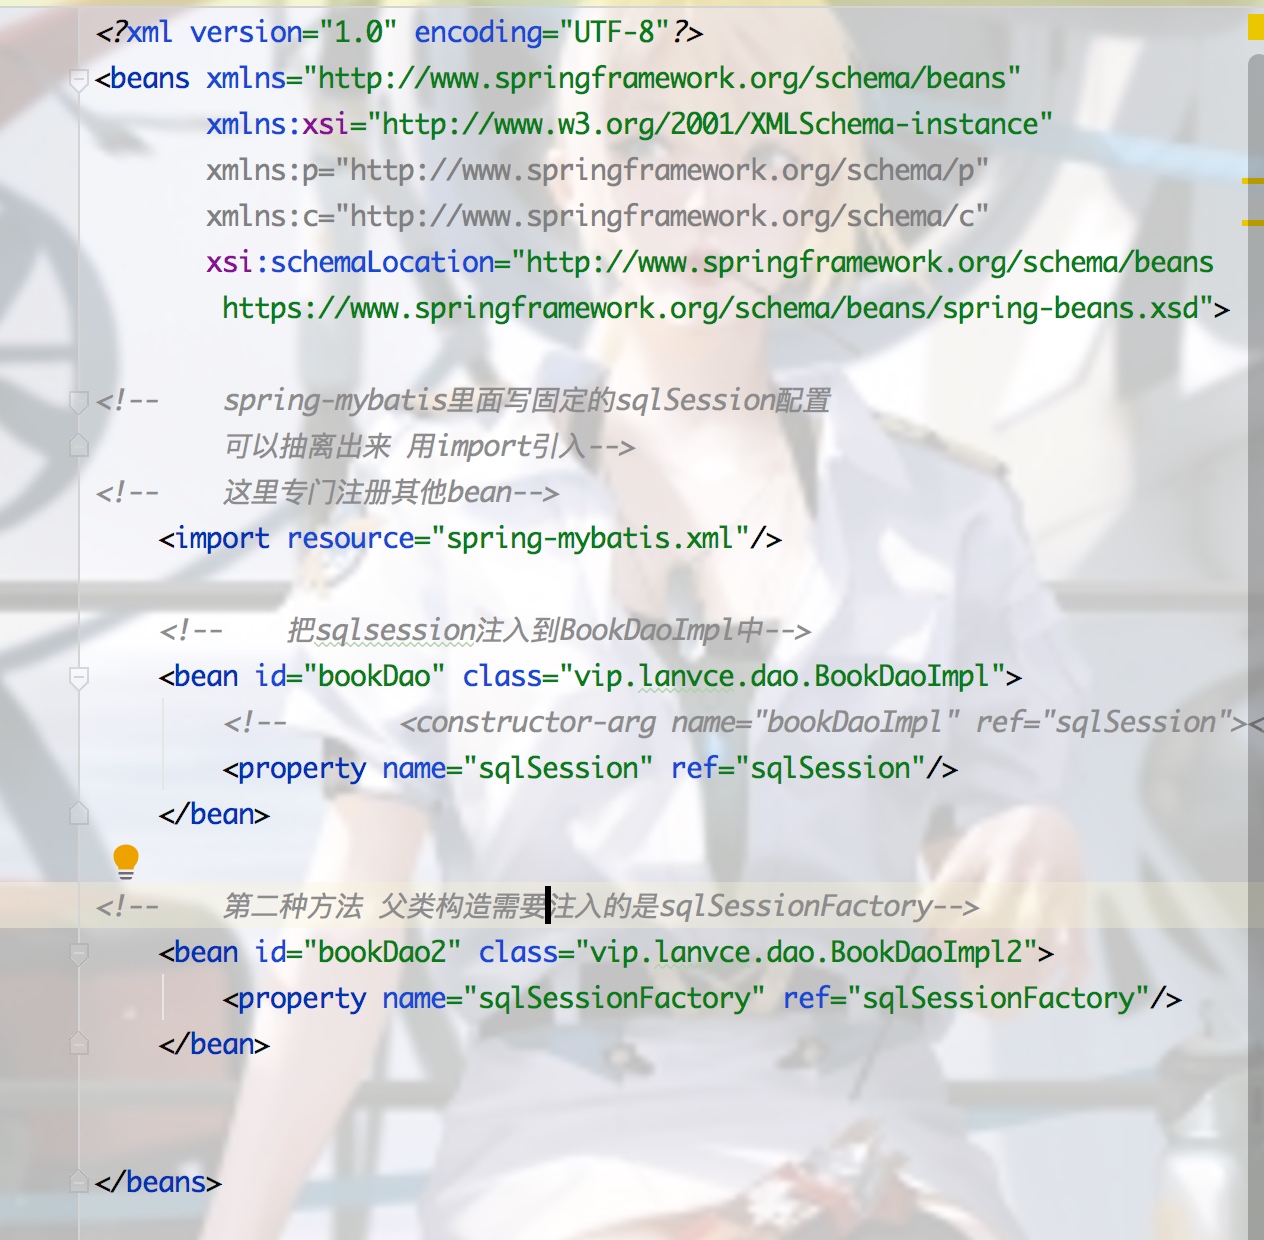
由上面可以看出,原来有mybatis-config进行数据源,sqlSession的配置以及映射具体的mapper文件,现在都交给Spring来做了。只与具体的service层的bean的配置可以拆分到一个新的applicationContext.xml中,如下:
mybatis-config.xml中可以进行一些setting,或者别名操作:
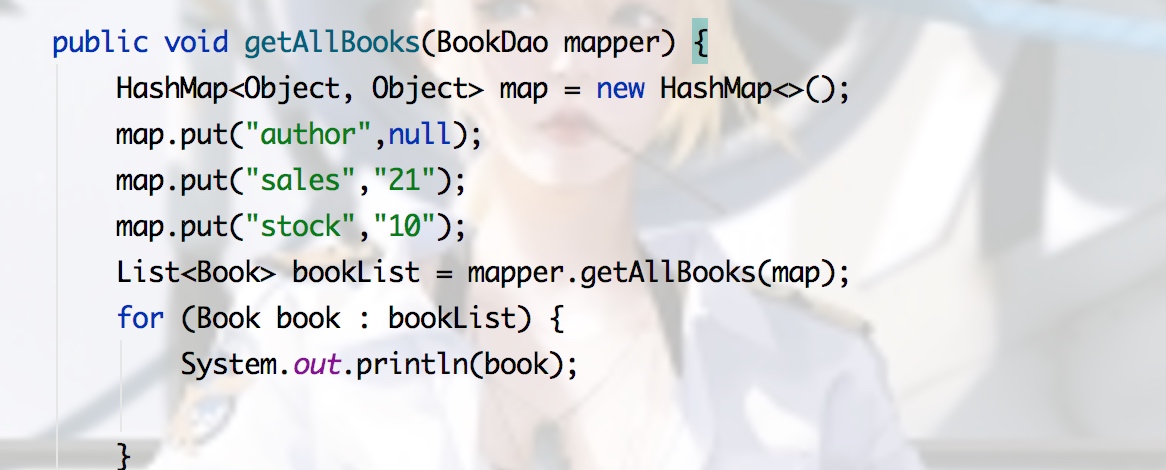
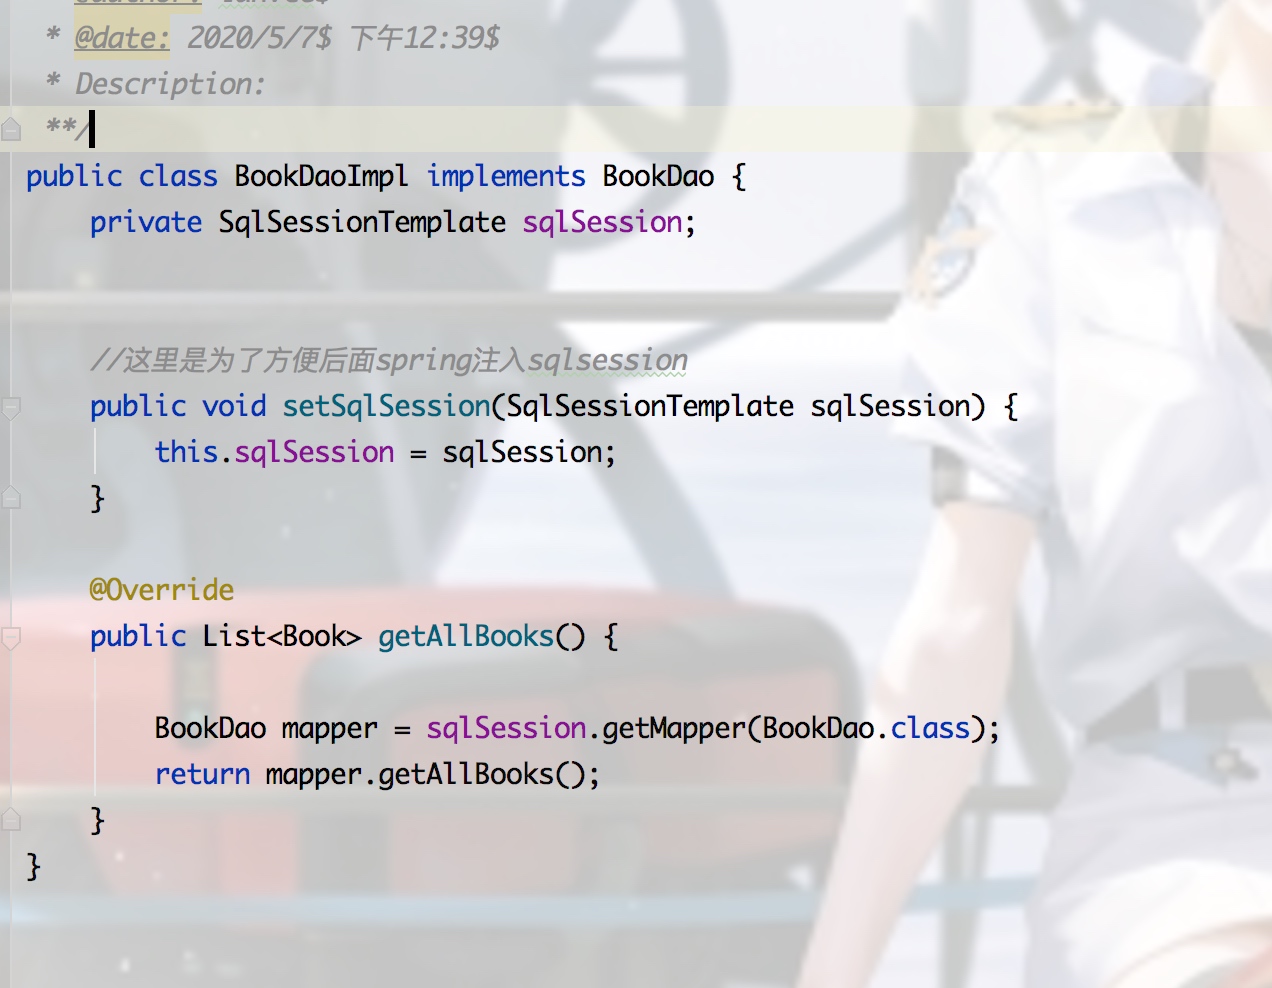
3.业务层代码如下:
BookDaoImpl:
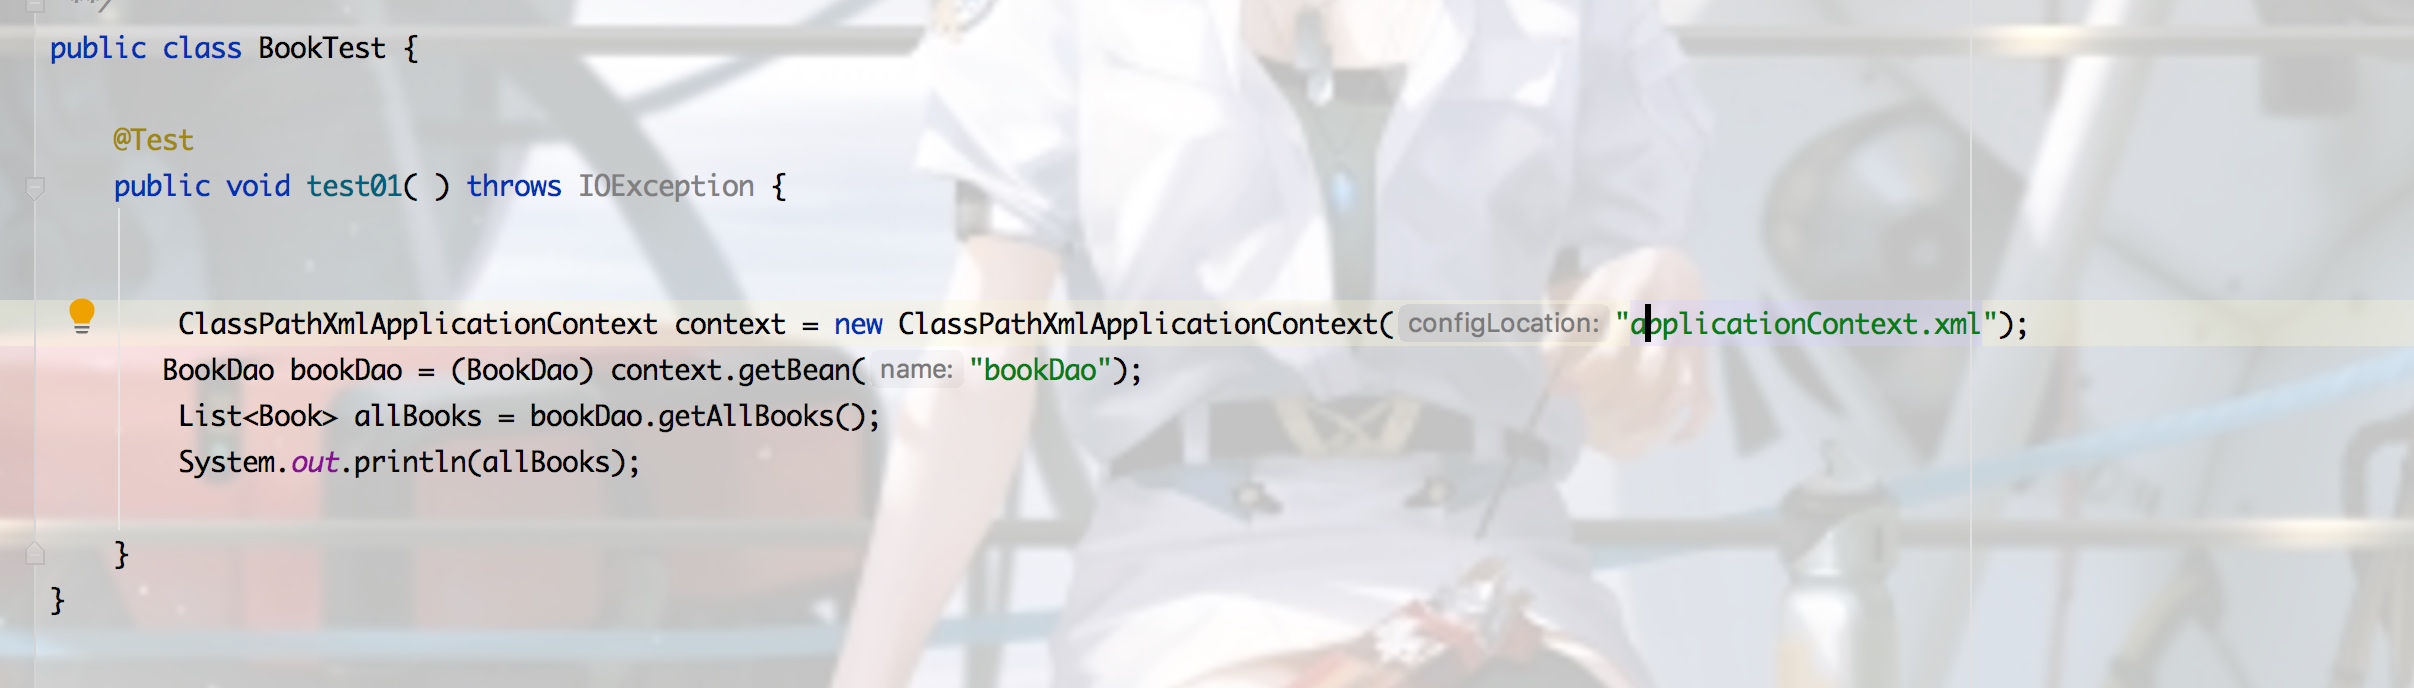
测试类:
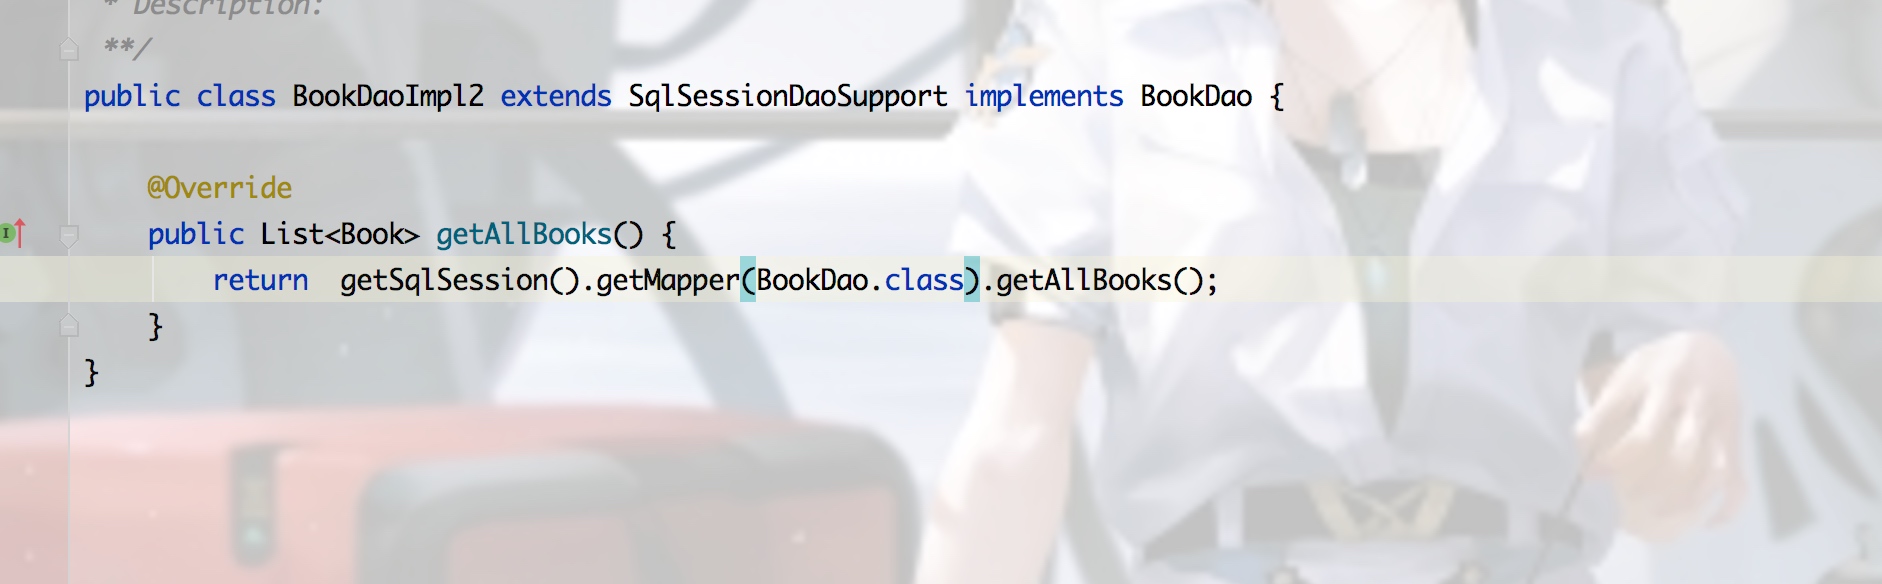
方式二:
和方法一不同在于这个需要注入的是sqlSessionFactory,更加简洁了
BookDaoImpl:
applicationContext.xml中:

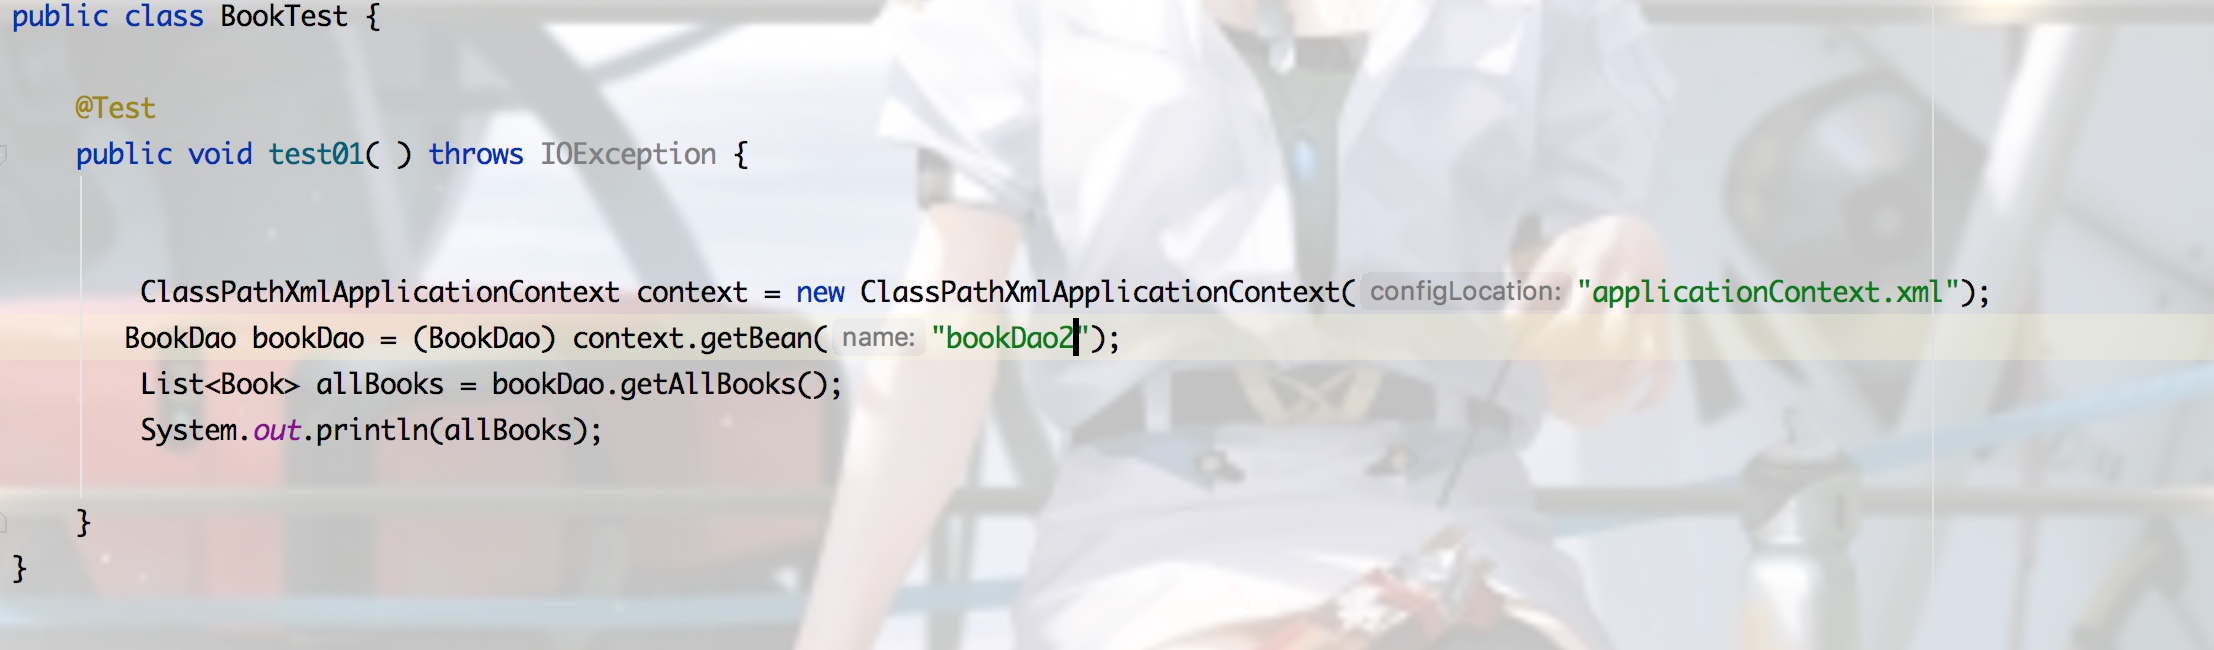
测试类:
Spring事务

SpringMvc
SSM整合
项目结构:
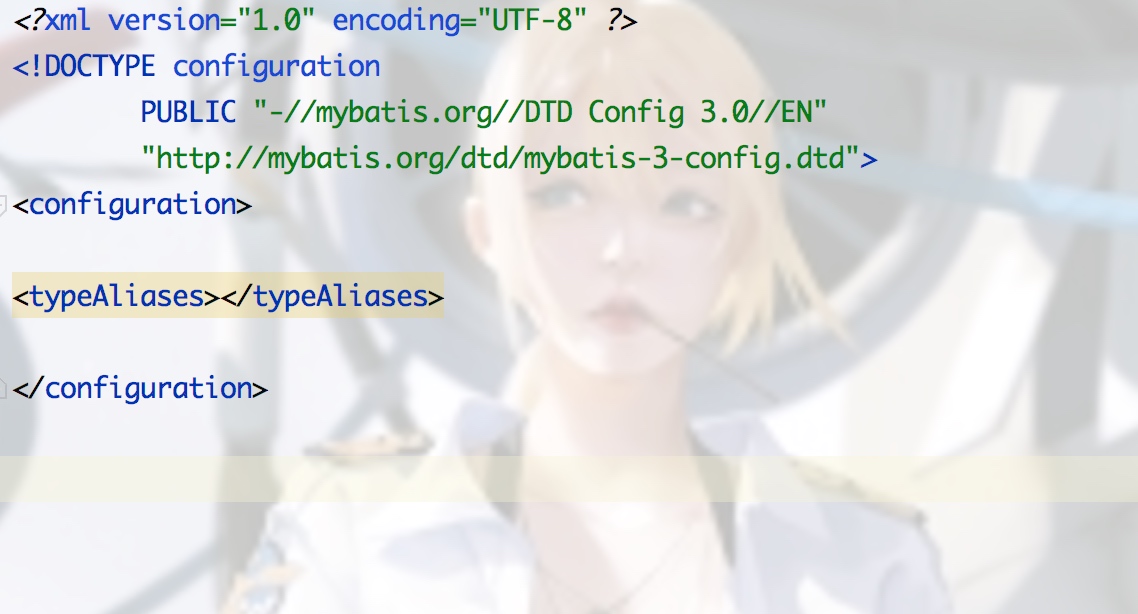
mybatis-config:

<?xml version="1.0" encoding="UTF-8" ?>
<!DOCTYPE configuration
        PUBLIC "-//mybatis.org//DTD Config 3.0//EN" "http://mybatis.org/dtd/mybatis-3-config.dtd">
<configuration>

    <typeAliases>
        <package name="vip.lanvce.entity"/>
    </typeAliases>


    <mappers>
        <mapper resource="/mapper/BookDao.xml"></mapper>
    </mappers>
</configuration>
spring-dao:
<?xml version="1.0" encoding="UTF-8"?>
<beans xmlns="http://www.springframework.org/schema/beans"
       xmlns:xsi="http://www.w3.org/2001/XMLSchema-instance"
       xmlns:context="http://www.springframework.org/schema/context"
       xsi:schemaLocation="http://www.springframework.org/schema/beans
        http://www.springframework.org/schema/beans/spring-beans.xsd
        http://www.springframework.org/schema/context
        https://www.springframework.org/schema/context/spring-context.xsd">


    <!-- 配置整合mybatis -->
    <!-- 1.关联数据库文件    -->
    <context:property-placeholder location="classpath:db1.properties"/>

    <!-- 2.数据库连接池    -->
    <!--数据库连接池
    dbcp  半自动化操作         不能自动连接
    c3p0  自动化操作(自动的加载配置文件    并且设置到对象里面)
    -->
    <bean id="datasource" class="com.mchange.v2.c3p0.ComboPooledDataSource">
        <property name="driverClass" value="${driver}"/>
        <property name="jdbcUrl" value="${jdbc_url}"/>
        <property name="user" value="${username}"/>
        <property name="password" value="${password}"/>


        <!-- c3p0连接池的私有属性    -->
        <property name="maxPoolSize" value="30"/>
        <property name="minPoolSize" value="10"/>
        <!-- 关闭连接后不自动commit -->
        <property name="autoCommitOnClose" value="false"/>
        <!-- 获取连接超时时间    -->
        <property name="checkoutTimeout" value="10000"/>
        <!-- 当获取连接失败重试次数    -->
        <property name="acquireRetryAttempts" value="2"/>
    </bean>

    <!-- 3.配置SqlSessionFactory对象    -->
    <bean id="sqlSessionFactory" class="org.mybatis.spring.SqlSessionFactoryBean">

        <property name="dataSource" ref="datasource"/>
<!--        这里一定要写classpath 否则报错-->
        <property name="configLocation" value="classpath:mybatis-config.xml"/>

    </bean>

    <!-- 4.配置扫描Dao接口包,动态实现Dao接口注入到spring容器中    -->
    <bean class="org.mybatis.spring.mapper.MapperScannerConfigurer">
        <!-- 注入sqlSessionFactory -->
        <property name="sqlSessionFactoryBeanName" value="sqlSessionFactory"/>
        <!-- 给出需要扫描Dao接口包    -->
        <property name="basePackage" value="vip.lanvce.dao"/>
    </bean>

</beans>
spring-mvc:
<?xml version="1.0" encoding="UTF-8"?>
<beans xmlns="http://www.springframework.org/schema/beans"
       xmlns:xsi="http://www.w3.org/2001/XMLSchema-instance"
       xmlns:context="http://www.springframework.org/schema/context" xmlns:mvc="http://www.springframework.org/schema/mvc"
       xsi:schemaLocation="http://www.springframework.org/schema/beans http://www.springframework.org/schema/beans/spring-beans.xsd
http://www.springframework.org/schema/context
http://www.springframework.org/schema/context/spring-context.xsd http://www.springframework.org/schema/mvc
https://www.springframework.org/schema/mvc/spring-mvc.xsd">


<!--1.开启springmvc注解驱动-->
    <mvc:annotation-driven/>
<!--    2.静态资源默认servlet配置-->
<mvc:default-servlet-handler/>

<!--    3.配置jsp 显示viewResolver视图解析器-->

    <bean class="org.springframework.web.servlet.view.InternalResourceViewResolver">

        <property name="viewClass" value="org.springframework.web.servlet.view.JstlView"/>
<!--        jsp/后面一定要加/-->
        <property name="prefix" value="/WEB-INF/jsp/"/>
        <property name="suffix" value=".jsp"/>
    </bean>

<!--    4.扫描web相关的bean-->
<context:component-scan base-package="vip.lanvce.controller"/>

</beans>
web.xml:
<?xml version="1.0" encoding="UTF-8"?>
<web-app xmlns="http://xmlns.jcp.org/xml/ns/javaee"
         xmlns:xsi="http://www.w3.org/2001/XMLSchema-instance"
         xsi:schemaLocation="http://xmlns.jcp.org/xml/ns/javaee http://xmlns.jcp.org/xml/ns/javaee/web-app_4_0.xsd"
         version="4.0">


    <servlet>
        <!--DispatcherServlet-->
        <servlet-name>DispatcherServlet</servlet-name>
        <servlet-class>org.springframework.web.servlet.DispatcherServlet</servlet-class>
        <init-param>
            <param-name>contextConfigLocation</param-name>
            <!--一定要注意:我们这里加载的是总的配置文件,之前被这里坑了!-->
            <param-value>classpath:applicationContext.xml</param-value>
        </init-param>
        <load-on-startup>1</load-on-startup>
    </servlet>

    <servlet-mapping>
        <servlet-name>DispatcherServlet</servlet-name>
        <url-pattern>/</url-pattern>
    </servlet-mapping>

    <!--encodingFilter-->
    <filter>
        <filter-name>encodingFilter</filter-name>
        <filter-class>org.springframework.web.filter.CharacterEncodingFilter</filter-class>
        <init-param>
           <param-name>encoding</param-name>
            <param-value>utf-8</param-value>
        </init-param>
    </filter>
    <filter-mapping>
        <filter-name>encodingFilter</filter-name>
        <url-pattern>/*</url-pattern>
    </filter-mapping>

<!--    session过期时间-->
<session-config>
    <session-timeout>15</session-timeout>
</session-config>

</web-app>
spring-service:
<?xml version="1.0" encoding="UTF-8"?>
<beans xmlns="http://www.springframework.org/schema/beans"
       xmlns:xsi="http://www.w3.org/2001/XMLSchema-instance"
       xmlns:context="http://www.springframework.org/schema/context" xsi:schemaLocation="http://www.springframework.org/schema/beans
http://www.springframework.org/schema/beans/spring-beans.xsd
http://www.springframework.org/schema/context
http://www.springframework.org/schema/context/spring-context.xsd">


<!--1.扫描service下的包-->
<context:component-scan base-package="vip.lanvce.service"/>

<!--2.将所有业务类注入进来,也可以通过注解-->
<bean id="BookServiceImpl" class="vip.lanvce.service.BookServiceImpl">

<property name="BookDao" ref="bookDao"/>
</bean>

    <!--   3. 声明式事务配置-->
<bean id="transactionManager" class="org.springframework.jdbc.datasource.DataSourceTransactionManager">

    <property name="dataSource" ref="datasource"/>
</bean>

<!--    4.aop事务支持-->

</beans>
application.xml:
<?xml version="1.0" encoding="UTF-8"?>
<beans xmlns="http://www.springframework.org/schema/beans"
       xmlns:xsi="http://www.w3.org/2001/XMLSchema-instance"
       xsi:schemaLocation="http://www.springframework.org/schema/beans
       http://www.springframework.org/schema/beans/spring-beans.xsd">


    <import resource="spring-dao.xml"/>
    <import resource="spring-service.xml"/>
    <import resource="spring-mvc.xml"/>

</beans>
mapper文件:
<?xml version="1.0" encoding="UTF-8" ?>
<!DOCTYPE mapper
        PUBLIC "-//mybatis.org//DTD Mapper 3.0//EN"
        "http://mybatis.org/dtd/mybatis-3-mapper.dtd">
<!--namespaces必须要写-->
<mapper namespace="vip.lanvce.dao.BookDao">
    <select id="getAllbooks" resultType="Book">
        select * from books
    </select>
</mapper>
踩坑指南
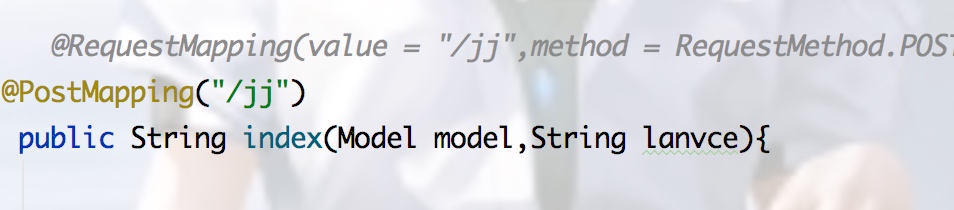
1.表单提交数据记得要用PostMapping,否则null 或者是 @RequestMapping(value = "",method = RequestMethod.POST)
2.创建maven项目记得要先用普通maven项目,然后添加web模块


必须要点这个Put into OutPut Root 生成lib目录
3.首页下的index.jsp中提交表单 路径如下
controller如下:

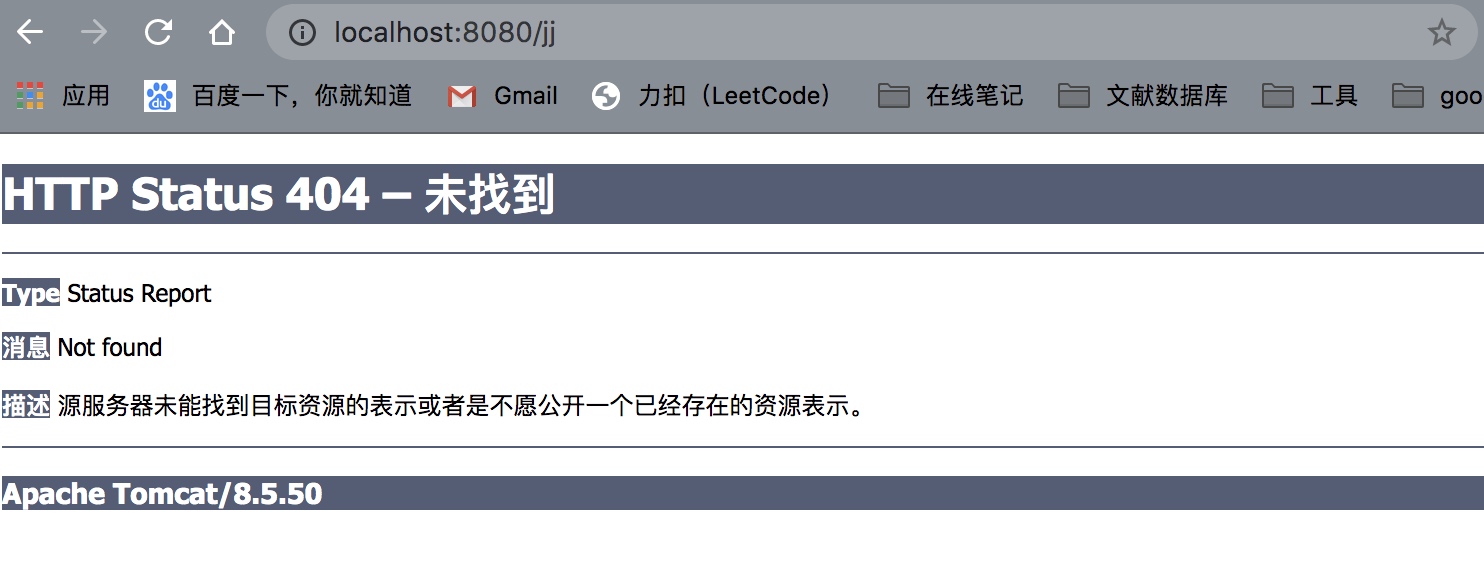
这样由于路径改变了,没有了前面的...war_explored,所以肯定找不到
4.表单中input标签name的值lanvce才是我们在控制器中要取出的,而不是name
  <form action="/jj" method="post">
    <input type="text" name="lanvce">
    <input type="submit" >
  </form>
5.乱码问题
可能的原因解决方式一:
web.xml中添加过滤器:
<filter>
<filter-name>encoding</filter-name>
<filter-
class>org.springframework.web.filter.CharacterEncodingFilter</filter-class> <init-param>
<param-name>encoding</param-name>
<param-value>utf-8</param-value>
</init-param>
</filter>
<filter-mapping>
<filter-name>encoding</filter-name>
<url-pattern>/*</url-pattern>
</filter-mapping>
方式二:
tomcat的server.xml设置编码:
<Connector URIEncoding="utf-8" port="8080" protocol="HTTP/1.1"
connectionTimeout="20000"
redirectPort="8443" />
方式三:
终极大招,大神配置的过滤器:
import javax.servlet.
*;
import javax.servlet.http.HttpServletRequest;
import javax.servlet.http.HttpServletRequestWrapper;
import javax.servlet.http.HttpServletResponse;
import java.io.IOException;
import java.io.UnsupportedEncodingException;
import java.util.Map;
/**
* 解决get和post请求 全部乱码的过滤器
*/
public class GenericEncodingFilter implements Filter {
@Override
public void destroy() {
}
@Override
public void doFilter(ServletRequest request, ServletResponse
response, FilterChain chain) throws IOException, ServletException {
//处理response的字符编码
HttpServletResponse myResponse=(HttpServletResponse) response;
myResponse.setContentType("text/html;charset=UTF-8");
// 转型为与协议相关对象
HttpServletRequest httpServletRequest = (HttpServletRequest)
request;
// 对request包装增强
HttpServletRequest myrequest = new
MyRequest(httpServletRequest);
chain.doFilter(myrequest, response);
}
@Override
public void init(FilterConfig filterConfig) throws
ServletException {
}
}
//自定义request对象,HttpServletRequest的包装类
class MyRequest extends HttpServletRequestWrapper {
private HttpServletRequest request;
//是否编码的标记
private boolean hasEncode;
//定义一个可以传入HttpServletRequest对象的构造函数,以便对其进行装饰
public MyRequest(HttpServletRequest request) {
super(request);// super必须写
this.request = request;
}
// 对需要增强方法 进行覆盖
@Override
public Map getParameterMap() {
// 先获得请求方式
String method = request.getMethod();
if (method.equalsIgnoreCase("post")) {
// post请求
try {
// 处理post乱码
request.setCharacterEncoding("utf-8");
return request.getParameterMap();
} catch (UnsupportedEncodingException e) {
e.printStackTrace();
}
} else if (method.equalsIgnoreCase("get")) {
// get请求
Map<String, String[]> parameterMap =
request.getParameterMap();
if (!hasEncode) { // 确保get手动编码逻辑只运行一次
for (String parameterName : parameterMap.keySet()) {
String[] values = parameterMap.get(parameterName);
if (values != null) {
for (int i = 0; i < values.length; i++) {
try {
// 处理get乱码
values[i] = new String(values[i]
.getBytes("ISO-8859-1"),
"utf-
8");
} catch (UnsupportedEncodingException e) {
e.printStackTrace();
}
}
}
}
hasEncode = true;
}
return parameterMap;
}
return super.getParameterMap();
}
//取一个值
@Override
public String getParameter(String name) {
Map<String, String[]> parameterMap = getParameterMap();
String[] values = parameterMap.get(name);
if (values == null) {
return null;
}
return values[0]; // 取回参数的第一个值
}
//取所有值
@Override
public String[] getParameterValues(String name) {
Map<String, String[]> parameterMap = getParameterMap(); String[] values = parameterMap.get(name);
return values;
}
}
5.用jackson 包要导入全面
  <!-- https://mvnrepository.com/artifact/com.fasterxml.jackson.core/jackson-databind -->
        <dependency>
            <groupId>com.fasterxml.jackson.core</groupId>
            <artifactId>jackson-databind</artifactId>
            <version>2.10.2</version>
        </dependency>
        <dependency>
            <groupId>com.fasterxml.jackson.core</groupId>
            <artifactId>jackson-annotations</artifactId>
            <version>2.10.2</version>
        </dependency>
        <dependency>
            <groupId>com.fasterxml.jackson.core</groupId>
            <artifactId>jackson-core</artifactId>
            <version>2.10.2</version>
        </dependency>
jackson中文乱码问题:
spring-mvc.xml中添加:
<!--Jackson乱码解决-->
<mvc:annotation-driven>
    <mvc:message-converters>
        <bean class="org.springframework.http.converter.StringHttpMessageConverter">
            <constructor-arg value="UTF-8"/>
        </bean>
        <bean class="org.springframework.http.converter.json.MappingJackson2HttpMessageConverter">
            <property name="objectMapper">
                <bean class="org.springframework.http.converter.json.Jackson2ObjectMapperFactoryBean">
                    <property name="failOnEmptyBeans" value="false"/>
                </bean>
            </property>
        </bean>
    </mvc:message-converters>
</mvc:annotation-driven>
6.jdbc——url中使用useSSL=true会报错,改为false
7.maven需要包括静态资源
 <build>

        <!--    //build中配置resources 防止资源导出失败-->

        <resources>
            <resource>
                <directory>src/main/java</directory>
                <includes>
                    <include>**/*.xml</include>
                    <include>**/*.properties</include>
                </includes>
                <filtering>true</filtering>
            </resource>
            <resource>
                <directory>src/main/resources</directory>
                <includes>
                    <include>**/*.xml</include>
                    <include>**/*.properties</include>
                </includes>
                <filtering>true</filtering>
            </resource>
        </resources>
    </build>
SSM面试题
Spring
1、什么是Spring框架?Spring框架有哪些主要模块?

2、使用Spring框架能带来哪些好处?
①、方便解耦,简化开发(IOC:通过Spring提供的IoC容器,我们可以将对象之间的依赖关系交由Spring进行控制,避免硬编码所造成的过度程序耦合。)
②、AOP编程的支持(通过Spring提供的AOP功能,方便进行面向切面的编程)
③、声明式事务的支持(可以从单调烦闷的事务管理代码中解脱出来,)
④、方便程序的测试(Spring对Junit4支持,可以通过注解方便的测试Spring程序。)
⑤、方便集成各种优秀框架(Spring不排斥各种优秀的开源框架如Struts,Hibernate)
3、什么是控制反转(IOC)?什么是依赖注入?
IOC:把对象的创建、初始化、销毁交给spring来管理,而不是由开发者控制,实现控制反转。
控制反转:传统应用程序都是由我们在类内部主动创建依赖对象,从而导致类与类之间高耦合,难于测试;有了IoC容器后,把创建和查找依赖对象的控制权交给了容器,由容器进行注入组合对象,所以对象与对象之间是松散耦合,这样也方便测试,利于功能复用,更重要的是使得程序的整个体系结构变得非常灵活


“依赖注入”:是组件之间依赖关系由容器在运行期决定,形象的说,即由容器动态的将某个依赖关系注入到组件之中。依赖注入的目的并非为软件系统带来更多功能,而是为了提升组件重用的频率,并为系统搭建一个灵活、可扩展的平台。通过依赖注入机制,我们只需要通过简单的配置,而无需任何代码就可指定目标需要的资源,完成自身的业务逻辑,而不需要关心具体的资源来自何处,由谁实现。
4、Spring框架中的单例Beans是线程安全的么?
Spring框架并没有对单例bean进行任何多线程的封装处理。关于单例bean的线程安全和并发问题需要开发者自行去搞定。但实际上,大部分的Spring bean并没有可变的状态(比如Serview类和DAO类),所以在某种程度上说Spring的单例bean是线程安全的。如果你的bean有多种状态的话(比如 View Model 对象),就需要自行保证线程安全。
最浅显的解决办法就是将多态bean的作用域由“singleton”变更为“prototype”。
5.、请举例说明如何在Spring中注入一个Java Collection?
Spring提供了以下四种集合类的配置元素:
: 该标签用来装配可重复的list值。
<beans>
   <!-- Definition for javaCollection -->
   <bean id="javaCollection" class="com.howtodoinjava.JavaCollection">
      <!-- java.util.List -->
      <property name="customList">
        <list>
           <value>INDIA</value>
           <value>Pakistan</value>
           <value>USA</value>
           <value>UK</value>
        </list>
      </property>

     <!-- java.util.Set -->
     <property name="customSet">
        <set>
           <value>INDIA</value>
           <value>Pakistan</value>
           <value>USA</value>
           <value>UK</value>
        </set>
      </property>

     <!-- java.util.Map -->
     <property name="customMap">
        <map>
           <entry key="1" value="INDIA"/>
           <entry key="2" value="Pakistan"/>
           <entry key="3" value="USA"/>
           <entry key="4" value="UK"/>
        </map>
      </property>

    <!-- java.util.Properties -->
    <property name="customProperies">
        <props>
            <prop key="admin">admin@nospam.com</prop>
            <prop key="support">support@nospam.com</prop>
        </props>
    </property>

   </bean>
</beans>
6、Spring 框架中都用到了哪些设计模式?
Spring框架中使用到了大量的设计模式,下面列举了比较有代表性的:

代理模式—在AOP和remoting中被用的比较多。
单例模式—在spring配置文件中定义的bean默认为单例模式。
模板方法—用来解决代码重复的问题。比如. RestTemplate, JmsTemplate, JpaTemplate。
前端控制器—Spring提供了DispatcherServlet来对请求进行分发。
视图帮助(View Helper )—Spring提供了一系列的JSP标签,高效宏来辅助将分散的代码整合在视图里。
依赖注入—贯穿于BeanFactory / ApplicationContext接口的核心理念。
工厂模式—BeanFactory用来创建对象的实例。

转至:http://blog.csdn.net/lovesomnus/article/details/46470255
7.spring容器创建对象的时机
第一种:默认情况下,启动 spring 容器便创建对象(遇到bean便创建对象)
第二种:在spring的配置文件bean中有一个属性 lazy-init=“default/true/false”
    ①、如果lazy-init为"default/false"在启动spring容器时创建对象(默认情况)
     ②、如果lazy-init为"true",在context.getBean时才要创建对象
8、你如何理解 AOP 中的连接点(Joinpoint)、切点(Pointcut)、增强(Advice)、引介(Introduction)、织入(Weaving)、切面(Aspect)这些概念?
答:a. 连接点(Joinpoint):程序执行的某个特定位置(如:某个方法调用前、调用后,方法抛出异常后)。一个类或一段程序代码拥有一些具有边界性质的特定点,这些代码中的特定点就是连接点。Spring 仅支持方法的连接点。

b. 切点(Pointcut):如果连接点相当于数据中的记录,那么切点相当于查询条件,一个切点可以匹配多个连接点。Spring AOP 的规则解析引擎负责解析切点所设定的查询条件,找到对应的连接点。

c. 增强(Advice):增强是织入到目标类连接点上的一段程序代码。Spring 提供的增强接口都是带方位名的,如:BeforeAdvice、AfterReturningAdvice、ThrowsAdvice 等。很多资料上将增强译为“通知”,这明显是个词不达意的翻译,让很多程序员困惑了许久。

说明: Advice 在国内的很多书面资料中都被翻译成"通知",但是很显然这个翻译无法表达其本质,有少量的读物上将这个词翻译为"增强",这个翻译是对 Advice 较为准确的诠释,我们通过 AOP 将横切关注功能加到原有的业务逻辑上,这就是对原有业务逻辑的一种增强,这种增强可以是前置增强、后置增 强、返回后增强、抛异常时增强和包围型增强。

d. 引介(Introduction):引介是一种特殊的增强,它为类添加一些属性和方法。这样,即使一个业务类原本没有实现某个接口,通过引介功能,可以动态的未该业务类添加接口的实现逻辑,让业务类成为 这个接口的实现类。

e. 织入(Weaving):织入是将增强添加到目标类具体连接点上的过程,AOP 有三种织入方式:

①编译期织入:需要特殊的 Java 编译期(例如 AspectJ 的 ajc);

②装载期织入:要求使用特殊的类加载器, 在装载类的时候对类进行增强;

③运行时织入:在运行时为目标类生成代理实现增强。Spring 采用了动 态代理的方式实现了运行时织入,而 AspectJ 采用了编译期织入和装载期织入的方式。

f. 切面(Aspect):切面是由切点和增强(引介)组成的,它包括了对横切关注功能的定义,也包括了对连接点的定义。
9.spring bean 的生命周期

1.Spring 容器根据配置中的 bean 定义中实例化 bean。
2. Spring 使用依赖注入填充所有属性,如 bean 中所定义的配置。
3. 如果 bean 实现 BeanNameAware 接口,则工厂通过传递 bean 的 ID 来调用 setBeanName()。
4. 如果 bean 实现 BeanFactoryAware 接口,工厂通过传递自身的实例来调用 setBeanFactory()。
5. 如果存在与 bean 关联的任何 BeanPostProcessors,则调用 postProcessBeforeInitialization() 方法。
6. 如果为 bean 指定了 init 方法( 的 init-method 属性),那么将调用它。
7. 最后,如果存在与 bean 关联的任何 BeanPostProcessors,则将调用 postProcessAfterInitialization() 方法。
8. 如果 bean 实现 DisposableBean 接口,当 spring 容器关闭时,会调用 destory()。
9. 如果为 bean 指定了 destroy 方法( 的 destroy-method 属性),那么将调用它。
10.IOC底层实现原理
概念:
IOC 是面向对象编程中的一种设计原则,IOC理论提出的观点大体是这样的:借助于“第三方”实现具有依赖关系的对象之间的解耦。所谓IoC,对于spring框架来说,就是由spring来负责控制对象的生命周期和对象间的关系。 是说创建对象的控制权进行转移,以前创建对象的主动权和创建时机是由自己把控的,而现在这种权力转移到第三方。

实现原理:
它是通过反射机制+工厂模式实现的,在实例化一个类时,它通过反射调用类中set方法将事先保存在HashMap中的类属性注入到类中。
控制反转就是:获得依赖对象的方式反转了。`

1、依赖注入发生的时间
(1).用户第一次通过getBean方法向IoC容索要Bean时,IoC容器触发依赖注入。
(2).当用户在Bean定义资源中为元素配置了lazy-init属性,即让容器在解析注册Bean定义时进行预实例化,触发依赖注入。
2.依赖注入实现在以下两个方法中:
(1).createBeanInstance:生成Bean所包含的java对象实例。
(2).populateBean :对Bean属性的依赖注入进行处理。
Mybatis
1.简单介绍下你对mybatis的理解?
1. mybatis配置
2. SqlMapConfig.xml,此文件作为mybatis的全局配置文件,配置了mybatis的运行环境等信息。
3. mapper.xml文件即sql映射文件,文件中配置了操作数据库的sql语句。此文件需要在SqlMapConfig.xml中加载。
4. 通过mybatis环境等配置信息构造SqlSessionFactory即会话工厂
5. 由会话工厂创建sqlSession即会话,操作数据库需要通过sqlSession进行。
6. mybatis底层自定义了Executor执行器接口操作数据库,Executor接口有两个实现,一个是基本执行器、一个是缓存执行器。
7. Mapped Statement也是mybatis一个底层封装对象,它包装了mybatis配置信息及sql映射信息等。mapper.xml文件中一个sql对应一个Mapped Statement对象,sql的id即是Mapped statement的id。
8. Mapped Statement对sql执行输入参数进行定义,包括HashMap、基本类型、pojo,Executor通过Mapped Statement在执行sql前将输入的java对象映射至sql中,输入参数映射就是jdbc编程中对preparedStatement设置参数。
9. Mapped Statement对sql执行输出结果进行定义,包括HashMap、基本类型、pojo,Executor通过Mapped Statement在执行sql后将输出结果映射至java对象中,输出结果映射过程相当于jdbc编程中对结果的解析处理过程。
2.Mybatis和hibernate不同
1)Mybatis和hibernate不同,它不完全是一个ORM框架,因为MyBatis需要程序员自己编写Sql语句,不过mybatis可以通过XML或注解方式灵活配置要运行的sql语句,并将java对象和sql语句映射生成最终执行的sql,最后将sql执行的结果再映射生成java对象。

(2)Mybatis学习门槛低,简单易学,程序员直接编写原生态sql,可严格控制sql执行性能,灵活度高,非常适合对关系数据模型要求不高的软件开发,例如互联网软件、企业运营类软件等,因为这类软件需求变化频繁,一但需求变化要求成果输出迅速。但是灵活的前提是mybatis无法做到数据库无关性,如果需要实现支持多种数据库的软件则需要自定义多套sql映射文件,工作量大。

(3)Hibernate对象/关系映射能力强,数据库无关性好,对于关系模型要求高的软件(例如需求固定的定制化软件)如果用hibernate开发可以节省很多代码,提高效率。但是Hibernate的学习门槛高,要精通门槛更高,而且怎么设计O/R映射,在性能和对象模型之间如何权衡,以及怎样用好Hibernate需要具有很强的经验和能力才行。

(4)总之,按照用户的需求在有限的资源环境下只要能做出维护性、扩展性良好的软件架构都是好架构,所以框架只有适合才是最好。
3.简述Mybatis一级、二级缓存
1)一级缓存: 基于 PerpetualCache 的 HashMap 本地缓存,其存储作用域为 Session,当 Session flush 或 close 之后,该 Session 中的所有 Cache 就将清空。

2)二级缓存与一级缓存其机制相同,默认也是采用 PerpetualCache,HashMap 存储,不同在于其存储作用域为 Mapper(Namespace),并且可自定义存储源,如 Ehcache。要开启二级缓存,你需要在你的 SQL 映射文件中添加一行:

3)对于缓存数据更新机制,当某一个作用域(一级缓存 Session/二级缓存Namespaces)的进行了C/U/D 操作后,默认该作用域下所有 select 中的缓存将被 clear。
4.JDBC编程有哪些不足之处,MyBatis是如何解决这些问题的?
(1)数据库链接创建、释放频繁造成系统资源浪费从而影响系统性能,如果使用数据库链接池可解决此问题。

解决:在SqlMapConfig.xml中配置数据链接池,使用连接池管理数据库链接。

(2) Sql语句写在代码中造成代码不易维护,实际应用sql变化的可能较大,sql变动需要改变java代码。

解决:将Sql语句配置在XXXXmapper.xml文件中与java代码分离。

(3) 向sql语句传参数麻烦,因为sql语句的where条件不一定,可能多也可能少,占位符需要和参数一一对应。

解决: Mybatis自动将java对象映射至sql语句。

(4)对结果集解析麻烦,sql变化导致解析代码变化,且解析前需要遍历,如果能将数据库记录封装成pojo对象解析比较方便。

解决:Mybatis自动将sql执行结果映射至java对象。

 浙公网安备 33010602011771号