SRS+flv.js打造兼容性较高的直播、点播平台
*************************************************************************************************************************************************
注意:强烈建议使用srs3.0,srs2.0存在的问题(回调,跨域)等问题不需要修改源码,而且可以修改生成mp4视频。
回调:
# SRS推流开始,结束
def live_publish(request):
    # 添加磁盘检测
    if not mounted():
        return HttpResponse(1)
    params = str(request.body, encoding="utf-8")
    object = json.loads(params)
    l_uuid = object.get('stream')
    live = Live.objects.get(uuid=l_uuid)
    live.status = 'living'
    live.save()
    return HttpResponse(0)
跨域:
没测,一直用nginx代理
MP4:
后期打算直接生成mp4,替换之前的flv
*************************************************************************************************************************************************
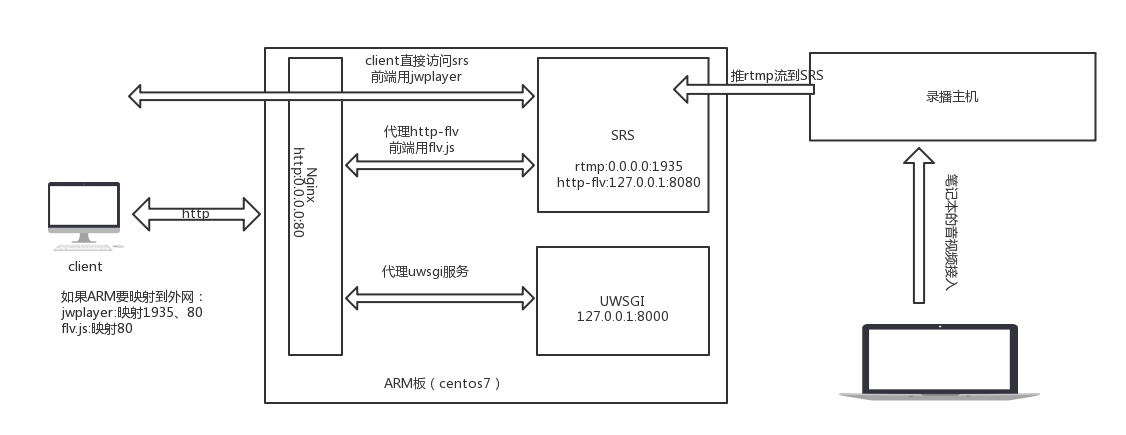
1、公司之前用的是:
直播:rtmp+jwplayer
点播:h5(mp4文件)
弊端:兼容性差,貌似跟系统版本,浏览器,浏览器版本都有关。还有就是rtmp推流生成的文件是flv格式,需要转码成mp4才能点播。
2、SRS+flv.js的优点:
当然是兼容性大大提高了,在pc端谷歌,火狐都可以播放,手机端火狐可以,谷歌不行,其他没测。
3、上图,看看效果:
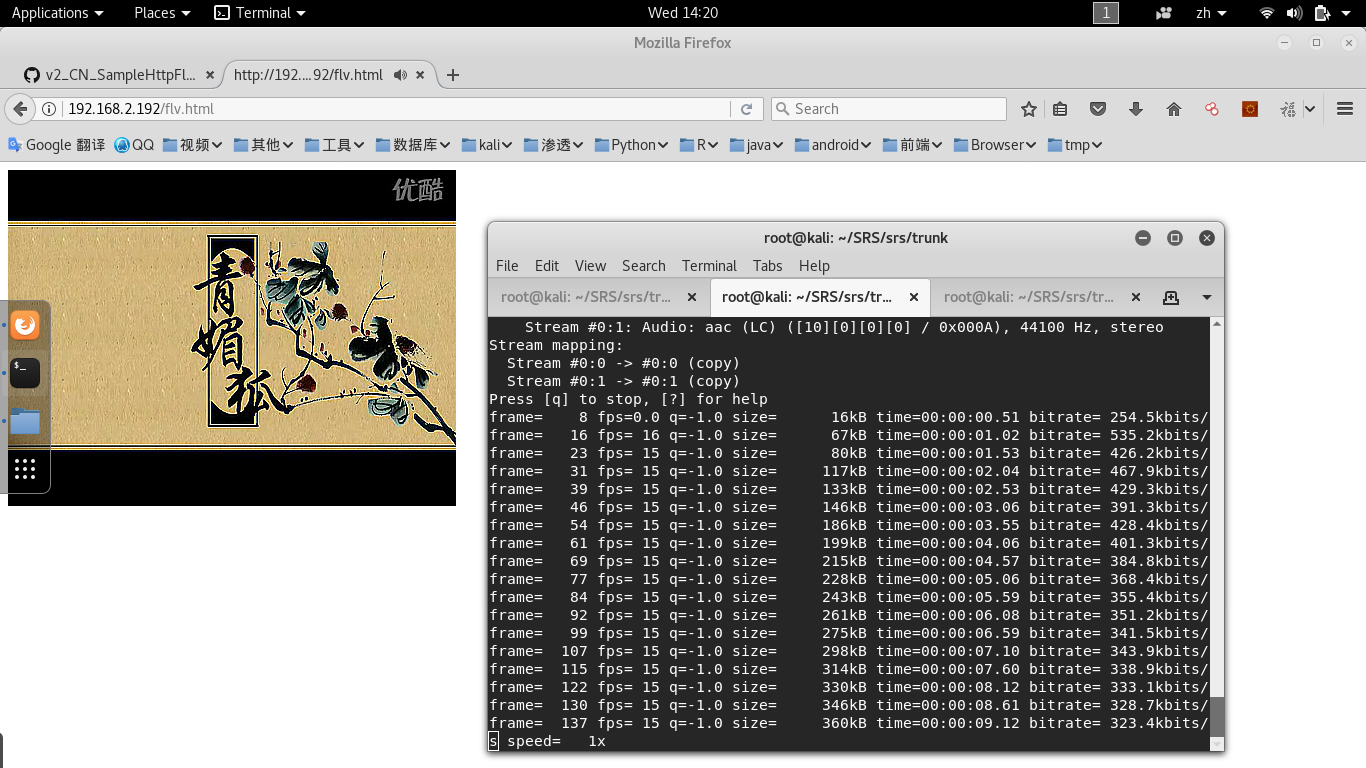

样式什么的没添加,官方的demon 直接copy过来。
4、flv.js下载,构建:
Github:https://github.com/Bilibili/flv.js
解压后进入mater:
构建:
npm install
npm install -g gulp
gulp release
在dist下生成了我们需要的js
flv.html:
<!DOCTYPE html>
<html>

<head>
    <meta content="text/html; charset=utf-8" http-equiv="Content-Type">

</head>

<body>
<script src="flv.min.js"></script>
<video id="videoElement"></video>
<script>
    if (flvjs.isSupported()) {
        var videoElement = document.getElementById('videoElement');
        var flvPlayer = flvjs.createPlayer({
            type: 'flv',
            url: 'http://192.168.2.192/live/video.flv'
        });
        flvPlayer.attachMediaElement(videoElement);
        flvPlayer.load();
        flvPlayer.play();
    }
</script>

</body>

</html>
type可以是mp4,flv。url的类型要对应,可以是服务器的文件,也可以是rtmp推流的临时文件。
在这一步可以测试下点播是否正常,文件应该放在http服务器下以http协议访问,不能是文件形式访问。http服务器可以是nginx,python,tomcat等都可以
5、如果上一步成功,接下来就是搭建SRS服务器了
Github : https://github.com/ossrs/srs/wiki/v2_CN_SampleHttpFlv
这篇文章介绍的比较详细,下面是简单记录步骤:
假定你已经下载并编译好了SRS,可以参考:SRS服务器搭建,ffmpeg 本地推流
首先复制conf中的http.flv.live.conf为my.http.flv.live.conf,内容:
# the config for srs to remux rtmp to flv live stream.
# @see https://github.com/ossrs/srs/wiki/v2_CN_DeliveryHttpStream
# @see full.conf for detail config.

listen              1935;
max_connections     1000;
daemon              off;
srs_log_tank        console;
http_server {
    enabled         on;
    listen          80;
    dir             ./objs/nginx/html;
}
vhost __defaultVhost__ {
    http_remux {
        enabled     on;
        mount       [vhost]/[app]/[stream].flv;
        hstrs       on;
    }

dvr {
        # https://github.com/ossrs/srs/wiki/v2_CN_DVR

        enabled         on;
        dvr_path        ./objs/nginx/html/[app]/[stream].flv;
        dvr_plan        session;
        dvr_duration    30;
        dvr_wait_keyframe       on;
        time_jitter             full;

   }

}
这里该了http的服务端口为80,添加了保存rtmp流文件的配置,指定存储路径./objs/nginx/html/[app]/[stream].flv。
启动SRS:
./objs/srs -c conf/my.http.flv.live.conf
接下来就是推流了。
假定你安装了ffmpeg。
ffmpeg -re -i /root/Videos/video.flv -c copy -f flv rtmp://192.168.2.192/live/video
如果推流成功那就可以在VLC中播放rtmp://192.168.2.192/live/video了,这样之前的html中的url就是:http://192.168.2.192/live/video.flv,
把之前的html/js copy到SRS的/objs/nginx/html/ 下,访问 http://ip/flv.html(这时的http服务由SRS提供,和之前的不一样) ,注意ip要和html中的ip一致,否则会报跨域的错。
至此整个直播点播服务的雏形就搭建成功!
6、添加回调
希望在开始推流的时候srs请求python服务,修改资源的状态为正在直播,推流结束是再次回调,请求python服务,修改状态为停止直播
srs的配置:
# the config for srs to remux rtmp to flv live stream.
# @see https://github.com/ossrs/srs/wiki/v2_CN_DeliveryHttpStream
# @see full.conf for detail config.

listen              1935;
max_connections     1000;
daemon              off;
srs_log_tank        console;

http_server {
    enabled         on;
    listen          8080;
    dir             ./objs/nginx/html;
}

vhost __defaultVhost__ {
    http_remux {
        enabled     on;
        mount       [vhost]/[app]/[stream].flv;
        hstrs       on;
    }

dvr {
        # https://github.com/ossrs/srs/wiki/v2_CN_DVR

        enabled         on;
        dvr_path        ./objs/nginx/html/[app]/[stream].flv;
        dvr_plan        session;
        dvr_duration    30;
        dvr_wait_keyframe       on;
        time_jitter             full;

   }

    http_hooks {
        enabled         on;
        on_publish      http://localhost:8000/on_publish/;
        on_unpublish    http://localhost:8000/on_unpublish/;

    }

}
注意: on_publish的ip需要根据netstat -pantu 判断,看看监听在哪个地址,比如127.0.0.1:8000,那么就应该保持一致,
按理说写localhost也应该可以,在终端用crul localhos:8000 也是可以访问,但是回调时报错:
[2017-11-30 03:08:22.478][error][20398][220][11] dns resolve server error, ip empty. ret=1029(Resource temporarily unavailable)
[2017-11-30 03:08:22.478][warn][20398][220][11] http client failed, server=localhost, port=8000, timeout=30000000, ret=1029
[2017-11-30 03:08:22.478][warn][20398][220][11] http connect server failed. ret=1029
[2017-11-30 03:08:22.478][error][20398][220][11] http post on_publish uri failed. client_id=220, url=http://localhost:8000/on_publish/, request={"action":"on_publish","client_id":220,"ip":"192.168.2.151","vhost":"__defaultVhost__","app":"live","tcUrl":"rtmp://192.168.2.134:1935/live","stream":"f345f5b0d34a11e78008365426bed70e"}, response=, code=-147690992, ret=1029(Resource temporarily unavailable)
[2017-11-30 03:08:22.478][error][20398][220][11] hook client on_publish failed. url=http://localhost:8000/on_publish/, ret=1029(Resource temporarily unavailable)
[2017-11-30 03:08:22.478][error][20398][220][11] http hook on_publish failed. ret=1029(Resource temporarily unavailable)
[2017-11-30 03:08:22.478][error][20398][220][11] stream service cycle failed. ret=1029(Resource temporarily unavailable)
所以还是保持一致的好。
另外:uwsgi并不对外提供访问服务,只由nginx转发,所以服务不要监听在0.0.0.0:8000,更不要写内网ip如192.168.2.111这样的,应为不确定下次启动ip不变。
所以uwsgi最好还是监听在127.0.0.1:8000。
python:
# SRS推流开始,结束
def live_publish(request):
    params = str(request.body, encoding="utf-8")
    object = json.loads(params)
    l_uuid = object.get('stream')
    live = Live.objects.get(uuid=l_uuid)
    live.status = 'living'
    live.save()
    return HttpResponse(0)


def live_unpublish(request):
    params = str(request.body, encoding="utf-8")
    object = json.loads(params)
    l_uuid = object.get('stream')
    live = Live.objects.get(uuid=l_uuid)
    live.status = 'stop'
    live.save()
    return HttpResponse(0)
官方文档的说明:
https://github.com/ossrs/srs/wiki/v2_CN_HTTPCallback
根据:an int value specifies the error code(0 corresponding to success)
大概是说要返回一个0,不过我尝试各种返回值0,“0“,{”code”:0}...都没用
一返回srs就报错:empty response
不知道为毛srs接收不到。
没办法,改源码:
在srs/trunk/src/app/srs_app_http_hooks.cpp
找到报错的位置:
    // should never be empty.
    res = SRS_HTTP_RESPONSE_OK;
    if (res.empty()) {
        ret = ERROR_HTTP_DATA_INVALID;
        srs_error("invalid empty response. ret=%d", ret);
        return ret;
    }
在进入判断前先赋值:res = SRS_HTTP_RESPONSE_OK;
然后重新编译安装。
还可以打包传服务器上用。
./scripts/package.sh --x86-x64
当然这只是权宜之计,因为我不需要判断用户的权限来滤用户,所以不用控制response返回值,希望日后搞明白说明原因导致。
如果有读者知道原因,还请告知,谢谢。
7、视频编辑
剪切:
ffmpeg -ss 0:1:30 -t 0:0:20 -i input.avi -vcodec copy -acodec copy output.avi
-ss 开始时间,-t 持续时间
提取图片:
ffmpeg –i test.avi –r 1 –f image2 image-%3d.jpeg
封装:
ffmpeg –i video_file –i audio_file –vcodec copy –acodec copy output_file
flv快速添加关键帧(为了拖动播放):
yamdi -i tmp.flv -o 51e714ded33a11e7889a365426bed70e.flv
8、压力测试
~/Downloads/flazr-0.7-RC2# ./client.sh rtmp://192.168.2.134:1935/live/a54b2dceda5911e7a5b1365426bed70e -load 200
查看srs服务器的网卡信息:
ethtool eth0
查看 srs服务器的流量:
iftop
9、转了一圈回到原点
前段时间用以上方案搭建的直播点播系统测试结果还是比较满意的
笔记本(百兆网卡)网线直连开发板(千兆网卡):
子码流(100-150并发)主码流(10-20)
笔记本(千兆网卡)网线直连开发板(千兆网卡):
子码流(没测,不过不会超过1000,srs中有最大连接数设置)主码流(100-200)(目标就是支持100人在线观看)
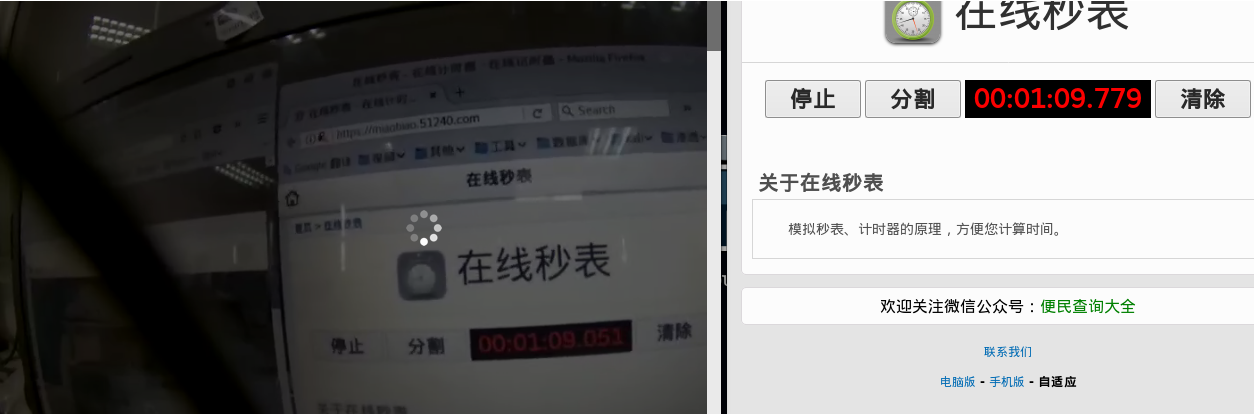
但是前两天用录播主机推流到开发板,出现视频流畅,声音卡顿的现象。
之前怀疑过网络不畅通,视频源有问题,录播主机有问题,flv.js。
后来发现是flv.js在处理某些视频流,或视频文件(直播http-flv,点播xx.flv)会发生以上现象。
但是直接用VLC客户端播放没有声音卡顿的现象。
没办法,只好改回JWPlayer(播放rtmp),Video(播放mp4)
这就需要将推流的临时文件xxx.flv重新封装成xxx.mp4。
希望flv.js的后续版本可以解决这样的问题。
10、转机
测试几天发现只有录播设备播放文件通道的时候声音会卡顿,直接将其他电脑的音视频接入没有卡顿,但是随着播放时间加长,会出现声音延迟的现象。
11、环境和部署脚本:
├── CentOS-Base.repo
├── ffmpeg-3.4
├── install.sh
├── my.http.flv.live.conf
├── nginx-1.12.2
├── nohup.out
├── Python-3.5.0
├── run.sh
├── SRS-Ubuntu12-armv7cpu-2.0.243
├── stop.sh
├── touch
├── touch.conf
├── touch.ini
└── yamdi-1.9
install.sh:
#!/bin/bash

install_list='system python srs nginx deploy env ffmpeg yamdi'
#install_list='ffmpeg yamdi'
if [[ ${install_list} =~ system ]]
then
#替换yum源,更新系统
yum_path='/etc/yum.repos.d/'
for file in ${yum_path}*
do
  end_str=${file:0-3}
  if [ "${end_str}" != 'bak' ]
  then
    mv $file ${file}.bak
  fi
done
cp CentOS-Base.repo ${yum_path}
yum update

#安装基本工具
yum install net-tools
yum install nc
else
  echo '>>>pass system'
fi


if [[ ${install_list} =~ "python" ]]
then
#Python3.5安装
cd Python-3.5.0/
./configure
make
make install
pip3 install uwsgi
cd ..
else
  echo '>>>pass python'
fi


if [[ ${install_list} =~ "nginx" ]]
then
#nginx 安装
yum -y install zlib zlib-devel openssl openssl--devel pcre pcre-devel
cd nginx-1.12.2/
./configure
make
make install
cd ..
else
  echo '>>>pass nginx'
fi


if [[ ${install_list} =~ "srs" ]]
then
#srs 安装
yum install redhat-lsb -y
cd SRS-Ubuntu12-armv7cpu-2.0.243/
./INSTALL
cd ..
else
  echo '>>>pass srs'
fi


if [[ ${install_list} =~ "ffmpeg" ]]
then
#ffmpeg 安装
cd ffmpeg-3.4/
#./configure
make
make install
cd ..
else
  echo '>>>pass ffmpeg'
fi


if [[ ${install_list} =~ "yamdi" ]]
then
#yamdi 安装
cd yamdi-1.9/
make
make install
cd ..
else
  echo '>>>pass yamdi'
fi


if [[ ${install_list} =~ "deploy" ]]
then
#部署项目
mkdir /opt/script/
cp my.http.flv.live.conf /usr/local/srs/conf/
cp touch.conf /usr/local/nginx/conf/
cp touch.ini /opt/script/
cp touch /opt/
mkdir /usr/local/nginx/html/images/
cp touch/tmp/* /usr/local/nginx/html/images/
else
  echo '>>>pass deploy'
fi


if [[ ${install_list} =~ "env" ]]
then
#安装项目依赖
pip3 install django==1.9.8
pip3 install xadmin
pip3 install future
pip3 install django_crispy_forms
pip3 install django-formtools
pip3 install httplib2
pip3 install six
pip3 install django_import_export
pip3 install django-cors-headers
pip3 install django-pure-pagination

yum install python-devel zlib-devel libjpeg-turbo-devel -y
pip3 install Pillow

else
  echo '>>>pass env'

fi
run.sh:
#!/bin/bash

#启动项目
#touch
pkill -9 uwsgi
cd /opt/
uwsgi --ini script/touch.ini &
chmod 766 /opt/script/touchrnb.sock

#nginx
pkill -9 nginx
cd /usr/local/nginx/
./sbin/nginx -c conf/touch.conf &

#srs
pkill -9 srs
cd /usr/local/srs/
./objs/srs -c conf/my.http.flv.live.conf > /dev/null &
stop.sh:
#!/bin/bash

#停止项目
#nginx
pkill -9 nginx
#srs
pkill -9 srs
#touch
pkill -9 uwsgi
开机启动:
编辑/etc/rc.d/rc.local,添加run.sh脚步路径
12、文件瘦身
strip objs/srs
(arm版本:arm-hisiv300-linux-strip)
可以从7-8兆减到2-3兆
13、srs跨域
之前是nginx代理服务器和srs在同一台机器上,但是公司考虑到嵌入式板的性能问题,需要提供更换直播服务器的功能,为了避免修改nginx配置的问题,所以
直播服务器地址由后台配置,存到数据库,而不使用nginx代理。但是这样就有跨域的问题了,我使用的srs版本为2.0,目前解决跨域的方法是修改源码。
参考:https://github.com/ossrs/srs/issues/1002
修改 src/app/srs_app_http_stream.cpp
在486行添加 w->header()->set("Access-Control-Allow-Origin", "*");
重新编译安装即可
14、集群和负载均衡
集群很简单参考:https://github.com/ossrs/srs/wiki/v3_CN_SampleHttpFlvCluster
负载均衡:
如果集群较大推荐CDN,如果小集群可以用nginx
值得一提的是srs在接收nginx的转发请求时不是用的相对路径
nginx配置文件:
worker_processes  4;

events {
    worker_connections  1024;
}


http {

    include       mime.types;
    default_type  application/octet-stream;
    sendfile        on;
    keepalive_timeout  65;
    gzip  on;
    client_max_body_size 4096m;

    upstream localhost{
	ip_hash;
	server 127.0.0.1:8080;
	server 192.168.2.127:8080;
    }

    server {
        listen 80;
        server_name 192.168.2.192 ;
        charset utf-8;

        location / {
	    add_header 'Access-Control-Allow-Origin' '*';
	    proxy_pass http://127.0.0.1:8000/;
        }

        # 指定静态文件路径
        location /static/ {
            alias /root/GitClient/touch/static_all/;
            index index.html index.htm;
        }

        location /uwsgi_http/ {

            proxy_pass http://localhost/;

        }


    }


}
如果upstream localhost 改为upstream aaa,浏览器访问: http://127.0.0.1/uwsgi_http/live/123.flv
srs接收到的是:http://aaa/live/123.flv
所以srs服务器要配置hosts文件,使aaa指向127.0.0.1
这里我直接命名为localhost,这样就可以偷懒啦。
还有负载均衡策略指定ip_hash,因为源站和边缘之间的视频可能不同步,这样可以提高用户体验。
但是如果srs集群的性能差异较大,还是用weight策略好一点。
15、flv.js优化--低延时(为了导播,直播不需要)
    <script>
        if (flvjs.isSupported()) {
            var videoElement = document.getElementById("myplayer");
            var flvPlayer = flvjs.createPlayer({
                    type: 'flv',
                    isLive: true,
                    url: '{{ LIVE_URL }}{{ current_live.uuid }}.flv',
                },
                {
                    enableWorker: false,
                    enableStashBuffer: false,
                    stashInitialSize: 1,
                    lazyLoad: false,
                    lazyLoadMaxDuration: 1,
                    lazyLoadRecoverDuration: 1,
                    deferLoadAfterSourceOpen: false,
                    autoCleanupMaxBackwardDuration: 1,
                    autoCleanupMinBackwardDuration: 1,
                    statisticsInfoReportInterval: 1,
                    fixAudioTimestampGap: false,

                });

            flvPlayer.attachMediaElement(videoElement);
            flvPlayer.load();
            flvPlayer.play();
        }
    </script>
srs低延时配置:
vhost __defaultVhost__ {
    gop_cache       off;
    queue_length    10;
    min_latency     on;
    mr {
        enabled     off;
    }
    mw_latency      100;
    tcp_nodelay     on;
}
video低延时:
videoElement.addEventListener('progress', function() {
    var range = 0;
    var bf = this.buffered;
    var time = this.currentTime;

    while(!(bf.start(range) <= time && time <= bf.end(range))) {
        range += 1;
    }
    this.currentTime = this.buffered.end(range) - 0.01;
});
设置video低延时会触发waiting事件,出现一个圆圈和降低屏幕亮度,有待处理...
这样大概可以把延时从2~3降到1秒左右。(环境不同可能有差别,在网线接交换机的情况下会比连WiFi要好)
延时和流畅不可兼得,需求不同要设置不同参数。
16、音频不同步和卡顿的解决
参考:https://github.com/Bilibili/flv.js/issues/136
解决方法是 fixAudioTimestampGap: false,注意这个配置要在config的位置
17、添加HLS流
官方文档:https://github.com/ossrs/srs/wiki/v3_CN_SampleHLS
vhost __defaultVhost__ {
...

    hls {
        enabled         on;
        hls_fragment    10;
        hls_window      60;
        hls_path        ./objs/nginx/html;
        hls_m3u8_file   [app]/[stream].m3u8;
        hls_ts_file     [app]/[stream]-[seq].ts;
        hls_dispose     10;

    }
}
存在的问题:同一地址第一次正常,后面推的都不能看,第一次生成ts切片正常,后面的ts切片会重复丢弃和生成。
参考: 转hls输出时出现的问题 #894:https://github.com/ossrs/srs/issues/894
在SrsHls::on_unpublish的时候设置SrsHls::aac_samples=0后正常。

 浙公网安备 33010602011771号