

Spring Cloud 笔记
@
第⼀部分 微服务架构
第 1 节 互联⽹应⽤架构发展(回顾)
随着互联⽹的发展,⽤户群体逐渐扩⼤,⽹站的流量成倍增⻓,常规的单体架构已 ⽆法满⾜请求压⼒和业务的快速迭代,架构的变化势在必⾏。下⾯我们就以拉勾⽹ 的架构演进为例,从最开始的单体架构分析,⼀步步的到现在的微服务架构。
1)单体应⽤架构
在诞⽣之初,拉勾的⽤户量、数据量规模都⽐较⼩,项⽬所有的功能模块都放在⼀ 个⼯程中编码、编译、打包并且部署在⼀个 Tomcat 容器中的架构模式就是单体应⽤ 架构,这样的架构既简单实 ⽤、便于维护,成本⼜低,成为了那个时代的主流架构 ⽅式。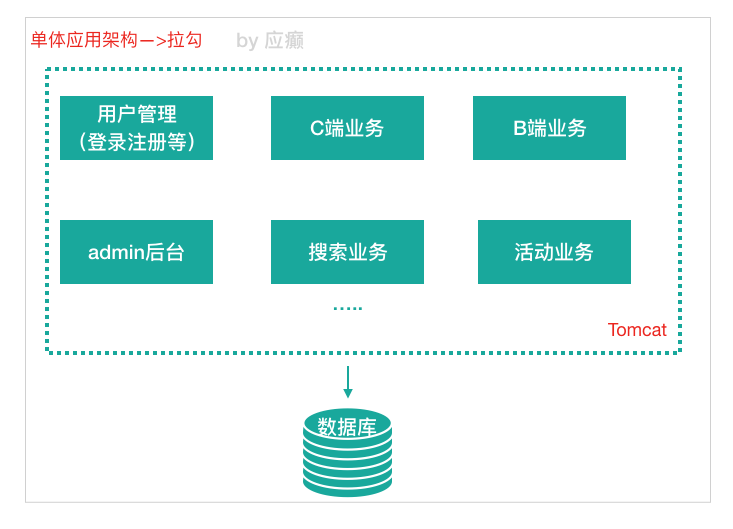
优点:
- 项⽬前期开发节奏快,团队成员少的时候能够快速迭代
- 架构简单:MVC 架构,只需要借助 IDE 开发、调试即可
- 易于测试:只需要通过单元测试或者浏览器完成
- 易于部署:打包成单⼀可执⾏的 jar 或者打成 war 包放到容器内启动
缺点:
- 随着不断的功能迭代,单个项⽬过⼤,代码杂乱,耦合严重,开发团队逐渐壮⼤ 以后,沟通 成本变⾼, 如:代码从编译到启动耗时达到 3-5 分钟 新增业务困难:在已经乱如麻的系统中增加新业务,维护旧功能,⼀脚踩进去全 是不可预测 的问题。新⼈来了以后很难接⼿任务,学习成本⾼,需要⼤概 ⼀周 时间 才能上⼿开发
- 核⼼业务与边缘业务混合在⼀块,出现问题互相影响,如:⼀个临时活动流量猛 涨,机器负 载升⾼就会影响正常的业务服务
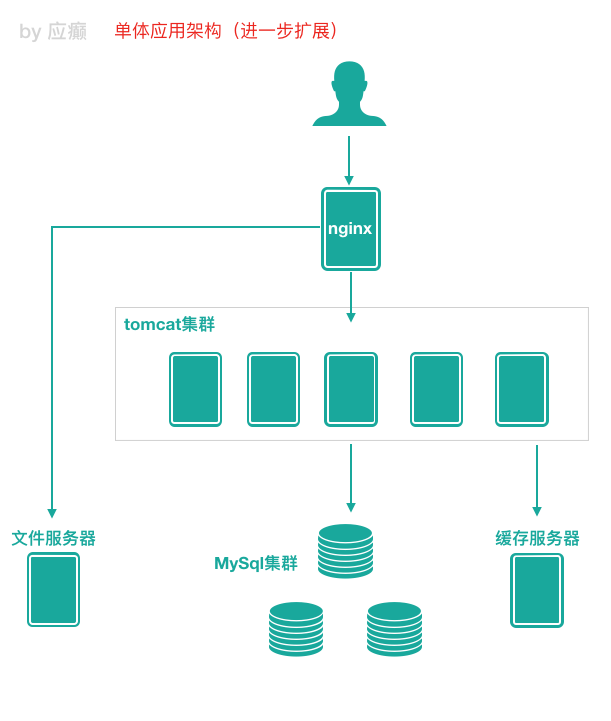
业务量上涨之后,单体应⽤架构进⼀步丰富变化,⽐如应⽤集群部署、使⽤ Nginx 进 ⾏负载均衡、增加缓存服务器、增加⽂件服务器、数据库集群并做读写分离等,通 过以上措施增强应对⾼并发的能⼒、应对⼀定的复杂业务场景,但依然属于单体应 ⽤架构。
2)垂直应⽤架构
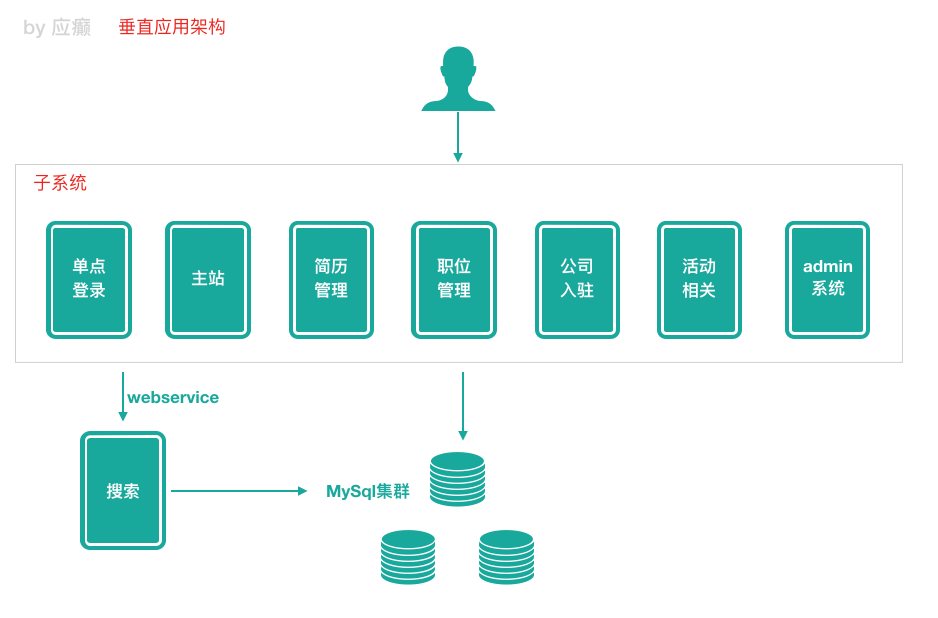
为了避免上⾯提到的那些问题,开始做模块的垂直划分,做垂直划分的原则是基于 拉勾现有的业 务特性来做,核⼼⽬标第⼀个是为了业务之间互不影响,第⼆个是在 研发团队的壮⼤后为了提⾼ 效率,减少之间的依赖。
优点
- 系统拆分实现了流量分担,解决了并发问题
- 可以针对不同模块进⾏优化
- ⽅便⽔平扩展,负载均衡,容错率提⾼
- 系统间相互独⽴,互不影响,新的业务迭代时更加⾼效
缺点
- 服务之间相互调⽤,如果某个服务的端⼝或者 ip 地址发⽣改变,调⽤的系统得⼿动改变
- 搭建集群之后,实现负载均衡⽐较复杂,如:内⽹负载,在迁移机器时会影响调⽤⽅的路 由,导致线上故障
- 服务之间调⽤⽅式不统⼀,基于 httpclient 、 webservice ,接⼝协议不统⼀
- 服务监控不到位:除了依靠端⼝、进程的监控,调⽤的成功率、失败率、总耗时等等这些监 控指标是没有的
3)SOA 应⽤架构
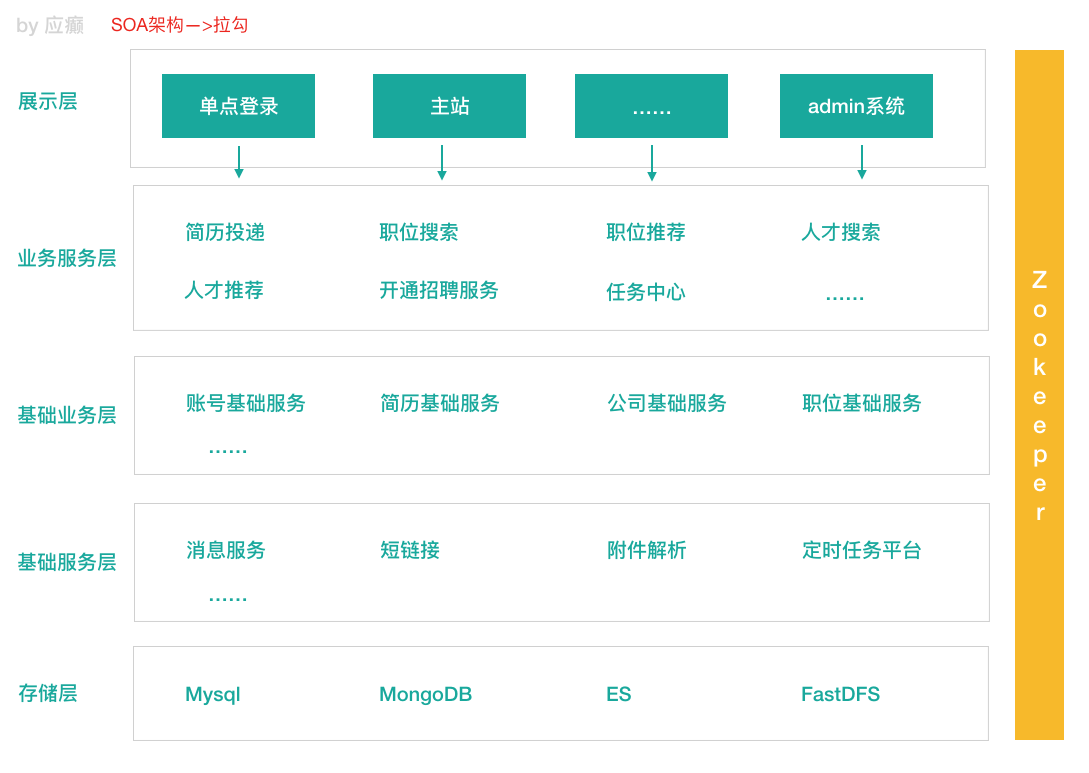
在做了垂直划分以后,模块随之增多,维护的成本在也变⾼,⼀些通⽤的业务和模 块重复的越来越多,为了解决上⾯提到的接⼝协议不统⼀、服务⽆法监控、服务的 负载均衡,引⼊了阿⾥巴巴开源的 Dubbo ,⼀款⾼性能、轻量级的开源 Java RPC 框 架,它提供了三⼤核⼼能⼒:⾯向接⼝的远程⽅法调⽤,智能容错和负载均衡,以 及服务⾃动注册和发现。
SOA (Service-Oriented Architecture),即⾯向服务的架构。根据实际业务,把系统 拆分成合适的、独⽴部署的模块,模块之间相互独⽴(通过 Webservice/Dubbo 等技 术进⾏通信)。
优点:分布式、松耦合、扩展灵活、可重⽤。
缺点:服务抽取粒度较⼤、服务调⽤⽅和提供⽅耦合度较⾼(接⼝耦合度)
4)微服务应⽤架构
微服务架构可以说是 SOA 架构的⼀种拓展,这种架构模式下它拆分粒度更⼩、服务 更独⽴。把应⽤拆分成为⼀个个微⼩的服务,不同的服务可以使⽤不同的开发语⾔ 和存储,服务之间往往通过 Restful 等轻量级通信。微服务架构关键在于微⼩、独 ⽴、轻量级通信。
微服务是在 SOA 上做的升华粒度更加细致,微服务架构强调的⼀个重点是“业务需要彻底的组件化和服务化”
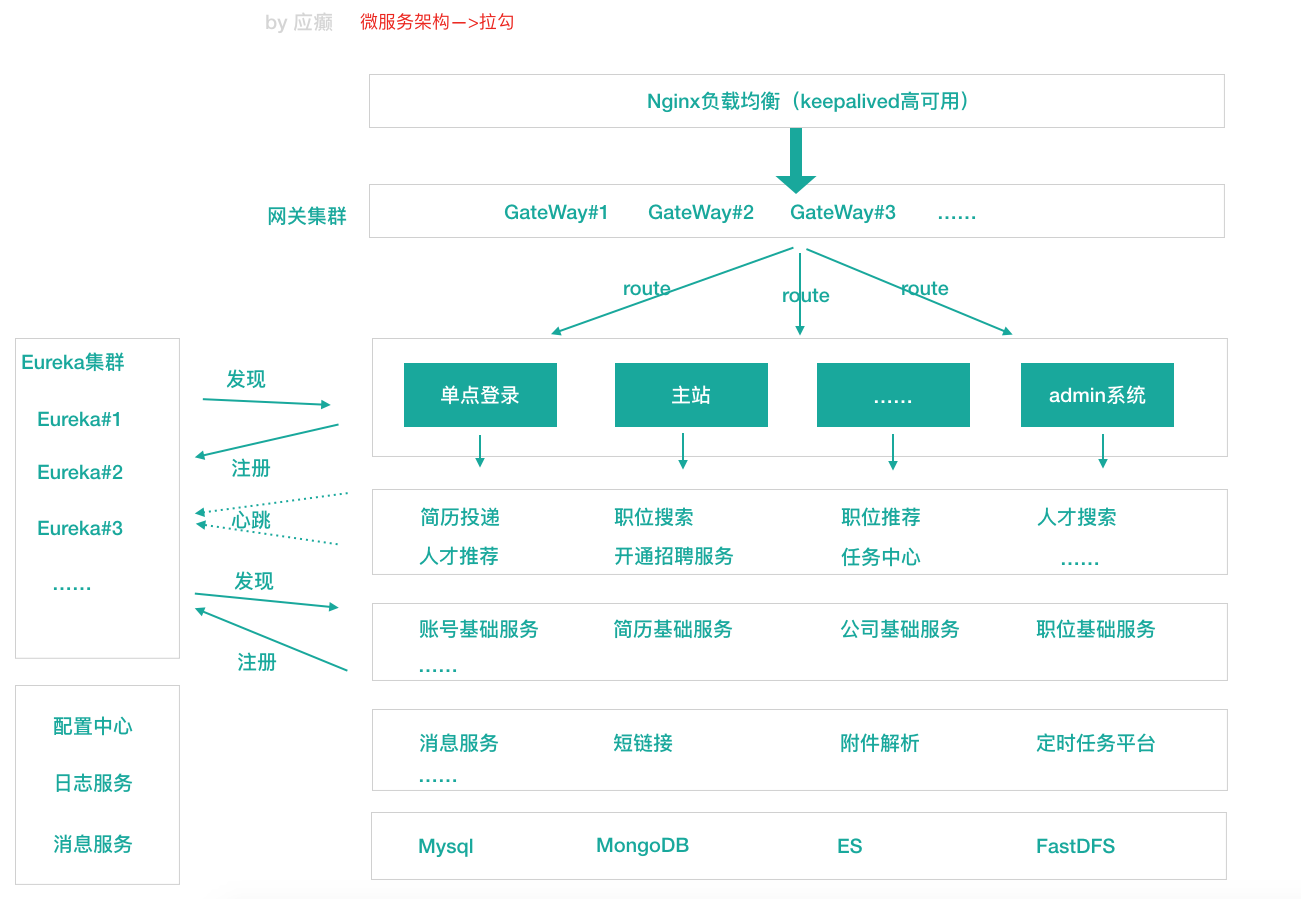
微服务架构和 SOA 架构相似⼜不同
微服务架构和 SOA 架构很明显的⼀个区别就是服务拆分粒度的不同,但是对于拉 勾的架构发展来说,我们所看到的 SOA 阶段其实服务拆分粒度相对来说已经⽐较 细了(超前哦!),所以上述拉勾 SOA 到拉勾微服务,从服务拆分上来说变化并 不⼤,只是引⼊了相对完整的新⼀代 Spring Cloud 微服务技术。⾃然,上述我们 看到的都是拉勾架构演变的阶段结果,每⼀个阶段其实都经历了很多变化,拉勾 的服务拆分其实也是⾛过了从粗到细,并⾮绝对的⼀步到位。
举个拉勾案例来说明 SOA 和微服务拆分粒度不同
我们在 SOA 架构的初期,“简历投递模块”和“⼈才搜索模块”都有简历内容展示的 需求,只不过说可能略有区别,⼀开始在两个模块中各维护了⼀套简历查询和展 示的代码;后期我们将服务更细粒度拆分,拆分出简历基础服务,那么不同模块 调⽤这个基础服务即可。
什么是 ESB
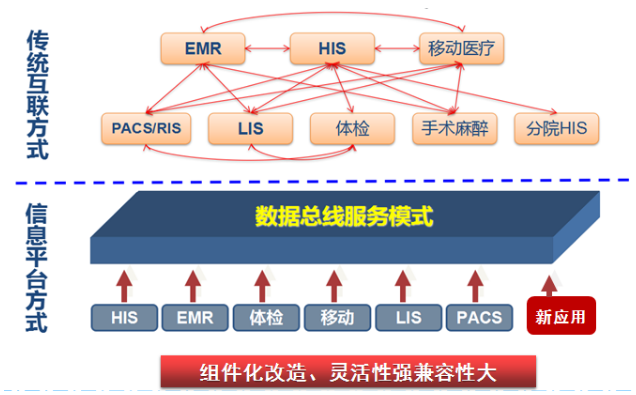
ESB 是一个集成的容器,是一个集中式的服务总线。通过 ESB,可以 实现集成业务处理,监控系统间消息流动,管理系统间交互的业务服务 。ESB 的关注点是 集成 ,核心概念是 服务和消息 ,主要方式是 协议适配和中介处理 。
系统与系统间的交互方式是服务。服务与服务之间,以及服务内部传递的都是消息。通过各种不同的协议适配,将各种不同平台的异构服务接入到 ESB,转换成消息流。再通过各种中介处理:路由、转换、增强、分支、聚合等等。最后再将消息转换成适当形式,发送到指定的目的地或返回给调用方。
一般来说, ESB 本身的模型就是管道和过滤器 。管道就是各种传输和消息传递。各种中介处理,就是过滤器。可以比拟成自来水管和各种阀门的关系。
SOA 和微服务的区别
最准确的说法:微服务是 SOA 的一种实现
最符合实际的说法:微服务是去 ESB 的 SOA
背后实际上是两种思想的分歧:分布还是集中
当然这里说的不是服务的分布和集中。服务肯定是分布的,这是大前提,是 SOA 的本质理念之一。分歧在于对服务的治理,是分布还是集中。
第 2 节 微服务架构体现的思想及优缺点
微服务架构设计的核⼼思想就是“微”,拆分的粒度相对⽐较⼩,这样的话单⼀职 责、开发的耦合度就会降低、微⼩的功能可以独⽴部署扩展、灵活性强,升级改造 影响范围⼩。
微服务架构的优点:
微服务很⼩,便于特定业务功能的聚焦 A B C D
微服务很⼩,每个微服务都可以被⼀个⼩团队单独实施(开发、测试、部署上线、运维),团队合作⼀定程度解耦,便于实施敏捷开发
微服务很⼩,便于重⽤和模块之间的组装
微服务很独⽴,那么不同的微服务可以使⽤不同的语⾔开发,松耦合
微服务架构下,我们更容易引⼊新技术
微服务架构下,我们可以更好的实现 DevOps 开发运维⼀体化;
微服务架构的缺点
微服务架构下,分布式复杂难以管理,当服务数量增加,管理将越加复杂;
微服务架构下,分布式链路跟踪难等;
第 3 节 微服务架构中的⼀些概念
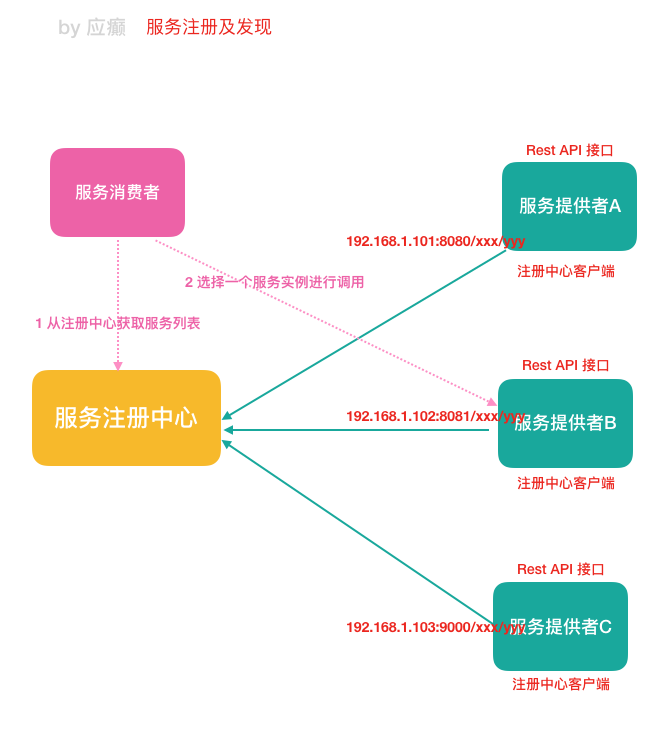
服务注册与服务发现
服务注册:服务提供者将所提供服务的信息(服务器 IP 和端⼝、服务访问协议等) 注册/登记到注册中⼼
服务发现:服务消费者能够从注册中⼼获取到较为实时的服务列表,然后根究⼀定 的策略选择⼀个服务访问
负载均衡
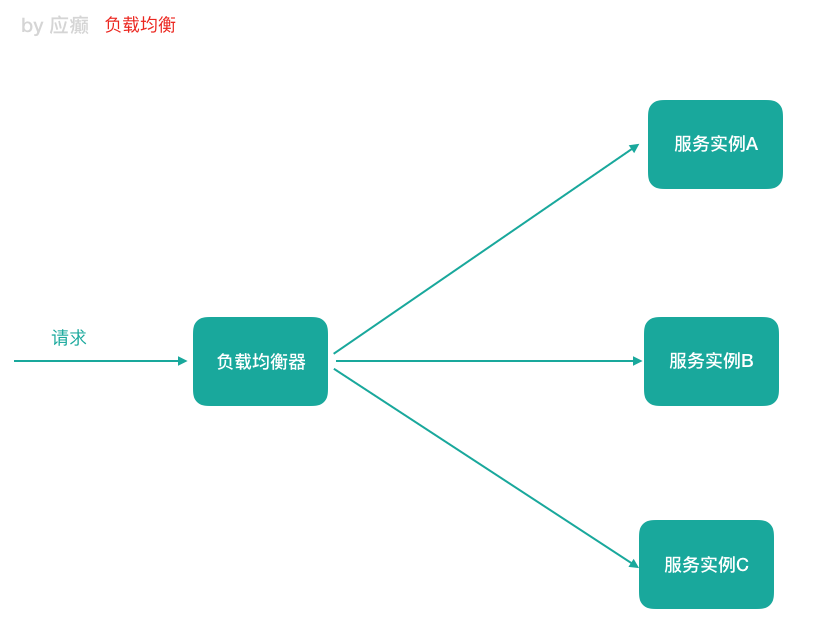
负载均衡即将请求压⼒分配到多个服务器(应⽤服务器、数据库服务器等),以 此来提⾼服务的性能、可靠性
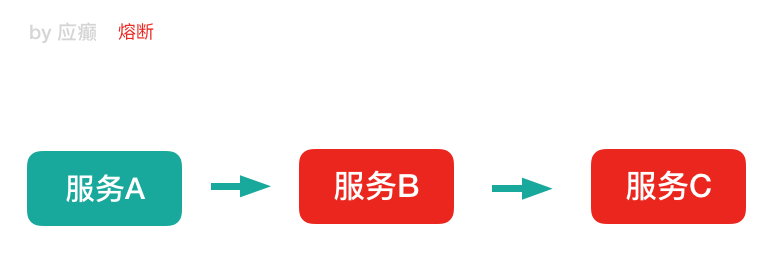
熔断
熔断即断路保护。微服务架构中,如果下游服务因访问压⼒过⼤⽽响应变慢或失 败,上游服务为了保护系统整体可⽤性,可以暂时切断对下游服务的调⽤。这种牺 牲局部,保全整体的措施就叫做熔断。
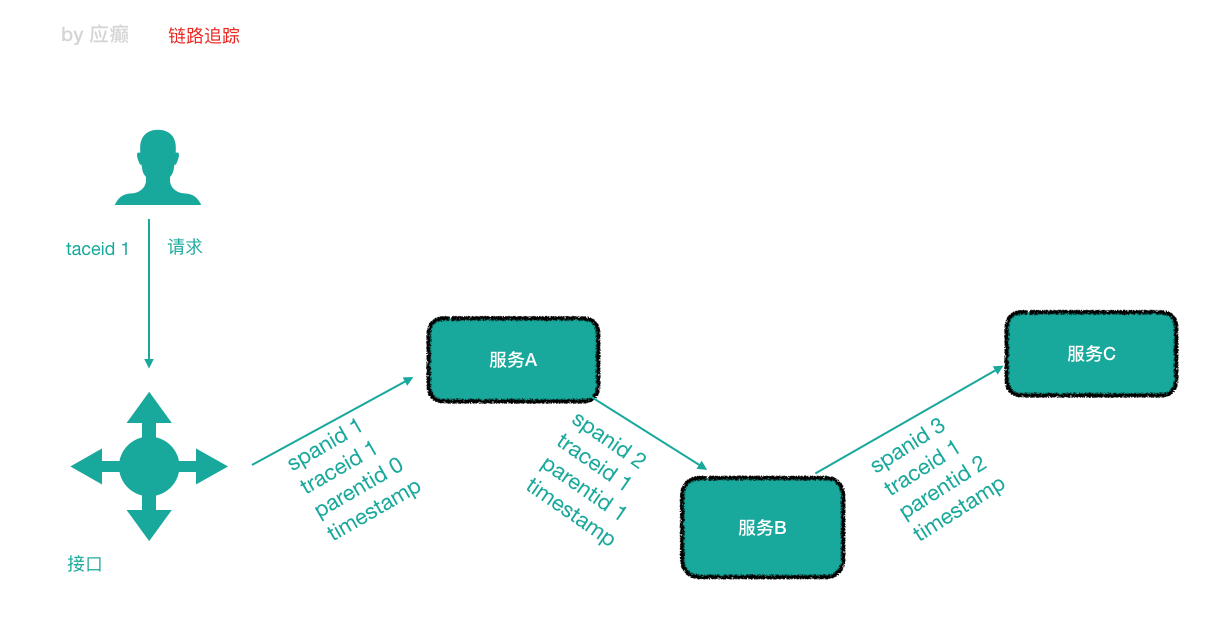
链路追踪
微服务架构越发流⾏,⼀个项⽬往往拆分成很多个服务,那么⼀次请求就需要涉及 到很多个服务。不同的微服务可能是由不同的团队开发、可能使⽤不同的编程语⾔ 实现、整个项⽬也有可能部署在了很多服务器上(甚⾄百台、千台)横跨多个不同 的数据中⼼。所谓链路追踪,就是对⼀次请求涉及的很多个服务链路进⾏⽇志记 录、性能监控
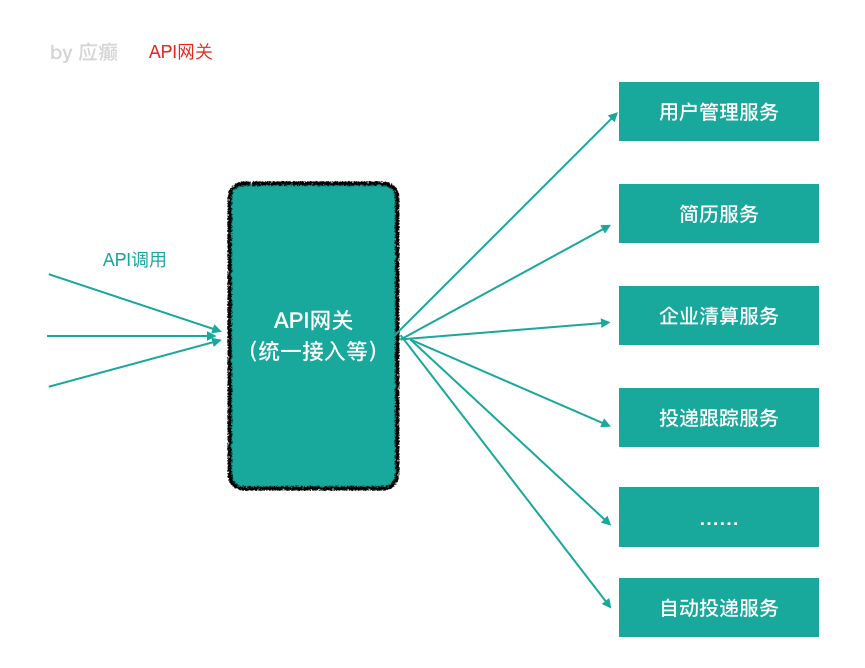
API ⽹关
微服务架构下,不同的微服务往往会有不同的访问地址,客户端可能需要调⽤多个 服务的接⼝才能完成⼀个业务需求,如果让客户端直接与各个微服务通信可能出 现:
1)客户端需要调⽤不同的 url 地址,增加了维护调⽤难度
2)在⼀定的场景下,也存在跨域请求的问题(前后端分离就会碰到跨域问题,原本 我们在后端采⽤ Cors 就能解决,现在利⽤⽹关,那么就放在⽹关这层做好了)
3)每个微服务都需要进⾏单独的身份认证
那么,API ⽹关就可以较好的统⼀处理上述问题,API 请求调⽤统⼀接⼊ API ⽹关层, 由⽹关转发请求。API ⽹关更专注在安全、路由、流量等问题的处理上(微服务团队 专注于处理业务逻辑即可),它的功能⽐如
1)统⼀接⼊(路由)
2)安全防护(统⼀鉴权,负责⽹关访问身份认证验证,与“访问认证中⼼”通信,实 际认证业务逻辑交移“访问认证中⼼”处理)
3)⿊⽩名单(实现通过 IP 地址控制禁⽌访问⽹关功能,控制访问)
4)协议适配(实现通信协议校验、适配转换的功能)
5)流量管控(限流)
6)⻓短链接⽀持
7)容错能⼒(负载均衡)
第⼆部分 Spring Cloud 综述
第 1 节 Spring Cloud 是什么
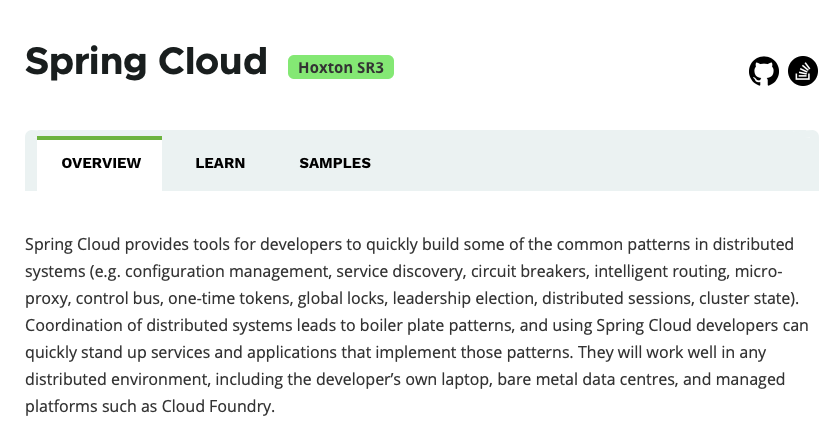
[百度百科]Spring Cloud 是⼀系列框架的有序集合。它利⽤ Spring Boot 的开发便利 性巧妙地简化了分布式系统基础设施的开发,如服务发现注册、配置中⼼、消息总 线、负载均衡、断路器、数据监控等,都可以⽤ Spring Boot 的开发⻛格做到⼀键启 动和部署。Spring Cloud 并没有重复制造轮⼦,它只是将⽬前各家公司开发的⽐较 成熟、经得起实际考验的服务框架组合起来,通过 Spring Boot ⻛格进⾏再封装屏蔽 掉了复杂的配置和实现原理,最终给开发者留出了⼀套简单易懂、易部署和易维护 的分布式系统开发⼯具包。
Spring Cloud 是⼀系列框架的有序集合(Spring Cloud 是⼀个规范)
开发服务发现注册、配置中⼼、消息总线、负载均衡、断路器、数据监控等
利⽤ Spring Boot 的开发便利性简化了微服务架构的开发(⾃动装配)
这⾥,我们需要注意,Spring Cloud 其实是⼀套规范,是⼀套⽤于构建微服务架构 的规范,⽽不是⼀个可以拿来即⽤的框架(所谓规范就是应该有哪些功能组件,然 后组件之间怎么配合,共同完成什么事情)。在这个规范之下第三⽅的 Netflix 公司 开发了⼀些组件、Spring 官⽅开发了⼀些框架/组件,包括第三⽅的阿⾥巴巴开发了 ⼀套框架/组件集合 Spring Cloud Alibaba,这些才是 Spring Cloud 规范的实现。
Netflix 搞了⼀套 简称 SCN Spring Cloud 吸收了 Netflix 公司的产品基础之上⾃⼰也搞了⼏个组件 阿⾥巴巴在之前的基础上搞出了⼀堆微服务组件,Spring Cloud Alibaba(SCA)
第 2 节 Spring Cloud 解决什么问题
Spring Cloud 规范及实现意图要解决的问题其实就是微服务架构实施过程中存在的 ⼀些问题,⽐如微服务架构中的服务注册发现问题、⽹络问题(⽐如熔断场景)、 统⼀认证安全授权问题、负载均衡问题、链路追踪等问题。
第 3 节 Spring Cloud 架构
如前所述,Spring Cloud 是⼀个微服务相关规范,这个规范意图为搭建微服务架构 提供⼀站式服务,采⽤组件(框架)化机制定义⼀系列组件,各类组件针对性的处 理微服务中的特定问题,这些组件共同来构成 Spring Cloud 微服务技术栈。
3.1 Spring Cloud 核⼼组件
Spring Cloud ⽣态圈中的组件,按照发展可以分为第⼀代 Spring Cloud 组件和第⼆ 代 Spring Cloud 组件。
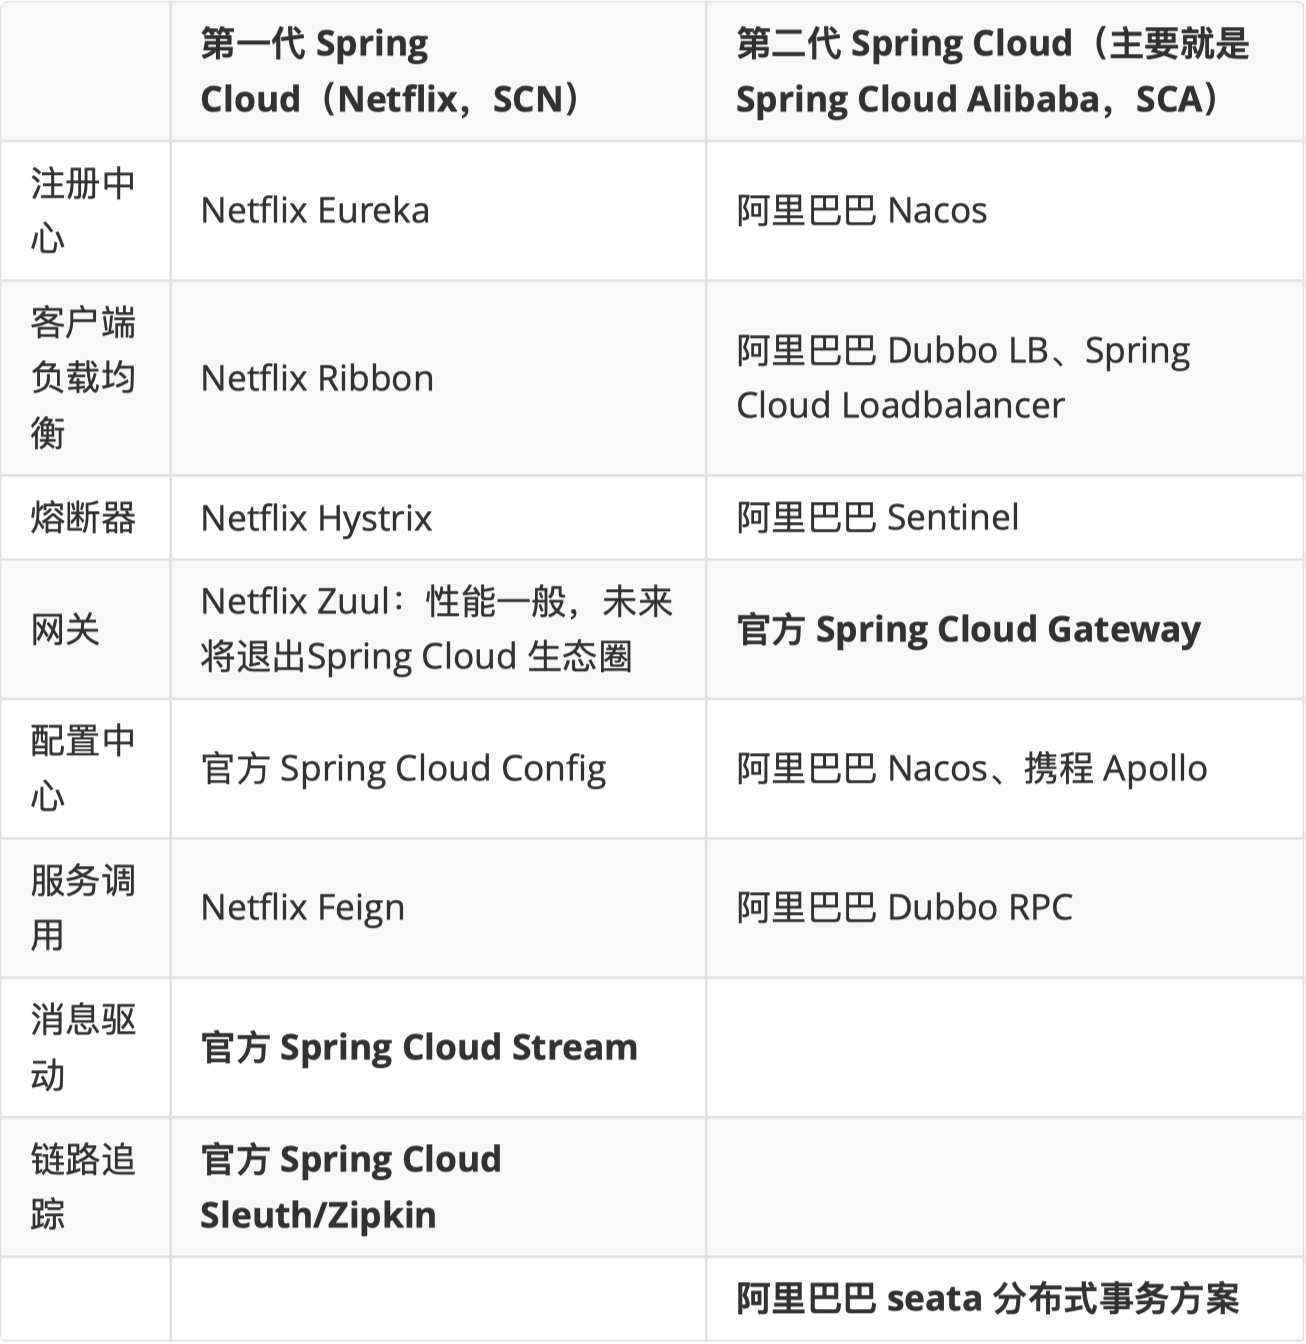
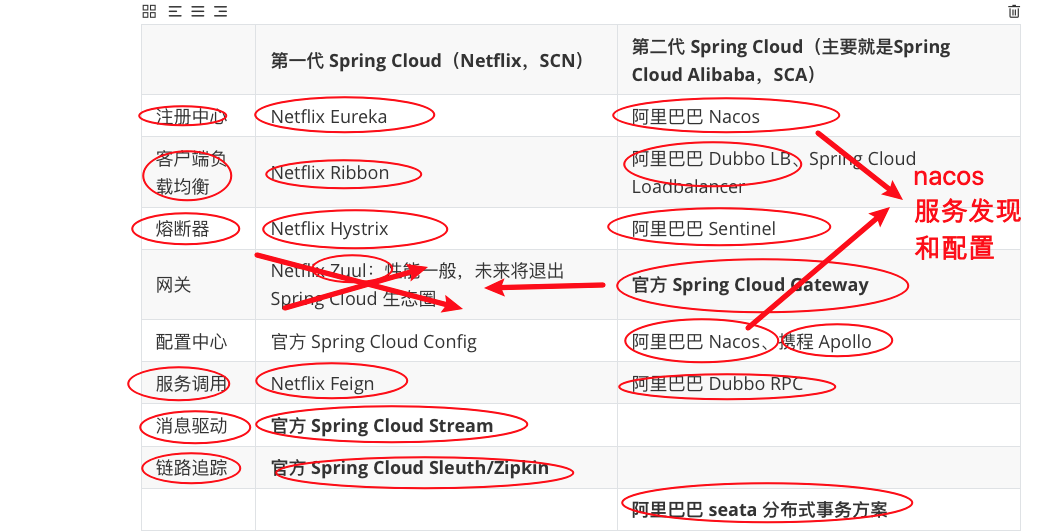
3.2 Spring Cloud 体系结构组件协同
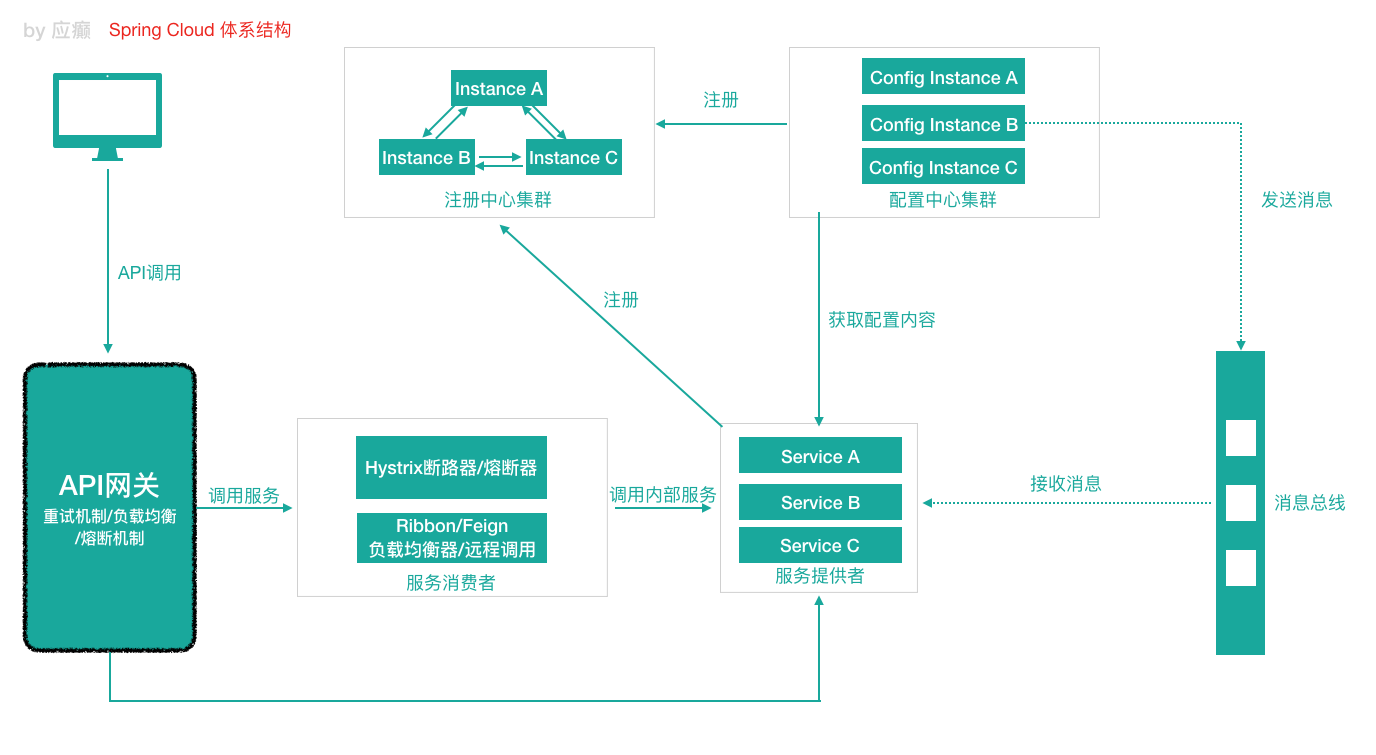
Spring Cloud 中的各组件协同⼯作,才能够⽀持⼀个完整的微服务架构。⽐如
注册中⼼负责服务的注册与发现,很好将各服务连接起来
API ⽹关负责转发所有外来的请求
断路器负责监控服务之间的调⽤情况,连续多次失败进⾏熔断保护。
配置中⼼提供了统⼀的配置信息管理服务,可以实时的通知各个服务获取最新的 配置信息
第 4 节 Spring Cloud 与 Dubbo 对⽐
Dubbo 是阿⾥巴巴公司开源的⼀个⾼性能优秀的服务框架,基于 RPC 调⽤,对于⽬ 前使⽤率较⾼的 Spring Cloud Netflix 来说,它是基于 HTTP 的,所以效率上没有 Dubbo ⾼,但问题在于 Dubbo 体系的组件不全,不能够提供⼀站式解决⽅案,⽐如 服务注册与发现需要借助于 Zookeeper 等实现,⽽ Spring Cloud Netflix 则是真正的 提供了⼀站式服务化解决⽅案,且有 Spring ⼤家族背景。
前些年,Dubbo 使⽤率⾼于 SpringCloud,但⽬前 Spring Cloud 在服务化/微服务解 决⽅案中已经有了⾮常好的发展趋势。
第 5 节 Spring Cloud 与 Spring Boot 的关系
Spring Cloud 只是利⽤了 Spring Boot 的特点,让我们能够快速的实现微服务组件 开发,否则不使⽤ Spring Boot 的话,我们在使⽤ Spring Cloud 时,每⼀个组件的相 关 Jar 包都需要我们⾃⼰导⼊配置以及需要开发⼈员考虑兼容性等各种情况。所以 Spring Boot 是我们快速把 Spring Cloud 微服务技术应⽤起来的⼀种⽅式。
第三部分 案例准备
第 1 节 案例说明
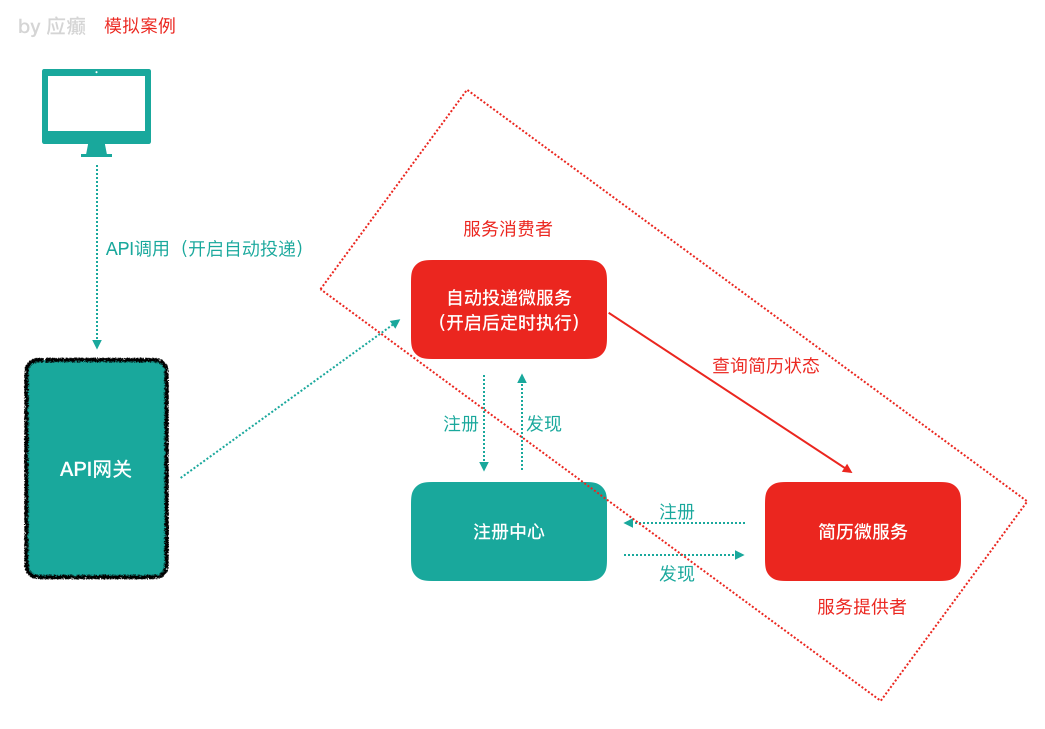
本部分我们按照普通⽅式模拟⼀个微服务之间的调⽤(后续我们将⼀步步使⽤ Spring Cloud 的组件对案例进⾏改造)。
拉勾 App ⾥有这样⼀个功能:“⾯试直通⻋”,当求职⽤户开启了⾯试直通⻋之后,会 根据企业客户的招聘岗位需求进⾏双向匹配。其中有⼀个操作是:为企业⽤户开启 ⼀个定时任务,根据企业录⼊的⽤⼈条件,每⽇匹配⼀定数量的应聘者“投递”到企业 的资源池中去,那么系统在将匹配到的应聘者投递到资源池的时候需要先检查:此 时应聘者默认简历的状态(公开/隐藏),如果此时默认简历的状态已经被应聘者设置 为“隐藏”,那么不再执⾏“投递”操作。 “⾃动投递功能”在“⾃动投递微服务”中,“简历 状态查询功能”在“简历微服务”中,那么就涉及到“⾃动投递微服务”调⽤“简历微服务” 查询简历。在这种场景下,“⾃动投递微服务”就是⼀个服务消费者,“简历微服务”就 是⼀个服务提供者。
第 2 节 案例数据库环境准备
本次课程数据库使⽤ Mysql 5.7.x
简历基本信息表 r_resume
SET NAMES utf8mb4;
SET FOREIGN_KEY_CHECKS = 0;

-- ----------------------------
-- Table structure for r_resume
-- ----------------------------
DROP TABLE IF EXISTS `r_resume`;
CREATE TABLE `r_resume` (
  `id` int(11) NOT NULL AUTO_INCREMENT,
  `sex` varchar(10) DEFAULT NULL COMMENT '性别',
  `birthday` varchar(30) DEFAULT NULL COMMENT '出生日期',
  `work_year` varchar(100) DEFAULT NULL COMMENT '工作年限',
  `phone` varchar(20) DEFAULT NULL COMMENT '手机号码',
  `email` varchar(100) DEFAULT NULL COMMENT '邮箱',
  `status` varchar(80) DEFAULT NULL COMMENT '目前状态',
  `resumeName` varchar(500) DEFAULT NULL COMMENT '简历名称',
  `name` varchar(40) DEFAULT NULL,
  `createTime` datetime DEFAULT NULL COMMENT '创建日期',
  `headPic` varchar(100) DEFAULT NULL COMMENT '头像',
  `isDel` int(2) DEFAULT NULL COMMENT '是否删除 默认值0-未删除  1-已删除',
  `updateTime` datetime DEFAULT NULL COMMENT '简历更新时间',
  `userId` int(11) DEFAULT NULL COMMENT '用户ID',
  `isDefault` int(2) DEFAULT NULL COMMENT '是否为默认简历 0-默认 1-非默认',
  `highestEducation` varchar(20) DEFAULT '' COMMENT '最高学历',
  `deliverNearByConfirm` int(2) DEFAULT '0' COMMENT '投递附件简历确认 0-需要确认 1-不需要确认',
  `refuseCount` int(11) NOT NULL DEFAULT '0' COMMENT '简历被拒绝次数',
  `markCanInterviewCount` int(11) NOT NULL DEFAULT '0' COMMENT '被标记为可面试次数',
  `haveNoticeInterCount` int(11) NOT NULL DEFAULT '0' COMMENT '已通知面试次数',
  `oneWord` varchar(100) DEFAULT '' COMMENT '一句话介绍自己',
  `liveCity` varchar(100) DEFAULT '' COMMENT '居住城市',
  `resumeScore` int(3) DEFAULT NULL COMMENT '简历得分',
  `userIdentity` int(1) DEFAULT '0' COMMENT '用户身份1-学生 2-工人',
  `isOpenResume` int(1) DEFAULT '3' COMMENT '人才搜索-开放简历 0-关闭,1-打开,2-简历未达到投放标准被动关闭 3-从未设置过开放简历',
  PRIMARY KEY (`id`)
) ENGINE=InnoDB AUTO_INCREMENT=2195388 DEFAULT CHARSET=utf8;

-- ----------------------------
-- Records of r_resume
-- ----------------------------
BEGIN;
INSERT INTO `r_resume` VALUES (2195320, '女', '1990', '2年', '199999999', 'test@testtest01.com', '我目前已离职,可快速到岗', '稻壳儿的简历', 'wps', '2015-04-24 13:40:14', 'images/myresume/default_headpic.png', 0, '2015-04-24 13:40:14', 1545132, 1, '本科', 0, 0, 0, 0, '', '广州', 15, 0, 3);
INSERT INTO `r_resume` VALUES (2195321, '女', '1990', '2年', '199999999', 'test@testtest01.com', '我目前已离职,可快速到岗', '稻壳儿的简历', 'wps', '2015-04-24 14:17:54', 'images/myresume/default_headpic.png', 0, '2015-04-24 14:20:35', 1545133, 1, '本科', 0, 0, 0, 0, '', '广州', 65, 0, 3);
INSERT INTO `r_resume` VALUES (2195322, '女', '1990', '2年', '199999999', 'test@testtest01.com', '我目前已离职,可快速到岗', '稻壳儿的简历', 'wps', '2015-04-24 14:42:45', 'images/myresume/default_headpic.png', 0, '2015-04-24 14:43:34', 1545135, 1, '本科', 0, 0, 0, 0, '', '广州', 65, 0, 3);
INSERT INTO `r_resume` VALUES (2195323, '女', '1990', '2年', '199999999', 'test@testtest01.com', '我目前已离职,可快速到岗', '稻壳儿的简历', 'wps', '2015-04-24 14:48:19', 'images/myresume/default_headpic.png', 0, '2015-04-24 14:50:34', 1545136, 1, '本科', 0, 0, 0, 0, '', '广州', 65, 0, 3);
INSERT INTO `r_resume` VALUES (2195331, '女', '1990', '2年', '199999999', 'test@testtest01.com', '我目前已离职,可快速到岗', '稻壳儿的简历', 'wps', '2015-04-24 18:43:35', 'images/myresume/default_headpic.png', 0, '2015-04-24 18:44:08', 1545145, 1, '本科', 0, 0, 0, 0, '', '广州', 65, 0, 3);
INSERT INTO `r_resume` VALUES (2195333, '女', '1990', '2年', '199999999', 'test@testtest01.com', '我目前已离职,可快速到岗', '稻壳儿的简历', 'wps', '2015-04-24 19:01:13', 'images/myresume/default_headpic.png', 0, '2015-04-24 19:01:14', 1545148, 1, '本科', 0, 0, 0, 0, '', '广州', 65, 0, 3);
INSERT INTO `r_resume` VALUES (2195336, '女', '1990', '2年', '199999999', 'test@testtest01.com', '我目前已离职,可快速到岗', '稻壳儿的简历', 'wps', '2015-04-27 14:13:02', 'images/myresume/default_headpic.png', 0, '2015-04-27 14:13:02', 1545155, 1, '本科', 0, 0, 0, 0, '', '广州', 65, 0, 3);
INSERT INTO `r_resume` VALUES (2195337, '女', '1990', '2年', '199999999', 'test@testtest01.com', '我目前已离职,可快速到岗', '稻壳儿的简历', 'wps', '2015-04-27 14:36:55', 'images/myresume/default_headpic.png', 0, '2015-04-27 14:36:55', 1545158, 1, '本科', 0, 0, 0, 0, '', '广州', 65, 0, 3);
INSERT INTO `r_resume` VALUES (2195369, '女', '1990', '10年以上', '199999999', 'test@testtest01.com', '我目前已离职,可快速到岗', '稻壳儿', 'wps', '2015-05-15 18:08:19', 'images/myresume/default_headpic.png', 0, '2015-05-15 18:08:19', 1545346, 1, '本科', 0, 0, 0, 0, '', '广州', 65, 0, 3);
INSERT INTO `r_resume` VALUES (2195374, '女', '1990', '1年', '199999999', 'test@testtest01.com', '我目前正在职,正考虑换个新环境', '稻壳儿', 'wps', '2015-06-04 17:53:37', 'images/myresume/default_headpic.png', 0, '2015-06-04 17:53:39', 1545523, 1, '本科', 0, 0, 0, 0, '', '广州', 65, 0, 3);
INSERT INTO `r_resume` VALUES (2195375, '女', '1990', '1年', '199999999', 'test@testtest01.com', '我目前正在职,正考虑换个新环境', '稻壳儿', 'wps', '2015-06-04 18:11:06', 'images/myresume/default_headpic.png', 0, '2015-06-04 18:11:07', 1545524, 1, '本科', 0, 0, 0, 0, '', '广州', 65, 0, 3);
INSERT INTO `r_resume` VALUES (2195376, '女', '1990', '1年', '199999999', 'test@testtest01.com', '我目前正在职,正考虑换个新环境', '稻壳儿', 'wps', '2015-06-04 18:12:19', 'images/myresume/default_headpic.png', 0, '2015-06-04 18:12:19', 1545525, 1, '本科', 0, 0, 0, 0, '', '广州', 65, 0, 3);
INSERT INTO `r_resume` VALUES (2195377, '女', '1990', '1年', '199999999', 'test@testtest01.com', '我目前正在职,正考虑换个新环境', '稻壳儿', 'wps', '2015-06-04 18:13:28', 'images/myresume/default_headpic.png', 0, '2015-06-04 18:13:28', 1545526, 1, '本科', 0, 0, 0, 0, '', '广州', 65, 0, 3);
INSERT INTO `r_resume` VALUES (2195378, '女', '1990', '1年', '199999999', 'test@testtest01.com', '我目前正在职,正考虑换个新环境', '稻壳儿', 'wps', '2015-06-04 18:15:16', 'images/myresume/default_headpic.png', 0, '2015-06-04 18:15:16', 1545527, 1, '本科', 0, 0, 0, 0, '', '广州', 65, 0, 3);
INSERT INTO `r_resume` VALUES (2195379, '女', '1990', '1年', '199999999', 'test@testtest01.com', '我目前正在职,正考虑换个新环境', '稻壳儿', 'wps', '2015-06-04 18:23:06', 'images/myresume/default_headpic.png', 0, '2015-06-04 18:23:06', 1545528, 1, '本科', 0, 0, 0, 0, '', '广州', 65, 0, 3);
INSERT INTO `r_resume` VALUES (2195380, '女', '1990', '1年', '199999999', 'test@testtest01.com', '我目前正在职,正考虑换个新环境', '稻壳儿', 'wps', '2015-06-04 18:23:38', 'images/myresume/default_headpic.png', 0, '2015-06-04 18:23:39', 1545529, 1, '本科', 0, 0, 0, 0, '', '广州', 65, 0, 3);
INSERT INTO `r_resume` VALUES (2195381, '女', '1990', '1年', '199999999', 'test@testtest01.com', '我目前正在职,正考虑换个新环境', '稻壳儿', 'wps', '2015-06-04 18:27:33', 'images/myresume/default_headpic.png', 0, '2015-06-04 18:27:33', 1545530, 1, '本科', 0, 0, 0, 0, '', '广州', 65, 0, 3);
INSERT INTO `r_resume` VALUES (2195382, '女', '1990', '1年', '199999999', 'test@testtest01.com', '我目前正在职,正考虑换个新环境', '稻壳儿', 'wps', '2015-06-04 18:31:36', 'images/myresume/default_headpic.png', 0, '2015-06-04 18:31:39', 1545531, 1, '本科', 0, 0, 0, 0, '', '广州', 65, 0, 3);
INSERT INTO `r_resume` VALUES (2195383, '女', '1990', '1年', '199999999', 'test@testtest01.com', '我目前正在职,正考虑换个新环境', '稻壳儿', 'wps', '2015-06-04 18:36:48', 'images/myresume/default_headpic.png', 0, '2015-06-04 18:36:48', 1545532, 1, '本科', 0, 0, 0, 0, '', '广州', 65, 0, 3);
INSERT INTO `r_resume` VALUES (2195384, '女', '1990', '1年', '199999999', 'test@testtest01.com', '我目前正在职,正考虑换个新环境', '稻壳儿', 'wps', '2015-06-04 19:15:15', 'images/myresume/default_headpic.png', 0, '2015-06-04 19:15:16', 1545533, 1, '本科', 0, 0, 0, 0, '', '广州', 65, 0, 3);
INSERT INTO `r_resume` VALUES (2195385, '女', '1990', '1年', '199999999', 'test@testtest01.com', '我目前正在职,正考虑换个新环境', '稻壳儿', 'wps', '2015-06-04 19:28:53', 'images/myresume/default_headpic.png', 0, '2015-06-04 19:28:53', 1545534, 1, '本科', 0, 0, 0, 0, '', '广州', 65, 0, 3);
INSERT INTO `r_resume` VALUES (2195386, '女', '1990', '1年', '199999999', 'test@testtest01.com', '我目前正在职,正考虑换个新环境', '稻壳儿', 'wps', '2015-06-04 19:46:42', 'images/myresume/default_headpic.png', 0, '2015-06-04 19:46:45', 1545535, 1, '本科', 0, 0, 0, 0, '', '广州', 65, 0, 3);
INSERT INTO `r_resume` VALUES (2195387, '女', '1990', '1年', '199999999', 'test@testtest01.com', '我目前正在职,正考虑换个新环境', '稻壳儿', 'wps', '2015-06-04 19:48:16', 'images/myresume/default_headpic.png', 0, '2015-06-04 19:48:16', 1545536, 1, '本科', 0, 0, 0, 0, '', '广州', 65, 0, 3);
COMMIT;

SET FOREIGN_KEY_CHECKS = 1;
第 3 节 案例⼯程环境准备
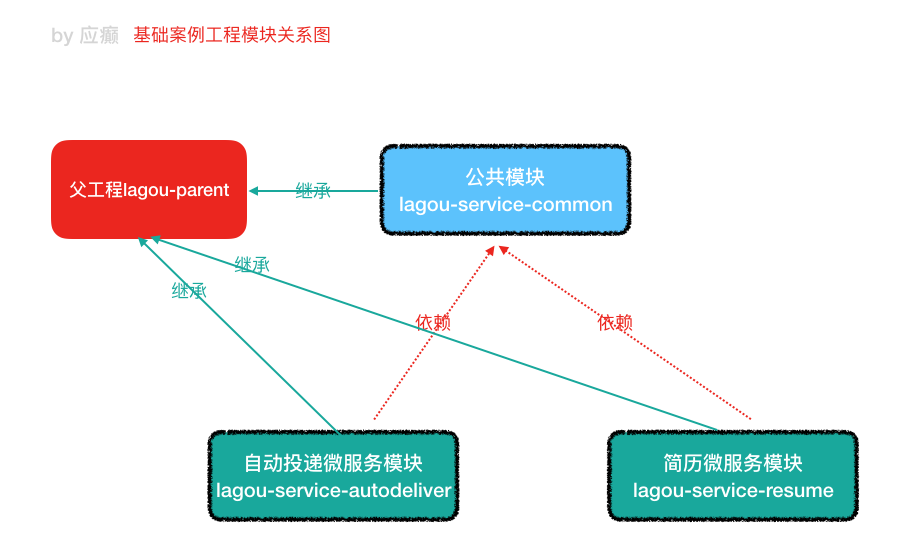
⽗⼯程 lagou-parent
pom.xml
<?xml version="1.0" encoding="UTF-8"?>
<project xmlns="http://maven.apache.org/POM/4.0.0"
         xmlns:xsi="http://www.w3.org/2001/XMLSchema-instance"
         xsi:schemaLocation="http://maven.apache.org/POM/4.0.0 http://maven.apache.org/xsd/maven-4.0.0.xsd">
    <modelVersion>4.0.0</modelVersion>

    <groupId>com.galaxy</groupId>
    <artifactId>lane-parent-project</artifactId>
    <version>1.0-SNAPSHOT</version>
    <modules>
        <module>lane-service-common</module>
        <module>lane-service-autodeliver</module>
        <module>lane-service-resume</module>
    </modules>
    <packaging>pom</packaging>
    <!--spring boot ⽗启动器依赖-->
    <parent>
        <groupId>org.springframework.boot</groupId>
        <artifactId>spring-boot-starter-parent</artifactId>
        <version>2.1.6.RELEASE</version>
    </parent>
    <dependencies>
        <!--web依赖-->
        <dependency>
            <groupId>org.springframework.boot</groupId>
            <artifactId>spring-boot-starter-web</artifactId>
        </dependency>
        <!--⽇志依赖-->
        <dependency>
            <groupId>org.springframework.boot</groupId>
            <artifactId>spring-boot-starter-logging</artifactId>
        </dependency>
        <!--测试依赖-->
        <dependency>
            <groupId>org.springframework.boot</groupId>
            <artifactId>spring-boot-starter-test</artifactId>
            <scope>test</scope>
        </dependency>
        <!--lombok⼯具-->
        <dependency> <groupId>org.projectlombok</groupId>
            <artifactId>lombok</artifactId>
            <version>1.18.4</version>
            <scope>provided</scope>
        </dependency>
        <!-- Actuator可以帮助你监控和管理Spring Boot应⽤-->
        <dependency>
            <groupId>org.springframework.boot</groupId>
            <artifactId>spring-boot-starter-actuator</artifactId>
        </dependency>
        <!--热部署-->
        <dependency>
            <groupId>org.springframework.boot</groupId>
            <artifactId>spring-boot-devtools</artifactId>
            <optional>true</optional>
        </dependency>
    </dependencies>
    <build>
        <plugins>
            <!--编译插件-->
            <plugin>
                <groupId>org.apache.maven.plugins</groupId>
                <artifactId>maven-compiler-plugin</artifactId>
                <configuration>
                    <source>11</source>
                    <target>11</target>
                    <encoding>utf-8</encoding>
                </configuration>
            </plugin> <!--打包插件-->
            <plugin>
                <groupId>org.springframework.boot</groupId>
                <artifactId>spring-boot-maven-plugin</artifactId>
            </plugin>

    </plugins>
    </build>
</project>
第 4 节 案例核⼼微服务开发及通信调⽤
4.1 简历微服务
pom ⽂件导⼊坐标
在 lane-service-common 模块的 pom.xml 中导⼊如下操作数据库相关坐标
<?xml version="1.0" encoding="UTF-8"?>
<project xmlns="http://maven.apache.org/POM/4.0.0"
         xmlns:xsi="http://www.w3.org/2001/XMLSchema-instance"
         xsi:schemaLocation="http://maven.apache.org/POM/4.0.0 http://maven.apache.org/xsd/maven-4.0.0.xsd">
    <parent>
        <artifactId>lane-parent-project</artifactId>
        <groupId>com.galaxy</groupId>
        <version>1.0-SNAPSHOT</version>
    </parent>
    <modelVersion>4.0.0</modelVersion>

    <artifactId>lane-service-common</artifactId>

    <dependencies>
        <!--Spring Data Jpa-->
        <dependency>
            <groupId>org.springframework.boot</groupId>
            <artifactId>spring-boot-starter-data-jpa</artifactId>
        </dependency>
        <dependency>
            <groupId>mysql</groupId>
            <artifactId>mysql-connector-java</artifactId>
            <scope>runtime</scope>
        </dependency>
    </dependencies>
</project>
pojo
package com.galaxy.pojo;

import lombok.Data;

import javax.persistence.Column;
import javax.persistence.Entity;
import javax.persistence.Id;
import javax.persistence.Table;

/**
 * @author lane
 * @date 2021年06月22日 下午4:32
 */
@Data
@Entity
@Table(name="r_resume")
public class Resume {
        @Id
        private Long id; // 主键
        private String sex; // 性别
        private String birthday; // 生日
        private String work_year; // 工作年限
        private String phone; // 手机号
        private String email; // 邮箱
        private String status; // 目前状态
        private String resumeName; // 简历名称
        private String name; // 姓名
        private String createTime; // 创建时间
        private String headPic; // 头像
        private Integer isDel; //是否删除 默认值0-未删除 1-已删除
        private String updateTime; // 简历更新时间
        private Long userId; // 用户ID
        private Integer isDefault; // 是否为默认简历 0-默认 1-非默认
        private String highestEducation; // 最高学历
        private Integer deliverNearByConfirm; // 投递附件简历确认 0-需要确认 1-不需要确认
        private Integer refuseCount; // 简历被拒绝次数
        private Integer markCanInterviewCount; //被标记为可面试次数
        private Integer haveNoticeInterCount; //已通知面试次数
        private String oneWord; // 一句话介绍自己
        private String liveCity; // 居住城市
        private Integer resumeScore; // 简历得分
        private Integer userIdentity; // 用户身份1-学生 2-工人
        private Integer isOpenResume; // 人才搜索-开放简历 0-关闭,1-打开,2-简历未达到投放标准被动关闭 3-从未设置过开放简历


}
lane-service-resume
pom.xml
<?xml version="1.0" encoding="UTF-8"?>
<project xmlns="http://maven.apache.org/POM/4.0.0"
         xmlns:xsi="http://www.w3.org/2001/XMLSchema-instance"
         xsi:schemaLocation="http://maven.apache.org/POM/4.0.0 http://maven.apache.org/xsd/maven-4.0.0.xsd">
    <parent>
        <artifactId>lane-parent-project</artifactId>
        <groupId>com.galaxy</groupId>
        <version>1.0-SNAPSHOT</version>
    </parent>
    <modelVersion>4.0.0</modelVersion>

    <artifactId>lane-service-resume</artifactId>
    <dependencies>
        <dependency>
            <groupId>com.galaxy</groupId>
            <artifactId>lane-service-common</artifactId>
            <version>1.0-SNAPSHOT</version>
        </dependency>
    </dependencies>

</project>
dao
package com.galaxy.dao;

import com.galaxy.pojo.Resume;
import org.springframework.data.jpa.repository.JpaRepository;

/**
 * @author lane
 * @date 2021年06月22日 下午4:37
 */
public interface ResumeDao extends JpaRepository<Resume,Long> {


}
service
package com.galaxy.service;

import com.galaxy.pojo.Resume;

/**
 * @author lane
 * @date 2021年06月22日 下午4:39
 */
public interface ResumeService {
    Resume findDefaultResumeByUserId(Long userId);
}


package com.galaxy.service.impl;

import com.galaxy.dao.ResumeDao;
import com.galaxy.pojo.Resume;
import com.galaxy.service.ResumeService;
import org.springframework.beans.factory.annotation.Autowired;
import org.springframework.data.domain.Example;
import org.springframework.stereotype.Service;

import java.util.Optional;

/**
 * @author lane
 * @date 2021年06月22日 下午4:40
 */
@Service
public class ResumeServiceImpl implements ResumeService {

    @Autowired
    ResumeDao resumeDao;

    @Override
    public Resume findDefaultResumeByUserId(Long userId) {
        Resume resume = new Resume();
        resume.setUserId(userId);
        // 查询默认简历
        resume.setIsDefault(1);
        Example<Resume> example = Example.of(resume);

        Optional<Resume> one = resumeDao.findOne(example);
        if (one.isEmpty()){
            System.out.println("数据为空!");
            return null;
        }

        return resumeDao.findOne(example).get();
    }
}
controller
package com.galaxy.controller;

import com.galaxy.pojo.Resume;
import com.galaxy.service.ResumeService;
import org.springframework.beans.factory.annotation.Autowired;
import org.springframework.web.bind.annotation.GetMapping;
import org.springframework.web.bind.annotation.PathVariable;
import org.springframework.web.bind.annotation.RequestMapping;
import org.springframework.web.bind.annotation.RestController;

/**
 * @author lane
 * @date 2021年06月22日 下午4:50
 */
@RestController
@RequestMapping("/resume")
public class ResumeController {
    @Autowired
    private ResumeService resumeService;
    //resume/openstate/1545132
    @GetMapping("/openstate/{userId}")
    public Integer findDefaultResumeState(@PathVariable Long userId){
        Resume resume = resumeService.findDefaultResumeByUserId(userId);
        System.out.println(resume);
        return resume.getIsOpenResume() ;
    }


}
启动类
package com.galaxy;

import org.springframework.boot.SpringApplication;
import org.springframework.boot.autoconfigure.SpringBootApplication;
import org.springframework.boot.autoconfigure.domain.EntityScan;

import javax.persistence.Entity;

/**
 * @author lane
 * @date 2021年06月22日 下午5:23
 */
@SpringBootApplication
@EntityScan("com.galaxy.pojo")
public class ResumeApplication {
    public static void main(String[] args) {
        SpringApplication.run(ResumeApplication.class, args);
    }
}
配置文件
server:
  port: 8080
spring:
  application:
    name: lane-service-resume
  datasource:
    driver-class-name: com.mysql.jdbc.Driver
    url: jdbc:mysql://localhost:3306/lagou?useUnicode=true&characterEncoding=utf8
    username: root
    password: root
  jpa:
    database: MySQL
    show-sql: true
    hibernate:
      naming:
        physical-strategy: org.hibernate.boot.model.naming.PhysicalNamingStrategyStandardImpl  #避免将驼峰命名转换为下划线命名
4.2 ⾃动投递微服务
lane-service-autodeliver
server:
  port: 8090
package com.galaxy.controller;

import org.springframework.beans.factory.annotation.Autowired;
import org.springframework.web.bind.annotation.GetMapping;
import org.springframework.web.bind.annotation.PathVariable;
import org.springframework.web.bind.annotation.RequestMapping;
import org.springframework.web.bind.annotation.RestController;
import org.springframework.web.client.RestTemplate;

/**
 * @author lane
 * @date 2021年06月22日 下午6:18
 */
@RestController
@RequestMapping("/autodeliver")
public class AutodeliverController {
    @Autowired
    RestTemplate restTemplate;

    @GetMapping("/checkState/{userId}")
    public Integer findResumeOpenState(@PathVariable Long userId){


        return  restTemplate.getForObject("http://localhost:8080/resume/openstate/"+userId, Integer.class);

    }
}
启动类
package com.galaxy;

import org.springframework.boot.SpringApplication;
import org.springframework.boot.autoconfigure.SpringBootApplication;
import org.springframework.context.annotation.Bean;
import org.springframework.web.client.RestTemplate;

/**
 * @author lane
 * @date 2021年06月22日 下午6:21
 */
@SpringBootApplication
public class AutodeliverApplication {

    public static void main(String[] args) {
        SpringApplication.run(AutodeliverApplication.class, args);

    }

    @Bean
    public RestTemplate restTemplate(){
        return new RestTemplate();
    }

}
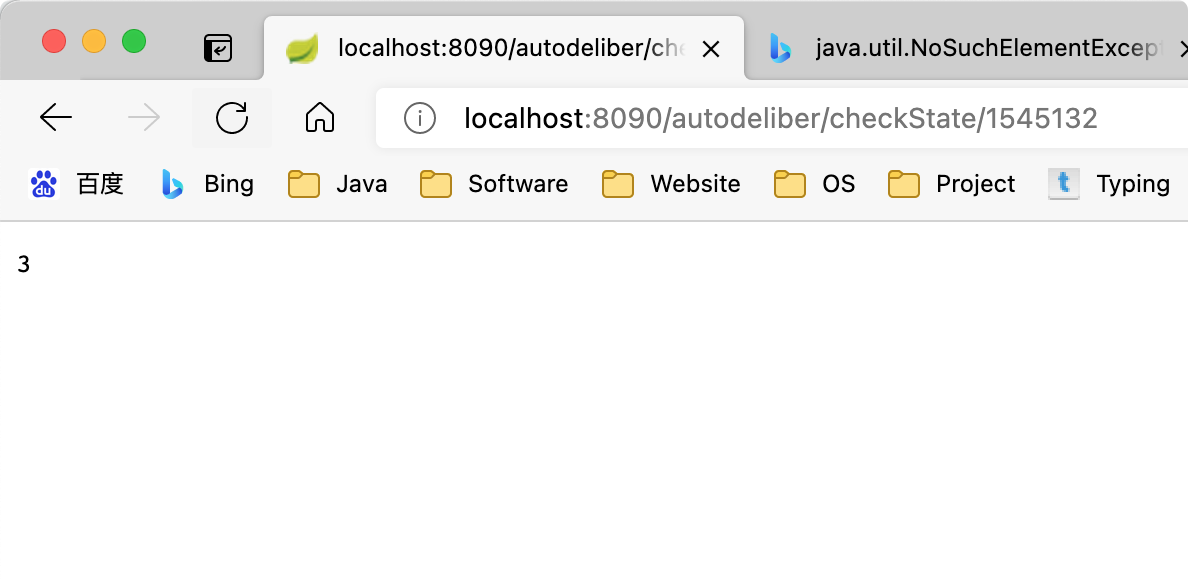
实现效果
第 5 节 案例代码问题分析
我们在⾃动投递微服务中使⽤ RestTemplate 调⽤简历微服务的简历状态接⼝时(Restful API 接⼝)。在微服务分布式集群环境下会存在什么问题呢?怎么解决?
存在的问题:
1)在服务消费者中,我们把 url 地址硬编码到代码中,不⽅便后期维护。
2)服务提供者只有⼀个服务,即便服务提供者形成集群,服务消费者还需要⾃⼰实现负载均衡。
3)在服务消费者中,不清楚服务提供者的状态。
4)服务消费者调⽤服务提供者时候,如果出现故障能否及时发现不向⽤户抛出异常⻚⾯?
5)RestTemplate 这种请求调⽤⽅式是否还有优化空间?能不能类似于 Dubbo 那样玩?
6)这么多的微服务统⼀认证如何实现?
7)配置⽂件每次都修改好多个很麻烦!?
8)....
上述分析出的问题,其实就是微服务架构中必然⾯临的⼀些问题:
1)服务管理:⾃动注册与发现、状态监管
2)服务负载均衡
3)熔断
4)远程过程调⽤
5)⽹关拦截、路由转发
6)统⼀认证
7)集中式配置管理,配置信息实时⾃动更新
这些问题,Spring Cloud 体系都有解决⽅案,后续我们会逐个学习。
第四部分 第⼀代 Spring Cloud 核⼼组件
说明:上⾯提到⽹关组件 Zuul 性能⼀般,未来将退出 Spring Cloud ⽣态圈,所以我 们直接讲解 GateWay,在课程章节规划时,我们就把 GateWay 划分到第⼀代 Spring Cloud 核⼼组件这⼀部分了。
各组件整体结构如下:
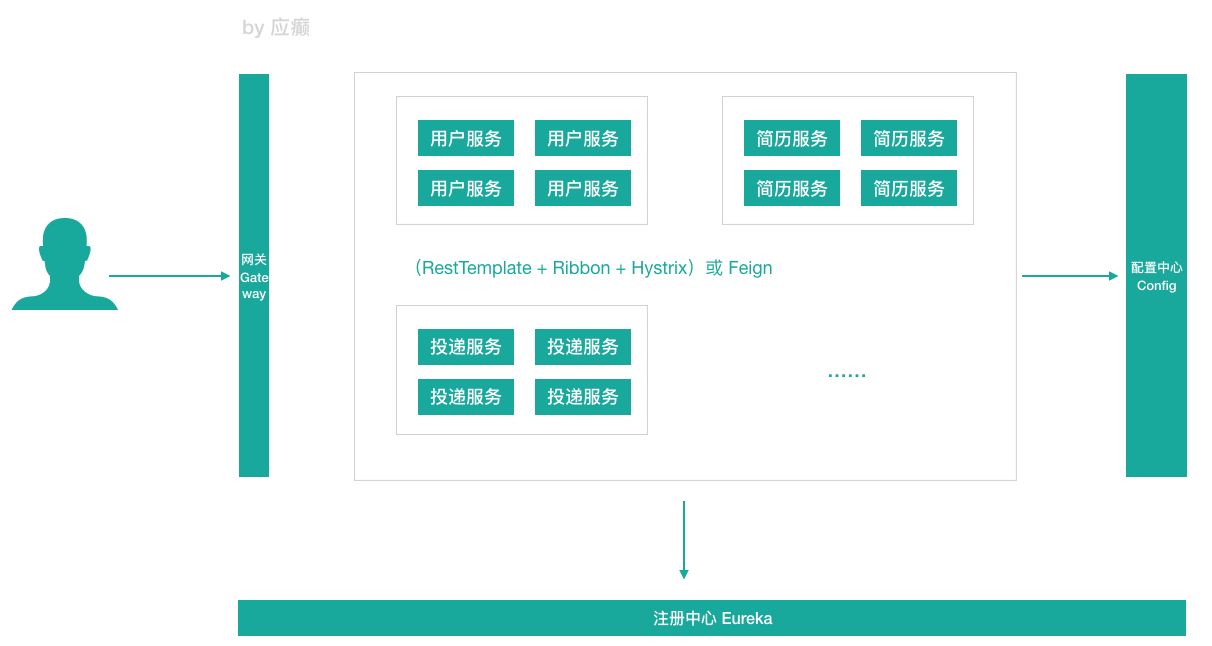
从形式上来说,Feign ⼀个顶三,Feign = RestTemplate + Ribbon + Hystrix
第 1 节 Eureka 服务注册中⼼
1.1 关于服务注册中⼼
注意:服务注册中⼼本质上是为了解耦服务提供者和服务消费者。
对于任何⼀个微服务,原则上都应存在或者⽀持多个提供者(⽐如简历微服务部署 多个实例),这是由微服务的分布式属性决定的。
更进⼀步,为了⽀持弹性扩缩容特性,⼀个微服务的提供者的数量和分布往往是动态变化的,也是⽆法预先确定的。因此,原本在单体应⽤阶段常⽤的静态 LB 机制就 不再适⽤了,需要引⼊额外的组件来管理微服务提供者的注册与发现,⽽这个组件 就是服务注册中⼼。
1.1.1 服务注册中⼼⼀般原理
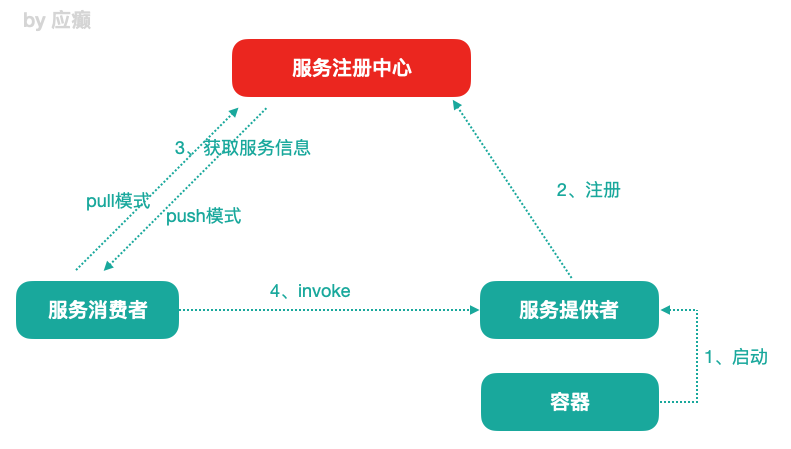
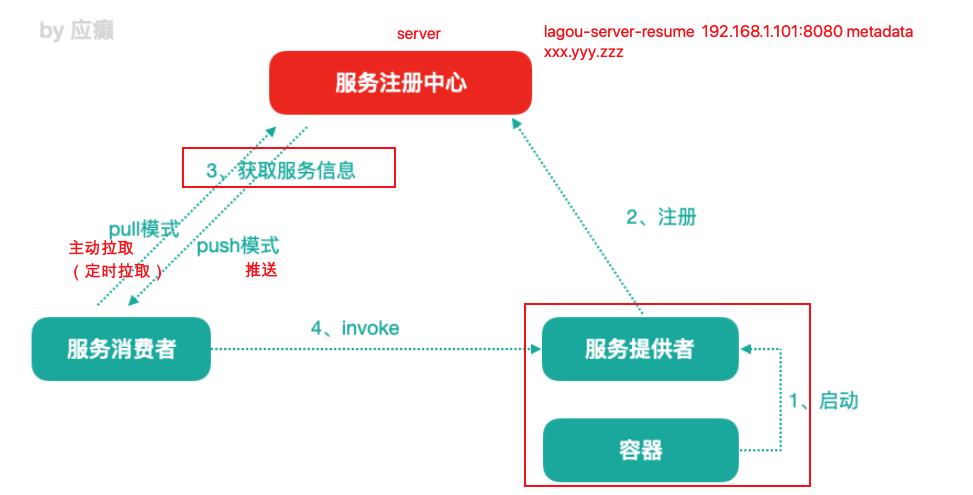
分布式微服务架构中,服务注册中⼼⽤于存储服务提供者地址信息、服务发布相关 的属性信息,消费者通过主动查询和被动通知的⽅式获取服务提供者的地址信息, ⽽不再需要通过硬编码⽅式得到提供者的地址信息。消费者只需要知道当前系统发 布了那些服务,⽽不需要知道服务具体存在于什么位置,这就是透明化路由。
1)服务提供者启动
2)服务提供者将相关服务信息主动注册到注册中⼼
3)服务消费者获取服务注册信息:
pull 模式:服务消费者可以主动拉取可⽤的服务提供者清单
push 模式:服务消费者订阅服务(当服务提供者有变化时,注册中⼼也会主动推送 更新后的服务清单给消费者
4)服务消费者直接调⽤服务提供者
另外,注册中⼼也需要完成服务提供者的健康监控,当发现服务提供者失效时需要 及时剔除;
1.1.2 主流服务中⼼对⽐
Zookeeper
Zookeeper 它是⼀个分布式服务框架,是 Apache Hadoop 的⼀个⼦项⽬,它主要是⽤来解决分布式应 ⽤中经常遇到的⼀些数据管理问题,如:统⼀命名服务、状态同步服务、集群管理、分布式应⽤配置项的管理等。简单来说 zookeeper 本质=存储 + 监听通知。
Zookeeper ⽤来做服务注册中⼼,主要是因为它具有节点变更通知功能,只要客户端监听相关服务节点,服务节点的所有变更,都能及时的通知到监听客户端,这样作为调⽤⽅只要使⽤ Zookeeper 的客户端就能实现服务节点的订阅和变更通知功能了,⾮常⽅便。另外,Zookeeper 可⽤性也可以,因为只要半数以上的选举节点存活,整个集群就是可⽤的。通常 3 个
Eureka
由 Netflix 开源,并被 Pivatal 集成到 SpringCloud 体系中,它是基于 RestfulAPI ⻛格开发的服务注册与发现组件。
Consul
Consul 是由 HashiCorp 基于 Go 语⾔开发的⽀持多数据中⼼分布式⾼可⽤的服务发布和注册服务软件, 采⽤ Raft 算法保证服务的⼀致性,且⽀持健康检查。
Nacos
Nacos 是⼀个更易于构建云原⽣应⽤的动态服务发现、配置管理和服务管理平台。简单来说 Nacos 就是 注册中⼼ + 配置中⼼的组合,帮助我们解决微服务开发必会涉及到的服务注册 与发现,服务配置,服务管理等问题。Nacos 是 Spring Cloud Alibaba 核⼼组件之⼀,负责服务注册与发现,还有配置。
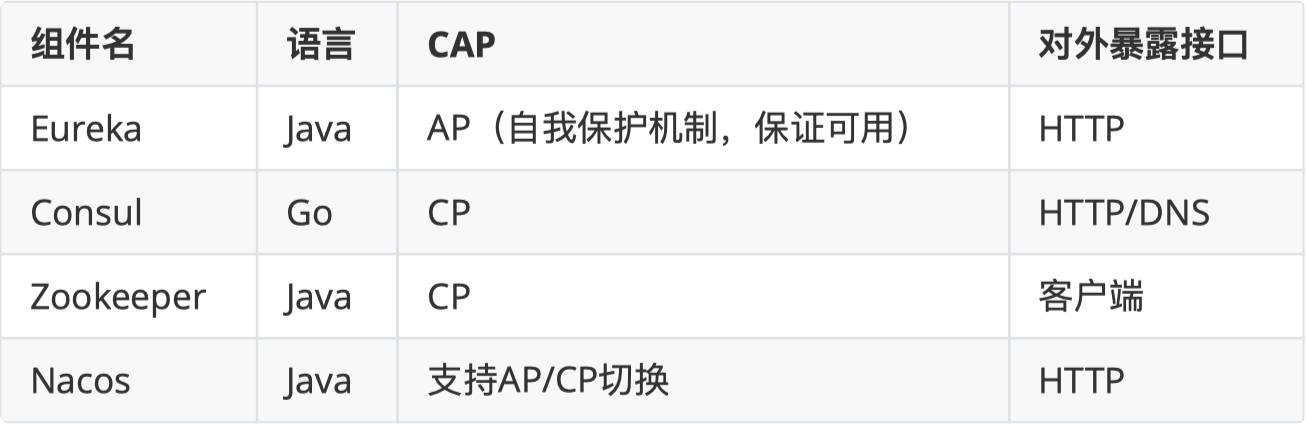
P:分区容错性(⼀定的要满⾜的)
C:数据⼀致性
A:⾼可⽤
CAP 不可能同时满⾜三个,要么是 AP,要么是 CP
1.2 服务注册中⼼组件 Eureka
服务注册中⼼的⼀般原理、对⽐了主流的服务注册中⼼⽅案 ⽬光聚焦 Eureka
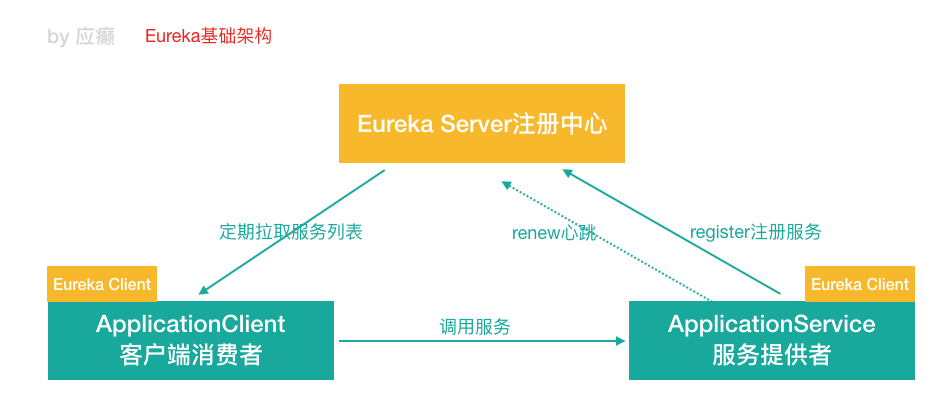
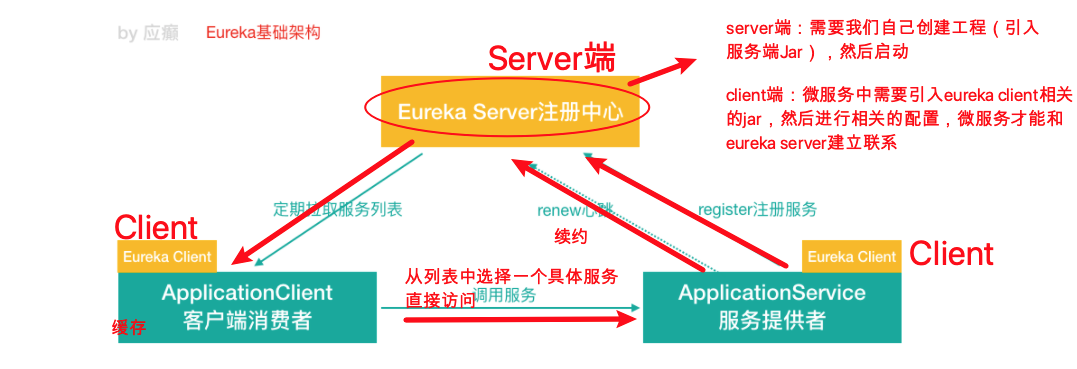
Eureka 基础架构
Eureka 交互流程及原理
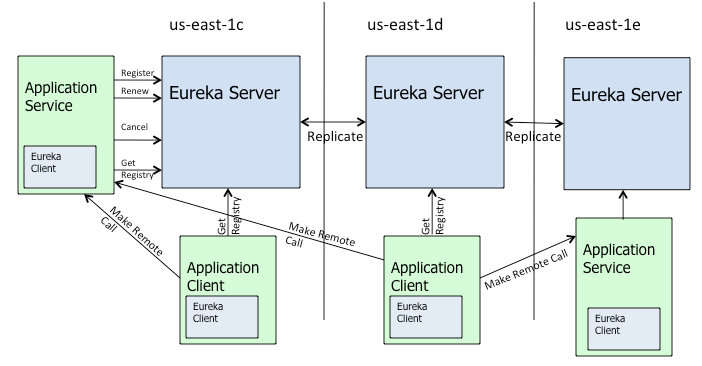
官⽹描述的⼀个架构图
replicate
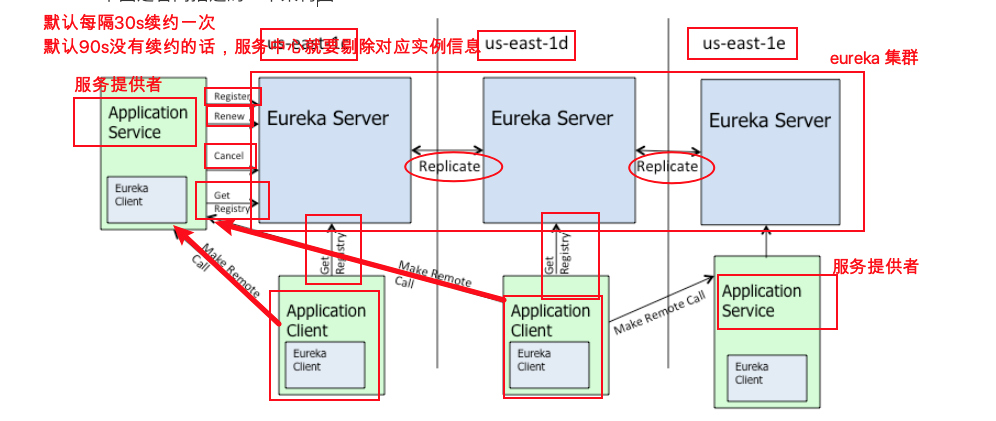
Eureka 包含两个组件:Eureka Server 和 Eureka Client,Eureka Client 是⼀个 Java 客户端,⽤于简化与 Eureka Server 的交互;Eureka Server 提供服务发现的 能⼒,各个微服务启动时,会通过 Eureka Client 向 Eureka Server 进⾏注册⾃⼰ 的信息(例如⽹络信息),Eureka Server 会存储该服务的信息;
1)图中 us-east-1c、us-east-1d,us-east-1e 代表不同的区也就是不同的机房
2)图中每⼀个 Eureka Server 都是⼀个集群。
3)图中 Application Service 作为服务提供者向 Eureka Server 中注册服务,Eureka Server 接受到注册事件会在集群和分区中进⾏数据同步,ApplicationClient 作为消费端(服务消费者)可以从 Eureka Server 中获取到服务注册信息,进⾏服务调⽤。
4)微服务启动后,会周期性地向 Eureka Server 发送⼼跳(默认周期为 30 秒)以续约⾃⼰的信息
5)Eureka Server 在⼀定时间内没有接收到某个微服务节点的⼼跳,EurekaServer 将会注销该微服务节点(默认 90 秒)
6)每个 Eureka Server 同时也是 Eureka Client,多个 Eureka Server 之间通过复制的⽅式完成服务注册列表的同步
7)Eureka Client 会缓存 Eureka Server 中的信息。即使所有的 Eureka Server 节点都宕掉,服务消费者依然可以使⽤缓存中的信息找到服务提供者
Eureka 通过⼼跳检测、健康检查和客户端缓存等机制,提⾼系统的灵活性、可伸缩性和可⽤性。
1.3 Eureka 应⽤及⾼可⽤集群
1)单实例 Eureka Server—> 访问管理界⾯—>Eureka Server 集群
2)服务提供者(简历微服务注册到集群)
3)服务消费者(⾃动投递微服务注册到集群/从 Eureka Server 集群获取服务信息)
4)完成调⽤
搭建 eureka 服务端
创建 maven 项目
父工程引入依赖
 <dependencyManagement>
        <dependencies>
            <!--spring cloud依赖管理,引入了Spring Cloud的版本-->
            <dependency>
                <groupId>org.springframework.cloud</groupId>
                <artifactId>spring-cloud-dependencies</artifactId>
                <version>Greenwich.RELEASE</version>
                <type>pom</type>
                <scope>import</scope>
            </dependency>
        </dependencies>
    </dependencyManagement>

  <!--eureka server 需要引入Jaxb,开始-->
        <dependency>
            <groupId>com.sun.xml.bind</groupId>
            <artifactId>jaxb-core</artifactId>
            <version>2.2.11</version>
        </dependency>
        <dependency>
            <groupId>javax.xml.bind</groupId>
            <artifactId>jaxb-api</artifactId>
        </dependency>
        <dependency>
            <groupId>com.sun.xml.bind</groupId>
            <artifactId>jaxb-impl</artifactId>
            <version>2.2.11</version>
        </dependency>
        <dependency>
            <groupId>org.glassfish.jaxb</groupId>
            <artifactId>jaxb-runtime</artifactId>
            <version>2.2.10-b140310.1920</version>
        </dependency>
        <dependency>
            <groupId>javax.activation</groupId>
            <artifactId>activation</artifactId>
            <version>1.1.1</version>
        </dependency>
        <!--引入Jaxb,结束-->
eureka server 引入依赖
   <dependencies>
        <!--Eureka server依赖-->
        <dependency>
            <groupId>org.springframework.cloud</groupId>
            <artifactId>spring-cloud-starter-netflix-eureka-server</artifactId>
        </dependency>
    </dependencies>
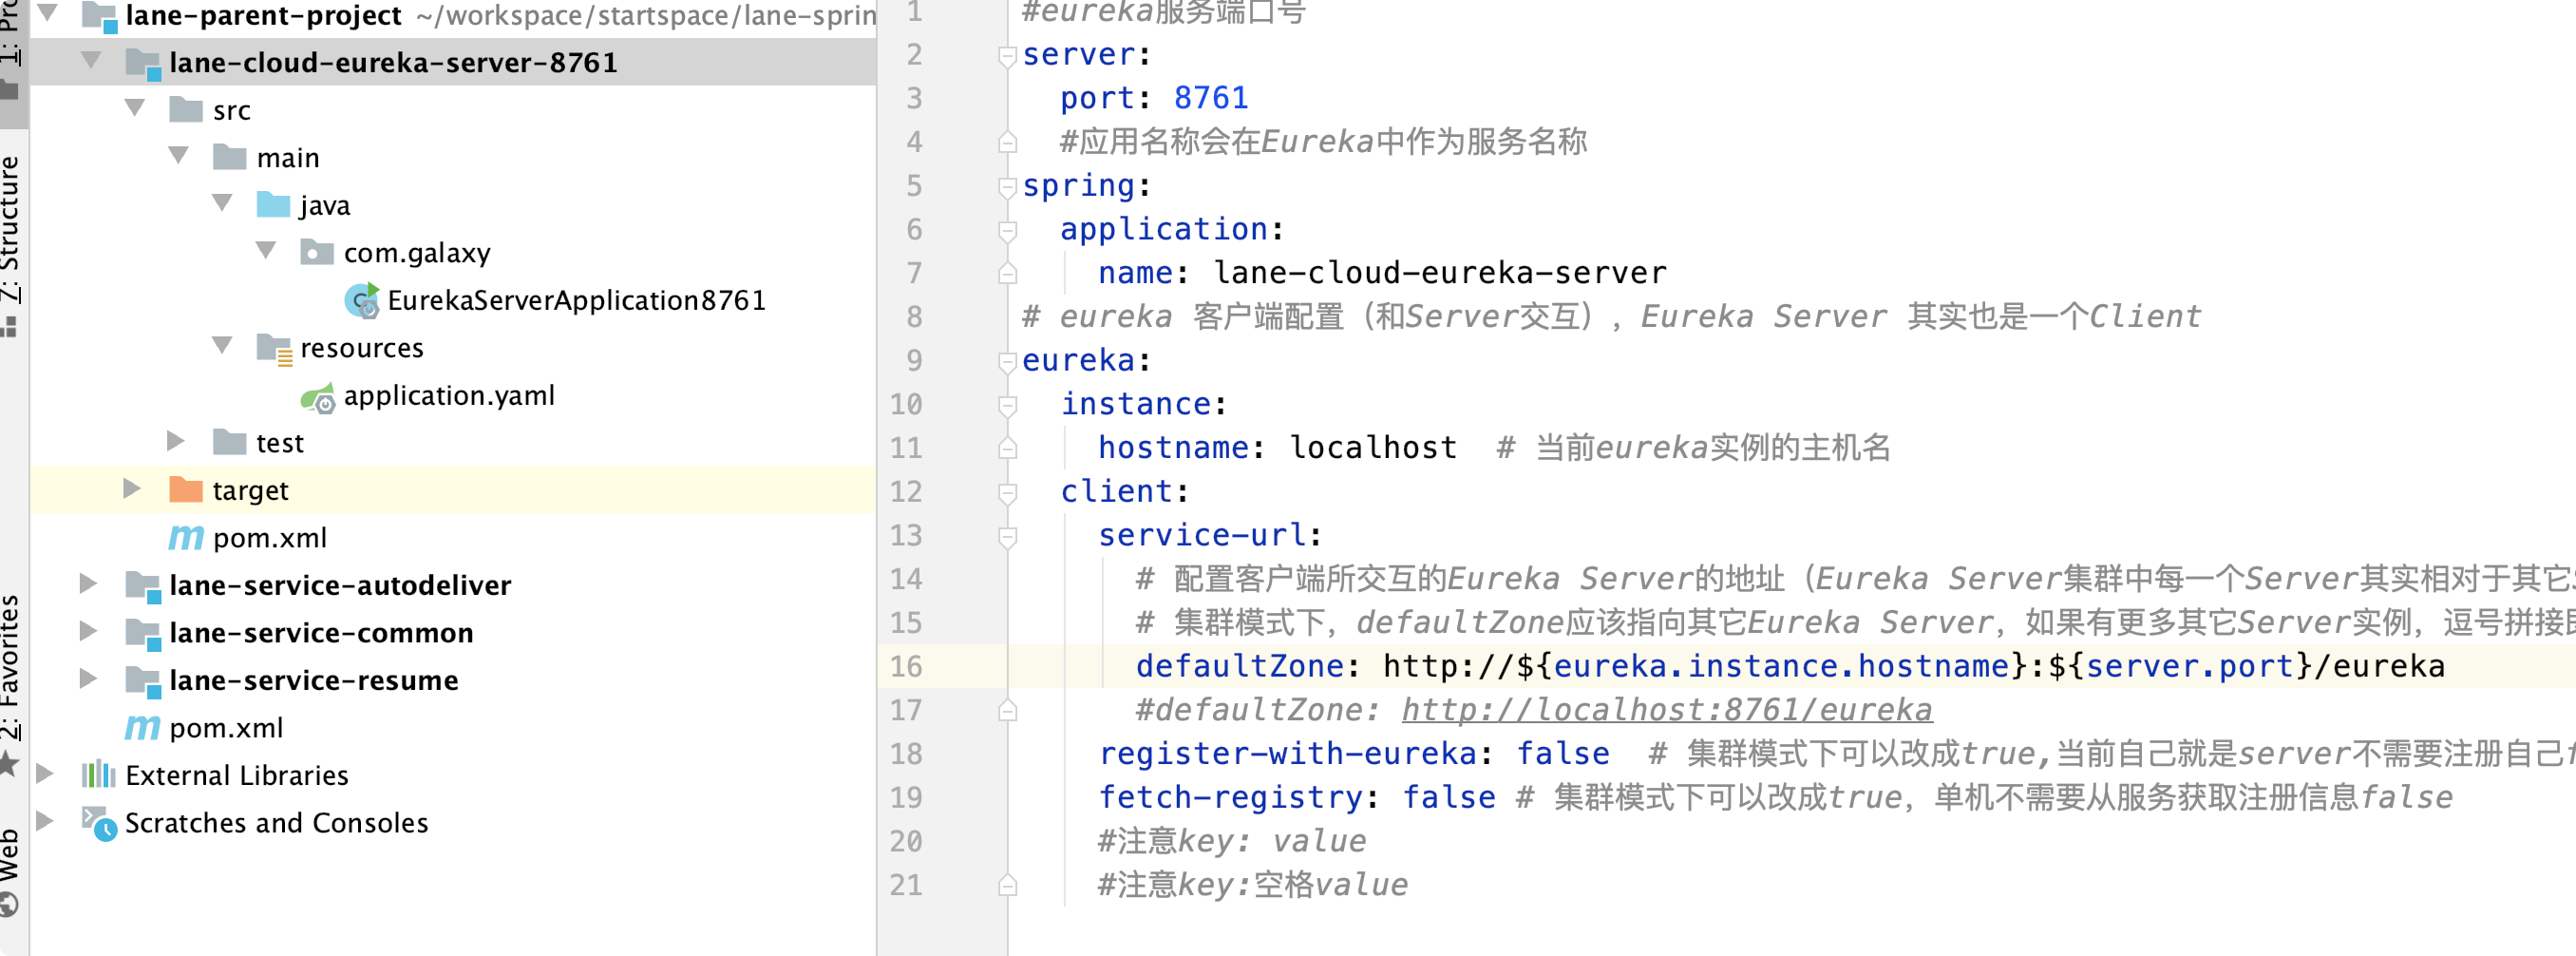
创建配置文件
#eureka服务端口号
server:
  port: 8761
  #应用名称会在Eureka中作为服务名称
spring:
  application:
    name: lane-cloud-eureka-server
# eureka 客户端配置(和Server交互),Eureka Server 其实也是一个Client
eureka:
  instance:
    hostname: localhost  # 当前eureka实例的主机名
  client:
    service-url:
      # 配置客户端所交互的Eureka Server的地址(Eureka Server集群中每一个Server其实相对于其它Server来说都是Client)
      # 集群模式下,defaultZone应该指向其它Eureka Server,如果有更多其它Server实例,逗号拼接即可
      defaultZone: http://${eureka.instance.hostname}:${server.port}/eureka
      #defaultZone: http://localhost:8761/eureka
    register-with-eureka: false  # 集群模式下可以改成true,当前自己就是server不需要注册自己false
    fetch-registry: false # 集群模式下可以改成true,单机不需要从服务获取注册信息false
    #注意key: value
    #注意key:空格value
创建启动类
package com.galaxy;

import org.springframework.boot.SpringApplication;
import org.springframework.boot.autoconfigure.SpringBootApplication;
import org.springframework.cloud.netflix.eureka.server.EnableEurekaServer;

/**
 * @author lane
 * @date 2021年06月23日 上午10:31
 */
@SpringBootApplication
//声明当前项目是eureka服务端
@EnableEurekaServer
public class EurekaServerApplication8761 {
    public static void main(String[] args) {
        SpringApplication.run(EurekaServerApplication8761.class,args);
    }
}
启动访问
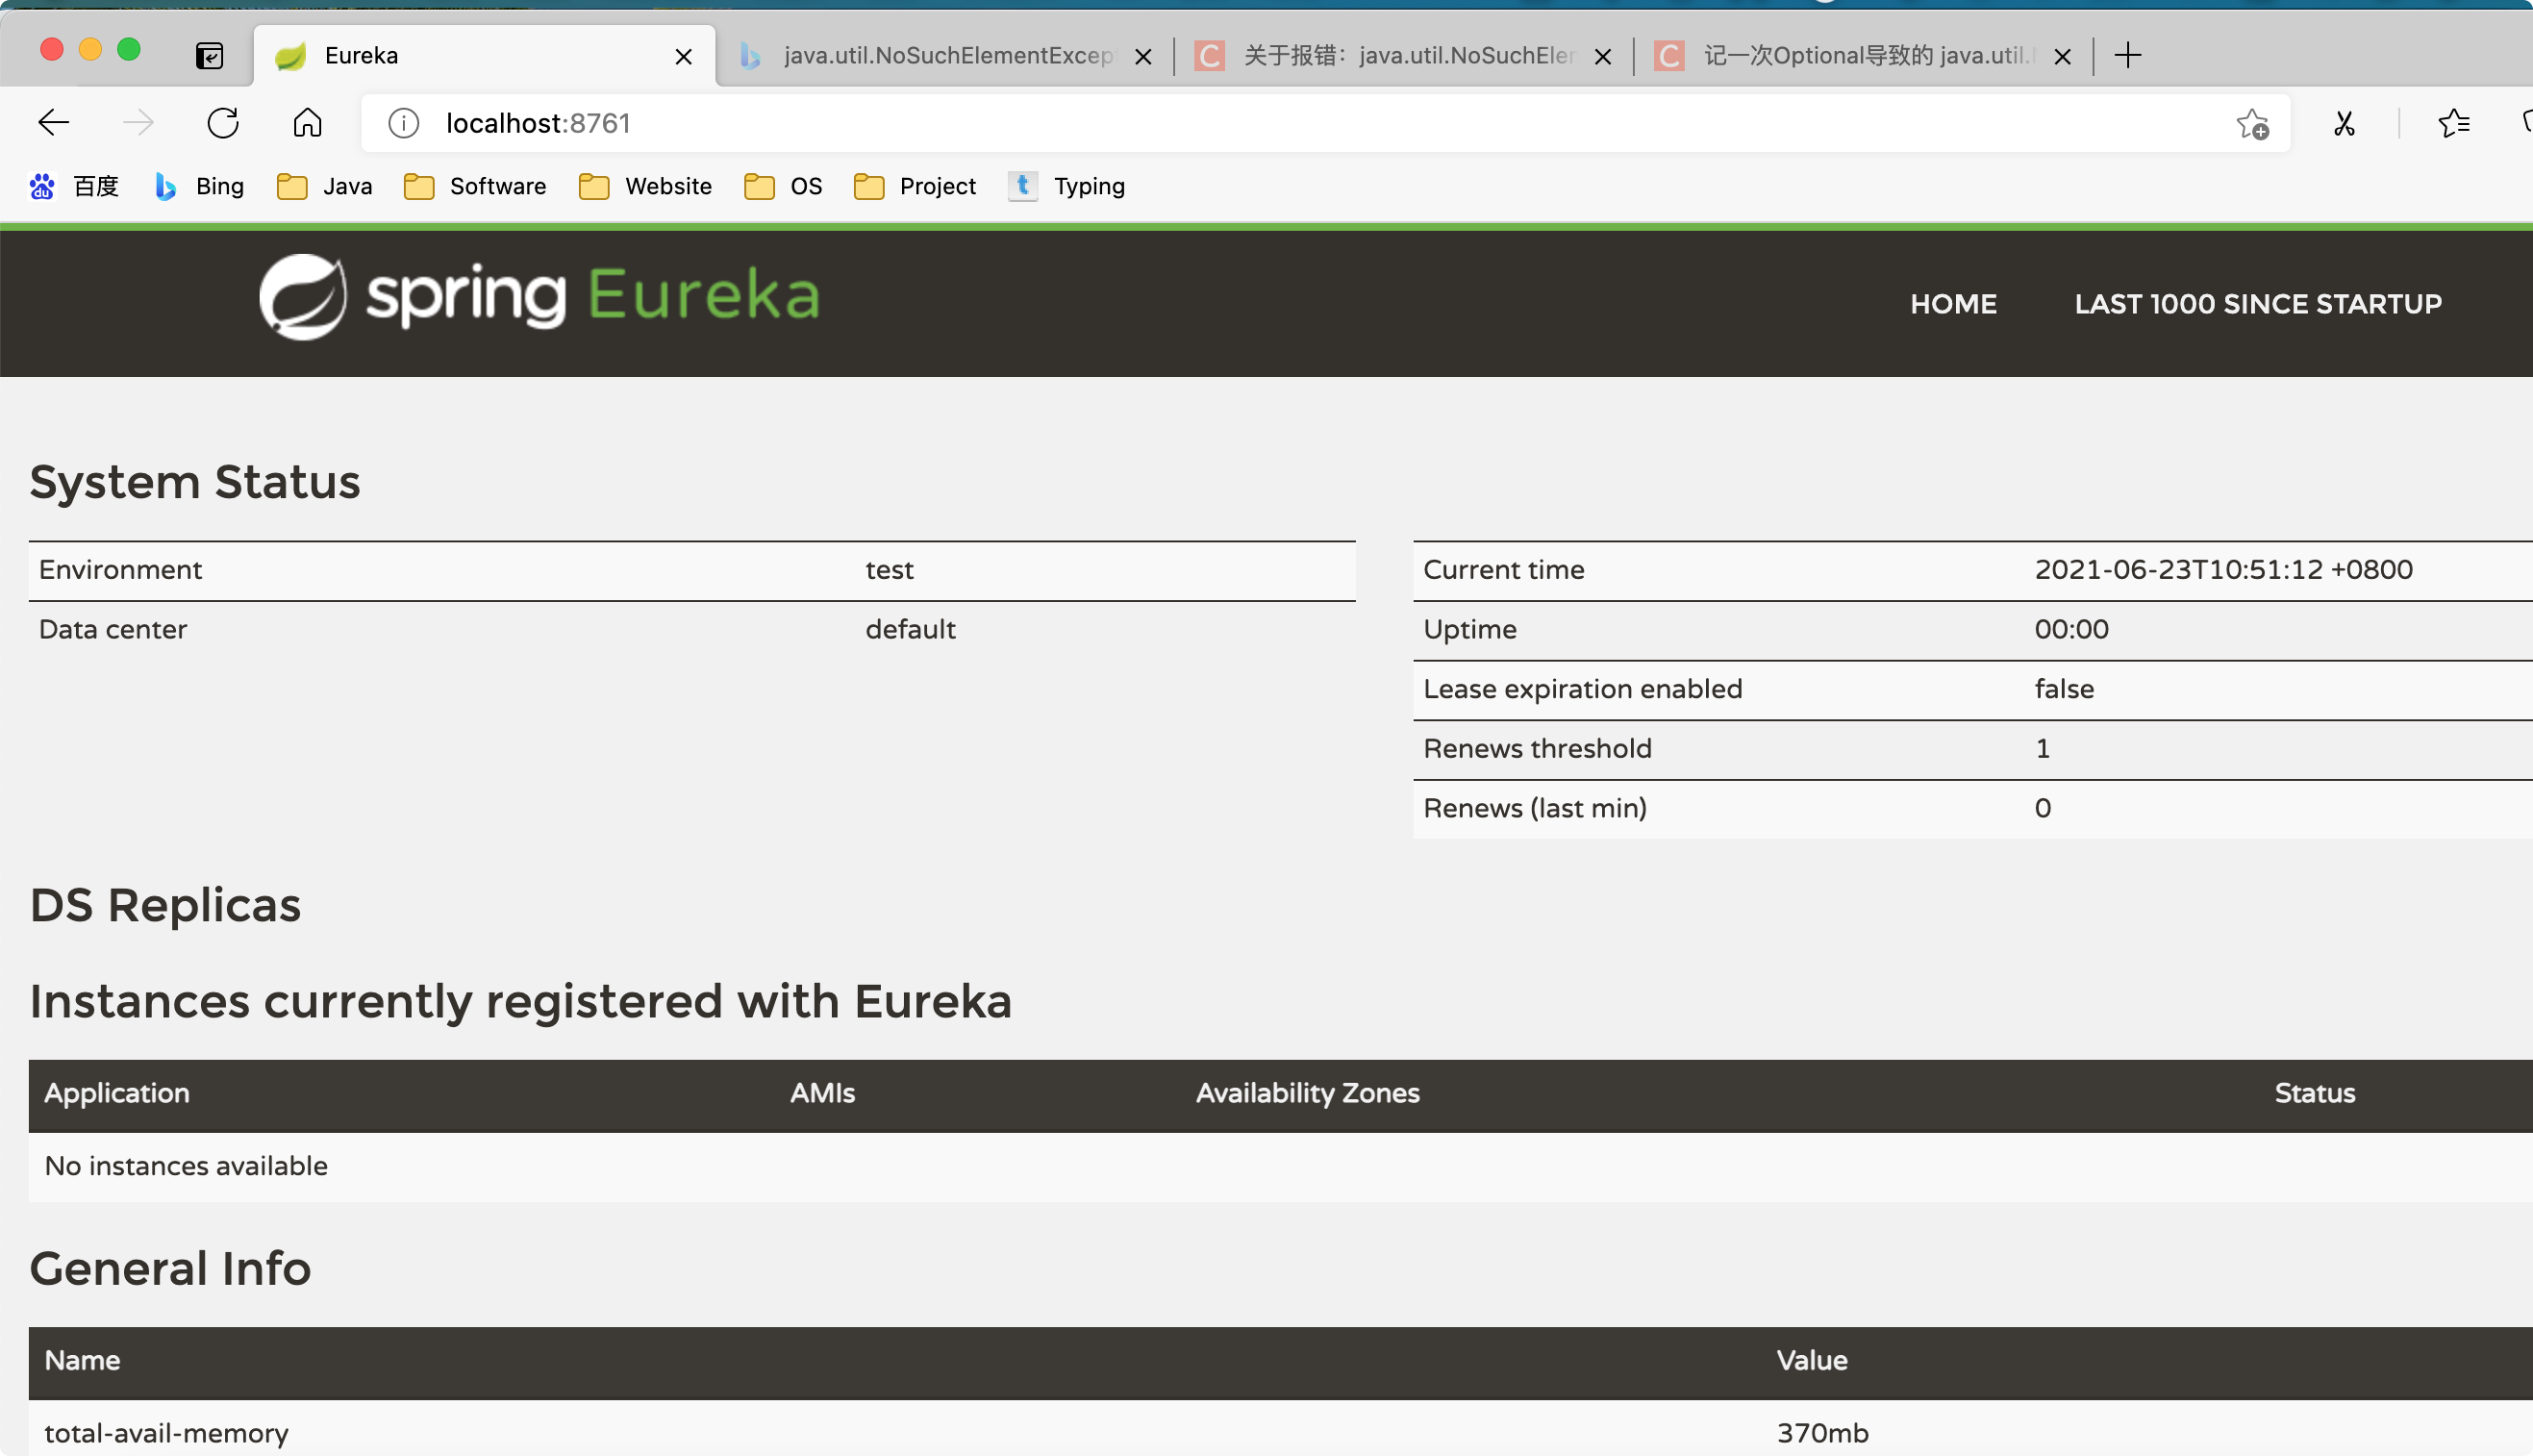
注意:在⽗⼯程的 pom ⽂件中⼿动引⼊ jaxb 的 jar,因为 Jdk9 之后默认没有加载该模 块,EurekaServer 使⽤到,所以需要⼿动导⼊,否则 EurekaServer 服务⽆法启动
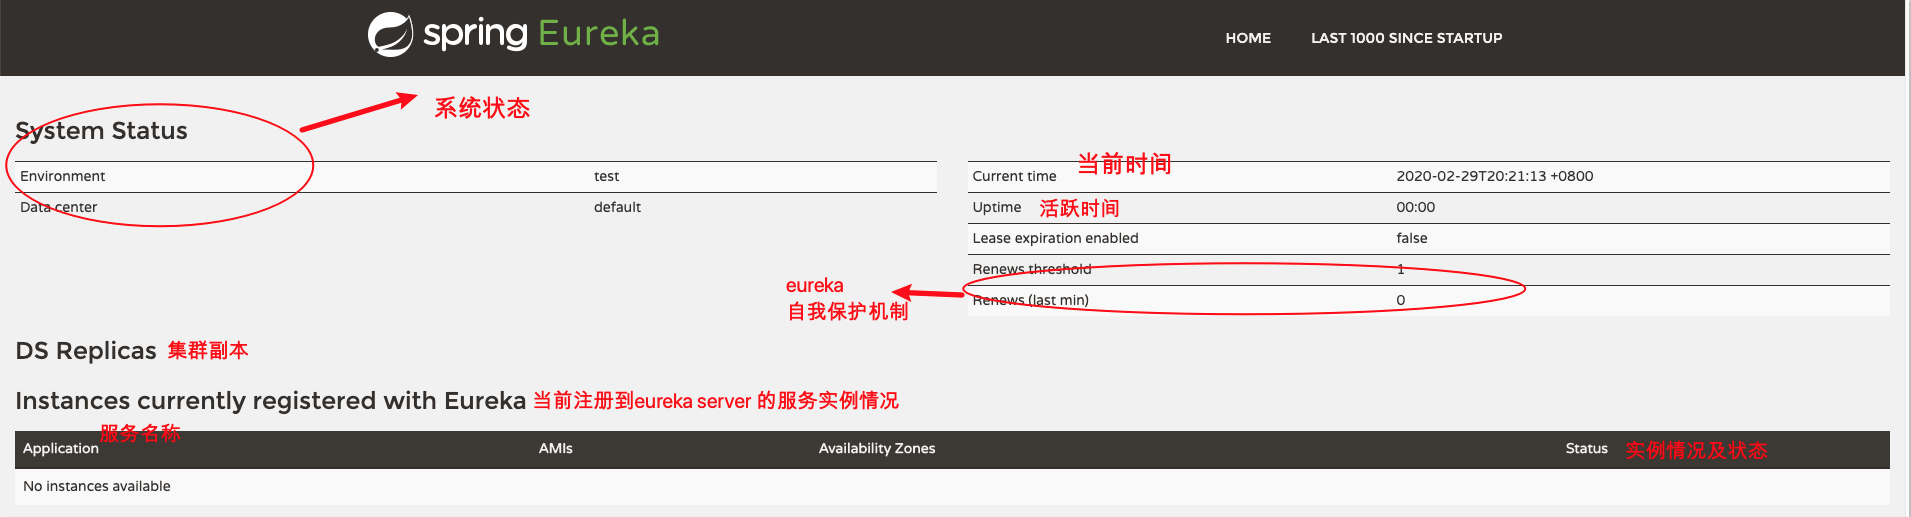
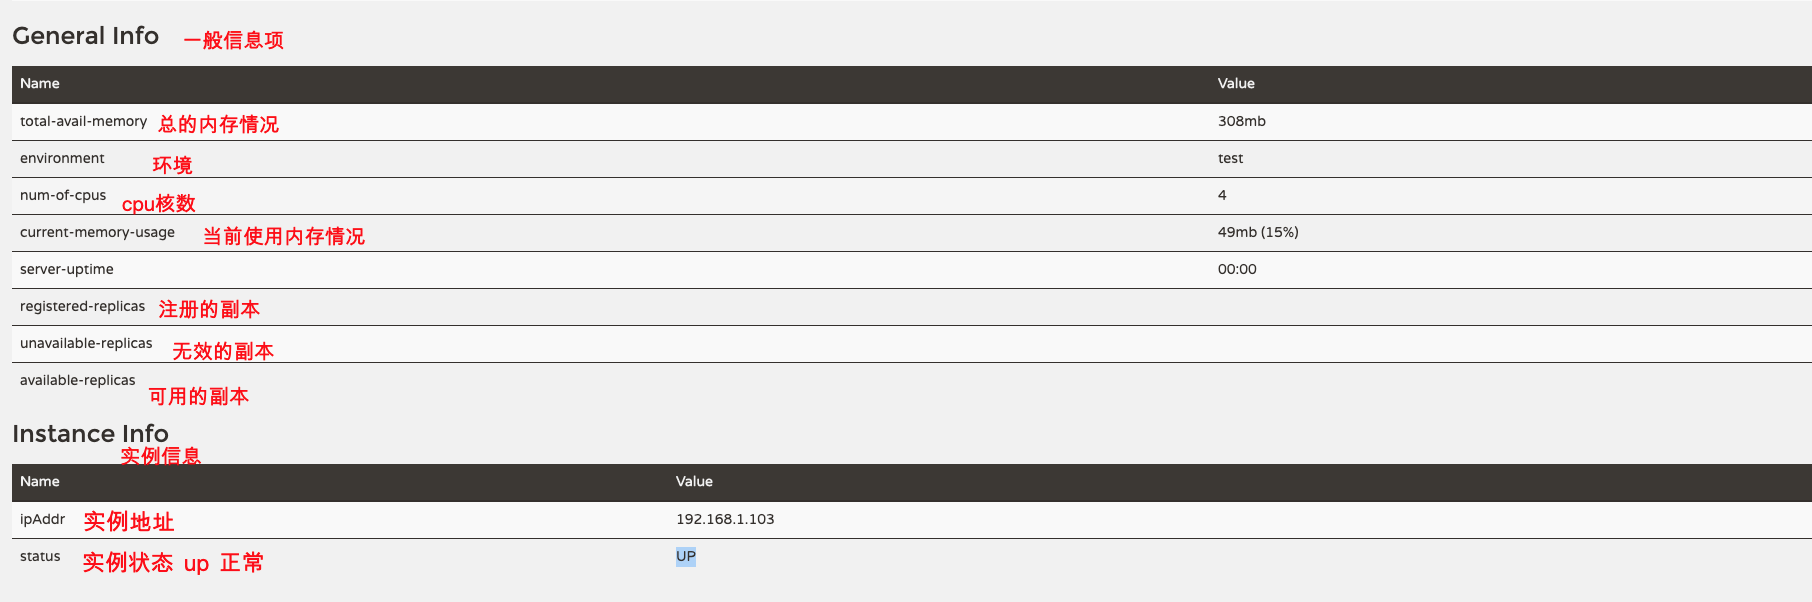
1.3.2 搭建 Eureka Server HA ⾼可⽤集群
在互联⽹应⽤中,服务实例很少有单个的。
即使微服务消费者会缓存服务列表,但是如果 EurekaServer 只有⼀个实例,该实例 挂掉,正好微服务消费者本地缓存列表中的服务实例也不可⽤,那么这个时候整个 系统都受影响。
在⽣产环境中,我们会配置 Eureka Server 集群实现⾼可⽤。Eureka Server 集群之 中的节点通过点对点(P2P)通信的⽅式共享服务注册表。我们开启两台 Eureka Server 以搭建集群。
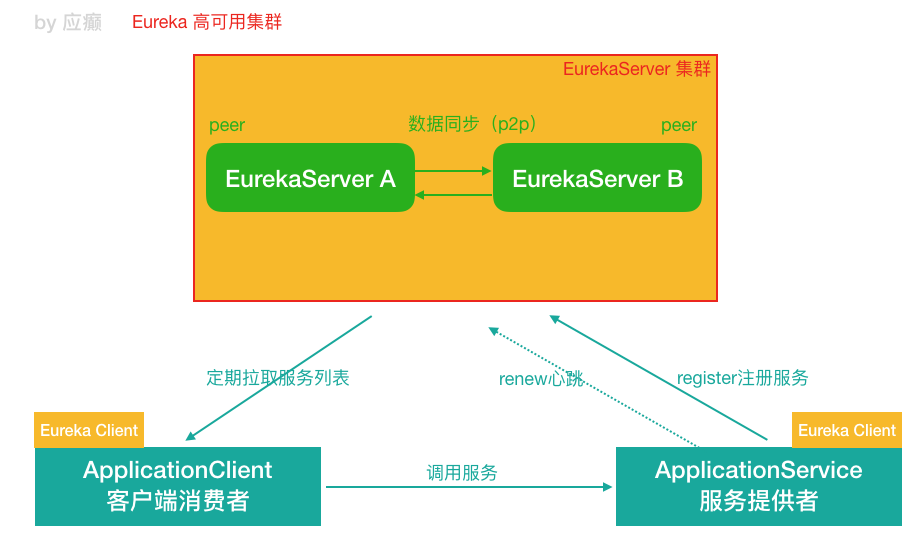
(1)修改本机 host 属性
由于是在个⼈计算机中进⾏测试很难模拟多主机的情况,Eureka 配置 server 集群时 需要执⾏ host 地址。 所以需要修改个⼈电脑中 mac 地址为 etc/hosts 地址添加如下
127.0.0.1 www.abc.com
127.0.0.1 www.def.com
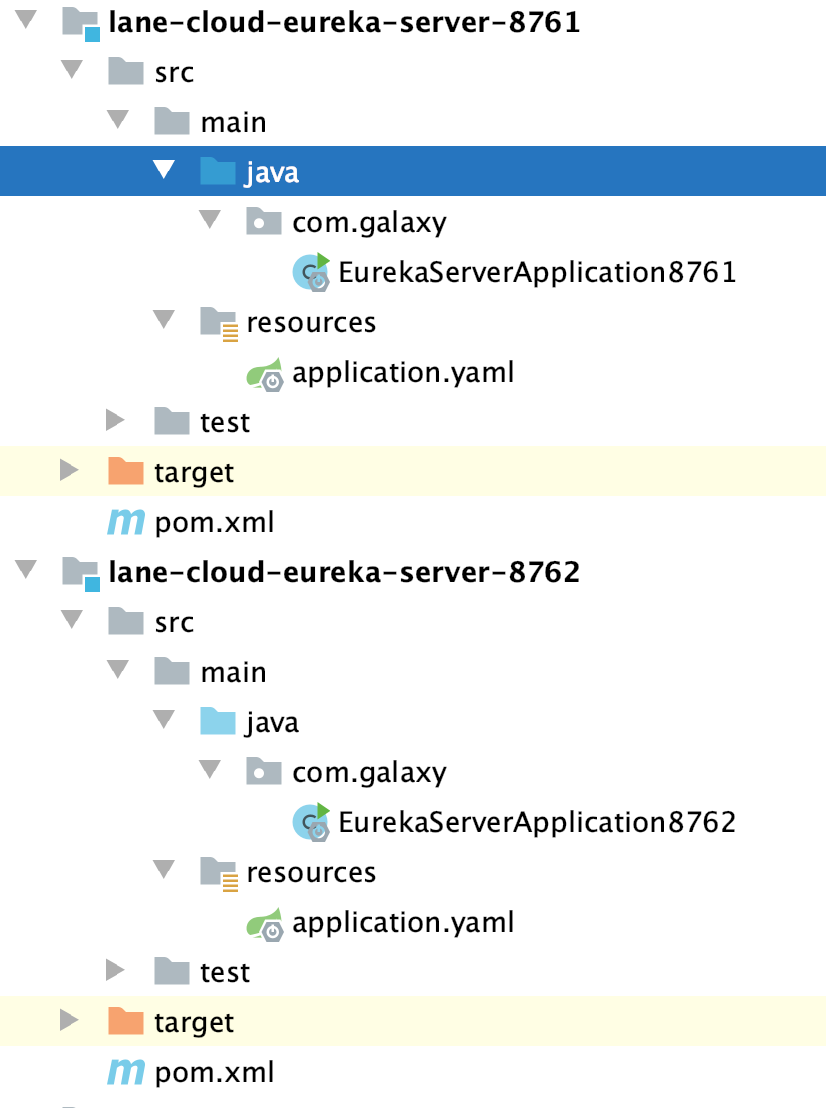
(2)复制下工程为 lane-cloud-eureka-server-8762 修改下必要内容启动类名称和配置文件
修改下配置文件注册下自己的信息
#eureka服务端口号
server:
  port: 8761
  #应用名称会在Eureka中作为服务名称
spring:
  application:
    name: lane-cloud-eureka-server
# eureka 客户端配置(和Server交互),Eureka Server 其实也是一个Client
eureka:
  instance:
    hostname: www.abc.com  # 当前eureka实例的主机名
  client:
    service-url:
      # 配置客户端所交互的Eureka Server的地址(Eureka Server集群中每一个Server其实相对于其它Server来说都是Client)
      # 集群模式下,defaultZone应该指向其它Eureka Server,如果有更多其它Server实例,逗号拼接即可
      defaultZone: http://www.def.com:8762/eureka
      #defaultZone: http://localhost:8761/eureka
    register-with-eureka: true  # 集群模式下可以改成true,当前自己就是server不需要注册自己false
    fetch-registry: true # 集群模式下可以改成true,单机不需要从服务获取注册信息false
=======================================8762===============
#eureka服务端口号
server:
  port: 8762
  #应用名称会在Eureka中作为服务名称
spring:
  application:
    name: lane-cloud-eureka-server
# eureka 客户端配置(和Server交互),Eureka Server 其实也是一个Client
eureka:
  instance:
    hostname: www.def.com  # 当前eureka实例的主机名
  client:
    service-url:
      # 配置客户端所交互的Eureka Server的地址(Eureka Server集群中每一个Server其实相对于其它Server来说都是Client)
      # 集群模式下,defaultZone应该指向其它Eureka Server,如果有更多其它Server实例,逗号拼接即可
      defaultZone: http://www.abc.com:8761/eureka
      #defaultZone: http://localhost:8761/eureka
    register-with-eureka: true  # 集群模式下可以改成true,当前自己就是server不需要注册自己false
    fetch-registry: true # 集群模式下可以改成true,单机不需要从服务获取注册信息false
启动服务效果
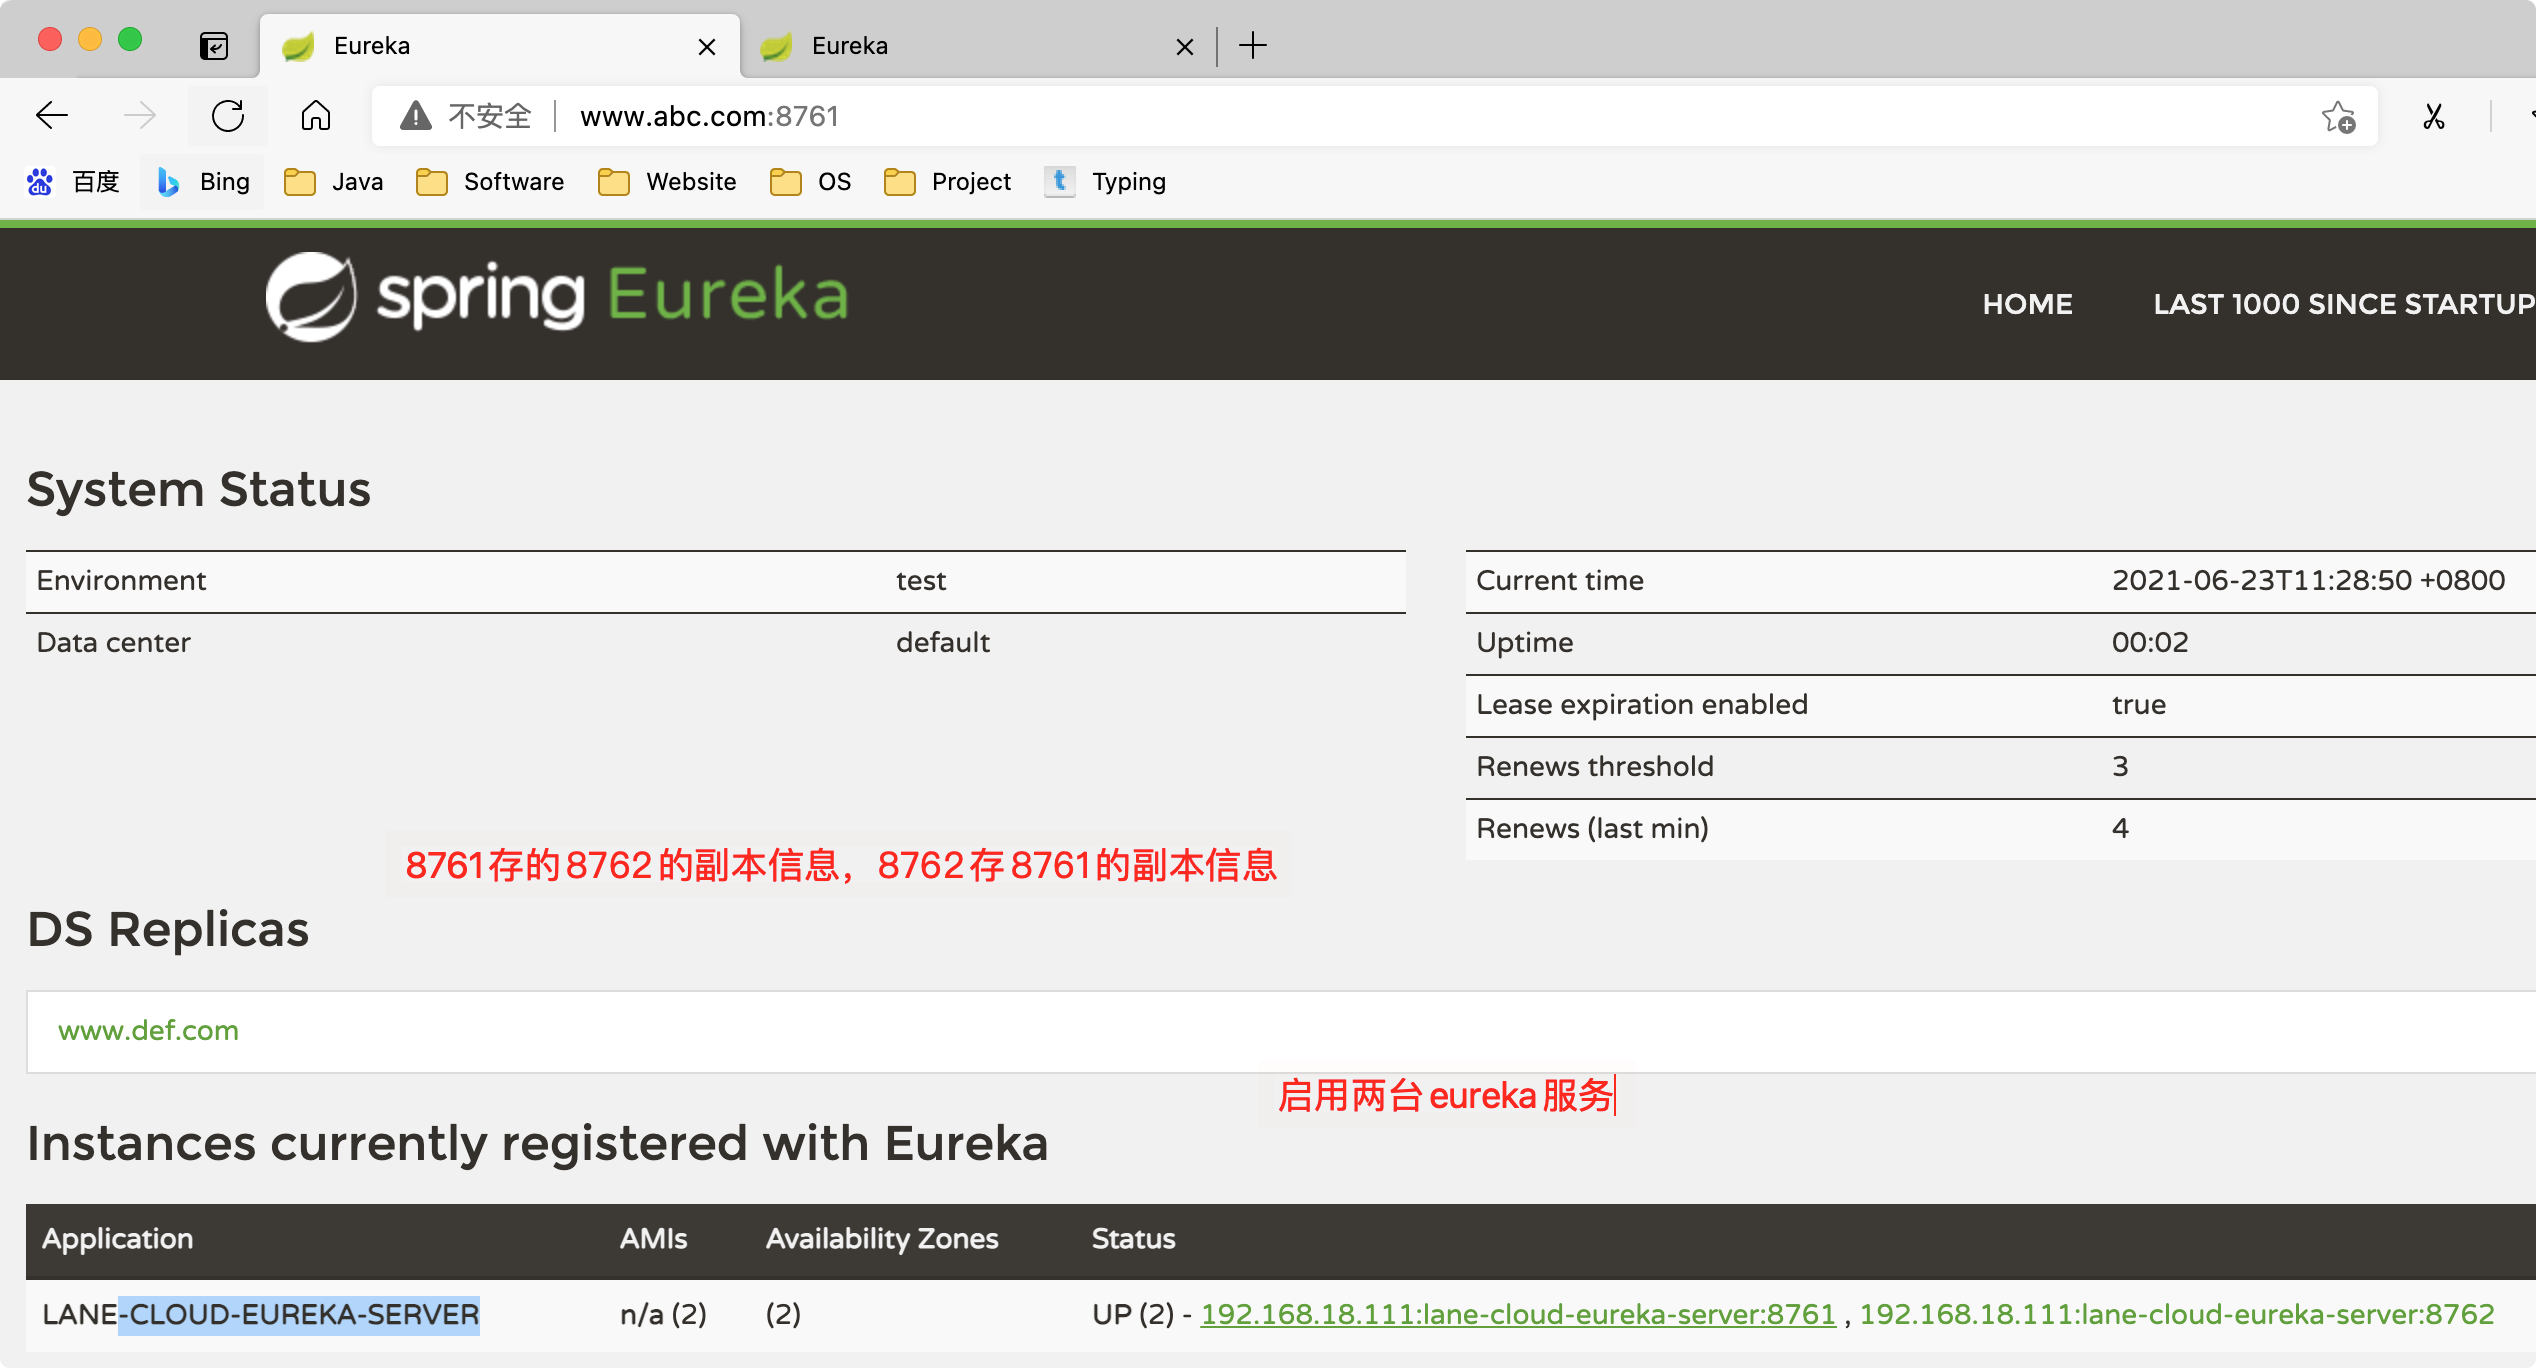
1.3.3 微服务提供者—> 注册到 Eureka Server 集群
⽗⼯程中引⼊ spring-cloud-commons 依赖
 <!--spring cloud commons模块引入-->
       <dependency>
           <groupId>org.springframework.cloud</groupId>
           <artifactId>spring-cloud-commons</artifactId>
       </dependency>
resume 项目中引入依赖
        <!--eureka client 客户端依赖引入-->
        <dependency>
            <groupId>org.springframework.cloud</groupId>
            <artifactId>spring-cloud-starter-netflix-eureka-client</artifactId>
        </dependency>
添加****配置文件为
#注册到Eureka服务中心
eureka:
  client:
    service-url:
      # 注册到集群,就把多个Eurekaserver地址使用逗号连接起来即可;注册到单实例(非集群模式),那就写一个就ok
      defaultZone:  http://www.abc.com:8761/eureka ,http://www.def.com:8762/eureka
修改启动类为
启动类添加注解
@SpringBootApplication
@EntityScan("com.galaxy.pojo")
// 开启Eureka Client(Eureka独有)
//@EnableEurekaClient
// 开启注册中心客户端 (通 用型注解,比如注册到Eureka、Nacos等)
// 说明:从SpringCloud的Edgware版本开始,不加注解也ok,但是建议大家加上
@EnableDiscoveryClient
public class ResumeApplication {
    public static void main(String[] args) {
        SpringApplication.run(ResumeApplication.class, args);
    }
}
启动效果
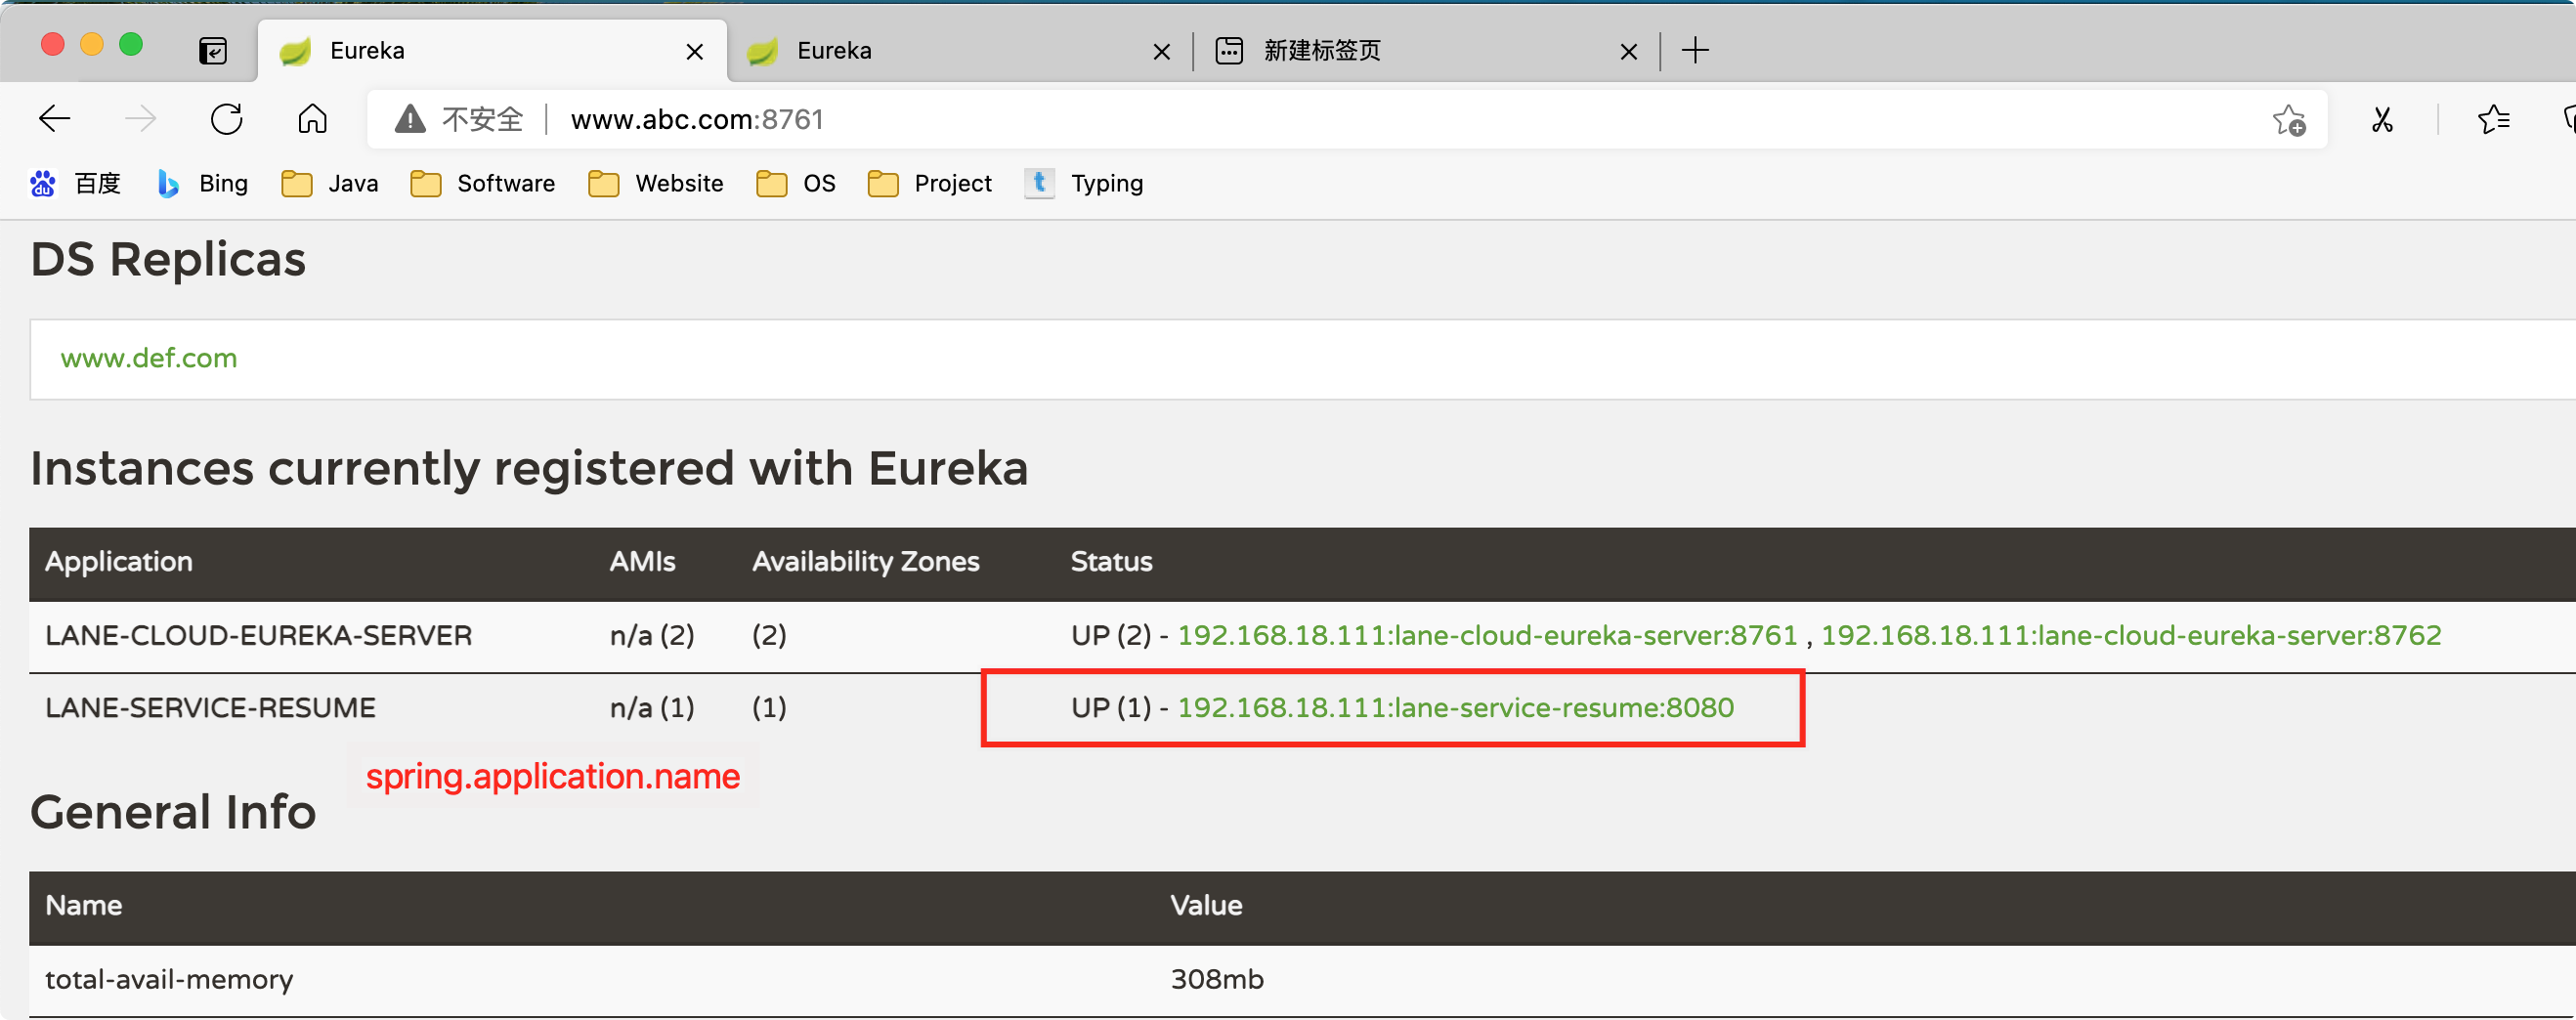
为了方便升级管理,实例名称可以自定义添加版本号
修改下配置文件中的 eureka 如下
#注册到Eureka服务中心
eureka:
  client:
    service-url:
      # 注册到集群,就把多个Eurekaserver地址使用逗号连接起来即可;注册到单实例(非集群模式),那就写一个就ok
      defaultZone:  http://www.abc.com:8761/eureka ,http://www.def.com:8762/eureka
  instance:
    prefer-ip-address: true  #服务实例中显示ip,而不是显示主机名(兼容老的eureka版本)
    # 实例名称: 192.168.18.111:lane-service-resume:8080,我们可以自定义它便于升级管理
    instance-id: ${spring.cloud.client.ip-address}:${spring.application.name}:${server.port}:@project.version@
显示效果

1.3.4 微服务消费者—> 注册到 Eureka Server 集群
- 添加依赖同上
- 修改配置文件同上
- 添加注解同上
<!--eureka client 客户端依赖引入-->
        <dependency>
            <groupId>org.springframework.cloud</groupId>
            <artifactId>spring-cloud-starter-netflix-eureka-client</artifactId>
        </dependency>
====================yaml============
server:
  port: 8090
spring:
  application:
    name: lane-service-autodeliver
#注册到Eureka服务中心
eureka:
  client:
    service-url:
      # 注册到集群,就把多个Eurekaserver地址使用逗号连接起来即可;注册到单实例(非集群模式),那就写一个就ok
      defaultZone:  http://www.abc.com:8761/eureka ,http://www.def.com:8762/eureka
  instance:
    prefer-ip-address: true  #服务实例中显示ip,而不是显示主机名(兼容老的eureka版本)
    # 实例名称: 192.168.18.111:lane-service-resume:8080,我们可以自定义它便于升级管理
    instance-id: ${spring.cloud.client.ip-address}:${spring.application.name}:${server.port}:@project.version@
=======注解=====================
@EnableDiscoveryClient
启动效果
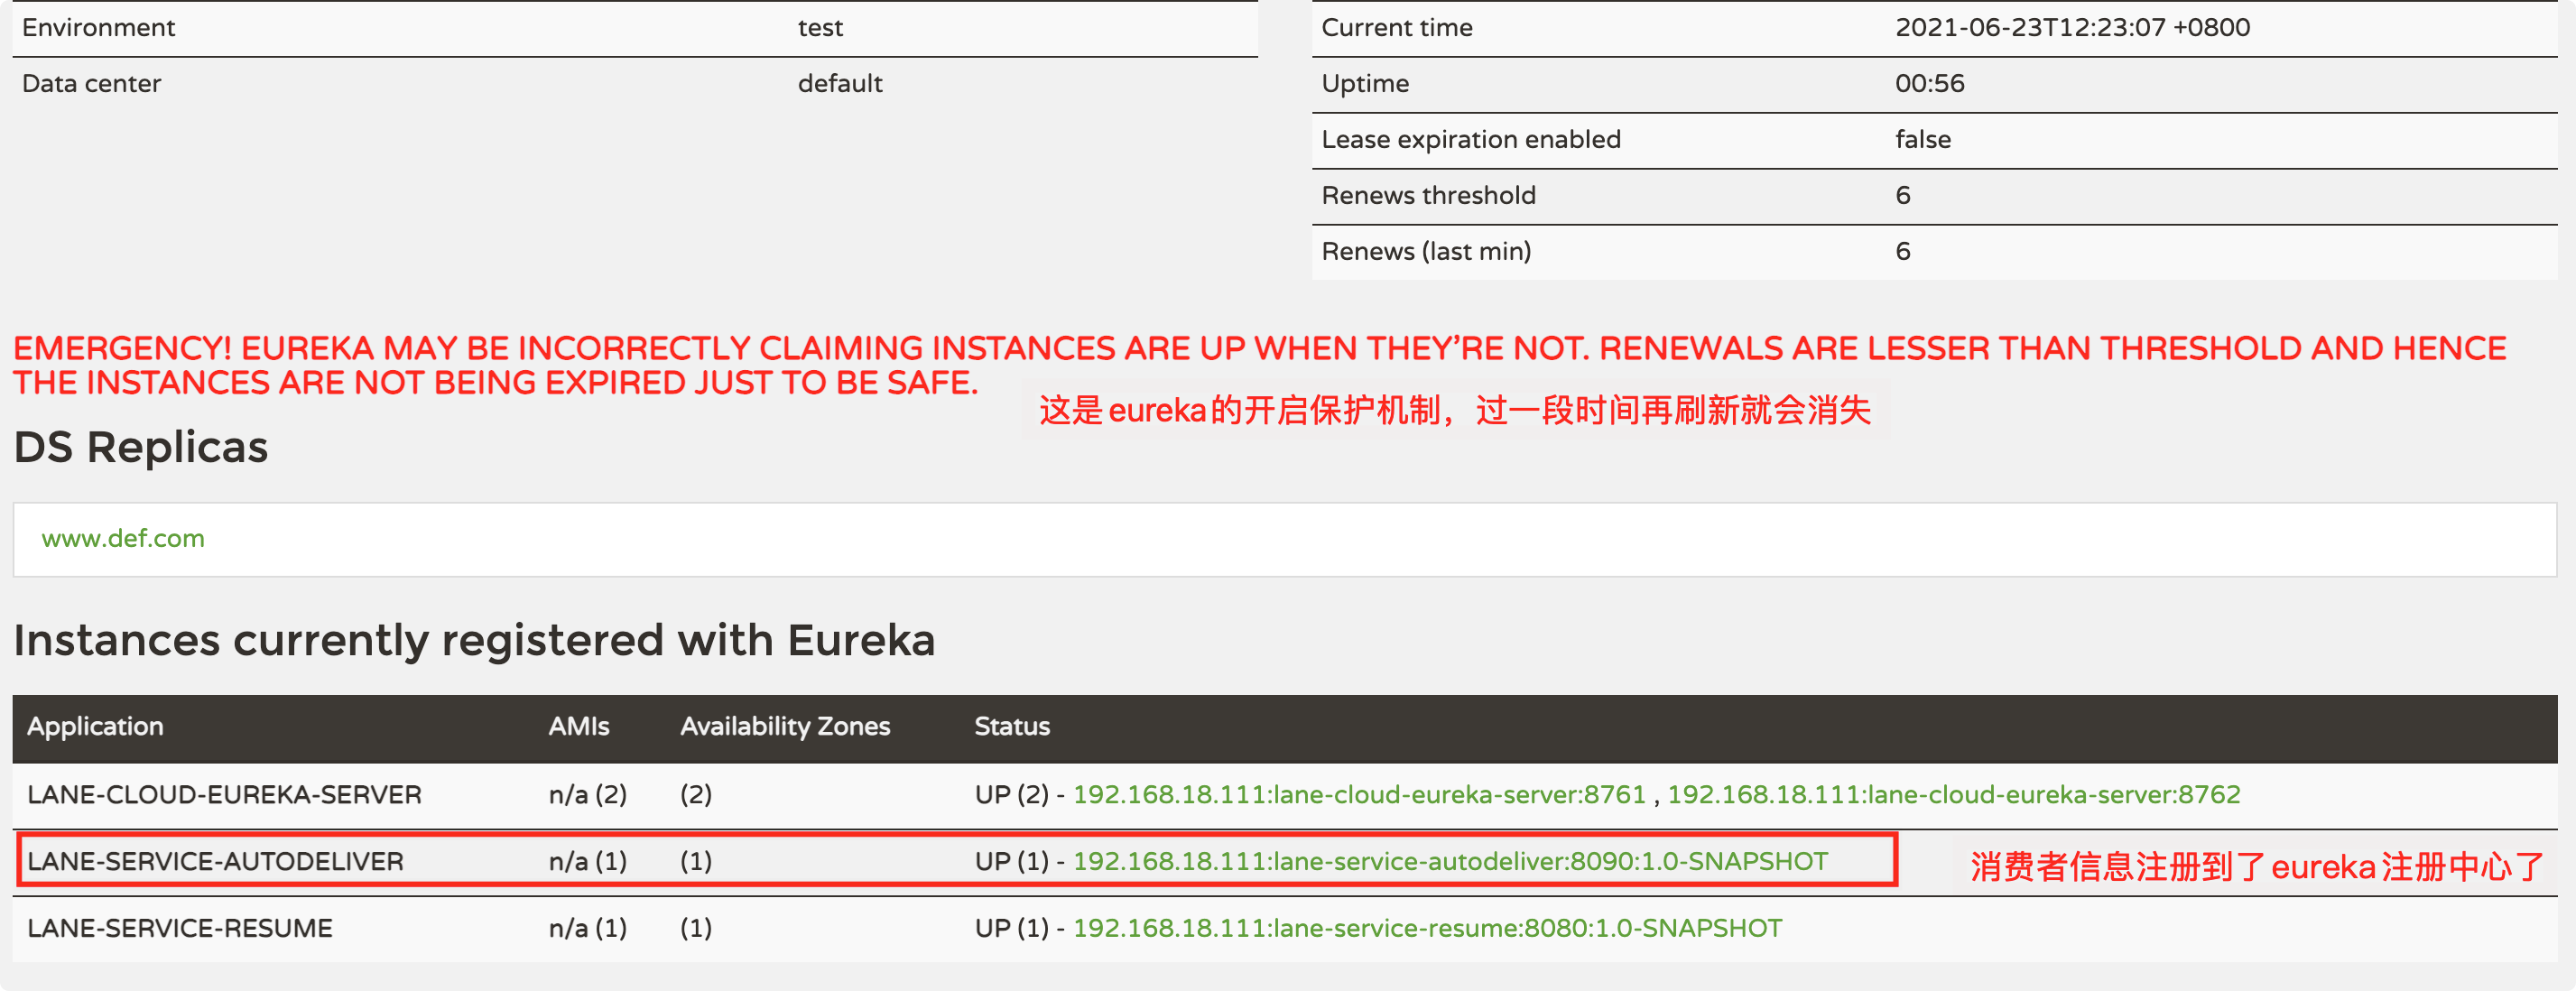
1.3.5 服务消费者调⽤服务提供者(通过 Eureka)
@Autowired
    private DiscoveryClient discoveryClient;
    /**
     * 服务注册到Eureka之后的改造
     * @author lane
     * @date 2021/6/23 下午2:52
     * @param userId
     * @return java.lang.Integer
     */
    @GetMapping("/checkState/{userId}")
    public Integer findResumeOpenState(@PathVariable Long userId){
        // 1、从 Eureka Server中获取lane-service-resume服务的实例信息(使用客户端对象做这件事)
        List<ServiceInstance> instances = discoveryClient.getInstances("lane-service-resume");
        // 2、如果有多个实例,选择一个使用(负载均衡的过程)
        ServiceInstance instanceInfo = instances.get(0);
        int port = instanceInfo.getPort();
        // 3、从元数据信息获取host port
        String host = instanceInfo.getHost();

        String url = "http://"+host+":"+port+"/resume/openstate/"+userId;
        System.out.println("===============>>>从EurekaServer集群获取服务实例拼接的url:" + url);
        // 调用远程服务—> 简历微服务接口  RestTemplate  -> JdbcTempate
        // httpclient封装好多内容进行远程调用
        return  restTemplate.getForObject(url, Integer.class);

    }
效果


注意导入信息不是网飞的客户端
import org.springframework.cloud.client.ServiceInstance;
import org.springframework.cloud.client.discovery.DiscoveryClient;
1.4 Eureka 细节详解
1.4.1 Eureka 元数据详解
Eureka 的元数据有两种:标准元数据和⾃定义元数据。
标准元数据:主机名、IP 地址、端⼝号等信息,这些信息都会被发布在服务注册表 中,⽤于服务之间的调⽤。
⾃定义元数据:可以使⽤ eureka.instance.metadata-map 配置,符合 KEY/VALUE 的 存储格式。这 些元数据可以在远程客户端中访问。 类似于 在 resume 配置文件添加自定义的元数据信息
#注册到Eureka服务中心
eureka:
  client:
    service-url:
      # 注册到集群,就把多个Eurekaserver地址使用逗号连接起来即可;注册到单实例(非集群模式),那就写一个就ok
      defaultZone:  http://www.abc.com:8761/eureka ,http://www.def.com:8762/eureka
  instance:
    prefer-ip-address: true  #服务实例中显示ip,而不是显示主机名(兼容老的eureka版本)
    # 实例名称: 192.168.18.111:lane-service-resume:8080,我们可以自定义它便于升级管理
    instance-id: ${spring.cloud.client.ip-address}:${spring.application.name}:${server.port}:@project.version@
    #自定义元数据携带
    metadata-map:
      tianhe: nb
      shengzhou12: nb
在 autodeliver 消费者端添加测试用例
import com.galaxy.AutodeliverApplication;
import org.junit.Test;
import org.junit.runner.RunWith;
import org.springframework.beans.factory.annotation.Autowired;
import org.springframework.boot.SpringApplication;
import org.springframework.boot.test.context.SpringBootTest;
import org.springframework.cloud.client.ServiceInstance;
import org.springframework.cloud.client.discovery.DiscoveryClient;
import org.springframework.test.context.junit4.SpringJUnit4ClassRunner;
import org.springframework.web.client.RestTemplate;

import java.util.List;

/**
 * @author lane
 * @date 2021年06月23日 下午3:20
 */
@SpringBootTest(classes = AutodeliverApplication.class)
@RunWith(SpringJUnit4ClassRunner.class)
public class AutodeliverApplicationTest {


    @Autowired
    private DiscoveryClient discoveryClient;

    @Autowired
    private RestTemplate restTemplate;

    @Test
    public void testInstanceMetadata() {
        List<ServiceInstance> instances = discoveryClient.getInstances("lane-service-resume");
        for (int i = 0; i < instances.size(); i++) {
            ServiceInstance serviceInstance =  instances.get(i);
            System.out.println(serviceInstance.getMetadata());
        }
    }


}
测试效果如下
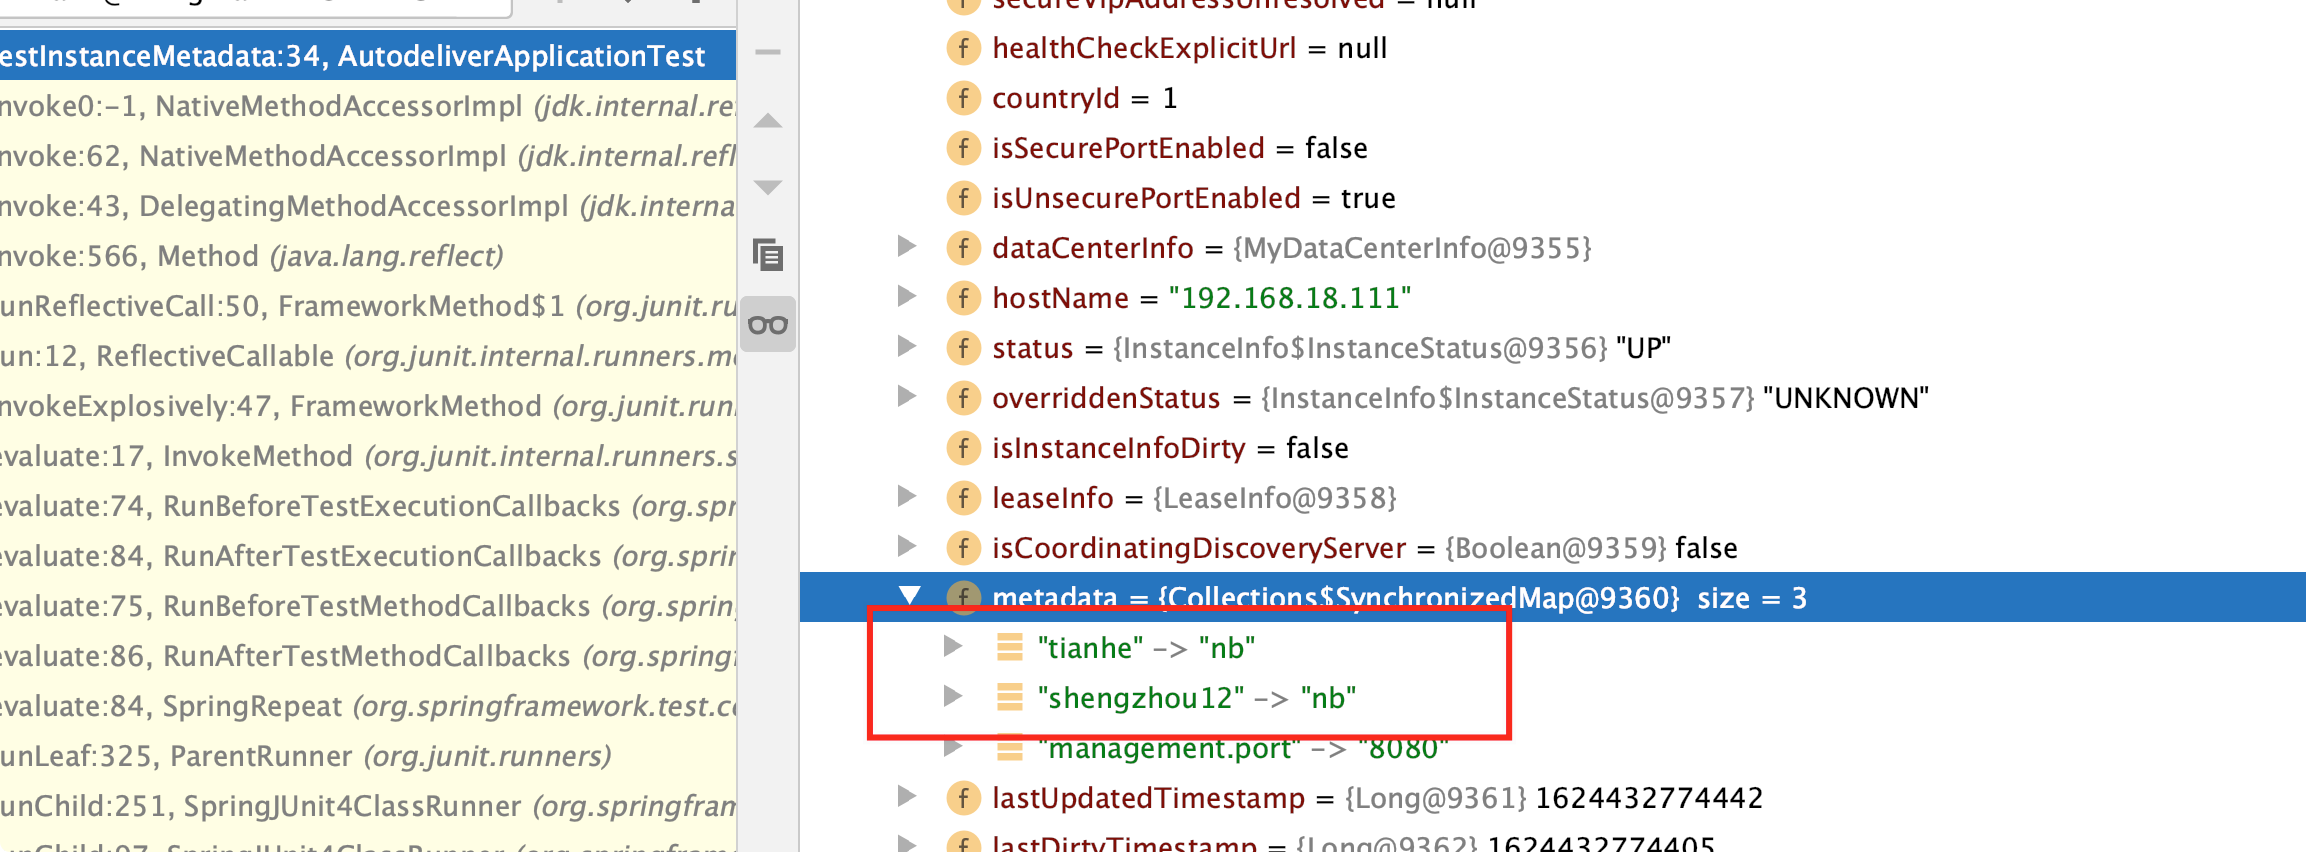
1.4.2 Eureka 客户端详解
服务提供者(也是 Eureka 客户端)要向 EurekaServer 注册服务,并完成服务续约等⼯作
服务注册详解(服务提供者)
1)当我们导⼊了 eureka-client 依赖坐标,配置 Eureka 服务注册中⼼地址
2)服务在启动时会向注册中⼼发起注册请求,携带服务元数据信息
3)Eureka 注册中⼼会把服务的信息保存在 Map 中
服务续约详解(服务提供者)
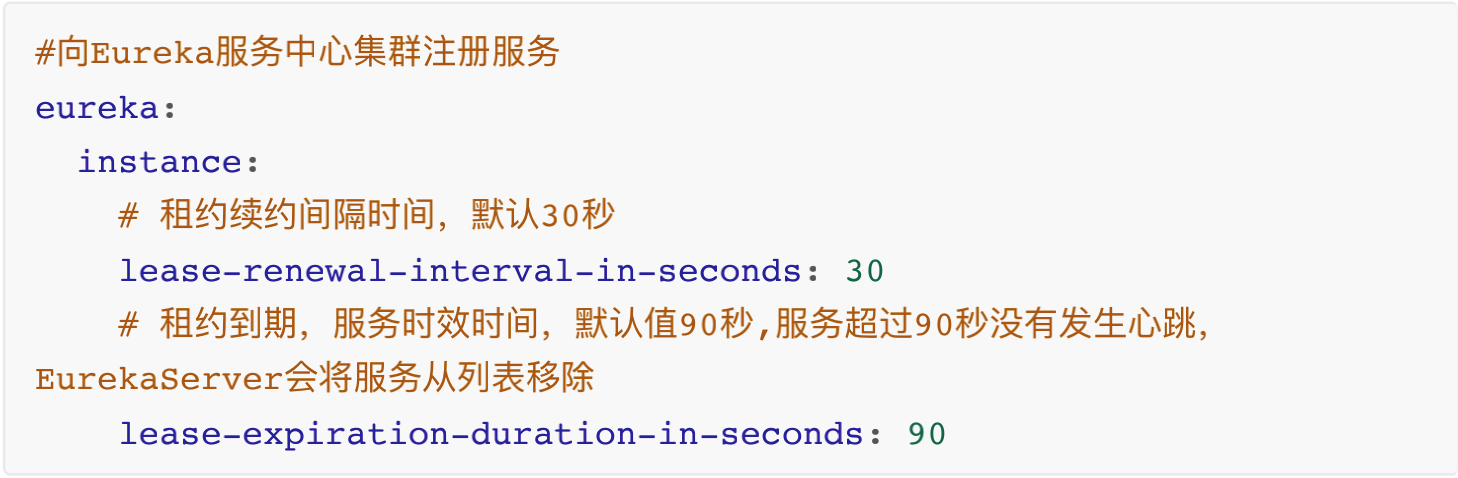
服务每隔 30 秒会向注册中⼼续约(⼼跳)⼀次(也称为报活),如果没有续约,租约在 90 秒后到期,然后服务会被失效。每隔 30 秒的续约操作我们称之为⼼跳检测 往往不需要我们调整这两个配置
获取服务列表详解(服务消费者)
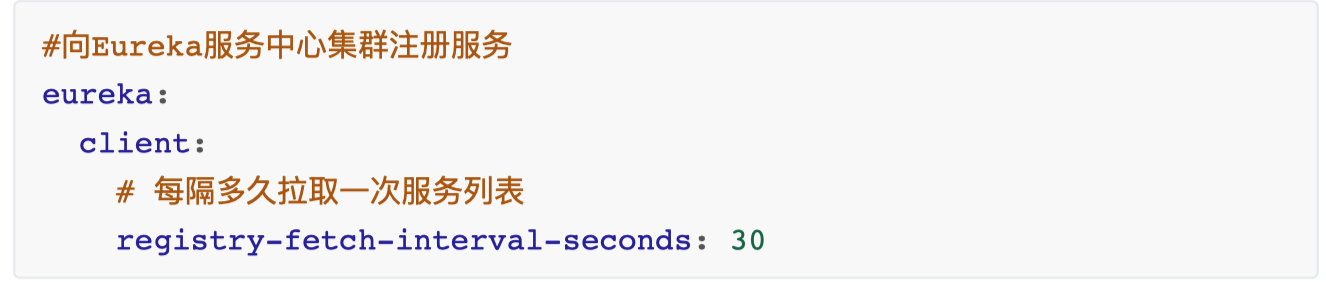
每隔 30 秒服务会从注册中⼼中拉取⼀份服务列表,这个时间可以通过配置修改。往 往不需要我们调整
1)服务消费者启动时,从 EurekaServer 服务列表获取只读备份,缓存到本地
2)每隔 30 秒,会重新获取并更新数据
3)每隔 30 秒的时间可以通过配置 eureka.client.registry-fetch-interval-seconds 修 改
1.4.3 Eureka 服务端详解
服务下线
1)当服务正常关闭操作时,会发送服务下线的 REST 请求给 EurekaServer。
2)服务中⼼接受到请求后,将该服务置为下线状态
失效剔除
Eureka Server 会定时(间隔值是 eureka.server.eviction-interval-timer-in-ms,默 认 60s)进⾏检查,如果发现实例在在⼀定时间(此值由客户端设置的 eureka.instance.lease-expiration-duration-in-seconds 定义,默认值为 90s)内没 有收到⼼跳,则会注销此实例。
⾃我保护
服务提供者 —> 注册中⼼
定期的续约(服务提供者和注册中⼼通信),假如服务提供者和注册中⼼之间的⽹络有点问题,不代表服务提供者不可⽤,不代表服务消费者⽆法访问服务提供者如果在 15 分钟内超过 85% 的客户端节点都没有正常的⼼跳,那么 Eureka 就认为客户端与注册中⼼出现了⽹络故障,Eureka Server ⾃动进⼊⾃我保护机制。
为什么会有⾃我保护机制?
默认情况下,如果 Eureka Server 在⼀定时间内(默认 90 秒)没有接收到某个微服务实例的⼼跳,Eureka Server 将会移除该实例。但是当⽹络分区故障发⽣时,微服务与 Eureka Server 之间⽆法正常通信,⽽微服务本身是正常运⾏的,此时不应该移除这个微服务,所以引⼊了⾃我保护机制。
服务中⼼⻚⾯会显示如下提示信息

当处于⾃我保护模式时
1)不会剔除任何服务实例(可能是服务提供者和 EurekaServer 之间⽹络问题),保证了⼤多数服务依然可⽤
2)Eureka Server 仍然能够接受新服务的注册和查询请求,但是不会被同步到其它节点上,保证当前节点依然可⽤,当⽹络稳定时,当前 Eureka Server 新的注册信息会被同步到其它节点中。
3)在 Eureka Server ⼯程中通过 eureka.server.enable-self-preservation 配置可⽤关停⾃我保护,默认值是打开

经验:建议⽣产环境打开⾃我保护机制
1.5 Eureka 核⼼源码剖析(略)
第 2 节 Ribbon 负载均衡
2.1 关于负载均衡
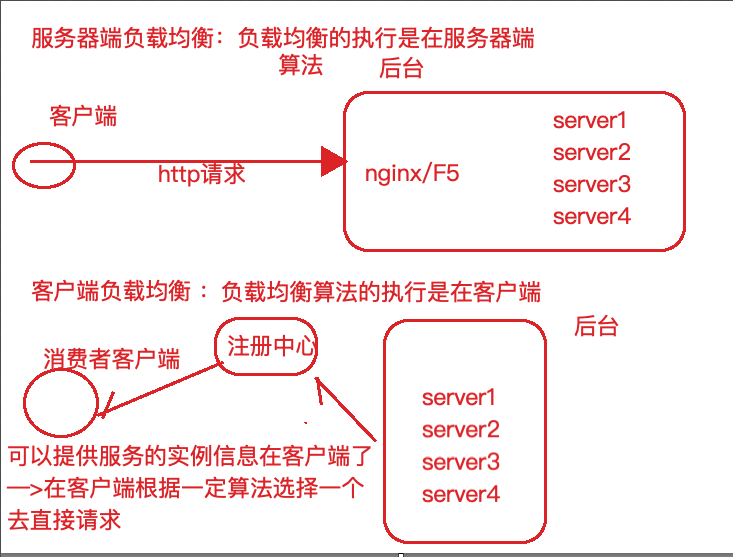
负载均衡⼀般分为服务器端负载均衡和客户端负载均衡
所谓服务器端负载均衡,⽐如 Nginx、F5 这些,请求到达服务器之后由这些负载均衡 器根据⼀定的算法将请求路由到⽬标服务器处理。
所谓客户端负载均衡,⽐如我们要说的 Ribbon,服务消费者客户端会有⼀个服务器 地址列表,调⽤⽅在请求前通过⼀定的负载均衡算法选择⼀个服务器进⾏访问,负载均衡算法的执⾏是在请求客户端进⾏。
Ribbon 是 Netflix 发布的负载均衡器。Eureka ⼀般配合 Ribbon 进⾏使⽤,Ribbon 利 ⽤从 Eureka 中读取到服务信息,在调⽤服务提供者提供的服务时,会根据⼀定的算 法进⾏负载。
2.2 Ribbon ⾼级应⽤
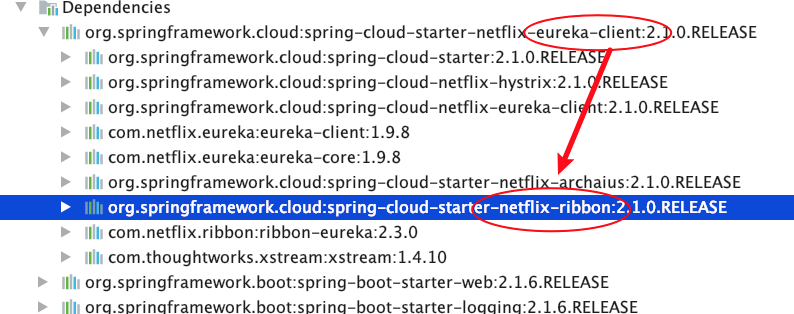
不需要引⼊额外的 Jar 坐标,因为在服务消费者中我们引⼊过 eureka-client,它会引 ⼊ Ribbon 相关 Jar
代码中使⽤如下,在 RestTemplate 上添加对应@LoadBalanced 注解即可
package com.galaxy;

import org.springframework.boot.SpringApplication;
import org.springframework.boot.autoconfigure.SpringBootApplication;
import org.springframework.cloud.client.discovery.EnableDiscoveryClient;
import org.springframework.cloud.client.loadbalancer.LoadBalanced;
import org.springframework.cloud.netflix.eureka.EnableEurekaClient;
import org.springframework.context.annotation.Bean;
import org.springframework.web.client.RestTemplate;

/**
 * @author lane
 * @date 2021年06月22日 下午6:21
 */
@SpringBootApplication
@EnableDiscoveryClient
//@EnableEurekaClient
public class AutodeliverApplication {

    public static void main(String[] args) {
        SpringApplication.run(AutodeliverApplication.class, args);

    }
    //ribbon负载均衡
    @LoadBalanced
    @Bean
    public RestTemplate restTemplate(){
        return new RestTemplate();
    }


}
再复制一份服务提供者便于观察负载均衡
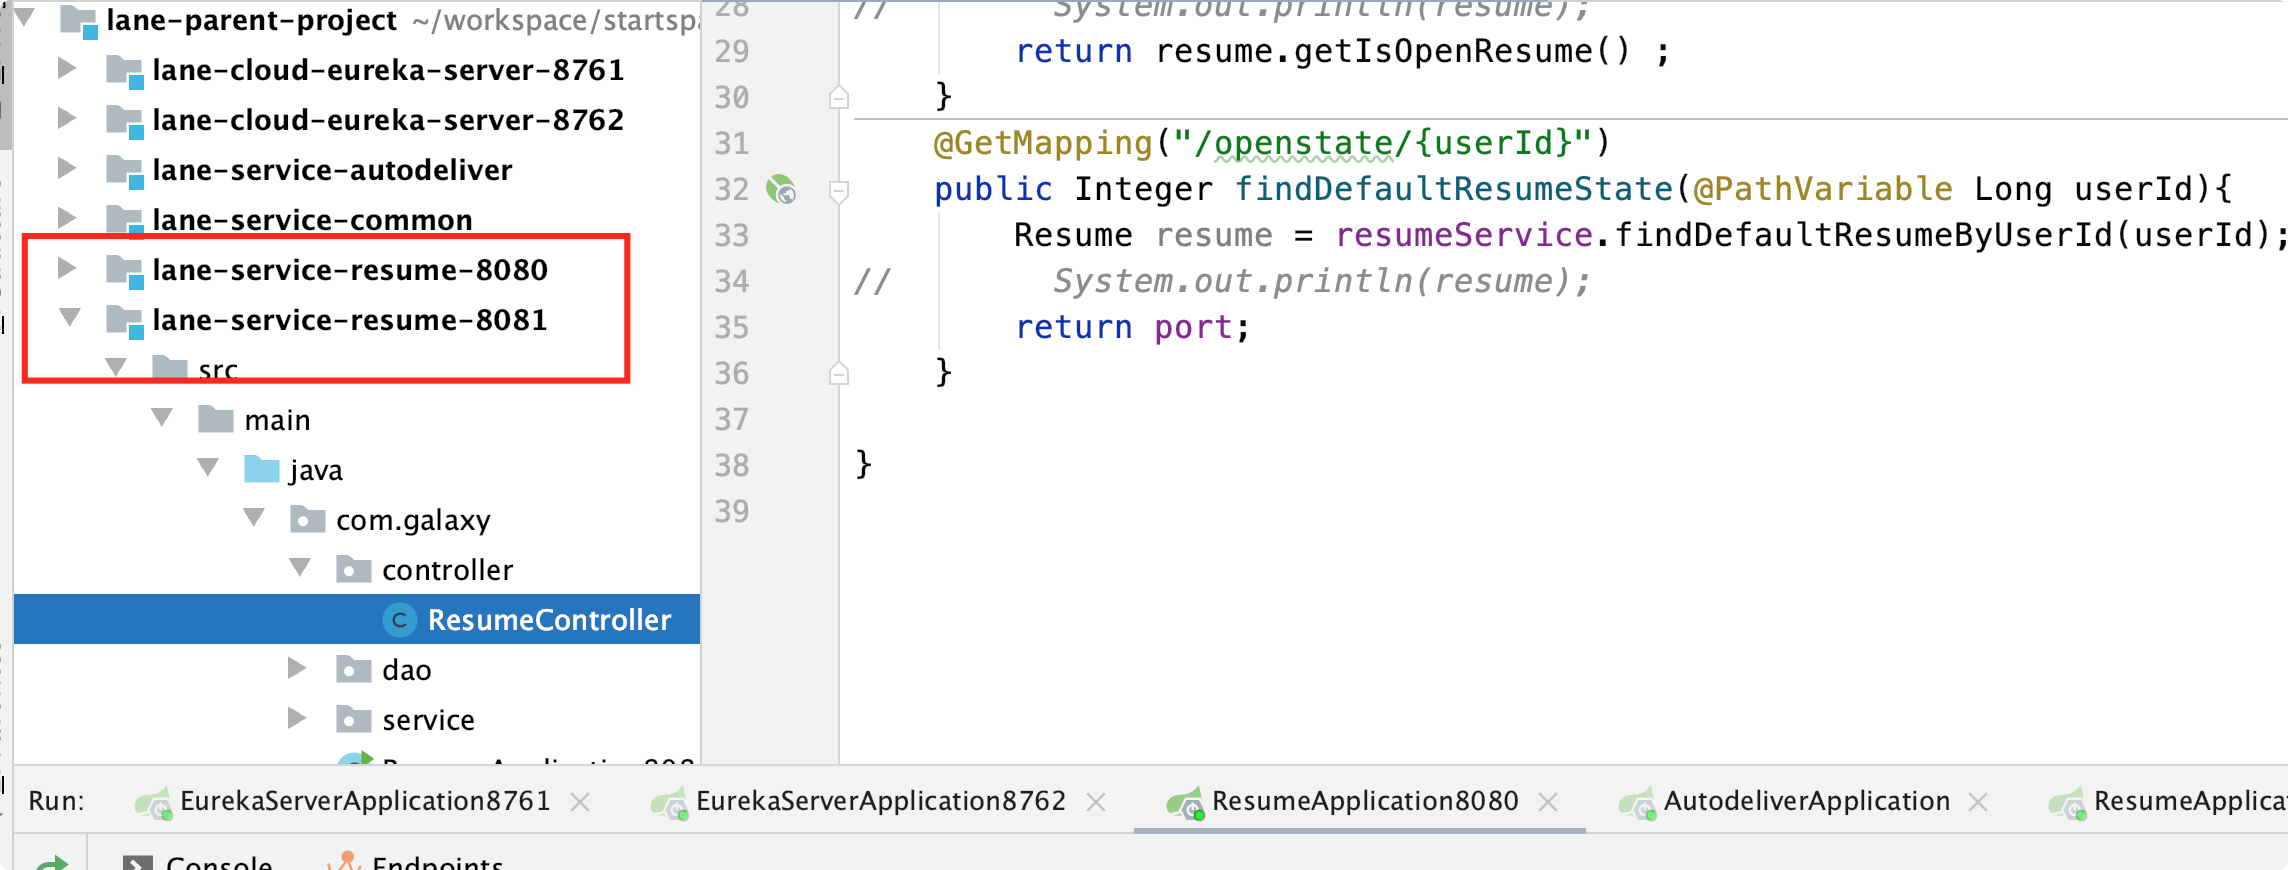
修改下 controller 便于观察负载均衡
   @Value("${server.port}")
    Integer port;

 @GetMapping("/openstate/{userId}")
    public Integer findDefaultResumeState(@PathVariable Long userId){
        Resume resume = resumeService.findDefaultResumeByUserId(userId);
//        System.out.println(resume);
        return port;
    }
消费者修改下获取提供者
/**
     * 使用Ribbon负载均衡
     * @param userId
     * @return
     */
    @GetMapping("/checkState/{userId}")
    public Integer findResumeOpenState(@PathVariable Long userId) {
        // 使用ribbon不需要我们自己获取服务实例然后选择一个那么去访问了(自己的负载均衡)
        String url = "http://lane-service-resume/resume/openstate/" + userId;  // 指定服务名
        Integer forObject = restTemplate.getForObject(url, Integer.class);
        return forObject;
    }

实现效果
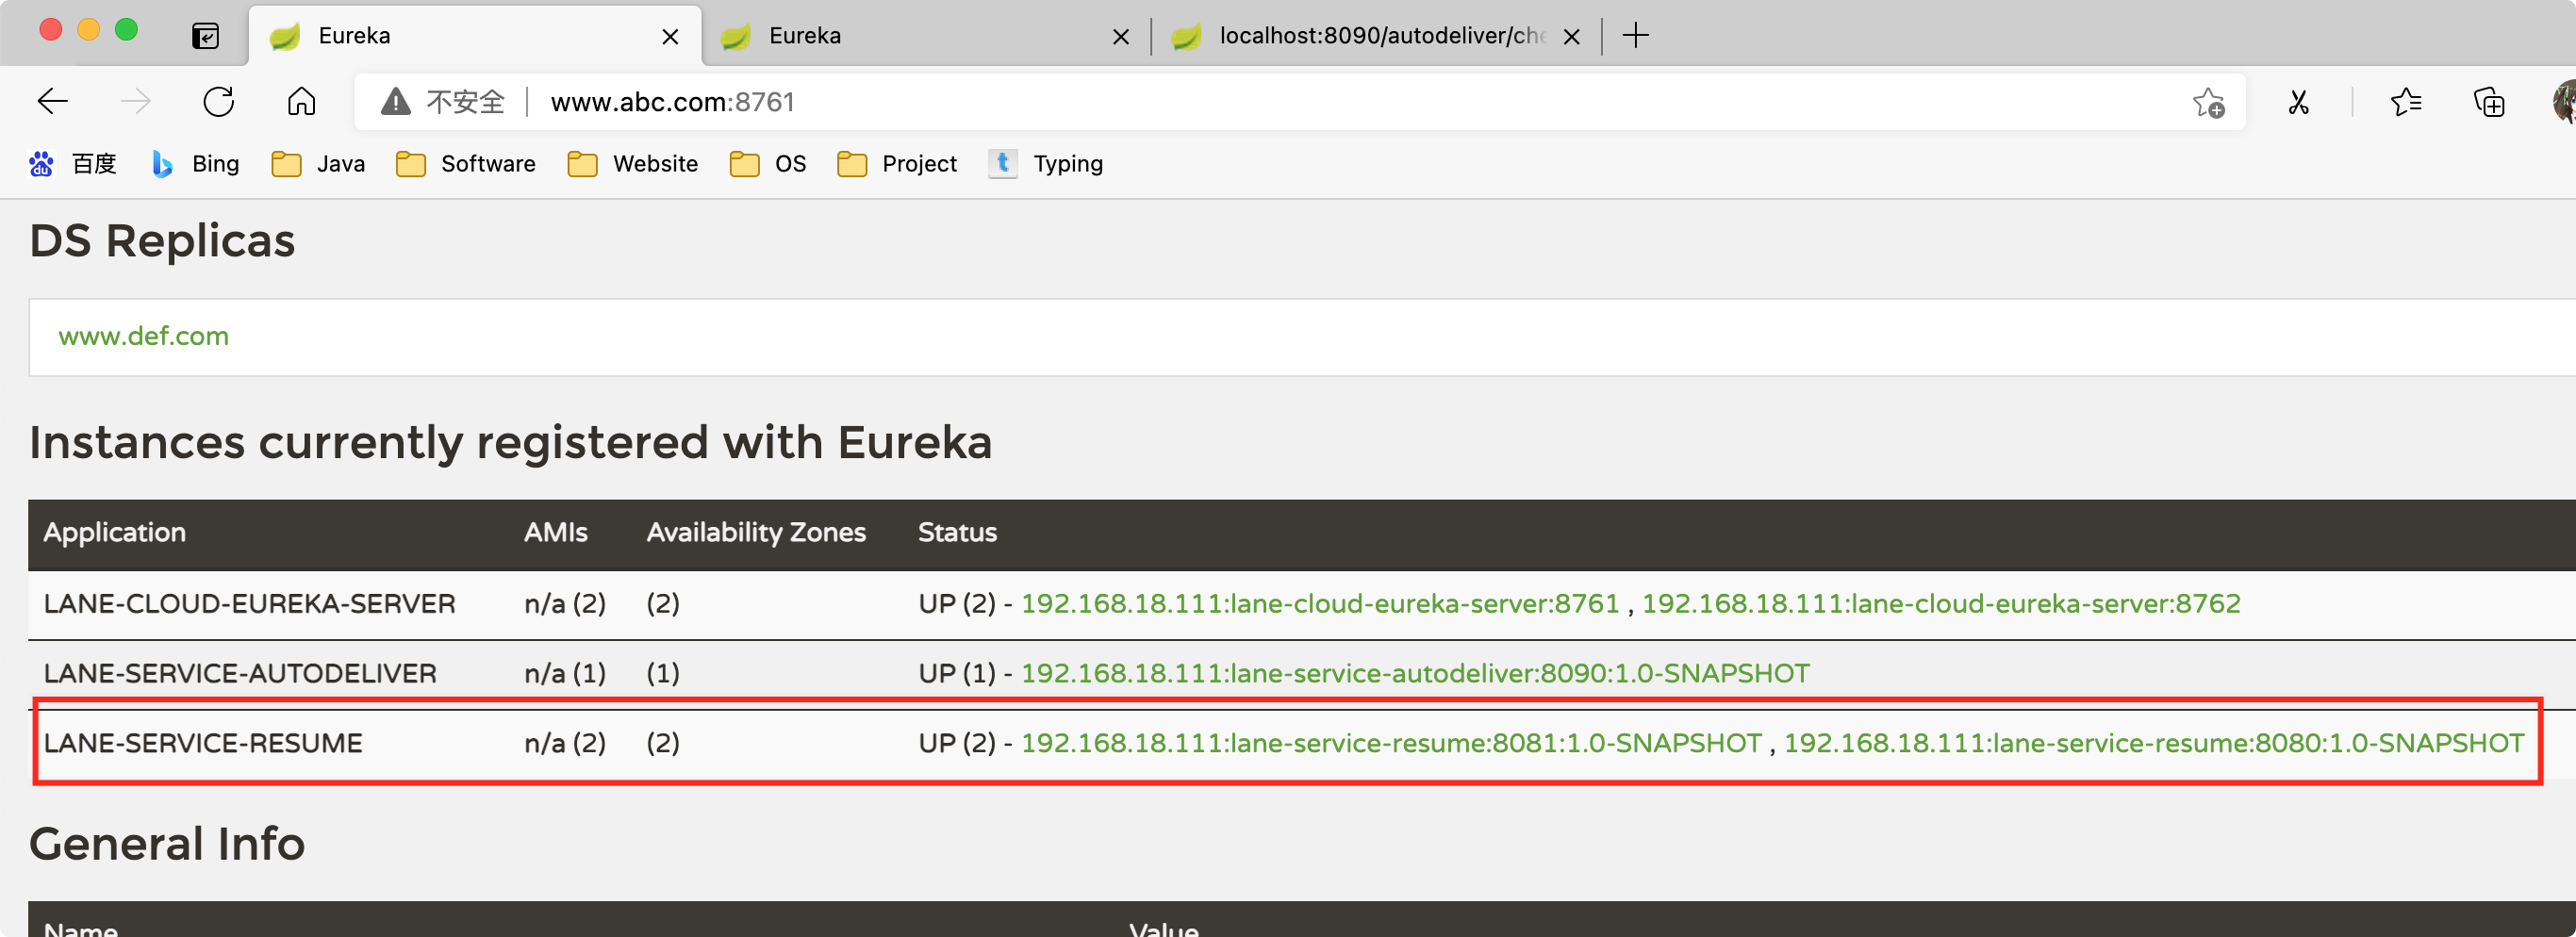
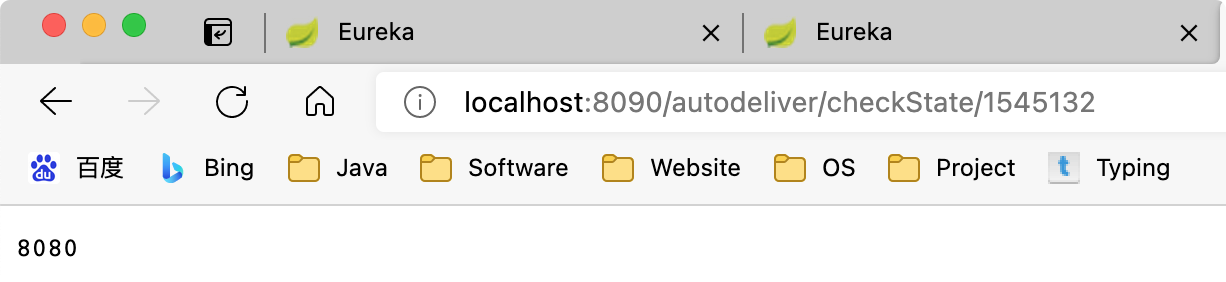

2.3 Ribbon 负载均衡策略
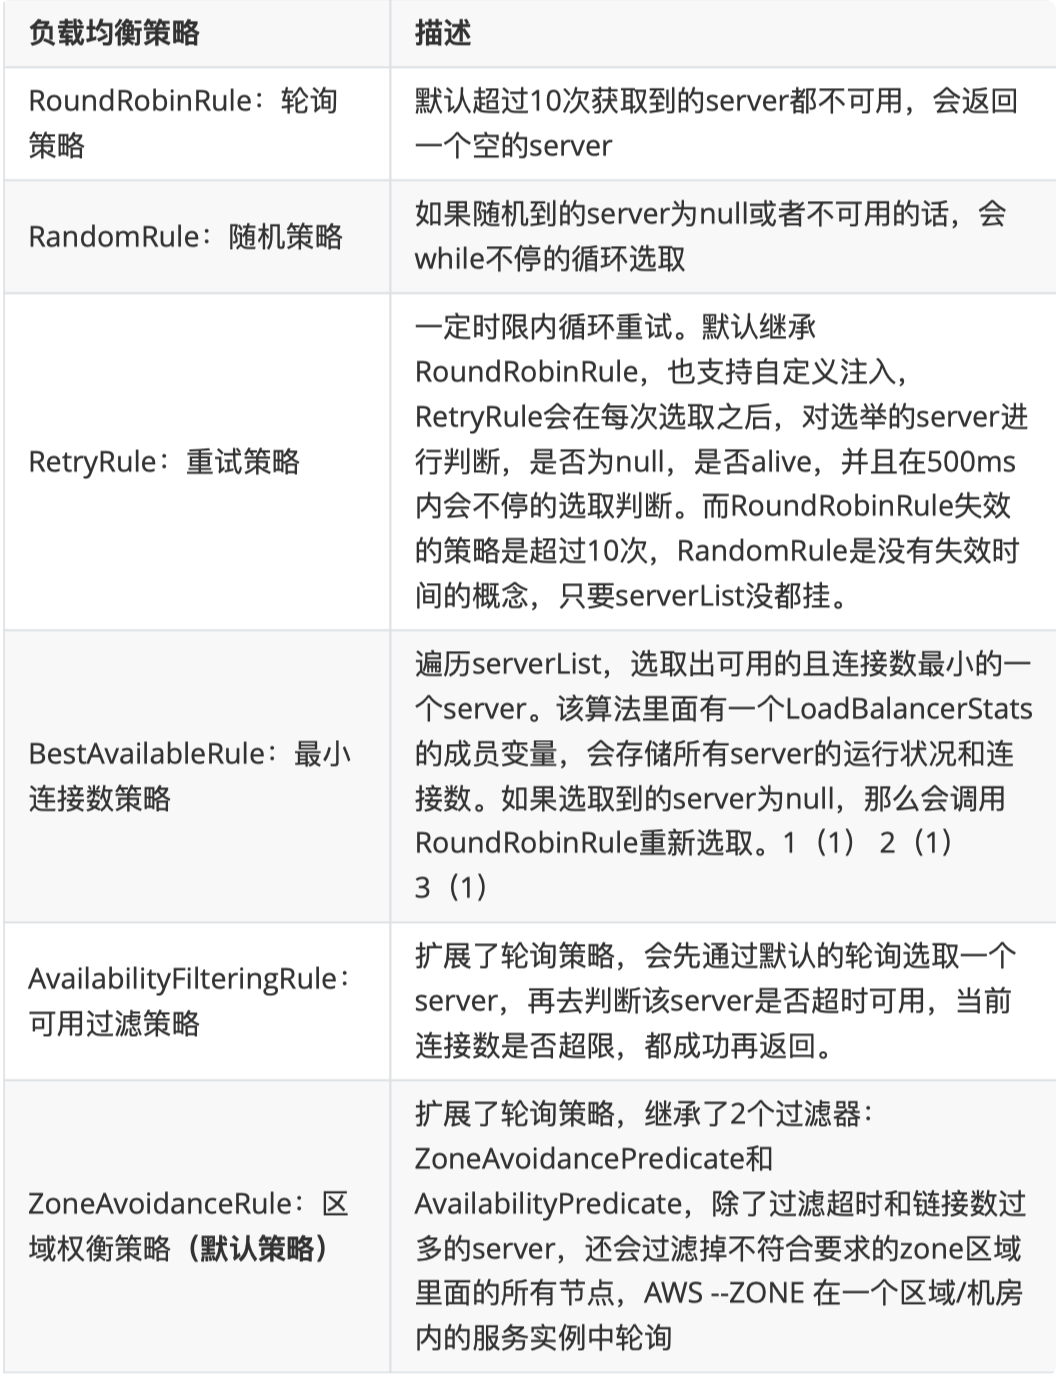
Ribbon 内置了多种负载均衡策略,内部负责复杂均衡的顶级接⼝为 com.netflix.loadbalancer.IRule ,类树如下
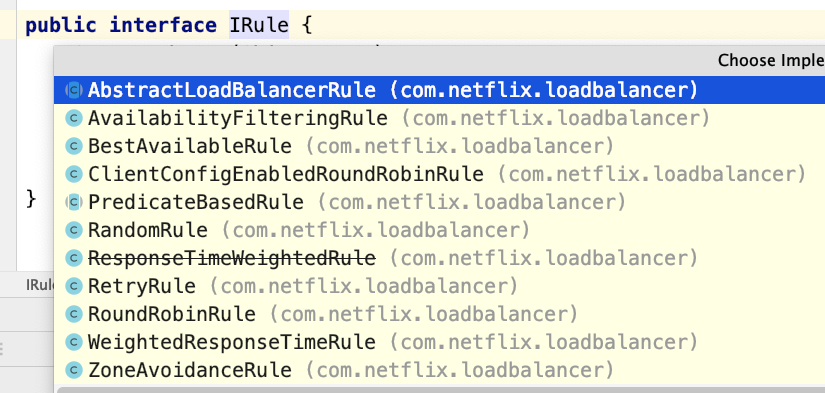
修改负载均衡策略
#注册到Eureka服务中心
eureka:
  client:
    service-url:
      # 注册到集群,就把多个Eurekaserver地址使用逗号连接起来即可;注册到单实例(非集群模式),那就写一个就ok
      defaultZone:  http://www.abc.com:8761/eureka ,http://www.def.com:8762/eureka
  instance:
    prefer-ip-address: true  #服务实例中显示ip,而不是显示主机名(兼容老的eureka版本)
    # 实例名称: 192.168.18.111:lane-service-resume:8080,我们可以自定义它便于升级管理
    instance-id: ${spring.cloud.client.ip-address}:${spring.application.name}:${server.port}:@project.version@
  #针对被调用方微服务名称,不加就是全局生效
  lane-service-resume:
    ribbon:
      NFLoadBalancerRuleClassName: com.netflix.loadbalancer.RoundRobinRule #负载策略调整为轮询
2.4 Ribbon 核⼼源码剖析(略)
Ribbon ⼯作原理
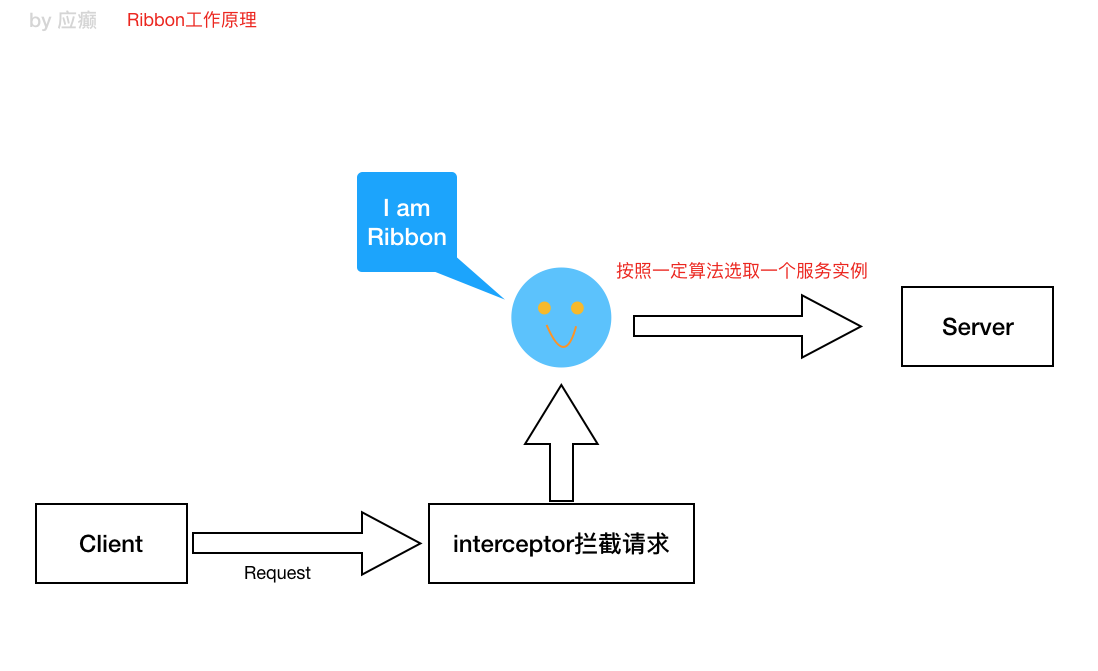
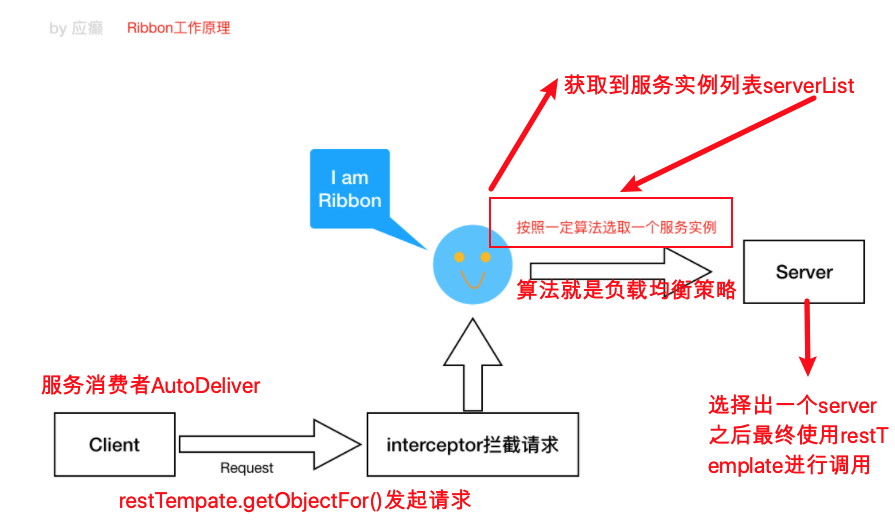
Ribbon 细节结构图(涉及到底层的⼀些组件/类的描述)
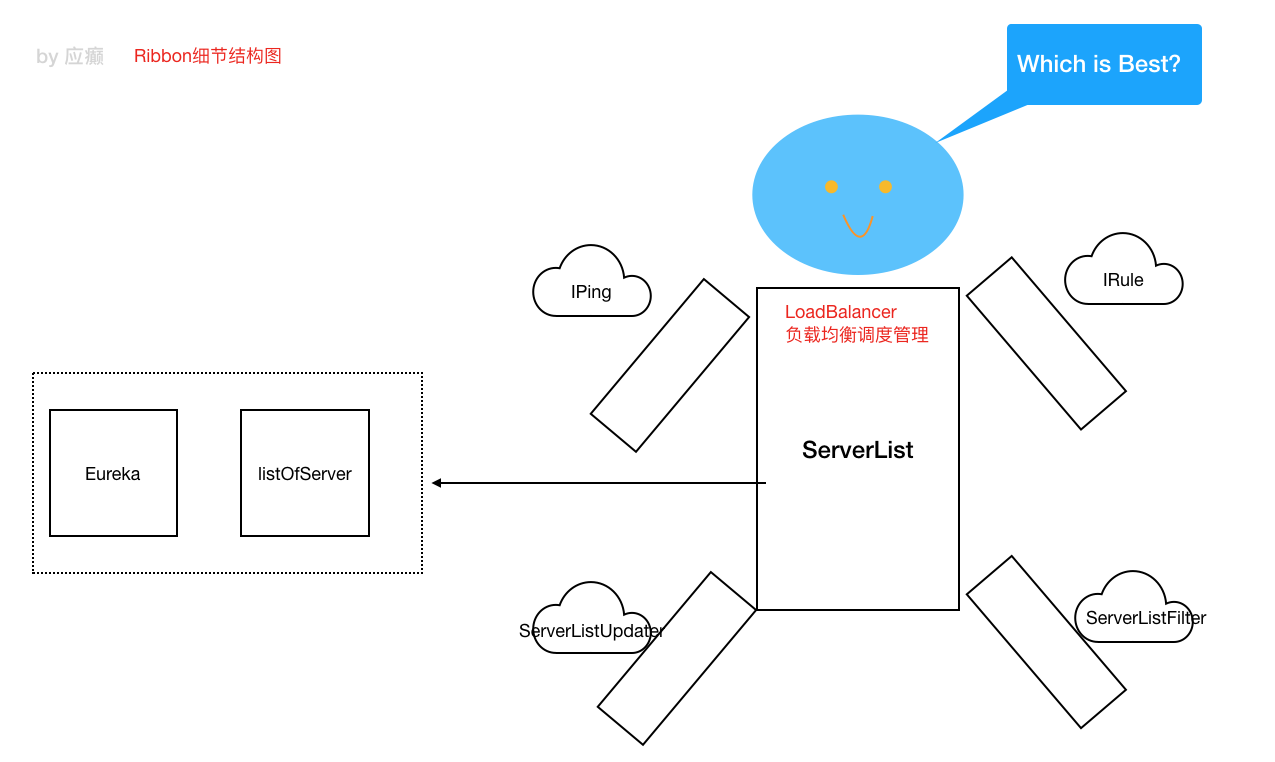
图中核⼼是负载均衡管理器 LoadBalancer(总的协调者,相当于⼤脑,为了做事 情,协调四肢),围绕它周围的多有 IRule、IPing 等
IRule:是在选择实例的时候的负载均衡策略对象
IPing:是⽤来向服务发起⼼跳检测的,通过⼼跳检测来判断该服务是否可⽤
ServerListFilter:根据⼀些规则过滤传⼊的服务实例列表
ServerListUpdater:定义了⼀系列的对服务列表的更新操作
第 3 节 Hystrix 熔断器 属于⼀种容错机制
3.1 微服务中的雪崩效应
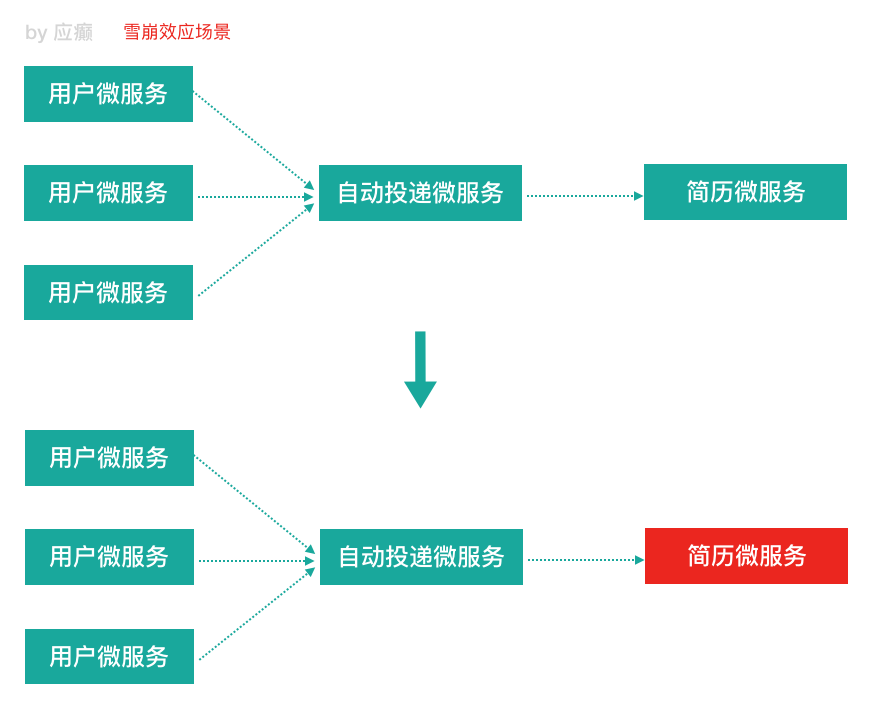
什么是微服务中的雪崩效应呢?
微服务中,⼀个请求可能需要多个微服务接⼝才能实现,会形成复杂的调⽤链路。
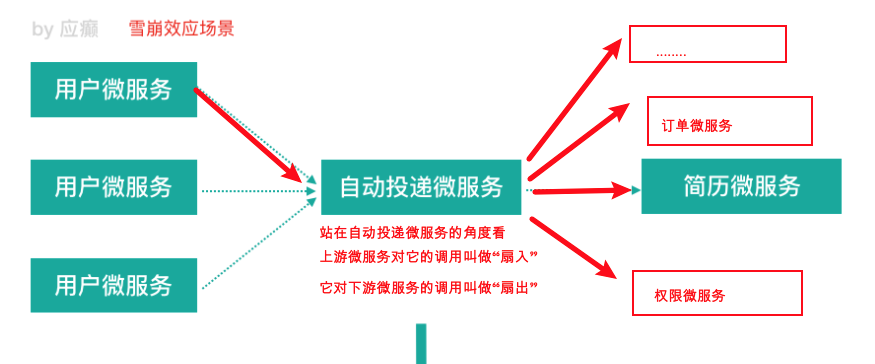
扇⼊:代表着该微服务被调⽤的次数,扇⼊⼤,说明该模块复⽤性好
扇出:该微服务调⽤其他微服务的个数,扇出⼤,说明业务逻辑复杂
扇⼊⼤是⼀个好事,扇出⼤不⼀定是好事
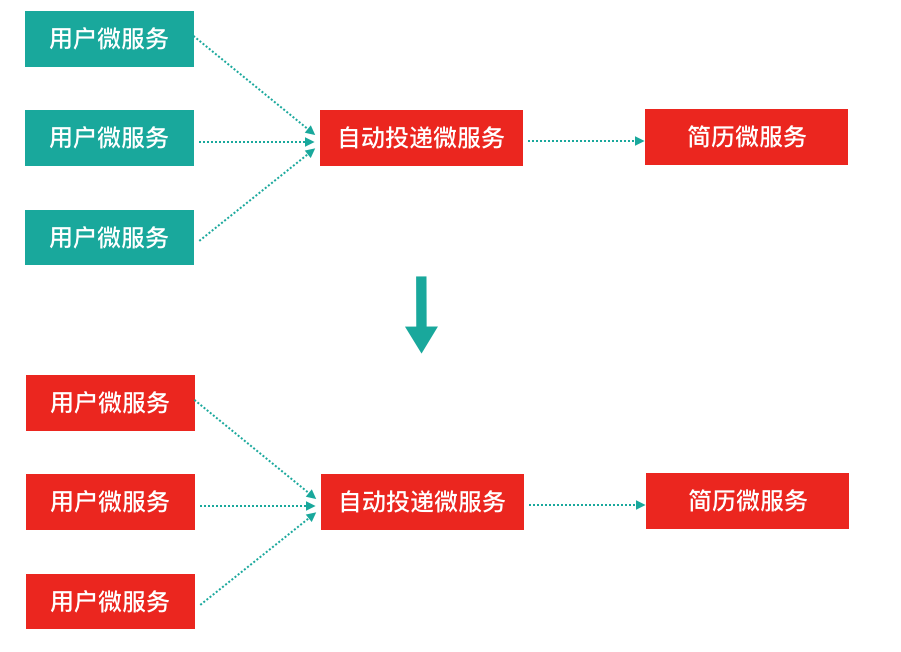
在微服务架构中,⼀个应⽤可能会有多个微服务组成,微服务之间的数据交互通过 远程过程调⽤完成。这就带来⼀个问题,假设微服务 A 调⽤微服务 B 和微服务 C,微 服务 B 和微服务 C ⼜调⽤其它的微服务,这就是所谓的“扇出”。如果扇出的链路上某 个微服务的调⽤响应时间过⻓或者不可⽤,对微服务 A 的调⽤就会占⽤越来越多的系 统资源,进⽽引起系统崩溃,所谓的“雪崩效应”。
如图中所示,最下游简历微服务响应时间过⻓,⼤量请求阻塞,⼤量线程不会释 放,会导致服务器资源耗尽,最终导致上游服务甚⾄整个系统瘫痪。
3.2 雪崩效应解决⽅案
从可⽤性可靠性着想,为防⽌系统的整体缓慢甚⾄崩溃,采⽤的技术⼿段;
下⾯,我们介绍三种技术⼿段应对微服务中的雪崩效应,这三种⼿段都是从系统可⽤性、可靠性⻆度出发,尽量防⽌系统整体缓慢甚⾄瘫痪。
服务熔断
熔断机制是应对雪崩效应的⼀种微服务链路保护机制。我们在各种场景下都会接触 到熔断这两个字。⾼压电路中,如果某个地⽅的电压过⾼,熔断器就会熔断,对电 路进⾏保护。股票交易中,如果股票指数过⾼,也会采⽤熔断机制,暂停股票的交 易。同样,在微服务架构中,熔断机制也是起着类似的作⽤。当扇出链路的某个微 服务不可⽤或者响应时间太⻓时,熔断该节点微服务的调⽤,进⾏服务的降级,快 速返回错误的响应信息。当检测到该节点微服务调⽤响应正常后,恢复调⽤链路。
注意:
1)服务熔断重点在“断”,切断对下游服务的调⽤
2)服务熔断和服务降级往往是⼀起使⽤的,Hystrix 就是这样。
服务降级
通俗讲就是整体资源不够⽤了,先将⼀些不关紧的服务停掉(调⽤我的时候,给你 返回⼀个预留的值,也叫做兜底数据),待渡过难关⾼峰过去,再把那些服务打 开。
服务降级⼀般是从整体考虑,就是当某个服务熔断之后,服务器将不再被调⽤,此 刻客户端可以⾃⼰准备⼀个本地的 fallback 回调,返回⼀个缺省值,这样做,虽然服 务⽔平下降,但好⽍可⽤,⽐直接挂掉要强。
服务限流
服务降级是当服务出问题或者影响到核⼼流程的性能时,暂时将服务屏蔽掉,待⾼ 峰或者问题解决后再打开;但是有些场景并不能⽤服务降级来解决,⽐如秒杀业务 这样的核⼼功能,这个时候可以结合服务限流来限制这些场景的并发/请求量,限流措施也很多,⽐如
- 限制总并发数(⽐如数据库连接池、线程池)
- 限制瞬时并发数(如 nginx 限制瞬时并发连接数)
- 限制时间窗⼝内的平均速率(如 Guava 的 RateLimiter、nginx 的 limit_req 模块, 限制每秒的平均速率)
- 限制远程接⼝调⽤速率、限制 MQ 的消费速率等
3.3 Hystrix 简介
[来⾃官⽹]Hystrix(豪猪-----> 刺),宣⾔“defend your app”是由 Netflix 开源的⼀个 延迟和容错库,⽤于隔离访问远程系统、服务或者第三⽅库,防⽌级联失败,从⽽ 提升系统的可⽤性与容错性。Hystrix 主要通过以下⼏点实现延迟和容错。
- 包裹请求:使⽤ HystrixCommand 包裹对依赖的调⽤逻辑。 ⾃动投递微服务⽅法(@HystrixCommand 添加 Hystrix 控制) ——调⽤简历微服务
- 跳闸机制:当某服务的错误率超过⼀定的阈值时,Hystrix 可以跳闸,停⽌请求该服务⼀段时间。
- 资源隔离:Hystrix 为每个依赖都维护了⼀个⼩型的线程池(舱壁模式)(或者信号量)。如果该线程池已满, 发往该依赖的请求就被⽴即拒绝,⽽不是排队等待,从⽽加速失败判定。
- 监控:Hystrix 可以近乎实时地监控运⾏指标和配置的变化,例如成功、失败、超时、以及被拒绝 的请求等。
- 回退机制:当请求失败、超时、被拒绝,或当断路器打开时,执⾏回退逻辑。回退逻辑由开发⼈员 ⾃⾏提供,例如返回⼀个缺省值。
- ⾃我修复:断路器打开⼀段时间后,会⾃动进⼊“半开”状态。
3.4 Hystrix 熔断应⽤
⽬的:简历微服务⻓时间没有响应,服务消费者—> ⾃动投递微服务快速失败给⽤户 提示
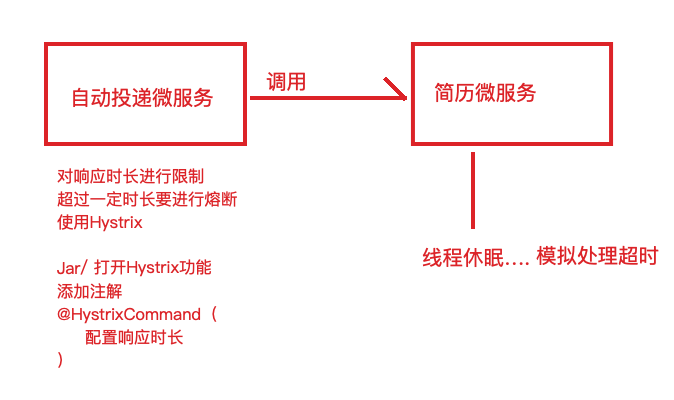
服务熔断
服务消费者⼯程(⾃动投递微服务)中引⼊ Hystrix 依赖坐标(也可以添加在⽗ ⼯程中)
 <!--熔断器Hystrix-->
        <dependency>
            <groupId>org.springframework.cloud</groupId>
            <artifactId>spring-cloud-starter-netflix-hystrix</artifactId>
        </dependency>
服务消费者⼯程(⾃动投递微服务)的启动类中添加熔断器开启注解
package com.galaxy;

/**
 * @author lane
 * @date 2021年06月22日 下午6:21
 */
@SpringBootApplication
@EnableDiscoveryClient // 开启服务发现
//@EnableEurekaClient
//@EnableHystrix //hystrix的注解
@EnableCircuitBreaker//通用熔断器的注解
//@SpringCloudApplication //上面3个注解的集合
public class AutodeliverApplication {

    public static void main(String[] args) {
        SpringApplication.run(AutodeliverApplication.class, args);

    }
    //ribbon负载均衡
    @LoadBalanced
    @Bean
    public RestTemplate restTemplate(){
        return new RestTemplate();
    }


}
 /**
     * 提供者模拟处理超时,调用方法添加Hystrix控制
     * @param userId
     * @return
     */
    @HystrixCommand(

            commandProperties = {
            // 每一个属性都是一个HystrixProperty,2s熔断
            @HystrixProperty(name="execution.isolation.thread.timeoutInMilliseconds",value="2000")
    })
    @GetMapping("/checkStateTimeout/{userId}")
    public Integer findResumeOpenStateTimeout(@PathVariable Long userId) {
        // 使用ribbon不需要我们自己获取服务实例然后选择一个那么去访问了(自己的负载均衡)
        String url = "http://lane-service-resume/resume/openstate/" + userId;  // 指定服务名
        Integer forObject = restTemplate.getForObject(url, Integer.class);
        return forObject;
    }
consumer 的 8081 服务器添加 10s 的阻塞之后测试效果如下
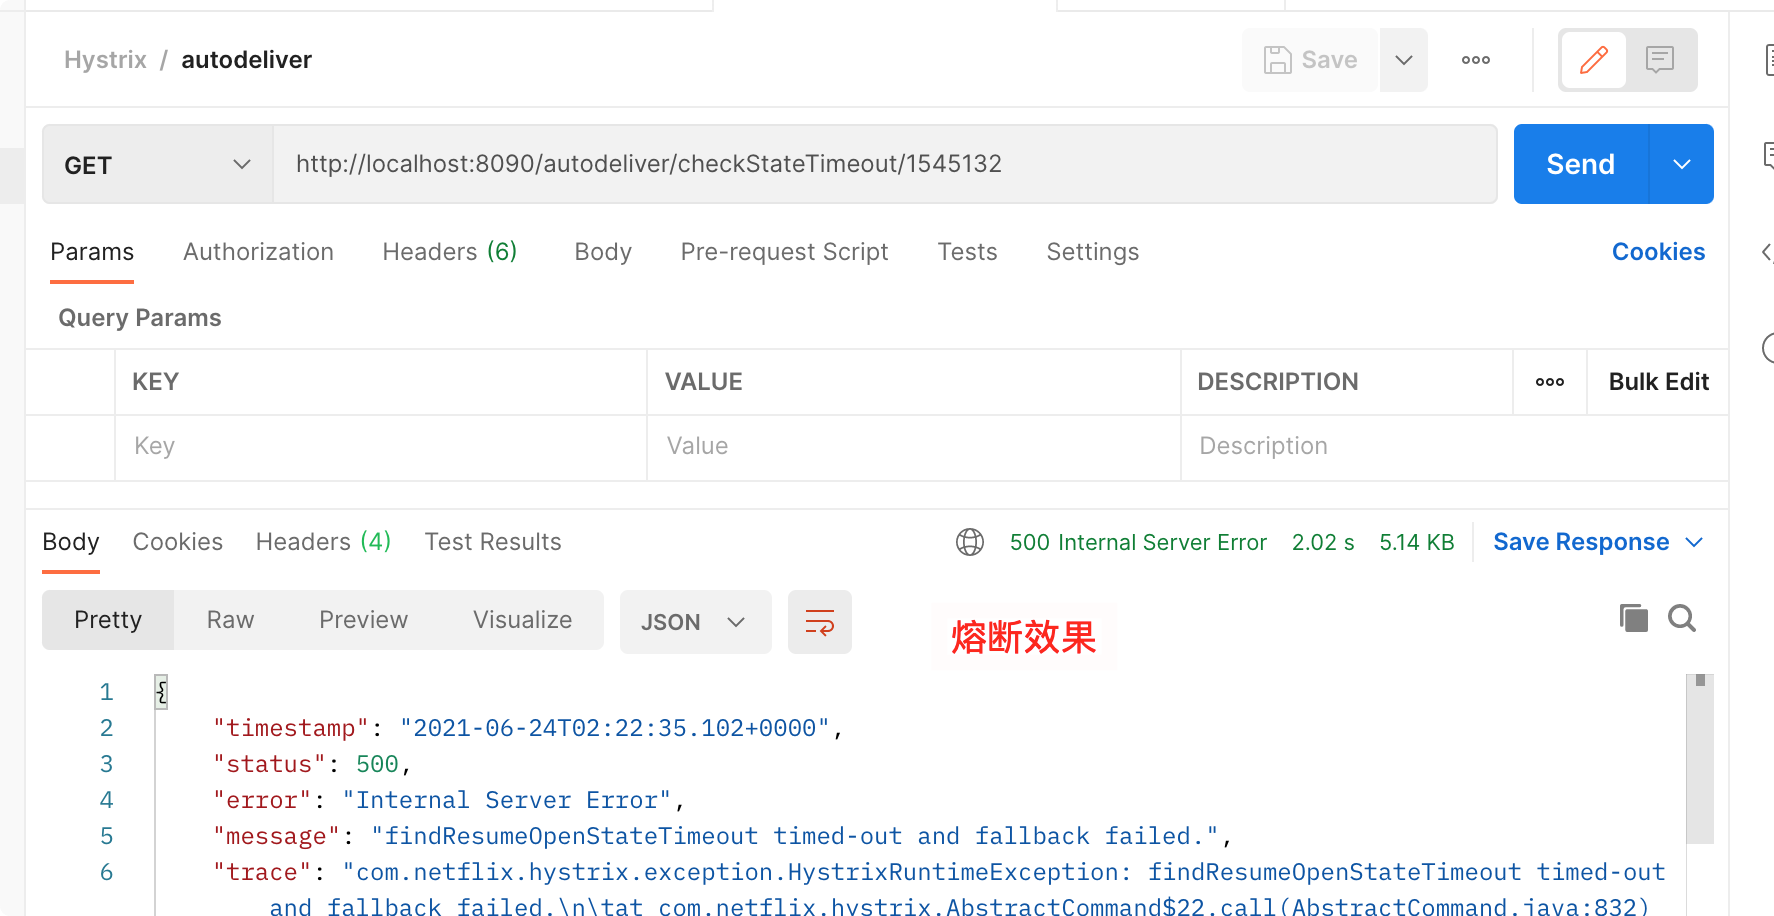
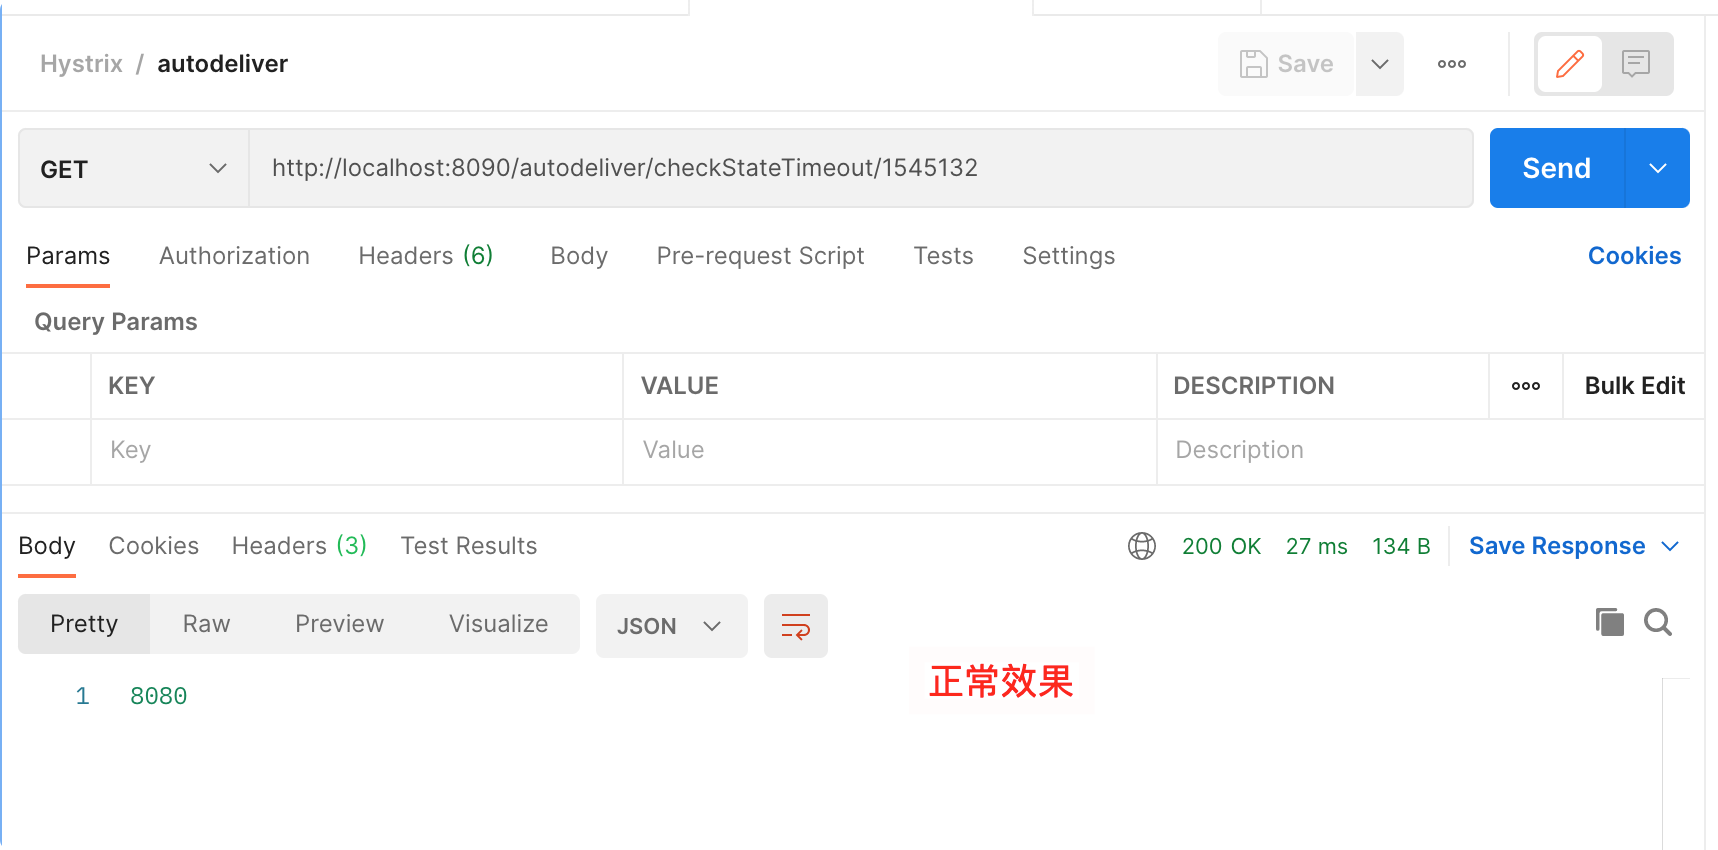
服务回退****(降级)
如上所示,返回错误信息很不好,添加服务回退,显示默认信息
 /**
     * 提供者模拟处理超时,调用方法添加Hystrix控制,添加熔断和服务回退fallbackMethod = "fallbackMethod"
     * @param userId
     * @return
     */
    @HystrixCommand(

            commandProperties = {
                    // 每一个属性都是一个HystrixProperty,2s熔断
                    @HystrixProperty(name="execution.isolation.thread.timeoutInMilliseconds",value="2000")
            },fallbackMethod = "fallbackMethod")//回退方法
    @GetMapping("/checkStateTimeoutFallback/{userId}")
    public Integer findResumeOpenStateTimeoutFallback(@PathVariable Long userId) {
        // 使用ribbon不需要我们自己获取服务实例然后选择一个那么去访问了(自己的负载均衡)
        String url = "http://lane-service-resume/resume/openstate/" + userId;  // 指定服务名
        Integer forObject = restTemplate.getForObject(url, Integer.class);
        return forObject;
    }
    /**
     * 默认返回方法调用,注意参数和返回值要和原方法保持一致
     * @author lane
     * @date 2021/6/24 上午10:37
     * @param userId
     * @return java.lang.Integer
     */
    public Integer fallbackMethod(Long userId){

        return -1;
    }
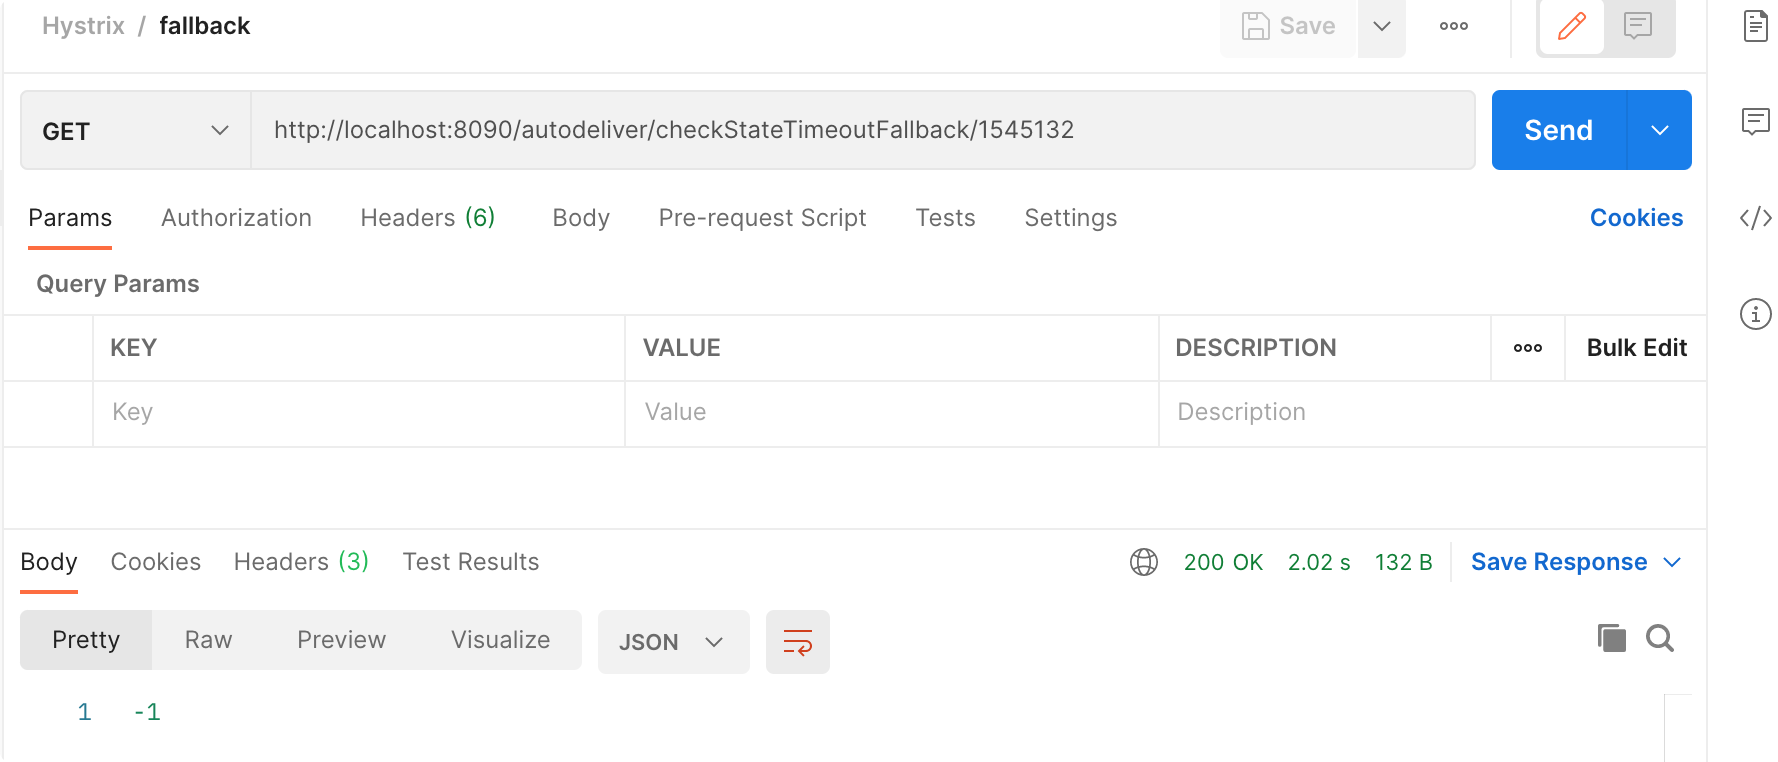
3.5 Hystrix 舱壁模式(线程池隔离策略)
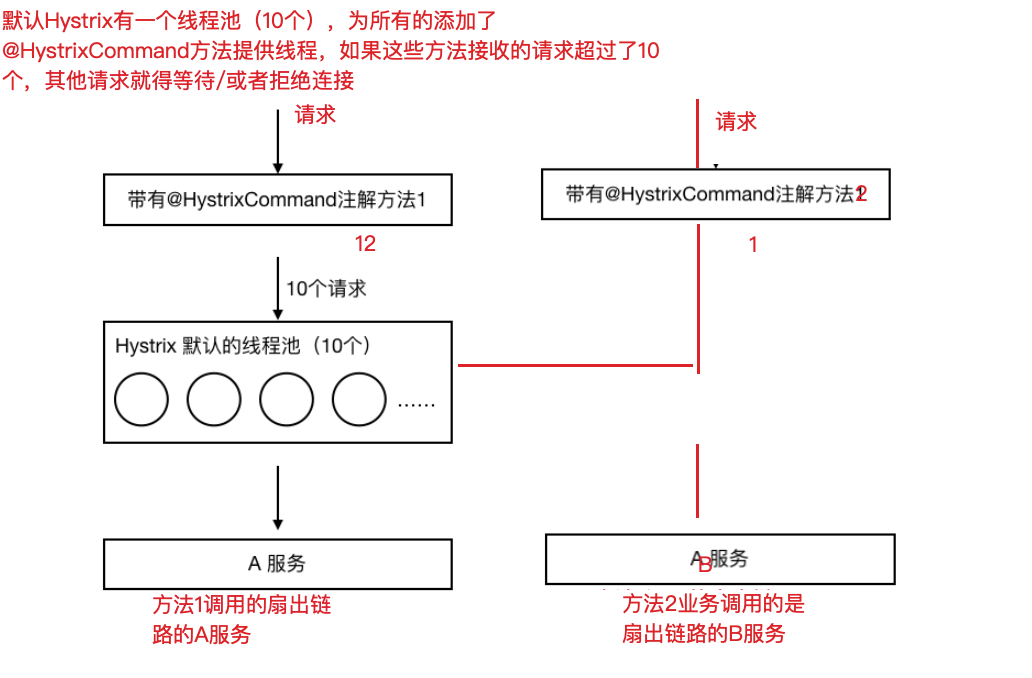
如果不进⾏任何设置,所有熔断⽅法使⽤⼀个 Hystrix 线程池(10 个线程),那么这 样的话会导致问题,这个问题并不是扇出链路微服务不可⽤导致的,⽽是我们的线 程机制导致的,如果⽅法 A 的请求把 10 个线程都⽤了,⽅法 2 请求处理的时候压根都 没法去访问 B,因为没有线程可⽤,并不是 B 服务不可⽤。
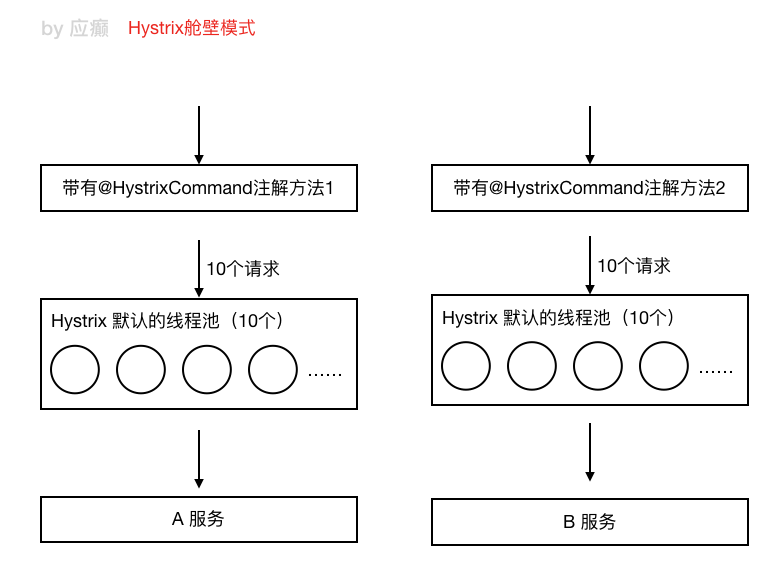
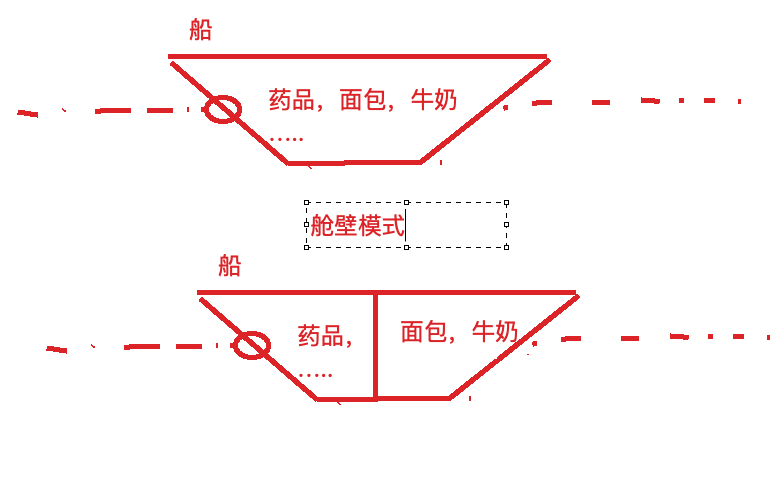
为了避免问题服务请求过多导致正常服务⽆法访问,Hystrix 不是采⽤增加线程数, ⽽是单独的为每⼀个控制⽅法创建⼀个线程池的⽅式,这种模式叫做“舱壁模式",也 是线程隔离的⼿段。
为了防止一个方法调用过多导致另外的方法不可用,而提出的一直线程隔离方案****避免所有熔断⽅法使⽤⼀个 Hystrix 线程池(10 个线程)
我们可以使⽤⼀些⼿段查看线程情况 jps
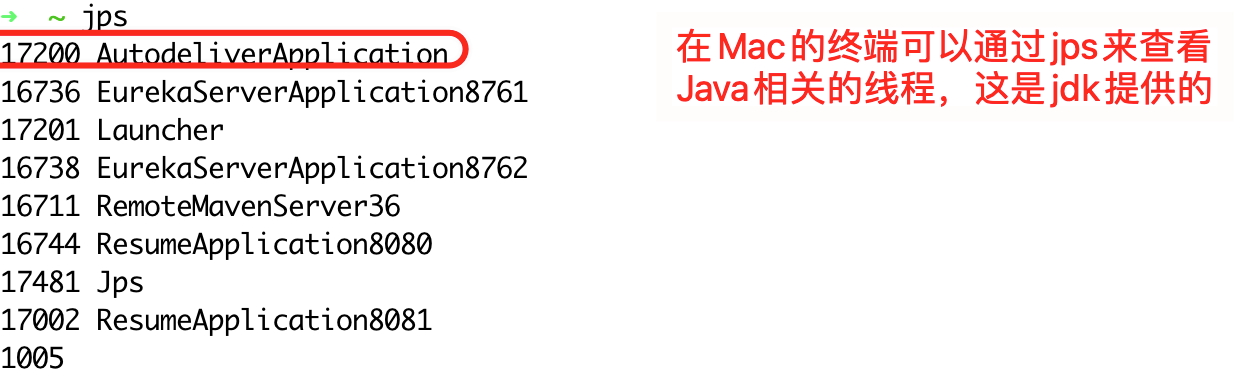
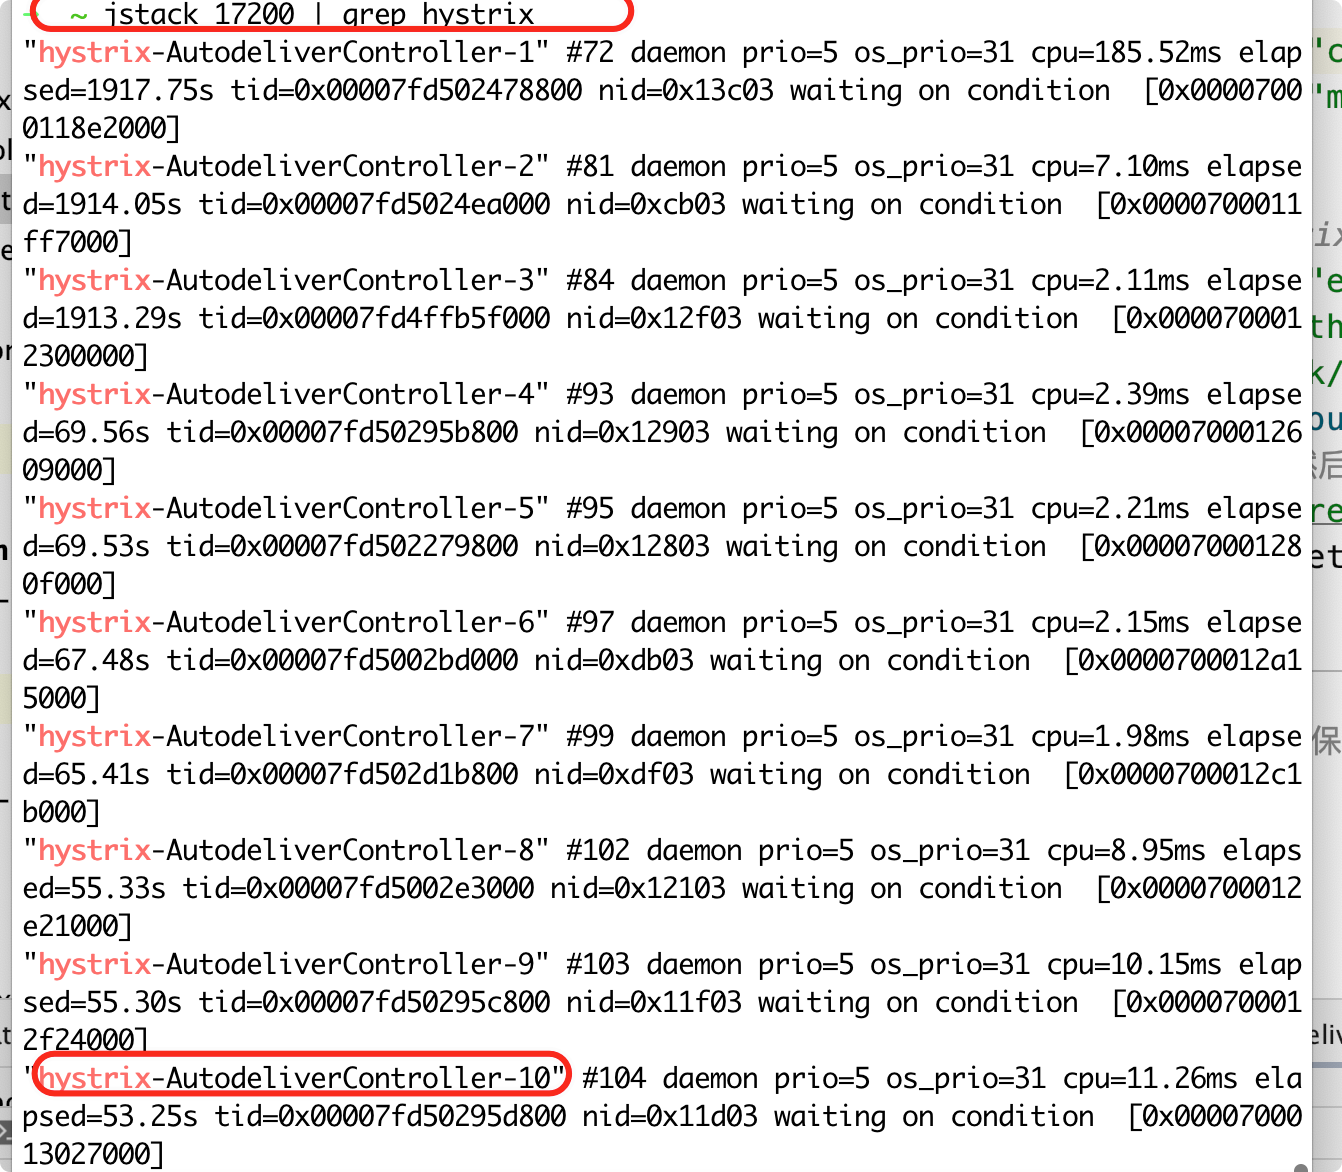
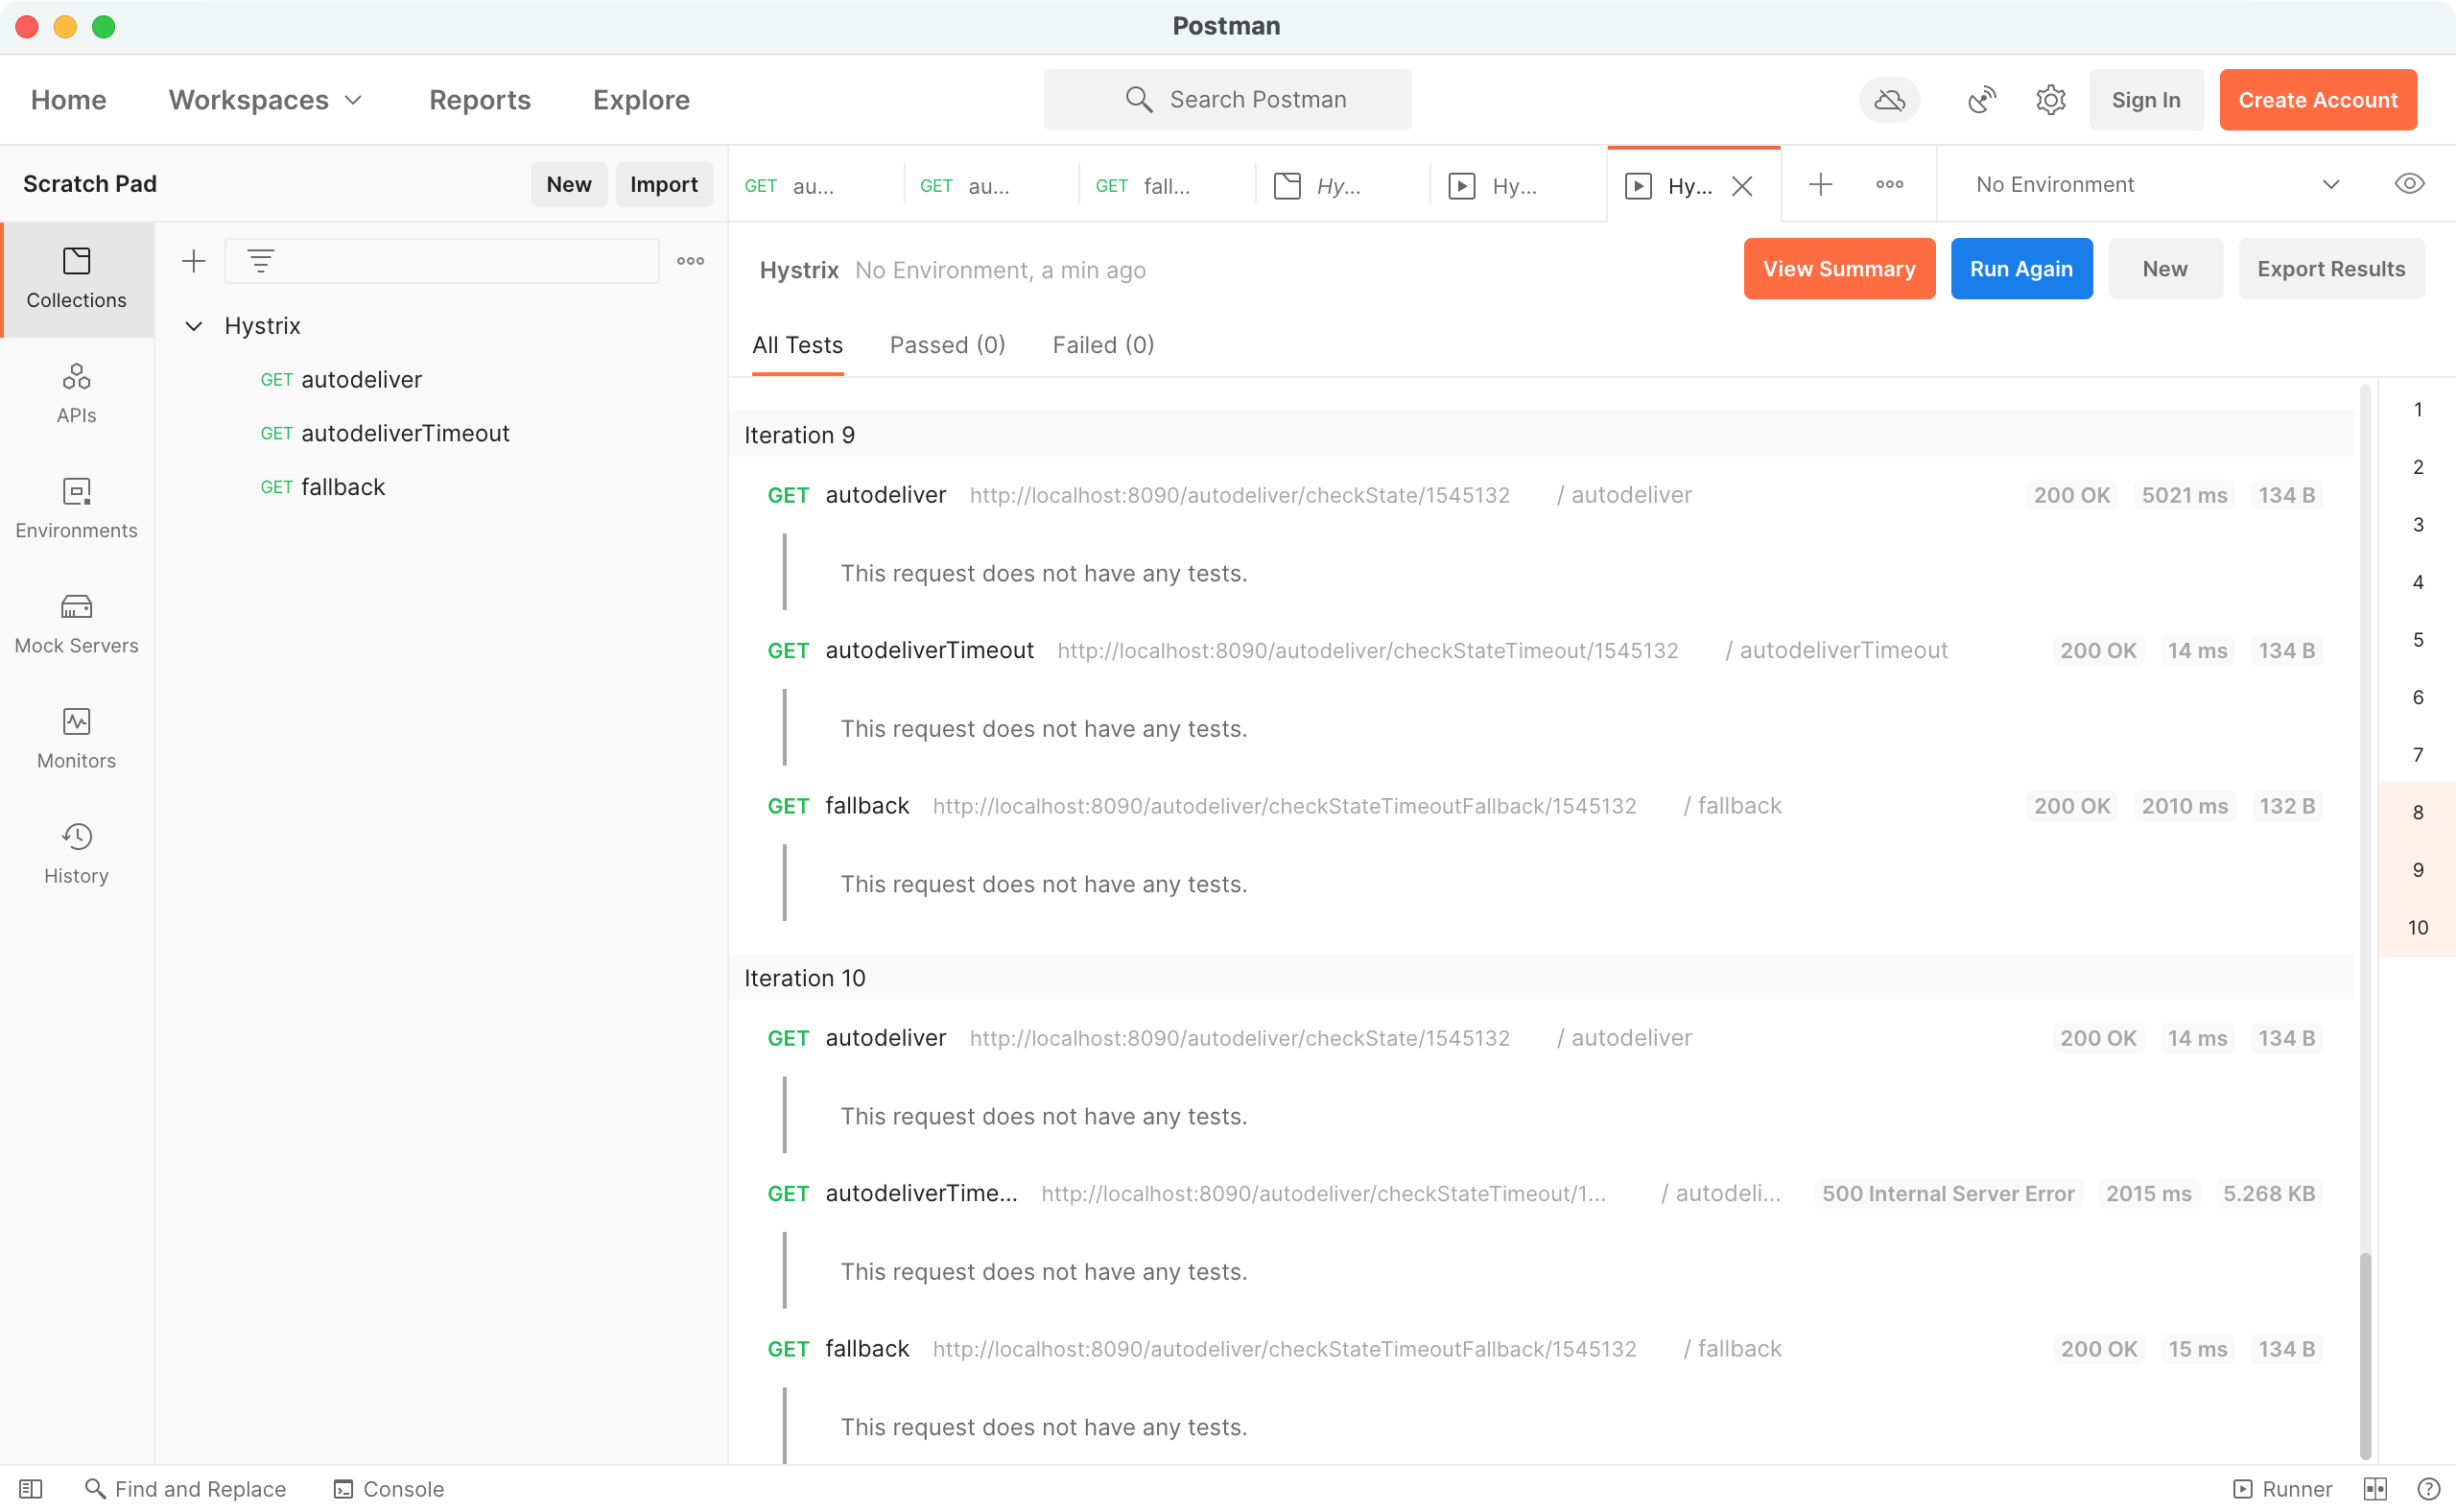
通过 postman 来调用 3 个方法 循环 10 次来看线程个数
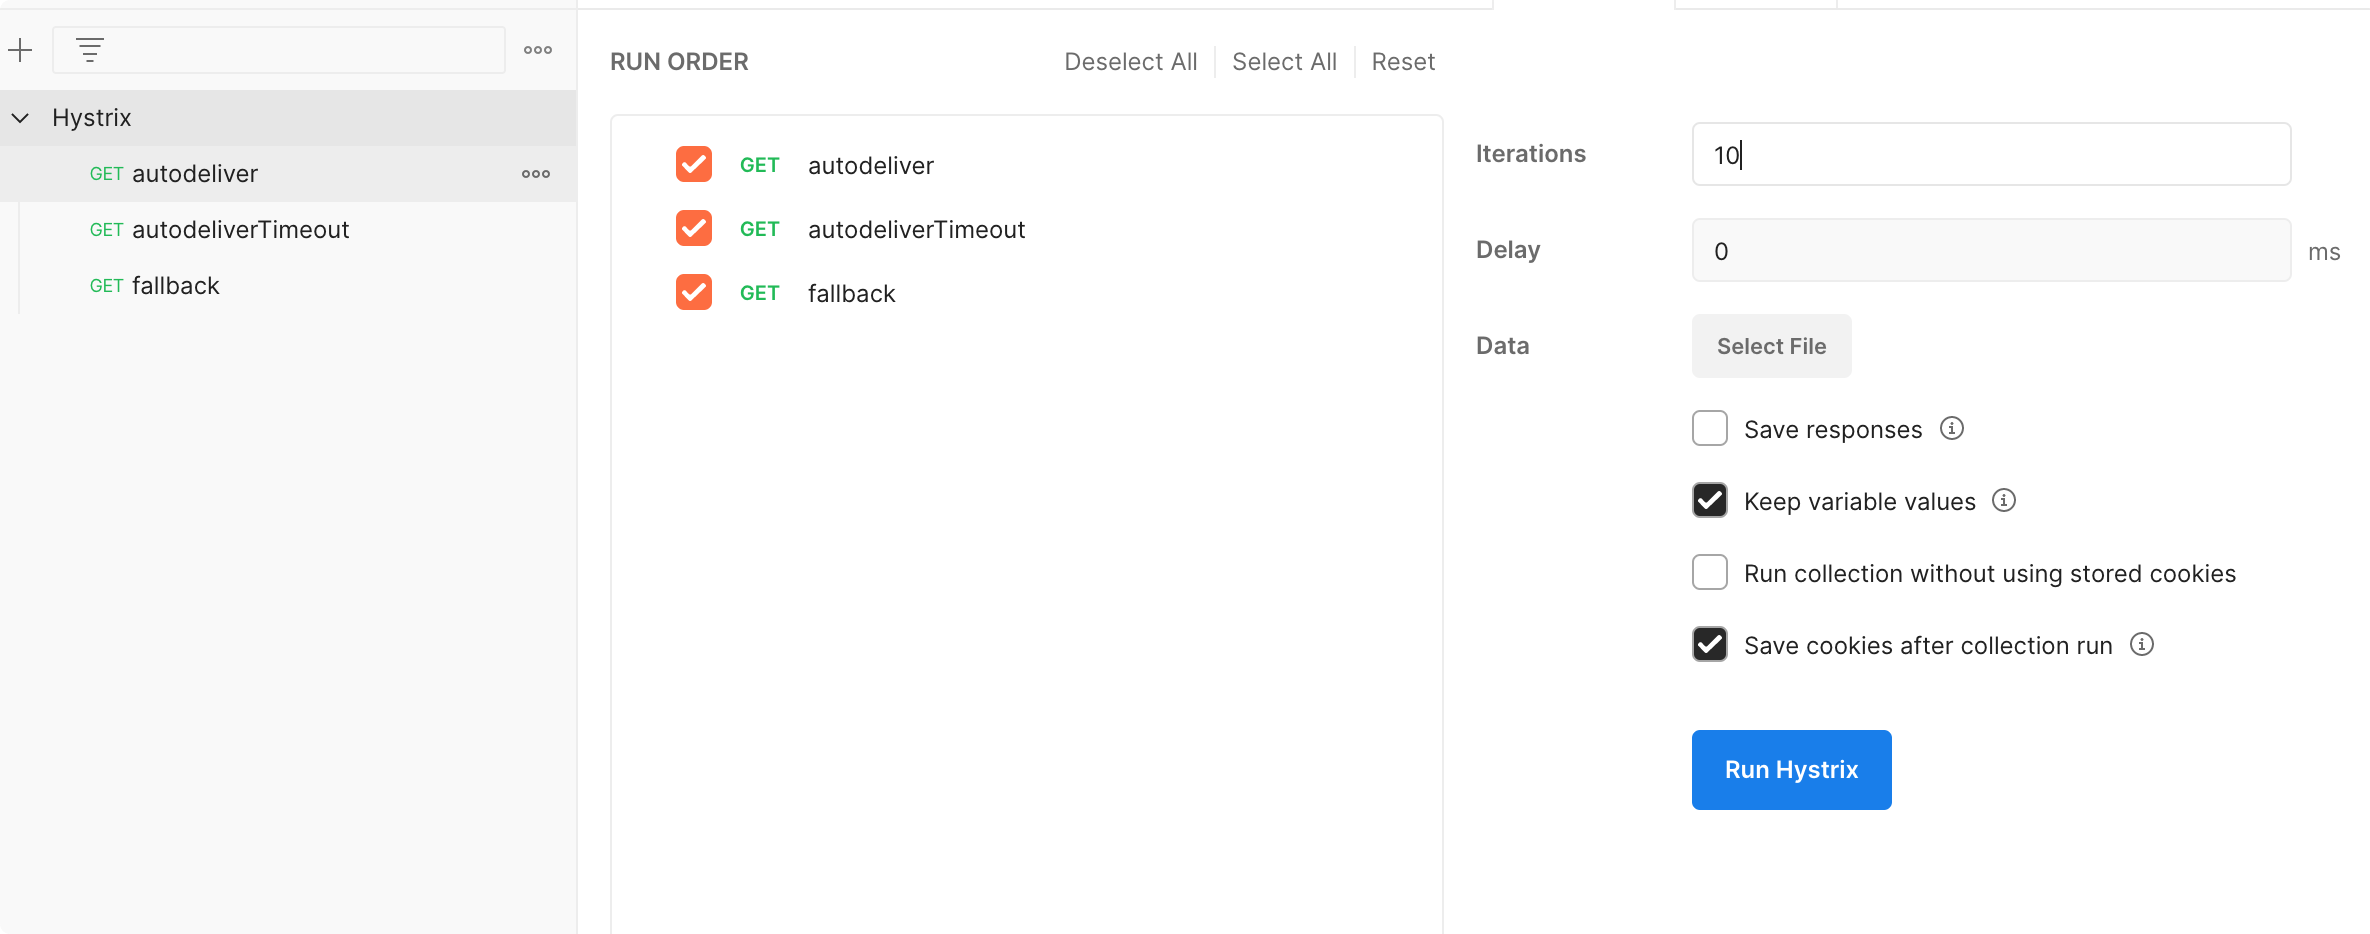
通过使用命令 jstack pid | grep hystrix 来查看 hystrix 的线程信息,发现只有 10 个线程
Hystrix 舱壁模式程序修改
通过添加线程池标识如 threadPoolKey = "findResumeOpenStateTimeout", 进行线程池隔离,并配置线程细节 1 个分别为 1 个和 2 个核心线程
	    // 线程池标识,要保持唯一,不唯一的话就共用了
            threadPoolKey = "findResumeOpenStateTimeout",
            // 线程池细节属性配置
            threadPoolProperties = {
                    @HystrixProperty(name="coreSize",value = "1"), // 线程数
                    @HystrixProperty(name="maxQueueSize",value="20") // 等待队列长度
            },
 /**
     * 提供者模拟处理超时,调用方法添加Hystrix控制
     * @param userId
     * @return
     */
    @HystrixCommand(
            // 线程池标识,要保持唯一,不唯一的话就共用了
            threadPoolKey = "findResumeOpenStateTimeout",
            // 线程池细节属性配置
            threadPoolProperties = {
                    @HystrixProperty(name="coreSize",value = "1"), // 线程数
                    @HystrixProperty(name="maxQueueSize",value="20") // 等待队列长度
            },
            commandProperties = {
            // 每一个属性都是一个HystrixProperty,2s熔断
            @HystrixProperty(name="execution.isolation.thread.timeoutInMilliseconds",value="2000")
    })
    @GetMapping("/checkStateTimeout/{userId}")
    public Integer findResumeOpenStateTimeout(@PathVariable Long userId) {
        // 使用ribbon不需要我们自己获取服务实例然后选择一个那么去访问了(自己的负载均衡)
        String url = "http://lane-service-resume/resume/openstate/" + userId;  // 指定服务名
        Integer forObject = restTemplate.getForObject(url, Integer.class);
        return forObject;
    }
    /**
     * 提供者模拟处理超时,调用方法添加Hystrix控制,添加熔断和服务回退
     * @param userId
     * @return
     */
    @HystrixCommand(
            // 线程池标识,要保持唯一,不唯一的话就共用了
            threadPoolKey = "findResumeOpenStateTimeoutFallback",
            // 线程池细节属性配置
            threadPoolProperties = {
                    @HystrixProperty(name="coreSize",value = "2"), // 线程数
                    @HystrixProperty(name="maxQueueSize",value="20") // 等待队列长度
            },
            commandProperties = {
                    // 每一个属性都是一个HystrixProperty,2s熔断
                    @HystrixProperty(name="execution.isolation.thread.timeoutInMilliseconds",value="2000")
            },fallbackMethod = "fallbackMethod")//回退方法
    @GetMapping("/checkStateTimeoutFallback/{userId}")
    public Integer findResumeOpenStateTimeoutFallback(@PathVariable Long userId) {
        // 使用ribbon不需要我们自己获取服务实例然后选择一个那么去访问了(自己的负载均衡)
        String url = "http://lane-service-resume/resume/openstate/" + userId;  // 指定服务名
        Integer forObject = restTemplate.getForObject(url, Integer.class);
        return forObject;
    }
再次通过 postman 进行 10 轮调用,并通过终端来查看线程个数是不是 1 和 2 来判断是否完成了线程池的隔离
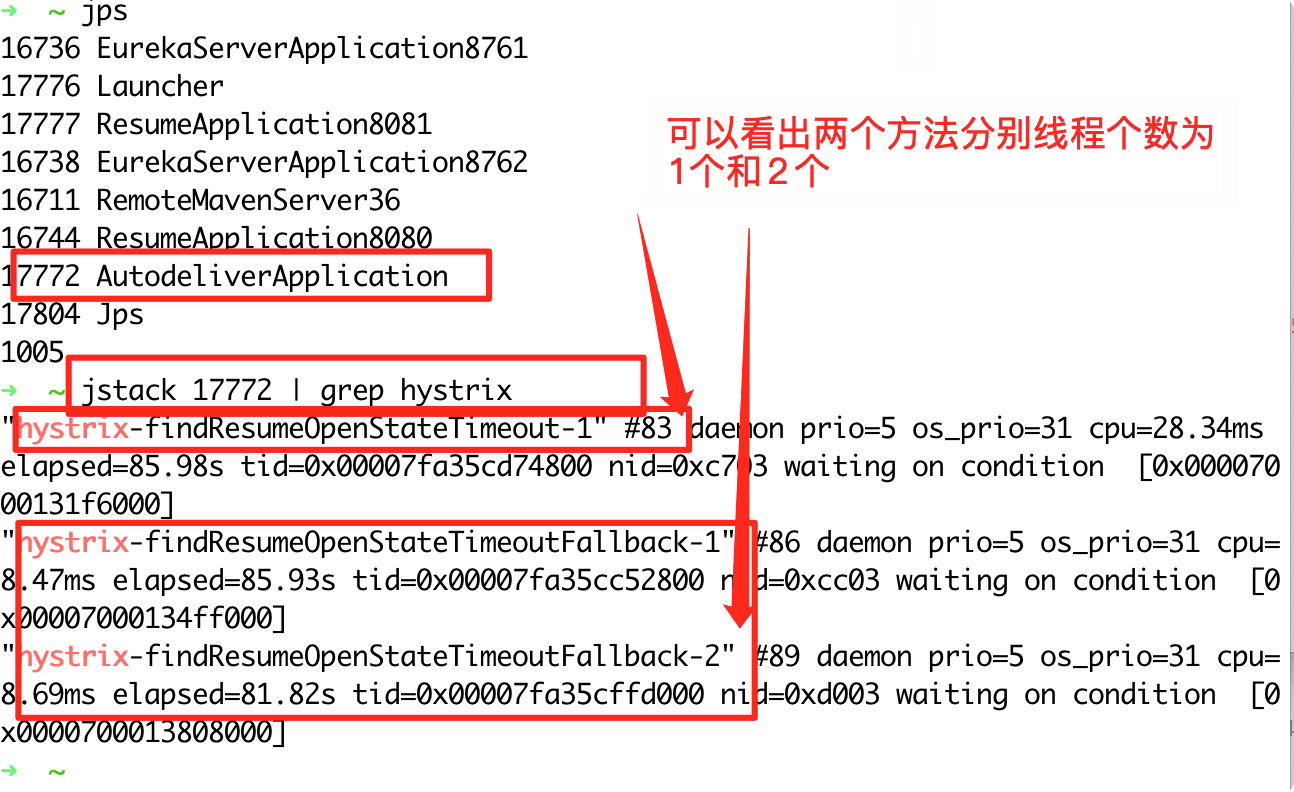
验证结果与预期相符合
3.6 Hystrix ⼯作流程与⾼级应⽤
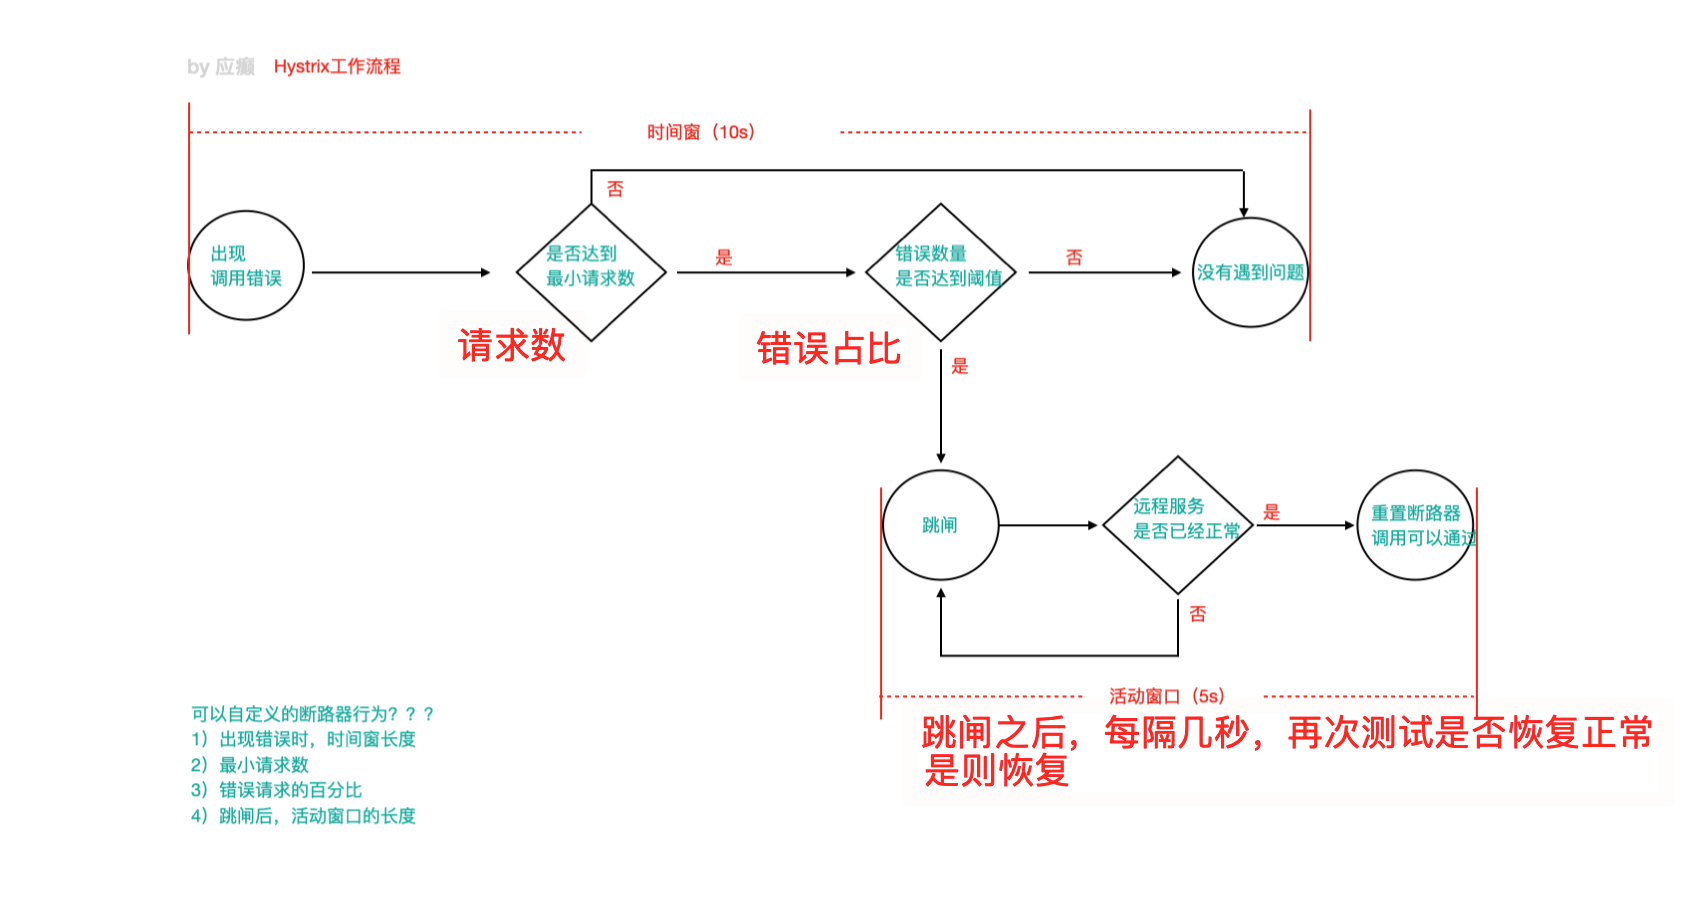
1)当调⽤出现问题时,开启⼀个时间窗(10s)
2)在这个时间窗内,统计调⽤次数是否达到最⼩请求数? 如果没有达到,则重置统计信息,回到第 1 步 如果达到了,则统计失败的请求数占所有请求数的百分⽐,是否达到阈值? 如果达到,则跳闸(不再请求对应服务) 如果没有达到,则重置统计信息,回到第 1 步
3)如果跳闸,则会开启⼀个活动窗⼝(默认 5s),每隔 5s,Hystrix 会让⼀个请求 通过,到达那个问题服务,看 是否调⽤成功,如果成功,重置断路器回到第 1 步,如 果失败,回到第 3 步
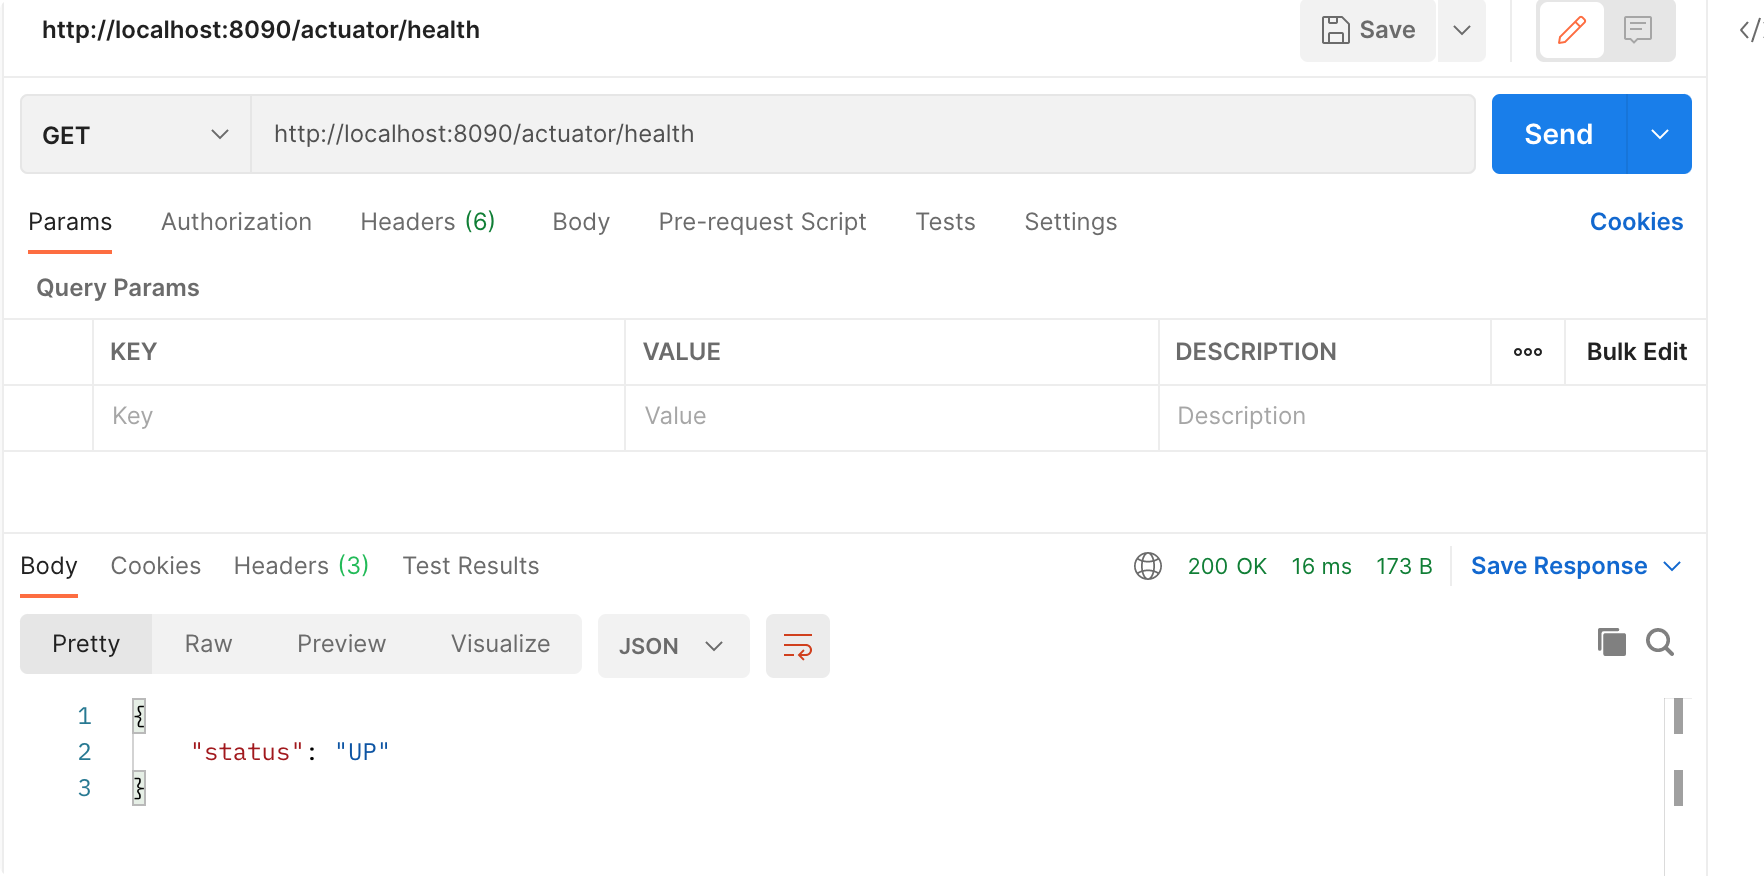
通过 Springboot 的监控来查看 hystrix 的状态 http://localhost:8090/actuator/health
配置下 Spring boot 的监控细节
# springboot中暴露健康检查等断点接口
management:
  endpoints:
    web:
      exposure:
        include: "*"
  # 暴露健康接口的细节
  endpoint:
    health:
      show-details: always
配置下 hysterix 的熔断与恢复信息
		    // 统计时间窗口定义
                    @HystrixProperty(name = "metrics.rollingStats.timeInMilliseconds",value = "8000"),
                    // 统计时间窗口内的最小请求数
                    @HystrixProperty(name = "circuitBreaker.requestVolumeThreshold",value = "2"),
                    // 统计时间窗口内的错误数量百分比阈值
                    @HystrixProperty(name = "circuitBreaker.errorThresholdPercentage",value = "50"),
                    // 自我修复时的活动窗口长度
                    @HystrixProperty(name = "circuitBreaker.sleepWindowInMilliseconds",value = "3000")
 /**
     * 提供者模拟处理超时,调用方法添加Hystrix控制,添加熔断和服务回退
     * @param userId
     * @return
     */
    @HystrixCommand(
            // 线程池标识,要保持唯一,不唯一的话就共用了
            threadPoolKey = "findResumeOpenStateTimeoutFallback",
            // 线程池细节属性配置
            threadPoolProperties = {
                    @HystrixProperty(name="coreSize",value = "2"), // 线程数
                    @HystrixProperty(name="maxQueueSize",value="20") // 等待队列长度
            },
            commandProperties = {
                    // 每一个属性都是一个HystrixProperty,2s熔断
                    @HystrixProperty(name="execution.isolation.thread.timeoutInMilliseconds",value="2000"),
                    // hystrix高级配置,定制工作过程细节

                    // 统计时间窗口定义
                    @HystrixProperty(name = "metrics.rollingStats.timeInMilliseconds",value = "8000"),
                    // 统计时间窗口内的最小请求数
                    @HystrixProperty(name = "circuitBreaker.requestVolumeThreshold",value = "2"),
                    // 统计时间窗口内的错误数量百分比阈值
                    @HystrixProperty(name = "circuitBreaker.errorThresholdPercentage",value = "50"),
                    // 自我修复时的活动窗口长度
                    @HystrixProperty(name = "circuitBreaker.sleepWindowInMilliseconds",value = "3000")


            },fallbackMethod = "fallbackMethod")//回退方法
    @GetMapping("/checkStateTimeoutFallback/{userId}")
    public Integer findResumeOpenStateTimeoutFallback(@PathVariable Long userId) {
        // 使用ribbon不需要我们自己获取服务实例然后选择一个那么去访问了(自己的负载均衡)
        String url = "http://lane-service-resume/resume/openstate/" + userId;  // 指定服务名
        Integer forObject = restTemplate.getForObject(url, Integer.class);
        return forObject;
    }
再次使用 postman 调用 5 轮来观察 hystrix 的调用状态
初始状态
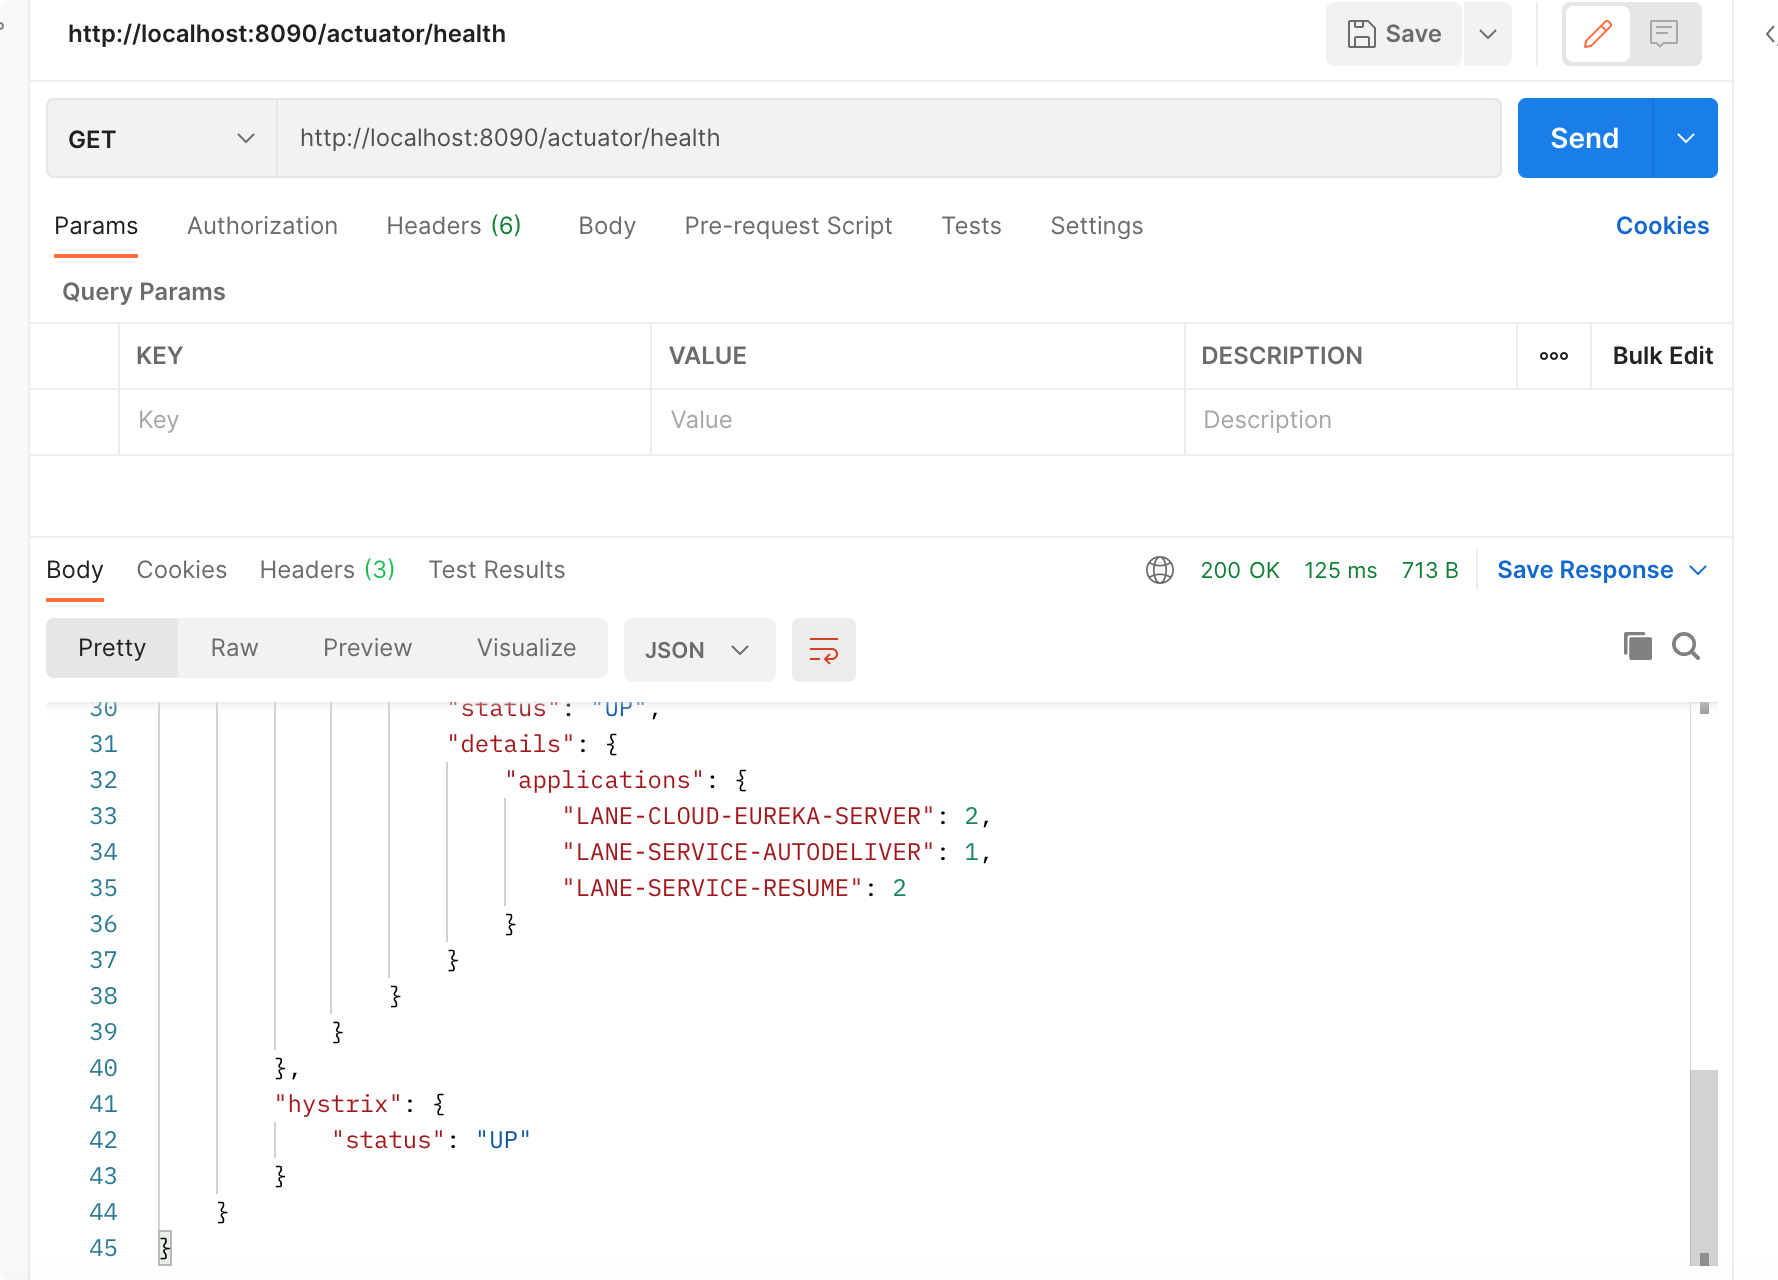
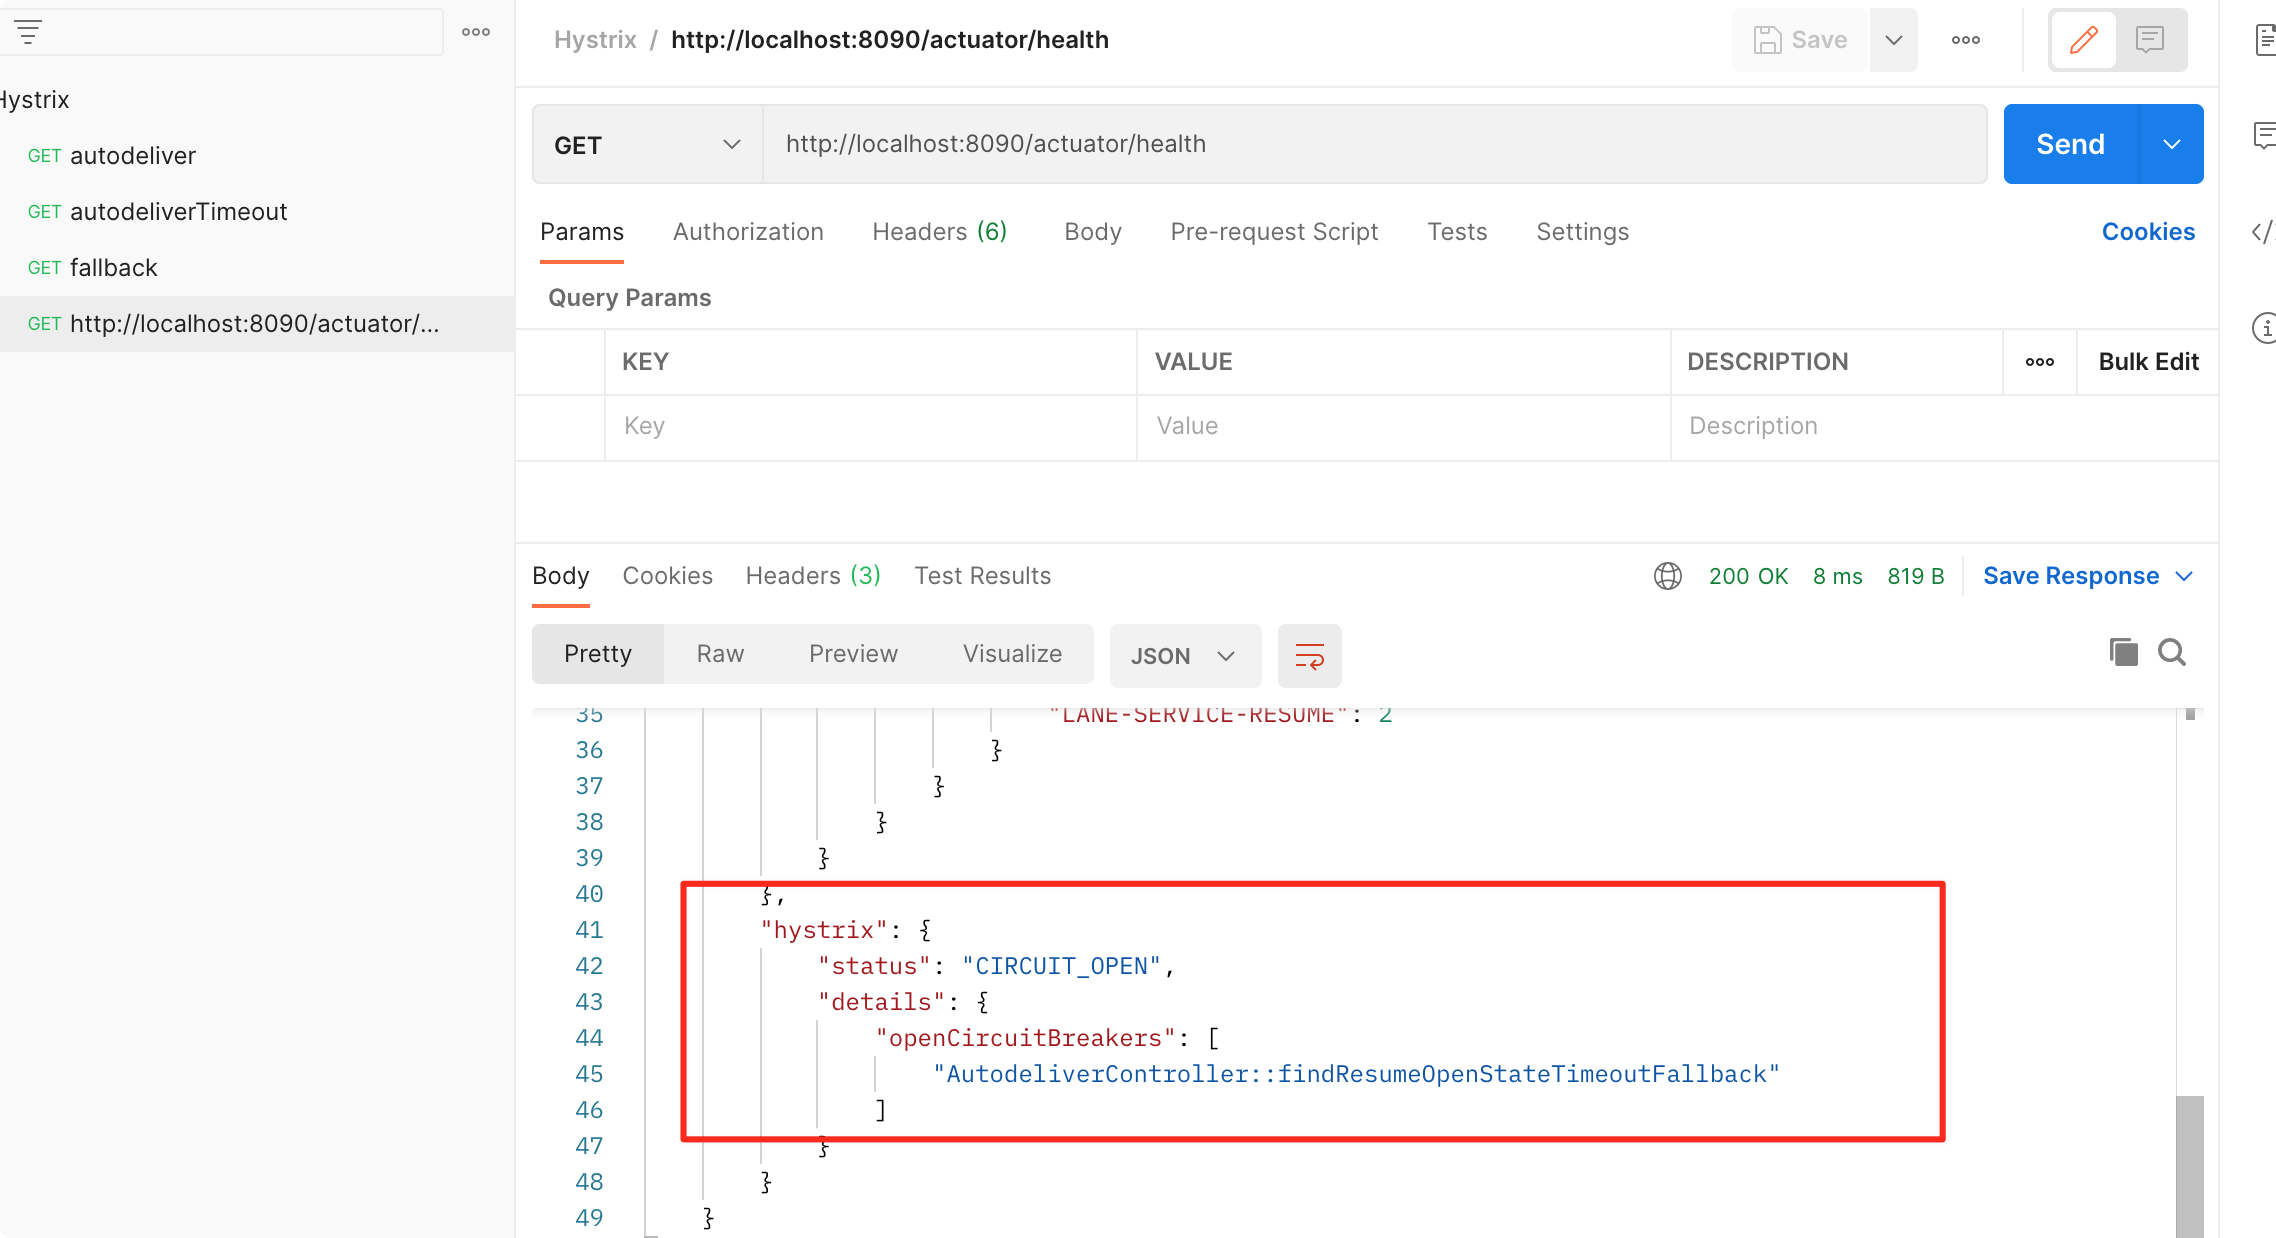
中间发现熔断
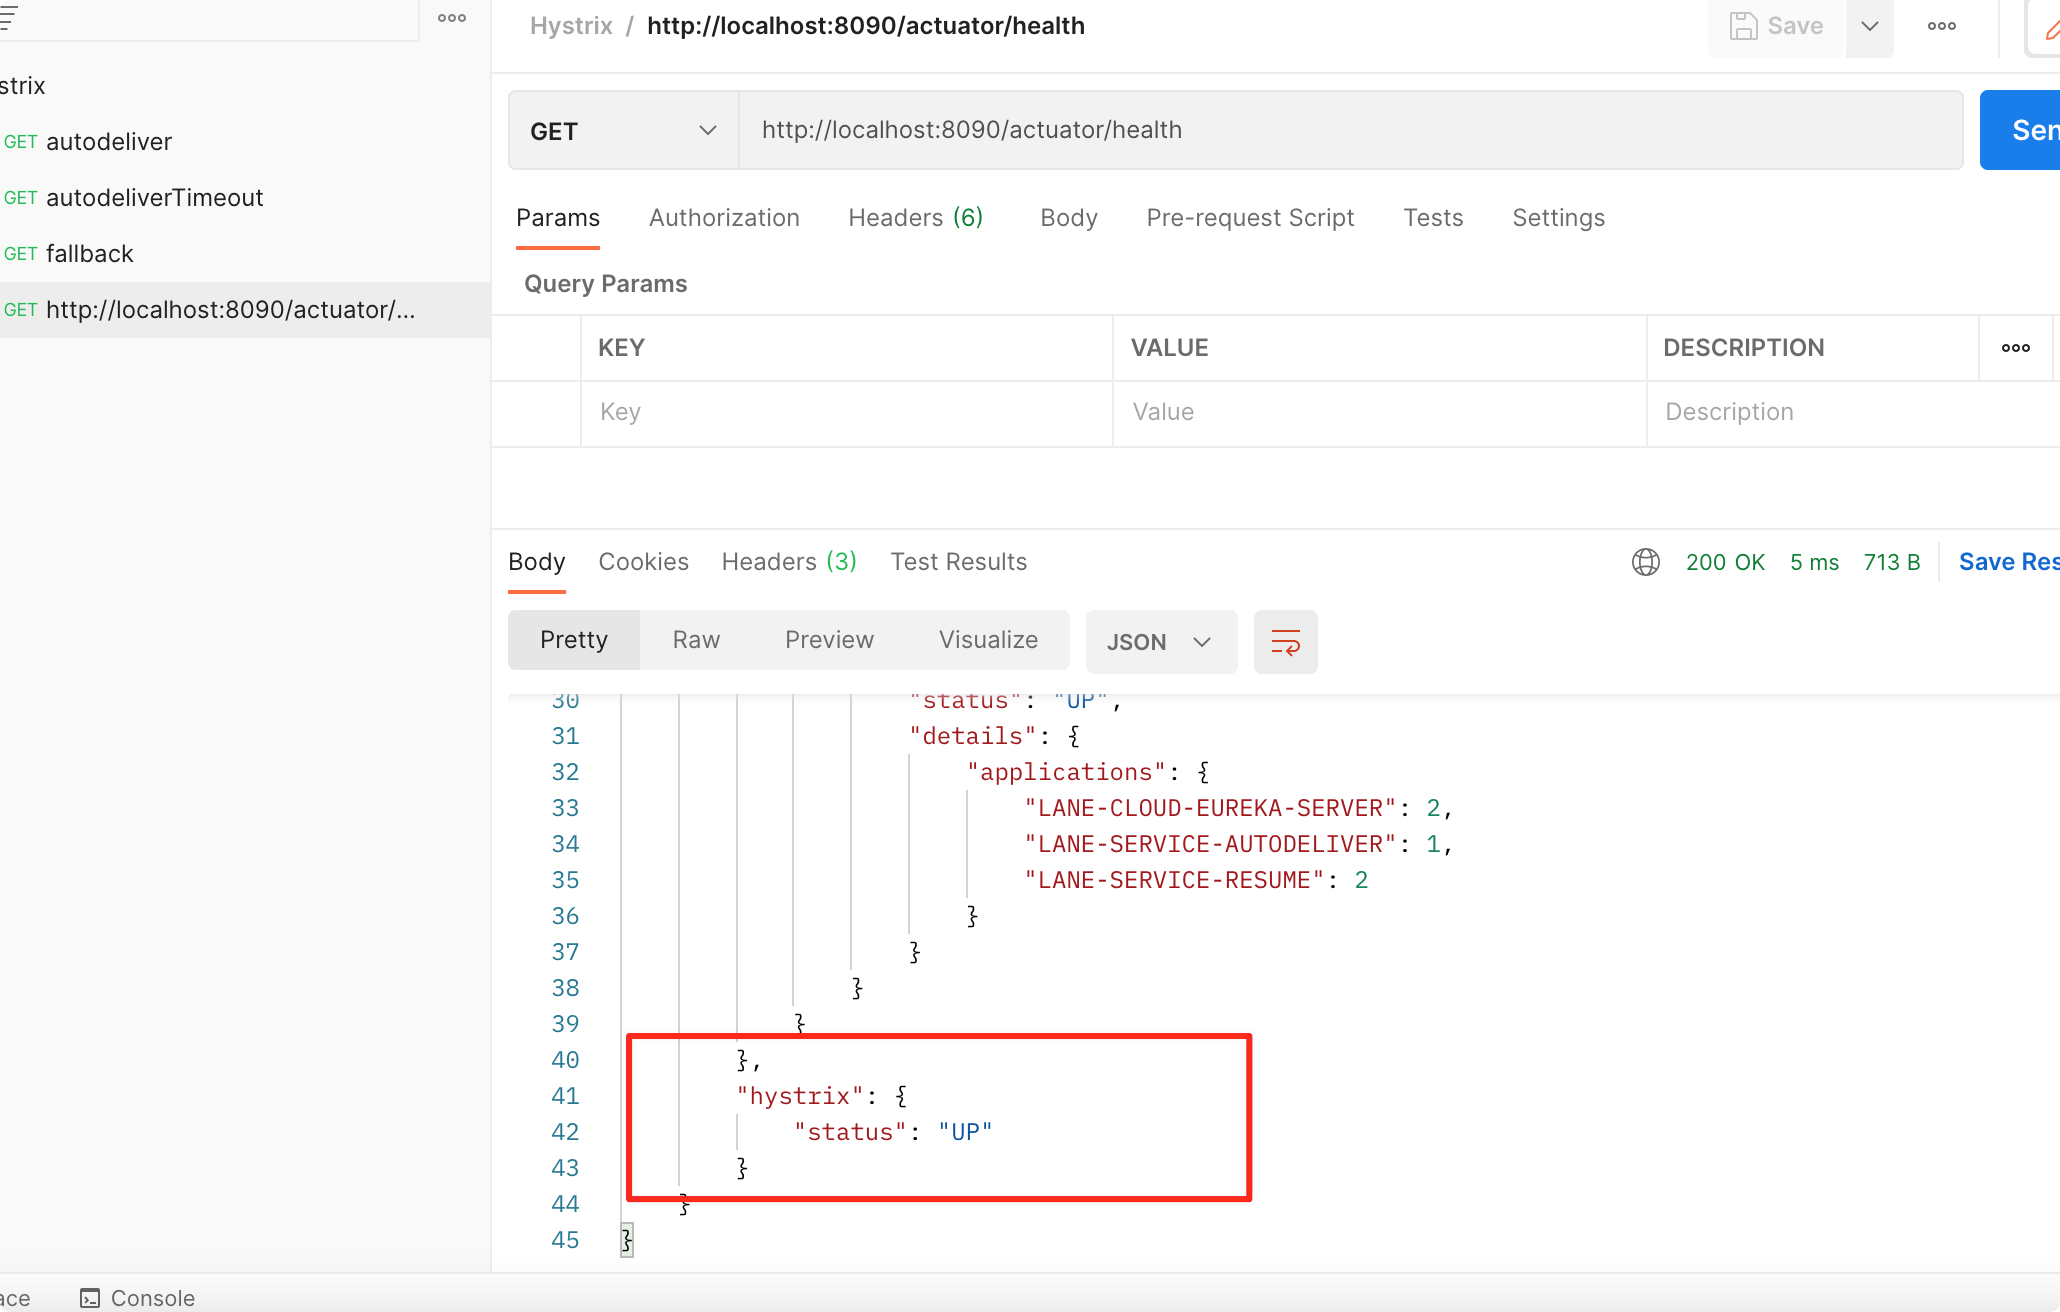
最后
注意
可以在类上使⽤@DefaultProperties 注解统⼀指定整个类中共⽤的降级方法
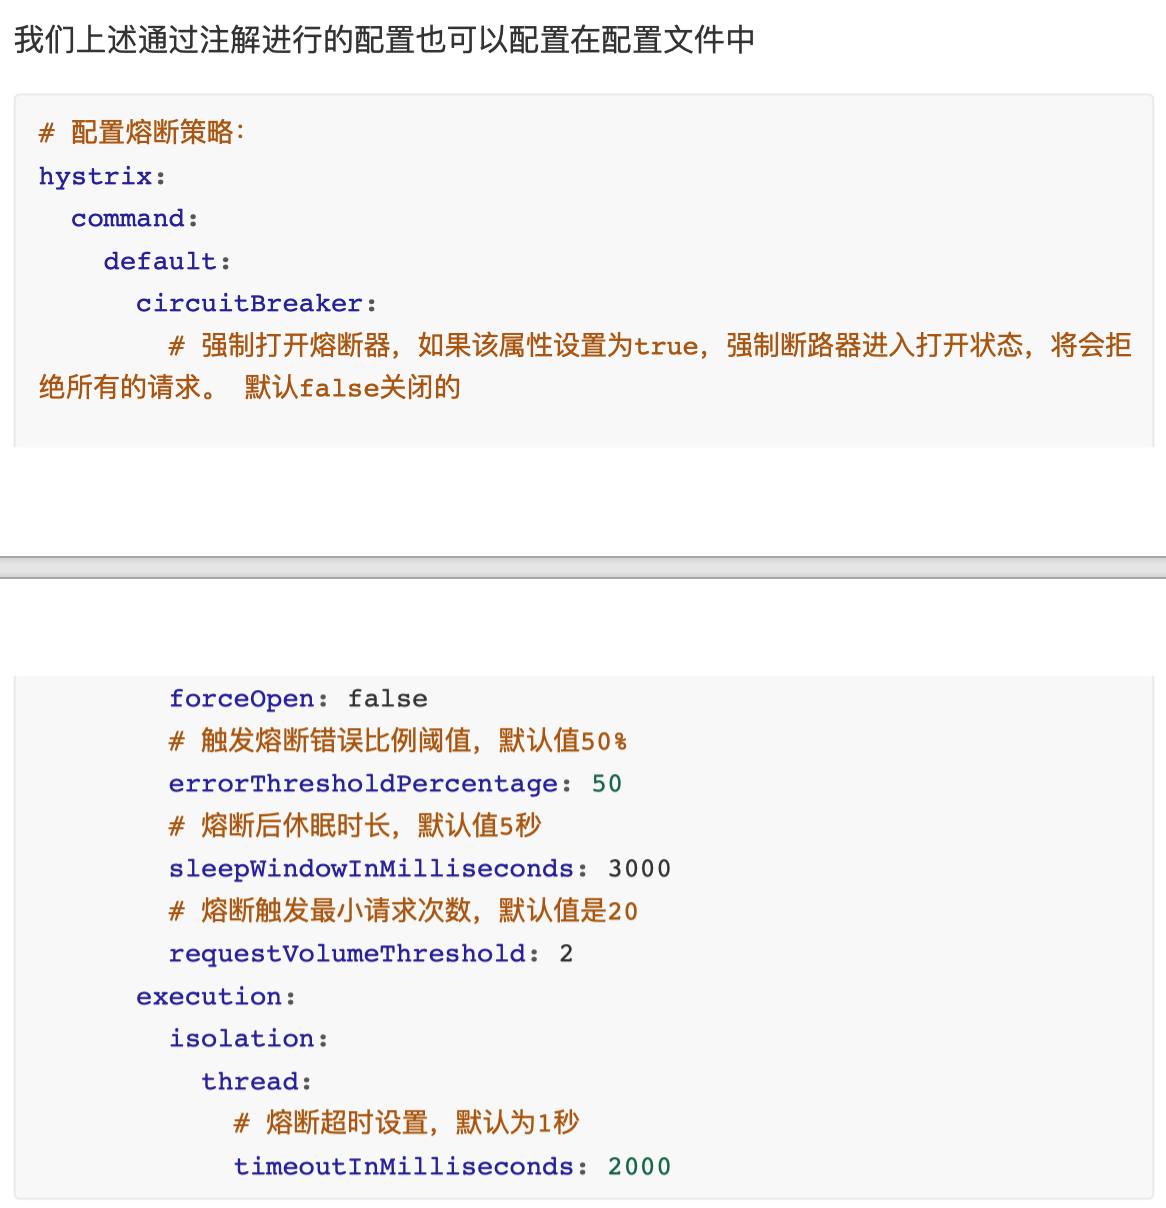
可以在配置文件进行全局配置如下熔断信息,优先级低于注解
# 配置熔断策略:
hystrix:
 command:
 default:
 circuitBreaker:
# 强制打开熔断器,如果该属性设置为true,强制断路器进⼊打开状态,将会拒
绝所有的请求。 默认false关闭的
 forceOpen: false
# 触发熔断错误⽐例阈值,默认值50%
 errorThresholdPercentage: 50
# 熔断后休眠时⻓,默认值5秒
 sleepWindowInMilliseconds: 3000
# 熔断触发最⼩请求次数,默认值是20
 requestVolumeThreshold: 2
 execution:
 isolation:
 thread:
# 熔断超时设置,默认为1秒
 timeoutInMilliseconds: 2000
3.7 Hystrix Dashboard 断路监控仪表盘
正常状态是 UP,跳闸是⼀种状态 CIRCUIT_OPEN,可以通过/health 查看,前提是⼯ 程中需要引⼊ SpringBoot 的 actuator(健康监控),它提供了很多监控所需的接 ⼝,可以对应⽤系统进⾏配置查看、相关功能统计等。
该监控依赖已经统⼀添加在⽗⼯程中
<dependency> <groupId>org.springframework.boot</groupId> <artifactId>spring-boot-starter-actuator</artifactId> </dependency>
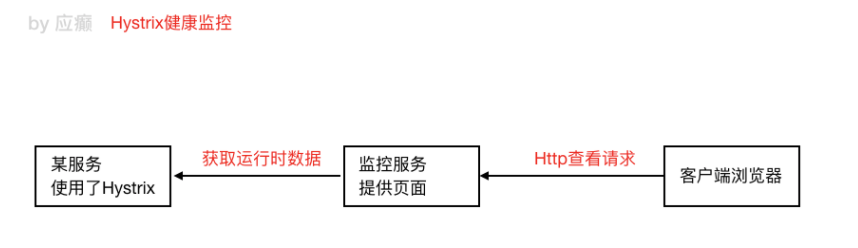
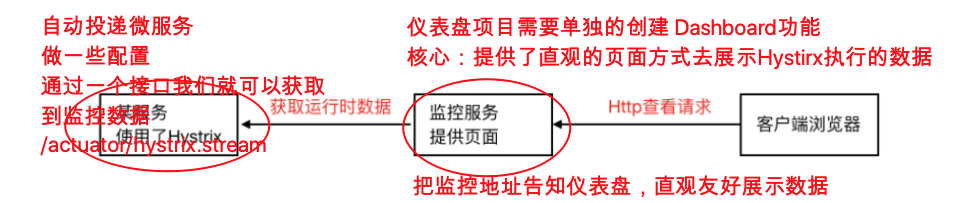
如果我们想看到 Hystrix 相关数据,⽐如有多少请求、多少成功、多少失败、多少降 级等,那么引⼊ SpringBoot 健康监控之后,访问/actuator/hystrix.stream 接⼝可以 获取到监控的⽂字信息,但是不直观,所以 Hystrix 官⽅还提供了基于图形化的 DashBoard(仪表板)监控平 台。Hystrix 仪表板可以显示每个断路器(被 @HystrixCommand 注解的⽅法)的状态。
1)新建⼀个监控服务⼯程,导⼊依赖
<?xml version="1.0" encoding="UTF-8"?>
<project xmlns="http://maven.apache.org/POM/4.0.0"
         xmlns:xsi="http://www.w3.org/2001/XMLSchema-instance"
         xsi:schemaLocation="http://maven.apache.org/POM/4.0.0 http://maven.apache.org/xsd/maven-4.0.0.xsd">
    <parent>
        <artifactId>lane-parent-project</artifactId>
        <groupId>com.galaxy</groupId>
        <version>1.0-SNAPSHOT</version>
    </parent>
    <modelVersion>4.0.0</modelVersion>

    <artifactId>lane-cloud-hystrix-dashboard-9000</artifactId>


    <dependencies>
        <!--hystrix-->
        <dependency>
            <groupId>org.springframework.cloud</groupId>
            <artifactId>spring-cloud-starter-netflix-hystrix</artifactId>
        </dependency>
        <!--hystrix 仪表盘-->
        <dependency>
            <groupId>org.springframework.cloud</groupId>
            <artifactId>spring-cloud-starter-netflix-hystrix-dashboard</artifactId>
        </dependency>
        <dependency>
            <groupId>org.springframework.cloud</groupId>
            <artifactId>spring-cloud-starter-netflix-eureka-client</artifactId>
        </dependency>
    </dependencies>
</project>
2)启动类添加@EnableHystrixDashboard 激活仪表盘
package com.galaxy;

import org.springframework.boot.SpringApplication;
import org.springframework.boot.autoconfigure.SpringBootApplication;
import org.springframework.cloud.client.discovery.EnableDiscoveryClient;
import org.springframework.cloud.netflix.hystrix.dashboard.EnableHystrixDashboard;

/**
 * @author lane
 * @date 2021年06月24日 下午2:38
 */
@SpringBootApplication
@EnableDiscoveryClient
@EnableHystrixDashboard
public class HystrixDashboard900 {
    public static void main(String[] args) {
        SpringApplication.run(HystrixDashboard900.class,args);
    }
}
- application.yml
server:
  port: 9000
Spring:
  application:
    name: lane-cloud-hystrix-dashboard
eureka:
  client:
    serviceUrl: # eureka server的路径
      defaultZone:  http://www.abc.com:8761/eureka/ ,http://www.def.com:8762/eureka/ #把 eureka 集群中的所有 url 都填写了进来,也可以只写一台,因为各个 eureka server 可以同步注册表
  instance:
    #使用ip注册,否则会使用主机名注册了(此处考虑到对老版本的兼容,新版本经过实验都是ip)
    prefer-ip-address: true
    #自定义实例显示格式,加上版本号,便于多版本管理,注意是ip-address,早期版本是ipAddress
    instance-id: ${spring.cloud.client.ip-address}:${spring.application.name}:${server.port}:@project.version@
4)在被监测的微服务中注册监控 servlet(⾃动投递微服务,监控数据就是来⾃于这 个微服务)我们是在 autodeliver 这个微服务的启动类添加如下进行监控
    /**
     * 在被监控的微服务中注册一个serlvet,后期我们就是通过访问这个servlet来获取该服务的Hystrix监控数据的
     * 前提:被监控的微服务需要引入springboot的actuator功能
     * @return
     */
    @Bean
    public ServletRegistrationBean getServlet(){
        HystrixMetricsStreamServlet streamServlet = new HystrixMetricsStreamServlet();
        ServletRegistrationBean registrationBean = new ServletRegistrationBean(streamServlet);
        registrationBean.setLoadOnStartup(1);
        registrationBean.addUrlMappings("/actuator/hystrix.stream");
        registrationBean.setName("HystrixMetricsStreamServlet");
        return registrationBean;
    }
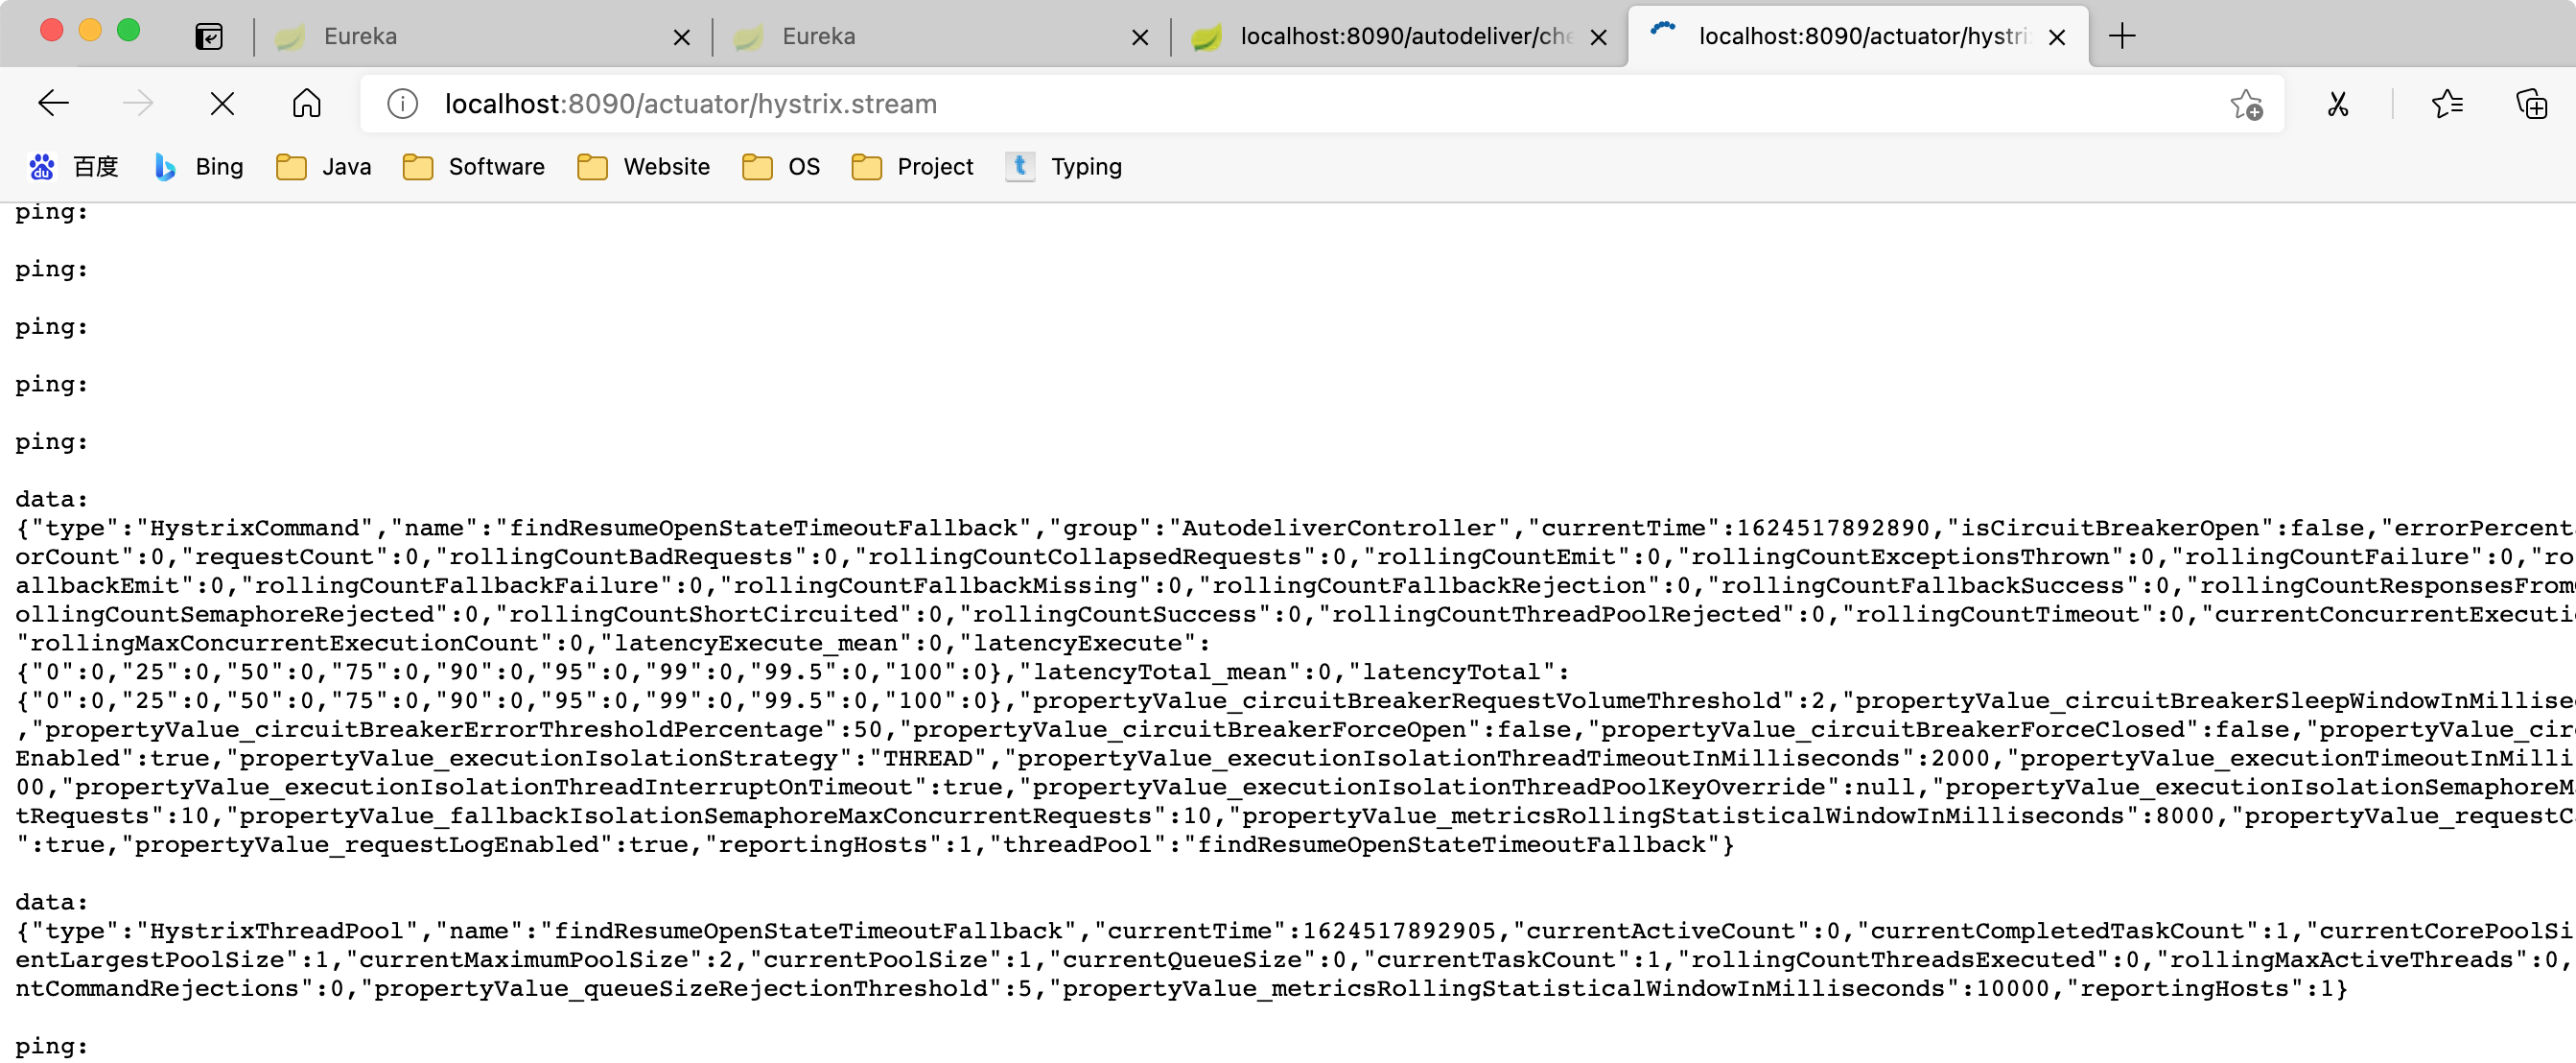
被监控微服务发布之后,可以直接访问监控 servlet,但是得到的数据并不直观,后 期可以结合仪表盘更友好的展示
访问地址 localhost:8090/actuator/hystrix.stream 看下不使用仪表盘的效果
5)启动 dashboard 项目访问测试 http://localhost:9000/hystrix
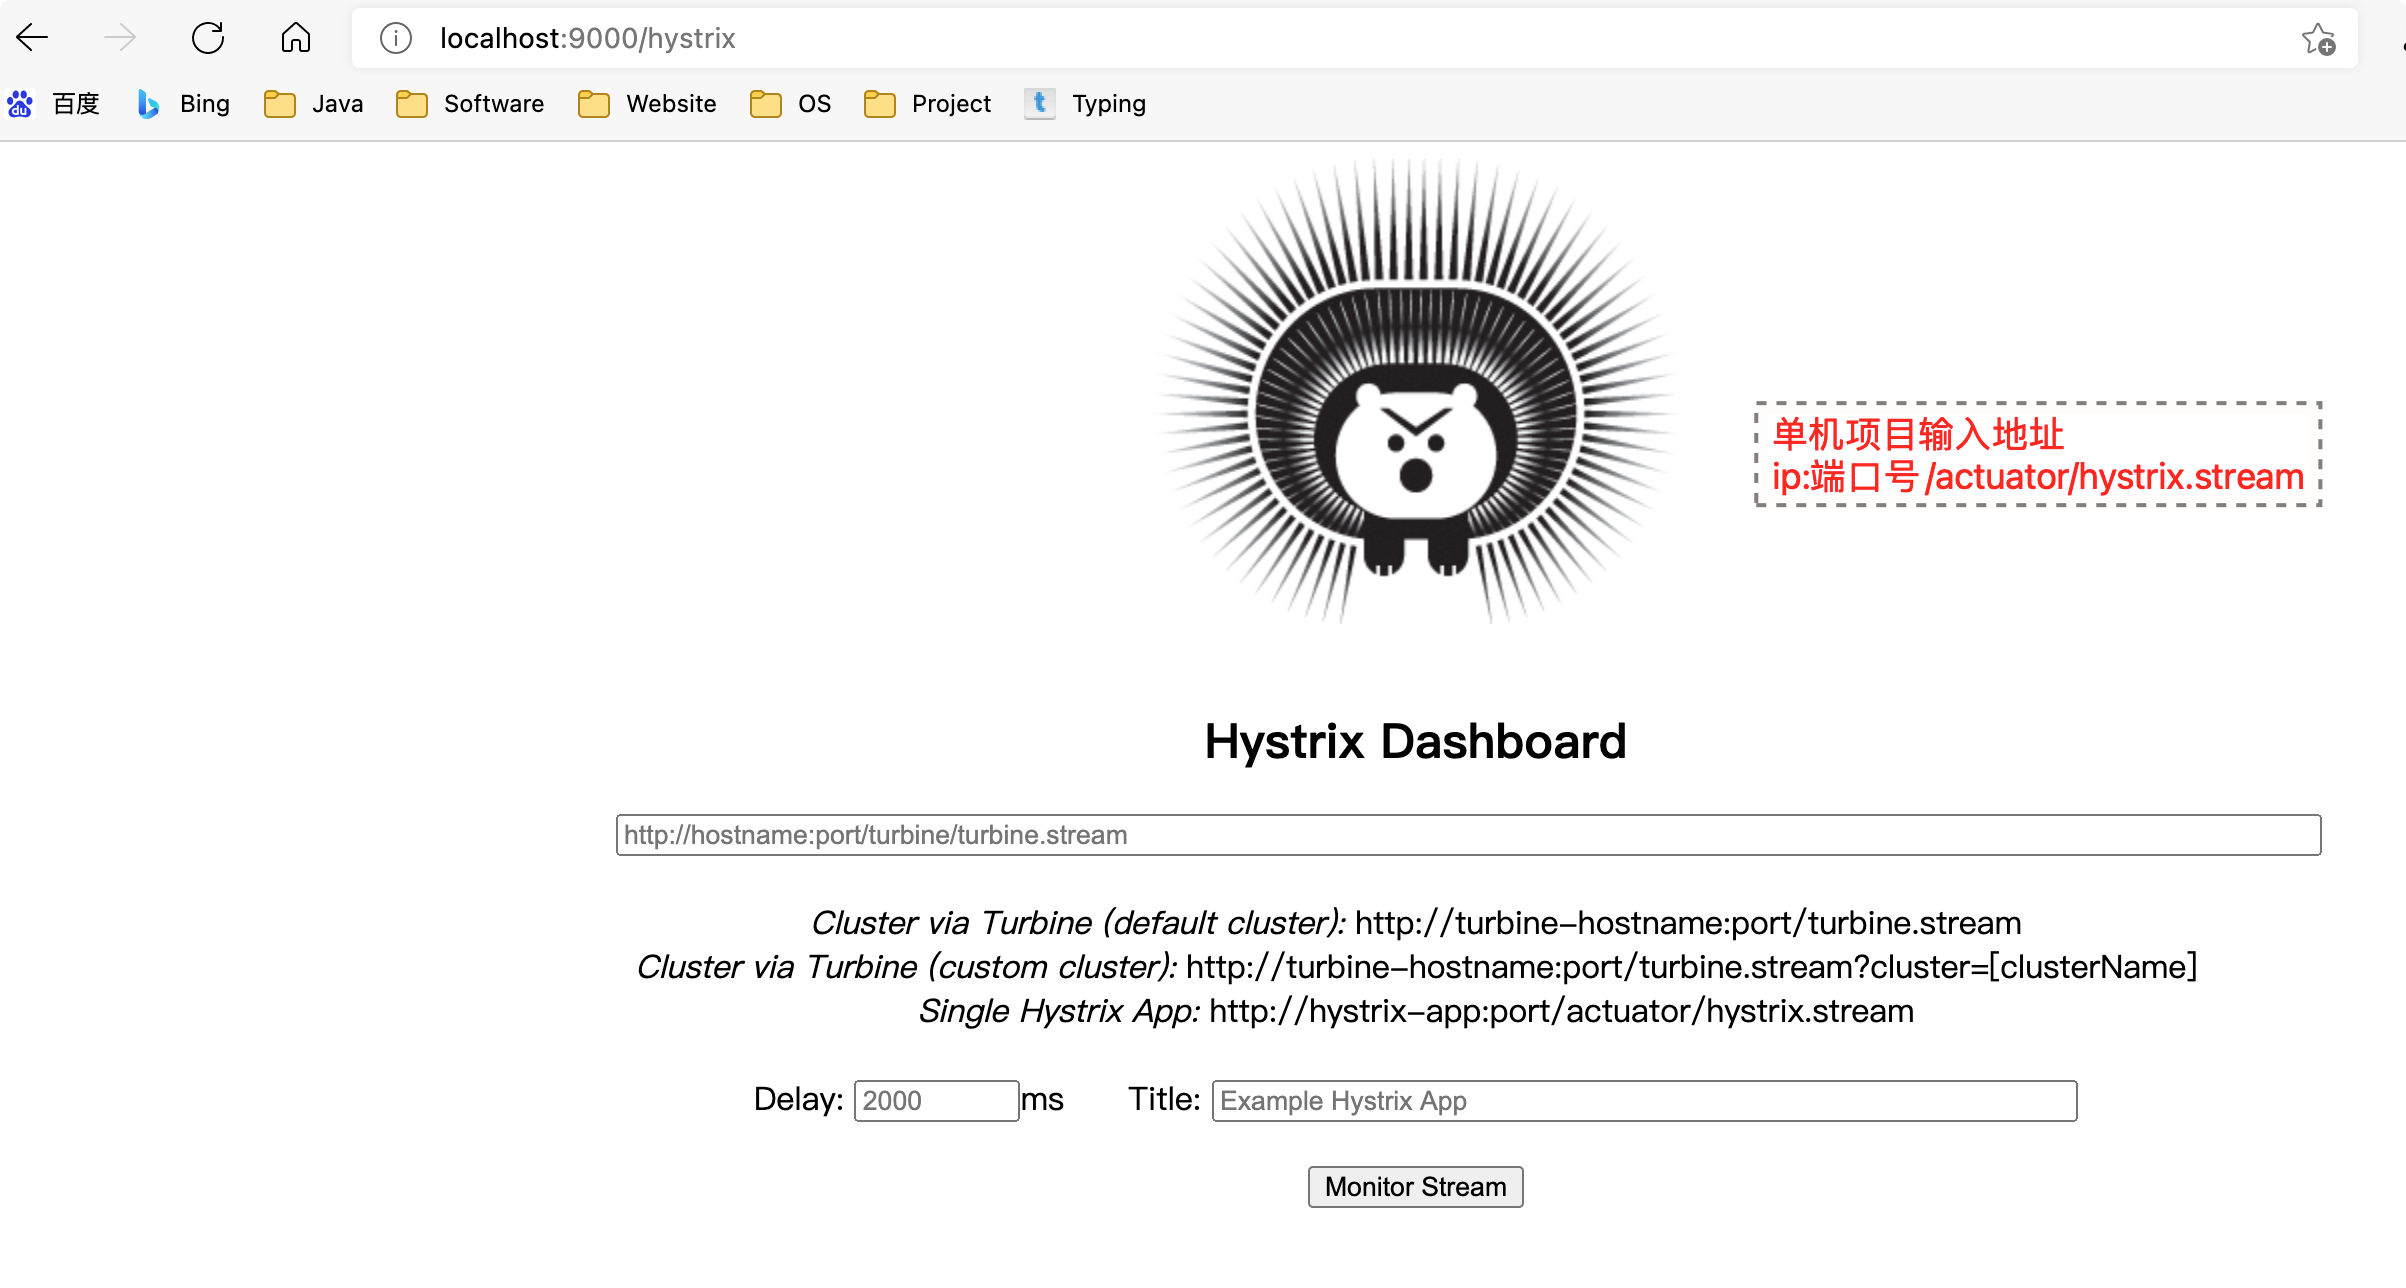
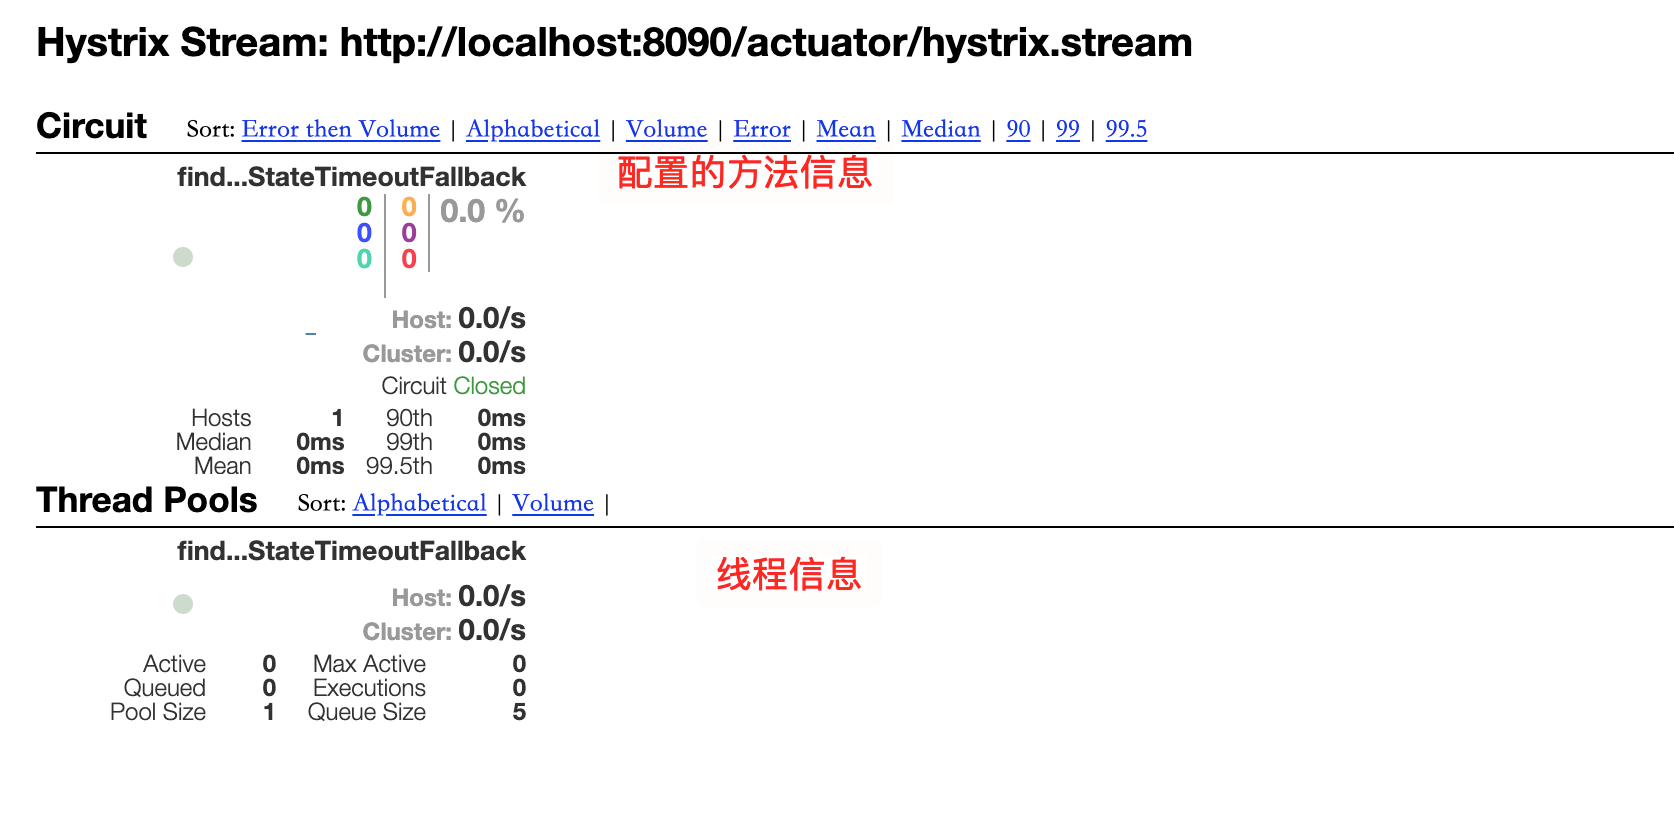
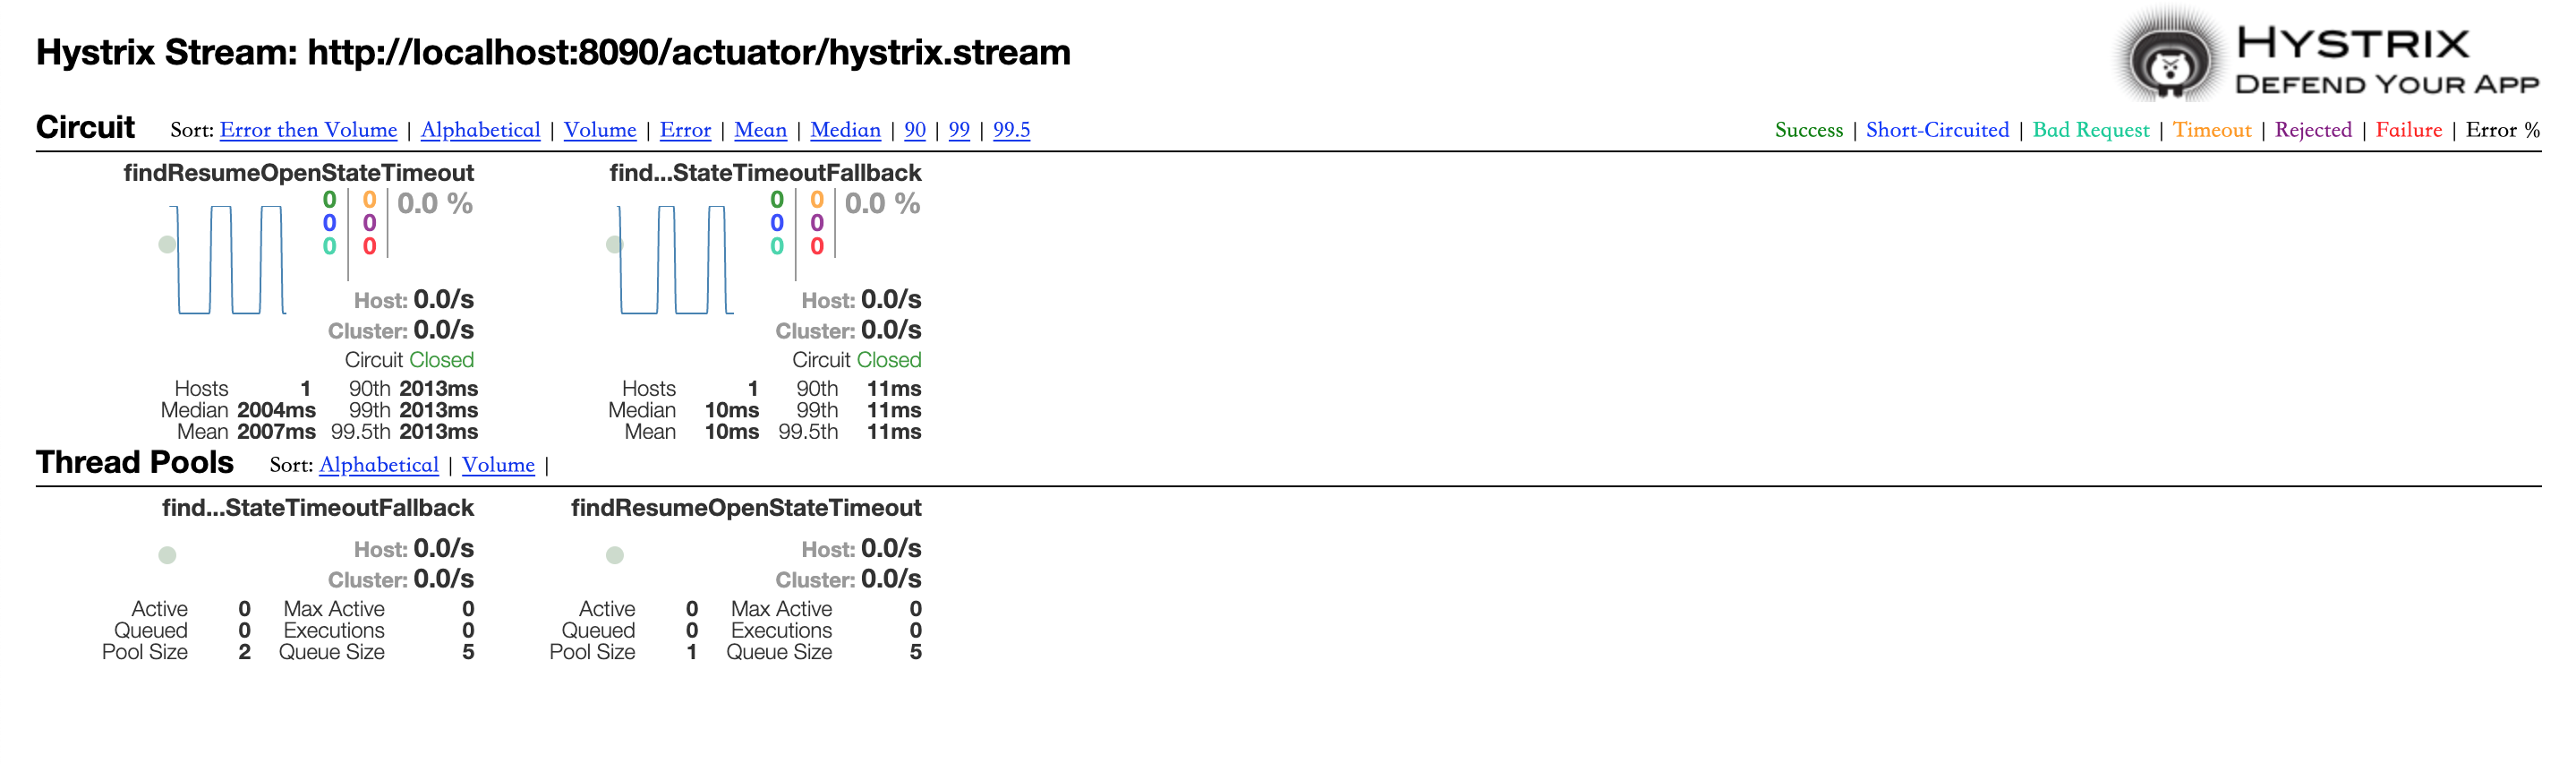
输⼊监控的微服务端点地址,并进行 postman 测试 5 次,展示监控的详细数据,⽐如监控服务消费者 http://localhost:8090/actuator/hystrix.stream
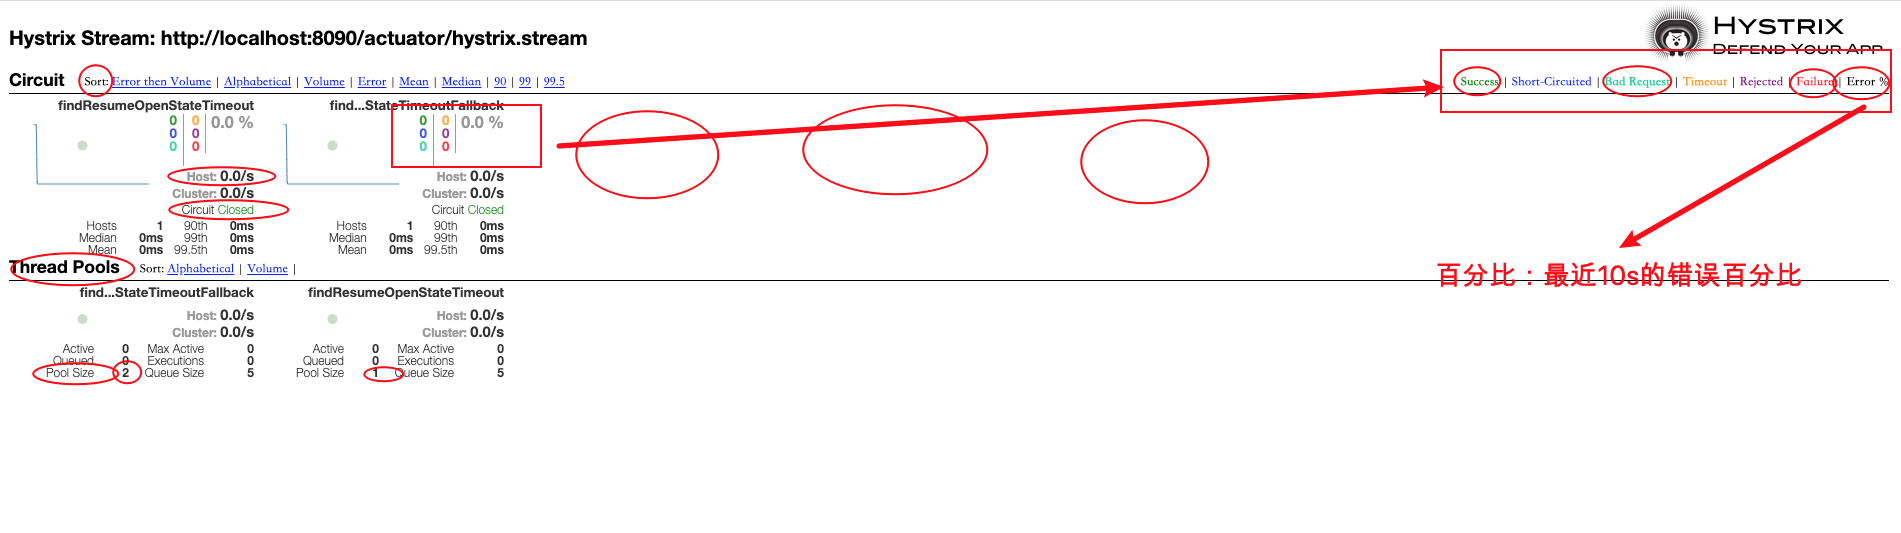
百分⽐,10s 内错误请求百分⽐
实⼼圆:
⼤⼩:代表请求流量的⼤⼩,流量越⼤球越⼤
颜⾊:代表请求处理的健康状态,从绿⾊到红⾊递减,绿⾊代表健康,红⾊就代 表很不健康
曲线波动图:
记录了 2 分钟内该⽅法上流量的变化波动图,判断流量上升或者下降的趋势
3.8 Hystrix Turbine 聚合监控
之前,我们针对的是⼀个微服务实例的 Hystrix 数据查询分析,在微服务架构下,⼀ 个微服务的实例往往是多个(集群化)
⽐如⾃动投递微服务
实例 1(hystrix) ip1:port1/actuator/hystrix.stream
实例 2(hystrix) ip2:port2/actuator/hystrix.stream
实例 3(hystrix) ip3:port3/actuator/hystrix.stream
按照已有的⽅法,我们就可以结合 dashboard 仪表盘每次输⼊⼀个监控数据流 url, 进去查看⼿⼯操作能否被⾃动功能替代?Hystrix Turbine 聚合(聚合各个实例上的 hystrix 监 控数据)监控 Turbine(涡轮)
思考:微服务架构下,⼀个微服务往往部署多个实例,如果每次只能查看单个实例 的监控,就需要经常切换很不⽅便,在这样的场景下,我们可以使⽤ Hystrix Turbine 进⾏聚合监控,它可以把相关微服务的监控数据聚合在⼀起,便于查看。
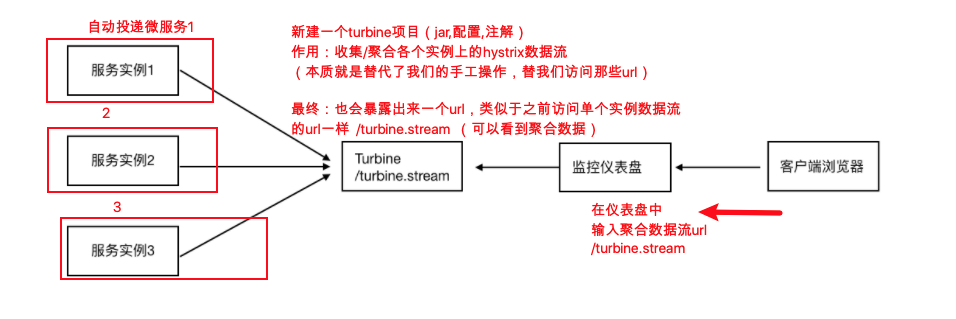
Turbine 服务搭建
1)新建项⽬ lagou-cloud-hystrix-turbine-9001,引⼊依赖坐标
<?xml version="1.0" encoding="UTF-8"?>
<project xmlns="http://maven.apache.org/POM/4.0.0"
         xmlns:xsi="http://www.w3.org/2001/XMLSchema-instance"
         xsi:schemaLocation="http://maven.apache.org/POM/4.0.0 http://maven.apache.org/xsd/maven-4.0.0.xsd">
    <parent>
        <artifactId>lane-parent-project</artifactId>
        <groupId>com.galaxy</groupId>
        <version>1.0-SNAPSHOT</version>
    </parent>
    <modelVersion>4.0.0</modelVersion>

    <artifactId>lane-cloud-hystrix-turbine-9001</artifactId>


    <dependencies>
        <!--hystrix turbine聚合监控-->
        <dependency>
            <groupId>org.springframework.cloud</groupId>
            <artifactId>spring-cloud-starter-netflix-turbine</artifactId>
        </dependency>

        <!--
            引入eureka客户端的两个原因
            1、老师说过,微服务架构下的服务都尽量注册到服务中心去,便于统一管理
            2、后续在当前turbine项目中我们需要配置turbine聚合的服务,比如,我们希望聚合
               lane-service-autodeliver这个服务的各个实例的hystrix数据流,那随后
               我们就需要在application.yml文件中配置这个服务名,那么turbine获取服务下具体实例的数据流的
               时候需要ip和端口等实例信息,那么怎么根据服务名称获取到这些信息呢?
                  当然可以从eureka服务注册中心获取
        -->
        <dependency>
            <groupId>org.springframework.cloud</groupId>
            <artifactId>spring-cloud-starter-netflix-eureka-client</artifactId>
        </dependency>

    </dependencies>
</project>
2)将需要进⾏ Hystrix 监控的多个微服务配置起来,在⼯程 application.yml 中开启 Turbine 及进⾏相关配置
server:
  port: 9001
Spring:
  application:
    name: lane-cloud-hystrix-turbine
eureka:
  client:
    serviceUrl: # eureka server的路径
      defaultZone:  http://www.abc.com:8761/eureka/ ,http://www.def.com:8762/eureka/ #把 eureka 集群中的所有 url 都填写了进来,也可以只写一台,因为各个 eureka server 可以同步注册表
  instance:
    #使用ip注册,否则会使用主机名注册了(此处考虑到对老版本的兼容,新版本经过实验都是ip)
    prefer-ip-address: true
    #自定义实例显示格式,加上版本号,便于多版本管理,注意是ip-address,早期版本是ipAddress
    instance-id: ${spring.cloud.client.ip-address}:${spring.application.name}:${server.port}:@project.version@
#turbine配置
turbine:
  # appCofing配置需要聚合的服务名称,比如这里聚合自动投递微服务的hystrix监控数据
  # 如果要聚合多个微服务的监控数据,那么可以使用英文逗号拼接,比如 a,b,c
  appConfig: lane-service-autodeliver
  clusterNameExpression: "'default'"   # 集群默认名称
3)在当前项⽬启动类上添加注解@EnableTurbine,开启仪表盘以及 Turbine 聚合
package com.galaxy;

import org.springframework.boot.SpringApplication;
import org.springframework.boot.autoconfigure.SpringBootApplication;
import org.springframework.cloud.client.discovery.EnableDiscoveryClient;
import org.springframework.cloud.netflix.turbine.EnableTurbine;

/**
 * @author lane
 * @date 2021年06月24日 下午3:34
 */
@SpringBootApplication
@EnableDiscoveryClient
@EnableTurbine //开启turbine聚合
public class HystrixTurbineApplication {
    public static void main(String[] args) {

        SpringApplication.run(HystrixTurbineApplication.class,args);

    }
}
4)浏览器访问 Turbine 项⽬, http://localhost:9001/turbine.stream ,就可以看到 监控数据了

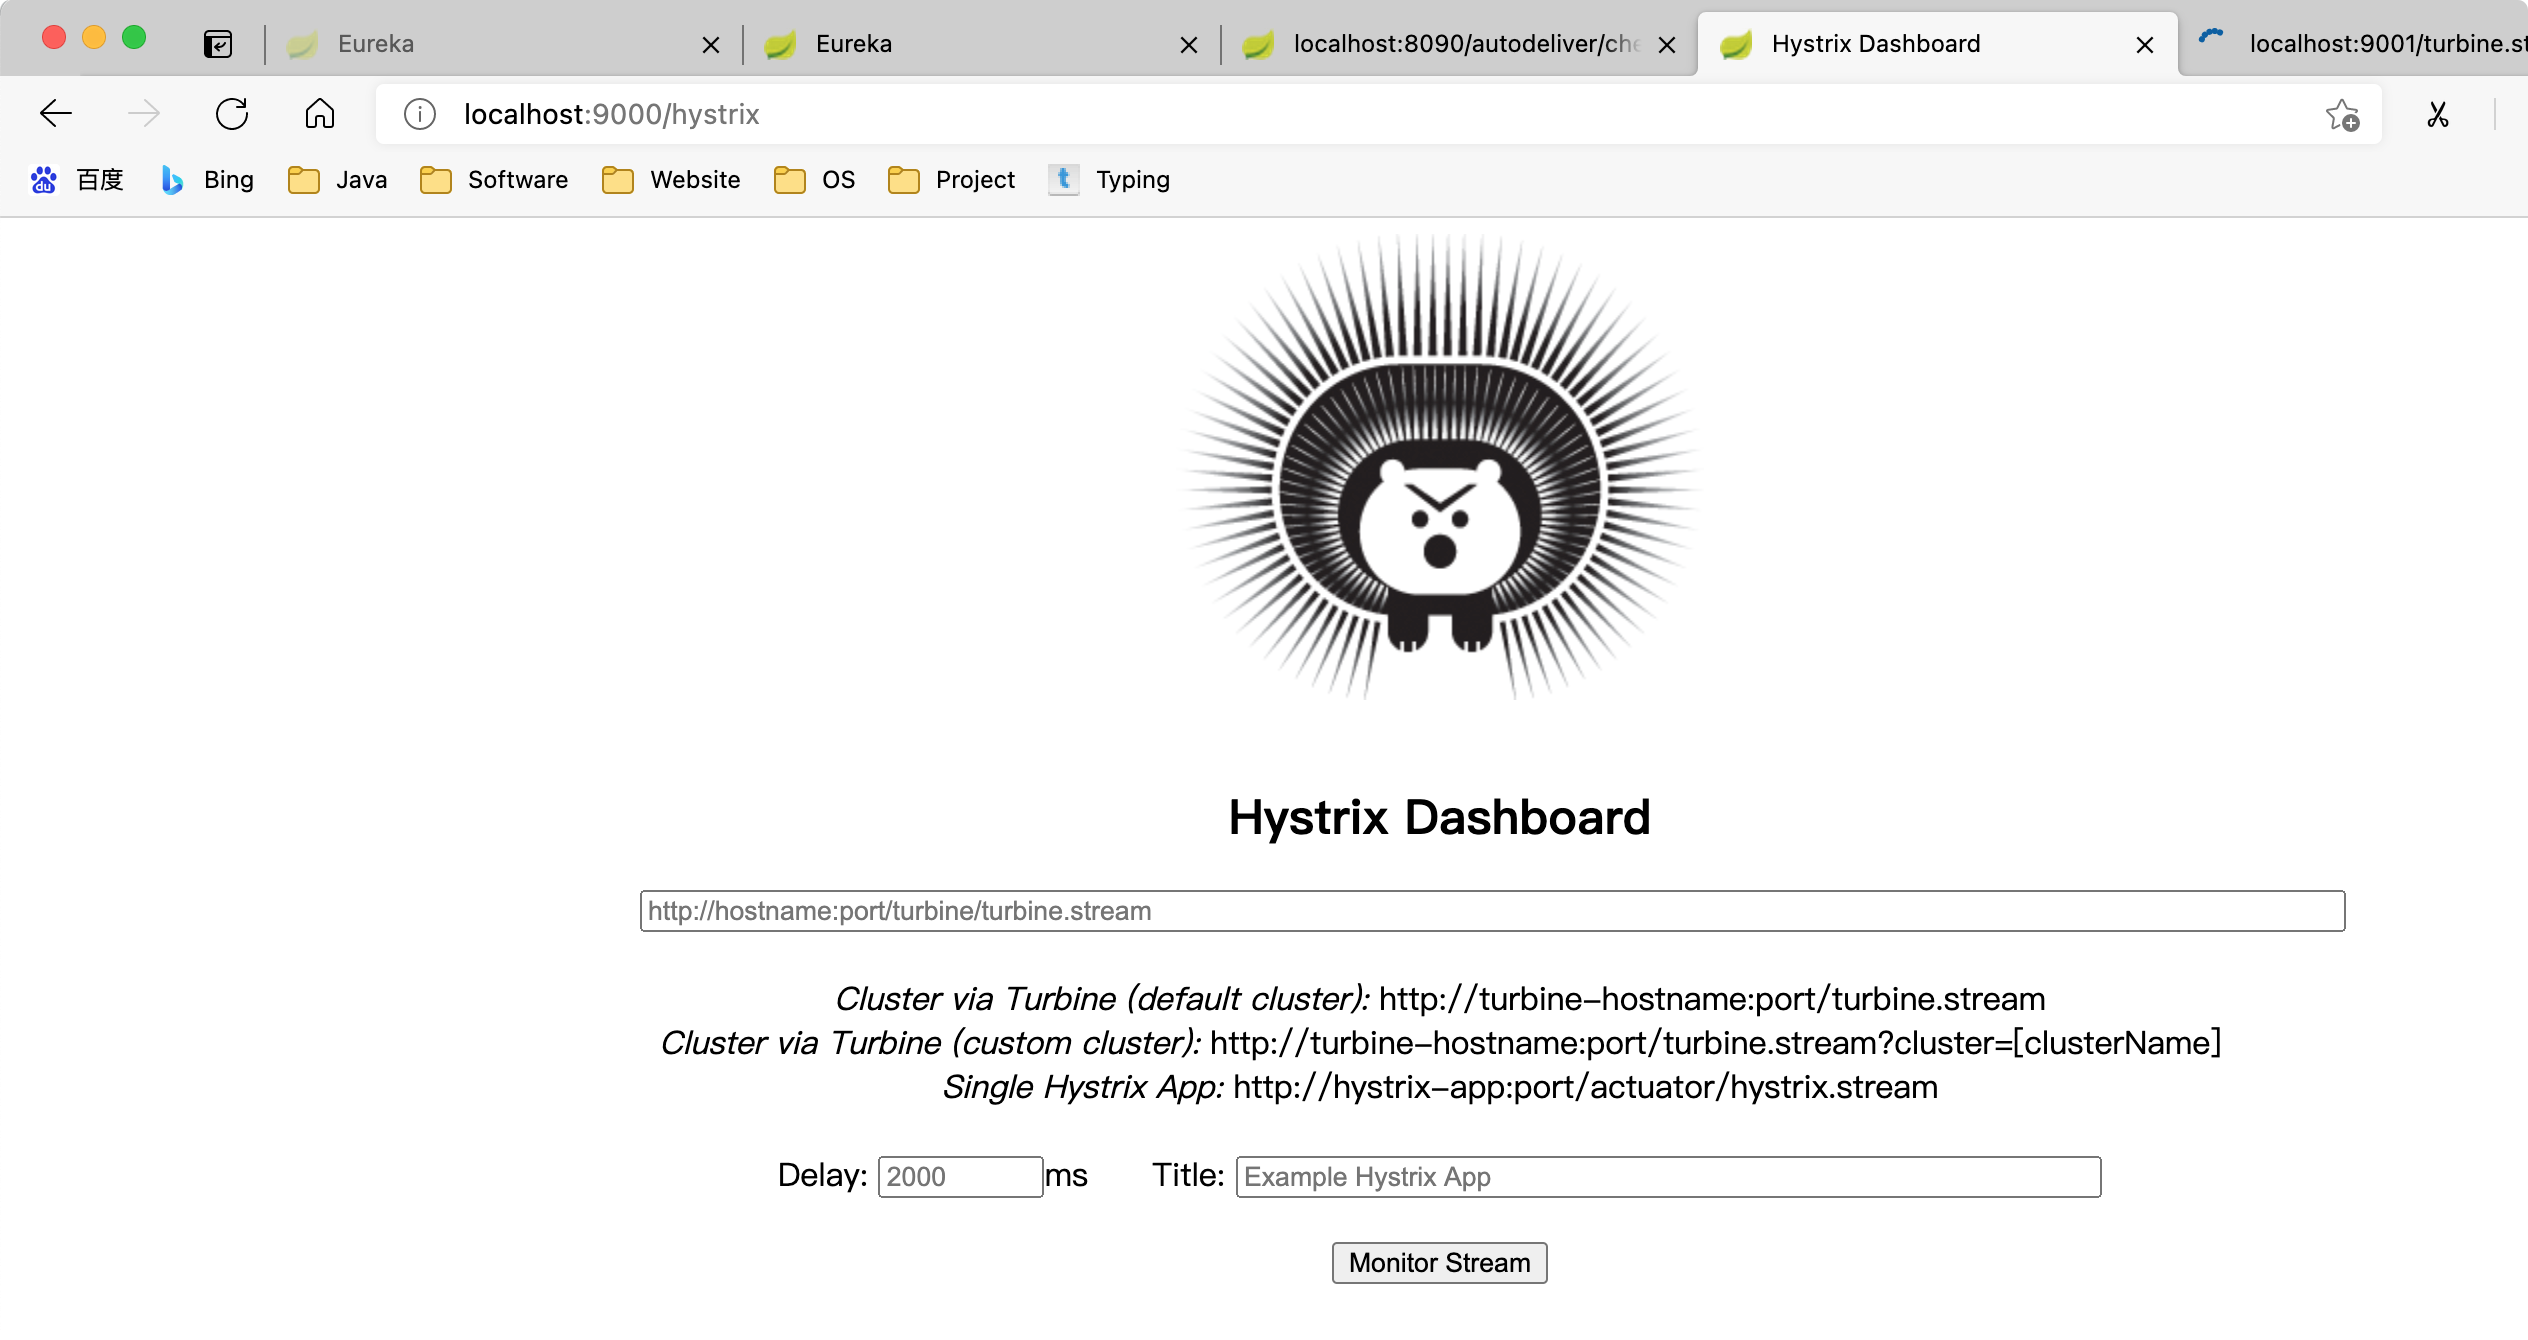
访问地址 http://localhost:9000/hystrix ,我们通过 dashboard 的⻚⾯查看数据更直观,把刚才的地址输⼊ dashboard 地址栏
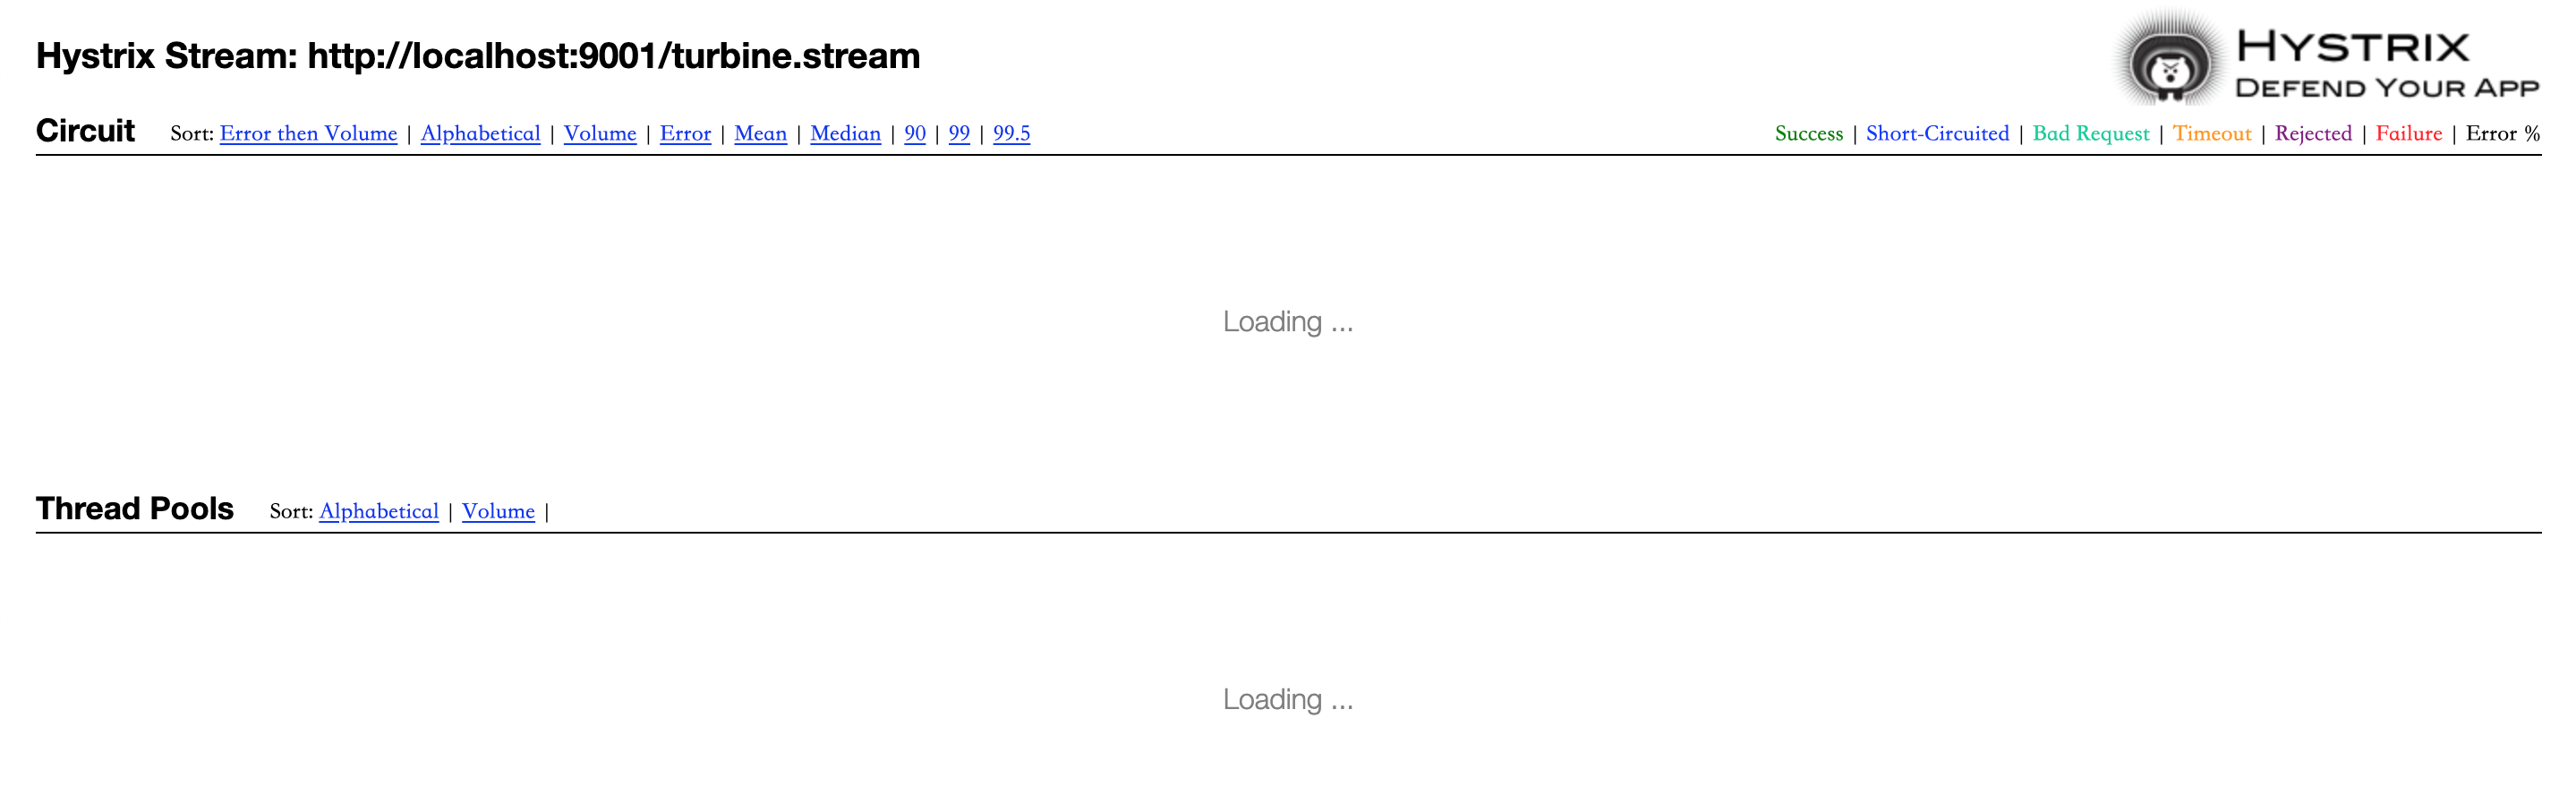
发现数据在加载中
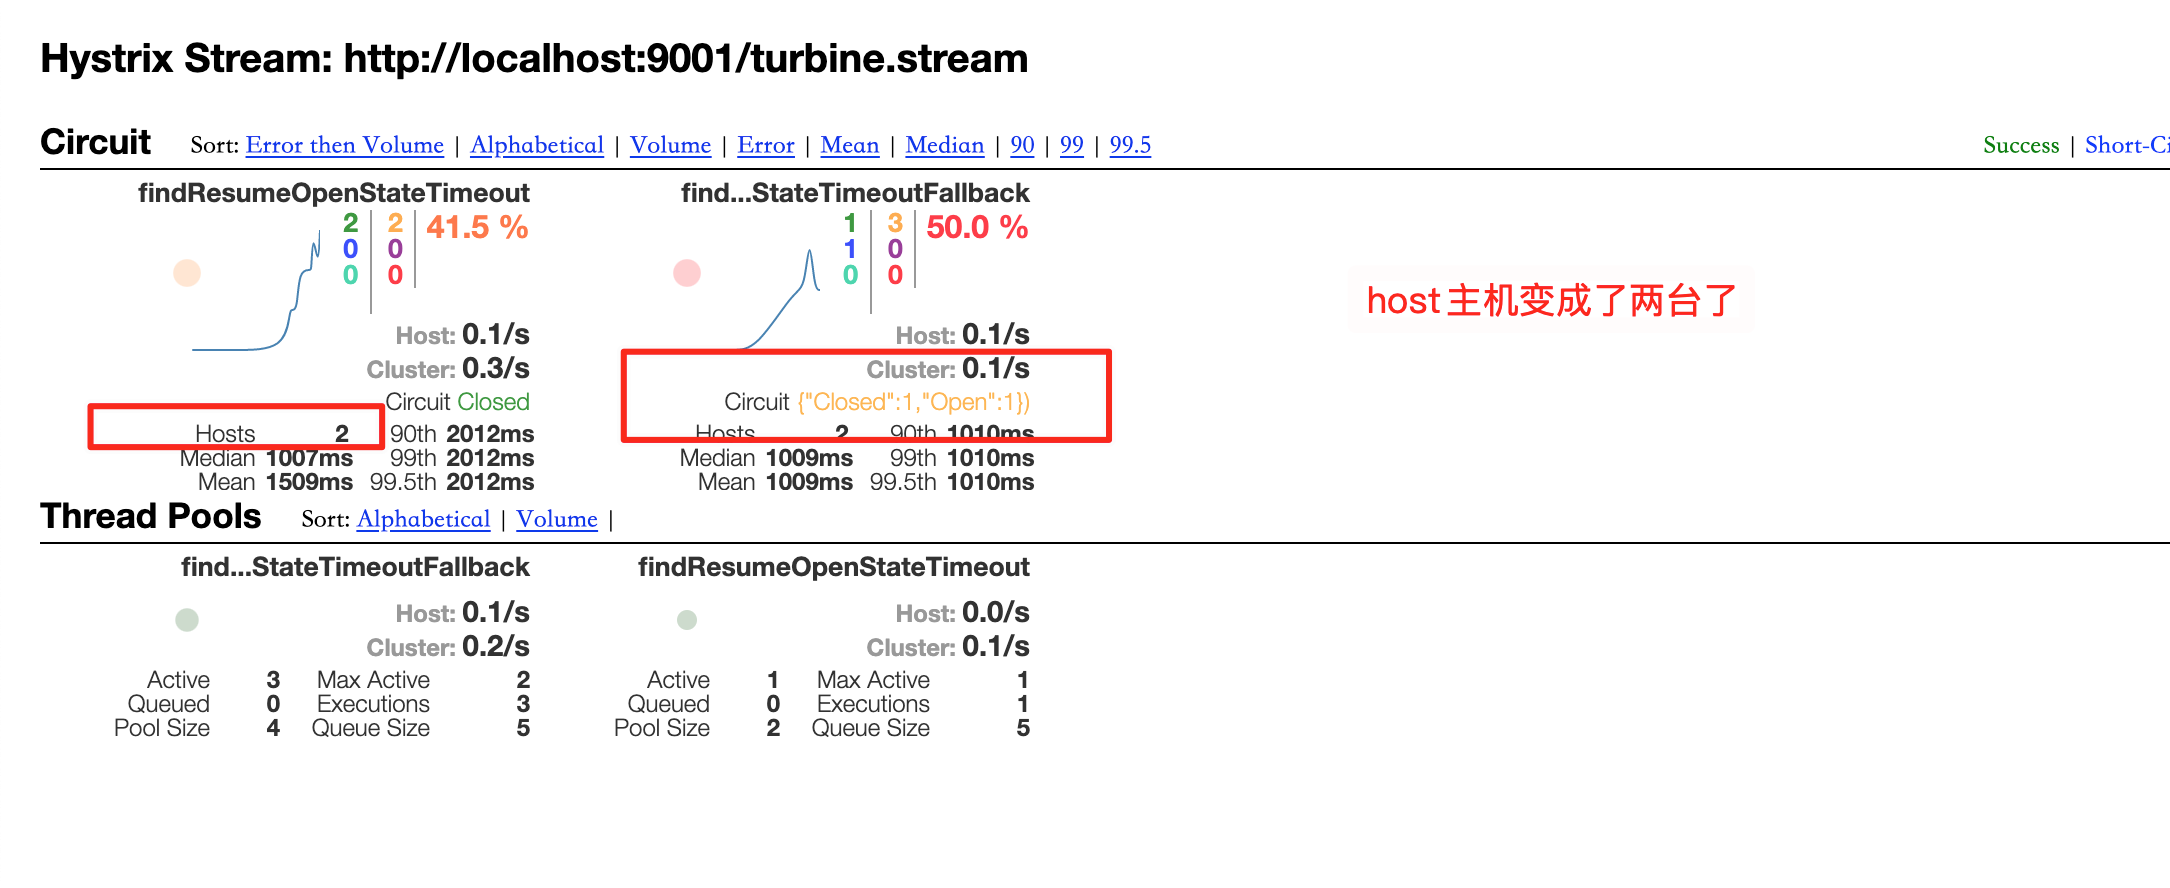
把 auto deliver 项目复制一份,在 postman 中启动测试两个项目查看效果
3.8 Hystrix 核⼼源码剖析(略)
springboot 装配、⾯向切⾯编程、RxJava 响应式编程的知识等等,我们剖析下主体 脉络。
分析⼊⼝:@EnableCircuitBreaker 注解激活了熔断功能,那么该注解就是 Hystrix 源码追踪的⼊⼝.
第 4 节 Feign 远程调⽤组件
服务消费者调⽤服务提供者的时候使⽤ RestTemplate 技术

存在不便之处
1)拼接 url
2)restTmplate.getForObJect
这两处代码都⽐较模板化,能不能不让我我们来写这种模板化的东⻄ 另外来说,拼接 url ⾮常的 low,拼接字符串,拼接参数,很 low 还容易出错
4.1 Feign 简介
Feign 是 Netflix 开发的⼀个轻量级 RESTful 的 HTTP 服务客户端(⽤它来发起请求,远程调⽤的),是以 Java 接⼝注解的⽅式调⽤ Http 请求,⽽不⽤像 Java 中通过封装 HTTP 请求报⽂的⽅式直接调⽤,Feign 被⼴泛应⽤在 Spring Cloud 的解决⽅案中。 类似于 Dubbo,服务消费者拿到服务提供者的接⼝,像调⽤本地接⼝⽅法⼀样 去调⽤,实际发出的是远程的请求。
Feign 可帮助我们更加便捷,优雅的调⽤ HTTP API:不需要我们去拼接 url 然后 调⽤ restTemplate 的 api,在 SpringCloud 中使⽤ Feign ⾮常简单,创建⼀个 接⼝(在消费者--服务调⽤⽅这⼀端),并在接⼝上添加⼀些注解,代码就完成 了
SpringCloud 对 Feign 进⾏了增强,使 Feign ⽀持了 SpringMVC 注解 (OpenFeign)
本质:封装了 Http 调⽤流程,更符合⾯向接⼝化的编程习惯,类似于 Dubbo 的服务调⽤
Dubbo 的调⽤⽅式其实就是很好的⾯向接⼝编程
4.2 Feign 配置应⽤
在服务调⽤者⼯程(消费者)创建接⼝(添加注解)
(效果)Feign = RestTemplate+Ribbon+Hystrix
创建一个新的 autodeliver 模块
服务消费者⼯程(⾃动投递微服务)中引⼊ Feign 依赖(或者⽗类⼯程)
<?xml version="1.0" encoding="UTF-8"?>
<project xmlns="http://maven.apache.org/POM/4.0.0"
         xmlns:xsi="http://www.w3.org/2001/XMLSchema-instance"
         xsi:schemaLocation="http://maven.apache.org/POM/4.0.0 http://maven.apache.org/xsd/maven-4.0.0.xsd">
    <parent>
        <artifactId>lane-parent-project</artifactId>
        <groupId>com.galaxy</groupId>
        <version>1.0-SNAPSHOT</version>
    </parent>
    <modelVersion>4.0.0</modelVersion>

    <artifactId>lane-service-autodeliver-8096</artifactId>

    <dependencies>
        <!--eureka client 客户端依赖引入-->
        <dependency>
            <groupId>org.springframework.cloud</groupId>
            <artifactId>spring-cloud-starter-netflix-eureka-client</artifactId>
        </dependency>

        <dependency>
            <groupId>org.springframework.cloud</groupId>
            <artifactId>spring-cloud-starter-openfeign</artifactId>
        </dependency>
    </dependencies>
</project>
服务消费者⼯程(⾃动投递微服务)启动类使⽤注解@EnableFeignClients 添加 Feign ⽀持
package com.galaxy;

import org.springframework.boot.SpringApplication;
import org.springframework.boot.autoconfigure.SpringBootApplication;
import org.springframework.cloud.client.discovery.EnableDiscoveryClient;
import org.springframework.cloud.openfeign.EnableFeignClients;

/**
 * @author lane
 * @date 2021年06月24日 下午4:35
 */
@SpringBootApplication
@EnableDiscoveryClient//开启服务发现
@EnableFeignClients //开启feign的功能
public class AutodeliverApplication8096 {
    public static void main(String[] args) {
        SpringApplication.run(AutodeliverApplication8096.class,args);
    }
}
注意:此时去掉 Hystrix 熔断的⽀持注解@EnableCircuitBreaker 即可包括引⼊的依赖,因为 Feign 会⾃动引⼊
创建 Feign 接⼝
接口 service
package com.galaxy.service;

import org.springframework.cloud.openfeign.FeignClient;
import org.springframework.web.bind.annotation.GetMapping;
import org.springframework.web.bind.annotation.PathVariable;
import org.springframework.web.bind.annotation.RequestMapping;

/**
 * @author lane
 * @date 2021年06月24日 下午4:41
 */
// 原来:http://lagou-service-resume/resume/openstate/ + userId;
// @FeignClient表明当前类是一个Feign客户端,value指定该客户端要请求的服务名称(登记到注册中心上的服务提供者的服务名称)
@FeignClient(value = "lane-service-resume")
//@RequestMapping("/resume")
public interface ResumeServiceFeignClient {


    // Feign要做的事情就是,拼装url发起请求
    // 我们调用该方法就是调用本地接口方法,那么实际上做的是远程请求
    @GetMapping("/openstate/{userId}")
    public Integer findDefaultResumeState(@PathVariable("userId") Long userId);

}
1)@FeignClient 注解的 name 属性⽤于指定要调⽤的服务提供者名称,和服务提供者 yml ⽂件中 spring.application.name 保持⼀致
2)接⼝中的接⼝⽅法,就好⽐是远程服务提供者 Controller 中的 Hander ⽅法 (只不过如同本地调⽤了),那么在进⾏参数绑定的时,可以使⽤ @PathVariable、@RequestParam、@RequestHeader 等,这也是 OpenFeign 对 SpringMVC 注解的⽀持,但是需要注意 value 必须设置,否则会抛出异常
使⽤接⼝中⽅法完成远程调⽤(注⼊接⼝即可,实际注⼊的是接⼝的实现)
controller
package com.galaxy.controller;

import com.galaxy.service.ResumeServiceFeignClient;
import org.springframework.beans.factory.annotation.Autowired;
import org.springframework.web.bind.annotation.GetMapping;
import org.springframework.web.bind.annotation.PathVariable;
import org.springframework.web.bind.annotation.RequestMapping;
import org.springframework.web.bind.annotation.RestController;

/**
 * @author lane
 * @date 2021年06月24日 下午4:45
 */
@RestController
@RequestMapping("/autodeliver")
public class AutoDeliverController {


    @Autowired
    ResumeServiceFeignClient resumeServiceFeignClient;
    @GetMapping("/checkState/{userId}")
    public Integer findResumeOpenState(@PathVariable Long userId){
        Integer defaultResumeState1 = resumeServiceFeignClient.findDefaultResumeState1(userId);
        return defaultResumeState1;
    }
}
postman 测试下
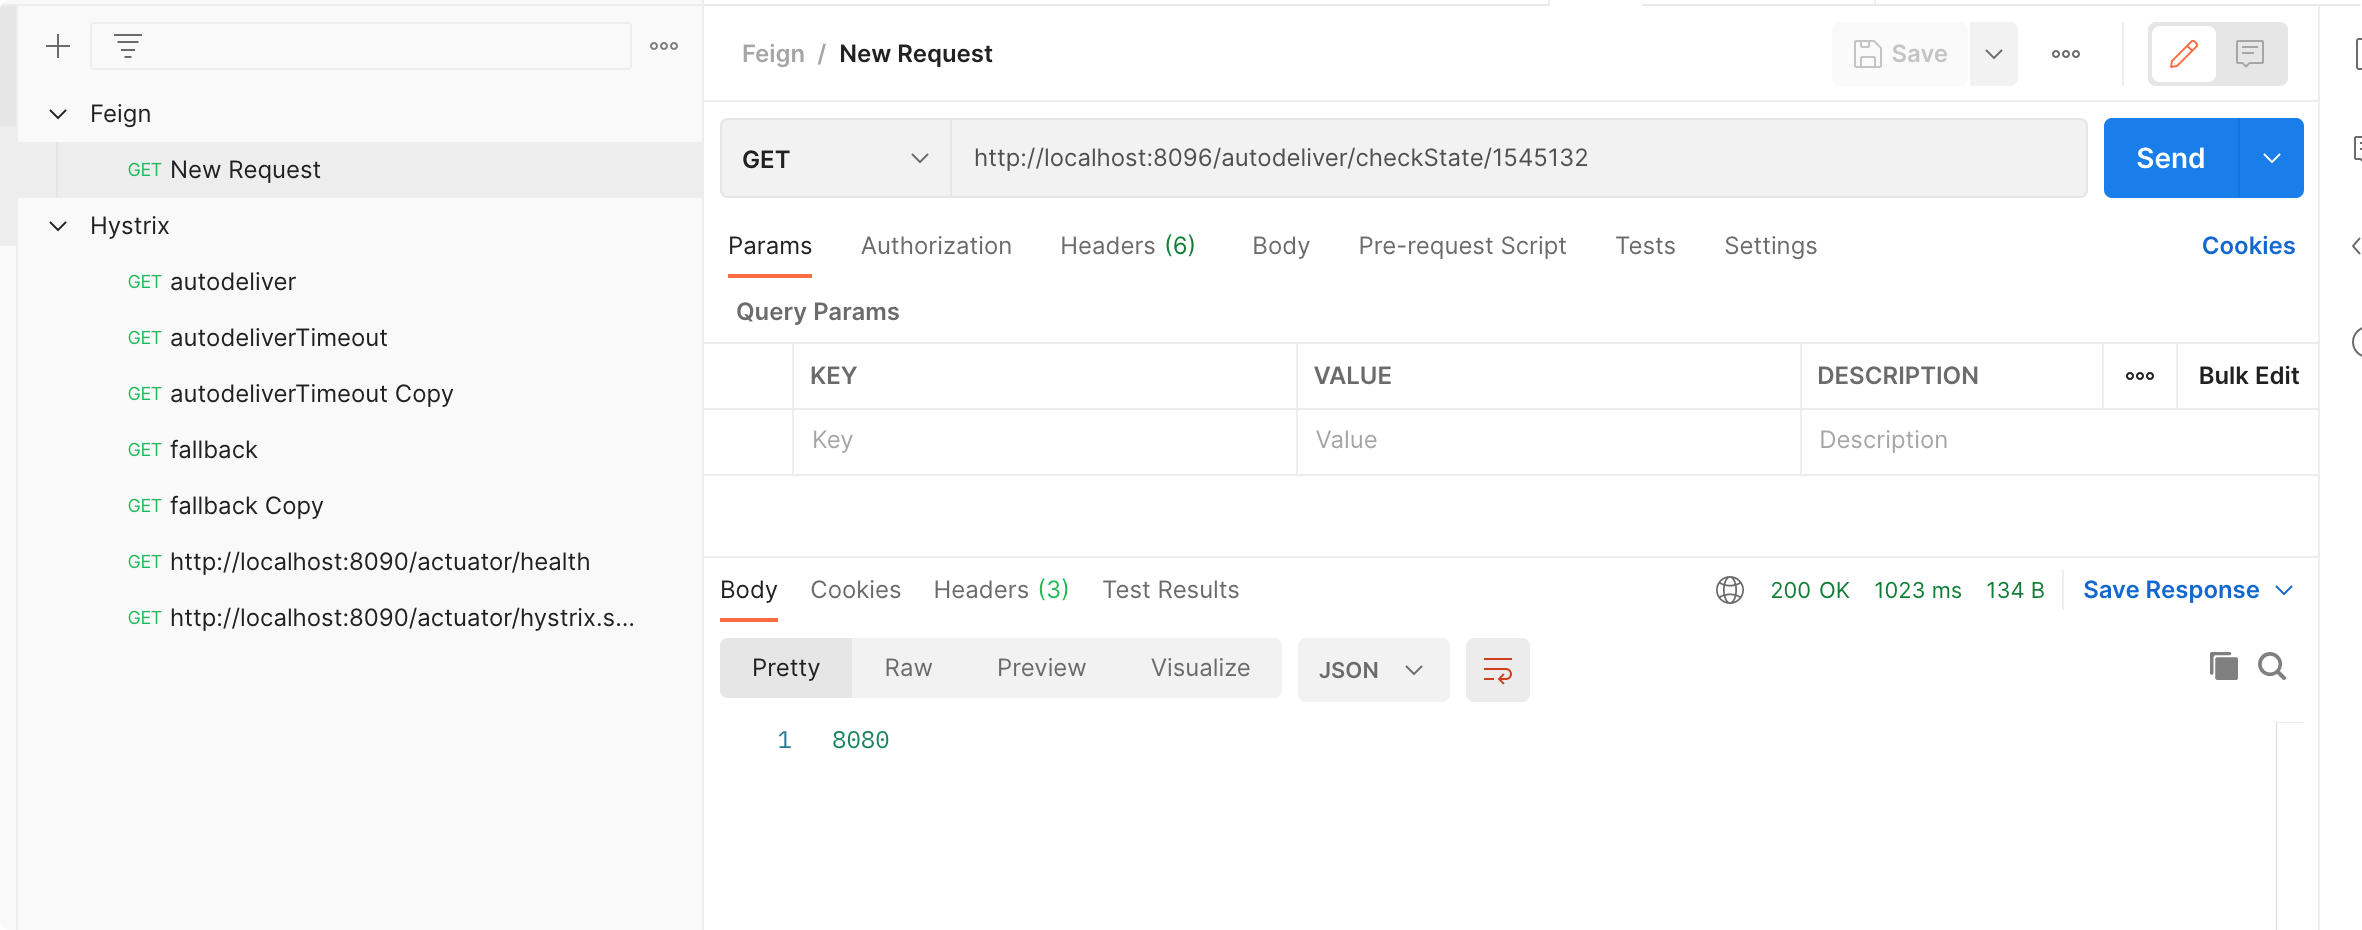
4.3 Feign 对负载均衡的⽀持
Feign 本身已经集成了 Ribbon 依赖和⾃动配置,因此我们不需要额外引⼊依赖,可 以通过 ribbon.xx 来进 ⾏全局配置,也可以通过服务名.ribbon.xx 来对指定服务进⾏ 细节配置配置(参考之前,此处略)
Feign 默认的请求处理超时时⻓ 1s,如果没有返回结果就去调用其他的服务有时候我们的业务确实执⾏的需要⼀定时间,那 么这个时候,我们就需要调整请求处理超时时⻓,Feign ⾃⼰有超时设置,如果配置 Ribbon 的超时,则会以 Ribbon 的为准
Ribbon 设置
#针对的被调用方微服务名称,不加就是全局生效
lane-service-resume:
  ribbon:
    #请求连接超时时间
    ConnectTimeout: 2000
    #请求处理超时时间
    ##########################################Feign超时时长设置
    ReadTimeout: 3000
    #对所有操作都进行重试
    OkToRetryOnAllOperations: true
    ####根据如上配置,当访问到故障请求的时候,它会再尝试访问一次当前实例(次数由MaxAutoRetries配置),
    ####如果不行,就换一个实例进行访问,如果还不行,再换一次实例访问(更换次数由MaxAutoRetriesNextServer配置),
    ####如果依然不行,返回失败信息。
    MaxAutoRetries: 0 #对当前选中实例重试次数,不包括第一次调用
    MaxAutoRetriesNextServer: 0 #切换实例的重试次数
    NFLoadBalancerRuleClassName: com.netflix.loadbalancer.RoundRobinRule #负载策略调整
4.4 Feign 的⽇志级别配置
Feign 是 http 请求客户端,类似于咱们的浏览器,它在请求和接收响应的时候,可以 打印出⽐较详细的⼀些⽇志信息(响应头,状态码等等) 如果我们想看到 Feign 请求时的⽇志,我们可以进⾏配置,默认情况下 Feign 的⽇志 没有开启。
- 开启 Feign ⽇志功能及级别
// NONE:默认的,不显示任何⽇志----性能最好
// BASIC:仅记录请求⽅法、URL、响应状态码以及执⾏时间----⽣产问题追踪
// HEADERS:在 BASIC 级别的基础上,记录请求和响应的 header
// FULL:记录请求和响应的 header、body 和元数据----适⽤于开发及测试环境定位问 题
package com.galaxy.config;

import feign.Logger;
import org.springframework.context.annotation.Bean;
import org.springframework.context.annotation.Configuration;

/**
 * @author lane
 * @date 2021年06月24日 下午5:50
 */
@Configuration
public class FeignLog {
 //Feign的⽇志级别(Feign请求过程信息)
 // NONE:默认的,不显示任何⽇志----性能最好
 // BASIC:仅记录请求⽅法、URL、响应状态码以及执⾏时间----⽣产问题追踪
 // HEADERS:在BASIC级别的基础上,记录请求和响应的header
 // FULL:记录请求和响应的header、body和元数据----适⽤于开发及测试环境定位问 题
    @Bean
    Logger.Level feignLevel() {
        return Logger.Level.FULL;
    }
}
- 配置 log ⽇志级别为 debug
logging:
  level:
    # Feign日志只会对日志级别为debug的做出响应
    com.galaxy.service.ResumeServiceFeignClient: debug
测试效果显示日志信息

4.5 Feign 对熔断器的⽀持
1)在 Feign 客户端⼯程配置⽂件(application.yml)中开启 Feign 对熔断器的⽀持
# 开启Feign的熔断功能
feign:
  hystrix:
    enabled: true
Feign 的超时时⻓设置那其实就上⾯ Ribbon 的超时时⻓
设置 Hystrix 超时设置(就按照之前 Hystrix 设置的⽅式就 OK 了)
注意:
1)开启 Hystrix 之后,Feign 中的⽅法都会被进⾏⼀个管理了,⼀旦出现问题就进⼊ 对应的回退逻辑处理
2)针对超时这⼀点,当前有两个超时时间设置(Feign/hystrix),熔断的时候是根 据这两个时间的最⼩值来进⾏的,
处理时⻓超过最短的那个超时时间了就熔断进 ⼊回退降级逻辑
熔断配置
hystrix:
  command:
    default:
      execution:
        isolation:
          thread:
            ##########################################Hystrix的超时时长设置
            timeoutInMilliseconds: 6000
降级回退逻辑需要定义一个类,实现 FeignClient 接口,实现接口中的方法
2)⾃定义 FallBack 处理类(需要实现 FeignClient 接⼝)
package com.galaxy.service;

import org.springframework.stereotype.Component;

/**
 * 降级回退逻辑需要定义一个类,实现FeignClient接口,实现接口中的方法
 * @author lane
 * @date 2021年06月24日 下午6:02
 */
@Component
public class ResumeFallback implements ResumeServiceFeignClient {
    @Override
    public Integer findDefaultResumeState(Long userId) {

        return -1024;
    }
}
3)在@FeignClient 注解中关联 2)中⾃定义的处理类
//指定降级走的方法
@FeignClient(value = "lane-service-resume",fallback = ResumeFallback.class,path = "/resume")
//@RequestMapping("/resume") //因为降级的时候必须放在上面path才行,这里注释下
测试下效果
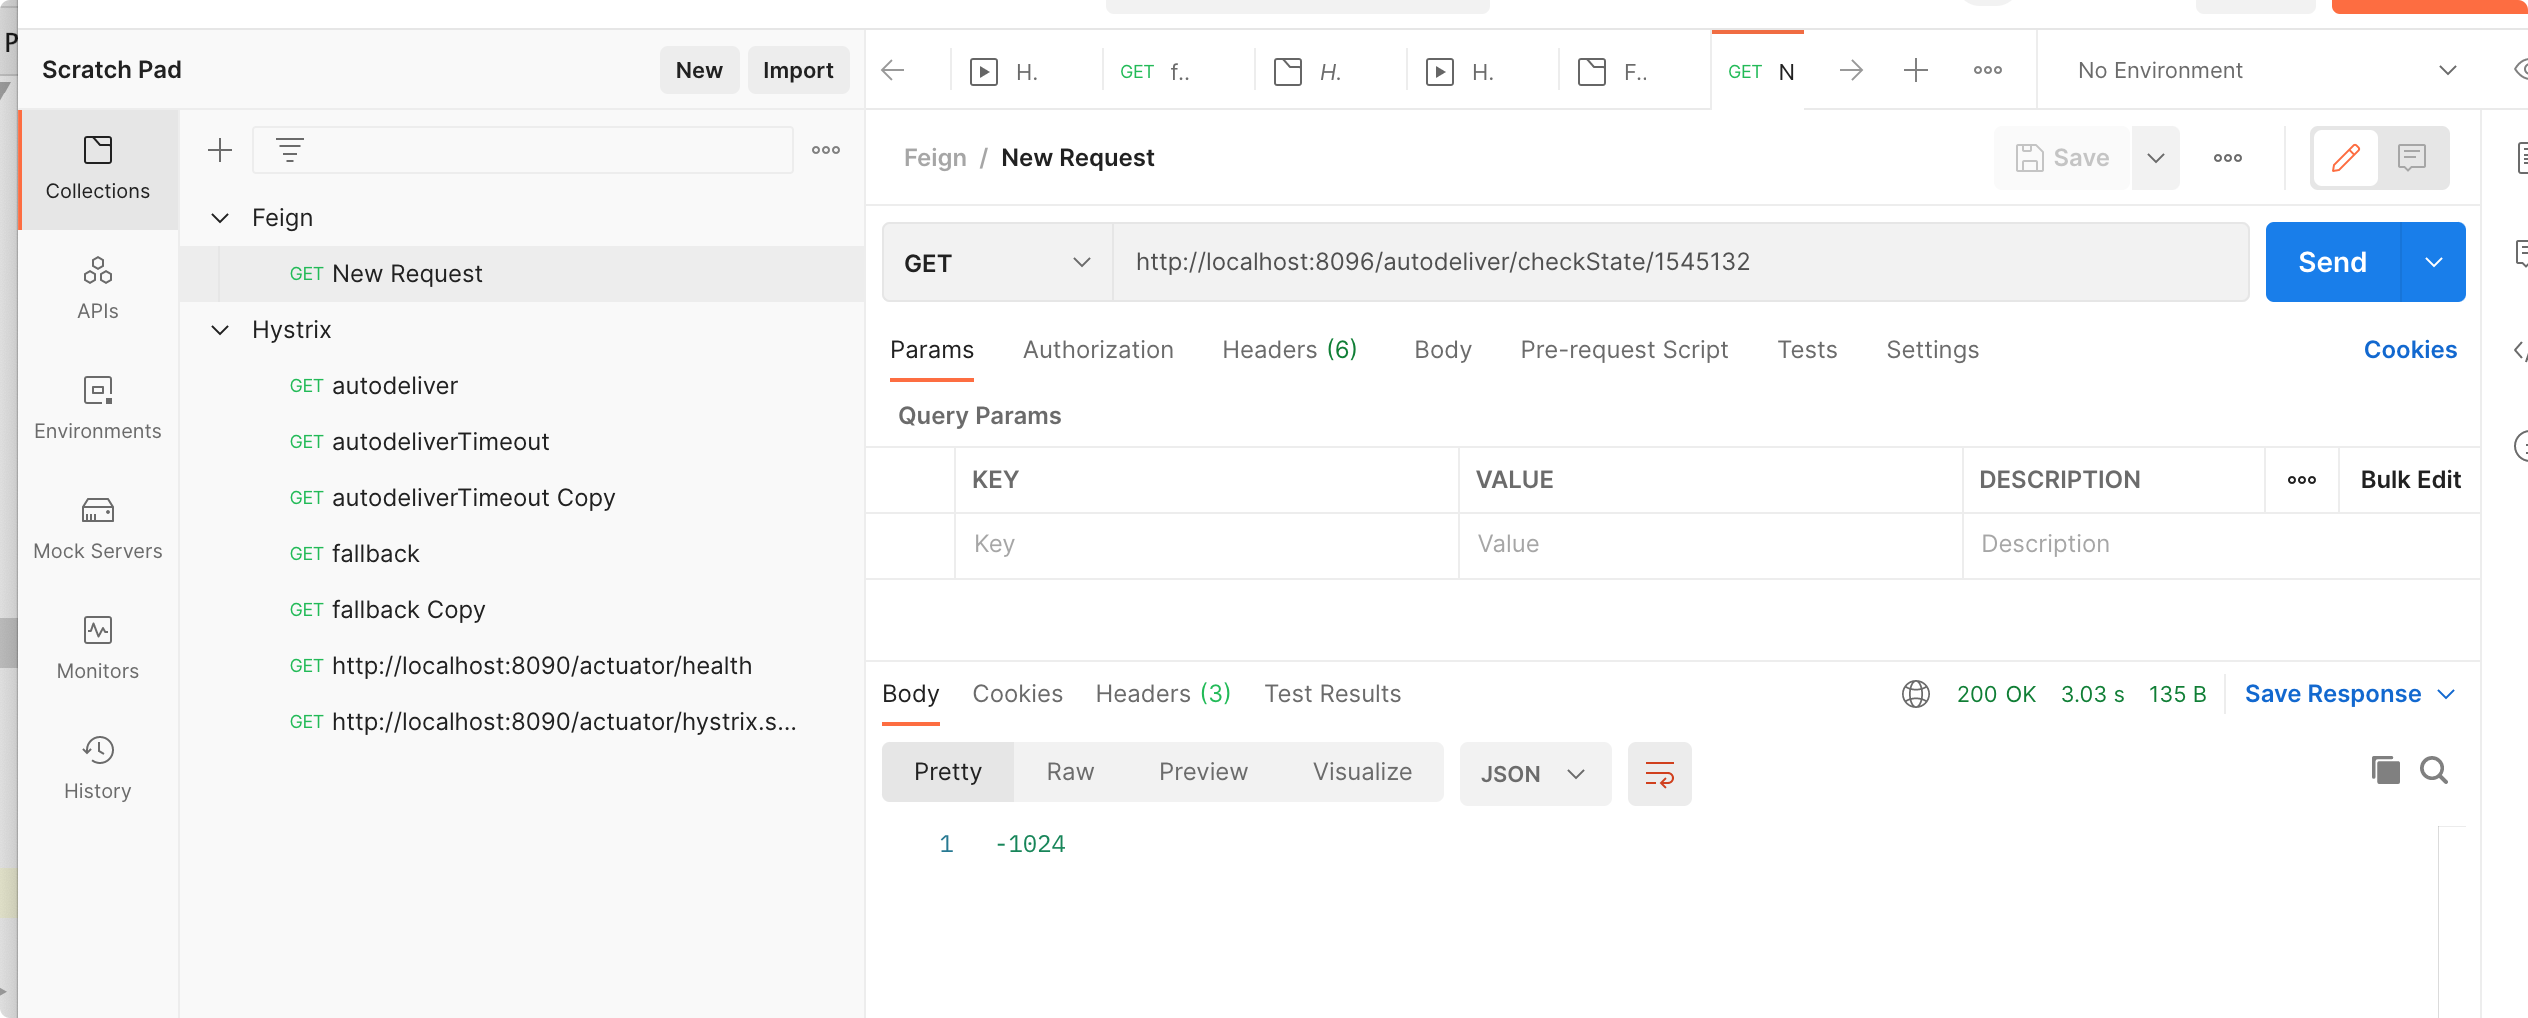
4.6 Feign 对请求压缩和响应压缩的⽀持
Feign ⽀持对请求和响应进⾏ GZIP 压缩,以减少通信过程中的性能损耗。通过下⾯ 的参数 即可开启请求与响应的压缩功能:
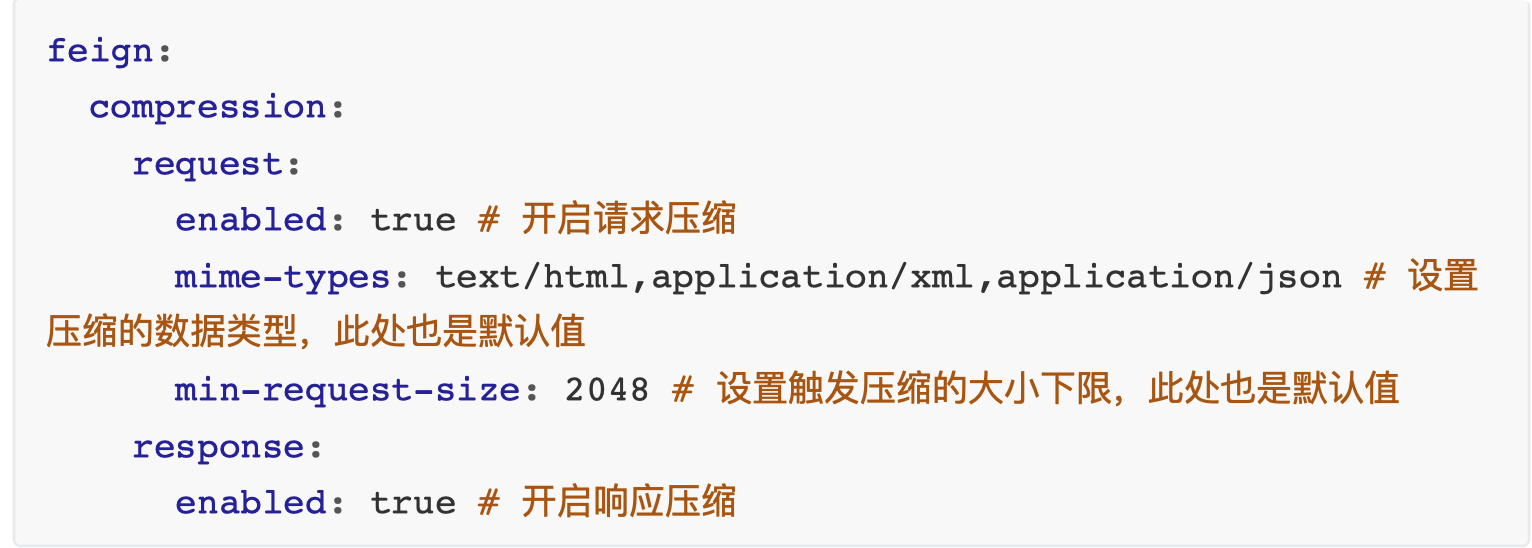
feign:
compression:
request:
enabled: true # 开启请求压缩
mime-types: text/html,application/xml,application/json # 设置
压缩的数据类型,此处也是默认值
min-request-size: 2048 # 设置触发压缩的⼤⼩下限,此处也是默认值
 response:
enabled: true # 开启响应压缩
4.7 Feign 核⼼源码剖析 (略)
第 5 节 GateWay ⽹关组件
⽹关(翻译过来就叫做 GateWay):微服务架构中的重要组成部分
局域⽹中就有⽹关这个概念,局域⽹接收或者发送数据出去通过这个⽹关,⽐如⽤ Vmware 虚拟机软件搭建虚拟机集群的时候,往往我们需要选择 IP 段中的⼀个 IP 作为 ⽹关地址。
我们学习的 GateWay-->Spring Cloud GateWay(它只是众多⽹关解决⽅案中的⼀ 种)
5.1 GateWay 简介
Spring Cloud GateWay 是 Spring Cloud 的⼀个全新项⽬,⽬标是取代 Netflix Zuul, 它基于 Spring5.0+SpringBoot2.0+WebFlux(基于⾼性能的 Reactor 模式响应式通信 框架 Netty,异步⾮阻塞模型)等技术开发,性能⾼于 Zuul,官⽅测试,GateWay 是 Zuul 的 1.6 倍,旨在为微服务架构提供⼀种简单有效的统⼀的 API 路由管理⽅式。
Spring Cloud GateWay 不仅提供统⼀的路由⽅式(反向代理)并且基于 Filter(定义 过滤器对请求过滤,完成⼀些功能) 链的⽅式提供了⽹关基本的功能,例如:鉴权、 流量控制、熔断、路径重写、⽇志监控等。
⽹关在架构中的位置
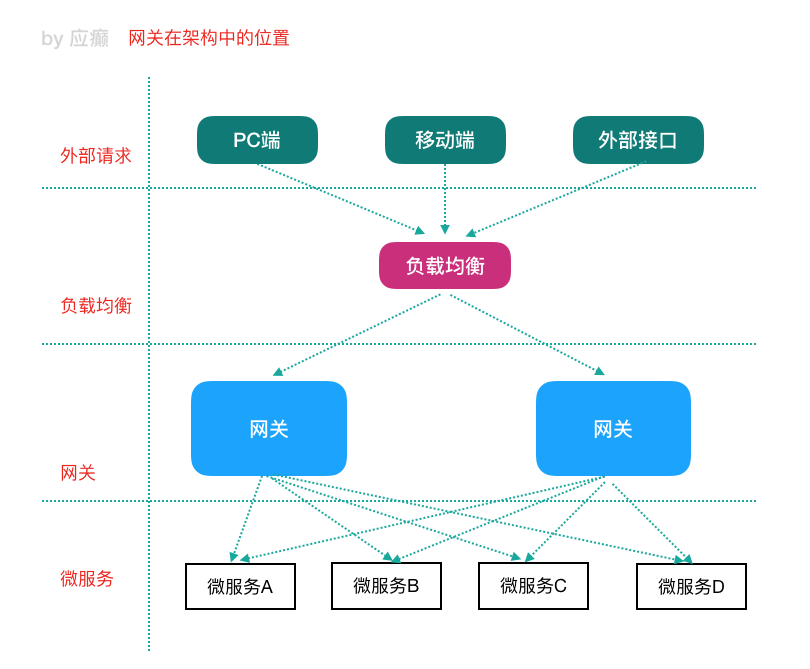
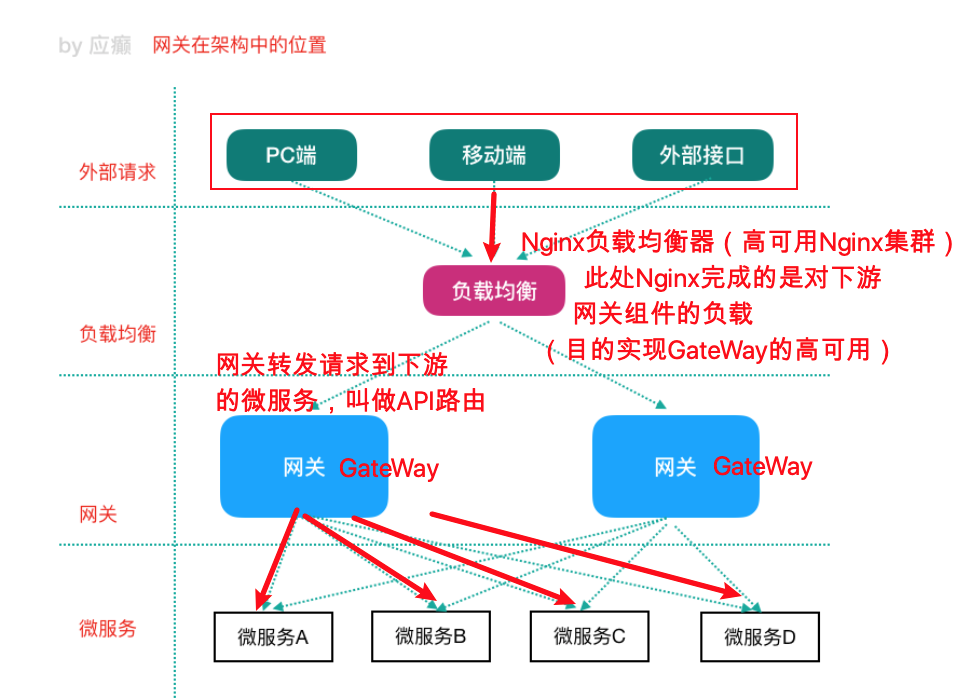
5.2 GateWay 核⼼概念
Zuul 介绍
1.x 阻塞式 IO
2.x 基于 Netty
Spring Cloud GateWay 天⽣就是异步⾮阻塞的,基于 Reactor 模型 ⼀个请求—> ⽹关根据⼀定的条件匹配—匹配成功之后可以将请求转发到指定的服务 地址;⽽在这个过程中,我们可以进⾏⼀些⽐较具体的控制(限流、⽇志、⿊⽩名单)
路由(route): ⽹关最基础的部分,也是⽹关⽐较基础的⼯作单元。路由由⼀ 个 ID、⼀个⽬标 URL(最终路由到的地址)、⼀系列的断⾔(匹配条件判断)和 Filter 过滤器(精细化控制)组成。如果断⾔为 true,则匹配该路由。
断⾔(predicates):参考了 Java8 中的断⾔ java.util.function.Predicate,开发 ⼈员可以匹配 Http 请求中的所有内容(包括请求头、请求参数等)(类似于 nginx 中的 location 匹配⼀样),如果断⾔与请求相匹配则路由。
过滤器(filter):⼀个标准的 Spring webFilter,使⽤过滤器,可以在请求之前 或者之后执⾏业务逻辑。
来⾃官⽹的⼀张图
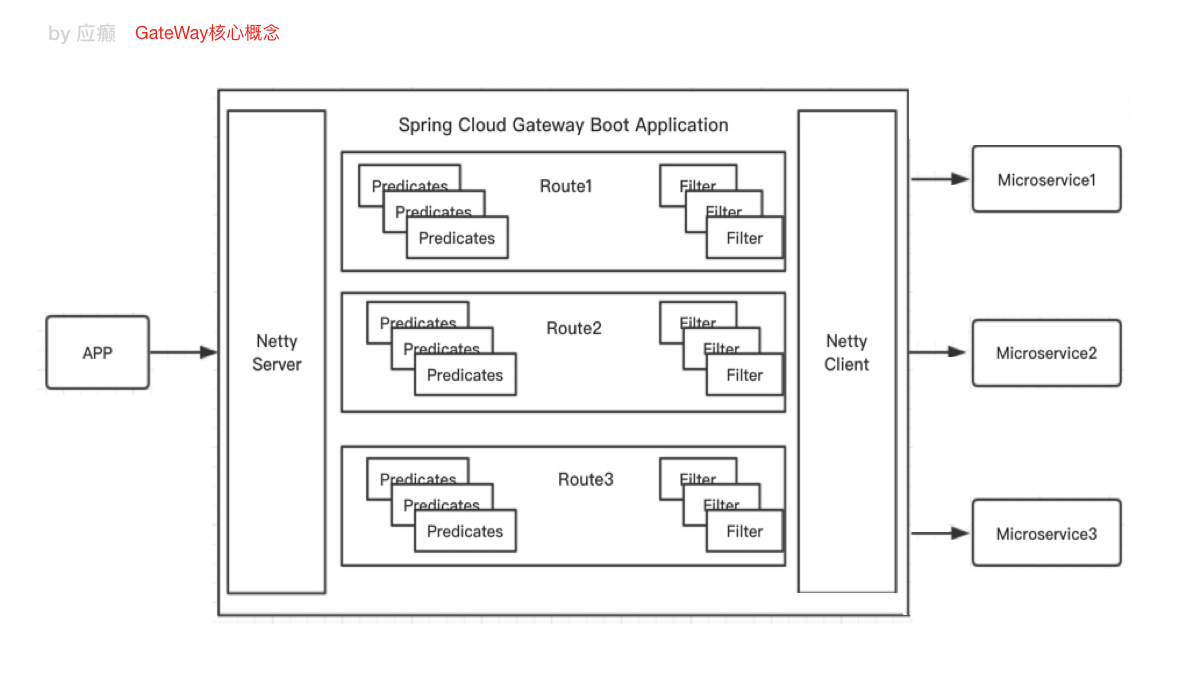
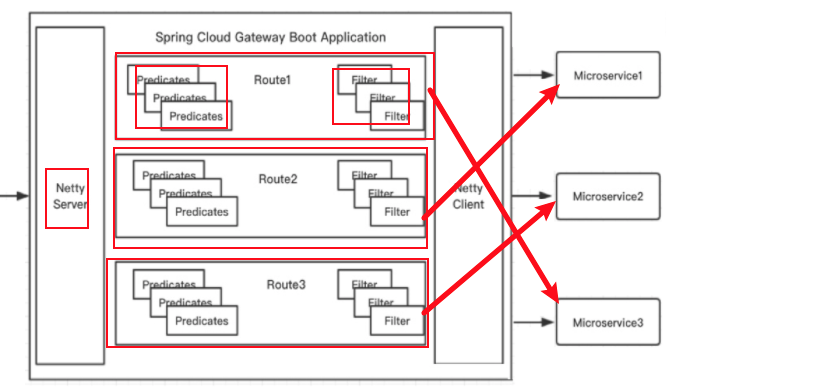
其中,Predicates 断⾔就是我们的匹配条件,⽽ Filter 就可以理解为⼀个⽆所不 能的拦截器,有了这两个元素,结合⽬标 URL,就可以实现⼀个具体的路由转 发。
5.3 GateWay ⼯作过程(How It Works)
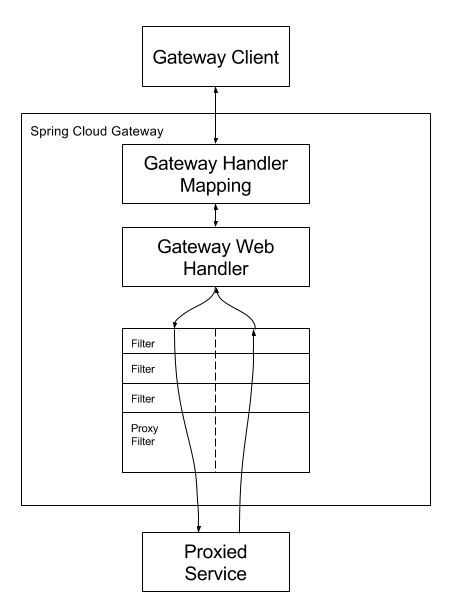
客户端向 Spring Cloud GateWay 发出请求,然后在 GateWay Handler Mapping 中 找到与请求相匹配的路由,将其发送到 GateWay Web Handler;Handler 再通过指 定的过滤器链来将请求发送到我们实际的服务执⾏业务逻辑,然后返回。过滤器之 间⽤虚线分开是因为过滤器可能会在发送代理请求之前(pre)或者之后(post)执 ⾏业务逻辑。
Filter 在“pre”类型过滤器中可以做参数校验、权限校验、流量监控、⽇志输出、协议 转换等,在“post”类型的过滤器中可以做响应内容、响应头的修改、⽇志的输出、流 量监控等。
GateWay 核⼼逻辑:路由转发 + 执⾏过滤器链
5.4 GateWay 应⽤
使⽤⽹关对⾃动投递微服务进⾏代理(添加在它的上游,相当于隐藏了具体微服务 的信息,对外暴露的是⽹关)
创建⼯程 lane-cloud-gateway-server-9002 导⼊依赖 GateWay 不需要使⽤ web 模块,它引⼊的是 WebFlux(类似于 SpringMVC)
<?xml version="1.0" encoding="UTF-8"?>
<project xmlns="http://maven.apache.org/POM/4.0.0"
         xmlns:xsi="http://www.w3.org/2001/XMLSchema-instance"
         xsi:schemaLocation="http://maven.apache.org/POM/4.0.0 http://maven.apache.org/xsd/maven-4.0.0.xsd">
    <modelVersion>4.0.0</modelVersion>

    <groupId>org.example</groupId>
    <artifactId>lane-cloud-gateway-9002</artifactId>
    <version>1.0-SNAPSHOT</version>

    <!--spring boot 父启动器依赖-->
    <parent>
        <groupId>org.springframework.boot</groupId>
        <artifactId>spring-boot-starter-parent</artifactId>
        <version>2.1.6.RELEASE</version>
    </parent>

    <dependencies>
        <dependency>
            <groupId>org.springframework.cloud</groupId>
            <artifactId>spring-cloud-commons</artifactId>
        </dependency>
        <dependency>
            <groupId>org.springframework.cloud</groupId>
            <artifactId>spring-cloud-starter-netflix-eureka-client</artifactId>
        </dependency>
        <!--GateWay 网关-->
        <dependency>
            <groupId>org.springframework.cloud</groupId>
            <artifactId>spring-cloud-starter-gateway</artifactId>
        </dependency>
        <!--引入webflux-->
        <dependency>
            <groupId>org.springframework.boot</groupId>
            <artifactId>spring-boot-starter-webflux</artifactId>
        </dependency>
        <!--日志依赖-->
        <dependency>
            <groupId>org.springframework.boot</groupId>
            <artifactId>spring-boot-starter-logging</artifactId>
        </dependency>
        <!--测试依赖-->
        <dependency>
            <groupId>org.springframework.boot</groupId>
            <artifactId>spring-boot-starter-test</artifactId>
            <scope>test</scope>
        </dependency>
        <!--lombok工具-->
        <dependency>
            <groupId>org.projectlombok</groupId>
            <artifactId>lombok</artifactId>
            <version>1.18.4</version>
            <scope>provided</scope>
        </dependency>

        <!--引入Jaxb,开始-->
        <dependency>
            <groupId>com.sun.xml.bind</groupId>
            <artifactId>jaxb-core</artifactId>
            <version>2.2.11</version>
        </dependency>
        <dependency>
            <groupId>javax.xml.bind</groupId>
            <artifactId>jaxb-api</artifactId>
        </dependency>
        <dependency>
            <groupId>com.sun.xml.bind</groupId>
            <artifactId>jaxb-impl</artifactId>
            <version>2.2.11</version>
        </dependency>
        <dependency>
            <groupId>org.glassfish.jaxb</groupId>
            <artifactId>jaxb-runtime</artifactId>
            <version>2.2.10-b140310.1920</version>
        </dependency>
        <dependency>
            <groupId>javax.activation</groupId>
            <artifactId>activation</artifactId>
            <version>1.1.1</version>
        </dependency>
        <!--引入Jaxb,结束-->

        <!-- Actuator可以帮助你监控和管理Spring Boot应用-->
        <dependency>
            <groupId>org.springframework.boot</groupId>
            <artifactId>spring-boot-starter-actuator</artifactId>
        </dependency>
        <!--热部署-->
        <dependency>
            <groupId>org.springframework.boot</groupId>
            <artifactId>spring-boot-devtools</artifactId>
            <optional>true</optional>
        </dependency>

        <!--链路追踪-->
        <!--<dependency>
            <groupId>org.springframework.cloud</groupId>
            <artifactId>spring-cloud-starter-sleuth</artifactId>
        </dependency>-->
    </dependencies>

    <dependencyManagement>
        <!--spring cloud依赖版本管理-->
        <dependencies>
            <dependency>
                <groupId>org.springframework.cloud</groupId>
                <artifactId>spring-cloud-dependencies</artifactId>
                <version>Greenwich.RELEASE</version>
                <type>pom</type>
                <scope>import</scope>
            </dependency>
        </dependencies>
    </dependencyManagement>

    <build>
        <plugins>
            <!--编译插件-->
            <plugin>
                <groupId>org.apache.maven.plugins</groupId>
                <artifactId>maven-compiler-plugin</artifactId>
                <configuration>
                    <source>11</source>
                    <target>11</target>
                    <encoding>utf-8</encoding>
                </configuration>
            </plugin>
            <!--打包插件-->
            <plugin>
                <groupId>org.springframework.boot</groupId>
                <artifactId>spring-boot-maven-plugin</artifactId>
            </plugin>
        </plugins>
    </build>

</project>
注意:不要引⼊ starter-web 模块,需要引⼊ web-flux
application.yml 配置⽂件部分内容
server:
  port: 9002
eureka:
  client:
    serviceUrl: # eureka server的路径
      defaultZone:  http://www.abc.com:8761/eureka/ ,http://www.def.com:8762/eureka/ #把 eureka 集群中的所有 url 都填写了进来,也可以只写一台,因为各个 eureka server 可以同步注册表
  instance:
    #使用ip注册,否则会使用主机名注册了(此处考虑到对老版本的兼容,新版本经过实验都是ip)
    prefer-ip-address: true
    #自定义实例显示格式,加上版本号,便于多版本管理,注意是ip-address,早期版本是ipAddress
    instance-id: ${spring.cloud.client.ip-address}:${spring.application.name}:${server.port}:@project.version@
spring:
  application:
  name: lane-cloud-gateway
  cloud:
    gateway:
      routes: # 路由可以有多个
        - id: service-autodeliver-router # 我们自定义的路由 ID,保持唯一
          uri: http://127.0.0.1:8090  # 目标服务地址  自动投递微服务(部署多实例)  动态路由:uri配置的应该是一个服务名称,而不应该是一个具体的服务实例的地址
#          uri: lb://lagou-service-autodeliver                                                                    # gateway网关从服务注册中心获取实例信息然后负载后路由
          predicates:                                         # 断言:路由条件,Predicate 接受一个输入参数,返回一个布尔值结果。该接口包含多种默 认方法来将 Predicate 组合成其他复杂的逻辑(比如:与,或,非)。
            - Path=/autodeliver/**
        - id: service-resume-router      # 我们自定义的路由 ID,保持唯一
          uri: http://127.0.0.1:8080       # 目标服务地址
          #http://localhost:9002/resume/openstate/1545132

          #http://127.0.0.1:8081/openstate/1545132
#          uri: lb://lagou-service-resume
          predicates:                                         # 断言:路由条件,Predicate 接受一个输入参数,返回一个布尔值结果。该接口包含多种默 认方法来将 Predicate 组合成其他复杂的逻辑(比如:与,或,非)。
            - Path=/resume/**
#          filters:
#            - StripPrefix=1
上⾯这段配置的意思是,配置了⼀个 id 为 service-autodeliver-router 的路由规 则,当向⽹关发起请求 http://localhost:9002/autodeliver/checkAndBegin/1545132 ,请求会被分发路由到对应的微服务上
测试效果
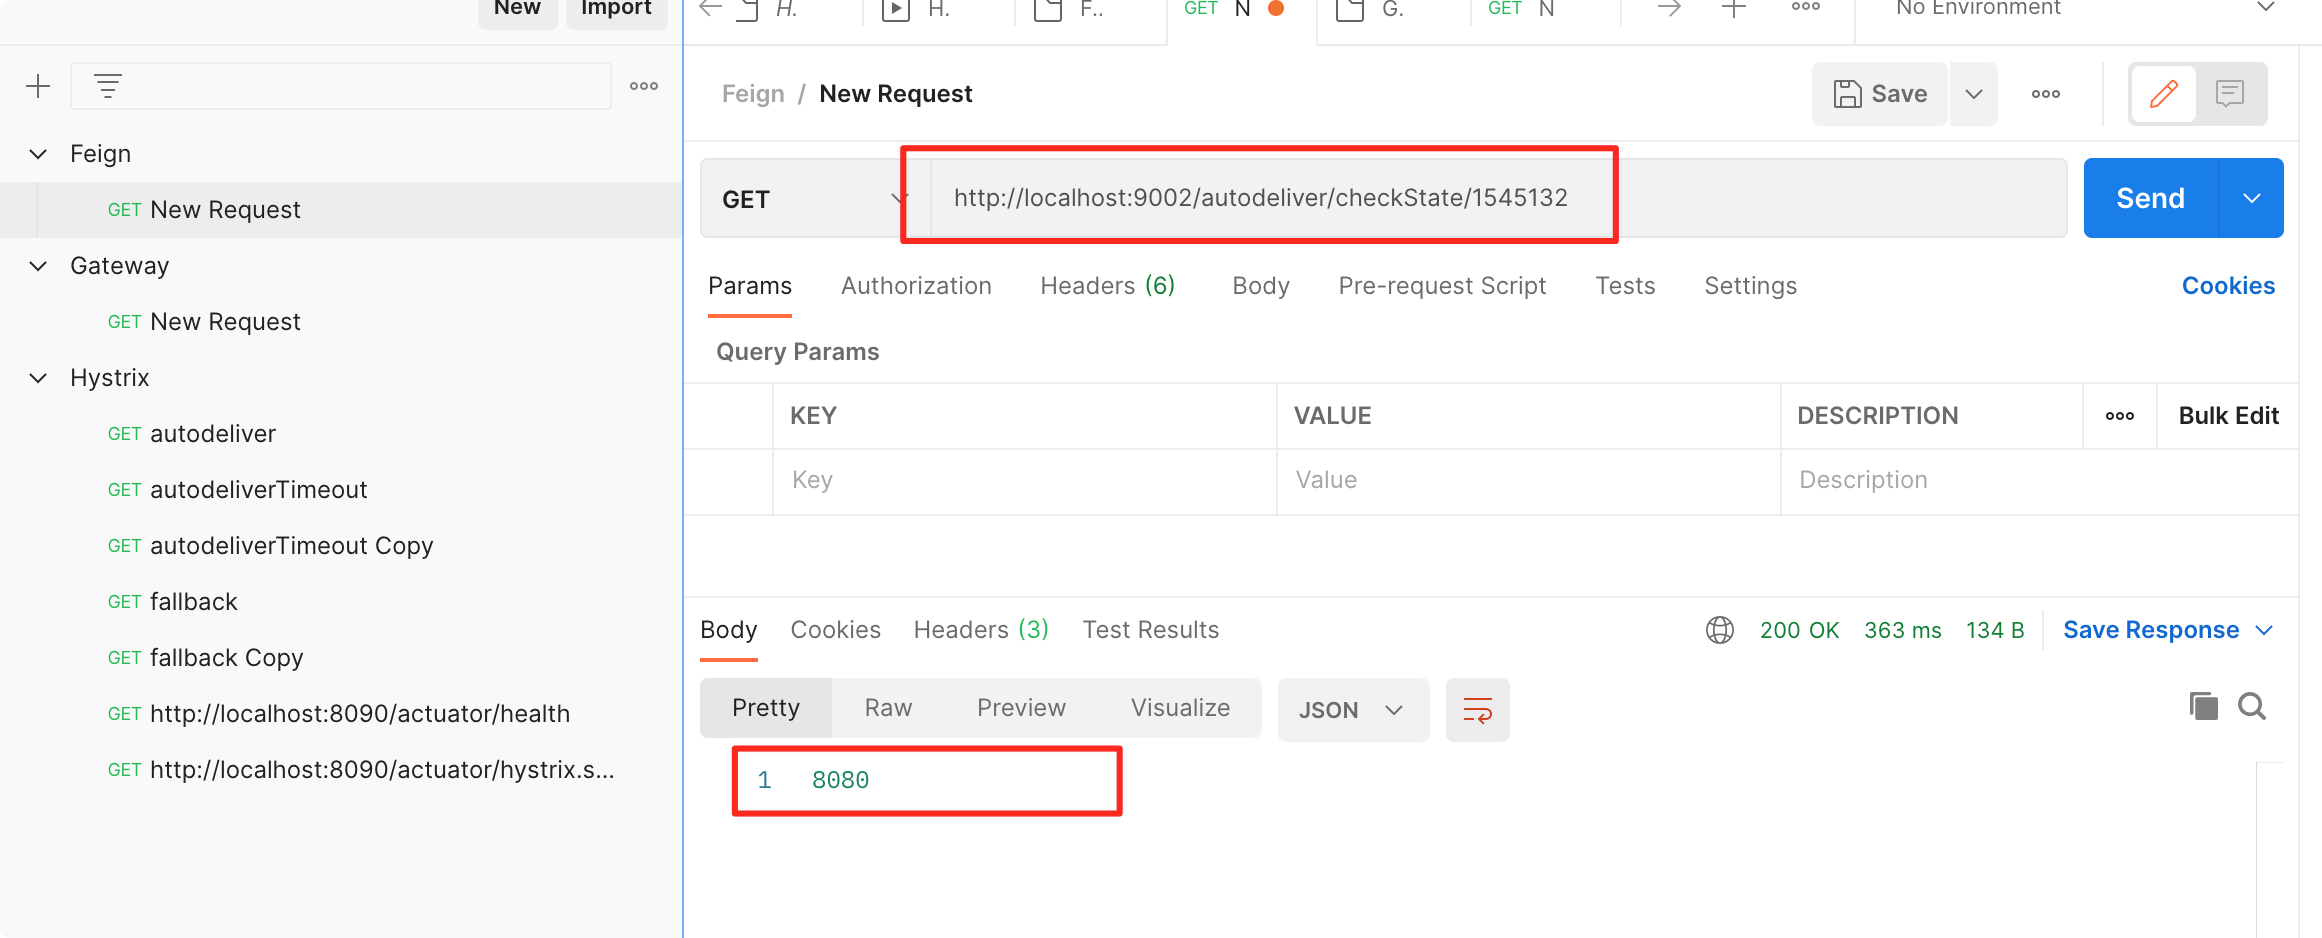
5.3 GateWay 路由规则详解
Spring Cloud GateWay 帮我们内置了很多 Predicates 功能,实现了各种路由匹配规则(通过 Header、请求参数等作为条件)匹配到对应的路由。
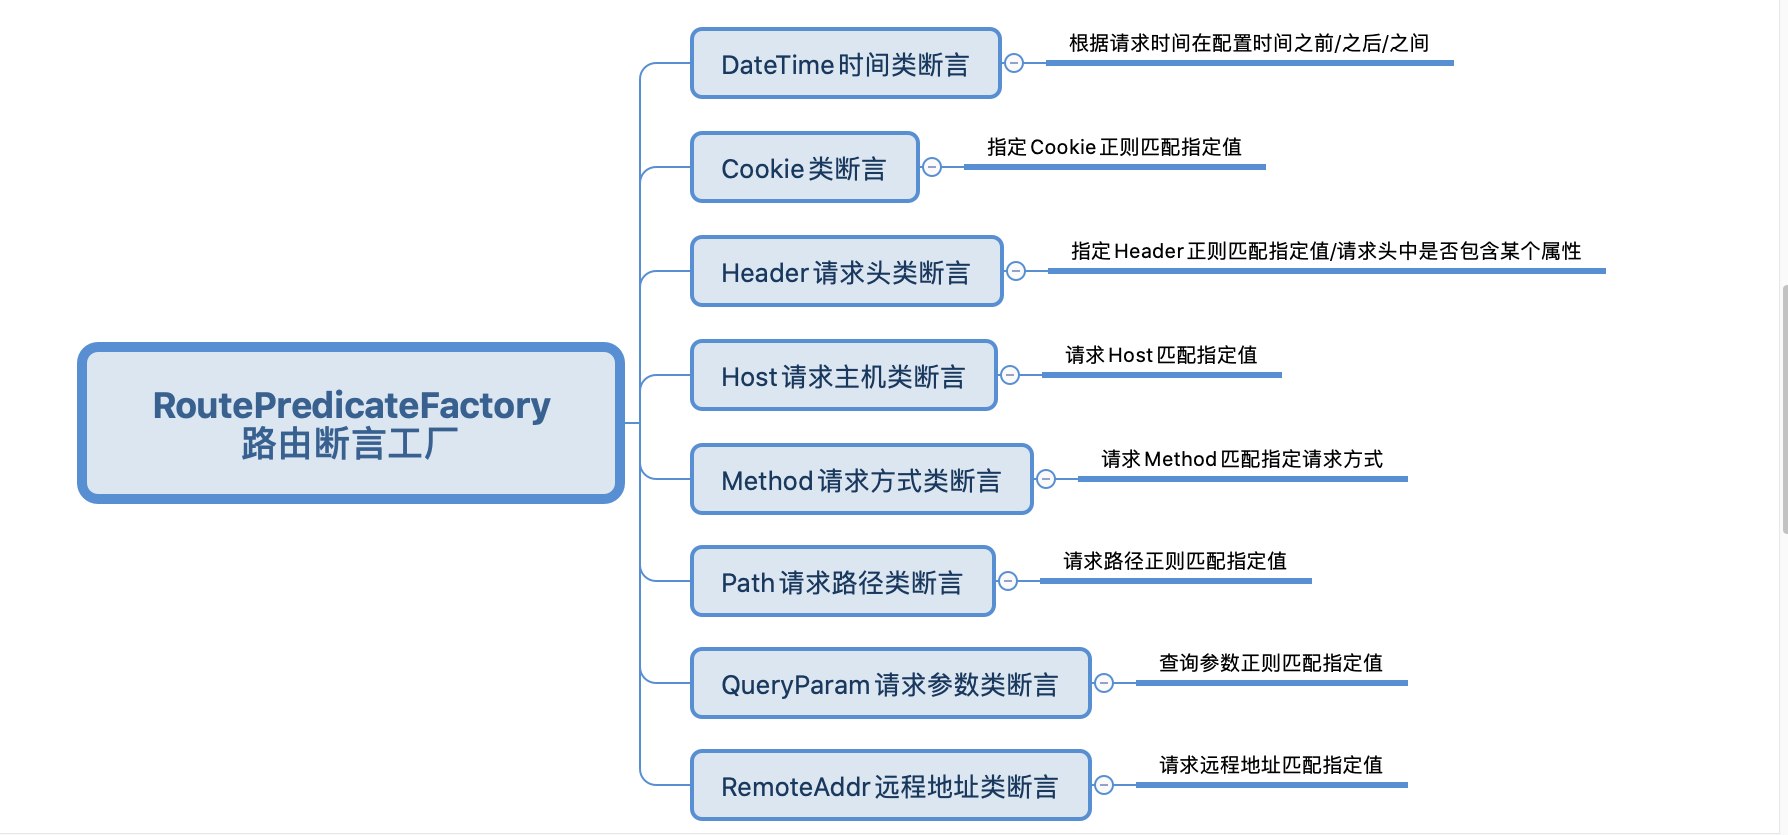
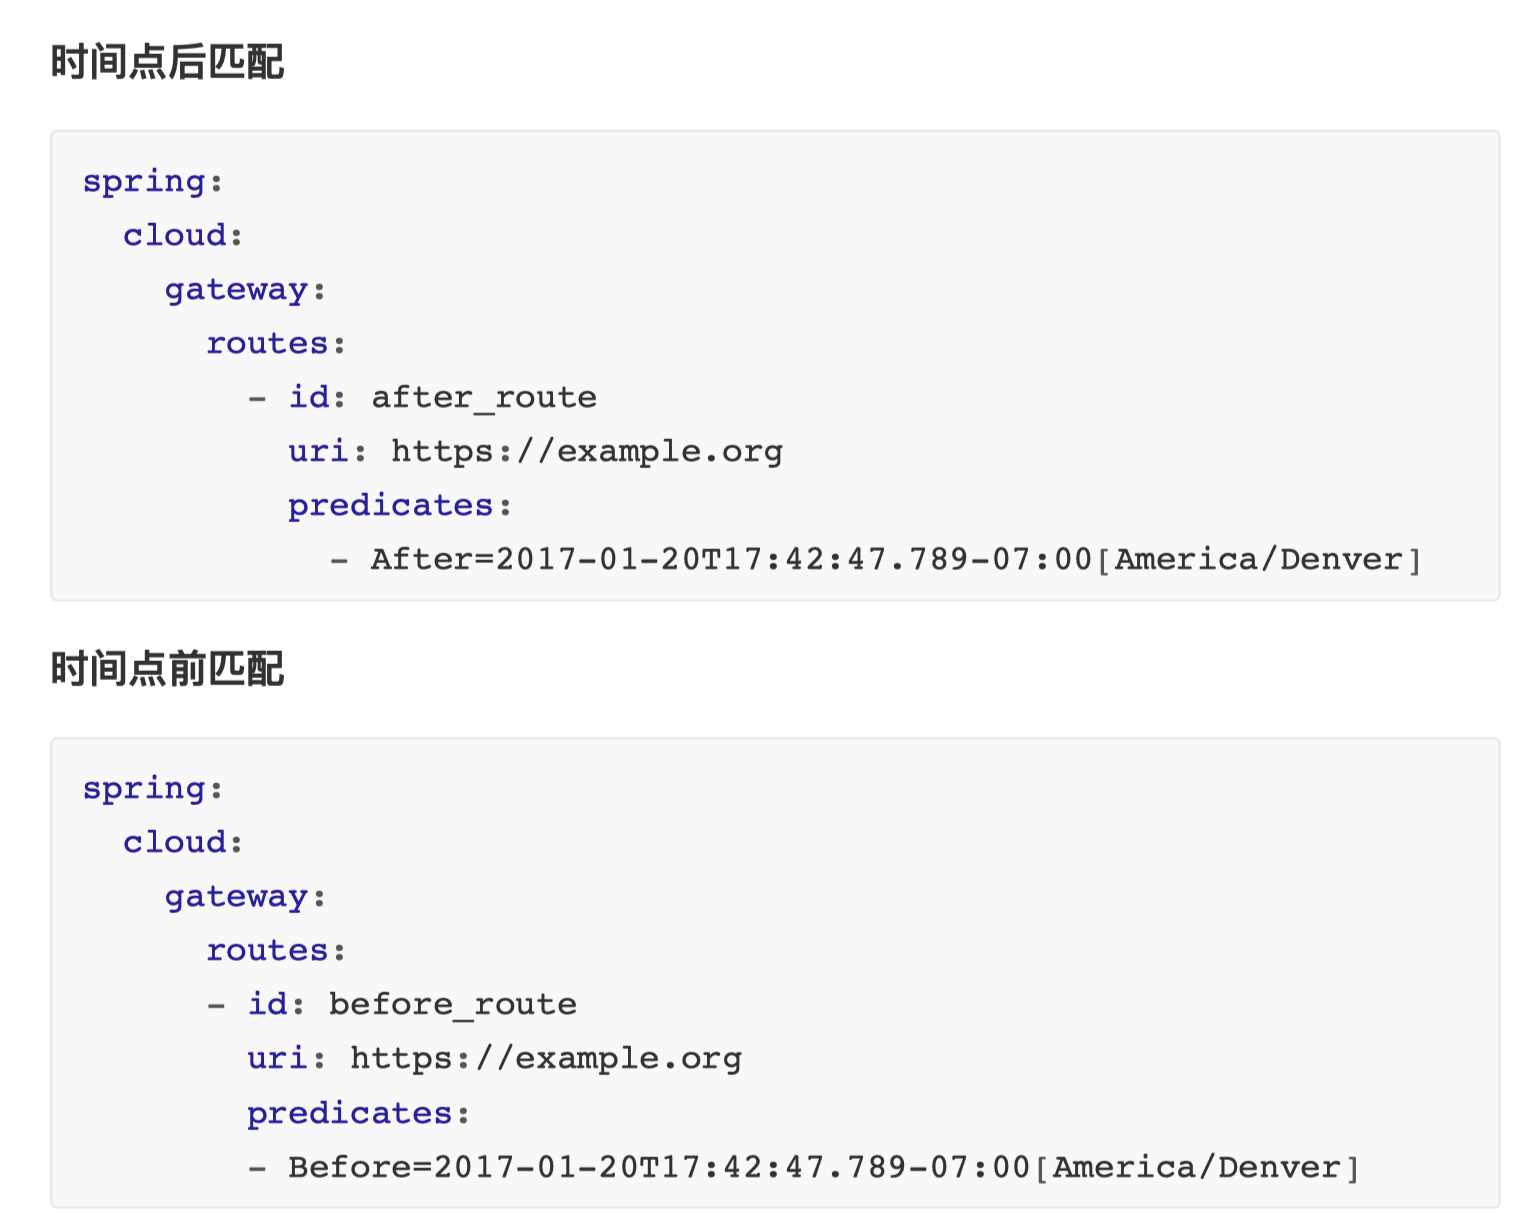
时间区间匹配
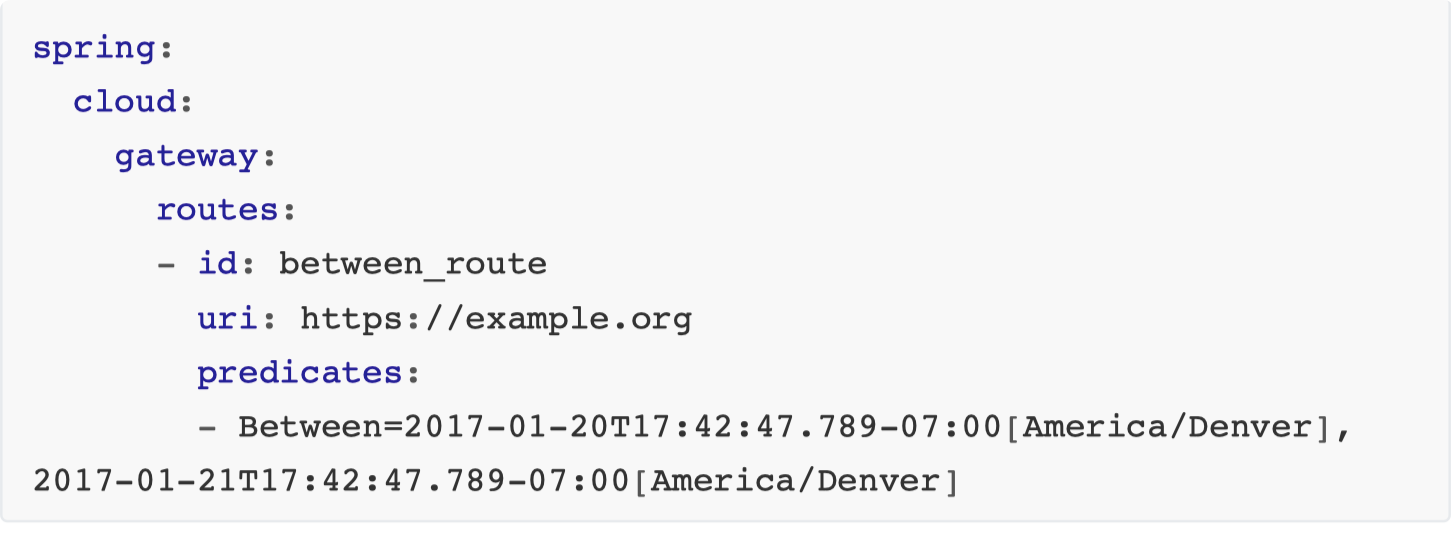
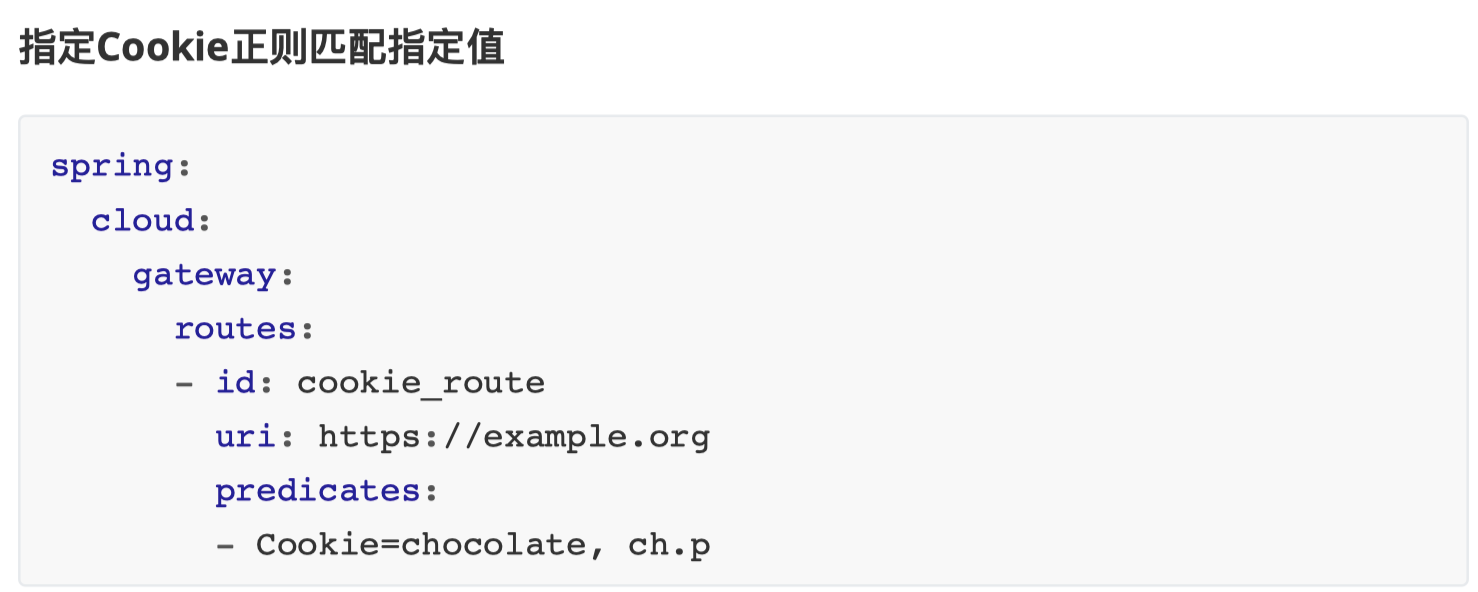
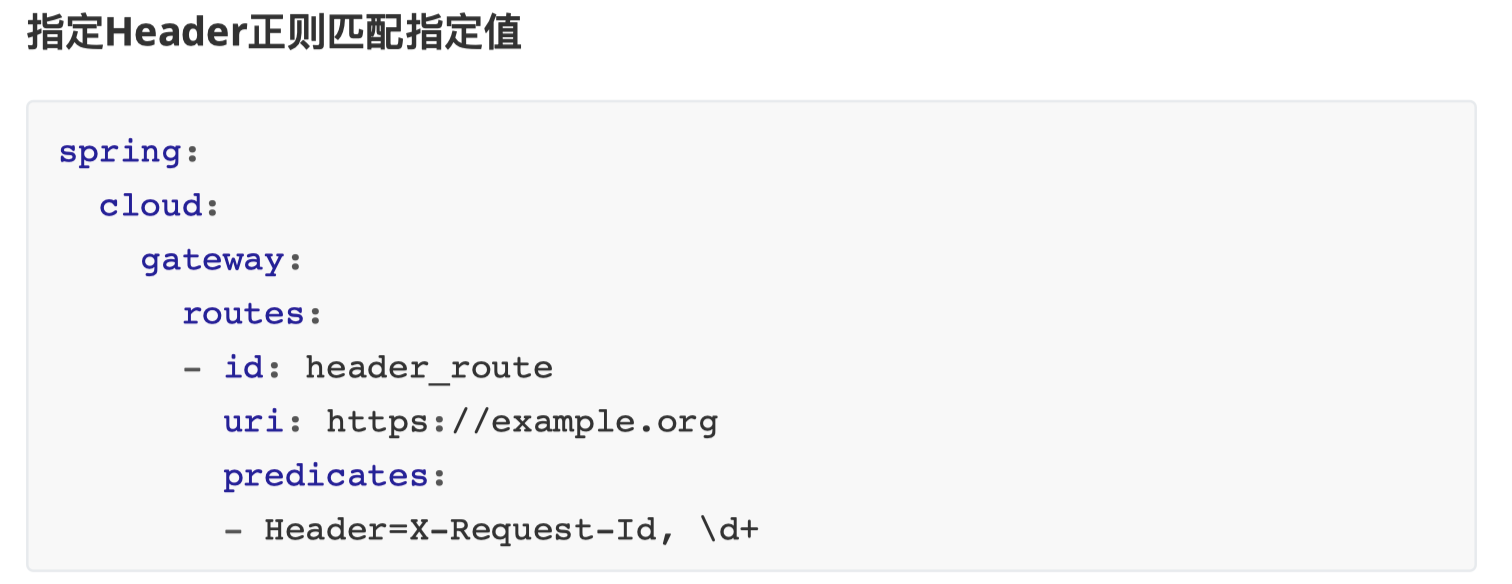
请求 Host 匹配指定值
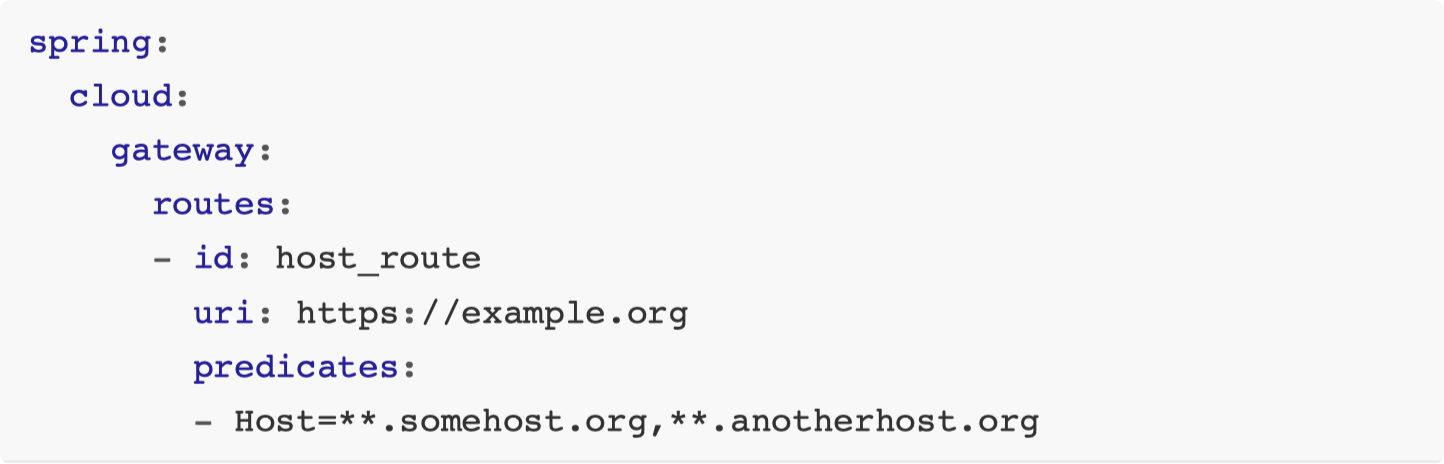
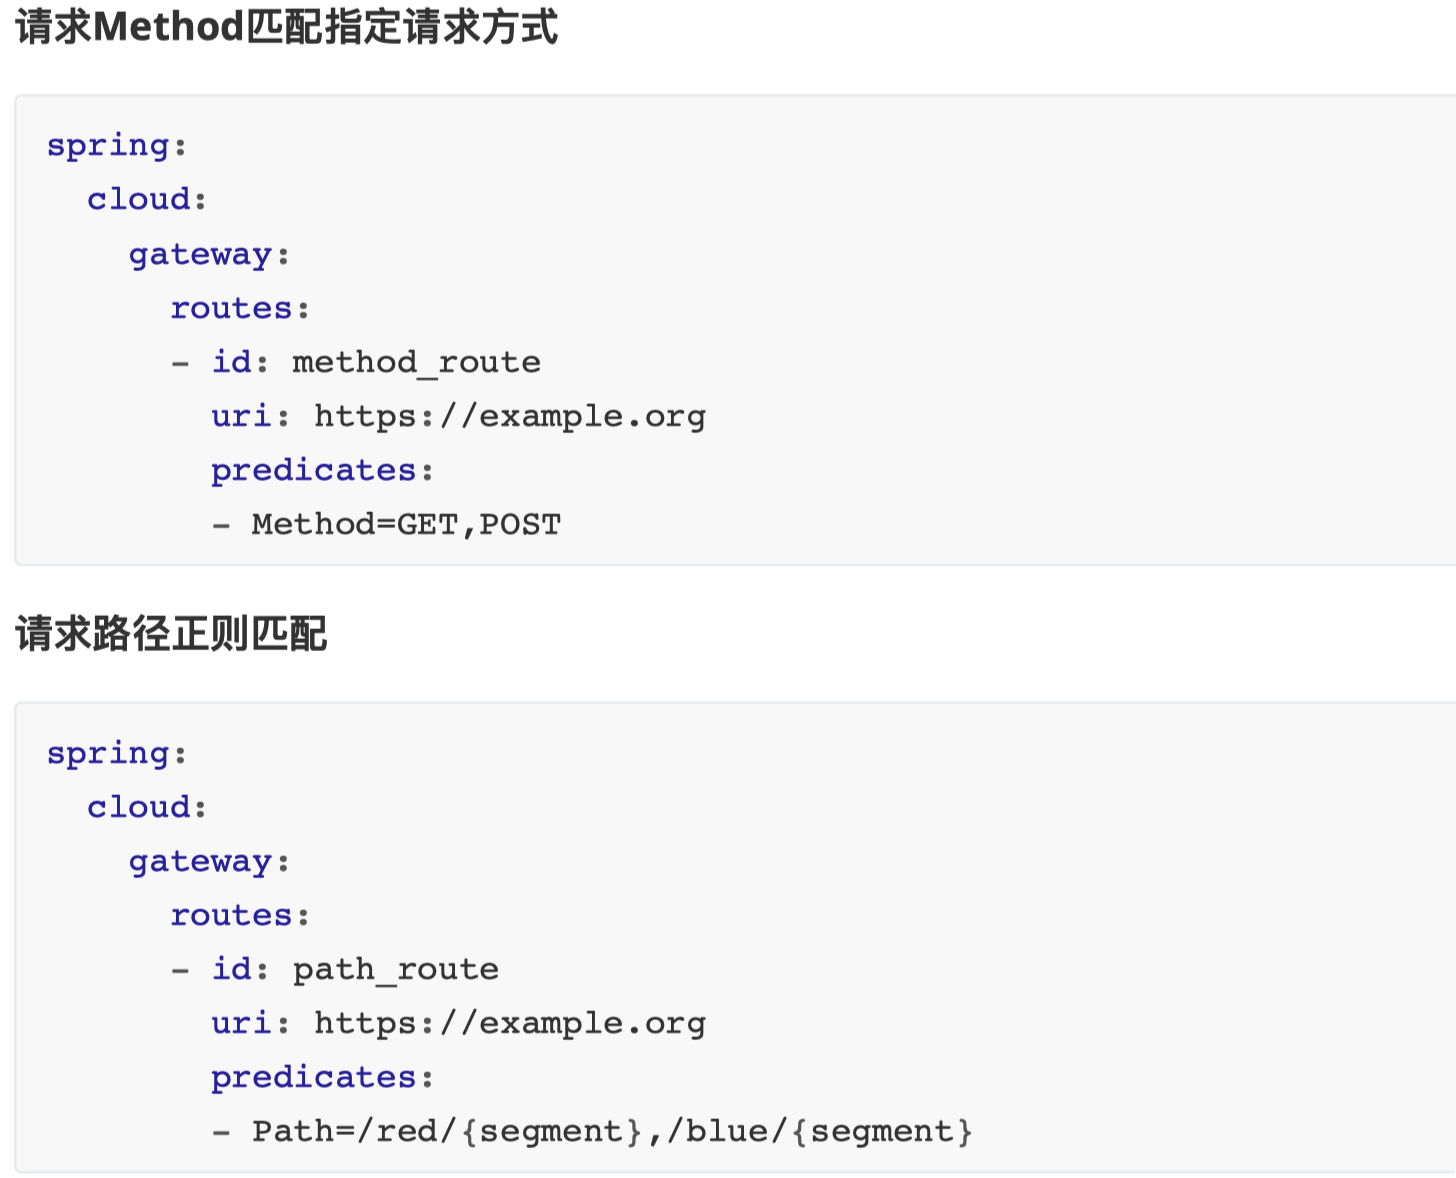
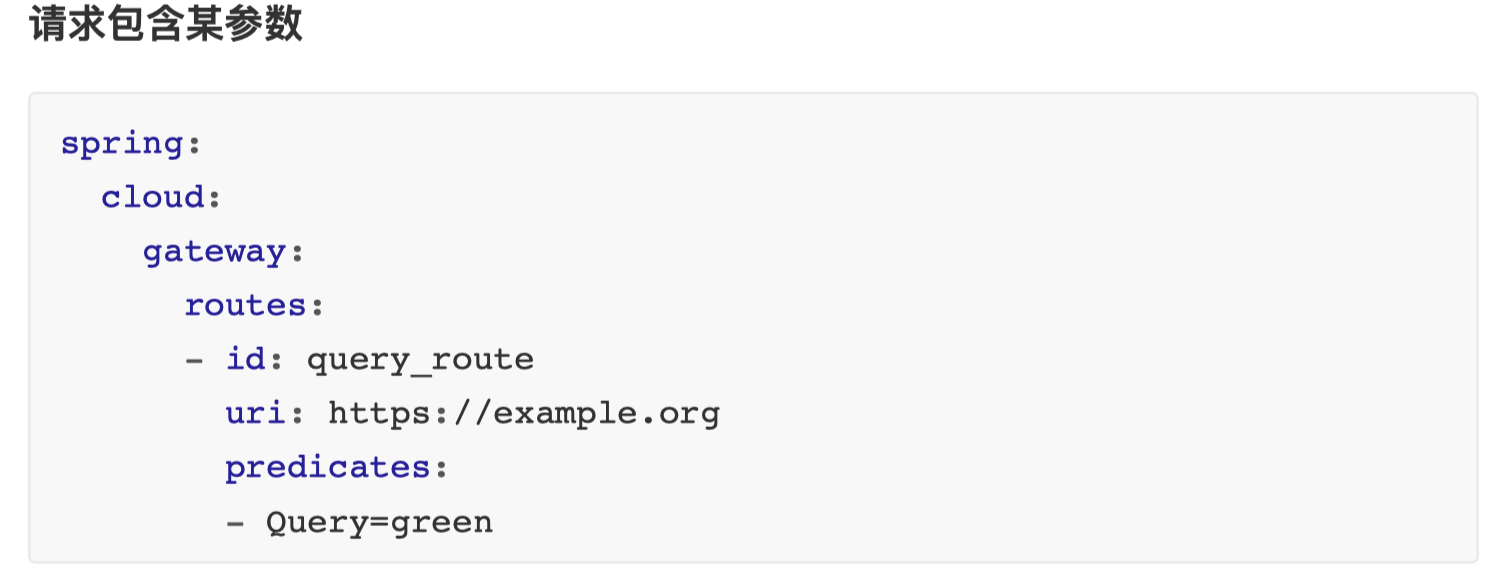
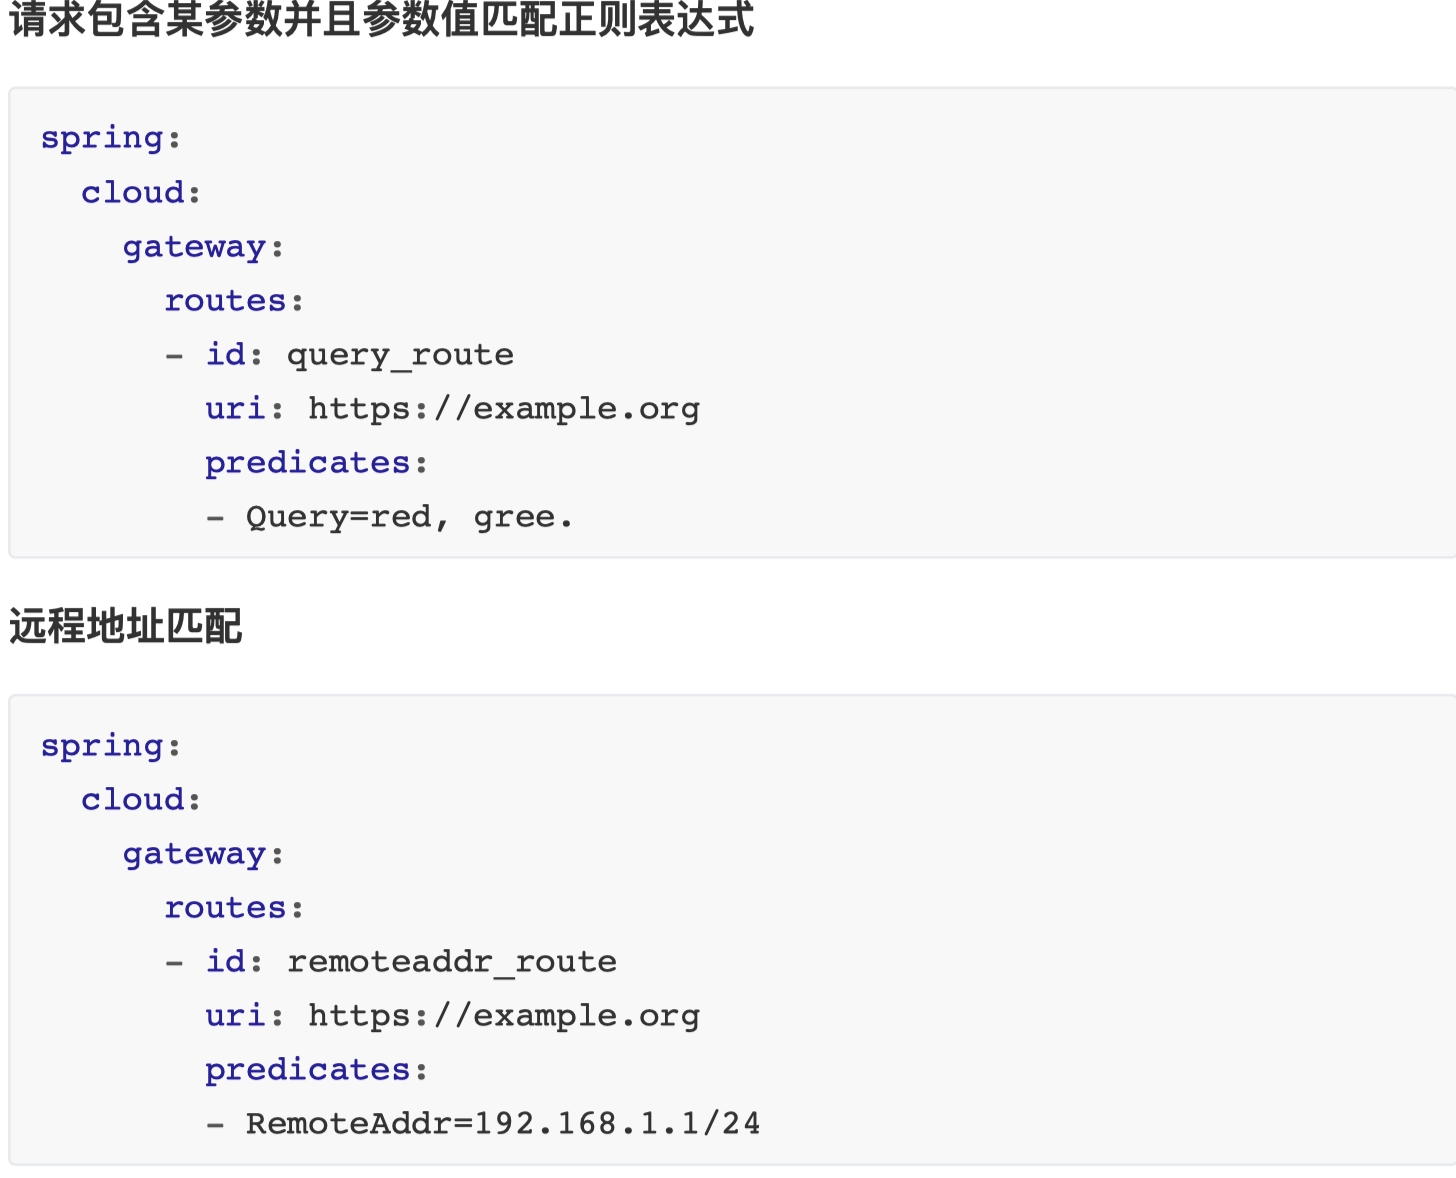
5.4 GateWay 动态路由详解
GateWay ⽀持⾃动从注册中⼼中获取服务列表并访问,即所谓的动态路由 实现步骤如下
1)pom.xml 中添加注册中⼼客户端依赖(因为要获取注册中⼼服务列表,eureka 客户端已经引⼊)
2)动态路由配置
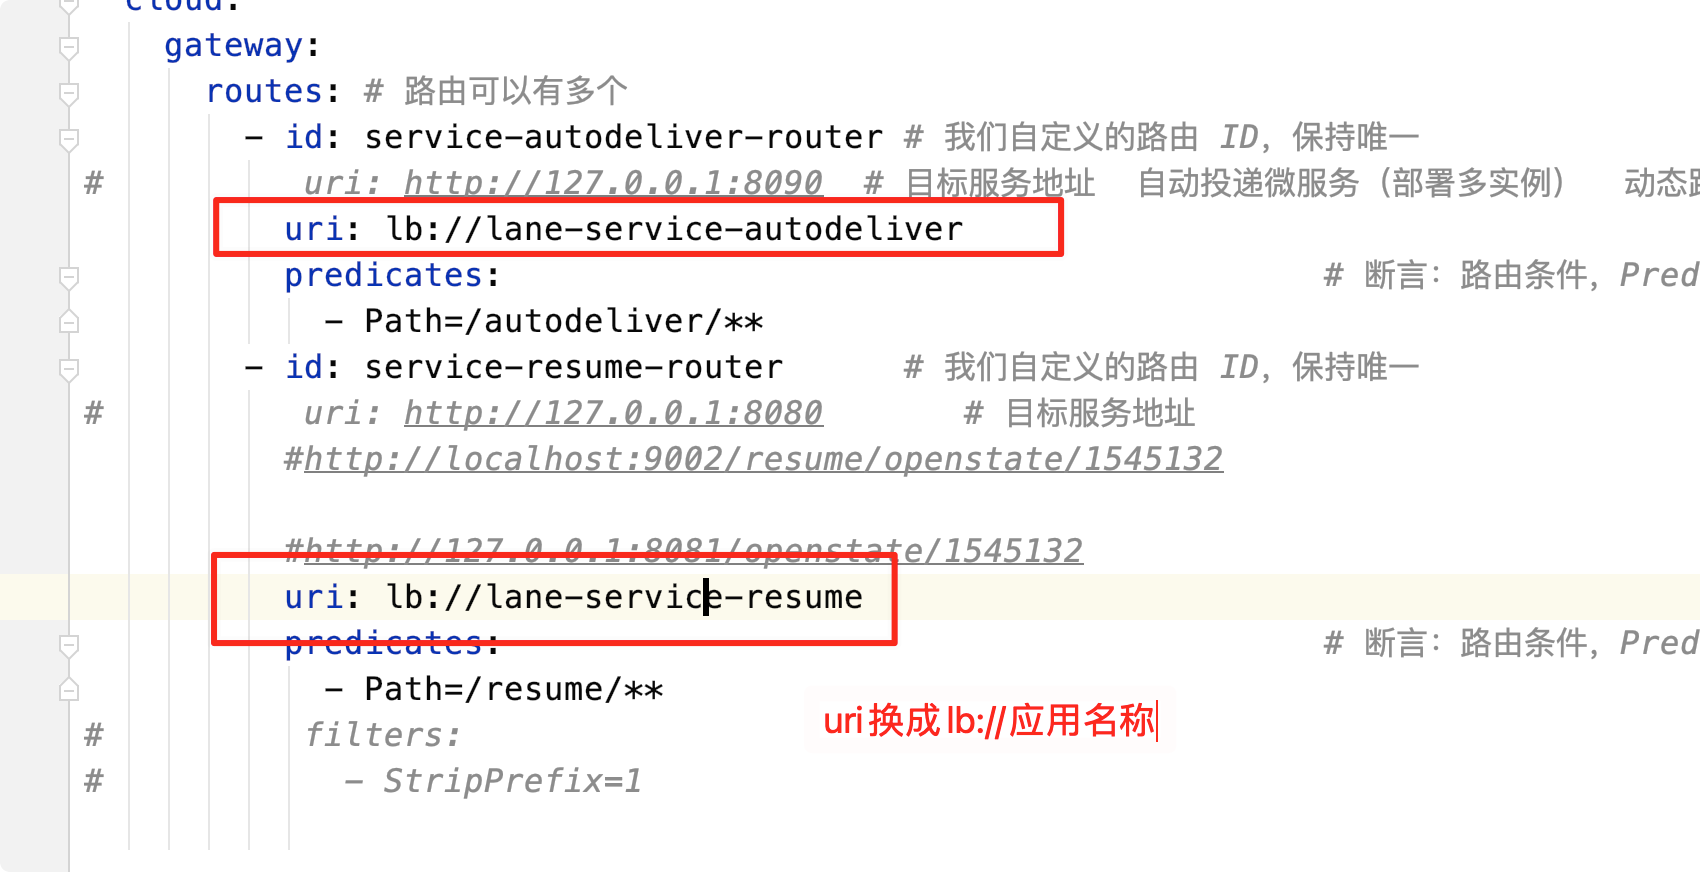
注意:动态路由设置时,uri 以 lb: //开头(lb 代表从注册中⼼获取服务),后⾯是 需要转发到的服务名称
测试效果实现了动态路由负载均衡
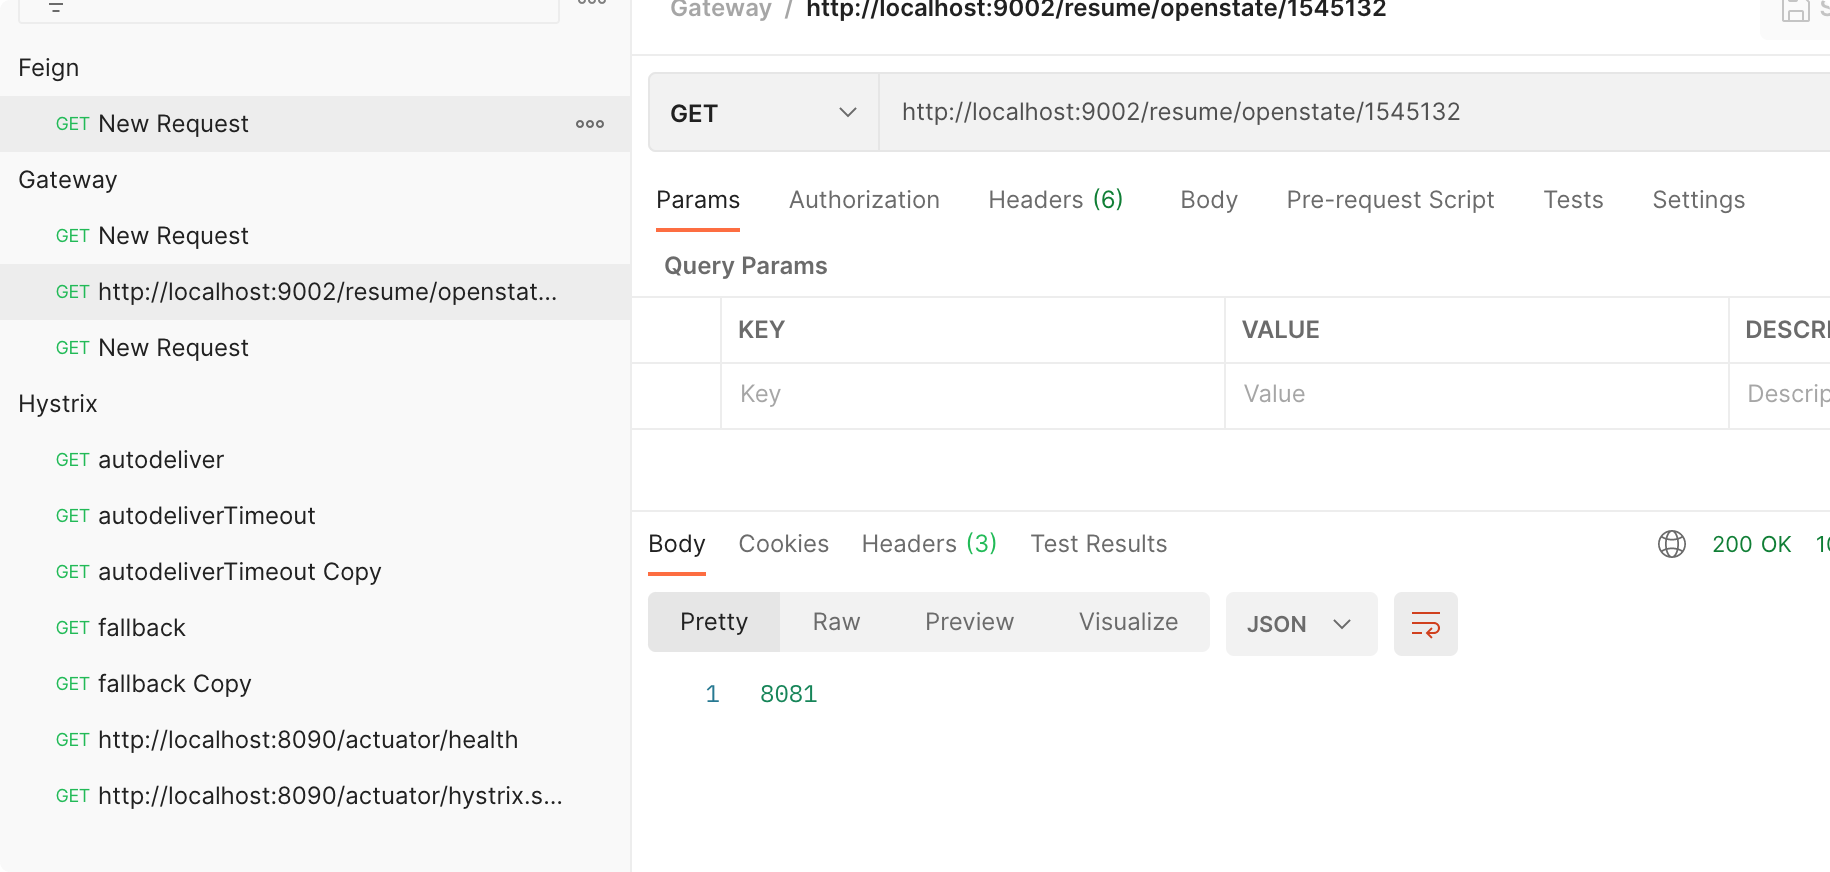
5.5 GateWay 过滤器
5.5.1 GateWay 过滤器简介
从过滤器⽣命周期(影响时机点)的⻆度来说,主要有两个 pre 和 post:
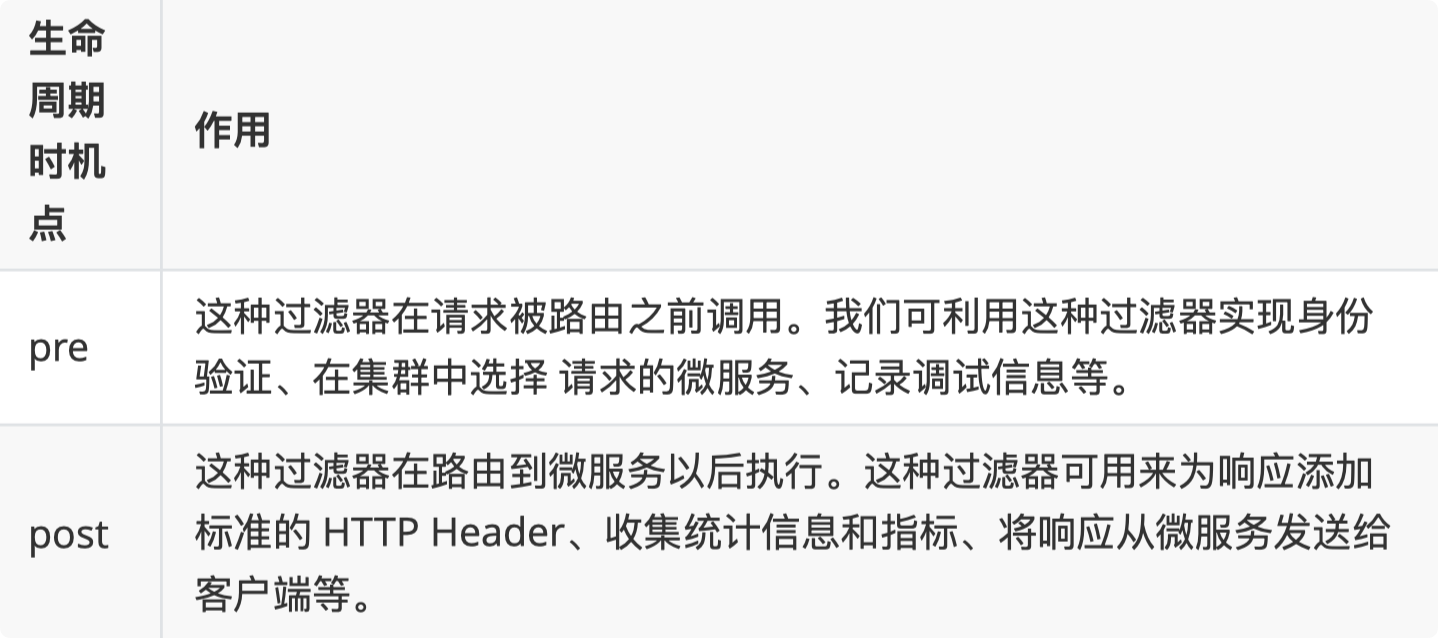
从过滤器类型的⻆度,Spring Cloud GateWay 的过滤器分为 GateWayFilter 和 GlobalFilter 两种
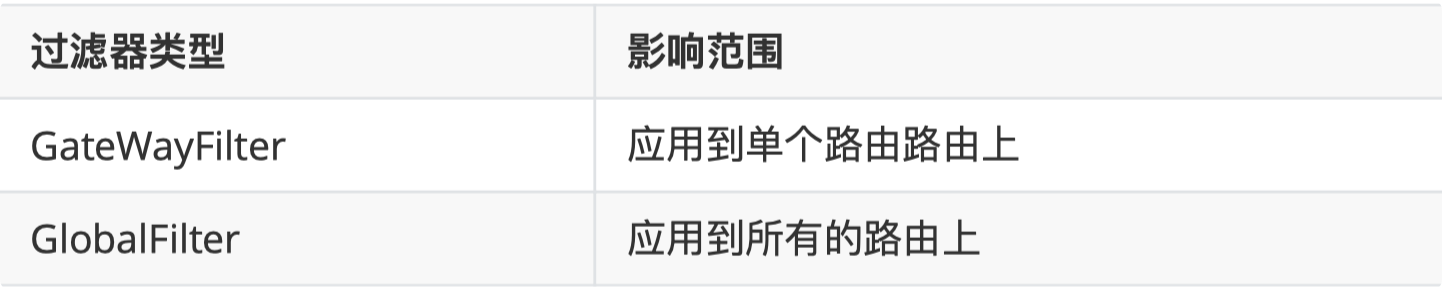
如 Gateway Filter 可以去掉 url 中的占位后转发路由,⽐如下面就是将路径中的第一个地址去掉之后的地址
http://a:8080/b/c 就会变成 http://a:8080/c

注意:GlobalFilter 全局过滤器是程序员使⽤⽐较多的过滤器,我们主要讲解这种类型
5.5.2 ⾃定义全局过滤器实现 IP 访问限制(⿊⽩名单)
请求过来时,判断发送请求的客户端的 ip,如果在⿊名单中,拒绝访问 ⾃定义 GateWay 全局过滤器时,我们实现 Global Filter 接⼝即可,通过全局过滤器可 以实现⿊⽩名单、限流等功能。
Java 代码实现只需要添加一个过滤器的实现类就可以了如下
package com.galaxy.filter;

import lombok.extern.slf4j.Slf4j;
import org.springframework.cloud.gateway.filter.GatewayFilterChain;
import org.springframework.cloud.gateway.filter.GlobalFilter;
import org.springframework.core.Ordered;
import org.springframework.core.io.buffer.DataBuffer;
import org.springframework.http.HttpStatus;
import org.springframework.http.server.reactive.ServerHttpRequest;
import org.springframework.http.server.reactive.ServerHttpResponse;
import org.springframework.web.server.ServerWebExchange;
import reactor.core.publisher.Mono;

import java.util.ArrayList;
import java.util.List;

/**
 * 定义全局过滤器,会对所有路由生效
 * @author lane
 * @date 2021年06月25日 上午9:15
 */
@Slf4j
@Component
public class BlackListFilter implements GlobalFilter, Ordered {
    // 模拟黑名单(实际可以去数据库或者redis中查询)
    private static List<String> blackList = new ArrayList<>();

    static {
        blackList.add("0:0:0:0:0:0:0:1");  // 模拟本机地址
    }

    /**
     * 过滤器核心方法
     * @param exchange 封装了request和response对象的上下文
     * @param chain 网关过滤器链(包含全局过滤器和单路由过滤器)
     * @return
     */
    @Override
    public Mono<Void> filter(ServerWebExchange exchange, GatewayFilterChain chain) {
        // 思路:获取客户端ip,判断是否在黑名单中,在的话就拒绝访问,不在的话就放行
        // 从上下文中取出request和response对象
        ServerHttpRequest request = exchange.getRequest();
        ServerHttpResponse response = exchange.getResponse();

        // 从request对象中获取客户端ip
        String clientIp = request.getRemoteAddress().getHostString();
        // 拿着clientIp去黑名单中查询,存在的话就决绝访问
        if(blackList.contains(clientIp)) {
            // 拒绝访问,返回
            response.setStatusCode(HttpStatus.UNAUTHORIZED); // 状态码
            log.debug("=====>IP:" + clientIp + " 在黑名单中,将被拒绝访问!");
            //返回前台数据
            String data = "Request be denied!";
            DataBuffer wrap = response.bufferFactory().wrap(data.getBytes());
            return response.writeWith(Mono.just(wrap));
        }

        // 合法请求,放行,执行后续的过滤器
        return chain.filter(exchange);
    }
    /*
     * 返回值表示当前过滤器的顺序(优先级),数值越小,优先级越高
     * @author lane
     * @date 2021/6/25 上午9:28
     * @return int
     */
    @Override
    public int getOrder() {
        return 0;
    }
}
访问效果
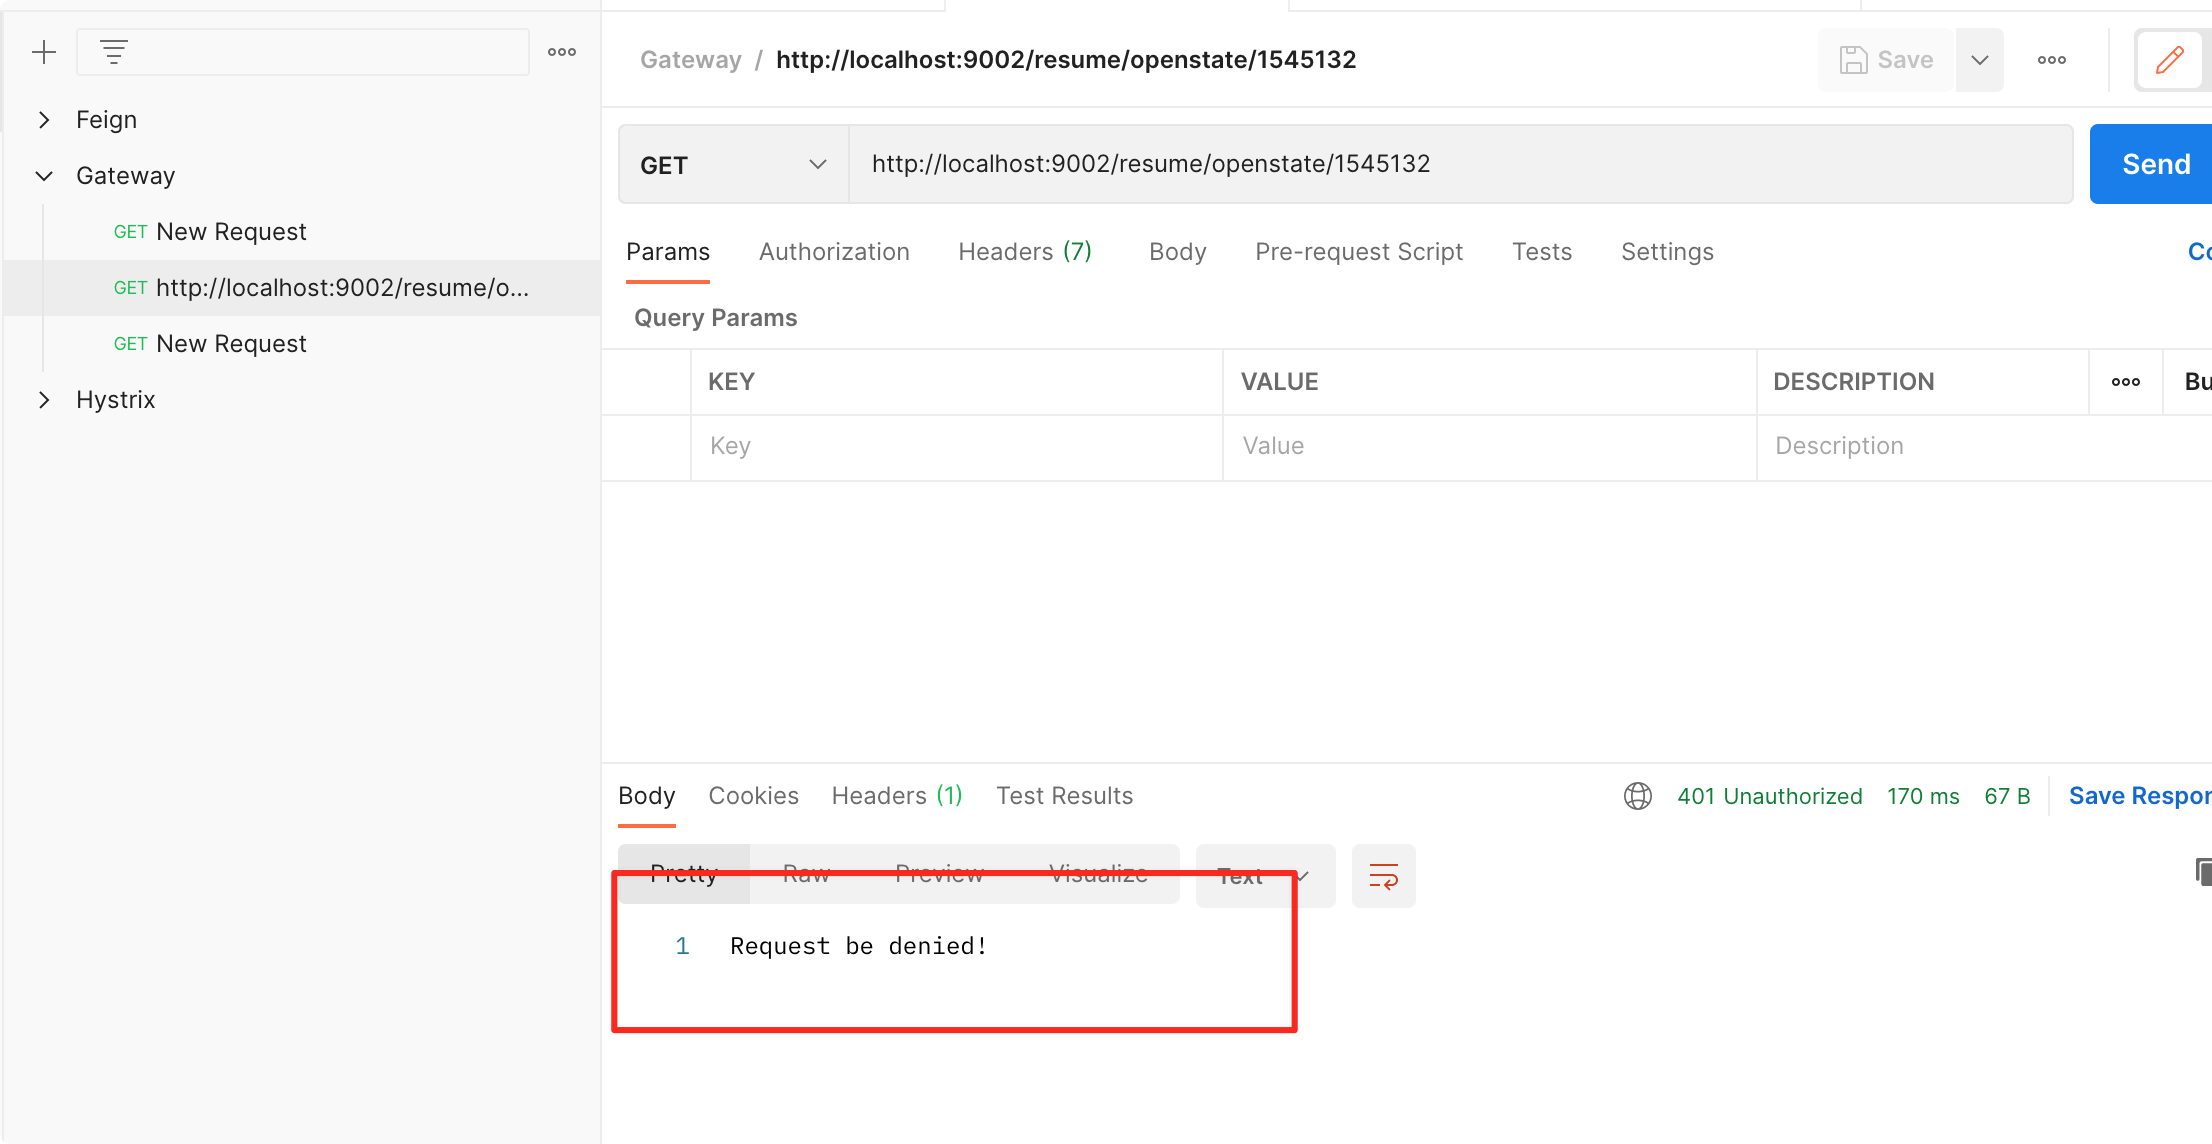
5.6 GateWay ⾼可⽤
⽹关作为⾮常核⼼的⼀个部件,如果挂掉,那么所有请求都可能⽆法路由处理,因 此我们需要做 GateWay 的⾼可⽤。
GateWay 的⾼可⽤很简单:可以启动多个 GateWay 实例来实现⾼可⽤,在 GateWay 的上游使⽤ Nginx 等负载均衡设备进⾏负载转发以达到⾼可⽤的⽬的。
启动多个 GateWay 实例(假如说两个,⼀个端⼝ 9002,⼀个端⼝ 9003),剩下的就 是使⽤ Nginx 等完成负载代理即可。示例如下:
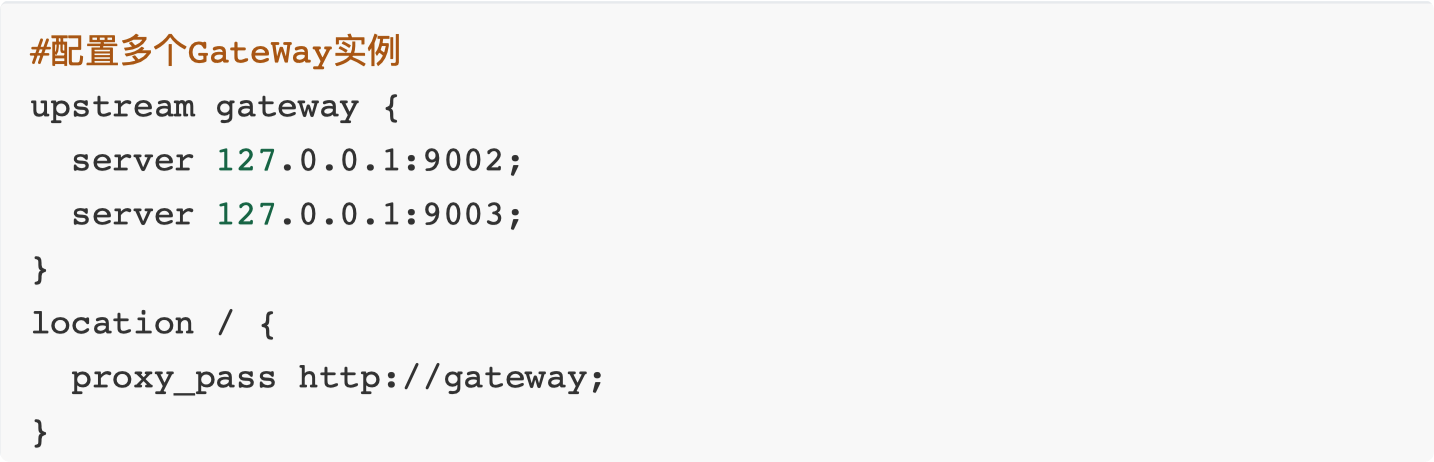
第 6 节 Spring Cloud Config 分布式配置中⼼
6.1 分布式配置中⼼应⽤场景
往往,我们使⽤配置⽂件管理⼀些配置信息,⽐如 application.yml
单体应⽤架构,配置信息的管理、维护并不会显得特别麻烦,⼿动操作就可以,因 为就⼀个⼯程;
微服务架构,因为我们的分布式集群环境中可能有很多个微服务,我们不可能⼀个 ⼀个去修改配置然后重启⽣效,在⼀定场景下我们还需要在运⾏期间动态调整配置 信息,⽐如:根据各个微服务的负载情况,动态调整数据源连接池⼤⼩,我们希望 配置内容发⽣变化的时候,微服务可以⾃动更新。
场景总结如下:
1)集中配置管理,⼀个微服务架构中可能有成百上千个微服务,所以集中配置管理 是很重要的(⼀次修改、到处⽣效)
2)不同环境不同配置,⽐如数据源配置在不同环境(开发 dev,测试 test,⽣产 prod) 中是不同的
3)运⾏期间可动态调整。例如,可根据各个微服务的负载情况,动态调整数据源连 接池⼤⼩等配置修改后可⾃动更新
4)如配置内容发⽣变化,微服务可以⾃动更新配置
那么,我们就需要对配置⽂件进⾏集中式管理,这也是分布式配置中⼼的作⽤
6.2 Spring Cloud Config
6.2.1 Config 简介
Spring Cloud Config 是⼀个分布式配置管理⽅案,包含了 Server 端和 Client 端两个部分。
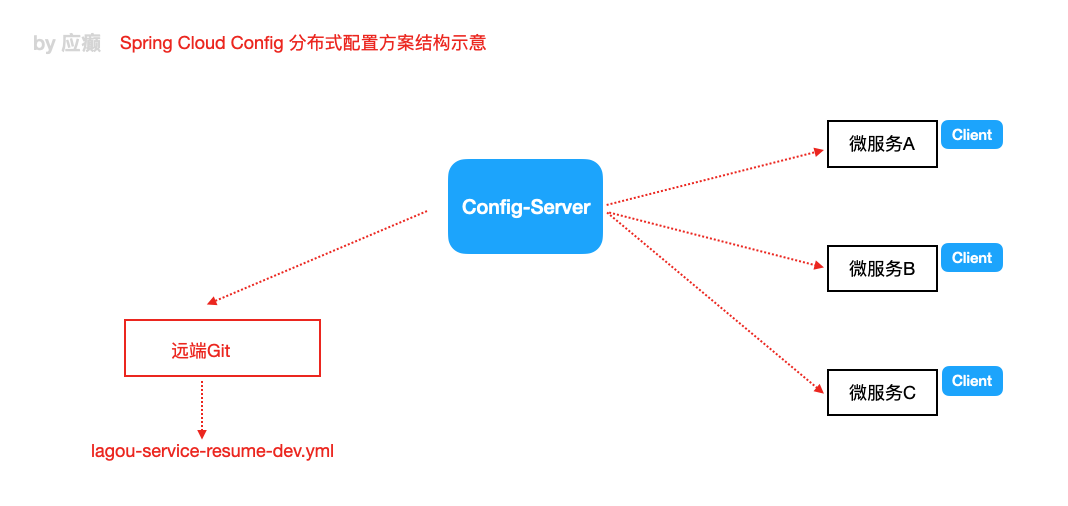
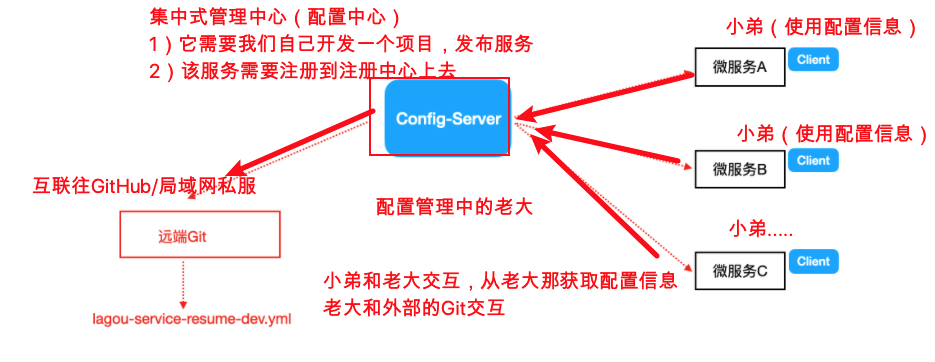
Server 端:提供配置⽂件的存储、以接⼝的形式将配置⽂件的内容提供出去,
通过使⽤@EnableConfigServer 注解在 Spring boot 应⽤中⾮常简单的嵌⼊
Client 端:通过接⼝获取配置数据并初始化⾃⼰的应⽤
6.2.2 Config 分布式配置应⽤
说明:Config Server 是集中式的配置服务,⽤于集中管理应⽤程序各个环境下的配 置。 默认使⽤ Git 存储配置⽂件内容,也可以 SVN。
⽐如,我们要对“简历微服务”的 application.yml 进⾏管理(区分开发环境、测试环 境、⽣产环境)
1)登录码云,创建项⽬ lagou-config-repo
2)上传 yml 配置⽂件,命名规则如下:
{application}-{profile}.yml 或者 {application}-{profile}.properties
其中,application 为应⽤名称,profile 指的是环境(⽤于区分开发环境,测试环 境、⽣产环境等) 示例:lagou-service-resume-dev.yml、lagou-service-resume-test.yml、lagouservice-resume-prod.yml
3)构建 Config Server 统⼀配置中⼼ 新建 SpringBoot ⼯程,引⼊依赖坐标(需要注册⾃⼰到 Eureka)
<?xml version="1.0" encoding="UTF-8"?>
<project xmlns="http://maven.apache.org/POM/4.0.0"
         xmlns:xsi="http://www.w3.org/2001/XMLSchema-instance"
         xsi:schemaLocation="http://maven.apache.org/POM/4.0.0 http://maven.apache.org/xsd/maven-4.0.0.xsd">
    <parent>
        <artifactId>lane-parent-project</artifactId>
        <groupId>com.galaxy</groupId>
        <version>1.0-SNAPSHOT</version>
    </parent>
    <modelVersion>4.0.0</modelVersion>

    <artifactId>lane-cloud-configserver-9006</artifactId>

    <dependencies>
        <!--eureka client 客户端依赖引入-->
        <dependency>
            <groupId>org.springframework.cloud</groupId>
            <artifactId>spring-cloud-starter-netflix-eureka-client</artifactId>
        </dependency>
        <!--config配置中心服务端-->
        <dependency>
            <groupId>org.springframework.cloud</groupId>
            <artifactId>spring-cloud-config-server</artifactId>
        </dependency>
       <!-- <dependency>
            <groupId>org.springframework.cloud</groupId>
            <artifactId>spring-cloud-starter-bus-amqp</artifactId>
        </dependency>-->
    </dependencies>
</project>
配置启动类,使⽤注解@EnableConfigServer 开启配置中⼼服务器功能
package com.galaxy;

import org.springframework.boot.SpringApplication;
import org.springframework.boot.autoconfigure.SpringBootApplication;
import org.springframework.cloud.client.discovery.EnableDiscoveryClient;
import org.springframework.cloud.config.server.EnableConfigServer;

/**
 * @author lane
 * @date 2021年06月25日 上午10:55
 */
@SpringBootApplication
@EnableDiscoveryClient
@EnableConfigServer //开启配置中心server
public class ConfigServerApplication9006 {

    public static void main(String[] args) {
        SpringApplication.run(ConfigServerApplication9006.class,args);
    }
}
application.yml 配置
server:
  port: 9006
#注册到Eureka服务中心
eureka:
  client:
    service-url:
      # 注册到集群,就把多个Eurekaserver地址使用逗号连接起来即可;注册到单实例(非集群模式),那就写一个就ok
      defaultZone:  http://www.abc.com:8761/eureka ,http://www.def.com:8762/eureka
  instance:
    prefer-ip-address: true  #服务实例中显示ip,而不是显示主机名(兼容老的eureka版本)
    # 实例名称: 192.168.1.103:lagou-service-resume:8080,我们可以自定义它
    instance-id: ${spring.cloud.client.ip-address}:${spring.application.name}:${server.port}:@project.version@
spring:
  application:
    name: lane-cloud-configserver
  cloud:
    config:
      server:
        git:
          uri: https://github.com/5173098004/lagou-config-repo.git #配置git服务地址
          username: 123456@qq.com #配置git用户名
          password: yingtian #配置git密码
          search-paths:
            - lagou-config-repo
      # 读取分支
      label: master
#  rabbitmq:
#    host: 127.0.0.1
#    port: 5672
#    username: guest
#    password: guest
#针对的被调用方微服务名称,不加就是全局生效
#lane-service-resume:
#  ribbon:
#    NFLoadBalancerRuleClassName: com.netflix.loadbalancer.RoundRobinRule #负载策略调整
# springboot中暴露健康检查等断点接口
management:
  endpoints:
    web:
      exposure:
        include: "*"
  # 暴露健康接口的细节
  endpoint:
    health:
      show-details: always
测试访问: http://localhost:9006/master/lagou-service-resume-dev.yml ,查看到 配置⽂件内容
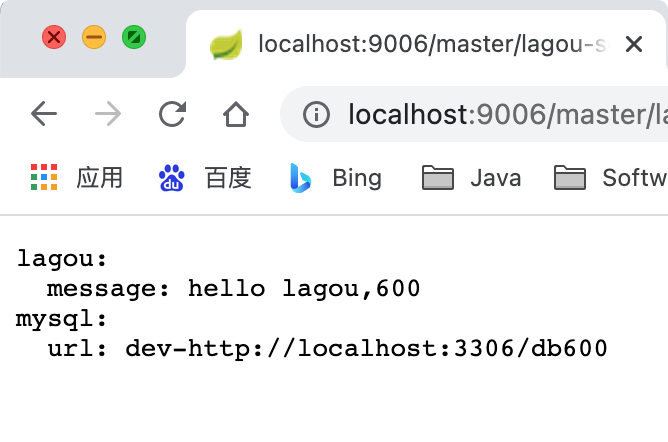
postman 测试
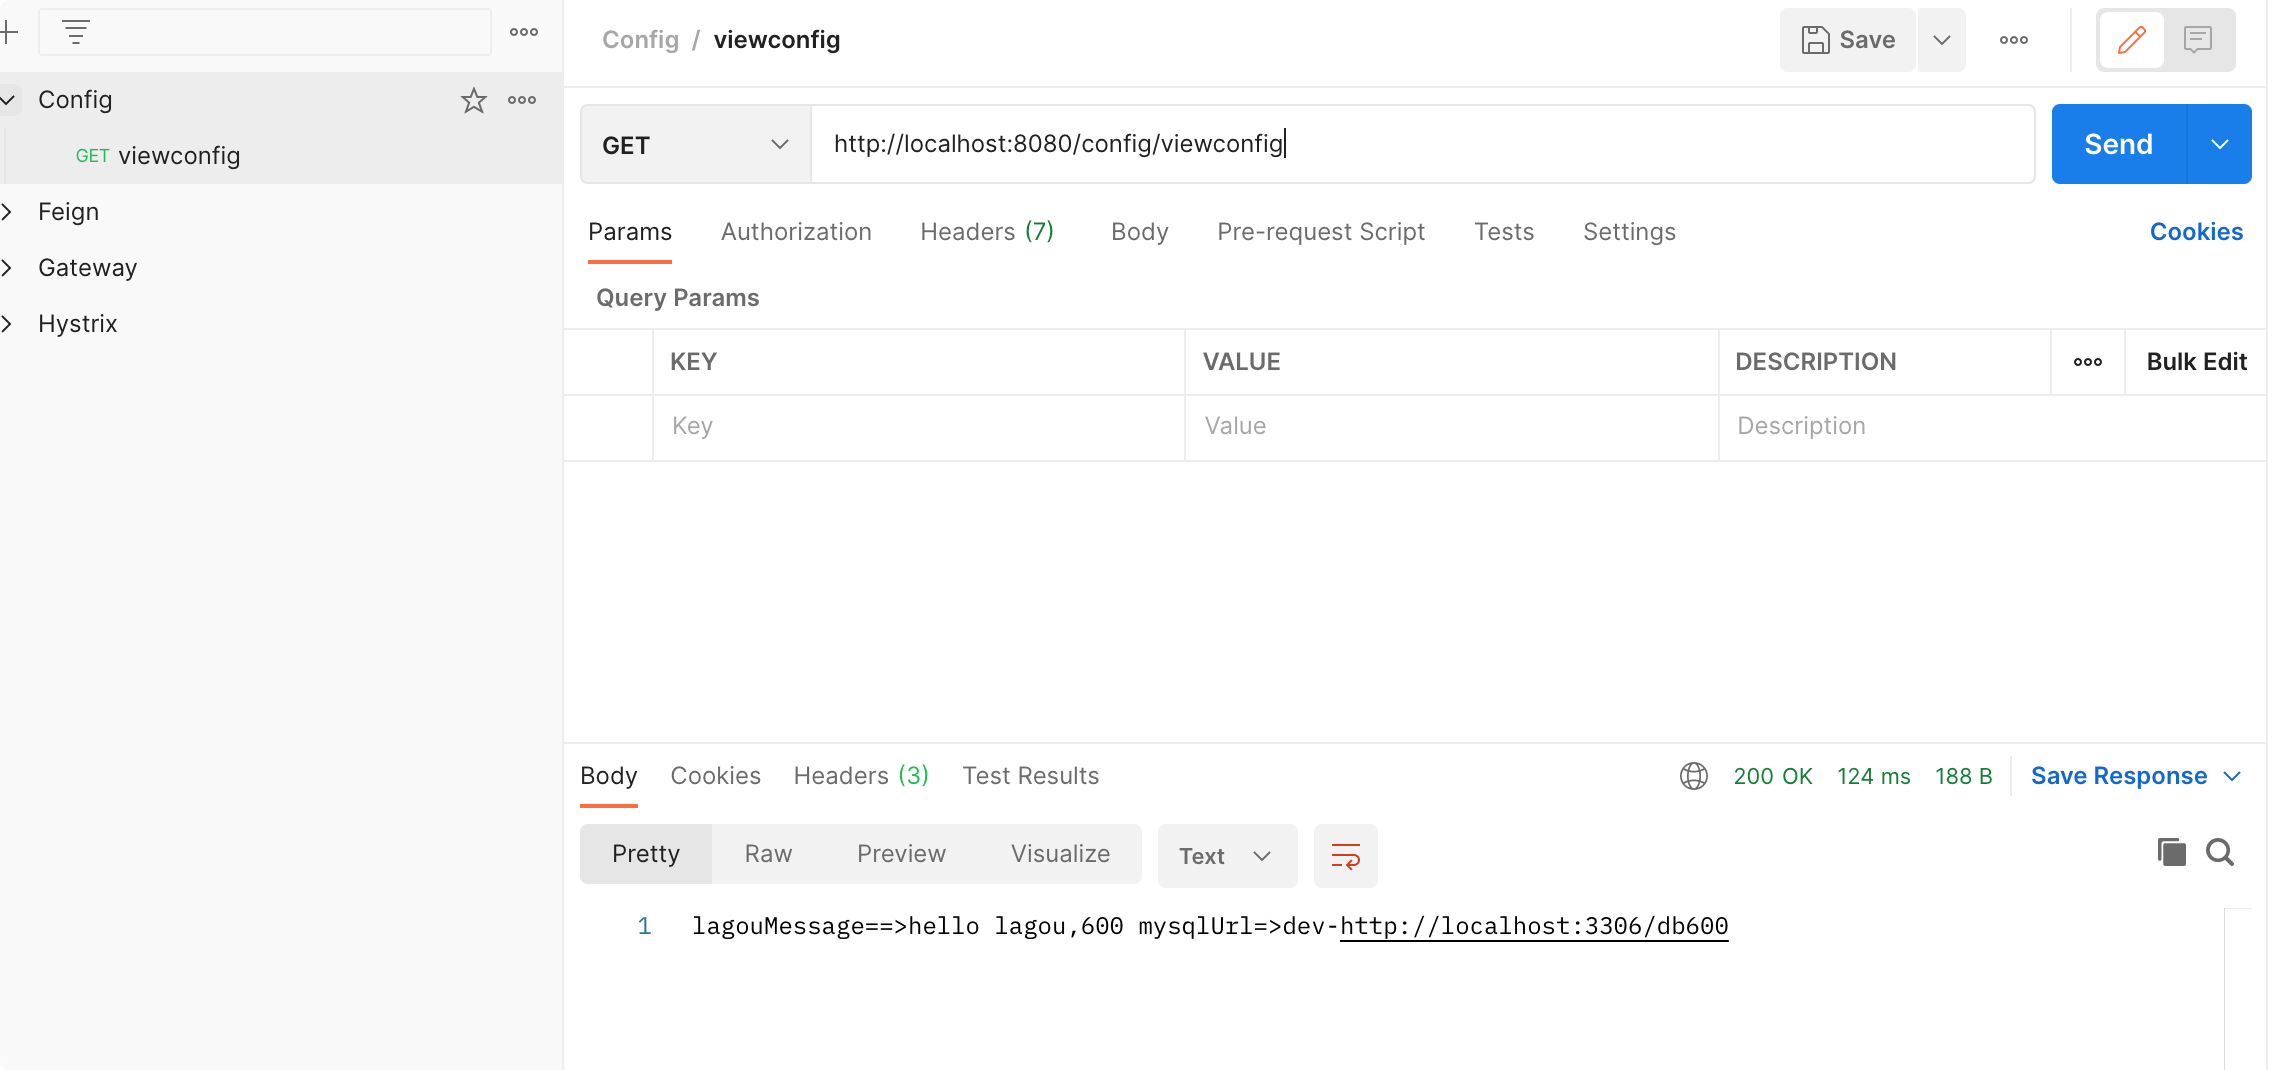
构建 Client 客户端
1.在已有简历微服务 8080 基础上
2.已有⼯程中添加依赖坐标
  <!--     spring cloud config 客户端引入 -->
        <dependency>
            <groupId>org.springframework.cloud</groupId>
            <artifactId>spring-cloud-config-client</artifactId>
        </dependency>
3.application.yml 修改为 bootstrap.yml 配置⽂件
bootstrap.yml 是系统级别的,优先级⽐ application.yml ⾼,应⽤启动时会检查这个 配置⽂件,在这个配置⽂件中指定配置中⼼的服务地址,会⾃动拉取所有应⽤配置 并且启⽤。
(主要是把与统⼀配置中⼼连接的配置信息放到 bootstrap.yml)
注意:需要统⼀读取的配置信息,从集中配置中⼼获取
bootstrap.yml 添加配置中心信息
server:
  port: 8080
spring:
  application:
    name: lane-service-resume
  datasource:
    driver-class-name: com.mysql.jdbc.Driver
    url: jdbc:mysql://localhost:3306/lagou?useUnicode=true&characterEncoding=utf8
    username: root
    password: root
  jpa:
    database: MySQL
    show-sql: true
    hibernate:
      naming:
        physical-strategy: org.hibernate.boot.model.naming.PhysicalNamingStrategyStandardImpl  #避免将驼峰命名转换为下划线命名
  cloud:
    # config客户端配置,和ConfigServer通信,并告知ConfigServer希望获取的配置信息在哪个文件中
    config:
      name: lagou-service-resume  #配置文件名称前缀
      profile: dev  #后缀名称
      label: master #分支名称
      uri: http://localhost:9006    #ConfigServer配置中心地址
#注册到Eureka服务中心
eureka:
  client:
    service-url:
      # 注册到集群,就把多个Eurekaserver地址使用逗号连接起来即可;注册到单实例(非集群模式),那就写一个就ok
      defaultZone:  http://www.abc.com:8761/eureka ,http://www.def.com:8762/eureka
  instance:
    prefer-ip-address: true  #服务实例中显示ip,而不是显示主机名(兼容老的eureka版本)
    # 实例名称: 192.168.18.111:lane-service-resume:8080,我们可以自定义它便于升级管理
    instance-id: ${spring.cloud.client.ip-address}:${spring.application.name}:${server.port}:@project.version@
    #自定义元数据携带
    metadata-map:
      tianhe: nb
      shengzhou12: nb

6.3 Config 配置⼿动刷新
不⽤重启微服务,只需要⼿动的做⼀些其他的操作(访问⼀个地址/refresh)刷新, 之后再访问即可
此时,客户端取到了配置中⼼的值,但当我们修改 GitHub 上⾯的值时,服务端 (Config Server)能实时获取最新的值,但客户端(Config Client)读的是缓存, ⽆法实时获取最新值。Spring Cloud 已 经为我们解决了这个问题,那就是客户端使⽤ post 去触发 refresh,获取最新数据。
1)Client 客户端添加依赖 springboot-starter-actuator(已添加)
2)Client 客户端 bootstrap.yml 中添加配置(暴露通信端点)
![[外链图片转存失败,源站可能有防盗链机制,建议将图片保存下来直接上传(img-s1KjH9RO-1624852119120)(https://scenery-1303094101.cos.ap-shanghai.myqcloud.com/uPic/20210628/image-20210625114446-t1ow9lz.png)]]( https://img-blog.csdnimg.cn/20210628115519399.png?x-oss-process=image/watermark ,type_ZmFuZ3poZW5naGVpdGk,shadow_10,text_aHR0cHM6Ly9ibG9nLmNzZG4ubmV0L0xhbmVEdQ==,size_16,color_FFFFFF,t_70)
3)Client 客户端使⽤到配置信息的类上添加@RefreshScope
4)⼿动向 Client 客户端发起 POST 请求, http://localhost:8080/actuator/refresh , 刷新配置信息
再 GitHub 上修改配置信息不会自动刷新,需要先发起一次 POST 请求访问 http://localhost:8080/actuator/refresh
之后再次访问发现配置信息发生了更改,不需要重启微服务应用了
注意:⼿动刷新⽅式避免了服务重启(流程:Git 改配置—>for 循环脚本⼿动刷新每 个微服务)
思考:可否使⽤⼴播机制,⼀次通知,每个微服务都⽣效,⽅便⼤范围配置刷新?
6.4 Config 配置一次更新全部生效
拉勾内部做分布式配置,⽤的是 zk(存储 + 通知),zk 中数据变更,可以通知各个监 听的客户端,客户端收到通知之后可以做出相应的操作(内存级别的数据直接⽣ 效,对于数据库连接信息、连接池等信息变化更新的,那么会在通知逻辑中进⾏处 理,⽐如重新初始化连接池)
在微服务架构中,我们可以结合消息总线(Bus)实现分布式配置的⾃动更新 (Spring Cloud Config+Spring Cloud Bus)
6.4.1 消息总线 Bus
所谓消息总线 Bus,即我们经常会使⽤ MQ 消息代理构建⼀个共⽤的 Topic,通过这个 Topic 连接各个微服务实例,MQ ⼴播的消息会被所有在注册中⼼的微服务实例监听 和消费。
换⾔之就是通过⼀个主题连接各个微服务,打通脉络。 Spring Cloud Bus(基于 MQ 的,⽀持 RabbitMq/Kafka) 是 Spring Cloud 中的消息 总线⽅案,Spring Cloud Config + Spring Cloud Bus 结合可以实现配置信息的⾃动 更新。
![[外链图片转存失败,源站可能有防盗链机制,建议将图片保存下来直接上传(img-YpJ4XbVw-1624852119121)(https://scenery-1303094101.cos.ap-shanghai.myqcloud.com/uPic/20210628/image-20210625120844-34t8n9u.png)]]( https://img-blog.csdnimg.cn/20210628115550776.png?x-oss-process=image/watermark ,type_ZmFuZ3poZW5naGVpdGk,shadow_10,text_aHR0cHM6Ly9ibG9nLmNzZG4ubmV0L0xhbmVEdQ==,size_16,color_FFFFFF,t_70)
6.4.2 Spring Cloud Config+Spring Cloud Bus 实现⾃动刷新
MQ 消息代理,我们选择使⽤ RabbitMQ,ConfigServer 和 ConfigClient 都添加都 消息总线的⽀持以及与 RabbitMq 的连接信息
1)Config Server 服务端添加消息总线⽀持
 <!--Springcloud bus 引入-->
        <dependency>
            <groupId>org.springframework.cloud</groupId>
            <artifactId>spring-cloud-starter-bus-amqp</artifactId>
        </dependency>
2)ConfigServer 添加配置
    #配置Spring cloud bus 可以使得GitHub公共配置文件修改访问post之后广播所有的微服务生效
	spring
	    rabbitmq:
	        host: 127.0.0.1
	        port: 5672
	        username: guest
	        password: guest
3)微服务暴露端⼝
![[外链图片转存失败,源站可能有防盗链机制,建议将图片保存下来直接上传(img-etwBrlL0-1624852119121)(https://scenery-1303094101.cos.ap-shanghai.myqcloud.com/uPic/20210628/image-20210625121154-iop1hon.png)]]( https://img-blog.csdnimg.cn/20210628115610968.png?x-oss-process=image/watermark ,type_ZmFuZ3poZW5naGVpdGk,shadow_10,text_aHR0cHM6Ly9ibG9nLmNzZG4ubmV0L0xhbmVEdQ==,size_16,color_FFFFFF,t_70)
5)重启各个服务,更改配置之后,向配置中⼼服务端发送 post 请求 http://localhost:9006/actuator/bus-refresh ,各个客户端配置即可⾃动刷新 在⼴播模式下实现了⼀次请求,处处更新,如果我只想定向更新呢?
在发起刷新请求的时候 可以通过后面加上端口号的方式如 http://localhost:9006/actuator/bus-refresh/lane-serviceresume:8081 即为最后⾯跟上要定向刷新的实例的 服务名:端⼝号即可
第 7 节 Spring Cloud Stream 消息驱动组件
Spring Cloud Stream 消息驱动组件帮助我们更快速,更⽅便,更友好的去构建消息驱动微服务的。
定时任务和消息驱动的⼀个对⽐。(消息驱动:基于消息机制做⼀些事情)
MQ:消息队列/消息中间件/消息代理,产品有很多,ActiveMQ RabbitMQ RocketMQ Kafka
7.1 Stream 解决的痛点问题
MQ 消息中间件⼴泛应⽤在应⽤解耦合、异步消息处理、流量削峰等场景中。
不同的 MQ 消息中间件内部机制包括使⽤⽅式都会有所不同,⽐如 RabbitMQ 中有 Exchange(交换机/交换器)这⼀概念,kafka 有 Topic、Partition 分区这些概念, MQ 消息中间件的差异性不利于我们上层的开发应⽤,当我们的系统希望从原有的 RabbitMQ 切换到 Kafka 时,我们会发现⽐较困难,很多要操作可能重来(因为应⽤ 程序和具体的某⼀款 MQ 消息中间件耦合在⼀起了)。
Spring Cloud Stream 进⾏了很好的上层抽象,可以让我们与具体消息中间件解耦合,屏蔽掉了底层具体 MQ 消息中间件的细节差异,就像 Hibernate 屏蔽掉了具体数 据库(Mysql/Oracle ⼀样)。如此⼀来,我们学习、开发、维护 MQ 都会变得轻松。 ⽬前 Spring Cloud Stream ⽀持 RabbitMQ 和 Kafka。
本质:屏蔽掉了底层不同 MQ 消息中间件之间的差异,统⼀了 MQ 的编程模型,降低 了学习、开发、维护 MQ 的成本
7.2 Stream 重要概念
Spring Cloud Stream 是⼀个构建消息驱动微服务的框架。应⽤程序通过 inputs(相当于消息消费者 consumer)或者 outputs(相当于消息⽣产者 producer)来与 Spring Cloud Stream 中的 binder 对象交互,⽽ Binder 对象是⽤来屏蔽底层 MQ 细节 的,它负责与具体的消息中间件交互。
对于我们来说,只需要知道如何使⽤ Spring Cloud Stream 与 Binder 对象 交互即可
![[外链图片转存失败,源站可能有防盗链机制,建议将图片保存下来直接上传(img-jjjnbP0k-1624852119122)(https://scenery-1303094101.cos.ap-shanghai.myqcloud.com/uPic/20210628/image-20210625153019-aca7rrr.png)]]( https://img-blog.csdnimg.cn/20210628115655622.png?x-oss-process=image/watermark ,type_ZmFuZ3poZW5naGVpdGk,shadow_10,text_aHR0cHM6Ly9ibG9nLmNzZG4ubmV0L0xhbmVEdQ==,size_16,color_FFFFFF,t_70)
![[外链图片转存失败,源站可能有防盗链机制,建议将图片保存下来直接上传(img-dcTaXeY2-1624852119123)(https://scenery-1303094101.cos.ap-shanghai.myqcloud.com/uPic/20210628/image-20210625153031-kew5lne.png)]]( https://img-blog.csdnimg.cn/20210628115712869.png?x-oss-process=image/watermark ,type_ZmFuZ3poZW5naGVpdGk,shadow_10,text_aHR0cHM6Ly9ibG9nLmNzZG4ubmV0L0xhbmVEdQ==,size_16,color_FFFFFF,t_70)
Binder 绑定器
Binder 绑定器是 Spring Cloud Stream 中⾮常核⼼的概念,就是通过它来屏蔽底层不同 MQ 消息中间件的细节差异,当需要更换为其他消息中间件时,我们需要做的就 是更换对应的 Binder 绑定器⽽不需要修改任何应⽤逻辑(Binder 绑定器的实现是框 架内置的,Spring Cloud Stream ⽬前⽀持 Rabbit、Kafka 两种消息队列)
7.3 传统 MQ 模型与 Stream 消息驱动模型
![[外链图片转存失败,源站可能有防盗链机制,建议将图片保存下来直接上传(img-YnbvRqKy-1624852119123)(https://scenery-1303094101.cos.ap-shanghai.myqcloud.com/uPic/20210628/image-20210625153146-ikfc0cc.png)]]( https://img-blog.csdnimg.cn/20210628115735780.png?x-oss-process=image/watermark ,type_ZmFuZ3poZW5naGVpdGk,shadow_10,text_aHR0cHM6Ly9ibG9nLmNzZG4ubmV0L0xhbmVEdQ==,size_16,color_FFFFFF,t_70)
7.4 Stream 消息通信⽅式及编程模型
7.4.1 Stream 消息通信⽅式
Stream 中的消息通信⽅式遵循了发布—订阅模式。
在 Spring Cloud Stream 中的消息通信⽅式遵循了发布-订阅模式,当⼀条消息被投递到消息中间件之 后,它会通过共享的 Topic 主题进⾏⼴播,消息消费者在订阅的 主题中收到它并触发⾃身的业务逻辑处理。这⾥所提到的 Topic 主题是 Spring Cloud Stream 中的⼀个抽象概念,⽤来代表发布共享消息给消 费者的地⽅。在不同 的消息中间件中, Topic 可能对应着不同的概念,⽐如:在 RabbitMQ 中的它对应 了 Exchange、在 Kakfa 中则对应了 Kafka 中的 Topic。
7.4.2 Stream 编程注解
如下的注解⽆⾮在做⼀件事,把我们结构图中那些组成部分上下关联起来,打通通 道(这样的话⽣产者的 message 数据才能进⼊ mq,mq 中数据才能进⼊消费者⼯ 程)。
![[外链图片转存失败,源站可能有防盗链机制,建议将图片保存下来直接上传(img-hlyl8del-1624852119124)(https://scenery-1303094101.cos.ap-shanghai.myqcloud.com/uPic/20210628/image-20210625153332-yncvwop.png)]]( https://img-blog.csdnimg.cn/20210628115755563.png?x-oss-process=image/watermark ,type_ZmFuZ3poZW5naGVpdGk,shadow_10,text_aHR0cHM6Ly9ibG9nLmNzZG4ubmV0L0xhbmVEdQ==,size_16,color_FFFFFF,t_70)
接下来,我们创建三个⼯程(我们基于 RabbitMQ,RabbitMQ 的安装和使⽤这⾥不 再说明)
lane-cloud-stream-producer-9090, 作为⽣产者端发消息
lane-cloud-stream-consumer-9091,作为消费者端接收消息
lane-cloud-stream-consumer-9092,作为消费者端接收消息
7.5 Stream 消息驱动之开发⽣产者端
1)在 lane_parent 下新建⼦ module:lane-cloud-stream-producer-9090
2)pom.xml 中添加依赖
<?xml version="1.0" encoding="UTF-8"?>
<project xmlns="http://maven.apache.org/POM/4.0.0"
         xmlns:xsi="http://www.w3.org/2001/XMLSchema-instance"
         xsi:schemaLocation="http://maven.apache.org/POM/4.0.0 http://maven.apache.org/xsd/maven-4.0.0.xsd">
    <parent>
        <artifactId>lane-parent-project</artifactId>
        <groupId>com.galaxy</groupId>
        <version>1.0-SNAPSHOT</version>
    </parent>
    <modelVersion>4.0.0</modelVersion>

    <artifactId>lane-cloud-stream-producer-9090</artifactId>

    <dependencies>
        <!--eureka client 客户端依赖引入-->
        <dependency>
            <groupId>org.springframework.cloud</groupId>
            <artifactId>spring-cloud-starter-netflix-eureka-client</artifactId>
        </dependency>

        <!--spring cloud stream 依赖(rabbit)-->
        <dependency>
            <groupId>org.springframework.cloud</groupId>
            <artifactId>spring-cloud-starter-stream-rabbit</artifactId>
        </dependency>

    </dependencies>

</project>
3)application.yml 添加配置
server:
  port: 9090
spring:
  application:
    name: lane-cloud-stream-producer
  cloud:
    stream:
      binders: # 绑定MQ服务信息(此处我们是RabbitMQ)
        laneRabbitBinder: # 给Binder定义的名称,用于后面的关联
          type: rabbit # MQ类型,如果是Kafka的话,此处配置kafka
          environment: # MQ环境配置(用户名、密码等)
            spring:
              rabbitmq:
                host: localhost
                port: 5672
                username: guest
                password: guest
      bindings: # 关联整合通道和binder对象
        output: # output是我们定义的通道名称,此处不能乱改
          destination: laneExchange # 要使用的Exchange名称(消息队列主题名称)
          content-type: text/plain # application/json # 消息类型设置,比如json
          binder: laneRabbitBinder # 关联MQ服务
eureka:
  client:
    serviceUrl: # eureka server的路径
      defaultZone:  http://www.abc.com:8761/eureka/ ,http://www.def.com:8762/eureka/ #把 eureka 集群中的所有 url 都填写了进来,也可以只写一台,因为各个 eureka server 可以同步注册表
    instance:
      prefer-ip-address: true #使用ip注册
4.启动类
package com.galaxy;

import org.springframework.boot.SpringApplication;
import org.springframework.boot.autoconfigure.SpringBootApplication;
import org.springframework.cloud.client.discovery.EnableDiscoveryClient;

/**
 * @author lane
 * @date 2021年06月25日 下午4:01
 */
@SpringBootApplication
@EnableDiscoveryClient
public class StreamProducerApplication9090 {
    public static void main(String[] args) {
        SpringApplication.run(StreamProducerApplication9090.class,args);
    }
}
5)业务类开发(发送消息接⼝、接⼝实现类、Controller)接⼝
package com.galaxy.service;

/**
 * @author lane
 * @date 2021年06月25日 下午4:28
 */
public interface IMessageProducer {

    String sendMessage(String message);
}
实现类
package com.galaxy.service.impl;

import com.galaxy.service.IMessageProducer;
import org.springframework.beans.factory.annotation.Autowired;
import org.springframework.cloud.stream.annotation.EnableBinding;
import org.springframework.cloud.stream.messaging.Source;
import org.springframework.messaging.support.MessageBuilder;

/**
 * // Source.class里面就是对输出通道的定义(这是Spring Cloud Stream内置的通道封装)
 * @author lane
 * @date 2021年06月25日 下午4:29
 */
@EnableBinding(Source.class)
public class MessageProducerImpl implements IMessageProducer {

    // 将MessageChannel的封装对象Source注入到这里使用
    @Autowired
    private Source source;
    @Override
    public String sendMessage(String message) {
        // 向mq中发送消息(并不是直接操作mq,应该操作的是spring cloud stream)
        // 使用通道向外发出消息(指的是Source里面的output通道)
        source.output().send(MessageBuilder.withPayload(message).build());
        System.out.println("send message start。。。");
        return null;
    }
}
测试类
import com.galaxy.StreamProducerApplication9090;
import com.galaxy.service.IMessageProducer;
import org.junit.Test;
import org.junit.runner.RunWith;
import org.springframework.beans.factory.annotation.Autowired;
import org.springframework.boot.test.context.SpringBootTest;
import org.springframework.test.context.junit4.SpringJUnit4ClassRunner;

/**
 * @author lane
 * @date 2021年06月25日 下午4:31
 */
@SpringBootTest(classes = {StreamProducerApplication9090.class})
@RunWith(SpringJUnit4ClassRunner.class)
public class StreamProducerTest {

    @Autowired
    IMessageProducer iMessageProducer;
    @Test
    public void test(){

        iMessageProducer.sendMessage("hello world");
    }
}
测试下效果,先启动 rabbitmq ,没有出现错误
![[外链图片转存失败,源站可能有防盗链机制,建议将图片保存下来直接上传(img-ieR6pFlv-1624852119124)(https://scenery-1303094101.cos.ap-shanghai.myqcloud.com/uPic/20210628/image-20210625163827-ja9mvg7.png)]]( https://img-blog.csdnimg.cn/20210628115816119.png?x-oss-process=image/watermark ,type_ZmFuZ3poZW5naGVpdGk,shadow_10,text_aHR0cHM6Ly9ibG9nLmNzZG4ubmV0L0xhbmVEdQ==,size_16,color_FFFFFF,t_70)
7.6 Stream 消息驱动之开发消费者端
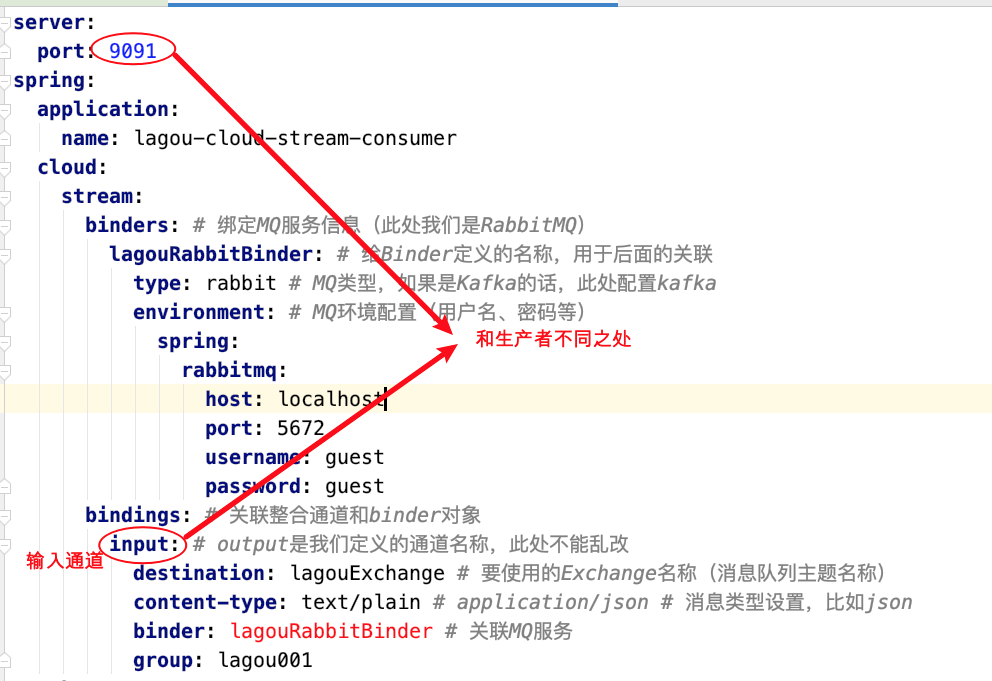
2)消息消费者监听
package com.galaxy.service.impl;

import org.springframework.cloud.stream.annotation.EnableBinding;
import org.springframework.cloud.stream.annotation.StreamListener;
import org.springframework.cloud.stream.messaging.Sink;
import org.springframework.messaging.Message;

/**
 * @author lane
 * @date 2021年06月25日 下午4:52
 */
@EnableBinding(Sink.class)
public class ReceiveMessage {

    @StreamListener(Sink.INPUT)
    public void receiveMessages(Message<String> message) {
        System.out.println("=========接收到的消息:" + message);
    }

}
测试效果

7.7 Stream ⾼级之⾃定义消息通道
Stream 内置了两种接⼝ Source 和 Sink 分别定义了 binding 为 “input” 的输⼊流和 “output” 的输出流,我们也可以⾃定义各种输⼊输出流(通道),但实际我们可以 在我们的服务中使⽤多个 binder、多个输⼊通道和输出通道,然⽽默认就带了⼀个 input 的输⼊通道和⼀个 output 的输出通道,怎么办?
我们是可以⾃定义消息通道的,学着 Source 和 Sink 的样⼦,给你的通道定义个⾃⼰ 的名字,多个输⼊通道和输出通道是可以写在⼀个类中的。
定义接⼝
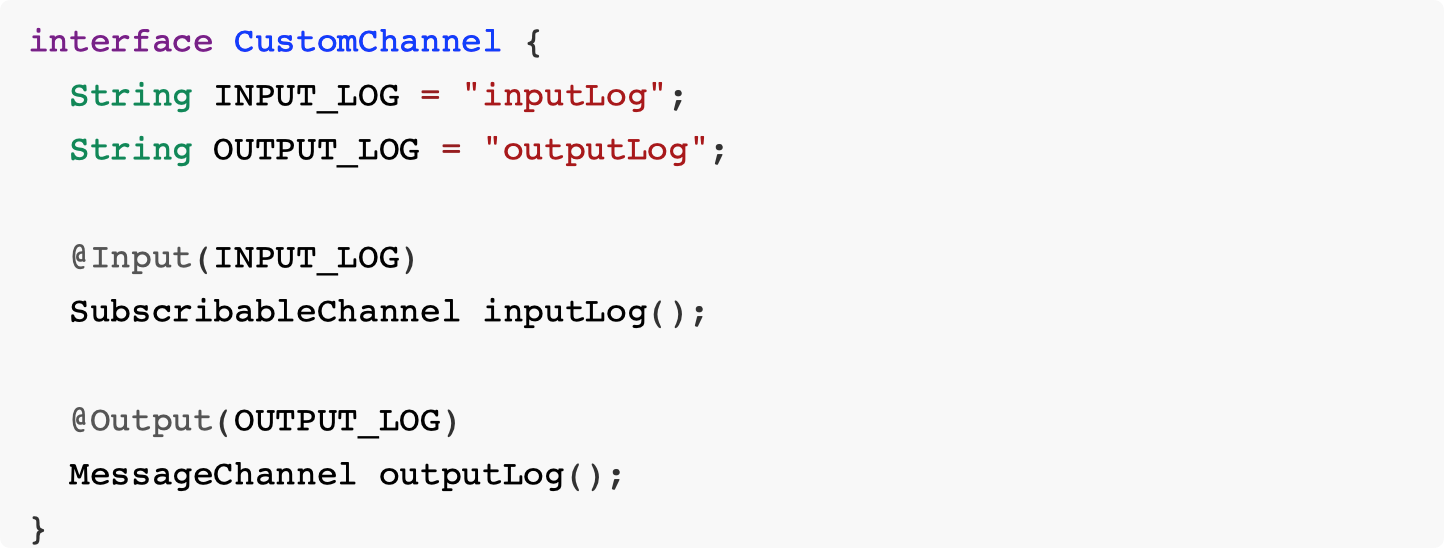
如何使⽤?
1)在 @EnableBinding 注解中,绑定⾃定义的接⼝
2)使⽤ @StreamListener 做监听的时候,需要指定 CustomChannel.INPUT_LOG
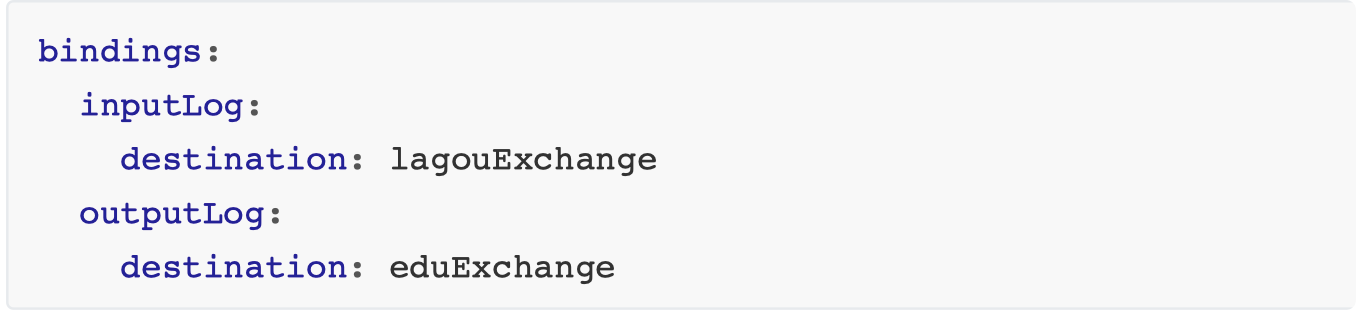
7.8 Stream ⾼级之消息分组
如上我们的情况,消费者端有两个(消费同⼀个 MQ 的同⼀个主题),但是呢我们的
业务场景中希望这个主题的⼀个 Message 只能被⼀个消费者端消费处理,此时我们 就可以使⽤消息分组。
默认情况下会发生给所有订阅的消费者,如果只想要一个消费者接收那就需要分组了
分组前


解决的问题:能解决消息重复消费问题
我们仅仅需要在服务消费者端设置 spring.cloud.stream.bindings.input.group 属 性,多个消费者实例配置为同⼀个 group 名称(在同⼀个 group 中的多个消费者只有 ⼀个可以获取到消息并消费)。
在每个消费者都添加分组信息,确保每组只有一个消费者可以接收到消息
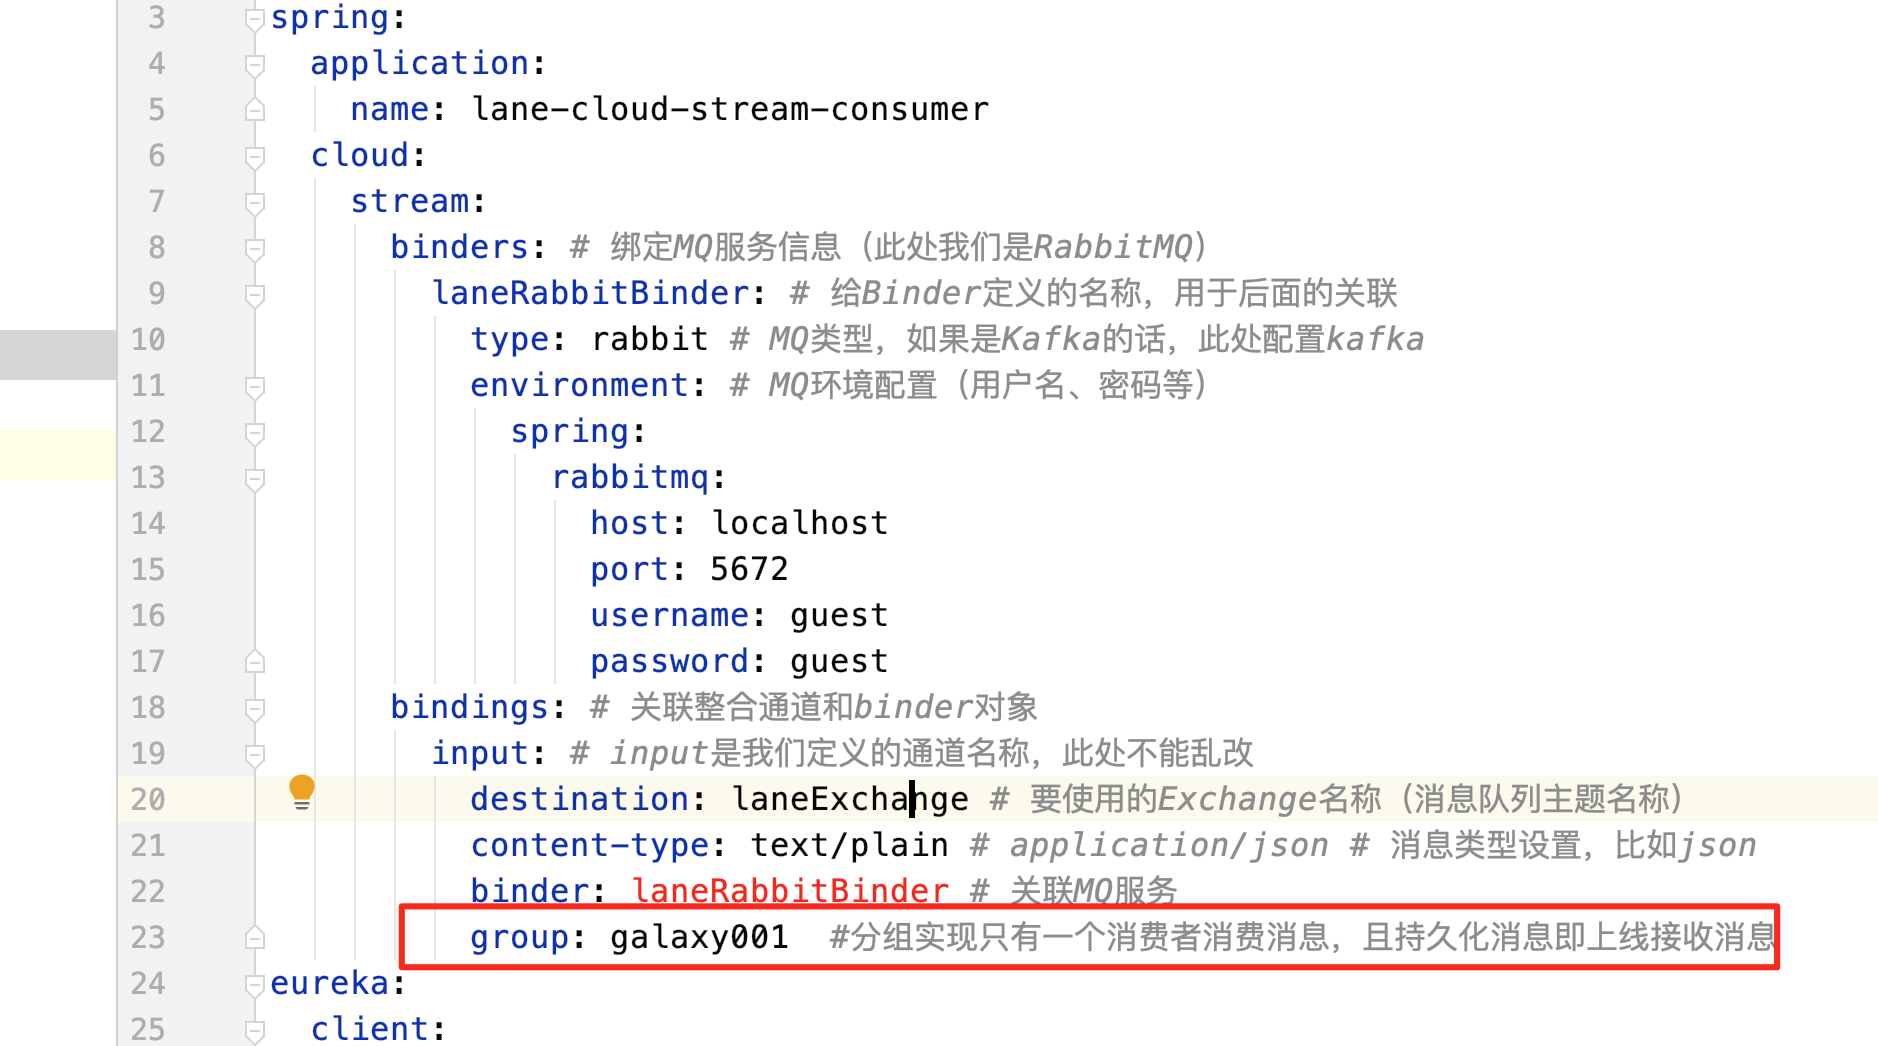
分组之后只有 9092 接收到了消息


分组也可以使消息持久化,即使先启动提供者进行消息发送,再启动消费者,此时消费者依然可以接收到消息
第五部分 常⻅问题及解决⽅案
本部分主要讲解 Eureka 服务发现慢的原因,Spring Cloud 超时设置问题。
如果你刚刚接触 Eureka,对 Eureka 的设计和实现都不是很了解,可能就会遇到⼀些 ⽆法快速解决的问题,这些问题包括:新服务上线后,服务消费者不能访问到刚上 线的新服务,需要过⼀段时间后才能访问?或是将服务下线后,服务还是会被调⽤ 到,⼀段时候后才彻底停⽌服务,访问前期会导致频繁报错?这些问题还会让你对 Spring Cloud 产⽣严重的怀疑,这难道不是⼀个 Bug?
问题场景
上线⼀个新的服务实例,但是服务消费者⽆感知,过了⼀段时间才知道
某⼀个服务实例下线了,服务消费者⽆感知,仍然向这个服务实例在发起请求
这其实就是服务发现的⼀个问题,当我们需要调⽤服务实例时,信息是从注册中⼼ Eureka 获取的,然后通过 Ribbon 选择⼀个服务实例发起调⽤,如果出现调⽤不到或 者下线后还可以调⽤的问题,原因肯定是服务实例的信息更新不及时导致的。
Eureka 服务发现慢的原因
Eureka 服务发现慢的原因主要有两个,⼀部分是因为服务缓存导致的,另⼀部分是 因为客户端缓存导致的。
![[外链图片转存失败,源站可能有防盗链机制,建议将图片保存下来直接上传(img-bGCy0Mzu-1624852119129)(https://scenery-1303094101.cos.ap-shanghai.myqcloud.com/uPic/20210628/image-20210625183431-h0ug763.png)]]( https://img-blog.csdnimg.cn/20210628115832132.png?x-oss-process=image/watermark ,type_ZmFuZ3poZW5naGVpdGk,shadow_10,text_aHR0cHM6Ly9ibG9nLmNzZG4ubmV0L0xhbmVEdQ==,size_16,color_FFFFFF,t_70)
1)服务端缓存
服务注册到注册中⼼后,服务实例信息是存储在注册表中的,也就是内存中。但 Eureka 为了提⾼响应速度,在内部做了优化,加⼊了两层的缓存结构,将 Client 需要 的实例信息,直接缓存起来,获取的时候直接从缓存中拿数据然后响应给 Client。 第⼀层缓存是 readOnlyCacheMap,readOnlyCacheMap 是采⽤ ConcurrentHashMap 来存储数据的,主要负责定时与 readWriteCacheMap 进⾏数 据同步,默认同步时间为 30 秒⼀次。
第⼆层缓存是 readWriteCacheMap,readWriteCacheMap 采⽤ Guava 来实现缓 存。缓存过期时间默认为 180 秒,当服务下线、过期、注册、状态变更等操作都会清 除此缓存中的数据。
Client 获取服务实例数据时,会先从⼀级缓存中获取,如果⼀级缓存中不存在,再从 ⼆级缓存中获取,如果⼆级缓存也不存在,会触发缓存的加载,从存储层拉取数据 到缓存中,然后再返回给 Client。
Eureka 之所以设计⼆级缓存机制,也是为了提⾼ Eureka Server 的响应速度,缺点 是缓存会导致 Client 获取不到最新的服务实例信息,然后导致⽆法快速发现新的服 务和已下线的服务。
了解了服务端的实现后,想要解决这个问题就变得很简单了
我们可以缩短只读缓存的更新时间(eureka.server.response-cache-update-interval-ms)让服务发现 变得更加及时
直接将只读缓存关闭(eureka.server.use-read-onlyresponse-cache=false)
多级缓存也导致 C 层⾯(数据⼀致性)很薄弱。
Eureka Server 中会有定时任务去检测失效的服务,将服务实例信息从注册表中移 除,也可以将这个失效检测的时间缩短,这样服务下线后就能够及时从注册表中清除。
2)客户端缓存
客户端缓存主要分为两块内容,⼀块是 Eureka Client 缓存,⼀块是 Ribbon 缓存。
Eureka Client 缓存
EurekaClient 负责跟 EurekaServer 进⾏交互,在 EurekaClient 中的 com.netflix.discovery.DiscoveryClient.initScheduledTasks() ⽅法中,初始化了⼀ 个 CacheRefreshThread 定时任务专⻔⽤来拉取 Eureka Server 的实例信息到本 地。
所以我们需要缩短这个定时拉取服务信息的时间间隔 (eureka.client.registryFetchIntervalSeconds)来快速发现新的服务。
Ribbon 缓存
Ribbon 会从 EurekaClient 中获取服务信息,ServerListUpdater 是 Ribbon 中负责服务实例更新的组件,默认的实现是 PollingServerListUpdater,通过 线程定时去更新实例信息。定时刷新的时间间隔默认是 30 秒,当服务停⽌或者上线 后,这边最快也需要 30 秒才能将实例信息更新成最新的。我们可以将这个时间调短 ⼀点,⽐如 3 秒。
刷新间隔的参数是通过 getRefreshIntervalMs ⽅法来获取的,⽅法中的逻辑也是从 Ribbon 的配置中进⾏取值的。
将这些服务端缓存和客户端缓存的时间全部缩短后,跟默认的配置时间相⽐,快了 很多。我们通过调整参数的⽅式来尽量加快服务发现的速度,但是还是不能完全解 决报错的问题,间隔时间设置为 3 秒,也还是会有间隔。所以我们⼀般都会开启重试 功能,当路由的服务出现问题时,可以重试到另⼀个服务来保证这次请求的成功。
Spring Cloud 各组件超时
在 SpringCloud 中,应⽤的组件较多,只要涉及通信,就有可能会发⽣请求超时。那 么如何设置超时时间? 在 Spring Cloud 中,超时时间只需要重点关注 Ribbon 和 Hystrix 即可。
Ribbon 如果采⽤的是服务发现⽅式,就可以通过服务名去进⾏转发,需要配置 Ribbon 的超时。Rbbon 的超时可以配置全局的 ribbon.ReadTimeout 和 ribbon.ConnectTimeout。也可以在前⾯指定服务名,为每个服务单独配置,⽐如 user-service.ribbon.ReadTimeout。
其次是 Hystrix 的超时配置,Hystrix 的超时时间要⼤于 Ribbon 的超时时间(包括重试时间),因为 Hystrix 将请求包装了起来,特别需要注意的是,如果 Ribbon 开启了重试机制,⽐如 重试 3 次,Ribbon 的超时为 1 秒,那么 Hystrix 的超时时间应该⼤于 3 秒,否则就 会出现 Ribbon 还在重试中,⽽ Hystrix 已经超时的现象。
Hystrix Hystrix 全局超时配置就可以⽤ default 来代替具体的 command 名称。
hystrix.command.default.execution.isolation.thread.timeoutInMilliseconds=3000 如果想对具体的 command 进⾏配置,那么就需要知道 command 名称的⽣成 规则,才能准确的配置。
如果我们使⽤ @HystrixCommand 的话,可以⾃定义 commandKey。如果使⽤ FeignClient 的话,可以为 FeignClient 来指定超时时间: hystrix.command.UserRemoteClient.execution.isolation.thread.timeoutInMillis econds = 3000
如果想对 FeignClient 中的某个接⼝设置单独的超时,可以在 FeignClient 名称后加上 具体的⽅法: hystrix.command.UserRemoteClient#getUser(Long).execution.isolation.thread. timeoutInMilliseconds = 3000
Feign 本身也有超时时间的设置,如果此时设置了 Ribbon 的时间就以 Ribbon 的时间为准,如果没设置 Ribbon 的时间但配置了 Feign 的时间,就以 Feign 的时间为 准。Feign 的时间同样也配置了连接超时时间(feign.client.config.服务名 称.connectTimeout)和读取超时时间(feign.client.config.服务名 称.readTimeout)。
建议,我们配置 Ribbon 超时时间和 Hystrix 超时时间即可。
结语
Spring Cloud 的课程是应癫老师讲的,个人感觉应癫老师应该是实力最强的了,源码信手拈来,很多内容都是手打的,不需要什么资料便可以手写各种配置。
Springcloud 主要组件 eureka、ribbon、hystrix、feign、gateway、Springcloud config、Springcloud bus、Spring cloud stream
功能分别是 eureka 注册中心、ribbon 负载均衡、rest template 接口调用、hystrix 熔断降级、feign 的作用包括了 hystrix 和 ribbon 及 rest template、gateway 网关拦截判断、spc config 配置中心动态获取配置、spc bus 配置中心广播修改、spc strean 中间件上层封装。链路追踪下一篇文章
功能我基本知道了,配置基本能看懂、真正去开发的时候还是很多需要去翻阅笔记和代码的,本文代码可以从我的 GitHub 获取 lane-spring-cloud-34。
附加:记忆、遗忘与复习
发现 zookeeper 和 dubbo 还能记住 20% 左右了,当然应该很容易去复习捡起来,但是时间一长怕是就跟从头再来学习一样,引发了一些思考对于记忆、遗忘和复习,那么先看下艾宾浩斯遗忘曲线吧
![[外链图片转存失败,源站可能有防盗链机制,建议将图片保存下来直接上传(img-Hvvx9pQQ-1624852119129)(https://scenery-1303094101.cos.ap-shanghai.myqcloud.com/uPic/20210628/image-20210628102329-g4vuykm.png)]]( https://img-blog.csdnimg.cn/20210628115347637.png?x-oss-process=image/watermark ,type_ZmFuZ3poZW5naGVpdGk,shadow_10,text_aHR0cHM6Ly9ibG9nLmNzZG4ubmV0L0xhbmVEdQ==,size_16,color_FFFFFF,t_70)
![[外链图片转存失败,源站可能有防盗链机制,建议将图片保存下来直接上传(img-OrPE9WsJ-1624852119130)(https://scenery-1303094101.cos.ap-shanghai.myqcloud.com/uPic/20210628/image-20210628102929-gc5tusw.png)]]( https://img-blog.csdnimg.cn/20210628115405921.png?x-oss-process=image/watermark ,type_ZmFuZ3poZW5naGVpdGk,shadow_10,text_aHR0cHM6Ly9ibG9nLmNzZG4ubmV0L0xhbmVEdQ==,size_16,color_FFFFFF,t_70)
可以看出近似是一个指数函数,设初次记忆后经过了 x 小时,那么记忆率 y 近似地满足 y=1-0.56x^0.06
艾宾浩斯还在关于记忆的实验中发现,记住 12 个无意义音节,平均需要重复 16.5 次;为了记住 36 个无意义章节,需重复 54 次;而记忆六首诗中的 480 个音节,平均只需要重复 8 次!这个实验告诉我们,凡是理解了的知识,就能记得迅速、全面而牢固。不然,愣是死记硬背,那也是费力不讨好的。
完整的艾宾浩斯遗忘曲线复习八遍
八遍复习点
1. 第一个记忆周期:5 分钟
2. 第二个记忆周期:30 分钟
3. 第三个记忆周期:12 小时
4. 第四个记忆周期:1 天
5. 第五个记忆周期:2 天
6. 第六个记忆周期:4 天
7. 第七个记忆周期:7 天
8. 第八个记忆周期:15 天
根据艾宾浩斯遗忘曲线来学习一般要复习四遍才行
四遍复习点
1.当时学完复习一遍
2.当天晚上复习一遍
3.当一周复习一遍
4.当一月复习一遍
可以称之为四当学习、当当当当学习、时天周月学习法,这样理论上可以长时记忆 80% 左右
而对于第一条有点难以满足,那么当天、当周、当月既是按照天周月复习法去复习,也能记住 60% 左右,性价比相比与不复习 21% 高很多哦。也可以参考我的大脑记忆模型文章看看。
people always resist to change !
maybe it is time for us to change !
it would be hard but hard means wonderful !
today is dark,tomorrow is hard,the day after tomorrow will be wonderful !

 浙公网安备 33010602011771号