【自动化】使用PlayWright+代理IP实现多环境隔离
Playwright是由微软公司2020年初发布的新一代自动化测试工具,相较于目前最常用的Selenium,它仅用一个API即可自动执行Chromium、Firefox、WebKit等主流浏览器自动化操作。
对各种开发语言也有非常好的支持。常用的NodeJs、Java、python都有支持,且有丰富的文档参考。
Python环境下的安装使用
1、安装依赖库
pip install playwright
2、安装浏览器驱动文件
安装好依赖库之后,会自动注册全局命令。下面2种方式都可以快速安装驱动文件(驱动就是内置的浏览器)
python -m playwright install
或者:
playwright install
如果命令是python3,替换为pip3 install 和python3 -m 即可。
网上有非常多的教程。安装并非本文的重点。
多环境隔离的应用场景
常见的如爬虫,可能需要使用代理IP隔离开不同的浏览器进行数据抓取。
像另一些需要多号操作的营销内容,也需要多个浏览器互相隔离开。更高要求的才会使用代理+隔离的方式。
产生完全不一样的浏览器环境。比如大量的号去做不同的事。
还有很多常用的场景。独立干净的浏览器环境+Playwright的自动化。可以实现非常多的有趣的应用。
Playwright启动浏览器有几种模式。我们需要先进行了解。
1、普通的无痕模式,用完即销毁。这种方式下,浏览器的历史记录之类的不会保存。适合用于爬虫性的工作。
代码大致是这样的。
browser = pw.chromium.launch(headless=headless, proxy=my_proxy,
                                         ignore_default_args=ignore_args,
                                 args=default_args)

browserContext = browser.new_context(user_agent=userAgent, storage_state=storage_state)
可以指定UserAgent,这是我们模拟不同操作系统和浏览器数据的必填项。
也可以指定headless无头模式,这样浏览器不会有界面出现。背后去工作。
2、普通的持久模式,需要指定用户的数据目录。实现数据的隔离。
比如1号浏览器存到data1,2号存到data2,数据不会冲突,各干各的事,可以同时登陆一个网站的多个账号,互不影响。
不方便的地方在于,每次执行完任务,浏览器会随着程序关闭而关闭。
copy一段网上的示例
# 获取 google chrome 的本地缓存文件
USER_DIR_PATH = f"C:\\Users\\{getpass.getuser()}\\AppData\Local\Google\Chrome\\User Data"

with sync_playwright() as p:
    browser = p.chromium.launch_persistent_context(
                        # 指定本机用户缓存地址,这是隔离环境的主要点,指定不同的目录存放用户的数据。
                        user_data_dir=USER_DIR_PATH,
                        # 接收下载事件,允许下载需要
                        accept_downloads=True,
                        # 设置 GUI 模式,可以看到浏览器界面
                        headless=False,
                        bypass_csp=True,
                        slow_mo=1000,
                        channel="chrome",
                    )

    page = browser.new_page()
    page.goto("https://www.cnblogs.com/yoyoketang")

    page.pause()
3、直连系统的Chrome。如果系统有Chrome浏览器,playwright可以直接连接,并进行操作。但是需要做一些配置。
这也是我目前用得最多的模式。
核心的原理就是使用CDP连接上Chrome。需要开启Chrome时,指定一个调试端口,供我们远程连接上去使用。
官方提供的具体函数是
pw.chromium.connect_over_cdp(cdp_url, timeout=0)
优点在于:
脚本和浏览器分离。脚本开不开,浏览器都不影响。只是需要自动化的时候,脚本才去工作。
缺点:
就是配置略麻烦。好在封装好之后,就是一次的麻烦,后面也会比较顺畅。
如何封装属于自己的快速启动类,python和java都可以,下次再聊。
下面以Chrome浏览器+动态代理为例构建多个不同的环境
由于Chrome自带的proxy 代理功能并不支持带账号密码的代理方式。
而我们采购的代理,肯定都是有账号密码的。
所以核心点是添加一个插件,配置上代理,能支持http和socks5的代理,并支持账号密码进行连接。
然后再通过python,调用系统的浏览器,产生不同的环境,使用不同的代理IP。就能达到目标。
直接上图
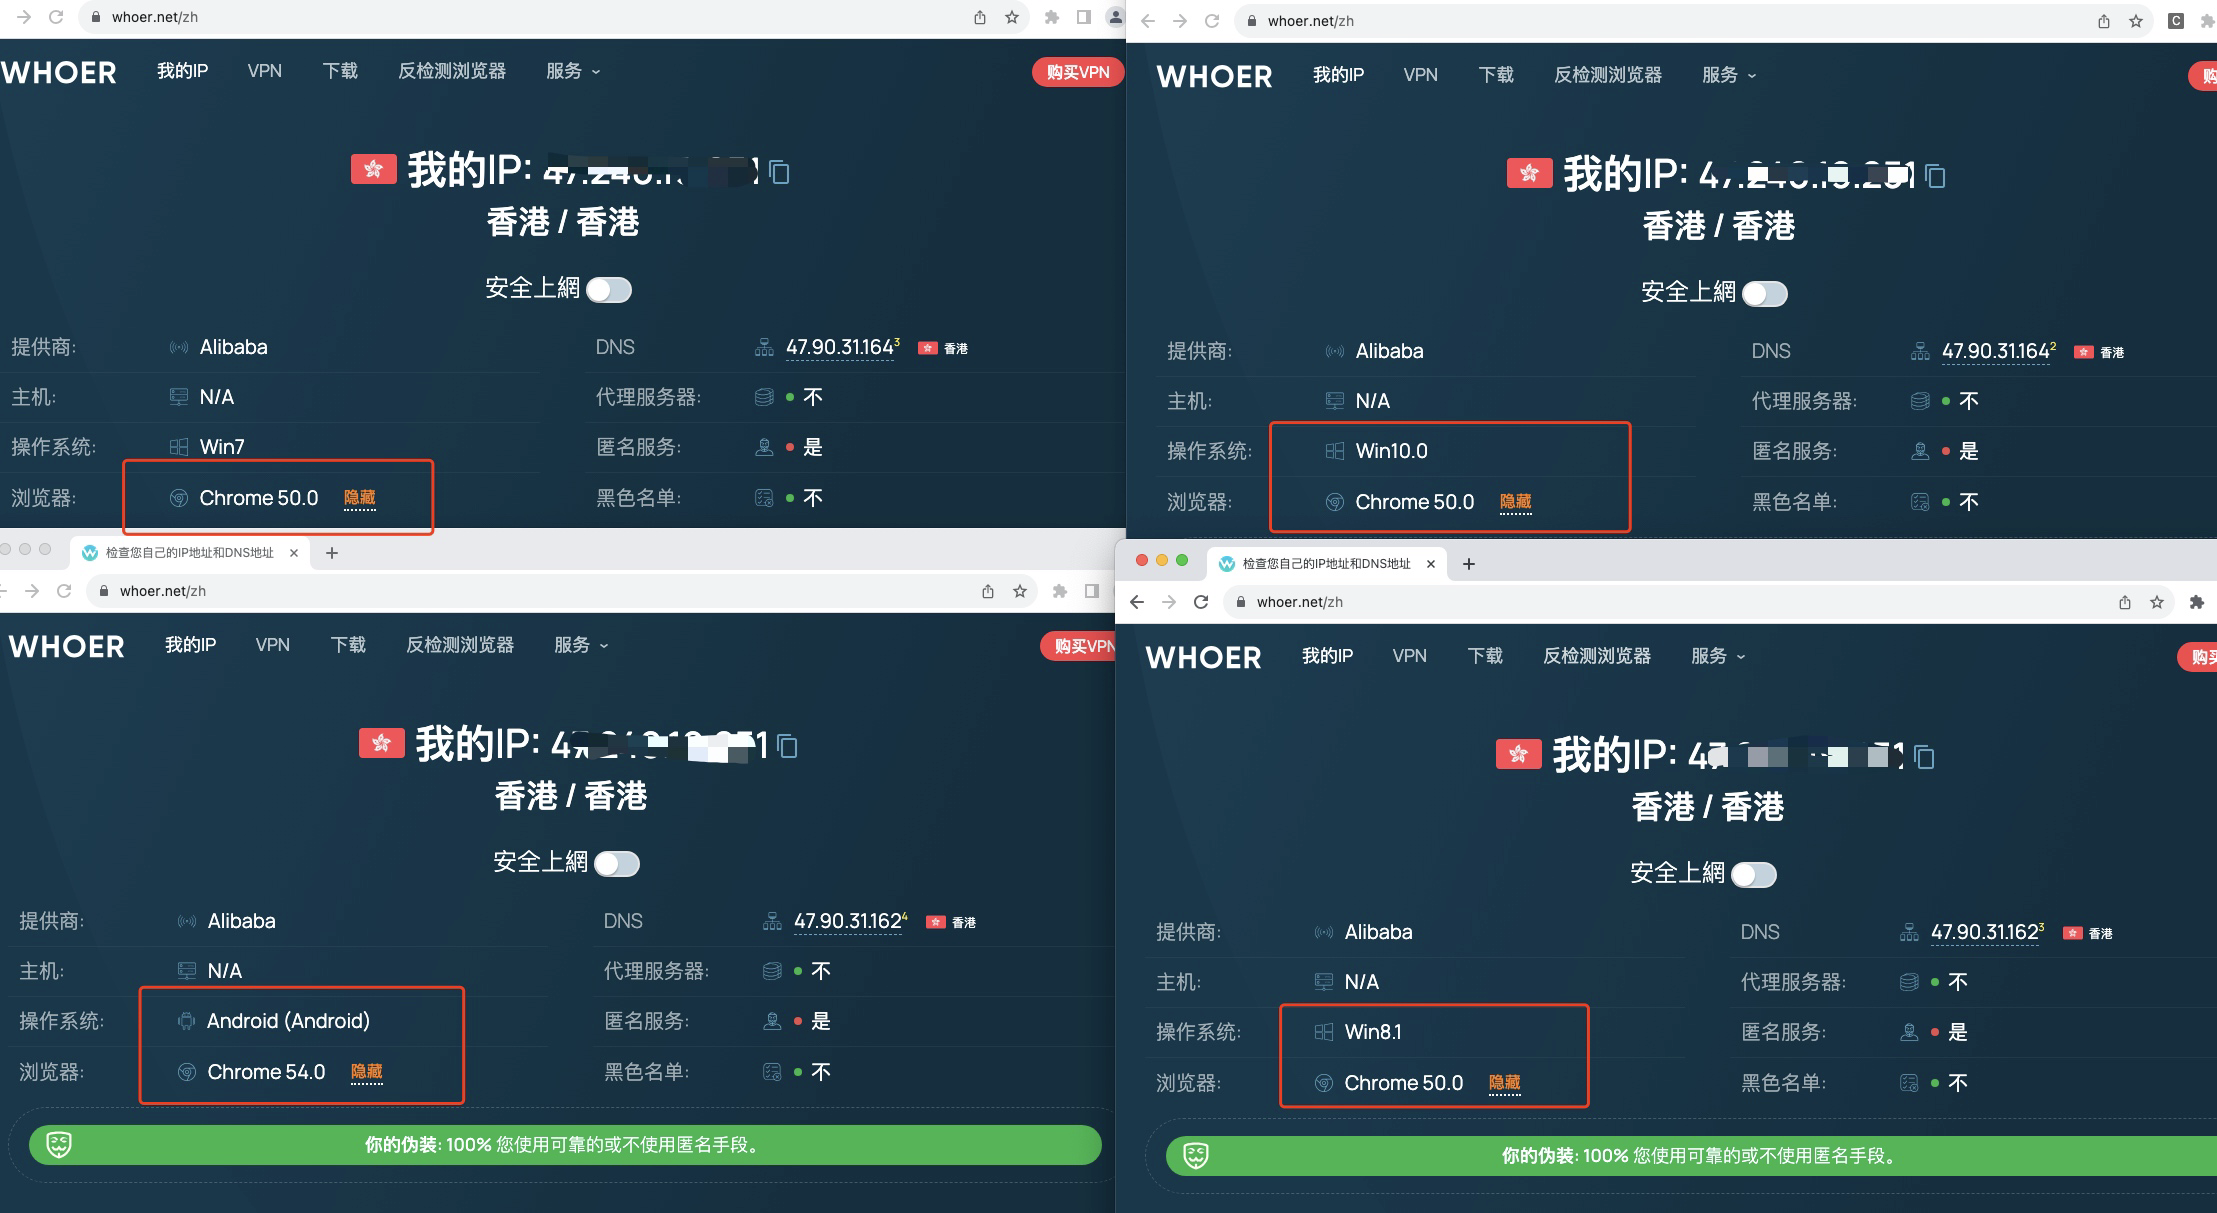
没有好用的收费代理,本地模拟了一个HK节点的代理。
可以看到4个浏览器的指纹已经不一样了。配合上代理,就是干净的环境了。
核心的逻辑在于启用不同的DataDir用户数据目录,加个独立的代理插件来支持http和socks5的代理,
1、核心1,使用python来快速启动Chrome
if sys.platform.startswith('linux'):  # Linux
    exe_name = 'chrome'
    extParam.append('--no-sandbox')
elif sys.platform.startswith('win'):  # Windows
    win_path = 'C:\Program Files\Google\Chrome\Application\chrome.exe'
    exe_name = win_path if os.path.exists(win_path) else 'chrome.exe'
elif sys.platform.startswith('darwin'):  # Mac
    exe_name = '/Applications/Google Chrome.app/Contents/MacOS/Google Chrome'
    extParam.append('--no-sandbox')

# 启用UA
if config.get('user_agent'):
    extParam.append(fr'--user-agent="{config.get("user_agent")}"')

# 启用无痕
if config.get('incognito'):
    extParam.append('--incognito')

# 无开屏
if config.get('no_window'):
    extParam.append('--no-startup-window')

command = fr'"{exe_name}" --remote-debugging-port={port} --user-data-dir="{data_dir}" --no-sandbox --disable-gpu --disable-software-rasterize --disable-background-networking --disable-background-mode --disable-sync --disable-blink-features=AutomationControlled --disable-client-side-phishing-detection --disable-default-apps --disable-desktop-notifications --disable-hang-monitor --disable-infobars --disable-notifications --disable-plugins-discovery --no-first-run --dns-prefetch-disable --ignore-certificate-errors --allow-running-insecure-content --test-type --origin-trial-disabled-features=WebGPU --no-default-browser-check --no-service-autorun --disable-popup-blocking --password-store=basic --disable-web-security --disable-dev-shm-usage --disable-component-update --disable-features=RendererCodeIntegrity --disable-features=FlashDeprecationWarning,EnablePasswordsAccountStorage {" ".join(extParam)}'

os.popen(command)
还有不少代码,就不往上面贴了。
2、核心点2,动态加载插件进不同的Chrome环境,各用各的代理。
def create_proxyauth_extension(proxy_host, proxy_port,
                               proxy_username, proxy_password,
                               scheme='http', plugin_dir=None):
    """
    代理认证插件,返回代理插件的地址
    Chrome使用带账号密码的代理IP
    插件来源:https://github.com/henices/Chrome-proxy-helper
    参考:https://ask.hellobi.com/blog/cuiqingcai/10307#articleHeader5
    https://my.oschina.net/sunboy2050/blog/1858508
    https://github.com/aneasystone/selenium-test/blob/master/08-proxy-with-password.py
    https://developer.chrome.com/extensions/proxy
    args:
        proxy_host (str): 你的代理地址或者域名(str类型)
        proxy_port (int): 代理端口号(int类型)
        proxy_username (str):用户名(字符串)
        proxy_password (str): 密码 (字符串)
    kwargs:
        scheme (str): 代理方式 默认http
        plugin_dir (str): 扩展的目录路径

    return str -> plugin_path
    """

    # 插件目录
    if not plugin_dir:
        plugin_dir = os.path.join(get_data_dir('chrome_plugin'), f'custom_proxyauth_plugin')
    if not os.path.exists(plugin_dir):
        os.makedirs(plugin_dir)

    # 生成的Zip文件地址
    plugin_file = os.path.join(plugin_dir, f"proxy_plugin_{proxy_host}_{proxy_port}.zip")
    # 旧文件清理掉
    if os.path.exists(plugin_file):
        os.remove(plugin_file)

    manifest_json = """
    {
        "version": "1.0.0",
        "manifest_version": 2,
        "name": "Chrome Proxy",
        "permissions": [
            "proxy",
            "tabs",
            "unlimitedStorage",
            "storage",
            "<all_urls>",
            "webRequest",
            "webRequestBlocking"
        ],
        "background": {
            "scripts": ["background.js"]
        },
        "minimum_chrome_version":"22.0.0"
    }
    """

    background_js = string.Template(
        """
        var config = {
                mode: "fixed_servers",
                pacScript: {},
                rules: {
                  singleProxy: {
                    scheme: "${scheme}",
                    host: "${host}",
                    port: ${port}
                  },
                  bypassList: ["foobar.com"]
                }
              };

        chrome.proxy.settings.set({value: config, scope: "regular"}, function() {});

        function callbackFn(details) {
            return {
                authCredentials: {
                    username: "${username}",
                    password: "${password}"
                }
            };
        }

        chrome.webRequest.onAuthRequired.addListener(
                    callbackFn,
                    {urls: ["<all_urls>"]},
                    ['blocking']
        );
        """
    ).substitute(
        host=proxy_host,
        port=proxy_port,
        username=proxy_username,
        password=proxy_password,
        scheme=scheme,
    )

    # 先写ZIP
    with zipfile.ZipFile(plugin_file, 'w') as zp:
        zp.writestr("manifest.json", manifest_json)
        zp.writestr("background.js", background_js)

    # 再手写文件过去
    with open(os.path.join(plugin_dir, 'manifest.json'), 'w+') as fi:
        fi.write(manifest_json)

    with open(os.path.join(plugin_dir, 'background.js'), 'w+') as fi:
        fi.write(background_js)

    return plugin_file
Java也可以用同样的方式实现。后续配上Java的多线程。相信开100个窗口干活,不是什么难事。
Playwright在下载上传方面,比以前的Selenium要强很多。还有很多功能,下次再分享。
关注我的公众号:青塬科技,定期分享经验文章。

 浙公网安备 33010602011771号