Spring Core 官方文档阅读笔记(十三)
1. Spring封装的数据访问异常
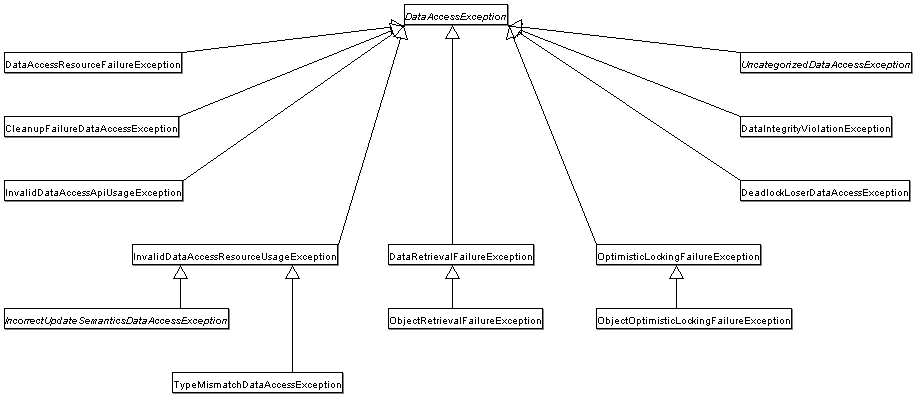
Spring自己封装了一系列数据访问的异常,它封装了SQLException,衍生出对应各种数据操作异常的异常类,其基类是DataAccessExcepiton。具体如下图:
2. 数据访问的相关注解
最基本的,可以使用@Respository注解来附于DAO数据访问和异常处理的能力。如下:
@Respository
public class MyDaoImpl implements MyDao {
    // ...
}
而对于不同的持久化客户端,可以采用不同的注解来访问持久化资源,如:
- JPA可以使用@PersistenceContext来注入EntityManager
@Repository
public class JpaMovieFinder implements MovieFinder {

    @PersistenceContext
    private EntityManager entityManager;

    // ...

}
- Hibernate可以使用@Autowired来注入SessionFactory
@Repository
public class HibernateMovieFinder implements MovieFinder {

    private SessionFactory sessionFactory;

    @Autowired
    public void setSessionFactory(SessionFactory sessionFactory) {
        this.sessionFactory = sessionFactory;
    }

    // ...

}
- JDBC可以使用@Autowired来注入JdbcTemplate
@Repository
public class JdbcMovieFinder implements MovieFinder {

    private JdbcTemplate jdbcTemplate;

    @Autowired
    public void init(DataSource dataSource) {
        this.jdbcTemplate = new JdbcTemplate(dataSource);
    }

    // ...

}
3. Spring JDBC
我们来看下Spring JDBC都帮我们做了哪些工作,以及哪些是需要由我们来完成的
| Action | Spring | You |
|---|---|---|
| Define connection parameters | x | |
| Open the connection | X | |
| Specify the SQL statement | x | |
| Declare parameters and provide parameter values | x | |
| Prepare and execute the statement | x | |
| Set up the loop to iterate through the results (if any) | x | |
| Do the work for each iteration | x | |
| Process any exception | x | |
| Handle transactions | x | |
| Close the connection, the statement, and the resultset | x |
要访问JDBC数据库,我们可以选择下面几种中的任意一种:
- JdbcTemplate
最基本的访问JDBC数据库的方法。 - NamedParameterJdbcTemplate
NamedParameterJdbcTemplate是对JdbcTemplate的封装,它提供了使用自定义名的参数的功能,啥意思?我们之前写数据库操作语句,参数都是使用占位符"?",那么在多个参数的情况下,就比较混乱,而这个NamedParameterJdbcTemplate就可以不用"?"占位符,而是用参数名。在这里,参数名是以冒号(:)开头的。 - SimpleJdbcInsert和SimpleJdbcCall
把这两个放在一起说,SimpleJdbcInsert提供了简便的插入操作类,而SimpleJdbcCall则主要用于调用存储过程。 - RDBMS对象
专门针对关系型数据库的访问方法,包括MappingSqlQuery(用于简化查询操作)、SqlUpdate(用于简化更新操作)和StoredProcedure(用于简化存储过程的操作),要求在数据访问层初始化期间创建可重用的线程安全对象。这种方法是以JDO查询为模型的,在JDO查询中定义查询字符串、声明参数并编译查询,可以使用不同的参数值多次调用Execute方法。
下面来看一下Spring JDBC的包结构,总体来说,有四个包:
- core
核心包,包含JdbcTemplate类、各种回调接口以及相关的类。其中有一个名为org.Springframe work.jdbc.core.Simple的子包,包含SimpleJdbcInsert和SimpleJdbcCall,org.Springframe work.jdbc.core.namedparam的子包则包含NamedParameterJdbcTemplate类和相关的支持类。 - datasource
org.Springframe work.jdbc.dataource包含一个用于轻松访问DataSource的实用程序类和各种简单的DataSource实现,可以使用这些实现在JavaEE容器外测试和运行未经修改的JDBC代码。嵌入式数据源提供了对使用Java数据库引擎(如HSQL、H2和Derby)创建嵌入式数据库的支持。 - object
包含RDBMS查询、更新和线程安全的存储过程、可重用对象的类。 - support
提供SQLException转换功能和一些实用程序类。JDBC处理过程中抛出的异常将被转换org.springframework.dao包中定义的异常。这意味着使用SpringJDBC抽象层的代码不需要实现特定于JDBC或RDBMS的错误处理。所有转换后的异常都是非检查类异常,需要进行捕获,以便从异常中恢复。
4. JdbcTemplate
JdbcTemplate是SpringJDBC的core包中的核心类,帮我们完成了资源创建和释放处理,以及JDBC工作流的基本任务,如语句创建和执行等。
下面我们来看一下如何使用JdbcTemplate完成基本的增删改查:
jdbc基本配置
/**
 * @Author: kuromaru
 * @Date: Created in 15:57 2019/5/7
 * @Description:
 * @modified:
 */
@Configuration
@EnableTransactionManagement
public class TransactionConfig {

    @Bean
    public BasicDataSource dataSource() {
        BasicDataSource dataSource = new BasicDataSource();
        dataSource.setUrl("jdbc:mysql://xxx.xxx.xxx.xxx:3306/xxx?useUnicode=true&characterEncoding=UTF-8");
        dataSource.setDriverClassName("com.mysql.jdbc.Driver");
        dataSource.setUsername("xxx");
        dataSource.setPassword("xxx");
        dataSource.setInitialSize(10);
        dataSource.setMinIdle(10);
        dataSource.setMaxIdle(10);
        dataSource.setMaxWaitMillis(200);
        return dataSource;
    }

    @Bean
    public DataSourceTransactionManager dataSourceTransactionManager() {
        DataSourceTransactionManager dataSourceTransactionManager = new DataSourceTransactionManager();
        dataSourceTransactionManager.setDataSource(dataSource());
        return dataSourceTransactionManager;
    }

    @Bean("myServiceImpl")
    public MyService myServiceImpl() {
        return new MyServiceImpl(){{
            setJdbcTemplate(new JdbcTemplate(dataSource()));
        }};
    }
}
query(查询)
/**
 * @Author: kuromaru
 * @Date: Created in 16:29 2019/5/7
 * @Description:
 * @modified:
 */
public interface MyService {

    int selectCnt();

    int selectCntByMobile(String mobile);

    String selectNameByMobile(String mobile);

    UserInfo selectUserInfoByMobile(String mobile);

    List<UserInfo> selectUserInfosByName(String name);
}
/**
 * @Author: kuromaru
 * @Date: Created in 16:30 2019/5/7
 * @Description:
 * @modified:
 */
public class MyServiceImpl implements MyService {

    @Autowired
    private BasicDataSource dataSource;

    private JdbcTemplate jdbcTemplate;

    public void setJdbcTemplate(JdbcTemplate jdbcTemplate) {
        this.jdbcTemplate = jdbcTemplate;
    }

    /**
     * 查询int
     */
    @Override
    public int selectCnt() {
        return jdbcTemplate.queryForObject("select count(1) from t_sys_user", Integer.class);
    }

    /**
     * 参数化查询
     */
    @Override
    public int selectCntByMobile(String mobile) {
        return jdbcTemplate.queryForObject("select count(1) from t_sys_user where cellphone = ?", Integer.class, mobile);
    }

    /**
     * 查询字符串
     */
    @Override
    public String selectNameByMobile(String mobile) {
        return jdbcTemplate.queryForObject("select user_name from t_sys_user where cellphone = ?", new Object[]{"13100000000"}, String.class);
    }

    /**
     * 将查询结果映射到自定义的Bean
     */
    @Override
    public UserInfo selectUserInfoByMobile(String mobile) {
        return jdbcTemplate.queryForObject("select cellphone, user_name from t_sys_user where cellphone = ?", new Object[]{"13100000000"}, new RowMapper<UserInfo>() {
            @Override
            public UserInfo mapRow(ResultSet rs, int rowNum) throws SQLException {
                UserInfo userInfo = new UserInfo();
                userInfo.setCellphone(rs.getString("cellphone"));
                userInfo.setUserName(rs.getString("user_name"));
                return userInfo;
            }
        });
    }

    /**
     * 查询自定义结果Bean的List
     */
    @Override
    public List<UserInfo> selectUserInfosByName(String name) {
        return jdbcTemplate.query("select cellphone, user_name from t_sys_user where user_name = ?", new Object[]{"刘凯"}, new RowMapper<UserInfo>() {
            @Override
            public UserInfo mapRow(ResultSet rs, int rowNum) throws SQLException {
                UserInfo userInfo = new UserInfo();
                userInfo.setCellphone(rs.getString("cellphone"));
                userInfo.setUserName(rs.getString("user_name"));
                return userInfo;
            }
        });
    }
}
/**
 * @Author: kuromaru
 * @Date: Created in 10:33 2019/5/9
 * @Description:
 * @modified:
 */
@Data
public class UserInfo {

    private String userName;

    private String cellphone;
}
/**
 * @Author: kuromaru
 * @Date: Created in 16:22 2019/5/7
 * @Description:
 * @modified:
 */
public class Client {

    public static void main(String[] args) {
        AnnotationConfigApplicationContext acac = new AnnotationConfigApplicationContext(TransactionConfig.class);
        MyService myService = (MyService) acac.getBean("myServiceImpl");

        System.out.println("用户表中有" + myService.selectCnt() + "条记录");
        String mobile = "13100000000";
        System.out.println("用户表中的手机号是" + mobile + "的数据有" + myService.selectCntByMobile(mobile) + "条");
        System.out.println("用户表中手机号是" + mobile + "的用户,姓名是" + myService.selectNameByMobile(mobile));
        System.out.println("根据手机号" + mobile + "获取到的用户信息是" + JSON.toJSONString(myService.selectUserInfoByMobile(mobile)));
        List<UserInfo> userInfoList = myService.selectUserInfosByName("刘凯");
        System.out.println("叫刘凯的用户有" + userInfoList.size() + "个");
    }
}
五月 09, 2019 1:18:41 下午 org.springframework.context.support.AbstractApplicationContext prepareRefresh
信息: Refreshing org.springframework.context.annotation.AnnotationConfigApplicationContext@5a2e4553: startup date [Thu May 09 13:18:41 CST 2019]; root of context hierarchy
Loading class `com.mysql.jdbc.Driver'. This is deprecated. The new driver class is `com.mysql.cj.jdbc.Driver'. The driver is automatically registered via the SPI and manual loading of the driver class is generally unnecessary.
用户表中有101372条记录
用户表中的手机号是13100000000的数据有1条
用户表中手机号是13100000000的用户,姓名是刘凯
根据手机号13100000000获取到的用户信息是{"cellphone":"13100000000","userName":"刘凯"}
叫刘凯的用户有5个

Process finished with exit code 0
MyServiceImpl中的最后两个方法都用到了RowMapper,我们可以把这两个匿名类封装一下,如下:
/**
 * @Author: kuromaru
 * @Date: Created in 16:30 2019/5/7
 * @Description:
 * @modified:
 */
public class MyServiceImpl implements MyService {

    // ...

    @Override
    public UserInfo selectUserInfoByMobile(String mobile) {
        return jdbcTemplate.queryForObject("select cellphone, user_name from t_sys_user where cellphone = ?", new Object[]{"13100000000"}, new UserInfoRowMapper());
    }

    @Override
    public List<UserInfo> selectUserInfosByName(String name) {
        return jdbcTemplate.query("select cellphone, user_name from t_sys_user where user_name = ?", new Object[]{"刘凯"}, new UserInfoRowMapper());
    }

    private static class UserInfoRowMapper implements RowMapper<UserInfo> {

        @Override
        public UserInfo mapRow(ResultSet rs, int rowNum) throws SQLException {
            UserInfo userInfo = new UserInfo();
            userInfo.setCellphone(rs.getString("cellphone"));
            userInfo.setUserName(rs.getString("user_name"));
            return userInfo;
        }
    }
}
JdbcTemplate中有一个queryForList(String sql, Object[] args, Class
如果觉着自己封装RowMapper麻烦,可以直接使用BeanPropertyRowMapper,如下:
@Override
public List<UserInfo> selectUserInfosByName(String name) {
    return jdbcTemplate.query("select cellphone, user_name from t_sys_user where user_name = ?", new Object[]{"刘凯"}, new BeanPropertyRowMapper<>(UserInfo.class));
}
当然,要保证自定义Bean里的字段名和数据库字段名是对应的,含有下划线的字段名要变成驼峰式的,如user_name对应userName。如果不能保证字段名一一对应的话,还是老老实实的写一个RowMapper的实现类吧。。。
更新(update、insert、delete)
@Override
public void insert(String userName, String cellphone) {
    jdbcTemplate.update("insert into my_spring_jdbc value(?,?)", userName, cellphone);
}
@Override
public void update(String userName, String cellphone) {
    jdbcTemplate.update("update my_spring_jdbc set cellphone = ? where user_name = ?", cellphone, userName);
}
@Override
public void delete(String userName) {
    jdbcTemplate.update("delete from my_spring_jdbc where user_name = ?", userName);
}
其他类型的SQL(create table、存储过程)
可以使用execute来执行建表语句,如下:
public class MyServiceImpl implements MyService {

    // ...

    @Override
    public void createTable(String statement) {
        jdbcTemplate.execute(statement);
    }
}
public class Client {

    public static void main(String[] args) {
        AnnotationConfigApplicationContext acac = new AnnotationConfigApplicationContext(TransactionConfig.class);
        MyService myService = (MyService) acac.getBean("myServiceImpl");

        myService.createTable("create table my_spring_jdbc (user_name varchar(64), cellphone varchar(16))");
    }
}
如果遇到存储过程咋办?别慌,jdbcTemplate.update可以搞定,如下:
jdbcTemplate.update("call SUPPORT.REFRESH_ACTORS_SUMMARY(?)",Long.valueOf(unionId));
具体关于存储过程的内容,后面会详细介绍,这里先放一放。
JdbcTemplate的实例是线程安全的,所以,我们可以配置一个实例,然后注入到任何需要的地方。
在项目中使用的时候,要确保尽可能少的创建JdbcTemplate实例,但是如果遇到需要配置多个数据源的情况下,可以创建多个JdbcTemplate与数据源对应。推荐在项目中使用注入功能来获取JdbcTemplate,如下:
public class JdbcCorporateEventDao implements CorporateEventDao {

    private JdbcTemplate jdbcTemplate;

    public void setDataSource(DataSource dataSource) {
        this.jdbcTemplate = new JdbcTemplate(dataSource);
    }

    // JDBC-backed implementations of the methods on the CorporateEventDao follow...
}
或者
@Repository
public class JdbcCorporateEventDao implements CorporateEventDao {

    private JdbcTemplate jdbcTemplate;

    @Autowired
    public void setDataSource(DataSource dataSource) {
        this.jdbcTemplate = new JdbcTemplate(dataSource);
    }

    // JDBC-backed implementations of the methods on the CorporateEventDao follow...
}
xml配置我就不写了。。。懒~
5. NamedParameterJdbcTemplate
JdbcTemplate传参的时候需要用"?"来占位,在参数多的时候就很头疼了。好在有NamedParameterJdbcTemplate,可以使用命名参数,一目了然,看例子:
/**
 * @Author: kuromaru
 * @Date: Created in 16:29 2019/5/7
 * @Description:
 * @modified:
 */
public interface MyService {

    int selectCntByMobile(String mobile);

    int selectCntByUserNameAndMobile(String userName, String mobile);
}
/**
 * @Author: kuromaru
 * @Date: Created in 16:30 2019/5/7
 * @Description:
 * @modified:
 */
public class MyServiceImpl implements MyService {

    private NamedParameterJdbcTemplate namedParameterJdbcTemplate;

    @Autowired
    public void setDataSource(DataSource dataSource) {
        this.namedParameterJdbcTemplate = new NamedParameterJdbcTemplate(dataSource);
    }

    @Override
    public int selectCntByMobile(String mobile) {
        SqlParameterSource sqlParameterSource = new MapSqlParameterSource("mobile", mobile);
        return namedParameterJdbcTemplate.queryForObject("select count(1) from t_sys_user where cellphone = :mobile", sqlParameterSource, Integer.class);
    }

    @Override
    public int selectCntByUserNameAndMobile(String userName, String mobile) {
        Map<String, String> paramMap = new HashMap<String, String>(){{
            put("mobile", mobile);
            put("userName", userName);
        }};
        SqlParameterSource sqlParameterSource = new MapSqlParameterSource(paramMap);
        return namedParameterJdbcTemplate.queryForObject("select count(1) from t_sys_user where cellphone = :mobile and user_name = :userName", sqlParameterSource, Integer.class);
    }

}
/**
 * @Author: kuromaru
 * @Date: Created in 16:22 2019/5/7
 * @Description:
 * @modified:
 */
public class Client {

    public static void main(String[] args) {
        AnnotationConfigApplicationContext acac = new AnnotationConfigApplicationContext(TransactionConfig.class);
        MyService myService = (MyService) acac.getBean("myServiceImpl");

        String mobile = "13100000000";
        String userName = "刘凯";
        System.out.println("用户表中的手机号是" + mobile + "的数据有" + myService.selectCntByMobile(mobile) + "条");
        System.out.println("用户表中的手机号是" + mobile + "的数据有" + myService.selectCntByUserNameAndMobile(userName, mobile) + "条");
    }
}
五月 09, 2019 4:49:21 下午 org.springframework.context.support.AbstractApplicationContext prepareRefresh
信息: Refreshing org.springframework.context.annotation.AnnotationConfigApplicationContext@5a2e4553: startup date [Thu May 09 16:49:21 CST 2019]; root of context hierarchy
Loading class `com.mysql.jdbc.Driver'. This is deprecated. The new driver class is `com.mysql.cj.jdbc.Driver'. The driver is automatically registered via the SPI and manual loading of the driver class is generally unnecessary.
用户表中的手机号是13100000000的数据有1条
用户表中的手机号是13100000000的数据有1条

Process finished with exit code 0
上面这个例子,通过MapSqlParameterSource构建了查询参数,构建这个MapSqlParameterSource时,可以传入一对key-value,也可以直接传入一个Map。当然,也可以直接用Map代替MapSqlParameterSource,像下面这样:
public int countOfActorsByFirstName(String firstName) {

    String sql = "select count(*) from T_ACTOR where first_name = :first_name";

    Map<String, String> namedParameters = Collections.singletonMap("first_name", firstName);

    return this.namedParameterJdbcTemplate.queryForObject(sql, namedParameters,  Integer.class);
}
上面提到有一个BeanPropertyRowMapper,相应的,NamedParameterJdbcTemplate也有一个BeanPropertySqlParameterSource,不过,如果要查List
先看看BeanPropertySqlParameterSource咋用:
    @Override
    public int selectByUserNameAndMobile(String userName, String cellphone) {
        BeanPropertySqlParameterSource beanPropertySqlParameterSource = new BeanPropertySqlParameterSource(new UserInfo(){{
            setUserName(userName);
            setCellphone(cellphone);
        }});
        return namedParameterJdbcTemplate.queryForObject("select count(1) from my_spring_jdbc where cellphone = :cellphone and user_name = :userName", beanPropertySqlParameterSource, Integer.class);
    }
其实NamedParameterJdbcTemplate是JdbcTemplate的一层包装,我们可以通过NamedParameterJdbcTemplate的getJdbcOperations方法获取到当前的JdbcTemplate。
6. SQLExceptionTranslator
SQLExcepitonTranslator是一个接口,用于将SQLExcepiton和Spring的DataAccessException相互转换。
SQLErrorCodeSQLExceptionTranslator是该接口的默认实现,它使用了一些特定的code,从而比SQLState更加精准。该类由SQLErrorCodesFactory创建和实例化,SQLErrorCodesFactory用于根据sql-error-codes.xml配置文件创建SQLErrorCodes。这个xml里定义了具体数据库的错误码,基于从DatabaseMetaData获取的DatabaseProductName。
SQLErrorCodeSQLExceptionTranslator应用以下匹配规则:
下面是Spring的官方解释。。。我也不太明白
- 子类实现的自定义转换。一般都使用具体的SQLErrorCodeSQLExceptionTranslator实现,所以此规则仅在子类实现中匹配。
- 作为SQLErrorCodes类的customSqlExceptionTranslator属性的SQLExceptionTranslator接口的任何自定义实现。
- 在CustomSQLErrorCodesTranslation类(为SQLErrorCodes类的customTranslations属性提供)的实例列表中搜索匹配项。
- 错误代码匹配。
- 使用回退转换器。SQLExceptionSubclassTranslator是默认的回退转换器。如果此转换不可用,则下一个回退转换器是SQLStateSQLExceptionTranslator。
例子:
public class CustomSQLErrorCodesTranslator extends SQLErrorCodeSQLExceptionTranslator {

    protected DataAccessException customTranslate(String task, String sql, SQLException sqlex) {
        // 如果错误码是-12345,则抛出一个死锁失败的异常。
        // 其他的错误码会交给默认的SQLErrorCodeSQLExceptionTranslator来处理
        if (sqlex.getErrorCode() == -12345) {
            return new DeadlockLoserDataAccessException(task, sqlex);
        }
        return null;
    }
}
private JdbcTemplate jdbcTemplate;

public void setDataSource(DataSource dataSource) {

    // create a JdbcTemplate and set data source
    this.jdbcTemplate = new JdbcTemplate();
    this.jdbcTemplate.setDataSource(dataSource);

    // create a custom translator and set the DataSource for the default translation lookup
    CustomSQLErrorCodesTranslator tr = new CustomSQLErrorCodesTranslator();
    tr.setDataSource(dataSource);
    // 把自定义的错误码转换器配置到jdbcTemplate中
    this.jdbcTemplate.setExceptionTranslator(tr);

}

public void updateShippingCharge(long orderId, long pct) {
    // use the prepared JdbcTemplate for this update
    this.jdbcTemplate.update("update orders" +
        " set shipping_charge = shipping_charge * ? / 100" +
        " where id = ?", pct, orderId);
}
7. Noraml Statement
偷个懒。。。直接用官方例子
- 执行语句
import javax.sql.DataSource;
import org.springframework.jdbc.core.JdbcTemplate;

public class ExecuteAStatement {

    private JdbcTemplate jdbcTemplate;

    public void setDataSource(DataSource dataSource) {
        this.jdbcTemplate = new JdbcTemplate(dataSource);
    }

    public void doExecute() {
        this.jdbcTemplate.execute("create table mytable (id integer, name varchar(100))");
    }
}
- 执行查询
import javax.sql.DataSource;
import org.springframework.jdbc.core.JdbcTemplate;

public class RunAQuery {

    private JdbcTemplate jdbcTemplate;

    public void setDataSource(DataSource dataSource) {
        this.jdbcTemplate = new JdbcTemplate(dataSource);
    }

    public int getCount() {
        return this.jdbcTemplate.queryForObject("select count(*) from mytable", Integer.class);
    }

    public String getName() {
        return this.jdbcTemplate.queryForObject("select name from mytable", String.class);
    }
}
- 执行更新
import javax.sql.DataSource;
import org.springframework.jdbc.core.JdbcTemplate;

public class ExecuteAnUpdate {

    private JdbcTemplate jdbcTemplate;

    public void setDataSource(DataSource dataSource) {
        this.jdbcTemplate = new JdbcTemplate(dataSource);
    }

    public void setName(int id, String name) {
        this.jdbcTemplate.update("update mytable set name = ? where id = ?", name, id);
    }
}
8. Auto-generated Keys
有一些数据库表的主键是递增序列,这个时候执行insert语句,是不需要指定主键的,但是在某些场景下,我们需要知道当前insert语句执行后,入库的主键的值,这个时候就可以通过KeyHolder来实现。
先来看下表结构:
CREATE TABLE `my_spring_jdbc` (
  `user_name` varchar(64) DEFAULT NULL,
  `cellphone` varchar(16) DEFAULT NULL,
  `id` int(32) NOT NULL AUTO_INCREMENT,
  PRIMARY KEY (`id`)
) ENGINE=InnoDB AUTO_INCREMENT=7 DEFAULT CHARSET=utf8;
上面这个表有一个主键ID,是递增序列。下面来看下代码:
/**
 * @Author: kuromaru
 * @Date: Created in 10:33 2019/5/9
 * @Description:
 * @modified:
 */
@Data
public class UserInfo {

    private String userName;

    private String cellphone;
}
/**
 * @Author: kuromaru
 * @Date: Created in 16:29 2019/5/7
 * @Description:
 * @modified:
 */
public interface MyService {

    void insert(String userName, String cellphone);
}
/**
 * @Author: kuromaru
 * @Date: Created in 16:30 2019/5/7
 * @Description:
 * @modified:
 */
public class MyServiceImpl implements MyService {

    private JdbcTemplate jdbcTemplate;

    public void setJdbcTemplate(JdbcTemplate jdbcTemplate) {
        this.jdbcTemplate = jdbcTemplate;
    }

    @Override
    public void insert(String userName, String cellphone) {
        KeyHolder keyHolder = new GeneratedKeyHolder();
        jdbcTemplate.update(new PreparedStatementCreator() {
            @Override
            public PreparedStatement createPreparedStatement(Connection con) throws SQLException {
                PreparedStatement ps = con.prepareStatement("insert into my_spring_jdbc(user_name, cellphone) value(?,?)", new String[]{"user_name", "cellphone"});
                ps.setString(1, userName);
                ps.setString(2, cellphone);
                return ps;
            }
        }, keyHolder);

        System.out.println(keyHolder.getKey());;
    }
}
/**
 * @Author: kuromaru
 * @Date: Created in 15:57 2019/5/7
 * @Description:
 * @modified:
 */
@Configuration
@EnableTransactionManagement
public class TransactionConfig {

    @Bean
    public BasicDataSource dataSource() {
        BasicDataSource dataSource = new BasicDataSource();
        dataSource.setUrl("jdbc:mysql://xxx.xxx.xxx.xxx:3306/xxxx?useUnicode=true&characterEncoding=UTF-8");
        dataSource.setDriverClassName("com.mysql.jdbc.Driver");
        dataSource.setUsername("xxx");
        dataSource.setPassword("xxxx");
        dataSource.setInitialSize(10);
        dataSource.setMinIdle(10);
        dataSource.setMaxIdle(10);
        dataSource.setMaxWaitMillis(200);
        return dataSource;
    }

    @Bean
    public DataSourceTransactionManager dataSourceTransactionManager() {
        DataSourceTransactionManager dataSourceTransactionManager = new DataSourceTransactionManager();
        dataSourceTransactionManager.setDataSource(dataSource());
        return dataSourceTransactionManager;
    }

    @Bean("myServiceImpl")
    public MyService myServiceImpl() {
        return new MyServiceImpl(){{
            setJdbcTemplate(new JdbcTemplate(dataSource()));
        }};
    }
}
/**
 * @Author: kuromaru
 * @Date: Created in 16:22 2019/5/7
 * @Description:
 * @modified:
 */
public class Client {

    public static void main(String[] args) {
        AnnotationConfigApplicationContext acac = new AnnotationConfigApplicationContext(TransactionConfig.class);
        MyService myService = (MyService) acac.getBean("myServiceImpl");

        myService.insert("hahah", "13111111111");
    }
}
执行结果:
六月 10, 2019 2:53:17 下午 org.springframework.context.support.AbstractApplicationContext prepareRefresh
信息: Refreshing org.springframework.context.annotation.AnnotationConfigApplicationContext@5a2e4553: startup date [Mon Jun 10 14:53:16 CST 2019]; root of context hierarchy
Loading class `com.mysql.jdbc.Driver'. This is deprecated. The new driver class is `com.mysql.cj.jdbc.Driver'. The driver is automatically registered via the SPI and manual loading of the driver class is generally unnecessary.
6

Process finished with exit code 0
可以看到,keyHolder.getKey()方法,返回了插入到表中的记录的主键ID的值。
9. DataSource
Spring通过DataSource来获取一个数据库的连接。DataSource是JDBC规范的一部分,是一个通用的连接工厂。它允许容器或框架从应用程序代码中隐藏连接池和事务管理的相关问题。
看个例子:
DriverManagerDataSource dmds = new DriverManagerDataSource();
dmds.setDriverClassName("com.mysql.jdbc.Driver");
dmds.setUrl("jdbc:mysql://xxx.xxx.xxx.xxx:3306/xxxx?useUnicode=true&characterEncoding=UTF-8");
dmds.setUsername("xxxx");
dmds.setPassword("xxxx");
return dmds;
需要注意的是,DriverManagerDataSource只能用于测试,不能在生产上使用,因为它并不提供连接池功能,而且对于单个连接的多次请求的处理性能极差。
支持池功能的DataSource可以选用BasicDataSource或者ComboPooledDataSource。
BasicDataSource dataSource = new BasicDataSource();
dataSource.setUrl("jdbc:mysql://xxx.xxx.xxx.xxx:3306/xxxx?useUnicode=true&characterEncoding=UTF-8");
dataSource.setDriverClassName("com.mysql.jdbc.Driver");
dataSource.setUsername("xxxx");
dataSource.setPassword("xxxx");
dataSource.setInitialSize(10);
dataSource.setMinIdle(10);
dataSource.setMaxIdle(10);
dataSource.setMaxWaitMillis(200);
ComboPooledDataSource cpds = new ComboPooledDataSource();
cpds.setDriverClass("com.mysql.jdbc.Driver");
cpds.setJdbcUrl("jdbc:mysql://xxx.xxx.xxx.xxx:3306/xxxx?useUnicode=true&characterEncoding=UTF-8");
cpds.setUser("xxxx");
cpds.setPassword("xxxx");
10. DataSourceUtils
DataSourceUtils是一个功能强大的工具类,提供从DataSource获取JDBC连接的方法,包括对Spring管理的事务连接的特殊支持,例如DataSourceTransactionManager和JtaTransactionManager管理。一般是在Spring的JdbcTemplate、DataSourceTransactionManager等内部使用,也可以直接在应用程序的代码中使用。
关于DataSourceUtils的详细说明,后面会单独介绍。这里就先跳过。
11. SmartDataSource
SmartDataSource是DataSource接口的扩展,由以拆包的方式返回JDBC连接的特殊DataSource实现。可以用于查询是否应在操作后关闭连接。Spring的DataSourceUtils和JdbcTemplate自动执行这样的检查。
我们看一下接口定义
public interface SmartDataSource extends DataSource {

	/**
	 * Should we close this Connection, obtained from this DataSource?
	 * <p>Code that uses Connections from a SmartDataSource should always
	 * perform a check via this method before invoking {@code close()}.
	 * <p>Note that the JdbcTemplate class in the 'jdbc.core' package takes care of
	 * releasing JDBC Connections, freeing application code of this responsibility.
	 * @param con the Connection to check
	 * @return whether the given Connection should be closed
	 * @see java.sql.Connection#close()
	 */
	boolean shouldClose(Connection con);

}
只有一个接口方法,返回boolean类型的值,用于判断是否需要关闭连接。这个接口的实现类是SingleConnectionDataSource,从字面意思上来看,就是单个连接的DataSource,这个连接在使用后不会被关闭。
这个类与DriverManagerDataSource一样,多用于测试,不同的是,SingleConnectionDataSource不会关闭连接,每次都会重用同一个连接。而DriverManagerDataSource每次都会新建一个连接。
12. AbstractDataSource
AbstractDataSource是一个基础的抽象类,它实现了DataSource接口,如果我们需要实现自己的DataSource,可以选择继承这个抽象类。
13. DataSourceTransactionManager
DataSourceTransactionManager是单个JDBC数据源的PlatformTransactionManager实现,它将指定的数据源的JDBC连接绑定到当前线程,并可以允许每一个数据库有一个线程连接。我们在事务管理的相关内容中有介绍到,PlatformTransactionManager是事务管理的基础核心接口,它定义了一些必须要实现的事务策略。
可以说,在不牵涉到分布式事务的情景下,DataSourceTransactionManager都是可用的。
14. JdbcTemplate批处理
直接看代码吧
jdbcTemplate.batchUpdate("insert into my_spring_jdbc(user_name, cellphone) value(?,?)", new BatchPreparedStatementSetter() {
    @Override
    public void setValues(PreparedStatement ps, int i) throws SQLException {
        ps.setString(1, userInfos.get(i).getUserName());
        ps.setString(2, userInfos.get(i).getCellphone());
    }

    @Override
    public int getBatchSize() {
        return userInfos.size();
    }
});
上面整理JdbcTemplate的时候,有介绍过NamedParameterJdbcTemplate,它支持自定义参数名,同样的,在批处理的时候,也有类似的功能,如下
namedParameterJdbcTemplate.batchUpdate(
"insert into my_spring_jdbc(user_name, cellphone) value(:userName,:cellphone)",
SqlParameterSourceUtils.createBatch(userInfos.toArray(new UserInfo[userInfos.size()])));
亦或者像下面这样
List<Object[]> params = new ArrayList<>(userInfos.size());
for (UserInfo userInfo : userInfos) {
    Object[] param = new Object[]{userInfo.getUserName(), userInfo.getCellphone()};
    params.add(param);
}
jdbcTemplate.batchUpdate("insert into my_spring_jdbc(user_name, cellphone) value(?,?)", params);
上述所有的批量更方法,都返回一个int数组,包含了每条sql影响的行数。如果计数不可用,则返回-2。
当批次特别大时,可能需要将批次拆分成几个小的批次来执行,如下
jdbcTemplate.batchUpdate(
"insert into my_spring_jdbc(user_name, cellphone) value(?,?)",
userInfos,
10,
new ParameterizedPreparedStatementSetter<UserInfo>() {

    @Override
    public void setValues(PreparedStatement ps, UserInfo argument) throws SQLException {
        ps.setString(1, argument.getUserName());
        ps.setString(2, argument.getCellphone());
    }
});
上面这句代码,把insert的批次操作分成了每次执行10条的小批次。它返回一个int的二维数组int[][],表示每个批次的每次执行的影响行数。同样,如果计数器不可用,则返回-2。
15. SimpleJdbc
可以通过SimpleJdbc的相关类来简化Jdbc的配置,话不多说,看代码:
/**
 * @Author: kuromaru
 * @Date: Created in 16:30 2019/5/7
 * @Description:
 * @modified:
 */
public class MyServiceImpl implements MyService {

    private JdbcTemplate jdbcTemplate;

    private SimpleJdbcInsert simpleJdbcInsert;

    public void setJdbcTemplate(JdbcTemplate jdbcTemplate) {
        this.jdbcTemplate = jdbcTemplate;
    }

    @Autowired
    public void setSimpleJdbcInsert(DataSource dataSource) {
        this.simpleJdbcInsert = new SimpleJdbcInsert(dataSource).withTableName("my_spring_jdbc");
    }


    @Override
    public void insertSimple(UserInfo userInfo) {
        Map<String, Object> param = new HashMap<>(2);
        param.put("user_name", userInfo.getUserName());
        param.put("cellphone", userInfo.getCellphone());
        simpleJdbcInsert.execute(param);
    }
}
看,我们并没有写sql,而是直接将SimpleJdbcInsert与我们要操作的表关联起来了。在execute方法中传入一个map,就可以完成数据库的操作。
前面我们介绍了可用使用KeyHolder来获取insert的递增主键,那么对于SimpleJdbcInsert来说,也是可以的,如下:
@Override
public void insertSimpleGenerateKey(UserInfo userInfo) {
    simpleJdbcInsert.usingGeneratedKeyColumns("id");
    Map<String, Object> param = new HashMap<>(2);
    param.put("user_name", userInfo.getUserName());
    param.put("cellphone", userInfo.getCellphone());
    Number key = simpleJdbcInsert.executeAndReturnKey(param);
    System.out.println(key.longValue());
}
执行结果:
六月 11, 2019 4:15:15 下午 org.springframework.context.support.AbstractApplicationContext prepareRefresh
信息: Refreshing org.springframework.context.annotation.AnnotationConfigApplicationContext@bebdb06: startup date [Tue Jun 11 16:15:15 CST 2019]; root of context hierarchy
Loading class `com.mysql.jdbc.Driver'. This is deprecated. The new driver class is `com.mysql.cj.jdbc.Driver'. The driver is automatically registered via the SPI and manual loading of the driver class is generally unnecessary.
21

Process finished with exit code 0
打印出主键是21,当然,我们可以直接在创建SimpleJdbcInsert对象的时候,就调用usingGeneratedKeyColumns来指定递增序列的列名。
根据官方解释,我们还可以指定插入的字段:
@Override
public void insertSimpleSpecifyColumns(UserInfo userInfo) {
    simpleJdbcInsert.usingGeneratedKeyColumns("id").usingColumns("user_name");
    Map<String, Object> param = new HashMap<>(2);
    param.put("user_name", userInfo.getUserName());
    param.put("cellphone", userInfo.getCellphone());
    Number key = simpleJdbcInsert.executeAndReturnKey(param);
    System.out.println(key.longValue());
}
最后执行的时候,一样把cellphone插入表记录了,感觉这个功能好像没啥用。。。后面如果顿悟了,再来做补充吧。
上面我们都是用Map来传入sql的参数,感觉还是有些麻烦,下面我们来看一下简便的写法:
@Override
public void insertSimpleParamSource(UserInfo userInfo) {
    simpleJdbcInsert.usingGeneratedKeyColumns("id");
    SqlParameterSource sqlParameterSource = new BeanPropertySqlParameterSource(userInfo);
    Number key = simpleJdbcInsert.executeAndReturnKey(sqlParameterSource);
    System.out.println(key.longValue());
}
我们用了一个SqlParameterSource来代替Map,很简便。BeanPropertySqlParameterSource可以直接将Bean属性转换成sql的参数,bean的参数名要对应于数据库表的字段名。
也可以像下面这样:
@Override
public void insertMapSqpParam(UserInfo userInfo) {
    simpleJdbcInsert.usingGeneratedKeyColumns("id");
    SqlParameterSource sqlParameterSource = new MapSqlParameterSource()
            .addValue("user_name", userInfo.getUserName())
            .addValue("cellphone", userInfo.getCellphone());
    Number key = simpleJdbcInsert.executeAndReturnKey(sqlParameterSource);
    System.out.println(key.longValue());
}
我们还可以创建存储过程等相关的处理逻辑,这块暂时先跳过,后面有需要的话再整理。
16.将JDBC操作建模为java对象
话不多说,直接看代码:
/**
 * @Author: kuromaru
 * @Date: Created in 10:33 2019/5/9
 * @Description:
 * @modified:
 */
@Data
public class UserInfo {

    private String userName;

    private String cellphone;
}
/**
 * @Author: kuromaru
 * @Date: Created in 14:39 2019/6/20
 * @Description:
 * @modified:
 */
public class UserMappingQuery extends MappingSqlQuery<UserInfo> {

    public UserMappingQuery(DataSource ds, String sql) {
        super(ds, sql);
        declareParameter(new SqlParameter("cellphone", Types.VARCHAR));
        compile();
    }

    @Override
    protected UserInfo mapRow(ResultSet rs, int rowNum) throws SQLException {
        UserInfo userInfo = new UserInfo();
        userInfo.setCellphone(rs.getString("cellphone"));
        userInfo.setUserName(rs.getString("user_name"));
        return userInfo;
    }
}
/**
 * @Author: kuromaru
 * @Date: Created in 15:57 2019/5/7
 * @Description:
 * @modified:
 */
@Configuration
@EnableTransactionManagement
public class TransactionConfig {

    @Bean
    public BasicDataSource dataSource() {
        BasicDataSource dataSource = new BasicDataSource();
        dataSource.setUrl("jdbc:mysql://xxx.xxx.xxx.xxx:3306/xxx?useUnicode=true&characterEncoding=UTF-8");
        dataSource.setDriverClassName("com.mysql.jdbc.Driver");
        dataSource.setUsername("xxxx");
        dataSource.setPassword("xxxx");
        dataSource.setInitialSize(10);
        dataSource.setMinIdle(10);
        dataSource.setMaxIdle(10);
        dataSource.setMaxWaitMillis(200);
        return dataSource;
    }

    @Bean
    public DataSourceTransactionManager dataSourceTransactionManager() {
        DataSourceTransactionManager dataSourceTransactionManager = new DataSourceTransactionManager();
        dataSourceTransactionManager.setDataSource(dataSource());
        return dataSourceTransactionManager;
    }

    @Bean("myServiceImpl")
    public MyService myServiceImpl() {
        return new MyServiceImpl();
    }
}
/**
 * @Author: kuromaru
 * @Date: Created in 16:29 2019/5/7
 * @Description:
 * @modified:
 */
public interface MyService {

    UserInfo selectByMappingSqlQuery(String cellphone);
}
/**
 * @Author: kuromaru
 * @Date: Created in 16:30 2019/5/7
 * @Description:
 * @modified:
 */
public class MyServiceImpl implements MyService {

    @Autowired
    private DataSource dataSource;

    private UserMappingQuery userMappingQuery;

    @Override
    public UserInfo selectByMappingSqlQuery(String cellphone) {
        userMappingQuery = new UserMappingQuery(dataSource, "select * from my_spring_jdbc where cellphone = ?");
        UserInfo userInfo = userMappingQuery.findObject(cellphone);
        return userInfo;
    }
}
/**
 * @Author: kuromaru
 * @Date: Created in 16:22 2019/5/7
 * @Description:
 * @modified:
 */
public class Client {

    public static void main(String[] args) throws SQLException {
        AnnotationConfigApplicationContext acac = new AnnotationConfigApplicationContext(TransactionConfig.class);
        MyService myService = (MyService) acac.getBean("myServiceImpl");

        UserInfo userInfo = myService.selectByMappingSqlQuery("13100000004");
        System.out.println(JSON.toJSONString(userInfo));
    }
}
运行结果:
六月 20, 2019 3:07:53 下午 org.springframework.context.support.AbstractApplicationContext prepareRefresh
信息: Refreshing org.springframework.context.annotation.AnnotationConfigApplicationContext@bebdb06: startup date [Thu Jun 20 15:07:53 CST 2019]; root of context hierarchy
Loading class `com.mysql.jdbc.Driver'. This is deprecated. The new driver class is `com.mysql.cj.jdbc.Driver'. The driver is automatically registered via the SPI and manual loading of the driver class is generally unnecessary.
{"cellphone":"13100000004","userName":"Tester1"}

Process finished with exit code 0
如果要做update操作,可以这么写:
/**
 * @Author: kuromaru
 * @Date: Created in 15:28 2019/6/20
 * @Description:
 * @modified:
 */
public class UserSqlUpdate extends SqlUpdate {

    public UserSqlUpdate(DataSource ds) {
        setDataSource(ds);
        setSql("update my_spring_jdbc set cellphone = ? where user_name = ?");
        declareParameter(new SqlParameter("cellphone", Types.VARCHAR));
        declareParameter(new SqlParameter("user_name", Types.VARCHAR));
        compile();
    }

    public int execute(String cellphone, String userName) {
        return update(cellphone, userName);
    }
}
    @Override
    public int updateBySqlUpdate(String cellphone, String userName) {
        UserSqlUpdate userSqlUpdate = new UserSqlUpdate(dataSource);
        return userSqlUpdate.execute(cellphone, userName);
    }
17.CLOB和BLOB
最后,来说一下JdbcTemplate如何操作CLOB和BLOB,看代码:
final File blobIn = new File("spring2004.jpg");
final InputStream blobIs = new FileInputStream(blobIn);
final File clobIn = new File("large.txt");
final InputStream clobIs = new FileInputStream(clobIn);
final InputStreamReader clobReader = new InputStreamReader(clobIs);

jdbcTemplate.execute(
    "INSERT INTO lob_table (id, a_clob, a_blob) VALUES (?, ?, ?)",
    new AbstractLobCreatingPreparedStatementCallback(lobHandler) {
        protected void setValues(PreparedStatement ps, LobCreator lobCreator) throws SQLException {
            ps.setLong(1, 1L);
            lobCreator.setClobAsCharacterStream(ps, 2, clobReader, (int)clobIn.length());
            lobCreator.setBlobAsBinaryStream(ps, 3, blobIs, (int)blobIn.length());
        }
    }
);

blobIs.close();
clobReader.close();
那么在获取的时候,可以这样:
List<Map<String, Object>> l = jdbcTemplate.query("select id, a_clob, a_blob from lob_table",
    new RowMapper<Map<String, Object>>() {
        public Map<String, Object> mapRow(ResultSet rs, int i) throws SQLException {
            Map<String, Object> results = new HashMap<String, Object>();
            String clobText = lobHandler.getClobAsString(rs, "a_clob");
            results.put("CLOB", clobText);
            byte[] blobBytes = lobHandler.getBlobAsBytes(rs, "a_blob");
            results.put("BLOB", blobBytes);
            return results;
        }
    });
至此,Spring关于数据访问的就整理完了(终于完了。。。),其中有一些遗漏的和整理不到位的,留在下一次翻看的时候补充吧。。。

 浙公网安备 33010602011771号