

1.Spring Boot 简介
Spring Boot是由Pivotal团队提供的快速开发框架,基于SpringMVC通过注解+内置Http服务器如:tomcat-embed-core,简化了XML配置,快速将一些常用的第三方依赖整合(通过Maven继承依赖关系),最终实现以Java应用程序的方式进行执行。
1.1 SpringBoot起源
- Spring框架:Spring框架从早期的IOC与AOP衍生出了很多产品例如Spring (boot、security、jpa)等等
- SpringMVC框架:Spring MVC提供了一种轻度耦合的方式来开发web应用,它是Spring的一个web框架。通过Dispatcher Servlet, ModelAndView 和 View Resolver,开发web应用变得很容易。解决的问题领域是网站应用程序或者服务开发——URL路由、Session、模板引擎、静态Web资源等等,是基于Spring的一个 MVC 框架。
- SpringBoot框架:Spring Boot实现了自动配置,降低了项目搭建的复杂度。它主要是为了解决使用Spring框架需要进行大量的配置太麻烦的问题,所以它并不是用来替代Spring的解决方案,而是和Spring框架紧密结合用于提升Spring开发者体验的工具。同时它集成了大量常用的第三方库配置(例如Jackson, JDBC, Mongo, Redis, Mail等等),是基于Spring4的条件注册的一套快速开发整合包。
![]()

1.2 便捷的starter poms (启动器)
starter包含了搭建项目快速运行所需的依赖。它是一个依赖关系描述符的集合。当应用需要一种spring的其它服务时,不需要粘贴拷贝大量的依赖关系描述符。例如想在spring中使用redis,只需要在项目中包含 spring-boot-starter-redis 依赖就可以使用了,所有的starters遵循一个相似的命名模式:spring-boot-starter-,在这里是一种特殊类型的应用程序。该命名结构可以帮你找到需要的starter。很多IDEs集成的Maven允许你通过名称搜索依赖。
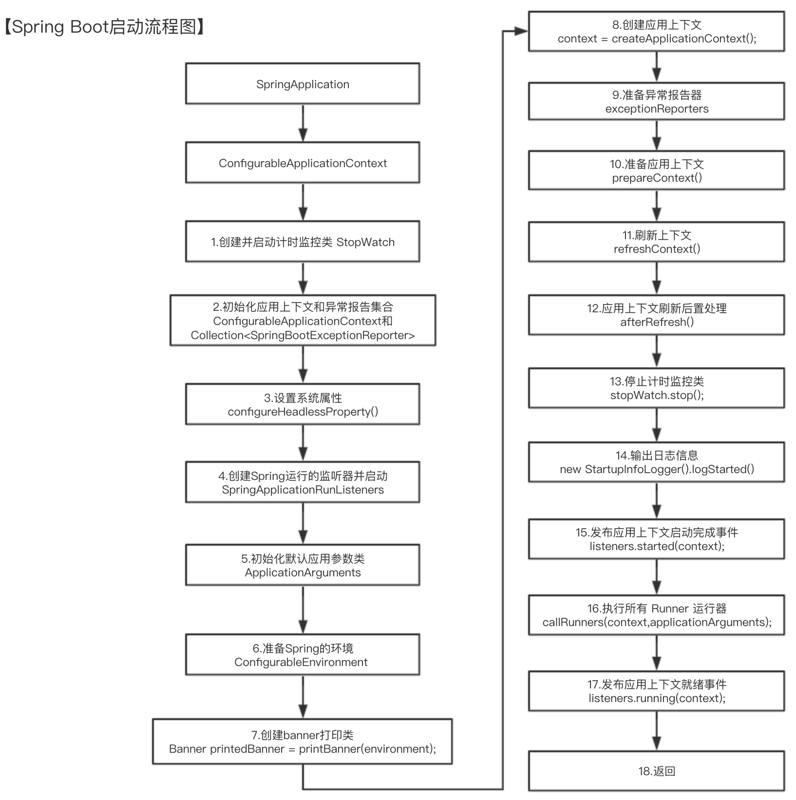
1.3 SpringBoot启动流程
2. 元注解
在JDK 1.5中提供了4个标准的用来对注解类型进行注解的注解类,我们称之为 元注解(meta-annotation)。
-
@Target:描述注解的使用范围
public enum ElementType { TYPE, // 类、接口、枚举类 FIELD, // 成员变量(包括:枚举常量) METHOD, // 成员方法 PARAMETER, // 方法参数 CONSTRUCTOR, // 构造方法 LOCAL_VARIABLE, // 局部变量 ANNOTATION_TYPE, // 注解类 PACKAGE, // 可用于修饰:包 TYPE_PARAMETER, // 类型参数,JDK 1.8 新增 TYPE_USE // 使用类型的任何地方,JDK 1.8 新增 } -
@Retention:描述注解保留的时间范围(即:被描述的注解在它所修饰的类中可以被保留到哪个阶段) 。
public enum RetentionPolicy { SOURCE, // 只在源代码级别保留,编译时就会被忽略 CLASS, // 编译期保留,在class文件中存在,但JVM将会忽略,默认值 RUNTIME // 运行期保留,被JVM保留,可通过反射去获取注解信息 } -
@Documented:描述在使用 javadoc 工具为类生成帮助文档时是否要保留其注解信息。 默认情况下,javadoc是不包括注解的. 但如果声明注解时指定了 @Documented,则它会被 javadoc 之类的工具处理, 所以注解类型信息也会被包括在生成的文档中。
-
@Inherited:使被它修饰的注解具有继承性(如果某个类使用了被@Inherited修饰的注解,则其子类将自动具有该注解)。允许子类继承父类的注解,仅限于类注解有用,对于方法和属性无效。
3. @SpringBootApplication
是一个组合注解
@Target({ElementType.TYPE})
@Retention(RetentionPolicy.RUNTIME)
@Documented
@Inherited
@SpringBootConfiguration
@EnableAutoConfiguration
@ComponentScan(
    excludeFilters = {@Filter(
    type = FilterType.CUSTOM,
    classes = {TypeExcludeFilter.class}
), @Filter(
    type = FilterType.CUSTOM,
    classes = {AutoConfigurationExcludeFilter.class}
)}
)
public @interface SpringBootApplication {
3.1 @SpringBootConfiguration
查看该注解的源码注解可知,该注解与@Configuration 注解功能相同,仅表示当前类为一个JavaConfig类,其就是为Spring Boot专门创建的一个注解。
@Target({ElementType.TYPE})
@Retention(RetentionPolicy.RUNTIME)
@Documented
@Configuration
public @interface SpringBootConfiguration {}
3.2 @ComponentScan
用于完成组件扫描。不过需要注意,其仅仅用于配置组件扫描指令,并没有真正扫描,更没有装配其中的类,这个真正扫描是由@EnableAutoConfiguration完成的。
@Retention(RetentionPolicy.RUNTIME)
@Target({ElementType.TYPE})
@Documented
@Repeatable(ComponentScans.class)
public @interface ComponentScan {
    @AliasFor("basePackages")
    String[] value() default {};

    @AliasFor("value")
    String[] basePackages() default {};

    Class<?>[] basePackageClasses() default {};

    ComponentScan.Filter[] includeFilters() default {};
    ComponentScan.Filter[] excludeFilters() default {};
相当于Spring XML配置文件中的:<context:component-scan>,可使用basePackages属性指定要扫描的包,及扫描的条件。如果不设置则默认扫描@ComponentScan注解所在类的同级类和同级目录下的所有类,所以我们的Spring Boot项目,一般会把入口类放在顶层目录中,这样就能够保证源码目录下的所有类都能够被扫描到。
3.3 @EnableXxx
@EnableXxx注解一般用于开启某一项功能,是为了简化代码的导入,即使用了该类注解,就会自动导入某些类。所以该类注解是组合注解,一般都会组合一个@Import注解,用于导入指定的多个类。@EnableXxx的功能主要体现在这些被导入的类上,而被导入的类一般分为三种:
配置类
@Import中指定的类一般以Configuration结尾,且该类上还会注解@Configuration,表示当前类是一个配置类,是一个JavaConfig类。
@Target({ElementType.TYPE})
@Retention(RetentionPolicy.RUNTIME)
@Import({SchedulingConfiguration.class})
@Documented
public @interface EnableScheduling {
}
@Configuration
@Role(BeanDefinition.ROLE_INFRASTRUCTURE)
public class SchedulingConfiguration {
选择器
@Import中指定的类一般以Selector结尾,且该类一般还实现了ImportSelector接口,表示当前类会根据条件选择导入不同的类。
@Target({ElementType.TYPE})
@Retention(RetentionPolicy.RUNTIME)
@Documented
@Import({CachingConfigurationSelector.class})
public @interface EnableCaching {
public class CachingConfigurationSelector extends AdviceModeImportSelector<EnableCaching> {
    private static final String PROXY_JCACHE_CONFIGURATION_CLASS = "org.springframework.cache.jcache.config.ProxyJCacheConfiguration";
    private static final String CACHE_ASPECT_CONFIGURATION_CLASS_NAME = "org.springframework.cache.aspectj.AspectJCachingConfiguration";
    private static final String JCACHE_ASPECT_CONFIGURATION_CLASS_NAME = "org.springframework.cache.aspectj.AspectJJCacheConfiguration";

    public String[] selectImports(AdviceMode adviceMode) {
        switch(adviceMode) {
        case PROXY:
            return this.getProxyImports();
        case ASPECTJ:
            return this.getAspectJImports();
        default:
            return null;
        }
    }
}
注册器
@Import中指定的类一般以Registrar结尾,且该类实现了ImportDeanDefinitionRegistrar接口,用于导入注册器。该类可以在代码运行时动态注册指定类的实例。
@Target({ElementType.TYPE})
@Retention(RetentionPolicy.RUNTIME)
@Documented
@Import({AspectJAutoProxyRegistrar.class})
public @interface EnableAspectJAutoProxy {
class AspectJAutoProxyRegistrar implements ImportBeanDefinitionRegistrar {
    AspectJAutoProxyRegistrar() {}

    public void registerBeanDefinitions(AnnotationMetadata importingClassMetadata, BeanDefinitionRegistry registry) {
        AopConfigUtils.registerAspectJAnnotationAutoProxyCreatorIfNecessary(registry);
        AnnotationAttributes enableAspectJAutoProxy = AnnotationConfigUtils.attributesFor(importingClassMetadata, EnableAspectJAutoProxy.class);
        if (enableAspectJAutoProxy != null) {
            if (enableAspectJAutoProxy.getBoolean("proxyTargetClass")) {
                AopConfigUtils.forceAutoProxyCreatorToUseClassProxying(registry);
            }
            if (enableAspectJAutoProxy.getBoolean("exposeProxy")) {
                AopConfigUtils.forceAutoProxyCreatorToExposeProxy(registry);
            }
        }
    }
}
3.4 @EnableAutoConfiguration
@Target({ElementType.TYPE})
@Retention(RetentionPolicy.RUNTIME)
@Documented
@Inherited
@AutoConfigurationPackage
@Import({AutoConfigurationImportSelector.class})
public @interface EnableAutoConfiguration {
该注解用于开启自动配置,是SpringBoot的核心注解,是一个组合注解。所谓自动配置是指,其会自动找到其所需要的类,然后交给Spring容器完成这些类的装配。
- @AutoConfigurationPackage 注解用于保存自动配置类以供之后的使用,比如给JPA entity扫描器,用来扫描开发人员通过注解@Entity定义的entity类。通俗的讲就是,注册bean定义到容器中。
- @Import(AutoConfigurationImportSelector.class)是EnableAutoConfiguration注解中最关键的来,它借助AutoConfigurationImportSelector,可以帮助SpringBoot应用将所有符合条件的@Configuration配置都加载到当前SpringBoot创建并使用的IoC容器中。
3.4.1 @Import
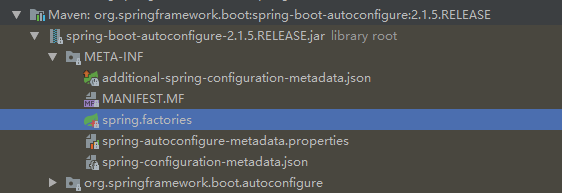
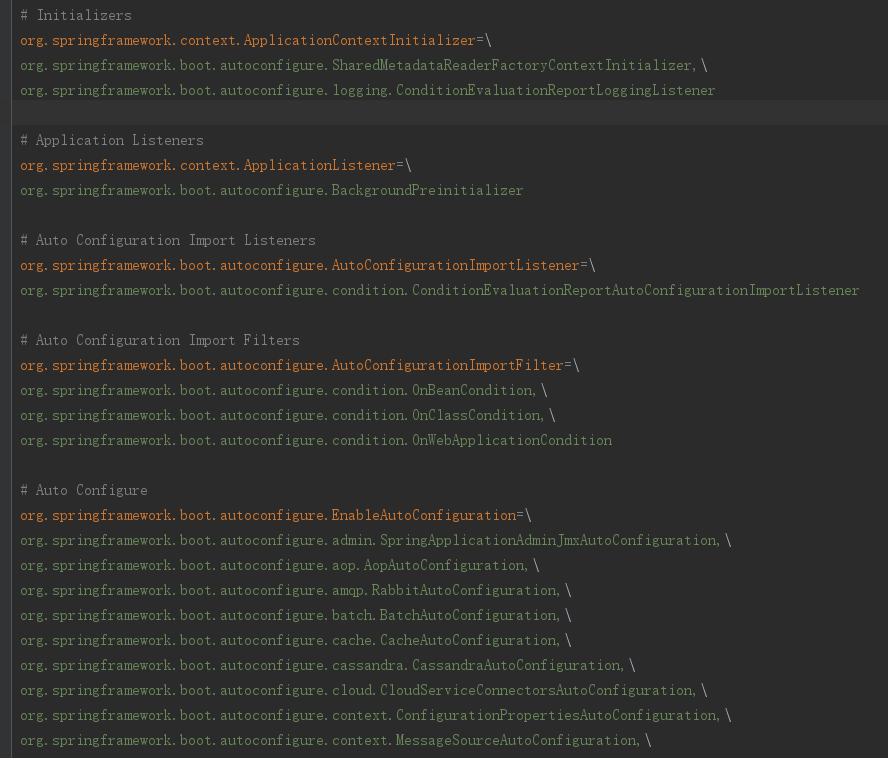
用于导入框架本身所包含的自动配置相关的类。其参数AutoConfigurationImportSelector类,该类用于导入自动配置的类。
public class AutoConfigurationImportSelector implements DeferredImportSelector, BeanClassLoaderAware, ResourceLoaderAware, BeanFactoryAware, EnvironmentAware, Ordered {
    // 返回应该导入的自动配置的类名
	protected List<String> getCandidateConfigurations(AnnotationMetadata metadata, AnnotationAttributes attributes) {
        List<String> configurations =
            SpringFactoriesLoader.loadFactoryNames(
            	this.getSpringFactoriesLoaderFactoryClass(), this.getBeanClassLoader());
        Assert.notEmpty(configurations, "No auto configuration classes found in META-INF/spring.factories. If you are using a custom packaging, make sure that file is correct.");
        return configurations;
    }
public final class SpringFactoriesLoader {
    public static final String FACTORIES_RESOURCE_LOCATION = "META-INF/spring.factories";
	public static List<String> loadFactoryNames(Class<?> factoryClass, @Nullable ClassLoader classLoader) {
        String factoryClassName = factoryClass.getName();
        return (List)loadSpringFactories(classLoader).getOrDefault(factoryClassName, Collections.emptyList());
    }

    private static Map<String, List<String>> loadSpringFactories(@Nullable ClassLoader classLoader) {
        MultiValueMap<String, String> result = (MultiValueMap)cache.get(classLoader);
        if (result != null) {
            return result;
        } else {
            try {
                Enumeration<URL> urls = classLoader != null ? classLoader.getResources(FACTORIES_RESOURCE_LOCATION) : ClassLoader.getSystemResources(FACTORIES_RESOURCE_LOCATION); // META-INF/spring.factories
                LinkedMultiValueMap result = new LinkedMultiValueMap();

       ...
    }

3.4.2 @AutoConfigurationPackage
用于导入用户自定义类,即自动扫描包中的类。
@Target({ElementType.TYPE})
@Retention(RetentionPolicy.RUNTIME)
@Documented
@Inherited
@Import({Registrar.class})
public @interface AutoConfigurationPackage {
}
static class Registrar implements ImportBeanDefinitionRegistrar, DeterminableImports {
    Registrar() {}

    public void registerBeanDefinitions(AnnotationMetadata metadata, BeanDefinitionRegistry registry) {
        AutoConfigurationPackages.register(registry, (new AutoConfigurationPackages.PackageImport(metadata)).getPackageName());
    }

    public Set<Object> determineImports(AnnotationMetadata metadata) {
        return Collections.singleton(new AutoConfigurationPackages.PackageImport(metadata));
    }
}
在AutoConfigurationPackages.register(registry, (new AutoConfigurationPackages.PackageImport(metadata)).getPackageName());打断点会发现getPackageName()就是启动类所在的包。
4. application.yml的加载
application.yml文件对于SpringBoot来说是核心配置文件,至关重要,那么,改文件是如何加载到内存的呢?需要从启动类的run()方法开始跟踪。
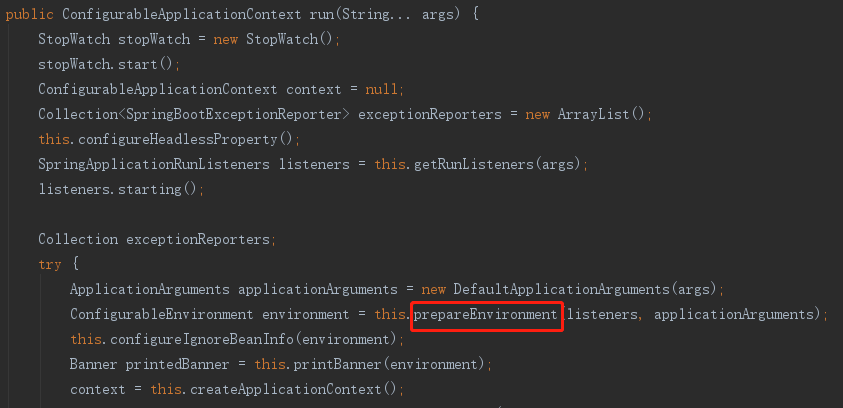
1. 启动方法run()的跟踪

SpringApplication #
public static ConfigurableApplicationContext run(Class<?> primarySource, String... args) {
    return run(new Class[]{primarySource}, args);
}

public static ConfigurableApplicationContext run(Class<?>[] primarySources, String[] args) {
    return (new SpringApplication(primarySources)).run(args);
}
2. 准备运行环境
3.让监听器监听环境准备过程

SpringApplicationRunListeners#
public void environmentPrepared(ConfigurableEnvironment environment) {
    Iterator var2 = this.listeners.iterator();
    while(var2.hasNext()) {
        SpringApplicationRunListener listener = (SpringApplicationRunListener)var2.next();
        listener.environmentPrepared(environment);
    }
}
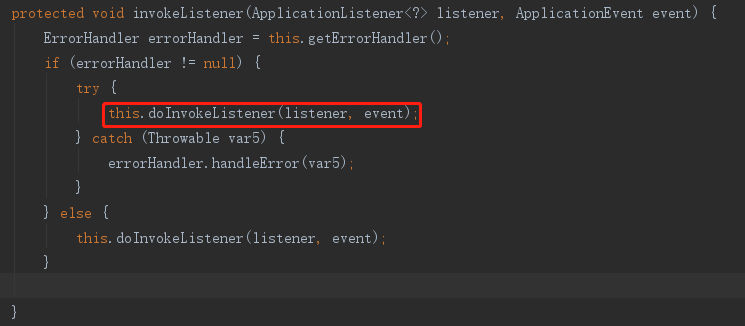
4. 广播环境准备事件
EventPublishingRunListener#
public void environmentPrepared(ConfigurableEnvironment environment) {
    this.initialMulticaster.multicastEvent(new ApplicationEnvironmentPreparedEvent(this.application, this.args, environment));
}
SimpleApplicationEventMulticaster#
public void multicastEvent(ApplicationEvent event) {
this.multicastEvent(event, this.resolveDefaultEventType(event));
}
public void multicastEvent(ApplicationEvent event, @Nullable ResolvableType eventType) {
ResolvableType type = eventType != null ? eventType : this.resolveDefaultEventType(event);
Iterator var4 = this.getApplicationListeners(event, type).iterator();
while(var4.hasNext()) {
ApplicationListener<?> listener = (ApplicationListener)var4.next();
Executor executor = this.getTaskExecutor();
if (executor != null) {
executor.execute(() -> {
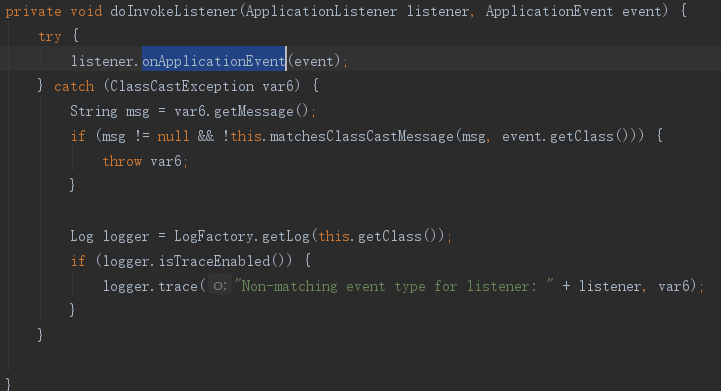
this.invokeListener(listener, event); //
});
} else {
this.invokeListener(listener, event);
}
}
}
5. 触发监听器


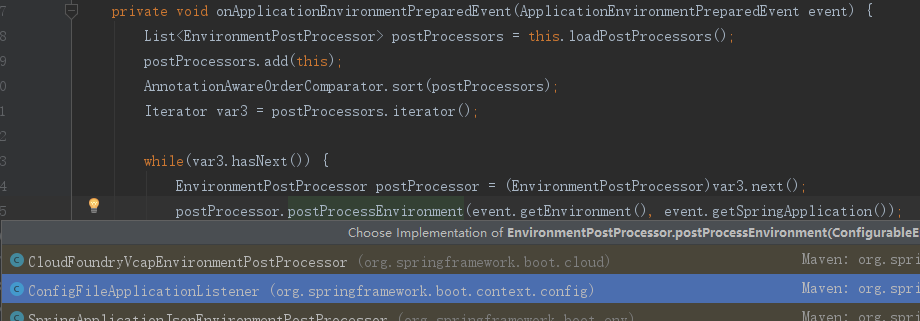

6.加载配置文件
protected void addPropertySources(ConfigurableEnvironment environment, ResourceLoader resourceLoader) {
    RandomValuePropertySource.addToEnvironment(environment);
    (new ConfigFileApplicationListener.Loader(environment, resourceLoader)).load();
}
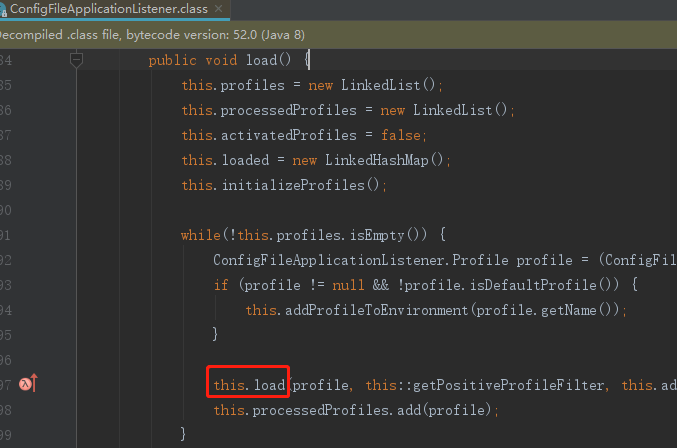
private void load(ConfigFileApplicationListener.Profile profile, ConfigFileApplicationListener.DocumentFilterFactory filterFactory, ConfigFileApplicationListener.DocumentConsumer consumer) {
    this.getSearchLocations().forEach((location) -> {
        boolean isFolder = location.endsWith("/");
        Set<String> names = isFolder ? this.getSearchNames() : ConfigFileApplicationListener.NO_SEARCH_NAMES;
        names.forEach((name) -> {
            this.load(location, name, profile, filterFactory, consumer); //
        });
    });
}
选择是YamlProperty还是Properties
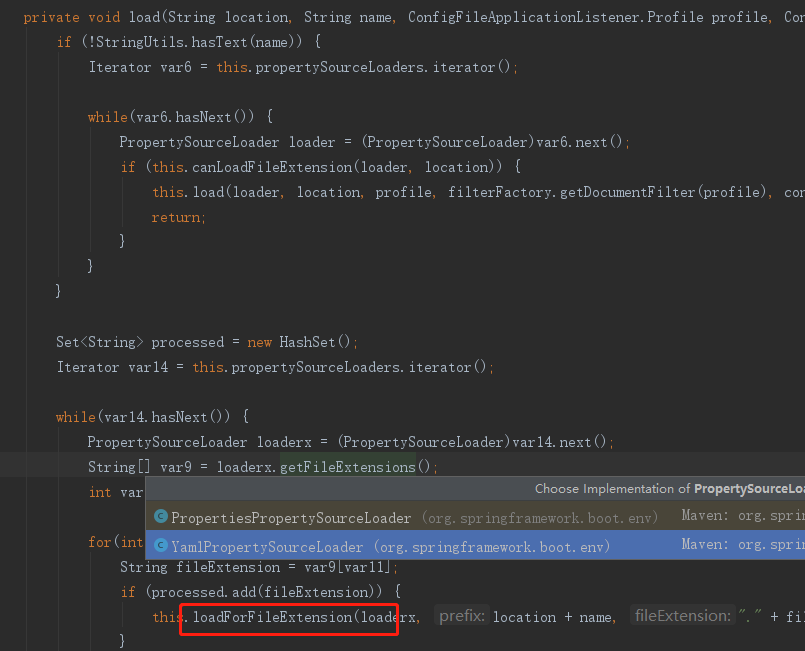


开始加载啦~
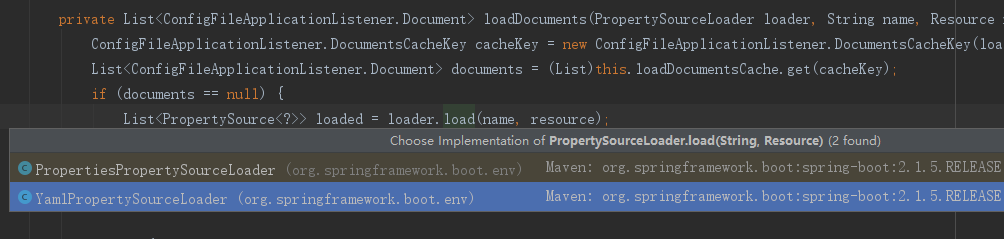

在return propertySources;加断点调试可以看到加载的yml文件。
5.SpringBoot整合Redis
在spring.factories中有一个RedisAutoConfiguration类,Spring容器自动装配该类。

@Configuration
@ConditionalOnClass({RedisOperations.class})
@EnableConfigurationProperties({RedisProperties.class})
@Import({LettuceConnectionConfiguration.class, JedisConnectionConfiguration.class})
public class RedisAutoConfiguration {
    public RedisAutoConfiguration() {}

    @Bean
    @ConditionalOnMissingBean(name = {"redisTemplate"} )//如果当前容器没有这个Bean则创建之
    public RedisTemplate<Object, Object> redisTemplate(RedisConnectionFactory redisConnectionFactory) throws UnknownHostException {
        RedisTemplate<Object, Object> template = new RedisTemplate();
        template.setConnectionFactory(redisConnectionFactory);
        return template;
    }
5.1 @ConditionalOnClass({RedisOperations.class})
@ConditionalOnBean // 当给定的在bean存在时,则实例化当前Bean
@ConditionalOnMissingBean // 当给定的在bean不存在时,则实例化当前Bean
@ConditionalOnClass // 当给定的类名在类路径上存在,则实例化当前Bean
@ConditionalOnMissingClass // 当给定的类名在类路径上不存在,则实例化当前Bean
@ConditionalOnClass({RedisOperations.class})
这个接口的实现类就是RedisTemplate,提供了一些对Redis命令的一些操作。
5.2 @EnableConfigurationProperties({RedisProperties.class})
@ConfigurationProperties(prefix = "spring.redis")
public class RedisProperties {
    private int database = 0;
    private String url;
    private String host = "localhost";
    private String password;
    private int port = 6379;
    private boolean ssl;
    private Duration timeout;
    private RedisProperties.Sentinel sentinel;
    private RedisProperties.Cluster cluster;
    private final RedisProperties.Jedis jedis = new RedisProperties.Jedis();
    private final RedisProperties.Lettuce lettuce = new RedisProperties.Lettuce();
6.Mybatis与SpringBoot的整合
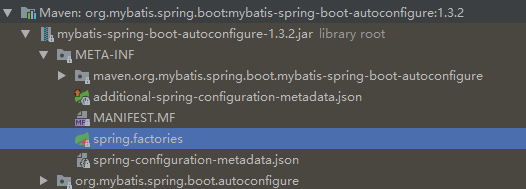
# Auto Configure
org.springframework.boot.autoconfigure.EnableAutoConfiguration=\
org.mybatis.spring.boot.autoconfigure.MybatisAutoConfiguration
@Configuration
@ConditionalOnClass({SqlSessionFactory.class, SqlSessionFactoryBean.class})
@ConditionalOnBean({DataSource.class})
@EnableConfigurationProperties({MybatisProperties.class})
//在加载MybatisAutoConfiguration之前先加载DataSourceAutoConfiguration
@AutoConfigureAfter({DataSourceAutoConfiguration.class})
public class MybatisAutoConfiguration {
    private static final Logger logger = LoggerFactory.getLogger(MybatisAutoConfiguration.class);
    private final MybatisProperties properties;
该类还包含两个创建的Bean
@Bean
@ConditionalOnMissingBean
public SqlSessionFactory sqlSessionFactory(DataSource dataSource) throws Exception {
    SqlSessionFactoryBean factory = new SqlSessionFactoryBean();
    factory.setDataSource(dataSource);
    factory.setVfs(SpringBootVFS.class);
@Bean
@ConditionalOnMissingBean
public SqlSessionTemplate sqlSessionTemplate(SqlSessionFactory sqlSessionFactory) {
    ExecutorType executorType = this.properties.getExecutorType();
    return executorType != null ?
        new SqlSessionTemplate(sqlSessionFactory, executorType)
        : new SqlSessionTemplate(sqlSessionFactory);
}
区别:SpringBoot整合redis 和 Mybatis与SpringBoot的整合最大的区别就是,redis的自动配置类是SpringBoot提供的,而mybatis则是自己提供的。
7.自定义Starter
7.1 Starter工程命名
Spring官方定义的Starter通常命名遵循的格式为spring-boot-starter-{name},例如spring-boot-starter-web。
Spring官方建议,非官方Starter命名应遵循{name}-spring-boot-starter的格式。例如,dubbo-spring-boot-starter。
7.2 实现
实现功能:为用户提供的字符串添加前后缀,前缀后缀定义在yml或properties配置文件。
1.创建工程,导入Configuration Processor依赖。
2.定义Service
public class SomeService {
    private String before;
    private String after;

    public SomeService(String before, String after) {
        this.before = before;
        this.after = after;
    }

    public String wrap(String word) {
        return before + word + after;
    }
}
3.定义配置属性封住类
@ConfigurationProperties("some.service")
public class SomeServiceProperties {
    // 读取配置文件中的如下两个属性值
    // some.service.prefix
    // some.service.surfix
    private String prefix;
    private String surfix;

    public void setPrefix(String prefix) {
        this.prefix = prefix;
    }

    public void setSurfix(String surfix) {
        this.surfix = surfix;
    }

    public String getPrefix() {
        return prefix;
    }

    public String getSurfix() {
        return surfix;
    }
}
4.定义自动配置类
@Configuration
@ConditionalOnClass(SomeService.class)
@EnableConfigurationProperties(SomeServiceProperties.class)
public class SomeServiceAutoConfiguration {
    @Autowired
    private SomeServiceProperties properties;
    // 注意,以下两个方法的顺序是不能颠倒的
    @Bean
    @ConditionalOnProperty(name = "some.service.enable", havingValue = "true", matchIfMissing = true)
    public SomeService someService() {
        return new SomeService(properties.getPrefix(), properties.getSurfix());
    }

    @Bean
    @ConditionalOnMissingBean
    public SomeService someService2() {
        return new SomeService("", "");
    }
}
5.创建spring.factories
org.springframework.boot.autoconfigure.EnableAutoConfiguration=com.hdu.config.SomeServiceAutoConfiguration
代码:https://github.com/kuotian/TestSpring/tree/master/02wrap-spring-boot-starter
测试代码:https://github.com/kuotian/TestSpring/tree/master/02wrap-test
效果:

参考资料
Spring Boot源码分析-启动原理
https://segmentfault.com/a/1190000020359093

 浙公网安备 33010602011771号