

k8s的拓扑编排规范--TOSCA
TOSCA(Topology and Orchestration Specification for Cloud Applications)是由OASIS组织制定的云应用拓扑编排规范。通俗地说,就是制定了一个标准,用来描述云平台上应用的拓扑结构。目前支持XML和YAML,Cloudiy的蓝图就是基于这个规范而来。这个规范比较庞大,本文尽量浓缩了TOSCA的YAML版前两章,以便用尽量少的时间了解尽量多的规范内容。
简介
TOSCA的基本概念只有两个:节点(node)和关系(relationship)。节点有许多类型,可以是一台服务器,一个网络,一个计算节点等等。关系描述了节点之间是如何连接的。举个栗子:一个nodejs应用(节点)部署在(关系)名为host的主机(节点)上。节点和关系都可以通过程序来扩展和实现。
目前它的开源实现有OpenStack (Heat-Translator,Tacker,Senlin),Alien4Cloud,Cloudify等。
示例
Hello World
首先登场的是广大程序猿和攻城狮们都喜闻乐见的Hello World,但是其实里面并没有Hello World,只是比较简单而已。先看下面这段描述文件:
tosca_definitions_version: tosca_simple_yaml_1_0

description: Template for deploying a single server with predefined properties.

topology_template:
  node_templates:
    my_server:
      type: tosca.nodes.Compute
      capabilities:
        host:
          properties:
            num_cpus: 1
            disk_size: 10 GB
            mem_size: 4096 MB
        os:
          properties:
            architecture: x86_64
            type: linux
            distribution: rhel
            version: 6.5
除了TOSCA的版本tosca_definitions_version和描述信息description以外,就是这个topology_template了。这里我们看到有一个名为my_server的节点,它的类型是tosca.nodes.Compute。这个类型预置了两个capabilities信息,一个是host,定义了硬件信息;另一个是os,定义了操作系统信息。
输入输出
再看看下面这个描述文件:
topology_template:
  inputs:
    cpus:
      type: integer
      description: Number of CPUs for the server.
      constraints:
        - valid_values: [ 1, 2, 4, 8 ]

  node_templates:
    my_server:
      type: tosca.nodes.Compute
      capabilities:
        host:
          properties:
            num_cpus: { get_input: cpus }
            mem_size: 2048  MB
            disk_size: 10 GB

  outputs:
    server_ip:
      description: The private IP address of the provisioned server.
      value: { get_attribute: [ my_server, private_address ] }
这里的inputs和outputs分别定义了输入和输出。输入的cpus是在1,2,4和8中的一个整数,而输出的server_ip就是my_server这个节点的private_address也就是私有IP地址。另外一点是TOSCA提供了一些内置函数,在上面这个文件中使用了get_input和get_attribute。输入参数可以通过get_input被使用。
安装软件
第三个描述文件如下:
topology_template:
  inputs:
    # 略

  node_templates:
    mysql:
      type: tosca.nodes.DBMS.MySQL
      properties:
        root_password: { get_input: my_mysql_rootpw }
        port: { get_input: my_mysql_port }
      requirements:
        - host: db_server

    db_server:
      type: tosca.nodes.Compute
      capabilities:
        # 略
我们看到了一个新的节点类型:tosca.nodes.DBMS.MySQL。这个类型允许接收root_password和port的参数。在requirements里定义了mysql这个节点需要被安装到db_server这个节点上,这就是“关系”。如果只想表明依赖,比如说service_a依赖于service_b,也可以直接用- dependency: service_b来描述。上面文件的拓扑结构如下图:
初始化数据库
第四个描述文件如下:
  node_templates:
    my_db:
      type: tosca.nodes.Database.MySQL
      properties:
        name: { get_input: database_name }
        user: { get_input: database_user }
        password: { get_input: database_password }
        port: { get_input: database_port }
      artifacts:
        db_content:
          file: files/my_db_content.txt
          type: tosca.artifacts.File
      requirements:
        - host: mysql
      interfaces:
        Standard:
          create:
            implementation: db_create.sh
            inputs:
              db_data: { get_artifact: [ SELF, db_content ] }

    mysql:
      type: tosca.nodes.DBMS.MySQL
      properties:
        root_password: { get_input: mysql_rootpw }
        port: { get_input: mysql_port }
      requirements:
        - host: db_server

    db_server:
      # 略
这里的tosca.nodes.Database.MySQL表示一个MySQL数据库的实例。在artifacts的db_content里指定了一个文本文件,而这个文件将被interfaces里的Create所用,为db_create.sh脚本提供数据。Standard表示生命周期,可能会包含configure、start、stop等各种操作,而db_create.sh本身是对tosca.nodes.Database.MySQL提供的默认create操作的一个重写。如下图: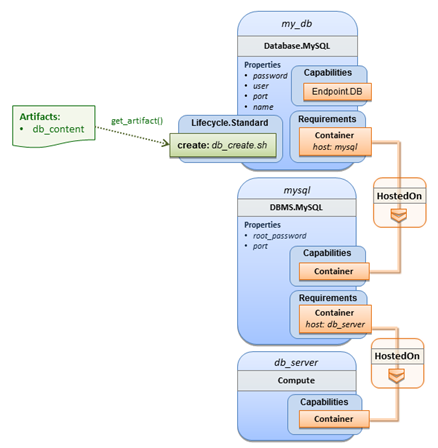
 转存失败重新上传取消
两层应用
再来看看第五个描述文件:
  node_templates:
    wordpress:
      type: tosca.nodes.WebApplication.WordPress
      properties:
        context_root: { get_input: context_root }
        admin_user: { get_input: wp_admin_username }
        admin_password: { get_input: wp_admin_password }
        db_host: { get_attribute: [ db_server, private_address ] }
      requirements:
        - host: apache
        - database_endpoint: wordpress_db
      interfaces:
        Standard:
          inputs:
            db_host: { get_attribute: [ db_server, private_address ] }
            db_port: { get_property: [ wordpress_db, port ] }
            db_name: { get_property: [ wordpress_db, name ] }
            db_user: { get_property: [ wordpress_db, user ] }
            db_password: { get_property: [ wordpress_db, password ] }
    apache:
      type: tosca.nodes.WebServer.Apache
      properties:
        # 略
      requirements:
        - host: web_server
    web_server:
      type: tosca.nodes.Compute
      # 略

    wordpress_db:
      type: tosca.nodes.Database.MySQL
      # 略
    mysql:
      type: tosca.nodes.DBMS.MySQL
      # 略
    db_server:
      type: tosca.nodes.Compute
      # 略
这个文件描述了一个很常见的拓扑结构:mysql里有一个wordpress_db,运行在db_server上;apache部署了一个wordpress,运行在web_server上。wordpress需要wordpress_db。
关系定制化
第六个描述文件:
  node_templates:
    wordpress:
      type: tosca.nodes.WebApplication.WordPress
      properties:
        # 略
      requirements:
        - host: apache
        - database_endpoint:
            node: wordpress_db
            relationship: my.types.WordpressDbConnection
    wordpress_db:
      type: tosca.nodes.Database.MySQL
      properties:
        # 略
      requirements:
        - host: mysql
  relationship_templates:
    my.types.WordpressDbConnection:
      type: ConnectsTo
      interfaces:
        Configure:
          pre_configure_source: scripts/wp_db_configure.sh
这里的关注点是relationship里的my.types.WordpressDbConnection。这是一个自定义的关系,在文件的下半部分描述了详细定义。它实际上是一个ConnectsTo类型,为pre_configure_source操作提供了一个自定义脚本。这个定义也可以单独提出一个文件,就像下面这样:
tosca_definitions_version: tosca_simple_yaml_1_0

description: Definition of custom WordpressDbConnection relationship type

relationship_types:
  my.types.WordpressDbConnection:
    derived_from: tosca.relationships.ConnectsTo
    interfaces:
      Configure:
        pre_configure_source: scripts/wp_db_configure.sh
限定需求资源
再看一个描述文件:
  node_templates:
    mysql:
      type: tosca.nodes.DBMS.MySQL
      properties:
        # 略
      requirements:
        - host:
            node_filter:
              capabilities:
                - host:
                    properties:
                      - num_cpus: { in_range: [ 1, 4 ] }
                      - mem_size: { greater_or_equal: 2 GB }
                - os:
                    properties:
                      - architecture: { equal: x86_64 }
                      - type: linux
                      - distribution: ubuntu
需要关注的是node_filter。这里并没有指定mysql在哪个节点上启动,但是指定了一些节点信息,只有符合的节点才能够启动它。也可以抽出来做个模板:
  node_templates:
    mysql:
      type: tosca.nodes.DBMS.MySQL
      properties:
        # 略
      requirements:
        - host: mysql_compute

    mysql_compute:
      type: Compute
      node_filter:
        capabilities:
          - host:
              properties:
                num_cpus: { equal: 2 }
                mem_size: { greater_or_equal: 2 GB }
          - os:
              properties:
                architecture: { equal: x86_64 }
                type: linux
                distribution: ubuntu
数据库也可以使用:
  node_templates:
    my_app:
      type: my.types.MyApplication
      properties:
        admin_user: { get_input: admin_username }
        admin_password: { get_input: admin_password }
        db_endpoint_url: { get_property: [SELF, database_endpoint, url_path ] }
      requirements:
        - database_endpoint:
            node: my.types.nodes.MyDatabase
            node_filter:
              properties:
                - db_version: { greater_or_equal: 5.5 }
上面指定了数据库的版本。也可以抽出来做个模板:
  node_templates:
    my_app:
      type: my.types.MyApplication
      properties:
        admin_user: { get_input: admin_username }
        admin_password: { get_input: admin_password }
        db_endpoint_url: { get_property: [SELF, database_endpoint, url_path ] }
      requirements:
        - database_endpoint: my_abstract_database
    my_abstract_database:
      type: my.types.nodes.MyDatabase
      properties:
        - db_version: { greater_or_equal: 5.5 }
节点模板替换
再看一个描述文件:
  node_templates:
    web_app:
      type: tosca.nodes.WebApplication.MyWebApp
      requirements:
        - host: web_server
        - database_endpoint: db

    web_server:
      type: tosca.nodes.WebServer
      requirements:
        - host: server

    server:
      type: tosca.nodes.Compute
      # 略

    db:
      # 这是一个抽象节点
      type: tosca.nodes.Database
      properties:
        user: my_db_user
        password: secret
        name: my_db_name
这里的db是一个抽象节点,可以被下面的描述文件所替换:
topology_template:
  inputs:
    db_user:
      type: string
    # 略
  substitution_mappings:
    node_type: tosca.nodes.Database
    capabilities:
      database_endpoint: [ database, database_endpoint ]
  node_templates:
    database:
      type: tosca.nodes.Database
      properties:
        user: { get_input: db_user }
        # 略
      requirements:
        - host: dbms
    dbms:
      type: tosca.nodes.DBMS
      # 略
    server:
      type: tosca.nodes.Compute
      # 略
这里的database_endpoint是由database节点提供的database_endpoint。两个文件联系起来看,表明了上面的web_app不需要管db是什么样子的,有什么拓扑结构,它关心的只是database_endpoint。而下面由database、dbms和server三个节点组成的模板正好可以提供database_endpoint,从而替换掉db这个抽象节点。另外,这样的替换也支持嵌套。
节点模板组
再看一个描述文件:
  node_templates:
    apache:
      type: tosca.nodes.WebServer.Apache
      properties:
        # 略
      requirements:
        - host: server
    server:
      type: tosca.nodes.Compute
        # 略
  groups:
    webserver_group:
      type: tosca.groups.Root
      members: [ apache, server ]

  policies:
    - my_anti_collocation_policy:
        type: my.policies.anticolocateion
        targets: [ webserver_group ]
        # 可以一起处理
这个例子表明了apache和server应该是一组的关系。这样它们就可以一起被处理,比如说伸缩。
YAML宏
下面这个描述文件使用了宏来避免重复:
dsl_definitions:
  my_compute_node_props: &my_compute_node_props
    disk_size: 10 GB
    num_cpus: 1
    mem_size: 2 GB

topology_template:
  node_templates:
    my_server:
      type: Compute
      capabilities:
        - host:
            properties: *my_compute_node_props

    my_database:
      type: Compute
      capabilities:
        - host:
            properties: *my_compute_node_props
传参
先看一个描述文件:
  node_templates:
    wordpress:
      type: tosca.nodes.WebApplication.WordPress
      requirements:
        - database_endpoint: mysql_database
      interfaces:
        Standard:
          inputs:
            wp_db_port: { get_property: [ SELF, database_endpoint, port ] }
          configure:
            implementation: wordpress_configure.sh
            inputs:
              wp_db_port: { get_property: [ SELF, database_endpoint, port ] }
这个例子有两个inputs,前者指的是为所有操作都声明一个变量,后者指的是为configure这个操作声明一个变量。再看下一个文件:
  node_templates:
    frontend:
      type: MyTypes.SomeNodeType
      attributes:
        url: { get_operation_output: [ SELF, Standard, create, generated_url ] }
      interfaces:
        Standard:
          create:
            implementation: scripts/frontend/create.sh
          configure:
            implementation: scripts/frontend/configure.sh
            inputs:
              data_dir: { get_operation_output: [ SELF, Standard, create, data_dir ] }
在这个例子里有两个get_operation_output,前者指的是将create操作的环境变量generated_url设置到url里,后者是将data_dir传递给configure操作。
取动态值
最后一个描述文件:
node_types:
  ServerNode:
    derived_from: SoftwareComponent
    properties:
      notification_port:
        type: integer
    capabilities:
      # 略
  ClientNode:
    derived_from: SoftwareComponent
    properties:
      # 略
    requirements:
      - server:
          capability: Endpoint
          node: ServerNode
          relationship: ConnectsTo
topology_template:
  node_templates:
    my_server:
      type: ServerNode
      properties:
        notification_port: 8000
    my_client:
      type: ClientNode
      requirements:
        - server:
            node: my_server
            relationship: my_connection
  relationship_templates:
    my_connection:
      type: ConnectsTo
      interfaces:
        Configure:
          inputs:
            targ_notify_port: { get_attribute: [ TARGET, notification_port ] }
            # 略
这个例子里,类型为ClientNode的my_client在my_connection关系的Configure操作上需要notification_port变量。这样的话,当类型为ServerNode的my_server连接过来时,就能取到它的notification_port变量,并设置到targ_notify_port环境变量里。有一点值得注意的是,真实的notification_port可能是8000,也可能不是。所以在这种情况下,不用get_property,而用get_attribute函数

 浙公网安备 33010602011771号