Rancher Fleet使用教程
官方文档:
博客截止日期为:20201204
当前官网版本为v0.3.0,但在实践中发现此版本使用私有仓库无法正常工作,更新为v0.3.1可正常使用;
有一些官方文档说的不清楚的地方,在这篇博客中进行了完善;
此处说不清楚,也许并非说不清楚,可能由于本人目前技术水平限制,经过大量实验验证才搞懂,并记录下来;
已将本篇文章打包提供给用户,可以下载使用:https://download.csdn.net/download/qq_42776455/13529342
fleet是一个轻量级的gitops工具,不管是管理单个集群还是大量集群都有很好的性能;
两段pull工作模式:
- Fleet manager pull from git repo;
- The cluster agents will pull from the Fleet manager.
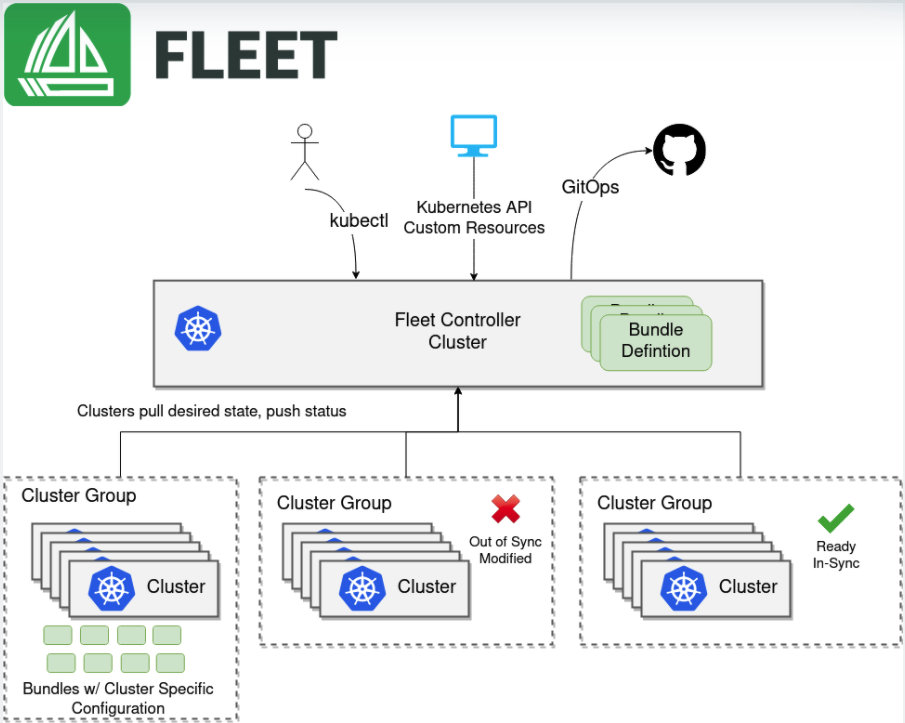
- Fleet Manager: 从git仓库获取k8s assets;
- Fleet controller: 在Fleet Manager上运行的控制器上协调GitOps。在实际操作中,Fleet manager和Fleet controller可以理解为一个东西;
- 单集群模式: Fleet Manager和下游集群是同一个集群,GitRepo命名空间固定是fleet-local;
- 多集群模式: 一个Fleet controller集群管理多个下游集群;
- Fleet agent: 多集群模式下,在受管理的下游集群中运行Fleet agent,用来与Fleet controller通信;
- GitRepo: Fleet所监控的git repositories,在集群中是CRD资源,
kind: GitRepo - Bundle:
- Bundle是从git repo中获取的,通常是Kubernetes manifests, Kustomize configuration, Helm charts;
- Bundle是Fleet中使用的基本部署单元;
- 不管哪种类型的(Kubernetes manifests, Kustomize configuration, Helm charts)最终都会被agent解释成为helm charts并部署到下游集群中;
- Cluster Registration Token:Tokens used by agents to register a new cluster.
fleet安装部署
单集群模式
helm -n fleet-system install --create-namespace \
    fleet-crd https://github.com/rancher/fleet/releases/download/v0.3.1/fleet-crd-0.3.1.tgz
helm -n fleet-system install --create-namespace \
    fleet https://github.com/rancher/fleet/releases/download/v0.3.1/fleet-0.3.1.tgz
建议修改fleet中的value.yaml文件,使用国内镜像源:
global:
  cattle:
    systemDefaultRegistry: "registry.cn-hangzhou.aliyuncs.com"
多集群模式
Fleet Controller Cluster部署
获取fleet controller 集群的CA证书:
kubectl config view -o json --raw | jq -r '.clusters[].cluster["certificate-authority-data"]' | base64 -d > ca.pem
部属fleet:
# 必须指定;
API_SERVER_URL="https://example.com:6443"
# Leave empty if your API server is signed by a well known CA
API_SERVER_CA="ca.pem"
helm -n fleet-system install --create-namespace --wait fleet-crd https://github.com/rancher/fleet/releases/download/v0.3.1/fleet-crd-0.3.1.tgz
helm -n fleet-system install --create-namespace --wait \
    --set apiServerURL="${API_SERVER_URL}" \
    --set-file apiServerCA="${API_SERVER_CA}" \
    fleet https://github.com/rancher/fleet/releases/download/v0.3.1/fleet-0.3.1.tgz
Agent注册到manager cluster的两种方式
Agent Initiated Registration:
- 由manager创建
cluster registration token; - agent通过
cluster registration token获取的values.yaml,来部署fleet-agent并向manager发起注册;
Manager Initiated Registration:
- 使用下游集群的kubeconfig文件,在manager集群里创建
clusters.fleet.cattle.io资源; - manager会主动向下游集群发起请求;
Agent Initiated Registration
- 在fleet controller cluster中创建一个
cluster registration token:
kind: ClusterRegistrationToken
apiVersion: "fleet.cattle.io/v1alpha1"
metadata:
    name: new-token
    namespace: clusters
spec:
  ttl:
    # A duration string for how long this token is valid for. A value <= 0 or null means infinite time.
    # ttl: 240h
kubectl -n clusters get secret new-token -o 'jsonpath={.data.values}' | base64 --decode > values.yaml
查看一下values.yaml,确保信息正确;
在下游集群中部署fleet-agent
# Leave blank if you do not want any labels
CLUSTER_LABELS="--set-string labels.example=true --set-string labels.env=dev"

helm -n fleet-system install --create-namespace \
    ${CLUSTER_LABELS} \
    --values values.yaml \
    fleet-agent https://github.com/rancher/fleet/releases/download/v0.3.1/fleet-agent-0.3.1.tgz
确认agent和manager链接成功;
kubectl -n fleet-system logs -l app=fleet-controller
kubectl -n fleet-system get pods -l app=fleet-controller
在fleet controller集群中使用,查看下游集群是否注册成功:
kubectl get clusters -n clusters
NAME                   BUNDLES-READY   NODES-READY   SAMPLE-NODE   LAST-SEEN              STATUS
cluster-a168d75438c9   2/2             5/5           lab5master    2020-12-03T03:51:44Z
创建一个gitrepo(需要指定target),确认下游集群成功部署了git repo中对应resources;
Manager Initiated Registration
在manager集群中创建:
kubectl create secret generic my-cluster-kubeconfig -n clusters --from-file=value=/kubeconfig
此处的kubeconfig是下游集群的,manager集群通过这个kubeconfig来控制下游集群;
在manager集群中创建下游cluster:
apiVersion: fleet.cattle.io/v1alpha1
kind: Cluster
metadata:
  name: my-cluster
  namespace: clusters
  labels:
    demo: "true"
    env: dev
spec:
  kubeConfigSecret: my-cluster-kubeconfig
fleet使用
单集群模式
公共仓库
因为是公开的仓库,所以无需任何secret,直接运行下面yaml文件即可;
kind: GitRepo
apiVersion: fleet.cattle.io/v1alpha1
metadata:
  name: fleet-test-gitrepo
  namespace: fleet-local
spec:
  repo: https://git.tdology.com/xiaohang/gittest
  paths:
  - simple
私有仓库
- 使用https登陆;
私有仓库必须指定clientSecretName,eg:
apiVersion: fleet.cattle.io/v1alpha1
kind: GitRepo
metadata:
  name: test
  namespace: fleet-local
spec:
  branch: master
  clientSecretName: test
  paths:
  - simple/
  repo: https://git.tdology.com/xiaohang/gittest
  targets:
  - clusterSelector: {}
需要在同一个命名空间下创建secret:
kubectl create secret generic -n fleet-local test --from-literal=username=<username> --from-literal=password=<password> --type=kubernetes.io/basic-auth
username和password是登陆git仓库的用户名和密码;
截止20201201,安装官方文档helm部署版本为v0.3.0,但这个版本在实践中是有问题的,公开的git repo可以正常工作,如果使用私有仓库设置
clientSecretName会失败;查看了一个rancher ui 2.5以后的版本开启了fleet功能,发现使用的是v0.3.1版本的,在这个集群里就可以;升级到fleet v0.3.1之后同样的配置文件就生效了;
- 使用ssh
kubectl create secret generic test-ssh-key -n fleet-local --from-file=ssh-privatekey=/file/to/private/key --type=kubernetes.io/ssh-auth
把对应的公钥添加到git repo中;
kind: GitRepo
apiVersion: fleet.cattle.io/v1alpha1
metadata:
  name: fleet-test-gitrepo
  namespace: fleet-local
spec:
  clientSecretName: hang-login-git
  repo: ssh://git@xxx
  paths:
  - simple/
⚠️:repo的地址开头的
ssh://不能省略;
多集群模式
多集群模式下使用,要制定target,用来选择控制的下游集;
https://fleet.rancher.io/gitrepo-targets/
kind: GitRepo
apiVersion: fleet.cattle.io/v1alpha1
metadata:
  name: myrepo
  namespace: clusters
spec:
  repo: https://github.com/rancher/fleet-examples
  paths:
  - simple

  # Targets are evaluated in order and the first one to match is used. If
  # no targets match then the evaluated cluster will not be deployed to.
  targets:
  # The name of target. This value is largely for display and logging.
  # If not specified a default name of the format "target000" will be used
  - name: prod
    # A selector used to match clusters.  The structure is the standard
    # metav1.LabelSelector format. If clusterGroupSelector or clusterGroup is specified,
    # clusterSelector will be used only to further refine the selection after
    # clusterGroupSelector and clusterGroup is evaluated.
    clusterSelector:
      matchLabels:
        env: prod
    # A selector used to match cluster groups.
    clusterGroupSelector:
      matchLabels:
        region: us-east
    # A specific clusterGroup by name that will be selected
    clusterGroup: group1

 浙公网安备 33010602011771号