背景
操作系统: Kylin Linux Advanced Server V10 (Lance)
| IP |
主机名 |
| kylin-k8s-m01 |
192.168.10.190 |
| kylin-k8s-n01 |
192.168.10.191 |
前期准备(所有节点都要操作)
# 设置系统主机名及Host文件
cat << EOF >> /etc/hosts
192.168.10.190  kylin-k8s-m01
192.168.10.191  kylin-k8s-n01
EOF

cat /etc/hosts

# 根据实际情况操作
hostnamectl set-hostname kylin-k8s-m01
hostnamectl set-hostname kylin-k8s-n01

# 禁用swap分区
sed -i 's@/dev/mapper/klas-swap@#/dev/mapper/klas-swap@g' /etc/fstab
swapoff -a

# 加载网络模块并配置开机加载
cat <<EOF | tee /etc/modules-load.d/k8s.conf
ip_vs
ip_vs_rr
ip_vs_wrr
ip_vs_sh
br_netfilter
ip_tables
iptable_nat
ipt_MASQUERADE
nf_conntrack
EOF

MODULES=(
    "br_netfilter"
    "ip_tables"
    "iptable_nat"
    "ipt_MASQUERADE"
    "ip_vs"
    "ip_vs_rr"
    "ip_vs_wrr"
    "ip_vs_sh"
    "nf_conntrack"
)

for module in "${MODULES[@]}"; do
    if modprobe "$module" 2>/dev/null; then
        echo "$module 加载成功"
    else
        echo "$module 加载失败(可能已内置或不存在)"
    fi
done

# 调整内核参数并配置开机加载
cat <<EOF | tee /etc/sysctl.d/k8s.conf
net.bridge.bridge-nf-call-iptables  = 1
net.bridge.bridge-nf-call-ip6tables = 1
net.ipv4.ip_forward                 = 1
vm.swappiness                       = 0
kernel.panic                        = 10
kernel.panic_on_oops                = 1
EOF

sysctl -p /etc/sysctl.d/k8s.conf

cat <<EOF > /etc/sysconfig/modules/ipvs.modules
#!/bin/bash
modprobe -- ip_vs
modprobe -- ip_vs_rr
modprobe -- ip_vs_wrr
modprobe -- ip_vs_sh
modprobe -- nf_conntrack
EOF

chmod +x /etc/sysconfig/modules/ipvs.modules
/bin/bash /etc/sysconfig/modules/ipvs.modules

# 安装 Containerd
mkdir -p /data/software

cd  /data/software

curl -LO https://github.com/containerd/containerd/releases/download/v1.7.13/cri-containerd-cni-1.7.13-linux-amd64.tar.gz

# 解压到根目录
tar -zxvf cri-containerd-cni-1.7.13-linux-amd64.tar.gz -C /

containerd -v

# 配置 Containerd
mkdir /etc/containerd

# 创建配置文件
containerd config default | sudo tee /etc/containerd/config.toml

# 修改配置文件
vi /etc/containerd/config.toml

# 将sandbox_image 值修改为 registry.aliyuncs.com/google_containers/pause:3.9
# 将SystemdCgroup 值修改为 true

# 启动并设置开机自启
systemctl enable --now containerd

# 注意移除下面这个配置,该配置会影响 pod 与 SVC 的对应关系
mv /etc/cni/net.d/10-containerd-net.conflist /etc/cni/net.d/10-containerd-net.conflist.backup
mv /etc/cni/net.d/87-podman-bridge.conflist  /etc/cni/net.d/87-podman-bridge.conflist.backup

yum install ipset ipvsadm -y

# 安装 Kubernetes 1.29
cat <<EOF | sudo tee /etc/yum.repos.d/kubernetes.repo
[kubernetes]
name=Kubernetes
baseurl=https://pkgs.k8s.io/core:/stable:/v1.29/rpm/
enabled=1
gpgcheck=1
gpgkey=https://pkgs.k8s.io/core:/stable:/v1.29/rpm/repodata/repomd.xml.key
exclude=kubelet kubeadm kubectl cri-tools kubernetes-cni
EOF

yum install -y kubelet kubeadm kubectl --disableexcludes=kubernetes
systemctl enable --now kubelet
初始化 K8S 集群 (Master 节点操作)
kubeadm init --image-repository registry.aliyuncs.com/google_containers \
--kubernetes-version=v1.29.9 \
--apiserver-advertise-address=192.168.10.190 \
--service-cidr=10.96.0.0/12 \
--pod-network-cidr=10.244.0.0/16 \
--v=5

mkdir -p $HOME/.kube
cp -i /etc/kubernetes/admin.conf $HOME/.kube/config
chown $(id -u):$(id -g) $HOME/.kube/config

# 去除污点
kubectl taint node kylin-k8s-m01 node-role.kubernetes.io/control-plane:NoSchedule-

# 部署 flannel
mkdir -p /data/yaml/kube-flannel
cd /data/yaml/kube-flannel
wget https://github.com/flannel-io/flannel/releases/latest/download/kube-flannel.yml
grep -r "docker.io" kube-flannel.yml
cp kube-flannel.yml kube-flannel.yml.ori

# 替换镜像
vi kube-flannel.yml
# 三处需要替换, 可上 https://docker.aityp.com/ 下载

kubectl apply -f kube-flannel.yml

# 检查是否  coredns 的 pod ip 为 10.244 开头
kubectl get pod -A -o wide

# 安装命令补全
yum install bash-completion -y
kubectl completion bash > ~/.kube/completion.bash.inc
echo source ~/.kube/completion.bash.inc >> /root/.bashrc
source ~/.kube/completion.bash.inc
K8S 加入 Node 节点(Node节点操作)
# 根据自身情况调整
kubeadm join 192.168.10.190:6443 --token eekr86.xbye3e4fp49fki8x \
        --discovery-token-ca-cert-hash sha256:a40323e9c3141dc7f1854228471ba85971b97dd46accd8fe0f3c47ed2a1bb03e
把K8S证书更新到10年 (Master 节点操作)
cd /data/software/
# 注意!请检查是否需要获取最新版本
apt install git
git clone https://github.com/yuyicai/update-kube-cert.git
cd update-kube-cert/
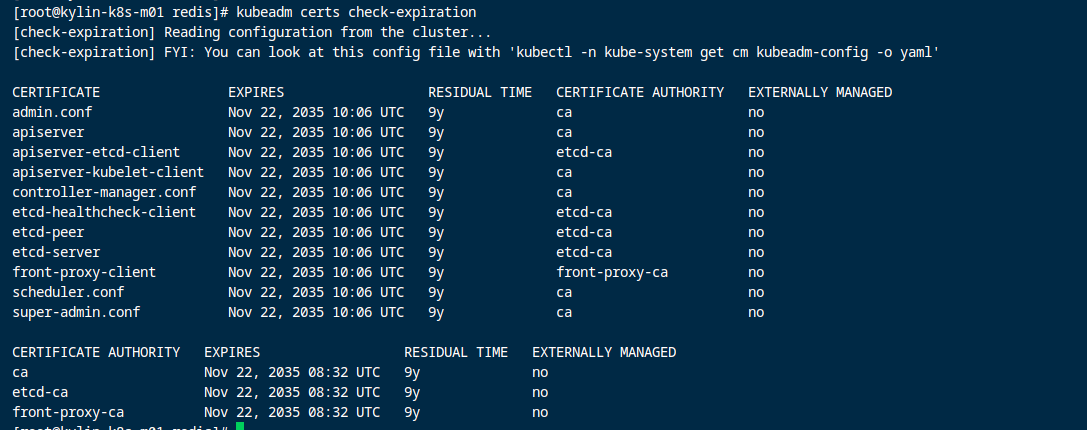
# 查看当前到期时间
kubeadm certs check-expiration
# 容器运行时为 containerd
bash update-kubeadm-cert.sh --cri containerd
# 备份并更新配置
cp /root/.kube/config /root/.kube/config_backup
cp /etc/kubernetes/admin.conf /root/.kube/config
# 查看最新证书到期时间
kubeadm certs check-expiration


 浙公网安备 33010602011771号