理解SPI机制
SPI是什么?
SPI全称为Service Provider Interface ,是一种服务发现机制,它是通过ClassPath路径下的META-INF/services文件夹查找文件,自动加载文件夹里所有定义的类。这一机制为很多框架扩展提供可能,比如在Dubbo、JDBC中都使用了SPI机制
一、简单实现:
1、定义接口及实现类
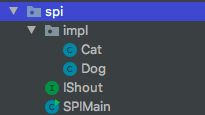
首先,我们需要定义一个接口 IShout
public interface IShout {
    void shout();
}
实现类Cat and Dog
public class Cat implements IShout {
    @Override
    public void shout() {
        System.out.println("miao miao");
    }
}
public class Dog implements IShout {
    @Override
    public void shout() {
        System.out.println("wang wang");
    }
}
资源路径配置

注意点:idea创建resources文件格式可能不对
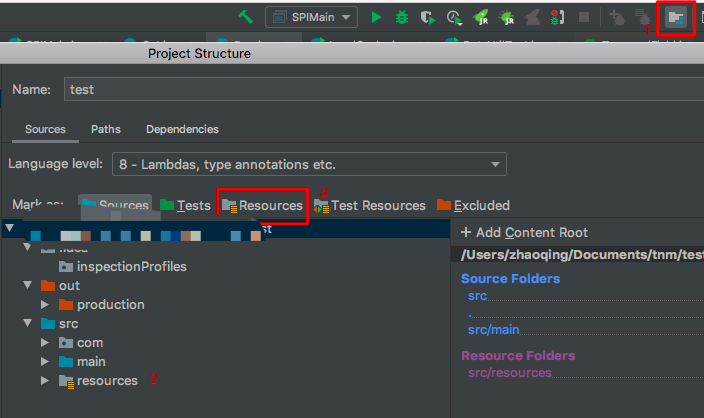
选择新建的resources点击1出现上图,选择Resources
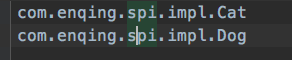
配置文件services 创建文件com.enqing.spi.IShout文件,要在ClassPath路径下配置添加一个文件。文件名字是接口的全限定类名,内容是实现类的全限定类名,多个实现类用换行符分隔。
2、调用
ServiceLoader.load或者Service.providers方法拿到实现类的实例。其中,Service.providers包位于sun.misc.Service,而ServiceLoader.load包位于java.util.ServiceLoader。public class SPIMain {
public static void main(String[] args) {
ServiceLoader<IShout> shouts = ServiceLoader.load(IShout.class);
for (IShout s:shouts){
s.shout();
}
}
}
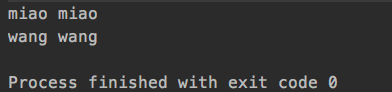
执行结果:
二、源码分析:
1、ServiceLoader 结构
public final class ServiceLoader<S>
    implements Iterable<S>
{

  //配置文件路径
    private static final String PREFIX = "META-INF/services/";

  //加载的服务类或接口
    // The class or interface representing the service being loaded
    private final Class<S> service;

  //类加载器
    // The class loader used to locate, load, and instantiate providers
    private final ClassLoader loader;

  //创建ServiceLoader时采取的访问控制上下文
    // The access control context taken when the ServiceLoader is created
    private final AccessControlContext acc;

  //已加载的服务类集合
    // Cached providers, in instantiation order
    private LinkedHashMap<String,S> providers = new LinkedHashMap<>();

  //内部类,真正加载的服务类
    // The current lazy-lookup iterator
    private LazyIterator lookupIterator;

    ...
2、load 方法
load方法创建了一些属性,重要的是实例化了内部类,LazyIterator。最后返回ServiceLoader的实例。
public static <S> ServiceLoader<S> load(Class<S> service,
                                            ClassLoader loader)
    {
        return new ServiceLoader<>(service, loader);
    }
private ServiceLoader(Class<S> svc, ClassLoader cl) {
  //要加载的接口
    service = Objects.requireNonNull(svc, "Service interface cannot be null");
  //类加载器
    loader = (cl == null) ? ClassLoader.getSystemClassLoader() : cl;
  //访问控制器
    acc = (System.getSecurityManager() != null) ? AccessController.getContext() : null;
    reload();
}
public void reload() {
  //先清空
    providers.clear();
  //实例化内部类
    lookupIterator = new LazyIterator(service, loader);
}
3、查找实现类
查找实现类和创建实现类的过程,都在LazyIterator完成。当我们调用iterator.hasNext和iterator.next方法的时候,实际上调用的都是LazyIterator的相应方法。
public Iterator<S> iterator() {
    return new Iterator<S>() {
        public boolean hasNext() {
            return lookupIterator.hasNext();
        }
        public S next() {
            return lookupIterator.next();
        }
        .......
    };
}
所以,我们重点关注lookupIterator.hasNext()方法,它最终会调用到hasNextService。
private class LazyIterator
        implements Iterator<S>
    {

        Class<S> service;
        ClassLoader loader;
        Enumeration<URL> configs = null;
        Iterator<String> pending = null;
        String nextName = null;

        private LazyIterator(Class<S> service, ClassLoader loader) {
            this.service = service;
            this.loader = loader;
        }

        private boolean hasNextService() {
       //第二次调用的时候,已经解析完成了,直接返回
            if (nextName != null) {
                return true;
            }

            if (configs == null) {
                try {
            //META-INF/services/ 加上接口的全限定类名,就是文件服务类的文件
                    String fullName = PREFIX + service.getName();
                    if (loader == null)
                        configs = ClassLoader.getSystemResources(fullName);
                    else
              //将文件路径转成URL对象
                        configs = loader.getResources(fullName);
                } catch (IOException x) {
                    fail(service, "Error locating configuration files", x);
                }
            }
            while ((pending == null) || !pending.hasNext()) {
                if (!configs.hasMoreElements()) {
                    return false;
                }
          //解析URL文件对象,读取内容,最后返回
                pending = parse(service, configs.nextElement());
            }
        //拿到第一个实现类的名称
            nextName = pending.next();
            return true;
        }
4、创建实例
调用next方法的时候,实际调用到的是,lookupIterator.nextService。它通过反射的方式,创建实现类的实例并返回。
private S nextService() {
            if (!hasNextService())
                throw new NoSuchElementException();
       //全限定类名
            String cn = nextName;
            nextName = null;
            Class<?> c = null;
            try {
          //创建类的Class对象
                c = Class.forName(cn, false, loader);
            } catch (ClassNotFoundException x) {
                fail(service,
                     "Provider " + cn + " not found");
            }
            if (!service.isAssignableFrom(c)) {
                fail(service,
                     "Provider " + cn  + " not a subtype");
            }
            try {
          //通过newInstance实例化对象
                S p = service.cast(c.newInstance());
          //放入实例集合返回
                providers.put(cn, p);
                return p;
            } catch (Throwable x) {
                fail(service,
                     "Provider " + cn + " could not be instantiated",
                     x);
            }
            throw new Error();          // This cannot happen
        }
三、JDBC中的应用
我们开头说,SPI机制为很多框架的扩展提供了可能,其实JDBC就应用到了这一机制。回忆一下JDBC获取数据库连接的过程。在早期版本中,需要先设置数据库驱动的连接,再通过DriverManager.getConnection获取一个Connection。
String url = "jdbc:mysql:///consult?serverTimezone=UTC";
String user = "root";
String password = "root";

Class.forName("com.mysql.jdbc.Driver");
Connection connection = DriverManager.getConnection(url, user, password);
在较新版本中(具体哪个版本,笔者没有验证),设置数据库驱动连接,这一步骤就不再需要,那么它是怎么分辨是哪种数据库的呢?答案就在SPI。
1、加载
我们把目光回到DriverManager类,它在静态代码块里面做了一件比较重要的事。很明显,它已经通过SPI机制, 把数据库驱动连接初始化了。
public class DriverManager {
    static {
        loadInitialDrivers();
        println("JDBC DriverManager initialized");
    }
}
具体过程还得看loadInitialDrivers,它在里面查找的是Driver接口的服务类,所以它的文件路径就是:META-INF/services/java.sql.Driver。
public class DriverManager {
    private static void loadInitialDrivers() {
        AccessController.doPrivileged(new PrivilegedAction<Void>() {
            public Void run() {
                //很明显,它要加载Driver接口的服务类,Driver接口的包为:java.sql.Driver
                //所以它要找的就是META-INF/services/java.sql.Driver文件
                ServiceLoader<Driver> loadedDrivers = ServiceLoader.load(Driver.class);
                Iterator<Driver> driversIterator = loadedDrivers.iterator();
                try{
                    //查到之后创建对象
                    while(driversIterator.hasNext()) {
                        driversIterator.next();
                    }
                } catch(Throwable t) {
                    // Do nothing
                }
                return null;
            }
        });
    }
}
那么,这个文件哪里有呢?我们来看MySQL的jar包,就是这个文件,文件内容为:com.mysql.cj.jdbc.Driver。

2、创建实例
上一步已经找到了MySQL中的com.mysql.cj.jdbc.Driver全限定类名,当调用next方法时,就会创建这个类的实例。它就完成了一件事,向DriverManager注册自身的实例。
public class Driver extends NonRegisteringDriver implements java.sql.Driver {
    static {
        try {
            //注册
            //调用DriverManager类的注册方法
            //往registeredDrivers集合中加入实例
            java.sql.DriverManager.registerDriver(new Driver());
        } catch (SQLException E) {
            throw new RuntimeException("Can't register driver!");
        }
    }
    public Driver() throws SQLException {
        // Required for Class.forName().newInstance()
    }
}
3、创建Connection
在DriverManager.getConnection()方法就是创建连接的地方,它通过循环已注册的数据库驱动程序,调用其connect方法,获取连接并返回。
private static Connection getConnection(
        String url, java.util.Properties info, Class<?> caller) throws SQLException {
    //registeredDrivers中就包含com.mysql.cj.jdbc.Driver实例
    for(DriverInfo aDriver : registeredDrivers) {
        if(isDriverAllowed(aDriver.driver, callerCL)) {
            try {
                //调用connect方法创建连接
                Connection con = aDriver.driver.connect(url, info);
                if (con != null) {
                    return (con);
                }
            }catch (SQLException ex) {
                if (reason == null) {
                    reason = ex;
                }
            }
        } else {
            println("    skipping: " + aDriver.getClass().getName());
        }
    }
}
4、再扩展
既然我们知道JDBC是这样创建数据库连接的,我们能不能再扩展一下呢?如果我们自己也创建一个java.sql.Driver文件,自定义实现类MyDriver,那么,在获取连接的前后就可以动态修改一些信息。
还是先在项目ClassPath下创建文件,文件内容为自定义驱动类com.viewscenes.netsupervisor.spi.MyDriver

我们的MyDriver实现类,继承自MySQL中的NonRegisteringDriver,还要实现java.sql.Driver接口。这样,在调用connect方法的时候,就会调用到此类,但实际创建的过程还靠MySQL完成。
package com.viewscenes.netsupervisor.spi

public class MyDriver extends NonRegisteringDriver implements Driver{
    static {
        try {
            java.sql.DriverManager.registerDriver(new MyDriver());
        } catch (SQLException E) {
            throw new RuntimeException("Can't register driver!");
        }
    }
    public MyDriver()throws SQLException {}

    public Connection connect(String url, Properties info) throws SQLException {
        System.out.println("准备创建数据库连接.url:"+url);
        System.out.println("JDBC配置信息:"+info);
        info.setProperty("user", "root");
        Connection connection =  super.connect(url, info);
        System.out.println("数据库连接创建完成!"+connection.toString());
        return connection;
    }
}
--------------------输出结果---------------------
准备创建数据库连接.url:jdbc:mysql:///consult?serverTimezone=UTC
JDBC配置信息:{user=root, password=root}
数据库连接创建完成!com.mysql.cj.jdbc.ConnectionImpl@7cf10a6f

 浙公网安备 33010602011771号