Material Design之TextInputLayout
-
设计UI
UI很简单,一个welcome的标签(后期可以很方便的替换成图片)和两个EditText (用户名,密码框),不居中再加上一个登陆按钮。再选个漂亮的背景色。
另一个需要注意的细节是设置好两个输入框的inputType ,第一个框设置为textEmail ,第二个框设置为textPassword,布局如下所示。<linearlayout xmlns:android="http://schemas.android.com/apk/res/android" xmlns:tools="http://schemas.android.com/tools" android:background="#e3e3e3" android:layout_width="match_parent" android:layout_height="match_parent" android:padding="@dimen/activity_horizontal_margin" tools:context=".LoginActivity" android:orientation="vertical"> <relativelayout android:layout_width="match_parent" android:layout_height="wrap_content" android:layout_weight="0.5" android:orientation="vertical"> <textview android:layout_width="match_parent" android:layout_height="wrap_content" android:layout_centerInParent="true" android:gravity="center" android:text="Welcome" android:textSize="30sp" android:textColor="#333333"></textview> </relativelayout> </linearlayout><linearlayout android:layout_width="match_parent" android:layout_height="wrap_content" android:layout_weight="0.5" android:orientation="vertical"> <edittext android:id="@+id/username" android:layout_width="match_parent" android:layout_height="wrap_content" android:inputType="textEmailAddress"></edittext> <edittext android:id="@+id/password" android:layout_width="match_parent" android:layout_height="wrap_content" android:inputType="textPassword"></edittext> <button android:id="@+id/btn" android:layout_marginTop="4dp" android:layout_width="match_parent" android:layout_height="wrap_content" android:text="Login"></button> </linearlayout>
你可能还想去掉应用栏(app bar),也就是之前说的action bar,修改下style.xml就可以了
<style name="AppTheme" parent="Theme.AppCompat.Light.NoActionBar">
</style>
-
使用TextInputLayout
终于到了教程中最有趣的部分了,TextInputLayout 控件表现得就像LinearLayout 一样,它是一个容器。TextInputLayout 中只能放一个子元素,和ScrollView有点类似,并且子元素必须是EditText 。<android .support.design.widget.TextInputLayout android:id="@+id/usernameWrapper" android:layout_width="match_parent" android:layout_height="wrap_content"> <edittext android:id="@+id/username" android:layout_width="match_parent" android:layout_height="wrap_content" android:inputType="textEmailAddress" android:hint="Username"></edittext> </android>
注意到了么,我在EditText设置一个属性-hint。这个属性大家都很熟悉了,EditText没有输入的时候,hint会显示,当输入第一个字母上去的时候,hint就消失了。这个体验不是太好。
感谢TextInputLayout,这个马上就不是问题了。当EditText中输入第一个字母要隐藏hint的时候,TextInputLayout中会出现一个悬浮的标签来显示这个hint,还负责一个炫酷的的material 动画。
下面,我们给password也来一个。
<android .support.design.widget.TextInputLayout
    android:id="@+id/passwordWrapper"
    android:layout_width="match_parent"
    android:layout_height="wrap_content"
    android:layout_below="@id/usernameWrapper"
    android:layout_marginTop="4dp">

    <edittext android:id="@+id/password"
        android:layout_width="match_parent"
        android:layout_height="wrap_content"
        android:inputType="textPassword"
        android:hint="Password"></edittext>

</android>
如果现在运行程序,啥效果都木有。当然,EditText 的hint效果除外。辣么,为啥会木有动画捏?我们还缺了点代码。
- 设置提示信息(hints)
在setContentView()下面,初始化TextInputLayout 的引用。
final TextInputLayout usernameWrapper = (TextInputLayout) findViewById(R.id.usernameWrapper);
final TextInputLayout passwordWrapper = (TextInputLayout) findViewById(R.id.passwordWrapper);
想要看到hint浮动的动画,还需要调用setHint
usernameWrapper.setHint("Username");
passwordWrapper.setHint("Password");
做完这个以后,这个应用已经完全符合material design了,运行程序,然后你会看到登录界面。 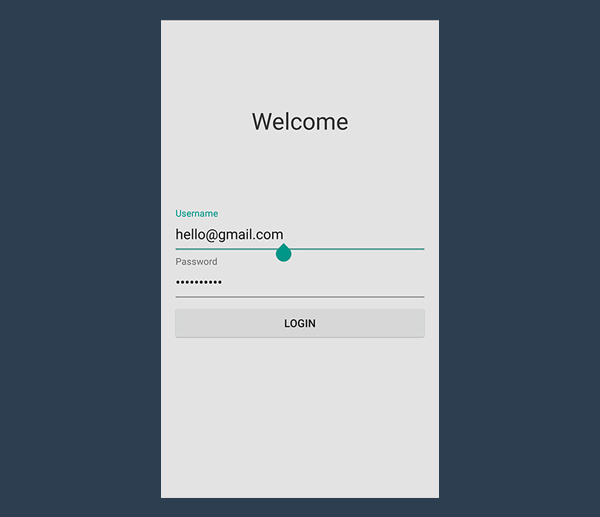
处理错误
TextInputLayout另一个很赞的功能是,可以处理错误情况。通过验证用户输入,你可以防止用户输入错误的邮箱,或者输入不符合规则的密码。
有些输入验证,验证是在后台做得,产生错误后会反馈给前台,最后展示给用户。非常耗时而且用户体验差。最好的办法是在请求后台前做校验。
-
实现onClick 方法
首先处理点击事件,处理点击事件的方法也有很多种,在XML中设置方法名,然后Activity完善这个方法。或者setOnClickListener。写文章的哥们儿比较喜欢后面这种。btn.setOnClickListener(new View.OnClickListener() { @Override public void onClick(View v) { // STUB } });其实,当这个方法被调用以后,就不需要键盘了。但是不幸的是,Android不会自动隐藏。怎么办呢?调用下面的方法吧。
private void hideKeyboard() { View view = getCurrentFocus(); if (view != null) { ((InputMethodManager) getSystemService(Context.INPUT_METHOD_SERVICE)). hideSoftInputFromWindow(view.getWindowToken(), InputMethodManager.HIDE_NOT_ALWAYS); } } -
验证用户输入
在设置错误标签前,我们先明确下什么是错误,什么不是错误。我们假设用户名验证邮箱是否正确。
验证邮箱稍微有些复杂,我们可以用Apache Commons library 来做这个事。我这里用一个维基百科里的正则表达式。/^[a-zA-Z0-9#_~!$&‘()*+,;=:."(),:;<>@\[\]\\]+@[a-zA-Z0-9-]+(\.[a-zA-Z0-9-]+)*$/为啥这么写,就不做解释了。。。。。
既然我们想验证一个string,我们必须依赖Pattern and Matcher,它们在java.util.regex下面。在Activity中导入它们。private static final String EMAIL_PATTERN = "^[a-zA-Z0-9#_~!$&‘()*+,;=:.\"(),:;<>@\\[\\]\\\\]+@[a-zA-Z0-9-]+(\\.[a-zA-Z0-9-]+)*$"; private Pattern pattern = Pattern.compile(EMAIL_PATTERN); private Matcher matcher; public boolean validateEmail(String email) { matcher = pattern.matcher(email); return matcher.matches(); }密码验证相对简单,不同的组织有不同的验证方式。但是大都有最小长度限制。最合理的规则就是至少输入六位字符。
public boolean validatePassword(String password) { return password.length() > 5; } -
接收数据
之前已说过,TextInputLayout只是一个容器。不像LinearLayout and ScrollView,你可以直接获取它的子元素通过特定的方法(getEditText)。根本木有必要使用findViewById。
如果TextInputLayout 中没有EditText,getEditText 会返回null,你得注意下NPE了。public void onClick(View v) { hideKeyboard(); String username = usernameWrapper.getEditText().getText().toString(); String password = usernameWrapper.getEditText().getText().toString(); // TODO: Checks // TODO: Login } -
显示错误
TextInputLayout 错误处理简单而迅速。相关的方法有setErrorEnabled和setError。
setError会弹出红色的提示消息同时显示在EditText下面,如果传入的错误消息是null,之前的消息会被清除掉。这个方法还会使EditText 也变红色。
setErrorEnabled 是控制这个功能的。这会直接影响layout的大小。请自行脑补。。。。
还有一个需要注意的是,如果没有调用setErrorEnabled(true)但是调用了setError 方法并且传入了非空的消息,setErrorEnabled(true) 会被自动调用。
正确和错误情况我们已经说明了,下面就实现onClick 方法。
public void onClick(View v) {
    hideKeyboard();
    String username = usernameWrapper.getEditText().getText().toString();
    String password = usernameWrapper.getEditText().getText().toString();
    if (!validateEmail(username)) {
        usernameWrapper.setError("Not a valid email address!");
    } else if (!validatePassword(password)) {
        passwordWrapper.setError("Not a valid password!");
    } else {
        usernameWrapper.setErrorEnabled(false);
        passwordWrapper.setErrorEnabled(false);
        doLogin();
    }
}
下面是空的登录方法:
public void doLogin() {
    Toast.makeText(getApplicationContext(), "OK! I‘m performing login.", Toast.LENGTH_SHORT).show();
    // TODO: login procedure; not within the scope of this tutorial.
}
-
修改TextInputLayout背景
<style name="AppTheme" parent="Theme.AppCompat.Light.NoActionBar">
    <item name="colorAccent">#3498db</item>
</style>

总结
感谢Design Support Library给我们带来了TextInputLayout。
下面的不想翻译了,好好学习,天天向上吧。

 浙公网安备 33010602011771号