Oracle 12cR1 RAC 部署+Host
1. 准备与规划
1.1 手册说明
- 通过 hosts 解析 scan IP
- 通过 NTP 同步时间
- 通过 centos 自带 UI 安装
- 使用 UDEV 绑定共享磁盘
1.2 软件准备
| 序号 | 类型 | 内容 |
|---|---|---|
| 1 | 数据库 | linuxamd64_12102_database_1of2.zip linuxamd64_12102_database_2of2.zip |
| 2 | 集群软件 | linuxamd64_12102_grid_1of2.zip linuxamd64_12102_grid_2of2.zip |
| 3 | 操作系统 | Centos 7.9 |
| 4 | 虚拟机 | VMware |
1.3 安装服务器
- VMware虚拟机中创建 rac01 和 rac02,GI 12cR1 要求内存至少 4 G,可以创建 rac01 后复制 rac02。
- 安装过程略。
1.4 网络规划
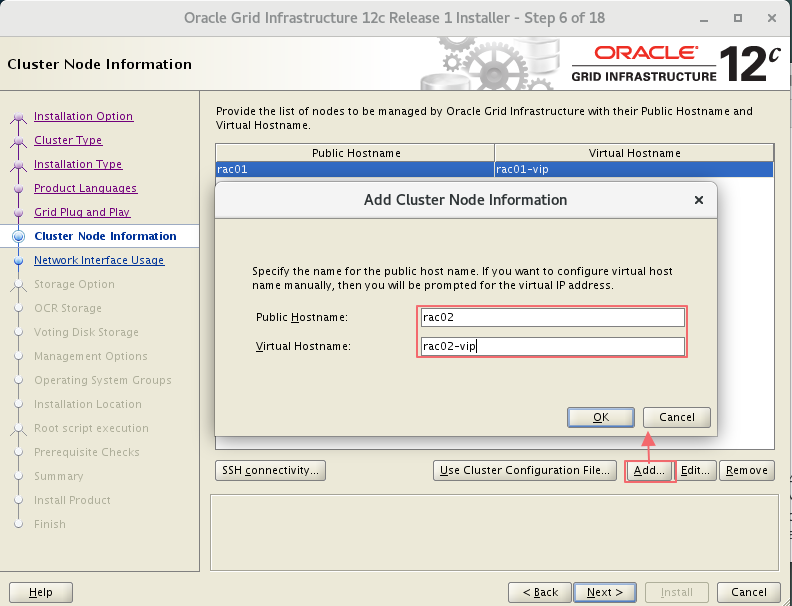
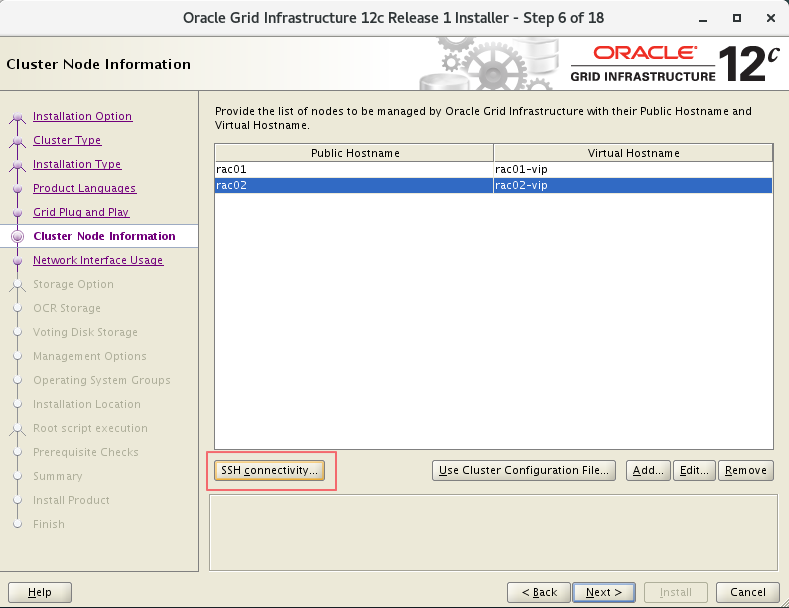
| Host Name | Interface Name | Type | IP Address | Interface |
|---|---|---|---|---|
| rac01 | rac01 | 公共/Public | 192.168.10.101 | ens33 VMnet 8 |
| rac01 | rac01-vip | 虚拟/Virtual | 192.168.10.201 | |
| rac01 | rac01-priv | 私有/Private | 192.168.20.101 | ens37 VMnet 2 |
| rac02 | rac02 | 公共/Public | 192.168.10.102 | ens33 VMnet 8 |
| rac02 | rac02-vip | 虚拟/Virtual | 192.168.10.202 | |
| rac02 | rac02-priv | 私有/Private | 192.168.20.102 | ens37 VMnet 2 |
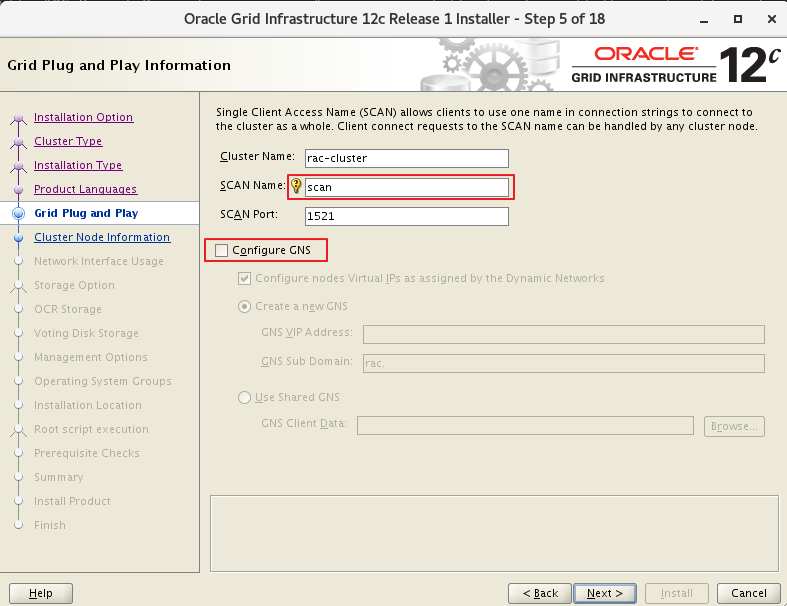
| scan | scan | scan | 192.168.10.100 |
说明一
主机名不能包含下划线,如
RAC_01是不允许的;安装之前两个节点的公网、私网共4个IP能ping通。
说明二
Oracle RAC 环境下每个节点都会有多个 IP 地址:
私有IP(Public IP)
Private IP address is used only for internal clustering processing (Cache Fusion).
专用(私有)IP地址只用于内部群集处理,如心跳侦测,服务器间的同步数据用。
虚拟IP(Virtual IP)
Virtual IP is used by database applications to enable fail over when one cluster node fails.
当一个群集节点出现故障时,数据库应用程序(包括数据库客户端)通过虚拟IP地址切换到另一个无故障节点,另一个功能是均衡负载。
公共IP(Public IP)
Public IP address is the normal IP address typically used by DBA and SA to manage storage, system and database.
正常的(真实的)IP 地址,通常 DBA 和 SA 使用公共 IP 地址在来管理存储、系统和数据库。
监听IP(SCAN IP)
从 Oracle 11g R2 开始,Oracle RAC 网络对 IP 地址有特殊要求,新增了加监听 IP 地址(
SCAN IP),所以从 Oracle 11g R2 开始 Oracle RAC 网络至少需要 4 种 IP 地址(前面介绍三种 IP 地址)。在 Oracle 11g R2 之前,如果数据库采用了 RAC 架构,在客户端的tnsnames中,需要配置多个节点的连接信息,从而实现诸如负载均衡、Failover等RAC的特性.因此,当数据库 RAC 集群需要添加或删除节点时,需要及时对客户端机器的tns进行更新,以免出现安全隐患。在 Oracle 11g R2 中,为了简化该项配置工作,引入了
SCAN(Single Client Access Name)的特性。该特性的好处在于,在数据库与客户端之间,添加了一层虚拟的服务层,就是所谓的SCAN IP以及SCAN IP Listener,在客户端仅需要配置SCAN IP的 tns 信息,通过 SCAN IP Listener,连接后台集群数据库。这样,不论集群数据库是否有添加或者删除节点的操作,均不会对 Client 产生影响。
2. 系统配置部分A
2.1 关闭防火墙
systemctl stop firewalld
systemctl disable firewalld
2.2 关闭selinux
vi /etc/selinux/config
# 修改内容,禁用selinux
SELINUX=disabled
2.3 安装必要的包
- 如果出现 Another app is currently holding the yum lock;,通过强制关掉yum进程:
[root@localhost ~]# rm -f /var/run/yum.pid
yum -y install binutils compat-libcap1 compat-libstdc++-33 compat-libstdc++-33*i686 compat-libstdc++-33*.devel compat-libstdc++-33 compat-libstdc++-33*.devel elfutils-libelf-devel gcc gcc-c++ glibc glibc*.i686 glibc-devel glibc-devel*.i686 ksh libaio libaio*.i686 libaio-devel libaio-devel*.devel libgcc libgcc*.i686 libstdc++ libstdc++*.i686 libstdc++-devel libstdc++-devel*.devel libXi libXi*.i686 libXtst libXtst*.i686 libX11 libX11*.i686 libXau libXau*.i686 libXext libXext*.i686 make sysstat unixODBC unixODBC*.i686 unixODBC-devel unixODBC-devel*.i686 zlib-devel zlib-devel.i686
- 如果
OEL平台,只需要执行:# yum install oracle-database-server-12cR1-preinstall -y Installed: oracle-database-server-12cR1-preinstall.x86_64 0:1.0-5.el7 Complete!首先我们要知道 oracle-database-server-12cR1-preinstall 做了什么:
- (1). 自动安装oracle所需的
RPM包- (2). 自动创建oracle用户和
dba、oinstall组- (3). 自动配置
/etc/sysctl.conf内核参数- (4). 自动配置
/etc/security/limits.conf参数- (5). 关闭
NUMA=OFF(关闭非一致内存访问)- (6). 关闭
NOZEROCONF=yes- (7). 修改系统启动版本信息
2.4 系统yum更新(optional)
# 升级系统,如果不想升级内核运行{yum --exclude=kernel* update}
yum clean all && yum update -y
2.5 创建swap交换区
(安装 centos 已经创建)。
2.6 创建oracle分区(optional)
如果操作系统原有分区都合适,这步可以忽略。
# 查看硬盘及分区信息(启动Disk开头的就是硬盘,Device开头的就是分区)。
fdisk -l
# 创建分区(/dev/sd是硬盘,是你需要创建分区的硬盘,创建分区后会生成 /dev/sdc1,如果本来有sdc1,则会出现sdc2)。
fdisk /dev/sdc
# 格式化新创建的分区。
mkfs.xfs /dev/sdc1。
# 将分区添加到/etc/fstab文件中,使之开机自动挂载(编辑保存fstab文件后不会立即生效)。
vim /etc/fstab
/dev/sdc1        /u01     xfs      defaults 0 0
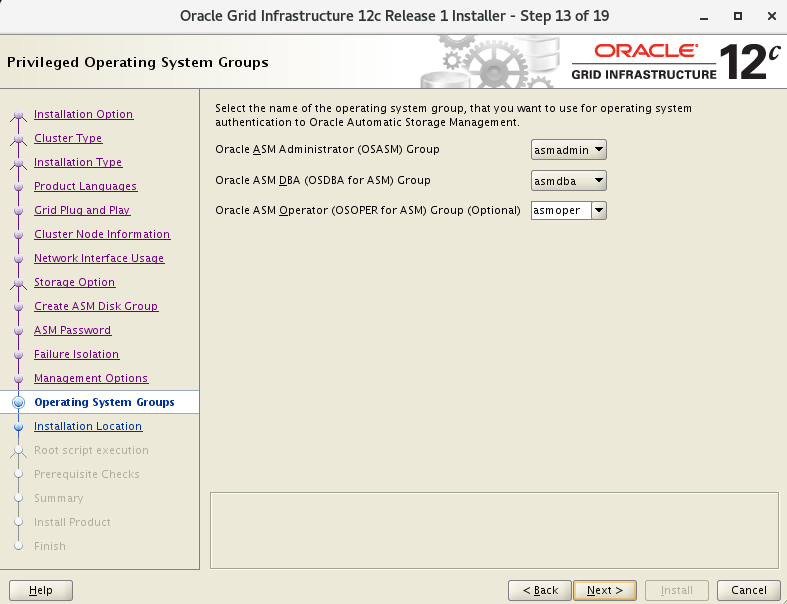
2.7 创建oracle用户与组
================#创建RAC环境组和用户====================================
# 创建组
groupadd oinstall
groupadd dba
groupadd oper
groupadd asmadmin
groupadd asmdba
groupadd asmoper
# 创建GI用户
useradd -g oinstall -G asmadmin,asmdba,asmoper,dba,oper grid
# 创建oracle用户
useradd -g oinstall -G dba,oper,asmdba oracle
# 如果用户存在,可重新规划该用户的组
usermod -g oinstall -G dba,oper,asmdba oracle

# 设置grid用户密码
passwd grid
echo grid | passwd --stdin grid
echo oracle | passwd --stdin oracle
# 查看创建结果
id grid
# 设置oracle用户密码
passwd oracle
2.8 创建oracle目录
mkdir -p /u01/app/oracle/product/12.1.0/dbhome_1
mkdir -p /u01/app/grid
mkdir -p /u01/app/12.1.0/grid
mkdir -p /u01/app/oraInventory
2.9 设置oracle用户的目录权限
chown -R grid:oinstall /u01
chown -R oracle:oinstall /u01/app/oracle
chmod -R 775 /u01
2.10 参数设置
# Add the following lines to the "/etc/sysctl.conf" file
fs.file-max = 6815744
kernel.sem = 250 32000 100 128
kernel.shmmni = 4096
kernel.shmall = 1073741824
kernel.shmmax = 4398046511104
kernel.panic_on_oops = 1
net.core.rmem_default = 262144
net.core.rmem_max = 4194304
net.core.wmem_default = 262144
net.core.wmem_max = 1048576
net.ipv4.conf.all.rp_filter = 2
net.ipv4.conf.default.rp_filter = 2
fs.aio-max-nr = 1048576
net.ipv4.ip_local_port_range = 9000 65500
# Run one of the following commands to change the current kernel parameters.
/sbin/sysctl -p
# Or
/sbin/sysctl -p /etc/sysctl.d/98-oracle.conf
# Add the following lines to a file called "/etc/security/limits.conf" file.
oracle soft nproc 2047
oracle hard nproc 16384
oracle soft nofile 1024
oracle hard nofile 65536
oracle soft stack 10240
oracle hard stack 32768
grid soft nproc 2047
grid hard nproc 16384
grid soft nofile 1024
grid hard nofile 65536
grid soft stack 10240
grid hard stack 32768
3. 系统配置部分B
3.1 修改主机名
# 节点rac01
[root@localhost ~]$  hostnamectl set-hostname rac01
# 节点rac02
[root@localhost ~]$  hostnamectl set-hostname rac02
3.2 网络IP配置
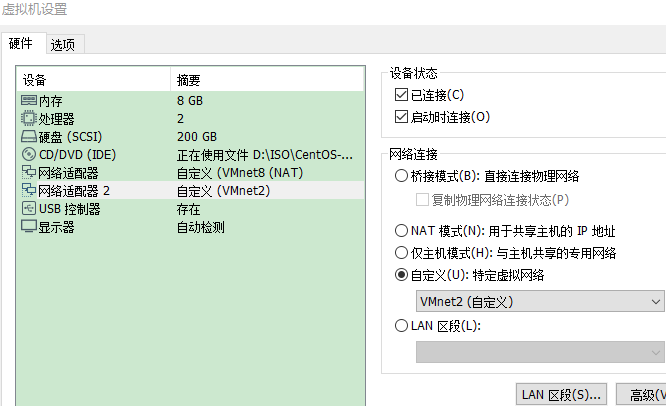
3.2.1 配置虚拟机VM网卡
- 添加虚拟网卡类型
如图所示,打开虚拟机 ”虚拟机网络编辑器”,设置两块网卡类型。添加 VMnet2,为私有网卡,设置主机模式,并设置子网和子网掩码
编辑 Vmnet8,为公共网卡,并设置子网和子网掩码。
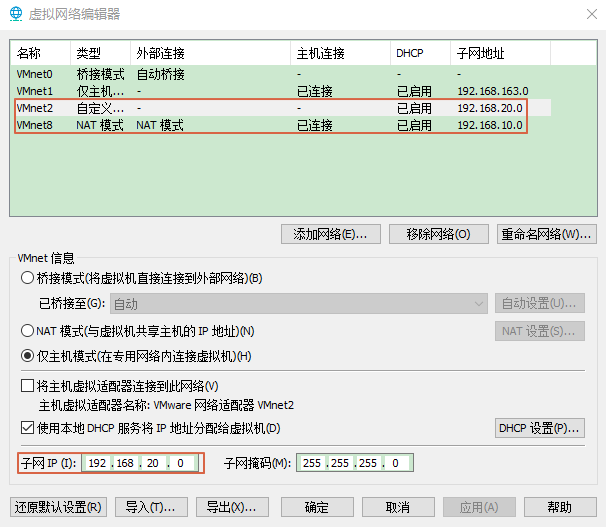
- 添加网卡
添加两块网卡,分别对应似有网卡和公共网卡。此处两块网卡一块为 NAT,另一块为自定义的设置成私有 IP 即可。
3.2.2 新增网卡后没有配置文件解决方法
如果是创建虚拟机之前设置好网卡,会有配置文件,装好 VM 再新增网卡没有配置文件。
#1、查看网卡信息
[root@rac01 ~]# ifconfig
ens33: flags=4163<UP,BROADCAST,RUNNING,MULTICAST>  mtu 1500
        inet 192.168.10.129  netmask 255.255.255.0  broadcast 192.168.10.255
        inet6 fe80::9f05:3a8b:c2ac:9b0  prefixlen 64  scopeid 0x20<link>
        ether 00:0c:29:f3:04:5d  txqueuelen 1000  (Ethernet)
        RX packets 39  bytes 4582 (4.4 KiB)
        RX errors 0  dropped 0  overruns 0  frame 0
        TX packets 116  bytes 14343 (14.0 KiB)
        TX errors 0  dropped 0 overruns 0  carrier 0  collisions 0
ens36: flags=4163<UP,BROADCAST,RUNNING,MULTICAST>  mtu 1500
        inet 192.168.20.129  netmask 255.255.255.0  broadcast 192.168.20.255
        inet6 fe80::dea:c462:15c0:8d6a  prefixlen 64  scopeid 0x20<link>
        ether 00:0c:29:f3:04:67  txqueuelen 1000  (Ethernet)
        RX packets 3  bytes 746 (746.0 B)
        RX errors 0  dropped 0  overruns 0  frame 0
        TX packets 23  bytes 4237 (4.1 KiB)
        TX errors 0  dropped 0 overruns 0  carrier 0  collisions 0
-- 查看得知:
ens33是10段的公共IP,对应的VMnet8
ens36是20段的私有IP,对应的VMnet2
#2、查看网卡配置文件
[root@rac01 ~]$ cd /etc/sysconfig/network-scripts/
[root@rac01 network-scripts]$ ll ifcfg*
-rw-r--r--. 1 root root 280 Dec 30 17:00 ifcfg-ens33
-rw-r--r--  1 root root 254 May 22  2020 ifcfg-lo
#查看发现并无新增的ens36网卡的配置文件,但是ens33和ens36都有ip地址,正常使用
#3、解决方案,查看UUID
# 使用nmcli con show命令,查看网卡的UUID信息,记下UUID值
# 网卡UUID和NetworkManager有关
[root@rac01 network-scripts]# nmcli con show
NAME			UUID                                  			TYPE	DEVICE
ens33			ed9ba3fc-b8e3-4406-acf6-d3bd534b68b6 	ethernet	ens33
Wired connection 1		a0804948-ca54-3a54-bc8e-a8b62d32c8e4	ethernet	ens36
virbr0			d56145e4-d46a-44ad-923b-d094cd160566	bridge	virbr0
#4、查看MAC
#查看ip addr获取ens36的MAC地址,MAC地址可以不用放入配置文件
[root@rac01 network-scripts]# ip addr
1: lo: <LOOPBACK,UP,LOWER_UP> mtu 65536 qdisc noqueue state UNKNOWN group default qlen 1000
    link/loopback 00:00:00:00:00:00 brd 00:00:00:00:00:00
    inet 127.0.0.1/8 scope host lo
       valid_lft forever preferred_lft forever
    inet6 ::1/128 scope host
       valid_lft forever preferred_lft forever
2: ens33: <BROADCAST,MULTICAST,UP,LOWER_UP> mtu 1500 qdisc pfifo_fast state UP group default qlen 1000
    link/ether 00:50:56:23:8d:83 brd ff:ff:ff:ff:ff:ff
    inet 192.168.10.131/24 brd 192.168.10.255 scope global noprefixroute ens33
       valid_lft forever preferred_lft forever
    inet6 fe80::9f05:3a8b:c2ac:9b0/64 scope link noprefixroute
       valid_lft forever preferred_lft forever
3: ens36: <BROADCAST,MULTICAST,UP,LOWER_UP> mtu 1500 qdisc pfifo_fast state UP group default qlen 1000
    link/ether 00:50:56:25:79:63 brd ff:ff:ff:ff:ff:ff
    inet 192.168.20.131/24 brd 192.168.20.255 scope global noprefixroute dynamic ens36
       valid_lft 1072sec preferred_lft 1072sec
    inet6 fe80::af47:a51e:762f:caf/64 scope link noprefixroute
       valid_lft forever preferred_lft forever
4: virbr0: <NO-CARRIER,BROADCAST,MULTICAST,UP> mtu 1500 qdisc noqueue state DOWN group default qlen 1000
    link/ether 52:54:00:fb:9a:6e brd ff:ff:ff:ff:ff:ff
    inet 192.168.122.1/24 brd 192.168.122.255 scope global virbr0
       valid_lft forever preferred_lft forever
5: virbr0-nic: <BROADCAST,MULTICAST> mtu 1500 qdisc pfifo_fast master virbr0 state DOWN group default qlen 1000
link/ether 52:54:00:fb:9a:6e brd ff:ff:ff:ff:ff:ff
#5、创建新网卡配置文件
# 如果只通过network服务,而不是NetworkManager,则无需配置UUID,直接cp新增网卡配置文件即可。
# ifcfg-ens33文件复制一份为ifcfg-ens36,后面再修改IP信息
[root@rac01 network-scripts]# cp ifcfg-ens33 ifcfg-ens36
3.2.3 配置节点rac01的IP
- 网卡的配置文件最后可以无需配置
MAC地址和UUID。 UUID是NetworkManager服务需要的配置,Linux 还有 network 服务,无需配置UUID。- 为了同步外网
NTP服务器,rac01的ens33增加了DNS通过WM的NAT8连接(其中192.168.10.1是物理机连接外网的DNS)。
# 查看当前的ens33信息
[oracle@rac01 network-scripts]$ vi ifcfg-ens33
TYPE=Ethernet
PROXY_METHOD=none
BROWSER_ONLY=no
BOOTPROTO=dhcp
DEFROUTE=yes
IPV4_FAILURE_FATAL=no
IPV6INIT=yes
IPV6_AUTOCONF=yes
IPV6_DEFROUTE=yes
IPV6_FAILURE_FATAL=no
IPV6_ADDR_GEN_MODE=stable-privacy
NAME=ens33
UUID=ed9ba3fc-b8e3-4406-acf6-d3bd534b68b6
DEVICE=ens33
ONBOOT=yes
# 修改后ens33的信息
[oracle@rac01 network-scripts]$ vi ifcfg-ens33
TYPE=Ethernet
PROXY_METHOD=none
BROWSER_ONLY=no
BOOTPROTO=static
DEFROUTE=yes
IPV4_FAILURE_FATAL=no
IPV6INIT=yes
IPV6_AUTOCONF=yes
IPV6_DEFROUTE=yes
IPV6_FAILURE_FATAL=no
IPV6_ADDR_GEN_MODE=stable-privacy
NAME=ens33
UUID=ed9ba3fc-b8e3-4406-acf6-d3bd534b68b6
DEVICE=ens33
ONBOOT=yes
IPADDR=192.168.10.101
PREFIX=24
GATEWAY=192.168.10.1
DNS1-114.114.114.114
DNS2=192.168.10.1
# 修改后ens36的信息
[oracle@rac01 network-scripts]$  vi ifcfg-ens36
TYPE=Ethernet
PROXY_METHOD=none
BROWSER_ONLY=no
BOOTPROTO=static
DEFROUTE=no
IPV4_FAILURE_FATAL=no
IPV6INIT=yes
IPV6_AUTOCONF=yes
IPV6_DEFROUTE=yes
IPV6_FAILURE_FATAL=no
IPV6_ADDR_GEN_MODE=stable-privacy
NAME=ens36
UUID=a0804948-ca54-3a54-bc8e-a8b62d32c8e4
DEVICE=ens36
ONBOOT=yes
IPADDR=192.168.20.101
PREFIX=24
GATEWAY=192.168.20.1
# 再次查看IP信息
[root@rac01 network-scripts]# ip a
1: lo: <LOOPBACK,UP,LOWER_UP> mtu 65536 qdisc noqueue state UNKNOWN group default qlen 1000
    link/loopback 00:00:00:00:00:00 brd 00:00:00:00:00:00
    inet 127.0.0.1/8 scope host lo
       valid_lft forever preferred_lft forever
    inet6 ::1/128 scope host
       valid_lft forever preferred_lft forever
# ens33 192.168.10.101
2: ens33: <BROADCAST,MULTICAST,UP,LOWER_UP> mtu 1500 qdisc pfifo_fast state UP group default qlen 1000
    link/ether 00:50:56:23:8d:83 brd ff:ff:ff:ff:ff:ff
    inet 192.168.10.101/24 brd 192.168.10.255 scope global noprefixroute ens33
       valid_lft forever preferred_lft forever
    inet6 fe80::9f05:3a8b:c2ac:9b0/64 scope link noprefixroute
       valid_lft forever preferred_lft forever
# ens36 192.168.20.101
3: ens36: <BROADCAST,MULTICAST,UP,LOWER_UP> mtu 1500 qdisc pfifo_fast state UP group default qlen 1000
    link/ether 00:50:56:25:79:63 brd ff:ff:ff:ff:ff:ff
    inet 192.168.20.101/24 brd 192.168.20.255 scope global noprefixroute ens36
       valid_lft forever preferred_lft forever
    inet6 fe80::af47:a51e:762f:caf/64 scope link noprefixroute
       valid_lft forever preferred_lft forever
4: virbr0: <NO-CARRIER,BROADCAST,MULTICAST,UP> mtu 1500 qdisc noqueue state DOWN group default qlen 1000
    link/ether 52:54:00:fb:9a:6e brd ff:ff:ff:ff:ff:ff
    inet 192.168.122.1/24 brd 192.168.122.255 scope global virbr0
       valid_lft forever preferred_lft forever
5: virbr0-nic: <BROADCAST,MULTICAST> mtu 1500 qdisc pfifo_fast master virbr0 state DOWN group default qlen 1000
    link/ether 52:54:00:fb:9a:6e brd ff:ff:ff:ff:ff:ff
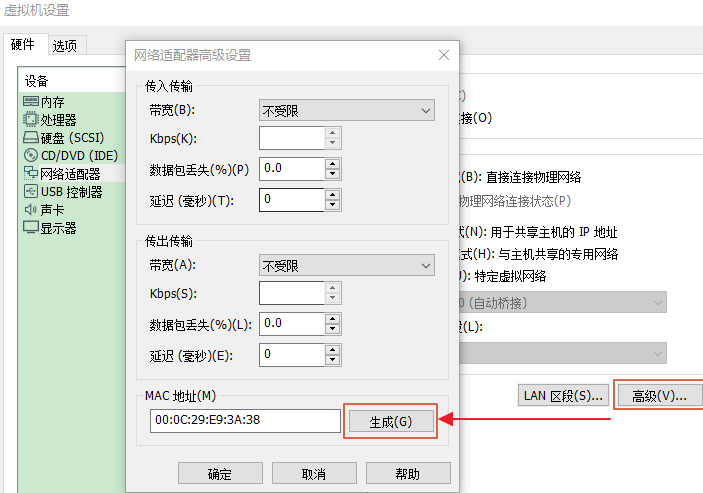
3.2.4 克隆的RAC02具有相同MAC和UUID的解决方法
如果节点 rac02 是从节点 rac01 复制过来的,会具有相同的MAC和UUID。
- 生成新的 MAC
虚拟机设置-网络适配器高级设置-高级-生成新的 MAC 地址即可。
- 查看 UUID
[root@rac01 network-scripts]# nmcli con show
NAME				UUID                                  	TYPE		DEVICE
ens33				ed9ba3fc-b8e3-4406-acf6-d3bd534b68b6 	ethernet	ens33
ens36				a0804948-ca54-3a54-bc8e-a8b62d32c8e4	ethernet	ens36
virbr0				d56145e4-d46a-44ad-923b-d094cd160566	bridge		virbr0
[root@rac02 network-scripts]# nmcli con show
NAME				UUID                                  	TYPE		DEVICE
ens33				ed9ba3fc-b8e3-4406-acf6-d3bd534b68b6 	ethernet	ens33
Wired connection 1	159f409e-a13a-308b-971c-d4e56ad0c55a	ethernet  	ens36
virbr0				a77fe004-b318-4b7b-b803-ba348eafb1ff	bridge		virbr0
# 此处配置完ens36重启网络后,Wired connection 1会更名为ens66
- 生成新的 UUID
[root@rac02 network-scripts]# uuidgen
044d428e-9e86-48c9-8a46-faf5785e6bf4
# 将新的UUID编辑到ens33的配置文件中
3.2.5 配置节点rac02的IP
- 网卡的配置文件最后可以不用配置 MAC 地址。
- 复制网卡 ens36 配置文件,修改配置信息,注意修改 UUID 的信息。
# 查看当前的ens33信息
[oracle@rac02 network-scripts]$ cat ifcfg-ens33
TYPE=Ethernet
PROXY_METHOD=none
BROWSER_ONLY=no
BOOTPROTO=dhcp
DEFROUTE=yes
IPV4_FAILURE_FATAL=no
IPV6INIT=yes
IPV6_AUTOCONF=yes
IPV6_DEFROUTE=yes
IPV6_FAILURE_FATAL=no
IPV6_ADDR_GEN_MODE=stable-privacy
NAME=ens33
UUID=ed9ba3fc-b8e3-4406-acf6-d3bd534b68b6
DEVICE=ens33
ONBOOT=yes
# 修改后ens33的信息
[oracle@rac02 network-scripts]$ cat ifcfg-ens33
TYPE=Ethernet
PROXY_METHOD=none
BROWSER_ONLY=no
BOOTPROTO=static
DEFROUTE=yes
IPV4_FAILURE_FATAL=no
IPV6INIT=yes
IPV6_AUTOCONF=yes
IPV6_DEFROUTE=yes
IPV6_FAILURE_FATAL=no
IPV6_ADDR_GEN_MODE=stable-privacy
NAME=ens33
UUID=044d428e-9e86-48c9-8a46-faf5785e6bf4
DEVICE=ens33
ONBOOT=yes
IPADDR=192.168.10.102
PREFIX=24
GATEWAY=192.168.10.1
# 修改后ens36的信息
[oracle@rac02 network-scripts]$ cat ifcfg-ens36
TYPE=Ethernet
PROXY_METHOD=none
BROWSER_ONLY=no
BOOTPROTO=static
DEFROUTE=yes
IPV4_FAILURE_FATAL=no
IPV6INIT=yes
IPV6_AUTOCONF=yes
IPV6_DEFROUTE=yes
IPV6_FAILURE_FATAL=no
IPV6_ADDR_GEN_MODE=stable-privacy
NAME=ens36
UUID=159f409e-a13a-308b-971c-d4e56ad0c55a
DEVICE=ens36
ONBOOT=yes
IPADDR=192.168.20.102
PREFIX=24
GATEWAY=192.168.20.1
# 查看两个节点配置的后IP
[root@rac01 network-scripts]# ip a
# ens33 192.168.10.101
2: ens33: <BROADCAST,MULTICAST,UP,LOWER_UP> mtu 1500 qdisc pfifo_fast state UP group default qlen 1000
    link/ether 00:50:56:23:8d:83 brd ff:ff:ff:ff:ff:ff
    inet 192.168.10.101/24 brd 192.168.10.255 scope global noprefixroute ens33
       valid_lft forever preferred_lft forever
    inet6 fe80::9f05:3a8b:c2ac:9b0/64 scope link noprefixroute
       valid_lft forever preferred_lft forever
# ens36 192.168.20.101
3: ens36: <BROADCAST,MULTICAST,UP,LOWER_UP> mtu 1500 qdisc pfifo_fast state UP group default qlen 1000
    link/ether 00:50:56:25:79:63 brd ff:ff:ff:ff:ff:ff
    inet 192.168.20.101/24 brd 192.168.20.255 scope global noprefixroute ens36
       valid_lft forever preferred_lft forever
    inet6 fe80::af47:a51e:762f:caf/64 scope link noprefixroute
       valid_lft forever preferred_lft forever
[root@rac02 network-scripts]# ip a
# ens33 192.168.10.102
2: ens33: <BROADCAST,MULTICAST,UP,LOWER_UP> mtu 1500 qdisc pfifo_fast state UP group default qlen 1000
    link/ether 00:50:56:28:8e:1d brd ff:ff:ff:ff:ff:ff
    inet 192.168.10.102/24 brd 192.168.10.255 scope global noprefixroute ens33
       valid_lft forever preferred_lft forever
    inet6 fe80::8362:20c4:e62e:5606/64 scope link noprefixroute
       valid_lft forever preferred_lft forever
# ens36 192.168.20.102
3: ens36: <BROADCAST,MULTICAST,UP,LOWER_UP> mtu 1500 qdisc pfifo_fast state UP group default qlen 1000
    link/ether 00:50:56:37:06:0e brd ff:ff:ff:ff:ff:ff
    inet 192.168.20.102/24 brd 192.168.20.255 scope global noprefixroute ens36
       valid_lft forever preferred_lft forever
    inet6 fe80::88f1:7b63:940a:b2cd/64 scope link noprefixroute
       valid_lft forever preferred_lft forever
3.2.6 配置网络服务(可选步骤)
# Linux网络服务有两个network和NetworkManager,默认不禁用NetworkManager也可以
chkconfig NetworkManager off
chkconfig network on
service NetworkManager stop
service network start
# 启动network停用NetworkManager
[root@rac01 ~]# chkconfig NetworkManager off
Note: Forwarding request to 'systemctl disable NetworkManager.service'.
Removed symlink /etc/systemd/system/multi-user.target.wants/NetworkManager.service.
Removed symlink /etc/systemd/system/dbus-org.freedesktop.nm-dispatcher.service.
Removed symlink /etc/systemd/system/network-online.target.wants/NetworkManager-wait-online.service.
[root@rac01 ~]# chkconfig network on
[root@rac01 ~]# service NetworkManager stop
Redirecting to /bin/systemctl stop NetworkManager.service
[root@rac01 ~]# service network start
Starting network (via systemctl):                          [  OK  ]
[root@rac02 ~]# chkconfig NetworkManager off
Note: Forwarding request to 'systemctl disable NetworkManager.service'.
Removed symlink /etc/systemd/system/multi-user.target.wants/NetworkManager.service.
Removed symlink /etc/systemd/system/dbus-org.freedesktop.nm-dispatcher.service.
Removed symlink /etc/systemd/system/network-online.target.wants/NetworkManager-wait-online.service.
[root@rac02 ~]# chkconfig network on
[root@rac02 ~]# service NetworkManager stop
Redirecting to /bin/systemctl stop NetworkManager.service
[root@rac02 ~]# service network start
Starting network (via systemctl):                          [  OK  ]
3.2.7 删除虚拟网卡
# 图形界面安装centos会创建虚拟网卡,可以删除,或在安装GI时候选择not use
ifconfig virbr0 down;
brctl delbr virbr0;
systemctl disable libvirtd.service
# 执行过程
[root@rac01 ~]# ifconfig virbr0 down;
[root@rac01 ~]# brctl delbr virbr0;
[root@rac01 ~]# systemctl disable libvirtd.service
 ystemd/system/multi-user.target.wants/libvirtd.service.
Removed symlink /etc/systemd/system/sockets.target.wants/virtlogd.socket.
Removed symlink /etc/systemd/system/sockets.target.wants/virtlockd.socket.
3.3 网络与主机名
# hosts指定的public主机名一定要和主机名相同
[root@rac01 ~]$ vi /etc/sysconfig/network
# Created by anaconda
NOZEROCONF=yes
NETWORKING=yes
NETWORKING_IPV6=no
HOSTNAME=rac01
GATEWAY=192.168.10.1
[root@rac02 ~]$ vi /etc/sysconfig/network
# Created by anaconda
NOZEROCONF=yes
NETWORKING=yes
NETWORKING_IPV6=no
HOSTNAME=rac02
GATEWAY=192.168.10.1
3.4 节点时间同步
RAC集群的时间同步,可以采用操作系统的NTP服务,也可以使用 Oracle 自带的服务CTSS,如果NTP没有启用,那么 Oracle 会自动启用自己的ctssd进程。从 Oracle 11gR2 RAC 开始使用Cluster Time Synchronization Service (CTSS)同步各节点的时间。CTSS时间同步服务作为Clusteware的一部分被安装,在系统中,如果察觉到时间同步服务或者时间同步服务配置NTP,那么 CTSS 将以观察模式Oberver Mode启动和运行,不执行时间同步操作。CTSS守护进程能随时被安装,并将一直运行,但是只有在系统符合配置条件情况下才会起作用。如果 NTP 不存在于任何的集群服务器中,CTSS将被激活,接管集群的时间管理工作,以活动模式Active Mode启动和运行,使用集群其中一个服务器作为参考服务器,同步集群中的其他服务器的时间。
在 RAC 中,集群的时间应该是保持同步的,否则可能导致很多问题,例如:依赖于时间的应用会造成数据的错误,各种日志打印的顺序紊乱,这将会影响问题的诊断,严重的可能会导致集群宕机或者重新启动集群时节点无法加入集群。
NTP和CTSS是可以共存的,且NTP的优先级要高于CTSS,也就是说,如果系统中同时有NTP和CTSS,那么集群的时间是由NTP同步的,CTSS会处于观望Observer模式,只有当集群关闭所有的NTP服务,CTSS才会处于激活Active模式。在一个集群中,只要有一个节点的ntp处于活动状态,那么集群的所有节点的CTSS都会处于观望Observer模式。需要注意的是,要让CTSS处于激活Active模式,则不仅要关闭ntp服务/sbin/service ntpd stop,还要删除/etc/ntp.conf文件(也可mv etc/ntp.conf etc/ntp.conf.bak),否则不能启用CTSS。
以下三种同步任选一种,不建议 NTP,配置稍微繁琐,且 NTP 已经逐步被 Chrony 取代,这里实验记录了古老的 NTP 方式,可以参考。
3.4.1 启用NTP同步时间
#1、查看
[root@rac01 ~]# service ntpd status
Redirecting to /bin/systemctl status ntpd.service
Unit ntpd.service could not be found.
[root@rac01 ~]# systemctl status ntpd
Unit ntpd.service could not be found.
#2、安装ntp,(所有节点)
[root@rac01 ~]# yum -y install ntp
[root@rac01 ~]# ll /etc/|grep ntp
drwxr-xr-x.  3 root root       52 Jan  7 13:42 ntp
-rw-r--r--   1 root root     2000 Nov 28  2019 ntp.conf
[root@rac01 ~]# ntpdate
 7 Jan 13:44:03 ntpdate[6098]: no servers can be used, exiting
#3、配置ntpd
-- 所有节点,修改ntpd文件,生成ntpd.pid文件
[root@rac01 ~]# vi /etc/sysconfig/ntpd
#OPTIONS="-g"
OPTIONS="-x -g -p /var/run/ntpd.pid"
[root@rac02 ~]# vi /etc/sysconfig/ntpd
#OPTIONS="-g"
OPTIONS="-x -g -p /var/run/ntpd.pid"
# 此处要配置,否则监测NTP失败,如下图
NTP 时间服务器部署以及时间同步设置:https://cloud.tencent.com/developer/article/1333862](https://cloud.tencent.com/developer/article/1333862)。
#4、配置ntp.conf
# 以rac01为ntp服务器,修改server部分,将server指向主节点rac01
# 添加
restrict 192.168.10.0 mask 255.255.255.0 nomodify notrap
# 自定义只允许某些主机可以同步时间,事例:
restrict 127.0.0.1
restrict 192.168.10.102										#指定某台机器时间同步
restrict 192.168.10.0 mask 255.255.255.0 nomodify notrap	#允许192.168.10.0/254子网内主机时间同步
restrict 0.0.0.0 mask 0.0.0.0 nomodify notrap				#允许任何主机跟进行时间同步
#4-1、配置主节点ntp.conf
# 备份
[root@rac01 ~]# cp /etc/ntp.conf /etc/ntp.conf.bak
# 新建配置文件
[root@rac01 ~]# vi /etc/ntp.conf
===# 修改前 ===
# For more information about this file, see the man pages
# ntp.conf(5), ntp_acc(5), ntp_auth(5), ntp_clock(5), ntp_misc(5), ntp_mon(5).
driftfile /var/lib/ntp/drift
# Permit time synchronization with our time source, but do not
# permit the source to query or modify the service on this system.
restrict default nomodify notrap nopeer noquery
# Permit all access over the loopback interface.  This could
# be tightened as well, but to do so would effect some of
# the administrative functions.
restrict 127.0.0.1
restrict ::1
# Hosts on local network are less restricted.
#restrict 192.168.1.0 mask 255.255.255.0 nomodify notrap
# Use public servers from the pool.ntp.org project.
# Please consider joining the pool (http://www.pool.ntp.org/join.html).
server 0.centos.pool.ntp.org iburst
server 1.centos.pool.ntp.org iburst
server 2.centos.pool.ntp.org iburst
server 3.centos.pool.ntp.org iburst
……
===# 修改后 ===
# For more information about this file, see the man pages
# ntp.conf(5), ntp_acc(5), ntp_auth(5), ntp_clock(5), ntp_misc(5), ntp_mon(5).
driftfile /var/lib/ntp/drift
# Permit time synchronization with our time source, but do not
# permit the source to query or modify the service on this system.
restrict default nomodify notrap nopeer noquery
# Permit all access over the loopback interface.  This could
# be tightened as well, but to do so would effect some of
# the administrative functions.
restrict 127.0.0.1
restrict ::1
# Hosts on local network are less restricted.
# restrict 192.168.1.0 mask 255.255.255.0 nomodify notrap
restrict 192.168.10.0 mask 255.255.255.0 nomodify notrap
# Use public servers from the pool.ntp.org project.
# Please consider joining the pool (http://www.pool.ntp.org/join.html).
# server 0.centos.pool.ntp.org iburst
# server 1.centos.pool.ntp.org iburst
# server 2.centos.pool.ntp.org iburst
# server 3.centos.pool.ntp.org iburst
server cn.pool.ntp.org prefer
server ntp1.aliyun.com
server 127.127.1.0
fudge 127.127.1.0 stratum 10
……
此处 rac01 向 cn.pool.ntp.org 同步时间。
#4-2、配置其他节点ntp.conf
#修改server节点,rac02向rac01同步
server 192.168.10.101
#在配置中增加以下配置:
#允许上层时间服务器主动修改本机时间
restrict 192.168.10.101 nomodify notrap noquery
#外部时间服务器不可用时,以本地时间作为时间服务
server 127.127.1.0
fudge 127.127.1.0 stratum 10
[root@rac02 ~]# cp /etc/ntp.conf /etc/ntp.conf.bak
[root@rac02 ~]# vi /etc/ntp.conf
===修改前===
# For more information about this file, see the man pages
# ntp.conf(5), ntp_acc(5), ntp_auth(5), ntp_clock(5), ntp_misc(5), ntp_mon(5).
driftfile /var/lib/ntp/drift
# Permit time synchronization with our time source, but do not
# permit the source to query or modify the service on this system.
restrict default nomodify notrap nopeer noquery
# Permit all access over the loopback interface.  This could
# be tightened as well, but to do so would effect some of
# the administrative functions.
restrict 127.0.0.1
restrict ::1
# Hosts on local network are less restricted.
#restrict 192.168.1.0 mask 255.255.255.0 nomodify notrap
# Use public servers from the pool.ntp.org project.
# Please consider joining the pool (http://www.pool.ntp.org/join.html).
server 0.centos.pool.ntp.org iburst
server 1.centos.pool.ntp.org iburst
server 2.centos.pool.ntp.org iburst
server 3.centos.pool.ntp.org iburst
……
===修改后===
# For more information about this file, see the man pages
# ntp.conf(5), ntp_acc(5), ntp_auth(5), ntp_clock(5), ntp_misc(5), ntp_mon(5).
driftfile /var/lib/ntp/drift
# Permit time synchronization with our time source, but do not
# permit the source to query or modify the service on this system.
restrict default nomodify notrap nopeer noquery
restrict 192.168.10.101 nomodify notrap noquery
# Permit all access over the loopback interface.  This could
# be tightened as well, but to do so would effect some of
# the administrative functions.
restrict 127.0.0.1
restrict ::1
# Hosts on local network are less restricted.
#restrict 192.168.1.0 mask 255.255.255.0 nomodify notrap
# Use public servers from the pool.ntp.org project.
# Please consider joining the pool (http://www.pool.ntp.org/join.html).
# server 0.centos.pool.ntp.org iburst
# server 1.centos.pool.ntp.org iburst
# server 2.centos.pool.ntp.org iburst
# server 3.centos.pool.ntp.org iburst
server 192.168.10.101 prefer
server 127.127.1.0
fudge 127.127.1.0 stratum 10
……
# 手动同步
[root@rac01 ~]# service ntpd stop
[root@rac01 ~]# ntpdate cn.pool.ntp.org

[root@rac02 ~]# service ntpd stop
[root@rac02 ~]# ntpdate rac01
# 启动ntp
[root@rac01 ~]# systemctl status ntpd
ntpd.service - Network Time Service
Loaded: loaded (/usr/lib/systemd/system/ntpd.service; disabled; vendor preset: disabled)
Active: inactive (dead)
[root@rac01 ~]# service ntpd start
Redirecting to /bin/systemctl start ntpd.service
[root@rac01 ~]# service ntpd restart
[root@rac01 ~]# service ntpd status
Redirecting to /bin/systemctl status ntpd.service
ntpd.service - Network Time Service
Loaded: loaded (/usr/lib/systemd/system/ntpd.service; disabled; vendor preset: disabled)
Active: active (running) since Thu 2021-01-07 13:48:54 CST; 6s ago
Process: 6409 ExecStart=/usr/sbin/ntpd -u ntp:ntp $OPTIONS (code=exited, status=0/SUCCESS)
Main PID: 6413 (ntpd)
Tasks: 1
CGroup: /system.slice/ntpd.service
└─6413 /usr/sbin/ntpd -u ntp:ntp -g
Jan 07 13:48:54 rac01 ntpd[6413]: Listen normally on 3 ens33 192.168.10.129...23
Jan 07 13:48:54 rac01 ntpd[6413]: Listen normally on 4 ens36 192.168.20.101...23
Jan 07 13:48:54 rac01 ntpd[6413]: Listen normally on 5 virbr0 192.168.122.1...23
Jan 07 13:48:54 rac01 ntpd[6413]: Listen normally on 6 lo ::1 UDP 123
Jan 07 13:48:54 rac01 ntpd[6413]: Listen normally on 7 ens36 fe80::af47:a51...23
Jan 07 13:48:54 rac01 ntpd[6413]: Listen normally on 8 ens33 fe80::9f05:3a8...23
Jan 07 13:48:54 rac01 ntpd[6413]: Listening on routing socket on fd #25 for...es
Jan 07 13:48:54 rac01 ntpd[6413]: 0.0.0.0 c016 06 restart
Jan 07 13:48:54 rac01 ntpd[6413]: 0.0.0.0 c012 02 freq_set kernel 0.000 PPM
Jan 07 13:48:54 rac01 ntpd[6413]: 0.0.0.0 c011 01 freq_not_set
Hint: Some lines were ellipsized, use -l to show in full.
# 设置开机启动
systemctl enable ntpd
systemctl disable chronyd
[root@rac01 ~]# systemctl enable ntpd
[root@rac02 ~]# systemctl enable ntpd
# 之后reboot重启检验状态
# 如果不成功那么查看
[root@rac01 ~]# systemctl is-enabled chronyd
enable
# 这就是导致在重启后NTP无法自动启动的原因
#(ntpd起不来的原因是在7版本当中,时间服务器有两个chronyd和ntpd,服务器默认开启chrony,但是两种服务冲突,所以需要关闭一种,因为在centos7当中,已经开始推广使用chrony了)
[root@rac01 ~]# systemctl disable chronyd
[root@rac02 ~]# systemctl disable chronyd
[root@rac01 ~]# reboot
[root@rac02 ~]# reboot
# 再在验证状态
[root@rac01 ~]# systemctl status ntpd
[root@rac02 ~]# systemctl status ntpd
# 删除chrony.conf,否则Oracle会监测chrony失败
[root@rac01 ~]# rm /etc/chrony.conf
rm: remove regular file ‘/etc/chrony.conf’? y
[root@rac02 ~]# rm /etc/chrony.conf
rm: remove regular file ‘/etc/chrony.conf’? y
# 验证
[root@rac02 ~]# ntpstat
synchronised to local net (127.127.1.0) at stratum 11
   time correct to within 950 ms
   polling server every 64 s
# 案例:rac01和rac02连接互联网
# rac01同步联网NTP
# 环境检查rac02没有同步rac01
# 取消rac02的nomodify,取消rac02联网,同时更正rac01和rac01网卡ens37的mac相同的问题,rac02可以同步rac01,不知哪个操作引起的,待验证。
# 观察一段时间,offset将接近0,即rac环境内各主机时间保持一致。
[root@rac01 ~]# service ntpd restart
[oracle@rac01 ~]$ ntpstat
synchronised to NTP server (120.25.115.20) at stratum 3
   time correct to within 37 ms
   polling server every 128 s
[oracle@rac01 ~]$ ntpq -p
remote                 refid                 st   t  when poll reach   delay   offset    jitter
============================================================
*120.25.115.20  10.137.53.7      2 u    7  128  377   41.885     0.000   1.650
xtime.cloudflare 10.12.2.186      3 u    6  128  377  264.552   0.000   3.072
 LOCAL(0)        .LOCL.          10 l 1393   64    0    0.000    0.000   0.000
[root@rac02 ~]# service ntpd restart
[root@rac02 ~]# ntpstat
synchronised to local net (192.168.10.101) at stratum 11
   time correct to within 7948 ms
   polling server every 64 s
[root@rac02 ~]# ntpq -p
remote        refid     st   t  when poll reach   delay   offset    jitter
=====================================================
 rac01          .INIT.    16  u   -         64   77        0.000    0.000   0.000
*LOCAL(0)  .LOCL.  10  l     3        64   77        0.000    0.000   0.000
3.4.2 启用Chrony同步时间
设置较 NTP 简单多了,这里(略)。
3.4.3 使用CTSS同步时间
# 停止并删除ntp服务即可,安装Oracle会监测没有ntp服务时,会启用oracle自身的CTSS同步
[root@rac01 ~]# service ntpd status
[root@rac01 ~]# chkconfig ntpd off
[root@rac01 ~]# cp /etc/ntp.conf /etc/ntp.conf.bak
[root@rac01 ~]# rm -rf /etc/ntp.conf
[root@rac01 ~]# rm /var/run/ntpd.pid

[root@rac02 ~]# service ntpd status
[root@rac02 ~]# chkconfig ntpd off
[root@rac02 ~]# cp /etc/ntp.conf /etc/ntp.conf.bak
[root@rac02 ~]# rm -rf /etc/ntp.conf
[root@rac02 ~]# rm /var/run/ntpd.pid
3.5 编辑hosts文件
# 两个节点配置相同的host文件
[root@rac01 network-scripts]# more /etc/hosts
127.0.0.1	localhost localhost.localdomain localhost4 localhost4.localdomain4
::1	localhost localhost.localdomain localhost6 localhost6.localdomain6
#Public IP
192.168.10.101	rac01
192.168.10.102	rac02
#Private IP
192.168.20.101	rac01-priv
192.168.20.102	rac02-priv
#Virtual IP
192.168.10.201	rac01-vip
192.168.10.202	rac02-vip
#Scan IP
192.168.10.100	scan
# 节点互ping
# 安装之前两个节点的公网、私网共4个IP能ping通
[root@rac01 /]# ping rac01
PING rac01 (192.168.10.101) 56(84) bytes of data.
64 bytes from rac01 (192.168.10.101): icmp_seq=1 ttl=64 time=0.036 ms
64 bytes from rac01 (192.168.10.101): icmp_seq=2 ttl=64 time=0.045 ms
64 bytes from rac01 (192.168.10.101): icmp_seq=3 ttl=64 time=0.048 ms
^C

[root@rac01 /]# ping rac02
PING rac02 (192.168.10.102) 56(84) bytes of data.
64 bytes from rac02 (192.168.10.102): icmp_seq=1 ttl=64 time=1.95 ms
64 bytes from rac02 (192.168.10.102): icmp_seq=2 ttl=64 time=2.11 ms
64 bytes from rac02 (192.168.10.102): icmp_seq=3 ttl=64 time=0.337 ms
^C

[root@rac01 /]# ping rac01-priv
PING rac01-priv (192.168.20.101) 56(84) bytes of data.
64 bytes from rac01-priv (192.168.20.101): icmp_seq=1 ttl=64 time=0.032 ms
64 bytes from rac01-priv (192.168.20.101): icmp_seq=2 ttl=64 time=0.042 ms
64 bytes from rac01-priv (192.168.20.101): icmp_seq=3 ttl=64 time=0.041 ms
^C

[root@rac01 /]# ping rac02-priv
PING rac02-priv (192.168.20.102) 56(84) bytes of data.
64 bytes from rac02-priv (192.168.20.102): icmp_seq=1 ttl=64 time=0.494 ms
64 bytes from rac02-priv (192.168.20.102): icmp_seq=2 ttl=64 time=0.655 ms
64 bytes from rac02-priv (192.168.20.102): icmp_seq=3 ttl=64 time=1.19 ms
^C

[root@rac01 /]# ping rac01-vip
PING rac01-vip (192.168.10.201) 56(84) bytes of data.
From rac01 (192.168.10.101) icmp_seq=1 Destination Host Unreachable
From rac01 (192.168.10.101) icmp_seq=2 Destination Host Unreachable
From rac01 (192.168.10.101) icmp_seq=3 Destination Host Unreachable
^C

[root@rac01 /]# ping rac02-vip
PING rac02-vip (192.168.10.202) 56(84) bytes of data.
From rac01-priv (192.168.10.101) icmp_seq=1 Destination Host Unreachable
From rac01-priv (192.168.10.101) icmp_seq=2 Destination Host Unreachable
From rac01-priv (192.168.10.101) icmp_seq=3 Destination Host Unreachable
^C

[root@rac01 /]# ping scan
PING scan (192.168.10.100) 56(84) bytes of data.
From rac01 (192.168.10.101) icmp_seq=1 Destination Host Unreachable
From rac01 (192.168.10.101) icmp_seq=2 Destination Host Unreachable
From rac01 (192.168.10.101) icmp_seq=3 Destination Host Unreachable
^C
3.6 关闭avahi-daemon
# Avahi-daemon 可能会带来网络问题和bug,尤其是对于RAC系统,本实验中安装前监监测也遇到了,Oracle建议直接关闭
systemctl stop avahi-daemon
systemctl disable avahi-daemon

[root@rac1 ~]# systemctl stop avahi-daemon
Warning: Stopping avahi-daemon.service, but it can still be activated by:
  avahi-daemon.socket
[root@rac1 ~]# systemctl disable avahi-daemon
Removed symlink /etc/systemd/system/multi-user.target.wants/avahi-daemon.service.
Removed symlink /etc/systemd/system/sockets.target.wants/avahi-daemon.socket.
Removed symlink /etc/systemd/system/dbus-org.freedesktop.Avahi.service.

[root@rac2 ~]# systemctl stop avahi-daemon
Warning: Stopping avahi-daemon.service, but it can still be activated by:
  avahi-daemon.socket
[root@rac2 ~]# systemctl disable avahi-daemon
Removed symlink /etc/systemd/system/multi-user.target.wants/avahi-daemon.service.
Removed symlink /etc/systemd/system/sockets.target.wants/avahi-daemon.socket.
Removed symlink /etc/systemd/system/dbus-org.freedesktop.Avahi.service.
3.7 变量环境
# 对于grid用户,如果环境设置成:
export ORACLE_BASE=/u01/app/grid
export ORACLE_HOME=$ORACLE_BASE/product/12.1.0/grid
# 这样目录是不正确的,因为ORACLE_BASE和ORACLE_HOME目录要分开,ORACLE_BASE安装好后是有root权限的,而ORACLE_HOME则没有.
# 这样才对:
export ORACLE_BASE=/u01/app/grid
export ORACLE_HOME=/u01/app/12.1.0/grid
# 否则安装会报错:
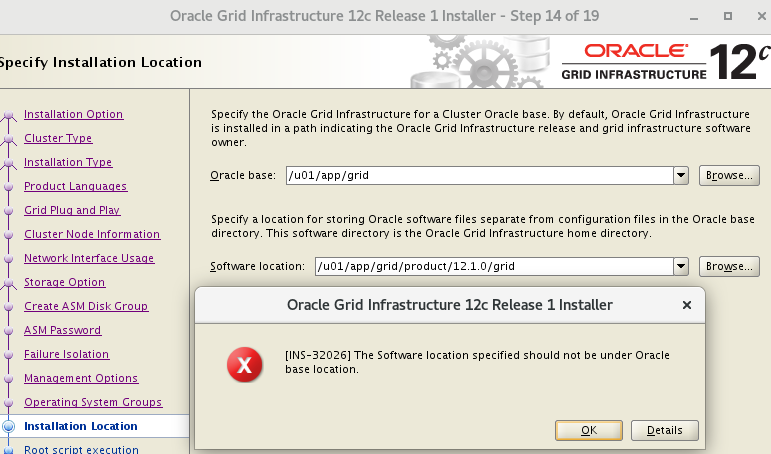
以相应用户登录,或直接 root 编辑
vi /home/oracle/.bash_profilevi /home/grid/.bash_profile。
3.7.1 rac01节点
# oracle
[oracle@rac01 ~]$ vim .bash_profile
export EDITOR=vi
export ORACLE_SID=orcl1
export ORACLE_BASE=/u01/app/oracle
export ORACLE_HOME=$ORACLE_BASE/product/12.1.0/dbhome_1
export LD_LIBRARY_PATH=$ORACLE_HOME/lib:/usr/lib
export PATH=$ORACLE_HOME/bin:/bin:/usr/bin:/usr/sbin:/usr/local/bin:/usr/X11R6/bin
export PATH=$ORACLE_HOME/bin:$PATH
# grid
[root@rac01 ~]# vi /home/grid/.bash_profile
export EDITOR=vi
export ORACLE_SID=+ASM1
export ORACLE_BASE=/u01/app/grid
export ORACLE_HOME=/u01/app/12.1.0/grid
export LD_LIBRARY_PATH=$ORACLE_HOME/lib:/usr/lib
export PATH=$ORACLE_HOME/bin:/bin:/usr/bin:/usr/sbin:/usr/local/bin:/usr/X11R6/bin
export PATH=$ORACLE_HOME/bin:$PATH

[oracle@rac01 ~]# source .bash_profile
[grid@rac01 ~]# source .bash_profile
3.7.2 rac02节点
# oracle
[oracle@rac02 ~]$  vim .bash_profile
export EDITOR=vi
export ORACLE_SID=orcl2
export ORACLE_BASE=/u01/app/oracle
export ORACLE_HOME=$ORACLE_BASE/product/12.1.0/dbhome_1
export LD_LIBRARY_PATH=$ORACLE_HOME/lib:/usr/lib
export PATH=$ORACLE_HOME/bin:/bin:/usr/bin:/usr/sbin:/usr/local/bin:/usr/X11R6/bin
export PATH=$ORACLE_HOME/bin:$PATH
# grid
[root@rac02 ~]# vi /home/grid/.bash_profile
export EDITOR=vi
export ORACLE_SID=+ASM2
export ORACLE_BASE=/u01/app/grid
export ORACLE_HOME=/u01/app/12.1.0/grid
export LD_LIBRARY_PATH=$ORACLE_HOME/lib:/usr/lib
export PATH=$ORACLE_HOME/bin:/bin:/usr/bin:/usr/sbin:/usr/local/bin:/usr/X11R6/bin
export PATH=$ORACLE_HOME/bin:$PATH
[oracle@rac02 ~]# source .bash_profile
[gird@rac02 ~]# source .bash_profile
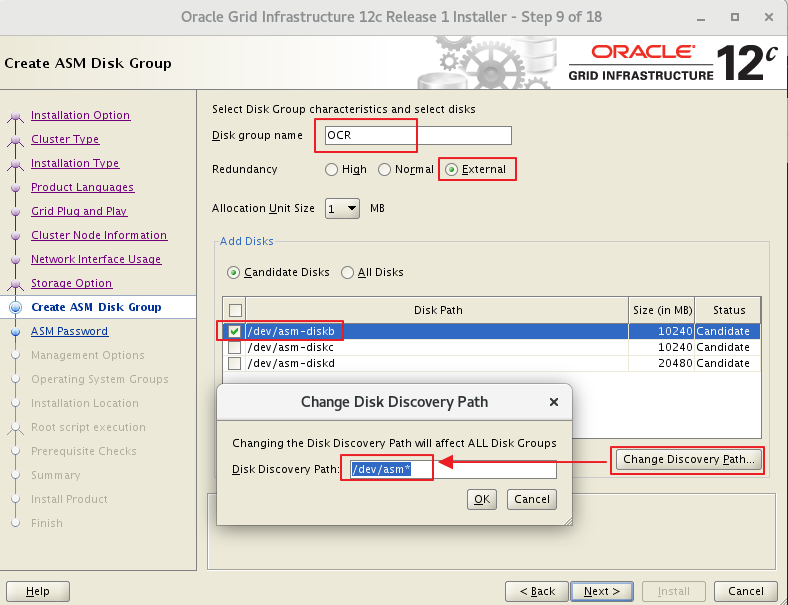
3.8 共享磁盘
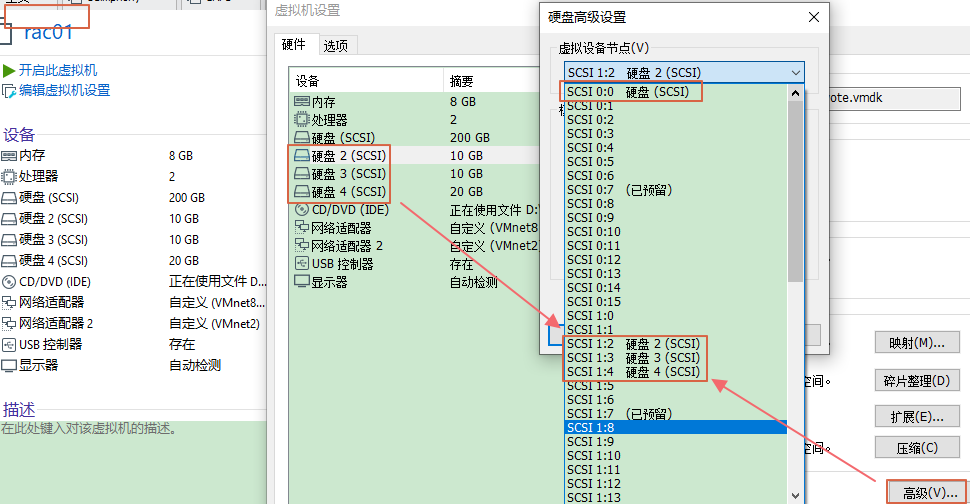
3.8.1 虚拟机添加磁盘
- 关闭虚拟机,或者虚拟机开启状态下添加完磁盘后重启虚拟机生效。比如在 E:\VM\SharedDisks。
- 两个节点添加共享的磁盘,第一个节点创建磁盘后,第二个节点选择现有的磁盘即可。
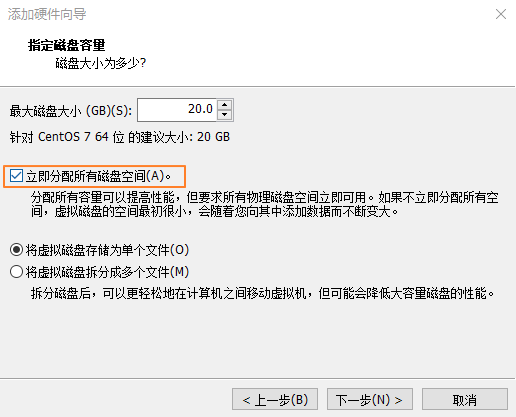
- 并且要立即分配+独立 (重要) ,否则 rac02 节点会报错:CLSRSC-378: Failed to get the configured node role for the local node。
- 立即分配所有磁盘空间
- 磁盘设置独立+永久

- 添加完成后的路径

- 系统硬盘的总线是 scsi0,如果是 RAC 的话,共享存储的总线需要另外单开一个,新建的存储必须不是 scsi0
- 每个节点的共享盘要选择相同的 scsi
- scsi1:2
- scsi1:3
- scsi1:4
3.8.2 虚拟机配置文件
# 编辑以下内容使VM共享磁盘生效,然后再开机
# 打开vmx配置文件,灰色段在添加完共享磁盘后会自动生成,其他参数信息需要手工加进去(双节点)
scsi1.virtualDev = "lsilogic"
scsi1.present = "TRUE"
scsi1:2.fileName = "E:\VM\rac_share_disks\ocr_vote.vmdk"
scsi1:2.present = "TRUE"
scsi1:3.fileName = "E:\VM\rac_share_disks\fra.vmdk"
scsi1:3.present = "TRUE"
scsi1:4.fileName = "E:\VM\rac_share_disks\data.vmdk"

diskLib.dataCacheMaxSize=0
diskLib.dataCacheMaxReadAheadSize=0
diskLib.dataCacheMinReadAheadSize=0
diskLib.dataCachePageSize=4096
diskLib.maxUnsyncedWrites = "0"

disk.EnableUUID="TRUE"
disk.locking="FALSE"
scsi1.SharedBus="Virtual"
scsi1.shared = "TRUE"

scsi1:2.deviceType = "disk"
scsi1:3.deviceType = "disk"
scsi1:4.deviceType = "disk"
3.8.3 查看磁盘UUID信息
-
虚拟机 vmx 增加参数
- 虚拟机默认情况下不会显示磁盘
UUID信息,关闭虚拟机,找到vmx配置文件,添加如下内容 (上步骤已经配置过):disk.EnableUUID="TRUE"
- 虚拟机默认情况下不会显示磁盘
-
双节点的磁盘 UUID
# 查看三个磁盘
[root@rac01 dev]# ls sd*
sda sda1 sda2 sdb sdc sdd
# root下双节点的磁盘UUID相同
[root@rac01 ~]# /usr/lib/udev/scsi_id -g -u /dev/sdb
36000c2934d6ec47587acce561dfc46b5
[root@rac01 ~]# /usr/lib/udev/scsi_id -g -u /dev/sdc
36000c29d0d9397d4c9263d0c2b1b284f
[root@rac01 ~]# /usr/lib/udev/scsi_id -g -u /dev/sdd
36000c295553f7a64ac0cbcd906b52468

[root@rac02 ~]# /usr/lib/udev/scsi_id -g -u /dev/sdb
36000c2934d6ec47587acce561dfc46b5
[root@rac02 ~]# /usr/lib/udev/scsi_id -g -u /dev/sdc
36000c29d0d9397d4c9263d0c2b1b284f
[root@rac02 ~]# /usr/lib/udev/scsi_id -g -u /dev/sdd
36000c295553f7a64ac0cbcd906b52468
3.8.4 设置共享磁盘
#1、root下,绑定udev
# 注意,不同版本路径不同,Linux 7 & 8 /usr/lib/udev/scsi_id, 系统初始没有99-oracle-asmdevices.rules文件
[root@rac01 dev]# cd /etc/udev/rules.d
[root@rac01 rules.d]#
for i in b c d;
do
echo "KERNEL==\"sd?\",SUBSYSTEM==\"block\",PROGRAM==\"/usr/lib/udev/scsi_id --whitelisted --replace-whitespace --device=/dev/\$name\",RESULT==\"`/usr/lib/udev/scsi_id --whitelisted --replace-whitespace --device=/dev/sd$i`\",SYMLINK+=\"asm-disk$i\",OWNER=\"grid\",GROUP=\"asmadmin\",MODE=\"0660\"" >>/etc/udev/rules.d/99-oracle-asmdevices.rules;
done
#2、查看配置文件
# 和Linux 6不同,7&8版本下脚本执行后的信息会直接写入配置文件中,无需手动vi
[root@rac01 rules.d]# cat 99-oracle-asmdevices.rules
KERNEL=="sd?",SUBSYSTEM=="block",PROGRAM=="/usr/lib/udev/scsi_id --whitelisted --replace-whitespace --device=/dev/$name",RESULT=="36000c2934d6ec47587acce561dfc46b5",SYMLINK+="asm-diskb",OWNER="grid",GROUP="asmadmin",MODE="0660"
KERNEL=="sd?",SUBSYSTEM=="block",PROGRAM=="/usr/lib/udev/scsi_id --whitelisted --replace-whitespace --device=/dev/$name",RESULT=="36000c29d0d9397d4c9263d0c2b1b284f",SYMLINK+="asm-diskc",OWNER="grid",GROUP="asmadmin",MODE="0660"
KERNEL=="sd?",SUBSYSTEM=="block",PROGRAM=="/usr/lib/udev/scsi_id --whitelisted --replace-whitespace --device=/dev/$name",RESULT=="36000c295553f7a64ac0cbcd906b52468",SYMLINK+="asm-diskd",OWNER="grid",GROUP="asmadmin",MODE="0660"
#3、查看ASM磁盘
# 查询无信息
[root@rac01 dev]# ll /dev/asm*
ls: cannot access /dev/asm*: No such file or directory
# 启动加载udev. 7之前使用start_udev,这里统一管理udevadm
[root@rac01 rules.d]# udevadm trigger --type=devices --action=change
[root@rac01 rules.d]# ll /dev/asm*
lrwxrwxrwx 1 root root 3 Jan  6 23:36 /dev/asm-diskb -> sdb
lrwxrwxrwx 1 root root 3 Jan  6 23:36 /dev/asm-diskc -> sdc
lrwxrwxrwx 1 root root 3 Jan  6 23:36 /dev/asm-diskd -> sdd
#4、拷贝配置文件到rac02上
[root@rac01 rules.d]# scp 99-oracle-asmdevices.rules rac02:/etc/udev/rules.d
The authenticity of host 'rac02 (192.168.10.102)' can't be established.
ECDSA key fingerprint is SHA256:3pM4MJ+MrMtGD3pyWqhVGd+LS+LAArCF+Va8cRQWn5M.
ECDSA key fingerprint is MD5:22:8d:e1:f4:87:63:81:1c:bb:3b:5b:6e:da:8a:3b:d3.
Are you sure you want to continue connecting (yes/no)? yes
Warning: Permanently added 'rac02,192.168.10.102' (ECDSA) to the list of known hosts.
root@rac02's password:
99-oracle-asmdevices.rules                                             100%  684   717.8KB/s   00:00
#5、查看rac02的ASM磁盘
[root@rac02 ~]# ll /dev/asm*
ls: cannot access /dev/asm*: No such file or directory
[root@rac02 ~]# udevadm trigger --type=devices --action=change
[root@rac02 ~]# ll /dev/asm*
lrwxrwxrwx 1 root root 3 Jan  7 00:02 /dev/asm-diskb -> sdb
lrwxrwxrwx 1 root root 3 Jan  7 00:02 /dev/asm-diskc -> sdc
lrwxrwxrwx 1 root root 3 Jan  7 00:02 /dev/asm-diskd -> sdd
3.9 禁用透明大页
3.9.1 查看默认开启
[root@rac01 ~]# cat /sys/kernel/mm/transparent_hugepage/enabled
[always] madvise never
本文采用方法一,所有节点:
# vi /etc/default/grub
transparent_hugepage=never
grub2-mkconfig -o /boot/grub2/grub.cfg
3.9.2 方法一
# 编辑文件,增加transparent_hugepage=never
[root@rac01 ~]# vi /etc/default/grub
GRUB_CMDLINE_LINUX="crashkernel=auto spectre_v2=retpoline rd.lvm.lv=centos/root rd.lvm.lv=centos/swap rhgb quiet transparent_hugepage=never"
# 生效
[root@rac01 ~]# grub2-mkconfig -o /boot/grub2/grub.cfg
Generating grub configuration file ...
Found linux image: /boot/vmlinuz-3.10.0-1160.15.2.el7.x86_64
Found initrd image: /boot/initramfs-3.10.0-1160.15.2.el7.x86_64.img
Found linux image: /boot/vmlinuz-3.10.0-1160.el7.x86_64
Found initrd image: /boot/initramfs-3.10.0-1160.el7.x86_64.img
Found linux image: /boot/vmlinuz-0-rescue-a1153b56ca6b4a34abe7c84845a7fe0c
Found initrd image: /boot/initramfs-0-rescue-a1153b56ca6b4a34abe7c84845a7fe0c.img
done
3.9.3 方法二
[root@rac01 ~]# vi /etc/rc.local
if test -f /sys/kernel/mm/transparent_hugepage/enabled; then echo never > /sys/kernel/mm/transparent_hugepage/enabled
fi
if test -f /sys/kernel/mm/transparent_hugepage/defrag; then echo never > /sys/kernel/mm/transparent_hugepage/defrag
fi
3.9.4 方法三
[root@rac01 ~]# echo never > /sys/kernel/mm/transparent_hugepage/enabled
3.9.5 重启验证
[root@rac01 ~]# cat /sys/kernel/mm/transparent_hugepage/enabled
always madvise [never]
3.10 准备安装介质
# 上传安装介质GI到节点rac01的/u01解压即可, GI会解压在 /u01/grid下
[root@rac01 ~]$ cd /u01/
[root@rac01 u01]$ unzip linuxamd64_12102_grid_1of2.zip
[root@rac01 u01]$ unzip linuxamd64_12102_grid_2of2.zip
3.11 配置SSH互信
3.11.1 方法一:手工配置
# 分别在grid和oracle下在两个节点各自配置,以Oracle用户为例
rac01:
[oracle@rac01 ~]$ ssh-keygen -t rsa	#一路回车
[oracle@rac01 ~]$ ssh-keygen -t dsa	#一路回车
rac02:
[oracle@rac02 ~]$ ssh-keygen -t rsa	#一路回车
[oracle@rac02 ~]$ ssh-keygen -t dsa	#一路回车
# 执行过上述两条命令后,再回到rac01再继续执行下面的命令
rac01:
[oracle@rac01 ~]$ cat ~/.ssh/id_rsa.pub >>~/.ssh/authorized_keys
[oracle@rac01 ~]$ cat ~/.ssh/id_dsa.pub >>~/.ssh/authorized_keys
[oracle@rac01 ~]$ ssh rac02 cat ~/.ssh/id_rsa.pub >>~/.ssh/authorized_keys		# 输入rac02的密码
[oracle@rac01 ~]$ ssh rac02 cat ~/.ssh/id_dsa.pub >>~/.ssh/authorized_keys		# 输入rac02的密码
[oracle@rac01 ~]$ scp ~/.ssh/authorized_keys rac02:~/.ssh/authorized_keys		# 输入rac02的密码
[oracle@rac01 ~]$ chmod 600 .ssh/authorized_keys
# 验证测试两个节点互相ssh连通性,第二次执行没有提示密码说明通信正常
-- 节点rac01/oracle:
[oracle@rac01 ~]$ ssh rac01 date
[oracle@rac01 ~]$ ssh rac02 date
[oracle@rac01 ~]$ ssh rac01-priv date
[oracle@rac01 ~]$ ssh rac02-priv date
-- 节点rac02/oracle:
[oracle@rac02 ~]$ ssh rac01 date
[oracle@rac02 ~]$ ssh rac02 date
[oracle@rac02 ~]$ ssh rac01-priv date
[oracle@rac02 ~]$ ssh rac02-priv date
-- 节点rac01/grid:
[grid@rac01 ~]$ ssh rac01 date
[grid@rac01 ~]$ ssh rac02 date
[grid@rac01 ~]$ ssh rac01-priv date
[grid@rac01 ~]$ ssh rac02-priv date
-- 节点rac02/grid:
[grid@rac02 ~]$ ssh rac01 date
[grid@rac02 ~]$ ssh rac02 date
[grid@rac02 ~]$ ssh rac01-priv date
[grid@rac02 ~]$ ssh rac02-priv date
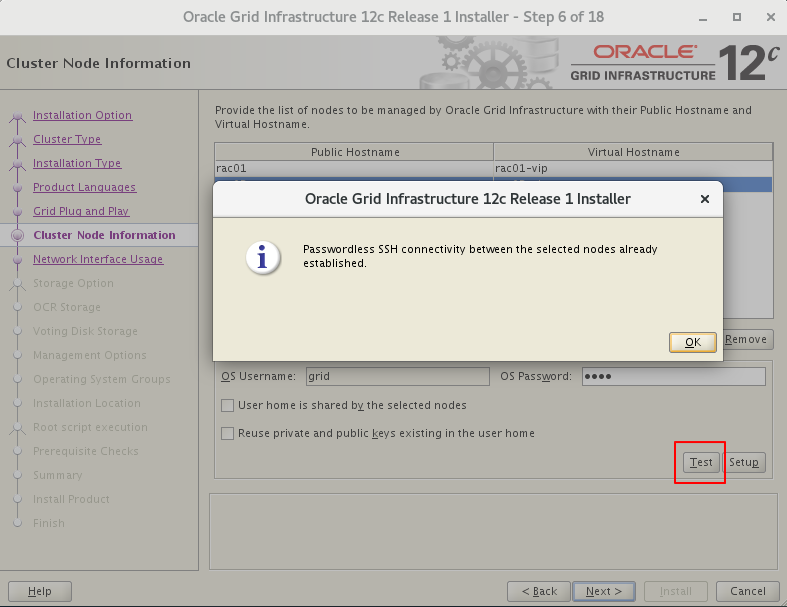
3.11.2 方法二:sshUserSetup.sh(推荐)
# sshUserSetup.sh在GI解压后的sshsetup目录下,下面的命令在一个节点的root下执行grid和oracle互信即可
# 会提示Passphrase回车忽略即可
cd /u01/grid/sshsetup/
./sshUserSetup.sh -user grid -hosts "rac01 rac02" -advanced exverrify -confirm
./sshUserSetup.sh -user oracle -hosts "rac01 rac02" -advanced exverrify -confirm
# 不会提示Passphrase
================
cd /u01/grid/sshsetup/
./sshUserSetup.sh -user grid -hosts "rac01 rac02" -advanced -noPromptPassphrase
./sshUserSetup.sh -user oracle -hosts "rac01 rac02" -advanced -noPromptPassphrase
================
# 一路回车+yes+输入密码即可
[root@rac01 ~]# cd /u01/grid/sshsetup/
[root@rac01 sshsetup]# ./sshUserSetup.sh -user grid -hosts "rac01 rac02" -advanced -noPromptPassphrase
[root@rac01 sshsetup]# ./sshUserSetup.sh -user oracle -hosts "rac01 rac02" -advanced -noPromptPassphrase
# 最后提示SSH verification compelte.即通信成功
# 验证测试两个节点互相ssh连通性, 第二次执行没有提示密码说明通信正常(一般提示SSH verification compelte说明正常,无需验证)
# oracle和grid用户分别测试
-- 节点rac01/oracle:
[oracle@rac01 ~]$ ssh rac01 date
[oracle@rac01 ~]$ ssh rac02 date
[oracle@rac01 ~]$ ssh rac01-priv date
[oracle@rac01 ~]$ ssh rac02-priv date
-- 节点rac01/grid:
[grid@rac01 ~]$ ssh rac01 date
[grid@rac01 ~]$ ssh rac02 date
[grid@rac01 ~]$ ssh rac01-priv date
[grid@rac01 ~]$ ssh rac02-priv date
-- 节点rac02/oracle:
[oracle@rac02 ~]$ ssh rac01 date
[oracle@rac02 ~]$ ssh rac02 date
[oracle@rac02 ~]$ ssh rac01-priv date
[oracle@rac02 ~]$ ssh rac02-priv date
-- 节点rac02/grid:
[grid@rac02 ~]$ ssh rac01 date
[grid@rac02 ~]$ ssh rac02 date
[grid@rac02 ~]$ ssh rac01-priv date
[grid@rac02 ~]$ ssh rac02-priv date
3.12 安装cvuqdisk包
解压 Grid 软件后,找到路径安装
cvuqdisk。
3.12.1 节点rac01上安装
cd /u01/grid/rpm
export CVUQDISK_GRP=oinstall
rpm -ivh cvuqdisk-1.0.9-1.rpm
scp cvuqdisk-1.0.9-1.rpm root@192.168.10.102:/u01
[root@rac01 ~]# export CVUQDISK_GRP=oinstall
[root@rac01 ~]# cd /u01/grid/rpm
[root@rac01 rpm]# rpm -ivh cvuqdisk-1.0.9-1.rpm
Preparing...					################################# [100%]
Updating / installing...
1:cvuqdisk-1.0.9-1              ################################# [100%]
[root@rac01 rpm]# rpm -qa cvuqdisk
cvuqdisk-1.0.9-1.x86_64
[root@rac01 rpm]# ls -l /usr/sbin/cvuqdisk
-rwsr-xr-x 1 root oinstall 11920 Jul  1  2014 /usr/sbin/cvuqdisk
3.12.2 节点rac02上安装
export CVUQDISK_GRP=oinstall
rpm -ivh /u01/cvuqdisk-1.0.9-1.rpm
# 传输到节点rac02上
[root@rac01 rpm]# scp cvuqdisk-1.0.9-1.rpm root@192.168.10.102:/u01
root@192.168.10.102's password:
cvuqdisk-1.0.9-1.rpm                                                   100% 8976     5.4MB/s   00:00
# 安装
[root@rac02 ~]# rpm -qa cvuqdisk
[root@rac02 ~]# export CVUQDISK_GRP=oinstall
[root@rac02 ~]# rpm -ivh /u01/cvuqdisk-1.0.9-1.rpm
Preparing...					################################# [100%]
Updating / installing...
1:cvuqdisk-1.0.9-1              ################################# [100%]
3.13 运行脚本检查
3.13.1 主节点运行脚本检查
================
cd /u01/grid
./runcluvfy.sh stage -pre crsinst -n rac01,rac02 -fixup -verbose
root
/tmp/CVU_12.1.0.2.0_grid/runfixup.sh
================
# 前提先配置SSH互信,再运行(单节点运行即可)
# 手动运行 CVU 使用程序验证 Oracle 集群件要求
[grid@rac01 ~]$ cd /u01/grid
[grid@rac01 grid]$ ./runcluvfy.sh stage -pre crsinst -n rac01,rac02 -fixup -verbose
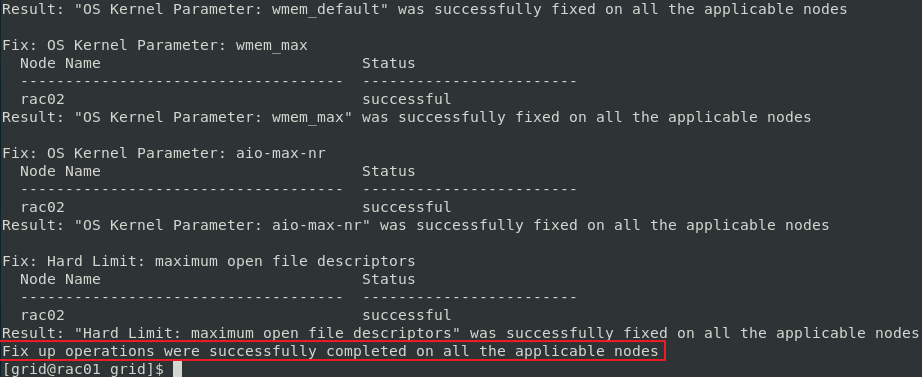
3.13.2 所有节点运行修复脚本
# 节点rac01运行runfixup.sh
# 监测完成后根据提示root下执行修复脚本
[root@rac01 ~]# cd /tmp/CVU_12.1.0.2.0_grid
[root@rac01 CVU_12.1.0.2.0_grid]# ./runfixup.sh
# 节点rac02运行runfixup.sh
# 运行/runcluvfy.sh脚本时,也会在其他相应的节点/ tmp/CVU_12.1.0.2.0_grid/下生成runfixup.sh
[root@rac02 ~]# cd /tmp/CVU_12.1.0.2.0_grid
[root@rac02 CVU_12.1.0.2.0_grid]# ./runfixup.sh
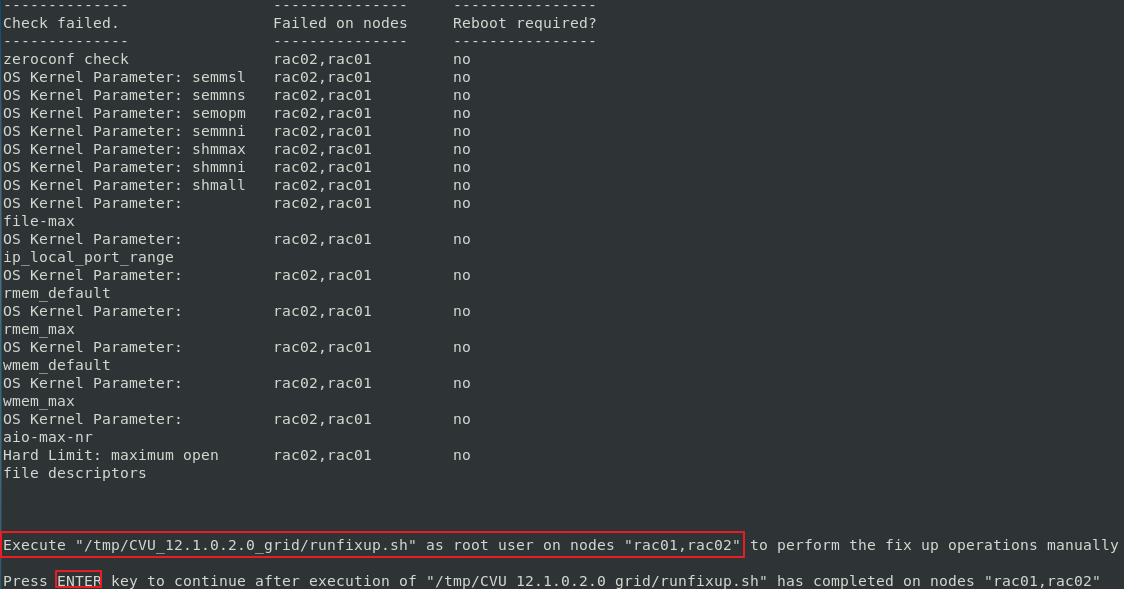
- rac02 运行 /runfixup.sh 后,回到 rac01 回车 (ENTER),提示成功。
3.13.3 因Bug报错
https://support.huawei.com/enterprise/en/doc/EDOC1100053123/fdb4b6fe/installation-procedure
# 再次运行.
[grid@rac01 grid]$ ./runcluvfy.sh stage -pre crsinst -n rac01,rac02 -fixup -verbose
# 运行检查后,会遇到如下报错,这是GI 12.1.2的Bug,忽略即可
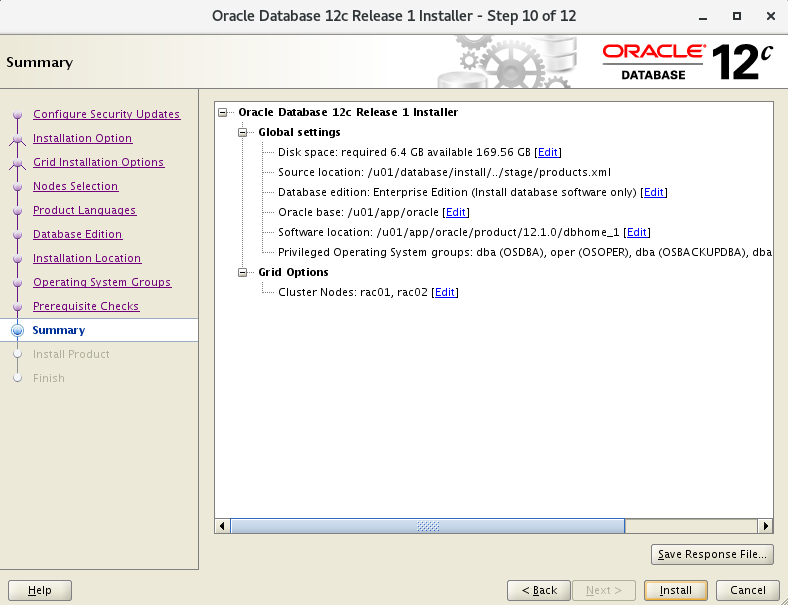
4. 安装GI
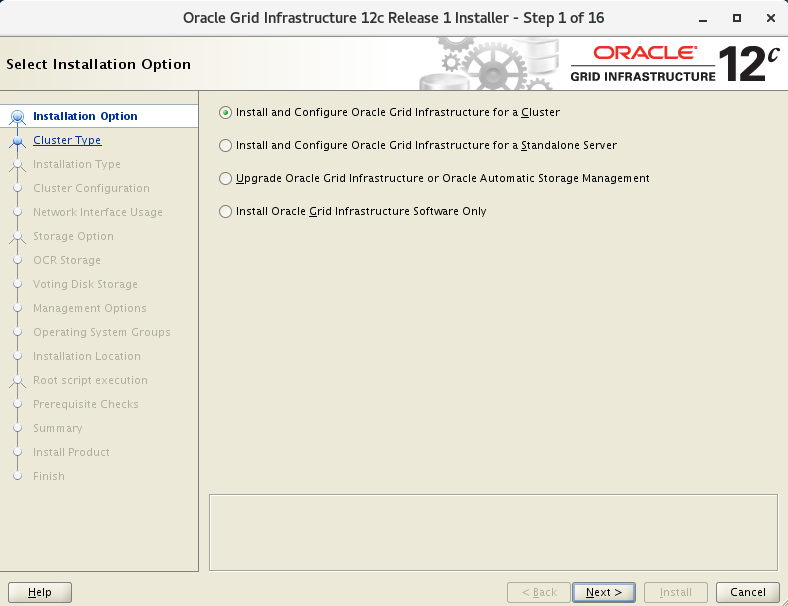
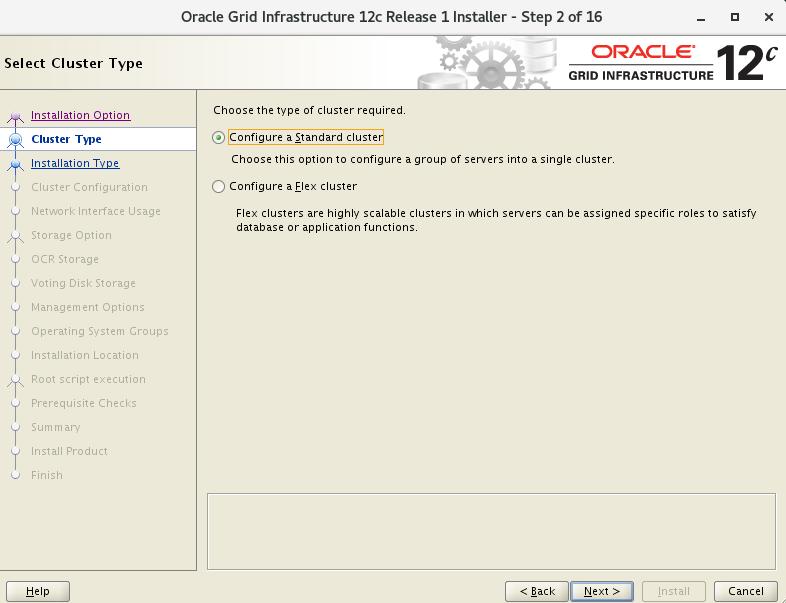
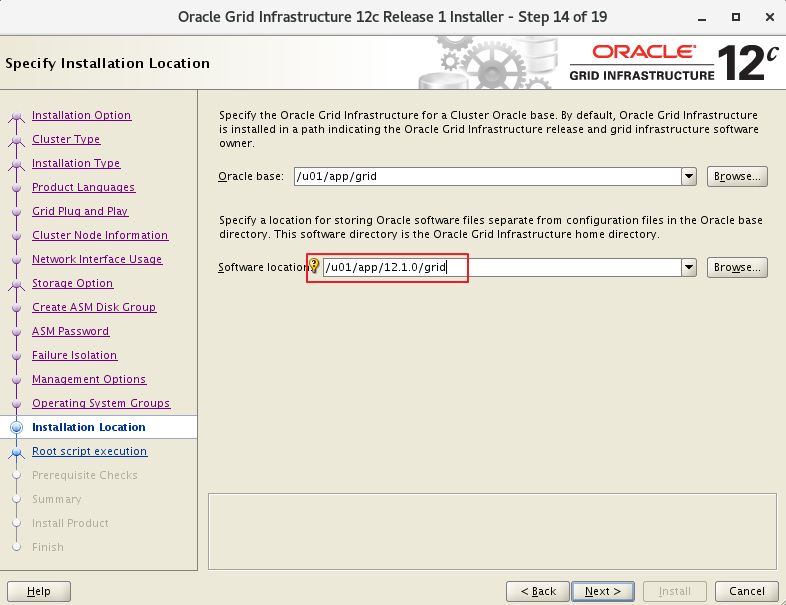
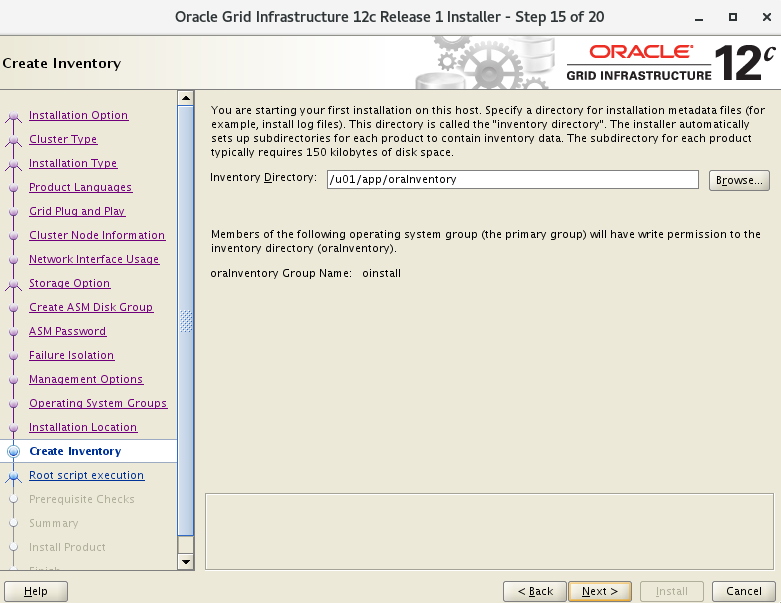
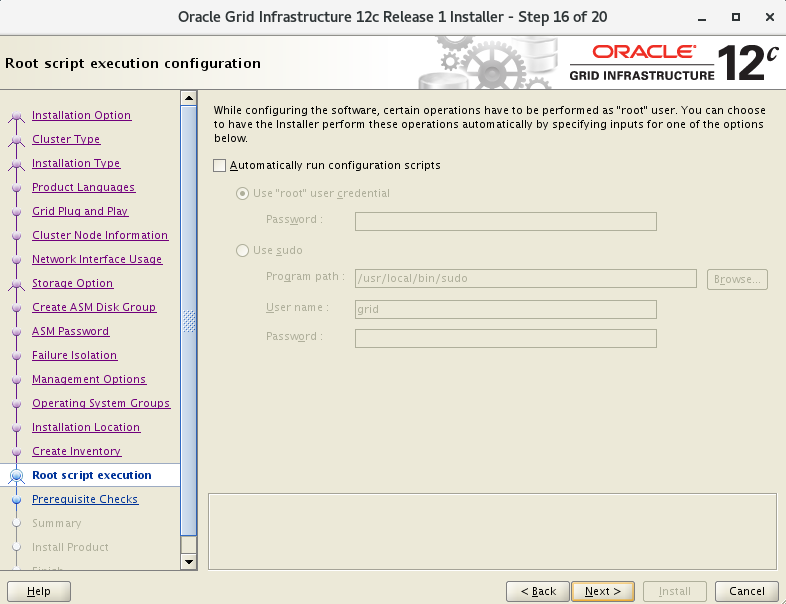
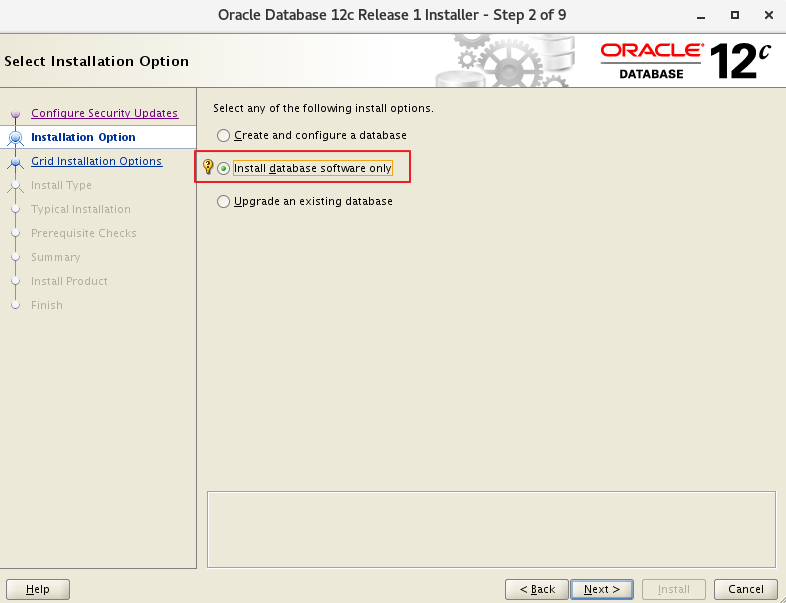
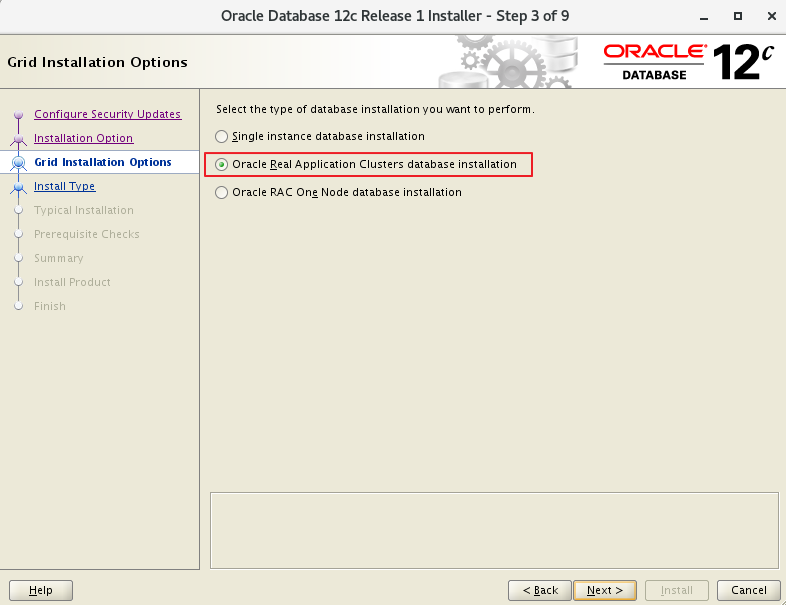
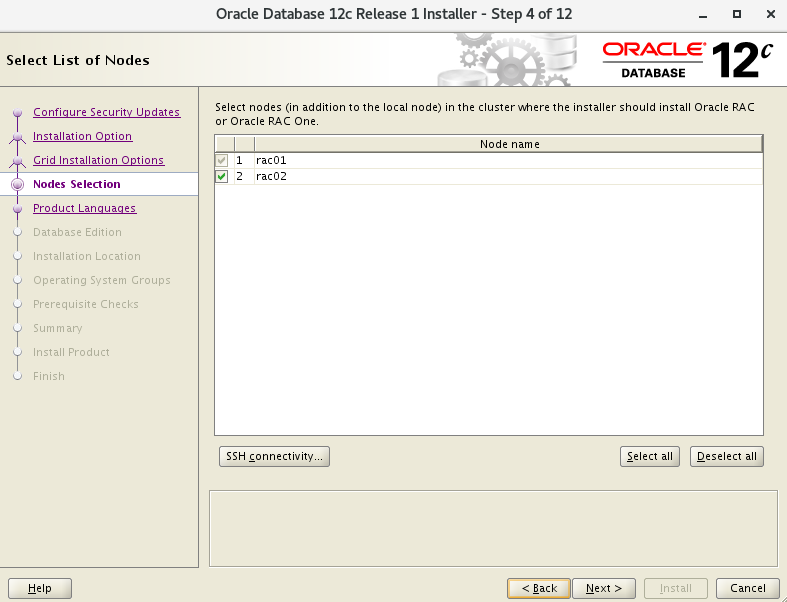
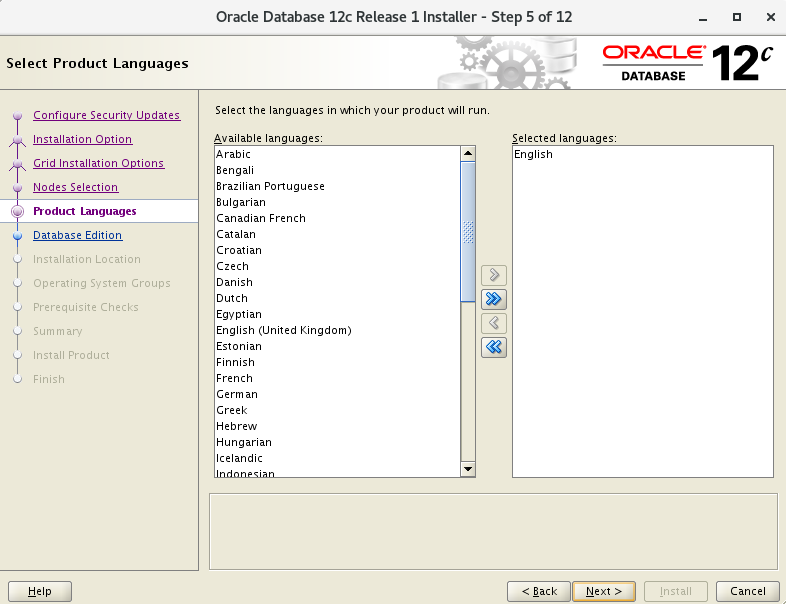
4.1 开始安装
[grid@rac01 ~]$ cd /u01/grid
[grid@rac01 grid]$ ./runInstaller
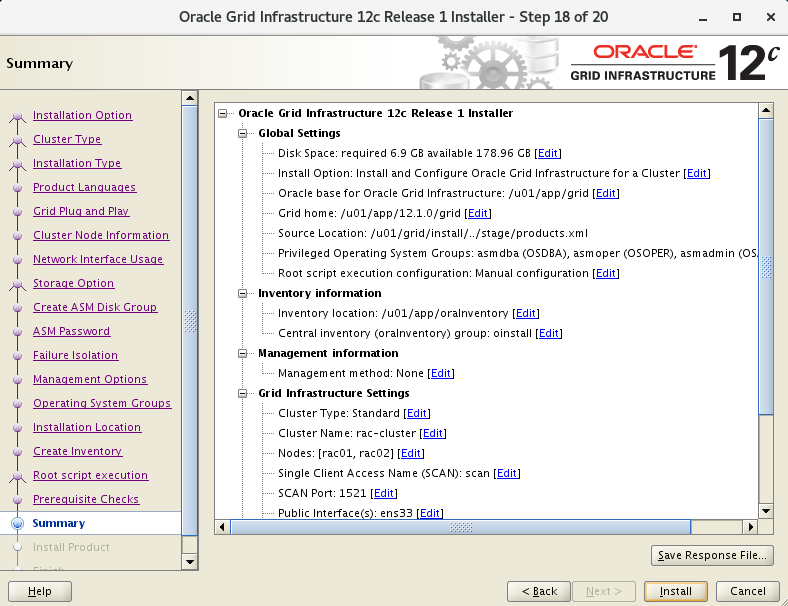
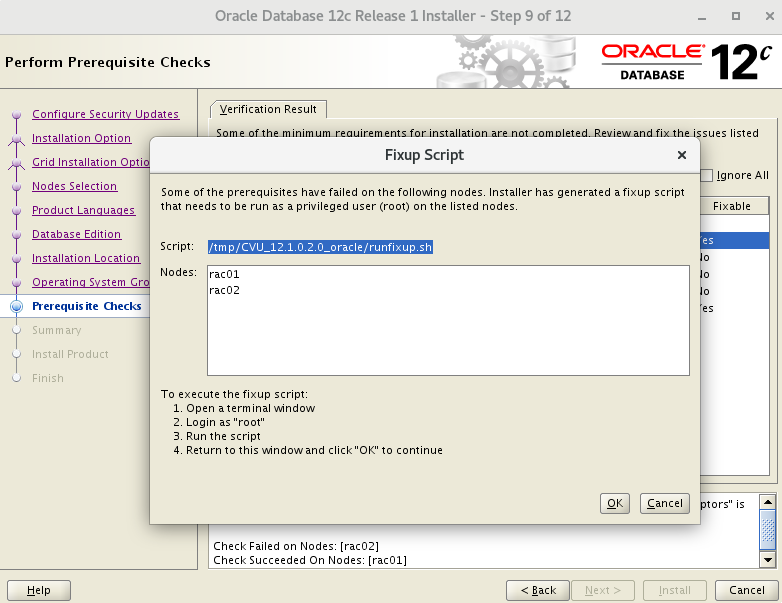
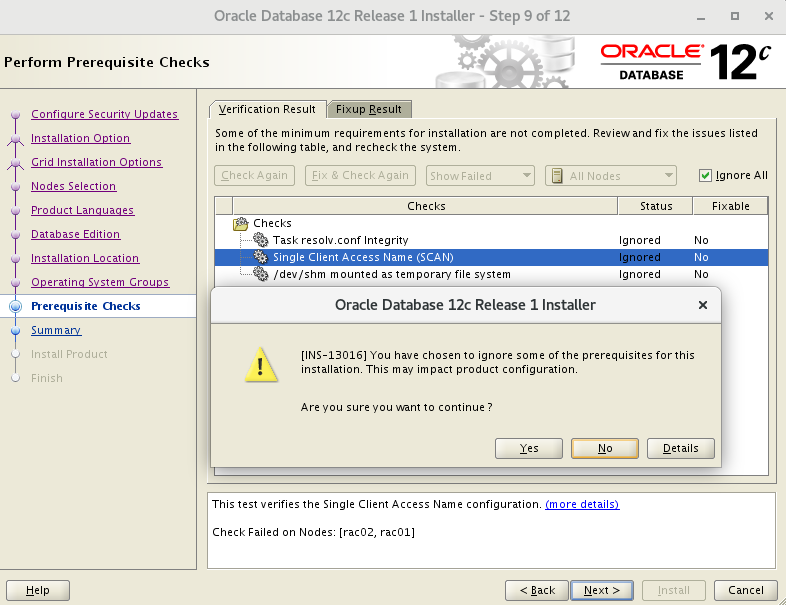
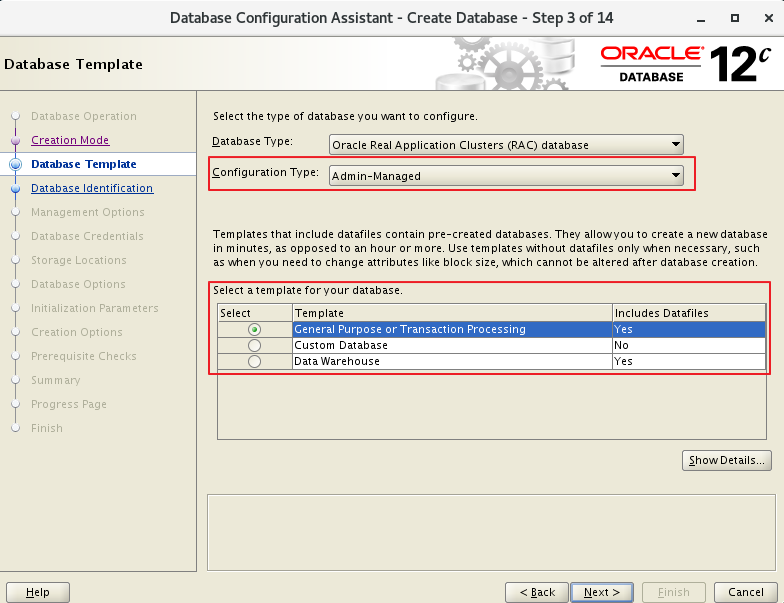
4.2 集群名称scan
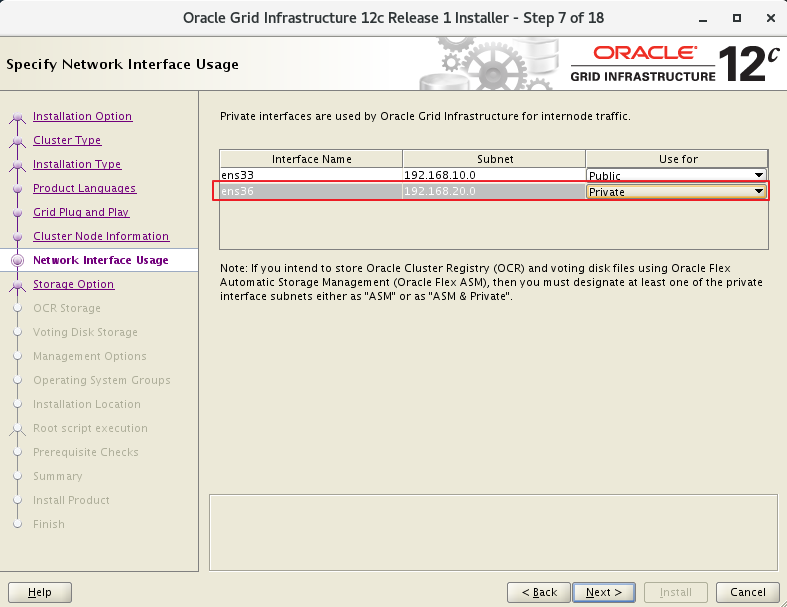
4.3 私网选择private
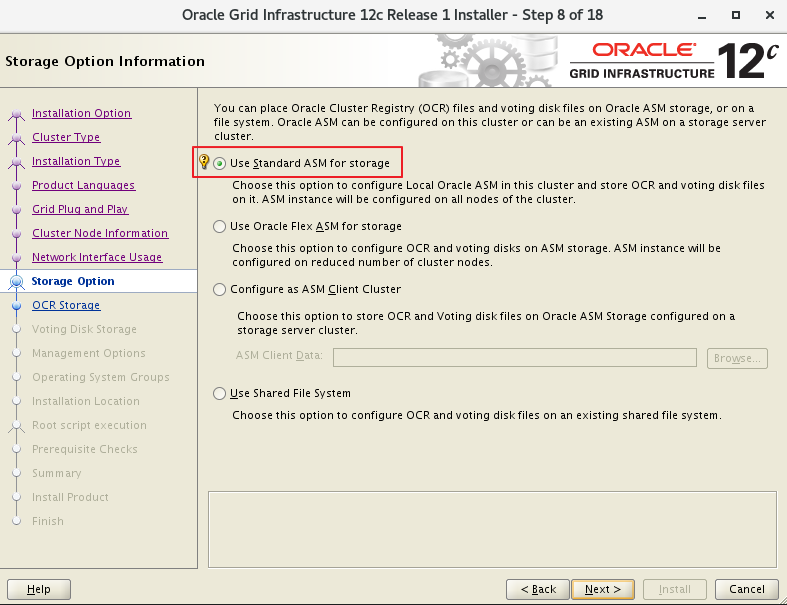
4.4 磁盘ocr和voting的组命名

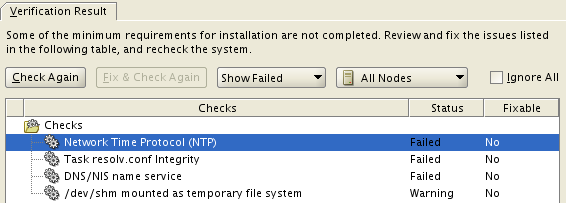
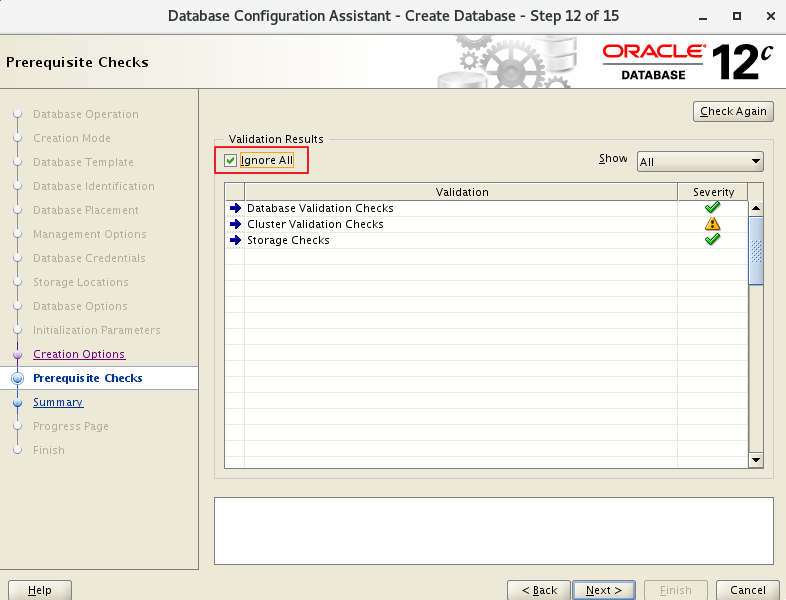
4.5 环境检查
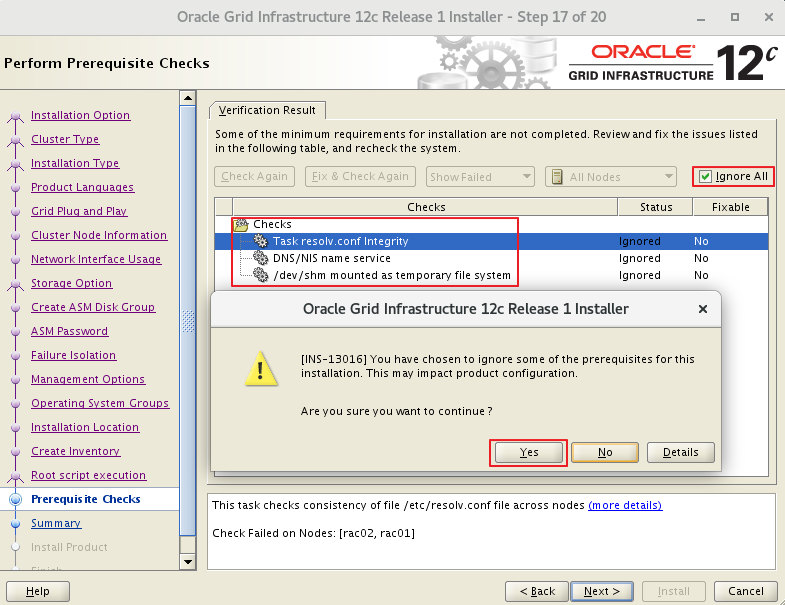
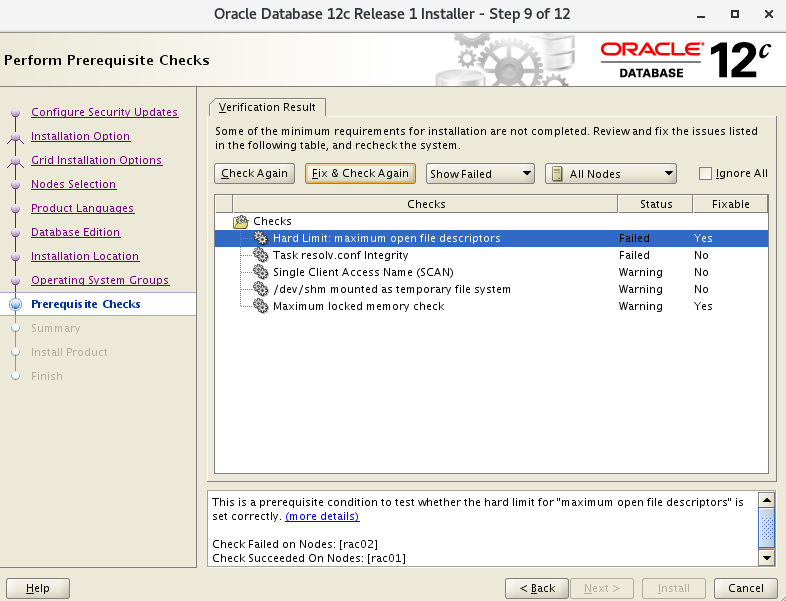
"Task resolv.conf Integrity"
#:This is a parsing timeout alarm and you can ignore it.
#:这里没有配置DNS,通过hosts来解析,可以忽略
"DNS/NIS name service"
#:这里没有配置DNS,通过hosts来解析,可以忽略
#:This alarm is reported if the DNS server is not used during SCAN IP address configuration. You can ignore this alarm.
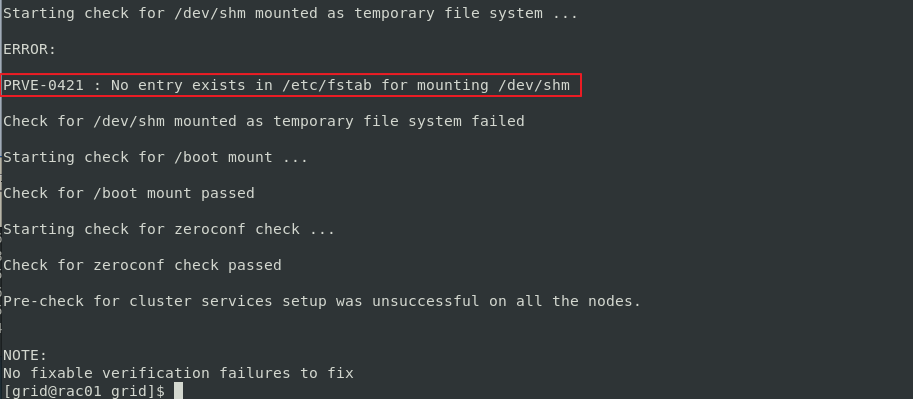
"/dev/shm mounted as temporary file system"
#:GI 12.1.0和12.2.0.1的Bug
#:也就是./runcluvfy.sh检查出的错
查看Doc ID 2065603.1
或查看 bug 说明,忽略即可 ( 实际检查已经 mounted )。NOTE:25907259.8:https://support.oracle.com/epmos/faces/DocumentDisplay?parent=DOCUMENT&sourceId=2065603.1&id=25907259.8 - Bug 25907259 - Linux:RHEL7: cvu reports /dev/shm not mounted when it is mounted
点击查看官网对此bug说明:https://support.oracle.com/epmos/faces/DocumentDisplay?_afrLoop=561588878358269&parent=WIDGET_RECENTLY_VIEWED&sourceId=245840.1&id=2065603.1&_afrWindowMode=0&_adf.ctrl-state=s0p44r7hf_801 :This alarm is generated due to a bug of Oracle. The cluvfy check does not check whether /dev/shm is mounted but checks the configuration information of /dev/shm in /etc/fstab. You can ignore this alarm.
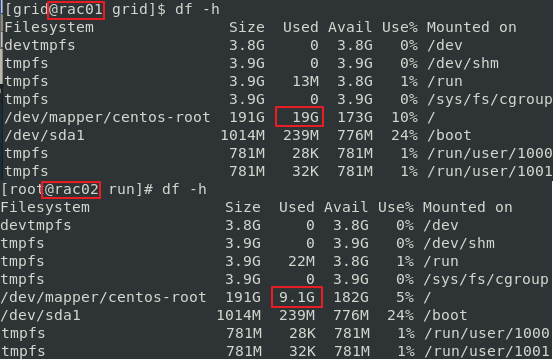
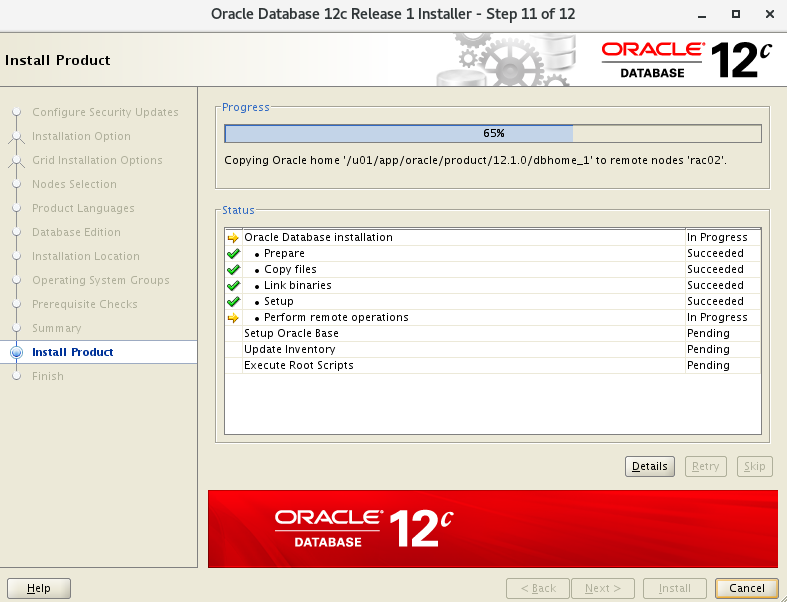
4.6 52%节点拷贝
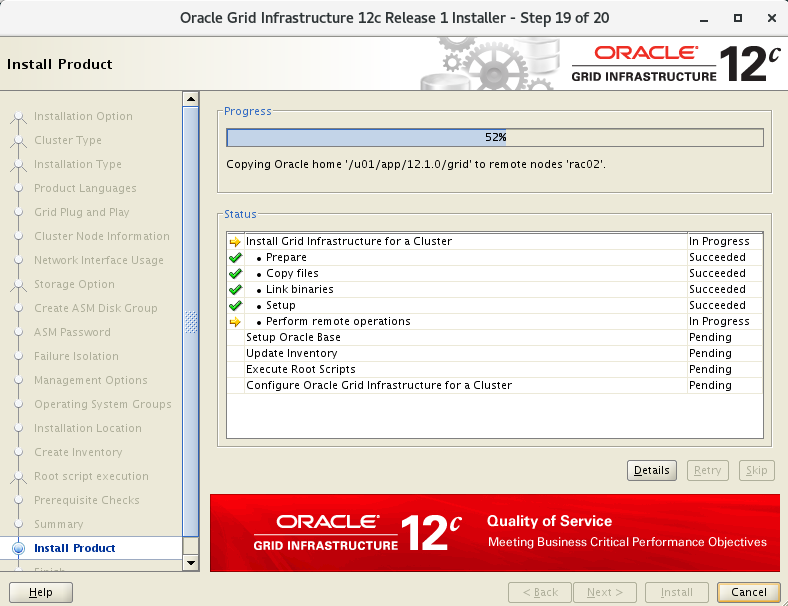
安装执行过程中发现 rac01 向 rac02 拷贝文件,查看磁盘大小变化。
4.7 81%执行脚本
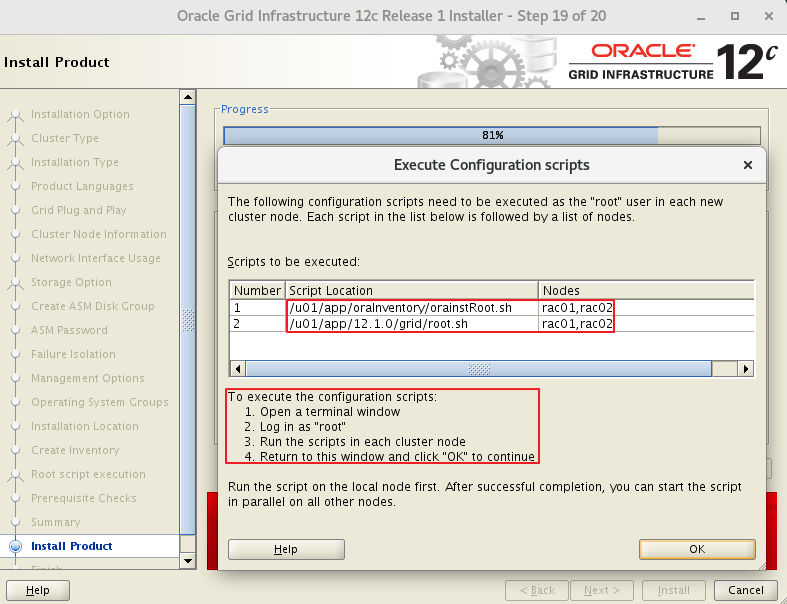
# 执行orainstRoot.sh脚本
[root@rac01 ~]# /u01/app/oraInventory/orainstRoot.sh
Changing permissions of /u01/app/oraInventory.
Adding read,write permissions for group.
Removing read,write,execute permissions for world.
Changing groupname of /u01/app/oraInventory to oinstall.
The execution of the script is complete.
[root@rac02 ~]# /u01/app/oraInventory/orainstRoot.sh
Changing permissions of /u01/app/oraInventory.
Adding read,write permissions for group.
Removing read,write,execute permissions for world.
Changing groupname of /u01/app/oraInventory to oinstall.
The execution of the script is complete.
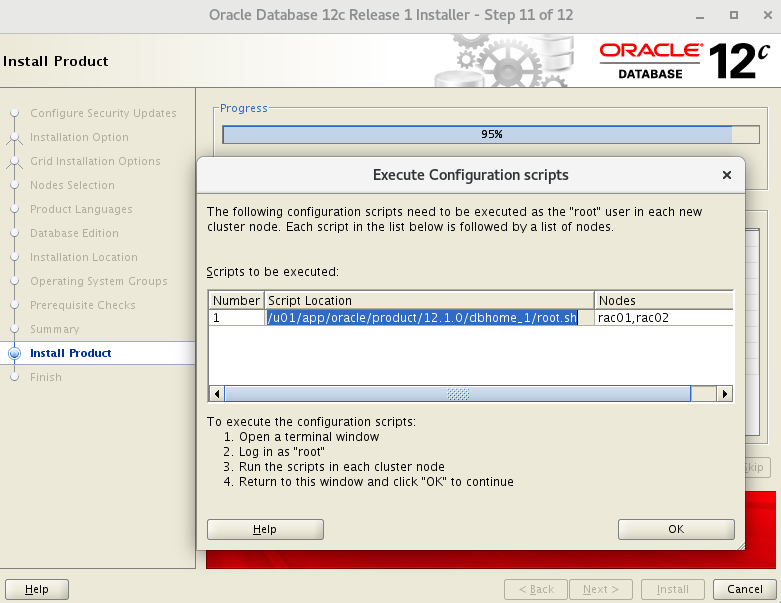
#执行root.sh脚本 (见文档最底部 )
[root@rac01 ~]# /u01/app/12.1.0/grid/root.sh
[root@rac02 ~]# /u01/app/12.1.0/grid/root.sh
#执行成功提示
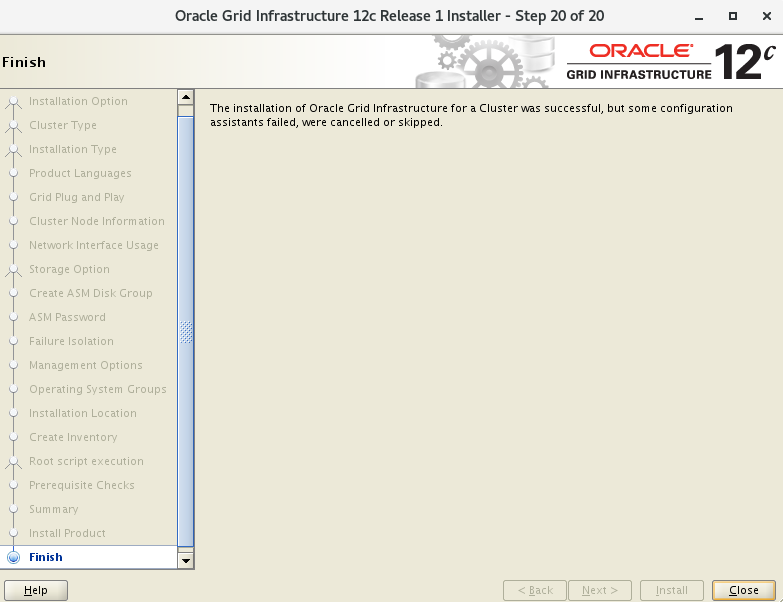
Configure Oracle Grid Infrastructure for a Cluster ....succeeded
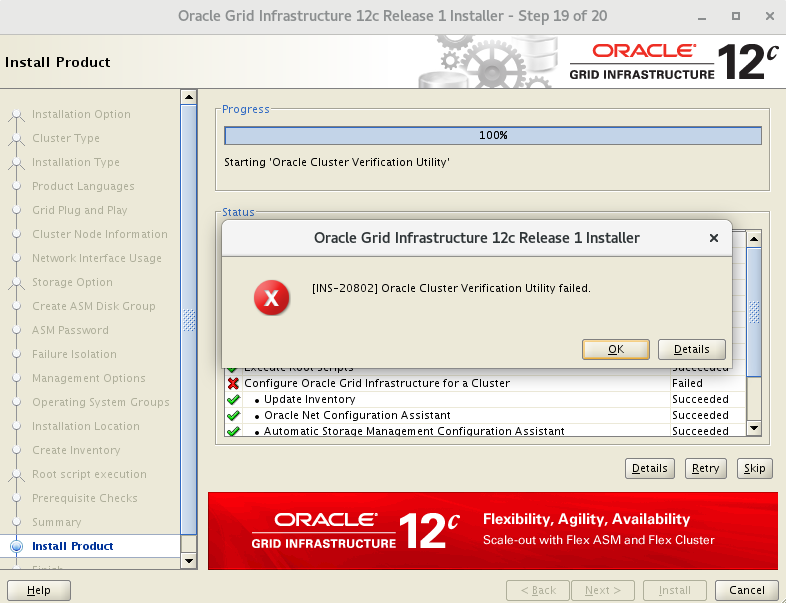
Oracle cluster verification utility failed
# 因为使用了一个 scan ip 的提示
# 这是因为没有配置 DNS 而是通过 hosts 来解析 SCAN IP 引起的检查错误,可以忽略此错误
4.8 节点检查
4.8.1 检查集群节点
[grid@rac01 ~]$ olsnodes -n
rac01   1
rac02   2
4.8.2 检查Oracle TNS监听器进程
[grid@rac01 ~]$ ps -ef|grep lsnr|grep -v 'grep'
grid   29736   1 0 19:02 ?    00:00:00 /u01/app/12.1.0/grid/bin/tnslsnr LISTENER_SCAN1 -no_crs_notify -inherit
grid   30226   1 0 19:02 ?    00:00:00 /u01/app/12.1.0/grid/bin/tnslsnr LISTENER -no_crs_notify -inherit
grid   39970   1 0 19:14 ?    00:00:00 /u01/app/12.1.0/grid/bin/tnslsnr MGMTLSNR -no_crs_notify -inherit
[grid@rac01 ~]$ ps -ef|grep lsnr|grep -v 'grep'|awk '{print $9}'
LISTENER_SCAN1
LISTENER
MGMTLSNR
4.8.3 检查Oracle ASM功能
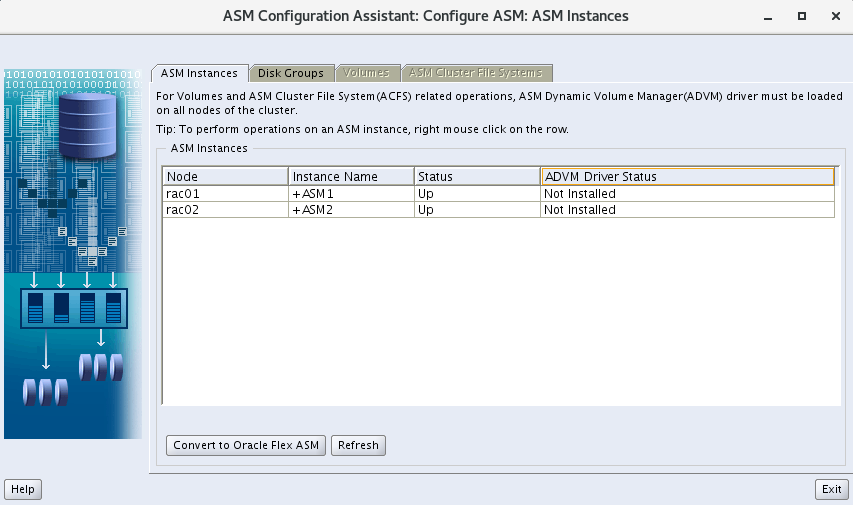
[grid@rac01 ~]$ srvctl status asm -a
ASM is running on rac01,rac02
ASM is enabled.
4.8.4 检查Oracle集群注册表(OCR状态)
[grid@rac01 grid]$ ocrcheck
Status of Oracle Cluster Registry is as follows :
	Version						:4
	Total space (kbytes)		:409568
	Used space (kbytes)			:1440
	Available space (kbytes)	:408128
	ID							:1413109658
	Device/File Name			:+OCR
					Device/File integrity check succeeded
					Device/File not configured
					Device/File not configured
					Device/File not configured
					Device/File not configured
	Cluster registry integrity check succeeded
	Logical corruption check bypassed due to non-privileged user
4.8.5 检查Clusterware资源
[grid@rac01 grid]$ crsctl stat res -t
--------------------------------------------------------------------------------
Name      Target State    Server          State details
--------------------------------------------------------------------------------
Local Resources
--------------------------------------------------------------------------------
ora.LISTENER.lsnr
        ONLINE ONLINE    rac01          STABLE
        ONLINE ONLINE    rac02          STABLE
ora.OCR.dg
        ONLINE ONLINE    rac01          STABLE
        ONLINE ONLINE    rac02          STABLE
ora.asm
        ONLINE ONLINE    rac01          STABLE
        ONLINE ONLINE    rac02          Started,STABLE
ora.net1.network
        ONLINE ONLINE    rac01          STABLE
        ONLINE ONLINE    rac02          STABLE
ora.ons
        ONLINE ONLINE    rac01          STABLE
        ONLINE ONLINE    rac02          STABLE
--------------------------------------------------------------------------------
Cluster Resources
--------------------------------------------------------------------------------
ora.LISTENER_SCAN1.lsnr
   1    ONLINE ONLINE    rac01          STABLE
ora.MGMTLSNR
   1    ONLINE ONLINE    rac01           169.254.126.42 192.168.20.101,STABLE
ora.cvu
   1    ONLINE ONLINE    rac01          STABLE
ora.mgmtdb
   1    ONLINE ONLINE    rac01          Open,STABLE
ora.oc4j
   1    ONLINE ONLINE    rac01          STABLE
ora.rac01.vip
   1    ONLINE ONLINE    rac01          STABLE
ora.rac02.vip
   1    ONLINE ONLINE    rac02          STABLE
ora.scan1.vip
   1    ONLINE ONLINE    rac01          STABLE
--------------------------------------------------------------------------------
[grid@rac01 grid]$ crsctl stat res -t -init
--------------------------------------------------------------------------------
Name      Target State    Server          State details
--------------------------------------------------------------------------------
Cluster Resources
--------------------------------------------------------------------------------
ora.asm
   1    ONLINE ONLINE    rac01          Started,STABLE
ora.cluster_interconnect.haip
   1    ONLINE ONLINE    rac01          STABLE
ora.crf
   1    ONLINE ONLINE    rac01          STABLE
ora.crsd
   1    ONLINE ONLINE    rac01          STABLE
ora.cssd
   1    ONLINE ONLINE    rac01          STABLE
ora.cssdmonitor
   1    ONLINE ONLINE    rac01          STABLE
ora.ctssd
   1    ONLINE ONLINE    rac01          OBSERVER,STABLE
ora.diskmon
   1    OFFLINE OFFLINE                STABLE
ora.evmd
   1    ONLINE ONLINE    rac01          STABLE
ora.gipcd
   1    ONLINE ONLINE    rac01          STABLE
ora.gpnpd
   1    ONLINE ONLINE    rac01          STABLE
ora.mdnsd
   1    ONLINE ONLINE    rac01          STABLE
ora.storage
   1    ONLINE ONLINE    rac01          STABLE
--------------------------------------------------------------------------------
4.8.6 检查表决磁盘
[grid@rac01 grid]$ crsctl query css votedisk
## STATE  File Universal Id        File Name Disk group
-- -----  -----------------        --------- ---------
1. ONLINE  00f1a87110b34fadbfcce6181fb3e9d6 (/dev/asm-diskb) [OCR]
Located 1 voting disk(s).
[grid@rac01 grid]$ crsctl query css votedisk
## STATE  File Universal Id        File Name Disk group
-- -----  -----------------        --------- ---------
1. ONLINE  00f1a87110b34fadbfcce6181fb3e9d6 (/dev/asm-diskb) [OCR]
Located 1 voting disk(s).
4.8.7 检查 ASM状态
[grid@rac01 ~]$ srvctl config asm -a
ASM home: <CRS home>
Password file: +OCR/orapwASM
ASM listener: LISTENER
ASM is enabled.
ASM is individually enabled on nodes:
ASM is individually disabled on nodes:
[grid@rac01 grid]$ asmcmd
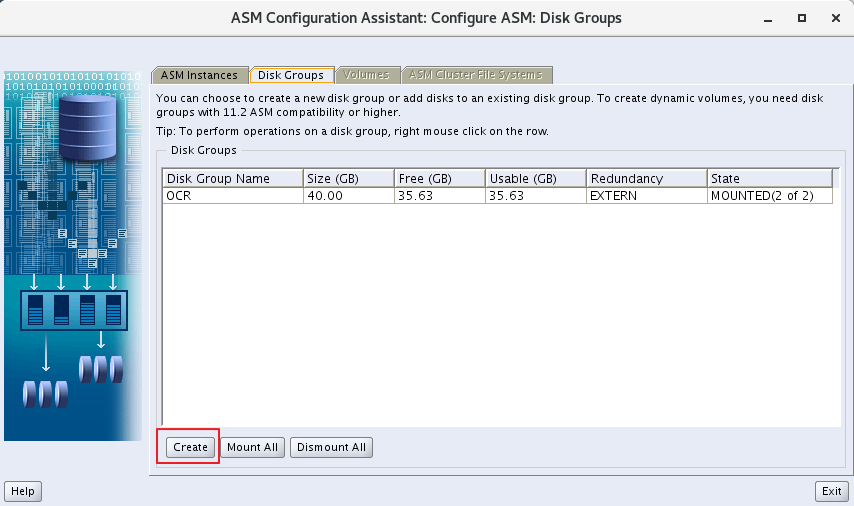
ASMCMD> lsdg
State Type Rebal Sector Block AU Total_MB Free_MB Req_mir_free_MB Usable_file_MB Offline_disks Voting_files Name
MOUNTED EXTERN N 512 4096 1048576 40960 36493 0 36493 0 Y OCR/
ASMCMD> lsdsk -p --discovery
Group_Num Disk_Num Incarn Mount_Stat Header_Stat Mode_Stat State Path
1 0 3916290675 CACHED MEMBER ONLINE NORMAL /dev/asm-diskb
0 0 0 CLOSED CANDIDATE ONLINE NORMAL /dev/asm-diskc
0 1 0 CLOSED CANDIDATE ONLINE NORMAL /dev/asm-diskd
4.8.8 检查监听状态
[grid@rac01 ~]$ lsnrctl status
LSNRCTL for Linux: Version 12.1.0.2.0 - Production on 19-JAN-2021 20:22:45
Copyright (c) 1991, 2014, Oracle. All rights reserved.
Connecting to (DESCRIPTION=(ADDRESS=(PROTOCOL=IPC)(KEY=LISTENER)))
STATUS of the LISTENER
------------------------
Alias			LISTENER
Version			TNSLSNR for Linux: Version 12.1.0.2.0 - Production
Start Date		19-JAN-2021 19:02:47
Uptime			0 days 1 hr. 19 min. 58 sec
Trace Level		off
Security		ON: Local OS Authentication
SNMP			OFF
Listener Parameter File  /u01/app/12.1.0/grid/network/admin/listener.ora
Listener Log File     /u01/app/grid/diag/tnslsnr/rac01/listener/alert/log.xml
Listening Endpoints Summary...
 (DESCRIPTION=(ADDRESS=(PROTOCOL=ipc)(KEY=LISTENER)))
 (DESCRIPTION=(ADDRESS=(PROTOCOL=tcp)(HOST=192.168.10.101)(PORT=1521)))
 (DESCRIPTION=(ADDRESS=(PROTOCOL=tcp)(HOST=192.168.10.201)(PORT=1521)))
Services Summary...
Service "+ASM" has 1 instance(s).
 Instance "+ASM1", status READY, has 1 handler(s) for this service...
Service "-MGMTDBXDB" has 1 instance(s).
 Instance "-MGMTDB", status READY, has 1 handler(s) for this service...
Service "_mgmtdb" has 1 instance(s).
 Instance "-MGMTDB", status READY, has 1 handler(s) for this service...
Service "rac_cluster" has 1 instance(s).
 Instance "-MGMTDB", status READY, has 1 handler(s) for this service...
The command completed successfully
4.8.9 登陆数据库验证
[grid@rac01 ~]$ sqlplus / as sysdba
# 或
[grid@rac01 ~]$ sqlplus / as sysasm
SQL*Plus: Release 12.1.0.2.0 Production on Tue Jan 19 20:24:16 2021
Copyright (c) 1982, 2014, Oracle. All rights reserved.
Connected to:
Oracle Database 12c Enterprise Edition Release 12.1.0.2.0 - 64bit Production
With the Real Application Clusters and Automatic Storage Management options
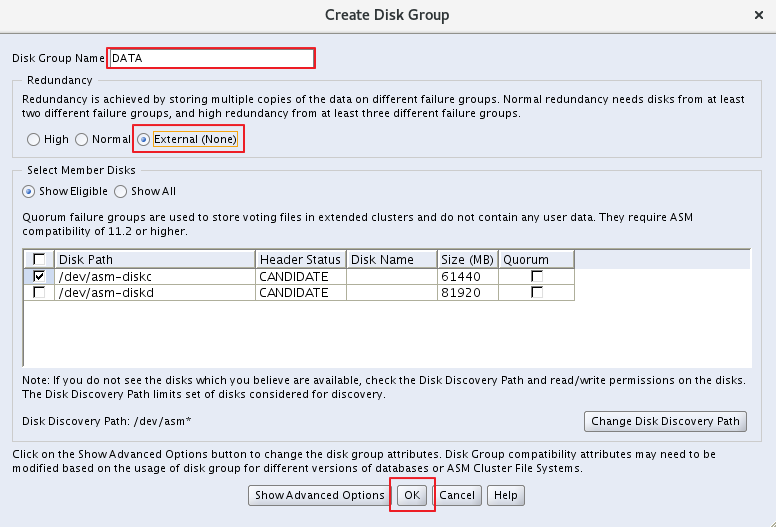
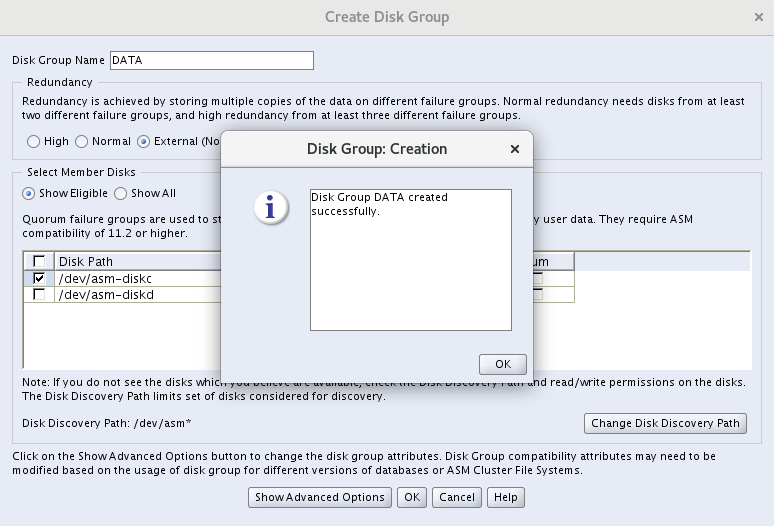
5. 创建其他ASM共享磁盘组
5.1 创建DATA组
[grid@rac01 ~]$ asmca
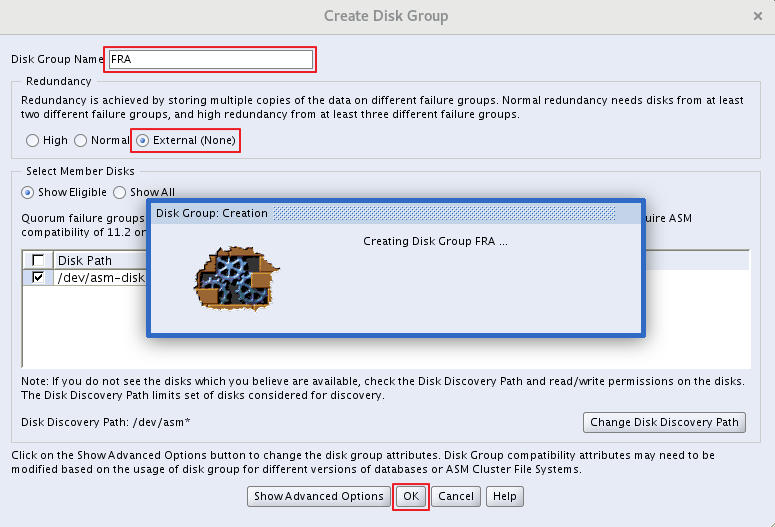
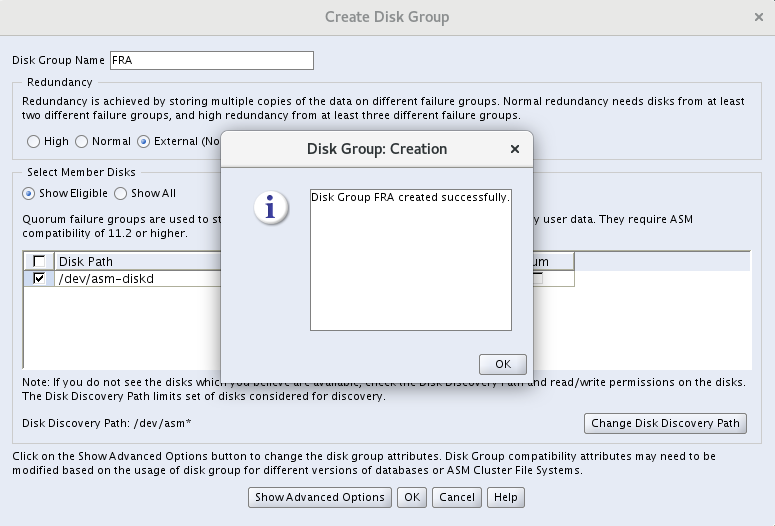
5.2 创建Flash recovery组
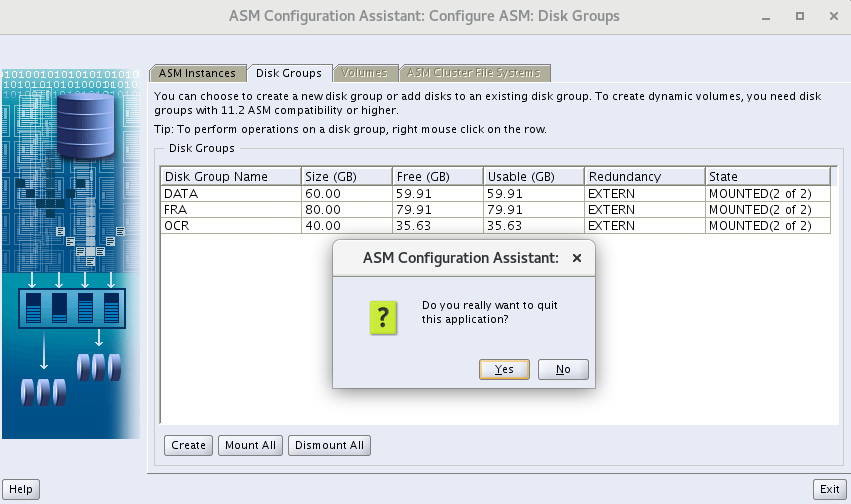
5.3 验证
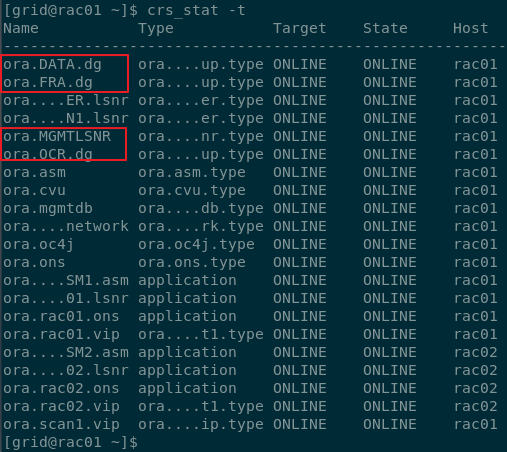
[grid@rac01 ~]$ crs_stat -t
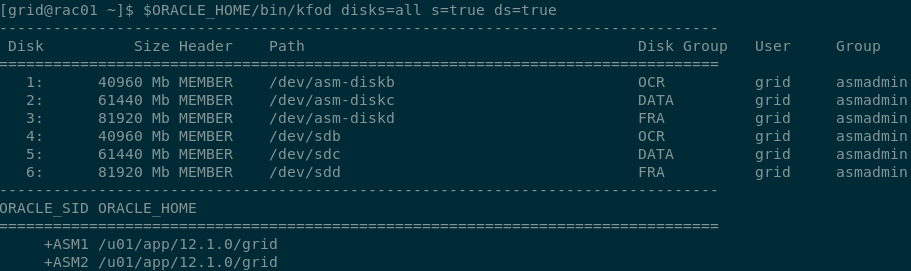
[grid@rac01 ~]$ ORACLE_HOME/bin/kfod disks=all s=true ds=true
6. 安装DB
# 上传到/u01解压,解压/u01/database
[root@rac01 ~]$ cd /u01
[root@rac01 u01]$ unzip linuxamd64_12102_database_1of2.zip
[root@rac01 u01]$ unzip linuxamd64_12102_database_2of2.zip
[oracle@rac01 u01]$ cd database/
[oracle@rac01 database]$ ./runInstaller
6.1 开始安装

6.2 环境检查
- 点击 Fix & Check Again
- 运行修复脚本
- 这里 Single Client Access Name(SCAN) 是因为
scan ip的缘故,忽略下一步
6.3 65%节点拷贝
6.4 执行脚本
# 所有节点
u01/app/oracle/product/12.1.0/dbhome_1/root.sh
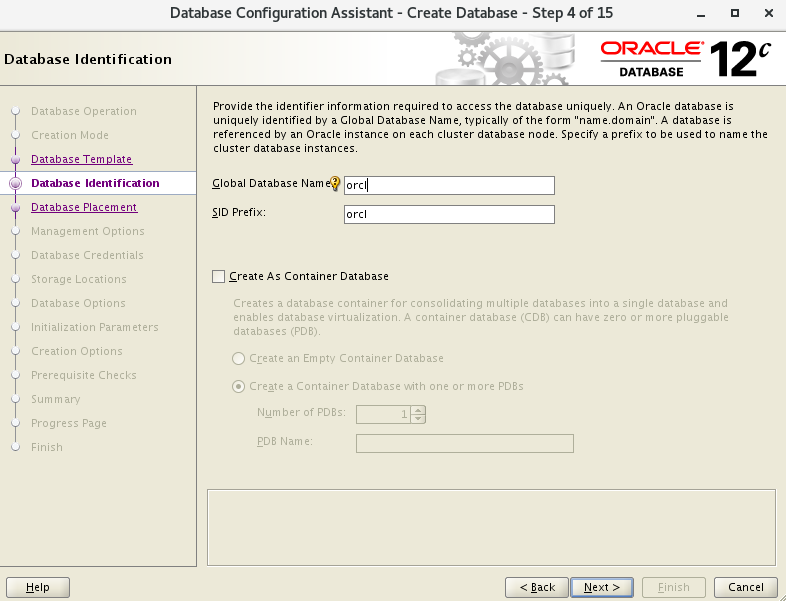
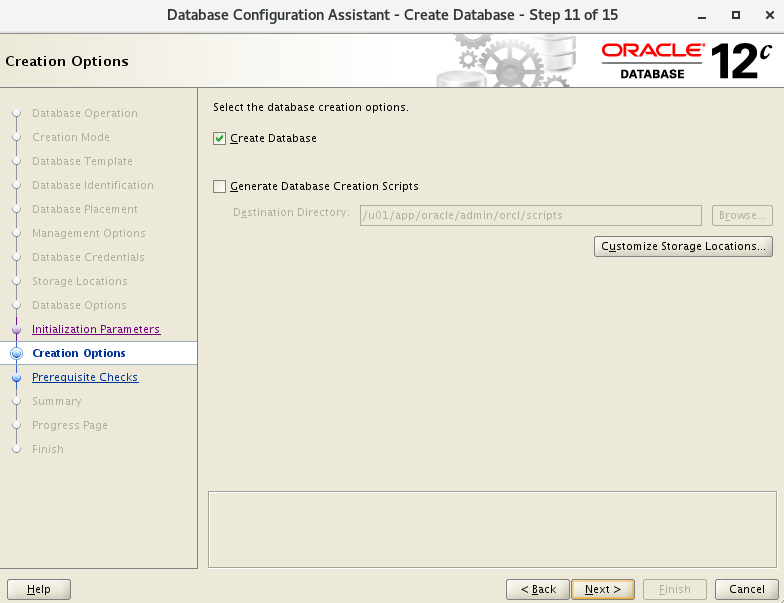
7. 用dbca建库
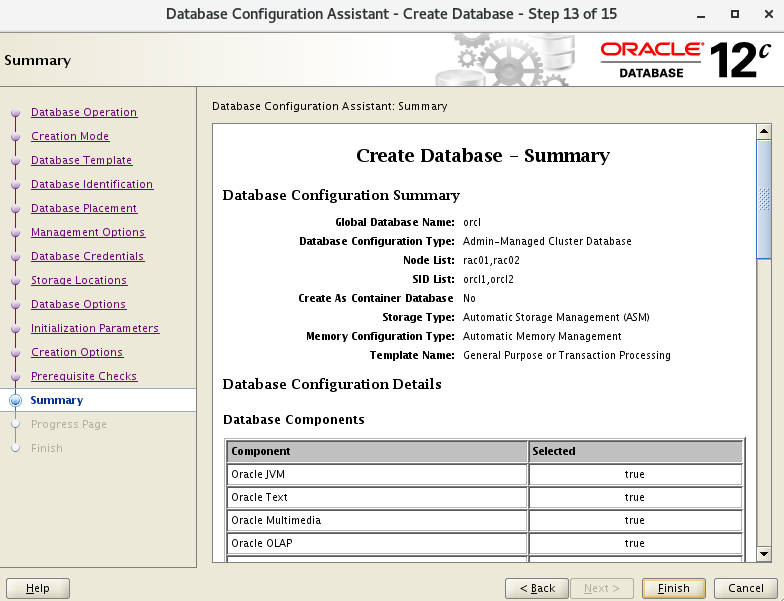
7.1 开始创建
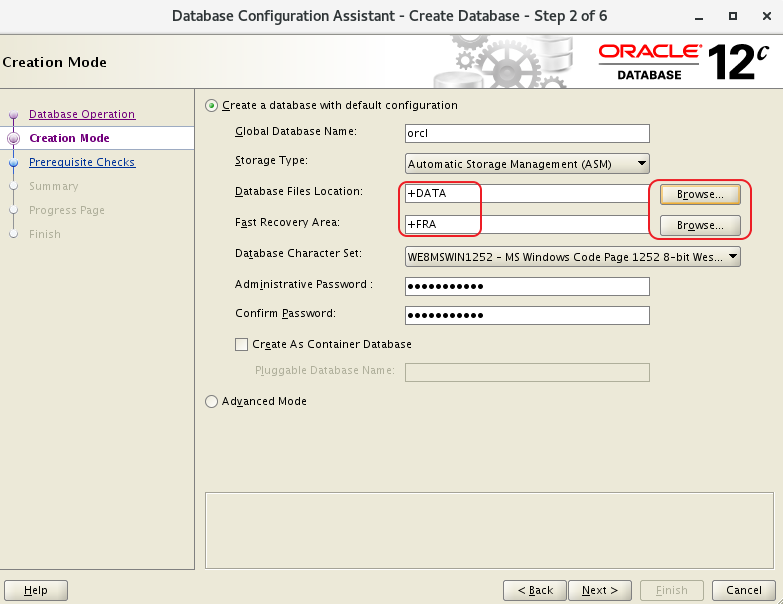
7.2 默认配置模式
- 这里可以选择一般模式简单步骤建库:
- 配置SID,因为变量环境设置的是orcl1和orcl2,这里设置orcl
- 数据存储+DATA
- 恢复存储+FRA
7.3 高级模式
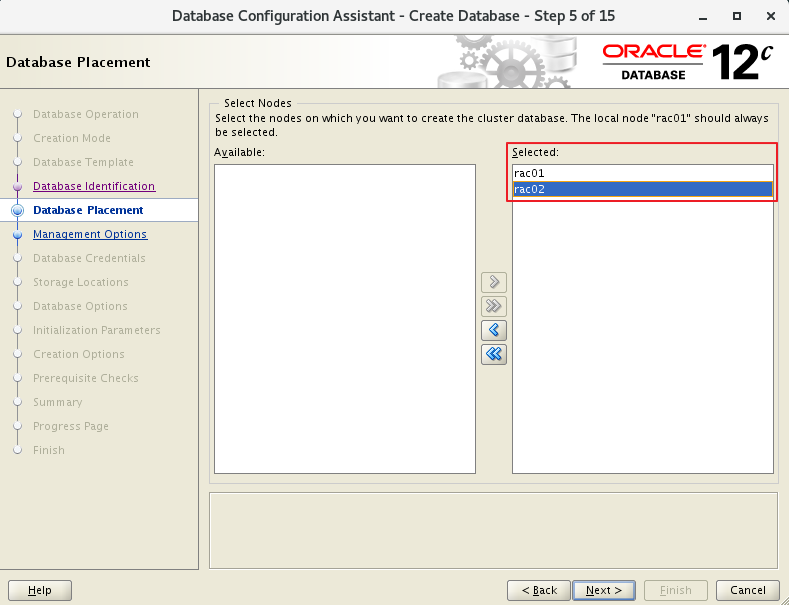
- 此次选择 Advanced 配置
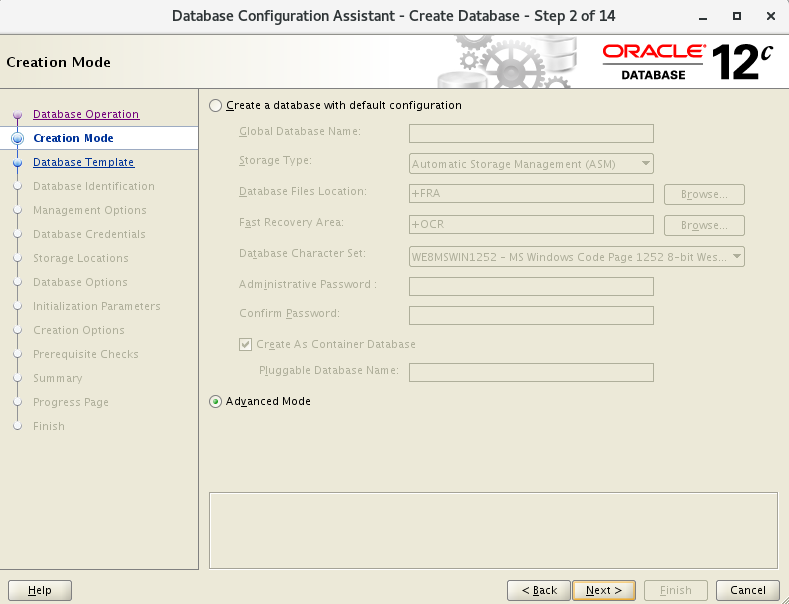
- 配置SID,因为变量环境设置的是orcl1和orcl2,这里设置orcl
- 选择双节点
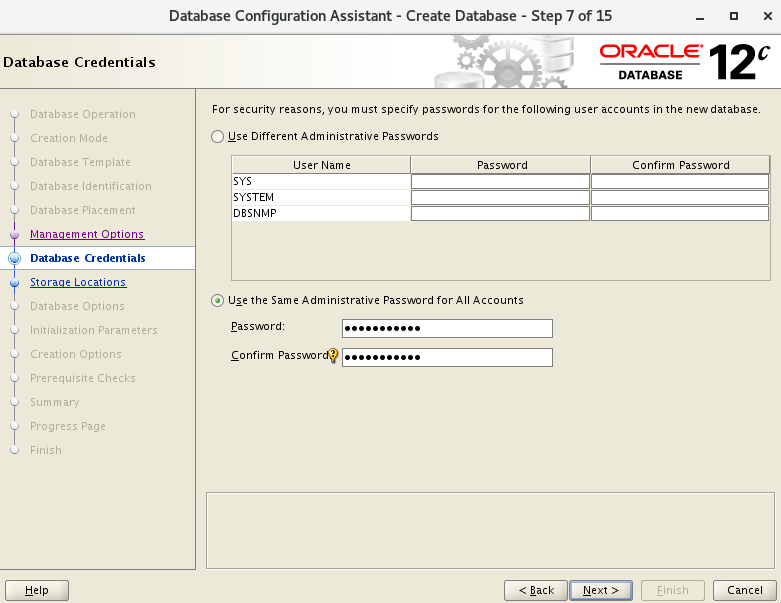
- 密码
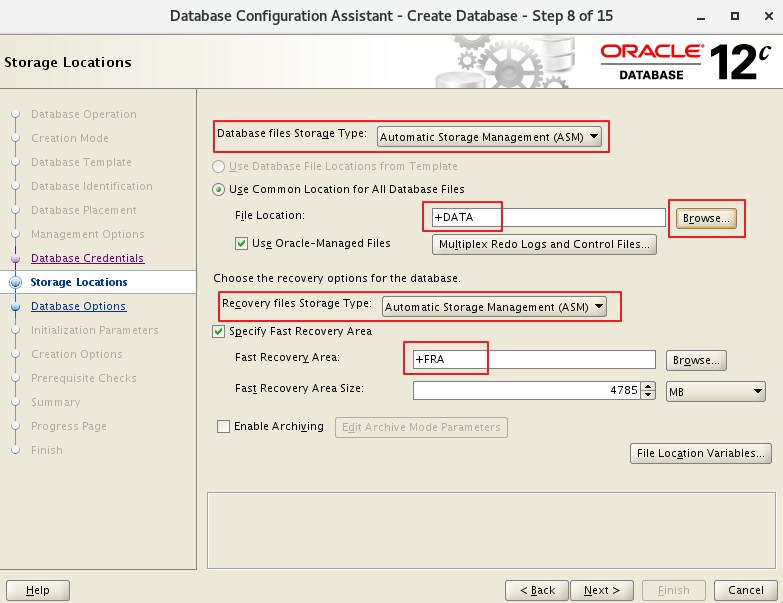
- 存储类型选择ASM
- 数据存储+DATA
- 恢复区存储+FRA
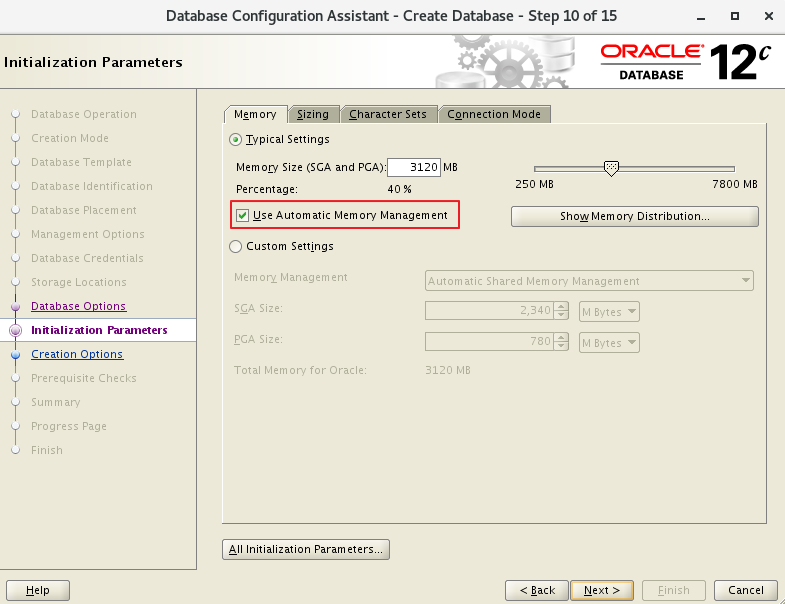
- 选择AMM
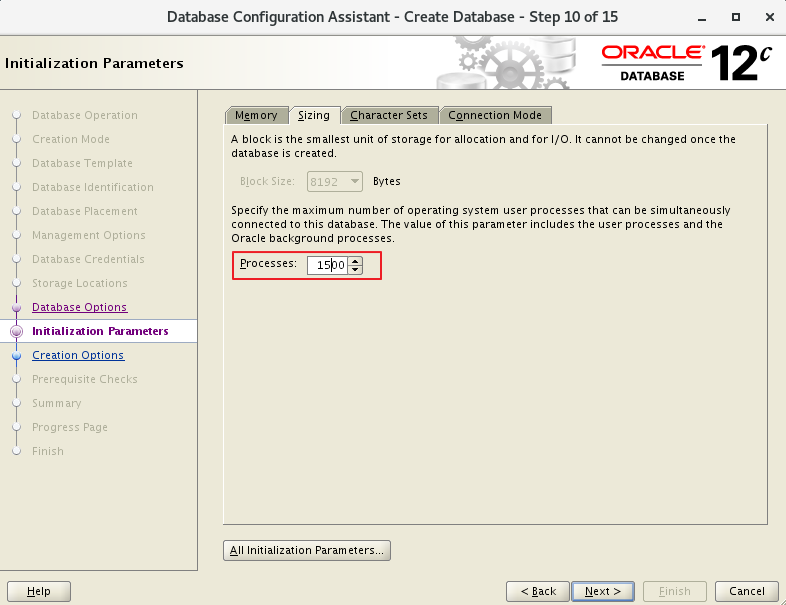
- 根据需要设置进程数

7.4 节点检查
#1
[grid@rac01 ~]$ crsctl stat res -t -init
[grid@rac01 ~]$ crsctl check cluster
CRS-4537: Cluster Ready Services is online
CRS-4529: Cluster Synchronization Services is online
CRS-4533: Event Manager is online
#2
[grid@rac01 ~]$ srvctl status database -d orcl
Instance orcl1 is running on node rac01
Instance orcl2 is running on node rac02
#3
[grid@rac01 ~]$ srvctl status nodeapps
VIP rac01-vip is enabled
VIP rac01-vip is running on node: rac01
VIP rac02-vip is enabled
VIP rac02-vip is running on node: rac02
Network is enabled
Network is running on node: rac01
Network is running on node: rac02
ONS is enabled
ONS daemon is running on node: rac01
ONS daemon is running on node: rac02
#4
[grid@rac01 ~]$ srvctl config nodeapps
Network 1 exists
Subnet IPv4: 192.168.10.0/255.255.255.0/ens33, static
Subnet IPv6:
Ping Targets:
Network is enabled
Network is individually enabled on nodes:
Network is individually disabled on nodes:
VIP exists: network number 1, hosting node rac01
VIP Name: rac01-vip
VIP IPv4 Address: 192.168.10.201
VIP IPv6 Address:
VIP is enabled.
VIP is individually enabled on nodes:
VIP is individually disabled on nodes:
VIP exists: network number 1, hosting node rac02
VIP Name: rac02-vip
VIP IPv4 Address: 192.168.10.202
VIP IPv6 Address:
VIP is enabled.
VIP is individually enabled on nodes:
VIP is individually disabled on nodes:
ONS exists: Local port 6100, remote port 6200, EM port 2016, Uses SSL false
ONS is enabled
ONS is individually enabled on nodes:
ONS is individually disabled on nodes:
#5
[grid@rac01 ~]$ srvctl config database -d orcl -a
Database unique name: orcl
Database name: orcl
Oracle home: /u01/app/oracle/product/12.1.0/dbhome_1
Oracle user: oracle
Spfile: +DATA/ORCL/PARAMETERFILE/spfile.268.1062286795
Password file: +DATA/ORCL/PASSWORD/pwdorcl.256.1062286347
Domain:
Start options: open
Stop options: immediate
Database role: PRIMARY
Management policy: AUTOMATIC
Server pools:
Disk Groups: FRA,DATA
Mount point paths:
Services:
Type: RAC
Start concurrency:
Stop concurrency:
Database is enabled
Database is individually enabled on nodes:
Database is individually disabled on nodes:
OSDBA group: dba
OSOPER group: oper
Database instances: orcl1,orcl2
Configured nodes: rac01,rac02
Database is administrator managed
#6
[grid@rac01 ~]$ srvctl status asm
ASM is running on rac01,rac02
#7
[grid@rac01 ~]$ srvctl config asm -a
ASM home: <CRS home>
Password file: +OCR/orapwASM
ASM listener: LISTENER
ASM is enabled.
ASM is individually enabled on nodes:
ASM is individually disabled on nodes:
#8
[grid@rac01 ~]$ srvctl status listener
Listener LISTENER is enabled
Listener LISTENER is running on node(s): rac01,rac02
#9
[grid@rac01 ~]$ srvctl config listener -a
Name: LISTENER
Type: Database Listener
Network: 1, Owner: grid
Home: <CRS home>
  /u01/app/12.1.0/grid on node(s) rac02,rac01
End points: TCP:1521
Listener is enabled.
Listener is individually enabled on nodes:
Listener is individually disabled on nodes:
#10
[grid@rac01 ~]$ srvctl config nodeapps -a -g -s -l
PRKO-2207 : Warning:-gsdonly option has been deprecated and will be ignored.
Warning:-listener option has been deprecated and will be ignored.
Network 1 exists
Subnet IPv4: 192.168.10.0/255.255.255.0/ens33, static
Subnet IPv6:
Ping Targets:
Network is enabled
Network is individually enabled on nodes:
Network is individually disabled on nodes:
VIP exists: network number 1, hosting node rac01
VIP Name: rac01-vip
VIP IPv4 Address: 192.168.10.201
VIP IPv6 Address:
VIP is enabled.
VIP is individually enabled on nodes:
VIP is individually disabled on nodes:
VIP exists: network number 1, hosting node rac02
VIP Name: rac02-vip
VIP IPv4 Address: 192.168.10.202
VIP IPv6 Address:
VIP is enabled.
VIP is individually enabled on nodes:
VIP is individually disabled on nodes:
ONS exists: Local port 6100, remote port 6200, EM port 2016, Uses SSL false
ONS is enabled
ONS is individually enabled on nodes:
ONS is individually disabled on nodes:
Name: LISTENER
Type: Database Listener
Network: 1, Owner: grid
Home: <CRS home>
  /u01/app/12.1.0/grid on node(s) rac02,rac01
End points: TCP:1521
Listener is enabled.
Listener is individually enabled on nodes:
Listener is individually disabled on nodes:
#11
[grid@rac01 ~]$ srvctl status scan
SCAN VIP scan1 is enabled
SCAN VIP scan1 is running on node rac01
#12
[grid@rac01 ~]$ srvctl config scan
SCAN name: scan, Network: 1
Subnet IPv4: 192.168.10.0/255.255.255.0/ens33, static
Subnet IPv6:
SCAN 0 IPv4 VIP: 192.168.10.100
SCAN VIP is enabled.
SCAN VIP is individually enabled on nodes:
SCAN VIP is individually disabled on nodes:
#13
[grid@rac01 ~]$ cluvfy comp clocksync -verbose
Verifying Clock Synchronization across the cluster nodes
Checking if Clusterware is installed on all nodes...
Oracle Clusterware is installed on all nodes.
Checking if CTSS Resource is running on all nodes...
Check: CTSS Resource running on all nodes
  Node Name                             Status
  ------------------------------------  ------------------------
  rac01                                 passed
CTSS resource check passed
Querying CTSS for time offset on all nodes...
Query of CTSS for time offset passed
Check CTSS state started...
Check: CTSS state
  Node Name                             State
  ------------------------------------  ------------------------
  rac01                                 Observer
CTSS is in Observer state. Switching over to clock synchronization checks using NTP
Starting Clock synchronization checks using Network Time Protocol(NTP)...
Checking existence of NTP configuration file "/etc/ntp.conf" across nodes
  Node Name                             File exists?
  ------------------------------------  ------------------------
  rac01                                 yes
The NTP configuration file "/etc/ntp.conf" is available on all nodes
NTP configuration file "/etc/ntp.conf" existence check passed
Checking daemon liveness...
Check: Liveness for "ntpd"
  Node Name                             Running?
  ------------------------------------  ------------------------
  rac01                                 yes
Result: Liveness check passed for "ntpd"
Check for NTP daemon or service alive passed on all nodes
Checking whether NTP daemon or service is using UDP port 123 on all nodes
Check for NTP daemon or service using UDP port 123
  Node Name                             Port Open?
  ------------------------------------  ------------------------
  rac01                                 yes
NTP common Time Server Check started...
NTP Time Server "10.137.53.7" is common to all nodes on which the NTP daemon is running
NTP Time Server "10.12.2.186" is common to all nodes on which the NTP daemon is running
NTP Time Server ".LOCL." is common to all nodes on which the NTP daemon is running
Check of common NTP Time Server passed
Clock time offset check from NTP Time Server started...
Checking on nodes "[rac01]"...
Check: Clock time offset from NTP Time Server
Time Server: 10.137.53.7
Time Offset Limit: 1000.0 msecs
  Node Name     Time Offset               Status
  ------------  ------------------------  ------------------------
  rac01         586.473                   passed
Time Server "10.137.53.7" has time offsets that are within permissible limits for nodes "[rac01]".
Time Server: 10.12.2.186
Time Offset Limit: 1000.0 msecs
  Node Name     Time Offset               Status
  ------------  ------------------------  ------------------------
  rac01         519.183                   passed
Time Server "10.12.2.186" has time offsets that are within permissible limits for nodes "[rac01]".
Time Server: .LOCL.
Time Offset Limit: 1000.0 msecs
  Node Name     Time Offset               Status
  ------------  ------------------------  ------------------------
  rac01         0.0                       passed
Time Server ".LOCL." has time offsets that are within permissible limits for nodes "[rac01]".
Clock time offset check passed
Result: Clock synchronization check using Network Time Protocol(NTP) passed
Oracle Cluster Time Synchronization Services check passed
Verification of Clock Synchronization across the cluster nodes was successful.
7.5 登陆查询
[oracle@rac01 ~]$ sqlplus / as sysdba
SQL> show parameter cluster
NAME						TYPE		VALUE
--------------------------	--------	----------
cluster_database			boolean		TRUE
cluster_database_instances	integer		2
cluster_interconnects		string
SQL> set linesize 200
SQL> col host_name format a10
SQL> select instance_name,host_name,version,startup_time,status,active_state,instance_role,database_status from gv$instance;
INSTANCE_NAME    HOST_NAME  VERSION           STARTUP_T STATUS       ACTIVE_ST INSTANCE_ROLE      DATABASE_STATUS
---------------- ---------- ----------------- --------- ------------ --------- ------------------ -----------------
orcl1            rac01      12.1.0.2.0        19-JAN-21 OPEN         NORMAL    PRIMARY_INSTANCE   ACTIVE
orcl2            rac02      12.1.0.2.0        19-JAN-21 OPEN         NORMAL    PRIMARY_INSTANCE   ACTIVE
8. 安装遇到的错
8.1 dev/shm
# 再次运行.
[grid@rac01 grid]$ ./runcluvfy.sh stage -pre crsinst -n rac01,rac02 -fixup -verbose
# 运行检查后,会遇到如下报错,这是GI 12.1.2的Bug,忽略即可
查看该说明:https://support.huawei.com/enterprise/en/doc/EDOC1100053123/fdb4b6fe/installation-procedure
8.2 Task resolv.conf Integrity和DNS/NIS name service
"Task resolv.conf Integrity"
#:This is a parsing timeout alarm and you can ignore it.
#:这里没有配置DNS,通过hosts来解析,可以忽略

"DNS/NIS name service"
#:这里没有配置DNS,通过hosts来解析,可以忽略
#:This alarm is reported if the DNS server is not used during SCAN IP address configuration. You can ignore this alarm.

"/dev/shm mounted as temporary file system"
#:GI 12.1.0和12.2.0.1的Bug
#:也就是./runcluvfy.sh检查出的错
查看 Doc ID 2065603.1
或查看bug说明,忽略即可 (实际检查已经 mounted)。NOTE:25907259.8 https://support.oracle.com/epmos/faces/DocumentDisplay?parent=DOCUMENT&sourceId=2065603.1&id=25907259.8 - Bug 25907259 - Linux:RHEL7: cvu reports /dev/shm not mounted when it is mounted
点击查看官网对此bug说明:https://support.oracle.com/epmos/faces/DocumentDisplay?_afrLoop=561588878358269&parent=WIDGET_RECENTLY_VIEWED&sourceId=245840.1&id=2065603.1&_afrWindowMode=0&_adf.ctrl-state=s0p44r7hf_801:This alarm is generated due to a bug of Oracle. The cluvfy check does not check whether /dev/shm is mounted but checks the configuration information of /dev/shm in /etc/fstab. You can ignore this alarm.
9. 附.GI脚本root.sh记录
- 节点 1
root@rac01 ~]# /u01/app/12.1.0/grid/root.sh
Performing root user operation.
The following environment variables are set as:
    ORACLE_OWNER= grid
    ORACLE_HOME=  /u01/app/12.1.0/grid
Enter the full pathname of the local bin directory: [/usr/local/bin]:
   Copying dbhome to /usr/local/bin ...
   Copying oraenv to /usr/local/bin ...
   Copying coraenv to /usr/local/bin ...
Creating /etc/oratab file...
Entries will be added to the /etc/oratab file as needed by
Database Configuration Assistant when a database is created
Finished running generic part of root script.
Now product-specific root actions will be performed.
Using configuration parameter file: /u01/app/12.1.0/grid/crs/install/crsconfig_params
2021/01/18 23:42:41 CLSRSC-4001: Installing Oracle Trace File Analyzer (TFA) Collector.
2021/01/18 23:43:11 CLSRSC-4002: Successfully installed Oracle Trace File Analyzer (TFA) Collector.
2021/01/18 23:43:12 CLSRSC-363: User ignored prerequisites during installation
OLR initialization - successful
  root wallet
  root wallet cert
  root cert export
  peer wallet
  profile reader wallet
  pa wallet
  peer wallet keys
  pa wallet keys
  peer cert request
  pa cert request
  peer cert
  pa cert
  peer root cert TP
  profile reader root cert TP
  pa root cert TP
  peer pa cert TP
  pa peer cert TP
  profile reader pa cert TP
  profile reader peer cert TP
  peer user cert
  pa user cert
2021/01/18 23:43:50 CLSRSC-330: Adding Clusterware entries to file 'oracle-ohasd.service'
CRS-4133: Oracle High Availability Services has been stopped.
CRS-4123: Oracle High Availability Services has been started.
CRS-4133: Oracle High Availability Services has been stopped.
CRS-4123: Oracle High Availability Services has been started.
CRS-2672: Attempting to start 'ora.evmd' on 'rac01'
CRS-2672: Attempting to start 'ora.mdnsd' on 'rac01'
CRS-2676: Start of 'ora.evmd' on 'rac01' succeeded
CRS-2676: Start of 'ora.mdnsd' on 'rac01' succeeded
CRS-2672: Attempting to start 'ora.gpnpd' on 'rac01'
CRS-2676: Start of 'ora.gpnpd' on 'rac01' succeeded
CRS-2672: Attempting to start 'ora.cssdmonitor' on 'rac01'
CRS-2672: Attempting to start 'ora.gipcd' on 'rac01'
CRS-2676: Start of 'ora.cssdmonitor' on 'rac01' succeeded
CRS-2676: Start of 'ora.gipcd' on 'rac01' succeeded
CRS-2672: Attempting to start 'ora.cssd' on 'rac01'
CRS-2672: Attempting to start 'ora.diskmon' on 'rac01'
CRS-2676: Start of 'ora.diskmon' on 'rac01' succeeded
CRS-2676: Start of 'ora.cssd' on 'rac01' succeeded
ASM created and started successfully.
Disk Group DATA created successfully.
CRS-2672: Attempting to start 'ora.crf' on 'rac01'
CRS-2672: Attempting to start 'ora.storage' on 'rac01'
CRS-2676: Start of 'ora.storage' on 'rac01' succeeded
CRS-2676: Start of 'ora.crf' on 'rac01' succeeded
CRS-2672: Attempting to start 'ora.crsd' on 'rac01'
CRS-2676: Start of 'ora.crsd' on 'rac01' succeeded
CRS-4256: Updating the profile
Successful addition of voting disk 15654bd847724f5ebffb8d510d0fb820.
Successfully replaced voting disk group with +DATA.
CRS-4256: Updating the profile
CRS-4266: Voting file(s) successfully replaced
##  STATE    File Universal Id                File Name Disk group
--  -----    -----------------                --------- ---------
 1. ONLINE   15654bd847724f5ebffb8d510d0fb820 (/dev/asm-diskb) [DATA]
Located 1 voting disk(s).
CRS-2791: Starting shutdown of Oracle High Availability Services-managed resources on 'rac01'
CRS-2673: Attempting to stop 'ora.crsd' on 'rac01'
CRS-2677: Stop of 'ora.crsd' on 'rac01' succeeded
CRS-2673: Attempting to stop 'ora.storage' on 'rac01'
CRS-2673: Attempting to stop 'ora.mdnsd' on 'rac01'
CRS-2673: Attempting to stop 'ora.gpnpd' on 'rac01'
CRS-2677: Stop of 'ora.storage' on 'rac01' succeeded
CRS-2673: Attempting to stop 'ora.ctssd' on 'rac01'
CRS-2673: Attempting to stop 'ora.evmd' on 'rac01'
CRS-2673: Attempting to stop 'ora.asm' on 'rac01'
CRS-2677: Stop of 'ora.mdnsd' on 'rac01' succeeded
CRS-2677: Stop of 'ora.gpnpd' on 'rac01' succeeded
CRS-2677: Stop of 'ora.ctssd' on 'rac01' succeeded
CRS-2677: Stop of 'ora.evmd' on 'rac01' succeeded
CRS-2677: Stop of 'ora.asm' on 'rac01' succeeded
CRS-2673: Attempting to stop 'ora.cluster_interconnect.haip' on 'rac01'
CRS-2677: Stop of 'ora.cluster_interconnect.haip' on 'rac01' succeeded
CRS-2673: Attempting to stop 'ora.cssd' on 'rac01'
CRS-2677: Stop of 'ora.cssd' on 'rac01' succeeded
CRS-2673: Attempting to stop 'ora.crf' on 'rac01'
CRS-2677: Stop of 'ora.crf' on 'rac01' succeeded
CRS-2673: Attempting to stop 'ora.gipcd' on 'rac01'
CRS-2677: Stop of 'ora.gipcd' on 'rac01' succeeded
CRS-2793: Shutdown of Oracle High Availability Services-managed resources on 'rac01' has completed
CRS-4133: Oracle High Availability Services has been stopped.
CRS-4123: Starting Oracle High Availability Services-managed resources
CRS-2672: Attempting to start 'ora.mdnsd' on 'rac01'
CRS-2672: Attempting to start 'ora.evmd' on 'rac01'
CRS-2676: Start of 'ora.mdnsd' on 'rac01' succeeded
CRS-2676: Start of 'ora.evmd' on 'rac01' succeeded
CRS-2672: Attempting to start 'ora.gpnpd' on 'rac01'
CRS-2676: Start of 'ora.gpnpd' on 'rac01' succeeded
CRS-2672: Attempting to start 'ora.gipcd' on 'rac01'
CRS-2676: Start of 'ora.gipcd' on 'rac01' succeeded
CRS-2672: Attempting to start 'ora.cssdmonitor' on 'rac01'
CRS-2676: Start of 'ora.cssdmonitor' on 'rac01' succeeded
CRS-2672: Attempting to start 'ora.cssd' on 'rac01'
CRS-2672: Attempting to start 'ora.diskmon' on 'rac01'
CRS-2676: Start of 'ora.diskmon' on 'rac01' succeeded
CRS-2676: Start of 'ora.cssd' on 'rac01' succeeded
CRS-2672: Attempting to start 'ora.cluster_interconnect.haip' on 'rac01'
CRS-2672: Attempting to start 'ora.ctssd' on 'rac01'
CRS-2676: Start of 'ora.ctssd' on 'rac01' succeeded
CRS-2676: Start of 'ora.cluster_interconnect.haip' on 'rac01' succeeded
CRS-2672: Attempting to start 'ora.asm' on 'rac01'
CRS-2676: Start of 'ora.asm' on 'rac01' succeeded
CRS-2672: Attempting to start 'ora.storage' on 'rac01'
CRS-2676: Start of 'ora.storage' on 'rac01' succeeded
CRS-2672: Attempting to start 'ora.crf' on 'rac01'
CRS-2676: Start of 'ora.crf' on 'rac01' succeeded
CRS-2672: Attempting to start 'ora.crsd' on 'rac01'
CRS-2676: Start of 'ora.crsd' on 'rac01' succeeded
CRS-6023: Starting Oracle Cluster Ready Services-managed resources
CRS-6017: Processing resource auto-start for servers: rac01
CRS-6016: Resource auto-start has completed for server rac01
CRS-6024: Completed start of Oracle Cluster Ready Services-managed resources
CRS-4123: Oracle High Availability Services has been started.
2021/01/18 23:48:05 CLSRSC-343: Successfully started Oracle Clusterware stack
CRS-2672: Attempting to start 'ora.asm' on 'rac01'
CRS-2676: Start of 'ora.asm' on 'rac01' succeeded
CRS-2672: Attempting to start 'ora.DATA.dg' on 'rac01'
CRS-2676: Start of 'ora.DATA.dg' on 'rac01' succeeded
2021/01/18 23:49:04 CLSRSC-325: Configure Oracle Grid Infrastructure for a Cluster ... succeeded
- 节点 2
[root@rac02 ~]# /u01/app/12.1.0/grid/root.sh
Performing root user operation.
The following environment variables are set as:
    ORACLE_OWNER= grid
    ORACLE_HOME=  /u01/app/12.1.0/grid
Enter the full pathname of the local bin directory: [/usr/local/bin]:
   Copying dbhome to /usr/local/bin ...
   Copying oraenv to /usr/local/bin ...
   Copying coraenv to /usr/local/bin ...
Creating /etc/oratab file...
Entries will be added to the /etc/oratab file as needed by
Database Configuration Assistant when a database is created
Finished running generic part of root script.
Now product-specific root actions will be performed.
Using configuration parameter file: /u01/app/12.1.0/grid/crs/install/crsconfig_params
2021/01/18 23:50:59 CLSRSC-4001: Installing Oracle Trace File Analyzer (TFA) Collector.
2021/01/18 23:51:23 CLSRSC-4002: Successfully installed Oracle Trace File Analyzer (TFA) Collector
2021/01/18 23:51:23 CLSRSC-363: User ignored prerequisites during installation
OLR initialization - successful
2021/01/18 23:52:30 CLSRSC-330: Adding Clusterware entries to file 'oracle-ohasd.service'
CRS-4133: Oracle High Availability Services has been stopped.
CRS-4123: Oracle High Availability Services has been started.
CRS-4133: Oracle High Availability Services has been stopped.
CRS-4123: Oracle High Availability Services has been started.
CRS-4133: Oracle High Availability Services has been stopped.
CRS-4123: Starting Oracle High Availability Services-managed resources
CRS-2672: Attempting to start 'ora.mdnsd' on 'rac02'
CRS-2672: Attempting to start 'ora.evmd' on 'rac02'
CRS-2676: Start of 'ora.mdnsd' on 'rac02' succeeded
CRS-2676: Start of 'ora.evmd' on 'rac02' succeeded
CRS-2672: Attempting to start 'ora.gpnpd' on 'rac02'
CRS-2676: Start of 'ora.gpnpd' on 'rac02' succeeded
CRS-2672: Attempting to start 'ora.gipcd' on 'rac02'
CRS-2676: Start of 'ora.gipcd' on 'rac02' succeeded
CRS-2672: Attempting to start 'ora.cssdmonitor' on 'rac02'
CRS-2676: Start of 'ora.cssdmonitor' on 'rac02' succeeded
CRS-2672: Attempting to start 'ora.cssd' on 'rac02'
CRS-2672: Attempting to start 'ora.diskmon' on 'rac02'
CRS-2676: Start of 'ora.diskmon' on 'rac02' succeeded
CRS-2676: Start of 'ora.cssd' on 'rac02' succeeded
CRS-2672: Attempting to start 'ora.cluster_interconnect.haip' on 'rac02'
CRS-2672: Attempting to start 'ora.ctssd' on 'rac02'
CRS-2676: Start of 'ora.ctssd' on 'rac02' succeeded
CRS-2676: Start of 'ora.cluster_interconnect.haip' on 'rac02' succeeded
CRS-2672: Attempting to start 'ora.asm' on 'rac02'
CRS-2676: Start of 'ora.asm' on 'rac02' succeeded
CRS-2672: Attempting to start 'ora.storage' on 'rac02'
CRS-2676: Start of 'ora.storage' on 'rac02' succeeded
CRS-2672: Attempting to start 'ora.crf' on 'rac02'
CRS-2676: Start of 'ora.crf' on 'rac02' succeeded
CRS-2672: Attempting to start 'ora.crsd' on 'rac02'
CRS-2676: Start of 'ora.crsd' on 'rac02' succeeded
CRS-6017: Processing resource auto-start for servers: rac02
CRS-2672: Attempting to start 'ora.net1.network' on 'rac02'
CRS-2676: Start of 'ora.net1.network' on 'rac02' succeeded
CRS-2672: Attempting to start 'ora.ons' on 'rac02'
CRS-2676: Start of 'ora.ons' on 'rac02' succeeded
CRS-6016: Resource auto-start has completed for server rac02
CRS-6024: Completed start of Oracle Cluster Ready Services-managed resources
CRS-4123: Oracle High Availability Services has been started.
2021/01/18 23:56:30 CLSRSC-343: Successfully started Oracle Clusterware stack
2021/01/18 23:56:48 CLSRSC-325: Configure Oracle Grid Infrastructure for a Cluster ... succeeded
扫码关注公众号,获取最新发布。


 浙公网安备 33010602011771号