
Django+微信公众号开发小项目
最近搞了点事情,因为web.py对微信公众号开发时不方便扩展和复用,使用Django开发微信公众号。使用celery推送模板消息到用户微信上,最终方便以后重复利用和功能增加。
01 准备
-
python3环境
-
微信公众号
-
可用域名
-
Mysql数据库
-
redis数据库
02 公众号配置
管理员在微信公众号中的基本配置中需要获取开发者 AppID 和 AppSecret 两个值,并保存下来。
获取 AppSecret 的值后,会出现IP白名单。
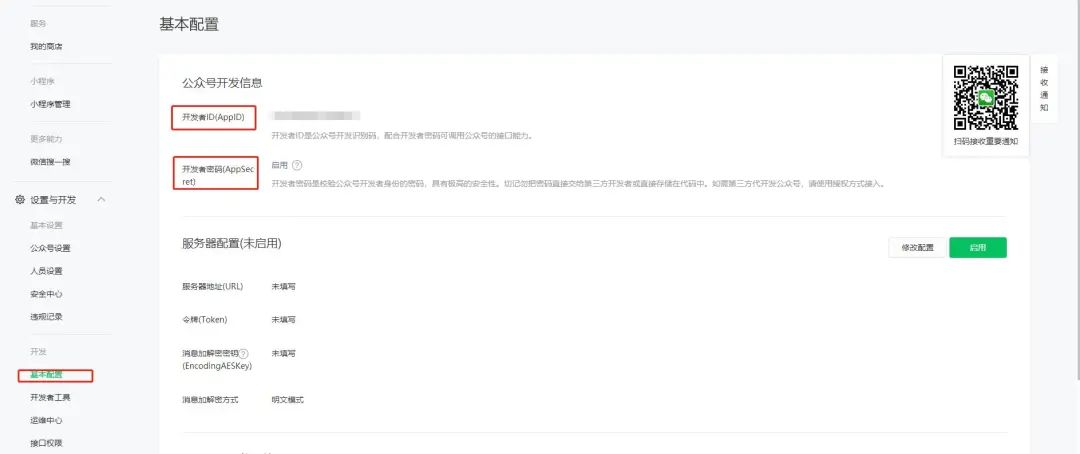
管理员设置IP白名单,在调用access_token接口的时候起到保护作用。

管理员设置服务器配置。

此时不用点击提交按钮,因为我们还没有开发响应的web监听服务。
03 开发
创建虚拟环境
创建app应用
python manager.py startapp userInfo
settings.py注册应用
INSTALLED_APPS = [
    ...,
    'userInfo',
]
配置访问路由
在userInfo应用中创建urls.py文件,并配置视图函数。
from django.conf.urls import url
from . import views

urlpatterns = [
    url("message/$", views.Message.as_view(), name='message'),
]
编辑views.py文件进行微信公众号后台服务对接
对接之前,先安装wechatpy、djangorestframework
pip install wechatpy[cryptography]
pip install djangorestframework
修改settings.py
INSTALLED_APPS = [
    ...,
    'rest-framework',
]
参考:
wechatpy使用文档:
微信公众号文档:
3.1用户信息获取


from rest_framework.views import APIView
from wechatpy.utils import check_signature
from wechatpy import parse_message, create_reply
from wechatpy.exceptions import InvalidSignatureException


class Message(APIView):
    def get(self, request):
        signature = request.GET.get('signature', '')
        timestamp = request.GET.get('timestamp', '')
        nonce = request.GET.get('nonce', '')
        echostr = request.GET.get('echostr', '')
        token = wx_config.get("token")
        try:
            check_signature(token, signature, timestamp, nonce)
        except InvalidSignatureException:
            echostr = '错误的请求'
        response = HttpResponse(echostr)
        return response

    def post(self, request):
        msg = parse_message(request.body)
        wel_msg = "欢迎关注微信公众号:程序员9527"
        openid = msg.source  # 获取用户openid
        if msg.type == 'text':
            reply = create_reply(content, msg)
        elif msg.type == 'image':
            reply = create_reply(content, msg)
        elif msg.type == 'voice':
            reply = create_reply(content, msg)
        else:
            reply = create_reply(content, msg)
        if hasattr(msg, 'event') and msg.event == "subscribe":
            print("用户关注", openid)
        elif hasattr(msg, 'event') and msg.event == 'unsubscribe':
            print("取消关注", openid)
        response = HttpResponse(reply.render(), content_type="application/xml")
        return response
根据微信公众号文档的实例代码,对微信服务器推送的消息进行验证并返回。
from wechatpy.utils import check_signature
from wechatpy.exceptions import InvalidSignatureException

try:
    check_signature(token, signature, timestamp, nonce)
except InvalidSignatureException:
    # 处理异常情况或忽略
解析微信服务器推送过来的xml
from wechatpy import parse_message
msg = parse_message(xml)
公共属性
| name | value |
|---|---|
| id | 消息 id, 64 位整型。 |
| source | 消息的来源用户,即发送消息的用户。 |
| target | 消息的目标用户。 |
| create_time | 消息的发送时间,UNIX 时间戳 |
| type | 消息的类型 |
成功启动微信公众号后台后配置access_token接口
在userInfo/urls.py中配置路由
from django.conf.urls import url
from . import views

urlpatterns = [
    url("message/$", views.Message.as_view(), name='message'),
    url("access/token/$", views.AccessToken.as_view(), name='token'),
]
pip install redis
![]()
在项目的根目录下创建config.ini配置文件
[wechat]
token = 公众号token
appid = 公众号AppID
appsecret = 公众号AppSecret
token_exp = access_toke过期时间
token_url = access_token的访问地址
3.2 获取access_token
view.py
import redis
import requests
import configparser

r = redis.Redis(host='localhost', port=6379, db=1, decode_responses=True)  # 创建redis对象
config = configparser.ConfigParser()
config.read(settings.WECHAT, encoding="utf-8")
wx_config = config.items("wechat")
wx_config = dict(map(lambda x: [x[0], x[1]], wx_config))
wx_config.update({"token_exp": int(wx_config.get("token_exp"))})


class AccessToken(APIView):
    def get(self, request):
        access_token = r.get("access_token")  # 从redis中获取ACCESS_TOKEN
        ifnot access_token:
            appid = wx_config.get("appid")
            appsecret = wx_config.get("appsecret")
            token_api = wx_config.get("token_api")
            exp = wx_config.get("token_exp")
            api = token_api.format(appid=appid, secret=appsecret)
            response = requests.get(api, headers=settings.HEADER).json()
            access_token = response.get("access_token")
            r.setex('access_token', exp, access_token)
        return JsonResponse({"code": 1, "token": access_token})
使用redis缓存access_token,避免每次都调用公众号接口,详情请看接口权限

调用接口,验证是否能获得access_token

3.3模板消息
配置
在公众号中配置要发送的消息模板

配置好模板ID以后,接下来使用celery进行任务执行。
pip install celery
创建celery_tasks包文件,配置相关celery信息
celery_tasks/main.py文件
from celery import Celery


celery_app = Celery('wechat_template')

# 导入配置文件
celery_app.config_from_object('celery_tasks.config')

# 自动注册celery任务
celery_app.autodiscover_tasks(['celery_tasks.sends'])
celery_tasks/config.py
broker_url = "redis://127.0.0.1/9"
result_backend = "redis://127.0.0.1/10"
创建celery_tasks/sends包,新建tasks.py
# -*-coding=utf-8 -*-
import json
import time
import requests
from celery_tasks.logs import Logger
from celery_tasks.main import celery_app

token_url = "你自己的access_token"
# 模板消息api
model_url = 'https://api.weixin.qq.com/cgi-bin/message/template/send?access_token={access_token}'

def request_model(temp_dict):
    """发送模板消息网络请求"""
    if temp_dict:
        token_str = requests.get(token_url).json()
        access_token = token_str.get('token')
        # model_url api接口
        send_url = model_url.format(access_token=access_token)
        try:
            for _ in range(3):
                response = requests.post(send_url, json=temp_dict)
                res_dict = json.loads(response.text)
                if res_dict.get('errcode') == 0:
                    returnTrue
                else:
                    msg = '发送模板id:' + temp_dict.get("template_id") + "发送出错,错误信息为" + str(res_dict) + '\n'
                    with open('msg.log', 'a+', encoding="utf-8") as f:
                        f.write(msg)
                    time.sleep(1)
        except Exception as e:
            log.logger.info(temp_dict.get("template_id") + "发送出错,错误信息为:" + str(e))
            return str(e)


@celery_app.task(name='send_server_sign')
def send_server_sign(openid=None, temp_id=None, **kwargs):
    """
    签约提醒
    """
    temp_dict = {
        "touser": openid,
        "template_id": temp_id,
        "data": {
            "first": {
                "value": '尊敬的客户,您已成功购买我司产品!',
                "color": "#FF0000"
            },
            "keyword1": {
                "value": kwargs.get("name"),
                "color": "#FF0000"
            },
            "keyword2": {
                "value": "{}至{}".format(kwargs.get("start_time"), kwargs.get("end_time")),
                "color": "#000000"
            },
            "remark": {
                "value":  "如您有任何疑问或咨询,请联系我司客服人员。",
                "color": "#000000"
            }
        }
    }
    status = request_model(temp_dict)
    return status
启动celery命令
celery multi start worker -A celery_tasks.main -l info --pool=gevent --concurrency=60 --logfile=celery.log
![]()
celery停止
celery multi stop worker -A celery_tasks.main -l info
views.py
from django.conf import settings
from rest_framework.views import APIView
from django.http import JsonResponse
from celery_tasks.sends.tasks import send_server_msg, send_server_sign

config = settings.EXPORT_CONFIG

class Complete(APIView):
    def get(self, request):

        items = {
            'url': 'http://www.baidu.com',
            'name': '杂品',
            'title': '基金收益优势凸显 吸引各家公募密集布局',
            'about': '测试数据:11省份同比上涨,但涨幅低于全国'
        }
        openid = "asdasPh0AfSasdasddsadwf"
        status = send_server_msg.delay(openid=openid, temp_id=config.get("modelID").get("complete_msg"), **items)
        return JsonResponse({"code": 1, 'msg': str(status)})


class SignMsg(APIView):
    def get(self, request):
        name = request.GET.get('name')  # 服务名称
        start_time = request.GET.get('start_time')  # 服务签约时间
        end_time = request.GET.get('end_time')  # 服务到期时间
        openid = request.GET.get('openid')  # 用户openid

        items = {"name": name, "start_time": start_time, "end_time": end_time}
        model_server_sign = config.get("modelID").get("sign_msg")
        status = send_server_sign.delay(openid=openid, temp_id=model_server_sign, **items)
        return JsonResponse({"code": 1, 'msg': str(status), 'model_server_sign': model_server_sign})
执行结果

以上就是用django和微信公众号开发的所有内容了,希望对大家有所帮助有问题可以联系作者。
感兴趣的可以关注作者微信公众号:程序员9527。


 浙公网安备 33010602011771号