

Linux高级网络设置——将多个网卡设置成一个网卡
Linux下可以设置网卡模式
模式0:负载均衡
模式1:主备模式,不提高网络带宽
模式3:多网卡同时发送相同的数据
准备实验环境:
Redhat 6.4 企业版64位,最小化安装。
给虚拟机添加网卡


此时我虚拟机有2块网卡,但是真正启用工作的只有一块,使用ifconfig也只能看到一块网卡。ifconfig -a可以看到我们加入的另一块网卡,此时这块网卡还没有启用。
[root@51cto network-scripts]# ifconfig -a
eth0      Link encap:Ethernet  HWaddr 00:0C:29:82:AA:8B
          inet addr:192.168.80.222  Bcast:192.168.80.255  Mask:255.255.255.0
          inet6 addr: fe80::20c:29ff:fe82:aa8b/64 Scope:Link
          UP BROADCAST RUNNING MULTICAST  MTU:1500  Metric:1
          RX packets:114 errors:0 dropped:0 overruns:0 frame:0
          TX packets:91 errors:0 dropped:0 overruns:0 carrier:0
          collisions:0 txqueuelen:1000
          RX bytes:11152 (10.8 KiB)  TX bytes:12126 (11.8 KiB)

eth1      Link encap:Ethernet  HWaddr 00:0C:29:82:AA:95
          BROADCAST MULTICAST  MTU:1500  Metric:1
          RX packets:0 errors:0 dropped:0 overruns:0 frame:0
          TX packets:0 errors:0 dropped:0 overruns:0 carrier:0
          collisions:0 txqueuelen:1000
          RX bytes:0 (0.0 b)  TX bytes:0 (0.0 b)

lo        Link encap:Local Loopback
          inet addr:127.0.0.1  Mask:255.0.0.0
          inet6 addr: ::1/128 Scope:Host
          UP LOOPBACK RUNNING  MTU:16436  Metric:1
          RX packets:0 errors:0 dropped:0 overruns:0 frame:0
          TX packets:0 errors:0 dropped:0 overruns:0 carrier:0
          collisions:0 txqueuelen:0
          RX bytes:0 (0.0 b)  TX bytes:0 (0.0 b)
可见原来的那块网卡IP没变,新加的网卡没有IP。现在将两块网卡绑定成一块网卡,并设置新地址为192.168.80.240。这就要求这两个网卡各自不设置地址,绑定后设置公共地址。
具体流程如下:
①创建绑定网卡的配置文件
[root@51cto network-scripts]# vi /etc/sysconfig/network-scripts/ifcfg-bond0
[root@51cto network-scripts]# cat ifcfg-bond0
DEVICE=bond0
IPADDR=192.168.80.240
PREFIX=24
GATEWAY=192.168.80.1
ONBOOT=yes
BOOTPROTO=none
USERCTL=no
BONDING_OPTS="mode=0 miimon=50"
miimon= — Specifies (in milliseconds) how often MII link monitoring occurs. This is useful if high availability is required because MII is used to verify that the NIC is active. To verify that the driver for a particular NIC supports the MII tool, type the following command as root:
ethtool <interface-name> | grep "Link detected:"
In this command, replace <interface-name> with the name of the device interface, such as eth0, not the bond interface. If MII is supported, the command returns:
Link detected: yes
If using a bonded interface for high availability, the module for each NIC must support MII.
Setting the value to 0 (the default), turns this feature off. When configuring this setting, a good starting point for this parameter is 100.
更多参考:Link monitoring
网卡配置文件各个字段含义参考:Interface Configuration
②更改网卡配置文件
[root@51cto network-scripts]# cat ifcfg-eth0
DEVICE=eth0
ONBOOT=yes
BOOTPROTO=none
MASTER=bond0
SLAVE=yes
USERCTL=no
[root@51cto network-scripts]# cat ifcfg-eth1
DEVICE=eth1
ONBOOT=yes
BOOTPROTO=none
MASTER=bond0
SLAVE=yes
USERCTL=no
③添加驱动支持
[root@51cto modprobe.d]# pwd
/etc/modprobe.d
[root@51cto modprobe.d]# ls
anaconda.conf  blacklist.conf  dist-alsa.conf  dist.conf  dist-oss.conf  openfwwf.conf
[root@51cto modprobe.d]#  vi /etc/modprobe.d/bonding.conf
[root@51cto modprobe.d]# cat bonding.conf
alias bond0 bonding
④重启网络服务

在xshell中测试,192.168.80.222这个绑定前的IP不通了,绑定后的公共IP通
[c:\~]$ ping 192.168.80.222

正在 Ping 192.168.80.222 具有 32 字节的数据:
请求超时。

192.168.80.222 的 Ping 统计信息:
    数据包: 已发送 = 1,已接收 = 0,丢失 = 1 (100% 丢失),
^C
[c:\~]$ ping 192.168.80.240

正在 Ping 192.168.80.240 具有 32 字节的数据:
来自 192.168.80.240 的回复: 字节=32 时间<1ms TTL=64
来自 192.168.80.240 的回复: 字节=32 时间<1ms TTL=64

192.168.80.240 的 Ping 统计信息:
    数据包: 已发送 = 2,已接收 = 2,丢失 = 0 (0% 丢失),
往返行程的估计时间(以毫秒为单位):
    最短 = 0ms,最长 = 0ms,平均 = 0ms
查看绑定的配置,显示网卡工作模式为负载均衡
[root@51cto ~]# cat /proc/net/bonding/bond0
Ethernet Channel Bonding Driver: v3.6.0 (September 26, 2009)
Ethernet Channel Bonding Driver: v3.6.0 (September 26, 2009)
Bonding Mode: load balancing (round-robin)
MII Status: up
MII Polling Interval (ms): 50
Up Delay (ms): 0
Down Delay (ms): 0
MII Status: up
MII Polling Interval (ms): 50
Up Delay (ms): 0
Down Delay (ms): 0
Slave Interface: eth0
MII Status: up
Speed: 1000 Mbps
Duplex: full
Link Failure Count: 0
Permanent HW addr: 00:0c:29:82:aa:8b
Slave queue ID: 0
MII Status: up
Speed: 1000 Mbps
Duplex: full
Link Failure Count: 0
Permanent HW addr: 00:0c:29:82:aa:8b
Slave queue ID: 0
Slave Interface: eth1
MII Status: up
Speed: 1000 Mbps
Duplex: full
Link Failure Count: 0
Permanent HW addr: 00:0c:29:82:aa:95
Slave queue ID: 0
MII Status: up
Speed: 1000 Mbps
Duplex: full
Link Failure Count: 0
Permanent HW addr: 00:0c:29:82:aa:95
Slave queue ID: 0
验证网卡工作状态是否是负载均衡
物理机上保持ping 192.168.80.240,在虚拟机系统里面每隔几秒钟执行ifconfig查看发送接收数据包变化。

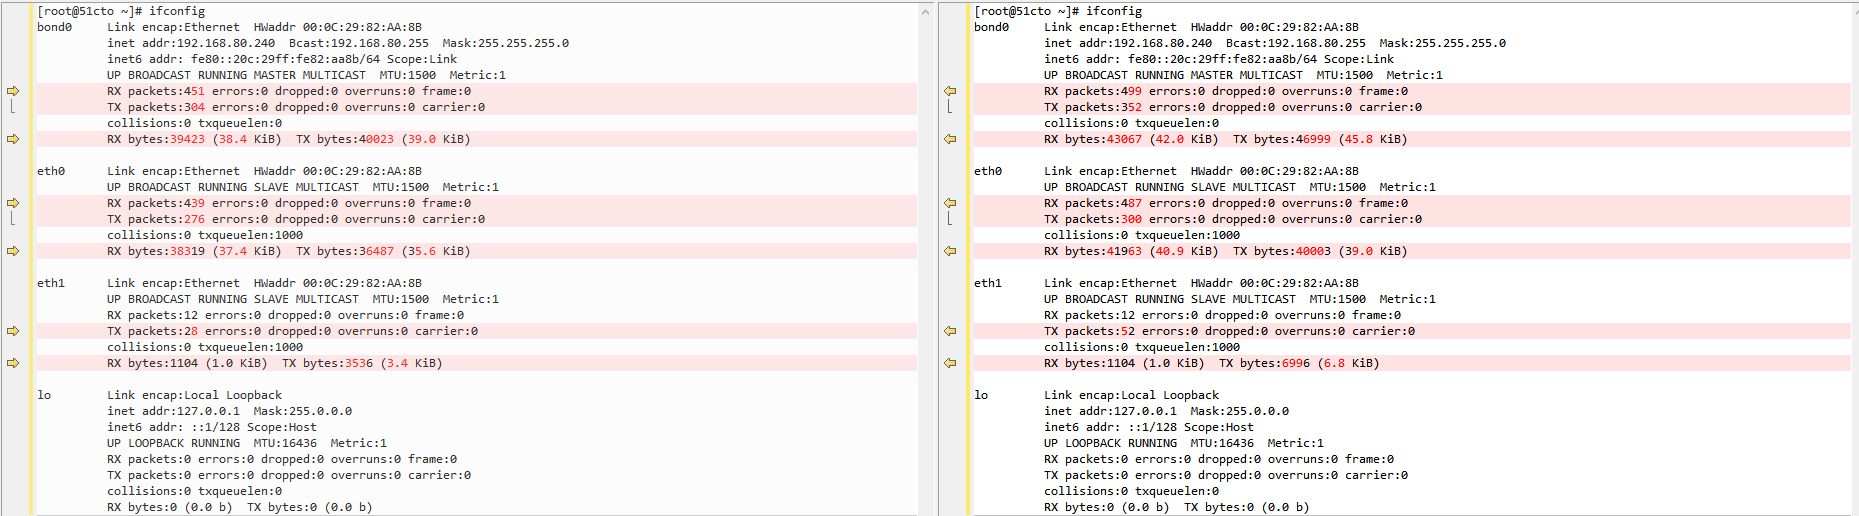
但是这种验证方法太笨
借助watch命令,可以设置间隔多少时间执行一次ifconfig
watch -n 5 ifconfig
上面验证的是负载均衡模式,如果是主备模式至于需要在ifcfg-bond0配置文件里面吧模式改为0即可
如果需要拔掉虚拟机的网卡,如下设置


 浙公网安备 33010602011771号