CDH使用Solr实现HBase二级索引
二、实时查询方案
三、部署流程
3.1 安装HBase、Solr
3.2 增加HBase复制功能
3.3创建相应的 SolrCloud 集合
3.4 创建 Lily HBase Indexer 配置
3.5创建 Morphline 配置文件
3.6 注册 Lily HBase Indexer Configuration 和 Lily HBase Indexer Service
3.7 同步数据
3.8批量同步索引
3.9 设置多个indexer
四、数据的增删改查
4.1 增加
4.2更新
4.3删除
4.4 总结
五、 扩展命令
六、F&Q
6.1创建indexer失败,原来indexer已经存在
6.2创建indexer失败
6.3使用自带的indexer工具批量同步索引失败,提示找不到morphlines.conf
6.4使用自带的indexer工具批量同步索引失败,提示找不到solrconfig.xml
6.5使用自带的indexer工具批量同步索引失败,提示找不到Java heap space
6.6 HBaseIndexer启动后一会儿就自动退出
6.7 HBaseIndexer同步的数据与Solr不一致
6.8 出现了6.7的问题之后,修改了read-row="never"后,丢失部分字段
一、为什么要使用Solr做二级索引
在Hbase中,表的RowKey 按照字典排序, Region按照RowKey设置split point进行shard,通过这种方式实现的全局、分布式索引. 成为了其成功的最大的砝码。
然而单一的通过RowKey检索数据的方式,不再满足更多的需求,查询成为Hbase的瓶颈,人们更加希望像Sql一样快速检索数据,可是,Hbase之前定位的是大表的存储,要进行这样的查询,往往是要通过类似Hive、Pig等系统进行全表的MapReduce计算,这种方式既浪费了机器的计算资源,又因高延迟使得应用黯然失色。于是,针对HBase Secondary Indexing的方案出现了。
Solr
Solr是一个独立的企业级搜索应用服务器,是Apache Lucene项目的开源企业搜索平台,
其主要功能包括全文检索、命中标示、分面搜索、动态聚类、数据库集成,以及富文本(如Word、PDF)的处理。Solr是高度可扩展的,并提供了分布式搜索和索引复制。Solr 4还增加了NoSQL支持,以及基于Zookeeper的分布式扩展功能SolrCloud。SolrCloud的说明可以参看:SolrCloud分布式部署。它的主要特性包括:高效、灵活的缓存功能,垂直搜索功能,Solr是一个高性能,采用Java5开发,基于Lucene的全文搜索服务器。同时对其进行了扩展,提供了比Lucene更为丰富的查询语言,同时实现了可配置、可扩展并对查询性能进行了优化,并且提供了一个完善的功能管理界面,是一款非常优秀的全文搜索引擎。
Solr可以高亮显示搜索结果,通过索引复制来提高可用,性,提供一套强大Data Schema来定义字段,类型和设置文本分析,提供基于Web的管理界面等。
Key-Value Store Indexer
这个组件非常关键,是Hbase到Solr生成索引的中间工具。
在CDH5.3.2中的Key-Value Indexer使用的是Lily HBase NRT Indexer服务.
Lily HBase Indexer是一款灵活的、可扩展的、高容错的、事务性的,并且近实时的处理HBase列索引数据的分布式服务软件。它是NGDATA公司开发的Lily系统的一部分,已开放源代码。Lily HBase Indexer使用SolrCloud来存储HBase的索引数据,当HBase执行写入、更新或删除操作时,Indexer通过HBase的replication功能来把这些操作抽象成一系列的Event事件,并用来保证写入Solr中的HBase索引数据的一致性。并且Indexer支持用户自定义的抽取,转换规则来索引HBase列数据。Solr搜索结果会包含用户自定义的columnfamily:qualifier字段结果,这样应用程序就可以直接访问HBase的列数据。而且Indexer索引和搜索不会影响HBase运行的稳定性和HBase数据写入的吞吐量,因为索引和搜索过程是完全分开并且异步的。Lily HBase Indexer在CDH5中运行必须依赖HBase、SolrCloud和Zookeeper服务。
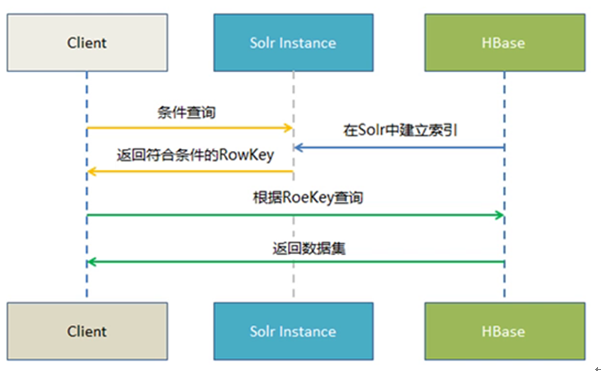
二、实时查询方案
Hbase —–> Key Value Store —> Solr ——-> Web前端实时查询展示
1.Hbase 提供海量数据存储
2.Solr提供索引构建与查询
3. Key Value Store 提供自动化索引构建(从Hbase到Solr)
三、部署流程
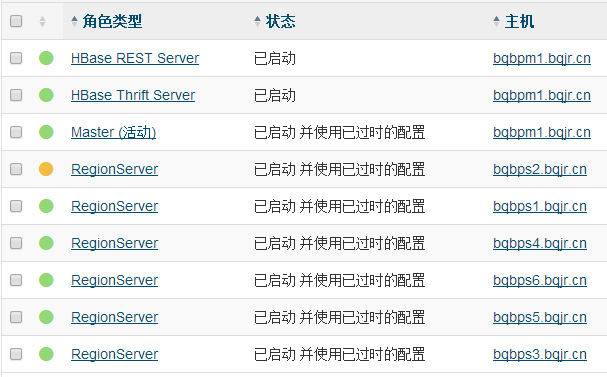
3.1 安装HBase、Solr

HBase的实例
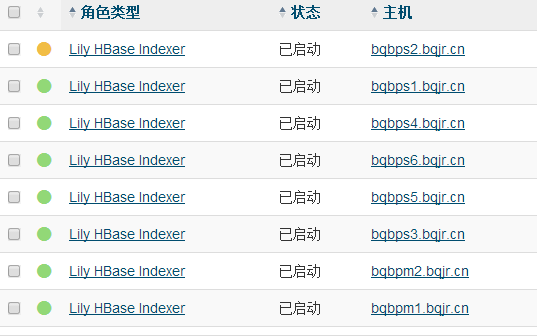
Key-Value Store Indexer的实例(目录在/opt/cloudera/parcels/CDH/lib/hbase-solr)
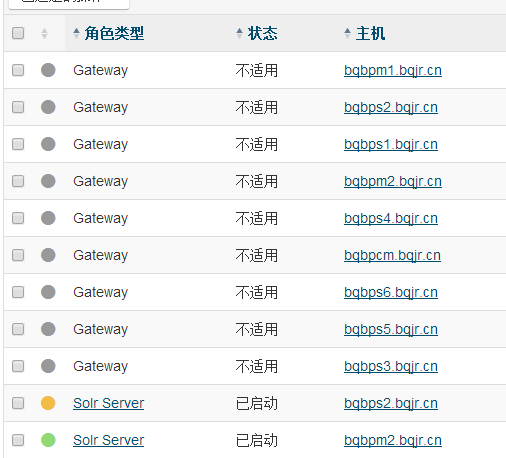
Solr的实例
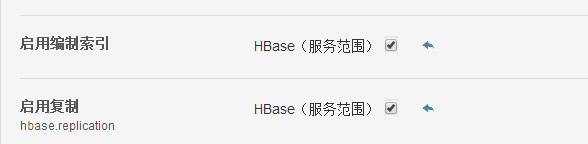
3.2 增加HBase复制功能
默认安装了Key-Value Store Indexer之后就会打开HBase的复制功能
接下来就是对HBase得表进行改造了
对于初次建立得表,可以使用
create 'table',{NAME =>'cf', REPLICATION_SCOPE =>1}#其中1表示开启replication功能,0表示不开启,默认为0
对于已经存在得表,可以
disable 'table'alter 'table',{NAME =>'cf', REPLICATION_SCOPE =>1}enable 'table'
这里,为了测试,我新建一张表,名字叫做
create 'HBase_Indexer_Test',{NAME => 'cf1', REPLICATION_SCOPE => 1}
并插入两条数据
put 'HBase_Indexer_Test','001','cf1:name','xiaoming'put 'HBase_Indexer_Test','002','cf1:name','xiaohua'
3.3创建相应的 SolrCloud 集合
接下来在安装有Solr的机器上运行
这里得路径和用户名都可以自己定义
# 生成实体配置文件:solrctl instancedir --generate $HOME/hbase-indexer/bqjr
此时会在home下生成hbase-indexer/bqjr文件夹,里面包含一个conf文件夹,我们修改下面得schema.xml文件.
我们新建一个filed字段
<fieldname="HBase_Indexer_Test_cf1_name"type="string"indexed="true"stored="true"/>
这里重点解释一下name字段,它对应了我们后续需要修改Morphline.conf文件中的outputField属性。因此可以看成是hbase中需要创建索引的值。因此我们建议将其与表名和列族结合。其对应关系如下
| HBase | Solr |
|---|---|
| name | HBase_Indexer_Test_cf1_name |
再修改solrconfig.xml文件,将硬提交打开(会影响部分性能)
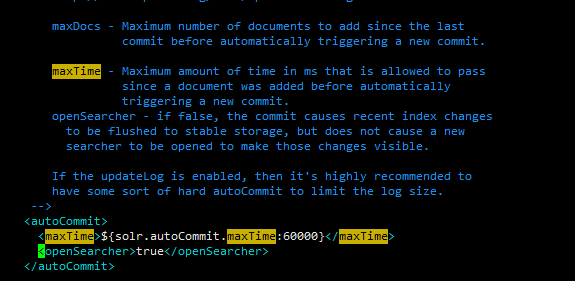
# 创建 collection实例并将配置文件上传到 zookeeper:solrctl instancedir --create bqjr $HOME/hbase-indexer/bqjr# 上传到 zookeeper 之后,其他节点就可以从zookeeper下载配置文件。接下来创建 collection:solrctl collection --create bqjr
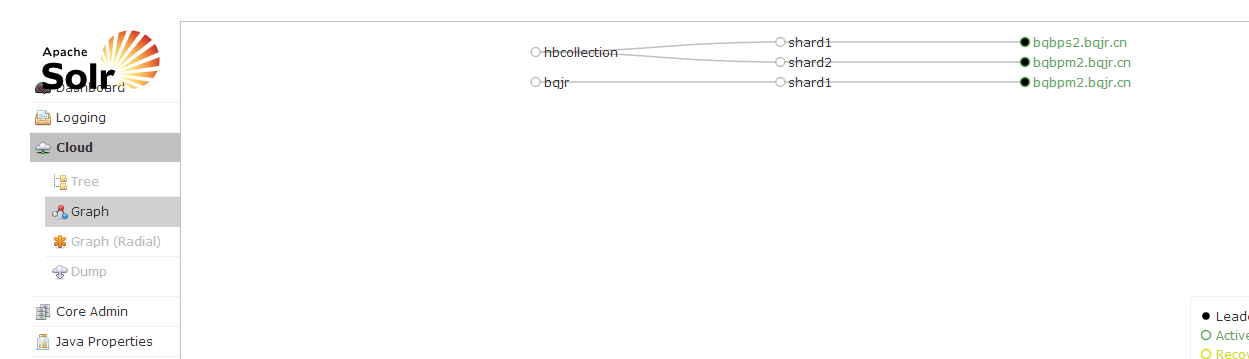
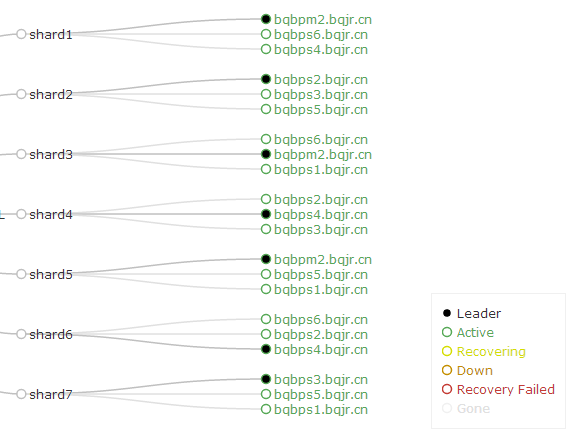
如果希望将数据分散到各个节点进行存储和检索,则需要创建多个shard,需要使用如下命令
solrctl collection --create bqjr -s 7-r 3-m 21
其中-s表示设置Shard数为7,-r表示设置的replica数为3,-m表示最大shards数目(7*3)
3.4 创建 Lily HBase Indexer 配置
在前面定义的$HOME/hbase-indexer/bqjr目录下,创建一个morphline-hbase-mapper.xml文件,内容如下:
<?xml version="1.0"?><!-- table:需要索引的HBase表名称--><!-- mapper:用来实现和读取指定的Morphline配置文件类,固定为MorphlineResultToSolrMapper--><indexertable="HBase_Indexer_Test"mapper="com.ngdata.hbaseindexer.morphline.MorphlineResultToSolrMapper"read-row="never"><!--param中的name参数用来指定当前配置为morphlineFile文件 --><!--value用来指定morphlines.conf文件的路径,绝对或者相对路径用来指定本地路径,如果是使用Cloudera Manager来管理morphlines.conf就直接写入值morphlines.conf"--><paramname="morphlineFile"value="morphlines.conf"/><!-- The optional morphlineId identifies a morphline if there are multiple morphlines in morphlines.conf --><paramname="morphlineId"value="bqjrMap"/></indexer>
其中:
** indexer table="HBase_Indexer_Test"得table对应HBase的表HBase_Indexer_Test**
**对应了Morphlines.conf 中morphlines 属性id值**
read-row="never"详见 6.7 HBaseIndexer同步的数据与Solr不一致
3.5创建 Morphline 配置文件
通过CM页面进入到Key-Value Store Indexer的配置页面,里面有一个Morphlines文件。我们编辑它
每个Collection对应一个morphline-hbase-mapper.xml

SOLR_LOCATOR :{# Name of solr collectioncollection : bqjr# ZooKeeper ensemblezkHost :"$ZK_HOST"}#注意SOLR_LOCATOR只能设置单个collection,如果我们需要配置多个怎么办呢?后面我们会讲morphlines :[{id : bqjrMapimportCommands :["org.kitesdk.**","com.ngdata.**"]commands :[{extractHBaseCells {mappings :[{inputColumn :"cf1:name"outputField :"HBase_Indexer_Test_cf1_name"type :stringsource : value}]}}{ logDebug { format :"output record: {}", args :["@{}"]}}]}]
其中
** id:表示当前morphlines文件的ID名称。**
** importCommands:需要引入的命令包地址。**
** extractHBaseCells:该命令用来读取HBase列数据并写入到SolrInputDocument对象中,该命令必须包含零个或者多个mappings命令对象。**
** mappings:用来指定HBase列限定符的字段映射。**
** inputColumn:需要写入到solr中的HBase列字段。值包含列族和列限定符,并用‘ : ’分开。其中列限定符也可以使用通配符‘’来表示,譬如可以使用data:表示读取只要列族为data的所有hbase列数据,也可以通过data:my*来表示读取列族为data列限定符已my开头的字段值。
** outputField:用来表示morphline读取的记录需要输出的数据字段名称,该名称必须和solr中的schema.xml文件的字段名称保持一致,否则写入不正确。**
** type:用来定义读取HBase数据的数据类型,我们知道HBase中的数据都是以byte[]的形式保存,但是所有的内容在Solr中索引为text形式,所以需要一个方法来把byte[]类型转换为实际的数据类型。type参数的值就是用来做这件事情的。现在支持的数据类型有:byte,int,long,string,boolean,float,double,short和bigdecimal。当然你也可以指定自定的数据类型,只需要实现com.ngdata.hbaseindexer.parse.ByteArrayValueMapper接口即可。**
** source:用来指定HBase的KeyValue那一部分作为索引输入数据,可选的有‘value’和'qualifier',当为value的时候表示使用HBase的列值作为索引输入,当为qualifier的时候表示使用HBase的列限定符作为索引输入。**
3.6 注册 Lily HBase Indexer Configuration 和 Lily HBase Indexer Service
当 Lily HBase Indexer 配置 XML文件的内容令人满意,将它注册到 Lily HBase Indexer Service。上传 Lily HBase Indexer 配置 XML文件至 ZooKeeper,由给定的 SolrCloud 集合完成此操作。
hbase-indexer add-indexer \--name bqjrIndexer \--indexer-conf $HOME/hbase-indexer/bqjr/morphline-hbase-mapper.xml \--connection-param solr.zk=bqbps1.bqjr.cn:2181,bqbpm1.bqjr.cn:2181,bqbpm2.bqjr.cn:2181/solr \--connection-param solr.collection=bqjr \--zookeeper bqbps1.bqjr.cn:2181,bqbpm1.bqjr.cn:2181,bqbpm2.bqjr.cn:2181
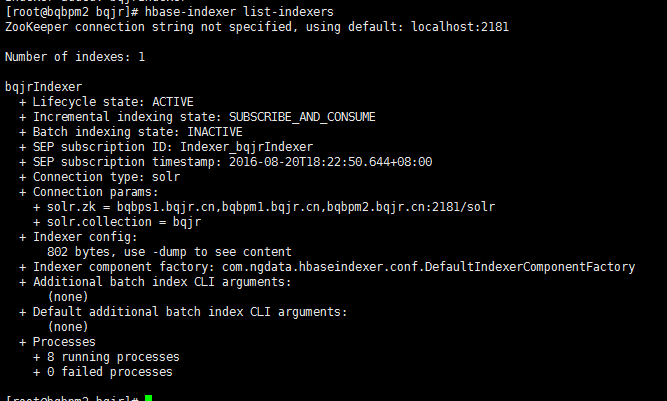
再次运行hbase-indexer list-indexers查看。添加成功
3.7 同步数据
put 'HBase_Indexer_Test','003','cf1:name','xiaofang'put 'HBase_Indexer_Test','004','cf1:name','xiaogang'
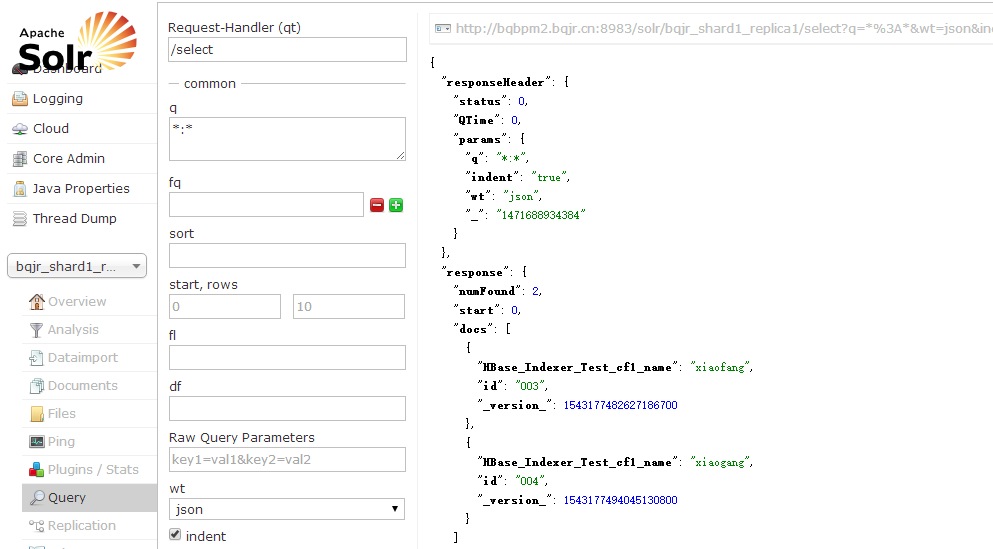
我们进入Solr的查询界面,在q里面输入HBase_Indexer_Test_cf1_name:xiaogang可以看到对应得HBase得rowkey

我们也可以使用:查询全部数据
3.8批量同步索引
仔细观察3.7我们会发现一个问题,我们只记录了后面插入得数据,那原来就存在HBase的数据怎么办呢?
在运行命令的目录下必须有morphlines.conf文件,执行
find / |grep morphlines.conf$

一般我们选择最新的那个process
进入到
/opt/cm-5.7.0/run/cloudera-scm-agent/process/1386-ks_indexer-HBASE_INDEXER/morphlines.conf
或者加上
--morphline-file /opt/cm-5.7.0/run/cloudera-scm-agent/process/1501-ks_indexer-HBASE_INDEXER/morphlines.conf
执行下面的命令
hadoop --config /etc/hadoop/conf \jar /opt/cloudera/parcels/CDH/lib/hbase-solr/tools/hbase-indexer-mr-1.5-cdh5.7.0-job.jar \--conf /etc/hbase/conf/hbase-site.xml \--hbase-indexer-file $HOME/hbase-indexer/bqjr/morphline-hbase-mapper.xml \--zk-host bqbpm1.bqjr.cn:2181,bqbps1.bqjr.cn:2181,bqbpm2.bqjr.cn:2181/solr \--collection bqjr \--go-live

提示找不到solrconfig.xml,这个问题纠结了很久。最终加上reducers--reducers 0就可以了
将修改的
hadoop --config /etc/hadoop/conf \jar /opt/cloudera/parcels/CDH/lib/hbase-solr/tools/hbase-indexer-mr-job.jar \--conf /etc/hbase/conf/hbase-site.xml \--hbase-indexer-file $HOME/hbase-indexer/bqjr/morphline-hbase-mapper.xml \--morphline-file /opt/cm-5.7.0/run/cloudera-scm-agent/process/1501-ks_indexer-HBASE_INDEXER/morphlines.conf \--zk-host bqbpm2.bqjr.cn:2181/solr \--collection bqjr \--reducers 0 \--go-live
3.9 设置多个indexer
每一个Hbase Table对应生成一个Solr的Collection索引,每个索引对应一个Lily HBase Indexer 配置文件morphlines.conf和morphline配置文件morphline-hbase-mapper.xml,其中morphlines.conf可由CDH的Key-Value Store Indexer控制台管理,以id区分
但是我们再CDH中没办法配置多个morphlines.conf文件的,那我们怎么让indexer和collection关联呢?
其实我们仔细回想增加indexer的时候有指定具体的collection,如--connection-param solr.collection=bqjr
所以我们的morphlines.conf可以直接这么写
SOLR_LOCATOR :{# ZooKeeper ensemblezkHost :"$ZK_HOST"}morphlines :[{id : XDGL_ACCT_FEE_MapimportCommands :["org.kitesdk.**","com.ngdata.**"]commands :[{extractHBaseCells {mappings :[{inputColumn :"cf1:ETL_IN_DT"outputField :"XDGL_ACCT_FEE_cf1_ETL_IN_DT"type :stringsource : value}]}}{ logDebug { format :"output record: {}", args :["@{}"]}}]},{id : XDGL_ACCT_PAYMENT_LOG_MapimportCommands :["org.kitesdk.**","com.ngdata.**"]commands :[{extractHBaseCells {mappings :[{inputColumn :"cf1:ETL_IN_DT"outputField :"XDGL_ACCT_PAYMENT_LOG_cf1_ETL_IN_DT"type :stringsource : value}]}}{ logDebug { format :"output record: {}", args :["@{}"]}}]}]
四、数据的增删改查
4.1 增加
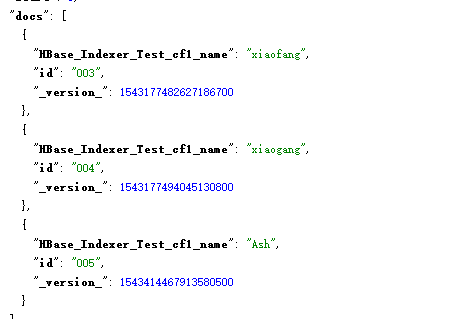
put 'HBase_Indexer_Test','005','cf1:name','bob'

在Solr中新增了一条名为bob的索引
4.2更新
put 'HBase_Indexer_Test','005','cf1:name','Ash'
我们尝试将bob改成Ash,过了几秒,发现Solr也随之更新了
4.3删除
deleteall 'HBase_Indexer_Test','005'
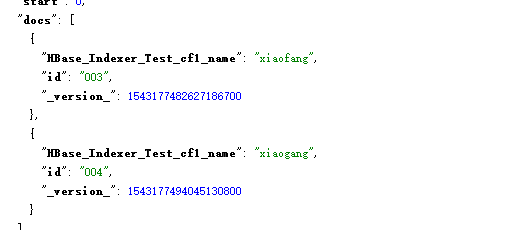
我们删除刚刚插入的005的索引,Solr也跟着删除了
4.4 总结
通过Lily HBase Indexer工具同步到Solr的索引,会很智能的将增删改操作同步过去,完全不用我们操作。非常方便
五、 扩展命令
#solrctlsolrctl instancedir --listsolrctl collection --list# 更新coolection配置solrctl instancedir --update User $HOME/hbase-indexer/Usersolrctl collection --reload User#删除instancedirsolrctl instancedir --deleteUser#删除collectionsolrctl collection --deleteUser#删除collection所有docsolrctl collection --deletedocs User#删除User配置目录rm -rf $HOME/hbase-indexer/User# hbase-indexer# 若修改了morphline-hbase-mapper.xml,需更新索引hbase-indexer update-indexer -n userIndexer# 删除索引hbase-indexer delete-indexer -n userIndexer#查看索引hbase-indexer list-indexers
六、F&Q
6.1创建indexer失败,原来indexer已经存在
执行了hbase-indexer add-indexer命令后发现原来已经存在了indexer

使用hbase-indexer delete-indexer --name $IndxerName删除原来的indexer
6.2创建indexer失败
使用hbase-indexer list-indexers命令,查看是否创建成功
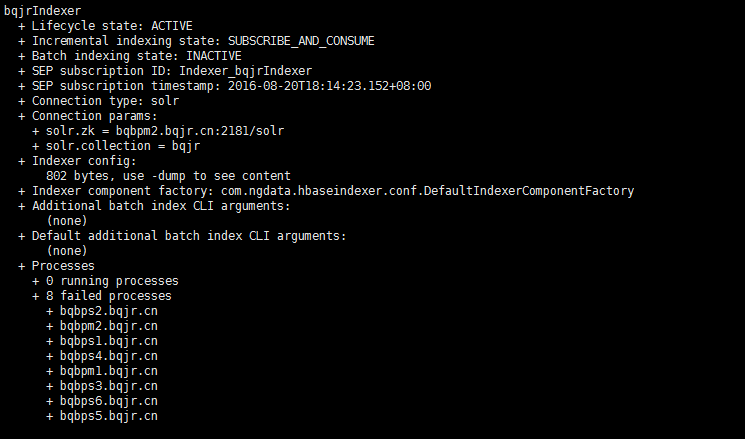
此时我们发现,

说明我们创建失败了。原因是zookeeper我只设置了一个。
错误示例:
hbase-indexer add-indexer \--name bqjrIndexer \--indexer-conf $HOME/hbase-indexer/bqjr/morphline-hbase-mapper.xml \--connection-param solr.zk=bqbpm2.bqjr.cn:2181/solr \--connection-param solr.collection=bqjr \--zookeeper bqbpm2.bqjr.cn:2181
正确示例
hbase-indexer add-indexer \--name bqjrIndexer \--indexer-conf $HOME/hbase-indexer/bqjr/morphline-hbase-mapper.xml \--connection-param solr.zk=bqbps1.bqjr.cn:2181,bqbpm1.bqjr.cn:2181,bqbpm2.bqjr.cn:2181/solr \--connection-param solr.collection=bqjr \--zookeeper bqbps1.bqjr.cn:2181,bqbpm1.bqjr.cn:2181,bqbpm2.bqjr.cn:2181
再次运行hbase-indexer list-indexers查看。这次成功了
6.3使用自带的indexer工具批量同步索引失败,提示找不到morphlines.conf
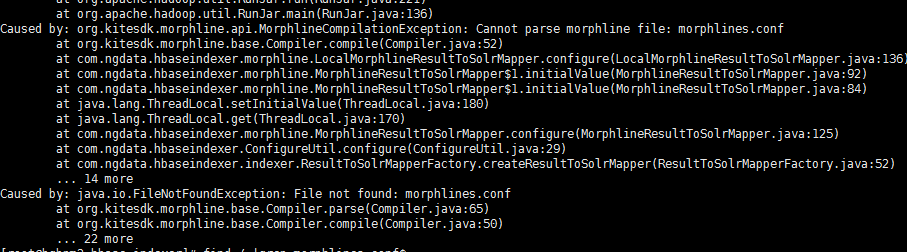
首先,命令中要指定morphlines.conf文件路径和morphline-hbase-mapper.xml文件路径。执行:
find / |grep morphlines.conf$
一般我们选择最新的那个process,我们将其拷贝或者添加到配置项中
进入到
/opt/cm-5.7.0/run/cloudera-scm-agent/process/1386-ks_indexer-HBASE_INDEXER/morphlines.conf
或者加上
--morphline-file /opt/cm-5.7.0/run/cloudera-scm-agent/process/1501-ks_indexer-HBASE_INDEXER/morphlines.conf
执行下面的命令
hadoop --config /etc/hadoop/conf \jar /opt/cloudera/parcels/CDH/lib/hbase-solr/tools/hbase-indexer-mr-1.5-cdh5.7.0-job.jar \--conf /etc/hbase/conf/hbase-site.xml \--hbase-indexer-file $HOME/hbase-indexer/bqjr/morphline-hbase-mapper.xml \--morphline-file /opt/cm-5.7.0/run/cloudera-scm-agent/process/1629-ks_indexer-HBASE_INDEXER/morphlines.conf \--zk-host bqbpm1.bqjr.cn:2181,bqbps1.bqjr.cn:2181,bqbpm2.bqjr.cn:2181/solr \--collection bqjr \--go-live
6.4使用自带的indexer工具批量同步索引失败,提示找不到solrconfig.xml
提示找不到solrconfig.xml,这个问题纠结了很久。最终加上reducers--reducers 0就可以了
hadoop --config /etc/hadoop/conf \jar /opt/cloudera/parcels/CDH/lib/hbase-solr/tools/hbase-indexer-mr-job.jar \--conf /etc/hbase/conf/hbase-site.xml \--hbase-indexer-file $HOME/hbase-indexer/bqjr/morphline-hbase-mapper.xml \--morphline-file /opt/cm-5.7.0/run/cloudera-scm-agent/process/1501-ks_indexer-HBASE_INDEXER/morphlines.conf \--zk-host bqbpm2.bqjr.cn:2181/solr \--collection bqjr \--reducers 0 \--go-live
但是为什么会出现这个问题呢?其实我们犯了一个错误,我们add-indexer的时候,指定的zookeeper信息中有两个节点忘了加端口,写成了
hbase-indexer add-indexer \--name XDGL_WITHHOLD_KFT_INFO \--indexer-conf $HOME/hbase-indexer/XDGL_WITHHOLD_KFT_INFO/morphline-hbase-mapper.xml \--connection-param solr.zk=bqbpm2.bqjr.cn:2181/solr \--connection-param solr.collection=XDGL_WITHHOLD_KFT_INFO \--zookeeper bqbps1.bqjr.cn,bqbpm1.bqjr.cn,bqbpm2.bqjr.cn:2181
所以在其他zookeeper节点找不到solrconfig.xml也正常,我们添加正确后,运行又好了
hadoop --config /etc/hadoop/conf \jar /opt/cloudera/parcels/CDH/lib/hbase-solr/tools/hbase-indexer-mr-1.5-cdh5.7.0-job.jar \--conf /etc/hbase/conf/hbase-site.xml \--hbase-indexer-file $HOME/hbase-indexer/XDGL_ACCT_FEE/morphline-hbase-mapper.xml \--morphline-file /opt/cm-5.7.0/run/cloudera-scm-agent/process/1629-ks_indexer-HBASE_INDEXER/morphlines.conf \--zk-host bqbpm1.bqjr.cn:2181,bqbps1.bqjr.cn:2181,bqbpm2.bqjr.cn:2181/solr \--collection XDGL_ACCT_FEE \--go-live
6.5使用自带的indexer工具批量同步索引失败,提示找不到Java heap space
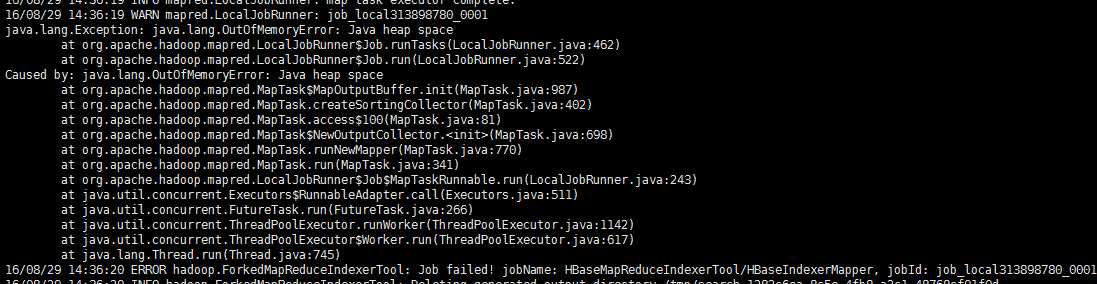
如果启动参数里面带有
-D 'mapred.child.java.opts=-Xmx500m'请删除它,或者调大一点比如-D 'mapred.child.java.opts=-Xmx3806m',因为我们一般设置了Mapreduce的运行参数的,所以不用再次设置这些参数
6.6 HBaseIndexer启动后一会儿就自动退出
这个问题有很多原因。一个是前面说的mappine文件不匹配,另一种是由于内存溢出。

这里面可以看到错误日志
如果是内存溢出的问题,需要调大

6.7 HBaseIndexer同步的数据与Solr不一致
第一种是因为自己写的Spark同步和HBaseIndexer同时在跑,而数据是一直更新的,在批量插入的时候清空了数据会导致原本由HBaseIndexer的插入的数据删除掉了
第二种如HBase Indexer导致Solr与HBase数据不一致问题解决所说,由于HBase插入的WAL和实际数据是异步的,因此会产生“取不到数据”的情况,增加read-row="never"

详情参考:http://stackoverflow.com/questions/37267899/hbase-indexer-solr-numfound-different-from-hbase-table-rows-size
6.8 出现了6.7的问题之后,修改了read-row="never"后,丢失部分字段
由于设置了read-row之后数据不会再次从HBase中获取,因此只会读取WAL。假如修改了部分字段,HBaseIndexer就会提交相应的字段上去。例如
HBase中有name和age两个字段
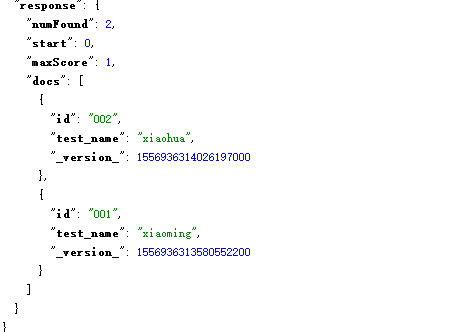
put 'HBase_Indexer_Test','001','cf1:name','xiaoming'put 'HBase_Indexer_Test','002','cf1:name','xiaohua'
此时的数据为
然后执行
put 'HBase_Indexer_Test','001','cf1:age','12'
最后只能看到

说明这种模式只从WAL获取数据,并且将获取的数据覆盖到了Solr里面。
解决办法有两个,一个是修改HBaseIndexer代码,使用原子更新到Solr。
第二种方法修改Solr配置,让一个ID对应的数据能容纳多个版本,和HBase一样

 浙公网安备 33010602011771号