全平台终端仿真工具 SecureCRT 使用总结
介绍
适用于 Windows、Mac 和 Linux 的 SecureCRT 客户端为计算机专业人士提供了坚如磐石的终端仿真,并通过高级会话管理以及多种节省时间和简化重复任务的方式提高了工作效率。 SecureCRT 为组织中的每个人提供安全的远程访问,文件传输和数据隧道。SecureCRT 支持 SSH2、SSH1、Telnet、Telnet/SSH、Relogin、Serial、TAPI、RAW 等协议。
下载软件:
官方学习文档:
- SecureCRT Documentation / documentation.pdf
- See videos on the SecureCRT video page and the VanDyke Software YouTube Channel.
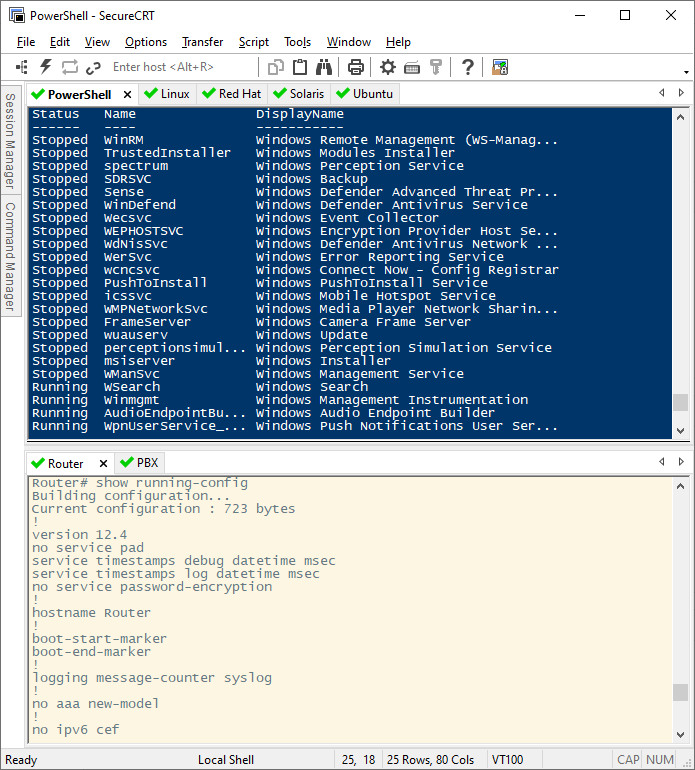
认识 SecureCRT 工具栏
1) File 文件
| Button | Function |
|---|---|
| Connect… | 连接,打开一个连接或者编辑已有的连接,创建新连接。 |
| Quick Connect… | 快速连接,快速连接对话框,快速连接主机的最便捷方式 |
| Connect in Tab… | 在 Tab 中打开一个新的会话窗口。 |
| Clone Session | 克隆当前会话窗口。 |
| Connect SFTP Tab | 打开 SFTP 窗口,对于 SSH 连接,此选项可用。在此会话窗口中可使用 SFTP 命令传输文件。 |
| Reconnect | 重新连接 |
| Disconnect | 中断当前会话窗口的连接 |
| Log Session | 把当前窗口的会话记录到 log 文件中。 |
| Raw Log Session | 将更详细的会话记录到 log 文件中,包括服务器更详细的响应信息。 |
| Trace Options | 在 log 文件中记录协议会话信息选项。(包括客户端与主机互相连接时的一些信息内容) |
2) Edit 编辑:拷贝粘贴等。
3) view 视图:显示各种工具条。
4) Options 选项:包括全局选项和 Session 选项。
5) Transfer 传递文件:使用 Xmodem/Zmodem 上传下载文件。
6) Script 脚本:运行一个脚本文件,或记录一个新的脚本。(类似 Word 中的宏功能)
7) Tools 工具:键盘映射编辑,密钥生成工具等。
8) Help 帮助:可以查看版本和使用证书。
配置默认会话
Options / Edit Default Session... / Terminal
设置保持会话:
Anti-idle 处勾选 Send protocol NO-OP,一般默认的 60s 就行了(SecureCRT 每隔 60s 往服务器发送一些信息,保持连接不断开。)
session keeplive: 相信大家都遇见过,连上服务器的 session 过一会,空闲的连接就自动断开了。SecureCRT 连接后如果稍长时间不用就会掉线,往往会造成工作状态的丢失。
调大终端输出缓冲:
Emulation 下调大 Scrollback buffer:5000 / 10,000。
Scrollback buffer 是终端输出缓冲,可以在终端保留更多信息,以便回看。
选择配色方案(Color Schemes):
Appearance 下根据喜好选择,可以通过编辑更换其他调色板(ANSI Color Palette)。
配置终端字体和大小:
Appearance 下设置 Normal Font,比如 Monospace 16pt。(其他字体 Consolas 或者 Courier New)
Connection / Logon Actions / Automate logon
设置登录机器时自动执行动作:
比如设置自动登录跳转:在部署和调试过程中,经常会遇到需要远程登录一个或多个跳板机后,才能进入目标机器。如果每次都需要反复的执行 ssh 命令是很令人厌烦的。通过 SecureCRT 的设置,可以自动完整这个过程。
1、添加会话
在链接中添加会话,如下图:
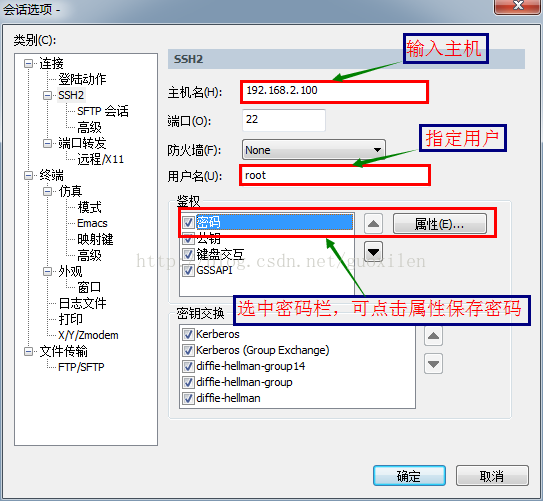
2、配置会话
在连接中进入登录动作,如下图:
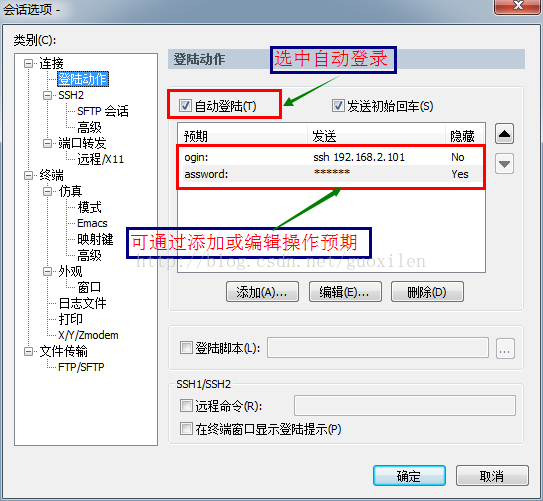
预期 即如果遇到某些的事件,发送 即需要输入的指令,隐藏 即指定是否可见。
ogin: 表示如果提示登录成功,则执行 ssh 命令,assword: 表示执行 ssh 命令后,在提示输入密码时,则使用其中配置的发送内容作为密码自动输入。
在自动登录中,相同的 预期,可以添加多个,通过调整对应的顺序,即可自动完成多次跳转任务。
软件主题 / 终端配色方案
View / Themes 如果有,根据喜好选择。
自定义配色方案
进入 Options / Global Options / Terminal / Appearance
ANSI Color 调色板介绍:
ANSI 颜色分为两种,分别是标准颜色和粗体颜色。
- Normal 1 号位:背景颜色,选择标准颜色
- Normal 2 号位:压缩文件颜色,复用vim编辑器的颜色
- Normal 3 号位:可执行权限文件的颜色,复用vim编辑器的颜色
- Normal 4 号位:
- Normal 5 号位:目录颜色,复用vim编辑器的颜色
- Normal 6 号位:图片文件的颜色,复用vim编辑器的颜色
- Normal 7 号位:软链接颜色,复用vim编辑器的颜色
- Normal 8 号位:字体颜色(有读写权限的文件的颜色),选择标准颜色
Advanced 下管理配色方案(Color Schemes):
黑白组合
- 新建调色板 ANSI Color: 基于 Standard 新建调色板 myDark,并修改为
- Normal 1 号位:#073642
- Normal 5 号位:#268bd2
- Bold 5 号位:#268bd2
- Normal 8 号位:#9c9c9c
- 新建配色方案 Color Schemes:myDark,选择调色板 myDark。
- Options > Edit Default Session... > 设置为 myDark
护眼组合 1
- ANSI Color: 基于 Standard 新建调色板 ProtectEye,并修改为
- Normal 1 号位(背景):#002b35
- Normal 2 号位(压缩文件):#808000
- Normal 5 号位(目录):#ffbcbc
- Bold 5 号位(目录):#8080ff
- Normal & Bold 8 号位(字体):#839496
- 设置光标颜色:White。(如果光标颜色和背景颜色一致,则看不到光标。)
- 新建配色方案 Color Schemes:ProtectEye,选择调色板 ProtectEye。
- Options > Edit Default Session... > 设置为 ProtectEye
护眼组合 2
- Color Schemes: Traditional + Standard
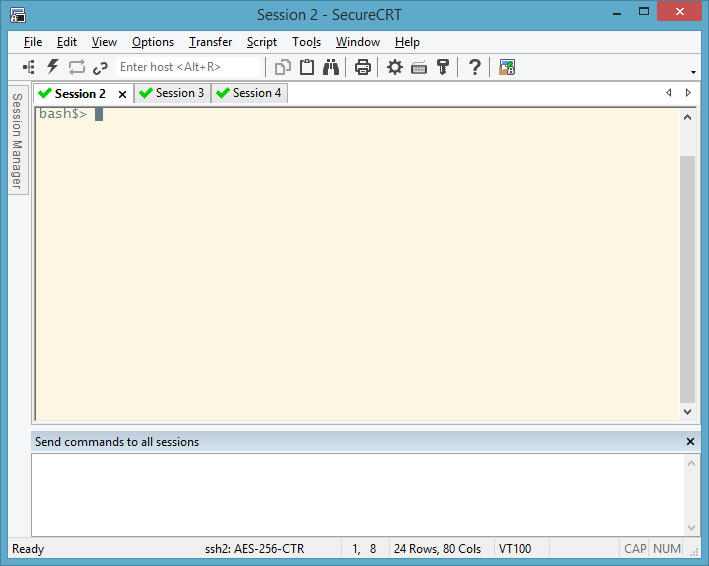
学会使用 Tab Groups
Tab groups allow you to compare the output of two sessions and group related sessions in the same SecureCRT window so that you can get more done in less time. You can organize sessions in tabs and switch easily between them. Or you can work in one tab while monitoring the output from a command in another tab and then go back to a single tab group when the command has finished.
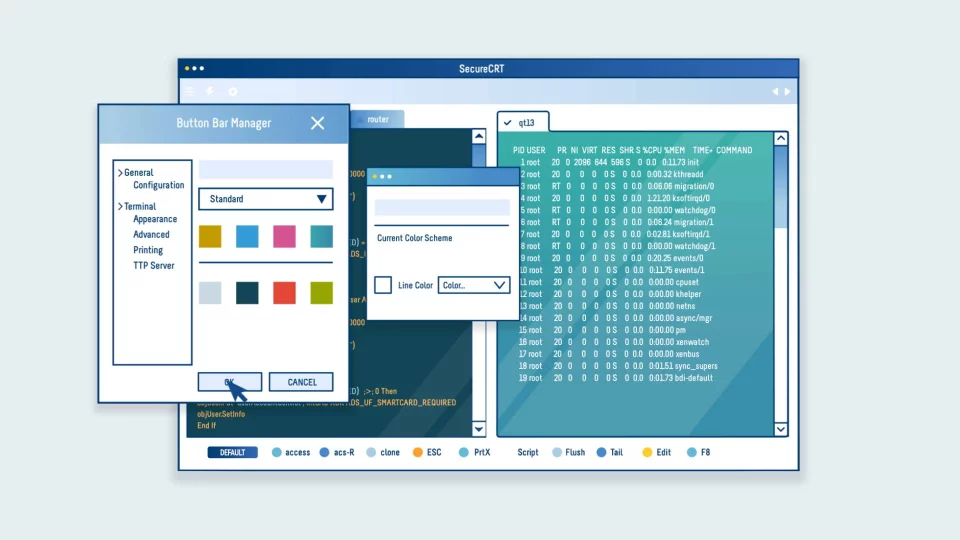
学会使用 Button Bar
通过详细制订按钮以执行命令或动作,例如发送字符串,运行脚本,菜单功能和协议命令,或启动外部程序,例如您喜欢的编辑器,cmd.exe 或 regedit。您可以为特定的会话或操作创建不同的按钮栏,并为按钮图标分配颜色,以便于查看和组织。通过按钮栏管理器,您可以添加,复制,编辑,删除,重命名和重新排列按钮栏。

设置默认开启 Button Bar:
Options / Global Options / Terminal / Appearance 下勾选 Show button bar on: bottom。
右键 button Bar 进行详细制订。比如:
#### Function = Send String ####
netstat -lntup |grep ssh \r
# 直接执行命令

chmod +x 755 *.AppImage
# 输出以上命令到终端

#### Function = Launch Application ####
/usr/bin/gnome-calculator
# 打开 GNOME 计算器

/usr/bin/gedit
# 打开 GNOME 默认编辑器

/usr/bin/code
# 打开 Visual Studio Code

#### Function = Run Script ####
/home/user/ping.sh

...
了解更多
学会使用 Command Window
The Command window gives you a way to compose text before sending it to the remote system. Using the command history, you can view, edit, and send previous commands. "Send Characters Immediately" mode allows you to type control characters and escape sequences in the Command window so that you can edit files, stop running commands, and do tab completion. You can be even more productive by issuing commands to all connected sessions, all visible sessions, or specific tab groups.
了解更多 Using The Command Window To Send Commands To Multiple SecureCRT® Sessions
学会使用 Public-Key Authentication
这部分知识属于 SSH,SSH 属于经常使用的基础工具,没有学过的请自觉去看书学习。看博文是很难学透的,因为,谁都没办法用几句话就说明白 SSH 的使用。该下工夫的地方,别偷懒!
官方文章:
Public-Key Authentication 常见错误
先了解一下容易使 SSH 出错的几个服务端配置:
#PermitRootLogin yes
设置root用户是否能够使用ssh登录。

#PasswordAuthentication yes
设置是否允许口令验证。

#RSAAuthentication yes
设置是否允许只有RSA安全验证。
#PubkeyAuthentication yes
一般默认都是 yes,如果被配置为 no 则会出错。
常见错误提示:
1. Public-key authentication with the server for user root failed.

2. root@192.168.0.109: Permission denied (publickey,gssapi-keyex,gssapi-with-mic).

3. Password authentication failed
排错方法:
检查服务端配置是否正确
PermitRootLogin yes
PasswordAuthentication yes
RSAAuthentication yes
PubkeyAuthentication yes

修改正确,然后重启 ssh 服务:
service sshd restart

注意!
如果你已经配置好可利用密钥远程免密码登录服务器(客户端:ssh-copy-id root@192.168.0.120),
那么 PasswordAuthentication 可以设置为 no,
因为此时 ssh root@192.168.0.120 使用密钥验证登录(PubkeyAuthentication yes)。
一定要注意先后顺序。
检查服务器 sshd 服务是否运行
netstat -anp | grep sshd

如果没有运行使用 service sshd restart 重启服务
检查服务器防火墙是否开放 22 端口
1. 客户端使用 ssh -v root@192.168.0.120 查看登陆信息

2. 提示“Permission denied, please try again.”

3. 查看防火墙
/etc/init.d/iptables status

# 如果 22 端口被限制则无法登陆。放开端口 22

/sbin/iptables -I INPUT -p tcp –dport 22 -j ACCEPT
/etc/rc.d/init.d/iptables save
记得备份配置
- 备份:Tools / Export Settings...
- 还原:Tools / Import Settings...
查看配置文件保存路径 Options / Global Options / General / Configuration Paths。
学会使用 Connect Bar
On the surface, the Connect bar, new in SecureCRT and SecureFX 6.7, is pretty straightforward. Enter a hostname, press the ENTER key and the current session window switches to that host. Adventurous users will find much more there than that. You can use session names, switch protocols, specify ports, and more.
The following are a couple of handy keyboard shortcuts for the Connect bar:
- ALT+R activates the Connect bar ready for input
- CTRL+ENTER in the Connect bar opens the specified session in a new window
The Connect bar can be displayed or hidden by selecting or deselecting the Connect Bar option on the View menu.
利用 Zmodem 上传下载文件
文件传输是数据交换的主要形式,在进行文件传输时,为使文件能被正确识别和传送,我们需要在两台计算机之间建立统一的传输协议,这个协议包括了文件的识别、传送的起止时间、错误的判断与纠正等内容。常见的传输协议有以下几种:
- ASCII:这是最快的传输协议,但只能传送文本文件。
- Xmodem:这种古老的传输协议速度较慢,但由于使用了CRC错误侦测方法,传输的准确率可高达99.6%。
- Ymodem:这是Xmodem的改良版,使用了1024位区段传送,速度比Xmodem要快。
- Zmodem:Zmodem采用了串流式(streaming)传输方式,传输速度较快,而且还具有自动改变区段大小和断点续传、快速错误侦测等功能。这是目前最流行的文件传输协议。
除以上几种外,还有 Imodem、Jmodem、Bimodem、Kermit、Lynx 等协议,由于没有多数厂商支持,这里就略去不讲。
SecureCRT 支持的文件传输协议有:ASCII、Xmodem、Ymodem、Zmodem 等。我们通常利用 Zmodem 协议来快速的传送文件。
设置传送文件存放目录
Options / Edit Default Session... / Terminal / X/Y/Zmodem 在 Directories 下设置上传和下载的默认目录。
服务端安装 lrzsz
rz,sz 是服务端 Linux/Unix 同本机进行 Zmodem 文件传输的命令行工具,由软件包 lrzsz 提供。
安装方法如下:
[root@centos-abc ~]# yum provides /usr/bin/rz
lrzsz-0.12.20-36.el7.x86_64 : The lrz and lsz modem communications programs

[root@centos-abc ~]# yum info lrzsz
Description : Lrzsz (consisting of lrz and lsz) is a cosmetically modified
            : zmodem/ymodem/xmodem package built from the public-domain version of
            : the rzsz package. Lrzsz was created to provide a working GNU
            : copylefted Zmodem solution for Linux systems.

[root@centos-abc ~]# yum install lrzsz -y

[root@centos-abc ~]# rpm -ql lrzsz-0.12.20-36.el7.x86_64
/usr/bin/rz
/usr/bin/sz    # 使用 zmodem 发送
/usr/bin/rx
/usr/bin/sx    # 使用 xmodem 发送
使用 Zmodem 上传下载文件
上传文件:
-
方法一:进入需要放置上传文件的工作目录,然后运行命令
rz(接收文件),SecureCRT 就会弹出文件选择对话框,选好文件之后关闭对话框,文件就会上传到当前目录。 -
方法二:在 Transfer > Zmodem Upoad list 弹出文件选择对话框,选好文件后按 Add 添加,OK 确认后窗口自动关闭;最后进入服务器中需要存放文件的目录,输入 rz 命令完成上传。
下载文件:
运行命令 sz file1 file2 将服务器文件发送到本机(Windows/Linux)上,Zmodem 接收自行启动,下载的文件存放在你设定的默认下载目录下。比 ftp 命令方便多了,而且服务器不用再开 FTP 服务了。
学会使用快捷键
软件快捷键:
- alt+enter 全屏
- alt+p 调出 sftp 窗口
- ctrl+f4 关闭当前 session
- alt+f4 关闭 SecureCRT 软件
- alt+c 打开连接标签
- ctrl+tab 切换至下一个会话窗口
- alt+number 切换至某个会话窗口,例如窗口1 Alt+1
终端快捷键:
编辑命令
TAB:补全
Ctrl + a :移到当前命令行首
Ctrl + e :移到当前命令行尾
Ctrl + xx:在当前命令行首和光标之间移动
Ctrl + u :从光标处删除至命令行首
Ctrl + k :从光标处删除至命令行尾
ALT + 1/2/3... : 在多个不同的session标签之间切换
重新执行命令
Ctrl + r:逆向搜索命令历史
Ctrl + g:从历史搜索模式退出
Ctrl + p:历史中的上一条命令
Ctrl + n:历史中的下一条命令
控制命令
Ctrl + l:清屏
Ctrl + c:终止命令
重新调整右键行为
第一次启动软件会有选项选择,后期有需要可以重新调整:
Options / Global Options / Terminal
- 右键粘贴:mouse 中勾选 Copy on select 和 Paste on right button。
- 右键显示菜单:取消勾选上面两项。
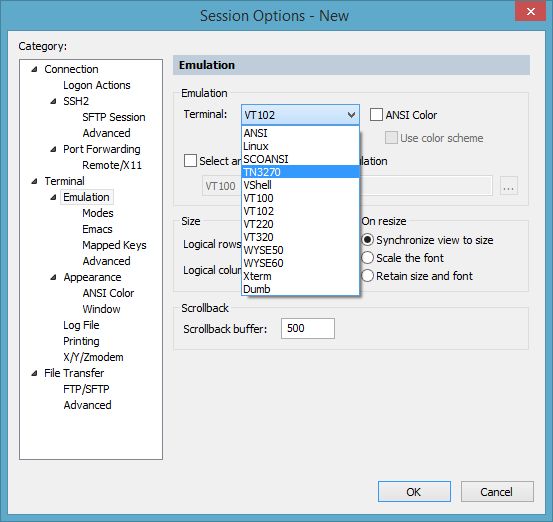
使用其他 Emulations
通常使用默认的 Xterm 即可。
Choose from a wide range of terminal emulation including TN3270, VT100, VT102, VT220, ANSI, SCO ANSI, Wyse 50/60, Xterm, and Linux console - all with color schemes and most with ANSI color support.
更多技巧 SecureCRT - Tips
See also
寻找知识的源头,探索宇宙的奥秘。
知识的存放地址:人的大脑里、书里、互联网上、自然界里。
获取知识的最优路径:精品课程 > 精品书籍 > 官方文档 > 优质文章 > 与人交流(互为补充,构建知识体系)。
内外兼修,形神合一。

 浙公网安备 33010602011771号