

富文本编辑器 ProseMirror 第二篇 の Schema
什么是 ProseMirror Schema?
在上一篇 ProseMirror の 初探 中,我们提到了 "如何实现 rich text editor?"
其基本思路是
- 监听交互事件
- 阻止原生事件
- 获取 selection info
- DOM manipulation
第三、第四步需要大量、繁琐、复杂的 DOM 操作。
我们都知道,DOM 结构是挺复杂的 (尤其是在需要兼顾 Semantic HTML 的时候)。
而 DOM API 呢,是很弱鸡的,倘若我们不对代码加以抽象和管理,写着写着,代码就会变得浑浊不堪。
基于这个原因,ProseMirror 对 DOM 做了一层封装。
在使用 ProseMirror 时,我们不直接调用 DOM API,取而代之的是操控 ProseMirror Schema。
你可以把 ProseMirror Schema 理解为一种自定义的 DOM 结构。
这有点类似于 Angular Logical View 或 React Virtual DOM 概念。
简而言之,为了更好地控制和管理代码,ProseMirror 引入了一个抽象层 -- Schema,作为 DOM 的管理。
HTML 和 DOM 规范
要理解 ProseMirror Schema 就得先理解 HTML 和 DOM。
HTML 是一种内容 / 文件格式,游览器是它对应的 reader。
游览器 read (解析) HTML 之后会创建 DOM tree。
DOM tree 由 Node 组合嵌套而成。
Node -> DOM tree -> HTML
我们可以透过 DOM API 创建 node,接着把 node 嵌套起来形成 DOM tree。
const h1 = document.createElement('h1');
const h1Text = document.createTextNode('Titanic');
h1.appendChild(h1Text);

const p = document.createElement('p');
const pText = document.createTextNode('I am the king of the world');
p.appendChild(pText);

const body = document.createElement('body');
body.appendChild(h1);
body.appendChild(p);
然后把 DOM tree 转换成 HTML
console.log(body.outerHTML);
/*
  <body>
    <h1>Titanic</h1>
    <p>I am the king of the world</p>
  </body>
*/
HTML -> DOM tree
我们也可以透过 DOM API 把 HTML 解析成 DOM tree
const rawHTML = `
  <body>
    <h1>Titanic</h1>
    <p>I am the king of the world</p>
  </body>
`;
const html = document.createElement('html');
html.innerHTML = rawHTML;
const body = html.querySelector('body');
const h1 = html.querySelector('h1');
const p = html.querySelector('p');
console.log([body instanceof HTMLBodyElement, h1 instanceof HTMLHeadingElement, p instanceof HTMLParagraphElement]); // [true, true, true]
HTML -> DOM tree の 解析规范
DOM 结构其实是有一套规范的,只是我们太习以为常了,所以平日不会留意到它。
nodeA > nodeB 规范
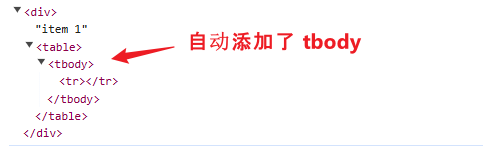
比如说,<ul> 里面必须是 <li>,<table> 里面必须是 <tbody>。
假如我没有按照规范去写 HTML,在检测的时候就会报错。
table > tbody

ul > li

在解析的时候也会出问题
table > tbody
const rawHtml = '<table><tr>item 1</tr></table>'; // table 里面应该要是 tbody
const div = document.createElement('div');
div.innerHTML = rawHtml;
console.log(div);
效果
ul > li
const rawHtml = '<ul><tr>item 1</tr></ul>'; // ul 里面应该要是 li
const div = document.createElement('div');
div.innerHTML = rawHtml;
console.log(div);
效果

总结
理解 HTML, DOM tree, Node, DOM API 对理解 ProseMirror Schema 至关重要。
因为 ProseMirror Schema 几乎就是这一套东西。只不过它是完全自定义的而已。
Define a ProseMirror Schema
HTML 的规范是由 W3C 制定的。
比如说
<p> 代表 paragraph,它是一个 block-level element。
<a> 代表 anchor,它是一个 inline element。
<google-map> 不是 HTML 规范,若我们想扩展原生 element,则需要配置 custom element。
再比如,inline element 不可以包含 block-level element

回到 ProseMirror Schema,它的规范则是由我们定义的。
比如说
<p> 是不是一个 node?
它是 inline 还是 block?
它可以包含其它什么类型的 node?
The simplest Schema
安装
yarn add prosemirror-model
Scripts
import { Schema, SchemaSpec } from 'prosemirror-model';

const schemaSpec: SchemaSpec = {
  nodes: {
    doc: {},
    text: {},
  },
};
const schema = new Schema(schemaSpec);
Schema 是 prosemirror-model package 里的一个 class。
SchemaSpec 是一个 interface。
我们的规范就是透过 SchemaSpec 定义的。
定义好以后,把 spec 传入 new Schema 里,这样就会实例化出一个 schema 对象。
你可以把这个 schema 对象比作 DOM API 里的 document 对象 -- 万物 の 起源。
A simple Schema
上一 part,我们定义的是 simplest (最简单的) schema,还看不出个所以然。
这里给一个比较 standard 的定义,然后我们再逐个解释。
const schemaSpec: SchemaSpec = {
  nodes: {
    doc: {
      content: 'block+',
    },
    paragraph: {
      group: 'block',
      content: 'inline*',
    },
    heading1: {
      group: 'block',
      content: 'inline*',
    },
    heading2: {
      group: 'block',
      content: 'inline*',
    },
    text: {
      group: 'inline',
    },
  },
};
SchemaSpec.nodes
SchemaSpec.nodes 负责定义 ProseMirror 支持的 node 类型。
比如说,<p>, <h1>, <table> 这些是 DOM 支持的 nodes。
而我们定义的 ProseMirror Schema 则支持 <paragraph>, <heading1>, <heading2> 这些 nodes (没有定义的就代表不支持,这就好比 HTML 不支持 <google-map> node 是同一个概念)。
doc stand for document,它是 root node (根节点),ProseMirror 规定,Schema 里必须定义一个 root node。
text 类似于 HTML 的 TextNode,它也是 ProseMirror 特别规定的,Schema 里最少要有 doc 和 text 这两个 node 定义,否则会直接报错。
NodeSpec.group
ProseMirror Schema 默认有两个 node 分组。
一个是 block,一个是 inline。
它们分别对应 HTML 的 block-level 和 inline element。
给 node 分组主要的作用是方便管理和表达。
具体怎么个方便法,我们后续遇到时再细讲。
注:doc 之所以不需要定义 group,是因为它是独一无二的 node,不能硬说它是 block。
NodeSpec.content
content 规范了 node 可以包含哪些 node。
比如说 ul > li 就是一种限制。
用 schema 来表示的话,就是这样
nodes: {
  ul: {
    content: 'li*',
  },
},
* 星号是正则表达式,表示 ul node 里面只能有 0 个或 n 个 li node。
heading2: {
  group: 'block',
  content: 'inline*',
},
text: {
  group: 'inline',
},
这两句则表示,heading2 内只能有 0 个或 n 个 inline group 的 node,比如 text 就 under inline group。(看到分组的用途了吧)
text 没有 content,代表它是 leaf node,已经是结尾了,不能再包含任何 node。
doc: {
  content: 'block+',
},
block+ 表示最少 1 个或 n 个 block-level node。
另外,ProseMirror 还有一个规则 -- block 和 inline 是互斥的 (注:DOM node 没有这个限制,ProseMirror node 有而已)。
我们可以这样定义
doc: {
  content: '(heading1|heading2|paragraph)*', // 全是 block-level node
},
也可以这样定义
doc: {
  content: 'text*', // inline node
},
但是不可以把 block 和 inline 参一起
doc: {
  content: '(heading1|heading2|paragraph|text)*', // 参入了 inline
},
它会直接报错

这是 ProseMirror 的限制。
告一段落
SchemaSpec,NodeSpec 远不止于此,但我们点到为止,先学一学如何创建 ProseMirror Node。
Create ProseMirror Node Tree
HTML 规范对应的是 ProseMirror Schema。
那 DOM API 和 DOM tree 对应的又是 ProseMirror 的什么呢?
延续上一 part 我们定义好的 ProseMirror Schema


const schemaSpec: SchemaSpec = {
  nodes: {
    doc: {
      content: 'block+',
    },
    paragraph: {
      group: 'block',
      content: 'inline*',
    },
    heading1: {
      group: 'block',
      content: 'inline*',
    },
    heading2: {
      group: 'block',
      content: 'inline*',
    },
    text: {
      group: 'inline',
    },
  },
};

const schema = new Schema(schemaSpec);
现在我们来创建一个 ProseMirror node tree。
import { Node as ProseMirrorNode, Schema } from 'prosemirror-model';

const schema = new Schema(schemaSpec);

const text = schema.text('Titanic');                  // 创建 text node

const heading1 = schema.node('heading1', null, text); // 创建 heading1 并且把 text node 放进去

const doc = schema.node('doc', null, heading1);       // 创建 doc node 并且把 heading1 放进去

console.log(nodeToXML(doc));                          // 把 doc node 打印成 XML 查看结构

// nodeToXML 函数不是重点,这里只是用它来展示 ProseMirror node tree 结构而已
function nodeToXML(node: ProseMirrorNode, level = 0): string {
  if (node.isText) return node.text!;

  const indent = '  '.repeat(level);
  const content = node.content.content.map(childNode => nodeToXML(childNode, level + 1)).join('');
  const contentIsTag = content.trimStart().startsWith('<');
  const attrs = Object.entries(node.attrs)
    .map(([key, value]) => `${key}="${value}"`)
    .join(' ');

  if (node.isLeaf) {
    return `${indent}<${node.type.name}${attrs === '' ? '' : ` ${attrs}`} />\n`;
  }

  return `${indent}<${node.type.name}${attrs === '' ? '' : ` ${attrs}`}>${contentIsTag ? '\n' : ''}${content}${contentIsTag ? indent : ''}</${node.type.name}>\n`;
}
效果
<doc>
  <heading1>Titanic</heading1>
</doc>
看出来了吗?上面的代码换做是 DOM API 的话,类似长这样
const text = document.createTextNode('Titanic');

const h1 = document.createElement('h1');
h1.appendChild(text);

const body = document.createElement('body');
body.appendChild(h1);

console.log(body.outerHTML); // <body><h1>Titanic</h1></body>
我想,透过对比这两段代码,大家应该开始 get 到 ProseMirror Schema 在干什么了吧。
ProseMirror Node Tree -> DOM Tree
无论 ProseMirror Schema 多么厉害,它最终依然是要输出 DOM tree 的。
所以,我们在定义 Schema 的时候,必须声明每一个 ProseMirror node 该如何映射 (或者叫 serialize or convert 都可以) 到对应的 DOM node。
toDOM method
const schemaSpec: SchemaSpec = {
  nodes: {
    paragraph: {
      group: 'block',
      content: 'inline*',
      toDOM: () => {
        const p = document.createElement('p');
        return {
          dom: p,
          contentDOM: p,
        };
      },
    },
  },
};
我们聚焦在 toDOM 方法上。
顾名思义,toDOM 会在 paragraph ProseMirror node serialize to DOM node 时被调用。
paragraph ProseMirror node 对应的是 p DOM node。
做法很简单,透过 DOM API 创建 p DOM node,然后返回一个对象。
这个对象带有 2 个属性
-
dom
它就是 p DOM node 咯。
-
contentDOM
contentDOM 是说 paragraph 的 child nodes (e.g. text node) 在 serialize to DOM node 以后,会被插入 (append) 到哪里?
这里的话,自然是 append 到 p DOM node 里咯。注:如果 ProseMirror node 是一个 leaf node 的话,那就不需要返回对象了,直接返回 DOM node 就可以了,因为不会有 contentDOM。
toDOM method return shorthand
由于上述的代码太简易,所以 ProseMirror 设置了一个 shorthand return 写法
toDOM: () => ['p', 0]
'p' 代表 document.createElement('p')。
array 的最后一个值是 0 的话,代表 contentDOM:DOM node。
define all toDOM method
我们把剩余的 toDOM 方法统统补上
const schemaSpec: SchemaSpec = {
  nodes: {
    doc: {
      content: 'block+',
    },
    paragraph: {
      group: 'block',
      content: 'inline*',
      toDOM: () => ['p', 0],
    },
    heading1: {
      group: 'block',
      content: 'inline*',
      toDOM: () => ['h1', 0],
    },
    heading2: {
      group: 'block',
      content: 'inline*',
      toDOM: () => ['h2', 0],
    },
    text: {
      group: 'inline',
    },
  },
};
doc 不需要 toDOM,因为 serialize 的是 doc 的 child nodes,doc 本身是不拿来 serialize 的。
text 也不需要 toDOM,因为它对应的是 DOM text node。
DOM API append text 有两种方式
第一种是 createTextNode + appendChild
const h1 = document.createElement('h1');

const text = document.createTextNode('Titanic');
h1.appendChild(text);
第二种是直接 append string
h1.append('Titanic');
效果是一样的,这也是为什么 text ProseMirror node 不需要 serialize to DOM node,因为直接 append string 就可以了。
Serialize to DOM tree by DOMSerializer
创建 ProseMirror node tree
const headingText = schema.text('Titanic');
const heading1 = schema.node('heading1', null, headingText);

const paragraphText = schema.text('I am the king of the world');
const paragraph = schema.node('paragraph', null, paragraphText);

const doc = schema.node('doc', null, [heading1, paragraph]); // 参数 3 传入 array 就可以同时放入多个 ProseMirror nodes
透过 DOMSerializer 把 ProseMirror node tree serialize to DOM tree
import { DOMSerializer, Schema, SchemaSpec } from 'prosemirror-model';

const documentFragment = DOMSerializer.fromSchema(schema).serializeFragment(doc.content); // 关键

const div = document.createElement('div');
div.appendChild(documentFragment);
console.log(div.innerHTML);
传入我们的 schema 对象,接着再传入要 serialize 的内容。
doc.content 的类型是 ProseMirror Fragment,类似于 DOM 的 DocumentFragment,其内容就是 doc 的 child nodes (heading1 和 paragraph)。
最终效果
<h1>Titanic</h1>
<p>I am the king of the world</p>
NodeSpec.attrs 的运用
我们需要定义 heading 1 到 heading 6
const schemaSpec: SchemaSpec = {
  nodes: {
    heading1: {
      group: 'block',
      content: 'inline*',
      toDOM: () => ['h1', 0],
    },
    heading2: {
      group: 'block',
      content: 'inline*',
      toDOM: () => ['h2', 0],
    },
  },
};
这样挨个挨个定义,代码有点繁琐、重复,不是很顺风水。
我们可以透过 NodeSpec.attrs 来优化,像这样
heading: {
  group: 'block',
  content: 'inline*',
  attrs: { level: { default: 1, validate: 'number' } },
  toDOM: node => [`h${node.attrs.level}`, 0],
},
首先把属性名从 heading1 改成 heading。
接着添加一个 attrs 对象,里面有一个 level 用来表示 heading 的等级 (1-6)。
default 和 validate 不是必须的,它表示 level 的默认值是 1,还有 level 的值类型是 number。(validate 仅支持简单的验证,比如 'number|string|boolean|null|undefined',pipe 是 "or" 的意思)
最后 toDOM 方法本来就带有一个参数,它就是 serialize 时,当前的 ProseMirror node。
我们可以拿这个 node 的 attrs.level 来动态声明 DOM node。
最后,创建 heading 时,需要额外定义 attrs.level,像这样
// const heading1 = schema.node('heading1', null, headingText);     // 本来是这样

const heading1 = schema.node('heading', { level: 1 }, headingText); // 变成这样,参数 2 就是让我们声明 attrs 的
const heading2 = schema.node('heading', { level: 2 }, headingText); // heading2
const heading3 = schema.node('heading', { level: 3 }, headingText); // heading3
DOM Tree -> ProseMirror Node Tree
既然可以从 ProseMirror node tree serialize to DOM tree,那反过来从 DOM tree deserialize (a.k.a parse) to ProseMirror node tree 自然也是可以的。
parseDOM method
首先需要定义 parse 的规则,就像 toDOM 方法一样。
paragraph: {
  group: 'block',
  content: 'inline*',
  toDOM: () => ['p', 0],
  parseDOM: [{ tag: 'p' }],
},
parseDOM 的类型是 Array<TagParseRule>。
tag 是一个 CSS selector 语法。
只要 DOM node 能匹配这个 CSS selector,那这个 DOM node 就会变成对应的 ProseMirror node。(e.g. p DOM node parse to paragraph ProseMirror node)
heading 的 parseDOM 是这样
heading: {
  group: 'block',
  content: 'inline*',
  attrs: { level: { default: 1, validate: 'number' } },
  toDOM: node => [`h${node.attrs.level}`, 0],
  parseDOM: [
    { tag: 'h1', attrs: { level: 1 } },
    { tag: 'h2', attrs: { level: 2 } },
    { tag: 'h3', attrs: { level: 3 } },
    { tag: 'h4', attrs: { level: 4 } },
    { tag: 'h5', attrs: { level: 5 } },
    { tag: 'h6', attrs: { level: 6 } },
  ],
},
不同的 tag 对应同一个 heading ProseMirror node,但是 attrs.level 不同。
这样写也是可以
parseDOM: new Array(6).fill(undefined).map((_, index) => ({ tag: `h${index + 1}`, attrs: { level: index + 1 } })),
Parse to ProseMirror node tree by DOMParser
创建 DOM tree
const div = document.createElement('div');
div.innerHTML = rawHtml;
const documentFragment = document.createDocumentFragment();
[...div.childNodes].forEach(node => documentFragment.appendChild(node));
透过 DOMParser 把 DOM tree parse to ProseMirror node tree
import { DOMParser, Node as ProseMirrorNode, Schema, SchemaSpec } from 'prosemirror-model';

const doc = DOMParser.fromSchema(schema).parse(documentFragment); // 关键
console.log(nodeToXML(doc));
效果
<doc>
  <heading level="1">Titanic</heading>
  <paragraph>I am the king of the world</paragraph>
</doc>
ProseMirror Mark
富文本最大的特色就是有 styles。
How to style a text in DOM node?
这是一段文本
<p>I am the king of the world</p>

如果我们想让 "king of the world" 带有 bold, italic, underline styles,我们有两种做法
-
使用 style attribute
<p>I am the <span style="font-weight: 700; font-style: italic; text-decoration: underline;">king of the world</span></p>
把 "king of the world" 用 span 框起来,接着给 span 加上 style attribute 和 CSS syntax。
效果
![]()
-
<p>I am the <strong><em><ins>king of the world</ins></em></strong></p>
<p>I am the <b><i><u>king of the world</u></i></b></p>
透过 strong, b, em, i, ins, u 这些自带 styling 的 element 来达到相同的效果
![]()


这两种做法各有各的优缺点
Semantic HTML 的好处是语义化加分,坏处是 DOM node 嵌套太多层,很乱。而且,游览器自带 style 的 element 不多,无法满足所有 style 需求。
style attribute 的好处是 DOM node 层级简单,而且可以实现任何 style,唯一的缺点是它没有 HTML 语义化。
How to style a text in ProseMirror node?
ProseMirror 自然要做的比 DOM 好,所以它实现了 HTML 语义化,同时支持所有 style,而且层级还简单。(保留了 DOM 所有优点,同时还去除了所有缺点👍)。
它是怎么做到的呢?答案是 -- ProseMirror Mark。
什么是 Mark?
Mark 是对 ProseMirror node 的一种附加状态。
比如说,一个 text node,它要 bold,那就添加一个 bold mark,它同时还要 italic,那就再加一个 italic mark。
一个 node 可以配置很多的 Mark 来表达不同的状态 (或者说 styling)。
从这个角度看的话,它更贴近方法 1 -- style attribute。
但是在 serialize to DOM node 的时候它又会变成 <b><i><u>,这样又变成了方法 2 -- Semantic HTML。
define Mark in Schema
// 看结构就好
const schemaSpec: SchemaSpec = {
  nodes: {
    doc: {},
    paragraph: {},
    text: {},
  },
  marks: {
    strong: {},
    emphasis: {},
  },
};
Node 和 Mark 是不同的东西,所以分两个属性 (nodes 和 marks) 来定义。
strong 和 emphasis (a.k.a <em>) 对 DOM node 来说是 node (节点),但对 ProseMirror 来说是 Mark,不要搞混哦。
Mark 没有 block-level / inline 的概念,也没有 content (child nodes) 的概念,但它有 toDOM 和 parseDOM。
marks: {
  strong: {
    toDOM: () => ['strong', 0],
  },
  emphasis: {
    toDOM: () => ['em', 0],
  },
  underline: {
    toDOM: () => ['u', 0],
  },
},
toDOM 非常简单。
parseDOM 则稍微复杂一些。
下面这 3 句是等价的
<p>I am the <span style="font-weight: 700; font-style: italic; text-decoration: underline;">king of the world</span></p>
<p>I am the <strong><em><ins>king of the world</ins></em></strong></p>
<p>I am the <b><i><u>king of the world</u></i></b></p>
虽然采用了不同的声明方式,但对用户来说,眼睛看到的 styles 是一样的。
因此,ProseMirror 在 parse DOM 的时候,需要同时兼顾多种不同的声明方式。
marks: {
  strong: {
    toDOM: () => ['strong', 0],
    parseDOM: [
      { tag: 'strong' }, // <strong> parse to strong ProseMirror mark
      { tag: 'b' },      // <b> parse to strong ProseMirror mark
    ],
  },
},
还有一个是看 style attribute
parseDOM: [
  {
    style: 'font-weight',
    getAttrs: value => (parseInt(value) > 400 ? null : false),
  },
],
没有 tag 意味着 any element 都可以匹配。
style: 'font-weight' 表示 element 必须带有 style attribute 而且要有定义 font-weight。
getAttrs 有多种形式,return false 表示匹配失败,return null or undefined 表示匹配成功,但是没有 mark.attrs。
return 一个对象的话,它会作为 mark.attrs,像这样
strong: {
  toDOM: () => ['strong', 0],
  attrs: { weight: { default: 700, validate: 'number' } },
  parseDOM: [
    {
      style: 'font-weight',
      getAttrs: value => (parseInt(value) > 400 ? { weight: parseInt(value) } : false),
    },
  ],
},
emphasis: {
  toDOM: () => ['em', 0],
  parseDOM: [
    { tag: 'em' },
    { tag: 'i' },
    {
      style: 'font-style',
      getAttrs: value => (value === 'italic' ? null : false),
    },
  ],
},
underline: {
  toDOM: () => ['u', 0],
  parseDOM: [
    { tag: 'u' },
    { tag: 'ins' },
    {
      style: 'text-decoration',
      getAttrs: value => (value === 'underline' ? null : false),
    },
  ],
},
create mark and add it to node
create mark 的方式和 create node 大同小异
const strong = schema.mark('strong');
const emphasis = schema.mark('emphasis');
const underline = schema.mark('underline');
添加到 text node 也非常简单
const text1 = schema.text('I am the ');
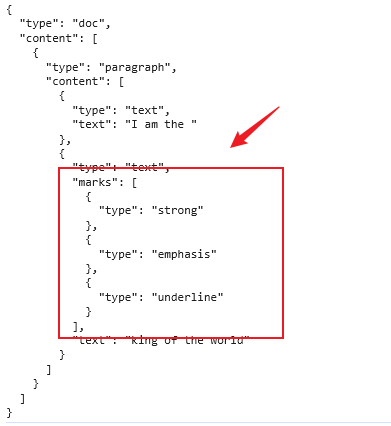
const text2 = schema.text('king of the world', [strong, emphasis, underline]); // 参数二可以传入 marks
const paragraph = schema.node('paragraph', null, [text1, text2]);
const doc = schema.node('doc', null, paragraph);
console.log(JSON.stringify(doc.toJSON(), null, 2));
效果
serialize and parse
const frag = DOMSerializer.fromSchema(schema).serializeFragment(doc.content);
const div = document.createElement('div');
div.appendChild(frag);
console.log(div.innerHTML); // <p>I am the <strong><em><u>king of the world</u></em></strong></p>
注:<strong> <em> <u> 这个顺序是依据 SchemaSpec.marks 决定的。
const rawHTMLs = [
  '<p>I am the <span style="font-weight: 700; font-style: italic; text-decoration: underline;">king of the world</span></p>',
  '<p>I am the <strong><em><ins>king of the world</ins></em></strong></p>',
  '<p>I am the <b><i><u>king of the world</u></i></b></p>',
];

for (const rawHTML of rawHTMLs) {
  const div = document.createElement('div');
  div.innerHTML = rawHTML;
  const documentFragment = document.createDocumentFragment();
  [...div.childNodes].forEach(node => documentFragment.appendChild(node));

  const doc = DOMParser.fromSchema(schema).parse(documentFragment);
  console.log(JSON.stringify(doc.toJSON(), null, 2));
}
效果

告一段落
MarkSpec 和 NodeSpec 都有一些属性我们还没有掌握,但不急,我们先学如何 modify ProseMirror node tree (上一 part 只教了创建),最后才把这些零碎的补全。
ProseMirror Node Manipulation
到目前为止,我们已经掌握了如何创建 ProseMirror node,如何把 ProseMirror node 嵌套成 ProseMirror node tree。
这一 part 我们来看看如何对 ProseMirror node tree 做 CRUD (增删改查)。
先搭个环境
import { Node as ProseMirrorNode, Schema, SchemaSpec } from 'prosemirror-model';

function nodeToXML(node: ProseMirrorNode, level = 0): string {
  if (node.isText) return node.text!;

  const indent = '  '.repeat(level);
  const content = node.content.content.map(childNode => nodeToXML(childNode, level + 1)).join('');
  const contentIsTag = content.trimStart().startsWith('<');
  const attrs = Object.entries(node.attrs)
    .map(([key, value]) => `${key}="${value}"`)
    .join(' ');

  if (content === '') {
    return `${indent}<${node.type.name}${attrs === '' ? '' : ` ${attrs}`} />\n`;
  }

  return `${indent}<${node.type.name}${attrs === '' ? '' : ` ${attrs}`}>${contentIsTag ? '\n' : ''}${content}${contentIsTag ? indent : ''}</${node.type.name}>\n`;
}

const schemaSpec: SchemaSpec = {
  nodes: {
    doc: {
      content: 'block+',
    },
    paragraph: {
      group: 'block',
      content: 'inline*',
      toDOM: () => ['p', 0],
      parseDOM: [{ tag: 'p' }],
    },
    heading: {
      group: 'block',
      content: 'inline*',
      attrs: { level: { default: 1, validate: 'number' } },
      toDOM: node => [`h${node.attrs.level}`, 0],
      parseDOM: new Array(6).fill(undefined).map((_, index) => ({ tag: `h${index + 1}`, attrs: { level: index + 1 } })),
    },
    unordered_list: {
      group: 'block',
      content: 'list_item*',
      toDOM: () => ['ul', 0],
      parseDOM: [{ tag: 'ul' }],
    },
    list_item: {
      group: 'block',
      content: 'inline*',
      toDOM: () => ['li', 0],
      parseDOM: [{ tag: 'li' }],
    },
    horizontal_rule: {
      group: 'block',
      toDOM: () => ['hr'],
      parseDOM: [{ tag: 'hr' }],
    },
    text: {
      group: 'inline',
    },
  },
  marks: {
    strong: {
      toDOM: () => ['strong', 0],
      parseDOM: [
        { tag: 'strong' },
        { tag: 'b' },
        {
          style: 'font-weight',
          getAttrs: value => (parseInt(value) > 400 ? null : false),
        },
      ],
    },

    underline: {
      toDOM: () => ['u', 0],
      parseDOM: [
        { tag: 'u' },
        { tag: 'ins' },
        {
          style: 'text-decoration',
          getAttrs: value => (value === 'underline' ? null : false),
        },
      ],
    },

    emphasis: {
      toDOM: () => ['em', 0],
      parseDOM: [
        { tag: 'em' },
        { tag: 'i' },
        {
          style: 'font-style',
          getAttrs: value => (value === 'italic' ? null : false),
        },
      ],
      excludes: 'strong',
    },
  },
};

const schema = new Schema(schemaSpec);
Node size
一个包含 'abc' 3 个字母的 text node,请问它的 nodeSize 会是多少?
const text = schema.text('abc');
console.log(text.nodeSize);
答案是 3,因为是 3 个字母。
一个不带内容的 paragraph,请问它的 nodeSize 会是多少?
const paragraph = schema.node('paragraph');
console.log(paragraph.nodeSize);
答案是 2,你可以认为它是以 tag 的数量来计算的,<paragraph></paragraph> 有 2 个 tag 所以是 2。
一个 horizontal_rule,请问它的 nodeSize 会是多少?
const horizontalRule = schema.node('horizontal_rule');
console.log(horizontalRule.nodeSize);
答案是 1,因为 horizontal_rule 在 NodeSpec 定义中不含 content
horizontal_rule: {
  group: 'block',
  toDOM: () => ['hr'],
  parseDOM: [{ tag: 'hr' }],
},
它会被认为是 void element,只有 1 个 tag <horizontal_rule /> 所以 nodeSize 是 1。
我们可以透过 node.isLeaf 来判断一个 Node 是不是 without define content property,像这样
const hr = schema.node('horizontal_rule');
console.log(hr.isLeaf); // true; <hr />; size: 1

const p = schema.node('paragraph');
console.log(p.isLeaf); // false; <paragraph></paragraph>; size: 2
把 text 和 paragraph 嵌套起来,请问 paragraph nodeSize 会是多少?
const text = schema.text('abc');
const paragraph = schema.node('paragraph', null, text);
console.log(paragraph.nodeSize);
答案是 5,因为 2 + 3 = 5。
来个考题
const rowHTML = `
  <h1>Titanic</h1>
  <p>I am the king of the world</p>
  <hr>
  <ul>
    <li>you jump, I jump</li>
    <li>all life is a game of luck</li>
  </ul>
`;
const div = document.createElement('div');
div.innerHTML = rowHTML;
const frag = document.createDocumentFragment();
[...div.childNodes].forEach(node => frag.appendChild(node));
const doc = DOMParser.fromSchema(schema).parse(frag);

console.log(nodeToXML(doc));
console.log(doc.nodeSize);
ProseMirror node tree 长这样
<doc>
  <heading level="1">Titanic</heading>
  <paragraph>I am the king of the world</paragraph>
  <horizontal_rule />
  <unordered_list>
    <list_item>you jump, I jump</list_item>
    <list_item>all life is a game of luck</list_item>
  </unordered_list>
</doc>
先把 node 累加起来
- doc = 2
- heading = 2
- paragraph = 2
- horizontal_rule = 1
- unordered_list = 2
- list_item = 2 x 2 (有两个 list_item)
总数是 13
再把 text.length 累加起来
- Titanic = 7
- I am the king of the world = 26
- you jump, I jump = 16
- all life is a game of luck = 26
总数是 75
node 和 text length 相加 75 + 13,最终的 nodeSize 是 88。
注:ProseMirror Mark 不计算在 nodeSize 内。
Node position
同样这个结构
<doc>
  <heading level="1">Titanic</heading>
  <paragraph>I am the king of the world</paragraph>
  <horizontal_rule />
  <unordered_list>
    <list_item>you jump, I jump</list_item>
    <list_item>all life is a game of luck</list_item>
  </unordered_list>
</doc>
请问 doc.nodeAt(0)
console.log(doc.nodeAt(0));
会拿到哪个 node?
答案是 heading
doc.nodeAt(0) 等价于 doc.content.child(0)
console.log(doc.content.child(0)); // heading node
那 doc.nodeAt(1) 又会拿到哪个 node 呢?
答案是 "Titanic" 的 text node。
它的计算方式是这样的

简单说就是依据 nodeSize 累加计算。
doc.nodeAt( 1 到 7 ) 拿到的都是 "Titanic" text node (同一个)。
而 doc.nodeAt(8) 则会拿到 null。
doc.nodeAt(9) 会拿到 paragraph node
doc.nodeAt( 10 到 35 ) 拿到的都是 "I am the king of the world" text node。
doc.nodeAt(36) 则会拿到 null。
两个点要留意
-
end tag 位置是拿不到 node 的,它会返回 null,比如上面的 8 和 36
-
假如 Titanic 由多个 text node 组成,那 1 到 7 拿的就不会是同一个 text node,比如说
const text1 = schema.node('Tita');
const text2 = schema.node('nic');
const heading = schema.node('heading', { level: 1 }, [text1, text2]);
1 到 4 拿的是 text1,5 到 7 则拿 text2
position の 细节
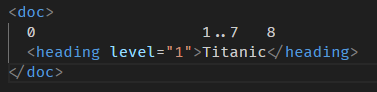
<doc>
  <heading level="1">Titanic</heading>
</doc>
doc.nodeSize 是 11
doc.nodeAt(0) 拿到 heading node。
doc.nodeAt(7) 拿到 "Titanic" text node。
doc.nodeAt(8) 拿到 null,因为是 heading 的 end tag。
这些我们上面已经了解清楚了。
问:
doc.nodeAt(9) 会拿到什么?
doc.nodeAt(10) 会拿到什么?
按照我们上面的计算图,9 和 10 应该已经超出范围了,理应会报错。
但测试的结果是
nodeAt(9) 返回 null。
nodeAt(10) 会报错。
为什么 9 不会报错呢🤔?
原因是我们的计算图显示的是 “nodeAt 会拿到哪个 node” 的位置,但这并不是 position 的位置。
严格来讲 position 的位置长这样
准确的说,nodeAt 会返回 position 的 next node。
0 的下一个 node 是 heading。
7 的下一个 node 是 text node。
8 的下一个 node 是 heading end tag 所以返回 null。
9 的下一个是没有,所以也返回 null。
10 完全没有 position,所以会报错。
Query node
ProseMirrorNode.descendants
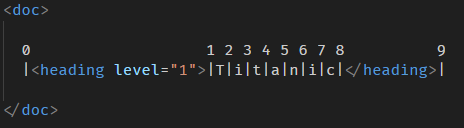
doc.descendants((node, position) => {
  if (node.type.name === 'list_item') {
    console.log([node, position]);
  }
});
descendants 会遍历 doc.content 内所有的 nodes。
每到一个 node 就会调用传入的 handle 方法。
并且把当前的 node 和 position 传进去。
像上面这个找 list_item 的例子,结果是
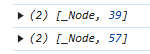
position 计算图
node 的前一个 pipe | 就是它的 position 了。
ProseMirrorNode.nodesBetween
nodesBetween 和 descendants 大同小异,唯一的区别是 nodesBetween 可以透过 from 和 to node position 来限制查询的范围。
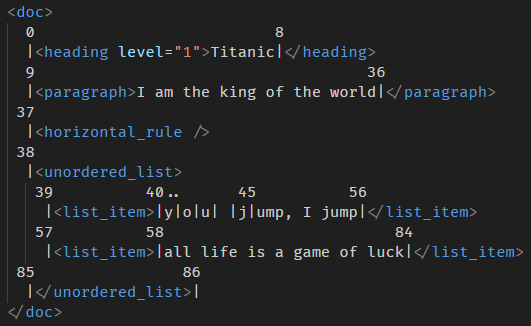
doc.nodesBetween(9, 38, (node, position) => {
  console.log([node.type.name, position]);
});
效果

9 - 38 position 内共有 3 个 node
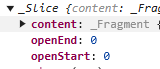
ProseMirrorNode.slice

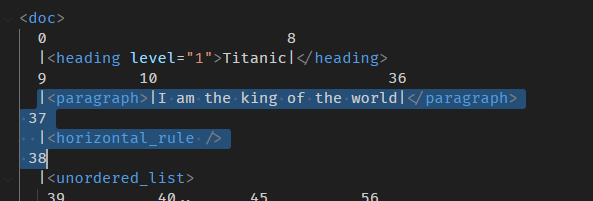
slice 0 到 5
console.log(doc.slice(0, 5));

highlight 的地方是 position 0 到 5。
slice 会返回一个 Slice 对象
slice.content 是一个 Fragment 里面包含了 heading > text (Tita),像这样
<heading>Tita</heading>
虽然 heading 的结尾 tag (</heading>) 不在 slice 的范围内,但 ProseMirror 会自动补全头尾,总之只要其中一边有 slice 到,那个 node 就会包含在 content 里。
此时 content.size 是 6 (heading node 2 + text node 4)。
openStart 和 openEnd 可以让我们知道是不是有头尾不均匀的情况。
比如上面这个 case,有 slide 到 heading 头,但是没有 heading 尾。
所以 openStart 是 0,而 openEnd 是 1。
假如我们 slice 的范围是 0 到 9

那就是有头有尾
openStart 和 openEnd 都会是 0。
如果我们 slice 的范围是 5 到 9
那就是没头有尾
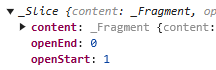
openStart 是 1,openEnd 是 0。
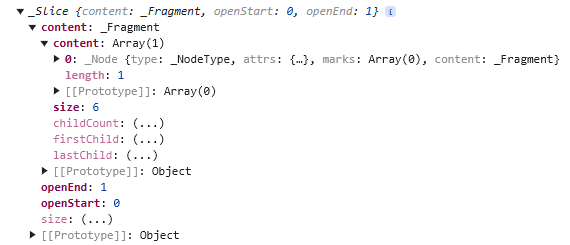
再一个例子,slice 77 到 86

const slice = doc.slice(77, 86);
console.log(nodeToXML(slice.content.firstChild!));
Slice.content
<unordered_list>
  <list_item>of luck</list_item>
</unordered_list>
Slice
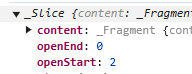
openStart 是 2 因为 list_item 和 unordered_list 的头没有被 slice 到,它们是被补全的。
Insert and update node
首先,一个重要的概念 -- ProseMirror node tree 是 Immutable!
也就是说,我们不能像 DOM API 那样 element.appendChild 就完事了。
我们需要类似这样
const newElement = element.appendChild()
而且哦,假如我们修改的是一个最底层的 leaf node,我们需要从最低层,一路修改到最顶层的 root node 才行。
append node
好,看例子
<doc>
  <heading level="1">Titanic</heading>
  <paragraph>I am the king of the world</paragraph>
  <horizontal_rule />
  <unordered_list>
    <list_item>you jump, I jump</list_item>
    <list_item>all life is a game of luck</list_item>
  </unordered_list>
</doc>
我们要在 unordered_list 里 append 一个新的 list_item。
// 首先,遍历 doc
doc.descendants((node, position) => {
  // 找到 unordered_list
  if (node.type.name === 'unordered_list') {
    // 创建 new list_item
    const newListItem = schema.node('list_item', null, schema.text('I will never let go'));

    // 往 unordered_list.content 里 append 会返回一个 new content,里面包含了旧和新的 list_item
    // append 的参数必须是 Fragment,所以这里需要把 node convert to Fragment,所以这里需要把
    const newContent = node.content.append(Fragment.from(newListItem)); // 这是 immutable 更新手法

    // node.copy 是 clone 一个 unordered_list 但是 without content,参数 1 则是要填充进去的 new content
    const newUnorderedList = node.copy(newContent); // 这也是 immutable 更新手法

    // 透过 position 定位做 replace
    // 参数 1 是 from
    // 参数 2 是 to
    // 参数 3 是要替换进去的 Slice (它只支持传入 Slice 对象,所以我们需要自己把 node wrap 成 Slice 对象)
    const newDoc = doc.replace(position, position + node.nodeSize, new Slice(Fragment.from(newUnorderedList), 0, 0));

    console.log(nodeToXML(newDoc));
  }
});
是不是很乱,很复杂?
但不用担心,因为我们在开发的时候,一般不会用到这么底层的 API,我们会用上层的 transform, transaction, state, step,这些下一篇会教。
效果
<doc>
  <heading level="1">Titanic</heading>
  <paragraph>I am the king of the world</paragraph>
  <horizontal_rule />
  <unordered_list>
    <list_item>you jump, I jump</list_item>
    <list_item>all life is a game of luck</list_item>
    <list_item>I will never let go</list_item>
  </unordered_list>
</doc>
prepend node
再看一个 prepend 的例子,关键是这一句
// const newContent = node.content.append(Fragment.from(newListItem)); // 这是 append
const newContent = Fragment.from(newListItem).append(node.content);    // 这是 prepend
思路反过来就可以了。
insert before node
const newContent = Fragment.fromArray([node.children[0], newListItem, node.children[1]]);
简单说就是 slice 前后 node 出来,然后重组,并加上 new list item。
API 小结
Fragment.from(node) -- 把 node convert to fragment
node.content.append(fragment) -- 插入 fragment 到 node.content 里,它会返回一个包含旧新 nodes 的 content
node.copy(contentFragment) -- clone node without old content 然后以参数 1 作为新 content
new Slice(Fragment.from(node), 0, 0)) -- 把 node convert to Slice
node.replace(fromPosition, toPosition, Slice) -- 依据 position 替换 nodes
Delete node
我们可以用回 insert before 的手法来实现 delete node。
const newContent = Fragment.fromArray([...node.children.slice(0, 1), ...node.children.slice(2)]);
const newUnorderedList = node.copy(newContent);
Resolved position
DOM Node API 有 parentNode,nextSibling 这些好用的方法,可以让我们在 node 之间移动查找。
而 ProseMirror 的 Node 没有这些方法。
可是呢,ProseMirror 有 Resolved Position 对象,它可以实现类似的操作。
我们一个一个例子过:
一样是这个计算图
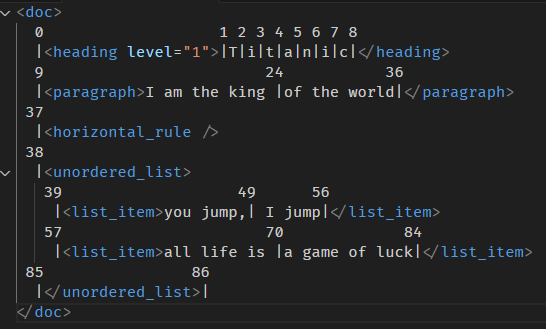
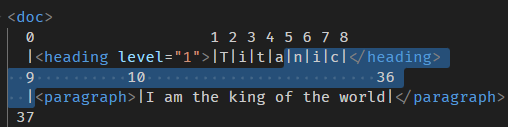
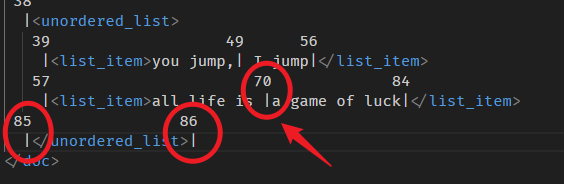
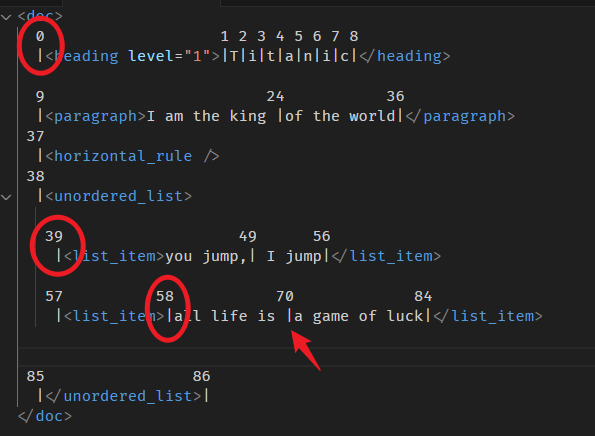
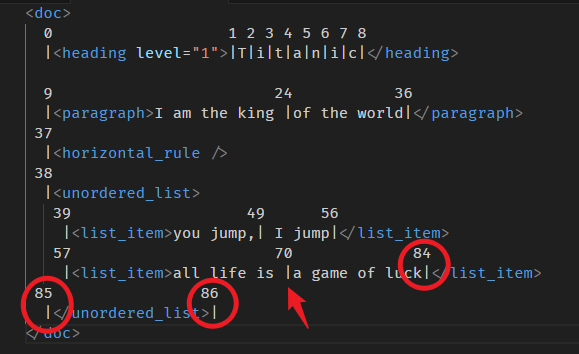
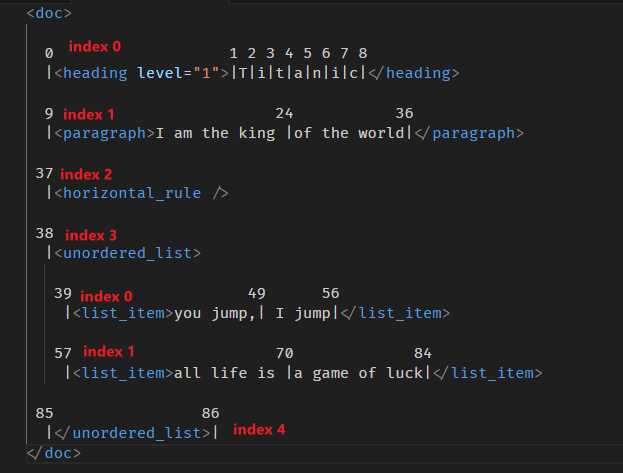
<doc>
  0                   1 2 3 4 5 6 7 8
  |<heading level="1">|T|i|t|a|n|i|c|</heading>
  9                        24           36
  |<paragraph>I am the king |of the world|</paragraph>
 37
  |<horizontal_rule />
 38
  |<unordered_list>
   39                   49      56
    |<list_item>you jump,| I jump|</list_item>
   57                      70             84
    |<list_item>all life is |a game of luck|</list_item>
 85                86
  |</unordered_list>|
</doc>
ResolvedPos 对象
const resolvedPos = doc.resolve(0);
调用 resolve 方法,传入 position,会得到一个 ResolvedPos 对象。
所有查找功能就从它开始。
depth 方法
它的解释是
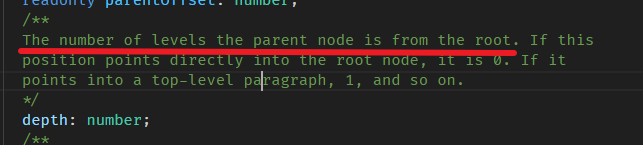
意思是,这个 resolved pos (简称 position) 的 parent node 是在第几层级 (从 root 算起)。
看例子:
const resolvedPos = doc.resolve(0); // position 是 0
console.log(resolvedPos.depth); // depth 是多少?
假设 position 是 0,那 depth 会是多少呢?

0 的 parent node 是 <doc>,它就是 root,所以 depth 是 0。
那如果 position 是 24 呢?
24 的 parent node 是 <paragraph>,它是 <doc> 的下一层,所以 depth 是 1。
再看一个 49

49 的 parent node 是 <list_item>,<doc> 是 0,<unordered_list> 是 1,<list_item> 的 depth 就是 2。
你会算了吗🙂?
parent 属性
顾名思义,就是拿 position 的 parent node。
const resolvedPos = doc.resolve(0);
console.log(resolvedPos.parent.type.name); // doc
position 0 的 parent node 是谁?

当然是 <doc> 咯。
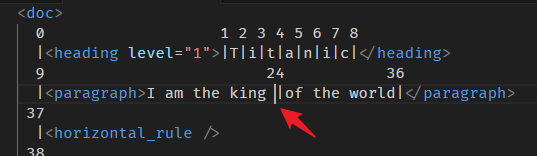
position 24 的 parent node 是谁?

是 <paragraph>,不是 text node 哦。
如果我们想拿 text node 应该要用 doc.nodeAt(24)。
要拿 parent 就是 doc.resolve(24).parent。
parentOffset 属性
const resolvedPos = doc.resolve(3);
console.log(resolvedPos.parentOffset); // 2
parent offset 指的是 position 和 parent start 的偏移数,看例子:

position 3,parent 是 <heading>,那从 <heading> 里面算起,到 3 之前,有多少个 pipe?
答案是 2 个 pipe,所以 parentOffset 就是 2。
再一个例子

position 37, parent 是 <doc>,从 <doc> 里面算起,到 37 之前,有多少个 pipe?
答案是 37 个 pipe,所以 parentOffset 就是 37。
你会算了吗🙂?
nodeAfter 属性
const resolvedPos = doc.resolve(0);
console.log(resolvedPos.nodeAfter?.type.name); // heading
node after 就是 position 位置的下一个 node,看例子:

就下一个 node,很好理解。
但,如果是在 text node 里面就有一点点特别了。
const resolvedPos = doc.resolve(4);
console.log(resolvedPos.nodeAfter);

效果

这个 text node 是临时被创建的,它的内容仅包含了 "anic" 4 个字母,因为 "anic" 是在 position 4 的 next (后面)。
再一个例子

再一个例子
上面提到,它会临时创建一个 text node,但如果刚巧是完整的 text node,那它会用回原本的 text node。
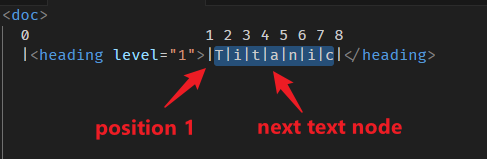
const resolvedPos = doc.resolve(1);
console.log(resolvedPos.nodeAfter === doc.nodeAt(1)); // true
resolve(1).nodeAfer 和 nodeAt(1) 是同一个 text node 对象。
你会算了吗🙂?
nodeBefore 属性
nodeBefore 就是跟 nodeAfter 反着来,看例子:
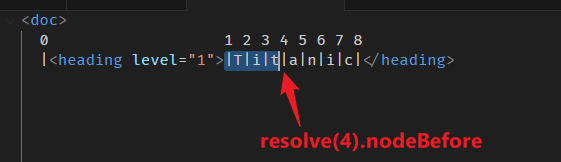

这个挺好理解的。
再一个例子

const resolvedPos = doc.resolve(8);
console.log(resolvedPos.nodeBefore === doc.nodeAt(7)); // true
同一个 text node 对象。
再一个例子
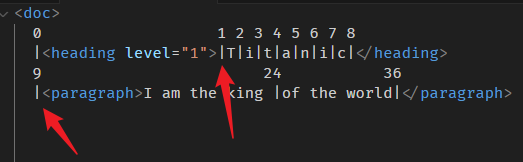
position 9 和 position 1 的 nodeBefore 分别是?
9 的 before 是 <heading /> end tag,按过往的逻辑,end tag 就是 null。
1 的 before 是 <heading>
答错了!
切记,是要跟 nodeAfter 反着来。
9 的 before 是 <heading>
1 的 before 是 null
你会算了吗🙂?
node 方法
node 方法的作用是查找祖先 node。
const resolvedPos = doc.resolve(0);
resolvedPos.node() // <doc>
resolvedPos.node(resolvedPos.depth) // <doc>
resolvedPos.parent // <doc>
以上三句是等价的
resolvedPos.node() 可以传入一个 number 来指定查找祖先的层级 (depth)。
没有传入的话,它的默认值是 resolvedPos.depth。
我们上面说过,resolvedPos.depth 就是指 position 的 parent node 层级。
所以 resolvedPos.node() === resolvedPos.node(resolvedPos.depth) === resolvedPos.parent。
再一个例子

position 70,一路往上调出祖先 node
const resolvedPos = doc.resolve(70);
for (let index = resolvedPos.depth; index >= 0; index--) {
  console.log('node', resolvedPos.node(index).type.name);
}
效果

你会算了吗🙂?
before 方法
上面我们学的是 nodeBefore 属性,这里是 before 方法,别搞混哦。
const resolvedPos = doc.resolve(70);
console.log(resolvedPos.before()); // 57
position 70 的 before 返回 number 57。
这个 57 是一个 position 来的。

规则是
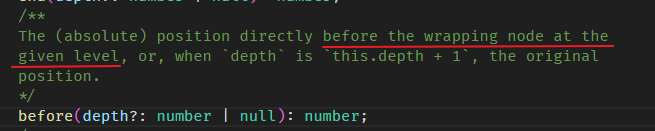
70 的 wrapping node 指的是 <list_item> (也就是 parent node 啦),然后 before 就是左边,所以是 57。
另外,before 方法 和 node 方法一样可以传入 depth 参数。
我们往上一层走
console.log(resolvedPos.before(resolvedPos.depth - 1)); // 38
为什么是 38 呢?

57 的 wrapping node 是 <unordered_list>,它的左边就是 position 38 咯。
假如我们再往上一层走会如何?
const resolvedPos = doc.resolve(70);
console.log(resolvedPos.before(resolvedPos.depth - 1 - 1));
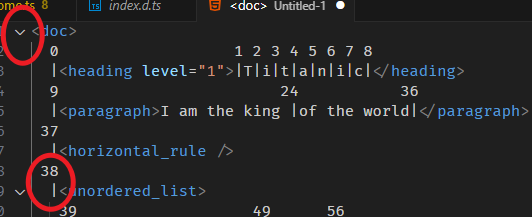
38 的 wrapping node 是 <doc>,它的左边没有 position 了,所以会直接报错。

你会算了吗🙂?
after 方法
有 before 方法,自然也有 after 方法。
const resolvedPos = doc.resolve(70);
console.log(resolvedPos.after()); // 85
console.log(resolvedPos.after(resolvedPos.depth - 1)); // 86
console.log(resolvedPos.after(resolvedPos.depth - 1 - 1)); // error
逻辑是一样的,只是方向从左边,换成右边。
你会算了吗🙂?
start 方法
start 方法和 before 方法挺相识的,主要的区别在于,before 是去 wrapping node "外面" 的左边,而 start 是去 wrapping node "里面" 的左边。
一个外面,一个里面。
const resolvedPos = doc.resolve(70);
console.log(resolvedPos.start());                          // 58
console.log(resolvedPos.start(resolvedPos.depth - 1));     // 39
console.log(resolvedPos.start(resolvedPos.depth - 1 - 1)); // 0
计算图
70 的 wrapping node 是 <list_item>,它里面最左边是 58。(对比 before 方法是拿 "外面" 左边,所以 before 返回的是 57)
往上一层是 <unordered_list>,它里面最左边是 39。
再往上一层是 <doc>,里面最左边是 0。
你会算了吗🙂?
end 方法
有 start 方法,自然就有 end 方法。
逻辑一样,我们直接看例子
const resolvedPos = doc.resolve(70);
console.log(resolvedPos.end());                          // 84
console.log(resolvedPos.end(resolvedPos.depth - 1));     // 85
console.log(resolvedPos.end(resolvedPos.depth - 1 - 1)); // 86
计算图
你会算了吗🙂?
index 方法
index 的计算方法是看前面有多少个 node。
const resolvedPos = doc.resolve(37);
console.log(resolvedPos.index()); // 2
计算图
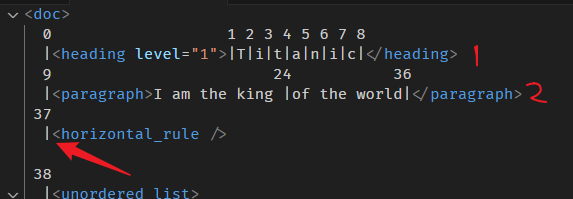
37 的前面有 2 个 node (算平级的,子孙层不算),那它的 index 就是 2。
再一个例子
再一个例子
const resolvedPos = doc.resolve(39);
console.log(resolvedPos.index(resolvedPos.depth - 1)); // 3
计算图

39 和 57 拿 index(depth -1) 上一层,会拿到 position 38 的 index 3。
再一个例子

text node 要留意哦,position 10 和 24 的 index 都是 0,因为 10 到 35 是同一个 text node。
36 的 index 是 1,因为前面有一个 text node。
假如我们把 HTML 结构改成这样
<p>I am the king <strong>of</strong> the world</p>
那 paragraph 里面就变成有 3 个 text node 了。
最后会变成这样计算

你会算了吗🙂?
告一段落
ResolvedPos 的属性方法不止于此,但我目前还没有开始用,等用到了才回来补。
ProseMirror Mark manipulation
mark 的修改和 node 大同小异,这里给个例子就好。
HTML 长这样
<p>I am <strong>the king</strong> of <strong>the world</strong></p>
"the king" 和 "the world" 是 bold。
ProseMirror node tree 长这样
const strong = schema.mark('strong');
const paragraph = schema.node('paragraph', null, [
  schema.text('I am '),
  schema.text('the king', [strong]),
  schema.text(' of '),
  schema.text('the world', [strong]),
]);
const doc = schema.node('doc', null, paragraph);
现在我们要把 "king of the world" 加上 italic。
// 首先,遍历 doc
doc.descendants((node, position) => {
  // 找到 paragraph
  if (node.type.name === 'paragraph') {
    // 创建 italic mark
    const emphasis = schema.mark('emphasis');

    // 依据字数 'I am the ' slice 出范围内的 text node,会拿到第一,二 text node
    const text1 = node.slice(0, 9);

    // 依据字数 'king of the world' slice 出范围内的 text node,会拿到第二,三,四 text node
    const text2 = node.slice(9);

    // text1 不需要处理,slice 它出来只是为了重组。
    // text2 要 map 里面 3 个 text node,给它们都添加上 italic mark
    const text2Nodes = text2.content.content.map(node => schema.text(node.text!, emphasis.addToSet(node.marks))); // 这是 immutable 更新手法

    // 重组 text nodes
    const newTextNodes = [...text1.content.content, ...text2Nodes];
    console.log(newTextNodes.length); // 变成 5 个 text node 了

    // 然后换掉 paragraph 的 content。
    const newParagraph = node.copy(Fragment.fromArray(newTextNodes));

    // 替换掉 paragraph
    const newDoc = doc.replace(position, position + node.nodeSize, new Slice(Fragment.from(newParagraph), 0, 0));

    // serialize to DOM tree
    const frag = DOMSerializer.fromSchema(schema).serializeFragment(newDoc.content);
    const div = document.createElement('div');
    div.appendChild(frag);
    console.log(div.innerHTML);
  }
});
效果
<p>I am <strong>the <em>king</em></strong><em> of </em><strong><em>the world</em></strong></p>
大部分 API 上一 part 都教过了,唯一新的是
emphasis.addToSet(node.marks)
addToSet 就是把一个新的 mark 添加到一群 (set) 旧的 mark 里面,然后返回旧新 marks,和 append 大同小异。
告一段落
零零散散的 API 还有很多,我们就不一一讲解了,毕竟实战时未必会用到这么多,等以后我实战用到了再回来补上呗。
总结
ProseMirror Schema 是 ProseMirror 对 HTML DOM 的 "上层" 和 "自定义" 封装。
因此,它和 HTML DOM 十分相似,并且可以相互转换。
本篇是以 "如何使用 DOM API" 这个角度去对应出 “如何使用 ProseMirror Schema”。
阐述了它们相似和不同的地方,还要如何相互转换。
掌握了这些基础,往后我们就可以使用 ProseMirror 创建出最终我们想要的 DOM 了。

 浙公网安备 33010602011771号