

Angular 20+ 高阶教程 – 信号 (Signals)
前言
Signals (Reactive Programming) 是在 Angular v16 (2023年5月) 被引入的,并在 v20 达到稳定 (stable) 阶段。
因此,从 v20 开始,Signals 就是主流了,这也是为什么我会把它放到教程的最前面几篇。
Signals 的前世 の KO.js
Signals 不是 Angular 专属概念,许多前端框架/库都有 Signals,甚至未来 TC39 也可能会内置 Signals (目前在 state 1)。
要想深入理解 Signals,我觉得最好的方式就是去"考古" -- 为什么 Signals 会诞生?它解决了什么问题?它如何演化至今?
Knockout.js
Signals 最早出现在 2010 年微软的 MVVM 框架 Knockout.js (简称 KO)。
下面是一段 KO 的代码
HTML
<body>
  <h1 data-bind="text: firstName"></h1>
</body>
Scripts
import ko from 'knockout';

const viewModel = {
  firstName: 'Derrick',
};

ko.applyBindings(viewModel);
效果

MVVM 框架的中心思想是:Application Level 只负责定义 view,view model,以及它们之间的 binding 关系,而框架则负责实际的 DOM API 操作,完成渲染。
下面这句是 view model
const viewModel = {
  firstName: 'Derrick',
};
这句是 view 和 binding
<h1 data-bind="text: firstName"></h1>
KO 则负责操作 DOM API,大概是这样
h1.textContent = viewModel.firstName;MVVM 框架的难题 -- 监听 view model 变更
上面的代码已经可以成功渲染出 firstName 了,让我们加入一个难题 -- 三秒钟后修改 firstName
const viewModel = {
  firstName: 'Derrick',
};

ko.applyBindings(viewModel);

// 三秒后
window.setTimeout(() => {
  viewModel.firstName = 'Richard'; // 把 firstName 从 'Derrick' 改成 'Richard'
}, 3000);
效果
等了三秒后,<h1> 仍然是 Derrick,Why🤔?
因为我们上面这个写法会让 KO 无法监听到 firstName 变更。
KO 不知道 firstName 变更了,自然不会去重新渲染,结果就是 <h1> 始终保持不变。
你可能会想,view model 是对象,KO 可以做一个 Proxy setter 去拦截 firstName 写入,这样不就能监听到 firstName 变更了吗?
没错,今时今日确实可以用 Proxy 实现,但 KO 是 2010 - 2012 年的框架,当时 JavaScript 还没有 Proxy 概念 (Proxy 是 ES6 于 2015 年才引入的)。
为了应对 "监听 view model 变更" 的难题,KO 引入了一个叫 observable variable 的概念。
ko.observable
顾名思义,observable variable 就是 "可观测变量",这里的 "观测" 指的就是监听变量的变更。
接下来,我们透过代码去了解它
// non-observable variable
let firstName: string = 'Derrick';

// try to observe variable change
firstName.onChange(newFirstName => console.log(newFirstName));

// change variable
firstName = 'Richard';
上面是一个普通的变量,由于 JavaScript 语言不支持监听 assignment operation,也没有 onChange 方法,所以上述代码完全无法实现预期效果。
下面是 KO observable variable 的写法 (对应上面的例子)
// observable variable
const firstName: KnockoutObservable<string> = ko.observable('Derrick');

// observe variable change
firstName.subscribe(newFirstName => console.log(newFirstName));

// change variable
firstName('Richard');
ko.observable 返回的不是 string,而是一个混合体 (object + setter 函数)。
object 的部分:它有一个 subscribe 方法,可以用来监听变量的变更,像这样
firstName.subscribe(newFirstName => console.log(newFirstName)); // 每当 firstName 变更,console.log 就会执行setter 的部分:我们不使用 assign operator 赋值 (因为 assign operator 无法监听和拦截),而是透过调用这个 setter,并传入要 assign 的 value,像这样
firstName('Richard'); // 把 firstName 从 'Derrick' 改成 'Richard'好,我们把 view model 里的 firstName 改成 observable variable,再试试
const viewModel = {
  firstName: ko.observable('Derrick'), // 使用 observable variable
};

ko.applyBindings(viewModel);

// 三秒后
window.setTimeout(() => {
  viewModel.firstName('Richard'); // 把 firstName 从 'Derrick' 改成 'Richard'
}, 3000);
效果
三秒后,<h1> 成功从 Derrick 变成了 Richard。
KO 操作 DOM API 大概是这样
// 监听 firstName 变更
viewModel.firstName.subscribe(
  // 每当 firstName 变更,更新 DOM
  newFirstName => (h1.textContent = newFirstName)
);
ko.observable 与 RxJS 的渊源
熟悉 RxJS 的朋友,第一眼看到 KO 可能会感到似曾相识。
下面是 KO 和 RxJS 的对比代码
// 这是 KO
const firstName = ko.observable('Derrick');
firstName.subscribe(newFirstName => console.log(newFirstName));
firstName('Richard');

// 这是 RxJS
const lastName = new BehaviorSubject('Derrick');
lastName.subscribe(newLastName => console.log(newLastName));
lastName.next('Richard');
是不是如出一辙?
RxJS 出自微软的 Rx (Reactive Extensions) 体系,而 KO 的灵感也正巧来自 Rx。
可谓师出同门,难怪如此相识。
虽然如此,我们可千万别把 KO 和 RxJS 划上等号哦,因为它们只是部分 (而且是少部分) 相似而已。下面我们会看到它们的显著不同。
这里先提两个小区别:
-
RxJS subscribe 后会立即出发第一次
调用 RxJS 的 lastName.subscribe 会立即触发第一次 (这是 BehaviorSubject 的特性),而 KO 的 firstName.subscribe 则会等到变量变更后才触发。
如果我们希望 RxJS 像 KO 那样,可以加一个 skip(1) operator,过滤掉第一次触发。
lastName.pipe(skip(1)).subscribe(newLastName => console.log(newLastName)); -
RxJS 每一次 next value 都会触发 subscription callback
每一次调用 RxJS 的 lastName.next('Derrick') 都会触发 subscription callback,即便我们传入相同的值。
而 KO 有一个判断,只有当 old value 和 new value 不相等的时候,subscription callback 才会触发。如果我们希望 RxJS 像 KO 那样,可以加一个 distinctUntilChanged operator,过滤掉相同值触发。
lastName.pipe(skip(1), distinctUntilChanged()).subscribe(newLastName => console.log(newLastName));
ko.computed
KO 的目标是让所有变量都成为 observable variable,上一 part 我们看了 ko.observable 的例子,它把一个普通变量变成了 observable variable。
这一 part,我们来看一个 "不那么普通" 的变量 -- computed variable。
computed variable 指的是一个变量,它的值不储存在它自身,而是透过计算其依赖的变量得来。
一个经典的例子就是 fullName = firstName + lastName。
我们通常用 getter 来实现,像这样:
const viewModel = {
  firstName: 'Derrick',
  lastName: 'Yam',

  get fullName() {
    return this.firstName + ' ' + this.lastName;
  },
};
但,getter 不是 observable 啊,怎么办呢?
用 RxJS 实现 computed variable
既然 KO 和 RxJS 师出同门,那我们先试试用 RxJS 来实现
const firstName = new BehaviorSubject('Derrick');
const lastName = new BehaviorSubject('Yam');

const fullName = combineLatest([firstName, lastName]).pipe(map(([firstName, lastName]) => firstName + ' ' + lastName));

fullName.subscribe(fullName => console.log(fullName)); // observe fullName change
用 combineLatest 监听依赖,map 作为 computation,这样 fullName 就变成 observable 了。
不过,它有一个缺失 -- 不能直接读取 value。
console.log(firstName.value); // direct read firstName value
console.log(fullName.value);  // Error: Property 'value' does not exist on type 'Observable<string>'
因为只有 BehaviorSubject 才能直接读取 value,combineLatest 返回的是 Observable 只能 subscribe 而已。
我们可以用一些粗糙的手法来实现,比如
function getObservableValue<T>(obs: Observable<T>): T {
  let value: T = undefined!;
  obs.pipe(take(1)).subscribe(v => (value = v));
  return value;
}

const fullName = combineLatest([firstName, lastName]).pipe(
  map(([firstName, lastName]) => firstName + ' ' + lastName),
  shareReplay({ bufferSize: 1, refCount: false }),
);

console.log(getObservableValue(fullName)); // direct read fullName value
或者
const firstName = new BehaviorSubject('Derrick');
const lastName = new BehaviorSubject('Yam');

const fullName = new BehaviorSubject<string>(undefined!);
combineLatest([firstName, lastName]).subscribe(([firstName, lastName]) => fullName.next(firstName + ' ' + lastName));

console.log(fullName.value); // direct read fullName value
老实说,这两个方式都不太优雅。
第一个就是乱。
第二个比较直观,但 BehaviorSubject 不是 readonly,作为 computed variable 有点反直觉,毕竟 database 的 computed column 和 Excel 的 formula column 这些都是 readonly。
而且,这两个实现方式的代码都非常繁琐。
无论选哪一个,我们都需要做上层封装。
好,我们试试封装它,假设我们选第二个方式来做封装

这三句,红线是动态的部分,需要用参数传进来,其余的部分封装进函数里。
type UnwrapObservable<T> = T extends Observable<infer U> ? U : never;
type UnwrapObservables<T extends readonly Observable<unknown>[]> = {
  [K in keyof T]: UnwrapObservable<T[K]>;
};
interface ObservableComputedVariable<TValue> {
  readonly value: TValue;
  subscribe: Observable<TValue>['subscribe'];
}

function computed<TValue, TDependentVariables extends readonly Observable<unknown>[]>(
  dependentVariables: TDependentVariables,
  computation: (...args: UnwrapObservables<TDependentVariables>) => TValue,
): ObservableComputedVariable<TValue> {
  const computedVariable = new BehaviorSubject<TValue>(undefined!);

  combineLatest(dependentVariables).subscribe(values => {
    computedVariable.next(computation(...(values as UnwrapObservables<TDependentVariables>)));
  });

  return computedVariable;
}
调用方式
const fullName = computed([firstName, lastName], (firstName, lastName) => firstName + ' ' + lastName);
console.log(fullName.value); // direct read fullName value
fullName.subscribe(newFullName => console.log(newFullName)); // observe fullName change
撇开性能和调用便捷性不谈,我们算是勉强实现了一个 observable computed variable。
用 KO 实现 computed variable
直接上代码
const firstName = ko.observable('Derrick');
const lastName = ko.observable('Yam');
const fullName = ko.computed(() => firstName() + ' ' + lastName());

console.log(fullName()); // read fullName value
fullName.subscribe(newFullName => console.log(newFullName)); // observe fullName change
KO 和 RxJS 在 computed variable 的实现上有着很大的区别,我们一个一个来看。
// 这是 RxJS
const fullName = computed([firstName, lastName], (firstName, lastName) => firstName + ' ' + lastName);

// 这是 KO
const fullName = ko.computed(() => firstName() + ' ' + lastName());
有两个地方很不一样的:
- KO 的 firstName 和 lastName 是 getter 函数
上一 part 我们有提到过,ko.observable 返回的是一个混合体,它是 object + setter。
其实不仅如此,它也是一个 getter。
当我们调用它时,如果有传入参数,它就作为 setter;如果没有传参数,它就作为 getter。
我们知道,KO 把 variable 做成 setter 是为了拦截写入,从而触发 subscription callback;那做成 getter 又是为了什么呢?RxJS 可没有 getter 啊 🤔
- RxJS 必须显式声明出 computation 里所有的依赖 (如 firstName 和 lastName),而 KO 则不需要。
![]()
这是因为 KO 实现了一套自动依赖收集机制。
当调用 ko.computed 时,computation 会立即执行一次。
由于 firstName 和 lastName 是 getter,KO 可以进行拦截,并将它们收集为 fullName 的依赖。
每当这些依赖变更,computation 就会重新执行。(解答上题:这就是为什么 KO 要把 variable 做成 getter 的原因,它要拦截 getter 做依赖收集)
这套机制有两个好处:
第一个是提升调用便捷性。
// RxJS 的写法不仅冗长,而且需要声明依赖,超麻烦
const fullName = computed([firstName, lastName], (firstName, lastName) => firstName + ' ' + lastName);

// 反观 KO 简洁干净
const fullName = ko.computed(() => firstName() + ' ' + lastName());

// ko.computed 几乎等价于我们写 getter 了
get fullName() {
  return this.firstName + ' ' + this.lastName;
}
第二个是提升性能
computed 会监听它的所有依赖,只要其中任一发生变更,就会重新执行 computation。
RxJS 的依赖是在声明时一次性写死的,所有可能在 computation 中用到的依赖都必须预先列出。
KO 的依赖则是在执行 computation 时动态收集的,例如:
const fullName = ko.computed(() => (status() === 'completed' ? firstName() : lastName()));当 status 是 'completed' 时,fullName 的依赖只有 firstName;反之,依赖变成只有 lastName。
固定依赖 (RxJS) 必须监听所有依赖,而动态依赖 (KO) 则只需监听当前真正用到的依赖。
监听所有依赖可能会引发不必要的 computation,而动态依赖则可以避免这种不必要的 computation,因此 KO 的实现方式在性能上通常优于 RxJS。

ko.computed の 特性详解
为什么要讲得这么细?因为这涉及到 Signals 概念在后 KO 时期的演化。
ko.computed 都做了些什么?
const fullName = ko.computed(() => firstName() + ' ' + lastName());在调用 ko.computed 后,传入的 computation 会立即执行一次。
执行过程中,会自动收集依赖,监听它们的变更。
computation 的返回值会被缓存起来,供 getter 使用。
当依赖变更,computation 会重新执行,依赖也会重新收集,缓存的值也会更新,同时还会触发 subscription callback (如果这个 computed variable 有被 subscribe 的话)。
除了自动依赖收集以外,整体的逻辑和 RxJS 实现的 computed variable 大同小异。
用 ko.computed 实现 multiple subscribe for side effect
ko.observable 只能 subscribe 一个 variable
const firstName = ko.observable('Derrick');
firstName.subscribe(newFirstName => console.log(newFirstName));
如果我们想同时 subscribe multiple variables 做点 side effect,该怎么办?
const firstName = ko.observable('Derrick');
const lastName = ko.observable('Yam');
// 想同时监听 firstName 和 lastName
[firstName, lastName].subscribe(([newFirstName, newLastName]) => {}) // Error!! array 没有 subscribe 方法
我们看看 RxJS 是怎么做的
const firstName = new BehaviorSubject('Derrick');
const lastName = new BehaviorSubject('Yam');

combineLatest([firstName, lastName]).subscribe(([firstName, lastName]) => console.log([firstName, lastName])); // ['Derrick', 'Yam']
把要监听的 variables 一股脑传给 combineLatest 函数,然后再 subscribe 就行了。
KO 虽然没有 combineLatest,但 ko.computed 的行为和 combineLatest 非常相近,所以我们可以借助 ko.computed 来实现。
ko.computed(() => console.log([firstName(), lastName()])); // ['Derrick', 'Yam']依据上一 part 我们对 ko.computed 的行为理解
-
ko.computed 会立即执行 computation,此时 console.log 会被调用
-
与此同时,firstName 和 lastName 会被 subscribe (因为自动依赖收集)
-
每当 firstName 或 lastName 变更,computation (也就是 console.log) 会重新执行。
注意,computation 不需要有返回值,ko.computed 的返回值也不需要存入 variable,因为我们的目的是 multiple subscribe for side effect,而不是为了要得到一个 observable computed variable。
ko.computed 用作 observable computed variable 的不足
看到这里,我相信大家开始有点混乱了:ko.computed 既能创建 observable computed variable,又能用来实现 multiple subscribe side effect,那它到底是一箭双雕,还是两头不到岸呢?
ko.computed 用作 observable computed variable,若与 JavaScript 对象的 getter 相比较,有几个特点:
-
push-based vs pull-based
JS 的 getter 是 pull-based,意思是,只有在读取 computed variable 的时候,computation 才会被执行。
而 KO 的 computed variable 则是 push-based。
即使我们没有读取 computed variable,它的 computation 也会被执行 -- 第一次的立即执行,以及之后每一次依赖变更时也都会执行。
-
cacheable
JS 的 getter 没有缓存能力,每次读取 computed variable,都会执行 computation。
而 KO 的 computed variable 是带缓存的。每次读取都是返回缓存值,而缓存会在依赖变更时被更新。
理想中的 computed variable 应同时具备 pull-based、cacheable、observable 以及自动依赖收集 -- 唯有聚合这些要素,才能做到最高效,且最便捷。
我们看看它们是否达标:
-
JS 的 getter 是 pull-based,但不是 cacheable 和 observable,因此不达标。
-
RxJS 具备 cacheable 和 observable,但属于 push-based,且不支持自动依赖收集,因此也不达标。
-
KO 具备 cacheable、observable 和自动依赖收集,但依然是 push-based,因此仍不达标。
KO 是三者中表现最好的,但可惜仍然不达标,这也为后 KO 时代 Signals 的演化埋下了伏笔。
题外话:ko.pureComputed
KO 在 v3.2 (Aug 2014) 推出了 ko.pureComputed,它是 pull-based,所以达标了。
但 2014 年已经是后 KO 时期了,而且这个灵感好像是借鉴自 Vue,所以我不把它看作是 Signals 的前世。
至于 pull-based 和 push-based 的 computed 有什么区别,我们留到下一 part -- Signals 的今生,再深入探究。
ko.computed 用作 multiple subscribe side effect 的别扭
ko.computed 用作 multiple subscribe side effect 与 RxJS 的 combineLatest 大同小异。
它们最大的区别在于:RxJS 是指定要监听的依赖,而 KO 是自动监听依赖。
自动是一把双刃剑,虽然方便,但有时也可能不够灵活。
来看一个 RxJS 灵活的例子
const firstName = new BehaviorSubject('Derrick');
const lastName = new BehaviorSubject('Yam');
const status = new BehaviorSubject('completed');

// 指定监听 firstName 和 lastName 而已
combineLatest([firstName, lastName]).subscribe(() => {
  // 但 side effect 里也使用到了没被监听的 status
  console.log([firstName.value, lastName.value, status.value]);
});
我们只监听 firstName 和 lastName,但在 side effect 里却也使用到了没被监听的 status。
再来看看 ko.computed 的相同例子
const firstName = ko.observable('Derrick');
const lastName = ko.observable('Yam');
const status = ko.observable('completed');

ko.computed(() => console.log([firstName(), lastName(), status()]));
KO 会自动监听依赖,像上面的 firstName,lastName,status 都会被监听,但这并不是我们想要的。
解决方法是使用 peek
ko.computed(() => console.log([firstName(), lastName(), status.peek()]));status() 会导致依赖被收集,而 status.peek() 同样是读取 value,但它不会被收集为依赖。
还有一种写法是这样
ko.computed(() => {
  // 把要监听的依赖声明在顶部
  firstName();
  lastName();

  // 把 side effect wrap 一层 ignoreDependencies
  ko.ignoreDependencies(() => console.log(firstName(), lastName(), status()));
});
把要监听的依赖放到最顶部,具体的 side effect 则用 ignoreDependencies wrap 起来。
顾名思义,ignoreDependencies 内的代码不会被自动收集为依赖。
这种写法等同于 RxJS 的 combineLatest,只不过这种表达方式太不直观了,谁能理解在顶部调用 firstName() 是为了让它被收集为依赖,具体的 side effect 代码又要多包一层,总之就是非常别扭的写法。
ko.computed 总结
显然,ko.computed 并不是一箭双雕,而是两头不到岸。
无论是用作 observable computed variable,还是用作 multiple subscribe side effect,都存在一些不足的地方。
这也正是后 KO 时代,Signals 要改进的方向。
KO 总结
KO 作为 MVVM 框架,面对的难题是:如何能监听到 view model 的变更?
KO 的想法是实现一套 observable variable 机制,让所有变量都能被监听。
透过 ko.observable、ko.computed、getter、setter、自动依赖收集等机制,KO 成功让所有的 variable 都变成 observable variable。
虽然 KO 的设计思想非常前沿,但放到今天来看,仍能发现不少不足和混入之处。
比如,ko.computed 用作 observable computed variable 时,是 push-based,性能并非最优。
另外,ko.computed 用作 multiple subscribe side effect 时,由于自动依赖收集的特性,它并不适合所有场景,有时还不如 RxJS 来得直观。
不过,无论如何,作为 2010 到 2012 年的框架,KO 拥有如此高的先见之明已经非常难得了。它的不足之处,就留待后 KO 时代的框架去完善吧。
Signals 的今生 の SolidJS
2012 年以后,KO 逐渐淡出前端视野,但 observable、computed、自动依赖收集等核心概念并未随之消失。
这些思想被 RxJS、Vue、MobX、SolidJS 等框架继承,并在实践中不断演化和改进。
其中又以 SolidJS 最为突出。这里我将以它为例,带大家一起看看今时今日的 Signals 及其演化。
Observable variable -- createSignal
这是 KO 的 declare, read, write observable variable
const firstName = ko.observable('Derrick'); // declare variable
console.log(firstName()); // read variable
firstName('Richard');     // write variable
这是 SolidJS 的 declare, read, write observable variable
const [getFirstName, setFirstName] = createSignal('Derrick'); // declare variable
console.log(getFirstName()); // read variable
setFirstName('Richard');     // write variable
KO 返回的是一个混合体:object + getter + setter。
SolidJS 返回的是 Tuple:[getter, setter]。
SolidJS 的 getter、setter 和 KO 的 getter、setter 用法大同小异。
至于是返回一个混合体好,还是拆分成两个函数好,我觉得各有所长。比如说:
getter、setter 是函数,用 getFirstName、setFirstName 来命名会比较规范(函数使用动词),而混合体就无法使用动词命名。
另外,getter、setter 拆开后,在传递时可以只传其中一个,比如只允许 getter,那我就只传 getter;混合体则只能整体传递。
当然,如果你想要一次性传递 getter 和 setter,那混合体就更方便,只需传一个变量,而拆分的形式就需要多传一个。
SolidJS 少了 KO 的 object,这意味着它没有 firstName.peek()、firstName.subscribe() 等功能。
不过这并不要紧,因为这些功能可以通过其他方式实现。
- firstName.subscribe 可以用 ko.computed 替代 (ko.computed 可以 subscribe multipl 自然也可以用作 subscribe single)。
-
firstName.peek 可以用 ko.ignoreDependencies 替代。
所以,只要 SolidJS 有实现 ko.computed 和 ko.ignoreDependencies,那就没问题了。
Observable computed variable -- createMemo
这是 KO 的 observable computed variable
const firstName = ko.observable('Derrick');
const lastName = ko.observable('Yam');

const fullName = ko.computed(() => firstName() + ' ' + lastName());

console.log(fullName()); // 'Derrick Yam'
这是 SolidJS 的 observable computed variable
const [getFirstName] = createSignal('Derrick');
const [getLastName] = createSignal('Yam');

const getFullName = createMemo(() => getFirstName() + ' ' + getLastName());

console.log(getFullName()); // 'Derrick Yam'
上一 part 我提到过 -- ko.computed 在用作 observable computed variable 时存在一些不足。
observable computed variable 应该具备 4 个要件:pull-based、cacheable、observable 以及自动依赖收集。
而 ko.computed 只满足了其中三个,因为它是 push-based,而不是 pull-based。
在这一点上,SolidJS 做了补强,它同时具备这 4 个要件:pull-based、cacheable、observable,以及自动依赖收集。
push-based:调用 computed 后,computation 会立即执行,每一次依赖变更,computation 都会执行。
pull-based:调用 computed 后,computation 不会立刻执行,只有在 computed variable 被读取时,computation 才会执行。
pull-based 的优势在于,它能最大程度地减少不必要的 computation 执行。
注:SolidJS 采用 pull-based 意味着它无法像 ko.computed 那样用作 multiple subscribe for side effect,但这并不要紧,SolidJS 有替代方案。
Multiple subscribe for side effect -- createEffect & createComputed
ko.computed 除了可以用作 observable computed variable 还可以用作 multiple subscribe for side effect。
没错,两个目的混在一起实现,最终就是两头不到岸。
因此 SolidJS 把这两个目的拆分实现:
-
observable computed variable 使用 createMemo 实现。
-
multiple subscribe for side effect 则使用 createEffect 实现。
这是 KO multiple subscribe for side effect
const firstName = ko.observable('Derrick');
const lastName = ko.observable('Yam');

ko.computed(() => console.log([firstName(), lastName()])); // ['Derrick', 'Yam']
这是 SolidJS multiple subscribe for side effect
const [getFirstName] = createSignal('Derrick');
const [getLastName] = createSignal('Yam');

createEffect(() => console.log([getFirstName(), getLastName()]));
SolidJS 也支持 observable.peek 和 ko.ignoreDependencies
// observable.peek
createEffect(() => {
  // 用 untrack 把 status wrap 起来,这样读取 status 时就不会被依赖收集
  console.log(getFirstName(), getLastName(), untrack(() => getStatus()))
});

// ko.ignoreDependencies
createEffect(() => {
  // 把要监听的依赖声明在顶部
  getFirstName();
  getLastName();

  // 把 side effect wrap 一层 untrack, 里面都不会被依赖收集
  untrack(() => console.log(getFirstName(), getLastName(), getStatus()));
});
SolidJS 还有一个叫 createRenderEffect 的函数,它和 createEffect 的区别是:
-
createRenderEffect 用于那些涉及 DOM 操作的 side effect
-
createEffect 用于不涉及 DOM 操作的 side effect
SolidJS 是框架,它对渲染有精细的 timings 控制,因此它的 side effect 分的很细。
除此之外,SolidJS 其实还有一个叫 createComputed 的函数。
它的作用是让我们同步 Signals 之间的逻辑值。
createComputed(() => setFullName(getFirstName() + ' ' + getLastName()));我们可以把它当成 push-based 版的 computed variable。
通常 createMemo 可以替代 createComputed,但有时候遇到复杂的情况,用 createComputed 在表达上会更直观。
好,来理一理:
-
createMemo 是 for computed 而不是 side effect,它是 pull-based。
-
createEffect 是 for side effect (非 DOM 操作),它是 push-based。
-
createRenderEffect 是 for side effect (DOM 操作),它是 push-based。
-
createComputed 是 for 半 computed 半 side effect (同步 Signals 逻辑值),它是 push-based。
SolidJS 总结
SolidJS 继承了 KO 的 getter setter、computed、side effect、自动依赖收集等核心概念,并改进了它们,比如:
-
把 ko.computed 拆分成 createMemo (还改成了 pull-based 优化了性能) 和 createEffect。
-
在 side effect 的部分又细分成 createEffect、createComputed、reateRenderEffect 不同的执行时机。
这些演化奠定了现代 Signals 的最终样态,Angular Signals 也大量借鉴了 SolidJS。
Angular 与 Signals 的关系
Angular 团队一直到 v16 (2023年5月) 才引入 Signals (Reactive Programming),这比其它框架晚了数年。
为什么号称 "在三年后等你" 的 Angular,反而在 Signals 上落后如此之久?
追溯历史,AngularJS (Angular 前身) 和 KO 作为第一代 MVVM 框架,都面临着相同的难题 -- 如何监听 view model 的变更,但它们却采用了截然不同的解决方案。
KO 选择直面问题,设计出 observable variable 概念,使所有变量 (view model) 都具备可监听能力。
AngularJS 则回避问题,选择去监听导致 view model 变更的事件 (click, ajax call, setTimeout 等等),再透过 dirty checking 的方式去推测 view model 是否发生变更。
到了 Angular 时期,团队甚至进一步发明了 Zone.js,以 monkey-patching 的方式更执着的去监听导致 view model 变更的事件,继续沿用 "监听事件 + 全面检测" 这一套思路。
那为什么 Angular 要绕这么大一圈?为什么不像 KO 那样,直接采用 observable variable 呢?
Observable variable 的代价
受 JavaScript 语法限制,要实现 observable variable 就必须使用 getter setter,或者像 RxJS、Vue3 那样对变量进行一层 object wrapping。
无论是 getter setter 还是 object wrapping 都会对代码造成一定程度的侵入性。
比如
// before
const value = 0;      // declare variable
console.log(value);   // read variable
value = 1;            // assign value to variable
value++               // other assign operator

// after
const value = declare(0);
console.log(value());
value(1);
value(value()++);
它有以下几个问题:
-
读取 value 时容易忘了放括弧。
-
无法使用 operator,比如 ++
- 代码可读性变差 (这一点尤其重要)
这也是当初 Angular 执意不走 observable variable 这条路的原因。
悬崖勒马
然而 Angular 团队没料到的是,前端开发人员其实并不怎么排斥这些写法,尤其是在 React 推出 useState hook 之后。
随后,Vue 3 和 SolidJS 对 observable variable 进行了完善,Signals 逐渐成为主流趋势。
而此时 Angular 却在另一条路上越走越窄,最终团队不得不悬崖勒马,回头拥抱 Signals。
至此,几乎所有主流前端框架都拥抱了 Signals。而在不久的将来,TC39 也极有可能将 Signals 纳入 JavaScript 标准,这无疑是 MVVM 框架发展史上的重要里程碑。
题外话 の 与众不同的 Svelte 5
Svelte 5 的 Signals 应该是所有框架/库里最符合直觉的。

只需要在最源头做 declaration 就可以了,count 不会变成恶心的 getter setter,它依然以 variable 的方式使用,但背后其实是 getter setter 的功能。
显然,Svelte 又在 compile 阶段加了很多黑魔法让其工作,不过我认为,让代码符合直觉是非常重要的,getter setter 本质上就是一种妥协。
那同样爱搞黑魔法、也有 compiler 的 Angular,它的 Signals 实现方式会和 Svelte 一样吗?

这段指出,Svelte 的黑魔法无法实现统一语法,在跨组件共享 Signals 的时候写法需要不一致。
而 Angular 认为代码一致性很重要,所以最后没有选择 Svelte 的实现方式。
题外话 の 各家 Signals 的性能
benchmark performance 看这里。
目前性能最快的是 Alien Signals (应该是 Vue 派系的),性能远超 Angular Signals。
Angular Signals 的性能表现一直很差 (不意外,Angular 向来以肿和慢闻名),之前甚至还有个专门的 Issue – Improve angular signals benchmark performance。
虽然官方声称在 v20 中做了大幅优化,但与其他框架/库相比,依然偏慢🙄。
Angular Signals 介绍
Angular Signals 大量借鉴了 SolidJS。
getter setter,computed,effect,自动依赖收集,这些概念通通都有。
Angular Signals 不依赖 compiler,且基本上是一个独立的库,可单独使用。
它和上一篇的 Dependency Injection (DI) 有几分相似。
DI 不是 Angular 独有的概念,Angular 只是借鉴了它、扩展了它,并将其融入到 Angular 的方方面面。
我们在学习 DI 时,可以分两个阶段,先掌握 pure DI (把 DI 单独拎出来使用,脱离 Angular 整体框架),接着才是 Angular DI (在 Angular 框架内各个方面使用 DI)。
Signals 也是一样,它不是 Angular 独有概念,Angular 只是借鉴了它、扩展了它,并将其融入到 Angular 的方方面面。
我们在学习 Signals 时,同样分两个阶段,先掌握 pure Signals (把 Signals 单独拎出来使用,脱离 Angular 整体框架),接着才是 Angular Signals (在 Angular 框架内各个方面使用 Signals)。
本篇主要是教 pure Signals 的部分,而 Angular Signals 的部分会在后续章节中,随着不同主题逐步讲解。
Angular signal & computed
掌握了 Signals 的前世今生 (从 KO 演化到 SolidJS),再来看 Angular Signals 就简单多了。
我们直接上代码吧🚀
signal 函数 の declare, get, set, update
main.ts
Signals 不依赖 Angular 整体框架,它可以单独拎出来使用,所以我们可以把 startup 相关的代码都注释掉。
// import { bootstrapApplication } from '@angular/platform-browser';
// import { appConfig } from './app/app.config';
// import { App } from './app/app';

// bootstrapApplication(App, appConfig).catch((err) => console.error(err));
接着
// 1. import signal 函数
import { signal } from '@angular/core';

const value = signal(0); // 2. declare a Signal variable
透过调用 signal 函数来 declare 一个 variable,0 是初始值。
返回的是一个混合体 (object + getter 函数)。
有点像 ko.observable
const value = ko.observable(0); // 返回混合体 (object + getter + setter)读取 value 的方式是调用这个 getter 函数。
const value = signal(0);
console.log(value()); // read value
赋值是通过 set 方法。
const value = signal(0);
value.set(5);
这点和 ko.observable 不同,反而有点像 RxJS
value.set(5); // 这是 Angular
value(5);     // 这是 KO
value.next(5) // 这是 RxJS
累加是这样
value.set(value() + 5);还有一个方式是用 update 方法
value.update(currentValue => currentValue + 5);update 和 set 都可以用来修改 value, 它们的区别是 update 带有一个 current value 参数,方便我们做累加之类的操作。
update 的底层其实也是调用 set 来完成的。
相关源码在 signal.ts
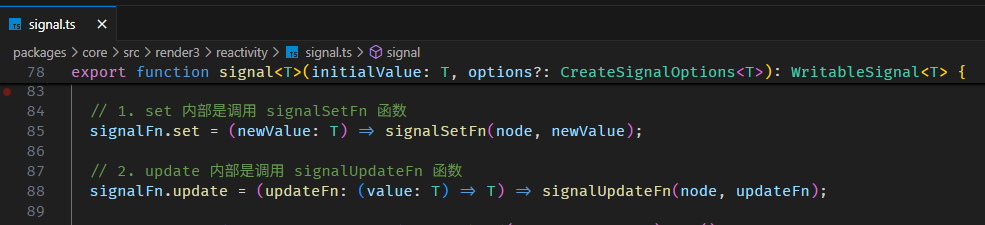
signalUpdateFn 函数内部也是调用 signalSetFn 函数
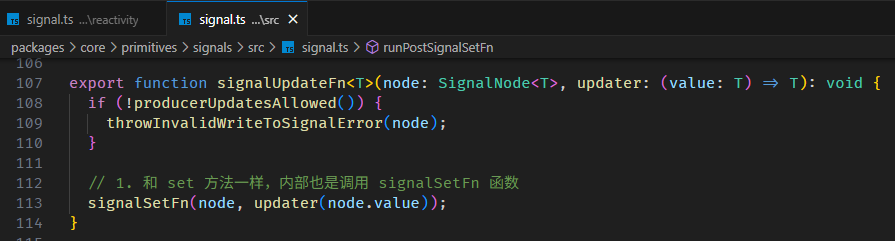
所以,update 算是一个语法糖吧。
createSignalTuple 函数
Angular 还有一个比较 internal 的 signal 函数 -- createSignalTuple。
它的用法类似 SolidJS 的 createSignal
import { createSignalTuple } from '@angular/core/primitives/signals';
const [getValue, setValue, updateValue] = createSignalTuple(0); // 这是 Angular
const [getValue, setValue] = createSignal(0);                   // 这是 SolidJS
它的好处是可以把 getter、setter 拆分传递。
不过 createSignalTuple 比较冷门,不推荐大家用。
asReadonly 方法
拆分 getter、setter 通常是为了传递 getter,不使用 createSignalTuple 我们还可以使用 asReadonly 方法。
const person = signal({ id : 1, name: 'Derrick' });
const readonlyPerson = person.asReadonly();
readonlyPerson.set() // Error: Property 'set' does not exist
asReadonly 会返回同一个对象,但在 TypeScript 类型上会隐藏 set, update 方法,这样就变成只读 (readonly) 了。
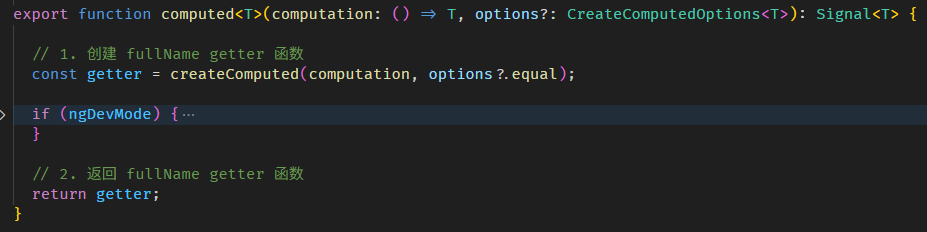
computed 函数
computed 函数用来创建 observable computed variable。
它和 SolidJS 的 createMemo 一样,满足 4 大要件:pull-based、cacheable、observable 以及自动依赖收集。
import { computed, signal } from '@angular/core';
const firstName = signal('Derrick');
const lastName = signal('Yam');
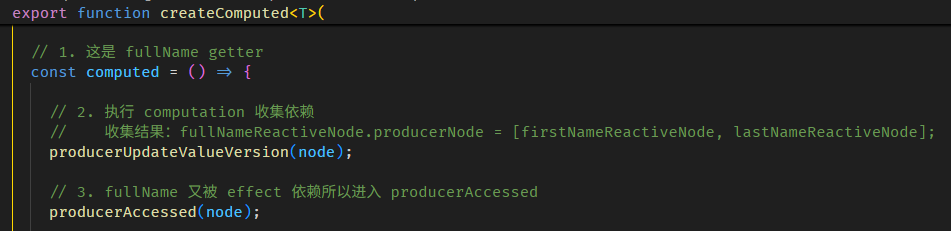
// 1. 调用 computed 函数,传入 computation (注:computation 不会立即执行,因为是 pull-based)
const fullName = computed(() => firstName() + ' ' + lastName());
// 2. 调用 fullName getter
// 它会执行 computation 返回 'Derrick Yam' 并且把这个值缓存起来
console.log(fullName());
// 3. 再次调用 fullName getter
// 这一次不会执行 computation,而是直接返回缓存 'Derrick Yam'
console.log(fullName());
// 4. 修改 fullName 的依赖 -- firstName
// 这时不会执行 fullName 的 computation (因为是 pull-based)
firstName.set('Richard');
// 5. 再次调用 fullName getter
// fullName 能判断出依赖 (firstName 和 lastName) 是否已经变更了(具体如何判断,下面逛源码的时候会讲解)
// 由于已经变更了,所以这一次会执行 computation 返回 'Richard Yam' 并且把这个值缓存起来
console.log(fullName());
// 6. 再次调用 fullName getter
// 这一次不会执行 computation,因为依赖都没有变更,所以直接返回缓存 'Richard Yam'
console.log(fullName());1. 因为是自动依赖收集, 所以不需要像 RxJS 那样明确指定 computation 的依赖。
2. 因为是 pull-based,所以调用 computed 后不会立即执行 computation。
3. 因为是 pull-based,所以当依赖变更时也不会立即执行 computation。
4. 因为是 cacheable,所以连续调用 fullName getter,不会每一次都需要执行 computation。
总之,尽可能少的去执行 computation 就对了。
computed 不支持异步
const url = signal('https://jsonplaceholder.typicode.com/users/1');

const name = computed(async () => {
  const response = await fetch(url());
  const { name } = await response.json() as { name: string };
  return name;
});

console.log(name());
效果
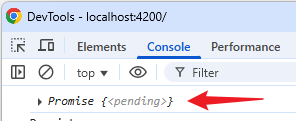
name() 返回的是 Promise...😂
这是因为 computed 不支持异步 -- computation 只能是同步代码。
KO 和 SolidJS 也是如此,不过 SolidJS 有一个 createResource 函数可以支持异步,而 Angular 也有对应的 resource 函数,这个下面会讲解。
逛一逛 Angular signal 和 computed 源码
想要深入理解 Angular signal 和 computed,最好的方式就是逛源码。
WritableSignal and Signal
上面我们有提到,signal 函数返回的是一个混合体 (object + getter 函数)
const firstName = signal('Derrick');
console.log(firstName());     // firstName 是一个 getter 函数
firstName.set('Richar');      // firstName 也是一个对象,它有 set, update 等方法
它的类型是 WritableSignal interface,源码在 signal.ts

WritableSignal 继承自 type Signal (顾名思义,WritableSignal 是支持写入的 Signal,而 Signal 则只是 readonly)
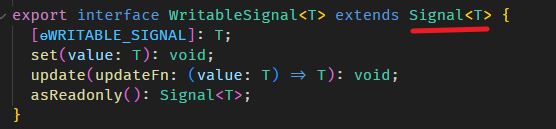
type Signal 是一个 getter 函数,同时也是一个对象,也就是上面我们一直提到的混合体 (object + getter)

另外,computed 函数返回的类型是 Signal 而不是 WritableSignal,因为 computed 是透过 computation 计算得出来的,它自然是 readonly 不能被写入。
源码在 computed.ts

结论:
signal 返回 WritableSignal
computed 返回 Signal (readonly)
WritableSignal 继续自 Signal
所以,抽象来讲 signal 和 computed 都返回 Signal。
SignalNode, ComputedNode and ReactiveNode
signal 创建的 Signal 对象内部有一个隐藏对象叫 SignalNode。
我们可以用 SIGNAL symbol 从 Signal 对象里取出这个 SignalNode 对象。
import { signal } from '@angular/core';
import { SIGNAL, type SignalNode } from '@angular/core/primitives/signals';

const firstName = signal('Derrick');

// 1. 用 SIGNAL symbol 获取隐藏的 SignalNode 对象
const firstNameSignalNode = firstName[SIGNAL] as SignalNode<string>;

console.log('firstNameSignalNode', firstNameSignalNode);
这个 SignalNode 下面会深入讲解,它是 Angular Signals 的核心。
另外,computed 创建的 Signal 对象内部也有这个隐藏对象,不过它是 ComputedNode。
const fullName = computed(() => firstName() + ' ' + lastName());
// 1. 一样用 SIGNAL symbol 获取隐藏的 ComputedNode 对象
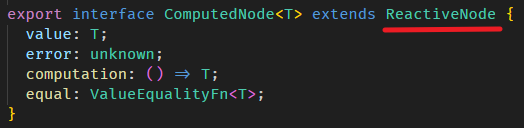
const fullNameComputedNode = fullName[SIGNAL] as ComputedNode<string>;SignalNode 和 ComputedNode 有一点区别,但它们都继承自 ReactiveNode。
源码在 signal.ts

源码在 computed.ts
结论:
signal 返回的 Signal 对象里有 SignalNode
computed 返回的 Signal 对象里有 ComputedNode
SignalNode 和 ComputedNode 都继承自 ReactiveNode
所以,抽象来讲 Signal 对象里有 ReactiveNode。
Create a ReactiveNode
SignalNode 和 ComputedNode 是 Angular 封装的上层接口,那我们能不能自己创建一个底层的 ReactiveNode?
当然可以!
我们参考一下 signal 函数,看看它是如何创建出 WritableSignal 和 SignalNode 的。
signal 函数的源码在 signal.ts

createSignal 函数的源码在 signal.ts

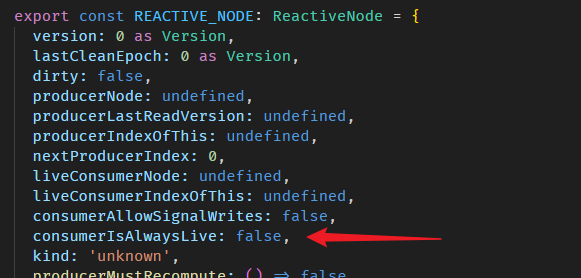
SIGNAL_NODE 长这样
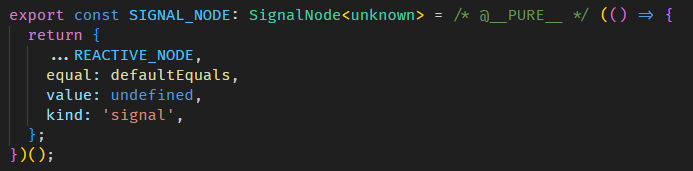
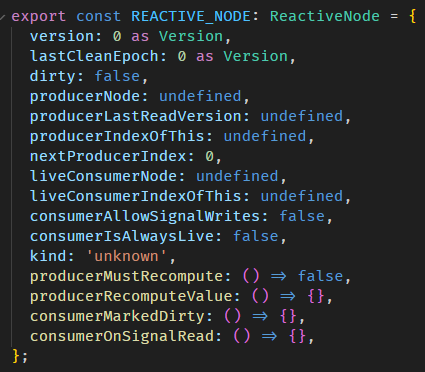
类型在 graph.ts
SignalNode 是透过 Object.create 创建出来的,也就是说 SIGNAL_NODE 是 SignalNode 的 prototype
非常古老的 new instance 手法。
ComputedNode 也是大同小异。
computed 函数的源码在 computed.ts

createComputed 的源码在 computed.ts
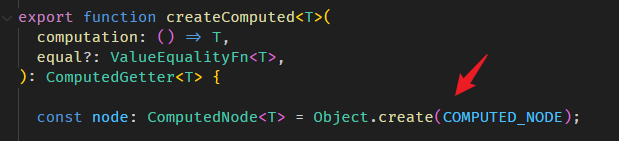
COMPUTED_NODE 长这样
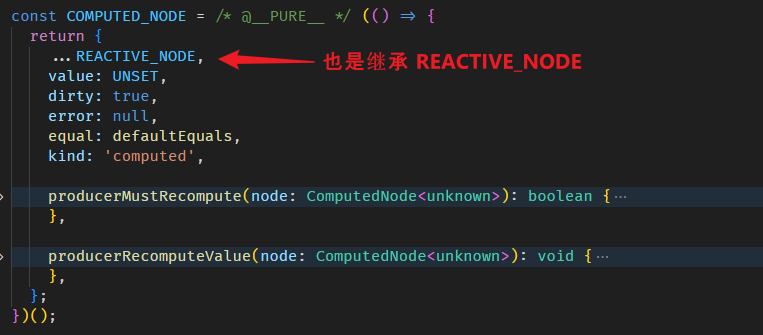
好,那我们也像 signal / computed 函数那样创建一个 ReactiveNode 来看看
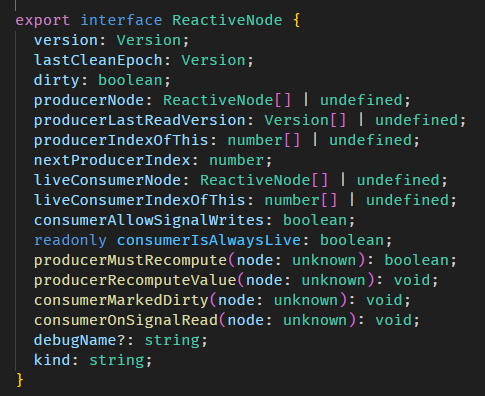
import { REACTIVE_NODE, type ReactiveNode } from '@angular/core/primitives/signals';

const myReactiveNode = Object.create(REACTIVE_NODE) as ReactiveNode;
ReactiveNode 是 Signals 的核心,许多底层功能都封装在里面 (下面会介绍)。
我们可以创建它,意味着可以扩展出类似 signal 和 computed 的功能,这对 Angular 重度使用者来说是很有帮助的👍。
computed 的实现原理 の 依赖收集
我们来试试推敲 computed 的实现原理 (留意 pull-based 和 cacheable 这两个特性对 computation 何时会被执行所产生的影响)
const firstName = signal('Derrick');
const lastName = signal('Yam');

// 1. create fullName computed 不会立即执行 computation,因为是 pull-based
const fullName = computed(() => firstName() + ' ' + lastName());

fullName(); // 2. 调用 fullName getter 会执行 computation,因为这是第一次调用,完全没有缓存

fullName(); // 3. 再次调用 fullName getter 不会执行 computation 因为有缓存了

firstName.set('Richard'); // 4. 修改 firstName 不会立即执行 computation,因为是 pull-based

fullName(); // 5. 再次调用 fullName getter 会执行 computation,因为缓存失效了-
创建 fullName computed,不会立即执行 computation。
这没问题,把 computation 存起来不跑就行了。
-
调用 fullName getter,由于这是第一次调用,没有任何缓存,所以会执行 computation。
这也没问题,执行 computation 并返回值即可。
-
再次调用 fullName getter,此时已经有缓存了,所以不会执行 computation。
这也没问题,第一次执行 computation 后把值缓存起来即可。
-
修改 firstName 不会立即执行 computation。
这也没问题,不跑即可。
-
再次调用 fullName getter,判断缓存是否失效,若失效则重新执行 computation。
这就有问题了 -- 我们要如何判断缓存是否失效?
computation 的逻辑本身是不会改变的,唯一可能改变的是它的依赖 (这个例子中是 firstName 和 lastName)。
也就是说,只要依赖没有变更,缓存就是有效的;反之,如果依赖变更了,缓存就该失效。
那我们有两件事要做
-
收集出 computation 的依赖
-
判断这些依赖是否变更了
好我们一步一步来,先看看如何收集依赖。
回顾这张图

RxJS 需要明确表明依赖,而 KO、SolidJS、Angular 则是把依赖混在 computation 里。
也就是说,在执行 fullName computation
() => firstName() + ' ' + lastName()的同时,我们需要收集到它的依赖 -- firstName 和 lastName。
ReactiveNode & Producer
我们上面说过,ReactiveNode 是 Signals 的核心,许多底层功能都是由它来实现的,这里就来看看它是如何工作的
const firstName = signal('Derrick');
const firstNameNode = firstName[SIGNAL] as SignalNode<string>; // firstName 的 ReactiveNode

const lastName = signal('Yam');
const lastNameNode = lastName[SIGNAL] as SignalNode<string>;   // lastName 的 ReactiveNode

// computed 是 pull-based,所以这里 computation 还不会执行
const fullName = computed(() => firstName() + ' ' + lastName());
const fullNameNode = fullName[SIGNAL] as ComputedNode<string>; // fullName 的 ReactiveNode

// 此时 fullNameNode.producerNode 还是 undefined (producerNode 是什么下面会讲解)
console.log(fullNameNode.producerNode === undefined);

// 调用 fullName() 会执行 computation
console.log(fullName());

// 在执行 computation 以后,fullNameNode.producerNode 就有东西了
console.log(
  // 第一个 "东西" 是 firstName 的 ReactiveNode
  fullNameNode.producerNode![0] === firstNameNode, // true
);
console.log(
  // 第二个 "东西" 是 lastName 的 ReactiveNode
  fullNameNode.producerNode![1] === lastNameNode, // true
);
关键就在 fullName 的 ReactiveNode.producerNode。
producer 中文叫制作人,fullName 是由 firstName 和 lastName 联合创作出来的,所以 fullName 的制作人是 firstName 和 lastName (也就是上面我们一直在讲的 "依赖")。
producer (a.k.a 依赖) 并不是一开始就存在于 fullName 的 ReactiveNode.producerNode。
它是在执行 fullName 的 computation 以后才被记录进去的。(执行 computation = 开始收集依赖)
// 此时 fullNameNode.producerNode 还是 undefined
console.log(fullNameNode.producerNode === undefined);

// 调用 fullName() 会执行 computation
console.log(fullName());

// 在执行 computation 以后,fullNameNode.producerNode 就收集到 producers 了
也就是说,在执行下面这句代码后
firstName() + ' ' + lastName()fullName 的 ReactiveNode.producerNode 就有了 firstNameReactiveNode 和 lastNameReactiveNode 两个 producers。
producerNode 的类型是 ReactiveNode Array
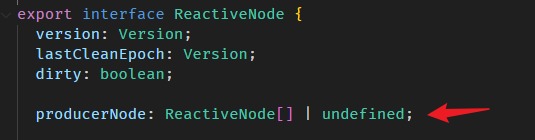
显然,依赖收集的秘诀就藏在 firstName 和 lastName getter 函数里,
不然怎么会出现 producerNode 从 undefined > 调用 computation > 调用 firstName, lastName > 变成 producerNode = [firstName, lastName] 的过程。
在深入 getter 函数之前,我们先尝试自己创建 ReactiveNode,并完成一次依赖收集的过程,这样能更清楚 computed 底层到底做了些什么。
替 ReactiveNode 收集 producer
我们来模拟一下 computed 的依赖收集过程
const firstName = signal('Derrick');
const firstNameNode = firstName[SIGNAL] as SignalNode<string>; // firstName 的 ReactiveNode
const lastName = signal('Yam');
const lastNameNode = lastName[SIGNAL] as SignalNode<string>; // lastName 的 ReactiveNode
// 创建 ReactiveNode 模拟 fullName ReactiveNode
const fullNameNode = Object.create(REACTIVE_NODE) as ReactiveNode;
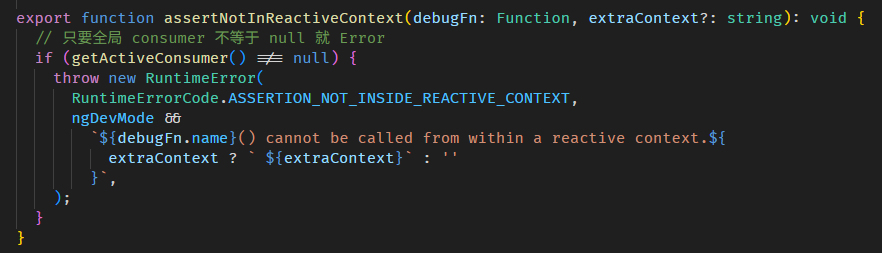
// 把 ReactiveNode 设置成全局 Consumer (什么是 Consumer 下面会讲解)
setActiveConsumer(fullNameNode);
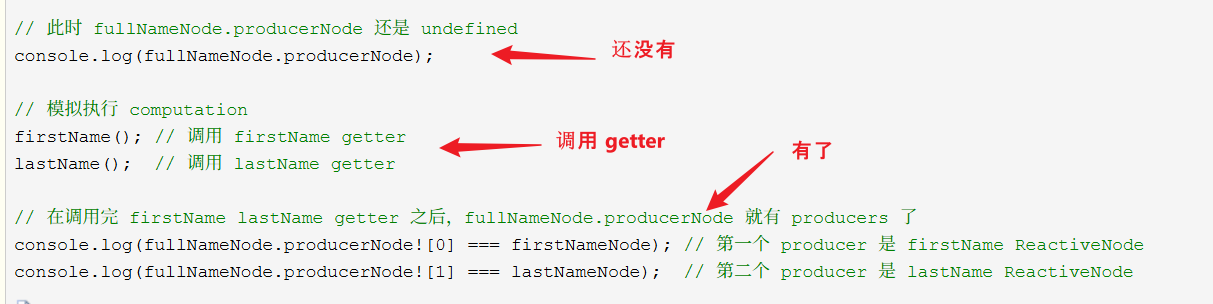
// 此时 fullNameNode.producerNode 还是 undefined
console.log(fullNameNode.producerNode);
// 模拟执行 computation
firstName(); // 调用 firstName getter
lastName(); // 调用 lastName getter
// 在调用完 firstName lastName getter 之后,fullNameNode.producerNode 就有 producers 了
console.log(fullNameNode.producerNode![0] === firstNameNode); // 第一个 producer 是 firstName ReactiveNode
console.log(fullNameNode.producerNode![1] === lastNameNode); // 第二个 producer 是 lastName ReactiveNode上面最关键的是 setActiveConsumer 函数和调用 firstName,lastName getter。
Consumer
在深入 setActiveConsumer 函数之前,我们先了解一下,什么是 consumer。
consumer 中文叫消费者,它和 producer 有点反过来的意思。
我们可以这样理解,fullName 是依赖 firstName 和 lastName 创建出来的,所以 fullName 的 producer (制作它出来的人) 是 firstName 和 lastName。
与此同时,fullName 本身也作为一个 consumer (消费者),因为它消费 (使用) 了 firstName 和 lastName。
好,有点绕,大概就是观察者模式中 Subject (producer) 和 Subscriber (consumer) 的关系啦。
setActiveConsumer 函数
好,我们继续深入 setActiveConsumer 函数,它的源码在 graph.ts
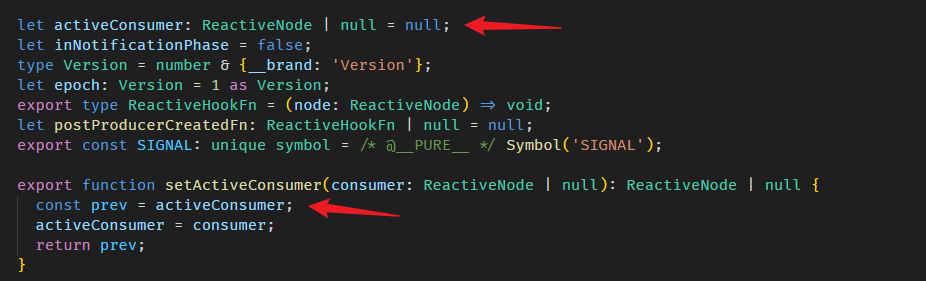
没什么特别的,它只是把传入的 consumer (fullName ReactiveNode) 设置成全局变量。
为什么要设置成全局变量?当然是为了让其它人可以在天涯海角之外链接上使用它。谁呢?
Signal getter 函数
调用 firstName() lastName() 后 fullName ReactiveNode.producerNode 就收集到了 producers。
所有秘密就在 Signal getter 函数里。
源码在 signal.ts

signalGetFn 函数

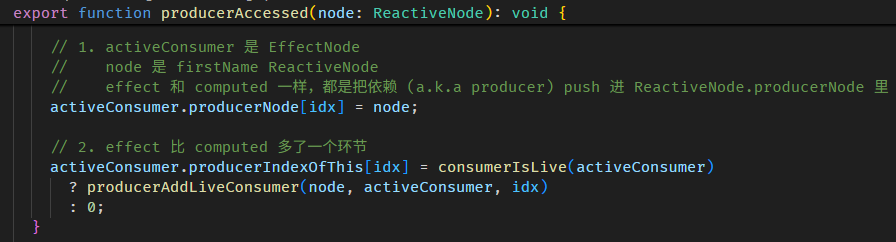
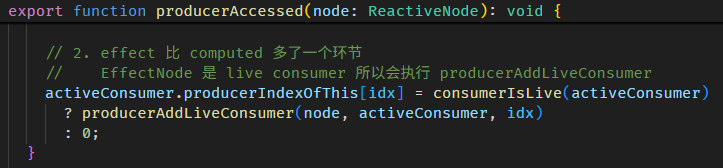
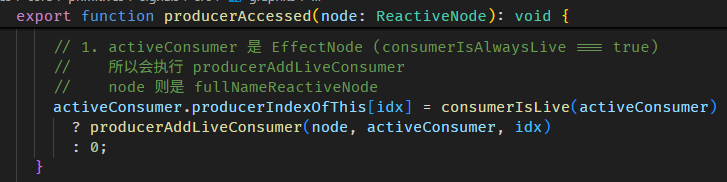
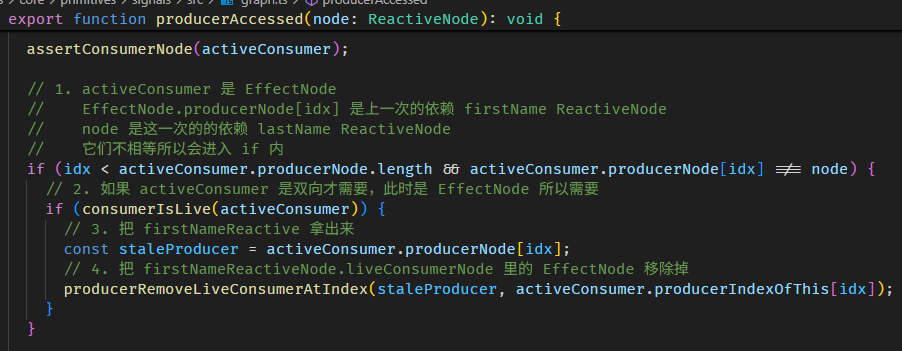
producerAccessed 函数源码在 graph.ts
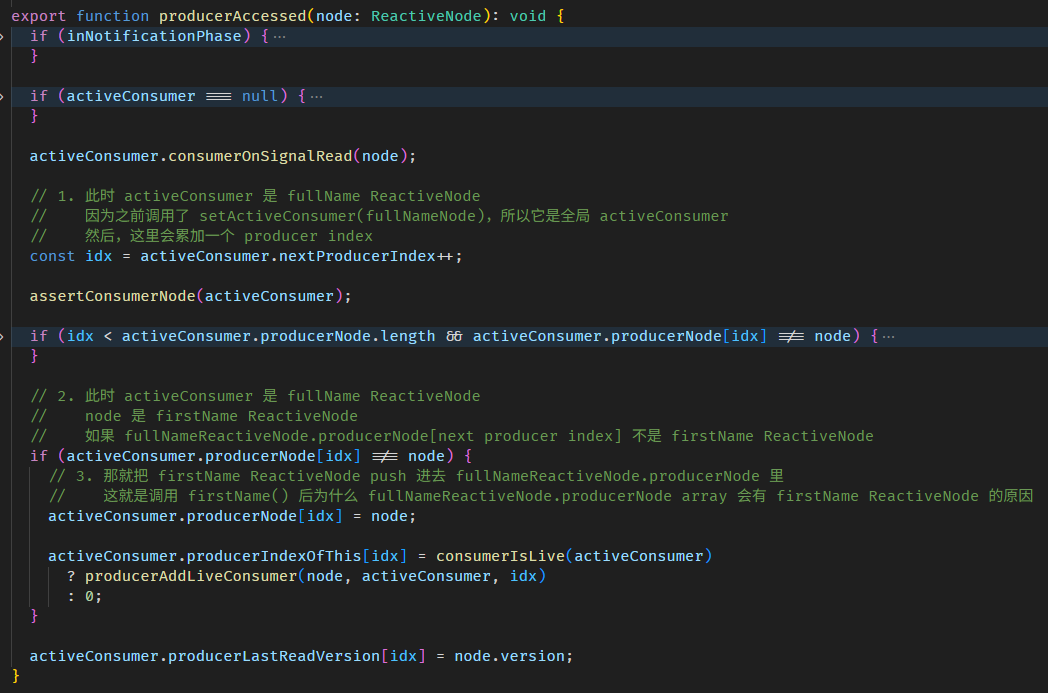
整个依赖收集的过程如下:
-
setActiveConsumer(fullNameNode)
把 fullName ReactiveNode 设置成全局 consumer
-
调用 firstName getter
-
firstName getter 里面会调用 producerAccessed
-
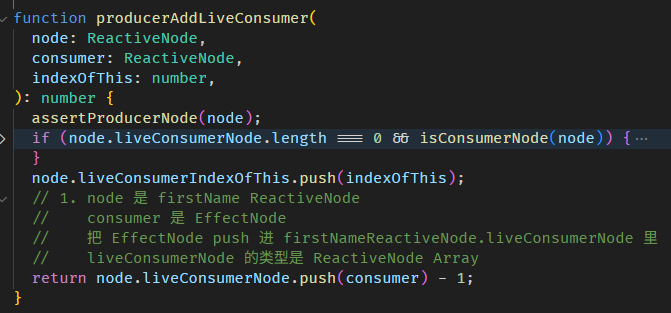
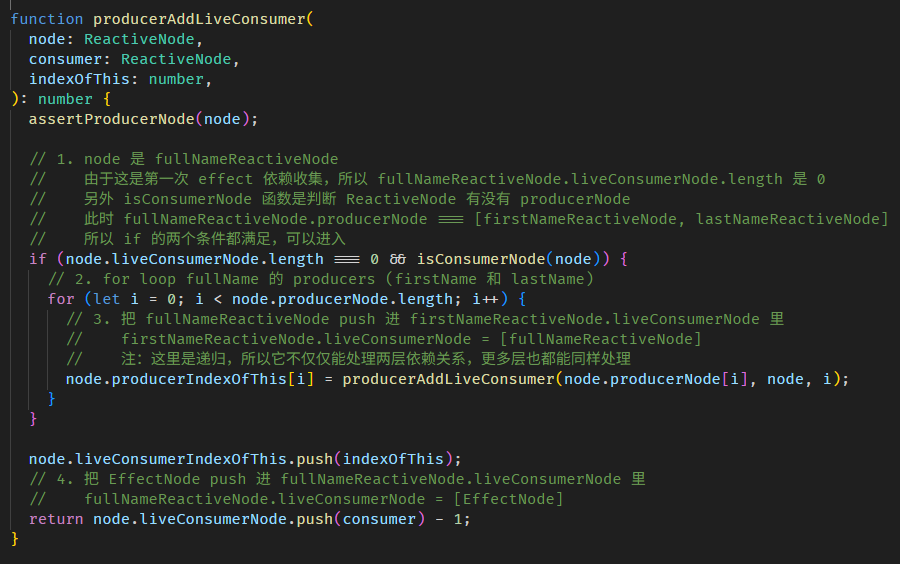
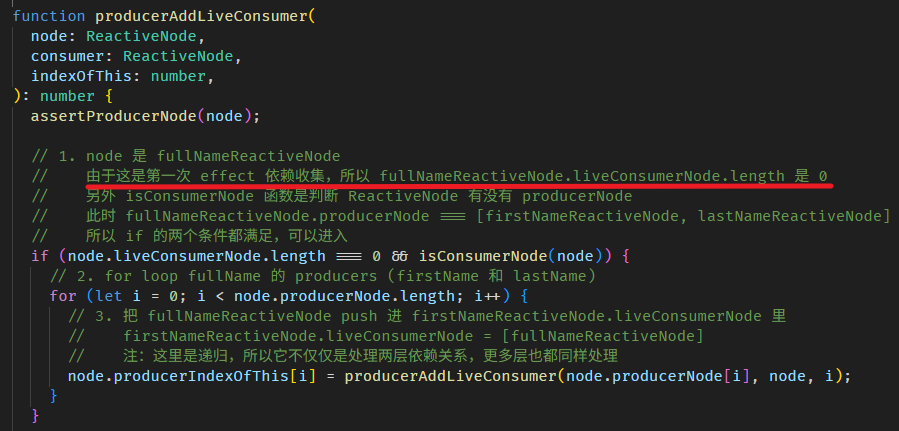
producerAccessed 里面会把 firstName ReactiveNode push 到当前全局 consumer (也就是 fullName ReactiveNode) 的 producerNode array 里
这样 producers (a.k.a 依赖) 就收集好了。
我们看看 computed 源码,是不是和我们上面模拟的一样。
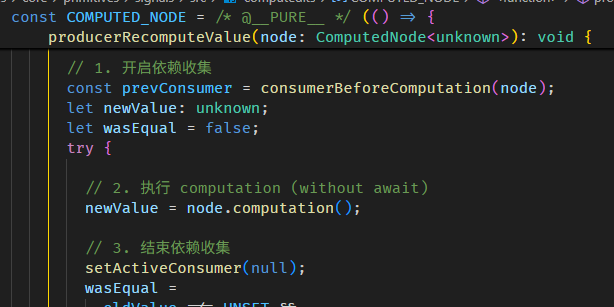
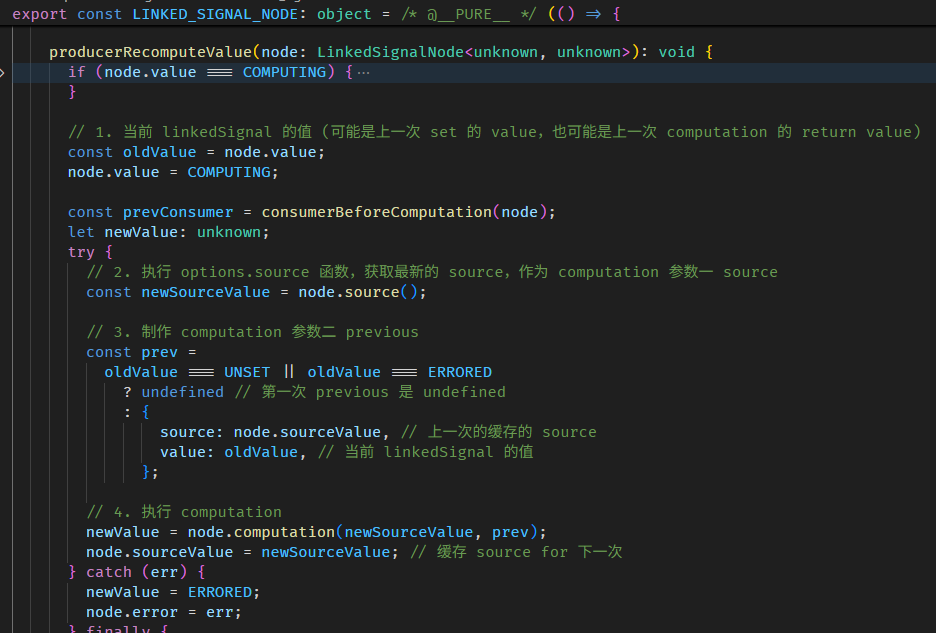
每当调用 fullName getter,如果是第一次没缓存,或是判断缓存已失效,就会调用 COMPUTED_NODE.producerRecomputeValue
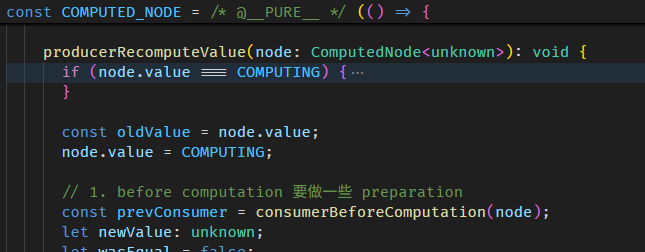
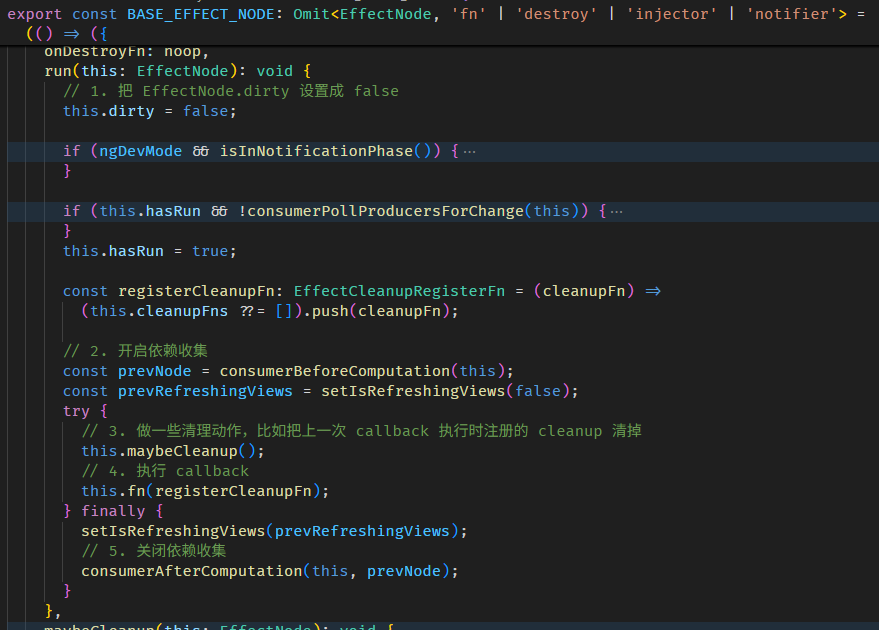
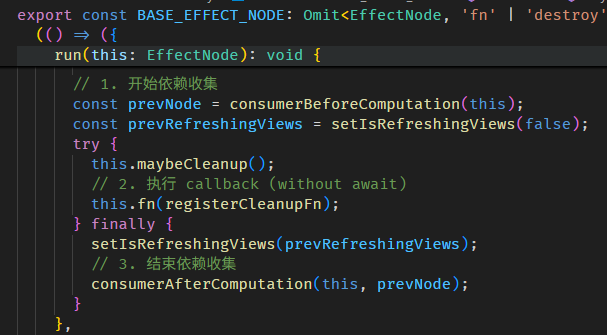
在执行 computation 前,会做两件事

setActiveConsumer 函数会 set 全局 consumer,同时返回当前的全局 consumer,因为依赖收集完后,要把全局 consumer 还原回去。
接着执行 computation
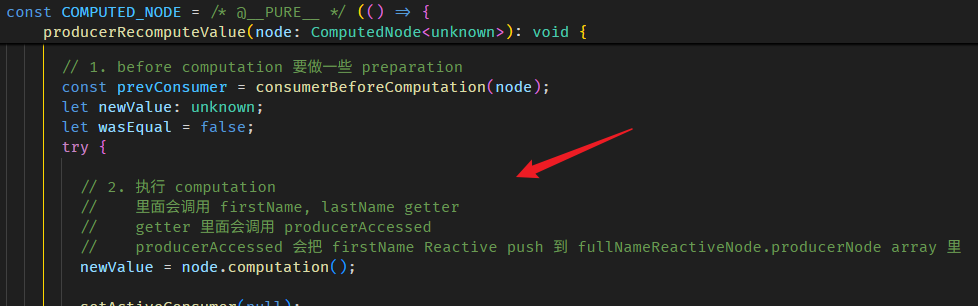
执行完 computation 依赖就收集完了。
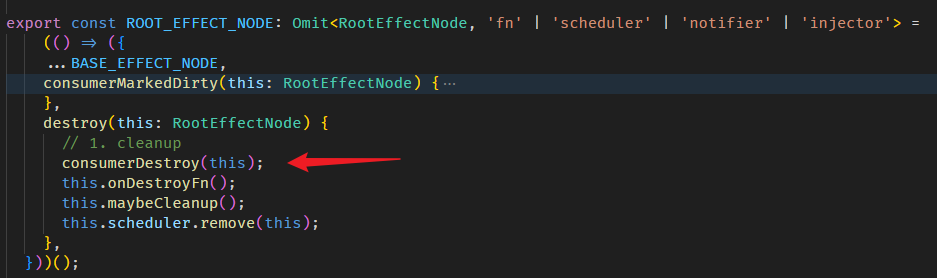
最后会做一些清理
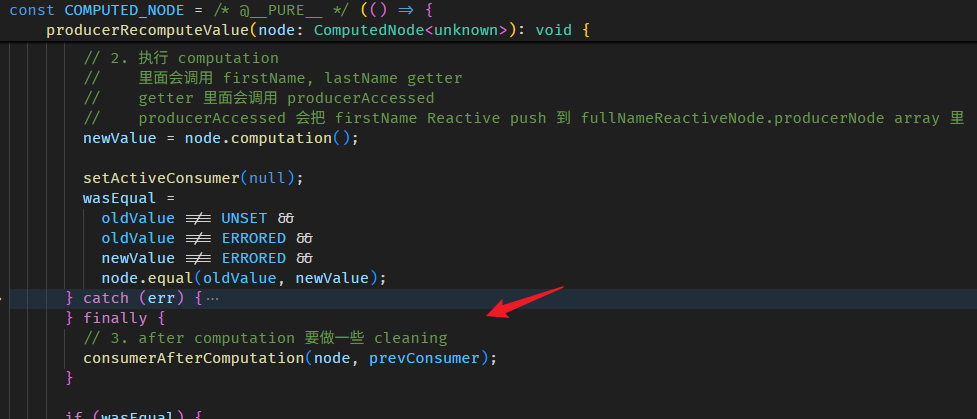
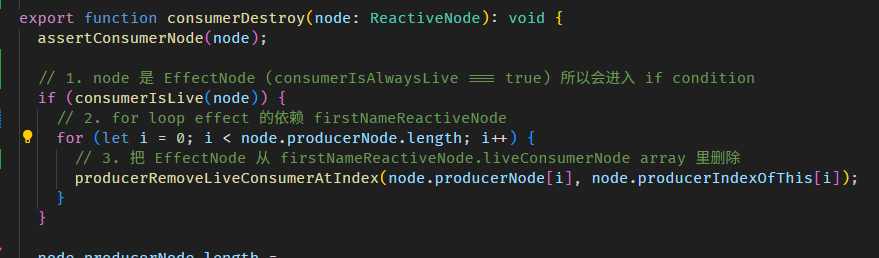
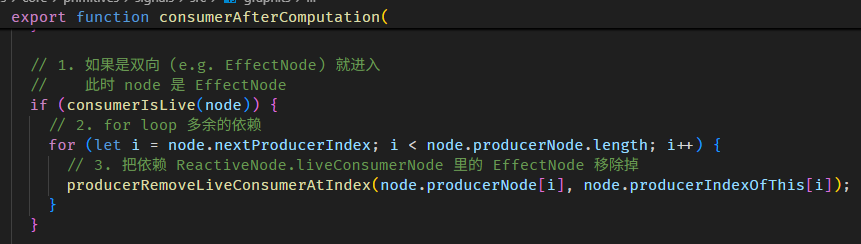
consumerAfterComputation 函数的源码在 graph.ts
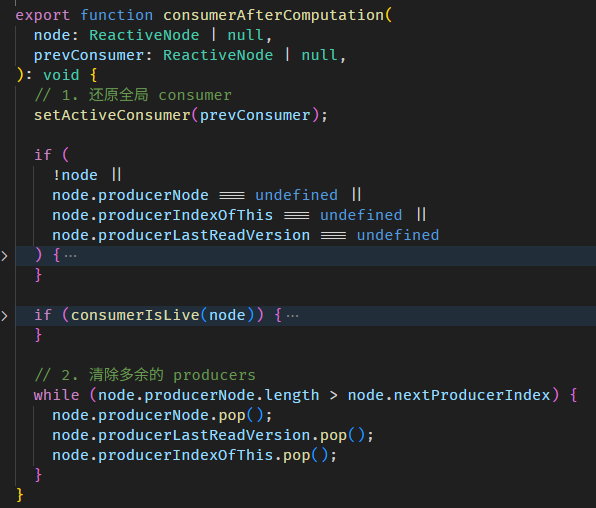
清除多余的 producers 概念是这样:
每一次执行 computation,收集到的依赖数量都有可能不一样。
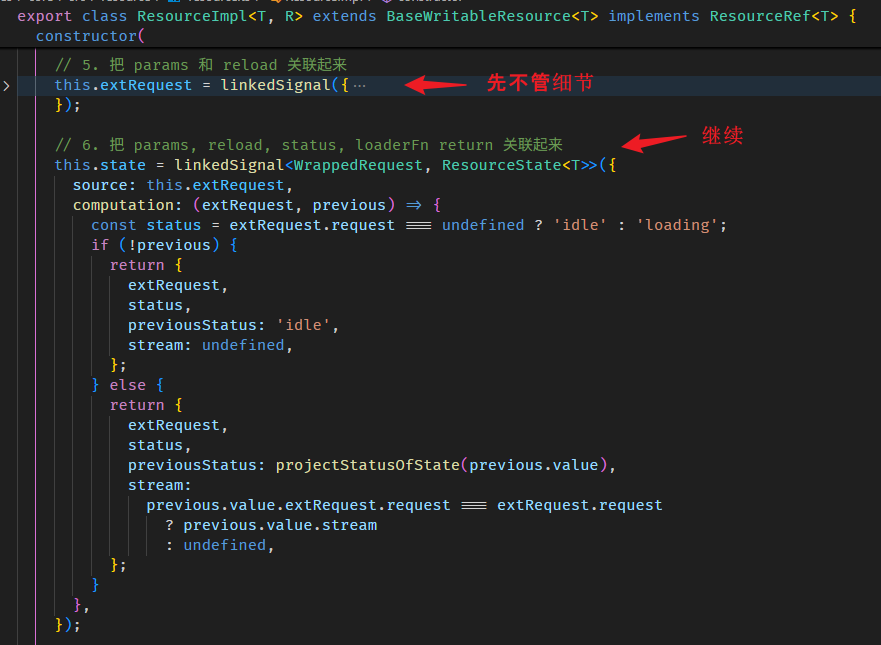
const fullName = linkedSignal(() => {
  if(showOnlyFirstName()) {
    return firstName();
  }
  else {
    return firstName() + ' ' + lastName();
  }
});
第一次执行 computation,如果 showOnlyFirstName 是 false,那最终收集到的依赖是 [showOnlyFirstName, firstName, lastName]。
第二次执行 computation,假如 showOnlyFirstName 变成了 true,整个依赖收集的过程如下:
0. 此时 producerNode 有 3 个 [showOnlyFirstName, firstName, lastName],这是第一次执行 computation 收集到的依赖。
1. nextProducerIndex = 0 ——— (consumerBeforeComputation 函数做的)
2. producerNode[nextProducerIndex++] = showOnlyFirstName ——— (producerAccessed 函数做的)
4. producerNode[nextProducerIndex++] = firstName
5. 此时,第二次执行的 computation 就结束了,但 producerNode 仍是 [showOnlyFirstName, firstName, lastName],其中 lastName 是多余的,因为 showOnlyFirstName 为 true,所以 lastName 并不是依赖。
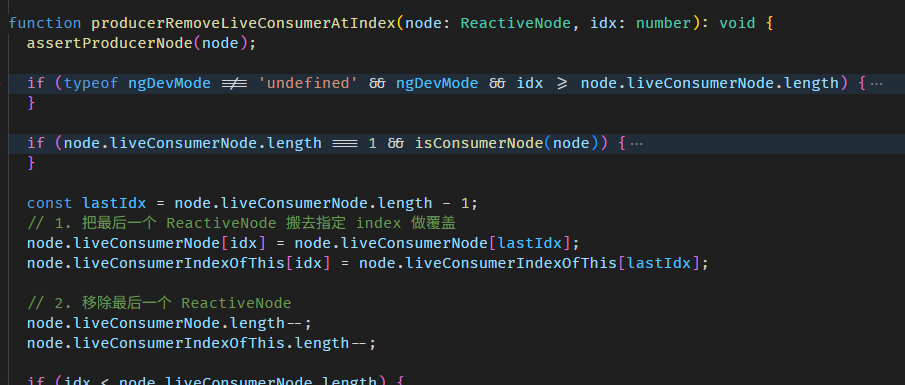
6. 此时,nextProducerIndex 是 2,producerNode.length 是 3,所以会 producerNode.pop() 一次 ——— (consumerAfterComputation 函数做的)
7. 最后 producerNode 是 [showOnlyFirstName, firstName],依赖收集正式完毕。
依赖收集不支持异步
从开始依赖收集 > 到执行 computation (without await) > 到结束依赖收集,整个过程都是同步的。
结论:computed 不支持异步。
computed 的实现原理 の 依赖变更检测
上面有提到,要实现 computed,需要完成两件事:
第一件是收集依赖,这个完成了。
第二件是判断依赖是否变更了,这一点我们继续深入了解。
How to know if a Signal value has changed?
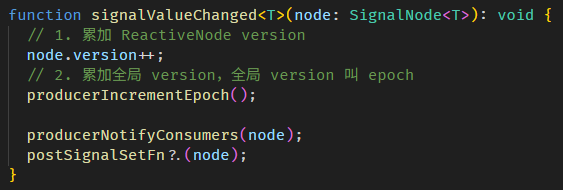
每次调用 WritableSignal.set 修改值,ReactiveNode 的 version 就会累加 1。
只要我们把某个时刻的 version 记录下来,之后再拿来和当前的 verision 做对比,就能判断这段期间是否发生了变更 (version 不同就表示这段期间有 set 新的值)。
注:虽然这种判断方式不是 100% 精准。
比如说:初始值是 'Derrick',接着我们 set('Alex') 然后马上又 set('Derrick') 把值改回去,严格来说这不算变更,但 version 仍累加了两次。若以 version 判断,会认为发生了变更。
不过这种判断方式既简单又低成本,因此也是一个可取的方案。
顺便介绍 equal options
假如连续 set 相同的值
firstName.set('Alex');
firstName.set('Alex');
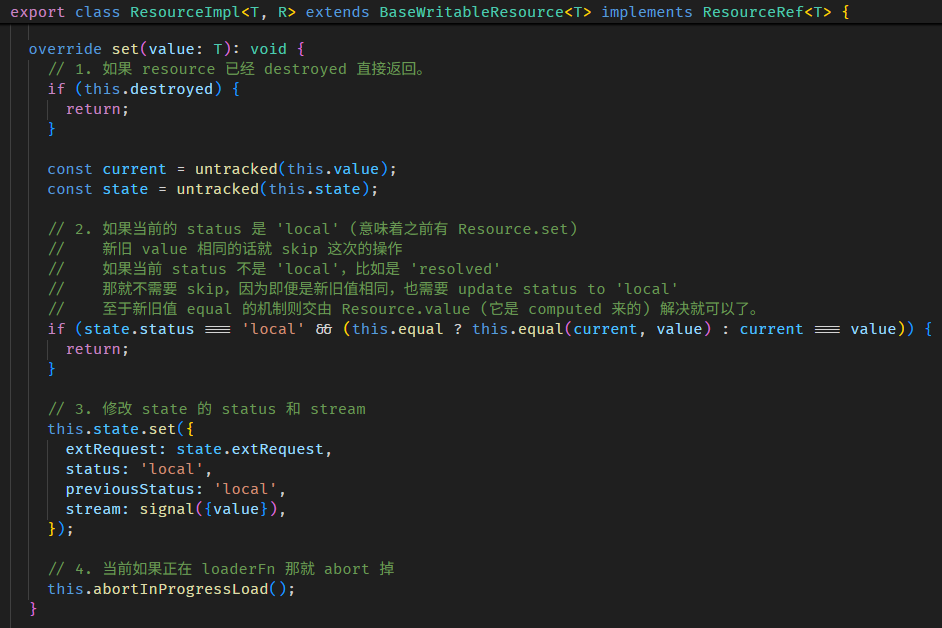
firstName.set('Alex');ReactiveNode 的 version 并不会每次都累加,WritableSignal 内部会先判断 set 进来的新值是否与旧值相同,若相同则会直接 skip 掉后续操作,因此 version 不会累加。
它比较新旧值的方式是使用 Object.is,也就是说对于对象来说,比的是引用 (reference) 而非值 (value)。
const person = signal({ firstName: 'Derrick' });
const personNode = person[SIGNAL] as SignalNode<string>;
// 换了对象引用,但是值是相同的
person.set({ firstName: 'Derrick' });
console.log(personNode.version); // version 累加变成 1,因为 compare 方式是 Object.is,对象的 reference 已经不同了
如果我们想改变它的 compare 方式,可以透过 equal options
const person = signal(
  { firstName: 'Derrick' },
  {
    // 把 compare 的方式换成 compare firstName
    equal: (prev, curr) => prev.firstName === curr.firstName,
  },
);
const personNode = person[SIGNAL] as SignalNode<string>;
// 换了对象引用,但是值是相同的
person.set({ firstName: 'Derrick' });
console.log(personNode.version); // version 依然是 0
提醒:当新旧值相同时,它是 skip 掉后续所有操作哦,所以不只是 version 不变,连旧值都不会变。
const person = signal({ id : 1, name: 'Derrick' }, { equal: (a, b) => a.id === b.id }); // 对比的方式是看 id
person.set({ id: 1, name: 'Richard' }); // id 一样但 name 不一样
console.log(person().name); // name 依然是 'Derrick',因为 version 和 value 都没有完全没有改变,整个过程被 skip 掉了
Best practice:建议 Signal 的 value 使用 immutable,这样变更会比较简单直观,debug 也会更容易。
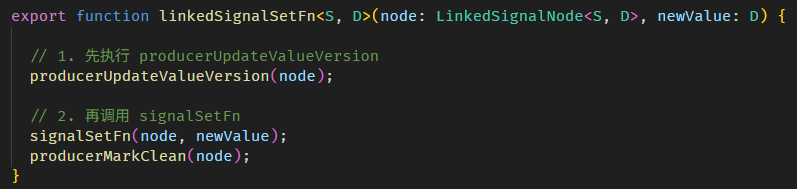
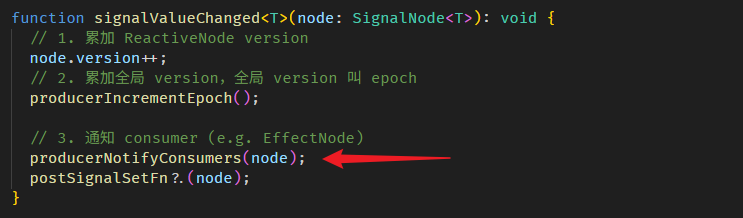
WritableSignal.set and ReactiveNode.version
WritableSignal.set 的源码在 signal.ts

signalSetFn 函数源码在 signal.ts
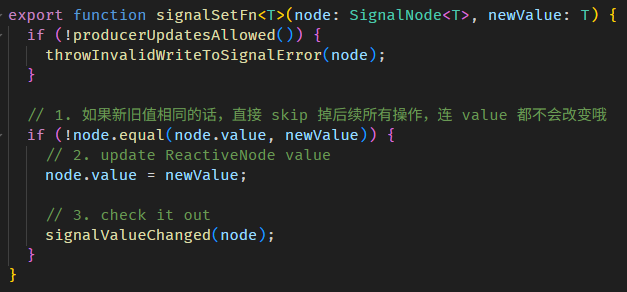
以上就是调用 WritableSignal.set 后,update value 和累加 ReactiveNode.version 的相关源码。
computed 依赖收集 version + 变更检测
回顾一下 computed 的流程:
-
调用 fullName getter
- 判断缓存是否失效 (这一 part 源码我们还没有看,下面会解说)
-
执行 COMPUTED_NODE.producerRecomputeValue
-
setActiveConsumer(fullNameReactiveNode) 把 fullName ReactiveNode 设置成全局 consumer
-
执行 fullName computation
-
调用 firstName getter
-
执行 producerAccessed
- 把 firstName ReactiveNode push 进 fullNameReactiveNode.producerNode array 里 (依赖收集完成)
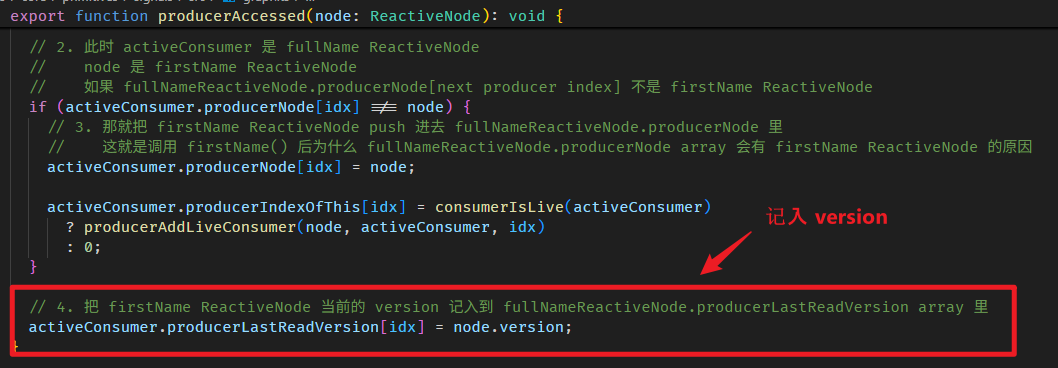
-
把 firstNameReactiveNode.version push 进 fullNameReactiveNode.producerLastReadVersion array 里 (这一 part 我们上面没讲到)
step 2 和 9 是新加的。
step 9 记入 version 的目的就是为了让 Step 2 能判断出缓存是否失效。
step 9 的源码在 graph.ts
step 2 判断缓存是否失效,具体的做法是这样:
第一次调用 fullName getter,肯定没有缓存,所以不需要判断,直接执行 computation。
执行 computation 的同时会收集依赖 (a.k.a producer) 以及它们当前的 version。
computation 返回的值会被缓存起来。
下一次调用 fullName getter 时,会将之前收集到的 producer version 与当前的 producer version 做对比。
如果所有 producer version 都和之前一样,就表示缓存可以使用;如果有任何一个 version 不同,就表示缓存失效,需要重新执行 computation。
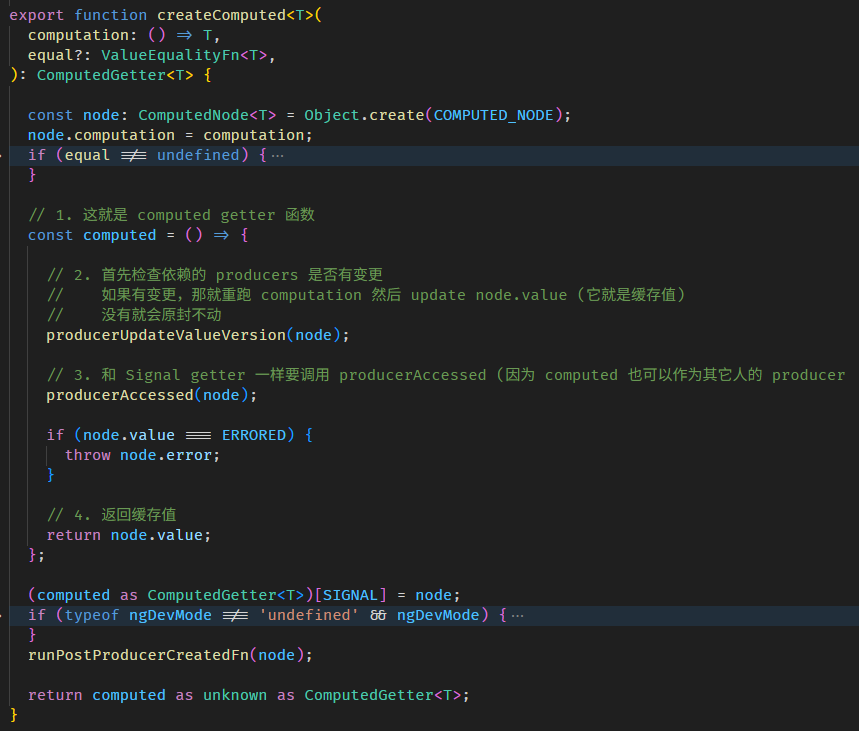
相关源码在 computed.ts
createComputed 函数的源码在 computed.ts
producerUpdateValueVersion 函数源码在 graph.ts
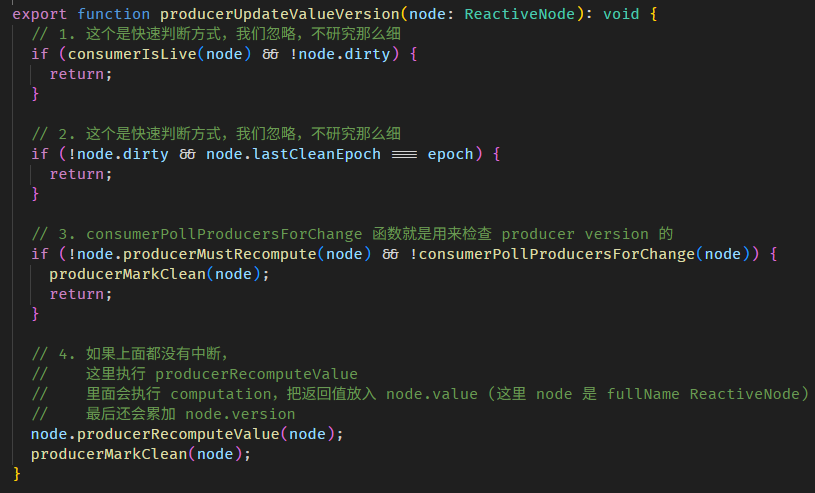
有一些小而快的判断,我们就不细讲了,像 epoch 它是一个全局 version,如果全世界的 Signal 都没有变更,那 producer 自然也不可能变更,所以可以直接 return。
step 3 是检测 producers version
step 4 是确认缓存失效后,执行 computation > 赋值给 fullNameComputedNode.value > 累加 fullNameReactiveNode.version (注:因为 computed 不是 WritableSignal,它没有 setter,所以它的 version 是在 getter 时累加的)
COMPUTED_NODE.producerRecomputeValue 上面我们逛过了,这里补上更新缓存值和累加 version 的部分。
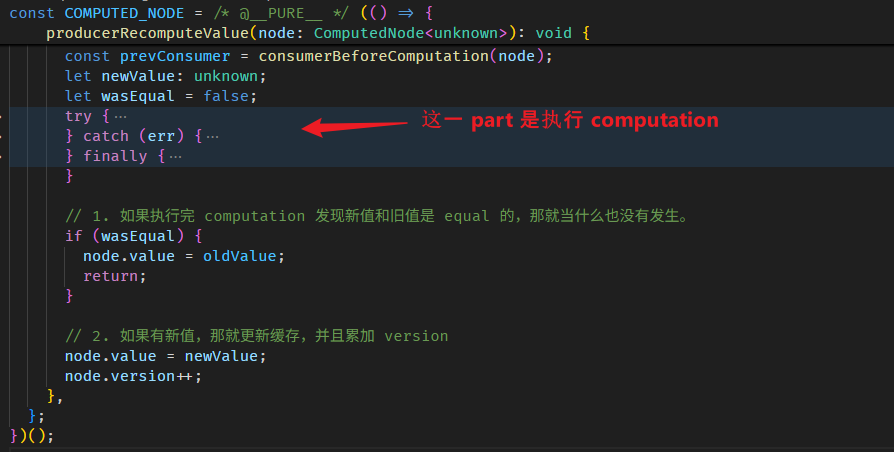
step 3 的 consumerPollProducersForChange 函数
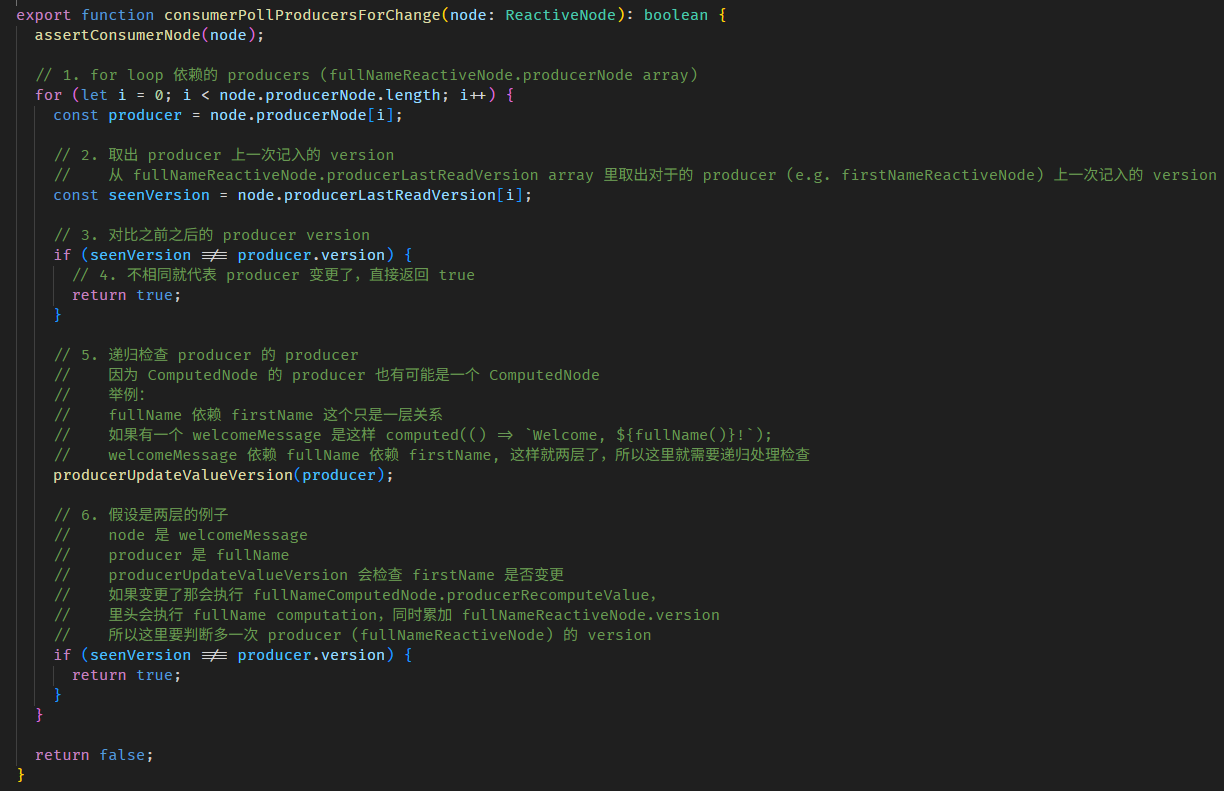
以上就是 computed 背后的机制。
总结
深入理解 Angualr Signals 源码有什么好处?
当你遇到 Angular bug 的时候,你可以平和的面对和解决。
比如:Issue – Signal Queries are populated before the input have been set on the components
大家可以去看这个 Issue,即便是 Angular 团队也经常会搞不清状况,因为很多代码都不是这批人写的 (是前朝遗留下来的)。
所以如果你是 Angular 重度使用者,遇到这群虾兵蟹将,你的项目绝对会被他们拖累到。
掌握源码就可以理解来龙去脉,虽然你改变不了他们的无能,但至少你不会被他们胡乱带着走。
Angular linkedSignal
linkedSignal 是 Angular 自创的,KO、RxJS、SolidJS 都没有这个概念。
它算是 signal + computed 的一个变种,有点像悟吉塔的感觉。
我们先来看一看它的各种特性,最后再看它适合用在哪些场合。
linkedSignal as computed
computed 能做的,linkedSignal 都能做,而且行为一模一样 -- pull-based、cacheable、observable、自动依赖收集。
const firstName = signal('Derrick');
const lastName = signal('Yam');
// 不执行 computation, 因为是 pull-based
const fullName = linkedSignal(() => firstName() + ' ' + lastName());

// 执行 computation,因为第一次没有缓存
console.log(fullName());

// 不执行 computation,因为有缓存
console.log(fullName());

// 不执行 computation,因为是 pull-based
firstName.set('Richard');

// 不执行 computation,因为缓存失效了
console.log(fullName());
linkedSignal as WritableSignal
signal 能做的,linkedSignal 也都能做到,虽然 declare 的方式有点诡异。
const firstName = linkedSignal(() => 'Derrick'); // 用 linkedSignal 替代 signal
const lastName = linkedSignal(() => 'Yam');
const fullName = computed(() => firstName() + ' ' + lastName());

console.log(fullName()); // 'Derrick Yam'

firstName.set('Richard'); // 可以 set value

console.log(fullName()); // 'Richard Yam'

lastName.update(oldLastName => oldLastName + 'a'); // 可以 update value

console.log(fullName()); // 'Richard Yama'
用法和 signal 一模一样,唯一的区别是,初始化值写法不同
const firstName = linkedSignal(() => 'Derrick'); // linkedSignal 是提供一个函数,函数返回值作为 Signal 初始值

const firstName = signal('Derrick'); // signal 是直接提供初始值
linkedSignal as writable computed
上面的例子只是为了说明 linkedSignal 是 signal + computed 的变种,兼具两者的能力。
但在真实项目中,如果 signal 和 computed 已经够用,我们自然不会刻意用 linkedSignal 去替代它们。
linkedSignal 既可以作为 computed (readonly Signal) 又可以作为 signal (WritableSignal) ,这不会冲突吗?
const firstName = signal(() => 'Derrick');
const lastName = signal(() => 'Yam');

const fullName = linkedSignal(() => firstName() + ' ' + lastName()); // 作为 computed (readonly Signal)
fullName.set('Richard Lee'); // 作为 signal (WritableSignal)

console.log(fullName()); // 'Derrick Yam' or 'Richard Lee' ?
fullName 的值应该是 computation 的结果 'Derrick Yam' 还是 set value 的 'Richard Lee' ?
答案是 'Richard Lee'
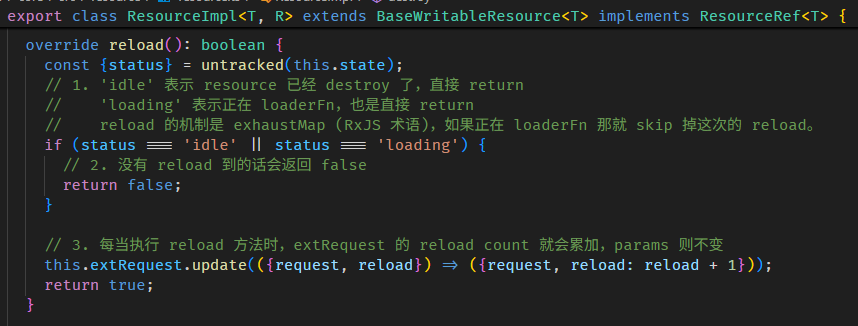
linkedSignal 的机制是这样:
after set,它就用 set 的值。
after 依赖变更,它就用 computation 的值。
const fullName = linkedSignal(() => firstName() + ' ' + lastName());

console.log(fullName());     // 此时 value 来自 computation -- 'Derrick Yam'

fullName.set('Richard Lee'); // 修改 fullName

console.log(fullName());     // 此时 value 来自 set -- 'Richard Lee'

firstName.set('Alex');       // 修改 fullName computation 的依赖 -- firstName

console.log(fullName());     // 此时 value 来自 computation -- 'Alex Yam'
linkedSignal as pairwise"able" computed
pairwise 是 RxJS 的概念,意思是 previous & current value。
signal 有一个 update 方法,它的特点是能在更新值的时候可以依赖旧值。
const count = signal(0);
count.update(oldCount => oldCount + 1); // 可以拿旧值 (previous value) 来做累加
computed 则做不到这个
const firstName = signal('Derrick');
const lastName = signal('Yam');
const fullName = computed(() => {

  // 1. 希望能拿到 fullName 旧值,办不到!
  // 2. 希望能拿到 firstName 和 lastName 旧值,办不到!

  return firstName() + ' ' + lastName();
});
我们无法拿到 firstName, lastName, fullName 的旧值。
但 linkedSignal 可以做到这个。
linkedSignal 函数有两个重载:
第一个是

参数一是 computation 函数,这个和 computed 一样,上面例子用得都是这个。
第二个是
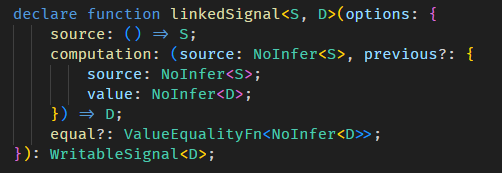
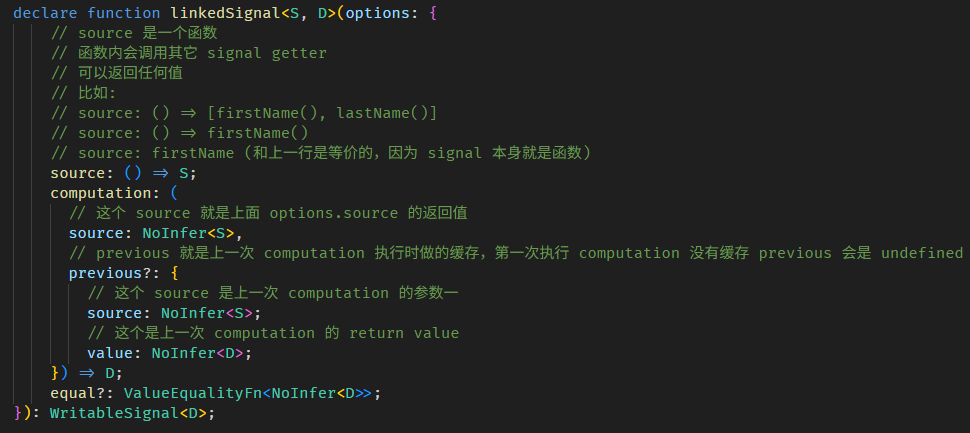
比较复杂,我们先忽略掉所有的 source 的部分。
computation 依旧,但它多了一个 previous 参数
previous.value 可以获取到当前 linkedSignal 的值 (旧值)。
const firstName = signal('Derrick');
const lastName = signal('Yam');

const fullName = linkedSignal<undefined, string>({
  source: () => {},
  computation: (_, previous) => {

    // 获取当前 fullName 的值
    // 第一次会是 undefined
    // 第二次是 'Derrick Yam'
    const oldFullName = previous?.value;
    console.log('oldFullName', oldFullName);

    return firstName() + ' ' + lastName();
  }
});

fullName(); // run computation return 'Derrick Yam'
firstName.set('Alex');
fullName(); // run computation return 'Alex Yam'
好,那如果我们连 firstName, lastName 的旧值也想获得,该怎么做?-- 使用 source
const firstName = signal('Derrick');
const lastName = signal('Yam');

const fullName = linkedSignal<[string, string], string>({
  source: () => [firstName(), lastName()],
  computation: (source, previous) => {

    // 第一次是 [undefined, undefined]
    // 第二次是 ['Derrick', 'Yam']
    const [oldFirstName, oldLastName] = previous?.source ?? [];

    // 第一次是 ['Derrick', 'Yam']
    // 第二次是 ['Alex', 'Yam']
    const [newFirstName, newLastName] = source;

    return newFirstName + ' ' + newLastName;
  }
});

fullName(); // run computation return 'Derrick Yam'
firstName.set('Alex');
fullName(); // run computation return 'Alex Yam'
我们需要把 firstName 和 lastName 明确定义到 source 里 (有点像 RxJS 的 combineLatest)。
这样 computation 的参数二 previous.source 就会有 firstName 和 fullName 的旧值。
另外,newFirstName 和 firstName() 其实是等价的,所以这样写也可以
computation: (_, previous) => {
  const [oldFirstName, oldLastName] = previous?.source ?? [];
  return firstName() + ' ' + lastName();
}
再看一次 interface
linkedSignal 的真实使用场景
单看 linkedSignal 的特性很难联想到它的真实使用场景。
比如说 writable computed 就很反直觉,computed 怎么可能是 writable 呢?


Angular Signals & RxJS
上文有提到,RxJS 与 KO (Knockout.js) 算师出同门,皆源自微软的 Rx (Reactive Extensions)。
后来,SolidJS 借鉴了 KO,而 Angular Signals 又借鉴了 SolidJS。
所以大家的根都是 Reactive Programming,但是!Signals 和 RxJS 在后续的发展中走上截然不同的道路。
接下来,我们来梳理一下它们之间的相似之处与差异 (毕竟不少人至今仍傻傻分不清楚,何时该用 Signals,何时该用 RxJS)。
相似 の observable variable
其实它俩相似的地方微乎其微,我能想到的只有一个 -- observable variable (而且只是相似,并不是完全一样)。
// Signals
const firstName = signal('Derrick');
effect(() => console.log(firstName()), { injector }); // 监听 firstName 变更,然后 console 新值

// RxJS
const firstNameBS = new BehaviorSubject('Derrick');
firstNameBS.subscribe(() => console.log(firstNameBS.value)); // 监听 firstName 变更,然后 console 新值
Signal 和 BehaviorSubject 都可以被监听。
但即便是这样一个基础功能,仍然有很多不同的地方:
-
effect callback 会延迟 (at least microtask) 触发,subscribe 是同步触发
-
signal 变更有 equal 概念,类似 RxJS 的 distinctuntilchanged
如果我们想把 BehaviorSubject 模拟成 signal + effect 会是这样
const firstNameBS = new BehaviorSubject('Derrick');

firstNameBS.pipe(
  distinctUntilChanged(), // 模拟 equal
  audit(v => new Observable(subscriber => queueMicrotask(() => subscriber.next(v)))) // 模拟 effect delay
).subscribe(() => console.log(firstNameBS.value));
即便我们做了模拟,它们仍然不是 100% 一样:
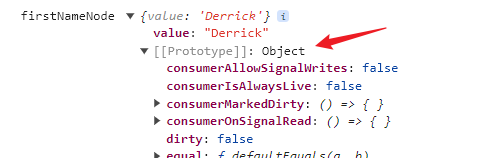
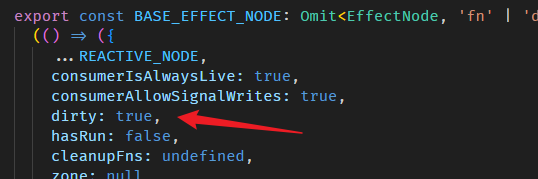
-
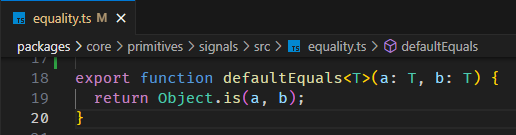
Signals 的 equal 默认的 compare 方式是 Object.is
![]()
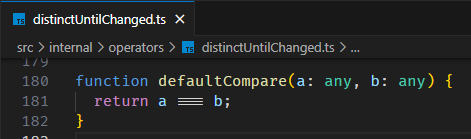
而 distinctUntilChanged 默认的 compare 方式是 ===
![]()
-
Signals 的 equal 过滤发生在 set value 之前
const product1 = { id: 1, name: 'iPhone1' };
const product2 = { id: 1, name: 'iPhone2' }; // id 一样但 name 不一样

const product = signal(product1, { equal: (p1, p2) => p1.id === p2.id }); // compare id

effect(() => console.log(product()), { injector }); // 只会触发一次, value 是 product1

window.setTimeout(() => {
  product.set(product2); // set product2
  console.log(product() === product1); // true 但仍然是 product1
}, 2000);
虽然 set 了 product2,但由于有 equal 所以仍然是 product1,effect 也不会触发第二次。
RxJS 的 distinctUntilChanged 发生在 next value 之后
const product1 = { id: 1, name: 'iPhone1' };
const product2 = { id: 1, name: 'iPhone2' }; // id 一样但 name 不一样

const product = new BehaviorSubject(product1);

product
  .pipe(distinctUntilChanged((p1, p2) => p1.id === p2.id)) // compare id
  .subscribe(() => console.log(product.value)); // 只会触发一次, value 是 product1

window.setTimeout(() => {
  product.next(product2); // set product 2
  console.log(product.value === product1); // false 已经变成 product2 了
}, 2000);
虽然 subscribe 不会触发,但 next product2 之后,value 就变成 product2 了。
总之,Signals 和 RxJS 有很大的区别,哪怕是它们比较相似的地方 (e.g. BehaviorSubject) 仍然有细微的区别,所以大家在使用的时候一定要分清楚,不要混为一谈。
Angular Signals 的特色
Signals 和 RxJS 的相似非常少,相对的,区别自然就多了。
这里讲一些 Signals 独有的特色:
-
自动依赖收集
computed, effect 都有自动依赖收集的机制。
这个是 RxJS 完全没有的。
BehaviorSubject.value 不是 getter,也没有 Proxy。
因此,它连实现依赖收集的基础都没有 (Signals 的依赖收集是靠 getter 实现的)。 -
computed variable
RxJS 虽然可以勉强实现 computed variable (上文有提到)。
但对比 Signals 它缺少了两个重要的概念:
a. 自动依赖收集 (提升便捷性,性能)
b. pull-based (提升性能)
因此,用 RxJS 来实现 computed variable 极为不妥,性能也不好,代码也繁琐。
-
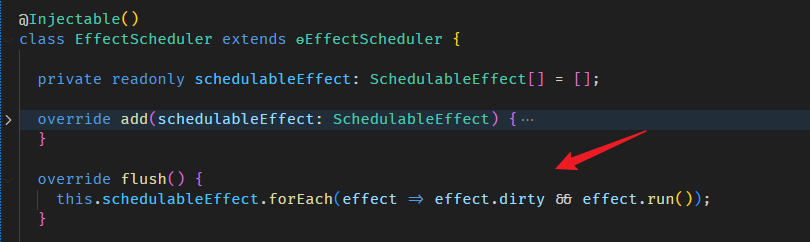
effect scheduler
Angular effect 会被 EffectScheduler 管理,不同的 effect (root effect, view effect, afterRenderEffect) 会有不同的触发 timings。
比如 root effect 会 delay 一个 microtask 才触发。
这个 EffectScheduler 是 Angular built-in 的 (虽然本篇我们采用模拟的),我们必须遵从它规定的触发 timings。
RxJS 虽然也有 Scheduler 概念,但 by default 它是同步触发的。
RxJS 的特色
RxJS 也有许多独有的特色:
- Observable
Signal 和 BehaviorSubject 有点像,但 RxJS 中的 Observable,在 Signals 里是没有对应实现的。
Observable 的特性自然也都没有,比如:Lazy Execution (有 subscribe 才开始),Cold Observable (multiple subscribe 会分流)。BehaviorSubject 适合用于描述 variable (state 状态变更)。
Observable 适合用于描述 event (事件发布)
-
异步与同步的处理能力
RxJS by default 是同步,但它可以很容易切换到异步,比如透过 switchMap operator。
Signals 很死板,computed 一定是同步,resource 专门异步,effect 的触发一定是异步,effect callback 可以异步,但依赖收集却一定是同步。规则很多,又不灵活。
-
operator
RxJS 有一堆 built-in 的 operators,可以对 event or state 的后续做各做处理,Signals 完全没有这些配套。
比如,RxJS 有 built-in 的 retry operator 可以用来做 fetch retry,Signals 的 resource 则完全没有支持 retry,甚至想要扩展都没办法。
何时该用 Signals,何时该用 RxJS?
RxJS 和 Signals 的差异远远大于相似,按理说,什么时候该用哪一个,其实应该很好判断。
但现实却不是这样。在实际的 Angular 项目中,我们往往会倾向用 Signals 去做所有的事,哪怕有些情况其实更适合用 RxJS。
why Angular chose signals?
为什么会出现这种情况呢?我们先看看 Angular 团队的选择
-
RxJS 是第三方库
Angular 团队不希望 Angular 框架依赖 RxJS。
RxJS 毕竟是第三方库,如果 Angular 依赖它,就意味着需要担心它是否会持续维护,它的 breaking changes 等等。
这对 Angular 团队来说,会有些许的不受控,还可能会提高维护成本和风险。
- RxJS 是一个 big concept
如果 Angular 依赖 RxJS 那就会逼着用户去学习 RxJS。
这大大提高了 Angular 的学习成本,不利于 Angular 的普及。
-
Signals 是为 MVVM 框架量身打造的解决方案
Signals 最早是因为 KO 要解决 MVVM 难题 -- "如何监听 view model 变更" 而量身打造的解决方案。
后来 Vue、SolidJS 对它进行了完善,这两个框架也都是 MVVM based。Angular 当然也是 MVVM based 框架,所以它选择 Signals 是绝对合适的。
由于 Angular 选择了 Signals,作为 Angular 的用户,我们自然而然会倾向跟随框架,沿用 Signals。
Should we only use Signals?
那我们是不是应该只用 Signals,而完全不用 RxJS 呢?
当然不是!
Signals 是为 MVVM 框架量身打造的解决方案。所谓 “量身打造”,意思是它特别适合用来解决特定类型的问题,但面对其它问题,反而可能更加不合身。
因此,我们应该自行判断,在适合使用 RxJS 的场景下就用 RxJS,而不是盲目跟随 Angular 框架,只用 Signals。
比如说,在实现 UI 组件时,常常需要处理大量复杂的事件监听,这时候 Signals 几乎完全派不上用场,硬要用它反而会事倍功半。
Signals to RxJS の toObservable
使用 Angular 框架,我们一定会用到 Signals。
面对复杂的问题,我们可能会用到 RxJS。
因此,Signals 和 RxJS 并存在 Angular 项目里是完全合理的。
并存就难免会遇到一些有趣的现象,比如说:
我们从 Angular 对外的某个接口得到了一个 Signal 对象,然后我们想监听它的变更,并进行一连串复杂的处理。
这时,我们可能就会想借助 RxJS 的 operators 来完成。
于是,如果能把 Signal 转成 RxJS 的 Observable,自然就是最理想的做法。
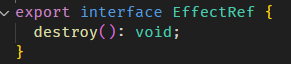
为此,Angular 贴心的为我们准备了相应的转换功能 -- toObservable 函数
import { toObservable } from "@angular/core/rxjs-interop";

const firstName = signal('Derrick'); // Signal 对象
const firstName$ = toObservable(firstName, { injector }); // 转换成 Observable 对象

firstName$.subscribe(firstName => console.log(firstName)); // 订阅 Observable
它可以把 Signal 对象转换成 RxJS 的 Observable 对象,这样我们就可以使用 RxJS 的 operator 做后续处理了。
它是如何实现的呢?我们直接逛源码吧🚀。
toObservable 函数的源码在 to_observable.ts

原理很简单,effect + ReplaySubject。
利用 effect 监听 Signal 变更,然后转发给 ReplaySubject。
虽然简单,但有几个特性需要注意:
-
由于内部使用 effect,所以 toObservable 也依赖 Injector 还有 effect 需要的 class provider。
-
由于内部使用 effect,所以这个 Observable.subscribe 也会 delay 触发 (因为 effect 最少会 delay 一个 microtask 才执行 callback)
-
这个 Observable 没有 Lazy Execution 概念,不管有没有 subscribe,effect 一定会开启监听,unsubscribe 也不会 destroy effect。
只有在 injector destroy 时才会 destroy effect。
以上这三个特性,尤其是第二和第三,都有点反 RxJS 直觉。
如果我们想让它更贴近 RxJS 一点,比如:lazy execution, unsubscribe destroy, first emit sync。
那可以这样实现:
查看代码// note 解释:
// 和 Angular 的 ToObservable 有 3 个不同
// 1. 有 subscribe 才有 effect
// 2. unsubscribe 和 error 都会 destroy effect
// 3. subscribe 的第一次 effect 是同步的,第二次才 based on effect scheduler
function myToObservable<T>(source: Signal<T>, options?: { injector: Injector }): Observable<T> {
const injector = options?.injector ?? inject(Injector);
const destroyRef = injector.get(DestroyRef);
// 1. 不要一开始就执行 effect,把它放到 Observable callback 里执行,这样才能 deferred execution
return new Observable<T>(subscriber => {
const tryGetValue = (): [succeeded: true, value: T] | [succeeded: false, error: unknown] => {
try {
return [true, source()];
} catch (error) {
return [false, error];
}
};
// 2. subscribe 后立刻同步 emit signal value,不等 effect scheduler
const [succeeded, valueOrError] = tryGetValue();
succeeded && subscriber.next(valueOrError);
if (!succeeded) {
subscriber.error(valueOrError);
// 3. 假如一开始就 error,那就不用执行 effect 了。
return;
}
let firstTime = true;
const firstTimeValue = valueOrError;
const watcher = effect(
() => {
const [succeeded, valueOrError] = tryGetValue();
if (firstTime) {
// 4. 由于上面我们已经同步 emit 了第一次的 signal value
// 这里 effect 的第一次有可能是多余的
// 之所以是 "有可能",而不是一定,是因为 signal 也有可能会在这短短的期间变更,所以我们最好 compare 一下它们的值。
firstTime = false;
const signalNode = source[SIGNAL] as SignalNode<T>;
if (succeeded && signalNode.equal(valueOrError, firstTimeValue)) {
return; // skip
}
}
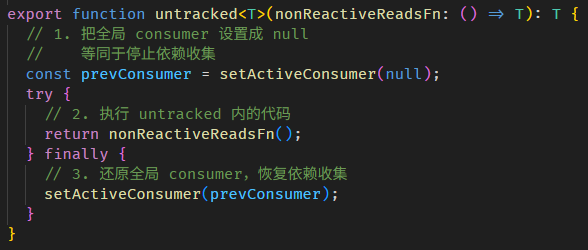
untracked(() => {
succeeded && subscriber.next(valueOrError);
if (!succeeded) {
watcher.destroy();
subscriber.error(valueOrError);
}
});
},
{ injector, manualCleanup: true },
);
destroyRef.onDestroy(() => {
watcher.destroy();
subscriber.complete();
});
return () => watcher.destroy(); // 5. unsubscribe destroy
}).pipe(shareReplay({ bufferSize: 1, refCount: true }));
}RxJS to Signals の toSignal
既然能从 Signals 转换到 RxJS,那反转自然也可以 (from RxJS to Signals)。
const firstNameBS = new BehaviorSubject('Derrick');
const firstName = toSignal(firstNameBS, { injector });
console.log(firstName()); // 'Derrick'
它的原理也很简单。
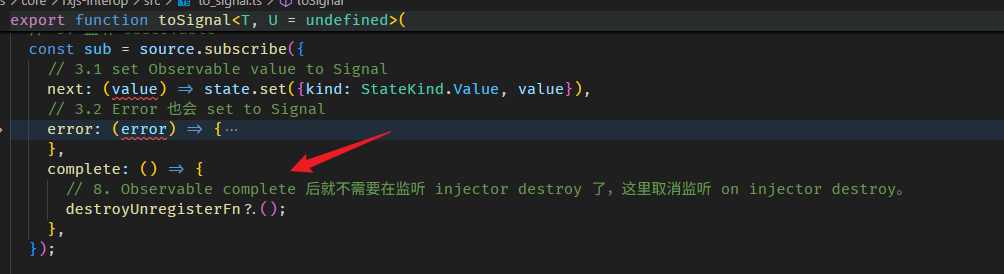
toSignal 内部会创建并返回一个 Signal 对象。
除此之外,它还会 subscribe 传入的 Observable,每当 Observable 接收到新值,就会把这个值 set to Signal。
再逛 toSignal 源码之前,我们先了解一下 ToSignalOptions
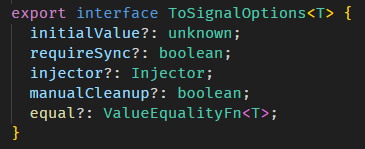
ToSignalOptions 是 toSignal 函数的第二个参数:
-
equal
equal 就是给 signal 的 equal
-
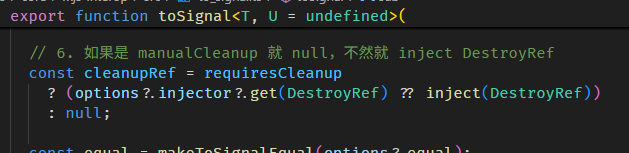
manualCleanup 和 injector
manualCleanup 和 injector 是一个套件。
上面有说到,toSignal 会 subscribe 传入的 Observable,那什么时候要 unsubscribe?
如果 manualCleanup 为 true,那就表示 Observable 会负责 complete,不需要 unsubscribe。
如果 manualCleanup 为 false (默认),那就表示 toSignal 需要一个 injector 来注入 DestroyRef,当 injector destroy 时一并 unsubscribe Observable。
总之,toSignal 会 subscribe Observable,为了防止内存泄漏,要嘛我们 complete Observable (manualCleanup) 或者透过 destroy injector 来 unsubscribe Observable。
-
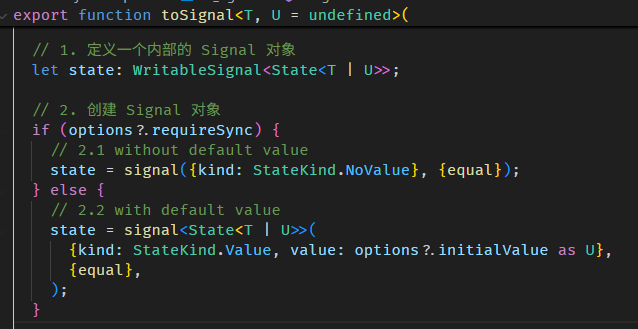
requireSync 和 initialValue
![]()
为什么 Signal 的类型会有 undefined?
因为 toSignal 支持的参数是 Observable 而不只是具体的 BehaviourSubject。
这两者的区别是,BehaviourSubject 一定会有 value,而 Observable 则不一定会有 value。
比如说:interval(1000) 这个 Observable 需要在一秒后才会开始有 value,那在一秒前它的 value 就是 undefined。
RxJS 的 Observable 没有办法从类型上反应出它一开始有没有 value,所以 Angular 只好保守的设定为有可能是 undefined。
但 Angular 也提供了 options 让我们来指定
![]()
配置 requireSync: true 之后,undefined 就没了,因为这表示 Observable 有同步 value (意思是立马可以获取到 value,像 BehaviorSubject 就可以)。
除了 requireSync 还有另一个类似的 options
![]()
配置 initialValue (初始值) 就肯定会有 value,也就不会 undefined 了。


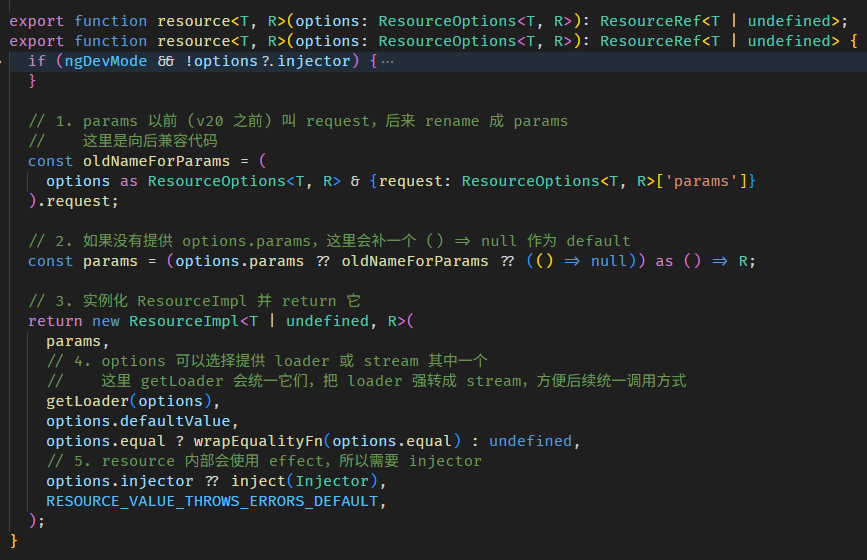
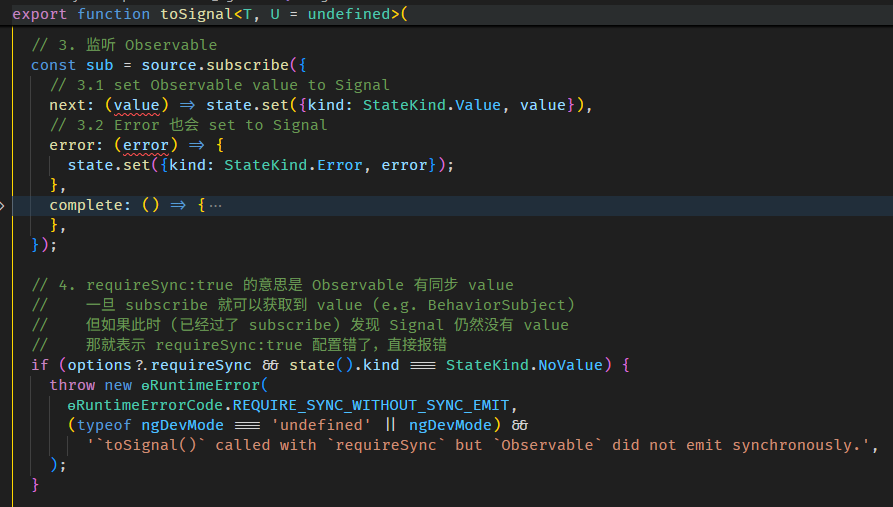
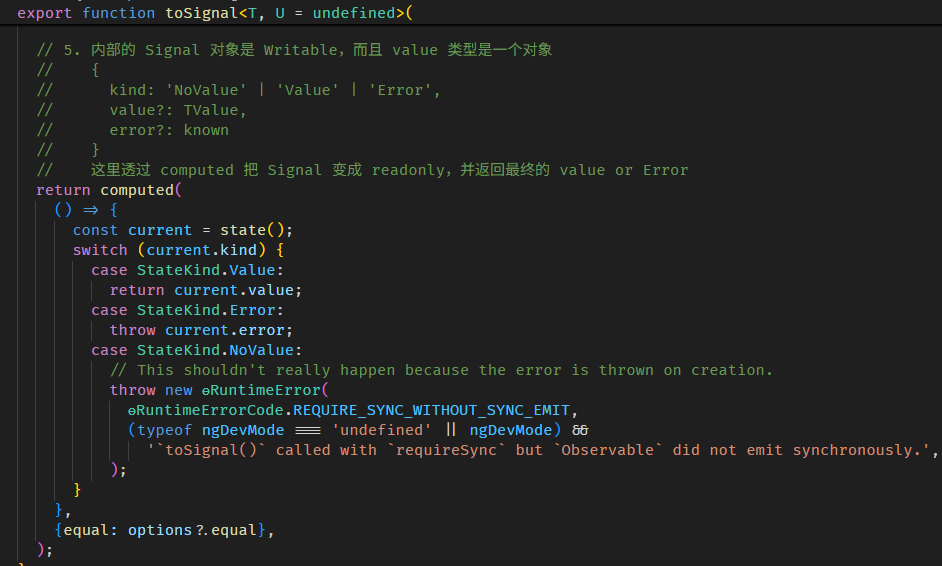
toSignal 函数的源码在 to_signal.ts
还有

rxResource
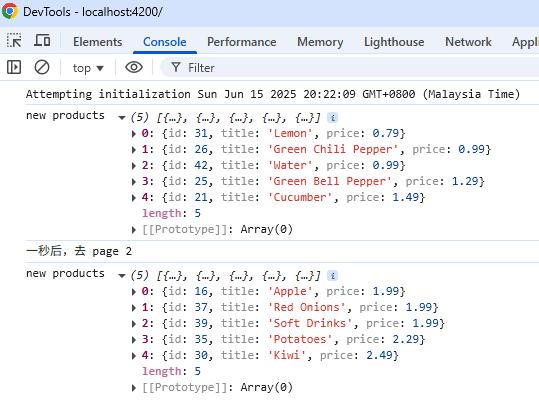
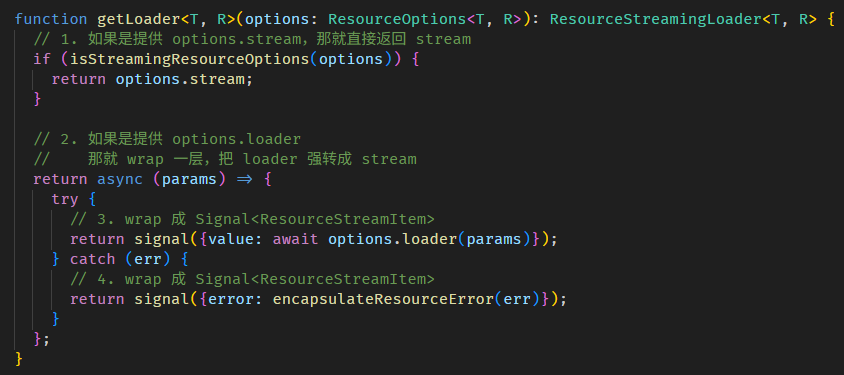
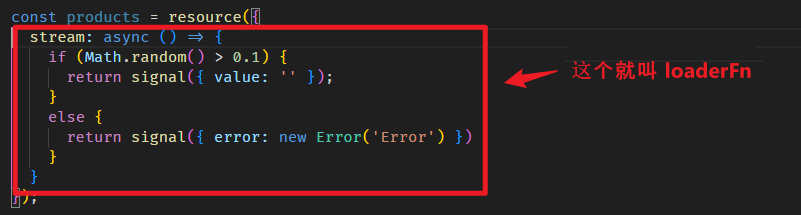
这是 resource with stream 的写法
const value = resource({
  injector,
  defaultValue: 'default value',
  stream: async () => signal({ value: 'new value' }),
});
stream 方法要返回 Promise<Signal<ResourceStreamItem<TValue>>>。
rxResource 和 resource with stream 一模一样,唯一的区别是:
const value = rxResource({
  injector,
  defaultValue: 'default value',
  stream: () => of('new value'),
});
stream 方法要返回 Observable<TValue>。
简单说就是为了方面 RxJS 的使用者,性质就如同 convert RxJS to Signals 一般。
rxResource 的源码在 rx_resource.ts
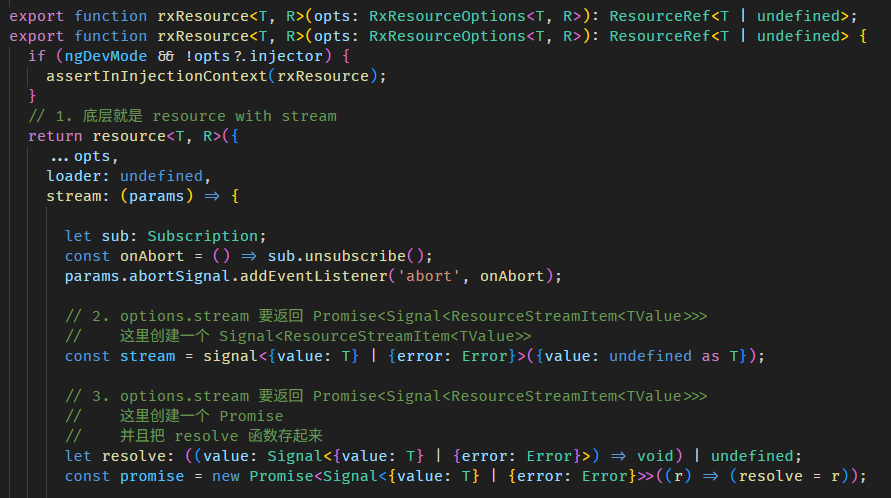
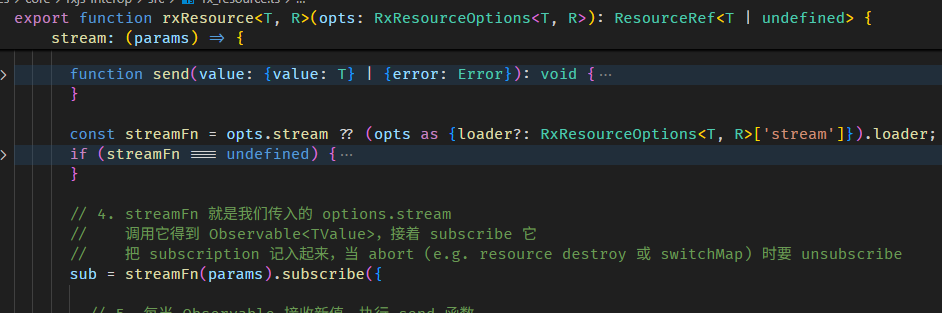
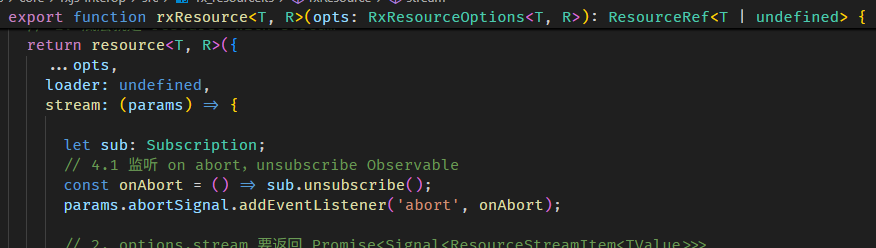
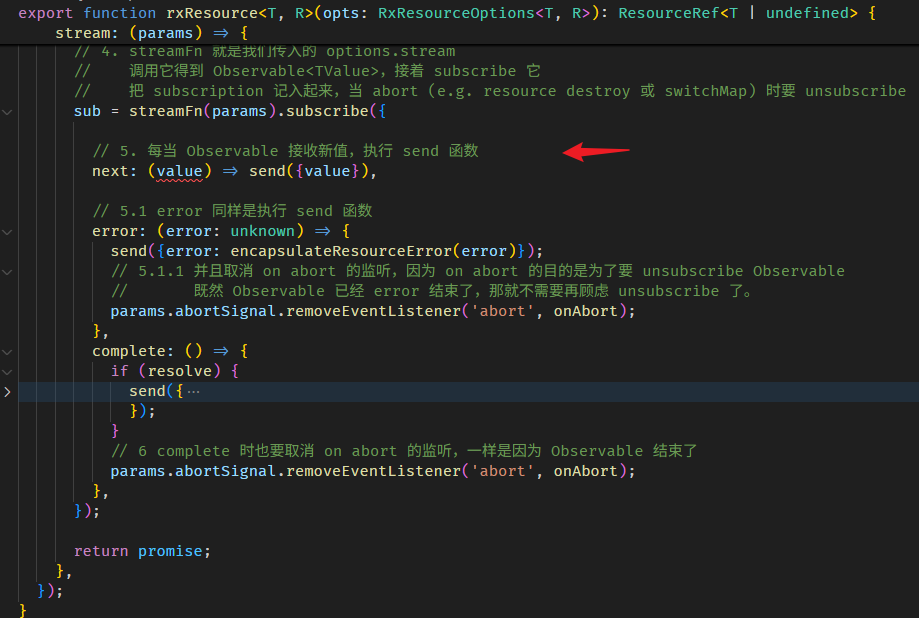
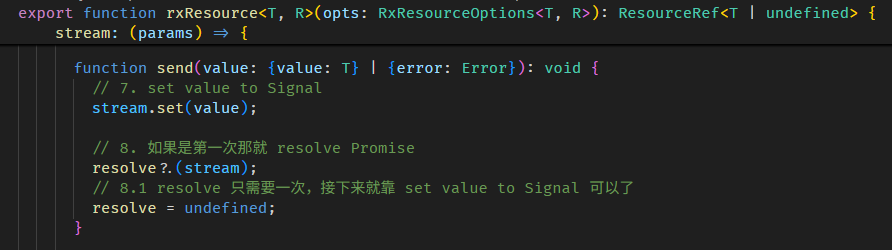
原理很简单,就是 wrap 了一层做接口处理而已。
Signal, immutable, immer
上文有提到,Signal 的 value 最好是使用 immutable,为什么呢?
const person = signal({
  firstName: 'Derrick',
  lastName: 'Yam'
});

const personFullName = computed(() => person().firstName + ' ' + person().lastName);
一个 person signal 和一个 personFullName computed
console.log(personFullName()); // 'Derrick Yam'

person().firstName = 'Alex';   // 变更 firstName

console.log(personFullName()); // 依然是 'Derrick Yam'
虽然 person.firstName 变更了,但 personFullName 却仍然是旧值 'Derrick Yam',why?
这是因为 personFullName 依赖的是 person 而不是 person.firstName。
person.firstName 变更了,但 person 却没有变更,它还是同一个 reference。
personFullName getter 时会对比 personReactiveNode 之前和之后的 version,发现 version 是相同的,于是返回缓存值 'Derrick Yam'。
如果不想发生这种情况,最好的方式是使用 immutable:
console.log(personFullName()); // 'Derrick Yam'

// 采用 immutable 方式 set value
person.set({
  ...person(),
  firstName: 'Alex'
});

console.log(personFullName()); // 'Alex Yam'
immutable 会连同 person 对象 reference 也变更,所以 personReactiveNode.version 就累加了。
immutable 常见写法
immutable 对识别变更友好,但写起来却很繁琐,这里记入一些常见的写法:
改属性值
const person = { name: 'Derrick', age: 11 };
const newPerson = {
  ...person,
  age: 12
};  // { name: 'Derrick', age: 12 } // person 的 reference 换了
remove 属性
const person = { firstName: 'Derrick', age: 11 };
const { firstName, ...newPerson } = person; // 利用解构
console.log(newPerson); // { "age": 11 }
remove 属性 by string
const person = { firstName: 'Derrick', age: 11 };
const keyToRemove = 'firstName';
const { [keyToRemove]: _, ...newPerson } = person; // 利用解构
console.log(newPerson); // { "age": 11 }
push to array
const people = [{ name: 'Derrick', age: 11 }];
const newPeople = [
  ...people,
  { name: 'Alex', age: 13 }
]; // [{ name: 'Derrick', age: 11 }] // people array 和 person 对象的 reference 都换了
insert to array
const people = [{ name: 'Derrick', age: 11 }];

const newPerson = { name: 'Alex', age: 13 };
const index = 0;

const newPeople = [...people.slice(0, index), newPerson, ...people.slice(index)];
console.log(newPeople); // [{ name: 'Alex', age: 13 }, { name: 'Derrick', age: 11 }]
index negative 也支持哦,行为和 splice 一致。
remove from array
const people = [{ name: 'Derrick', age: 11 }];
const newPeople = people.filter(person => person.age === 11); // [] // people array 的 reference 换了

// 再一个 index 的例子
const values = ['a', 'b', 'c', 'd', 'e'];
const index = values.indexOf('c');

const newValues = index === -1 ? values : [...values.slice(0, index), ...values.slice(index + 1)]; // ['a', 'b', 'd', 'e']
上面这几个简单的还能接受,如果遇到嵌套的,那就会变得非常的乱。
remove at index
const people = [{ name: 'Alex', age: 13 }, { name: 'Derrick', age: 11 }, { name: 'David', age: 18 }];
const index = 1;

const newPeople = [...people.slice(0, index), ...people.slice(index + 1)];
console.log(newPeople); // [{ name: 'Alex', age: 13 }, { name: 'David', age: 18 }]
上面这段不支持 negative index,如果要支持 negative 像 splice 那样,需要加入一些 formula,我的建议是用 clone array + splice 会更简单。
const people = [{ name: 'Alex', age: 13 }, { name: 'Derrick', age: 11 }, { name: 'David', age: 18 }];
const index = -1;

const newPeople = [...people]; // clone
newPeople.splice(index, 1);    // mutate

console.log(newPeople); // [{ name: 'Alex', age: 13 }, { name: 'Derrick', age: 11 }]
immer
为了享受 immutable 的好处,又不想写的那么累,可以考虑使用 immer library。
yarn add immer
它的使用方法非常简单
const newPerson = produce(person(), draftPerson => {
  draftPerson.firstName = 'Alex';
});
person.set(newPerson);
调用 produce 函数,把 oldPerson 传进去,然后修改 draftPerson,最后它会返回一个 newPerson。
这个 draftPerson 是一个 Proxy 对象,我们修改它不需要使用 immutable 的手法,把它当作 mutable 对象来修改就可以了 (嵌套也没有问题),
immer 会负责监听 Proxy 然后在背地里制作出 newPerson。
另外,immer 修改的时候是很细腻的
const oldPerson = {
  childA : { age: 11 },
  childB: { age : 12 }
}

const newPerson = produce(oldPerson, draftPerson => {
  draftPerson.childB.age = 13
});

console.log(newPerson === oldPerson); // false
console.log(newPerson.childA === oldPerson.childA); // true
console.log(newPerson.childB === oldPerson.childB); // false
上面只改了 childB,所以只有 childB 和 person 对象变更了,而 childA 依然是同一个 reference。
还有
draftPerson.childB.age = 12; // assign 回同样的值虽然有 assign 的动作,但是值没有换,最终也不会有变更
console.log(newPerson === oldPerson); // true
console.log(newPerson.childA === oldPerson.childA); // true
console.log(newPerson.childB === oldPerson.childB); // true
immer 的局限
像 immer 这种背地里搞东搞西的技术,通常都会有一些 limitation,这里记入一些我遇到过的。
use immer for class instance
上面的例子都是用 pure object,这里我们试试 class instance
class Person {
  constructor(firstName: string) {
    console.log('person constructor');
    this.firstName = firstName;
  }

  firstName: string;
}

const oldPerson = new Person('Derrick');
const newPerson = produce(oldPerson, draftPerson => {
  draftPerson.firstName = 'Alex';
});

console.log('newPerson', newPerson);
效果

报错了,信息上说要加上 [immerable]
class Person {
  [immerable] = true;
}
效果

可以了,但有一点要注意,person constructor 只触发了一次

由 produce 创建出来的 newPerson 是不会执行 constructor 函数的。
lost array properties
const oldValues: string[] & { hiddenValue?: string } = [];
oldValues['hiddenValue'] = 'value';

const newValues = produce(oldValues, draftValues => {
  draftValues.push('value');
});

console.log(newValues['hiddenValue']); // undefined
假如 array 有特别的属性 (虽然很罕见),produce 生成的 newValues 会丢失原本 array 里的属性。
only proxy object and array
const oldPerson = { dateOfBirth : new Date(2021, 0, 1) }
const newPerson = produce(oldPerson, draftPerson => {
  draftPerson.dateOfBirth.setFullYear(2022);
});

console.log(newPerson === oldPerson); // true
只有 object 和 array 会被 proxy,像 Date 是不会被 Proxy 的,我们要修改 Date 就必须用 immutable 的手法。
总结
虽然 immutable 写起来有点繁琐,但 Signal 配 immutable 会避开不少坑,还是强烈建议大家使用。
Signals 的小烦恼😌
记入一些日常中我遇到的小烦恼:
无法 JSON.stringify
signal 是 function,在 to json 时会自动被过滤掉。
const person = {
  firstName: signal('Derrick'),
  lastName: signal('Yam'),
  fullName: computed((): string => person.firstName() + ' ' + person.lastName()),
  child: signal({ age: 11 }),
};

console.log(JSON.stringify(person)); // {} emtpty object
如果我们希望它输出正确的值,可以提供一个 replacer。
console.log(JSON.stringify(person, (_key, value: unknown) => (isSignal(value) ? value() : value), ' '));
// 效果
// {
//   "firstName": "Derrick",
//   "lastName": "Yam",
//   "fullName": "Derrick Yam",
//   "child": {
//     "age": 11
//   }
// }
参数二是 replacer,判断 value 是否是 Signal,如果是就调用它获取值,这样就可以了。
注:isSignal 是 Angular built-in 函数。
总结
本篇讲解了 Signals 的前世(KO)今生(SolidJS),以及 Angular Signals 的核心功能与原理。
虽然内容已经不少,但这还远远不是 Angular Signals 的全貌。
像是 Angular built-in 的 EffectScheduler 和 ChangeDetectionScheduler,本篇刻意用模拟的跳过了 (因为要了解这部分,需要其它 Angular 知识作为基础,还没教呢)。
实际上,Angular 框架在各个方面都会牵涉到 Signals (不管是我们输入给它,还是它返回给我们),这些内容我会在后续章节,按主题逐一补上。
目录
上一篇 Angular 20+ 高级教程 – Dependency Injection 依赖注入
下一篇 Angular 20+ 高级教程 – Component 组件 の Angular Component vs Web Component
想查看目录,请移步 Angular 20+ 高级教程 – 目录
喜欢请点推荐👍,若发现教程内容以新版脱节请评论通知我。happy coding 😊💻
在组件里使用 effect
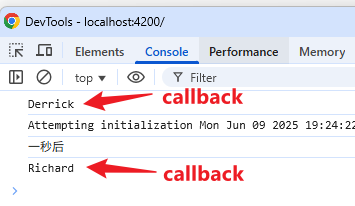
上一 part 我刻意避开了在组件内使用 effect (躲到了 APP_INITIALIZER 里头用😅),因为我说组件内用 effect 会有化学反应。
这里就讲讲这些化学反应。
DestroyRef 不同
effect 会用 Injector inject DestroyRef 做 autoCleanup,Root Injector inject 的 DestroyRef 是 Root Injector 本身。
而换到组件里就不同了,组件的 Injector 是 NodeInjector,inject 的 DestroyRef 是依据组件的生命周期,当组件 destroy 时 effect 也同时被 destroy。
第一次执行 effect callback 的时机不同
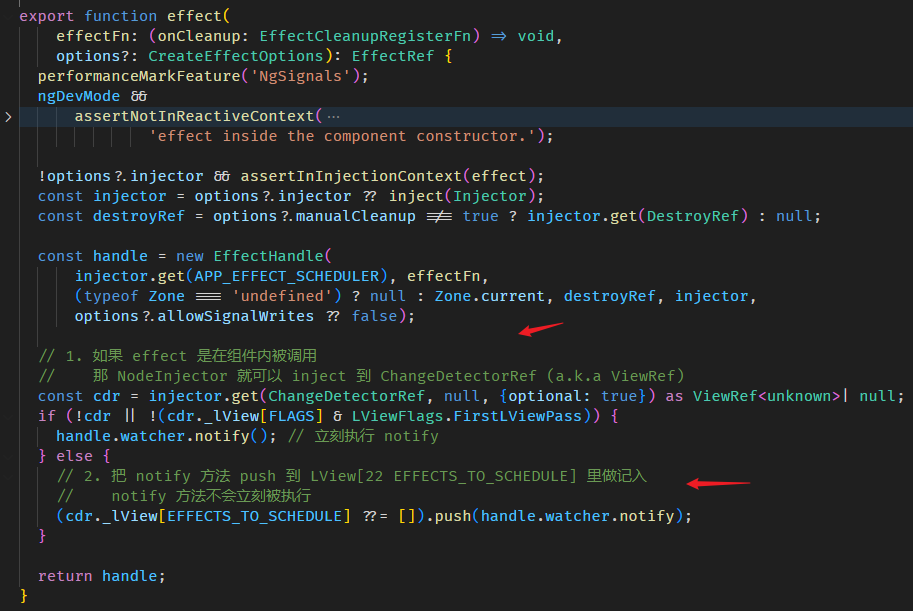
组件内调用 effect,callback 不会立刻被 schedule to queue,而是先把 notify 方法寄存在 LView[22 EFFECTS_TO_SCHEDULE] 里。
一直等到当前 LView 被 refresh

AfterViewInit 后,afterNextRender 前,notify 方法被执行,effect callback 被 schedule to queue。
注意,只是 schedule to queue 而已,effect callback 正真被调用是在 afterNextRender 之后。
另外,假如我们在 afterNextRender 里面调用 effect 它会立刻 schedule to queue。

因为这个阶段 LView 已经完成了第一次的 create 和 update 满足 FirstLViewPass 条件。
好,以上就是在组件内使用 effect 和在组件外使用 effect 的两个区别,好像区别也没有很大...😂
Signal as ViewModel
上面的一些例子已经有在组件内使用 Signal 了,但它们都没有用于 Template Binding Syntax。
接下来我们看看 Signal 如何作为 ViewModel。
app.component.ts
export class AppComponent {
  firstName = signal('Derrick');
  lastName = signal('Yam');
  fullName = computed(() => `${this.firstName()} ${this.lastName()}`);
}
app.component.html
<p>{{ fullName() }}</p>
<button (click)="firstName.set('Alex')">set first name</button>
<button (click)="lastName.set('Lee')">set last name</button>
效果

Signal and refreshView
Angular 文档有提到,Signal 是可以搭配 ChangeDetectionStrategy.OnPush 使用的。

但是有一点我要 highlight,当 Signal 变更,当前的 LView 并不会被 markForCheck。
Angular 用了另一套机制来处理 Signal 和 refresh LView 的关系。
逛一逛 Signal 和 refresh LView 的源码
如果你对 Angular TView,LView,bootstrapApplication 过程不熟悉的话,请先看 Change Detection 文章。
场景:
有一个组件,ChangeDetectionStrategy.OnPush,它有一个 Signal 属性,binding 到 Template。
组件内跑一个 setTimeout 后修改 Signal 的值,但不做 markForCheck,结果 DOM 依然被更新了。
提问:
1. Signal 变更,Angular 怎么感知?
2. Angular 是怎样更新 DOM 的?使用 tick、detechChanges 还是 refreshView?
回答:
首先,不要误会,Angular 并没有暗地里替我们 markForCheck,它采用了另一套机制。
这套机制依然需要 NgZone,当 Zone.js 监听事件后,依然是跑 tick。
v17.1.0 后,markForCheck 和这套机制都会触发 tick 功能,不需要再依赖 Zonje.js 触发 tick 了。
tick 会从 Root LView 开始往下遍历。到这里,按理说我们没有 markForCheck 任何 LView,遍历根本跑不下去。
所以 Angular 新加了一个往下遍历的条件。

detectChangesInViewWhileDirty 是判断要不要往下遍历。


HasChildViewsToRefresh 意思是当前 LView 或许不需要 refresh,但是其子孙 LView 需要,所以得继续往下遍历。

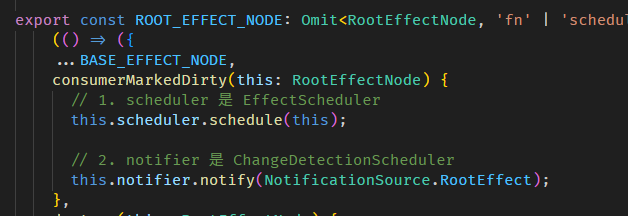
那这个 HasChildViewsToRefresh 是谁去做设定的呢?自然是 Signal 咯。
当 Angular 在 refreshView 时

consumerBeforeComputation 函数的源码在 graph.ts

里面调用了 setActiveConsumer 把 node 设置成全局 consumer。
这个 node 是一个 ReactiveNode,具体类型是 ReactiveLViewConsumer。(源码在 reactive_lview_consumer.ts)

我想你也已经看出来了,它在搞什么鬼。
每一个 LView 都有一个 ReactiveLViewConsumer,它用来收集依赖 (a.k.a producer) 的。
在 LView refresh 之前,它会把 LView 的 ReactiveLViewConsumer (ReactiveNode 来的) 设置成全局 consumer,
refreshView 执行的时候,LView 的 Template Binding Syntax (compile 后是一堆函数调用) 会被执行,这些函数中就包含了 Signal getter。
全局 consumer + Signal getter = 收集 producer 和 consumer (这就是 effect 的机制嘛)
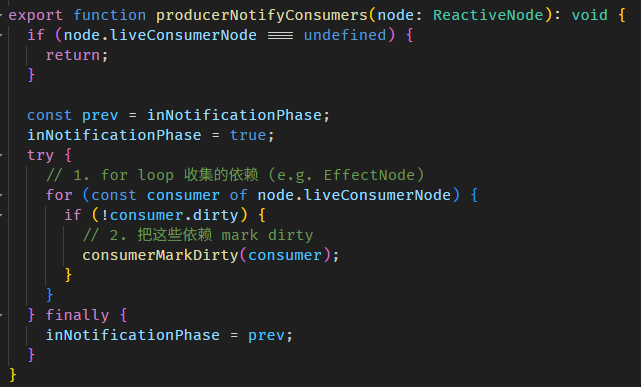
接下来就等 Signal 变更后执行 markAncestorsForTraversal

顾名思义,就是把祖先 mark as HasChildViewsToRefresh,源码在 view_utils.ts

总结:
LView 用了和 effect 类似的手法收集 producer 和 consumer,当 producer 变更它 markAncestorsForTraversal (新招数),markAncestorsForTraversal 会触发 tick,然后 refreshView,这样就更新 DOM 了。
另外一点,markAncestorsForTraversal 比 markForCheck 好,因为 markForCheck 会造成祖先一定会 refreshView,而 markAncestorsForTraversal 只是把祖先 mark 成 HasChildViewsToRefresh,
意思是只有子孙要需要 refreshView,自己是不需要 refreshView 的。希望未来 Angular 会公开这个 markAncestorsForTraversal 功能。
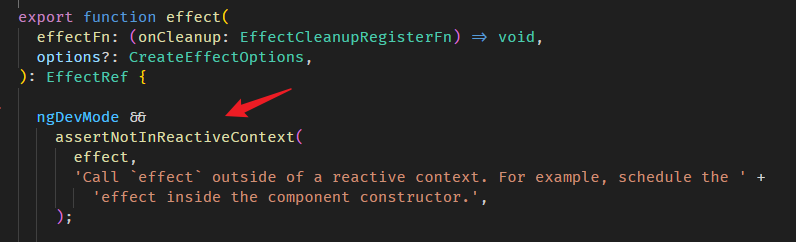
AfterNextRender + effect + signal view model 面试题
export class SimpleTestComponent {
  // 1. 这是一个 Signal view model
  name = signal('derrick');

  constructor() {
    const injector = inject(Injector);

    // 2. 这里注册一个 after render callback
    afterNextRender(() => {
      // 3. 里面执行 effect
      effect(
        () => {
          if (this.name() === 'derrick') {
            // 4. effect 里面修改 Signal view model
            this.name.set('new name');
          }
        },
        { allowSignalWrites: true, injector },
      );
    });
  }
}
面试官:依据上面的理解,讲解一下你了解的 Angular 执行过程。
你:Angular bootstrapApplication 会执行 renderView 和 tick > refreshView。
renderView 会执行 SimpleTest 组件的 constructor,然后会注册 after render callback。
等到 refreshView 结束后会执行 after render callback。
这时会执行 effect。由于已经过了 LView 第一轮的 render 和 refresh 所以 effect callback 会直接 schedule to queue。
此时第一轮的 tick 就结束了,但是还没有到 browser 渲染哦,因为 effect schedule 是 microtask level 而已,所以 tick 结束后就会接着执行 effect callback。
callback 里面会修改 signal view model,LView (ReactiveLViewConsumer) 监听了这个 view model 的变更,一旦变更就会执行 markAncestorsForTraversal,然后会触发一个 tick。
于是又一轮 refreshView,修改 DOM,tick 结束,browser 渲染。
Signal 新手常掉的坑
刚开始使用 Signal 可能会不适应它的一些机制,一不小心就会掉坑了,这里给大家提个醒。
effect 没有执行
afterNextRender(() => {
  const classSelector = signal('item');
  effect(() => {
    const elements = Array.from(document.querySelectorAll('.container')).filter(el => el.matches(classSelector()));
    console.log('elements', elements);
  });
});
假如第一次执行 effect callback 的时候,querySelectorAll('.container') 返回的是 empty array,那后面的 filter 就不会跑,classSelector getter 也不会被调用。
这样依赖就没有被收集到,从此这个 effect callback 就不会再触发了。
下面这样写就完全不同了
effect(() => {
  const selector = classSelector();
  const elements = Array.from(document.querySelectorAll('.container')).filter(el => el.matches(selector));
  console.log('elements', elements);
});
classSelector 会被依赖收集,每当它变更,querySelectorAll 和后续的逻辑都会执行。
具体你是要哪一种效果,我不知道,我只是告诉你它们的区别。
Signal-based Input (a.k.a Signal Inputs)
Angular v17.1.0 版本 release 了 Signal-based Input。
Input Signal 的作用就是自动把 @Input 转换成 Signal,这样既可以利用 Signal Change Detection 机制,也可以用来做 Signal Computed 等等,非常方便。
下面是一个 Input Signal
export class SayHiComponent implements OnInit {
  inputWithDefaultValue = input('default value');

  computedValue = computed(() => this.inputWithDefaultValue() + ' extra value');

  ngOnInit(): void {
    console.log(this.inputWithDefaultValue()); // 'default value'
    console.log(this.computedValue());         // 'default value extra value'
  }
}
除了变成 Signal 以外,其它机制和传统的 @Input 没有太多区别,比如一样是在 OnInit Hook 时才可用。
还有一点要注意,这个 Input Signal 是 readonly 的,不是 WritableSignal,这其实是合理的,以前 @Input 可以被修改反而很危险。
required 的写法
inputRequired = input.required<string>();
为了更好的支持 TypeScript 类型提示,Angular 把 requried 做成了另一个方法调用,而不是通过 options。
如果它是 required 那就不需要 default value,相反如果它不是 required 那就一定要放 default value。
也因为 required 没有 default value 所以需要通过泛型声明类型。
alias 和 transform 的写法
inputRequiredWithAlias = input.required<string>({ alias: 'inputRequiredAlias' });
inputRequiredWithTransform = input.required({
  transform: booleanAttribute,
});
transform 之所以不需要提供类型是因为它从 boolAttribute 中推断出来了。
我们要声明也是可以的
inputWithTransform = input.required<unknown, boolean>({
  transform: booleanAttribute,
});
optional alias 和 transform 的写法
inputOptionalWithAlias = input('defualt', { alias: 'inputOptionalAlias' });
inputOptionalWithTransform = input(undefined, { transform: booleanAttribute });
第一个参数是 initial value,一定要放,哪怕是放 undefined 也行,因为它只有三种重载。

set readonly Input Signal
Input Signal 对内是 readonly 合理,但是对外是 readonly 就不合理了。
Message 组件
@Component({
  selector: 'app-message',
  standalone: true,
  template: `<h1>{{ message() }}</h1>`,
  changeDetection: ChangeDetectionStrategy.OnPush,
})
export class MessageComponent {
  readonly message = input.required<string>();
}
App 组件
@Component({
  selector: 'app-root',
  standalone: true,
  template: `<app-message message="hello world" />`,
  changeDetection: ChangeDetectionStrategy.OnPush,
  imports: [MessageComponent],
})
export class AppComponent {}
如果我们想在 App 组件 query Message 组件,然后直接 set message 进去可以吗?
答案是不可以,因为 InputSignal 没有 set 或 update 方法

这就非常不方便,而且也和之前的 @Input 不兼容。
那有没有黑科技,或者 workaround?还真有😏
constructor() {
  window.setTimeout(() => {
    const messageSignal = this.messageComponent().message[SIGNAL];
    messageSignal.applyValueToInputSignal(messageSignal, 'new message');
  }, 2000);
}
直接拿 InputSignalNode 出来操作就可以了。
如果 input 有配置 transform 可以先调用 transformFn 获取 transform 后的值再调用 applyValueToInputSignal
const numberValue = messageSignal.transformFn!.('100');
messageSignal.applyValueToInputSignal(messageSignal, numberValue);
Signal-based Two-way Binding (a.k.a Signal Models)
Angular v17.2.0 版本 release 了 Signal-based Two-way Binding,请看这篇 Component 组件 の Template Binding Syntax # Signal-based Two-way Binding
Signal-based Query (a.k.a Signal Queries)
温馨提醒:忘记了 Query Elements 的朋友,可以先回去复习。
Signal-based Query 是 Angular v17.2.0 推出的新 Query View 和 Query Content 写法。
大家先别慌,它只是上层写法换了,底层逻辑还是 Query Elements 文章教的那一套。
viewChild
before Signal
@ViewChild('title', { read: ElementRef })
titleElementRef!: ElementRef<HTMLHeadingElement>;
after Signal
titleElementRef2 = viewChild.required('title', {
  read: ElementRef<HTMLHeadingElement>,
});
有 3 个变化:
-
Decorator 没了,改成了函数调用。从 v14 的 inject 函数取代 @Inject Decorator 开始,大家都预料到了,有朝一日 Angular Team 一定会把 Decorator 赶尽杀绝的😱。
-
titleElementRef 类型从 ElementRef<HTMLHeadingElement> 变成了 Signal 对象 -- Signal<ElementRef<HTMLHeadingElement>>。
不过目前 TypeScript 类型推导好像有点问题,titleElementRef2 的类型是 Signal<ElementRef<any>>,它没有办法推导出泛型,所以 read ElementRef 时不够完美。
我们只能自己声明类型来解决
titleElementRef2 = viewChild.required<string, ElementRef<HTMLHeadingElement>>('title', {
  read: ElementRef,
});
泛型第一个参数是 'title' 的类型,第二个是 read 的类型。
-
titleElementRef! 结尾的 ! 惊叹号变成了 viewChild.required。没有惊叹号就不需要 .required。
惊叹号或 required 表示一定能 Query 出 Result,不会出现 undefined。
viewChildren
// before Signal
@ViewChildren('title', { read: ElementRef })
titleQueryList!: QueryList<ElementRef<HTMLHeadingElement>>;

// after Signal
titleArray = viewChildren<string, ElementRef<HTMLHeadingElement>>('title', {
  read: ElementRef,
});
两个知识点:
-
before Signal 返回的类型是 QueryList 对象,after Signal 类型变成了 Signal Array -- Signal<readonly ElementRef<HTMLHeadingElement>[]>。
-
! 惊叹号不需要 viewChildren.required,因为 @ViewChild 和 viewChildren 即便 Query 不出 Result,也会返回 QueryList 对象或 Signal Empty Array。
contentChild 和 contentChildren
content 的写法和 view 是一样的。把 view 改成 content 就可以了。这里就不给例子了。
Replacement for QueryList and Lifecycle Hook
我们先理一下 QueryList 的特性:
-
QueryList 是在 renderView 阶段创建的,理论上来说,组件在 constructor 阶段肯定还拿不到 QueryList,但从 OnInit Lifecycle Hook 开始就应该可以拿到 QueryList 了。
但是
![]()
这是因为 Angular 是在 refreshView 阶段才将 QueryList 赋值到组件属性的,所以 OnInit 和 AfterContentInit 时组件属性依然是 undefined。
-
QueryList Result Index 是在 renderView 结束时收集完毕的。理论上来说,只要在这个时候调用 ɵɵqueryRefresh 函数,QueryList 就可以拿到 Result 了。
但是 Angular 一直等到 refreshView 结束后才执行 ɵɵqueryRefresh 函数。
-
综上 2 个原因,我们只能在 AfterViewInit 阶段获取到 QueryList 和 Query Result。
-
Angular 这样设计的主要原因是不希望让我们拿到不完整的 Result,尽管 renderView 结束后已经可以拿到 Result,但是这些 Result 都是还没有经过 refreshView 的,
组件没有经过 refreshView 那显然是不完整的,所以 Angular 将时间推迟到了最后,在 AfterViewInit 阶段所有 Query 到的组件都是已经 refreshView 了的。
-
QueryList.changes 只会在后续的改动中发布,第一次是不发布的。

Replacement for QueryList
Signal-based Query 不再曝露 QueryList 对象了 (这个对象依然还在,只是不在公开而已),取而代之的是 Signal 对象,那我们要怎样监听从前的 QueryList.changes 呢?
QueryList 没了,不要紧,我们多了个 Signal 嘛,Signal 也可以监听丫,要监听 Signal 可以使用 effect 函数。
export class AppComponent {
  titles = viewChildren<string, ElementRef<HTMLHeadingElement>>('title', {
    read: ElementRef,
  });

  constructor() {
    effect(() => {
      console.log(this.titles());
    });
  }
}
每当内部的 QueryList 发生变化 (包括第一次哦,这点和 QueryList.changes 不同),Signal 就会发布新值,监听 Signal 值的 effect 就会触发。
Replacement for Lifecycle Hook
除了隐藏 QueryList 之外,Signal-based Query 也修改了执行顺序。
export class AppComponent implements OnInit, AfterContentInit, AfterViewInit {
  titles = viewChildren<string, ElementRef<HTMLHeadingElement>>('title', {
    read: ElementRef,
  });

  constructor() {
    console.log(this.titles().length);   // 0
    effect(() => {
      console.log(this.titles().length); // 1
    });
  }
  ngOnInit(): void {
    console.log(this.titles().length);    // 1
  }
  ngAfterContentInit(): void {
    console.log(this.titles().length);    // 1
  }
  ngAfterViewInit(): void {
    console.log(this.titles().length);    // 1
  }
}
在 renderView 结束后,Angular 就执行了 ɵɵqueryRefresh,所以从 OnInit 开始就可以获取到 Query Result 了。(注:此时的 Query Result 依然属于不完整状态,组件还没有 refreshView 的)
Angular 修改这个顺序主要是因为它想把职责交还给我们,它提早给,我们可以选择要不要用,它不给,我们连选择的机会都没有。
Signal-based Query 源码逛一逛
App 组件
export class AppComponent {
  titles = viewChildren<string, ElementRef<HTMLHeadingElement>>('title', {
    read: ElementRef,
  });

  @ViewChildren('title', { read: ElementRef })
  titleQueryList!: ElementRef<HTMLHeadingElement>;
}
一个 Signal-based,一个 Decorator-based,我们做对比。
yarn run ngc -p tsconfig.json
app.component.js

2 个区别:
-
Decorator-based 在 refreshView 阶段做了 2 件事,Signal-based 一件也没有。
第一件事是赋值给组件属性,Signal-based 改成了在 constructor 阶段完成。
所以在 constructor 阶段 Decorator-based 的 QueryList 属性是 undefined,而 Signal-based 的 Signal 属性是有 Signal 对象的。
第二件事是刷新 Query Result,Signal-based 改成了去监听 Dyanmic Component 的 append 和 removeChild,当插入和移除时就会刷新 Query Result。
-
在 renderView 阶段,Decorator-based 会创建 QueryList,然后收集 Query Result Index,这些 Signal-based 也都会做,做法也都一模一样。
Signal-based 唯一多做了的事是关联 QueryList 和 Signal。具体流程大致上是这样:
当 Dynamic Component append 和 removeChild 时,它会 set QueryList to Dirty,Signal 会监听 QueryList Dirty,当 QueryList Dirty 后 Signal 会刷新 Query Result。
viewChildren 函数的源码在 queries.ts

createMultiResultQuerySignalFn 函数的源码在 query_reactive.ts

createQuerySignalFn 函数的源码在 query_reactive.ts

createQuerySignalFn 函数有点绕,一行一行很难讲解,我分几个段落讲解吧。
createComputed 函数是我们常用的 Signal computed 函数的 internal 版本


Computed Signal 的特色是它内部会依赖其它 Signal。
Computed Signal 内部


回到 app.component.js,ɵɵviewQuerySignal 函数的源码在 queries_signals.ts

createViewQuery 函数负责创建 TQuery、LQuery、QueryList。
Signal-based 和 Decorator-based 调用的是同一个 createViewQuery 函数,所以 Signal-based 的区别是在 bindQueryToSignal 函数。
bindQueryToSignal 函数的源码在 query_reactive.ts

总结
-
有 2 个主要阶段
第一个是 constructor
第二个是 renderView
-
有 2 个主要对象
第一个是 QueryList
第二是 Computed Signal
-
constructor 阶段创建了 Computed Signal
renderView 阶段创建了 QueryList
-
Computed Signal 负责刷新 Query Result,但刷新 Query Result 需要 QueryList (当然还有其它的,比如 LView 我就不一一写出来的,用 QueryList 做代表)。
所以在 renderView 创建 QueryList 后,Computed Signal 和 QueryList 需要关联起来。
-
_dirtyCounter Signal 是一个小配角,因为 QueryList on Dirty 的时候要刷新 Query Result,
而刷新 Query Result 是 Computed Signal 负责的,要触发一个 Signal 只能通过给它一个依赖的 Signal,所以就有了 _dirtyCounter Signal。
-
最后:QueryList on Dirty 时 -> 通知 _dirtyCounter Signal -> Computed Signal 依赖 _dirtyCounter Signal -> Computed Signal 刷新 Query Result。
-
QueryList on Dirty 是什么时候触发的呢?
LQueries 负责 set QueryList to Dirty
LQueries 的 insertView、detachView 方法是在 Dynamic Component 插入/移除时被调用的。![]()
finishViewCreation 会在 LView renderView 后,Child LView renderView 之前被调用。

Might be a bug
export class AppComponent {
  constructor() {
    const titles = viewChildren<string, ElementRef<HTMLHeadingElement>>('title', {
      read: ElementRef,
    });

    effect(() => {
      console.log(titles());
    })
  }
}
如果我们把 viewChildren 返回的 Signal assign to 一个 variable 而不是一个属性的话,compilation 出来的 App Definition 不会有 viewQuery 方法。

也不只是 assign to variable 才出问题,写法不一样它也 compile 不了。
export class AppComponent {
  titles: Signal<readonly ElementRef<HTMLHeadingElement>[]>;

  constructor() {
    this.titles = viewChildren<string, ElementRef<HTMLHeadingElement>>(
      'title', { read: ElementRef, }
    );

    effect(() => {
      console.log(this.titles());
    });
  }
}
像上面这样分开写也是不可以的。提交了 Github Issue,我猜 Angular Team 会说:是的,必须按照官方的 code style 去写,不然 compiler 解析不到。
这也是 compiler 黑魔法常见的问题,因为语法设计本来就是很复杂的,框架如果要支持各做逻辑会很耗精力。
Signal-based Output (a.k.a Signal Outputs)
Angular v17.3.0 版本 release 了 Signal-based Output。
Signal-based Output 其实和 Signal 没有太多关系,因为它不根本就没有使用到 Signal 对象,它和 Signal-based Input 完全不可相提并论。
它们唯一的共同点是调用的手法非常相识,仅此而已。
Signal-based Output 长这样
export class HelloWorldComponent {

  newClick = output<string>();

  @Output()
  oldClick = new EventEmitter<string>();

  handleClick() {
    this.newClick.emit('value');
    this.oldClick.emit('value');
  }
}
和 Decorator-based Output 相比,主要是它不使用 Decorator 了,改成使用全局函数 output。
这一点和 inject, input, viewChild, contentChild 概念是一样的,通通都是从 Decorator 改成了全局函数。
监听的方式和以前一样,没有任何改变。
<app-hello-world (newClick)="log($event)" (oldClick)="log($event)" />
OutputEmitterRef vs EventEmitter
output 函数返回的是 OutputEmitterRef 对象。对于我们使用者来说,OutputEmitterRef 和 EventEmitter 没有什么区别。
但是往里面看,它俩的区别可就大了,这甚至会引出 Angular 团队的下一个大方向 -- Optional RxJS🤔。
EventEmitter 继承自 RxJS 的 Subject

而 OutputEmitterRef 不依赖 RxJS

OutputEmitterRef 的源码在 output_emitter_ref.ts

它只有 2 个公开接口 -- subscribe 和 emit。
Signal-based Output 源码逛一逛
如果你没有跟我一起逛过源码,最好是顺着本教程学,因为我讲解过的就不会再重复讲解了。
首先 run compilation
yarn run ngc -p tsconfig.json
app.component.js

监听 output 和监听普通 DOM event 是一样的,都是通过 ɵɵlistener 函数。
hello-world.js

Decorator-based Output 和 Signal-based Output compile 出来的 Definition 是一样的。
关于 output 的信息都记录在 outputs 属性中。
在 Angular bootstrapApplication 源码逛一逛 文章中,我们提到过 initializeDirectives 函数。
它的源码在 shared.ts
在 initializeDirectives 函数的结尾调用了 initializeInputAndOutputAliases 函数
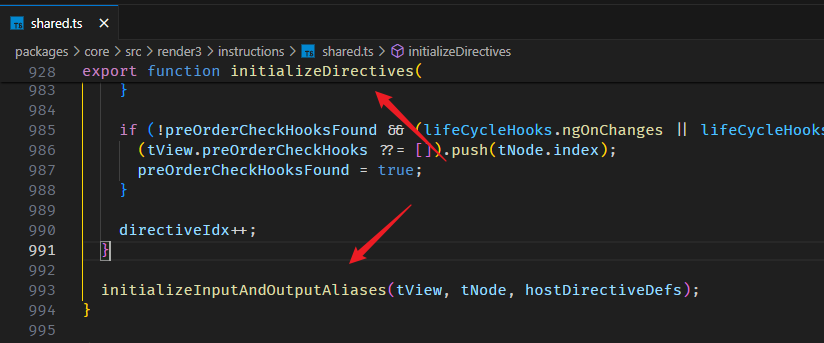
initializeInputAndOutputAliases 函数最终把 output 信息存放到了 TNode 上。
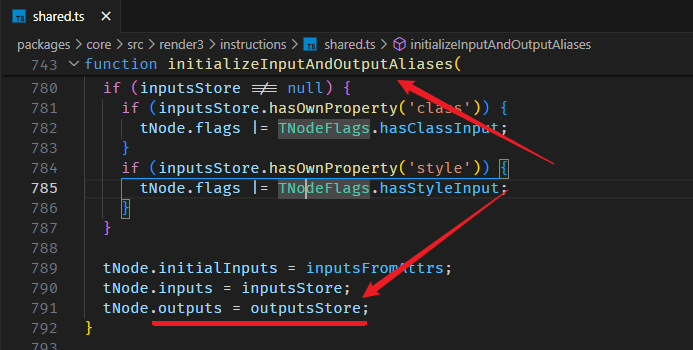
HelloWorld 组件 TNode

上面有提到 app.component.js 会调用 ɵɵlistener 函数监听 output。
相关源码在 listener.ts
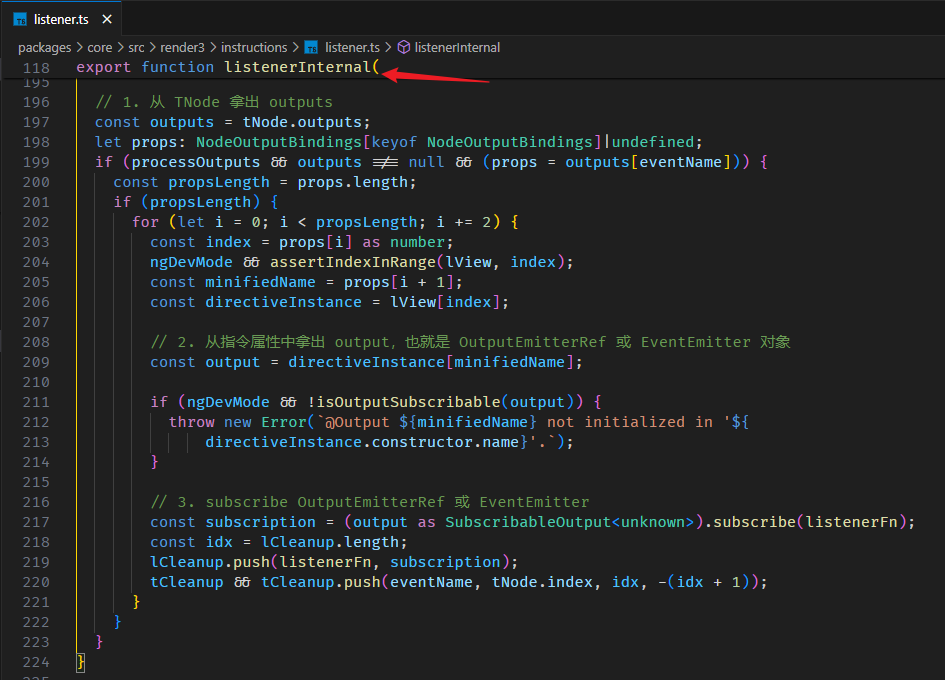
总结
<app-hello-world (newClick)="log($event)" (oldClick)="log($event)" />
export class HelloWorldComponent {
  newClick: OutputEmitterRef<string> = output<string>();

  @Output()
  oldClick = new EventEmitter<string>();
}
上面这些 Template Binding Syntax 最终变成了
helloWorldInstance.newClick.subscribe($event => appInstandce.log($event))
helloWorldInstance.oldClick.subscribe($event => appInstandce.log($event))
Related with Signal
我唯一看到和 Signal 有关的
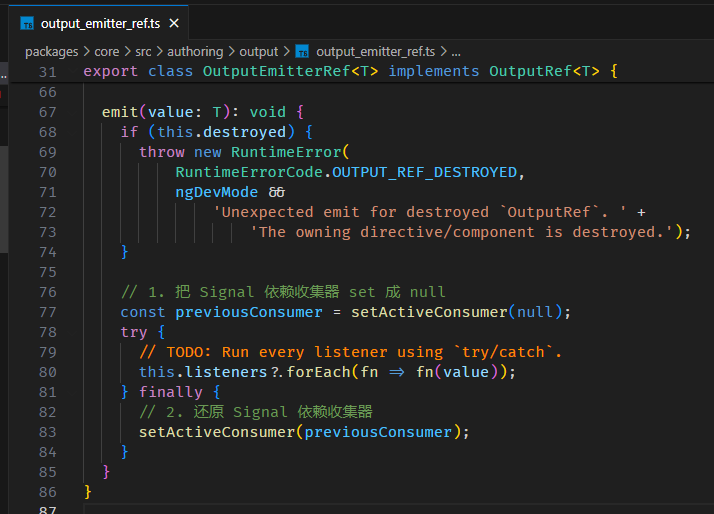
在 OutputEmitterRef.emit 执行 callback function 之前,它会先把 Signal 的依赖收集器 set 成 null,执行完 callback function 后再还原 Signal 依赖收集器。
我不清楚为什么它这么做,也懒得去研究,以后遇到 bug 再回头看呗。
outputFromObservable 和 outputToObservable
Signal 对象可以 convert to RxJS Observable,OutputEmitterRef 也行。
export class HelloWorldComponent {
  myClickSubject = new Subject<string>();
  myClick = outputFromObservable(this.myClickSubject) satisfies OutputRef<string>;

  myHover = output<string>();
  myHover$ = outputToObservable(this.myHover) satisfies Observable<string>;
}
没什么特别的,就只是一个 convert 而已。
值得留意的是,outputFromObservable 返回的是 OutputRef 而不是 OutputEmitterRef,它俩的区别是 OutputRef 只能 subscribe 不能 emit,类似 readonly 的概念。
Signal-based OnInit? (the hacking way...🤪)
Angular 团队说了

Signal-based 会保留 ngOnInit 和 ngOnDestroy。其它 lifecycle 用 effect 和 AfterRenderHooks 替代。
其实 ngOnDestroy 早就被 DestroyRef 取代了,目前无可替代的只剩下 ngOnInit 而已。
这我就纳闷了,留一个另类在那边,这不是摆明来乱的吗?😡
好,今天心血来潮,我们就来试试看有没有一些 hacking way 可以实现 Signal-based 风格的 ngOnInit。
ngOnInit 的原理
首先,我们需要知道 ngOnInit 的原理。
这个好办,以前我们逛过它源码的,如果你忘记了,可以看这篇。
我们先搭个环境
App Template
<app-hello-world [value]="value()" appDir1 />
App Template 里有 HelloWorld 组件,组件上有 Dir1 指令和 @Input value。
HelloWorld 组件
export class HelloWorldComponent implements OnInit {
  readonly value = input.required<string>();
  ngOnInit() {
    console.log('HelloWorld 组件', this.value());
  }
}
Dir1 指令
export class Dir1Directive implements OnInit {
  ngOnInit() {
    console.log('Dir1 指令')
  }
}
HelloWorld 组件和 Dir1 指令都有 ngOnInit。
我们知道 ngOnInit 会被保存到 LView 的 parent TView 里,也就是说,HelloWorld 组件和 Dir1 指令的 ngOnInit 会被保存到 App TView 的 preOrderHooks array 里。
下图是 App TView

preOrderHooks 的记录是有顺序规则的。
index 0: 25 是 <app-hello-wrold> TNode 在 App TView.data 的 index
index 1: -36 是 HelloWorld 实例在 App LView 的 index
index 2: ngOnInit 是 HelloWorld 组件的 ngOnInit 方法
index 3: -37 是 Dir1 实例在 App LView 的 index
index 4: ngOnInit 是 Dir1 指令的 ngOnInit 方法
一个 TNode 可能会包含多个指令,所以会有多个指令实例和 ngOnInit 方法。
index 5: 下一个 TNode。我们目前的例子没有下一个了,像下面这样就会有
<app-hello-world [value]="value()" appDir1 />
<app-say-hi [value]="value()" appDir1 />
此时 index 5 就是 SayHi TNode 的 index,index 6 就是 SayHi 实例 index,index 7 就是 SayHI ngOnInit 方法,以此类推。
好,搞清楚 ngOnInit 被存放到哪里还不够,我们还要知道它存放的时机。
在 renderView 阶段,App template 方法被调用。
此时会实例化 HelloWorld 组件,并且 register pre order hooks。
但在实例化 HelloWorld 组件之前,有这么一 part

initializeDirectives 函数我们之前逛过,这里就不再赘述了。
我们看它的两个重点:
-
它会从 class HelloWorld 的 prototype 里取出 ngOnInit 方法
HelloWorld.prototype['ngOnInit']
熟悉 JavaScript class prototype 概念的朋友应该能理解
![]()
-
如果这个 prototype 中有 ngOnInit,ngDoCheck,ngOnChanges (这三个都是 pre order hooks),
那它会把 TNode index 存入 preOrderHooks array 里,也就是上面的 index 0:25。

提醒:此时 HelloWorld 组件是还没有被实例化的哦,constructor 还没有被执行。
好,接着就是实例化 HelloWorld 组件,然后 register pre order hooks。
相关源码在 di.ts 里的 getNodeInjectable 函数

实例化组件后才会 register pre order hooks。
registerPreOrderHooks 函数源码在 hooks.ts

往 preOrderHooks array 里 push 了 2 个值。也就是上面提到的 index 1: HelloWorld 组件实例的 index,index 2: HelloWorld 组件的 ngOnInit 方法 (方法是从 class HelloWorld prototype 里拿的)
然后就是 refreshView 阶段了,当 @Input 被赋值后,它就会调用 TView.preOrderHooks 中的 ngOnInit 方法。
The hacking way
好,理一理思路:
-
在 HelloWorld 组件实例化之前,class HelloWorld 的 prototype 中最好能有 ngOnInit 方法。
因为这样它才会要把 TNode index push 到 TView.preOrderHooks array 里。
-
在 HelloWorld 组件实例化以后,class HelloWorld 的 prototype 一定要有 ngOnInit 方法。
因为它要 register pre order hooks,把组件实例和 ngOnInit 方法 push 到 TView.preOrderHooks array 里。
我们的目标是不要定义 ngOnInit 方法,取而代之的是像调用 afterNextRender 函数那样在 constructor 里调用 onInit 函数注册 on init callback。
按照我们的目标,上面第一条是无法达成了,所以我们需要手动把 TNode index 添加到 TView.preOrderHooks array 里。
至于第二条,我们可以办到。只要在 constructor 里添加 ngOnInit 方法到 HelloWorld.prototype 就可以了。
好,思路清晰,开干。
首先,我们定义一个全局函数 onInit
type CallBack = () => void;
function onInit(componentInstance: Record<PropertyKey, any>, callback: CallBack) {

}
参数一是组件实例,我们需要从组件实例中获取它的 prototype,然后添加 ngOnInit 方法进去。
参数二就是 on init callback 函数。
它的使用方式是这样的
export class HelloWorldComponent {
  readonly value = input.required<string>();

  constructor() {
    onInit(this, () => {
      console.log('init1', this.value());
      console.log(inject(ElementRef)); // callback 最好是 injection context, 可以直接调用 inject 函数会比较方便
    });

    onInit(this, () => {
      console.log('init2', this.value());
    });
  }
}
好,我们来具体实现 onInit 函数
function onInit(
  componentInstance: Record<PropertyKey, any>,
  callback: CallBack
) {
  setupTViewPreOrderHooks();
  setupPrototype();
  saveCallback();
}
有三大步骤:
第一步是把 TNode.index push 到 TView.preOrderHooks 里。
function setupTViewPreOrderHooks() {
  // 1. 这里是 LView 中的 index 引用
  const TVIEW = 1;
  const PARENT = 3;

  // 2. 首先,我们要拿到 TNode index
  //    以这个例子来说的话
  //    app.component.html
  //    <app-hello-world [value]="value()" appDir1 />
  //    HelloWorld 组件和 dir1 指令的 TNode 是同一个 <app-hello-world>
  //    TNode index 指的是这个 <app-hello-world> 在 App LView 里的 index
  //    它是第一个 element,所以 index 是 25 咯。
  //    我们透过 ViewContainerRef 拿到当前的 TNode,然后再拿它的 index
  //    提醒:
  //    不要使用 ChangeDetectorRef['_lView'][T_Host 5].index 去拿
  //    因为指令和组件拿的 ChangeDetectorRef['_lView'] 是不同逻辑,很混乱的。
  //    用 ViewContainerRef 就对了

  const viewContainerRef = inject(ViewContainerRef) as any;
  const hostTNode = viewContainerRef['_hostTNode'];
  const tNodeIndex = hostTNode.index;

  // 3. 接下来要拿到 TView.preOrderHooks
  //    同样的,不要试图用 ChangeDetectorRef['_lView'][TView 1] 去拿,不准的
  //    用 ViewContainerRef 就对了
  const lContainer = viewContainerRef['_lContainer'];
  const targetLView = lContainer[PARENT];
  const targetTView = targetLView[TVIEW];

  // 4. 如果 preOrderHooks 是 null 创建一个 array 把 TNode index 传进去给它
  if (!targetTView.preOrderHooks) {
    targetTView.preOrderHooks = [tNodeIndex];
    return;
  }

  // 5. 如果 preOrderHooks 里还没有这个 TNode index 就 push 进去,有了就 skip
  if(!targetTView.preOrderHooks.includes(tNodeIndex)) {
    targetTView.preOrderHooks.push(tNodeIndex);
  }
}
主要是依赖 ViewContainerRef 获取到准确的 TNode index 和 TView,至于它是不是真的拿的那么准,我也不好说,
但基本的组件,指令,@if,@for,ng-template, ngTemplateOutlet 我都测试过,拿的还挺准的。
第二步是添加 ngOnInit 方法到 HelloWorld.prototype
function setupPrototype() {
  const prototype = Object.getPrototypeOf(componentInstance);
  if (prototype['ngOnInit'] === undefined) {
    prototype['ngOnInit'] = StgOnInit;
  }
}
Stg 是我的 library 名字缩写。StgOnInit 是一个通用的 ngOnInit 方法,下面我会展开。
HelloWorld.prototype 有了 ngOnInit 方法,Angular 就会 register pre order hooks 了。
第三步是把 on init callback 保存起来,还有 injector 也保存起来 (调用 callback 时,需要用 injector 来创建 injection context)。
const ON_INIT_CALLBACKS_PROPERTY_NAME = '__stgOnInitCallbacks__';
const INJECTOR_PROPERTY_NAME = '__stgInjector__';

function saveCallback() {
  const callbacks = componentInstance[ON_INIT_CALLBACKS_PROPERTY_NAME] ?? [];
  Object.defineProperty(componentInstance, ON_INIT_CALLBACKS_PROPERTY_NAME, {
    configurable: true,
    value: [...callbacks, callback],
  });

  if (componentInstance[INJECTOR_PROPERTY_NAME] === undefined) {
    const injector = inject(Injector);
    Object.defineProperty(componentInstance, INJECTOR_PROPERTY_NAME, {
      value: injector,
    });
  }
}
把它们保存在组件实例里就可以了。但要记得 enumerable: false 哦。
最后是通用的 ngOnInit 函数
function StgOnInit(this: {
  [ON_INIT_CALLBACKS_PROPERTY_NAME]: CallBack[];
  [INJECTOR_PROPERTY_NAME]: Injector;
}) {
  const callbacks = this[ON_INIT_CALLBACKS_PROPERTY_NAME];
  const injector = this[INJECTOR_PROPERTY_NAME];
  runInInjectionContext(injector, () => {
    for (const callback of callbacks) {
      callback();
    }
  });
}
这个函数被赋值到 HelloWorld.prototype['ngOnInit'],lifecycle 时会被 Angular 调用。
this 指向组件实例。
我们只要从组件实例拿出 callback 和 injector 然后 for loop 执行就可以了。
步骤 1,2的替代方案
步骤 1,2 用到了黑科技,风险比较大,如果我们担心随时翻车,那可以用另一个比较笨拙的方法 -- 手动添加 prototype。
export class Dir1Directive {
  constructor() {
    onInit(this, () => console.log('dir1 init'));
  }
}
(Dir1Directive.prototype as any).ngOnInit = StgOnInit;
步骤 1,2 主要就是搞 prototype,如果我们改成手动添加,就可以避开黑科技了。当然代价就是代码超级丑。
总结
完整代码


type CallBack = () => void;

function StgOnInit(this: {
  [ON_INIT_CALLBACKS_PROPERTY_NAME]: CallBack[];
  [INJECTOR_PROPERTY_NAME]: Injector;
}) {
  const callbacks = this[ON_INIT_CALLBACKS_PROPERTY_NAME];
  const injector = this[INJECTOR_PROPERTY_NAME];
  runInInjectionContext(injector, () => {
    for (const callback of callbacks) {
      callback();
    }
  });
}

const ON_INIT_CALLBACKS_PROPERTY_NAME = '__stgOnInitCallbacks__';
const INJECTOR_PROPERTY_NAME = '__stgInjector__';

function onInit(
  componentInstance: Record<PropertyKey, any>,
  callback: CallBack
) {
  setupTViewPreOrderHooks();
  setupPrototype();
  saveCallback();

  function setupTViewPreOrderHooks() {
    // 1. 这里是 LView 中的 index 引用
    const TVIEW = 1;
    const PARENT = 3;

    // 2. 首先,我们要拿到 TNode index
    //    以这个例子来说的话
    //    app.component.html
    //    <app-hello-world [value]="value()" appDir1 />
    //    HelloWorld 组件和 dir1 指令的 TNode 是同一个 <app-hello-world>
    //    TNode index 指的是这个 <app-hello-world> 在 App LView 里的 index
    //    它是第一个 element,所以 index 是 25 咯。
    //    我们透过 ViewContainerRef 拿到当前的 TNode,然后再拿它的 index
    //    提醒:
    //    不要使用 ChangeDetectorRef['_lView'][T_Host 5].index 去拿
    //    因为指令和组件拿的 ChangeDetectorRef['_lView'] 是不同逻辑,很混乱的。
    //    用 ViewContainerRef 就对了

    const viewContainerRef = inject(ViewContainerRef) as any;
    const hostTNode = viewContainerRef['_hostTNode'];
    const tNodeIndex = hostTNode.index;

    // 3. 接下来要拿到 TView.preOrderHooks
    //    同样的,不要试图用 ChangeDetectorRef['_lView'][TView 1] 去拿,不准的
    //    用 ViewContainerRef 就对了
    const lContainer = viewContainerRef['_lContainer'];
    const targetLView = lContainer[PARENT];
    const targetTView = targetLView[TVIEW];

    // 4. 如果 preOrderHooks 是 null 创建一个 array 把 TNode index 传进去给它
    if (!targetTView.preOrderHooks) {
      targetTView.preOrderHooks = [tNodeIndex];
      return;
    }

    // 5. 如果 preOrderHooks 里还没有这个 TNode index 就 push 进去,有了就 skip
    if(!targetTView.preOrderHooks.includes(tNodeIndex)) {
      targetTView.preOrderHooks.push(tNodeIndex);
    }
  }

  function setupPrototype() {
    const prototype = Object.getPrototypeOf(componentInstance);
    if (prototype['ngOnInit'] === undefined) {
      prototype['ngOnInit'] = StgOnInit;
    }
  }

  function saveCallback() {
    const callbacks = componentInstance[ON_INIT_CALLBACKS_PROPERTY_NAME] ?? [];
    Object.defineProperty(componentInstance, ON_INIT_CALLBACKS_PROPERTY_NAME, {
      configurable: true,
      value: [...callbacks, callback],
    });

    if (componentInstance[INJECTOR_PROPERTY_NAME] === undefined) {
      const injector = inject(Injector);
      Object.defineProperty(componentInstance, INJECTOR_PROPERTY_NAME, {
        value: injector,
      });
    }
  }
}

@Component({
  selector: 'app-hello-world',
  standalone: true,
  imports: [],
  templateUrl: './hello-world.component.html',
  styleUrl: './hello-world.component.scss',
})
export class HelloWorldComponent {
  readonly value = input.required<string>();

  constructor() {
    onInit(this, () => console.log('HelloWorld 组件', this.value()))
  }
}
以上就是 Signal-based 风格的 ngOnInit。
一时心血来潮写的,没有经过严格测试,我们拿来研究学习就好,不要乱用哦。
最后,还是希望 Angular 团队能提供一个 Signal-based 的 ngOnInit,就目前这个状态,我真的觉得 ngOnInit 和大伙儿 (effect, DetroyedRef, AfterNextRender) 格格不入🙄
One more thing の Signal-based ngAfterContentInit
Angular v19 以后,effect 已经可以完全取代 ngAfterContentInit 了 (v18 还不行)。
之所以 v19 可以,是因为 v19 换 (breaking changes) 了 effect 的 execution timing,详细的区别可以看这篇 -- Angular 19 正式发布 の 新功能介绍。
简而言之,effect callback 会在 AfterContentInit 前一脚触发,所以我们可以完全把它俩的执行时机看成是一样的。
所有 ngAfterContentInit 时机可以拿到的数据 (e.g. contentChildren),effect callback 里同样可以拿到。
ngAfterContentInit 和 effect 唯一的区别就是,ngAfterContentInit 只会触发一次,而 effect 可能会触发多次。
假如我们透过 effect + untracked 或者 manualCleanup 让 effect 只跑一次,那它俩就真的一模一样了。
那 ngAfterContentInit 还有意义吗?
我自己的经验是这样,variable 有分 const 和 let,property 有 readonly 概念。
这些都是为了让我们分得清楚,什么是会变更的,什么是不会变更的。
Angular 把 input, contentChild 全部设定为 Signal,代表这些都是有可能变更的。
但真实项目中并不是这样,有些 input,contentChild 它就是不会变更的。
会不会变更对 user 来说是有影响的,会变更,我们就需要兼顾变更后的状况,不会变更我们就只需要考量当下。
把一个明明不会变更的 variable 硬看作是会变更的,然后写一堆兼顾它变更后的状态,这就属于过度设计了。
所以,当我遇到一些不需要变更的情况时,我会更倾向于 ngAfterContentInit,因为它的语义比较好。
为此,我也写了一个 Siganl-based 的 ngAfterContentInit
import { Injector, runInInjectionContext, inject, ViewContainerRef } from "@angular/core";

type Any = any;
type AnyObject = Record<PropertyKey, Any>;
type Callback = () => void;

//#region Signal-based ngOnInit, ngAfterContentInit
const ON_INIT_CALLBACKS_PROPERTY_NAME = '__stgOnInitCallbacks__';
const AFTER_CONTENT_INIT_CALLBACKS_PROPERTY_NAME = '__stgAfterContentInitCallbacks__';
const INJECTOR_PROPERTY_NAME = '__stgInjector__';

function createLifecycleHook(callbackPropertyName: string) {
  return function lifecycleHook(this: Record<string, Any>) {
    const callbacks = this[callbackPropertyName] as Callback[];
    const injector = this[INJECTOR_PROPERTY_NAME] as Injector;
    runInInjectionContext(injector, () => {
      for (const callback of callbacks) {
        callback();
      }
    });
  }
}

function setupPrototype(componentInstance: AnyObject, ngHookPropertyName: string, callbackPropertyName: string) {
  const prototype = Object.getPrototypeOf(componentInstance);
  if (prototype[ngHookPropertyName] === undefined) {
    prototype[ngHookPropertyName] = createLifecycleHook(callbackPropertyName);
  }
}

function saveCallback(componentInstance: AnyObject, callback: Callback, callbackPropertyName: string) {
  const callbacks = componentInstance[callbackPropertyName] as Callback[] | undefined ?? [];
  Object.defineProperty(componentInstance, callbackPropertyName, {
    configurable: true,
    value: [...callbacks, callback],
  });

  if (componentInstance[INJECTOR_PROPERTY_NAME] === undefined) {
    const injector = inject(Injector);
    Object.defineProperty(componentInstance, INJECTOR_PROPERTY_NAME, {
      value: injector,
    });
  }
}

export function onInit(componentInstance: AnyObject, callback: () => void) {
  setupTViewPreOrderHooks();
  setupPrototype(componentInstance, 'ngOnInit', ON_INIT_CALLBACKS_PROPERTY_NAME);
  saveCallback(componentInstance, callback, ON_INIT_CALLBACKS_PROPERTY_NAME);

  function setupTViewPreOrderHooks() {
    const TVIEW = 1;
    const PARENT = 3;

    const viewContainerRef = inject(ViewContainerRef) as Any;
    const hostTNode = viewContainerRef['_hostTNode'];
    const tNodeIndex = hostTNode.index;

    const lContainer = viewContainerRef['_lContainer'];
    const targetLView = lContainer[PARENT];
    const targetTView = targetLView[TVIEW];

    if (!targetTView.preOrderHooks) {
      targetTView.preOrderHooks = [tNodeIndex];
      return;
    }

    if (!targetTView.preOrderHooks.includes(tNodeIndex)) {
      targetTView.preOrderHooks.push(tNodeIndex);
    }
  }
}

export function afterContentInit(componentInstance: AnyObject, callback: () => void) {
  setupPrototype(componentInstance, 'ngAfterContentInit', AFTER_CONTENT_INIT_CALLBACKS_PROPERTY_NAME);
  saveCallback(componentInstance, callback, AFTER_CONTENT_INIT_CALLBACKS_PROPERTY_NAME);
}
//#endregion
原理和 onInit 一样,而且更简单,因为它只需要 onInit 的后两个 step 就足够了。

 浙公网安备 33010602011771号