Spring Boot整合Swagger2自动生成接口文档
1 背景
在实际开发中,前后端分离的项目架构已经被越来越多的公司和团体采用,这种架构能够让前端开发人员和后端开发人员在遵循相同的接口的前提下同时进行各自的开发,从而能够有效地提高开发效率。然而,现实的开发工作中,接口经常需要进行改变,这无疑增加了接口文档的维护成本,同时增加了前端人员和后端人员之间的沟通成本。Swagger2技术能够让开发人员在代码中只是增加少量的注解描述,就能够自动生成接口文档,即便是接口发生了变化,也很容易更新接口文档。
本文主要是在Spring Boot工程中整合Swagger2技术以实现自动生成接口文档。
2 项目代码
2.1 版本说明
Spring Boot: 2.1.7
Swagger: 2.9.2
JDK: 1.8
IDE: IDEA
2.2 创建项目
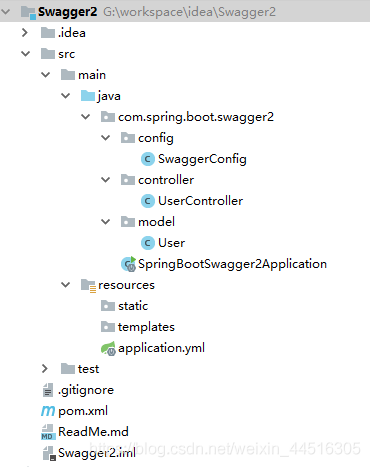
创建一个名为Swagger2的Spring Boot项目,并添加maven依赖和相应的Java代码,最后的项目结构如下图所示:
pom.xml 文件内容如下所示:
<?xml version="1.0" encoding="UTF-8"?>
<project xmlns="http://maven.apache.org/POM/4.0.0" xmlns:xsi="http://www.w3.org/2001/XMLSchema-instance"
xsi:schemaLocation="http://maven.apache.org/POM/4.0.0 https://maven.apache.org/xsd/maven-4.0.0.xsd">
<modelVersion>4.0.0</modelVersion>
<parent>
<groupId>org.springframework.boot</groupId>
<artifactId>spring-boot-starter-parent</artifactId>
<version>2.1.7.RELEASE</version>
<relativePath/> <!-- lookup parent from repository -->
</parent>
<groupId>com.spring.boot</groupId>
<artifactId>spring-boot-swagger2</artifactId>
<version>1.0.0-SNAPSHOT</version>
<name>spring-boot-swagger2</name>
<description>SpringBoot整合Swagger2示例</description>
<properties>
<java.version>1.8</java.version>
</properties>
<dependencies>
<dependency>
<groupId>org.springframework.boot</groupId>
<artifactId>spring-boot-starter-web</artifactId>
</dependency>
<dependency>
<groupId>org.springframework.boot</groupId>
<artifactId>spring-boot-starter-test</artifactId>
<scope>test</scope>
</dependency>
<dependency>
<groupId>org.projectlombok</groupId>
<artifactId>lombok</artifactId>
<optional>true</optional>
</dependency>
<!--Swagger2接口文档相关依赖-->
<dependency>
<groupId>io.springfox</groupId>
<artifactId>springfox-swagger2</artifactId>
<version>2.9.2</version>
</dependency>
<dependency>
<groupId>io.springfox</groupId>
<artifactId>springfox-swagger-ui</artifactId>
<version>2.9.2</version>
</dependency>
</dependencies>
<build>
<plugins>
<plugin>
<groupId>org.springframework.boot</groupId>
<artifactId>spring-boot-maven-plugin</artifactId>
</plugin>
</plugins>
</build>
</project>
User 实体类程序如下所示:
package com.spring.boot.swagger2.model;
import lombok.Data;
/**
* 用户实体类
*/
@Data
public class User {
/**
* 用户ID
*/
private String id;
/**
* 用户名
*/
private String name;
/**
* 性别
*/
private Boolean sex;
/**
* 年龄
*/
private Integer age;
}
SwaggerConfig 配置类程序如下所示:
package com.spring.boot.swagger2.config;
import org.springframework.context.annotation.Bean;
import org.springframework.context.annotation.Configuration;
import springfox.documentation.builders.ApiInfoBuilder;
import springfox.documentation.builders.PathSelectors;
import springfox.documentation.builders.RequestHandlerSelectors;
import springfox.documentation.service.ApiInfo;
import springfox.documentation.spi.DocumentationType;
import springfox.documentation.spring.web.plugins.Docket;
/**
* Swagger2配置类
*/
@Configuration
public class SwaggerConfig {
@Bean
public Docket controllerApi() {
return new Docket(DocumentationType.SWAGGER_2)
.apiInfo(getApiInfo())
.select()
.apis(RequestHandlerSelectors.basePackage("com.spring.boot.swagger2.controller"))
.paths(PathSelectors.any())
.build();
}
public ApiInfo getApiInfo() {
return new ApiInfoBuilder()
.title("Spring Boot整合Swagger2项目接口文档")
.description("该项目主要是演示Swagger2自动生成接口文档")
.version("1.0.0")
.build();
}
}
UserController 接口类程序如下所示:
package com.spring.boot.swagger2.controller;
import com.spring.boot.swagger2.model.User;
import io.swagger.annotations.Api;
import io.swagger.annotations.ApiImplicitParam;
import io.swagger.annotations.ApiImplicitParams;
import io.swagger.annotations.ApiOperation;
import org.springframework.web.bind.annotation.GetMapping;
import org.springframework.web.bind.annotation.PathVariable;
import org.springframework.web.bind.annotation.PostMapping;
import org.springframework.web.bind.annotation.RequestBody;
import org.springframework.web.bind.annotation.RequestMapping;
import org.springframework.web.bind.annotation.RequestParam;
import org.springframework.web.bind.annotation.ResponseBody;
import org.springframework.web.bind.annotation.RestController;
import java.util.Random;
/**
* Swagger接口示例类
*/
@Api(value = "用户模块", tags = "用户基础信息接口模块")
@RestController
@RequestMapping("/user")
@ResponseBody
public class UserController {
/**
* 一个路径参数的接口示例
*/
@ApiOperation(value = "查询用户信息", notes = "根据用户id查询用户信息")
@ApiImplicitParam(name = "id", value = "用户ID", required = true, dataType = "String", paramType = "path")
@GetMapping(value = "getUserById/{id}")
public User getUserById(@PathVariable(name = "id") String id) {
User user = new User();
user.setId(String.valueOf(new Random().nextInt(1000)));
user.setName("user" + id);
user.setSex(true);
user.setAge(new Random().nextInt(30));
return user;
}
/**
* 两个请求参数的接口示例
*/
@ApiOperation(value = "查询用户信息", notes = "根据用户名和性别查询用户信息")
@ApiImplicitParams({
@ApiImplicitParam(name = "name", value = "用户名", required = true, dataType = "String"),
@ApiImplicitParam(name = "sex", value = "性别", required = true, dataType = "Boolean")
})
@GetMapping(value = "/getUserByNameAndSex")
public User getUserByNameAndSex(@RequestParam(name = "name") String name, @RequestParam(name = "sex") Boolean sex) {
User user = new User();
user.setId(String.valueOf(new Random().nextInt(1000)));
user.setName(name);
user.setSex(sex);
user.setAge(new Random().nextInt(30));
return user;
}
/**
* 一个请求对象的接口示例
*/
@ApiOperation(value = "查询用户信息", notes = "根据用户的多项信息查询用户信息")
@ApiImplicitParam(name = "user", value = "用户对象", required = true, dataType = "User")
@PostMapping(value = "/getUser")
public User getUser(@RequestBody User user) {
User user1 = new User();
user1.setId(String.valueOf(new Random().nextInt(1000)));
user1.setName(user.getName());
user1.setSex(user.getSex());
user1.setAge(new Random().nextInt(30));
return user1;
}
}
SpringBootSwagger2Application 主启动类程序如下所示:
package com.spring.boot.swagger2;
import org.springframework.boot.SpringApplication;
import org.springframework.boot.autoconfigure.SpringBootApplication;
import springfox.documentation.swagger2.annotations.EnableSwagger2;
/**
* Spring Boot整合Swagger2示例
*/
@EnableSwagger2
@SpringBootApplication
public class SpringBootSwagger2Application {
public static void main(String[] args) {
SpringApplication.run(SpringBootSwagger2Application.class, args);
}
}
application.yml 配置文件内容如下所示:
server:
port: 8080
3 运行测试
直接运行SpringBootSwagger2Application 主程序,运行成功后,通过浏览器访问以下地址即可查看Swagger2自动生成的接口文档如下图所示:
http://localhost:8080/swagger-ui.html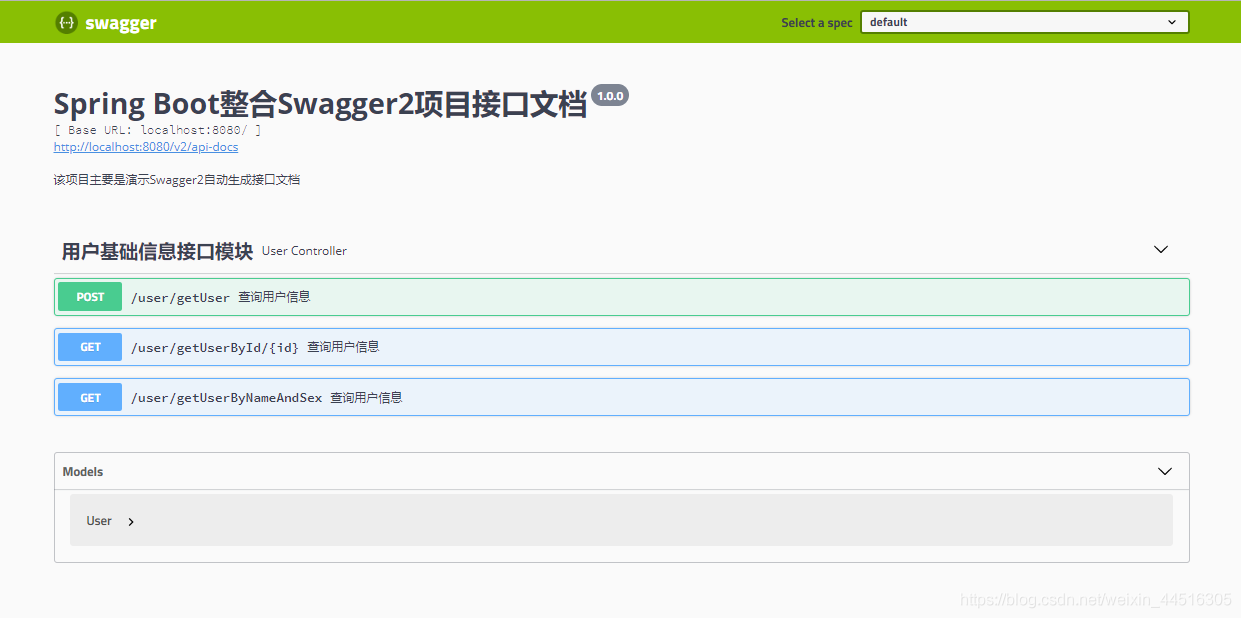
从上图可以看出,Swagger2自动生成的接口文档中只有一个模块,该模块下一共有三个接口,展开其中一个接口后内容如下图所示:
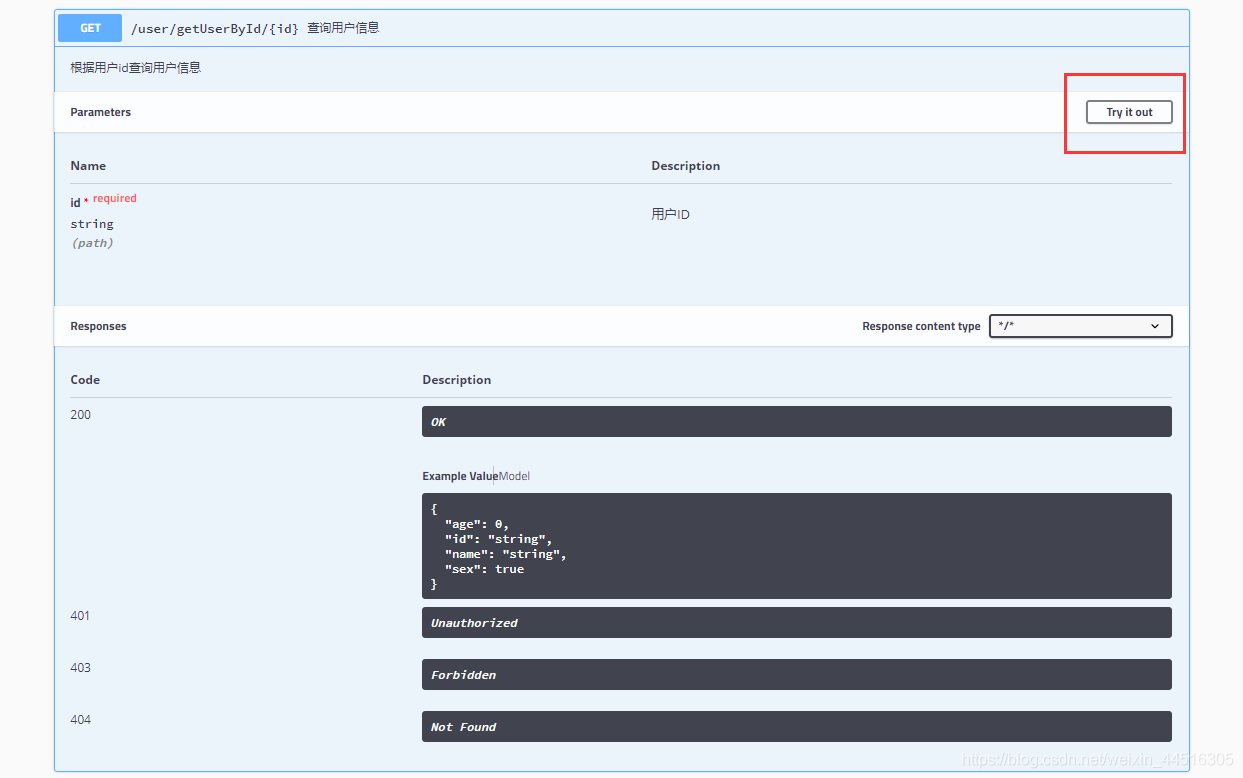
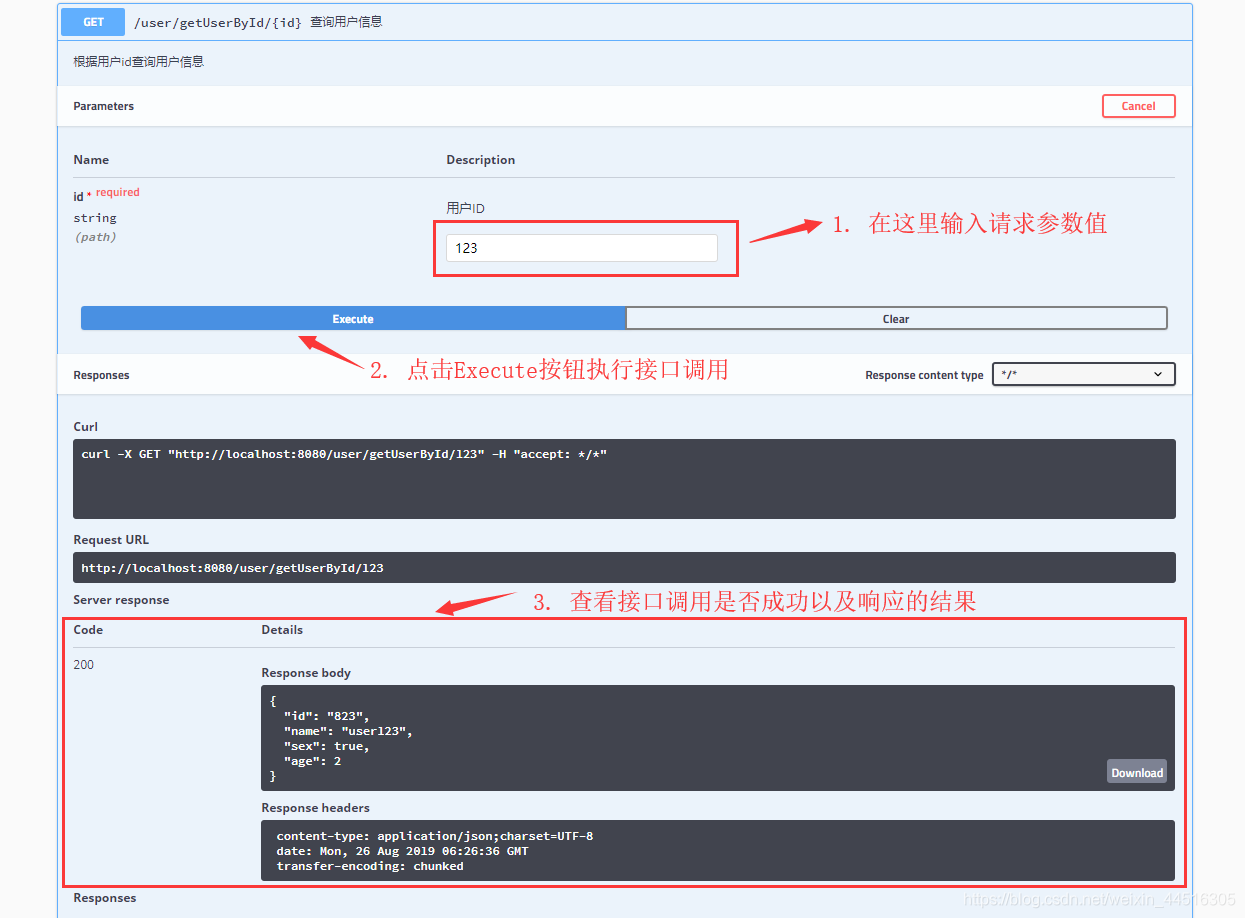
从上图可以看出,该接口的请求路径、功能描述、参数个数、参数类型、参数描述、请求类型、响应类型等信息。点击右上角的 “Try it out” 按钮还可以直接输入参数调用接口,以查看接口是否能够调用成功以及返回结果等,如下图所示:
4 Swagger2注解介绍
注解 描述
@Api 类的描述:即Controller的描述
@ApiOperation 方法的描述:即接口的描述
@ApiParam 单个参数的描述
@ApiImplicitParam 单个请求参数的描述
@ApiImplicitParams 多个请求参数的描述,需要与@ApiImplicitParam注解结合使用
@ApiModel 用对象来接收参数
@ApiProperty 用对象接收参数时,描述对象中的一个字段
@ApiResponse 单个HTTP响应体的描述
@ApiResponses 一组HTTP响应体的描述,需要与@ApiResponse注解结合使用
@ApiIgnore 使用该注解忽略某个接口
@ApiError 指定发生错误返回的信息
————————————————
版权声明:本文为CSDN博主「JavaBigData1024」的原创文章,遵循CC 4.0 BY-SA版权协议,转载请附上原文出处链接及本声明。
原文链接:https://blog.csdn.net/weixin_44516305/article/details/100075993

 浙公网安备 33010602011771号