初玩OpenWRT之编译TP-Link WR841N V8固件

0x00 安装依赖
安装git以下载OpenWrt源码。安装编译工具以进行交叉编译:
sudo apt-get update
sudo apt-get install build-essential subversion git-core libncurses5-dev zlib1g-dev gawk flex quilt libssl-dev xsltproc libxml-parser-perl mercurial bzr ecj cvs unzip
feeds中的部分软件包可能只能通过subversion (缩写: svn)或者mercurial下载源代码。如果你需要安装这些软件包,你同时也应当安装svn和mercurial:
sudo apt-get install subversion mercurial
通过git来下载OpenWrt bleeding edge(trunk版本) 详情参考https://wiki.openwrt.org/doc/howto/buildroot.exigence 这里我编译是的15.05
git clone git://github.com/openwrt/openwrt.git
15.05 branch (Chaos Calmer)
git clone -b chaos_calmer git://github.com/openwrt/chaos_calmer.git
14.07 branch (Barrier Breaker)
git clone -b barrier_breaker git://github.com/openwrt/archive.git
0x01 安装Feeds
此处就是下载一些你之后要编译进firmware里的一些软件。若有自己需要额外添加的组件,可以通过添加feeds来实现。比如,我需要添加openvswitch的支持,在目录下输入如下命令:
echo 'src-git openvswitch git://github.com/schuza/openvswitch.git' >> feeds.conf.default
然后,更新下载feeds组件包并安装:
./scripts/feeds update -a //更新下载全部软件包./scripts/feeds update [包名]) //单独更新下载某软件包
./scripts/feeds install -a //安装全部软件包./scripts/feeds install [包名] //单独安装某软件包
0x02 配置OpenWRT
直接在 [openwrt主目录] 下输入命令 make menuconfig 即可开始自定义选择组件
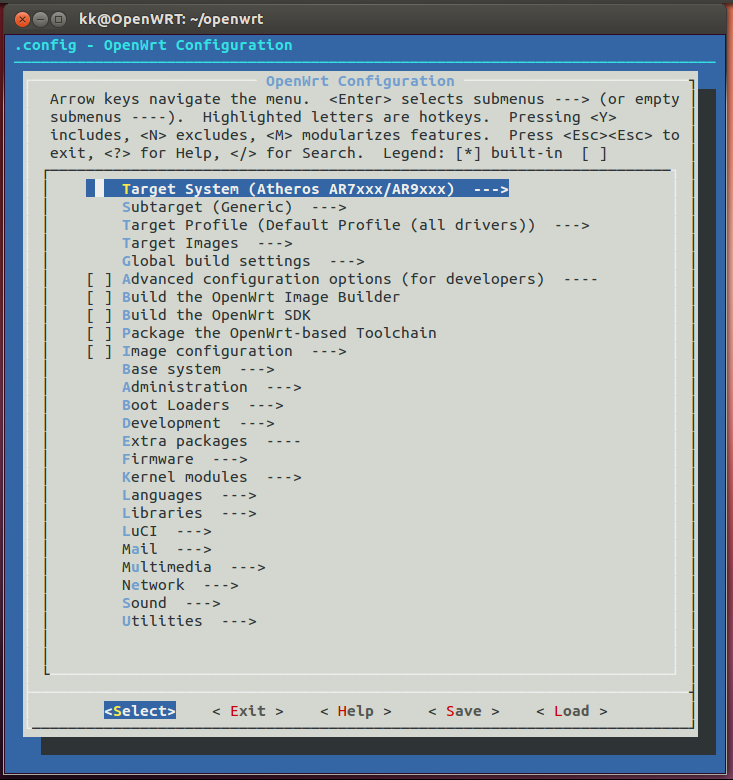
Target System --> 选择路由器CPU
Target Profile --> 选择路由器型号
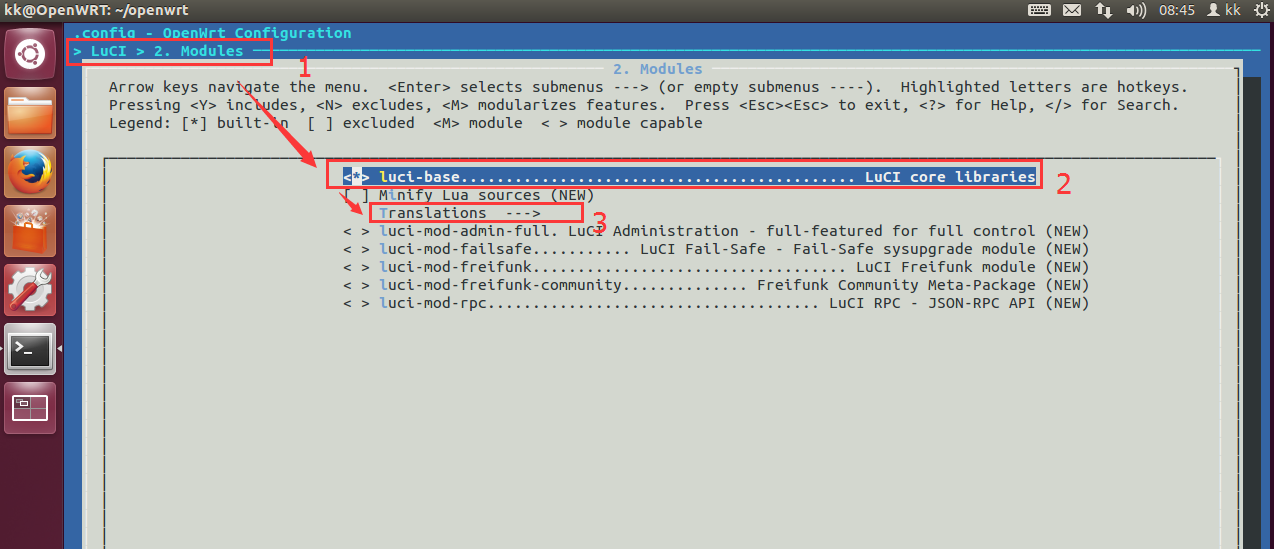
LuCI --> Modules --> <*> luci-base.........LuCI core libraries 然后进入下面的Translations --> 选择语言
添加LuCI界面
LuCI --> Collections --> <*> luci
添加UTF-8编码
Kernel modules --> Native Language Support --> <*> kmod-nls-utf8
若之前添加过自己的组件,就对应选择上,否则编译不进去!
全部选择完,一定记住保存,才能成功写入 .config 文件。
设置LuCI默认语言
打开 feeds/luci/modules/luci-base/root/etc/config/luci 文件
config core main
    option lang auto //此处修改为option lang zh_cn
    option mediaurlbase /luci-static/bootstrap
    option resourcebase /luci-static/resources

config extern flash_keep
    option uci         "/etc/config/"
    option dropbear "/etc/dropbear/"
    option openvpn    "/etc/openvpn/"
    option passwd    "/etc/passwd"
    option opkg        "/etc/opkg.conf"
    option firewall    "/etc/firewall.user"
    option uploads    "/lib/uci/upload/"

config internal languages
    option zh_cn chinese //新增
    option en English //新增

config internal sauth
    option sessionpath "/tmp/luci-sessions"
    option sessiontime 3600

config internal ccache
    option enable 1

config internal themes
设置默认开启WIFI
打开 package/kernel/mac80211/files/lib/wifi/mac80211.sh 文件

0x04 编译前注意事项
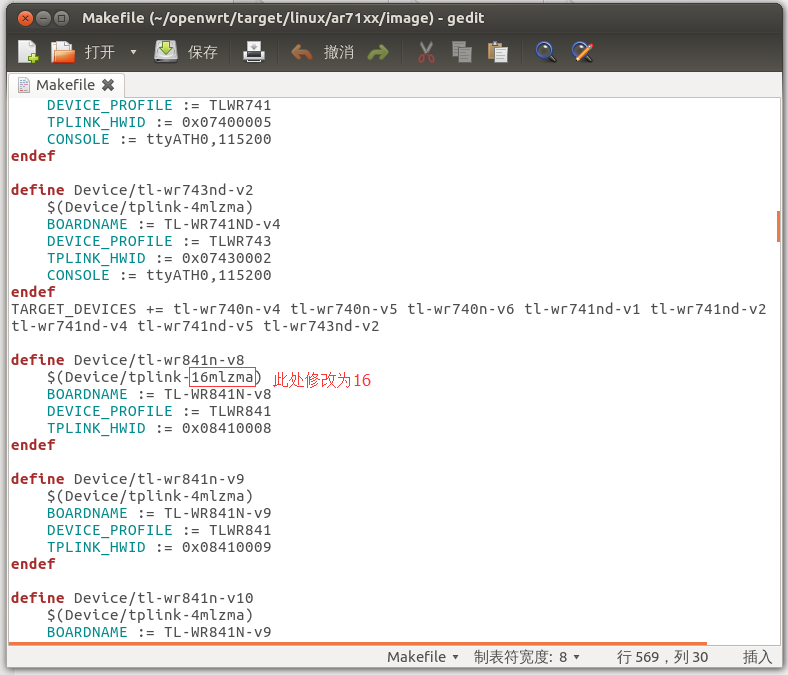
修改固件大小
我的路由器型号WL841N_V8(硬件方面改装成16M的Flash),所以需要把默认的4M改成了16M,这样编译后就没问题了。
修改 target/linux/ar71xx/image/Makefile 文件,搜索 tl-wr841n-v8
修正网口顺序问题
OpenWRT的网口经常是反过来的,所以要进行修正
打开 /openwrt/target/linux/ar71xx/files/arch/mips/ath79/mach-tl-wr841n-v8.c 文件
ath79_setup_ar934x_eth_cfg(AR934X_ETH_CFG_SW_PHY_SWAP);
改为
ath79_setup_ar934x_eth_cfg(AR934X_ETH_CFG_SW_ONLY_MODE);

ath79_switch_data.phy_poll_mask = BIT(0);
改为
ath79_switch_data.phy_poll_mask = BIT(4);

ath79_eth0_data.phy_mask = BIT(0);
改为
ath79_eth0_data.phy_mask = BIT(4);
修改LED灯顺序问题
打开 target/linux/ar71xx/base-files/etc/uci-defaults/01_leds 文件,修改为如图所示

0x05 编译固件
一般情况下,编译直接在 [openwrt主目录] 下输入命令 make V=99 。可以查看编译过程具体信息。直接make无具体信息。编译完成后,在bin目录下就可以找到你编译好的bin文件,以及bin/packages下编译好的一些ipk文件,ipk文件可以直接安装于刷好的OpenWRT中。
注意:此处千万不要以root权限执行make,否则报N多错误。
另附一些编译选项:
- 在多核电脑中编译,常规用法为【 cpu处理器的数目 + 1】– 例如使用3进程来编译 (即双核CPU), 命令及参数: make -j 3 。这样可以加速编译,不过我没试过。
- 后台编译,你还在忙其他,不想让编译耗费太多资源,只使用一些空闲的I/O和CPU能力来编译: ionice -c 3 nice -n19 make -j 2
- 单独编译某个包: make package/[包名]/compile V=99 。编完后在bin/packages下会找到对应的ipk文件。
- 单独编译某个包: make package/[包名]/compile V=99 。编完后在bin/packages下会找到对应的ipk文件。
0x06 参考链接


 浙公网安备 33010602011771号