在微服务架构和分布式系统中,负载均衡是实现高并发与高可用的核心组件。HAProxy作为一款轻量级七层代理,凭借其出色的性能和灵活性,成为系统架构师的首选工具之一。本文将通过实战实验,带你深入理解HAProxy的核心特性与配置技巧。
一、环境搭建与基础配置
在开始实验前,我们需要准备三台主机:一台作为HAProxy代理服务器,另外两台作为后端Web服务器(WebServer1和WebServer2)。所有主机需配置在同一网段,确保网络互通。以下是IP地址规划:
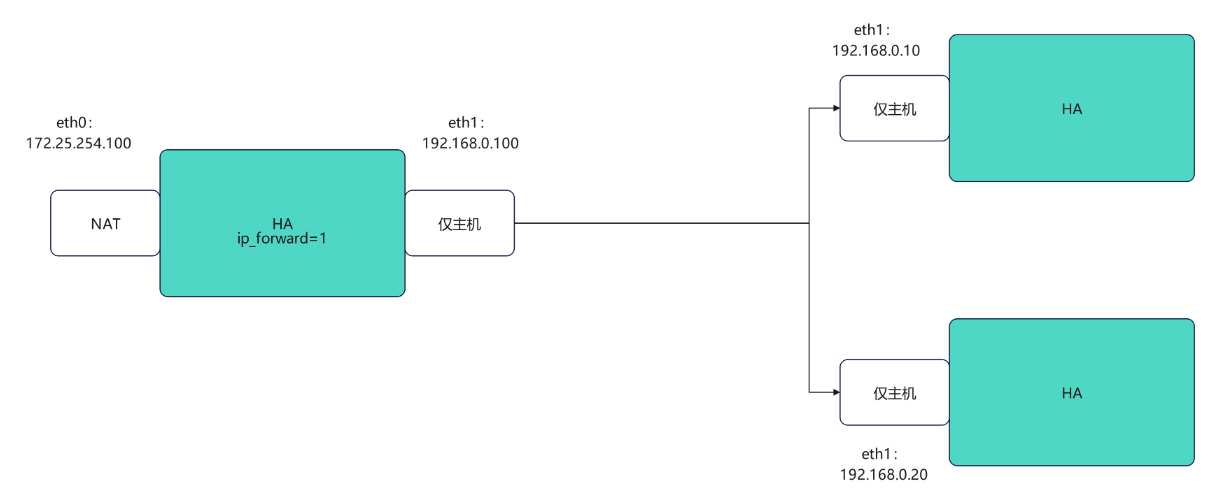
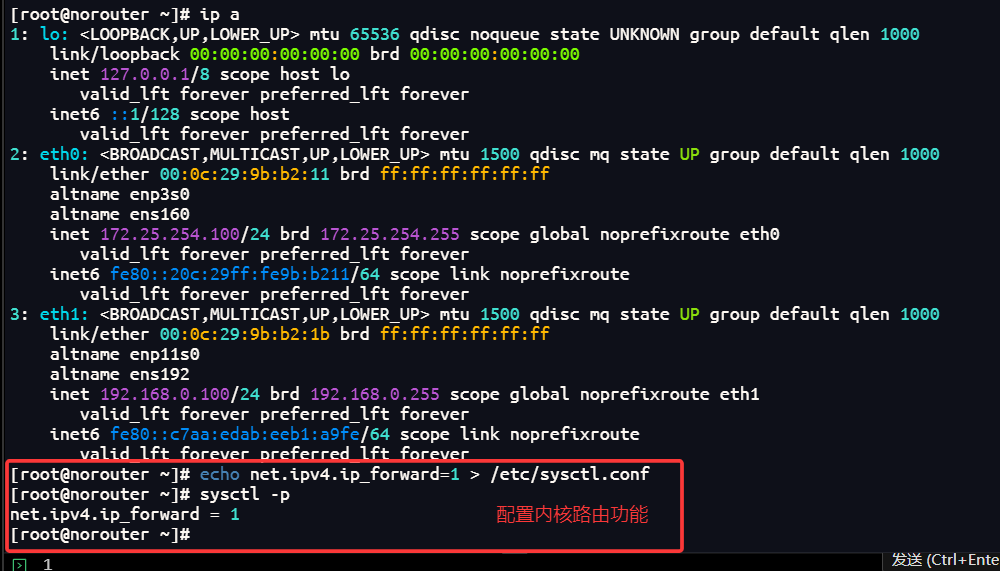
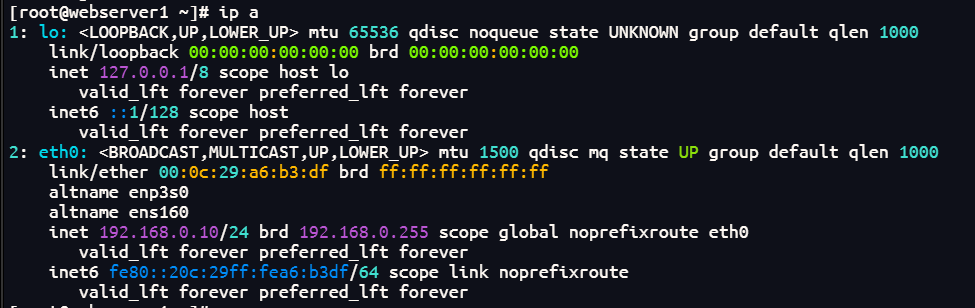
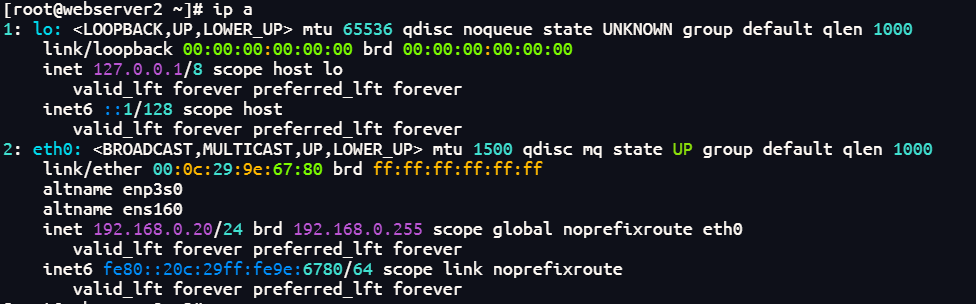
在后端服务器上安装httpd服务用于测试:
[root@webserver1 ~] dnf install httpd -y
root@webserver1 ~] echo webserver1 - 192.168.0.10 > /var/www/html/index.html
[root@webserver1 ~] systemctl enable --now httpd
[root@webserver2 ~] dnf install httpd -y
[root@webserver2 ~]  echo webserver2 - 192.168.0.20 > /var/www/html/index.html
[root@webserver2 ~] systemctl enable --now httpd
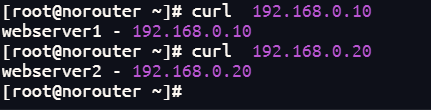
验证环境连通性:
二、HAProxy安装与核心参数实验
2.1 安装与基础负载均衡
使用包管理器安装HAProxy:
[root@norouter ~] dnf install haproxy.x86_64 -y
[root@norouter ~] systemctl enable --now haproxy
实现最基本的负载均衡配置:
[root@norouter ~]# vim /etc/haproxy/haproxy.cfg
该文件中有:
    global:全局参数,在最顶部
    defaults:默认参数,在 global 之后
    frontend:定义客户端入口,在 defaults 之后
    backend:定义后端服务器池,在 frontend 之后(或同级)
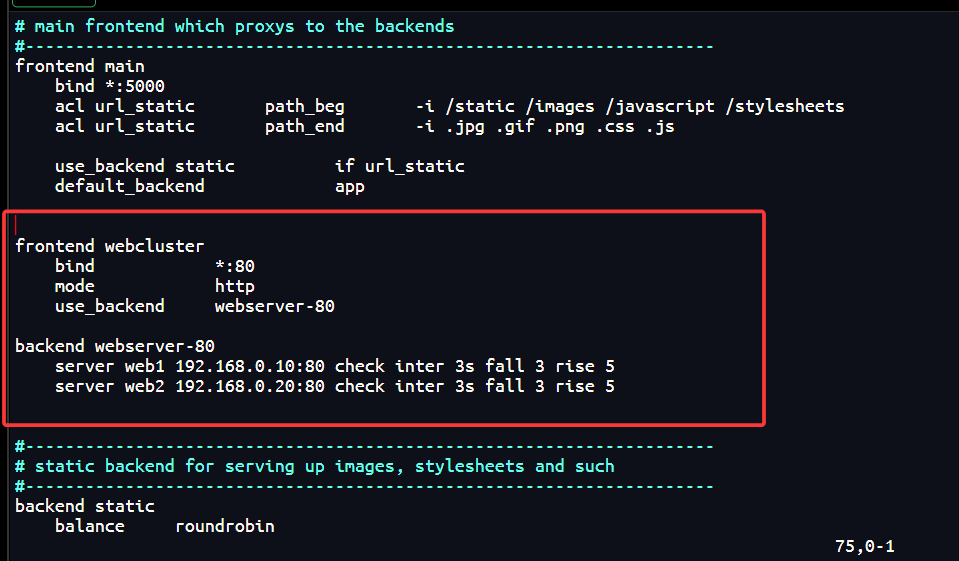
在文件中写入以下内容:
frontend webcluster
    bind            *:80
    mode            http
    use_backend     webserver-80
#bind *:80:监听所有网卡的 80 端口,接收客户端请求。
#mode http:工作在 HTTP 模式,支持对 HTTP 报文进行处理。
#use_backend webserver-80:将所有请求转发到名为 webserver-80 的后端服务器组
backend webserver-80
    server web1 192.168.0.10:80 check inter 3s fall 3 rise 5
    server web2 192.168.0.20:80 check inter 3s fall 3 rise 5
#定义了两个后端服务器:
#web1:IP 地址为 192.168.0.10,端口 80。
#web2:IP 地址为 192.168.0.20,端口 80。
#check inter 3s fall 3 rise 5:启用健康检查,每 3 秒检查一次;连续 3 次失败则标记为宕机,连续 5 次成功则恢复服务。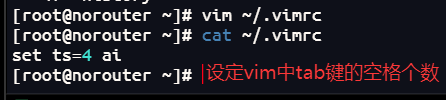
修改主配置文件 /etc/haproxy/haproxy.cfg:
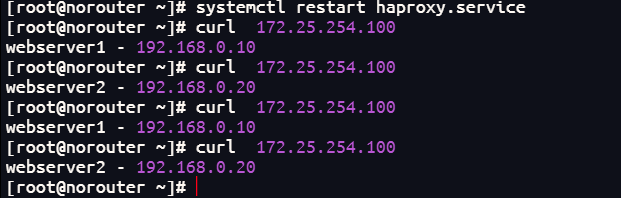
重启服务后测试负载效果:
2.2 日志发送配置
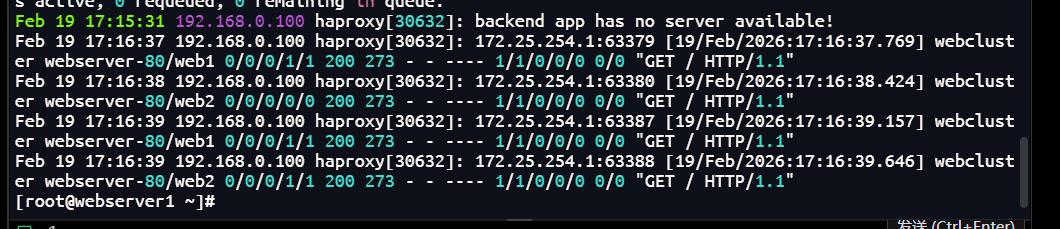
日志集中管理是高可用架构中的重要环节。将日志发送到指定服务器(如192.168.0.10):
[root@webserver1 ~]  vim /etc/rsyslog.conf
在文件的31,32行去掉 #
[root@webserver1 ~] systemctl restart rsyslog.service
验证日志端口是否开启:

在HAProxy主机配置日志发送:
[root@norouter ~] vim /etc/haproxy/haproxy.cfg
[root@norouter ~] systemctl restart haproxy.service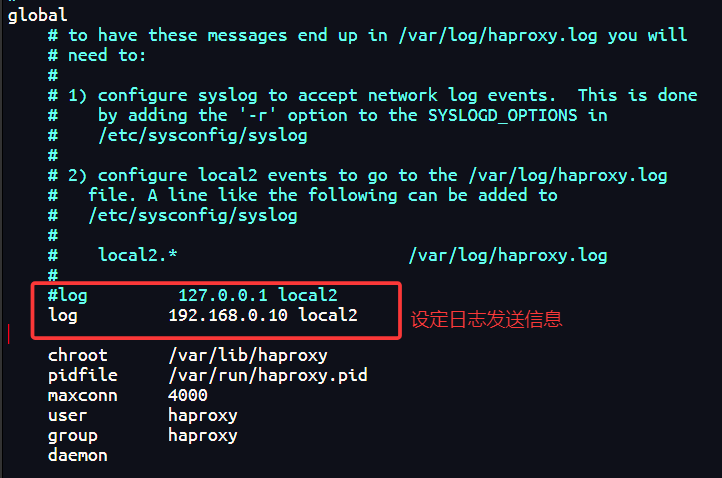
在WebServer1上查看日志:
2.3 多进程与多线程优化
为应对高并发场景,HAProxy支持多进程和多线程模式,但两者不可同时启用。
多进程配置:

[root@norouter ~] vim /etc/haproxy/haproxy.cfg
写在global段中:
nbproc      2
[root@norouter ~] systemctl restart haproxy.service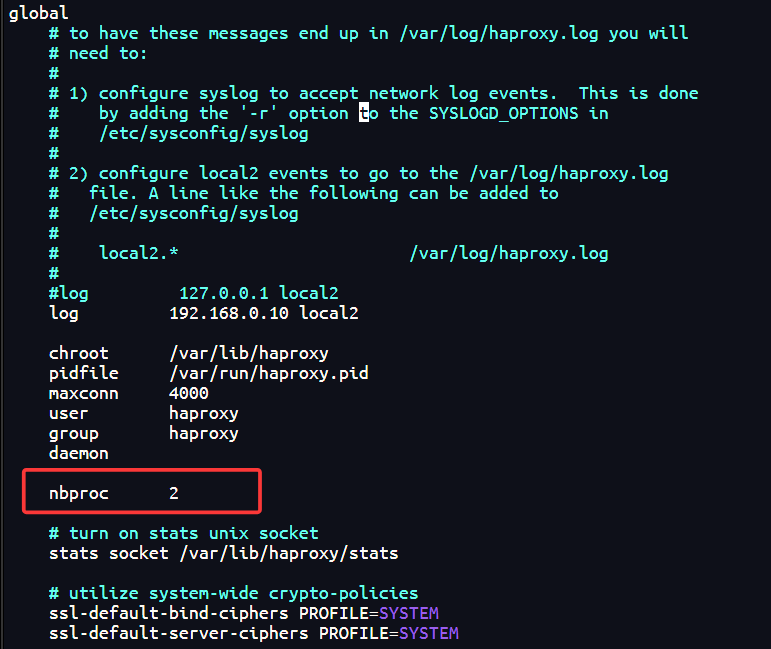
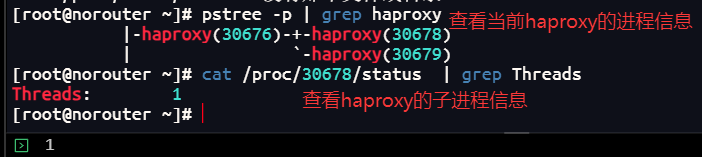
验证多进程效果:

绑定CPU核心以提升性能:
[root@norouter ~] vim /etc/haproxy/haproxy.cfg
    nbproc      2
    cpu-map     1 0
    cpu-map     2 1
[root@norouter ~] systemctl restart haproxy.service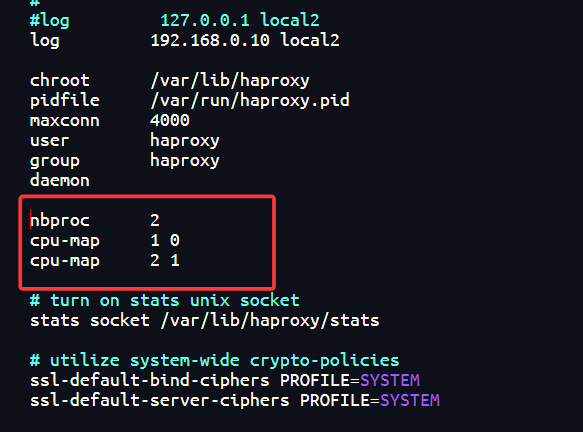
为不同进程分配独立套接字:

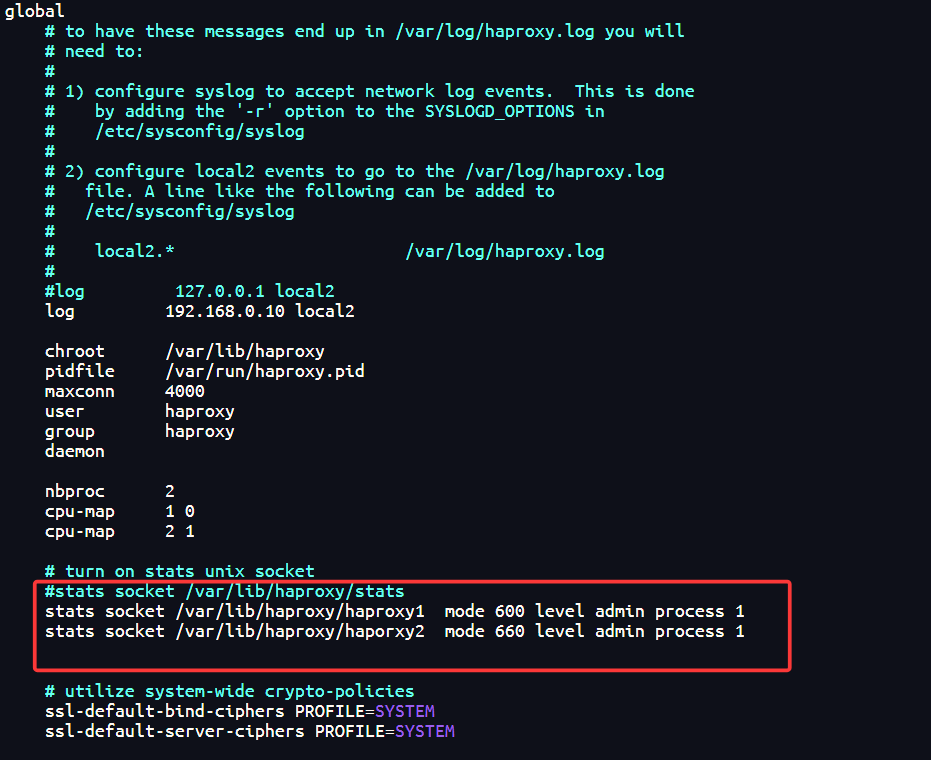

多线程配置:
[root@norouter ~] vim /etc/haproxy/haproxy.cfg
nbthread    2
[root@norouter ~] systemctl restart haproxy.service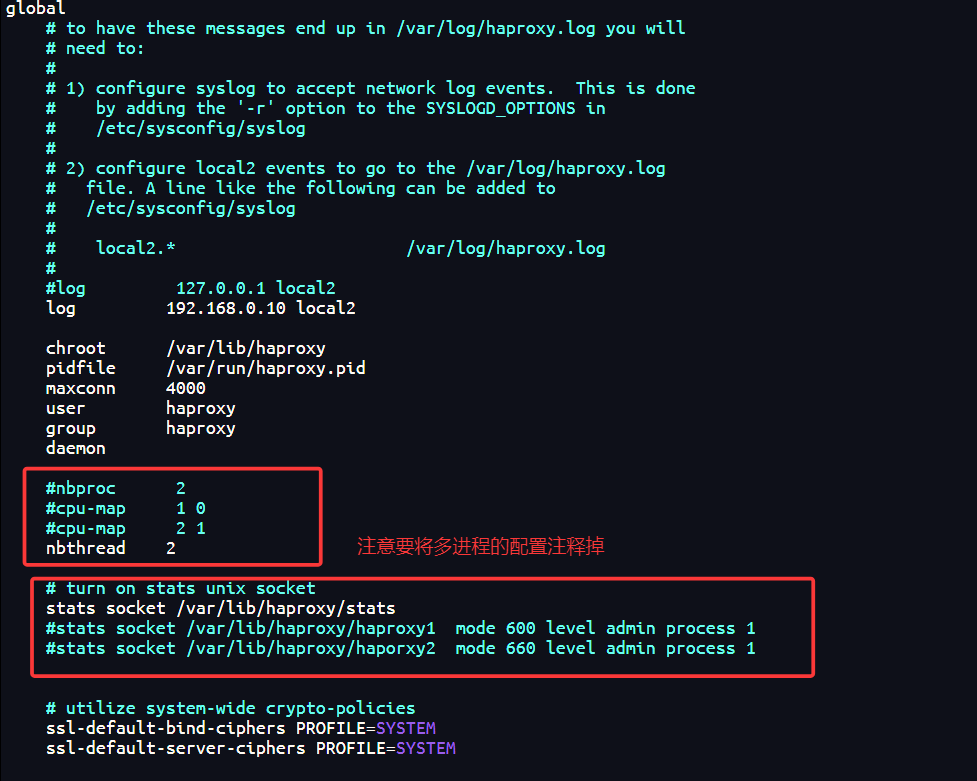
测试效果:

三、socat热更新与动态管理
⚠️ 热更新能力是分布式系统中服务不中断的关键。socat工具允许在不重启HAProxy的情况下动态调整配置。
3.1 安装socat
[root@haproxy ~]# dnf install socat -y
[root@haproxy ~]# socat  -h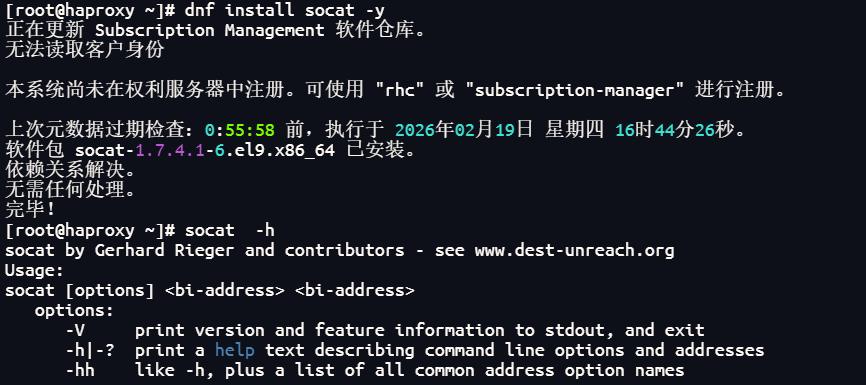
3.2 查看与修改HAProxy状态
通过socat查看运行时信息:
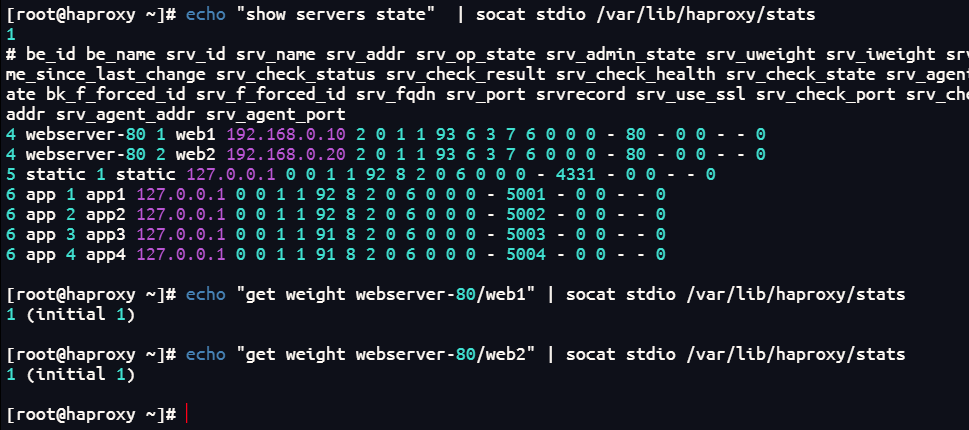
动态修改后端服务器权重:

为socket设置访问授权:

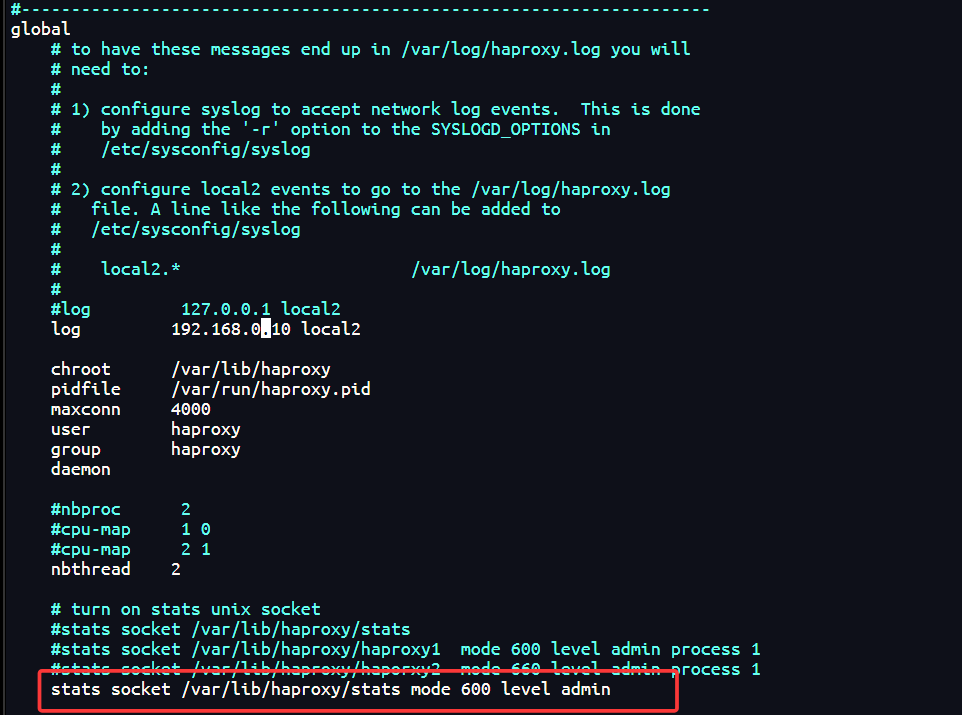
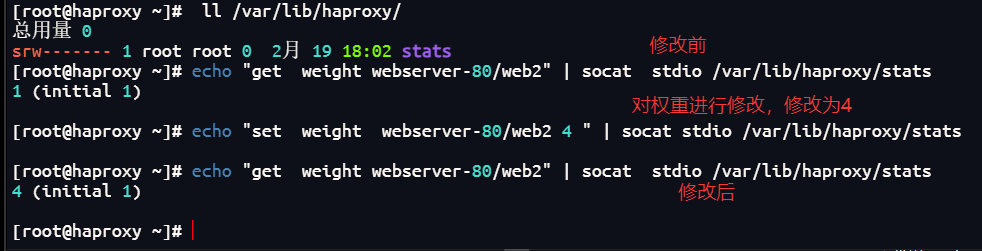
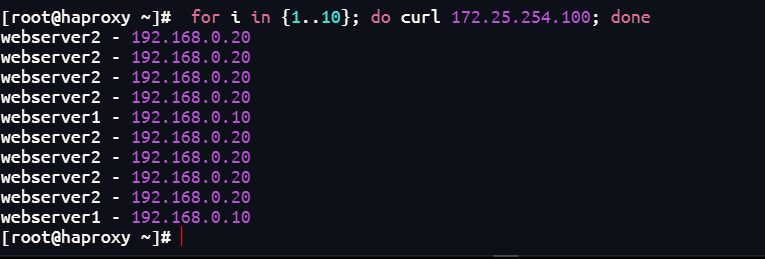
注意:socat修改是临时生效,重启后丢失:
四、负载均衡算法深度实验
HAProxy支持静态算法、动态算法和混合算法三类,理解其差异对系统架构设计至关重要。
4.1 静态算法
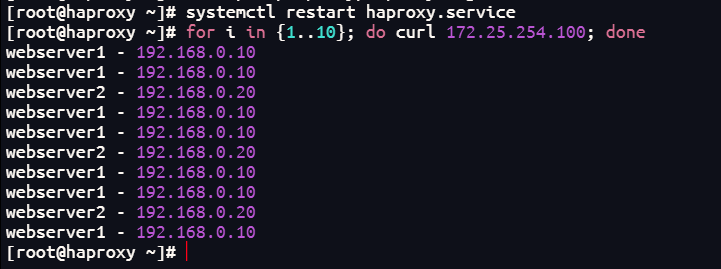
static-rr:基于权重的轮询,不支持运行时调整权重(只接受0或1)。
[root@haproxy ~] vim /etc/haproxy/haproxy.cfg
listen webcluster
    bind        *:80
    balance     static-rr
    server haha 192.168.0.10:80 check inter 3s fall 3 rise 5 weight 2
    server hehe 192.168.0.20:80 check inter 3s fall 3 rise 5 weight 1
[root@haproxy ~] systemctl restart haproxy.service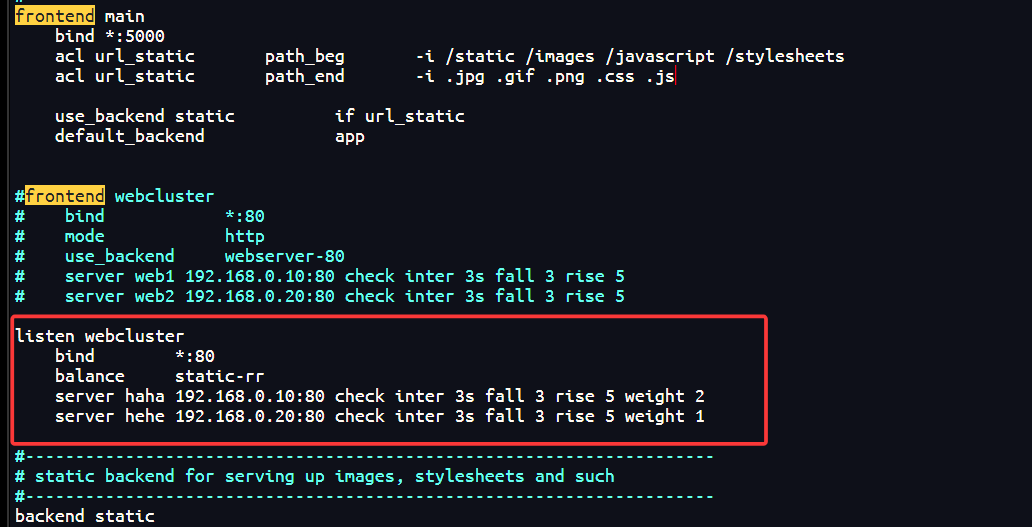
测试效果:
0%100%
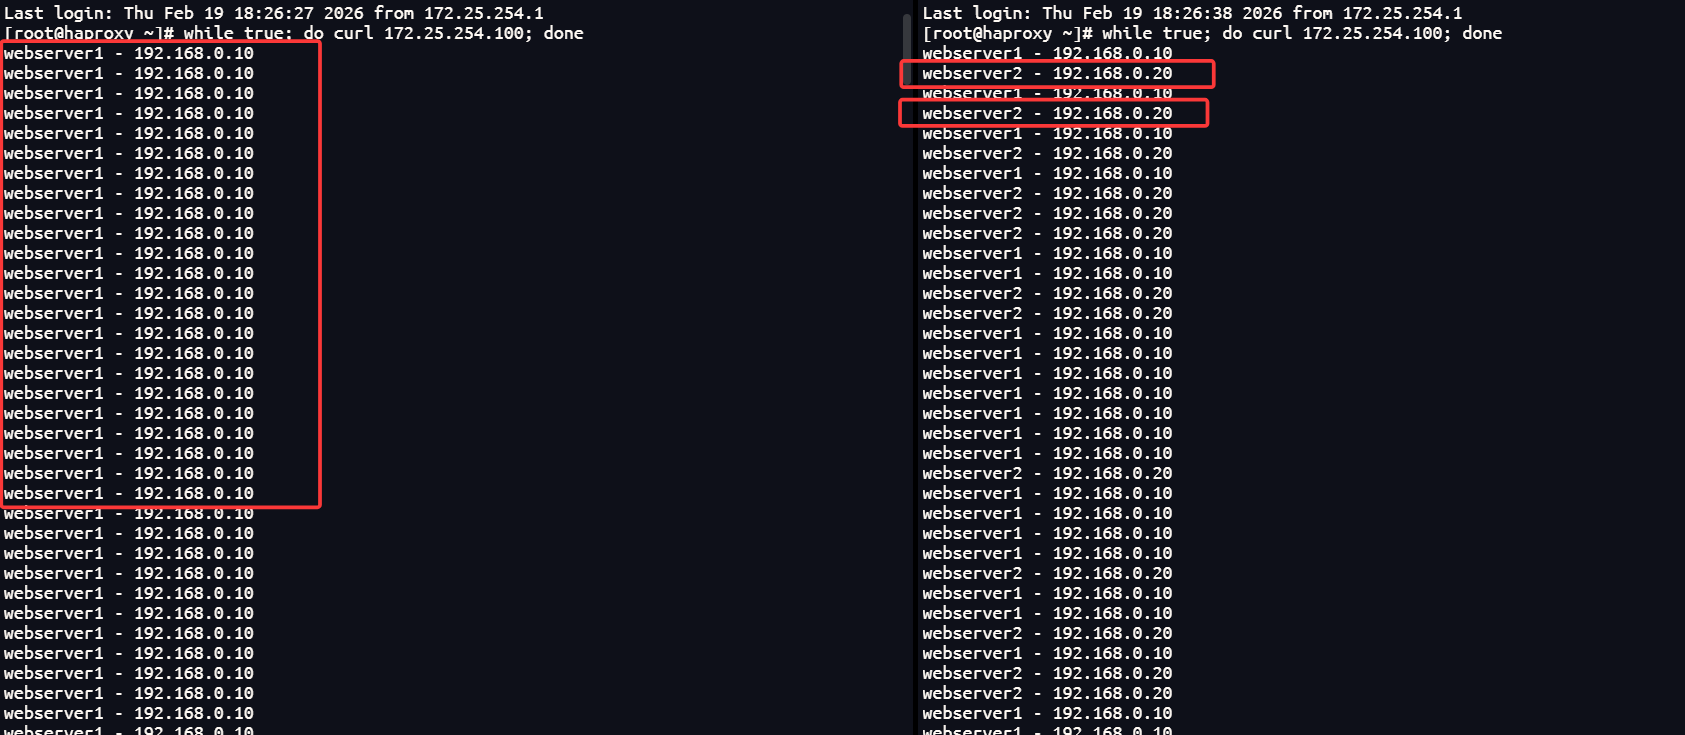
first:按服务器列表顺序调度,连接数达上限后才切换。
[root@haproxy ~] vim /etc/haproxy/haproxy.cfg
listen webcluster
    bind        *:80
    balance     first
    server haha 192.168.0.10:80 maxconn 1 check inter 3s fall 3 rise 5 weight 2
    server hehe 192.168.0.20:80 check inter 3s fall 3 rise 5 weight 1
[root@haproxy ~] systemctl restart haproxy.service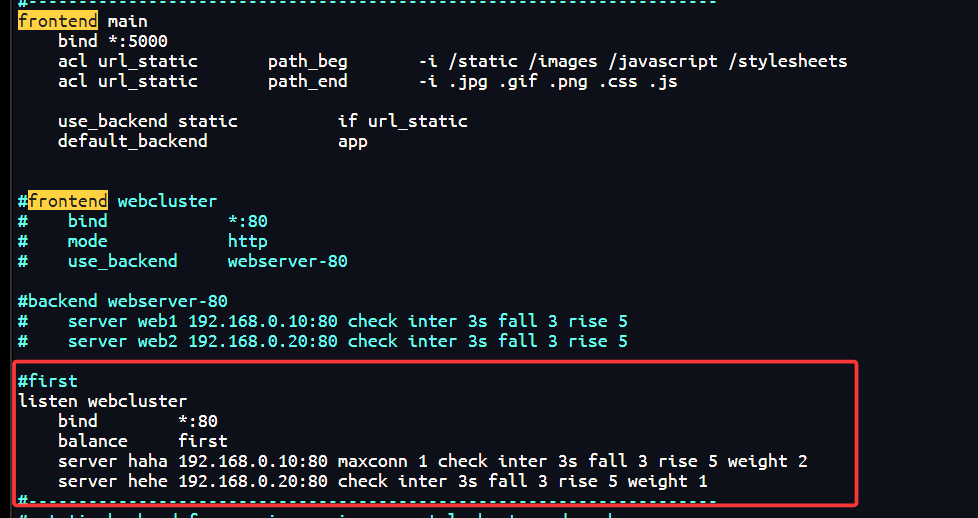
持续访问测试:
4.2 动态算法
roundrobin:默认算法,支持权重动态调整和慢启动,最多支持4095台后端。
[root@haproxy ~] vim /etc/haproxy/haproxy.cfg
listen webcluster
    bind        *:80
    balance     roundrobin
    server haha 192.168.0.10:80 check inter 3s fall 3 rise 5 weight 2
    server hehe 192.168.0.20:80 check inter 3s fall 3 rise 5 weight 1
[root@haproxy ~] systemctl restart haproxy.service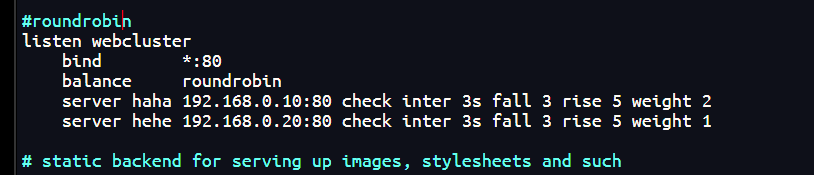
测试与动态权重更新:
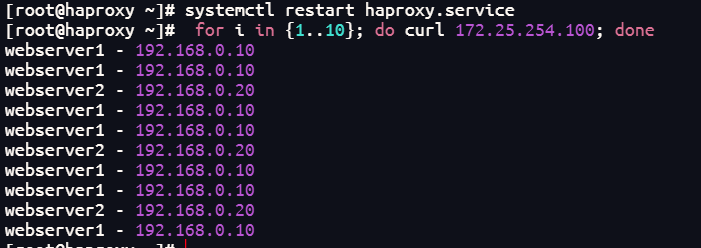
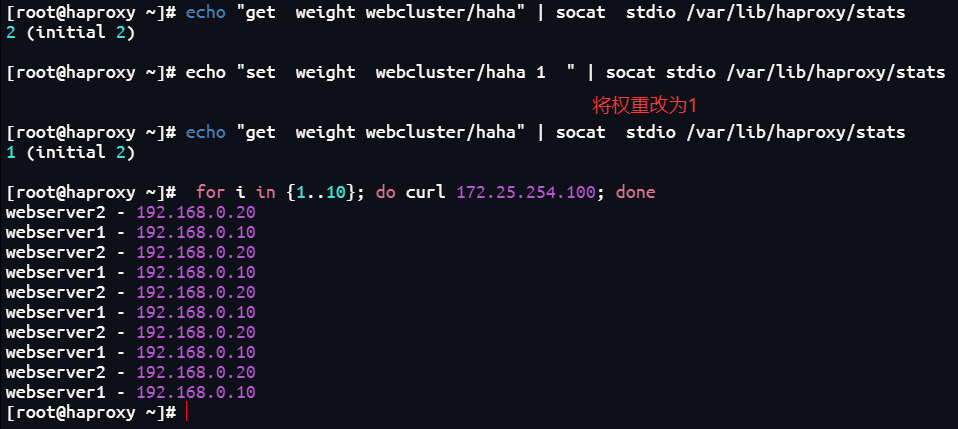
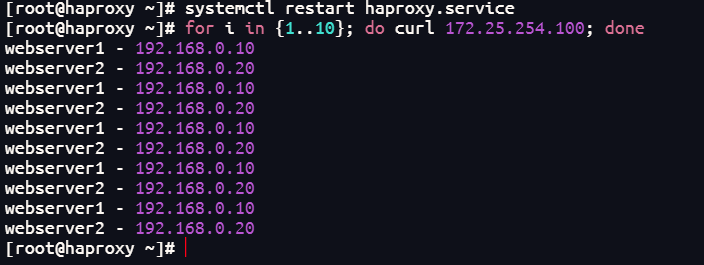
leastconn:根据当前连接数最少优先调度,适合长连接场景(如MySQL)。
[root@haproxy ~] vim /etc/haproxy/haproxy.cfg
listen webcluster
    bind        *:80
    balance     leastconn
    server haha 192.168.0.10:80 check inter 3s fall 3 rise 5 weight 2
    server hehe 192.168.0.20:80 check inter 3s fall 3 rise 5 weight 1
[root@haproxy ~] systemctl restart haproxy.service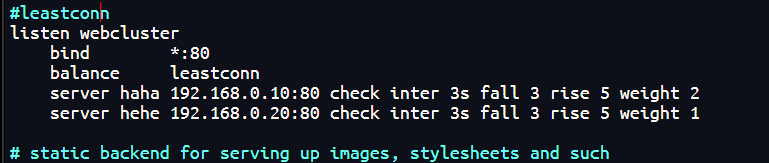
4.3 混合算法
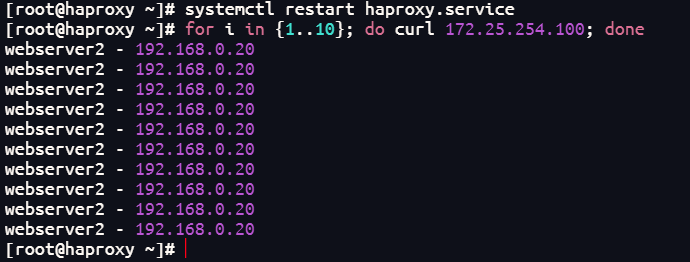
source:基于源IP地址hash,实现会话保持。
[root@haproxy ~] vim /etc/haproxy/haproxy.cfg
listen webcluster
    bind        *:80
    balance     source
    server haha 192.168.0.10:80 check inter 3s fall 3 rise 5 weight 2
    server hehe 192.168.0.20:80 check inter 3s fall 3 rise 5 weight 1
[root@haproxy ~] systemctl restart haproxy.service
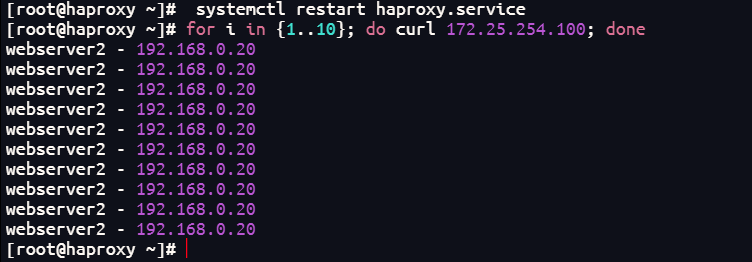
动态模式配置:
listen webcluster
    bind        *:80
    balance     source
    hash-type 	consistent
    server haha 192.168.0.10:80 check inter 3s fall 3 rise 5 weight 2
    server hehe 192.168.0.20:80 check inter 3s fall 3 rise 5 weight 1
测试:
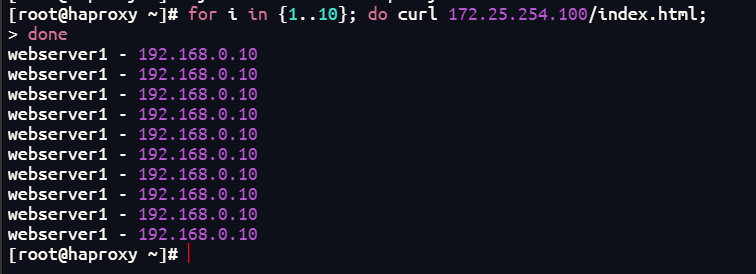
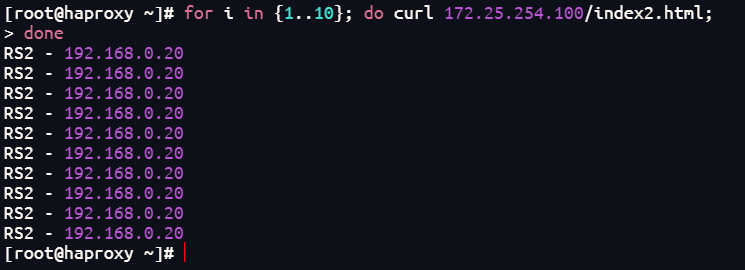
uri:对URI进行hash,适用于缓存服务器场景。
[root@webserver1 ~] echo RS1 - 192.168.0.10 > /var/www/html/index1.html
[root@webserver1 ~] echo RS1 - 192.168.0.10 > /var/www/html/index2.html
[root@webserver2 ~] echo RS2 - 192.168.0.20 > /var/www/html/index1.html
[root@webserver2 ~] echo RS2 - 192.168.0.20 > /var/www/html/index2.html

[root@haproxy ~] vim /etc/haproxy/haproxy.cfg
listen webcluster
    bind        *:80
    balance     uri
    hash-type 	consistent
    server haha 192.168.0.10:80 check inter 3s fall 3 rise 5 weight 2
    server hehe 192.168.0.20:80 check inter 3s fall 3 rise 5 weight 1
[root@haproxy ~] systemctl restart haproxy.service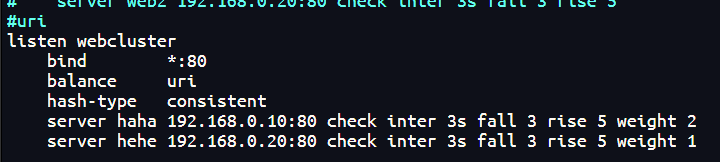
测试:
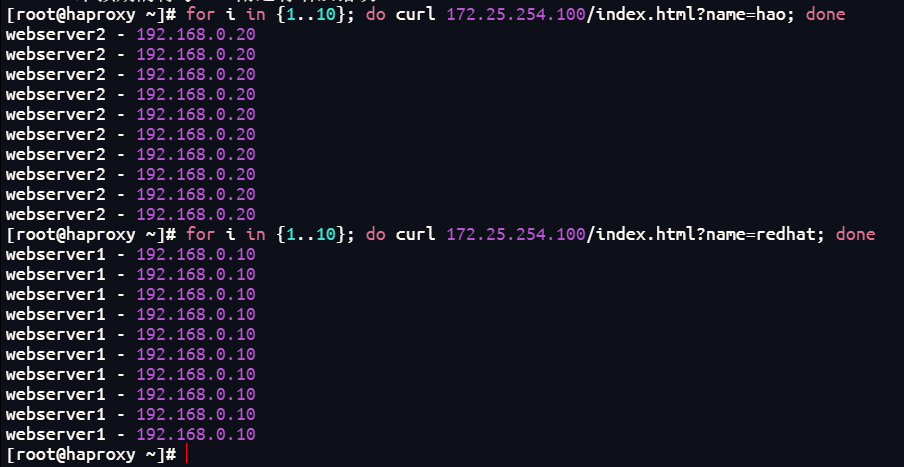
url_param:对URL参数hash,常用于电商追踪用户。
[root@webserver1 ~] echo RS1 - 192.168.0.10 > /var/www/html/index1.html
[root@webserver1 ~] echo RS1 - 192.168.0.10 > /var/www/html/index2.html
[root@webserver2 ~] echo RS2 - 192.168.0.20 > /var/www/html/index1.html
[root@webserver2 ~] echo RS2 - 192.168.0.20 > /var/www/html/index2.html
[root@haproxy ~] vim /etc/haproxy/haproxy.cfg
listen webcluster
bind *:80
balance url_param name
hash-type consistent
server haha 192.168.0.10:80 check inter 3s fall 3 rise 5 weight 2
server hehe 192.168.0.20:80 check inter 3s fall 3 rise 5 weight 1
[root@haproxy ~] systemctl restart haproxy.service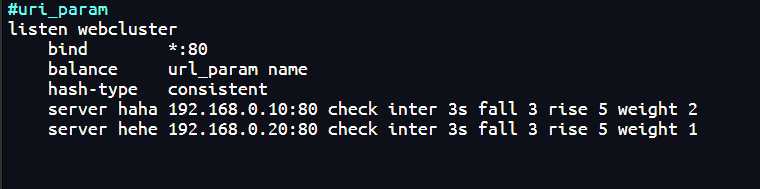
测试:
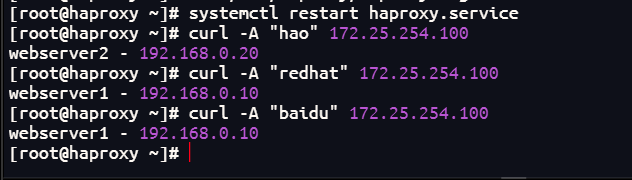
hdr:基于HTTP头部信息hash。
[root@haproxy ~] vim /etc/haproxy/haproxy.cfg
listen webcluster
    bind        *:80
    balance     hdr(User-Agent)
    hash-type 	consistent
    server haha 192.168.0.10:80 check inter 3s fall 3 rise 5 weight 2
    server hehe 192.168.0.20:80 check inter 3s fall 3 rise 5 weight 1
[root@haproxy ~] systemctl restart haproxy.service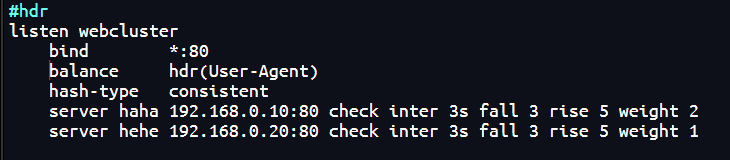
测试:
算法总结:
#静态
static-rr--------->tcp/http
first------------->tcp/http
#动态
roundrobin-------->tcp/http
leastconn--------->tcp/http
random------------>tcp/http
#以下静态和动态取决于hash_type是否consistent
source------------>tcp/http
Uri--------------->http
url_param--------->http
hdr--------------->http
五、会话保持与状态监控
5.1 基于Cookie的会话保持
通过Cookie实现浏览器级别的会话保持,确保同一浏览器访问同一后端:
[root@haproxy ~] vim /etc/haproxy/haproxy.cfg
listen webcluster
    bind        *:80
    balance     roundrobin
    hash-type   consistent
    cookie WEBCOOKIE insert nocache indirect
    server haha 192.168.0.10:80 cookie web1 check inter 3s fall 3 rise 5 weight 2
    server hehe 192.168.0.20:80 cookie web2 check inter 3s fall 3 rise 5 weight 1
[root@haproxy ~] systemctl restart haproxy.service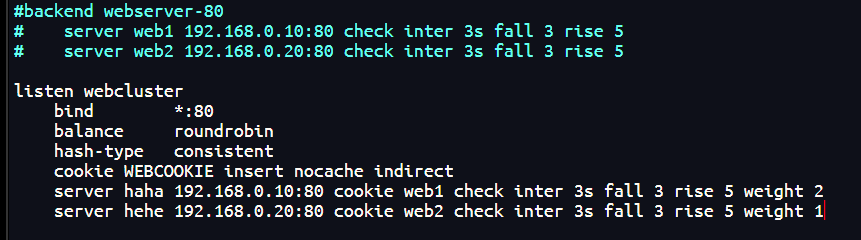

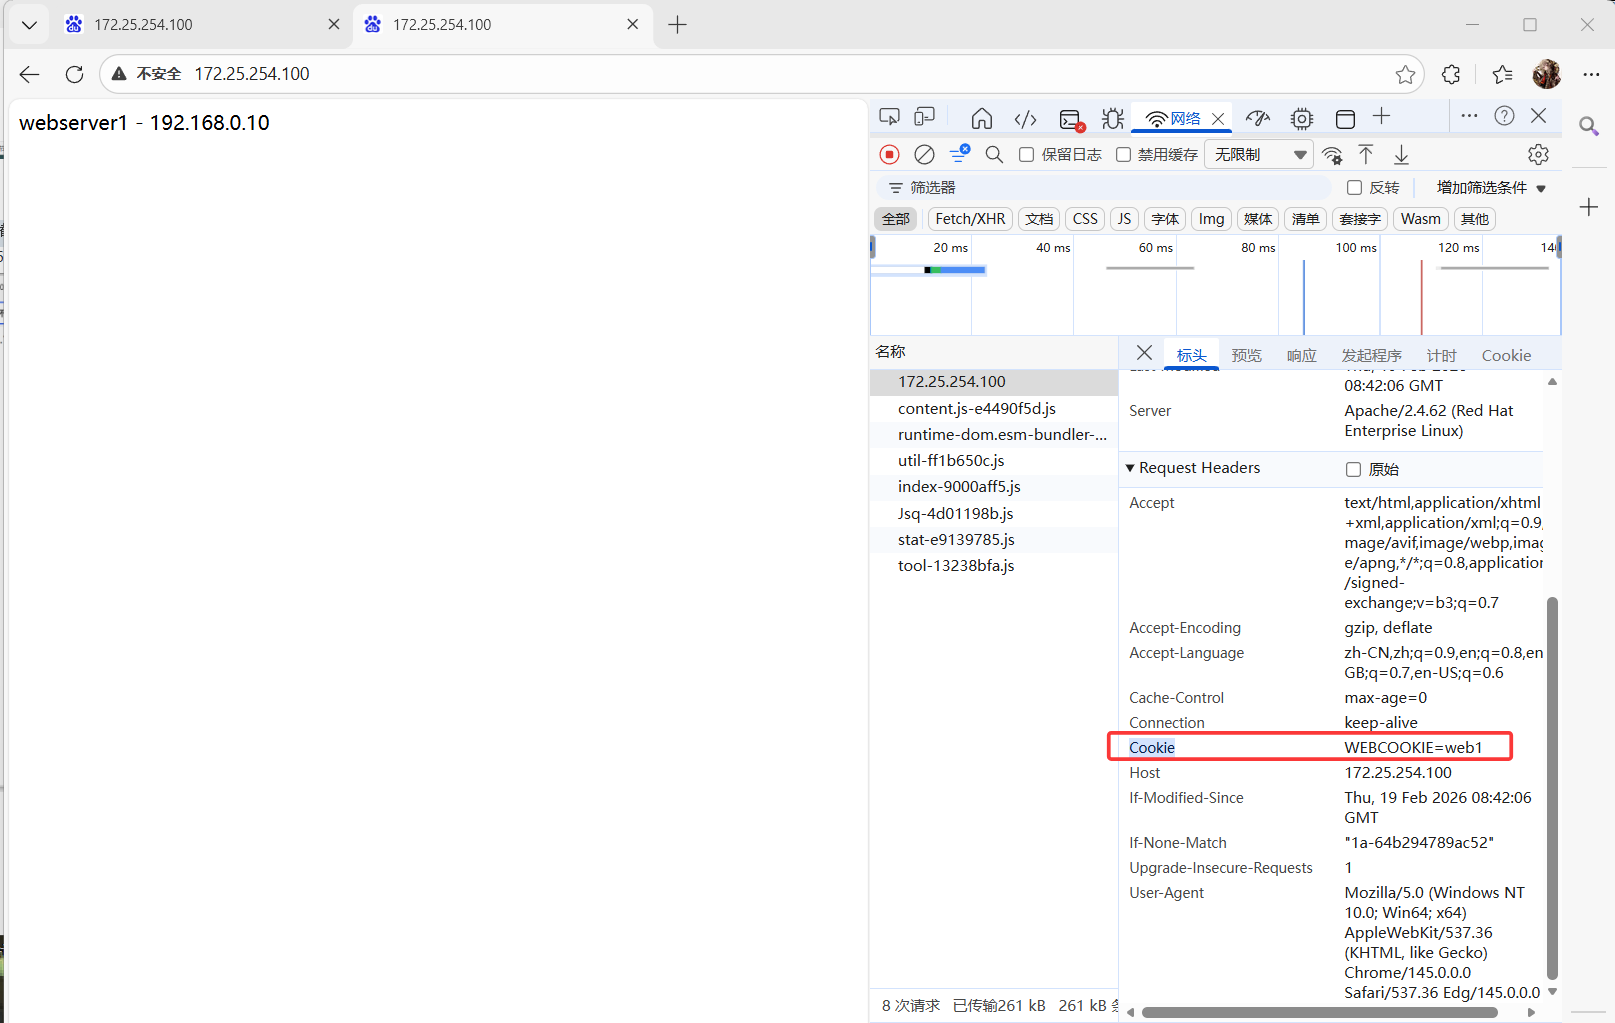
5.2 HAProxy状态页
配置状态页以实时监控后端服务器健康状态:
[root@haproxy ~] vim /etc/haproxy/haproxy.cfg
listen stats
    mode        http
    bind 0.0.0.0:4321
    stats       enable
    log         global
#   stats       refresh
    stats uri   /status
    stats auth  lee:lee
[root@haproxy ~] systemctl restart haproxy.service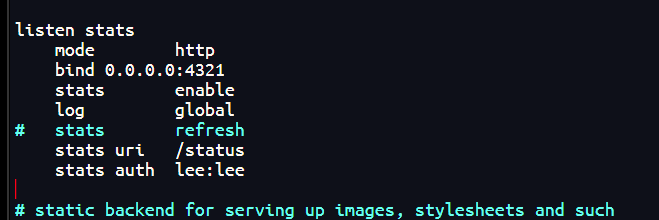
测试访问:
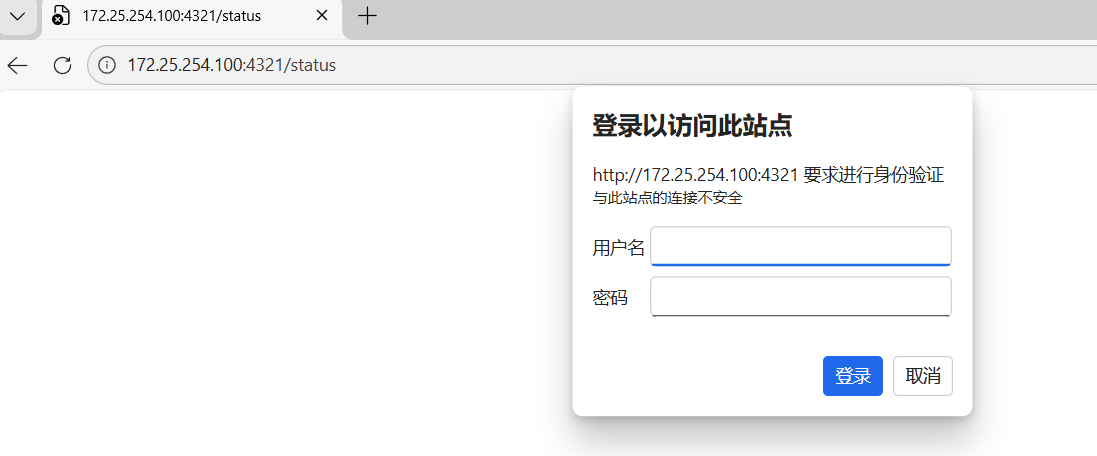
开启自动刷新:
[root@haproxy ~] vim /etc/haproxy/haproxy.cfg
listen stats
    mode        http
    bind 0.0.0.0:4321
    stats       enable
    log         global
    stats       refresh   1
    stats uri   /status
    stats auth  lee:lee
[root@haproxy ~] systemctl restart haproxy.service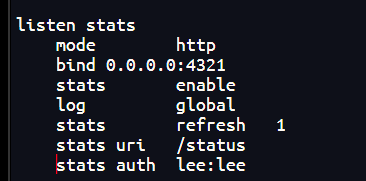
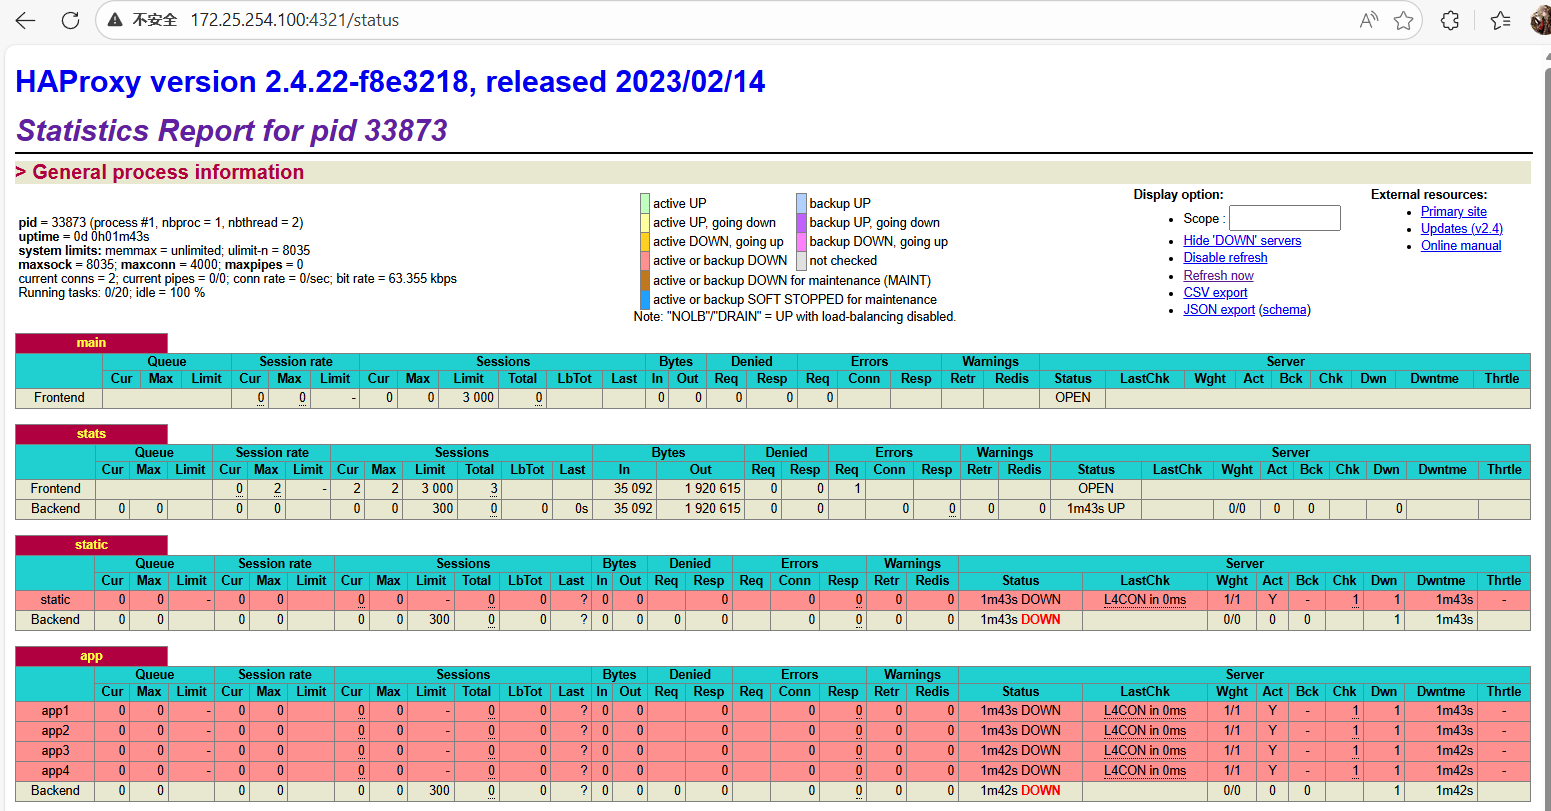
六、IP透传与四层负载
6.1 七层IP透传
IP透传让后端服务器获取客户端真实IP,对日志审计和安全策略至关重要。
[root@haproxy ~] vim /etc/haproxy/haproxy.cfg
listen webcluster
    bind        *:80
    balance     roundrobin
    server haha 192.168.0.10:80 check inter 3s fall 3 rise 5 weight 1
    server hehe 192.168.0.20:80 check inter 3s fall 3 rise 5 weight 1
[root@haproxy ~] systemctl restart haproxy.service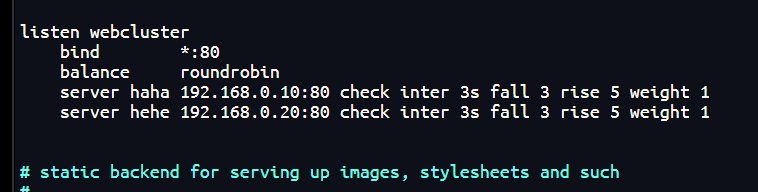
测试环境:
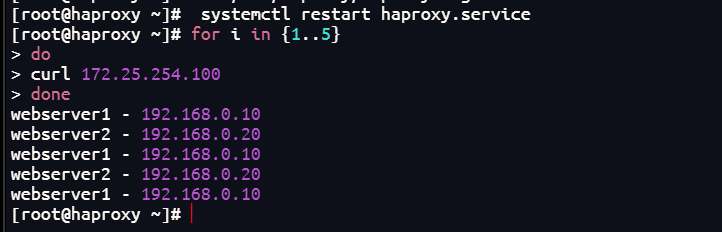
默认未开启透传:
[root@webserver2 ~] cat /etc/httpd/logs/access_log
192.168.0.100 - - [19/Feb/2026:19:13:04 +0800] "GET / HTTP/1.1" 200 26 "-" "hao"
192.168.0.100 - - [19/Feb/2026:19:28:24 +0800] "GET / HTTP/1.1" 200 26 "-" "curl/7.76.1"
192.168.0.100 - - [19/Feb/2026:19:43:22 +0800] "GET / HTTP/1.1" 200 26 "-" "curl/7.76.1"
192.168.0.100 - - [19/Feb/2026:19:43:22 +0800] "GET / HTTP/1.1" 200 26 "-" "curl/7.76.1"
开启透传:
[root@haproxy ~] vim /etc/haproxy/haproxy.cfg
.......................
defaults
    mode                    http
    log                     global
    option                  httplog
    option                  dontlognull
    option http-server-close
    option forwardfor       except 127.0.0.0/8				#开启haproxy透传功能
    option                  redispatch
    retries                 3
    timeout http-request    10s
    timeout queue           1m
    timeout connect         10s
    timeout client          1m
    timeout server          1m
    timeout http-keep-alive 10s
    timeout check           10s
    maxconn                 3000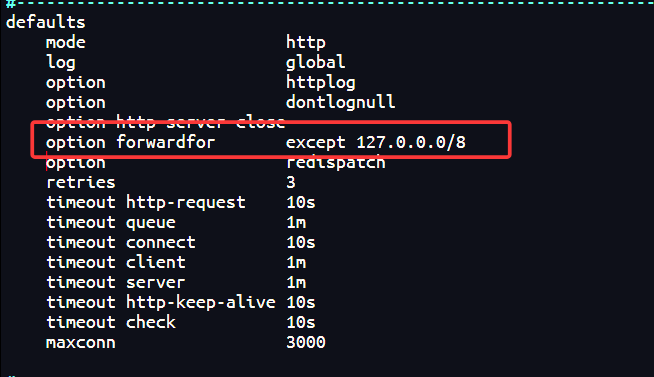
配置后端采集透传IP:
[root@webserver2 ~]  vim /etc/httpd/conf/httpd.conf
  LogFormat "%h %l %u %t \"%r\" %>s %b \"%{X-Forwarded-For}i\" \"%{Referer}i\" \"%{User-Agent}i    \"" combined
[root@webserver2 ~] systemctl restart httpd
测试效果:
[root@webserver2 ~] cat /etc/httpd/logs/access_log
92.168.0.100 - - [19/Feb/2026:19:59:30 +0800] "GET / HTTP/1.1" 200 26 "192.168.0.1" "-" "curl/8.4.0    "
192.168.0.100 - - [19/Feb/2026:19:59:32 +0800] "GET / HTTP/1.1" 200 26 "192.168.0.1" "-" "curl/8.4.0    "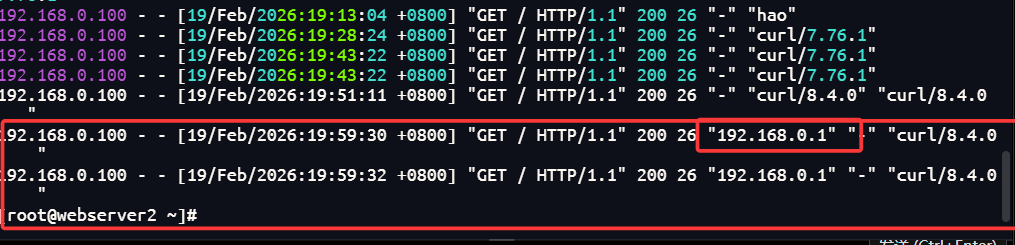
6.2 四层IP透传
#在RS中把apache停止
[root@webserver1 ~] systemctl disable --now httpd
[root@webserver2 ~] systemctl disable --now httpd
#部署nginx
[root@webserver1 ~] dnf install nginx -y
[root@webserver2 ~] dnf install nginx -y
[root@webserver1 ~] echo RS1 - 192.168.0.10 > /usr/share/nginx/html/index.html
[root@webserver2 ~] echo RS2 - 192.168.0.20 > /usr/share/nginx/html/index.html
[root@webserver1 ~] systemctl enable --now nginx
[root@webserver2 ~] systemctl enable --now nginx

测试:

启用nginx四层访问控制:
[root@webserver1 ~] vim /etc/nginx/nginx.conf
    server {
        listen       80 proxy_protocol;			#启用四层访问控制
        listen       [::]:80;
        server_name  _;
        root         /usr/share/nginx/html;
        # Load configuration files for the default server block.
        include /etc/nginx/default.d/*.conf;
        error_page 404 /404.html;
        location = /404.html {
        }
[root@webserver1 ~] systemctl restart nginx.service
[root@webserver2 ~] vim /etc/nginx/nginx.conf
    server {
        listen       80 proxy_protocol;			#启用四层访问控制
        listen       [::]:80;
        server_name  _;
        root         /usr/share/nginx/html;
        # Load configuration files for the default server block.
        include /etc/nginx/default.d/*.conf;
        error_page 404 /404.html;
        location = /404.html {
        }
[root@webserver2 ~] systemctl restart nginx.service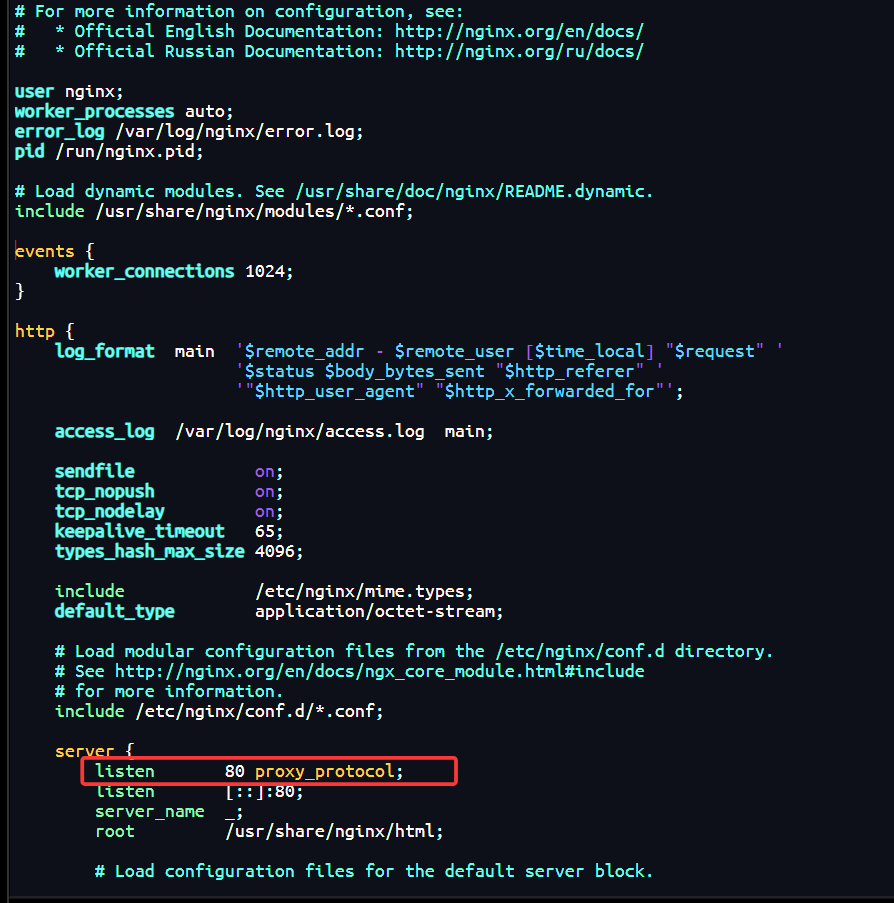
测试:
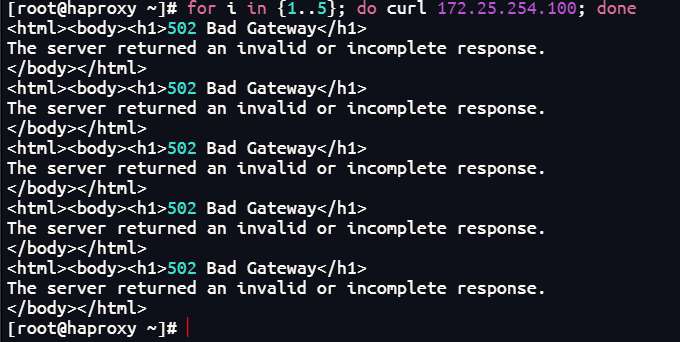
配置HAProxy四层访问:
[root@haproxy ~] vim /etc/haproxy/haproxy.cfg
listen webcluster
    bind        *:80
    mode        tcp				#四层访问
    balance     roundrobin
    server haha 192.168.0.10:80 send-proxy check inter 3s fall 3 rise 5 weight 1
    server hehe 192.168.0.20:80 send-proxy check inter 3s fall 3 rise 5 weight 1
[root@haproxy ~] systemctl restart haproxy.service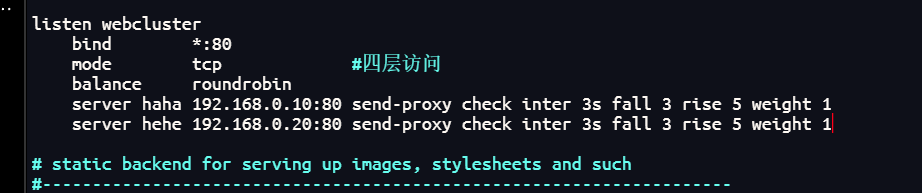
测试四层访问:
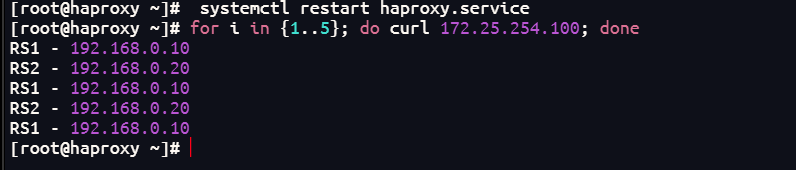
设置四层IP透传:
[root@webserver1&2 ~] vim /etc/nginx/nginx.conf
    log_format  main  '$remote_addr - $remote_user [$time_local] "$request" '
                      '"$proxy_protocol_addr"'			#采集透传信息
                      '$status $body_bytes_sent "$http_referer" '
                      '"$http_user_agent" "$http_x_forwarded_for"';
[root@webserver1&2 ~] systemctl restart nginx.service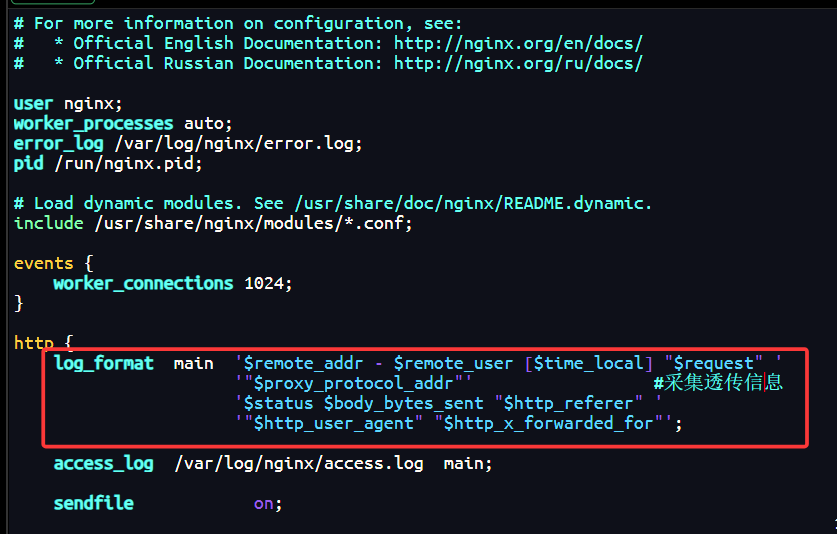
测试:
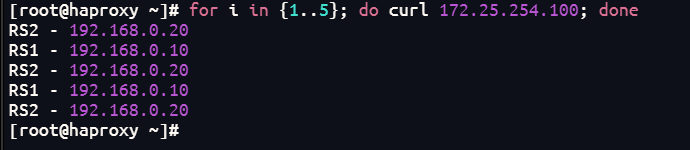
[root@webserver1 ~] cat /var/log/nginx/access.log
192.168.0.100 - - [19/Feb/2026:20:12:41 +0800] "GET / HTTP/1.1" "172.25.254.100"200 19 "-" "curl/7.76.1" "-"
192.168.0.100 - - [19/Feb/2026:20:12:41 +0800] "GET / HTTP/1.1" "172.25.254.100"200 19 "-" "curl/7.76.1" "-"
6.3 HAProxy四层负载
[root@webserver1+2 ~] dnf install mariadb-server mariadb  -y
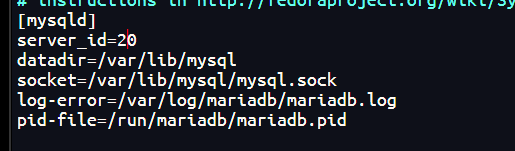
[root@webserver1+1 ~] vim /etc/my.cnf.d/mariadb-server.cnf
[mysqld]
server_id=10			#设定数据库所在主机的id标识,在20上设定id为20
datadir=/var/lib/mysql
socket=/var/lib/mysql/mysql.sock
log-error=/var/log/mariadb/mariadb.log
pid-file=/run/mariadb/mariadb.pid
#建立远程登录用户并授权
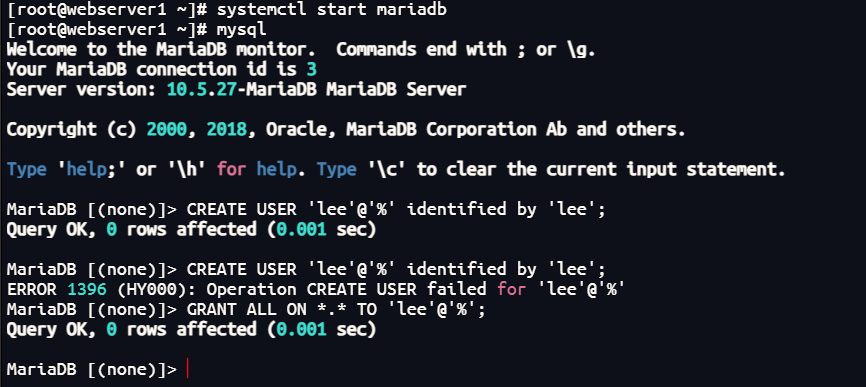
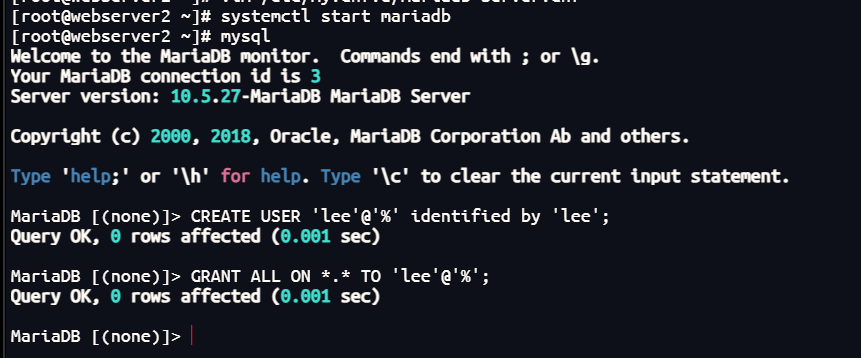
[root@webserver2+1 ~] systemctl start mariadb
[root@webserver2+1 ~] mysql
MariaDB [(none)]>  CREATE USER 'lee'@'%' identified by 'lee';
Query OK, 0 rows affected (0.001 sec)
MariaDB [(none)]> GRANT ALL ON *.* TO 'lee'@'%';
Query OK, 0 rows affected (0.000 sec)
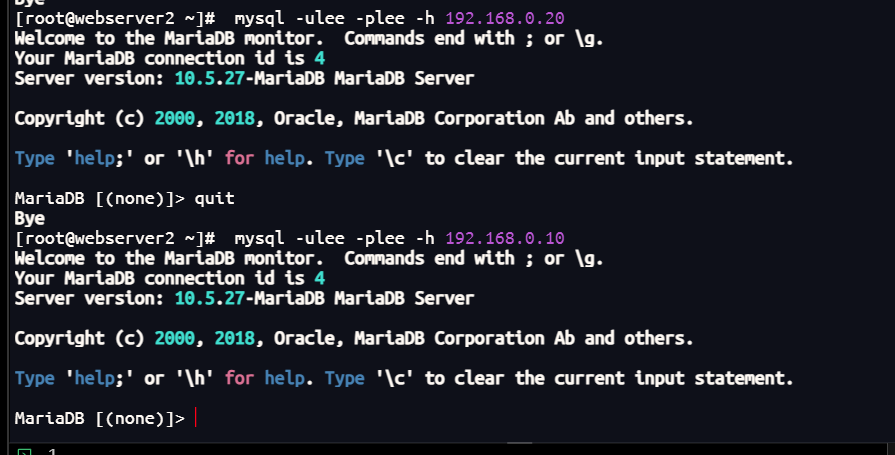
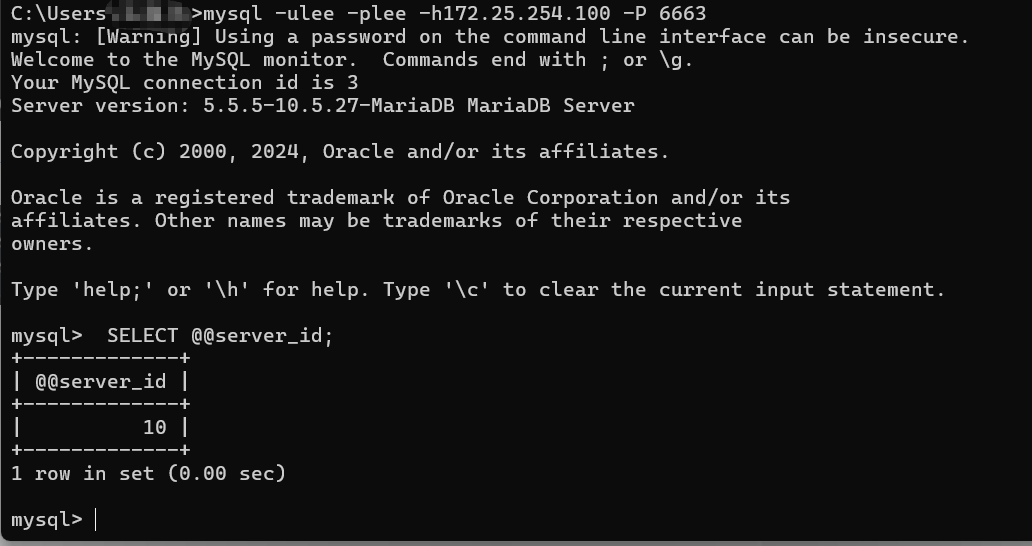
测试:
四层负载操作:
[root@haproxy ~] vim /etc/haproxy/haproxy.cfg
listen mariadbcluster
    bind        *:6663
    mode        tcp
    balance     roundrobin
    server haha 192.168.0.10:3306  check inter 3s fall 3 rise 5 weight 1
    server hehe 192.168.0.20:3306  check inter 3s fall 3 rise 5 weight 1
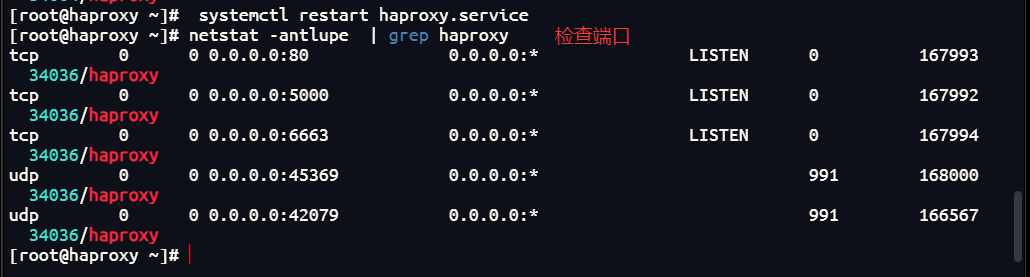
[root@haproxy ~] systemctl restart haproxy.service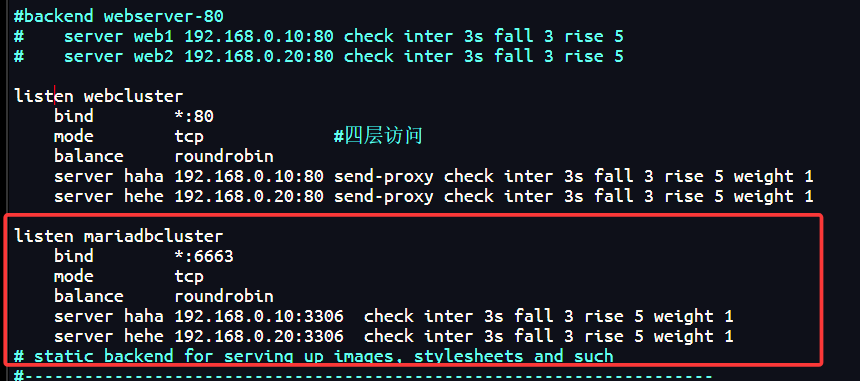
测试:
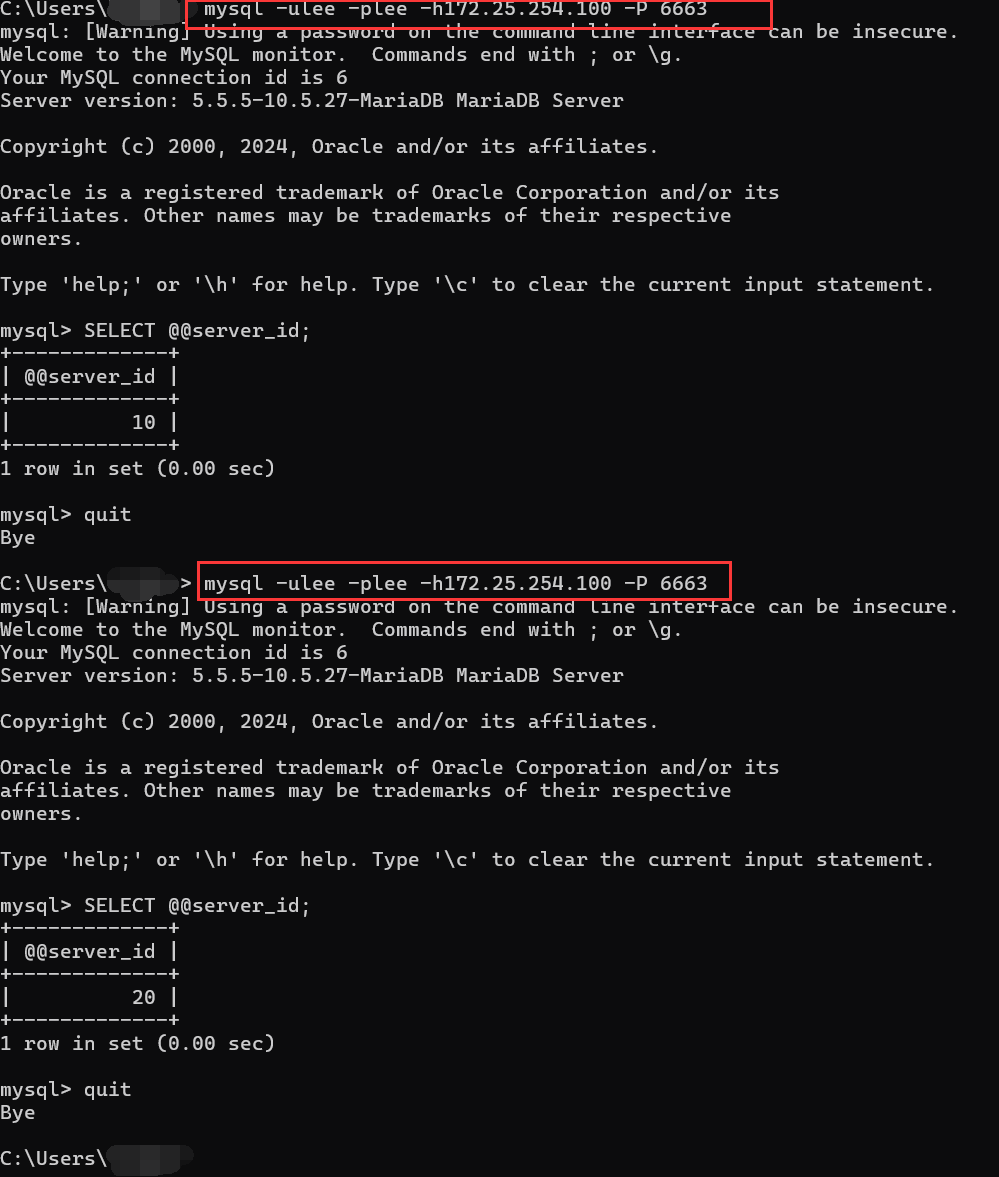
backup参数配置:
[root@haproxy ~] vim /etc/haproxy/haproxy.cfg
listen mariadbcluster
    bind        *:6663
    mode        tcp
    balance     roundrobin
    server haha 192.168.0.10:3306  check inter 3s fall 3 rise 5 weight 1
    server hehe 192.168.0.20:3306  check inter 3s fall 3 rise 5 weight 1 backup
[root@haproxy ~] systemctl restart haproxy.service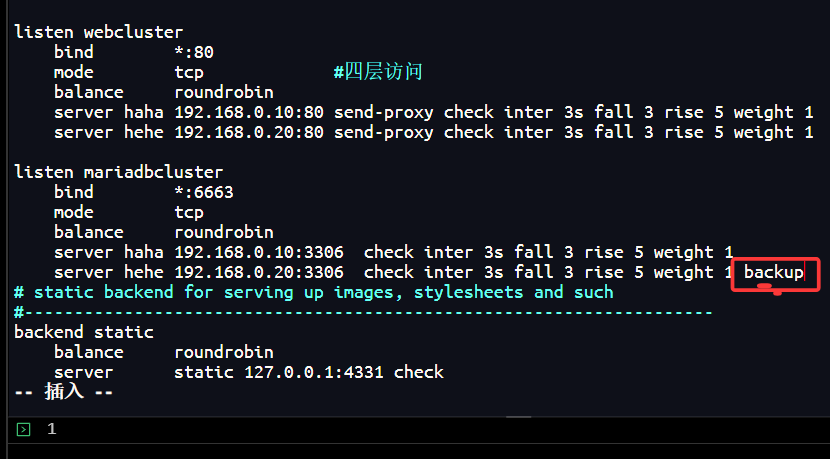
测试:
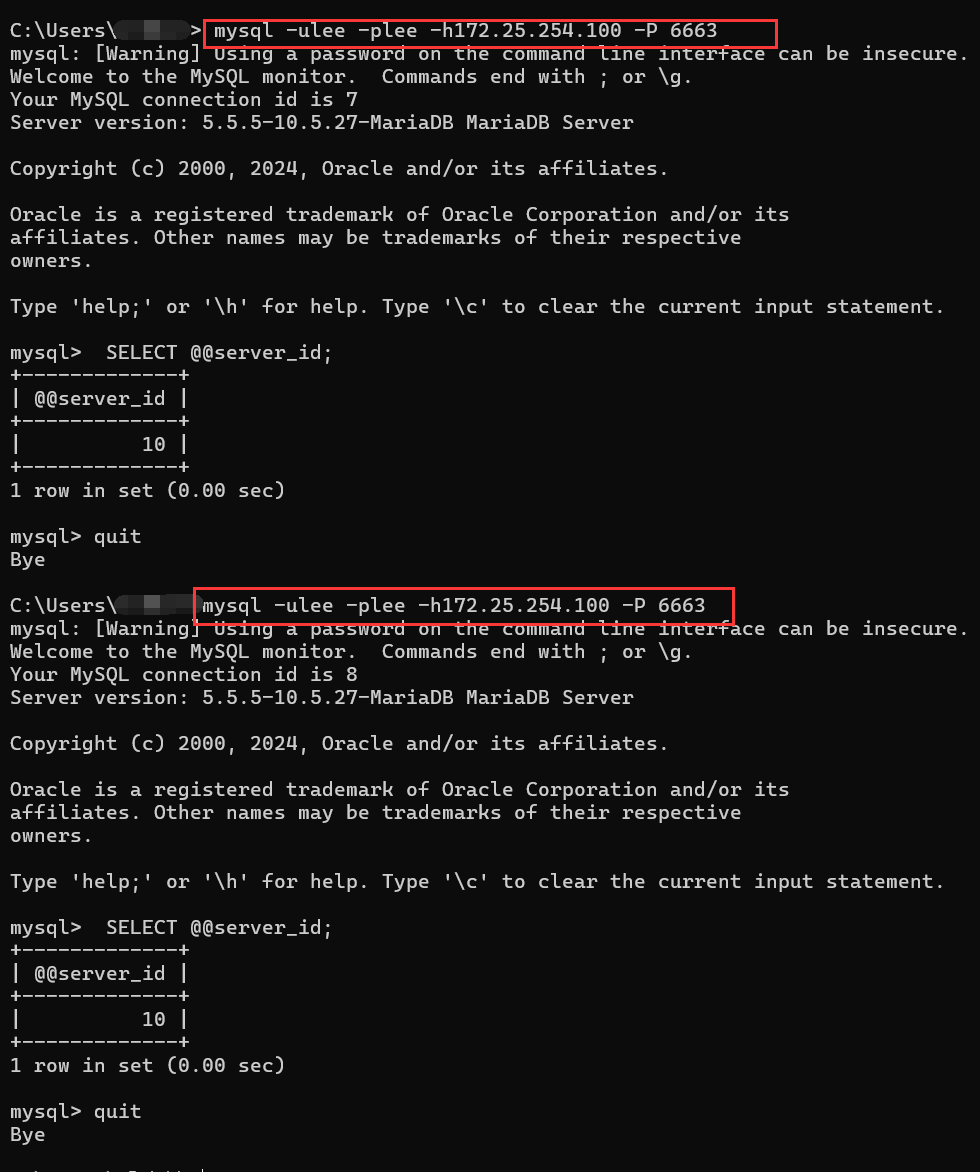
关闭主节点测试故障转移:

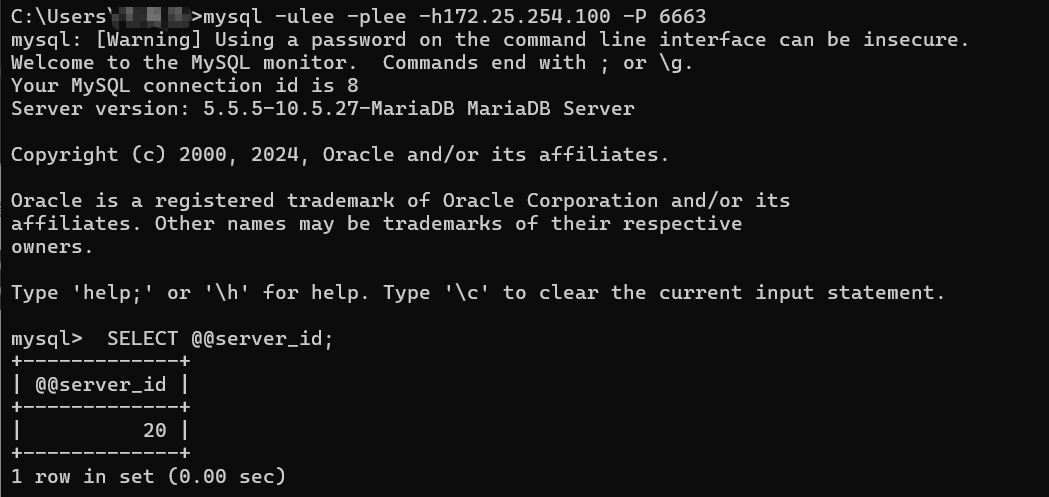
恢复后自动切换:

七、自定义错误页面与ACL访问控制
7.1 Sorry Server与自定义错误页
⚠️ 当所有后端宕机时,配置Sorry Server提供友好提示:
#在新主机中安装apache(可以用haproxy主机代替)
[root@haproxy ~] dnf install httpd -y
[root@haproxy ~] vim /etc/httpd/conf/httpd.conf
第47行:
Listen 8080
[root@haproxy ~]# systemctl enable --now httpd
Created symlink /etc/systemd/system/multi-user.target.wants/httpd.service → /usr/lib/systemd/system/httpd.service.
[root@haproxy ~]# echo "11111111111" > /var/www/html/index.html

#配置sorryserver上线
[root@haproxy ~] vim /etc/haproxy/haproxy.cfg
listen webcluster
    bind        *:80
    mode        tcp
    balance     roundrobin
    server haha 192.168.0.10:80  check inter 3s fall 3 rise 5 weight 1
    server hehe 192.168.0.20:80  check inter 3s fall 3 rise 5 weight 1
    server wuwu 192.168.0.100:8080  backup					#sorryserver
[root@haproxy ~] systemctl restart haproxy.service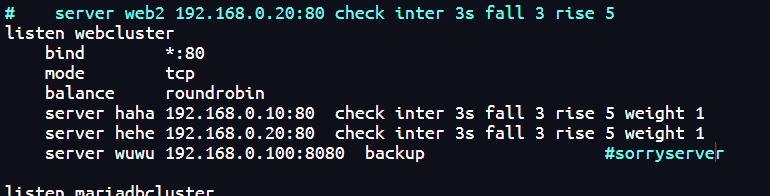
测试:

关闭所有业务主机:



自定义错误页面:
# 修改为http
[root@norouter ~]# vim /etc/haproxy/haproxy.cfg
listen webcluster
    bind        *:80
    mode        http
    option       httplog
    balance     roundrobin
    server haha 192.168.0.10:80  check inter 3s fall 3 rise 5 weight 1
    server hehe 192.168.0.20:80  check inter 3s fall 3 rise 5 weight 1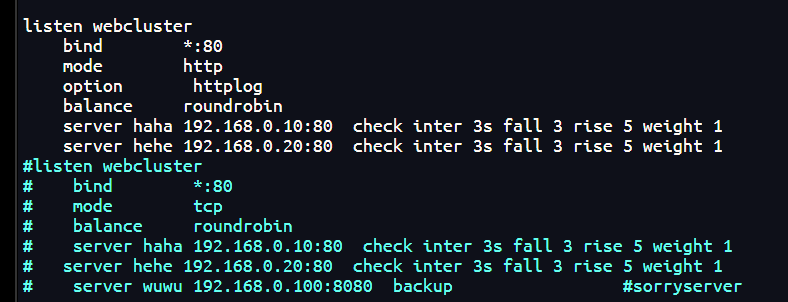
#出现的错误页面
[root@webserver1+2 ~]# systemctl stop httpd
[root@haproxy ~]# systemctl stop httpd
#所有后端web服务都宕机
[Administrator.DESKTOP-VJ307M3] ➤ curl 172.25.254.100
503 Service Unavailable
No server is available to handle this request.

创建错误文件并配置:
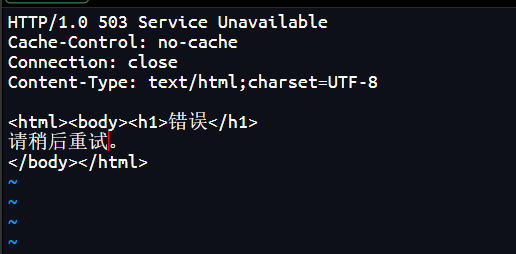

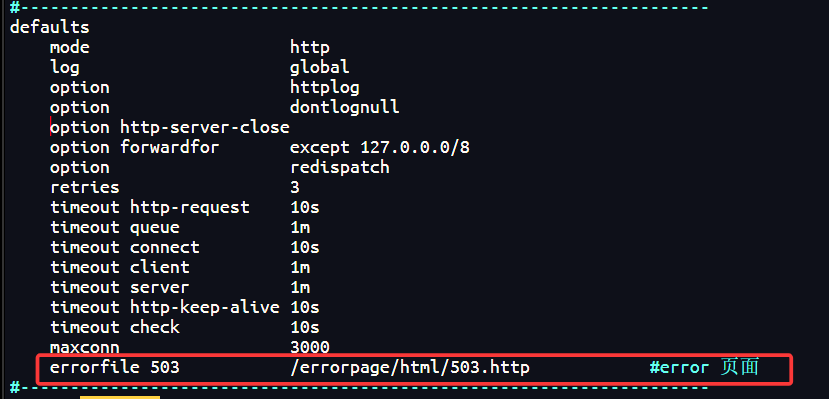
测试:

7.2 ACL访问控制
配置DNS解析:

基础配置:
[root@haproxy ~] vim /etc/haproxy/haproxy.cfg
[root@haproxy ~] systemctl restart haproxy.service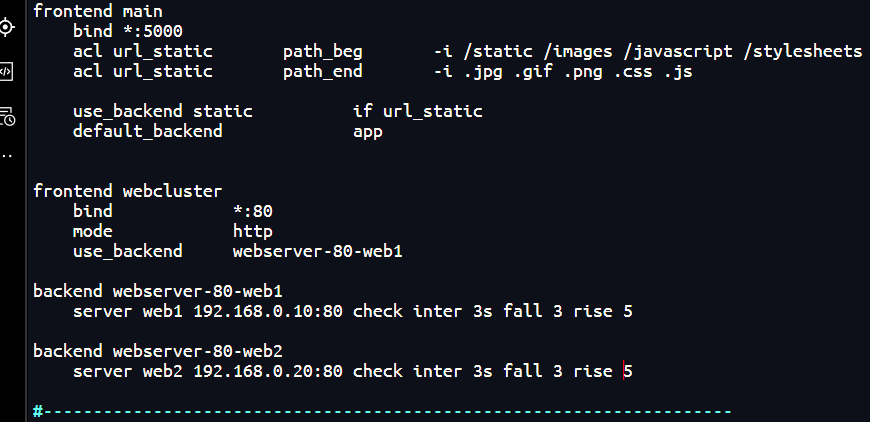
基础ACL示例:
[root@haproxy ~] vim /etc/haproxy/haproxy.cfg
frontend webcluster
    bind            *:80
    mode            http
    acl test hdr_end(host) -i .com			#acl列表
    use_backend  webserver-80-web1 if test	#acl列表访问匹配
    default_backend webserver-80-web2		#acl列表访问不匹配
backend webserver-80-web1
    server web1 192.168.0.10:80 check inter 3s fall 3 rise 5
backend webserver-80-web2
    server web2 192.168.0.20:80 check inter 3s fall 3 rise 5
[root@haproxy ~] systemctl restart haproxy.service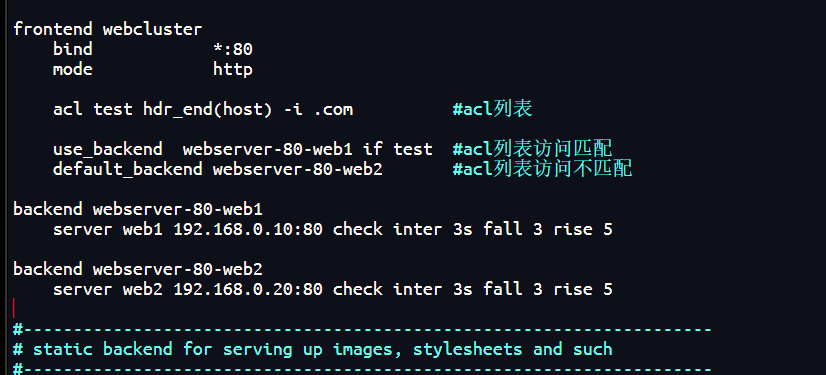
测试:

基于头部信息ACL:
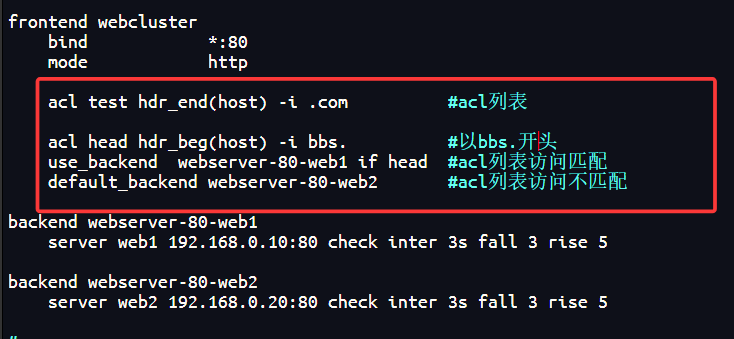

base参数ACL:
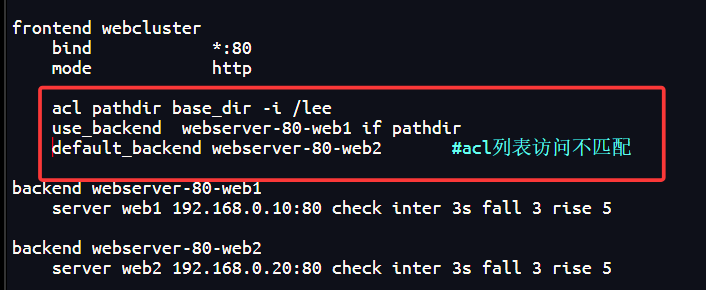

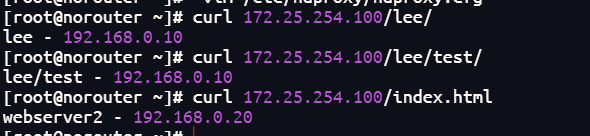
测试:
黑名单配置:
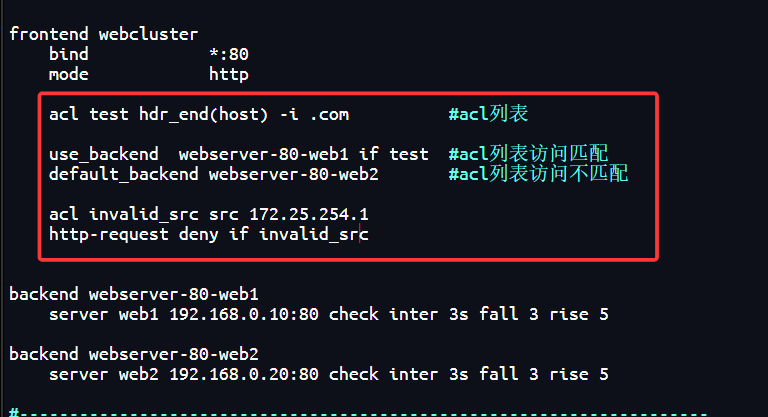
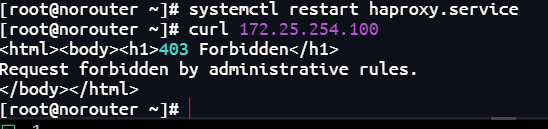
测试:
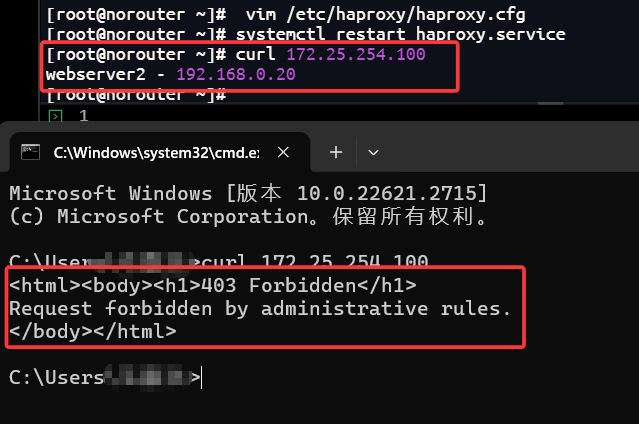
白名单配置:
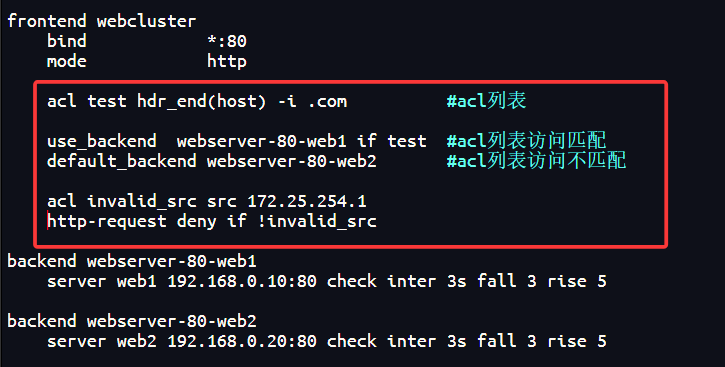
测试:
八、全站加密实战
为保障数据传输安全,HAProxy支持SSL/TLS全站加密。
8.1 制作证书
[root@haproxy ~] mkdir /etc/haproxy/certs/
[root@haproxy ~] openssl req -newkey rsa:2048 -nodes -sha256  -keyout /etc/haproxy/certs/timinglee.org.key -x509 -days 365 -out /etc/haproxy/certs/timinglee.org.crt
[root@haproxy ~] ls /etc/haproxy/certs/
timinglee.org.crt  timinglee.org.key
[root@haproxy ~] cat /etc/haproxy/certs/timinglee.org.{key,crt} > /etc/haproxy/certs/timinglee.pem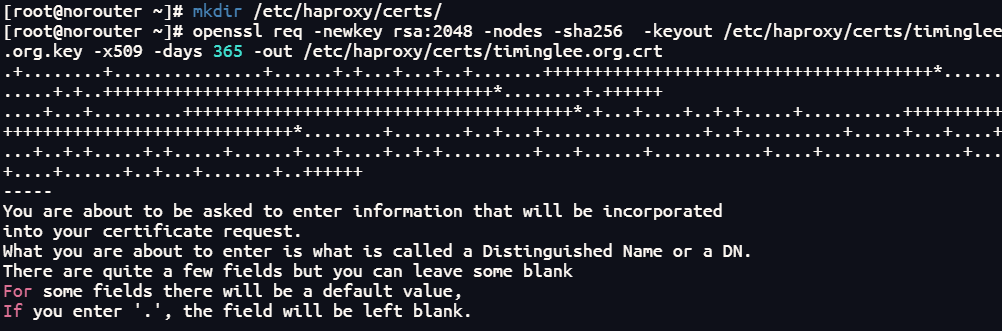

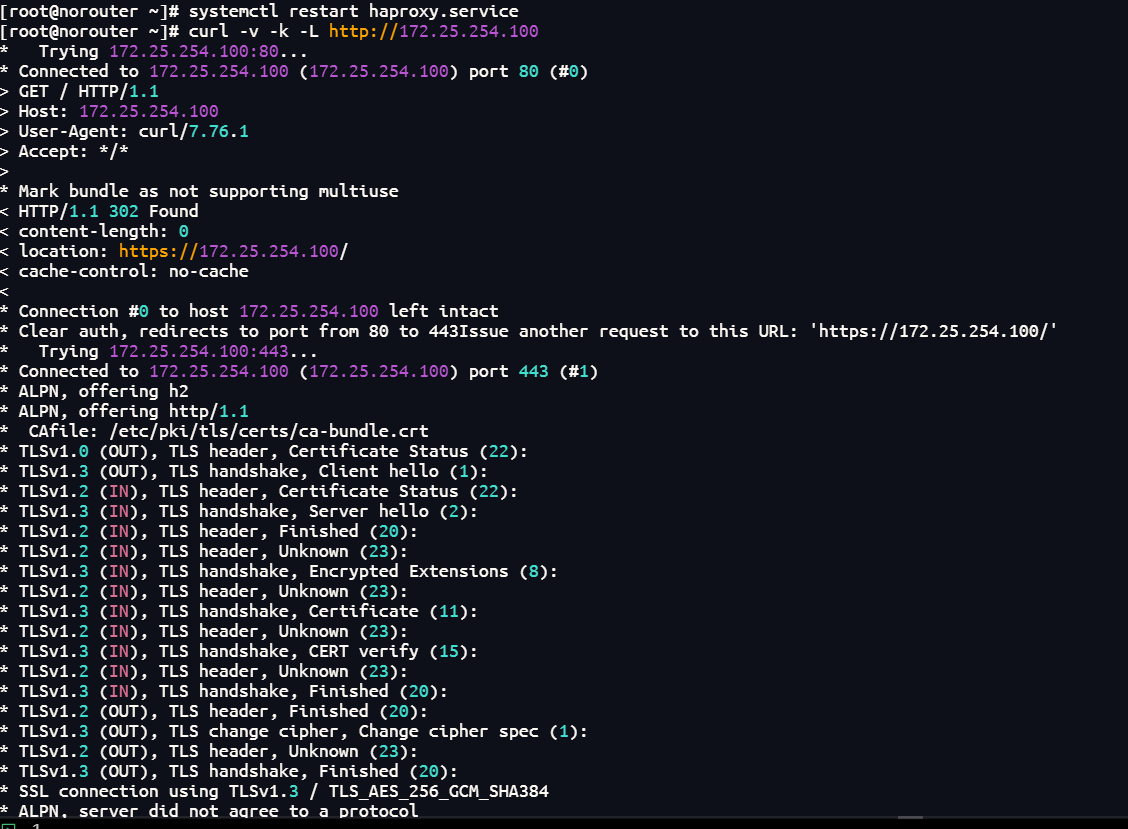
8.2 配置全站加密
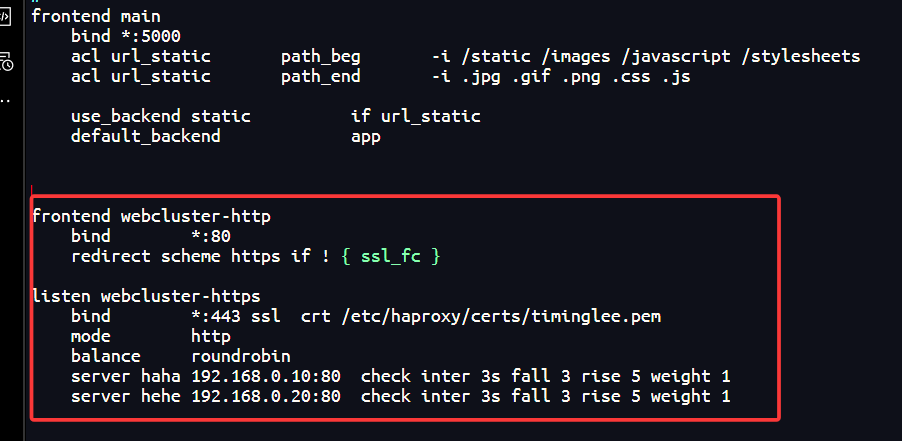
测试:
 [AFFILIATE_SLOT_1]
总结
本文从零开始搭建HAProxy七层代理环境,覆盖了基础负载均衡、多进程多线程优化、socat热更新、多种算法实验、会话保持、IP透传、四层负载、自定义错误页面、ACL访问控制及全站加密等核心功能。掌握这些技能,你将能够在微服务架构和分布式系统中灵活运用HAProxy,构建高并发、高可用的系统架构。
[AFFILIATE_SLOT_2]

 浙公网安备 33010602011771号