

关于SpringBoot全解
1、SpringBoot入门程序
所需依赖:
<!-- 父级依赖 -->
  <parent>
     <groupId>org.springframework.boot</groupId>
     <artifactId>spring-boot-starter-parent</artifactId>
     <version>1.5.6.RELEASE</version>
  </parent>
 <!-- 使用SpringMV和Spring的jar包 -->
  <dependencies>
      <dependency>
           <groupId>org.springframework.boot</groupId>
           <artifactId>spring-boot-starter-web</artifactId>
      </dependency>
  </dependencies>
<!-- 使用jdk1.80 -->
  <build>
     <plugins>
        <plugin>
           <groupId>org.apache.maven.plugins</groupId>
           <artifactId>maven-compiler-plugin</artifactId>
           <configuration>
              <source>1.8</source>
              <target>1.8</target>
           </configuration>
        </plugin>
     </plugins>
  </build>
程序代码:
package com.qianfeng.controller;

import org.springframework.boot.SpringApplication;
import org.springframework.boot.autoconfigure.EnableAutoConfiguration;
import org.springframework.stereotype.Controller;
import org.springframework.web.bind.annotation.RequestMapping;
import org.springframework.web.bind.annotation.ResponseBody;


@EnableAutoConfiguration //开启自动配置
@Controller
public class IndexController {

    @RequestMapping("/")
    @ResponseBody
    public String first(){
        return "hello world!";
    }

    //入口
    public static void main(String[] args) {
        SpringApplication.run(IndexController.class, args);
    }

}
2.SpringBoot启动自动配置注解:
@EnableAutoConfiguration:启用自动配置,该注解会使用SpringBoot根据项目依赖的jar包自动配置项目的配置项。例如:我们添加了spring-boot-starter-web的依赖,
项目中也就会引入SpringMVC的依赖,SpringBoot就会自动配置Tomcat和SpringMVC。

@EnableAutoConfiguration(exclude={RedisAutoConfiguration.class}):关闭自动配置
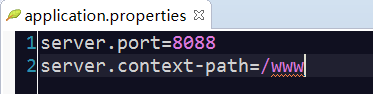
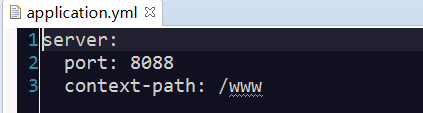
3.SpringBoot全局配置文件:
SpringBoot项目使用一个全局的配置文件application.properties或者是application.yml,在resources目录下或者类路径下的/config下,一般我们放到resources下。
区别:主要是书写格式不同;.yml格式不支持@PropertySource注解导入配置
4.SpringBootstarter pom:
SpringBoot为我们提供了
企业级开发绝大多数场景的starter pom,只要使用了应用场景所需的starter pom,相关技术配置将会相除,就可以得到SpringBoot为我们提供的自动配置的been。
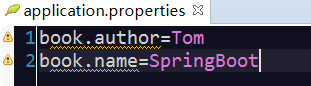
5.SpringBoot获取自定义配置的值:
全局配置:
程序代码:
package com.qianfeng.controller;

import org.springframework.beans.factory.annotation.Value;
import org.springframework.boot.SpringApplication;
import org.springframework.boot.autoconfigure.EnableAutoConfiguration;
import org.springframework.boot.autoconfigure.SpringBootApplication;
import org.springframework.stereotype.Controller;
import org.springframework.web.bind.annotation.RequestMapping;
import org.springframework.web.bind.annotation.ResponseBody;

@EnableAutoConfiguration
@Controller
public class BookController {

    @Value("${book.author}")
    private String author;

    @Value("${book.name}")
    private String name;


    @RequestMapping("/book")
    @ResponseBody
    public String showInfo(){
        return author+":"+name;
    }

    public static void main(String[] args) {
        SpringApplication.run(BookController.class, args);
    }

}
6.SpringBoot获取自定义配置的值(类型安全的配置):
使用@Value注入每个自定义配置在项目中闲的很麻烦,当自定义属性很多时需要注入很多次
SpringBoot还提供了基于类型安全的配置方式,通过 @ConfigurationProperties 将properties 中的属性和一个Bean的属性关联,从而实现类型安全的配置。
package com.qianfeng.controller;

import org.springframework.beans.factory.annotation.Value;
import org.springframework.boot.SpringApplication;
import org.springframework.boot.autoconfigure.EnableAutoConfiguration;
import org.springframework.boot.autoconfigure.SpringBootApplication;
import org.springframework.boot.context.properties.ConfigurationProperties;
import org.springframework.stereotype.Controller;
import org.springframework.web.bind.annotation.RequestMapping;
import org.springframework.web.bind.annotation.ResponseBody;

@EnableAutoConfiguration
@Controller
@ConfigurationProperties(prefix="book")//取properties文件中book开头的属性值
public class BookController {

    //@Value("${book.author}")
    private String author;

    //@Value("${book.name}")
    private String name;


    @RequestMapping("/book")
    @ResponseBody
    public String showInfo(){
        return author+":"+name;
    }

    public String getAuthor() {
        return author;
    }

    public void setAuthor(String author) {
        this.author = author;
    }

    public String getName() {
        return name;
    }

    public void setName(String name) {
        this.name = name;
    }

    public static void main(String[] args) {
        SpringApplication.run(BookController.class, args);
    }

}
7.SpringBootProfile配置:
Profile 是针对不同的环境对不同的配置提供支持的,全局Profile配置使用application-*.properties(application-prod.properties, application-sit.properties, applicaiton-dev.properties)
通过在appliation.properties 中设置spring.profiles.active=prod 来指定活动的Profile。
spring.profiles.active=dev
8.SpringBoot整合测试:
所需依赖:
        <dependency>
          <groupId>org.springframework.boot</groupId>
          <artifactId>spring-boot-starter-test</artifactId>
          <scope>test</scope>
       </dependency>
       <dependency>
          <groupId>junit</groupId>
          <artifactId>junit</artifactId>
          <scope>test</scope>
       </dependency>
被测试类程序代码:
package com.qianfeng.controller;

import org.springframework.boot.SpringApplication;
import org.springframework.boot.autoconfigure.EnableAutoConfiguration;
import org.springframework.stereotype.Controller;
import org.springframework.web.bind.annotation.RequestMapping;
import org.springframework.web.bind.annotation.ResponseBody;

@Controller
@EnableAutoConfiguration
public class SpringController {

	@RequestMapping("/hello")
	@ResponseBody
	public String yes(){
		return "hello";
	}

	public static void main(String[] args) {
		SpringApplication.run(SpringController.class, args);
	}

}
测试类程序代码:
package com.qianfeng.test;

import org.junit.Test;
import org.junit.runner.RunWith;
import org.springframework.beans.factory.annotation.Autowired;
import org.springframework.boot.test.context.SpringBootTest;
import org.springframework.test.context.junit4.SpringJUnit4ClassRunner;
import org.springframework.test.context.web.WebAppConfiguration;

import com.qianfeng.controller.SpringController;

import junit.framework.TestCase;

@SpringBootTest(classes=SpringController.class) //测试哪个类 测试谁?
@RunWith(SpringJUnit4ClassRunner.class) //实现测试的类  谁来测试?
@WebAppConfiguration
public class TestSpringController {

    @Autowired
    private SpringController springController;


    @Test
    public void test1(){
        TestCase.assertEquals(this.springController.yes(), "hello");
    }


}
9.SpringBootApplication 注解 和 RestController注解:
@SpringBootApplication:包含了@ComponentScan @Configuration @EnableAutoConfiguration注解
@ComponentScan:让spring Boot扫描到Configuration类并把它加入到程序上下文。

@Configuration :等同于spring的XML配置文件;使用Java代码可以检查类型安全。

@EnableAutoConfiguration :自动配置。

@ComponentScan :组件扫描,注解在类上,扫描标注了@Controller等注解的类,注册为bean 。@ComponentScan 为 @Configuration注解的类配置组件扫描指令。@ComponentScan 注解会自动扫描指定包下
                的全部标有 @Component注解的类,并注册成bean,当然包括 @Component下的子注解@Service、@Repository、@Controller。
@Component可配合CommandLineRunner使用,在程序启动后执行一些基础任务。

@RestController:注解是@Controller和@ResponseBody的合集,表示这是个控制器bean,并且是将函数的返回值直 接填入HTTP响应体中,是REST风格的控制器。
10.SpringBoot 的日志管理:
Spring Boot 支持 Java Util Logging, Log4j2, Lockback 作为日志框架,如果你使用 Starters 启动器,Spring Boot 将使用 Logback 作为默认日志框架,Spring Boot支持Java Util Logging,Log4j2,Lockback作为日志框架,如果你使用starters启动器,Spring Boot将使用Logback作为默认日志框架。无论使用哪种日志框架,Spring Boot都支持配置将日志输出到控制台或者文件中。
spring-boot-starter启动器包含spring-boot-starter-logging启动器并集成了slf4j日志抽象及Logback日志框架。
SpringBoot的日志级别有7个从低到高:
TRACE<DEBUG<INFO<WARN<ERROR<FATAL<OFF
SpringBoot 中默认配置 ERROR、WARN和 INFO级别的日志输出到控制台。
11.配置工程为开发模式:
       <!-- 配置工厂为开发模式:加入以下依赖,代码做了修改,不用重新运行 -->
       <dependency>
          <groupId>org.springframework</groupId>
          <artifactId>springloaded</artifactId>
       </dependency>
       <dependency>
          <groupId>org.springframework.boot</groupId>
          <artifactId>spring-boot-devtools</artifactId>
       </dependency>
12.SpringBoot的Web开发:
SpringBoot 提供了spring-boot-starter-web 为Web开发予以支持,spring-boot-starter-web提供了嵌入的Tomcat以及SpringMVC的依赖,Web相关的自动配置存储在spring-boot-sutoconfigure.jar的org.srpingframework.boot.autoconfigure.web下。
13.访问静态资源:
在SpringBoot 中加载静态资源和普通的web应用中不太一样。默认情况下,SpringBoot从classPath的 /static,/public 或 /META-INF/resources 文件夹或从ServletContext 跟目录供静态资源。
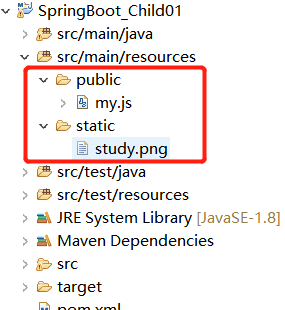
设定静态文件路径,js,css,image等
spring.resources.static-locations=classpath:/static/
14.自定义消息转换器:
只需要在类中添加消息转换器的@Bean,就会被SpringBoot自动加入到容器中。
         //消息转换器 解决乱码问题。
        //SpringBoot默认配置了消息转换器
        @Bean
        public StringHttpMessageConverter stringHttpMessageConvert(){
            StringHttpMessageConverter convert=new StringHttpMessageConverter(Charset.forName("UTF-8"));
            return convert;
        }
15.使用FastJson解析Json数据:
所需依赖:
      <!--FastJson依赖--!>
       <dependency>
          <groupId>com.alibaba</groupId>
          <artifactId>fastjson</artifactId>
          <version>1.2.15</version>
       </dependency>
第一种方式(启动类继承并重写方法):
@SpringBootApplication(scanBasePackages={"com.qianfeng.controller"})//组合注解
public class SpringApplications extends WebMvcConfigurerAdapter{
    @Override
    public void configureMessageConverters(List<HttpMessageConverter<?>> converters) {
        //创建FastJson的消息转换器
        FastJsonHttpMessageConverter convert=new FastJsonHttpMessageConverter();
        //配置FastJson的配置对象
        FastJsonConfig config=new FastJsonConfig();
        //对Json数据进行格式化
        config.setSerializerFeatures(SerializerFeature.PrettyFormat);
        convert.setFastJsonConfig(config);
        converters.add(convert);

    }

    public static void main(String[] args) {
        SpringApplication.run(SpringApplications.class, args);

    }

}
实体类:
package com.qianfeng.pojo;

import java.util.Date;

import com.alibaba.fastjson.annotation.JSONField;

public class Person {

    private int id;
    private String name;

    @JSONField(format="yyyy-MM-dd HH:mm:ss")//验证使用的是FastJson解析
    private Date date;

    public int getId() {
        return id;
    }
    public void setId(int id) {
        this.id = id;
    }
    public String getName() {
        return name;
    }
    public void setName(String name) {
        this.name = name;
    }
    public Date getDate() {
        return date;
    }
    public void setDate(Date date) {
        this.date = date;
    }


}
package com.qianfeng.controller;

import java.util.Date;

import org.springframework.stereotype.Controller;
import org.springframework.web.bind.annotation.RequestMapping;
import org.springframework.web.bind.annotation.ResponseBody;

import com.qianfeng.pojo.Person;

@Controller
public class PersonController {

    @RequestMapping("/person")
    @ResponseBody
    public Object show(){
        Person ren=new Person();
        ren.setId(66);
        ren.setName("赵四");
        ren.setDate(new Date());
        return ren;
    }

}
乱码解决:把SpringBoot的response 编码设置为utf-8这个功能开启就好:
spring.http.encoding.force=true
第二种方式:
    @Bean
    public HttpMessageConverters fastJsonMessageConvert(){
         //创建FastJson的消息转换器
        FastJsonHttpMessageConverter convert=new FastJsonHttpMessageConverter();
        //配置FastJson的配置对象
        FastJsonConfig config=new FastJsonConfig();
        //对Json数据进行格式化
        config.setSerializerFeatures(SerializerFeature.PrettyFormat);
        convert.setFastJsonConfig(config);
        HttpMessageConverter<T> con=(HttpMessageConverter<T>) convert;
        return new HttpMessageConverters(con);
    }
16.自定义拦截器:
有些时候我们需要自己配置SpringMVC而不是采用默认,比如说增加一个拦截器,这个时候就得通过继承WebMvcConfigurerAdapter 然后重写父类中的方法进行扩展。
package com.qianfeng.interceptor;

import javax.servlet.http.HttpServletRequest;
import javax.servlet.http.HttpServletResponse;

import org.springframework.context.annotation.Configuration;
import org.springframework.web.servlet.HandlerInterceptor;
import org.springframework.web.servlet.ModelAndView;
import org.springframework.web.servlet.config.annotation.InterceptorRegistry;
import org.springframework.web.servlet.config.annotation.WebMvcConfigurerAdapter;
/*
 * 注解在类上,表示这是一个IOC容器,相当于spring的配置文件,java配置的方式。 IOC容器的配置类一般与 @Bean 注解配合使用,用 @Configuration
 * 注解类等价与 XML 中配置 beans,用@Bean 注解方法等价于 XML 中配置 bean。
 */
@Configuration
public class MyInterceptor extends WebMvcConfigurerAdapter {

    @Override
    public void addInterceptors(InterceptorRegistry registry) {HandlerInterceptor inter=new HandlerInterceptor(){

            @Override
            public void afterCompletion(HttpServletRequest arg0, HttpServletResponse arg1, Object arg2, Exception arg3)
                    throws Exception {
                // TODO Auto-generated method stub

            }

            @Override
            public void postHandle(HttpServletRequest arg0, HttpServletResponse arg1, Object arg2, ModelAndView arg3)
                    throws Exception {
                // TODO Auto-generated method stub

            }

            @Override
            public boolean preHandle(HttpServletRequest arg0, HttpServletResponse arg1, Object arg2) throws Exception {
                System.out.println("自定义拦截器.....");
                return true;
            }

        };
        //拦截路径
        registry.addInterceptor(inter).addPathPatterns("/**");
    }

}
17.定义全局异常处理器(AOP思想):
package com.qianfeng.controller;

import java.util.HashMap;
import java.util.Map;

import org.springframework.web.bind.annotation.ControllerAdvice;
import org.springframework.web.bind.annotation.ExceptionHandler;
import org.springframework.web.bind.annotation.ResponseBody;

//全局异常处理器
@ControllerAdvice
public class GlobalExceptionHandler {

    @ExceptionHandler(Exception.class)
    @ResponseBody
    public Map<String,Object> handleException(Exception exception){
        Map<String,Object> map=new HashMap<>();//封装异常信息
        map.put("errorCode",500);
        map.put("erroMsg", exception.toString());
        return map;
    }

}
18.异步调用:
在项目中,当访问其他接口较慢或者做耗时任务时,不想程序一直卡在耗时任务上,想程序能够并发执行,我们可以使用多线程来并行的处理任务,SpringBoot提供了异步处理方式 @Async
package com.qianfeng.service;

import java.util.concurrent.Future;

public interface AsyncService {

    Future<String> doTask1() throws Exception;
    Future<String> doTask2() throws Exception;
    Future<String> doTask3() throws Exception;

}
package com.qianfeng.service;

import java.util.Random;
import java.util.concurrent.Future;

import org.springframework.scheduling.annotation.Async;
import org.springframework.scheduling.annotation.AsyncResult;
import org.springframework.stereotype.Controller;
import org.springframework.stereotype.Service;

@Service
public class AsyncServiceImpl implements AsyncService {

    private static Random random=new Random();

    @Async
    @Override
    public Future<String> doTask1() throws Exception {
        System.out.println("任务一开始执行");
        long start=System.currentTimeMillis();
        Thread.sleep(random.nextInt(10000));
        long end=System.currentTimeMillis();
        System.out.println("任务一结束:"+(end-start)+"ms");

        return new AsyncResult<>("任务一结束");
    }

    @Async
    @Override
    public Future<String> doTask2() throws Exception {
        System.out.println("任务二开始执行");
        long start=System.currentTimeMillis();
        Thread.sleep(random.nextInt(10000));
        long end=System.currentTimeMillis();
        System.out.println("任务二结束:"+(end-start)+"ms");

        return new AsyncResult<>("任务二结束");
    }

    @Async
    @Override
    public Future<String> doTask3() throws Exception {
        System.out.println("任务三开始执行");
        long start=System.currentTimeMillis();
        Thread.sleep(random.nextInt(10000));
        long end=System.currentTimeMillis();
        System.out.println("任务三结束:"+(end-start)+"ms");

        return new AsyncResult<>("任务三结束");
    }

}
package com.qianfeng.controller;

import java.util.concurrent.Future;

import org.springframework.beans.factory.annotation.Autowired;
import org.springframework.boot.SpringApplication;
import org.springframework.boot.autoconfigure.EnableAutoConfiguration;
import org.springframework.stereotype.Controller;
import org.springframework.web.bind.annotation.RequestMapping;
import org.springframework.web.bind.annotation.ResponseBody;

import com.qianfeng.service.AsyncService;

@Controller
public class SpringController {

    @Autowired
    private AsyncService asyncService;


    @RequestMapping("/async")
    @ResponseBody
    public String asyncTest() throws Exception{
        long start=System.currentTimeMillis();
        Future<String> task1=asyncService.doTask1();
        Future<String> task2=asyncService.doTask2();
        Future<String> task3=asyncService.doTask3();

        while(true){
            if(task1.isDone()&&task2.isDone()&&task3.isDone()){
                break;
            }
            Thread.sleep(1000);
        }
        long end=System.currentTimeMillis();

        return "全部执行完成,总耗时:"+(end-start)+"ms";

    }
}
package com.qianfeng.app;

import org.springframework.boot.SpringApplication;
import org.springframework.boot.autoconfigure.EnableAutoConfiguration;
import org.springframework.boot.autoconfigure.SpringBootApplication;
import org.springframework.context.annotation.ComponentScan;
import org.springframework.scheduling.annotation.EnableAsync;


//@EnableAutoConfiguration
/*
 * 注解在类上,扫描标注了@Controller等注解的类,注册为bean 。@ComponentScan 为 @Configuration注解的类配置组件
 * 扫描指令。@ComponentScan 注解会自动扫描指定包下的全部标有 @Component注解的类,并注册成bean,当然包括 @Component
 * 下的子注解@Service、@Repository、@Controller。
 */
//@ComponentScan("com.qianfeng.controller")

@SpringBootApplication(scanBasePackages={"com.qianfeng.controller","com.qianfeng.service"})//默认情况下扫描的是对当前包及其包的子包
@EnableAsync //开启异步调用
public class SpringApplications {


    public static void main(String[] args) {
        SpringApplication.run(SpringApplications.class, args);
    }


}
控制台输出: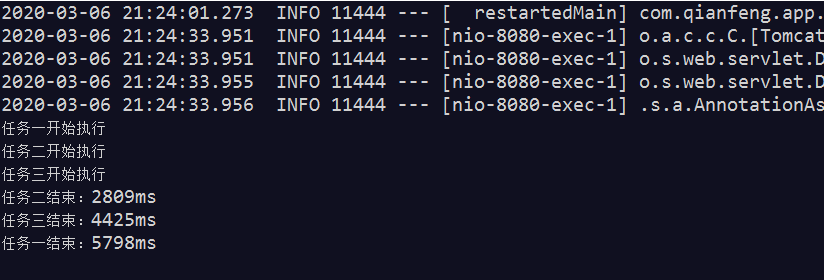
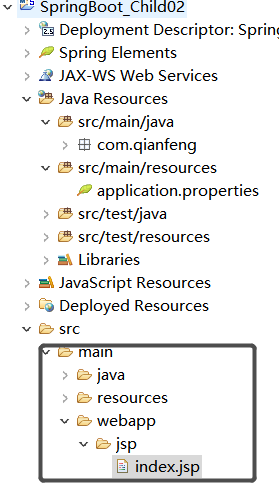
19.SpringBoot整合JSP:
SpringBoot 官方不推荐使用jsp ,因为jsp相对于一些模板引擎,性能都比较低,官方推荐使用 thymeleaf。
所需依赖:
<dependencies>
     <dependency>
           <groupId>org.springframework.boot</groupId>
           <artifactId>spring-boot-starter-web</artifactId>
      </dependency>

       <!-- 整合jsp需要的依赖 -->
       <dependency>
           <groupId>org.springframework.boot</groupId>
           <artifactId>spring-boot-starter-tomcat</artifactId>
      </dependency>
       <dependency>
           <groupId>org.apache.tomcat.embed</groupId>
           <artifactId>tomcat-embed-jasper</artifactId>
      </dependency>
  </dependencies>

   <!-- maven项目packaging为war类型时,必须要加这个插件 -->
   <build>
     <plugins>
        <plugin>
           <groupId>org.apache.maven.plugins</groupId>
           <artifactId>maven-war-plugin</artifactId>
           <version>2.3</version>
           <configuration>
              <failOnMissingWebXml>false</failOnMissingWebXml>
           </configuration>
        </plugin>
     </plugins>
  </build>
全局配置:
spring.mvc.view.prefix=/jsp/
spring.mvc.view.suffix=.jsp
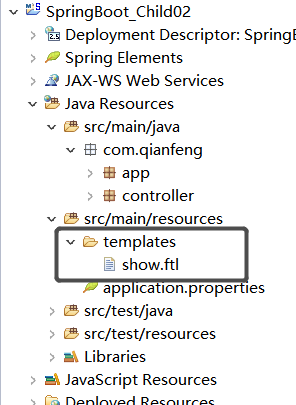
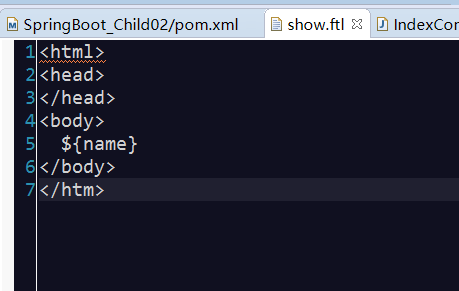
20.SpringBoot 整合Freemarker
SpringBoot不建议使用JSP,使用模板引擎,比如:themleaf,velocity,freemarker。
所需依赖:
      <!-- 整合freemarker需要的依赖 -->
      <dependency>
           <groupId>org.springframework.boot</groupId>
           <artifactId>spring-boot-starter-freemarker</artifactId>
      </dependency>
21.SpringBoot 整合Thymeleaf:
所需依赖:
 <!-- 整合Thymeleaf -->
      <dependency>
           <groupId>org.springframework.boot</groupId>
           <artifactId>spring-boot-starter-thymeleaf</artifactId>
      </dependency>
      <dependency>
          <groupId>net.sourceforge.nekohtml</groupId>
          <artifactId>nekohtml</artifactId>
          <version>1.9.22</version>
      </dependency>
全局配置:
spring.thymeleaf.prefix=classpath:/templates/
spring.thymeleaf.suffix=.html
spring.thymeleaf.mode=LEGACYHTML5
spring.thymeleaf.encoding=UTF-8
spring.thymeleaf.content-type=text/html
spring.thymeleaf.cache=false
22.SpringBoot 整合QuartZ:
package com.qianfeng.job;

import java.text.SimpleDateFormat;
import java.util.Date;

import org.springframework.scheduling.annotation.Scheduled;
import org.springframework.stereotype.Component;

@Component
public class MyJob {

    /*
     * 用来开启定时任务 :每隔1秒输出
     */
    @Scheduled(fixedRate=1000)
    public void run(){
        System.out.println(new SimpleDateFormat("yyyy-MM-dd").format(new Date()));
    }

}
package com.qianfeng.app;

import org.springframework.boot.SpringApplication;
import org.springframework.boot.autoconfigure.SpringBootApplication;
import org.springframework.scheduling.annotation.EnableScheduling;

@SpringBootApplication(scanBasePackages={"com.qianfeng.service","com.qianfeng.controller","com.qianfeng.dao","com.qianfeng.email"})
@EnableScheduling //任务调度
public class SpringApp {

    public static void main(String[] args) {
       SpringApplication.run(SpringApp.class, args);

    }

}
23.SpringBoot 整合jdbcTemplate:
所需依赖:
       <!-- 整合jdbcTemplate依赖 -->
       <dependency>
           <groupId>org.springframework.boot</groupId>
           <artifactId>spring-boot-starter-jdbc</artifactId>
      </dependency>
      <!-- 对mysql依赖 -->
        <dependency>
           <groupId>mysql</groupId>
           <artifactId>mysql-connector-java</artifactId>
      </dependency>
全局配置:
spring.datasource.driver-class-name=com.mysql.jdbc.Driver
spring.datasource.username=root
spring.datasource.password=123456
spring.datasource.url=jdbc:mysql://localhost:3306/demo
程序代码:
package com.qianfeng.dao;

import org.springframework.beans.factory.annotation.Autowired;
import org.springframework.jdbc.core.JdbcTemplate;
import org.springframework.stereotype.Repository;

import com.qianfeng.pojo.Users;

@Repository
public class UserDao {

    @Autowired
    private JdbcTemplate jdbcTemplate;

    public void addUser(Users user){
        jdbcTemplate.update("insert into user(uid,uname,usex) values(?,?,?)", new Object[]{user.getUid(),user.getUname(),user.getUsex()});
    }

}
24.SpringBoot整合Mybatis(xml方式):
所需依赖:
      <!-- 对mysql依赖 -->
        <dependency>
           <groupId>mysql</groupId>
           <artifactId>mysql-connector-java</artifactId>
      </dependency>

       <!-- springBoot 整合mybatis-->
       <dependency>
           <groupId>org.mybatis.spring.boot</groupId>
           <artifactId>mybatis-spring-boot-starter</artifactId>
           <version>1.3.1</version>
      </dependency>
      <!-- alibaba的druid数据库连接池 -->
      <dependency>
           <groupId>com.alibaba</groupId>
           <artifactId>druid-spring-boot-starter</artifactId>
           <version>1.1.0</version>
      </dependency>
      <dependency>
           <groupId>com.alibaba</groupId>
           <artifactId>druid</artifactId>
           <version>1.0.11</version>
      </dependency>
      <!-- 分页插件 -->
      <dependency>
          <groupId>com.github.pagehelper</groupId>
          <artifactId>pagehelper-spring-boot-starter</artifactId>
          <version>1.1.2</version>
      </dependency>
25.SpringBoot区分多数据源分析:
在项目中我们通常会进行数据库拆分或是引入其他数据库,从而我们需要配置多个数据源:
如何区分多个数据源:
1.通过包来区分;
2.使用注解来区分;
26.区分多数据源实现:
27.SpringBoot的事务管理:
在SpringBoot中推荐使用@Transactional 注解来声明事务
当我们使用 spring-boot-starter-jdbc 或 spring-boot-starter-data-jpa依赖的时候,SpringBoot 会自动默认分别注入 DataSourceTransactionManager或 JpaTransactionManager。
package com.qianfeng.service;

import org.springframework.beans.factory.annotation.Autowired;
import org.springframework.stereotype.Service;
import org.springframework.transaction.annotation.Transactional;

import com.qianfeng.dao.UserDao;
import com.qianfeng.pojo.Users;

@Service
public class UserService {

    @Autowired
    private UserDao userDao;


    @Transactional
    public void saveUser(Users user){
        userDao.addUser(user);
        int i=6/0;
    }

}
28.打包发布到独立的tomcat:
1:需要打包成war包
2.所需依赖:
    <dependency>
          <groupId>org.springframework.boot</groupId>
          <artifactId>spring-boot-starter-tomcat</artifactId>
          <scope>provided</scope>
      </dependency>
3.启动类继承SpringBootServletInitializer,重写configure方法
package com.qianfeng.app;

import org.springframework.boot.SpringApplication;
import org.springframework.boot.autoconfigure.SpringBootApplication;
import org.springframework.boot.builder.SpringApplicationBuilder;
import org.springframework.boot.web.support.SpringBootServletInitializer;
import org.springframework.scheduling.annotation.EnableScheduling;

@SpringBootApplication(scanBasePackages={"com.qianfeng.service","com.qianfeng.controller","com.qianfeng.dao","com.qianfeng.email"})
//@EnableScheduling //任务调度
public class SpringApp extends SpringBootServletInitializer{


    @Override
    protected SpringApplicationBuilder configure(SpringApplicationBuilder builder) {
        // TODO Auto-generated method stub
        return  builder.sources(SpringApp.class);
    }

    public static void main(String[] args) {
       SpringApplication.run(SpringApp.class, args);

    }

}
29.MongoDB:
MongoDB 是一个基于分布式文件存储的数据库。旨在为WEB应用提供可扩展的高性能数据存储解决方案。MongoDB是一个介于关系数据库和非关系数据库之间的产品。是非关系数据库当中功能最丰富,最像关系数据库的。它支持的数据结构非常松散,是类似json的bson格式,因此可以存储比较复杂的数据类型。Mongo最大的特点是它支持的查询语言非常强大,其语法有点类似于面向对象的查询语言,几乎可以实现类似关系数据库单表查询的绝大部分功能,而且支持对数据建立索引。
所需依赖:
<dependency>
   <groupId>org.springframework.boot</groupId>
   <artifactId>spring-boot-starter-data-mongodb</artifactId>
</dependency>
配置.yml:
  spring:
     data:
     mongodb:
     host:
     port:27017
    databases:mydb
30.SpringBoot整合 ActiveMQ:
所需依赖:
     <dependency>
         <groupId>org.springframework.boot</groupId>
         <artifactId>spring-boot-starter-activemg</artifactId>
      </dependency>
配置:
spring.activemq.broker-url=tcp://192.168.25.129:61616
spring.activemq.in-memory=true
spring.activemq.user=admin
spring.activemq.password=admin
#如果此处设置为true,需要加如下面的依赖包,否则会自动配置失败,JmsMessagingTemplate
spring.activemq.pool.enabled=false

 浙公网安备 33010602011771号