Maven 私人服务器(Nexus)
回顾下 Maven 的构建流程,如果没有私服,我们所需的所有 jar 包都需要通过 Maven 的中央仓库或者第三方的 Maven 仓库下载到本地,当一个公司或者一个团队所有人都重复的从 Maven 仓库下载 jar 包,这样就加大了中央仓库的负载和浪费了外网的带宽,如果网速慢的话还会影响项目的进程。
私服是在局域网的一种特殊的远程仓库,目的是代理远程仓库及部署第三方构件。有了私服之后,当 Maven 需要下载 jar 包时,先请求私服,私服上如果存在则下载到本地仓库。否则,私服直接请求外部的远程仓库,将 jar 包下载到私服,再提供给本地仓库下载。
1. nexus 安装
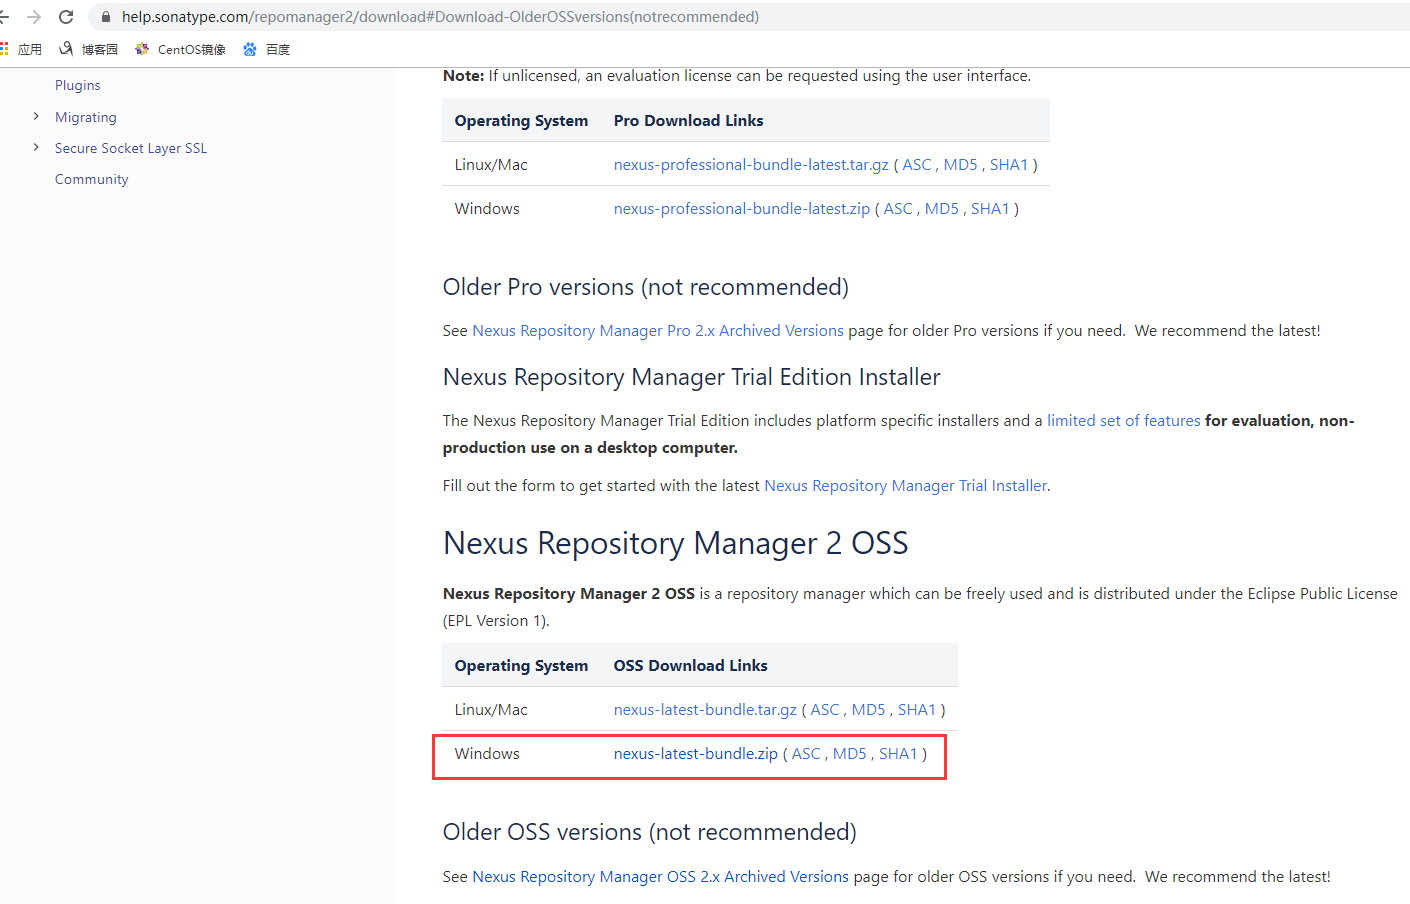
我们可以使用专门的 Maven 仓库管理软件来搭建私服,这里我们使用 Nexus。下载地址:https://help.sonatype.com/repomanager2/download。
Nexus 专业版是需要付费的,这里我们下载开源版 Nexus OSS,最新的是 OSS3.x,我们选择稳定的版本 2.x。
下载完成后,我们将压缩包解压到F盘,形成以下目录

接下来我们启动 nexus:
1)以管理员身份打开 cmd,进入到 bin 目录,先执行 nexus install 命令

再执行 nexus start 命令

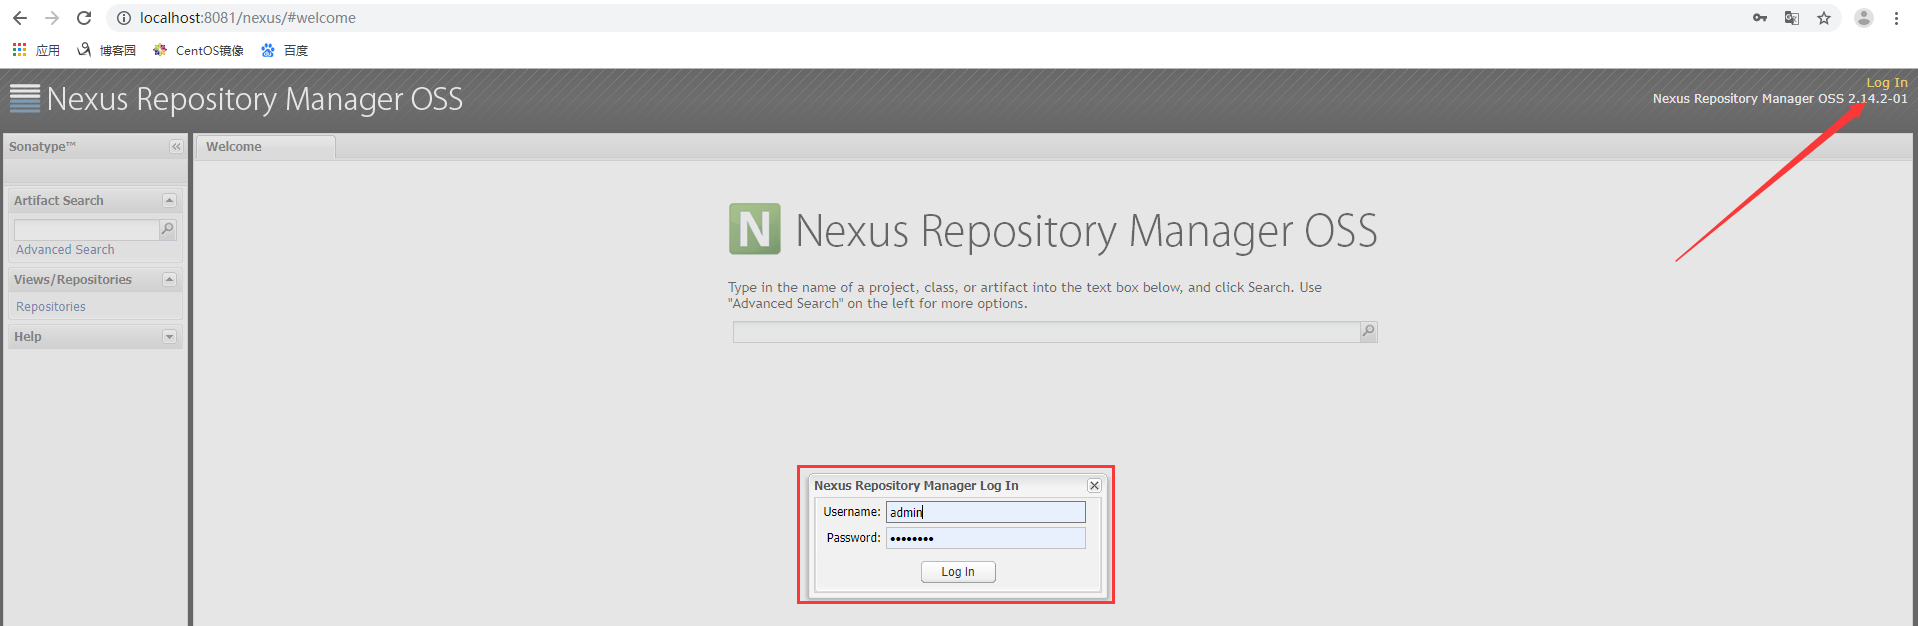
2)打开浏览器,访问 http://localhost:8081/nexus
3)点击右上角Log in,使用用户名:admin,密码:admin123登录
2. nexus 服务器仓库类型
1)hosted:是本地仓库,用户可以把自己的一些jar包,发布到hosted中,比如公司的第二方库
2)proxy:代理仓库,它们被用来代理远程的公共仓库,如maven中央仓库。不允许用户自己上传jar包,只能从中央仓库下载
3)group:仓库组,用来合并多个hosted/proxy仓库,当你的项目希望在多个repository使用资源时就不需要多次引用了,只需要引用一个group即可
4)virtual:虚拟仓库基本废弃了。
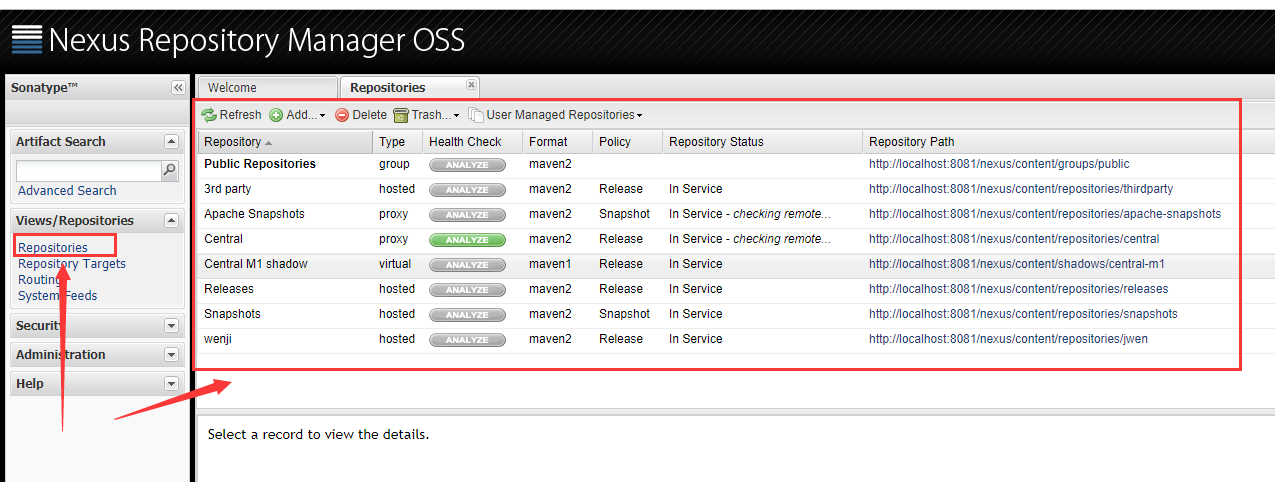
3. nexus 预置仓库
1)Central:该仓库代理 Maven 中央仓库,其策略为 Release,因此只会下载和缓存中央仓库中的发布版本构件。
2)Releases:这是一个策略为 Release 的宿主类型仓库,用来部署正式发布版本构件
3)Snapshots:这是一个策略为 Snapshot 的宿主类型仓库,用来部署开发版本构件。
4)3rd party:这是一个策略为 Release 的宿主类型仓库,用来部署无法从 Maven 中央仓库获得的第三方发布版本构件,比如 IBM 或者 oracle 的一些jar包(比如 classe12.jar),由于受到商业版权的限制,不允许在中央仓库出现,如果想让这些包在私服上进行管理,就需要第三方的仓库。
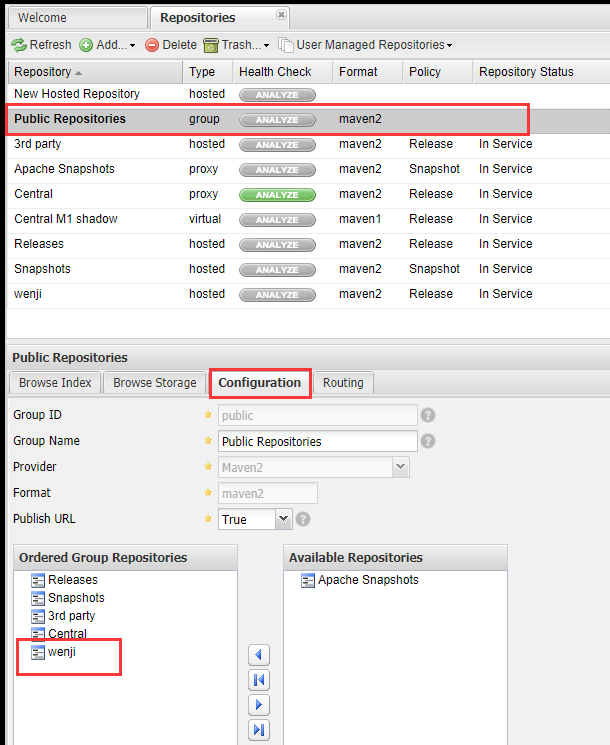
5)Public Repositories:一个组合仓库
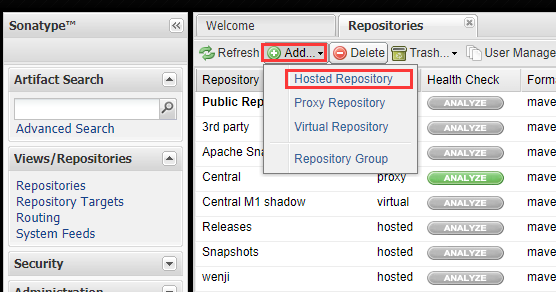
4. 在 nexus 建立仓库
1)建库,Add -->Hosted Repository
2)填写仓库信息

(1)Respository ID:仓库编号
(2)Repository NAME:仓库名称
(3)Repository Type:仓库类型
(4)Repository Policy:仓库策略
(5)Default Local Storage Location:仓库路径(不填的话默认 nexus 安装的路径)
(6)Deployment Policy:发布策略
3)然后选择 Public Repositories,打开 configuration 选项卡,将自己创建的仓库添加到 group
5. 配置远程仓库的几种方法
1)在 pom 文件里配置多个远程仓库
<repositories>
    <repository>
       <id>nexus</id>
       <name>nexus私服URL</name>
       <url>http://localhost:8081/nexus/content/groups/public/</url>
    </repository>
    <repository>
        <id>aliyun</id>
        <name>阿里云</name>
        <url>http://maven.aliyun.com/nexus/content/groups/public/</url>
    </repository>
</repositories>
缺点:每个项目都需要配置,固可以在 settings.xml 配置全局
2)在 settings.xml 里配置全局
<profiles>
    <profile>
        <id>my</id>
        <repositories>
            <repository>
                <id>aliyun</id>
                <name>Nexus aliyun</name>
                <url>http://maven.aliyun.com/nexus/content/groups/public</url>
                <snapshots>
                    <enabled>true</enabled>
                </snapshots>
                <releases>
                    <enabled>true</enabled>
                </releases>
            </repository>
            <repository>
                <id>nexus</id>
                <name>nexus私服URL</name>
                <url>http://localhost:8081/nexus/content/groups/public/</url>
                <snapshots>
                    <enabled>true</enabled>
                </snapshots>
                <releases>
                    <enabled>true</enabled>
                </releases>
            </repository>
        </repositories>
    </profile>
</profiles>

<activeProfiles>
    <activeProfile>my</activeProfile>
</activeProfiles>
6.配置镜像
在 settings.xml 里配置阿里云镜像加速默认的远程仓库
<mirrors>
    <mirror>
        <id>aliyun</id>
        <mirrorOf>central</mirrorOf>
        <name>Nexus aliyun</name>
        <url>http://maven.aliyun.com/nexus/content/groups/public</url>
  </mirror>
</mirrors>
全局默认的远程仓库:
<repository>
    <id>central</id>
    <url>https://repo1.maven.org/maven2/</url>
</repository>
由于配置 <mirrorOf>central</mirrorOf>,所有从 center(默认远程仓库)去拉取依赖都将重定向从 aliyun 镜像中去拉取依赖
注:mirrorOf 匹配的都是 repository 的 id
<mirrorOf>*</mirrorOf> :匹配所有仓库请求,即将所有的仓库请求都转到该镜像上
<mirrorOf>repo1,repo2</mirrorOf> :将仓库 repo1 和 repo2 的请求转到该镜像上,使用逗号分隔多个远程仓库
<mirrorOf>*,!repo1</mirrorOf> : 匹配所有仓库请求,repo1 除外(将继续从 repo1 请求),使用感叹号将仓库从匹配中排除
7.加速远程仓库的3种方式
1)如果没有 nexus 私服,可以使用 aliyun 镜像来加速默认的官方远程仓库
在 settings.xml 里配置:
<mirrors>
  <mirror>
    <id>aliyun</id>
    <mirrorOf>central</mirrorOf>
    <name>Nexus aliyun</name>
    <url>http://maven.aliyun.com/nexus/content/groups/public</url>
  </mirror>
</mirrors>
2) 如果有 nexus 私服,可以同时使用 aliyun 镜像和私服远程仓库,aliyun 镜像用于加速官方仓库,私服用于加载第三方 jar 包和自己 deploy 的 jar 包
在 setting.xml 里配置:
<mirrors>
  <mirror>
    <id>aliyun</id>
    <mirrorOf>central</mirrorOf>
    <name>Nexus aliyun</name>
    <url>http://maven.aliyun.com/nexus/content/groups/public</url>
  </mirror>
</mirrors>


<profiles>
  <profile>
    <id>my</id>
    <repositories>
      <repository>
        <id>nexus</id>
        <name>nexus私服URL</name>
        <url>http://127.0.0.1:8081/repository/maven-public/</url>
        <snapshots>
          <enabled>true</enabled>
        </snapshots>
        <releases>
          <enabled>true</enabled>
        </releases>
       </repository>
    </repositories>
  </profile>
</profiles>


<activeProfiles>
  <activeProfile>my</activeProfile>
</activeProfiles>
3)如果私服 nexus 里可以联网,直接新建 repository,设置远程代理到 aliyun,然后 settings.xml 里配置
<profiles>
    <profile>
        <id>my</id>
        <repositories>
            <repository>
                <id>nexus</id>
                <name>nexus私服URL</name>
                <url>http://127.0.0.1:8081/repository/maven-public/</url>
                <snapshots>
                    <enabled>true</enabled>
                </snapshots>
                <releases>
                    <enabled>true</enabled>
                </releases>
            </repository>
        </repositories>
    </profile>
</profiles>

<activeProfiles>
  <activeProfile>my</activeProfile>
</activeProfiles>
8. 如果想将自己的项目打成的 jar 包 deploy 到 nexus 服务器上,需要配置 distributionManagement
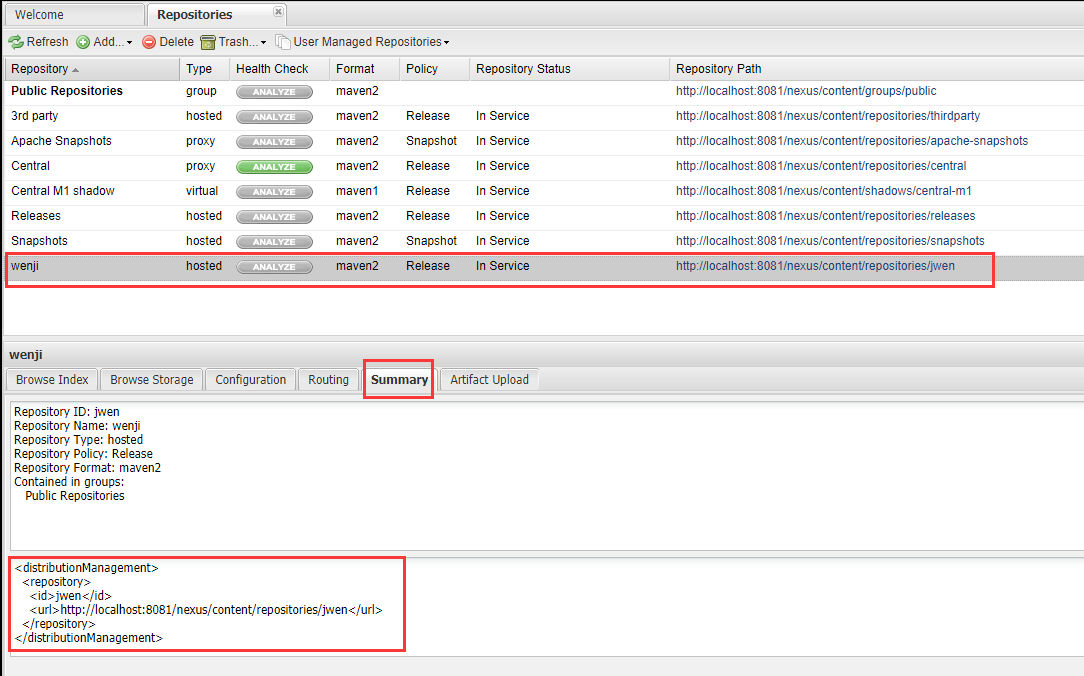
<distributionManagement>
  <repository>
    <id>jwen</id>
    <url>http://localhost:8081/nexus/content/repositories/jwen</url>
  </repository>
</distributionManagement>
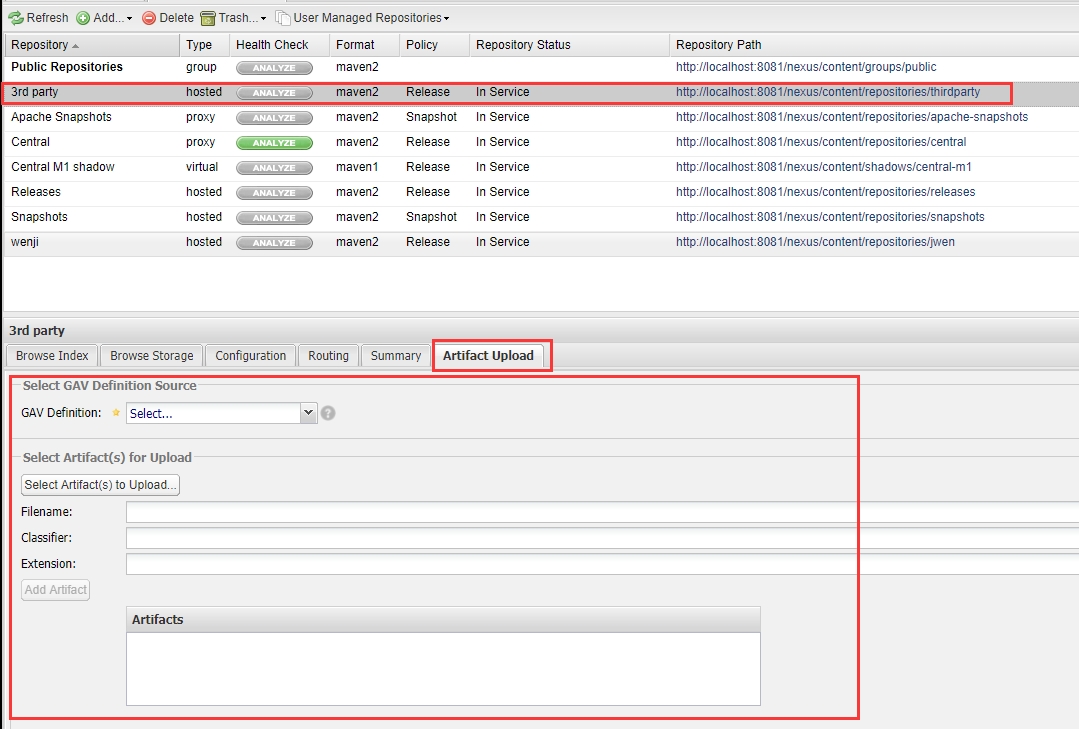
9. 如何使用 3rd party 上传第三方 jar 包
在Repository列表中,选中 3rd party,选中 artifact upload,如下图所示:
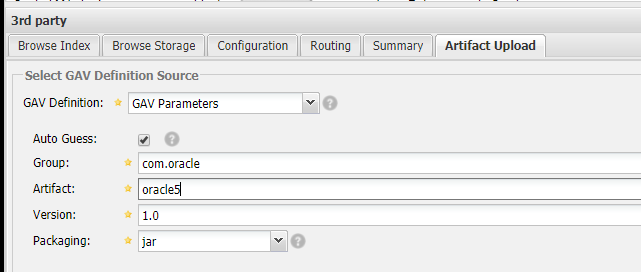
选择 GAV Defini3ion:GAV Parameters,Auto Guess 打钩。
在下方输入 JAR 包对应的 Group、Artifact、Version,Packaging 选择 JAR 格式。
点击 select Artifact(s) to upload 按钮,选择要上传的 JAR 包
点击 Add Artifact 按钮,添加 JAR 包
点击 Upload Artifact(s) 按钮,加载上传 JAR 包


 浙公网安备 33010602011771号