
26.B站薪享宏福笔记——第十章(2)Ingress - nginx
10 k8s Ingress
10.3 Ingress - nginx
10.3.1 Ingress nginx 概念
(1)四层负载与七层负载区别
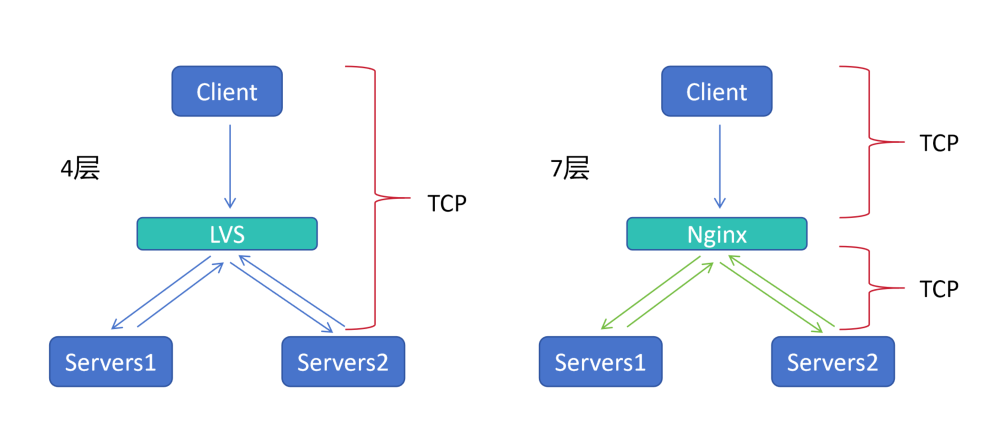
四层负载:
1.四层负载的代表 Lvs,只负责调度,不具备提供服务的能力
2.客户端Client 请求 Lvs,Lvs将请求转发给后端真实服务器 Server,Server 返回请求给 Lvs,Lvs再将Server返回的数据传给客户端Client
七层负载:
1.七层负载的代表 Nginx,虽然同样只负责调度,不具备提供服务的能力,但会建立新的连接
2.客户端Client 请求 Nginx,Nginx 索要 客户端Client 的真实请求,当知道 客户端Client 想要的请求,再建立 新的TCP 连接到 服务器Server
3.服务器Server 将数据返回给 Nginx,Nginx 拿到数据,再将数据返回给 客户端Client
(2)TCP 连接优点
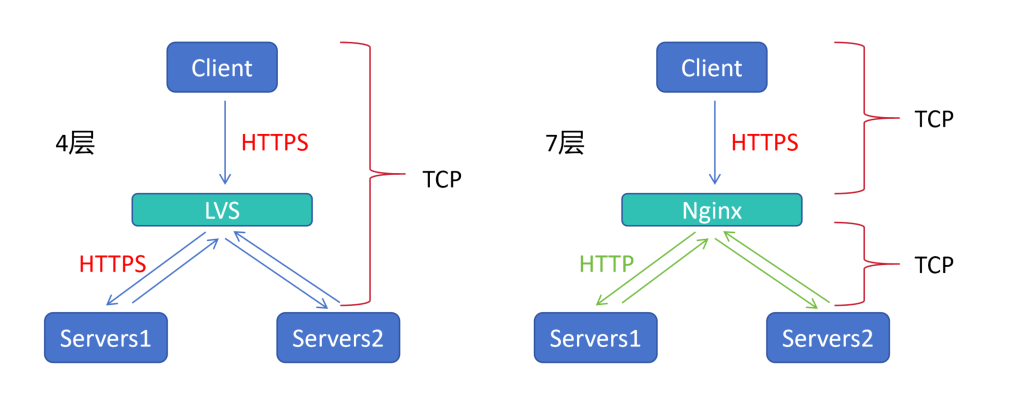
1.Lvs 是四层负载,只起到调度的作用,客户端通过 HTTPS 访问,调度器转发 HTTPS 的访问
2.Nginx 是七层负载,不光调度,还会创建新的 TCP 连接,客户端通过 HTTPS 访问,调度器 Nginx 再创建连接可以选择是 HTTP 也可以选择是 HTTPS(当Nginx 、Server 同在集群内安全网络环境时,HTTPS 需要三次握手,链路时间延长了)
(3)路径转发功能
upstream ro {
    server 192.168.66.11;
    server 192.168.66.12;
    server 192.168.66.13;
}
upstream stu {
    server 192.168.66.14;
    server 192.168.66.15;
}
server {
    location /ro {
    proxy_pass http://ro:80;
    }
    location /stu {
    proxy_pass http://stu:80;
    }
}
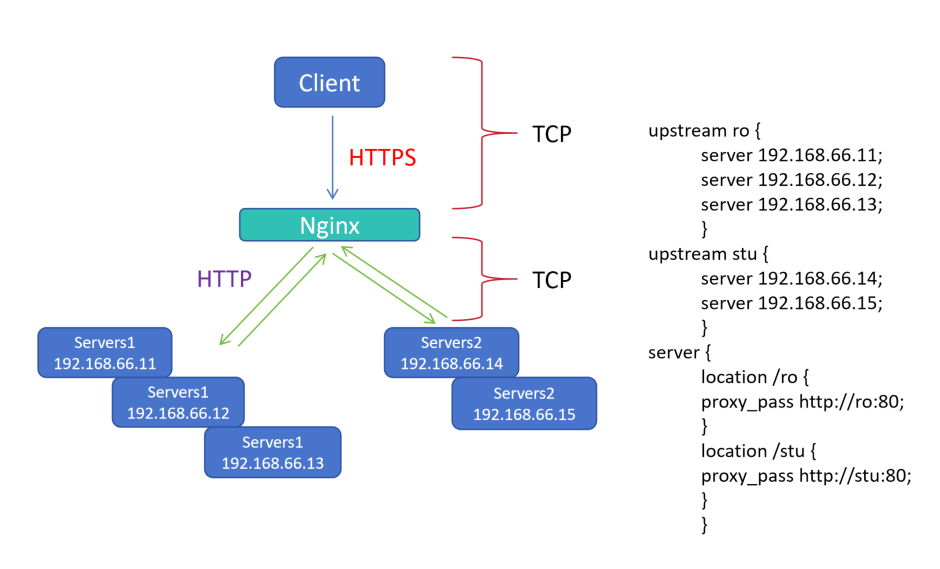
1.四层负载只能负载 IP + 端口,没办法做到路径转发
2.七层负载Nginx 可以进行路径转发,将访问 Nginx 的请求,转发到后端路径
3.当请求 NginxIP:80/ro 路径时,被 server 的 location /ro 匹配,Nginx 再根据规则连接到后端 代理池upstream 的 ro 集群的某一个服务器
4.当请求 NginxIP:80/stu 路径时,被 server 的 location /stu 匹配,Nginx 再根据规则连接到后端 代理池upstream 的 stu 集群的某一个服务器
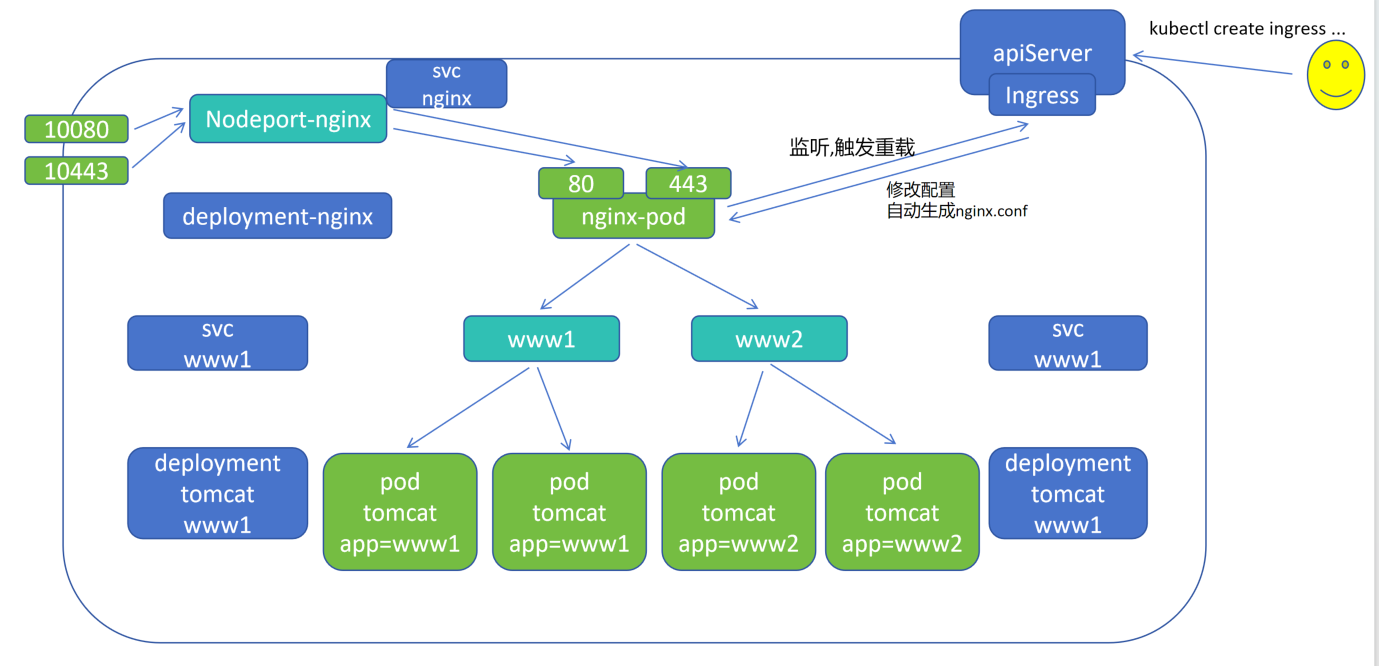
(4)集群模拟七层负载实现 Ingress nginx 功能
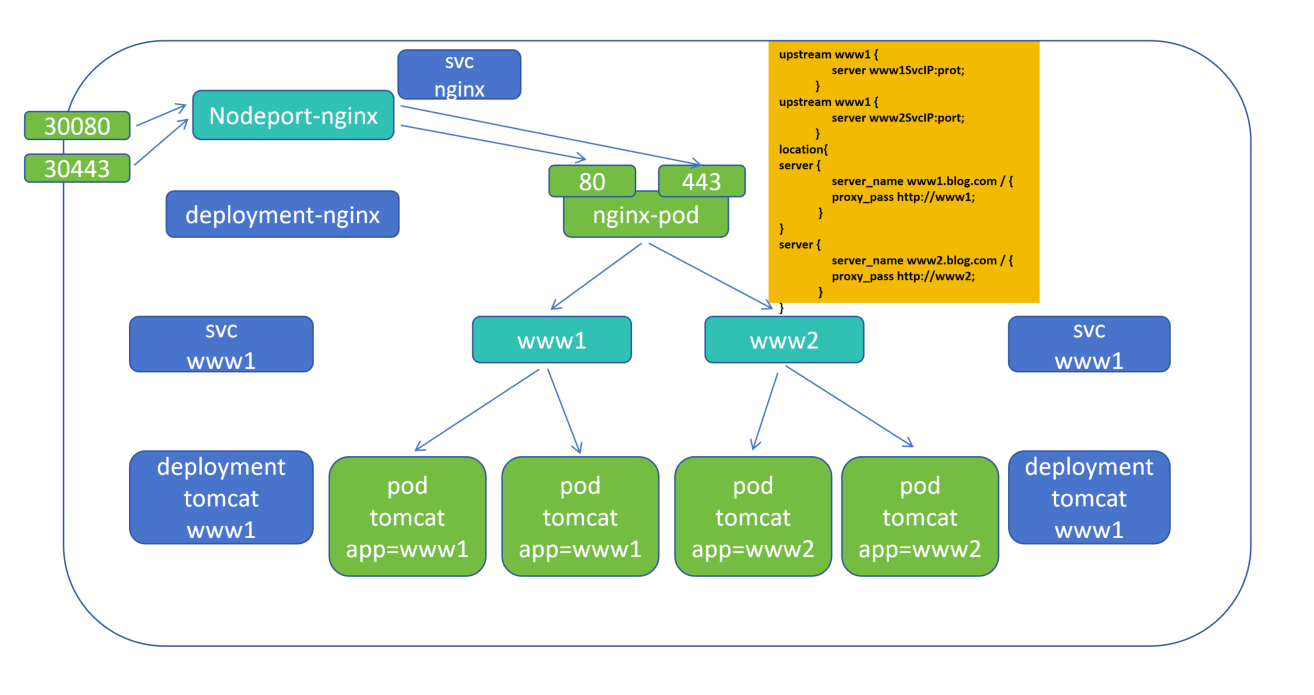
1.在 k8s集群中运行 deployment-nginx 控制器,会启动一个 nginx-pod
2.再创建 nodeport-nginx 类型的 svc,将物理机端口绑定,30080 映射 nginx-pod 的 80,30443 映射 nginx-pod 的 443
3.再创建 deployment-tomcat 控制器,标签是 www1、www2,会分别启动 www1、www2 标签的 Pod
4.deployment-nginx 直接代理后端 Pod 的 IP,当 Pod 死亡,nginx 需要重新写入IP并重载才能生效,因此增加svc层,nginx-pod 中写入svc 的 IP(svc 与后端 Pod 变化实时监控),所以需要创建 clusterip 类型的 svc ,标签分别是 www1、www2
5.nginx-pod 的 nginx.conf 配置文件可以写在 pod 中也可以封装在 configmap 中,nginx.conf 配置文件中 upstream 分别写入 www1 的 www1svcIP:port、www2 的 www2svcIP:port
6.图片中 nodeport-nginx、svc www1、svc www2、deployment www1、deployment www2 都可以声明式表达,一条命令创建,但是 nginx-pod 却每次都需要修改配置 nginx.conf中svc IP,域名等
(5)集群中 Ingress nginx 功能优势
1.在集群的 apiServer 中有 Ingress 资源对象,Ingress 是描述七层负载的
2.通过 nginx-pod 监听 Ingress 的变化,Ingress 当有变化发生,自动修改 nginx 的 配置文件nginx.conf
3.用户通过接口调用,命令行端 kubectl create ingress xxx 修改 nginx 的 配置文件 nginx.conf
(6)Ingress nginx 结构图
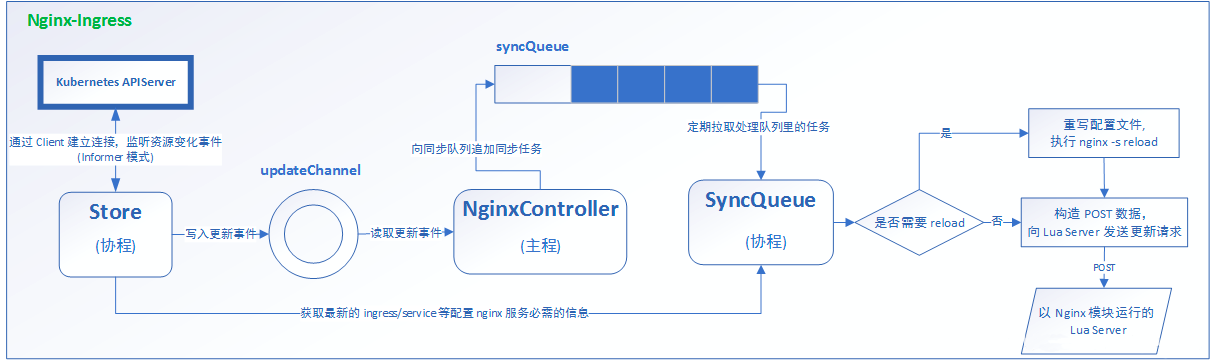
1.nginx-Ingress 是 nginx 实现了 Ingress 接口
2.k8s 的 apiServer 会出现一个协程(协程是轻量化的线程,线程可以定义大小,最小单位),相同性能下,相比于线程,可以运行更多协程(并发上做的很好)
3.协程有两条写入渠道,一个是不重要信息(上面),通过二次缓冲的方式,定期拉取到 SyncQueue协程上(拉取是先入先出规则),另一个是重要信息(下面),由 Store协程直接发到 SyncQueue协程上
4.SyncQueue 拉取规则变化,再判断是否需要重载,需要重载则进行 nginx 重载,不需要重载通过异步方案 Lua Server更新
5.nginx 在保证尽量少次数的重载,因为每次重载都会造成正在请求中的用户请求丢失
(7)其他类似功能组件
 全称:ingress-istio-controller 功能:微服务可观测性方面很好,七层负载与真实服务器之间的流量图会以绘画方式展示
 全称:traefik 功能:go 语言编写的反向代理服务器,云原生方面用的比较多,能自动监听配置文件,当配置文件发生动态变化时,可以自动应用
 全称:apisix-ingress-controller 功能:JAVA 方面,微服务方面使用比较多
(8)总结
负载均衡:
四层负载:
特性:一次完整的 TCP 连接,由 客户端Client 与 服务端Server 建立,调度器Schedule 只起到转发的作用
七层负载:
特性:两次完整的 TCP 连接,由客户端Client 与 调度器Schedule 建立,调度器Schedule 与 服务端Server 建立(常说的代理作用,代理服务器)
10.3.2 Ingress nginx 应用
(1)Ingress nginx 安装部署
# 上传、解压
[root@k8s-master01 10.3]# rz -E
rz waiting to receive.
[root@k8s-master01 10.3]# ls
ingress-nginx.zip
[root@k8s-master01 10.3]# unzip ingress-nginx.zip
Archive:  ingress-nginx.zip
   creating: 2、ingress-nginx/
  inflating: 2、ingress-nginx/.DS_Store
  inflating: __MACOSX/2、ingress-nginx/._.DS_Store
  inflating: 2、ingress-nginx/安装文档.md
  inflating: __MACOSX/2、ingress-nginx/._安装文档.md
   creating: 2、ingress-nginx/chart/
   creating: 2、ingress-nginx/image/
  inflating: 2、ingress-nginx/chart/ingress-nginx-4.8.3.tgz
  inflating: 2、ingress-nginx/chart/values.yaml
  inflating: __MACOSX/2、ingress-nginx/chart/._values.yaml
  inflating: 2、ingress-nginx/image/registry.k8s.io-ingress-nginx-controller-v1.9.4.tar
  inflating: 2、ingress-nginx/image/ingress-nginx-kube-webhook-certgen-v20231011-8b53cabe0.tar
# 导入镜像,以及把镜像压缩包发送到其他节点
[root@k8s-master01 10.3]# ls
2、ingress-nginx  __MACOSX  ingress-nginx.zip
[root@k8s-master01 10.3]# cd 2、ingress-nginx/
[root@k8s-master01 2、ingress-nginx]# ls
chart  image  安装文档.md
[root@k8s-master01 2、ingress-nginx]# cd image/
[root@k8s-master01 image]# scp * n1:/root
.........
[root@k8s-master01 image]# scp * n2:/root
.........
[root@k8s-master01 image]# for i in `ls`;do docker load -i $i;done
.........
# 查看导入是否成功
[root@k8s-master01 image]# docker images
REPOSITORY                                                                     TAG                   IMAGE ID       CREATED         SIZE
.........
registry.k8s.io/ingress-nginx/controller                                       v1.9.4                5aa0bf4798fa   21 months ago   273MB
registry.k8s.io/ingress-nginx/kube-webhook-certgen                             v20231011-8b53cabe0   1ebff0f9671b   21 months ago   53.7MB
.........
# 另外两个节点导入镜像,查看本地是否导入成功
[root@k8s-node01 ~]# for i in `ls *ingress*`;do docker load -i $i;done
..........
[root@k8s-node02 ~]# for i in `ls *ingress*`;do docker load -i $i;done
..........
[root@k8s-node01 ~]# docker images|grep ingress
registry.k8s.io/ingress-nginx/controller                                                               v1.9.4                 5aa0bf4798fa   21 months ago   273MB
registry.k8s.io/ingress-nginx/kube-webhook-certgen                                                     v20231011-8b53cabe0    1ebff0f9671b   21 months ago   53.7MB
[root@k8s-node02 ~]# docker images|grep ingress
registry.k8s.io/ingress-nginx/controller                                                               v1.9.4                5aa0bf4798fa   21 months ago   273MB
registry.k8s.io/ingress-nginx/kube-webhook-certgen                                                     v20231011-8b53cabe0   1ebff0f9671b   21 months ago   53.7MB
# 将 ingress-nginx 的yaml 文件进行解压
[root@k8s-master01 image]# cd ../chart/
[root@k8s-master01 chart]# ls
ingress-nginx-4.8.3.tgz  values.yaml
[root@k8s-master01 chart]# tar -xvf ingress-nginx-4.8.3.tgz
..........
[root@k8s-master01 chart]# ls
ingress-nginx  ingress-nginx-4.8.3.tgz
[root@k8s-master01 chart]# cd ingress-nginx/
[root@k8s-master01 ingress-nginx]# ls
CHANGELOG.md  Chart.yaml  OWNERS  README.md  README.md.gotmpl  changelog  changelog.md.gotmpl  ci  templates  values.yaml
# 以上是网络不通,没办法直接下载,导入镜像包,如果可以访问外网,也可以执行如下
[root@k8s-master ~]# helm repo add ingress-nginx https://kubernetes.github.io/ingress-nginx
[root@k8s-master src]# helm pull ingress-nginx/ingress-nginx

# 修改 values.yaml 文件
修改 hostNetwork 的值为 true
dnsPolicy的值改为: ClusterFirstWithHostNet
kind类型更改为:DaemonSet

metrics:
  service:
    annotations: {}
      prometheus.io/scrape: "true"
      prometheus.io/port: "10254"

# 关闭所有镜像的 digest
[root@k8s-master01 ingress-nginx]# vim values.yaml
..........
# 防止因为导入或转存导致哈希值效验不同,再去官网下载 Ingress-nginx 镜像
 30     tag: "v1.9.4"
 31     #digest: sha256:5b161f051d017e55d358435f295f5e9a297e66158f136321d9b04520ec6c48a3
 32     #digestChroot: sha256:5976b1067cfbca8a21d0ba53d71f83543a73316a61ea7f7e436d6cf84ddf9b26
..........
# dnsPolicy 与 hostNetwork 要修改同时修改
 70   dnsPolicy: ClusterFirstWithHostNet
..........
# 开启主机网络
 91   hostNetwork: true
 92   ## Use host ports 80 and 443
 93   ## Disabled by default
..........
# 设置 nginx 类名,即指定类名,才会被所指定类名接收,当安装多个七层负载时,比如traefik ingress等类时,需要指定,此处设置默认类
110   ingressClassResource:
111     # -- Name of the ingressClass
112     name: nginx
113     # -- Is this ingressClass enabled or not
114     enabled: true
115     # -- Is this the default ingressClass for the cluster
116     default: true
..........
# 高可用,防止 Deployment 部署到同一台节点上
186   # -- Use a `DaemonSet` or `Deployment`
187   kind: DaemonSet
..........
646         tag: v20231011-8b53cabe0
647         #digest: sha256:a7943503b45d552785aa3b5e457f169a5661fb94d82b8a3373bcd9ebaf9aac80
..........
dnsPolicy:
ClusterFirstWithHostNet:
当 Pod 的 hostNetwork 设置为 true 时,使用该 DNS 策略
这意味着 Pod 的网络命名空间与主机共享,Pod 使用主机的网格栈
在此配置下,Pod 将 1.首先尝试通过主机上的 DNS 解析 DNS 请求。如果主机上没有找到,2.则会将请求发送到 kube-dns 服务,由 kube-dns 服务进行处理
这种策略适用于需要与主机网络共享的特殊情况,但它不会为 Pod 提供专用的 DNS 解析功能
ClusterFirst:
这是 Kubernetes 中默认的 DNS 策略
当 Pod 的 hostNetwork 设置为 false 或未设置时,使用该策略
在此策略下,Pod 1.首先尝试通过 kube-dns 服务解析 DNS 请求。如果kube-dns 无法解析,2.则会向上级 DNS 服务器继续发起请求
这种策略适用于大多数情况,其中 Pod 需要使用 Kubernetes 集群的 DNS 服务解析其他 Pod 或服务的主机名
# 安装 名为 ingress、指定存在名称空间、本地文件安装、指定变量 values.yaml
[root@k8s-master01 ingress-nginx]# kubectl create namespace ingress
namespace/ingress-nginx created
[root@k8s-master01 ingress-nginx]# helm install ingress-nginx -n ingress . -f values.yaml
..........
[root@k8s-master01 ingress-nginx]# kubectl get pod -o wide -n ingress
NAME                             READY   STATUS    RESTARTS   AGE   IP              NODE         NOMINATED NODE   READINESS GATES
ingress-nginx-controller-hmwmx   1/1     Running   0          15m   10.244.85.246   k8s-node01   <none>           <none>
ingress-nginx-controller-lxgdz   1/1     Running   0          15m   10.244.58.209   k8s-node02   <none>           <none>
(2)实验1 Ingress-nginx http 代理
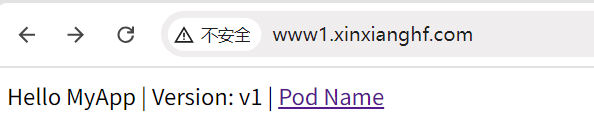
[root@k8s-master01 10]# cat 5.ingress.yaml
apiVersion: apps/v1
kind: Deployment
metadata:
 name: ingress-httpproxy-www1
spec:
 replicas: 2
 selector:
   matchLabels:
     hostname: www1
 template:
   metadata:
     labels:
       hostname: www1
   spec:
     containers:
     - name: nginx
       image: myapp:v1.0
       imagePullPolicy: IfNotPresent
       ports:
       - containerPort: 80
---
apiVersion: v1
kind: Service
metadata:
 name: ingress-httpproxy-www1
spec:
 ports:
 - port: 80
   targetPort: 80
   protocol: TCP
 selector:
   hostname: www1
---
apiVersion: networking.k8s.io/v1
kind: Ingress
metadata:
  name: ingress-httpproxy-www1
spec:
  ingressClassName: nginx
  rules:
    - host: www1.xinxianghf.com
      http:
        paths:
          - path: /
            pathType: Prefix
            backend:
              service:
                name: ingress-httpproxy-www1
                port:
                  number: 80
4.deployment 期望:副本数、selector 选择器:匹配标签:标签名、标签值、Pod 模版:元数据:Pod 标签:标签名、标签值、Pod 期望:容器组:容器名、基于镜像版本、镜像拉取策略、端口:容器端口
---
4.service 期望:端口:开放端口、目标容器端口、端口协议TCP、selector 选择器:标签名、标签值
---
1.接口组版本:networking.k8s.io 组 v1 版
2.类别:Ingress 类
3.元数据:Ingress 名称
4.Ingress 期望:Ingress 类使用的名称:nginx(前面定义名称的时候定义的nginx,已设置默认)、访问规则、主机名:http协议:路径为 /、前缀 / 都可以、后端代理:service:service 名、svc端口
# 创建 deployment、svc、ingress
[root@k8s-master01 10]# kubectl apply -f 5.ingress.yaml
deployment.apps/ingress-httpproxy-www1 created
service/ingress-httpproxy-www1 created
ingress.networking.k8s.io/ingress-httpproxy-www1 created
[root@k8s-master01 10]# kubectl get pod -o wide
NAME                                      READY   STATUS    RESTARTS   AGE   IP              NODE         NOMINATED NODE   READINESS GATES
ingress-httpproxy-www1-6747878964-hp2qt   1/1     Running   0          40m   10.244.85.204   k8s-node01   <none>           <none>
ingress-httpproxy-www1-6747878964-hs424   1/1     Running   0          40m   10.244.58.224   k8s-node02   <none>           <none>
[root@k8s-master01 10]# kubectl get svc -n ingress
NAME                                 TYPE           CLUSTER-IP     EXTERNAL-IP   PORT(S)                      AGE
ingress-nginx-controller             LoadBalancer   10.0.255.251   <pending>     80:31975/TCP,443:32207/TCP   41m
ingress-nginx-controller-admission   ClusterIP      10.3.189.164   <none>        443/TCP                      41m
[root@k8s-master01 10]# kubectl get svc
NAME                     TYPE        CLUSTER-IP     EXTERNAL-IP   PORT(S)   AGE
ingress-httpproxy-www1   ClusterIP   10.3.229.112   <none>        80/TCP    41m
kubernetes               ClusterIP   10.0.0.1       <none>        443/TCP   52d
[root@k8s-master01 10]# kubectl get ingress
NAME                     CLASS   HOSTS                 ADDRESS   PORTS   AGE
ingress-httpproxy-www1   nginx   www1.xinxianghf.com             80      41m
浏览器输入 : 192.168.66.12 ,与传统版本的 nginx 有 default server 不同,当没有 default server 会返回 404

# 电脑主机进入目录,在 hosts 文件中添加新的信息
C:\Windows\System32\drivers\etc

192.168.66.12 www1.xinxianghf.com
# 本地进行测试,本地能够解析 域名
C:\Users\马俊南>ping www1.xinxianghf.com

正在 Ping www1.xinxianghf.com [192.168.66.12] 具有 32 字节的数据:
来自 192.168.66.12 的回复: 字节=32 时间<1ms TTL=64
来自 192.168.66.12 的回复: 字节=32 时间<1ms TTL=64
来自 192.168.66.12 的回复: 字节=32 时间=1ms TTL=64
在浏览器中输入域名,可以访问
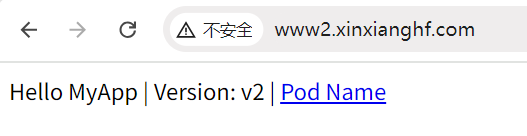
# 拷贝文件,对文件内内容进行替换
[root@k8s-master01 10]# cp 5.ingress.yaml 6.ingress.yaml
[root@k8s-master01 10]# sed -i "s/www1/www2/g" 6.ingress.yaml
[root@k8s-master01 10]# sed -i "s/myapp:v1.0/myapp:v2.0/g" 6.ingress.yaml
[root@k8s-master01 10]# egrep 'www1|myapp:v1.0' 6.ingress.yaml
[root@k8s-master01 10]# kubectl apply -f 6.ingress.yaml
deployment.apps/ingress-httpproxy-www2 created
service/ingress-httpproxy-www2 created
ingress.networking.k8s.io/ingress-httpproxy-www2 created
[root@k8s-master01 10]# kubectl get ingress
NAME                     CLASS   HOSTS                 ADDRESS   PORTS   AGE
ingress-httpproxy-www1   nginx   www1.xinxianghf.com             80      142m
ingress-httpproxy-www2   nginx   www2.xinxianghf.com             80      49s
# 电脑主机进入目录,在 hosts 文件中添加新的信息
C:\Windows\System32\drivers\etc

192.168.66.12 www1.xinxianghf.com
192.168.66.12 www2.xinxianghf.com
在浏览器中输入域名,可以访问
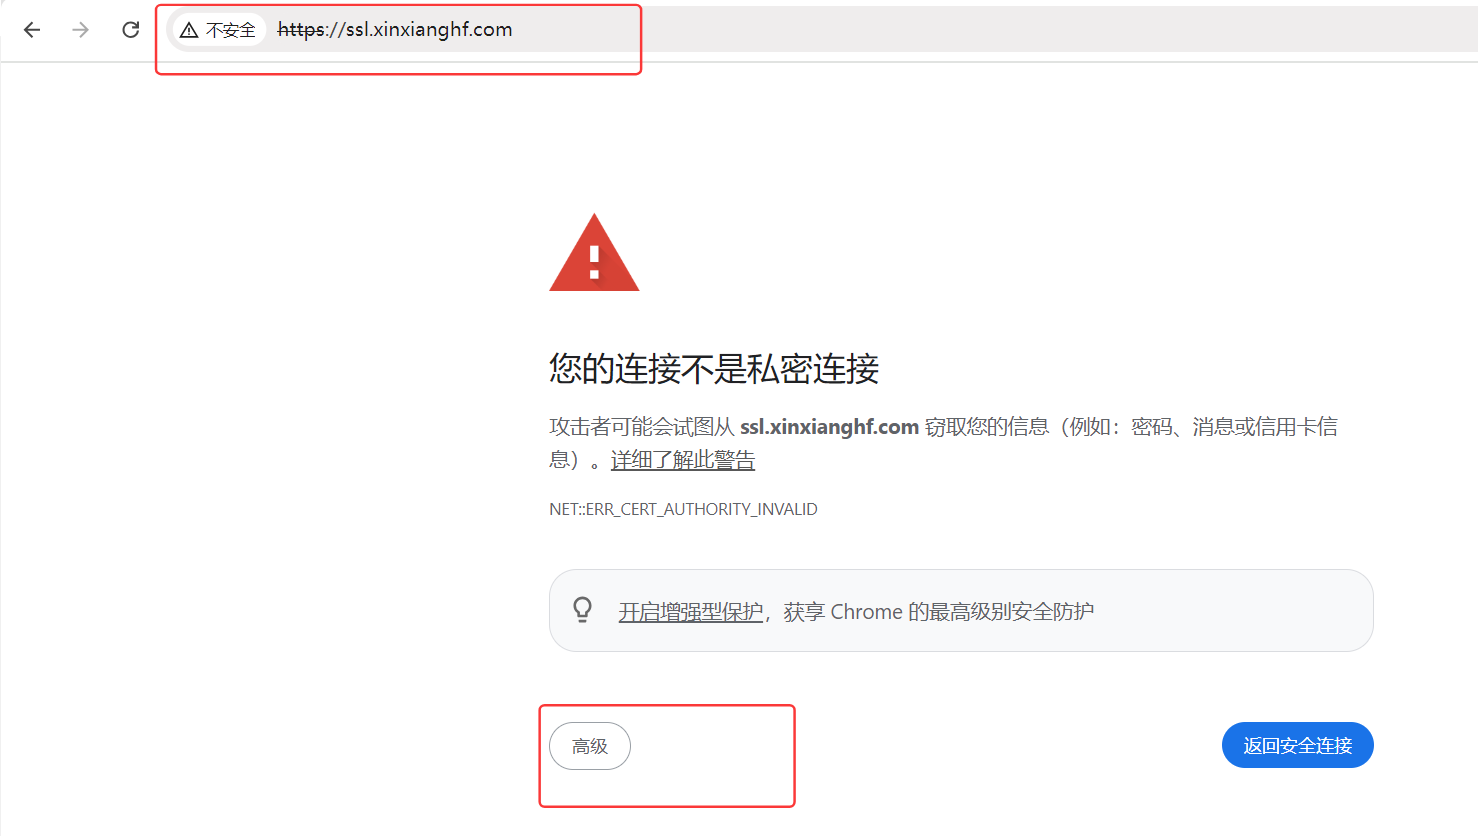
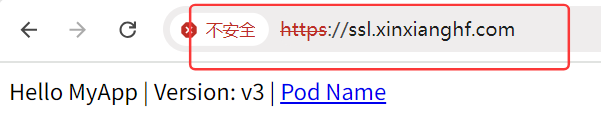
(3)实验2 Ingress-nginx https 代理
# 生成私钥,基于私钥封装 secrets
[root@k8s-master01 10.7]# openssl req -x509 -sha256 -nodes -days 365 -newkey rsa:2048 -keyout tls.key -out tls.crt -subj "/CN=nginxsvc/O=nginxsvc"
.+......+++++++++++++++++++++++++++++++++++++++*..+....+...+...+++++++++++++++++++++++++++++++++++++++*...+.....................+....+..+.......+..+.........+......+.+...+..+...+..........+..............+.+..+...+.+........+.......+...+..+...++++++
...+........+.......+++++++++++++++++++++++++++++++++++++++*..+...+.+...............+...+.................+...+...+.......+..+.+........+.+.........+..+............+...+....+...+.....+++++++++++++++++++++++++++++++++++++++*..+..+......+..........+..+...+......+...+.......+...........+.........+......+....+...+........+............+......+.......+..+.+...........+.+..+...+...+......+.............+...........+................+...+..+...+......+.......+...+..+............++++++
-----
[root@k8s-master01 10.7]# ls
tls.crt  tls.key
[root@k8s-master01 10.7]# kubectl create secret tls ingress-nginx-tls  --key tls.key --cert tls.crt
secret/ingress-nginx-tls created
[root@k8s-master01 10.7]# kubectl get secrets
NAME                TYPE                DATA   AGE
ingress-nginx-tls   kubernetes.io/tls   2      7s
mysecret            Opaque              2      33d
[root@k8s-master01 10.7]# cat deploy_svc.yaml
apiVersion: apps/v1
kind: Deployment
metadata:
 name: ingress-httpproxy-ssl
spec:
 replicas: 2
 selector:
   matchLabels:
     hostname: ssl
 template:
   metadata:
     labels:
       hostname: ssl
   spec:
     containers:
     - name: nginx
       image: myapp:v3.0
       imagePullPolicy: IfNotPresent
       ports:
       - containerPort: 80
---
apiVersion: v1
kind: Service
metadata:
 name: ingress-httpproxy-ssl
spec:
 ports:
 - port: 80
   targetPort: 80
   protocol: TCP
 selector:
   hostname: ssl
[root@k8s-master01 10.7]# cat ingress.yaml
apiVersion: networking.k8s.io/v1
kind: Ingress
metadata:
 name: ingress-httpproxy-ssl
 namespace: default
 annotations:
   nginx.ingress.kubernetes.io/ssl-redirect: "true"
spec:
 ingressClassName: nginx
 rules:
 - host: ssl.xinxianghf.com
   http:
     paths:
     - path: /
       pathType: Prefix
       backend:
         service:
           name: ingress-httpproxy-ssl
           port:
             number: 80
 tls:
 - hosts:
   - ssl.xinxianghf.com
   secretName: ingress-nginx-tls
3.元数据:Ingress 名称、Ingress 所在名称空间、外部接口约定
4.期望:使用类名
    规则:主机名:域名、http 路径:路径 /、后缀、后端绑定:service、svc名、svc 端口
    tls 协议:主机:域名、使用的 secret 名(上面步骤中基于 tls.crt  tls.key 封装了 名为 ingress-nginx-tls 的 secrets)
# 这里也叫 会话卸载层,前面是七层 https ,到内部 service 时转成四层,由 https -> http
[root@k8s-master01 10.7]# kubectl apply -f deploy_svc.yaml
deployment.apps/ingress-httpproxy-ssl created
service/ingress-httpproxy-ssl created
[root@k8s-master01 10.7]# kubectl apply -f ingress.yaml
ingress.networking.k8s.io/ingress-httpproxy-ssl created
[root@k8s-master01 10.7]# kubectl get ingress
NAME                     CLASS   HOSTS                 ADDRESS   PORTS     AGE
ingress-httpproxy-ssl    nginx   ssl.xinxianghf.com              80, 443   4s
ingress-httpproxy-www1   nginx   www1.xinxianghf.com             80        3h31m
ingress-httpproxy-www2   nginx   www2.xinxianghf.com             80        70m
# 电脑主机进入目录,在 hosts 文件中添加新的信息
C:\Windows\System32\drivers\etc

192.168.66.12 www1.xinxianghf.com
192.168.66.12 www2.xinxianghf.com
192.168.66.12 ssl.xinxianghf.com
在浏览器中输入域名 ssl.xinxianghf.com,自动由 http 跳转到 https
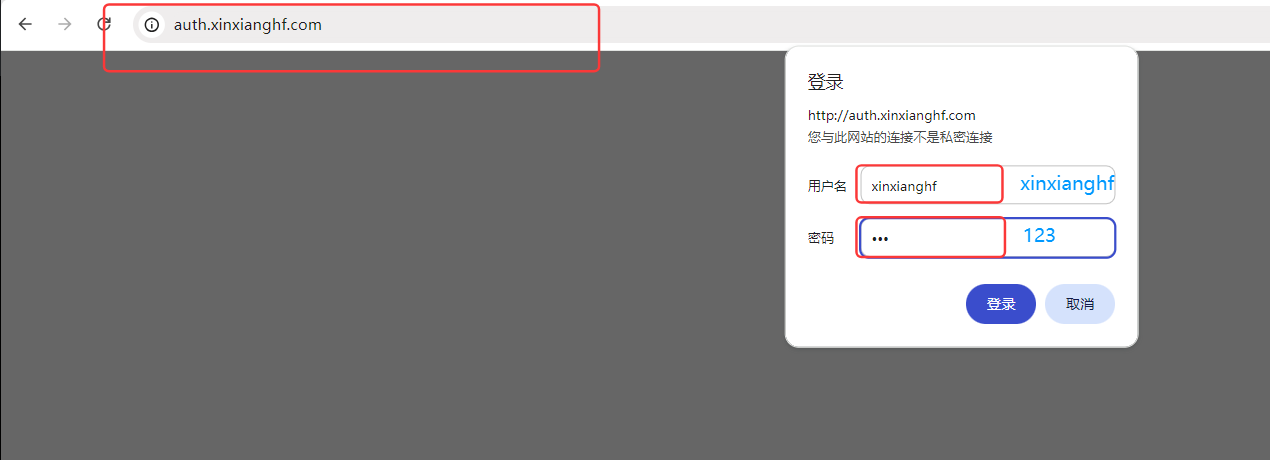
(4)实验3 Ingress-nginx BasicAuth 代理
# 安装 httpd-tools 服务,提供 htpasswd 功能
[root@k8s-master01 10.8]# yum -y install httpd-tools
..........
Complete!
# 使用 htpasswd 生成认证文件,文件名:auth ,用户名:xinxianghf(密码:输入两次123  回车)
[root@k8s-master01 10.8]# htpasswd -c auth xinxianghf
New password:
Re-type new password:
Adding password for user xinxianghf
[root@k8s-master01 10.8]# ls
auth
# 创建 secret ,generic 类型,sercet 名称,指定基于封装的文件
[root@k8s-master01 10.8]# kubectl create secret generic ingress-basic-auth --from-file=auth
secret/ingress-basic-auth created
# 拷贝前面用到的 yaml 文件,第一个 sed 修改 deployment,service 名,第二个 sed 修改 deployment,service,pod 标签的 value,第三个 sed 修改 镜像版本
[root@k8s-master01 10.8]# cp ../10.7/deploy_svc.yaml .
[root@k8s-master01 10.8]# sed -i "s/ingress-httpproxy-ssl/ingress-httpproxy-auth/g" deploy_svc.yaml
[root@k8s-master01 10.8]# sed -i "s/hostname: ssl/hostname: auth/g" deploy_svc.yaml
[root@k8s-master01 10.8]# sed -i "s/myapp:v3.0/myapp:v1.0/g" deploy_svc.yaml
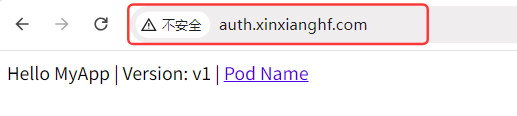
[root@k8s-master01 10.8]# cat basic_ingress.yaml
apiVersion: networking.k8s.io/v1
kind: Ingress
metadata:
 name: ingress-with-auth
 annotations:
   nginx.ingress.kubernetes.io/auth-type: basic
   nginx.ingress.kubernetes.io/auth-secret: ingress-basic-auth
   nginx.ingress.kubernetes.io/auth-realm: 'Authentication Required - xinxianghf'
spec:
 ingressClassName: nginx
 rules:
 - host: auth.xinxianghf.com
   http:
     paths:
     - path: /
       pathType: ImplementationSpecific
       backend:
         service:
           name: ingress-httpproxy-auth
           port:
             number: 80
3.元数据:Ingress 名称、描述标记:开启基础认证、基于 secret 提供认证的数据文件名(与前面封装的 secret 名相同)、认证时的提示信息
4.期望:类名、规则:域名、http协议:访问路径、路径类型( ImplementationSpecific 由控制器本身处理)、后端代理:service 提供:service 名称、代理后端端口:80
[root@k8s-master01 10.8]# kubectl apply -f deploy_svc.yaml
deployment.apps/ingress-httpproxy-auth created
service/ingress-httpproxy-auth created
[root@k8s-master01 10.8]# kubectl apply -f basic_ingress.yaml
ingress.networking.k8s.io/ingress-with-auth created
[root@k8s-master01 10.8]# kubectl get ingress
NAME                     CLASS   HOSTS                 ADDRESS   PORTS     AGE
ingress-httpproxy-ssl    nginx   ssl.xinxianghf.com              80, 443   37h
ingress-httpproxy-www1   nginx   www1.xinxianghf.com             80        40h
ingress-httpproxy-www2   nginx   www2.xinxianghf.com             80        38h
ingress-with-auth        nginx   auth.xinxianghf.com             80        8s
# 电脑主机进入目录,在 hosts 文件中添加新的信息
C:\Windows\System32\drivers\etc

192.168.66.12 www1.xinxianghf.com
192.168.66.12 www2.xinxianghf.com
192.168.66.12 ssl.xinxianghf.com
192.168.66.12 auth.xinxianghf.com
在浏览器中输入域名 auth.xinxianghf.com,弹出认证信息,是前面根据定义的用户名密码封装的 secret,输入用户名、密码,可以进行访问
注意:提示信息可以使用老版本的 IE浏览器 访问查看,目前新版本的浏览器认为可有可无,所以未提供提示信息
(5)实验4 Ingress-nginx 域名重定向
[root@k8s-master01 10.9]# cat redirect_ingress.yaml
apiVersion: networking.k8s.io/v1
kind: Ingress
metadata:
 name: redirect.xinxianghf.com
 namespace: default
 annotations:
   kubernetes.io/ingress.class: "nginx"
   nginx.ingress.kubernetes.io/permanent-redirect: https://www.baidu.com
   nginx.ingress.kubernetes.io/permanent-redirect-code: '301'
spec:
 ingressClassName: "nginx"
 rules:
  - host: redirect.xinxianghf.com
    http:
3.元数据:Ingress 名称、所在名称空间、描述信息:类名(老版本所使用方法)、指定重定向的地址、重定向的代码
4.期望:类名(新版本用法,目前都在此处定义)、规则:主机当前域名、http 协议
[root@k8s-master01 10.9]# kubectl apply -f redirect_ingress.yaml
ingress.networking.k8s.io/redirect.xinxianghf.com created
[root@k8s-master01 10.9]# kubectl get ingress
NAME                      CLASS   HOSTS                     ADDRESS   PORTS     AGE
ingress-httpproxy-ssl     nginx   ssl.xinxianghf.com                  80, 443   37h
ingress-httpproxy-www1    nginx   www1.xinxianghf.com                 80        41h
ingress-httpproxy-www2    nginx   www2.xinxianghf.com                 80        38h
ingress-with-auth         nginx   auth.xinxianghf.com                 80        37m
redirect.xinxianghf.com   nginx   redirect.xinxianghf.com             80        5s
# 电脑主机进入目录,在 hosts 文件中添加新的信息
C:\Windows\System32\drivers\etc

192.168.66.12 www1.xinxianghf.com
192.168.66.12 www2.xinxianghf.com
192.168.66.12 ssl.xinxianghf.com
192.168.66.12 auth.xinxianghf.com
192.168.66.12 redirect.xinxianghf.com
在浏览器中输入域名 redirect.xinxianghf.com 回车,直接重定向到设置的域名 www.baidu.com
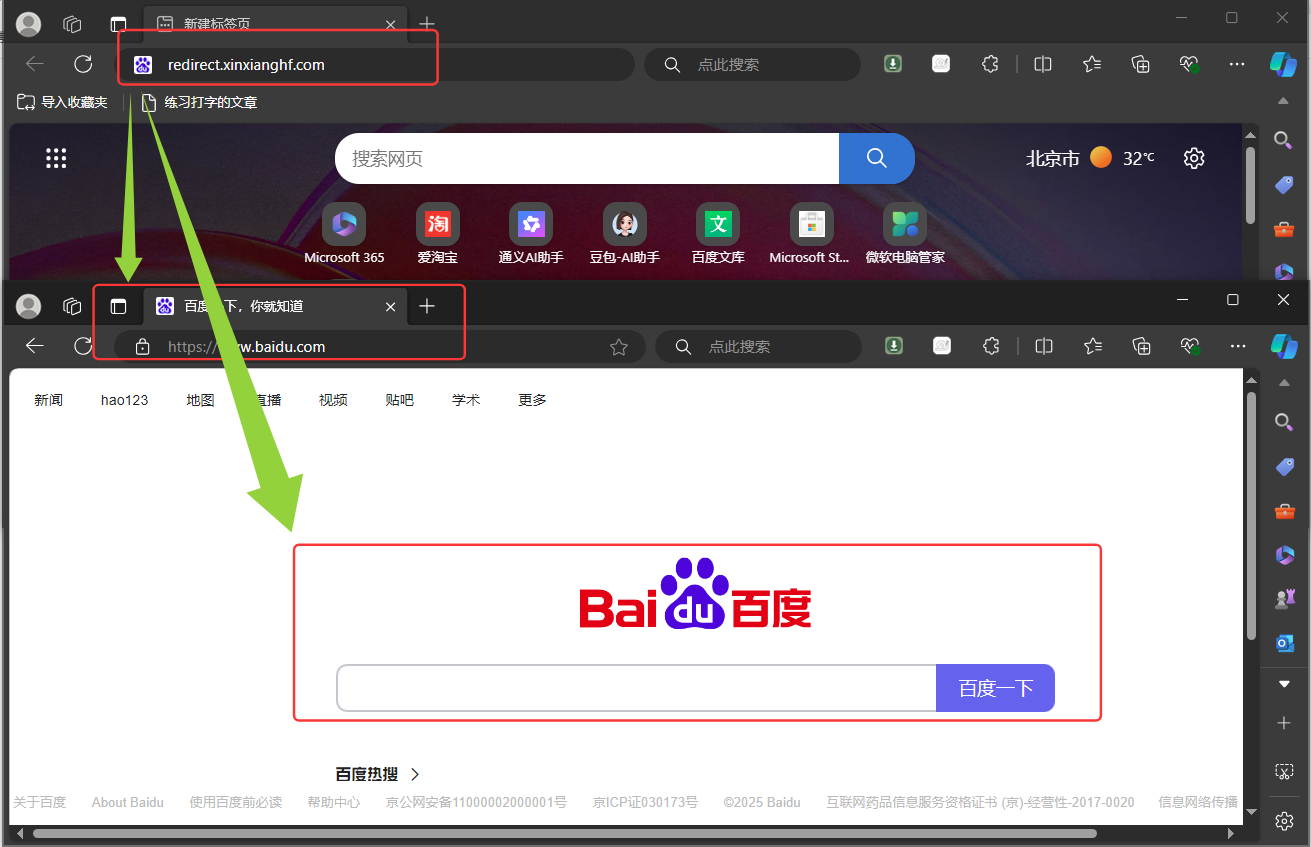
# 服务器添加本地解析
[root@k8s-master01 10.9]# echo "192.168.66.12 redirect.xinxianghf.com" >> /etc/hosts
# curl 域名 ,-I 只返回头部信息
[root@k8s-master01 10.9]# curl redirect.xinxianghf.com -I
HTTP/1.1 301 Moved Permanently
Date: Mon, 21 Jul 2025 09:18:22 GMT
Content-Type: text/html
Content-Length: 162
Connection: keep-alive
Location: https://www.baidu.com
(6)实验5 Ingress-nginx Rewrite
# 拷贝前面用到的 yaml 文件,第一个 sed 修改 deployment,service 名,第二个 sed 修改 deployment,service,pod 标签的 value,第三个 sed 修改 镜像版本
[root@k8s-master01 10.10]# cp ../10.7/deploy_svc.yaml .
[root@k8s-master01 10.10]# sed -i "s/ingress-httpproxy-ssl/ingress-httpproxy-rew/g" deploy_svc.yaml
[root@k8s-master01 10.10]# sed -i "s/hostname: ssl/hostname: rew/g" deploy_svc.yaml
[root@k8s-master01 10.10]# sed -i "s/myapp:v3.0/myapp:v2.0/g" deploy_svc.yaml
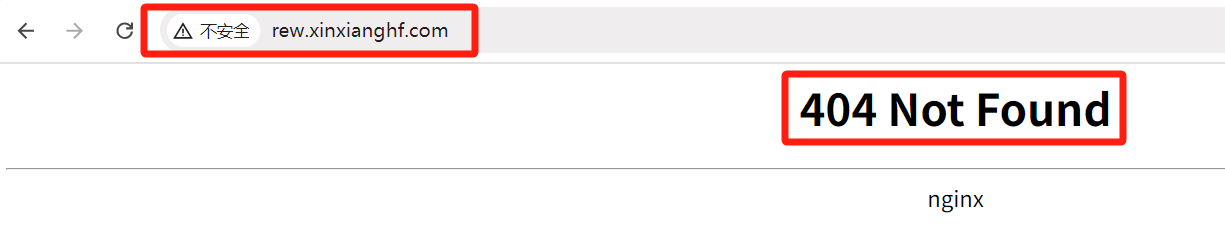
[root@k8s-master01 10.10]# cat rewrite_ingress.yaml
apiVersion: networking.k8s.io/v1
kind: Ingress
metadata:
 name: rew.xinxianghf.com
 namespace: default
 annotations:
   nginx.ingress.kubernetes.io/rewrite-target: /$2
spec:
 ingressClassName: "nginx"
 rules:
 - host: rew.xinxianghf.com
   http:
     paths:
     - path: /api(/|$)(.*)
       pathType: ImplementationSpecific
       backend:
         service:
           name: ingress-httpproxy-rew
           port:
             number: 80
3.元数据:Ingress 名称、所在名称空间、描述信息:重写:将第二个分组进行替换(支持正则表达式)
4.期望:类名、规则:主机域名、http协议:路径:路径组(下分两组,不同括号内代表不同分组 上面匹配 .*)、路径类型(基于控制器修改)、后端代理:service:service 名、端口
[root@k8s-master01 10.10]# kubectl apply -f deploy_svc.yaml
deployment.apps/ingress-httpproxy-rew created
service/ingress-httpproxy-rew created
[root@k8s-master01 10.10]# kubectl apply -f rewrite_ingress.yaml
ingress.networking.k8s.io/rew.xinxianghf.com created
[root@k8s-master01 10.10]# kubectl get ingress
NAME                      CLASS   HOSTS                     ADDRESS   PORTS     AGE
ingress-httpproxy-ssl     nginx   ssl.xinxianghf.com                  80, 443   42h
ingress-httpproxy-www1    nginx   www1.xinxianghf.com                 80        45h
ingress-httpproxy-www2    nginx   www2.xinxianghf.com                 80        43h
ingress-with-auth         nginx   auth.xinxianghf.com                 80        5h20m
redirect.xinxianghf.com   nginx   redirect.xinxianghf.com             80        4h43m
rew.xinxianghf.com        nginx   rew.xinxianghf.com                  80        5s
# 电脑主机进入目录,在 hosts 文件中添加新的信息
C:\Windows\System32\drivers\etc

192.168.66.12 www1.xinxianghf.com
192.168.66.12 www2.xinxianghf.com
192.168.66.12 ssl.xinxianghf.com
192.168.66.12 auth.xinxianghf.com
192.168.66.12 redirect.xinxianghf.com
192.168.66.12 rew.xinxianghf.com
在浏览器中输入域名 rew.xinxianghf.com 返回 404 ,是因为定义了匹配需要加 /api 变成 http://rew.xinxianghf.com/api,访问 http://rew.xinxianghf.com/api/hostname.html

当 service1 代表前端、service2 代表后端时,可以做前后端分离
当访问 http://rew.xinxianghf.com/fron/xxx.html 代表访问前端,连接 service1
当访问 http://rew.xinxianghf.com/back/xxx.html 代表访问后端,连接 service2

在 Ingress 控制器中,rewrite(重写) 和 redirect(重定向) 是两种不同的操作,他们的作用和行为有所不同
Rewrite(重写):
作用:重写是指修改请求的路径,但是客户端不会察觉到这个变化,它仅在服务器内部发生。在 Kubernetes 中,可以通过 Ingress 的注解来配置重写规则
示例:比如有一个服务部署在 /v1 路径下,但希望用户访问时不需要输入 /v1,那么可以使用重写将请求从根路径 / 重写到 /v1
Redirect(重定向):
作用:重定向是指服务器向客户端发起一个新的 URL,让客户端进行新的请求。客户端会收到一个 HTTP 3xx 状态码,然后根据其中的重定向地址进行新的请求,这意味着客户端会知道发生了重定向,它会发起新的请求。
示例:比如有一个网站的旧地址是 http://example.com,但希望所有的请求都转发到 https://example.com,这时就可以使用重定向将所有的 HTTP 请求重定向到 HTTPS
区别:
影响范围:Rewrite 只在服务器内部修改请求路径,不会影响到客户端,而 Redirect 则会向客户端发送一个新的 URL,让客户端发起新的请求
状态码:Rewrite 不涉及状态码的改变,而 Redirect 会向客户端发送一个重定向的 HTTP 状态码(例如 301永久重定向、302临时重定向等)
可见性:Rewrite 对于客户端来说是透明的,而 Redirect 则会告知客户端发生了重定向
在选择使用 Rewrite 还是 Redirect 时,需要根据具体的需求来决定。如果希望在不修改客户端请求的情况下修改路径,那么使用 Rewrite ;如果希望客户端知道发生了重定向,并且根据新的 URL 进行新的请求,那么使用 Redirect
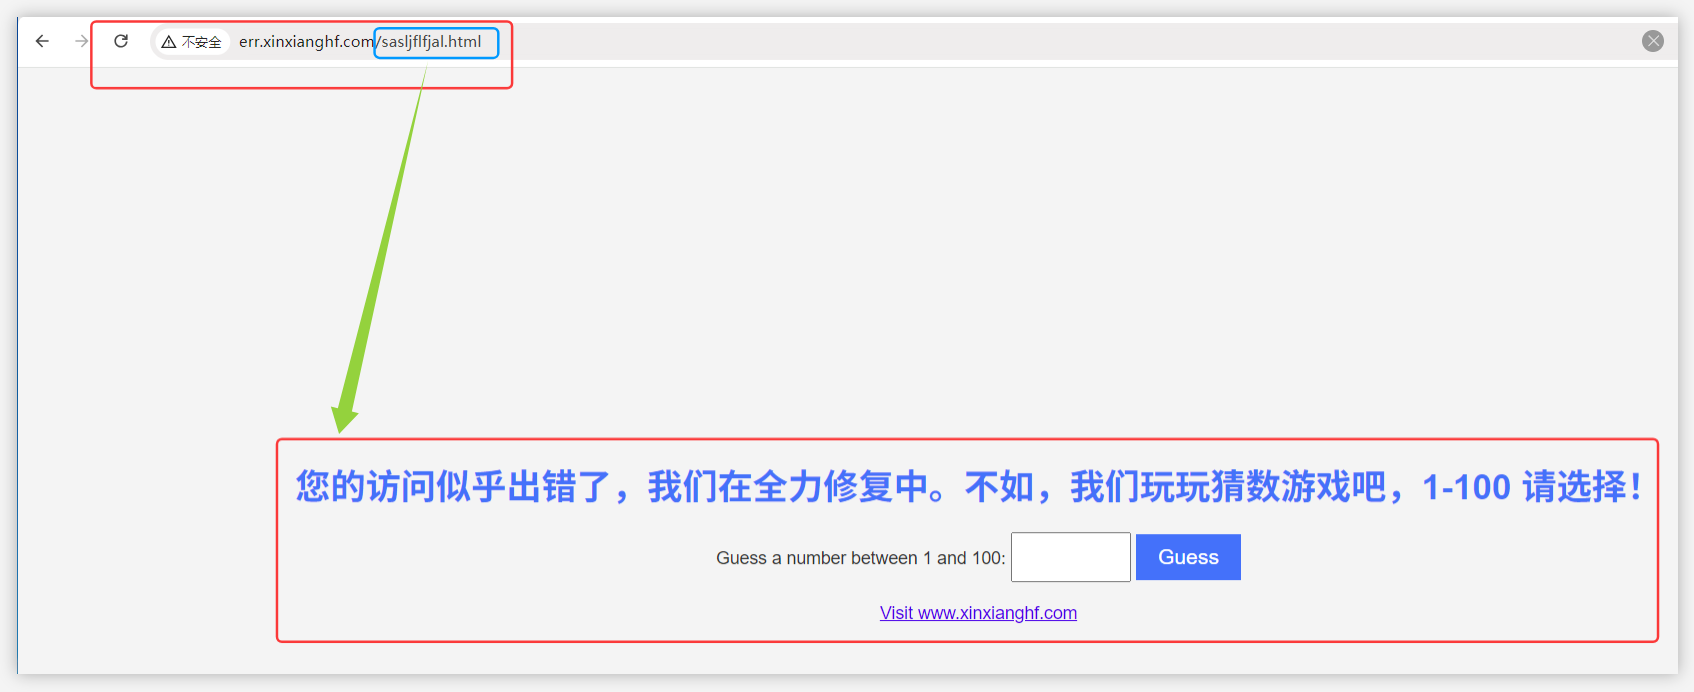
(7)实验6 Ingress-nginx 错误代码重定向 - 默认错误后端
# 提前拉取 errweb 镜像(各个节点)
[root@k8s-master01 10.9]# docker pull swr.cn-north-4.myhuaweicloud.com/ddn-k8s/docker.io/wangyanglinux/tools:errweb1.0
errweb1.0: Pulling from ddn-k8s/docker.io/wangyanglinux/tools
59bf1c3509f3: Pull complete
4e89ee5a3f83: Pull complete
a0f1444c99ff: Pull complete
Digest: sha256:b41c6030e0680d685138817bee588a4cd99bbed310aec7fe58090bd3421f08b0
Status: Downloaded newer image for swr.cn-north-4.myhuaweicloud.com/ddn-k8s/docker.io/wangyanglinux/tools:errweb1.0
swr.cn-north-4.myhuaweicloud.com/ddn-k8s/docker.io/wangyanglinux/tools:errweb1.0
[root@k8s-master01 10.9]# docker tag  swr.cn-north-4.myhuaweicloud.com/ddn-k8s/docker.io/wangyanglinux/tools:errweb1.0  tools:errweb1.0
[root@k8s-master01 10.9]# docker images
REPOSITORY                                                                     TAG                   IMAGE ID       CREATED         SIZE
.........
tools                                                                          errweb1.0             f026bdb32b34   16 months ago   19MB
.........
# 打开 Ingress-nginx 重定向,修改固定返回的镜像名称
[root@k8s-master01 ingress-nginx]# pwd
/root/10/10.3/2、ingress-nginx/chart/ingress-nginx
[root@k8s-master01 ingress-nginx]# cat values.yaml
........
770 defaultBackend:
771   ##
772   enabled: true
773   name: defaultbackend
774   image:
775     registry: docker.io
776     image: tools
777     ## for backwards compatibility consider setting the full image url via the repository value below
778     ## use *either* current default registry/image or repository format or installing chart by providing the values.yaml will fail
779     ## repository:
780     tag: "errweb1.0"
781     pullPolicy: IfNotPresent
782     # nobody user -> uid 65534
783     runAsUser: 65534
784     runAsNonRoot: true
785     readOnlyRootFilesystem: true
786     allowPrivilegeEscalation: false
787   # -- Use an existing PSP instead of creating one
788   existingPsp: ""
789   extraArgs: {}
790   serviceAccount:
791     create: true
792     name: ""
793     automountServiceAccountToken: true
794   # -- Additional environment variables to set for defaultBackend pods
795   extraEnvs: []
796   port: 80
........
# 以下二选一,一个是重新安装,一个是进行升级

$ helm uninstall ingress-nginx -n ingress
$ helm install ingress-nginx -n ingress .

# helm 升级,指定变量文件,升级的 helm 名称, .  基于本地文件,-n 指定命名空间
[root@k8s-master01 ingress-nginx]# helm upgrade -f values.yaml ingress-nginx . -n ingress
.........
[root@k8s-master01 ingress-nginx]# helm ls -n ingress
NAME             NAMESPACE    REVISION    UPDATED                                    STATUS      CHART                  APP VERSION
ingress-nginx    ingress      2           2025-07-22 10:21:59.151031163 +0800 CST    deployed    ingress-nginx-4.8.3    1.9.4
[root@k8s-master01 ingress-nginx]# kubectl get pod -n ingress
NAME                                           READY   STATUS    RESTARTS   AGE
ingress-nginx-controller-kgxhr                 1/1     Running   0          24s
ingress-nginx-controller-zt6qt                 1/1     Running   0          46s
ingress-nginx-defaultbackend-89db9d699-h89ng   1/1     Running   0          57s
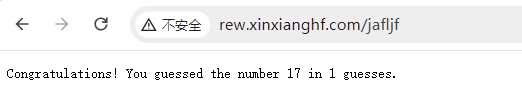
在浏览器中输入域名 rew.xinxianghf.com(上一个实验所用域名) ,之前是返回 404,现在只要 Ingress 不能解析,就返回重定向的页面
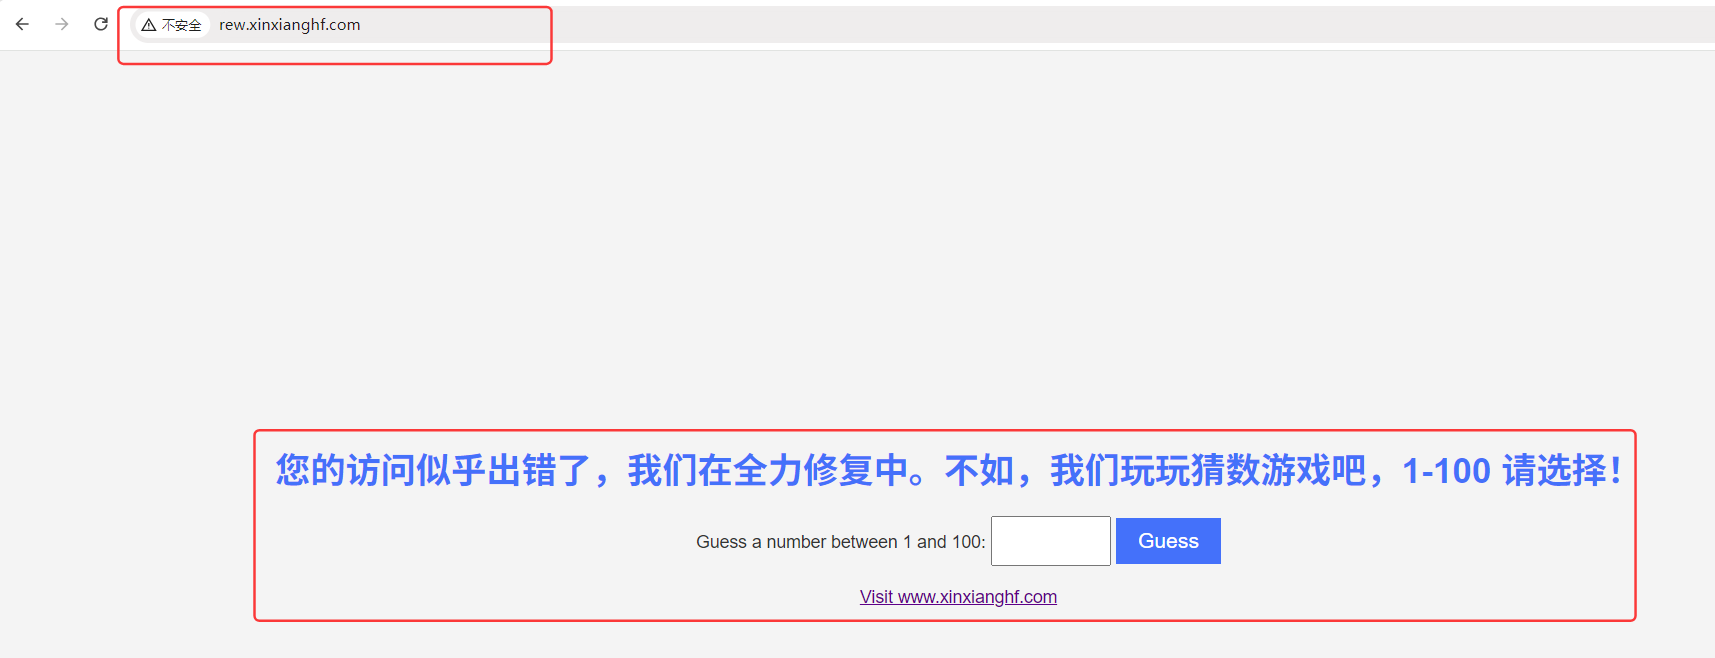
[root@k8s-master01 10]# kubectl get pod -n ingress
NAME                                           READY   STATUS    RESTARTS   AGE
ingress-nginx-controller-kgxhr                 1/1     Running   0          26m
ingress-nginx-controller-zt6qt                 1/1     Running   0          26m
ingress-nginx-defaultbackend-89db9d699-h89ng   1/1     Running   0          26m
[root@k8s-master01 10]# kubectl logs ingress-nginx-defaultbackend-89db9d699-h89ng -n ingress
17
“ 开挂 ” 输入猜数小游戏数字 : 17,猜中了
(8)实验7 Ingress-nginx 错误代码重定向 - 单独申明错误后端
# 将之前实验的 deployment,svc ,pod 都删除,防止影响以后实验
[root@k8s-master01 10]# kubectl delete deployment,svc,pod --all
..........
[root@k8s-master01 10]# kubectl get pod
No resources found in default namespace.
# 分别定义两组 deployment,svc,pod,标签分别是 errcode 和 errtest,正常的访问由 errtest 组提供访问,当访问地址返回 404,415 状态码时,由 errcode 组提供返回页面
[root@k8s-master01 10.11]# cat errtest_ingress.yaml
apiVersion: apps/v1
kind: Deployment
metadata:
 labels:
   app: errcode
 name: errcode
spec:
 replicas: 1
 selector:
   matchLabels:
     app: errcode
 template:
   metadata:
     labels:
       app: errcode
   spec:
     containers:
     - image: tools:errweb1.0
       name: tools
---
apiVersion: v1
kind: Service
metadata:
 labels:
   app: errcode
 name: errcode
spec:
 ports:
 - name: 80-80
   port: 80
   protocol: TCP
   targetPort: 80
 selector:
   app: errcode
 type: ClusterIP
---
apiVersion: apps/v1
kind: Deployment
metadata:
 labels:
   app: errtest
 name: errtest
spec:
 replicas: 1
 selector:

  matchLabels:
     app: errtest
 template:
   metadata:
     labels:
       app: errtest
   spec:
     containers:
     - image: myapp:v1.0
       name: tools
---
apiVersion: v1
kind: Service
metadata:
 labels:
   app: errtest
 name: errtest
spec:
 ports:
 - name: 80-80
   port: 80
   protocol: TCP
   targetPort: 80
 selector:
   app: errtest
 type: ClusterIP
---
apiVersion: networking.k8s.io/v1
kind: Ingress
metadata:
 name: err.xinxianghf.com
 namespace: default
 annotations:
   nginx.ingress.kubernetes.io/default-backend: 'errcode'
   nginx.ingress.kubernetes.io/custom-http-errors: "404,415"
spec:
 rules:
 - host: err.xinxianghf.com
   http:
     paths:
     - path: /
       pathType: Prefix
       backend:
         service:
           name: errtest
           port:
             number: 80
Ingress
3.元数据:Ingress 名称、所在名称空间、描述信息:指定后端 errcode 返回、返回码:404、415 时,返回 定制错误页 errcode
4.期望:规则:主机名:域名、http 协议:路径、路径前缀、后端代理:service 提供:service 名称、端口:端口值
[root@k8s-master01 10.11]# kubectl apply -f errtest_ingress.yaml
deployment.apps/errcode created
service/errcode created
deployment.apps/errtest created
service/errtest created
ingress.networking.k8s.io/err.xinxianghf.com created
[root@k8s-master01 10.11]# kubectl get pod
NAME                       READY   STATUS    RESTARTS   AGE
errcode-78dbd5d599-9l27d   1/1     Running   0          3s
errtest-5954d4bc5c-g7dsc   1/1     Running   0          3s
[root@k8s-master01 10.11]# kubectl get ingress
NAME                      CLASS   HOSTS                     ADDRESS   PORTS     AGE
err.xinxianghf.com        nginx   err.xinxianghf.com                  80        22s
ingress-httpproxy-ssl     nginx   ssl.xinxianghf.com                  80, 443   2d8h
ingress-httpproxy-www1    nginx   www1.xinxianghf.com                 80        2d11h
ingress-httpproxy-www2    nginx   www2.xinxianghf.com                 80        2d9h
ingress-with-auth         nginx   auth.xinxianghf.com                 80        19h
redirect.xinxianghf.com   nginx   redirect.xinxianghf.com             80        18h
rew.xinxianghf.com        nginx   rew.xinxianghf.com                  80        13h
# 电脑主机进入目录,在 hosts 文件中添加新的信息
C:\Windows\System32\drivers\etc

192.168.66.12 www1.xinxianghf.com
192.168.66.12 www2.xinxianghf.com
192.168.66.12 ssl.xinxianghf.com
192.168.66.12 auth.xinxianghf.com
192.168.66.12 redirect.xinxianghf.com
192.168.66.12 rew.xinxianghf.com
192.168.66.12 err.xinxianghf.com
在浏览器中输入域名 err.xinxianghf.com 可以正常访问,但是当有未定义的后缀,nginx 认为是正常的访问,但后端访问不到,所以控制器拦截 404,415 的状态码,返回定制页面
(9)实验8 Ingress-nginx 匹配请求头
Ingress annotations 的 nginx.ingress.kubernetes.io/server-snippet 配置。Snippet 配置是专门用于一些复杂的 Nginx 配置,和 Nginx 配置通用,在这里模拟移动端与电脑端访问同一个域名转发到不同服务。
# 默认是 false 不开启,开启此功能,因为 configmap 加载需要一定时间,可以直接删除让其更新
[root@k8s-master01 10.12]# kubectl edit configMap ingress-nginx-controller -n ingress
..........
data:
  allow-snippet-annotations: "true"
..........
configmap/ingress-nginx-controller edited
[root@k8s-master01 10.12]# kubectl delete pod --all -n ingress
pod "ingress-nginx-controller-kgxhr" deleted
pod "ingress-nginx-controller-zt6qt" deleted
pod "ingress-nginx-defaultbackend-89db9d699-h89ng" deleted
[root@k8s-master01 10.12]# kubectl get pod -n ingress
NAME                                           READY   STATUS    RESTARTS   AGE
ingress-nginx-controller-h2v6q                 0/1     Running   0          7s
ingress-nginx-controller-vkbp9                 0/1     Running   0          7s
ingress-nginx-defaultbackend-89db9d699-rzklk   1/1     Running   0          19s
[root@k8s-master01 10.12]# cat snippet_ingress.yaml
apiVersion: apps/v1
kind: Deployment
metadata:
 labels:
   app: snippet
 name: snippet
spec:
 replicas: 1
 selector:
   matchLabels:
     app: snippet
 template:
   metadata:
     labels:
       app: snippet
   spec:
     containers:
     - image: myapp:v1.0
       name: tools
---
apiVersion: v1
kind: Service
metadata:
 labels:
   app: snippet
 name: snippet
spec:
 ports:
 - name: 80-80
   port: 80
   protocol: TCP
   targetPort: 80
 selector:
   app: snippet
 type: ClusterIP
---
apiVersion: networking.k8s.io/v1
kind: Ingress
metadata:
 name: snippet.xinxianghf.com
 namespace: default
 annotations:
   nginx.ingress.kubernetes.io/server-snippet: |
     set $agentflag 0;
     if ($http_user_agent ~* "(Android|IPhone)") {
       set $agentflag 1;
     }
     if ($agentflag = 1) {
       return 302 http://www.baidu.com;
     }
spec:
 rules:
 - host: snippet.xinxianghf.com
   http:
     paths:
     - path: /
       pathType: Prefix
       backend:
         service:
           name: snippet
           port:
             number: 80
Ingress
3.元数据:Ingress 名称、所在名称空间、描述信息:(设置变量0,判断当请求头遇到安卓、苹果时,重置变量为1,判断变量为1时,跳转返回 302 的代理)
4.期望:规则:主机域名、http 协议:路径:路径匹配、前缀、后端代理:由server 返回:后端 server 名、端口
[root@k8s-master01 10.12]# kubectl apply -f snippet_ingress.yaml
deployment.apps/snippet created
service/snippet created
ingress.networking.k8s.io/snippet.xinxianghf.com created
[root@k8s-master01 10.12]# kubectl get pod
NAME                       READY   STATUS    RESTARTS   AGE
errcode-78dbd5d599-9l27d   1/1     Running   0          3h56m
errtest-5954d4bc5c-g7dsc   1/1     Running   0          3h56m
snippet-5d946d89b7-dthll   1/1     Running   0          85s
[root@k8s-master01 10.12]# kubectl get ingress
NAME                      CLASS   HOSTS                     ADDRESS   PORTS     AGE
err.xinxianghf.com        nginx   err.xinxianghf.com                  80        3h57m
ingress-httpproxy-ssl     nginx   ssl.xinxianghf.com                  80, 443   2d12h
ingress-httpproxy-www1    nginx   www1.xinxianghf.com                 80        2d15h
ingress-httpproxy-www2    nginx   www2.xinxianghf.com                 80        2d13h
ingress-with-auth         nginx   auth.xinxianghf.com                 80        23h
redirect.xinxianghf.com   nginx   redirect.xinxianghf.com             80        22h
rew.xinxianghf.com        nginx   rew.xinxianghf.com                  80        17h
snippet.xinxianghf.com    nginx   snippet.xinxianghf.com              80        94s
# 本地服务器进行域名解析
[root@k8s-master01 10.12]# echo "192.168.66.12 snippet.xinxianghf.com" >> /etc/hosts
[root@k8s-master01 10.12]# cat /etc/hosts
..........
192.168.66.11 k8s-master01 m1
192.168.66.12 k8s-node01 n1
192.168.66.13 k8s-node02 n2
20.205.243.166 github.com

192.168.66.12 www1.xinxianghf.com
192.168.66.12 redirect.xinxianghf.com
192.168.66.12 snippet.xinxianghf.com
# 模拟电脑端和安卓、苹果端访问,-H 请求头部信息,-I 只返回头部信息,电脑端访问正常,当 安卓、苹果端 访问,返回 302,让客户端再去连接百度页面
[root@k8s-master01 10.12]# curl snippet.xinxianghf.com
Hello MyApp | Version: v1 | <a href="hostname.html">Pod Name</a>
[root@k8s-master01 10.12]# curl snippet.xinxianghf.com -H 'User-Agent: Android'  -I
HTTP/1.1 302 Moved Temporarily
Date: Tue, 22 Jul 2025 07:31:08 GMT
Content-Type: text/html
Content-Length: 138
Connection: keep-alive
Location: http://www.baidu.com

[root@k8s-master01 10.12]# curl snippet.xinxianghf.com -H 'User-Agent: IPhone'  -I
HTTP/1.1 302 Moved Temporarily
Date: Tue, 22 Jul 2025 07:31:26 GMT
Content-Type: text/html
Content-Length: 138
Connection: keep-alive
Location: http://www.baidu.com
(10)实验9 Ingress-nginx 配置黑白名单
a.黑白名单配置要求
配置方案:
Annotations:只对指定的 Ingress 生效
ConfigMap:全局生效
若是同时配置了 Annotations 和 configmap,一般都是 annotations 生效,configmap 不生效,因为 annotations 优先级比 configmap 高(计算机中,作用域越小,权重越高)
黑白名单区别:
白名单是默认拒绝所有,只允许指定的地址访问
黑名单是不允许指定的地址访问
黑白名单配置使用 configmap 还是 annotations
黑名单可以使用 ConfigMap 配置(黑名单拒绝的 IP 少,全局响应)
白名单建议使用 Annotations 配置(白名单需求不多)
b.configmap 配置黑名单
# block-cidrs 之间可以写多个 IP,IP 之间使用逗号分隔
[root@k8s-master01 10.13]# kubectl edit configmap ingress-nginx-controller -n ingress
.........
data:
  allow-snippet-annotations: "true"
  block-cidrs: 192.168.66.12
.........
configmap/ingress-nginx-controller edited
# 为了使 ingress 快速生效,删除 pod ,让它快速重构
[root@k8s-master01 10.13]# kubectl delete pod --all -n ingress
pod "ingress-nginx-controller-h2v6q" deleted
pod "ingress-nginx-controller-vkbp9" deleted
pod "ingress-nginx-defaultbackend-89db9d699-rzklk" deleted
[root@k8s-master01 10.13]# kubectl get pod -n ingress
NAME                                           READY   STATUS    RESTARTS   AGE
ingress-nginx-controller-88xrt                 1/1     Running   0          21s
ingress-nginx-controller-h5dbc                 1/1     Running   0          21s
ingress-nginx-defaultbackend-89db9d699-7kdg4   1/1     Running   0          32s
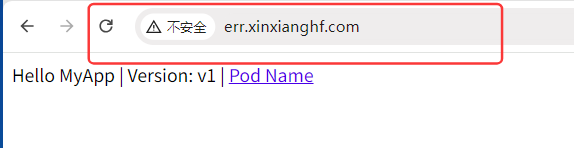
# 前面 k8s-master01 上一个实验加入了解析,node01、node02 节点也加入解析
[root@k8s-node01 ~]# echo "192.168.66.12 snippet.xinxianghf.com" >> /etc/hosts
[root@k8s-node02 ~]# echo "192.168.66.12 snippet.xinxianghf.com" >> /etc/hosts
# 本地服务器通过域名访问
[root@k8s-master01 10.13]# curl snippet.xinxianghf.com
Hello MyApp | Version: v1 | <a href="hostname.html">Pod Name</a>
[root@k8s-node01 ~]# curl snippet.xinxianghf.com
<html>
<head><title>403 Forbidden</title></head>
<body>
<center><h1>403 Forbidden</h1></center>
<hr><center>nginx</center>
</body>
</html>
[root@k8s-node02 ~]# curl snippet.xinxianghf.com
Hello MyApp | Version: v1 | <a href="hostname.html">Pod Name</a>
# 删除 黑名单选项 block-cidrs,避免实验干扰!
[root@k8s-master01 10.13]# kubectl edit -n ingress configmaps ingress-nginx-controller
..........
data:
  allow-snippet-annotations: "true"
..........
configmap/ingress-nginx-controller edited
[root@k8s-master01 10.13]# kubectl delete pod --all -n ingress
pod "ingress-nginx-controller-69gjt" deleted
pod "ingress-nginx-controller-qmd4n" deleted
pod "ingress-nginx-defaultbackend-89db9d699-nt264" deleted
c.annotations 配置黑名单
[root@k8s-master01 10.13]# cat black_ingress.yaml
apiVersion: apps/v1
kind: Deployment
metadata:
 labels:
   app: black
 name: black-deploy
spec:
 replicas: 1
 selector:
   matchLabels:
     app: black
 template:
   metadata:
     labels:
       app: black
   spec:
     containers:
     - image: myapp:v1.0
       name: myapp
---
apiVersion: v1
kind: Service
metadata:
 labels:
   app: black
 name: black-svc
spec:
 ports:
 - name: 80-80
   port: 80
   protocol: TCP
   targetPort: 80
 selector:
   app: black
 type: ClusterIP
---
apiVersion: networking.k8s.io/v1
kind: Ingress
metadata:
 annotations:
   nginx.ingress.kubernetes.io/server-snippet: |-
     deny 192.168.66.11;
     allow all;
 name: black.xinxianghf.com
spec:
 rules:
 - host: black.xinxianghf.com
   http:
     paths:
     - pathType: Prefix
       backend:
         service:
           name: black-svc
           port:
             number: 80
       path: /
Ingress
3.元数据:描述信息:拒绝 IP、允许所有、Ingress 名称
[root@k8s-master01 10.13]# kubectl apply -f black_ingress.yaml
deployment.apps/black-deploy created
service/black-svc created
ingress.networking.k8s.io/black.xinxianghf.com created
[root@k8s-master01 10.13]# kubectl get ingress
NAME                      CLASS   HOSTS                     ADDRESS   PORTS     AGE
black.xinxianghf.com      nginx   black.xinxianghf.com                80        8m27s
err.xinxianghf.com        nginx   err.xinxianghf.com                  80        5h40m
ingress-httpproxy-ssl     nginx   ssl.xinxianghf.com                  80, 443   2d13h
ingress-httpproxy-www1    nginx   www1.xinxianghf.com                 80        2d17h
ingress-httpproxy-www2    nginx   www2.xinxianghf.com                 80        2d15h
ingress-with-auth         nginx   auth.xinxianghf.com                 80        24h
redirect.xinxianghf.com   nginx   redirect.xinxianghf.com             80        24h
rew.xinxianghf.com        nginx   rew.xinxianghf.com                  80        19h
snippet.xinxianghf.com    nginx   snippet.xinxianghf.com              80        105m
# 各服务器节点添加域名解析
[root@k8s-master01 10.13]# echo "192.168.66.12 black.xinxianghf.com" >> /etc/hosts
[root@k8s-node01 ~]# echo "192.168.66.12 black.xinxianghf.com" >> /etc/hosts
[root@k8s-node02 ~]# echo "192.168.66.12 black.xinxianghf.com" >> /etc/hosts
# master01 访问,被拒绝 ,其他节点 node01、node02 仍然可以访问
# 上面添加黑名单后,下面实验没有删除,是因为 annotations 和 configmap 不同,一个 仅Ingress 域名生效,一个全局生效,所以此 annotations 黑名单只针对 black.xinxianghf.com 生效
[root@k8s-master01 10.13]# curl black.xinxianghf.com
<html>
<head><title>403 Forbidden</title></head>
<body>
<center><h1>403 Forbidden</h1></center>
<hr><center>nginx</center>
</body>
</html>
[root@k8s-node01 ~]# curl black.xinxianghf.com
Hello MyApp | Version: v1 | <a href="hostname.html">Pod Name</a>
[root@k8s-node02 ~]# curl black.xinxianghf.com
Hello MyApp | Version: v1 | <a href="hostname.html">Pod Name</a>
d.configmap 配置白名单
# 在 configmap 中添加白名单配置,删除重构,强制更新
[root@k8s-master01 10.13]# kubectl edit cm ingress-nginx-controller -n ingress
..........
data:
  allow-snippet-annotations: "true"
  whitelist-source-range: 192.168.66.13
..........
configmap/ingress-nginx-controller edited
[root@k8s-master01 10.13]# kubectl delete pod --all -n ingress
pod "ingress-nginx-controller-tfjtl" deleted
pod "ingress-nginx-controller-x2dcp" deleted
pod "ingress-nginx-defaultbackend-89db9d699-pcg7l" deleted
[root@k8s-master01 10.13]# cat white_cm_ingress.yaml
apiVersion: apps/v1
kind: Deployment
metadata:
 labels:
   app: white-cm
 name: white-cm-deploy
spec:
 replicas: 1
 selector:
   matchLabels:
     app: white-cm
 template:
   metadata:
     labels:
       app: white-cm
   spec:
     containers:
     - image: myapp:v1.0
       name: myapp
---
apiVersion: v1
kind: Service
metadata:
 labels:
   app: white-cm
 name: white-cm-svc
spec:
 ports:
 - name: 80-80
   port: 80
   protocol: TCP
   targetPort: 80
 selector:
   app: white-cm
 type: ClusterIP
---
apiVersion: networking.k8s.io/v1
kind: Ingress
metadata:
 name: whitecm.xinxianghf.com
spec:
 rules:
 - host: whitecm.xinxianghf.com
   http:
     paths:
     - path: /
       pathType: Prefix
       backend:
         service:
           name: white-cm-svc
           port:
             number: 80
[root@k8s-master01 10.13]# kubectl apply -f white_cm_ingress.yaml
deployment.apps/white-cm-deploy created
service/white-cm-svc created
ingress.networking.k8s.io/whitecm.xinxianghf.com created
[root@k8s-master01 10.13]# kubectl get ingress
NAME                      CLASS   HOSTS                     ADDRESS   PORTS     AGE
black.xinxianghf.com      nginx   black.xinxianghf.com                80        17h
err.xinxianghf.com        nginx   err.xinxianghf.com                  80        22h
ingress-httpproxy-ssl     nginx   ssl.xinxianghf.com                  80, 443   3d7h
ingress-httpproxy-www1    nginx   www1.xinxianghf.com                 80        3d10h
ingress-httpproxy-www2    nginx   www2.xinxianghf.com                 80        3d8h
ingress-with-auth         nginx   auth.xinxianghf.com                 80        42h
redirect.xinxianghf.com   nginx   redirect.xinxianghf.com             80        41h
rew.xinxianghf.com        nginx   rew.xinxianghf.com                  80        36h
snippet.xinxianghf.com    nginx   snippet.xinxianghf.com              80        18h
whitecm.xinxianghf.com    nginx   whitecm.xinxianghf.com              80        8s
# 各服务器节点添加域名解析
[root@k8s-master01 10.13]# echo "192.168.66.12 whitecm.xinxianghf.com" >> /etc/hosts
[root@k8s-node01 ~]# echo "192.168.66.12 whitecm.xinxianghf.com" >> /etc/hosts
[root@k8s-node02 ~]# echo "192.168.66.12 whitecm.xinxianghf.com" >> /etc/hosts
# master01 、 node01访问被拒绝 ,node02 因为添加在白名单内仍然可以访问
[root@k8s-master01 10.13]# curl whitecm.xinxianghf.com
<html>
<head><title>403 Forbidden</title></head>
<body>
<center><h1>403 Forbidden</h1></center>
<hr><center>nginx</center>
</body>
</html>
[root@k8s-node01 ~]# curl whitecm.xinxianghf.com
<html>
<head><title>403 Forbidden</title></head>
<body>
<center><h1>403 Forbidden</h1></center>
<hr><center>nginx</center>
</body>
</html>
[root@k8s-node02 ~]# curl whitecm.xinxianghf.com
Hello MyApp | Version: v1 | <a href="hostname.html">Pod Name</a>
# 删除 白名单选项 whitelist,避免实验干扰!删除,强制更新配置
[root@k8s-master01 10.13]# kubectl edit cm ingress-nginx-controller -n ingress
.........
data:
  allow-snippet-annotations: "true"
.........
configmap/ingress-nginx-controller edited
[root@k8s-master01 10.13]# kubectl delete pod --all -n ingress
pod "ingress-nginx-controller-8wdwp" deleted
pod "ingress-nginx-controller-rhflt" deleted
pod "ingress-nginx-defaultbackend-89db9d699-wfpbw" deleted
e.annotations 配置白名单
[root@k8s-master01 10.13]# cat white_as_ingress.yaml
apiVersion: apps/v1
kind: Deployment
metadata:
 labels:
   app: white-as
 name: white-as-deploy
spec:
 replicas: 1
 selector:
   matchLabels:
     app: white-as
 template:
   metadata:
     labels:
       app: white-as
   spec:
     containers:
     - image: myapp:v1.0
       name: myapp
---
apiVersion: v1
kind: Service
metadata:
 labels:
   app: white-as
 name: white-as-svc
spec:
 ports:
 - name: 80-80
   port: 80
   protocol: TCP
   targetPort: 80
 selector:
   app: white-as
 type: ClusterIP
---
apiVersion: networking.k8s.io/v1
kind: Ingress
metadata:
 annotations:
   nginx.ingress.kubernetes.io/whitelist-source-range: 192.168.66.12
 name: whiteas.xinxianghf.com
spec:
 rules:
 - host: whiteas.xinxianghf.com
   http:
     paths:
     - path: /
       pathType: Prefix
       backend:
         service:
           name: white-as-svc
           port:
             number: 80
[root@k8s-master01 10.13]# kubectl apply -f white_as_ingress.yaml
deployment.apps/white-as-deploy created
service/white-as-svc created
ingress.networking.k8s.io/whiteas.xinxianghf.com created
[root@k8s-master01 10.13]# kubectl get ingress
NAME                      CLASS   HOSTS                     ADDRESS   PORTS     AGE
black.xinxianghf.com      nginx   black.xinxianghf.com                80        17h
err.xinxianghf.com        nginx   err.xinxianghf.com                  80        23h
ingress-httpproxy-ssl     nginx   ssl.xinxianghf.com                  80, 443   3d7h
ingress-httpproxy-www1    nginx   www1.xinxianghf.com                 80        3d10h
ingress-httpproxy-www2    nginx   www2.xinxianghf.com                 80        3d8h
ingress-with-auth         nginx   auth.xinxianghf.com                 80        42h
redirect.xinxianghf.com   nginx   redirect.xinxianghf.com             80        41h
rew.xinxianghf.com        nginx   rew.xinxianghf.com                  80        37h
snippet.xinxianghf.com    nginx   snippet.xinxianghf.com              80        19h
whiteas.xinxianghf.com    nginx   whiteas.xinxianghf.com              80        6s
whitecm.xinxianghf.com    nginx   whitecm.xinxianghf.com              80        19m
# 各服务器节点添加域名解析
[root@k8s-master01 10.13]# echo "192.168.66.12 whiteas.xinxianghf.com" >> /etc/hosts
[root@k8s-node01 ~]# echo "192.168.66.12 whiteas.xinxianghf.com" >> /etc/hosts
[root@k8s-node02 ~]# echo "192.168.66.12 whiteas.xinxianghf.com" >> /etc/hosts
# master01、node02 访问被拒绝 ,节点 node01 因为添加到了白名单仍然可以访问
[root@k8s-master01 10.13]# curl whiteas.xinxianghf.com
<html>
<head><title>403 Forbidden</title></head>
<body>
<center><h1>403 Forbidden</h1></center>
<hr><center>nginx</center>
</body>
</html>
[root@k8s-node01 ~]# curl whiteas.xinxianghf.com
Hello MyApp | Version: v1 | <a href="hostname.html">Pod Name</a>
[root@k8s-node02 ~]# curl whiteas.xinxianghf.com
<html>
<head><title>403 Forbidden</title></head>
<body>
<center><h1>403 Forbidden</h1></center>
<hr><center>nginx</center>
</body>
</html>
# 删除上面的实验pod
[root@k8s-master01 10.13]# kubectl delete deployment,pod -n default
(11)实验10 Ingress-nginx 速率限制
当需要限制速率以降低后端压力或限制单个 IP 每秒的访问速率防止攻击时,此时可以使用 Nginx 的 rate limit 进行配置
nginx.ingress.kubernetes.io/limit-rps:限制每秒单个 IP 的连接
nginx.ingress.kubernetes.io/limit-rpm:限制每分钟单个 IP 的连接
nginx.ingress.kubernetes.io/limit-rate:限制客户端每秒传输的字节数,单位为 K,需要开启 proxy-buffering
nginx.ingress.kubernetes.io/limit-whitelist:速率限制白名单
[root@k8s-master01 10.14]# cat deploy_svc.yaml
apiVersion: apps/v1
kind: Deployment
metadata:
 labels:
   app: speed
 name: speed-deploy
spec:
 replicas: 1
 selector:
   matchLabels:
     app: speed
 template:
   metadata:
     labels:
       app: speed
   spec:
     containers:
     - image: myapp:v1.0
       name: myapp
---
apiVersion: v1
kind: Service
metadata:
 labels:
   app: speed
 name: speed-svc
spec:
 ports:
 - name: 80-80
   port: 80
   protocol: TCP
   targetPort: 80
 selector:
   app: speed
 type: ClusterIP
---
apiVersion: networking.k8s.io/v1
kind: Ingress
metadata:
 name: speed.xinxianghf.com
 namespace: default
spec:
 rules:
 - host: speed.xinxianghf.com
   http:
     paths:
     - pathType: Prefix
       path: "/"
       backend:
         service:
           name: speed-svc
           port:
             number: 80
[root@k8s-master01 10.14]# kubectl apply -f deploy_svc.yaml
deployment.apps/speed-deploy created
service/speed-svc created
ingress.networking.k8s.io/speed.xinxianghf.com created
[root@k8s-master01 10.14]# kubectl get ingress
NAME                      CLASS   HOSTS                     ADDRESS   PORTS     AGE
black.xinxianghf.com      nginx   black.xinxianghf.com                80        20h
err.xinxianghf.com        nginx   err.xinxianghf.com                  80        26h
ingress-httpproxy-ssl     nginx   ssl.xinxianghf.com                  80, 443   3d10h
ingress-httpproxy-www1    nginx   www1.xinxianghf.com                 80        3d14h
ingress-httpproxy-www2    nginx   www2.xinxianghf.com                 80        3d11h
ingress-with-auth         nginx   auth.xinxianghf.com                 80        45h
redirect.xinxianghf.com   nginx   redirect.xinxianghf.com             80        44h
rew.xinxianghf.com        nginx   rew.xinxianghf.com                  80        40h
snippet.xinxianghf.com    nginx   snippet.xinxianghf.com              80        22h
speed.xinxianghf.com      nginx   speed.xinxianghf.com                80        14s
whiteas.xinxianghf.com    nginx   whiteas.xinxianghf.com              80        3h14m
whitecm.xinxianghf.com    nginx   whitecm.xinxianghf.com              80        3h34m
# 添加解析,访问没有问题
[root@k8s-master01 10.14]# echo "192.168.66.12 speed.xinxianghf.com" >> /etc/hosts
[root@k8s-master01 10.14]# curl speed.xinxianghf.com
Hello MyApp | Version: v1 | <a href="hostname.html">Pod Name</a>
# 使用 ab 命令,需要安装httpd-tools 工具,前面做 BasicAuth 代理实验时使用 htpasswd 命令安装过 httpd-tools 工具
# ab 压测命令、-c 并发数量、-n 请求总和、域名
# 总量请求 100、失败 0、请求总时间 4.119 ms
[root@k8s-master01 10.14]# ab -c 10 -n 100 http://speed.xinxianghf.com/ | grep requests
Complete requests:      100
Failed requests:        0
Time per request:       4.119 [ms] (mean, across all concurrent requests)
Percentage of the requests served within a certain time (ms)
# 添加速度限制
[root@k8s-master01 10.14]# cat speed_ingress.yaml
apiVersion: networking.k8s.io/v1
kind: Ingress
metadata:
 name: speed.xinxianghf.com
 namespace: default
 annotations:
   nginx.ingress.kubernetes.io/limit-connections: "1"
spec:
 rules:
 - host: speed.xinxianghf.com
   http:
     paths:
     - pathType: Prefix
       path: "/"
       backend:
         service:
           name: speed-svc
           port:
             number: 80
3.元数据:Ingress 名称、所属名称空间、描述信息:nginx 连接限制 并发数量 1
[root@k8s-master01 10.14]# kubectl apply -f speed_ingress.yaml
ingress.networking.k8s.io/speed.xinxianghf.com configured
# 请求总数:100、请求失败的数量:88、成功 12 个,大约 10%,因为总数10,并发10,每次并发10个时都只能处理成功一个请求,其他 9 个失败,所以成功请求大概 10%
[root@k8s-master01 10.14]# ab -c 10 -n 100 http://speed.xinxianghf.com/ | grep requests
Complete requests:      100
Failed requests:        88
Time per request:       4.237 [ms] (mean, across all concurrent requests)
Percentage of the requests served within a certain time (ms)
(12)实验11 Ingress-nginx 灰度或金丝雀发布
[root@k8s-master01 10.15]# cat v1_deploy_svc_ingress.yaml
apiVersion: apps/v1
kind: Deployment
metadata:
 labels:
   app: v1
 name: v1-deploy
spec:
 replicas: 10
 selector:
   matchLabels:
     app: v1
 template:
   metadata:
     labels:
       app: v1
   spec:
     containers:
     - image: myapp:v1.0
       name: myapp
---
apiVersion: v1
kind: Service
metadata:
 labels:
   app: v1
 name: v1-svc
spec:
 ports:
 - name: 80-80
   port: 80
   protocol: TCP
   targetPort: 80
 selector:
   app: v1
 type: ClusterIP
---
apiVersion: networking.k8s.io/v1
kind: Ingress
metadata:
  name: v1.xinxianghf.com
  namespace: default
spec:
 rules:
 - host: svc.xinxianghf.com
   http:
     paths:
     - pathType: Prefix
       path: "/"
       backend:
         service:
           name: v1-svc
           port:
             number: 80
[root@k8s-master01 10.15]# kubectl apply -f v1_deploy_svc_ingress.yaml
deployment.apps/v1-deploy created
service/v1-svc created
kubeingress.networking.k8s.io/v1.xinxianghf.com created
[root@k8s-master01 10.15]# kubectl get pod
NAME                            READY   STATUS    RESTARTS   AGE
speed-deploy-794f498bc9-gdfpb   1/1     Running   0          95m
v1-deploy-8fdd4677c-4kjxk       1/1     Running   0          24m
v1-deploy-8fdd4677c-57675       1/1     Running   0          24m
v1-deploy-8fdd4677c-85bh8       1/1     Running   0          24m
v1-deploy-8fdd4677c-d4857       1/1     Running   0          24m
v1-deploy-8fdd4677c-gqbqp       1/1     Running   0          24m
v1-deploy-8fdd4677c-hbjn9       1/1     Running   0          24m
v1-deploy-8fdd4677c-j5mt6       1/1     Running   0          24m
v1-deploy-8fdd4677c-s8q4n       1/1     Running   0          24m
v1-deploy-8fdd4677c-st7h7       1/1     Running   0          24m
v1-deploy-8fdd4677c-xggft       1/1     Running   0          24m
[root@k8s-master01 10.15]# echo "192.168.66.12 svc.xinxianghf.com" >> /etc/hosts
[root@k8s-master01 10.15]# for i in {1..100};do curl svc.xinxianghf.com >> sum;done
.........
[root@k8s-master01 10.15]# cat sum | sort | uniq -c && rm -f sum
    100 Hello MyApp | Version: v1 | <a href="hostname.html">Pod Name</a>
[root@k8s-master01 10.15]# cat v2_deploy_svc_ingress.yaml
apiVersion: apps/v1
kind: Deployment
metadata:
 labels:
   app: v2
 name: v2-deploy
spec:
 replicas: 10
 selector:
   matchLabels:
     app: v2
 template:
   metadata:
     labels:
       app: v2
   spec:
     containers:
     - image: myapp:v2.0
       name: myapp
---
apiVersion: v1
kind: Service
metadata:
 labels:
   app: v2
 name: v2-svc
spec:
 ports:
 - name: 80-80
   port: 80
   protocol: TCP
   targetPort: 80
 selector:
   app: v2
 type: ClusterIP
---
apiVersion: networking.k8s.io/v1
kind: Ingress
metadata:
 name: v2.xinxianghf.com
 namespace: default
 annotations:
   nginx.ingress.kubernetes.io/canary: "true"
   nginx.ingress.kubernetes.io/canary-weight: "10"
spec:
 rules:
 - host: svc.xinxianghf.com
   http:
     paths:
     - pathType: Prefix
       path: "/"
       backend:
         service:
           name: v2-svc
           port:
             number: 80
Ingress
3.元数据:Ingress 名称、所属名称空间、描述信息:1.开启灰度发布、2.灰度发布权重 10%
# 注意 v1 与 v2 不同版本,相同的域名 svc.xinxianghf.com
[root@k8s-master01 10.15]# kubectl apply -f v2_deploy_svc_ingress.yaml
deployment.apps/v2-deploy created
service/v2-svc created
ingress.networking.k8s.io/v2.xinxianghf.com created
[root@k8s-master01 10.15]# kubectl get pod
NAME                            READY   STATUS    RESTARTS   AGE
speed-deploy-794f498bc9-gdfpb   1/1     Running   0          98m
v1-deploy-8fdd4677c-4kjxk       1/1     Running   0          28m
v1-deploy-8fdd4677c-57675       1/1     Running   0          28m
v1-deploy-8fdd4677c-85bh8       1/1     Running   0          28m
v1-deploy-8fdd4677c-d4857       1/1     Running   0          28m
v1-deploy-8fdd4677c-gqbqp       1/1     Running   0          28m
v1-deploy-8fdd4677c-hbjn9       1/1     Running   0          28m
v1-deploy-8fdd4677c-j5mt6       1/1     Running   0          28m
v1-deploy-8fdd4677c-s8q4n       1/1     Running   0          28m
v1-deploy-8fdd4677c-st7h7       1/1     Running   0          28m
v1-deploy-8fdd4677c-xggft       1/1     Running   0          28m
v2-deploy-578fccbc5-47xm2       1/1     Running   0          27s
v2-deploy-578fccbc5-55tn5       1/1     Running   0          27s
v2-deploy-578fccbc5-7sj8n       1/1     Running   0          27s
v2-deploy-578fccbc5-brzs8       1/1     Running   0          27s
v2-deploy-578fccbc5-fpmww       1/1     Running   0          27s
v2-deploy-578fccbc5-lgsr9       1/1     Running   0          27s
v2-deploy-578fccbc5-qgn7m       1/1     Running   0          27s
v2-deploy-578fccbc5-shjgb       1/1     Running   0          27s
v2-deploy-578fccbc5-z7hq2       1/1     Running   0          27s
v2-deploy-578fccbc5-zd5fh       1/1     Running   0          27s
# 负载根据 Ingress 设置,灰度发布新版本访问量大约 10%
[root@k8s-master01 10.15]# for i in {1..100};do curl svc.xinxianghf.com >> sum;done
.........
[root@k8s-master01 10.15]# cat sum | sort | uniq -c && rm -f sum
     91 Hello MyApp | Version: v1 | <a href="hostname.html">Pod Name</a>
      9 Hello MyApp | Version: v2 | <a href="hostname.html">Pod Name</a>
# 动态调整灰度发布的比例,两个权重都需要更改,一个 json 格式,一个 yaml 格式
[root@k8s-master01 10.15]# kubectl get ingress
NAME                      CLASS   HOSTS                     ADDRESS   PORTS     AGE
v1.xinxianghf.com         nginx   svc.xinxianghf.com                  80        38m
v2.xinxianghf.com         nginx   svc.xinxianghf.com                  80        11m
[root@k8s-master01 10.15]# kubectl edit ingress v2.xinxianghf.com
.........
  annotations:
    kubectl.kubernetes.io/last-applied-configuration: |
      {"apiVersion":"networking.k8s.io/v1","kind":"Ingress","metadata":{"annotations":{"nginx.ingress.kubernetes.io/canary":"true","nginx.ingress.kubernetes.io/canary-weight":"50"},"name":"v2.xinxianghf.com","namespace":"default"},"spec"
:{"rules":[{"host":"svc.xinxianghf.com","http":{"paths":[{"backend":{"service":{"name":"v2-svc","port":{"number":80}}},"path":"/","pathType":"Prefix"}]}}]}}
    nginx.ingress.kubernetes.io/canary: "true"
    nginx.ingress.kubernetes.io/canary-weight: "50"
.........
ingress.networking.k8s.io/v2.xinxianghf.com edited
[root@k8s-master01 10.15]# for i in {1..100};do curl svc.xinxianghf.com >> sum;done
.........
[root@k8s-master01 10.15]# cat sum | sort | uniq -c && rm -f sum
     49 Hello MyApp | Version: v1 | <a href="hostname.html">Pod Name</a>
     51 Hello MyApp | Version: v2 | <a href="hostname.html">Pod Name</a>
(13)实验12 Ingress-nginx 代理后端 https 协议
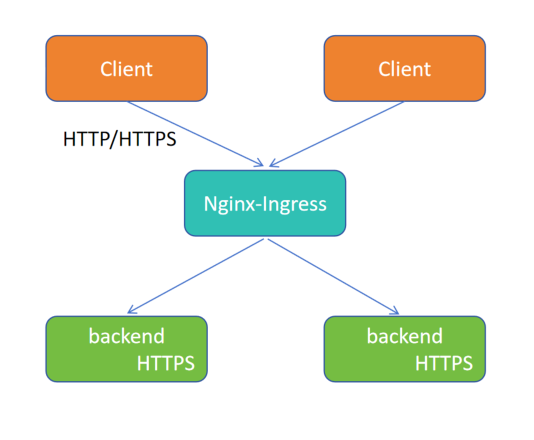
Nginx-Ingress 对后端使用 HTTPS 连接
[root@k8s-master01 10.16]# cat deploy_svc_ingress.yaml
apiVersion: apps/v1
kind: Deployment
metadata:
 labels:
   app: proxyhttps
 name: proxyhttps-deploy
spec:
 replicas: 1
 selector:
   matchLabels:
     app: proxyhttps
 template:
   metadata:
     labels:
       app: proxyhttps
   spec:
     containers:
     - image: myapp:v1.0
       name: myapp
---
apiVersion: v1
kind: Service
metadata:
 labels:
   app: proxyhttps
 name: proxyhttps-svc
spec:
 ports:
 - name: 443-443
   port: 443
   protocol: TCP
   targetPort: 443
 selector:
   app: proxyhttps
 type: ClusterIP
---
apiVersion: networking.k8s.io/v1
kind: Ingress
metadata:
 annotations:
   nginx.ingress.kubernetes.io/backend-protocol: HTTPS
 name: proxyhttps.xinxianghf.com
 namespace: default
spec:
 rules:
 - host: proxyhttps.xinxianghf.com
   http:
     paths:
     - backend:
         service:
           name: proxyhttps-svc
           port:
             number: 443
       path: /
       pathType: ImplementationSpecific
Ingress
3.元数据:描述信息:声明后端应用使用 HTTPS 协议、Ingress 名称、所属名称空间
上面 host:下面的 http 是固定的字段, http 和 https 都使用 http
[root@k8s-master01 10.16]# kubectl apply -f deploy_svc_ingress.yaml
deployment.apps/proxyhttps-deploy created
service/proxyhttps-svc created
ingress.networking.k8s.io/proxyhttps.xinxianghf.com created
[root@k8s-master01 10.16]# kubectl get ingress
NAME                        CLASS   HOSTS                       ADDRESS   PORTS     AGE
black.xinxianghf.com        nginx   black.xinxianghf.com                  80        29h
err.xinxianghf.com          nginx   err.xinxianghf.com                    80        35h
ingress-httpproxy-ssl       nginx   ssl.xinxianghf.com                    80, 443   3d19h
ingress-httpproxy-www1      nginx   www1.xinxianghf.com                   80        3d22h
ingress-httpproxy-www2      nginx   www2.xinxianghf.com                   80        3d20h
ingress-with-auth           nginx   auth.xinxianghf.com                   80        2d6h
proxyhttps.xinxianghf.com   nginx   proxyhttps.xinxianghf.com             80        20s
redirect.xinxianghf.com     nginx   redirect.xinxianghf.com               80        2d5h
rew.xinxianghf.com          nginx   rew.xinxianghf.com                    80        2d1h
snippet.xinxianghf.com      nginx   snippet.xinxianghf.com                80        31h
speed.xinxianghf.com        nginx   speed.xinxianghf.com                  80        8h
v1.xinxianghf.com           nginx   svc.xinxianghf.com                    80        7h37m
v2.xinxianghf.com           nginx   svc.xinxianghf.com                    80        7h9m
whiteas.xinxianghf.com      nginx   whiteas.xinxianghf.com                80        12h
whitecm.xinxianghf.com      nginx   whitecm.xinxianghf.com                80        12h
# 本地进行测试,本地能够解析 域名
C:\Users\马俊南>ping www1.xinxianghf.com

192.168.66.12 www1.xinxianghf.com
192.168.66.12 www2.xinxianghf.com
192.168.66.12 ssl.xinxianghf.com
192.168.66.12 auth.xinxianghf.com
192.168.66.12 redirect.xinxianghf.com
192.168.66.12 rew.xinxianghf.com
192.168.66.12 err.xinxianghf.com
192.168.66.12 proxyhttps.xinxianghf.com
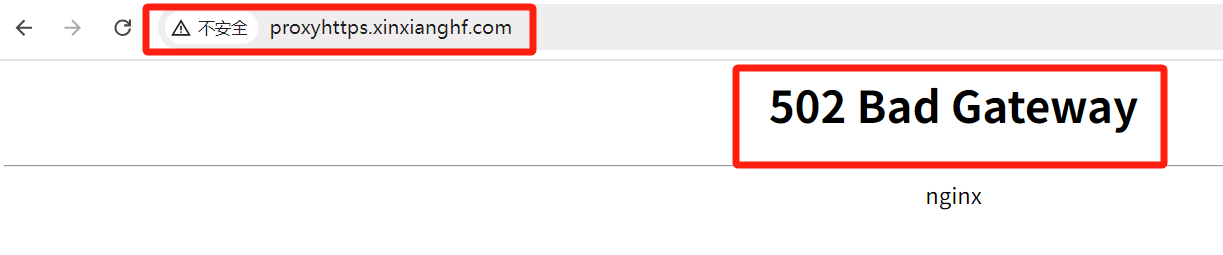
在浏览器中输入域名 http://proxyhttps.xinxianghf.com https://proxyhttps.xinxianghf.com,后端没有访问到 是因为容器内没有对应后端,但是可以通过访问的协议看出协议可以设置 http、https

# 将 service 由 ClusterIP 改为 NodePort
[root@k8s-master01 10.16]# kubectl get svc
NAME             TYPE        CLUSTER-IP      EXTERNAL-IP   PORT(S)   AGE
proxyhttps-svc   ClusterIP   10.12.170.229   <none>        443/TCP   3m9s
[root@k8s-master01 10.16]# kubectl edit svc proxyhttps-svc
.........
  type: NodePort
.........
[root@k8s-master01 10.16]# kubectl get svc
NAME             TYPE        CLUSTER-IP      EXTERNAL-IP   PORT(S)         AGE
proxyhttps-svc   NodePort    10.12.170.229   <none>        443:30297/TCP   15m
在浏览器中输入 https://192.168.66.11:30297 可以通过访问的协议看出协议可以设置 http、https
(14)实验13 Ingress-nginx 四层代理
Nginx 1.9.0 版本起支持四层负载均衡,从而使得 Nginx 变的更加强大(既然 Nginx 都支持了,那 Ingress-nginx 同样支持,都是通过 Ingress 接口修改 nginx.conf 配置而已)
# 修改配置文件,将 读取指定空间下的 configmap 对象,将其装换成4层负载的配置文件
[root@k8s-master01 10.17]# kubectl get daemonset -n ingress
NAME                       DESIRED   CURRENT   READY   UP-TO-DATE   AVAILABLE   NODE SELECTOR            AGE
ingress-nginx-controller   2         2         2       2            2           kubernetes.io/os=linux   4d10h
[root@k8s-master01 10.17]# kubectl edit daemonset -n ingress ingress-nginx-controller
..........
    spec:
      containers:
      - args:
        - /nginx-ingress-controller
        - --tcp-services-configmap=$(POD_NAMESPACE)/nginx-ingress-tcp-configmap
..........
daemonset.apps/ingress-nginx-controller edited
# 元数据中 名称空间 和 configmap 要与上面修改的要转换的配置信息相对应,data下方写代理,意为 服务器 9000 端口 映射 svc 的 80端口
[root@k8s-master01 10.17]# cat tcp_configmap.yaml
apiVersion: v1
kind: ConfigMap
metadata:
 name: nginx-ingress-tcp-configmap
 namespace: ingress
data:
 "9000": "default/proxyhttps-svc:80"
[root@k8s-master01 10.17]# kubectl apply -f upd_configmap.yaml
configmap/nginx-ingress-tcp-configmap created
[root@k8s-master01 10.17]# kubectl get pod -n ingress
NAME                                           READY   STATUS    RESTARTS       AGE
ingress-nginx-controller-69fr4                 1/1     Running   0              10m
ingress-nginx-controller-xr4d4                 1/1     Running   0              10m
ingress-nginx-defaultbackend-89db9d699-4gkmw   1/1     Running   2 (114m ago)   23h
[root@k8s-master01 10.17]# kubectl exec -it ingress-nginx-controller-69fr4 -n ingress -- /bin/bash
k8s-node01:/etc/nginx$ cat nginx.conf
.........
    # TCP services
.........
在浏览器中通过输入 IP + 端口 https://192.168.66.11:9000 访问
(15)实验14 Ingress-nginx
[root@k8s-master01 10]# kubectl edit daemonset -n ingress ingress-nginx-controller
..........
    spec:
      containers:
      - args:
        - /nginx-ingress-controller
        - --udp-services-configmap=$(POD_NAMESPACE)/nginx-ingress-udp-configmap
..........
[root@k8s-master01 10.18]# cat tcp_configmap.yaml
apiVersion: v1
kind: ConfigMap
metadata:
 name: nginx-ingress-udp-configmap
 namespace: ingress
data:
 "53": "kube-system/kube-dns:53"
在浏览器中通过输入 IP + 端口 http://192.168.66.11:9000 访问
(16)实验15 Ingress-nginx 链路追踪
官方推荐的链路追踪插件为 Zipkin 或者 Jaeger,此实验选用 Jaeger
官方部署示例文件 https://raw.githubusercontent.com/jaegertracing/jaeger-kubernetes/master/all-inone/jaeger-all-in-one-template.yml
# 修改了 deployment 版本号,添加了 标签选择器
[root@k8s-master01 10.19]# cat 19.jaeger-all-in-one-template.yml
#
# Copyright 2017-2019 The Jaeger Authors
#
# Licensed under the Apache License, Version 2.0 (the "License"); you may not use this file except
# in compliance with the License. You may obtain a copy of the License at
#
# http://www.apache.org/licenses/LICENSE-2.0
#
# Unless required by applicable law or agreed to in writing, software distributed under the License
# is distributed on an "AS IS" BASIS, WITHOUT WARRANTIES OR CONDITIONS OF ANY KIND, either express
# or implied. See the License for the specific language governing permissions and limitations under
# the License.
#

apiVersion: v1
kind: List
items:
- apiVersion: apps/v1
  kind: Deployment
  metadata:
    name: jaeger
    labels:
      app: jaeger
      app.kubernetes.io/name: jaeger
      app.kubernetes.io/component: all-in-one
  spec:
    replicas: 1
    selector:
      matchLabels:
        app: "jaeger"
    strategy:
      type: Recreate
    template:
      metadata:
        labels:
          app: jaeger
          app.kubernetes.io/name: jaeger
          app.kubernetes.io/component: all-in-one
        annotations:
          prometheus.io/scrape: "true"
          prometheus.io/port: "16686"
      spec:
          containers:
          -   env:
              - name: COLLECTOR_ZIPKIN_HTTP_PORT
                value: "9411"
              image: jaegertracing/all-in-one
              name: jaeger
              ports:
                - containerPort: 5775
                  protocol: UDP
                - containerPort: 6831
                  protocol: UDP
                - containerPort: 6832
                  protocol: UDP
                - containerPort: 5778
                  protocol: TCP
                - containerPort: 16686
                  protocol: TCP
                - containerPort: 9411
                  protocol: TCP
              readinessProbe:
                httpGet:
                  path: "/"
                  port: 14269
                initialDelaySeconds: 5
- apiVersion: v1
  kind: Service
  metadata:
    name: jaeger-query
    labels:
      app: jaeger
      app.kubernetes.io/name: jaeger
      app.kubernetes.io/component: query
  spec:
    ports:
      - name: query-http
        port: 80
        protocol: TCP
        targetPort: 16686
    selector:
      app.kubernetes.io/name: jaeger
      app.kubernetes.io/component: all-in-one
    type: LoadBalancer
- apiVersion: v1
  kind: Service
  metadata:
    name: jaeger-collector
    labels:
      app: jaeger
      app.kubernetes.io/name: jaeger
      app.kubernetes.io/component: collector
  spec:
    ports:
    - name: jaeger-collector-tchannel
      port: 14267
      protocol: TCP
      targetPort: 14267
    - name: jaeger-collector-http
      port: 14268
      protocol: TCP
      targetPort: 14268
    - name: jaeger-collector-zipkin
      port: 9411
      protocol: TCP
      targetPort: 9411
    selector:
      app.kubernetes.io/name: jaeger
      app.kubernetes.io/component: all-in-one
    type: ClusterIP
- apiVersion: v1
  kind: Service
  metadata:
    name: jaeger-agent
    labels:
      app: jaeger
      app.kubernetes.io/name: jaeger
      app.kubernetes.io/component: agent
  spec:
    ports:
    - name: agent-zipkin-thrift
      port: 5775
      protocol: UDP
      targetPort: 5775
    - name: agent-compact
      port: 6831
      protocol: UDP
      targetPort: 6831
    - name: agent-binary
      port: 6832
      protocol: UDP
      targetPort: 6832
    - name: agent-configs
      port: 5778
      protocol: TCP
      targetPort: 5778
    clusterIP: None
    selector:
      app.kubernetes.io/name: jaeger
      app.kubernetes.io/component: all-in-one
- apiVersion: v1
  kind: Service
  metadata:
    name: zipkin
    labels:
      app: jaeger
      app.kubernetes.io/name: jaeger
      app.kubernetes.io/component: zipkin
  spec:
    ports:
    - name: jaeger-collector-zipkin
      port: 9411
      protocol: TCP
      targetPort: 9411
    clusterIP: None
    selector:
      app.kubernetes.io/name: jaeger
      app.kubernetes.io/component: all-in-one
[root@k8s-master01 10.19]# kubectl apply -f 19.jaeger-all-in-one-template.yml -n ingress
deployment.apps/jaeger created
service/jaeger-query created
service/jaeger-collector created
service/jaeger-agent created
service/zipkin created
[root@k8s-master01 10.19]# kubectl get pod -n ingress -o wide
NAME                                           READY   STATUS    RESTARTS     AGE     IP              NODE         NOMINATED NODE   READINESS GATES
ingress-nginx-controller-5gclq                 1/1     Running   0            3h59m   192.168.66.12   k8s-node01   <none>           <none>
ingress-nginx-controller-sch98                 1/1     Running   0            3h59m   192.168.66.13   k8s-node02   <none>           <none>
ingress-nginx-defaultbackend-89db9d699-4gkmw   1/1     Running   2 (6h ago)   28h     10.244.85.208   k8s-node01   <none>           <none>
jaeger-ddb59666b-jkrdh                         1/1     Running   0            81s     10.244.85.197   k8s-node01   <none>           <none>
[root@k8s-master01 10.19]# kubectl get configmap -n ingress
NAME                          DATA   AGE
ingress-nginx-controller      1      4d14h
kube-root-ca.crt              1      5d15h
nginx-ingress-tcp-configmap   1      3h49m
[root@k8s-master01 10.19]# kubectl edit configmap ingress-nginx-controller -n ingress
.........
data:
  allow-snippet-annotations: "true"
  enable-opentracing: "true"   #开启链路追踪
  jaeger-collector-host: jaeger-agent.ingress.svc.cluster.local  #链路追踪的svc名称,拼接的内部域名 ,前面 service 知识
.........
[root@k8s-master01 10.19]# kubectl get pod -o wide -n ingress
NAME                                           READY   STATUS    RESTARTS       AGE    IP              NODE         NOMINATED NODE   READINESS GATES
ingress-nginx-controller-5gclq                 1/1     Running   0              4h8m   192.168.66.12   k8s-node01   <none>           <none>
ingress-nginx-controller-sch98                 1/1     Running   0              4h8m   192.168.66.13   k8s-node02   <none>           <none>
ingress-nginx-defaultbackend-89db9d699-4gkmw   1/1     Running   2 (6h9m ago)   28h    10.244.85.208   k8s-node01   <none>           <none>
jaeger-ddb59666b-jkrdh                         1/1     Running   0              10m    10.244.85.197   k8s-node01   <none>           <none>
# 删除一下,让 pod 重新加载一下配置
[root@k8s-master01 10.19]# kubectl delete pod jaeger-ddb59666b-jkrdh -n ingress
pod "jaeger-ddb59666b-jkrdh" deleted
[root@k8s-master01 10.19]# kubectl get pod -o wide -n ingress
NAME                                           READY   STATUS    RESTARTS        AGE    IP              NODE         NOMINATED NODE   READINESS GATES
ingress-nginx-controller-5gclq                 1/1     Running   0               4h9m   192.168.66.12   k8s-node01   <none>           <none>
ingress-nginx-controller-sch98                 1/1     Running   0               4h9m   192.168.66.13   k8s-node02   <none>           <none>
ingress-nginx-defaultbackend-89db9d699-4gkmw   1/1     Running   2 (6h10m ago)   28h    10.244.85.208   k8s-node01   <none>           <none>
jaeger-ddb59666b-s45j8                         1/1     Running   0               62s    10.244.58.221   k8s-node02   <none>           <none>
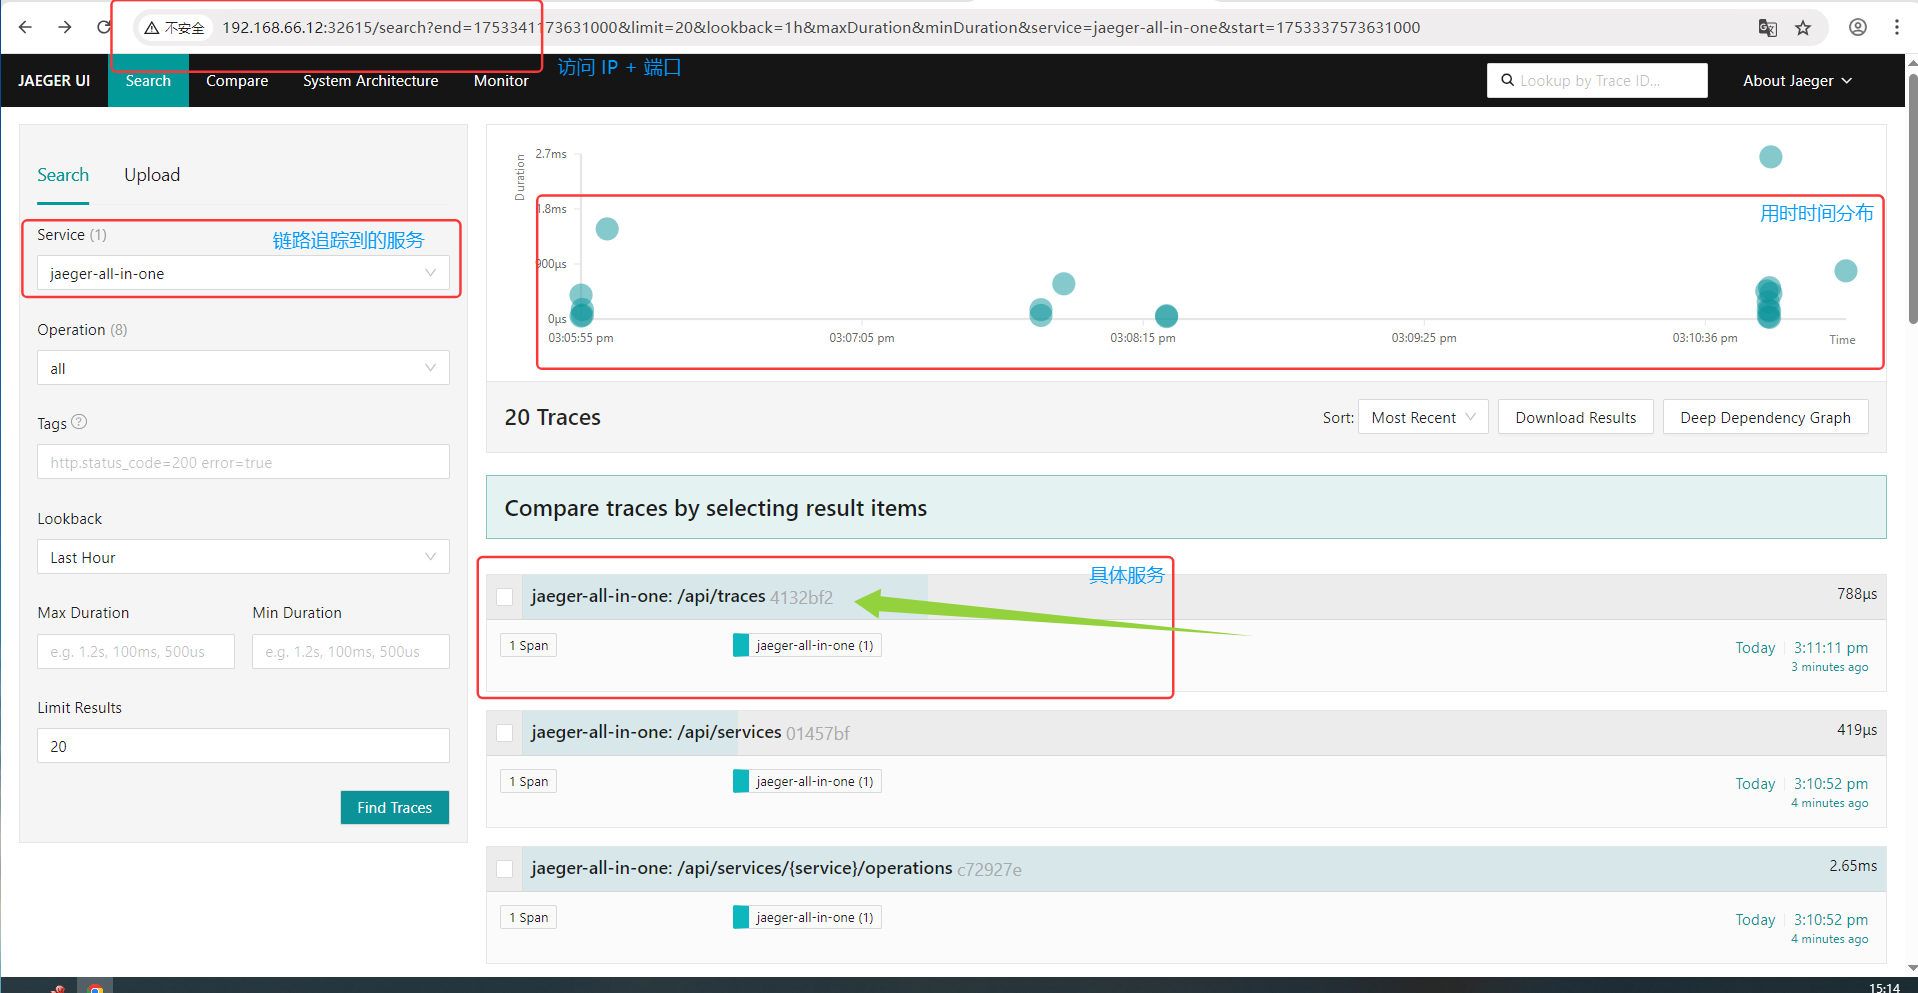
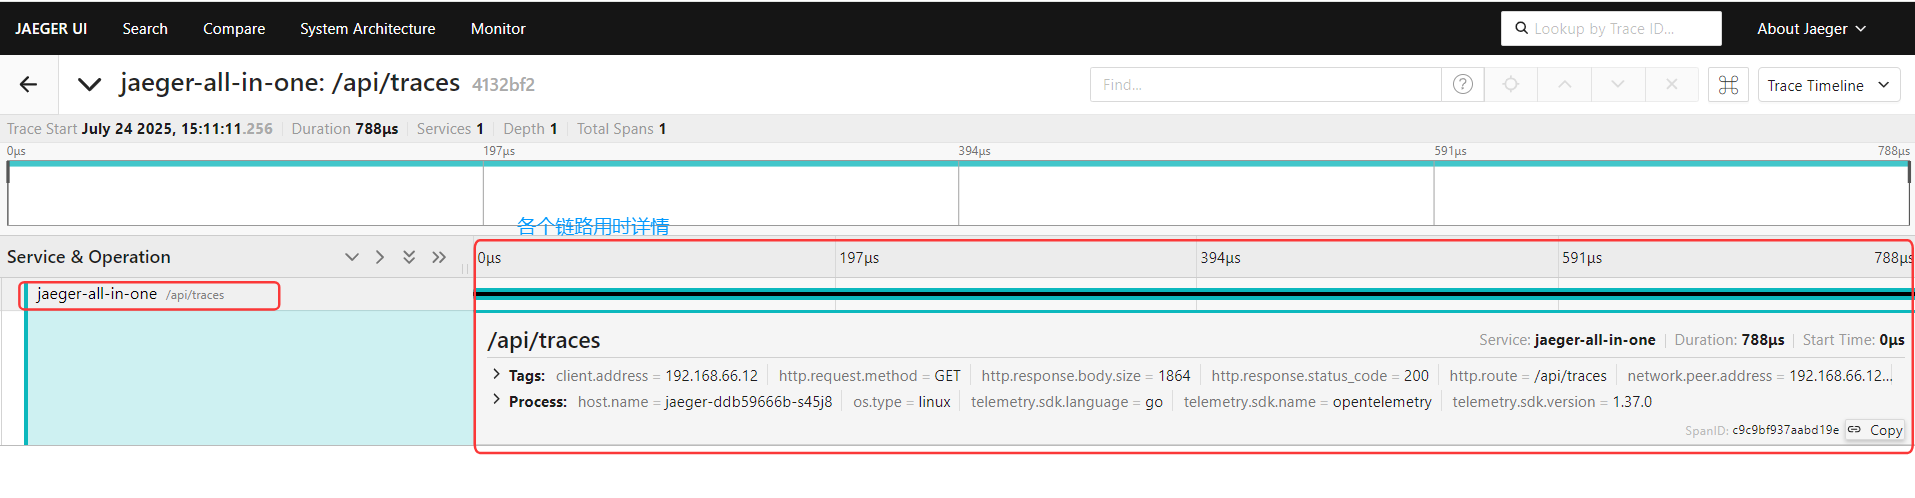
[root@k8s-master01 10.19]# kubectl get svc -n ingress
NAME                                 TYPE           CLUSTER-IP     EXTERNAL-IP   PORT(S)                               AGE
ingress-nginx-controller             LoadBalancer   10.0.255.251   <pending>     80:31975/TCP,443:32207/TCP            4d15h
ingress-nginx-controller-admission   ClusterIP      10.3.189.164   <none>        443/TCP                               4d15h
ingress-nginx-defaultbackend         ClusterIP      10.15.35.208   <none>        80/TCP                                2d4h
jaeger-agent                         ClusterIP      None           <none>        5775/UDP,6831/UDP,6832/UDP,5778/TCP   12m
jaeger-collector                     ClusterIP      10.8.129.58    <none>        14267/TCP,14268/TCP,9411/TCP          12m
jaeger-query                         LoadBalancer   10.9.157.189   <pending>     80:32615/TCP                          12m
zipkin                               ClusterIP      None           <none>        9411/TCP                              12m
[root@k8s-master01 10.19]# kubectl edit svc jaeger-query -n ingress
.........
  type: NodePort
.........
service/jaeger-query edited
[root@k8s-master01 10.19]# kubectl get svc -n ingress
NAME                                 TYPE           CLUSTER-IP     EXTERNAL-IP   PORT(S)                               AGE
ingress-nginx-controller             LoadBalancer   10.0.255.251   <pending>     80:31975/TCP,443:32207/TCP            4d15h
ingress-nginx-controller-admission   ClusterIP      10.3.189.164   <none>        443/TCP                               4d15h
ingress-nginx-defaultbackend         ClusterIP      10.15.35.208   <none>        80/TCP                                2d4h
jaeger-agent                         ClusterIP      None           <none>        5775/UDP,6831/UDP,6832/UDP,5778/TCP   13m
jaeger-collector                     ClusterIP      10.8.129.58    <none>        14267/TCP,14268/TCP,9411/TCP          13m
jaeger-query                         NodePort       10.9.157.189   <none>        80:32615/TCP                          13m
zipkin                               ClusterIP      None           <none>        9411/TCP                              13m
在浏览器中通过输入 IP + 端口 http://192.168.66.11:32615 访问
———————————————————————————————————————————————————————————————————————————
无敌小马爱学习

 浙公网安备 33010602011771号