
18.B站薪享宏福笔记——第三章 k8s安装
3 k8s安装
3.1 基础网络结构说明
—— 成功的第一步3.1.1 安装方式介绍
(1)kubeadm
基于kubeadm方式安转,或在kubeadm之上开发的自动化工具形式安装,组件以容器化方式运行。
优势:
安装较简单
容器的进程是一种特殊的系统进程,被名字空间隔离的伪进程,当容器死亡,可以基于 deployment 控制器自愈。
劣势:
大部分安装为自动化,不容易了解其中各组件工作原理。
(2)二进制安装
压缩包方式安装,各大主要组件以守护进程的方式运行。
优势:
灵活性较高,各组件可以跨节点安装。
高可用更适用于生产环境,以及版本更新。
劣势:
安装比较困难,很多密钥对需要生成。
3.1.2 基于kubeadm安装架构图及参数配置
(1)网络拓扑图
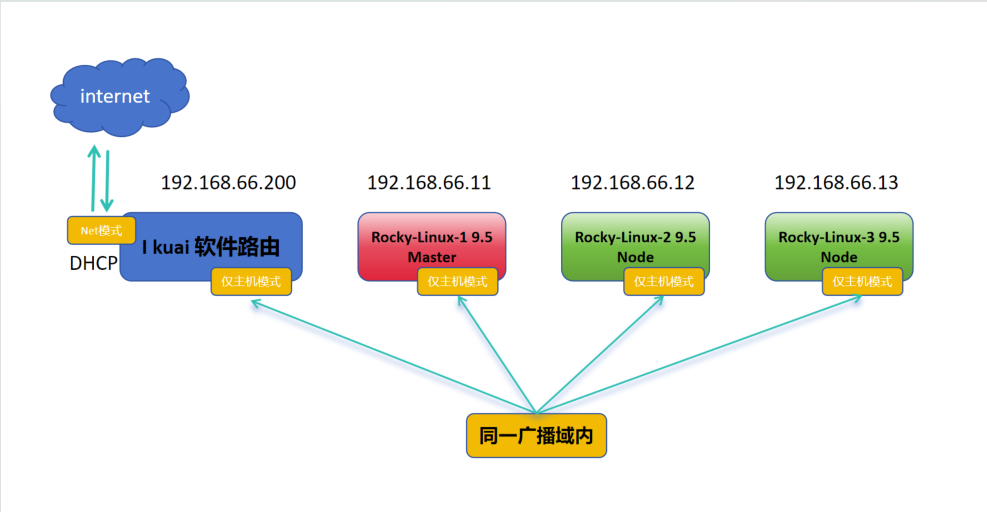
Ikuai为软件路由,分配两张网卡,一个与192.168.66.1/24同一网段,另外一个网卡经DHCP进行外网访问,整个集群都走DHCP网络。
(2)参数配置
机器为一主两从:
主节点:CPU >= 2、内存MEM >=4GB、网卡NIC >=1、磁盘DISK = 100GB
从节点:CPU >= 1、内存MEM >=2GB、网卡NIC >=1、磁盘DISK = 100GB
3.1.3 安装及配置软路由
(1)安装i kuai虚拟机
1.打开虚拟机,点击文件,点击新建虚拟机,选中自定义(高级)(C),点击下一步。
2.硬件兼容性(H):默认既可,选中稍后安装操作系统(S),点击下一步。
3.客户机操作系统:其他(O),版本(V):其他,虚拟机名称(V):ikuai,位置:D:\VMware\ikuai,点击下一步。
4.处理器数量(P):1、内核数量(C):1,点击下一步。内存:2048MB,点击下一步。
5.选中使用仅主机模式网络(H),点击下一步。SCSI控制器:BusLogic(U),点击下一步。
6.虚拟磁盘类型:IDE(I),点击下一步。磁盘:创建新虚拟磁盘(V),点击下一步。
7.最大磁盘大小(GB)(S):8.0GB、选中将虚拟磁盘拆分成多个文件(M),点击下一步。
8.磁盘文件(F):ikuai.vmdk,点击下一步。点击完成。
9.点击ikuai虚拟机,点击编辑虚拟机设置,点击添加,选择网络适配器,点击完成。注意:网络适配器2默认是NET模式。
(2)安装i kuai镜像
1.点击CD/DVD(IDE),选择使用ISO映像文件(M),添加浏览的i kuai ISO镜像。点击确定。
2.点击开启此虚拟机,选择1.将系统安装到硬盘1 sda,是否将系统安装到硬盘sda(y/n):y,I kuai安装,安装后重启成功,会有蜂鸣声。
3.输入2.设置LAN/WAN地址,输入0.设置LAN1地址,请输入lan1地址:192.168.66.200/255.255.255.0,回车。输入:q退出,输入:q锁定控制台。
4.打开浏览器,输入:192.168.66.200。 账户:admin,密码:admin,点击登录。输入新密码两次:JUNnan123,点击确定。
5.点击网络设置,点击内外网设置,可以看到lan1已经变绿色,证明lan1已经开始工作。点击 wan1,选择 eth1|空闲,点击绑定。自动获取DHCP,点击保存。
6.可以看到wan1已经变绿色,证明wan1已经开始工作。
Master和Node可以根据第二章安装重新安装两个虚拟机,也可以基于原虚拟机克隆两个虚拟机,要一个一个打开,先修改/etc/NetworkManager/system-connections/ens33.nmconnection的IP。这里up主克隆后虚拟机连不上啊喂!o(╥﹏╥)o。。。哭晕
7.关闭eth1网卡,calico 网络借助物理网卡提供Pod间访问能力。如果访问错网卡,会造成网路不通,例如:从192.168.66.11到了10.0.0.132,会网络不通。
(3)环境初始化
# 192.168.66.11 两块网卡设置
[root@localhost ~]# cat /etc/NetworkManager/system-connections/ens33.nmconnection
[connection]
id=ens33
uuid=bb876cde-1acd-389f-994a-79ccc9c523d4
type=ethernet
autoconnect-priority=-999
interface-name=ens33
timestamp=1747900514

[ethernet]

[ipv4]
address1=192.168.66.11/24,192.168.66.200
method=manual
dns=114.114.114.114;8.8.8.8

[ipv6]
addr-gen-mode=eui64
method=auto

[proxy]
[root@localhost ~]# cat /etc/NetworkManager/system-connections/ens34.nmconnection
[connection]
id=ens34
uuid=f870886d-509e-3bbe-86a6-f6c105655049
type=ethernet
autoconnect-priority=-999
autoconnect=false
interface-name=ens34
timestamp=1747900514

[ethernet]

[ipv4]
method=auto
route-metric=100

[ipv6]
addr-gen-mode=eui64
method=auto

[proxy]
# 192.168.66.12 两块网卡设置
[root@loaclhost ~]# cat /etc/NetworkManager/system-connections/ens33.nmconnection
[connection]
id=ens33
uuid=a7035701-a04e-369d-864c-c0cb37c9ad2f
type=ethernet
autoconnect-priority=-999
interface-name=ens33
timestamp=1748355966

[ethernet]

[ipv4]
address1=192.168.66.12/24,192.168.66.200
method=manual
dns=114.114.114.114;8.8.8.8

[ipv6]
addr-gen-mode=eui64
method=auto

[proxy]
[root@loaclhost ~]# cat /etc/NetworkManager/system-connections/ens34.nmconnection
[connection]
id=ens34
uuid=ab21ce58-a135-3fe0-a105-4054f9dcbc51
type=ethernet
autoconnect-priority=-999
autoconnect=false
interface-name=ens34
timestamp=1748355967

[ethernet]

[ipv4]
method=auto

[ipv6]
addr-gen-mode=eui64
method=auto

[proxy]
# 192.168.66.13 两块网卡配置
[root@loaclhost ~]# cat /etc/NetworkManager/system-connections/ens33.nmconnection
[connection]
id=ens33
uuid=dfe30873-9665-3ef2-95d8-79a466ce717c
type=ethernet
autoconnect-priority=-999
interface-name=ens33
timestamp=1748355572

[ethernet]

[ipv4]
address1=192.168.66.13/24,192.168.66.200
method=manual
dns=114.114.114.114;8.8.8.8

[ipv6]
addr-gen-mode=eui64
method=auto

[proxy]
[root@loaclhost ~]# cat /etc/NetworkManager/system-connections/ens34.nmconnection
[connection]
id=ens34
uuid=3e1dd358-c1d1-34d0-89bd-77b8fe7d5717
type=ethernet
autoconnect-priority=-999
autoconnect=false
interface-name=ens34
timestamp=1748355573

[ethernet]

[ipv4]
method=auto

[ipv6]
addr-gen-mode=eui64
method=auto

[proxy]
以下三个节点都需要操作:
# k8s在初始化前,检测当前swap分区是否关闭,交换分区会影响当前软件的运行效率。
# 也可以开启虚拟内存,初始化时跳过错误选项。
# 临时关闭 swap 分区
[root@localhost ~]# free -h
               total        used        free      shared  buff/cache   available
Mem:           3.5Gi       453Mi       3.0Gi       9.0Mi       276Mi       3.1Gi
Swap:          3.9Gi          0B       3.9Gi
[root@localhost ~]# swapoff -a
[root@localhost ~]# free -h
               total        used        free      shared  buff/cache   available
Mem:           3.5Gi       453Mi       3.0Gi       9.0Mi       275Mi       3.1Gi
Swap:             0B          0B          0B
# 永久关闭 swap 分区,在虚拟机开机启动时,注释挂载的磁盘,相当于没有挂载。
[root@localhost ~]# cat /etc/fstab

#
# /etc/fstab
# Created by anaconda on Thu May 22 04:20:25 2025
#
# Accessible filesystems, by reference, are maintained under '/dev/disk/'.
# See man pages fstab(5), findfs(8), mount(8) and/or blkid(8) for more info.
#
# After editing this file, run 'systemctl daemon-reload' to update systemd
# units generated from this file.
#
/dev/mapper/rl_loaclhost-root /                       xfs     defaults        0 0
UUID=1a7ef5bf-d46c-4878-979d-475b013e690b /boot                   xfs     defaults        0 0
/dev/mapper/rl_loaclhost-swap none                    swap    defaults        0 0
[root@localhost ~]# sed -i 's:/dev/mapper/rl_loaclhost-swap:#/dev/mapper/rl_loaclhost-swap:g' /etc/fstab
[root@localhost ~]# cat /etc/fstab

#
# /etc/fstab
# Created by anaconda on Thu May 22 04:20:25 2025
#
# Accessible filesystems, by reference, are maintained under '/dev/disk/'.
# See man pages fstab(5), findfs(8), mount(8) and/or blkid(8) for more info.
#
# After editing this file, run 'systemctl daemon-reload' to update systemd
# units generated from this file.
#
/dev/mapper/rl_loaclhost-root /                       xfs     defaults        0 0
UUID=1a7ef5bf-d46c-4878-979d-475b013e690b /boot                   xfs     defaults        0 0
#/dev/mapper/rl_loaclhost-swap none                    swap    defaults        0 0
# k8s在安装集群时,默认抓取当前主机名为节点名,默认localhost,不便于区分各个节点。
[root@localhost ~]# hostnamectl  set-hostname k8s-master01
[root@localhost ~]# hostnamectl  set-hostname k8s-node01
[root@localhost ~]# hostnamectl  set-hostname k8s-node02

# 添加各节点解析
[root@localhost ~]# cat /etc/hosts
127.0.0.1   localhost localhost.localdomain localhost4 localhost4.localdomain4
::1         localhost localhost.localdomain localhost6 localhost6.localdomain6

192.168.66.11 k8s-master01 m1
192.168.66.12 k8s-node01 n1
192.168.66.13 k8s-node02 n2
# 安装 ipvs,后期可以使用ipvs作为防火墙,比iptables性能更高。
[root@localhost ~]# yum install -y ipvsadm
Rocky Linux 9 - BaseOS          13 kB/s | 4.1 kB     00:00
Rocky Linux 9 - AppStream       19 kB/s | 4.5 kB     00:00
Rocky Linux 9 - Extras          14 kB/s | 2.9 kB     00:00
Dependencies resolved.
===============================================================
 Package      Arch        Version         Repository      Size
===============================================================
Installing:
 ipvsadm      x86_64      1.31-6.el9      appstream       50 k

Transaction Summary
===============================================================
Install  1 Package

Total download size: 50 k
Installed size: 89 k
Downloading Packages:
ipvsadm-1.31-6.el9.x86_64.rpm  145 kB/s |  50 kB     00:00
---------------------------------------------------------------
Total                          143 kB/s |  50 kB     00:00
Running transaction check
Transaction check succeeded.
Running transaction test
Transaction test succeeded.
Running transaction
  Preparing        :                                       1/1
  Installing       : ipvsadm-1.31-6.el9.x86_64             1/1
  Running scriptlet: ipvsadm-1.31-6.el9.x86_64             1/1
  Verifying        : ipvsadm-1.31-6.el9.x86_64             1/1

Installed:
  ipvsadm-1.31-6.el9.x86_64

Complete!
[root@localhost ~]# reboot
三台节点Net网卡均已关闭,仍能ping通www.baidu.com,走 i kuai路由上网。

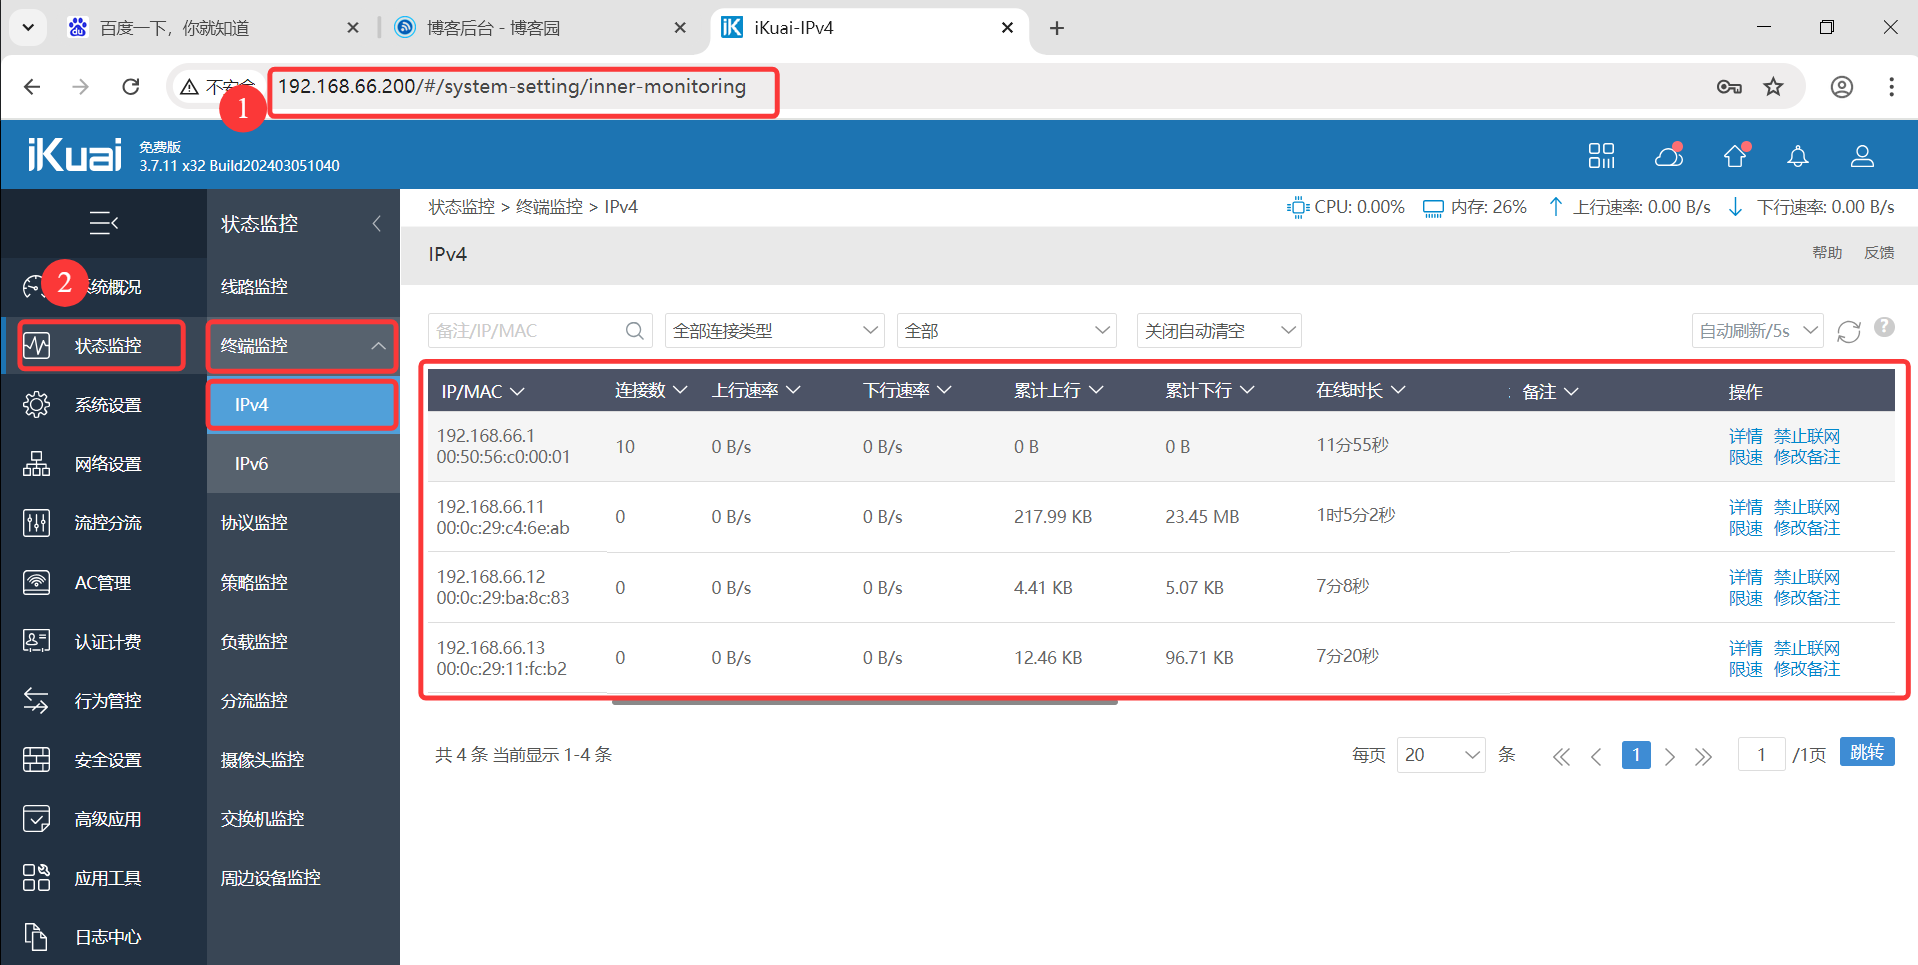
登录I kuai:192.168.66.200,账户:admin,密码:JUNnan123,发现三个节点通过内网挂靠过来。
(4)CRI 关系图
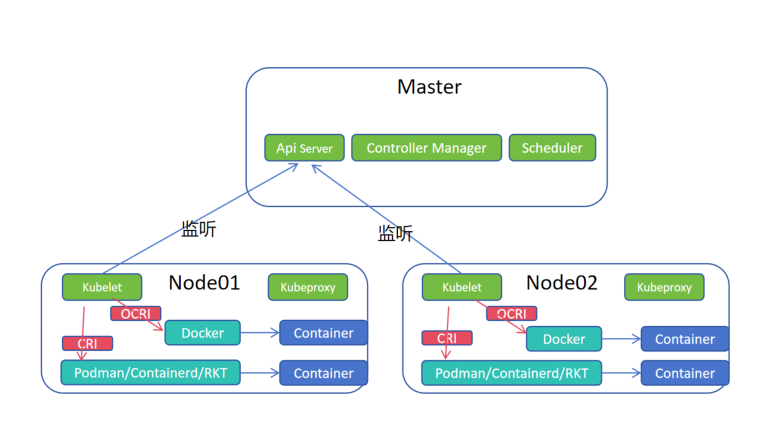
1.kubelet 监听主节点的Api Server,当有启动容器的任务时,调用底层的容器运行时创建容器。
2.Docker是基于OCRI接口创建容器,Podman、Containerd、RKT等基于CRI接口创建容器。
3.k8s默认接口是CRI,原来Docker的用户庞大,所以k8s维护接口规范cri-docker(垫片,将OCRI接口翻译成CRI接口)以实现Docker对接,但是随着CRI容器运行时的日益庞大,k8s不在维护cri-docker垫片。
4.Docker公司接手开始维护cri-docker垫片。
# 上传垫片压缩包,解压放到命令下,加执行权限,发送给node01、node02
[root@k8s-master01 ~]# rz

[root@k8s-master01 ~]# ls -ltr
total 15260
-rw-r--r--  1 root root 14856434 Jan  8  2024 cri-dockerd-0.3.9.amd64.tgz
[root@k8s-master01 ~]# tar -zxvf cri-dockerd-0.3.9.amd64.tgz
cri-dockerd/
cri-dockerd/cri-dockerd
[root@k8s-master01 ~]# cp cri-dockerd/cri-dockerd /usr/bin/
[root@k8s-master01 ~]# chmod a+x /usr/bin/cri-dockerd
[root@k8s-master01 ~]# scp /usr/bin/cri-dockerd root@n1:/usr/bin
The authenticity of host 'n1 (192.168.66.12)' can't be established.
ED25519 key fingerprint is SHA256:MjamPRLZGNNXaYZgb7CxJ9lS6HtBbIadP1q5u/LcJPk.
This host key is known by the following other names/addresses:
    ~/.ssh/known_hosts:4: 192.168.66.12
Are you sure you want to continue connecting (yes/no/[fingerprint])? yes
Warning: Permanently added 'n1' (ED25519) to the list of known hosts.
root@n1's password:
cri-dockerd                  100%   46MB  73.8MB/s   00:00
[root@k8s-master01 ~]# scp /usr/bin/cri-dockerd root@n2:/usr/bin
The authenticity of host 'n2 (192.168.66.13)' can't be established.
ED25519 key fingerprint is SHA256:j/2eOJGpLLWeSSyxvDwzOlPPrSNxdKsh6O6kCMKaicA.
This host key is known by the following other names/addresses:
    ~/.ssh/known_hosts:7: 192.168.66.13
Are you sure you want to continue connecting (yes/no/[fingerprint])? yes
Warning: Permanently added 'n2' (ED25519) to the list of known hosts.
root@n2's password:
cri-dockerd                  100%   46MB  72.4MB/s   00:00
# 命令解读
# /usr/bin/cri-dockerd 可执行程序
# --network-plugin=cni 网络插件基于 cni 实现,容器网络接口
# --pod-infra-container-image=registry.aliyuncs.com/google_containers/pause:3.8 ,Pod初始话Pause容器的镜像和版本
ExecStart=/usr/bin/cri-dockerd --network-plugin=cni --pod-infra-container-image=registry.aliyuncs.com/google_containers/pause:3.8
# 配置 cri-docker 服务 systemctl 启动
[root@k8s-master01 ~]# cat /usr/lib/systemd/system/cri-docker.service
[Unit]
Description=CRI Interface for Docker Application Container Engine
Documentation=https://docs.mirantis.com
After=network-online.target firewalld.service docker.service
Wants=network-online.target
Requires=cri-docker.socket
[Service]
Type=notify
ExecStart=/usr/bin/cri-dockerd --network-plugin=cni --pod-infra-container-image=registry.aliyuncs.com/google_containers/pause:3.8
ExecReload=/bin/kill -s HUP $MAINPID
TimeoutSec=0
RestartSec=2
Restart=always
StartLimitBurst=3
StartLimitInterval=60s
LimitNOFILE=infinity
LimitNPROC=infinity
LimitCORE=infinity
TasksMax=infinity
Delegate=yes
KillMode=process
[Install]
WantedBy=multi-user.target
# 添加 cri-docker 套接字
[root@k8s-master01 ~]# cat /usr/lib/systemd/system/cri-docker.socket
[Unit]
Description=CRI Docker Socket for the API
PartOf=cri-docker.service
[Socket]
ListenStream=%t/cri-dockerd.sock
SocketMode=0660
SocketUser=root
SocketGroup=docker
[Install]
WantedBy=sockets.target
# 加载、开启自启、启动、查看启动状态
[root@k8s-master01 ~]# systemctl daemon-reload
[root@k8s-master01 ~]# systemctl enable cri-docker
Created symlink /etc/systemd/system/multi-user.target.wants/cri-docker.service → /usr/lib/systemd/system/cri-docker.service.
[root@k8s-master01 ~]# systemctl start cri-docker
[root@k8s-master01 ~]# systemctl is-active cri-docker
active
3.2 Kubernetes 集群安装
—— 一主两从
3.2.1 安装组件
# 上传kubeadm 软件包
[root@k8s-master01 ~]# rz -E
rz waiting to receive.
[root@k8s-master01 ~]# ls -ltr
total 55596
-rw-r--r-- 1 root root 56928906 Mar  5  2024 kubernetes-1.29.2-150500.1.1.tar.gz
[root@k8s-master01 ~]# tar -xf kubernetes-1.29.2-150500.1.1.tar.gz
[root@k8s-master01 ~]# ls
kubernetes-1.29.2-150500.1.1  kubernetes-1.29.2-150500.1.1.tar.gz
[root@k8s-master01 ~]# cd kubernetes-1.29.2-150500.1.1
[root@k8s-master01 kubernetes-1.29.2-150500.1.1]# ls -ltr
total 55680
-rw-r--r-- 1 root root 19980928 Mar  5  2024 kubelet-1.29.2-150500.1.1.x86_64.rpm
-rw-r--r-- 1 root root 10196924 Mar  5  2024 kubeadm-1.29.2-150500.1.1.x86_64.rpm
-rw-r--r-- 1 root root 10605380 Mar  5  2024 kubectl-1.29.2-150500.1.1.x86_64.rpm
-rw-r--r-- 1 root root   226812 Mar  5  2024 conntrack-tools-1.4.7-2.el9.x86_64.rpm
-rw-r--r-- 1 root root  8604404 Mar  5  2024 cri-tools-1.29.0-150500.1.1.x86_64.rpm
-rw-r--r-- 1 root root    28691 Mar  5  2024 libnetfilter_queue-1.0.5-1.el9.x86_64.rpm
-rw-r--r-- 1 root root    23082 Mar  5  2024 libnetfilter_cttimeout-1.0.0-19.el9.x86_64.rpm
-rw-r--r-- 1 root root    23242 Mar  5  2024 libnetfilter_cthelper-1.0.0-22.el9.x86_64.rpm
-rw-r--r-- 1 root root  6998912 Mar  5  2024 kubernetes-cni-1.3.0-150500.1.1.x86_64.rpm
-rw-r--r-- 1 root root   306980 Mar  5  2024 socat-1.7.4.1-5.el9.x86_64.rpm
[root@k8s-master01 kubernetes-1.29.2-150500.1.1]# yum -y install *
..........
Complete!
# 发送到node01、node02节点
[root@k8s-master01 ~]# scp -r kubernetes-1.29.2-150500.1.1 root@n1:/root
root@n1's password:
kubeadm-1.29.2-150500.1.1.x86_64.rpm         100% 9958KB  27.1MB/s   00:00
kubectl-1.29.2-150500.1.1.x86_64.rpm         100%   10MB  27.1MB/s   00:00
kubelet-1.29.2-150500.1.1.x86_64.rpm         100%   19MB  22.2MB/s   00:00
conntrack-tools-1.4.7-2.el9.x86_64.rpm       100%  221KB  18.1MB/s   00:00
cri-tools-1.29.0-150500.1.1.x86_64.rpm       100% 8403KB  28.7MB/s   00:00
kubernetes-cni-1.3.0-150500.1.1.x86_64.rpm   100% 6835KB  29.6MB/s   00:00
libnetfilter_cthelper-1.0.0-22.el9.x86_64.rp 100%   23KB   6.9MB/s   00:00
libnetfilter_cttimeout-1.0.0-19.el9.x86_64.r 100%   23KB   7.8MB/s   00:00
libnetfilter_queue-1.0.5-1.el9.x86_64.rpm    100%   28KB  11.3MB/s   00:00
socat-1.7.4.1-5.el9.x86_64.rpm               100%  300KB  21.2MB/s   00:00
[root@k8s-master01 ~]# scp -r kubernetes-1.29.2-150500.1.1 root@n2:/root
root@n2's password:
kubeadm-1.29.2-150500.1.1.x86_64.rpm         100% 9958KB  32.5MB/s   00:00
kubectl-1.29.2-150500.1.1.x86_64.rpm         100%   10MB  31.8MB/s   00:00
kubelet-1.29.2-150500.1.1.x86_64.rpm         100%   19MB  29.3MB/s   00:00
conntrack-tools-1.4.7-2.el9.x86_64.rpm       100%  221KB  19.4MB/s   00:00
cri-tools-1.29.0-150500.1.1.x86_64.rpm       100% 8403KB  30.2MB/s   00:00
kubernetes-cni-1.3.0-150500.1.1.x86_64.rpm   100% 6835KB  29.5MB/s   00:00
libnetfilter_cthelper-1.0.0-22.el9.x86_64.rp 100%   23KB   9.6MB/s   00:00
libnetfilter_cttimeout-1.0.0-19.el9.x86_64.r 100%   23KB   5.4MB/s   00:00
libnetfilter_queue-1.0.5-1.el9.x86_64.rpm    100%   28KB  10.2MB/s   00:00
socat-1.7.4.1-5.el9.x86_64.rpm               100%  300KB  21.5MB/s   00:00
# node01、node02节点安装
[root@k8s-node01 kubernetes-1.29.2-150500.1.1]# yum -y install *
..........
Complete!
[root@k8s-node02 kubernetes-1.29.2-150500.1.1]# yum -y install *
..........
Complete!
# 三节点设置开机自启,先不启动,因为集群没有生成配置文件,所以要初始化。
# 启动kubelet是因为kubelet要保证所有容器化组件启动,对其进行启动管理。
[root@k8s-master01 ~]# systemctl enable kubelet.service
Created symlink /etc/systemd/system/multi-user.target.wants/kubelet.service → /usr/lib/systemd/system/kubelet.service.
3.2.2 集群初始化部署
# 初始化主节点
# kubeadm init 初始化
# --apiserver-advertise-address=192.168.66.11 指定Master主服务器地址
# --image-repository registry.aliyuncs.com/google_containers 集群组件下载地址,默认是GCR谷歌镜像仓库
# --kubernetes-version 1.29.2 当前 kubernetes 版本
# --service-cidr=10.10.0.0/12 当前server网络范围
# --pod-network-cidr=10.244.0.0/16 当前Pod网络范围
# --ignore-preflight-errors=all 跳过所有前置错误检测
# --cri-socket unix:///var/run/cri-dockerd.sock 指定cri-docker套接字所在位置(docker配置cri-docker,此条是必须的,否则找不到CRI接口)
[root@k8s-master01 ~]# kubeadm init --apiserver-advertise-address=192.168.66.11 --image-repository registry.aliyuncs.com/google_containers --kubernetes-version 1.29.2 --service-cidr=10.10.0.0/12 --pod-network-cidr=10.244.0.0/16 --ignore-preflight-errors=all --cri-socket unix:///var/run/cri-dockerd.sock
[init] Using Kubernetes version: v1.29.2
[preflight] Running pre-flight checks
[preflight] Pulling images required for setting up a Kubernetes cluster
[preflight] This might take a minute or two, depending on the speed of your internet connection
[preflight] You can also perform this action in beforehand using 'kubeadm config images pull'
W0528 02:22:11.395663    5689 checks.go:835] detected that the sandbox image "registry.aliyuncs.com/google_containers/pause:3.8" of the container runtime is inconsistent with that used by kubeadm. It is recommended that using "registry.aliyuncs.com/google_containers/pause:3.9" as the CRI sandbox image.
[certs] Using certificateDir folder "/etc/kubernetes/pki"
[certs] Generating "ca" certificate and key
[certs] Generating "apiserver" certificate and key
[certs] apiserver serving cert is signed for DNS names [k8s-master01 kubernetes kubernetes.default kubernetes.default.svc kubernetes.default.svc.cluster.local] and IPs [10.0.0.1 192.168.66.11]
[certs] Generating "apiserver-kubelet-client" certificate and key
[certs] Generating "front-proxy-ca" certificate and key
[certs] Generating "front-proxy-client" certificate and key
[certs] Generating "etcd/ca" certificate and key
[certs] Generating "etcd/server" certificate and key
[certs] etcd/server serving cert is signed for DNS names [k8s-master01 localhost] and IPs [192.168.66.11 127.0.0.1 ::1]
[certs] Generating "etcd/peer" certificate and key
[certs] etcd/peer serving cert is signed for DNS names [k8s-master01 localhost] and IPs [192.168.66.11 127.0.0.1 ::1]
[certs] Generating "etcd/healthcheck-client" certificate and key
[certs] Generating "apiserver-etcd-client" certificate and key
[certs] Generating "sa" key and public key
[kubeconfig] Using kubeconfig folder "/etc/kubernetes"
[kubeconfig] Writing "admin.conf" kubeconfig file
[kubeconfig] Writing "super-admin.conf" kubeconfig file
[kubeconfig] Writing "kubelet.conf" kubeconfig file
[kubeconfig] Writing "controller-manager.conf" kubeconfig file
[kubeconfig] Writing "scheduler.conf" kubeconfig file
[etcd] Creating static Pod manifest for local etcd in "/etc/kubernetes/manifests"
[control-plane] Using manifest folder "/etc/kubernetes/manifests"
[control-plane] Creating static Pod manifest for "kube-apiserver"
[control-plane] Creating static Pod manifest for "kube-controller-manager"
[control-plane] Creating static Pod manifest for "kube-scheduler"
[kubelet-start] Writing kubelet environment file with flags to file "/var/lib/kubelet/kubeadm-flags.env"
[kubelet-start] Writing kubelet configuration to file "/var/lib/kubelet/config.yaml"
[kubelet-start] Starting the kubelet
[wait-control-plane] Waiting for the kubelet to boot up the control plane as static Pods from directory "/etc/kubernetes/manifests". This can take up to 4m0s
[kubelet-check] Initial timeout of 40s passed.
[apiclient] All control plane components are healthy after 54.505363 seconds
[upload-config] Storing the configuration used in ConfigMap "kubeadm-config" in the "kube-system" Namespace
[kubelet] Creating a ConfigMap "kubelet-config" in namespace kube-system with the configuration for the kubelets in the cluster
[upload-certs] Skipping phase. Please see --upload-certs
[mark-control-plane] Marking the node k8s-master01 as control-plane by adding the labels: [node-role.kubernetes.io/control-plane node.kubernetes.io/exclude-from-external-load-balancers]
[mark-control-plane] Marking the node k8s-master01 as control-plane by adding the taints [node-role.kubernetes.io/control-plane:NoSchedule]
[bootstrap-token] Using token: uoxcrw.tojl3gdya7vo6tjt
[bootstrap-token] Configuring bootstrap tokens, cluster-info ConfigMap, RBAC Roles
[bootstrap-token] Configured RBAC rules to allow Node Bootstrap tokens to get nodes
[bootstrap-token] Configured RBAC rules to allow Node Bootstrap tokens to post CSRs in order for nodes to get long term certificate credentials
[bootstrap-token] Configured RBAC rules to allow the csrapprover controller automatically approve CSRs from a Node Bootstrap Token
[bootstrap-token] Configured RBAC rules to allow certificate rotation for all node client certificates in the cluster
[bootstrap-token] Creating the "cluster-info" ConfigMap in the "kube-public" namespace
[kubelet-finalize] Updating "/etc/kubernetes/kubelet.conf" to point to a rotatable kubelet client certificate and key
[addons] Applied essential addon: CoreDNS
[addons] Applied essential addon: kube-proxy

Your Kubernetes control-plane has initialized successfully!

To start using your cluster, you need to run the following as a regular user:

  mkdir -p $HOME/.kube
  sudo cp -i /etc/kubernetes/admin.conf $HOME/.kube/config
  sudo chown $(id -u):$(id -g) $HOME/.kube/config

Alternatively, if you are the root user, you can run:

  export KUBECONFIG=/etc/kubernetes/admin.conf

You should now deploy a pod network to the cluster.
Run "kubectl apply -f [podnetwork].yaml" with one of the options listed at:
  https://kubernetes.io/docs/concepts/cluster-administration/addons/

Then you can join any number of worker nodes by running the following on each as root:

kubeadm join 192.168.66.11:6443 --token uoxcrw.tojl3gdya7vo6tjt \
    --discovery-token-ca-cert-hash sha256:86968cb95dc2ff4df8b5960ee5712a148a485ec2bf8dd4ab9ecd5cef97158a6f

# 根据上面提示,添加集群钥匙,添加文件权限
[root@k8s-master01 ~]#   mkdir -p $HOME/.kube
[root@k8s-master01 ~]#   sudo cp -i /etc/kubernetes/admin.conf $HOME/.kube/config
[root@k8s-master01 ~]#   sudo chown $(id -u):$(id -g) $HOME/.kube/config
# CS 已连接,当前主节点已加入集群中
[root@k8s-master01 ~]# kubectl get node
NAME           STATUS     ROLES           AGE   VERSION
k8s-master01   NotReady   control-plane   11m   v1.29.2

# node01、node02根据提示加入集群
# 注意使用cri-docker垫片的情况,需要添加套接字信息--cri-socket unix:///var/run/cri-dockerd.sock
[root@k8s-node01 ~]# kubeadm join 192.168.66.11:6443 --token uoxcrw.tojl3gdya7vo6tjt \
> --discovery-token-ca-cert-hash sha256:86968cb95dc2ff4df8b5960ee5712a148a485ec2bf8dd4ab9ecd5cef97158a6f --cri-socket unix:///var/run/cri-dockerd.sock
[preflight] Running pre-flight checks
[preflight] Reading configuration from the cluster...
[preflight] FYI: You can look at this config file with 'kubectl -n kube-system get cm kubeadm-config -o yaml'
[kubelet-start] Writing kubelet configuration to file "/var/lib/kubelet/config.yaml"
[kubelet-start] Writing kubelet environment file with flags to file "/var/lib/kubelet/kubeadm-flags.env"
[kubelet-start] Starting the kubelet
[kubelet-start] Waiting for the kubelet to perform the TLS Bootstrap...

This node has joined the cluster:
* Certificate signing request was sent to apiserver and a response was received.
* The Kubelet was informed of the new secure connection details.

Run 'kubectl get nodes' on the control-plane to see this node join the cluster.
[root@k8s-node02 ~]# kubeadm join 192.168.66.11:6443 --token uoxcrw.tojl3gdya7vo6tjt \
> --discovery-token-ca-cert-hash sha256:86968cb95dc2ff4df8b5960ee5712a148a485ec2bf8dd4ab9ecd5cef97158a6f --cri-socket unix:///var/run/cri-dockerd.sock
[preflight] Running pre-flight checks
[preflight] Reading configuration from the cluster...
[preflight] FYI: You can look at this config file with 'kubectl -n kube-system get cm kubeadm-config -o yaml'
[kubelet-start] Writing kubelet configuration to file "/var/lib/kubelet/config.yaml"
[kubelet-start] Writing kubelet environment file with flags to file "/var/lib/kubelet/kubeadm-flags.env"
[kubelet-start] Starting the kubelet
[kubelet-start] Waiting for the kubelet to perform the TLS Bootstrap...

This node has joined the cluster:
* Certificate signing request was sent to apiserver and a response was received.
* The Kubelet was informed of the new secure connection details.

Run 'kubectl get nodes' on the control-plane to see this node join the cluster.

# 此时在查看集群节点信息
[root@k8s-master01 ~]# kubectl get node
NAME           STATUS     ROLES           AGE   VERSION
k8s-master01   NotReady   control-plane   16m   v1.29.2
k8s-node01     NotReady   <none>          42s   v1.29.2
k8s-node02     NotReady   <none>          9s    v1.29.2
3.2.3 部署网络插件
下载地址:https://docs.tigera.io/calico/latest/getting-started/kubernetes/self-managed-onprem/onpremises#install-calico-with-kubernetes-api-datastore-more-than-50-nodes
# 上传calico包
[root@k8s-master01 ~]# rz -E
rz waiting to receive.
[root@k8s-master01 ~]# ls -ltr
total 297740
-rw-r--r-- 1 root root 247947395 Jan  8  2024 calico.zip
drwxr-xr-x 2 root root      4096 Mar  5  2024 kubernetes-1.29.2-150500.1.1
-rw-r--r-- 1 root root  56928906 Mar  5  2024 kubernetes-1.29.2-150500.1.1.tar.gz
[root@k8s-master01 ~]# unzip calico.zip
-bash: unzip: command not found
[root@k8s-master01 ~]# yum -y install unzip
..........
Complete!
[root@k8s-master01 ~]# unzip calico.zip
Archive:  calico.zip
  inflating: calico/calico-images.tar.gz
  inflating: calico/calico-typha.yaml
  inflating: calico/calicoctl-linux-amd64
  inflating: calico/calicoctl.yaml
[root@k8s-master01 ~]# cd calico
# calico-typha.yaml 部署文件
# calicoctl-linux-amd64 命令行可执行文件
# calicoctl.yaml 命令行配置的部署文件
# calico 运行所需要的所有镜像
[root@k8s-master01 calico]# ls -ltr
total 277724
-rw-r--r-- 1 root root      2019 Nov  6  2023 calicoctl.yaml
-rw-r--r-- 1 root root    250773 Nov  7  2023 calico-typha.yaml
-rw-r--r-- 1 root root  45314048 Nov 20  2023 calicoctl-linux-amd64
-rw-r--r-- 1 root root 238815237 Nov 21  2023 calico-images.tar.gz
# 解压镜像包
[root@k8s-master01 calico]# tar -xf calico-images.tar.gz
[root@k8s-master01 calico]# cd calico-images
[root@k8s-master01 calico-images]# ls -ltr
total 586436
-rw-r--r-- 1 root root  67504128 Nov 21  2023 calico-typha-v3.26.3.tar
-rw-r--r-- 1 root root  74401280 Nov 21  2023 calico-kube-controllers-v3.26.3.tar
-rw-r--r-- 1 root root 208966656 Nov 21  2023 calico-cni-v3.26.3.tar
-rw-r--r-- 1 root root 249630720 Nov 21  2023 calico-node-v3.26.3.tar
# 发到node01、node02节点,全部都导入到镜像
[root@k8s-master01 calico]# scp -r calico-images root@n1:/root
root@n1's password:
calico-typha-v3.26.3.tar                     100%   64MB  38.4MB/s   00:01
calico-kube-controllers-v3.26.3.tar          100%   71MB  39.1MB/s   00:01
calico-cni-v3.26.3.tar                       100%  199MB  40.1MB/s   00:04
calico-node-v3.26.3.tar                      100%  238MB  29.5MB/s   00:08
[root@k8s-master01 calico]# scp -r calico-images root@n2:/root
root@n2's password:
calico-typha-v3.26.3.tar                     100%   64MB  34.5MB/s   00:01
calico-kube-controllers-v3.26.3.tar          100%   71MB  32.4MB/s   00:02
calico-cni-v3.26.3.tar                       100%  199MB  29.5MB/s   00:06
calico-node-v3.26.3.tar                      100%  238MB  27.8MB/s   00:08
[root@k8s-master01 calico-images]# for i in `ls`;do docker load -i $i ;done
c0223a8035c1: Loading layer  88.58kB/88.58kB
12655f7f7839: Loading layer  13.82kB/13.82kB
a6c32b08bf2b: Loading layer  1.064MB/1.064MB
ba2f9db4970a: Loading layer  152.1kB/152.1kB
12c4bbe57ef6: Loading layer  2.092MB/2.092MB
2d5ea3644a46: Loading layer  31.74kB/31.74kB
2a200d399ae4: Loading layer  56.83kB/56.83kB
8df6bd1ca1ee: Loading layer  95.23kB/95.23kB
db2f02c7410e: Loading layer   2.56kB/2.56kB
c320177a6d03: Loading layer  4.608kB/4.608kB
2539d8fd3b1a: Loading layer  205.3MB/205.3MB
5f70bf18a086: Loading layer  1.024kB/1.024kB
Loaded image: calico/cni:v3.26.3
6df0676e5064: Loading layer  13.82kB/13.82kB
e9d486cc48d1: Loading layer   2.56kB/2.56kB
6c0663c2d2ac: Loading layer  2.048kB/2.048kB
4750c2740db4: Loading layer  2.048kB/2.048kB
3aac44253037: Loading layer  152.1kB/152.1kB
ddc38a6110ba: Loading layer  2.092MB/2.092MB
c2bee487d874: Loading layer  1.064MB/1.064MB
792590853e0b: Loading layer  31.74kB/31.74kB
52a9a8c1c6d9: Loading layer  56.83kB/56.83kB
ea52b1a53efa: Loading layer  95.23kB/95.23kB
6db57b8b6047: Loading layer   2.56kB/2.56kB
82dfd4ef6e9f: Loading layer  4.608kB/4.608kB
fcb61cda7402: Loading layer  67.91MB/67.91MB
d2a176aec5c8: Loading layer  2.918MB/2.918MB
Loaded image: calico/kube-controllers:v3.26.3
aee2cbf886a1: Loading layer  249.6MB/249.6MB
6155e112c051: Loading layer  13.82kB/13.82kB
Loaded image: calico/node:v3.26.3
2143e112a94f: Loading layer    873kB/873kB
fb43a9568a86: Loading layer  99.33kB/99.33kB
1782ffbbe6c2: Loading layer  2.048kB/2.048kB
4a5d64f99c23: Loading layer  152.1kB/152.1kB
da193993fc4d: Loading layer  2.092MB/2.092MB
aaba9c822516: Loading layer  1.064MB/1.064MB
60441a673fc8: Loading layer  95.23kB/95.23kB
17f5bc99c556: Loading layer  31.74kB/31.74kB
2713b7538778: Loading layer  56.83kB/56.83kB
deaa4e4c36f9: Loading layer   2.56kB/2.56kB
e8afadadc167: Loading layer   2.56kB/2.56kB
3c5f1a48d995: Loading layer  62.97MB/62.97MB
9bca983bd9a2: Loading layer  3.072kB/3.072kB
5f70bf18a086: Loading layer  1.024kB/1.024kB
Loaded image: calico/typha:v3.26.3
[root@k8s-master01 calico-images]# docker images
REPOSITORY                                                        TAG        IMAGE ID       CREATED         SIZE
ghost                                                             latest     486437c49b1e   5 days ago      580MB
nginx                                                             latest     be69f2940aaf   5 weeks ago     192MB
busybox                                                           latest     6d3e4188a38a   8 months ago    4.28MB
registry.aliyuncs.com/google_containers/kube-apiserver            v1.29.2    8a9000f98a52   15 months ago   127MB
registry.aliyuncs.com/google_containers/kube-scheduler            v1.29.2    6fc5e6b7218c   15 months ago   59.5MB
registry.aliyuncs.com/google_containers/kube-proxy                v1.29.2    9344fce2372f   15 months ago   82.3MB
registry.aliyuncs.com/google_containers/kube-controller-manager   v1.29.2    138fb5a3a2e3   15 months ago   122MB
registry.aliyuncs.com/google_containers/etcd                      3.5.10-0   a0eed15eed44   19 months ago   148MB
calico/typha                                                      v3.26.3    5993c7d25ac5   19 months ago   67.4MB
calico/kube-controllers                                           v3.26.3    08c1b67c88ce   19 months ago   74.3MB
calico/cni                                                        v3.26.3    fb04b19c1058   19 months ago   209MB
calico/node                                                       v3.26.3    17e960f4e39c   19 months ago   247MB
registry.aliyuncs.com/google_containers/coredns                   v1.11.1    cbb01a7bd410   21 months ago   59.8MB
registry.aliyuncs.com/google_containers/pause                     3.9        e6f181688397   2 years ago     744kB
ghost                                                             4.48.2     1ae6b8d721a2   2 years ago     480MB
registry.aliyuncs.com/google_containers/pause                     3.8        4873874c08ef   2 years ago     711kB
pause                                                             3.1        da86e6ba6ca1   7 years ago     742kB
k8s.gcr.io/pause                                                  3.1        da86e6ba6ca1   7 years ago     742kB
# 如果是从官网下载,需要修改文件内配置(两处)
# 修改成 BGP 网络模式,将 value:'Always' 改为 "Off"
[root@k8s-master01 calico]# grep -nA 2 '# Enable IPIP' calico-typha.yaml
4812:            # Enable IPIP
4813-            - name: CALICO_IPV4POOL_IPIP
4814-              value: "Off"
# 指定 Pod 的网段地址
[root@k8s-master01 calico]# grep -nA 1 'CALICO_IPV4POOL_CIDR' calico-typha.yaml
4842:            - name: CALICO_IPV4POOL_CIDR
4843-              value: "10.244.0.0/16"
# kubectl 命令行工具,apply -f 基于 .yaml 文件创建对应的资源清单
[root@k8s-master01 calico]# kubectl apply -f calico-typha.yaml
poddisruptionbudget.policy/calico-kube-controllers created
poddisruptionbudget.policy/calico-typha created
serviceaccount/calico-kube-controllers created
serviceaccount/calico-node created
serviceaccount/calico-cni-plugin created
configmap/calico-config created
customresourcedefinition.apiextensions.k8s.io/bgpconfigurations.crd.projectcalico.org created
customresourcedefinition.apiextensions.k8s.io/bgpfilters.crd.projectcalico.org created
customresourcedefinition.apiextensions.k8s.io/bgppeers.crd.projectcalico.org created
customresourcedefinition.apiextensions.k8s.io/blockaffinities.crd.projectcalico.org created
customresourcedefinition.apiextensions.k8s.io/caliconodestatuses.crd.projectcalico.org created
customresourcedefinition.apiextensions.k8s.io/clusterinformations.crd.projectcalico.org created
customresourcedefinition.apiextensions.k8s.io/felixconfigurations.crd.projectcalico.org created
customresourcedefinition.apiextensions.k8s.io/globalnetworkpolicies.crd.projectcalico.org created
customresourcedefinition.apiextensions.k8s.io/globalnetworksets.crd.projectcalico.org created
customresourcedefinition.apiextensions.k8s.io/hostendpoints.crd.projectcalico.org created
customresourcedefinition.apiextensions.k8s.io/ipamblocks.crd.projectcalico.org created
customresourcedefinition.apiextensions.k8s.io/ipamconfigs.crd.projectcalico.org created
customresourcedefinition.apiextensions.k8s.io/ipamhandles.crd.projectcalico.org created
customresourcedefinition.apiextensions.k8s.io/ippools.crd.projectcalico.org created
customresourcedefinition.apiextensions.k8s.io/ipreservations.crd.projectcalico.org created
customresourcedefinition.apiextensions.k8s.io/kubecontrollersconfigurations.crd.projectcalico.org created
customresourcedefinition.apiextensions.k8s.io/networkpolicies.crd.projectcalico.org created
customresourcedefinition.apiextensions.k8s.io/networksets.crd.projectcalico.org created
clusterrole.rbac.authorization.k8s.io/calico-kube-controllers created
clusterrole.rbac.authorization.k8s.io/calico-node created
clusterrole.rbac.authorization.k8s.io/calico-cni-plugin created
clusterrolebinding.rbac.authorization.k8s.io/calico-kube-controllers created
clusterrolebinding.rbac.authorization.k8s.io/calico-node created
clusterrolebinding.rbac.authorization.k8s.io/calico-cni-plugin created
service/calico-typha created
daemonset.apps/calico-node created
deployment.apps/calico-kube-controllers created
deployment.apps/calico-typha created
# 节点间通信正常
[root@k8s-master01 calico]# kubectl get node
NAME           STATUS   ROLES           AGE   VERSION
k8s-master01   Ready    control-plane   54m   v1.29.2
k8s-node01     Ready    <none>          38m   v1.29.2
k8s-node02     Ready    <none>          38m   v1.29.2
# 各个组件以Pod形式已启动
[root@k8s-master01 calico]# kubectl get pod -A
NAMESPACE     NAME                                       READY   STATUS    RESTARTS   AGE
kube-system   calico-kube-controllers-558d465845-b9kbj   1/1     Running   0          3m45s
kube-system   calico-node-2dkqp                          1/1     Running   0          3m45s
kube-system   calico-node-68zfv                          1/1     Running   0          3m45s
kube-system   calico-node-nv747                          1/1     Running   0          3m45s
kube-system   calico-typha-5b56944f9b-nz5zs              1/1     Running   0          3m45s
kube-system   coredns-857d9ff4c9-ccs9j                   1/1     Running   0          54m
kube-system   coredns-857d9ff4c9-txp8q                   1/1     Running   0          54m
kube-system   etcd-k8s-master01                          1/1     Running   0          54m
kube-system   kube-apiserver-k8s-master01                1/1     Running   0          54m
kube-system   kube-controller-manager-k8s-master01       1/1     Running   0          54m
kube-system   kube-proxy-2bmbv                           1/1     Running   0          38m
kube-system   kube-proxy-hfspv                           1/1     Running   0          54m
kube-system   kube-proxy-xb4px                           1/1     Running   0          38m
kube-system   kube-scheduler-k8s-master01                1/1     Running   0          54m
至此,集群安装完毕,三台虚拟机打上快照!!!
3.2.4 calico网络插件可选选项
# 目标 IP 或域名可达(选择绑定的网卡)
        - name: calico-node
          image: registry.geoway.com/calico/node:v3.19.1
          env:
            # Auto-detect the BGP IP address.
            - name: IP
              value: "autodetect"
            - name: IP_AUTODETECTION_METHOD
              value: "can-reach=www.google.com"
kubectl set env daemonset/calico-node -n kube-system IP_AUTODETECTION_METHOD=can-reach=www.google.com
# 匹配目标网卡
- name: calico-node
  image: registry.geoway.com/calico/node:v3.19.1
  env:
    # Auto-detect the BGP IP address.
    - name: IP
      value: "autodetect"
    - name: IP_AUTODETECTION_METHOD
      value: "interface=eth.*"
# 排除匹配网卡
- name: calico-node
  image: registry.geoway.com/calico/node:v3.19.1
  env:
    # Auto-detect the BGP IP address.
    - name: IP
      value: "autodetect"
    - name: IP_AUTODETECTION_METHOD
      value: "skip-interface=eth.*"
# CIDR 指定一定的范围,在这个范围内都是你能绑定的网卡
- name: calico-node
  image: registry.geoway.com/calico/node:v3.19.1
  env:
    # Auto-detect the BGP IP address.
    - name: IP
      value: "autodetect"
    - name: IP_AUTODETECTION_METHOD
      value: "cidr=192.168.200.0/24,172.15.0.0/24"
3.2.5 修改kube-proxy 模式为 ipvs
# kubectl edit configmap kube-proxy -n kube-system
mode: ipvs

kubectl delete pod -n kube-system -l k8s-app=kube-proxy
3.2.6 安装输出解析
# 输出k8s安装版本
[init] Using Kubernetes version: v1.29.2
# 开始进行前置的检测
[preflight] Running pre-flight checks
# 下载镜像为k8s集群
[preflight] Pulling images required for setting up a Kubernetes cluster
[preflight] This might take a minute or two, depending on the speed of your internet connection
# 可以执行kubeadm config images pull 提前把k8s集群需要的镜像下载到本机
[preflight] You can also perform this action in beforehand using 'kubeadm config images pull'
# 指定的 pause:3.8 的版本
W0528 02:22:11.395663    5689 checks.go:835] detected that the sandbox image "registry.aliyuncs.com/google_containers/pause:3.8" of the container runtime is inconsistent with that used by kubeadm. It is recommended that using "registry.aliyuncs.com/google_containers/pause:3.9" as the CRI sandbox image.
# 在 /etc/kubernetes/pki 下存放着集群的证书
[certs] Using certificateDir folder "/etc/kubernetes/pki"
# ca 证书
[certs] Generating "ca" certificate and key
[certs] Generating "apiserver" certificate and key
[certs] apiserver serving cert is signed for DNS names [k8s-master01 kubernetes kubernetes.default kubernetes.default.svc kubernetes.default.svc.cluster.local] and IPs [10.0.0.1 192.168.66.11]
[certs] Generating "apiserver-kubelet-client" certificate and key
[certs] Generating "front-proxy-ca" certificate and key
[certs] Generating "front-proxy-client" certificate and key
[certs] Generating "etcd/ca" certificate and key
[certs] Generating "etcd/server" certificate and key
[certs] etcd/server serving cert is signed for DNS names [k8s-master01 localhost] and IPs [192.168.66.11 127.0.0.1 ::1]
[certs] Generating "etcd/peer" certificate and key
[certs] etcd/peer serving cert is signed for DNS names [k8s-master01 localhost] and IPs [192.168.66.11 127.0.0.1 ::1]
[certs] Generating "etcd/healthcheck-client" certificate and key
[certs] Generating "apiserver-etcd-client" certificate and key
[certs] Generating "sa" key and public key
# 在/etc/kubernetes目录下生成各个组件的管理员权限
[kubeconfig] Using kubeconfig folder "/etc/kubernetes"
[kubeconfig] Writing "admin.conf" kubeconfig file
[kubeconfig] Writing "super-admin.conf" kubeconfig file
[kubeconfig] Writing "kubelet.conf" kubeconfig file
[kubeconfig] Writing "controller-manager.conf" kubeconfig file
[kubeconfig] Writing "scheduler.conf" kubeconfig file
# 以静态Pod的方案启动静态Pod,启动此目录下yaml文件,形成k8s集群
[etcd] Creating static Pod manifest for local etcd in "/etc/kubernetes/manifests"
[control-plane] Using manifest folder "/etc/kubernetes/manifests"
[control-plane] Creating static Pod manifest for "kube-apiserver"
[control-plane] Creating static Pod manifest for "kube-controller-manager"
[control-plane] Creating static Pod manifest for "kube-scheduler"
# 定义的环境变量,cri接口位置,启动pause镜像版本
[kubelet-start] Writing kubelet environment file with flags to file "/var/lib/kubelet/kubeadm-flags.env"
[kubelet-start] Writing kubelet configuration to file "/var/lib/kubelet/config.yaml"
[kubelet-start] Starting the kubelet
# 启动k8s组件预计耗时4分钟
[wait-control-plane] Waiting for the kubelet to boot up the control plane as static Pods from directory "/etc/kubernetes/manifests". This can take up to 4m0s
# 实际耗时40秒钟
[kubelet-check] Initial timeout of 40s passed.
[apiclient] All control plane components are healthy after 54.505363 seconds
# 创建ConfigMap的配置参数在kube-system命名空间下
[upload-config] Storing the configuration used in ConfigMap "kubeadm-config" in the "kube-system" Namespace
[kubelet] Creating a ConfigMap "kubelet-config" in namespace kube-system with the configuration for the kubelets in the cluster
# RBAC 赋予权限
[upload-certs] Skipping phase. Please see --upload-certs
[mark-control-plane] Marking the node k8s-master01 as control-plane by adding the labels: [node-role.kubernetes.io/control-plane node.kubernetes.io/exclude-from-external-load-balancers]
[mark-control-plane] Marking the node k8s-master01 as control-plane by adding the taints [node-role.kubernetes.io/control-plane:NoSchedule]
[bootstrap-token] Using token: uoxcrw.tojl3gdya7vo6tjt
[bootstrap-token] Configuring bootstrap tokens, cluster-info ConfigMap, RBAC Roles
[bootstrap-token] Configured RBAC rules to allow Node Bootstrap tokens to get nodes
[bootstrap-token] Configured RBAC rules to allow Node Bootstrap tokens to post CSRs in order for nodes to get long term certificate credentials
[bootstrap-token] Configured RBAC rules to allow the csrapprover controller automatically approve CSRs from a Node Bootstrap Token
[bootstrap-token] Configured RBAC rules to allow certificate rotation for all node client certificates in the cluster
[bootstrap-token] Creating the "cluster-info" ConfigMap in the "kube-public" namespace
[kubelet-finalize] Updating "/etc/kubernetes/kubelet.conf" to point to a rotatable kubelet client certificate and key
# 添加对应的插件 CoreDNS、kube-proxy
[addons] Applied essential addon: CoreDNS
[addons] Applied essential addon: kube-proxy
# 控制器端初始化完成
Your Kubernetes control-plane has initialized successfully!
# 想使用集群可以执行如下命令
To start using your cluster, you need to run the following as a regular user:

  mkdir -p $HOME/.kube
  sudo cp -i /etc/kubernetes/admin.conf $HOME/.kube/config
  sudo chown $(id -u):$(id -g) $HOME/.kube/config

Alternatively, if you are the root user, you can run:

  export KUBECONFIG=/etc/kubernetes/admin.conf
# 部署网络给这个集群使用,下面地址是官方提供的几个常用插件描述
You should now deploy a pod network to the cluster.
Run "kubectl apply -f [podnetwork].yaml" with one of the options listed at:
  https://kubernetes.io/docs/concepts/cluster-administration/addons/
# 其他节点加入集群
Then you can join any number of worker nodes by running the following on each as root:

kubeadm join 192.168.66.11:6443 --token uoxcrw.tojl3gdya7vo6tjt \
    --discovery-token-ca-cert-hash sha256:86968cb95dc2ff4df8b5960ee5712a148a485ec2bf8dd4ab9ecd5cef97158a6f
———————————————————————————————————————————————————————————————————————————
无敌小马爱学习

 浙公网安备 33010602011771号