
SpringBoot集成mybatis以及自动化测试代码实现
Mybatis和logback的应用配置
- 1、在module的pom.xml文件中,加载springboot和swagger、lombok、fastjson、mysql、mybatis包
- 2、在resources中添加配置:
- 配置文件有两种,一种是properties,另一种是yaml,这里使用yaml
- yaml配置与properties一样,只是格式不同,内容则类似。
![]()
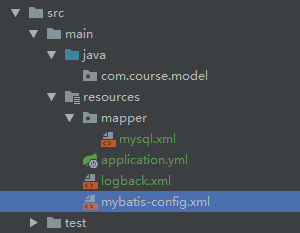
- 3、在配置文件application.yml中,编写MySQL的连接配置(通过url连接数据库course)
server:
port: 8888 # 程序端口
logging:
path: logs # 在项目根路径下
file: mylog.log
spring:
application:
name: myTest # 程序名
datasource:
driver-class-name: com.mysql.jdbc.Driver
url: jdbc:mysql://localhost:3306/course
username: root
password: root
mybatis:
type-aliases-package: com.course.model #用mybatis时,需要用到的一些包,做映射
mapper-locations: #用来写SQL的
- mapper/* #指加载resource/mapper路径下,所有的XML文件
- 4、在resources下,创建日志配置文件logback.xml(含日志回滚),如下
- 5、在resources下,创建mybatis配置文件mybatis-config.xml,如下
使用mybatis+SpringBoot完成第一个查询demo
- 1、在resources下创建一个文件夹mapper,然后创建mysql.xml(存储mybatis的SQL语句的配置文件),在mysql.xml里编写需要执行的sql语句
- 2、在Java下新建com.course.controller包,然后在该包下新建demo.java类,如下
package com.course.controller;
import io.swagger.annotations.Api;
import io.swagger.annotations.ApiOperation;
import lombok.extern.log4j.Log4j2;
import org.mybatis.spring.SqlSessionTemplate;
import org.springframework.beans.factory.annotation.Autowired;
import org.springframework.web.bind.annotation.*;
@Log4j2 //日志注解,用于写日志,是对.Log4j的优化
@RestController
@Api(value = "v1",description = "这是我的第一个版本的demo") //这里的value值需与RequestMapping的值一致,因这里是后者的一个说明,这里表示对v1请求的说明
@RequestMapping("v1") //表示根目录为v1,后续的接口路径都需要先加上该根目录
public class Demo {
//首先创建一个执行sql语句的对象template
@Autowired //该标签是指启动即加载,即将Demo类启动时,就自动加载了template对象
private SqlSessionTemplate template;
@RequestMapping(value = "/getUserCount",method = RequestMethod.GET) //注明请求路径和请求方法
@ApiOperation(value = "可以获取到用户数",httpMethod = "GET") //表明该接口为get接口,以及它的作用
public int getUserCount(){
return template.selectOne("getUserCount"); //该请求的响应结果,即通过执行SQL语句后,把结果返回,通过id定位到需执行的sql
} //selectOne表执行一条查询,getUserCount即mysql.xml中的select标签的id值
}
- 3、在包com.course下新建一个启动程序Application.java ,
该启动程序与之前的不同,之前的写法需要指定扫描某个包,而这里的写法则不需要指定扫描某个包,这种写法是通用的,可以直接拿到其他的地方执行,而不需做改动。
package com.course;
//通用型入口启动程序写法
import org.springframework.boot.SpringApplication;
import org.springframework.boot.autoconfigure.SpringBootApplication;
import org.springframework.context.ConfigurableApplicationContext;
import org.springframework.scheduling.annotation.EnableScheduling;
import javax.annotation.PreDestroy;
@EnableScheduling
@SpringBootApplication
public class Application {
private static ConfigurableApplicationContext context;
//启动程序
public static void main(String[] args){
Application.context = SpringApplication.run(Application.class,args);
}
//退出程序
@PreDestroy
public void close(){
Application.context.close();
}
}
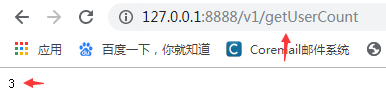
- 4、执行入口程序后,调用接口结果如下:
![]()
使用mybaits实现数据的更新和删除
- user.java
package com.course.model;
import lombok.Data;
@Data
public class User {
private int id;
private String name;
private String sex;
private int age;
}
- Demo.java
package com.course.controller;
import com.course.model.User;
import io.swagger.annotations.Api;
import io.swagger.annotations.ApiOperation;
import lombok.extern.log4j.Log4j2;
import org.mybatis.spring.SqlSessionTemplate;
import org.springframework.beans.factory.annotation.Autowired;
import org.springframework.web.bind.annotation.*;
@Log4j2 //日志注解,用于写日志,是对.Log4j的优化
@RestController
@Api(value = "v1",description = "这是我的第一个版本的demo") //这里的value值需与RequestMapping的值一致,因这里是后者的一个说明,这里表示对v1请求的说明
@RequestMapping("v1") //表示根目录为v1,后续的接口路径都需要先加上该根目录
public class Demo {
//首先创建一个执行sql语句的对象template
@Autowired //该标签是指启动即加载,即将Demo类启动时,就自动加载了template对象
private SqlSessionTemplate template;
@RequestMapping(value = "/getUserCount",method = RequestMethod.GET) //注明请求路径和请求方法
@ApiOperation(value = "可以获取到用户数",httpMethod = "GET") //表明该接口为get接口,以及它的作用
public int getUserCount(){
return template.selectOne("getUserCount"); //该请求的响应结果,即通过执行SQL语句后,把结果返回,通过id定位到需执行的sql
} //selectOne表执行一条查询,getUserCount即mysql.xml中的select标签的id值
//插入数据的接口请求
@RequestMapping(value = "/addUser",method = RequestMethod.POST)
public int addUser(@RequestBody User user){
//通过id定位到sql语句,并传入该sql语句所需的参数user对象
int result = template.insert("addUser",user); //返回的结果是插入的数据条数,整型;Alt+enter可看到返回值类型
return result;
}
//更新数据库请求
@RequestMapping(value = "/updateUser",method = RequestMethod.POST)
public int updateUser(@RequestBody User user){
return template.update("updateUser",user);
}
//删除请求,此时只需知道删除条件的值,不需要知道user类里的成员,因而这里直接定义一个参数即可
@RequestMapping(value = "/deleteUser",method = RequestMethod.GET)
public int delUser(@RequestParam int id){
return template.delete("deleteUser",id);
}
}
- mysql.xml
insert into user(id,name,age,sex)
values(#{id},#{name},#{age},#{sex})
update user set name=#{name},age=#{age}
where id=#{id}
delete from user where id = #{id}
跨类依赖实现
跨类依赖在类中的实现1
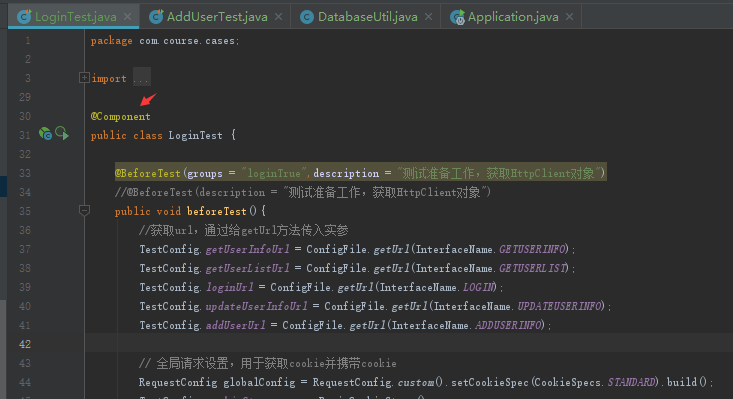
- 在类上面,加上@Component的注解,该类会被作为普通组件加入bean配置中,程序运行时,会优先初始化运行该类。
![]()
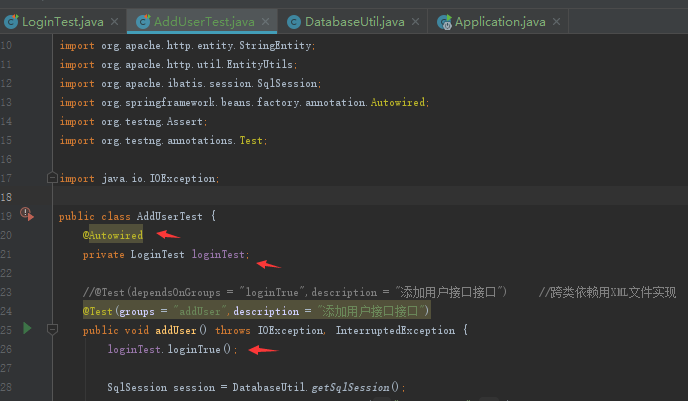
- 在有依赖关系的类下,加入@Autowired注解,用来给指定的字段或方法注入所需的外部资源。这里在该注解下申明了一个LoginTest对象,表明该类是引用外部的类,后续即可使用该对象方法
![]()
跨类依赖在类中的实现2(通过XML文件实现)
- 1、对各个测试方法进行分组
@Test(groups = "loginTrue",description = "用户成功登陆接口")
public void loginTrue() throws IOException {
- 2、在XML执行文件如:testng.xml中,写上它们之间的依赖关系
- 该文件表明,用户管理系统的测试用例,包含addUser和loginTrue测试组,且addUser测试组的执行依赖于loginTrue测试组,该测试用例下,包含两个测试类,分别是addUserTest和LoginTest,其中LoginTest包含两个测试方法(本次需要执行的),分别是loginTrue和loginFalse。
封装SQLsession 用于简化数据库操作
- DatabaseUtil.java 如下(SQLsession是属于mybatis的方法)
package com.course.utils;
import org.apache.ibatis.io.Resources;
import org.apache.ibatis.session.SqlSession;
import org.apache.ibatis.session.SqlSessionFactory;
import org.apache.ibatis.session.SqlSessionFactoryBuilder;
import java.io.IOException;
import java.io.Reader;
public class DatabaseUtil {
//工具类一般用静态方法,方便直接引用。这里方法的数据类型是SqlSession类
public static SqlSession getSqlSession() throws IOException {
//获取配置的资源文件,即加载xml的配置文件,注:这里使用的是org.apache.ibatis.io的类包
Reader reader = Resources.getResourceAsReader("databaseConfig.xml");
//得到SqlSessionFactory,使用类加载器加载上面获取到的xml文件,即将上面的文件build出来
SqlSessionFactory factory = new SqlSessionFactoryBuilder().build(reader);
//创建sqlSession对象,这个对象就能够用于执行配置文件中的sql语句了,true:自动提交事务,false:手动提交,不填则默认false
SqlSession sqlSession = factory.openSession(true);
//返回sqlSession,后续引用即可通过getSqlSession.sql语句来执行了
return sqlSession;
}
}
接口代码开发
- 新建model,并引用相关依赖包
- 在resource下新建相关基础配置文件
- Swagger默认配置文件:application.yml
- 日志配置文件:logback.xml
- Mybatis的配置文件:mybatis-config.xml
- mapper下放存储操作数据库sql语句的配置文件:mysql.xml
- 编写启动类:Application.java
- 分层:
- 新建model层,用于存放数据类型类,比如User.java
- 配置层config,存放程序配置类,如SwaggerConfig.java,存放需在swagger上发布的接口方法、路径等配置
- 控制层 controller,存放执行类,如入口执行类UserManager.java,里面存放控制本程序运行的具体业务逻辑方法。
相关代码如下:
- User.java
package com.course.model;
import lombok.Data;
@Data
public class User {
private int id;
private String userName;
private String password;
private int age;
private String sex;
private int permission;
private int isDelete;
}
- mysql.xml
insert into
user (userName,password,sex,age,permission,isDelete)
values (#{userName},#{password},#{sex},#{age},#{permission},#{isDelete});
update user
userName=#{userName},
sex=#{sex},
age=#{age},
permission=#{permission},
isDelete=#{isDelete},
where id = #{id}
- SwaggerConfig.java
package com.course.config;
import org.springframework.context.annotation.Bean;
import org.springframework.context.annotation.Configuration;
import springfox.documentation.builders.ApiInfoBuilder;
import springfox.documentation.builders.PathSelectors;
import springfox.documentation.service.ApiInfo;
import springfox.documentation.service.Contact;
import springfox.documentation.spi.DocumentationType;
import springfox.documentation.spring.web.plugins.Docket;
import springfox.documentation.swagger2.annotations.EnableSwagger2;
//Configuration和EnableSwagger2这两个注解标签用于自动加载swagger的配置文件
@Configuration
@EnableSwagger2
public class SwaggerConfig {
@Bean
//固定写法,方法名api自定义
public Docket api(){
return new Docket(DocumentationType.SWAGGER_2)
//括号里加载的是下面创建的apiInfo方法
.apiInfo(apiInfo())
//配置整个的访问路径,这里为根路径
.pathMapping("/")
//选择上前面的目录,根路径
.select()
//路径选择器,正则配置controller下的方法,这里选择根目录下的所有方法
.paths(PathSelectors.regex("/.*"))
//build下该文件
.build();
}
private ApiInfo apiInfo(){
//swagger界面标题,联系人(含姓名,链接,邮箱),描述,该应用本次发布的版本,最后build这个文件
return new ApiInfoBuilder().title("我的接口文档")
.contact(new Contact("junjun","http://test.com","test168test@126.com"))
.description("this is UserManager service API")
.version("1.0.0.0")
.build();
}
}
- UserManager.java
package com.course.controller;
import com.course.model.User;
import io.swagger.annotations.Api;
import io.swagger.annotations.ApiOperation;
import lombok.extern.log4j.Log4j2;
import org.mybatis.spring.SqlSessionTemplate;
import org.springframework.beans.factory.annotation.Autowired;
import org.springframework.web.bind.annotation.RequestBody;
import org.springframework.web.bind.annotation.RequestMapping;
import org.springframework.web.bind.annotation.RequestMethod;
import org.springframework.web.bind.annotation.RestController;
import javax.servlet.http.Cookie;
import javax.servlet.http.HttpServletRequest;
import javax.servlet.http.HttpServletResponse;
import java.util.List;
import java.util.Objects;
@Log4j2 //日志注解,用于写日志,是对.Log4j的优化
@RestController
@Api(value = "v1",description = "用户管理系统")
@RequestMapping("v1")
public class UserManager {
//首先获取一个执行sql语句的对象
@Autowired
private SqlSessionTemplate template;
@ApiOperation(value = "登陆接口",httpMethod = "POST")
@RequestMapping(value = "/login",method = RequestMethod.POST)
public Boolean login(HttpServletResponse response, @RequestBody User user){
int i = template.selectOne("login",user);
log.info("查看到的结果是"+i);
if(i==1){
log.info("登录的用户是:"+user.getUserName());
Cookie cookie = new Cookie("login","true");
response.addCookie(cookie);
return true;
}
return false;
}
@ApiOperation(value = "添加用户接口",httpMethod = "POST")
@RequestMapping(value = "/addUser",method = RequestMethod.POST)
public boolean addUser(HttpServletRequest request, @RequestBody User user){
Boolean x = verifyCookies(request);
int result = 0;
if(x ==true){
result = template.insert("addUser",user);
}
if(result>0){
log.info("添加用户的数量是:"+result);
return true;
}
return false; //其他情况(即不符合上面两个条件的),返回此结果
}
@ApiOperation(value = "获取用户(列表)信息接口",httpMethod = "POST")
@RequestMapping(value = "/getUserInfo",method = RequestMethod.POST)
public List
Boolean x = verifyCookies(request);
if(x==true){
List
log.info("getUserInfo获取到的用户数量是" +users.size());
return users; //返回查询到的具体结果信息
}else {
return null;
}
}
@ApiOperation(value = "更新/删除用户接口",httpMethod = "POST")
@RequestMapping(value = "/updateUserInfo",method = RequestMethod.POST)
public int updateUser(HttpServletRequest request,@RequestBody User user){
Boolean x = verifyCookies(request);
int i = 0;
if(x==true) {
i = template.update("updateUserInfo", user);
}
log.info("更新数据的条目数为:" + i);
return i;
}
private Boolean verifyCookies(HttpServletRequest request) {
Cookie[] cookies = request.getCookies();
if(Objects.isNull(cookies)){
log.info("cookies为空");
return false; //执行了return后,表明该方法已结束,后续的语句不会再被执行
}
for(Cookie cookie : cookies){
if(cookie.getName().equals("login") &&
cookie.getValue().equals("true")){
log.info("cookies验证通过");
return true;
}
}
return false; //若前面的条件都不满足,则该方法直接返回此结果,结束该方法
}
}
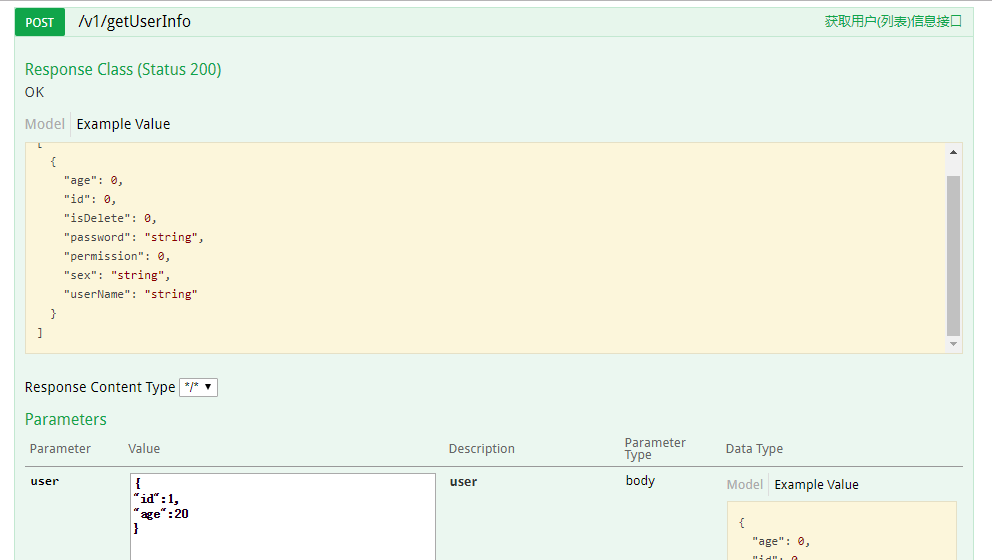
- 发布后,多个参数的请求如下:
![]()
自动化测试代码二次开发
- GetUserInfoTest.java
package com.course.cases;
import com.alibaba.fastjson.JSON;
import com.alibaba.fastjson.JSONArray;
import com.alibaba.fastjson.JSONObject;
import com.course.config.TestConfig;
import com.course.model.GetUserInfoCase;
import com.course.model.User;
import com.course.utils.DatabaseUtil;
import org.apache.http.HttpResponse;
import org.apache.http.client.methods.HttpPost;
import org.apache.http.entity.StringEntity;
import org.apache.http.util.EntityUtils;
import org.apache.ibatis.session.SqlSession;
import org.testng.Assert;
import org.testng.annotations.Test;
import java.io.IOException;
import java.util.ArrayList;
import java.util.Arrays;
import java.util.List;
public class GetUserInfoTest {
//@Test(dependsOnGroups="loginTrue",description = "获取userId为1的用户信息")
@Test(groups = "getUserInfo",description = "获取userId为1的用户信息")
public void getUserInfo() throws IOException, InterruptedException {
SqlSession session = DatabaseUtil.getSqlSession();
GetUserInfoCase getUserInfoCase = session.selectOne("getUserInfoCase",1);
System.out.println(getUserInfoCase.toString());
System.out.println(TestConfig.getUserInfoUrl);
//执行接口测试
JSONArray resultJson = getJsonResult(getUserInfoCase);
Thread.sleep(2000);
//传入的getUserInfoCase只有userId,即从user表取出userId的用户信息,获取到的是字典
User user = session.selectOne(getUserInfoCase.getExpected(),getUserInfoCase);
System.out.println("自己查库获取用户信息:"+user.toString());
//把字典转成字典列表的形式,否则无法转成json数组,以下申明了一个列表
/* List是一个接口,而ArrayList是List接口的一个实现类。创建了一个ArrayList实现类的对象后把它上溯到了List接口。此时它就是一个List对象了,它有些ArrayList类具有的,
但是List接口没有的属性和方法,它就不能再用了。而ArrayList list=newArrayList();创建一对象则保留了ArrayList的所有属性和方法。*/
List userList = new ArrayList();
//将user这个json对象添加到列表中,形成json列表。不写下标,则表示在列表的末尾追加元素
userList.add(user);
JSONArray jsonArray= JSONArray.parseArray(JSON.toJSONString(userList));
System.out.println("获取用户信息:"+jsonArray.toString());
System.out.println("调用接口获取用户信息:"+resultJson.toString());
/* JSONObject actual = (JSONObject) resultJson.get(0); //获取json数组的第1项,并将其转成json对象,即{}部分(键值对)
JSONObject expect = (JSONObject) jsonArray.get(0);
Assert.assertEquals(expect.toString(), actual.toString()); //将json对象转成字符串,然后比较*/
Assert.assertEquals(jsonArray,resultJson); //直接比较json数组
}
private JSONArray getJsonResult(GetUserInfoCase getUserInfoCase) throws IOException {
HttpPost post = new HttpPost(TestConfig.getUserInfoUrl);
JSONObject param = new JSONObject();
param.put("id",getUserInfoCase.getUserId());
//设置请求头信息 设置header
post.setHeader("content-type","application/json");
//将参数信息添加到方法中
StringEntity entity = new StringEntity(param.toString(),"utf-8");
post.setEntity(entity);
//执行post请求,并带上上下文的全局设置中的cookie信息
HttpResponse response =TestConfig.client.execute(post,TestConfig.context);
//声明一个对象来进行响应结果的存储
String result;
//获取响应结果,json字符串
result = EntityUtils.toString(response.getEntity(),"utf-8");
System.out.println("调用接口result:"+result);
//将json字符串转成json数组,即json字符串的中括号[]及里面的内容
JSONArray jsonArray = JSONArray.parseArray(result);
return jsonArray;
}
}
- GetUserInfoListTest.java
package com.course.cases;
import com.alibaba.fastjson.JSON;
import com.alibaba.fastjson.JSONArray;
import com.alibaba.fastjson.JSONObject;
import com.course.config.TestConfig;
import com.course.model.GetUserListCase;
import com.course.model.User;
import com.course.utils.DatabaseUtil;
import org.apache.http.HttpResponse;
import org.apache.http.client.methods.HttpPost;
import org.apache.http.entity.StringEntity;
import org.apache.http.util.EntityUtils;
import org.apache.ibatis.session.SqlSession;
import org.testng.Assert;
import org.testng.annotations.Test;
import java.io.IOException;
import java.util.List;
public class GetUserInfoListTest {
//@Test(dependsOnGroups="loginTrue",description = "获取性别为男的用户信息")
@Test(groups = "getUserList",description = "获取性别为男的用户信息")
public void getUserListInfo() throws IOException, InterruptedException {
SqlSession session = DatabaseUtil.getSqlSession();
GetUserListCase getUserListCase = session.selectOne("getUserListCase",1);
System.out.println(getUserListCase.toString());
System.out.println(TestConfig.getUserListUrl);
//执行接口测试
JSONArray resultJson = getJsonResult(getUserListCase);
Thread.sleep(2000);
//通过获取数据库中的期望结果,得到getUserList,通过定位id为getUserList的sql语句,查询数据库得到结果为字典列表
//传入的getUserListCase只有sex有值,因而查询条件为sex,即从user表取出性别为男的用户信息
List
System.out.println("数据库返回结果列表:"+userList); //[{},{}]
//返回的是多条记录的结果,遍历出来为字典
for(User u : userList){
System.out.println("list获取的user:"+u.toString());
}
//JSONArray userListJson = new JSONArray(userList);
//把列表转成json字符串,然后再转成json数组,即[{},{}]
JSONArray userListJson= JSONArray.parseArray(JSON.toJSONString(userList));
System.out.println("list转成json数组后:"+userListJson);
//取json数组的长度,用size();取列表长度,才用length(),这里比较用户数是否等于预期
Assert.assertEquals(userListJson.size(),resultJson.size());
//将用户从json数组中取出,对比具体的用户信息是否等于预期
for(int i = 0;i<resultJson.size();i++){
JSONObject actual = (JSONObject) resultJson.get(i); //获取json数组的第i项,并将其转成json对象,即{}部分(键值对)
JSONObject expect = (JSONObject) userListJson.get(i);
Assert.assertEquals(expect.toString(), actual.toString()); //将json对象转成字符串,然后比较
}
}
private JSONArray getJsonResult(GetUserListCase getUserListCase) throws IOException {
HttpPost post = new HttpPost(TestConfig.getUserListUrl);
JSONObject param = new JSONObject();
param.put("userName",getUserListCase.getUserName());
param.put("sex",getUserListCase.getSex());
param.put("age",getUserListCase.getAge());
//设置请求头信息 设置header
post.setHeader("content-type","application/json");
//将参数信息添加到方法中
StringEntity entity = new StringEntity(param.toString(),"utf-8");
post.setEntity(entity);
//执行post请求,并带上上下文的全局设置中的cookie信息
HttpResponse response =TestConfig.client.execute(post,TestConfig.context);
//声明一个对象来进行响应结果的存储
String result;
//获取响应结果,这里将响应结果转成转成字符串,然后将响应体保存在result中,即响应结果为json字符串
result = EntityUtils.toString(response.getEntity(),"utf-8");
//JSONArray jsonArray = new JSONArray(result);
//将json字符串转成json数组,即json字符串的中括号[]及里面的内容
JSONArray jsonArray = JSONArray.parseArray(result);
System.out.println("调用接口list result:"+result);
return jsonArray;
}
}
/*
JSON就是一串字符串 只不过元素会使用特定的符号标注
{} 双括号表示对象
[] 中括号表示数组
"" 双引号内是属性或值
1,JSONObject
json对象,就是一个键对应一个值,使用的是大括号{ },如:{key:value}
2,JSONArray
json数组,使用中括号[ ],只不过数组里面的项也是json键值对格式的
[{name1:{name2:{name3:'value1',name4:'value2'}}},{}]
取出name4值过程步骤:1,将以上字符串转换为JSONArray对象;2,取出对象的第一项,JSONObject对象;
3,取出name1的值JSONObject对象;4,取出name2的值JSONObject对象;5,取出name4的值value2。
*/
附录
报错问题解决(执行入口程序后):
- 1、Error starting ApplicationContext. To display the conditions report re-run your application with 'debug' enabled.
2019-06-20 22:37:15.167 [main] ERROR org.springframework.boot.SpringApplication - Application run failed
org.springframework.beans.factory.UnsatisfiedDependencyException: Error creating bean with name 'demo': Unsatisfied dependency expressed through field 'template'; nested exception is org.springframework.beans.factory.UnsatisfiedDependencyException: Error creating bean with name 'sqlSessionTemplate' defined in class path resource- 解决:一般是数据库配置有问题,比如application.yml文件中,数据库的url: jdbc:mysql://localhost:3306/course,若该数据库只有localhost有链接权限,其他ip都无权限,则报此错误,如将localhost改成127.0.0.1,就会出现这种错误。
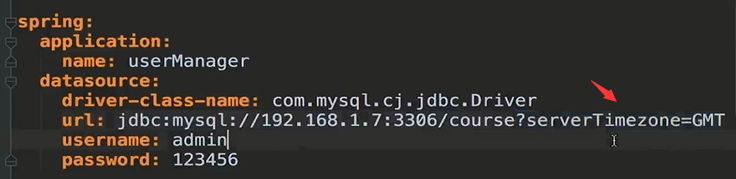
- 2、ERROR com.zaxxer.hikari.pool.HikariPool - HikariPool-1 - Exception during pool initialization.
java.sql.SQLException: The server time zone value '�й���ʱ��' is unrecognized or represents more than one time zone. You must configure either the server or JDBC driver (via the serverTimezone configuration property) to use a more specifc time zone value if you want to utilize time zone support.- 解决:造成这个原因是因为mysql的版本过高。修改为:
SpringBoot 去除"No MyBatis mapper was found in '[com.XXX]' package. " 警告
仔细观察发现,这个包恰恰是 Application 主类的包,看样子是默认扫描了。虽然不影响使用,但不想让这个警告出现,怎么去掉这个警告呢?偶然想到一个思路,既然你要找主类包里的mapper,我就给你一个mapper。如下
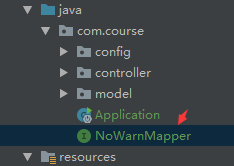
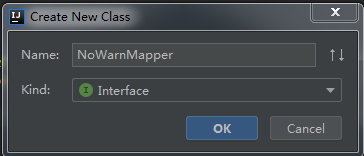
NoWarnMapper.java
package com.course;
@org.apache.ibatis.annotations.Mapper
public interface NoWarnMapper {
}
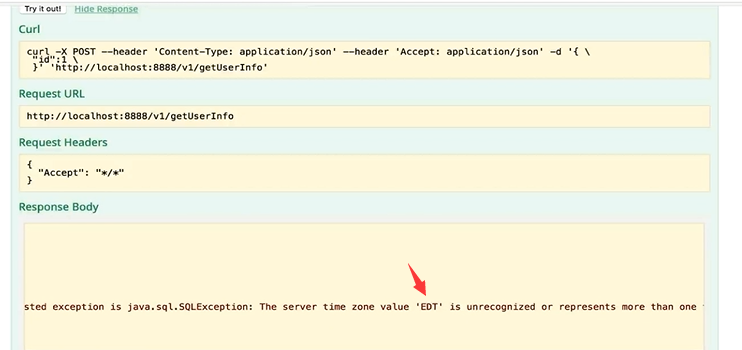
请求的响应中,出现EDT错误
解决如下:(若没有出现EDT错误,则不需要加如下内容)
在application.yml中,加入serverTimezone=GMT

 浙公网安备 33010602011771号