


Android 4 学习(18):搜索
参考《Professional Android 4 Development》
搜索
通过下面这几种方式可以给应用程序添加搜索功能:
- Search Bar

- Search View

- Quick Search Box

可搜索的Content Provider
首先,要在res./xml目录下创建一个xml文件,例如:
<?xml version=”1.0” encoding=”utf-8”?>
  <searchable xmlns:android=”http://schemas.android.com/apk/res/android” android:label=”@string/app_name” android:hint=”@string/search_hint”>
</searchable>
其中,Label一般是应用程序的名称。
为应用程序创建Search Activity
Search Activity和普通的Activity不同,它是一直在back stack的栈顶,每次有新的search activity创建时,不会有将其简单的入栈,因为用户是不会希望按返回键时返回自己前面的查询结果。为了表明该Activity可以被搜索,需要将android.intent.action.SEARCH加入到自己的Intent Filter中,同时需要将前面创建的searchable的xml文件加到meta-data标签中:
<activity android:name=”.DatabaseSkeletonSearchActivity” android:label=”Element Search” android:launchMode=”singleTop”>
  <intent-filter>
    <action android:name=”android.intent.action.SEARCH” />
    <category android:name=”android.intent.category.DEFAULT” />
  </intent-filter>
  <meta-data android:name=”android.app.searchable” android:resource=”@xml/searchable” />
</activity>
用户进行搜索后,可以在搜索结果中继续搜索,而这种操作会生成新的Intent,而这些Intent可以通过onNewIntent handler来处理:
@Override
public void onCreate(Bundle savedInstanceState) {
  super.onCreate(savedInstanceState);
  // Get the launch Intent
  parseIntent(getIntent());
}
@Override
protected void onNewIntent(Intent intent) {
  super.onNewIntent(intent);
  parseIntent(getIntent());
}
private void parseIntent(Intent intent) {
  // If the Activity was started to service a Search request, extract the search query.
  if (Intent.ACTION_SEARCH.equals(intent.getAction())) {
    String searchQuery = intent.getStringExtra(SearchManager.QUERY);
    // Perform the search
    performSearch(searchQuery);
  }
}
设置默认的Serach Provider
在应用程序中,最好设置一个Activity,让所有的搜索结果都从这个Activity中出来,设置方法也简单,将下面的配置加到程序配置中就可以了:
<meta-data android:name=”android.app.default_searchable” android:value=”.DatabaseSkeletonSearchActivity” />
使用Cursor Loader的Search Activity示例
import android.app.ListActivity;
import android.app.LoaderManager;
import android.app.SearchManager;
import android.content.ContentUris;
import android.content.CursorLoader;
import android.content.Intent;
import android.content.Loader;
import android.database.Cursor;
import android.net.Uri;
import android.os.Bundle;
import android.view.View;
import android.widget.ListView;
import android.widget.SimpleCursorAdapter;
public class DatabaseSkeletonSearchActivity extends ListActivity implements LoaderManager.LoaderCallbacks<Cursor> {
  private static String QUERY_EXTRA_KEY = “QUERY_EXTRA_KEY”;
  private SimpleCursorAdapter adapter;
  @Override
  public void onCreate(Bundle savedInstanceState) {
    super.onCreate(savedInstanceState);
    // Create a new adapter and bind it to the List View
    adapter = new SimpleCursorAdapter(this, android.R.layout.simple_list_item_1, null, new String[] { MyContentProvider.KEY_COLUMN_1_NAME }, new int[] { android.R.id.text1 }, 0);
    setListAdapter(adapter);
    // Initiate the Cursor Loader
    getLoaderManager().initLoader(0, null, this);
    // Get the launch Intent
    parseIntent(getIntent());
  }
  @Override
  protected void onNewIntent(Intent intent) {
    super.onNewIntent(intent);
    parseIntent(getIntent());
  }
  private void parseIntent(Intent intent) {
    // If the Activity was started to service a Search request, extract the search query.
    if (Intent.ACTION_SEARCH.equals(intent.getAction())) {
      String searchQuery = intent.getStringExtra(SearchManager.QUERY);
      // Perform the search
      performSearch(searchQuery);
    }
  }
  // Execute the search.
  private void performSearch(String query) {
    // Pass the search query as an argument to the Cursor Loader
    Bundle args = new Bundle();
    args.putString(QUERY_EXTRA_KEY, query);
    // Restart the Cursor Loader to execute the new query.
    getLoaderManager().restartLoader(0, args, this);
  }
  public Loader<Cursor> onCreateLoader(int id, Bundle args) {
    String query = “0”;
    // Extract the search query from the arguments.
    if (args != null)
      query = args.getString(QUERY_EXTRA_KEY);
    // Construct the new query in the form of a Cursor Loader.
    String[] projection = {MyContentProvider.KEY_ID, MyContentProvider.KEY_COLUMN_1_NAME};
    String where = MyContentProvider.KEY_COLUMN_1_NAME + “ LIKE \”%” + query + “%\””;
    String[] whereArgs = null;
    String sortOrder = MyContentProvider.KEY_COLUMN_1_NAME + “ COLLATE LOCALIZED ASC”;
    // Create the new Cursor loader.
    return new CursorLoader(this, MyContentProvider.CONTENT_URI, projection, where, whereArgs, sortOrder);
  }
  public void onLoadFinished(Loader<Cursor> loader, Cursor cursor) {
    // Replace the result Cursor displayed by the Cursor Adapter with the new result set.
    adapter.swapCursor(cursor);
  }
  public void onLoaderReset(Loader<Cursor> loader) {
    // Remove the existing result Cursor from the List Adapter.
    adapter.swapCursor(null);
  }
}
大部分情况下,我们需要响应对搜索结果的click事件,因此需要重写onListItemClick方法:
@Override
protected void onListItemClick(ListView listView, View view, int position, long id) {
  super.onListItemClick(listView, view, position, id);
  // Create a URI to the selected item.
  Uri selectedUri = ContentUris.withAppendedId(MyContentProvider.CONTENT_URI, id);
  // Create an Intent to view the selected item.
  Intent intent = new Intent(Intent.ACTION_VIEW);
  intent.setData(selectedUri);
  // Start an Activity to view the selected item.
  startActivity(intent);
}
使用Search View Widget
Android 3.0后推出了Search View Widget以替代Search Activity。将Search View绑定到searchable activity中,首先要获取searchableInfo:
// Use the Search Manager to find the SearchableInfo related  to this Activity.
SearchManager searchManager = (SearchManager)getSystemService(Context.SEARCH_SERVICE);
SearchableInfo searchableInfo = searchManager.getSearchableInfo(getComponentName());
// Bind the Activity’s SearchableInfo to the Search View
SearchView searchView = (SearchView)findViewById(R.id.searchView);
searchView.setSearchableInfo(searchableInfo);
本地Android Content Provider
Android中提供了一些本地的Content Provider,包括下面这些:
- Media Store
- Browser
- Contacts Contract
- Calendar
- Call Log
使用Media Store Content Provider
MediaStore类有Audio,Video和Image子类,这些子类又有含有uri信息的子类。每个子类中uri信息是这么存储的:
- MediaStore.<mediatype>.Media.EXTERNAL_CONTENT_URI
- MediaStore.<mediatype>.Media.INTERNAL_CONTENT_URI
下面是一个示例:
// Get a Cursor over every piece of audio on the external volume,
// extracting the song title and album name.
String[] projection = new String[] {
  MediaStore.Audio.AudioColumns.ALBUM,
  MediaStore.Audio.AudioColumns.TITLE
};
Uri contentUri = MediaStore.Audio.Media.EXTERNAL_CONTENT_URI;
Cursor cursor = getContentResolver().query(contentUri, projection, null, null, null);
// Get the index of the columns we need.
int albumIdx = cursor.getColumnIndexOrThrow(MediaStore.Audio.AudioColumns.ALBUM);
int titleIdx = cursor.getColumnIndexOrThrow(MediaStore.Audio.AudioColumns.TITLE);
// Create an array to store the result set.
String[] result = new String[cursor.getCount()];
// Iterate over the Cursor, extracting each album name and song title.
while (cursor.moveToNext()) {
  // Extract the song title.
  String title = cursor.getString(titleIdx);
  // Extract the album name.
  String album = cursor.getString(albumIdx);
  result[cursor.getPosition()] = title + “ (“ + album + “)”;
}
// Close the Cursor.
cursor.close();
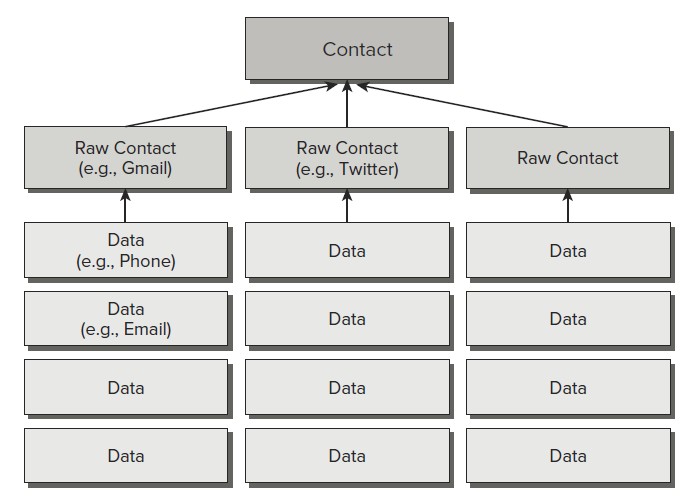
使用Contacts Contract Content Provider
Contacts Contract Provider使用三层模型存储数据:

 浙公网安备 33010602011771号