日常学习总结
1.String.join
使用String.join("间隔符","数组或者集合");替代原先的StringBuffer或者StringBuilder
StringJoiner joiner = new StringJoiner("间隔符,如:","前缀,如[","后缀,如]");

joiner.add("数值").add("数值2");--> [数值:数值2]
第一个参数为拼接符号,第二个参数为数组和集合
源码:
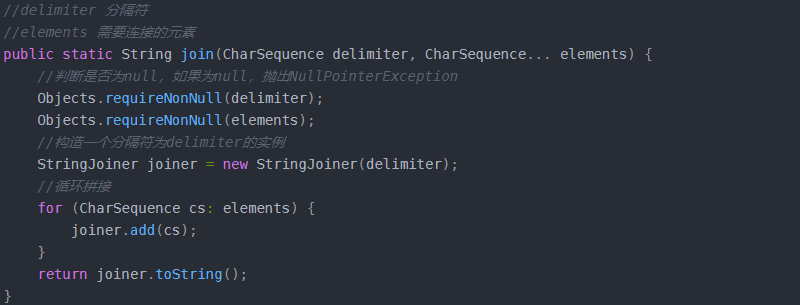
但其底层使用的是StringBuilder的append(),非线程安全
这里和StringUtils.join()有区别,参数顺序不一样,另外,StringUtils.join()可以传入Integer或者其他类型的集合或数组,而String.join()尽可以传入实现charSequence接口类型的集合或数组。
如果是字符串类型的集合或数组推荐使用String.join().
2.Collections.unmodifiableList(list);
针对list提供一个类似于视图的集合,仅供查询,并不能对其作出修改.
3.ConcurrentHashMap
ConcurrentHashMap 是一个并发散列映射表的实现,它允许完全并发的读取,并且支持给定数量的并发更新。相比于 HashTable 和用同步包装器包装的HashMap(Collections.synchronizedMap(new HashMap())),ConcurrentHashMap 拥有更高的并发性。在 HashTable 和由同步包装器包装的HashMap 中,使用一个全局的锁来同步不同线程间的并发访问。同一时间点,只能有一个线程持有锁,也就是说在同一时间点,只能有一个线程能访问容器。这虽然保证多线程间的安全并发访问,但同时也导致对容器的访问变成 串行化 的了。
在使用锁来协调多线程间并发访问的模式下,减小对锁的竞争可以有效提高并发性。有两种方式可以减小对锁的竞争:
减小请求 同一个锁的 频率。
减少持有锁的 时间。
ConcurrentHashMap 的高并发性主要来自于三个方面:
用分离锁实现多个线程间的更深层次的共享访问。
用 HashEntery 对象的不变性来降低执行读操作的线程在遍历链表期间对加锁的需求。
通过对同一个 Volatile 变量的写 / 读访问,协调不同线程间读 / 写操作的内存可见性。
使用分离锁,减小了请求 同一个锁 的频率。
4.DMQ:
producer:
一般是前台传过来,向DMQ发送消息,sendDmqMessage方法(com.huawei.ssp.portal.service.DeveloperAgreementService);
serviceSender.sendPost(String.valueOf(acc.getId()), "/v1/publisher/updateWhiteListInfo",
"sspportal2partnersrv", req, Object.class);
这个方法才是向dmq发送消息
consumer:
后台接收订阅消息,dmq-conf.xml中配置:
<bean id="creativeUploadListener" class="com.huawei.pps.dspservice.tool.dmq.listener.CreativeUploadListener"></bean>
	<bean id="creativeUpload" class="com.huawei.pps.dspservice.tool.dmq.MQConsumer" init-method="init"
          destroy-method="destory">
        <property name="mqClient" ref="applicationChangeClient" /> --固定的配置类
        <property name="messageListener" ref="creativeUploadListener" /> --需要自定义的监听类 指向第8行的定义类
        <property name="props">
            <props>
                <prop key="group.id">PPSDspService.openalliance.fileserver.fileUploadStatus</prop> --dmq的topic
                <prop key="consumer.timeout.ms">5000</prop> --超时时间
                <prop key="auto.commit.enable">false</prop>
                <prop key="mq.consumer.connections">5</prop>
            </props>
        </property>

        <property name="listQueue">
            <list>
                <value>openalliance.fileserver.fileUploadStatus</value>
            </list>
        </property>
	</bean>

	其中   CreativeUploadListener 是需要自己定义的,主要是复写其中的onMessage方法,主要是监听是否成功获取了对应topic中的消息说
5.编程模块接口
编排过程中的所有模块必须实现此接口,在start方法中进行功能编排。
IPPSLayoutModel 支持函数式编程,并且支持通过after与before方法实现自由组合,比如:
// (A -> (B -> C -> D)) -> E
B.after(C).after(D).before(A).after(E)
A.after(B.after(C).after(D)).after(E)
使用方法举例:
  // 初始化一个文件配置对象,实际使用时可以从文件中加载、也可以把客户端传的参数放入
   ObjectConf conf = new ObjectConf().set(PagingFlowContext.CUR_PAGE, 1)
       .set(PagingFlowContext.PAGE_SIZE, 80001);

   PPSLayout  , ObjectConf, PagingFlowContext > layout = PPSLayout
       // 通过PPSLayout.flowController方法获取一个编排对象
       .flowController(new PagingFlowController<>(), conf);

   // 组合Model(通过after、before方法),做数据的收集、转换等
   IPPSLayoutModel  > model =
       ((IPPSLayoutModel  , ObjectConf, PagingFlowContext >) (context, con, s) -> {
       // System.out.println("Query - " + context.getCurPage());
       // 查询数据
       TestBeanDao dao = new TestBeanDao();
       QueryReq req = new QueryReq();
       req.setPageNum(context.getCurPage());
       req.setPageSize(context.getPageSize());
       List  beans = dao.query(req);
       if (beans.isEmpty()) {
           context.markFinish();
       }

       return beans;
   }).after((context, con, beans) -> {
       // 导出到文件
       // System.out.println("Export - " + context.getCurPage());
       ExportRule rule = ExportRule.fromClass(TestBean.class)
       .withFileName("PPSLayout")
       .withFileOption(StandardFileOption.TAIL_APPENDING)
       .withFileDir(Paths.get("C:\\", "Recovery"));
       IExporter exporter = FileExporterFactory.single().provide("csv");
       return exporter.export(beans, TestBean.class, rule);
   });
6.Mysql中concat()、concat_ws()和 group_concat()的用法
1.concat()函数
CONCAT(str1,str2,…)
返回结果为连接参数产生的字符串。如有任何一个参数为NULL ,则返回值为 NULL。可以有一个或多个参 数。
2.concat_ws()函数
使用语法为:CONCAT_WS(separator,str1,str2,…)
CONCAT_WS() 代表 CONCAT With Separator ,是CONCAT()的特殊形式。第一个参数是其它参数的分隔符。 分隔符的位置放在要连接的两个字符串之间。分隔符可以是一个字符串,也可以是其它参数。如果分隔符为 NULL,则结果为 NULL。函数会忽略任何分隔符参数后的 NULL 值。但是CONCAT_WS()不会忽略任何空字符串。 (然而会忽略所有的 NULL)。
3.group_concat()函数
GROUP_CONCAT([DISTINCT] expr [,expr ...][ORDER BY {unsigned_integer | col_name | formula} [ASC | DESC] [,col ...]]
[SEPARATOR str_val])
GROUP_CONCAT(distinct id ORDER BY id DESC SEPARATOR '') --> 5_3_2_1 按照id倒序排列中间分隔符为''拼接字段
Substring函数
substring(参数1,参数2,参数3),其中三个参数分别表示:参数1表示需要截取的字符串,参数2表示从字符串的那个位置开始截取(字符串下标从1开始),参数3表示要截取多少位(可以为负数),如果不写,表示截取从参数2指定的位置开始剩下的全部字符。
7.PropertiesCache:
内存缓存数据
通过system.getProperty("catalina.home") 获取tomcat安装目录;
FilenameFilter propertiesSuffixFileFilter = new SuffixFileFilter(".properties");
通过加载所有的".properties"结尾的配置文件放入到Map中;
最后通过PropertiesCache.getKey("key")获取对应缓存的value
8.try catch finally总结为以下几条:
当 try 代码块和 catch 代码块中有 return 语句时,finally 仍然会被执行。
执行 try 代码块或 catch 代码块中的 return 语句之前,都会先执行 finally 语句。
无论在 finally 代码块中是否修改返回值,返回值都不会改变,仍然是执行 finally 代码块之前的值。
finally 代码块中的 return 语句一定会执行。
9.函数编程Stream
1、Stream的操作步骤
Stream有如下三个操作步骤:
一、创建Stream
从一个数据源,如集合、数组中获取流。
二、中间操作
一个操作的中间链,对数据源的数据进行操作。
三、终止操作
一个终止操作,执行中间操作链,并产生结果。
要注意的是,对流的操作完成后需要进行关闭操作(或者用JAVA7的try-with-resources)
①创建Stream,一般简单理解就是 数据源.stream
②Stream的中间操作---筛选和切片
~filter:接收Lambda,从流中排除某些操作;
~limit:截断流,使其元素不超过给定对象
~skip(N):跳过元素,返回一个扔掉了前N个元素的流,若流中元素不足N个,则返回一个空流,与limit(N)互补
~distinct:筛选,通过流所生成元素的hashCode()和equals()去除重复元素
③Stream的中间操作---映射
~map:对其返回的结果返回一个流(返回的就是直接返回,如果有多层嵌套的流只会简单返回)
~flatMap:将其返回的结果每个元素取出放入到一个Stream中,最后将一个含有多个元素的Stream返回
④Stream的中间操作---排序
~sorted():自然排序
~sorted(Comparator com):自定义排序
final Stream<Person> sorted = personList.stream().sorted((p1, p2) -> {

    if (p1.getAge().equals(p2.getAge())) {
        return p1.getName().compareTo(p2.getName());
    } else {
        return p1.getAge().compareTo(p2.getAge());
    }
});
sorted.forEach(System.out::println);
⑤Stream的终止操作---查找和匹配
~allMatch:检查是否匹配所有元素(boolean)
~anyMatch:检查是否至少匹配一个元素(boolean)
~noneMatch:检查是否没有匹配所有元素(boolean)
~findFirst:返回第一个元素
~findAny:返回当前流中的任意元素
~count:返回流中元素的总个数
~max:返回流中最大值
~min:返回流中最小值
⑥Stream的终止操作---归约
~reduce:将六中的元素反复结合起来,得到一个值
Optional<T> reduce(BinaryOperator<T> accumulator);

T reduce(T identity, BinaryOperator<T> accumulator);

<U> U reduce(U identity,
                 BiFunction<U, ? super T, U> accumulator,
                 BinaryOperator<U> combiner);
⑦Stream的终止操作---收集
~collect:将流转换为其他形式,接收一个Collector接口的实现,用于给Stream中汇总的方法;常用即collect(Collector.toList()),当然这里就可以直接参考java.util.stream.Collectors
当然和所有的流一样都是需要关闭操作的,可以直接放入到try-with-resources(java7的语法糖,在编译后会加上关闭流代码)中
try-with-resources结构:
try(//声明流
    final Stream<Integer> integerStream = personList.stream().map(Person::getAge)){
    final Optional<Integer> minAge = integerStream.collect(Collectors.minBy(Integer::compareTo));
    System.out.println(minAge.get());
}
四、Stream的一些常用操作示例:
list-->map:
Map<Integer, List<DkSaleOrderItem>> dkSaleOrderDetailVoMap = dkSaleOrderDetailVoLst.stream()
                .collect(Collectors.groupingBy(e -> e.getBatchId()));

Map<String, String> customGroupMap = customGrouplist.stream().collect(Collectors
    .toMap(CxmCustomGroup::getCustomerName, CxmCustomGroup::getMergeCustomerName, (k1, k2) -> k1));

Map<Integer, Student> map = list.stream().collect(Collectors.toMap(Student::getId, student -> student));

所有数据不存在主键重复或value为null的情况,如有此情况,请再加参数
,(k1,k2)->k1)。重复时用后面的value 覆盖前面的value

value为null
Map<String, Object> collect = arrayList.parallelStream().collect(Collectors.toMap(TrainInfo::getMainIp, e -> e.getLineId() == null ? "" : e.getLineId()));
10.Spring封装的定时任务Scheduled
直接在xml中定义配置需要定时任务的Bean对象,同时可以针对schedule进行配置,管理对应任务类中的执行方法来定时执行相关的任务操作
优点在于不需要手动关闭,不需要考虑tomcat的启停处理,参数可以自行配置,比较适合常驻场景
 <bean id="threadManager" class="com.test.ThreadManager"/>
    <bean id="appThreadManager" class="com.test.AppThreadManager"/>

    <task:annotation-driven scheduler="dataPushScheduled"/>
    <task:scheduler id="dataPushScheduled" pool-size="10"/>

    <task:scheduled-tasks scheduler="dataPushScheduled">
        <!-- 每天的整点执行一次任务 -->
        <task:scheduled ref="threadManager" method="execute" cron="0 0 0/1 * * ?"/>
    </task:scheduled-tasks>
    <task:scheduled-tasks scheduler="dataPushScheduled">
        <!-- 每小时执行一次 -->
        <task:scheduled ref="appThreadManager" method="execute" cron="0 0 */1 * * ?"/>
    </task:scheduled-tasks>
11.关于equals()探究
equals方法对于字符串来说是比较内容的,而对于非字符串来说是比较,其指向的对象是否相同的;
String类中重新定义了equals这个方法,而且比较的是值,而不是地址,所以一般定义实体类的时候都会重写equals方法,如果不重写就是默认使用Object的equals方法,比较的是地址;
如果是基本类型比较,那么只能用==来比较,不能用equals ,如果是基本类型的包装类型,那么用equals.
- 可能犯错的地方
Map<Long,String>() map = new HashMap<~>();
long id = 12314121L;
//使用包装类就可以避免这个问题
Long id = 12314121L;
//一般情况是获取实体类的值,所以实体类中一般都是定义基本类型的包装类,避免发生这样的问题
Long trueAdvertiserId = agDataPushTaskPO.getTrueAdvertiserId();
if(map.containsKey(id)){//这里会一直走else,因为containsKey底层用的还是equals方法,会比较地址并不会比较值
    ....;
}else{
    return null;
}
12.**isEmpty()和isBlank()区别*
isEmpty() 是判断null/长度为0
isBlank()是判断null/长度为0/空字符串
13.Linux命令中的chown chgrp chmod
ch---change :
own :所属用户 chown -r 改变后的用户名 文件名
grp:所属分组 chgrp -r 改变后的用户组 文件名
mod:读写权限 chmod 777 文件名 ---全部的读写权限
unzip -P<密码> <文件名.zip> -d<目录>
14.ServletContextListener 浅探
Servlet API 中有一个 ServletContextListener 接口,它能够监听 ServletContext 对象的生命周期,实际上就是监听 Web 应用的生命周期。
当Servlet 容器启动或终止Web 应用时,会触发ServletContextEvent 事件,该事件由ServletContextListener 来处理。在 ServletContextListener 接口中定义了处理ServletContextEvent 事件的两个方法。
 1 /**
 2  * 当Servlet 容器启动Web 应用时调用该方法。在调用完该方法之后,容器再对Filter 初始化,
 3  * 并且对那些在Web 应用启动时就需要被初始化的Servlet 进行初始化。
 4  */
 5 contextInitialized(ServletContextEvent sce)
 6
 7
 8 /**
 9  * 当Servlet 容器终止Web 应用时调用该方法。在调用该方法之前,容器会先销毁所有的Servlet 和Filter 过滤器。
10  */
11 contextDestroyed(ServletContextEvent sce)
下面通过两个具体的例子来介绍 ServletContextListener 的用法。
例一:在服务启动时,将数据库中的数据加载进内存,并将其赋值给一个属性名,其它的 Servlet 就可以通过 getAttribute 进行属性值的访问。
有如下两个步骤:
1、ServletContext 对象是一个为整个 web 应用提供共享的内存,任何请求都可以访问里面的内容
2、如何实现在服务启动的时候就动态的加入到里面的内容:我们需要做的有:
1 ) 实现 servletContextListerner 接口 并将要共享的通过 setAttribute ( name,data )方法提交到内存中去 ;
2 )应用项目通过 getAttribute(name) 将数据取到 。
java代码
public class ServletContextLTest implements ServletContextListener{
 2
 3     // 实现其中的销毁函数
 4
 5     public void contextDestroyed(ServletContextEvent sce) {
 6
 7         System.out.println("this is last destroyeed");
 8
 9     }
10
11     // 实现其中的初始化函数,当有事件发生时即触发
12
13     public void contextInitialized(ServletContextEvent sce) {
14
15         ServletContext sct=sce.getServletContext();
16
17         Map<Integer,String> depts=new HashMap<Integer,String>();
18
19         Connection connection=null;
20
21         PreparedStatement pstm=null;
22
23         ResultSet rs=null;
24
25
26
27         try{
28
29             connection=ConnectTool.getConnection();
30
31             String sql="select deptNo,dname from dept";
32
33             pstm=connection.prepareStatement(sql);
34
35             rs=pstm.executeQuery();
36
37             while(rs.next()){
38
39                 depts.put(rs.getInt(1), rs.getString(2));
40
41             }
42
43             // 将所取到的值存放到一个属性键值对中
44
45             sct.setAttribute("dept", depts);
46
47             System.out.println("======listener test is beginning=========");
48
49         }catch(Exception e){
50
51             e.printStackTrace();
52
53         }finally{
54
55             ConnectTool.releasersc(rs, pstm, connection);
56
57         }
58
59     }
60
61 }
在完成上述编码后,仍需在 web.xml 中进行如下配置,以使得该监听器可以起作用。
Xml代码
1 <listener>
2
3    <listener-class>ServletContextTest.ServletContextLTest</listener-class>
4
5 </listener>
在完成上述配置后, web 服务器在启动时,会直接加载该监听器,通过以下的应用程序就可以进行数据的访问。
Java代码
1 public class CreateEmployee extends HttpServlet{
 2
 3     @Override
 4
 5     protected void service(HttpServletRequest request, HttpServletResponse response)
 6
 7             throws ServletException, IOException {
 8
 9         ServletContext sct=getServletConfig().getServletContext();
10
11         // 从上下文环境中通过属性名获取属性值
12
13         Map<Integer,String> dept=(Map<Integer,String>)sct.getAttribute("dept");
14
15         Set<Integer> key=dept.keySet();
16
17         response.setContentType("text/html;charset=utf-8");
18
19         PrintWriter out=response.getWriter();
20
21         out.println("<html>");
22
23         out.println("<body>");
24
25         out.println("<form action='/register' action='post'>");
26
27         out.println("<table alignb='center'>");
28
29         out.println("<tr>");
30
31         out.println("<td>");
32
33         out.println("username:");
34
35         out.println("</td>");
36
37         out.println("<td>");
38
39         out.println("<input type='text' name='username'");
40
41         out.println("</tr>");
42
43         out.println("<tr>");
44
45         out.println("<td>");
46
47         out.println("city:");
48
49         out.println("</td>");
50
51         out.println("<td>");
52
53         out.println("<select name='dept'");
54
55         for(Integer i:key){
56
57             out.println("<option value='"+i+"'>"+dept.get(i)+"</option>");
58
59         }
60
61         out.println("</select>");
62
63         out.println("</td>");
64
65         out.println("<tr>");
66
67         out.println("</table>");
68
69         out.println("</form>");
70
71         out.println("</body>");
72
73         out.println("</html>");
74
75         out.flush();
76
77     }
78
79 }
例二:书写一个类用于统计当Web 应用启动后,网页被客户端访问的次数。如果重新启动Web 应用,计数器不会重新从1 开始统计访问次数,而是从上次统计的结果上进行累加。
在实际应用中,往往需要统计自Web 应用被发布后网页被客户端访问的次数,这就要求当Web 应用被终止时,计数器的数值被永久存储在一个文件中或者数据库中,等到Web 应用重新启动时,先从文件或数据库中读取计数器的初始值,然后在此基础上继续计数。
向文件中写入或读取计数器的数值的功能可以由自定义的 MyServletContextListener 类来完成,它具有以下功能:
1 、在 Web 应用启动时从文件中读取计数器的数值,并把表示计数器的 Counter 对象存放到 Web应用范围内。存放计数器的文件的路径为helloapp/count/count.txt 。
2 、在Web 应用终止时把Web 应用范围内的计数器的数值保存到count.txt 文件中。
Java代码
1 public class MyServletContextListener implements ServletContextListener{
 2
 3   public void contextInitialized(ServletContextEvent sce){
 4
 5     System.out.println("helloapp application is Initialized.");
 6
 7     // 获取 ServletContext 对象
 8
 9     ServletContext context=sce.getServletContext();
10
11     try{
12
13        // 从文件中读取计数器的数值
14
15        BufferedReader reader=new BufferedReader(
16
17            new InputStreamReader(context.
18
19            getResourceAsStream("/count/count.txt")));
20
21        int count=Integer.parseInt(reader.readLine());
22
23        reader.close();
24
25        // 创建计数器对象
26
27        Counter counter=new Counter(count);
28
29        // 把计数器对象保存到 Web 应用范围
30
31        context.setAttribute("counter",counter);
32
33        } catch(IOException e) {
34
35           e.printStackTrace();
36
37        }
38
39    }
40
41    public void contextDestroyed(ServletContextEvent sce){
42
43        System.out.println("helloapp application is Destroyed.");
44
45        // 获取 ServletContext 对象
46
47        ServletContext context=sce.getServletContext();
48
49        // 从 Web 应用范围获得计数器对象
50
51        Counter counter=(Counter)context.getAttribute("counter");
52
53        if(counter!=null){
54
55        try{
56
57           // 把计数器的数值写到 count.txt 文件中
58
59           String filepath=context.getRealPath("/count");
60
61           filepath=filepath+"/count.txt";
62
63           PrintWriter pw=new PrintWriter(filepath);
64
65           pw.println(counter.getCount());
66
67           pw.close();
68
69          } catch(IOException e) {
70
71              e.printStackTrace();
72
73          }
74
75      }
76
77    }
78
79 }
将用户自定义的 MyServletContextListener 监听器在 Servlet 容器进行注册, Servlet 容器会在启动或终止 Web 应用时,会调用该监听器的相关方法。在 web.xml 文件中,
Xml代码
1 <listener>
2     <listenerclass>
3         ServletContextTest.MyServletContextListener
4     <listener-class/>
5 </listener>
总结:
此API是在web服务启动加载时,做初始化配置,可以在contextInitialized()和contextDestroyed()中定义需要加载初始化的参数和配置.
15.Optional理解运用
Optional 类是一个可以为null的容器对象。如果值存在则isPresent()方法会返回true,调用get()方法会返回该对象。
Optional 是个容器:它可以保存类型T的值,或者仅仅保存null。Optional提供很多有用的方法,这样我们就不用显式进行空值检测。
Optional 类的引入很好的解决空指针异常。
private static Integer a = null;//1
    public static void main(String[] args) {

        Optional<Integer> a1 = optional.ofNullable(a);//若a为null 返回Optional.empty ;若a为1 返回Optional[1]
        System.out.println(a1);
        if (optional.ofNullable(a1).isPresent()){//true  isPresent()判断 是否有值,有值则true;否则false
            Object o = a1.get();// o = 1
            System.out.println(o);//1
        }

    }
API
	static <T> Optional<T> ofNullable(T value)
如果为非空,返回 Optional 描述的指定值,否则返回空的 Optional。
    T get()
如果在这个Optional中包含这个值,返回值,否则抛出异常:NoSuchElementException
    boolean isPresent()
如果值存在则方法会返回true,否则返回 false。
    boolean equals(Object obj)
判断其他对象是否等于 Optional。
    <U>Optional<U> map(Function<? super T,? extends U> mapper)
如果有值,则对其执行调用映射函数得到返回值。如果返回值不为 null,则创建包含映射返回值的Optional作为map方法返回值,否则返回空Optional。
	T orElse(T other)
如果存在该值,返回值, 否则返回 other。
 	T orElseGet(Supplier<? extends T> other)
如果存在该值,返回值, 否则触发 other,并返回 other 调用的结果。
尽量使用Optional作为判断,不要直接做空指针判断.
16.Filter工作原理
Filter 接口中有一个doFilter 方法,当咱们编写好 Filter,并配置对哪个 web 资源进行拦截后,web 服务器每次在调用 web 资源的 service 方法之前,都会先调用一下 Filter 的 doFilter 方法,因此,在该方法内编写代码可达到如下的:
- 调用目标资源之前,让一段代码执行;
- 是否调用目标资源,即是否让用户访问 web 资源;
- 调用目标资源之后,让一段代码执行。
web 服务器在调用 doFilter 方法时,会传递一个 filterChain 对象进来,filterChain 对象是 filter 接口中最重要的一个对象,它也提供了一个 doFilter 方法,开发人员可以根据需求决定是否调用此方法。如果调用该方法,则 web 服务器就会调用 web 资源的 service 方法,即 web 资源就会被访问;否则的话, web 资源就不会被访问。
17.for(;;)和while(true)的区别
Java中 for(;;)和while(true)都是死循环。
总结:两者都是用于 无限循环的判断语句。且编译后的字节码 完全相同。
但是:注意 这是 依赖于编译器优化后的结果。--->有些不优化的编译器-->则会体现出不同。for(;;)的指令就会少一些。而while(true)会用到寄存器,就会多一些指令。
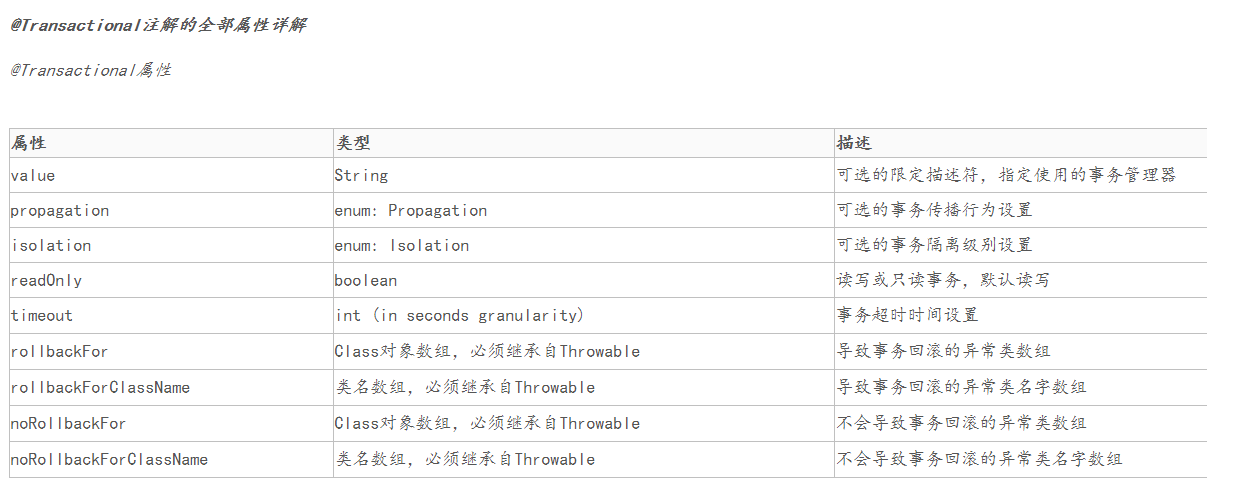
18.@Transactional事务回滚
当作用于类上时,该类的所有 public 方法将都具有该类型的事务属性,同时,我们也可以在方法级别使用该标注来覆盖类级别的定义。
在项目中,@Transactional(rollbackFor=Exception.class),如果类加了这个注解,那么这个类里面的方法抛出异常,就会回滚,数据库里面的数据也会回滚。
在@Transactional注解中如果不配置rollbackFor属性,那么事物只会在遇到RuntimeException的时候才会回滚,加上rollbackFor=Exception.class,可以让事物在遇到非运行时异常时也回滚
19.关于Spring事务< tx:annotation-driven/>的理解(Controller可以使用@Transactional)结合18点
在使用SpringMvc的时候,配置文件中我们经常看到 annotation-driven 这样的注解,其含义就是支持注解,一般根据前缀 tx、mvc 等也能很直白的理解出来分别的作用。< tx:annotation-driven/> 就是支持事务注解的(@Transactional) 、< mvc:annotation-driven> 就是支持mvc注解的,说白了就是使Controller中可以使用MVC的各种注解。简单来说就是使< tx:annotation-driven/>配置的数据库支持@Transactional操作
首先,<tx:annotation-driven/>  会有一个属性来指定使用哪个事务管理器,如:<tx:annotation-driven transaction-manager="transactionManager" />。然后事务管理器 transactionManager 会引用 dataSource (如果我们使用JPA或hibernate,也需要指定一个 entityManagerFactory ),dataSouce 肯定就是直接对数据库的了。

这样逐层引用下去,所以我们使用@Transactionl 注解可以控制事务就通俗易懂了。另外要提一下的就是 spring 是使用 aop 通过 asm 操作Java字节码的方式来实现对方法的前后事务管理的。

说到这里,已经有了对 <tx:annotation-driven/> 的简单理解,那我们是否就可以在程序中所有被spring管理的类上都可以使用@Transactional注解了呢,在Service上可以使用@Transactional 注解这个是肯定的了,那总有些人也想弄明白能否在Controller 使用?答案显然是“不一定”的(与时间配置有关),下面做下解释:
在 spring-framework-reference.pdf 文档上有这样一段话:
< tx:annotation-driven/> only looks for @Transactional on beans in the same application context it is defined in. This means that, if you put < tx:annotation-driven/> in a WebApplicationContext for a DispatcherServlet, it only checks for @Transactional beans in your controllers, and not your services.
意思就是:< tx:annoation-driven/>只会查找和它在相同的应用上下文件中定义的bean上面的@Transactional注解,如果你把它放在Dispatcher的应用上下文中,它只检查控制器(Controller)上的@Transactional注解,而不是你services上的@Transactional注解。
所以,可以确定的是我们是可以在Controller上使用事务注解的,但是我们不推荐这样做(本人也从来没有这样做过),这里只是为了说明spring对<tx:annotation-driven/>的使用。
<tx:annotation-driven
		transaction-manager="transactionManager" />
<tx:annotation-driven
		transaction-manager="transactionManagerInvoice" />
20.spring的aop之 <aop:aspectj-autoproxy />的作用
通过配置织入@Aspectj切面
虽然可以通过编程的方式织入切面,但是一般情况下,我们还是使用spring的配置自动完成创建代理织入切面的工作。
通过aop命名空间的<aop:aspectj-autoproxy />声明自动为spring容器中那些配置@aspectJ切面的bean创建代理,织入切面。
当然,spring在内部依旧采用AnnotationAwareAspectJAutoProxyCreator进行自动代理的创建工作,但具体实现的细节已经被<aop:aspectj-autoproxy />隐藏起来了
<aop:aspectj-autoproxy />有一个proxy-target-class属性,默认为false,如果proxy-target-class属值被设置为false或者这个属性被省略,那么标准的JDK 基于接口的代理将起作用。
当配为<aop:aspectj-autoproxy poxy-target-class="true"/>时,表示使用CGLib动态代理技术织入增强。
不过即使proxy-target-class设置为false,如果目标类没有声明接口,则spring将自动使用CGLib动态代理。
@AspectJ语法基础
@AspectJ使用jdk5.0注解和正规则的AspectJ 5的切面表达式语言描述切面,由于spring只支持方法的连接点,所以spring仅支持部分aspectJ的切面语言,在这节时,我们将对AspectJ切点表达式语言进行必要的学习。
切点表达式函数
AspectJ 5的切点表达式由关键字和操作参数组成。如execution(greeTo(..))的切点表达式,"execute"为关键字,而"greeTo(..)"为操作参数。在这里,execution代表目标类执行某一方法,而"greeTo(..)"是描述目标方法的匹配模式串,两者联合起来所表示的切点匹配目标类greeTo(..)方法的连接点。为了描述方便,我们将execution()称作函数,而将匹配串"greeTo(..)"称作函数的入参。
21.try{}catch{}对于事务的影响
try {
            TransactionUtils.transactionStart();

            // 如果不携带targeting的信息,则说明是任务关联定向包
            if (req.getTargeting() == null) {
                for (int i = 0; i < req.getAdgroups().size(); i++) {
                    if (Objects.equals(CampaignPB.FlowResource.APPMARKET_VALUE, req.getAdgroups().get(i).getFlowResource()) &&
                            Objects.equals(CampaignPB.PromotionType.AUCTION_VALUE, req.getAdgroups().get(i).getPromotionType())) {
                        LOG.debug("ag auction adgroup, no need updateCreativeAndApproval");
                        return;
                    }
                    Targeting oriTargetingInfo = CommonService.getTargetingDetailInfo(
                            req.getAdgroups().get(i).getTargetingId(), req.getAdvertiserId());
                    Targeting targetTargetingInfo = CommonService.getTargetingDetailInfo(
                            req.getOriTargetingId(), req.getAdvertiserId());
                    updateCreativeAndApproval(targetTargetingInfo,
                            req.getAdgroupIds().get(i), oriTargetingInfo, tableInvoiceList);
                }
            } else {
                for (Long adgroupId : req.getAdgroupIds()) {
                    Targeting oriTargetingInfo = CommonService.getTargetingDetailInfo(
                            req.getOriTargetingId(), req.getAdvertiserId());
                    AdgroupDetailPO adgroupDetail = adgroupMapper.queryAdgroupDetail(req.getAdvertiserId(), adgroupId);
                    if (Objects.equals(CampaignPB.FlowResource.APPMARKET_VALUE, adgroupDetail.getFlowResource()) &&
                            Objects.equals(CampaignPB.PromotionType.AUCTION_VALUE, adgroupDetail.getPromotionType())) {
                        LOG.debug("ag auction adgroup, no need updateCreativeAndApproval");
                        return;
                    }
                    updateCreativeAndApproval(req.getTargeting(), adgroupId, oriTargetingInfo, tableInvoiceList);
                }
            }
            InvoiceService.insertInvoice(tableInvoiceList);
            TransactionUtils.transactionCommit();
        } catch (Throwable e) {
            LOG.error("operateDb exception.");
            TransactionUtils.transactionRollback();
            throw e;
        }
TransactionUtils.transactionStart();事务开启后,在下面的循环语句及判断中有return操作,导致事务未能commit,导致死锁或者锁超时;需要单独把业务判断抽出,不能影响事务的操作.
22.Web.xml详解
web.xml.pdf 参考整理的pdf文件
23.java 泛型中标记符的含义
E - Element(在集合中使用,因为集合中存放的是元素)
T - Type (java类)
K - key 键
V - Value 值
N - Number(数值类型)
? - 表示不确定的java 类型
24.spring管理属性配置文件properties——使用PropertiesFactoryBean
通过PropertiesFactoryBean 读取配置文件中的属性值 https://blog.csdn.net/lee0723/article/details/48715827
用法:
@Value("#{PropertiesFactoryBean['dmq.log.public.key']}") @Value("${beanid['properties_key']}")
25.linux vi面板的一些快捷操作
1.复制一行
- 把光标移动到要复制的行上
- 按yy
- 把光标移动到要复制的位置
- 按p
2.删除整行
移动光标到需要删除的行 dd
3.撤消前一个命令 按u
4.撤销前一行命令 按U
5.shift+z+z 保存并退出
26.LINUX的crontab命令详解
https://www.cnblogs.com/shamo89/p/10160946.html
27.对比集合的STREAM().FOREACH()和FOREACH()
Collection.forEach()使用集合的迭代器(如果指定了一个),集合里元素的处理顺序是明确的。相反,Collection.stream().forEach()的处理顺序是不明确的。
如果我们不需要流但只想迭代集合,则第一个选择应该直接在集合上使用forEach()。
https://baijiahao.baidu.com/s?id=1637952388544934539&wfr=spider&for=pc
28.查看服务对外提供端口号
netstat -tnlp|grep 进程号
29.sql索引的作用
https://www.cnblogs.com/hyd1213126/p/5828937.html
30.Spring中初始化bean的三种方式
1.xml中指定init-method方法初始化
public class TestBean1 {
    private String name;

    private void init() {
        this.name = "hello world";
        System.out.println(this.name);
    }

    public String getName() {
        return name;
    }
}
在spring配置文件中配置init-method
<bean class="com.huawei.geek.spring.beaninit.TestBean1" init-method="init"/>
2.@PostConstruct注解
@PostConstruct注解好多人以为是Spring提供的。其实是Java自己的注解。
Java中该注解的说明:@PostConstruct该注解被用来修饰一个非静态的void()方法。被@PostConstruct修饰的方法会在服务器加载Servlet的时候运行,并且只会被服务器执行一次。PostConstruct在构造函数之后执行,init()方法之前执行。
通常我们会是在Spring框架中使用到@PostConstruct注解 该注解的方法在整个Bean初始化中的执行顺序:
Constructor(构造方法) -> @Autowired(依赖注入) -> @PostConstruct(注释的方法)
@Component
public class TestBean2 {
    private String name;

    @PostConstruct
    private void init() {
        this.name = "hello world";
        System.out.println(this.name);
    }

    public String getName() {
        return name;
    }
}
测试用例:
@Test
public void testBeanInitWithAnnotation() {
    // when
    String actual = testBean2.getName();

    // then
    Assert.assertEquals("hello world", actual);
}
3.实现InitializingBean接口
@Component
public class TestBean3 implements InitializingBean {
    private String name;

    public String getName() {
        return name;
    }

    @Override
    public void afterPropertiesSet() throws Exception {
        this.name = "hello world";
        System.out.println(this.name);
    }
}
测试用例:
@Test
public void testBeanInitWithImpl() {
    // when
    String actual = testBean3.getName();

    // then
    Assert.assertEquals("hello world", actual);
}
31.LocalDate、LocalTime、LocalDateTime探究
SimpleDateFormat是线程不安全的,calendar.setTime(date);多线程情况下,calendar可以被其他线程所修改.
private StringBuffer format(Date date, StringBuffer toAppendTo, FieldDelegate delegate) {
        // Convert input date to time field list
        calendar.setTime(date);
        boolean useDateFormatSymbols = useDateFormatSymbols();
        for (int i = 0; i < compiledPattern.length; ) {
            int tag = compiledPattern[i] >>> 8;
            int count = compiledPattern[i++] & 0xff;
            if (count == 255) {
                count = compiledPattern[i++] << 16;
                count |= compiledPattern[i++];
            }
            switch (tag) {
                case TAG_QUOTE_ASCII_CHAR:
                    toAppendTo.append((char) count);
                    break;
                case TAG_QUOTE_CHARS:
                    toAppendTo.append(compiledPattern, i, count);
                    i += count;
                    break;
                default:
                    subFormat(tag, count, delegate, toAppendTo, useDateFormatSymbols);
                    break;
            }
        }
        return toAppendTo;
    }
    @Test
    public void test1(){
        LocalDate l = LocalDate.now();
        LocalDate date = LocalDate.of(2019,2,3);
        System.out.println(l);//2021-05-25
        System.out.println(date);//2019-02-03

        LocalTime now = LocalTime.now();
        LocalTime localTime = LocalTime.of(13, 51, 10);
        System.out.println(now);//11:21:43.656
        System.out.println(localTime);//13:51:10

        LocalDateTime localDateTime = LocalDateTime.now();
        LocalDateTime localDateTime1 = LocalDateTime.of(2018, Month.APRIL,10,10,50,10);
        System.out.println(localDateTime);//2021-05-25T11:22:52.473
        System.out.println(localDateTime1);//2018-04-10T10:50:10

        LocalDateTime localDateTime2 = localDateTime1.plusDays(1); //LocalDate、LocalTime、LocalDateTime、Instant为不可变对象 用新的对象替换
        System.out.println(localDateTime2);//2018-04-11T10:50:10

        Instant instant = Instant.now();
        System.out.println(instant);//2021-05-25T03:25:29.883Z

        //将LocalDateTime字段以指定格式化日期的方式返回给前端 在LocalDateTime字段上添加@JsonFormat(shape=JsonFormat.Shape.STRING, pattern="yyyy-MM-dd HH:mm:ss")注解即可,如下:
        @JsonFormat(shape=JsonFormat.Shape.STRING, pattern="yyyy-MM-dd HH:mm:ss")
        protected LocalDateTime gmtModified;

        //对前端传入的日期进行格式化 在LocalDateTime字段上添加@DateTimeFormat(pattern = "yyyy-MM-dd HH:mm:ss")注解即可,如下:
        @DateTimeFormat(pattern = "yyyy-MM-dd HH:mm:ss")
        protected LocalDateTime gmtModified;
    }
}
32.Java8 之后的一些新特性
Steam流,Lambada,LocalDateTime,List.of(),Map.forEach(),switch的新语法;
- Java8之前的初始化List只能使用Arrays.asList();现在可以直接使用List.of();
ArrayList<String> friends =  new ArrayList<>(List.of("Peter", "Paul"));
ArrayList<String> friends =  new ArrayList<>(Arrays.asList("Peter", "Paul"));
- 而Map.forEach():
Map<String, Object> map= new HashMap<>();
infoMap.put("a", "a");
infoMap.put("b", "b");
infoMap.put("c", "c");
// 传统的Map迭代方式
for (Map.Entry<String, Object> entry : map.entrySet()) {
    System.out.println(entry.getKey() + ":" + entry.getValue());
}
// JDK8的迭代方式
map.forEach((key, value) -> {
    System.out.println(key + ":" + value);
});
- Switch的新语法
之前的switch语法:
switch (day) {
case MONDAY:

case FRIDAY:

case SUNDAY:

System.out.println(6);

break;

case TUESDAY:

System.out.println(7);

break;

case THURSDAY:

case SATURDAY:

System.out.println(8);

break;

case WEDNESDAY:

System.out.println(9);

break;

}
新的switch语法:
switch (day) {
case MONDAY, FRIDAY, SUNDAY -> System.out.println(6);

case TUESDAY -> System.out.println(7);

case THURSDAY, SATURDAY -> System.out.println(8);

case WEDNESDAY -> System.out.println(9);

}
33.Error,Exception
两者的超类即Throwable类.
总的来说,异常可分为受检异常(比如 ClassNotFoundException(没有找到指定的类异常),IOException(IO流异常))与非受检异常(所有的异常直接划分为RuntimeException与非RuntimeException异常是不准确的,而Exception异常是可以这样划分的,比如NullPointerException空指针异常、ArrayIndexOutBoundException数组下标越界异常、ClassCastException类型转换异常)。非受检异常指的是java.lang.RuntimeException和java.lang.Error类及其子类,所有其他的异常类都称为受检异常。受检异常需要在代码中显式处理,否则会编译出错. 简单来说就是受检异常会在JVM编译时就报错,而非受检异常则是在代码运行中报错.
而错误是Error类及其子类,都是非受检异常;
声明异常
通常,应该捕获那些知道如何处理的异常,将不知道如何处理的异常继续传递下去。传递异常可以在方法签名处使用 throws 关键字声明可能会抛出的异常。
注意
- 非检查异常(Error、RuntimeException 或它们的子类)不可使用 throws 关键字来声明要抛出的异常。
- 一个方法出现编译时异常,就需要 try-catch/ throws 处理,否则会导致编译错误。
抛出异常
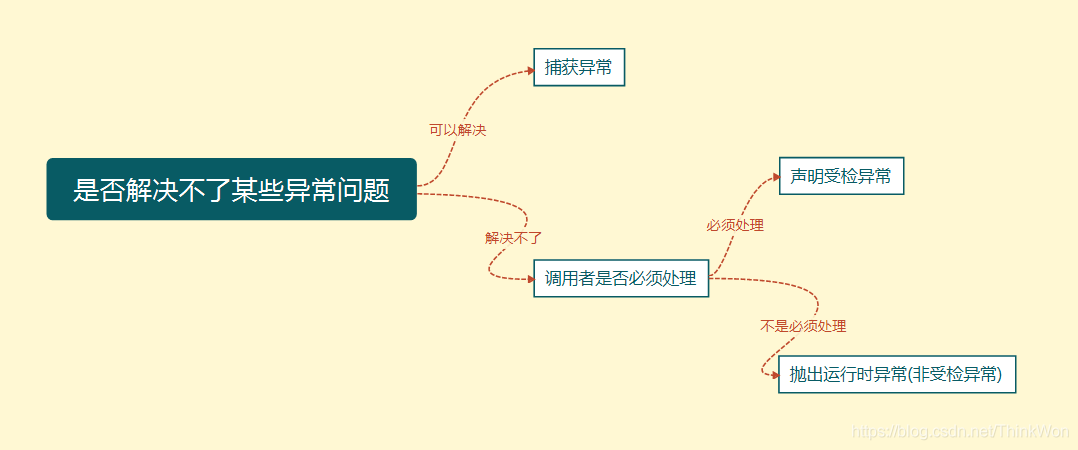
如果你觉得解决不了某些异常问题,且不需要调用者处理,那么你可以抛出异常。
throw关键字作用是在方法内部抛出一个Throwable类型的异常。任何Java代码都可以通过throw语句抛出异常。
捕获异常
程序通常在运行之前不报错,但是运行后可能会出现某些未知的错误,但是还不想直接抛出到上一级,那么就需要通过try…catch…的形式进行异常捕获,之后根据不同的异常情况来进行相应的处理。
如何选择异常类型
可以根据下图来选择是捕获异常,声明异常还是抛出异常

 浙公网安备 33010602011771号