

Spring boot初入门
1. Spring的Java配置方式
Java配置是Spring4.x推荐的配置方式,可以完全替代xml配置。
1.1. @Configuration 和 @Bean
Spring的Java配置方式是通过 @Configuration 和 @Bean 这两个注解实现的:
1、@Configuration 作用于类上,相当于一个xml配置文件;
2、@Bean 作用于方法上,相当于xml配置中的<bean>;
2. Spring Boot
2.1.1. 设置spring boot的parent
<parent>
    <groupId>org.springframework.boot</groupId>
    <artifactId>spring-boot-starter-parent</artifactId>
    <version>1.5.2.RELEASE</version>
</parent>
(说明:Spring boot的项目必须要将parent设置为spring boot的parent,该parent包含了大量默认的配置,大大简化了我们的开发。)
2.1.2. 导入spring boot的web支持
<dependency>
    <groupId>org.springframework.boot</groupId>
    <artifactId>spring-boot-starter-web</artifactId>
</dependency>
2.1.3. 添加Spring boot的插件
<plugin>
    <groupId>org.springframework.boot</groupId>
    <artifactId>spring-boot-maven-plugin</artifactId>
</plugin>
2.1.4. 编写第一个Spring Boot的应用
①.pom配置
<project xmlns="http://maven.apache.org/POM/4.0.0" xmlns:xsi="http://www.w3.org/2001/XMLSchema-instance" xsi:schemaLocation="http://maven.apache.org/POM/4.0.0 http://maven.apache.org/xsd/maven-4.0.0.xsd">
  <modelVersion>4.0.0</modelVersion>
  <parent>
    <groupId>org.springframework.boot</groupId>
    <artifactId>spring-boot-starter-parent</artifactId>
    <version>1.5.2.RELEASE</version>
  </parent>

  <groupId>cn.home.springboot</groupId>
  <artifactId>home-springboot</artifactId>
  <version>1.0.0-SNAPSHOT</version>
  <packaging>war</packaging>

    <dependencies>
        <dependency>
            <groupId>org.springframework</groupId>
            <artifactId>spring-webmvc</artifactId>
        </dependency>
        <!-- 连接池 -->
        <dependency>
            <groupId>com.jolbox</groupId>
            <artifactId>bonecp-spring</artifactId>
            <version>0.8.0.RELEASE</version>
        </dependency>
        <dependency>
            <groupId>org.springframework.boot</groupId>
            <artifactId>spring-boot-starter-web</artifactId>
        </dependency>
    </dependencies>
    <build>
        <finalName>${project.artifactId}</finalName>
        <plugins>
            <!-- 资源文件拷贝插件 -->
            <plugin>
                <groupId>org.apache.maven.plugins</groupId>
                <artifactId>maven-resources-plugin</artifactId>
                <configuration>
                    <encoding>UTF-8</encoding>
                </configuration>
            </plugin>
            <!-- java编译插件 -->
            <plugin>
                <groupId>org.apache.maven.plugins</groupId>
                <artifactId>maven-compiler-plugin</artifactId>
                <configuration>
                    <source>1.7</source>
                    <target>1.7</target>
                    <encoding>UTF-8</encoding>
                </configuration>
            </plugin>
            <plugin>
                <groupId>org.springframework.boot</groupId>
                <artifactId>spring-boot-maven-plugin</artifactId>
            </plugin>
        </plugins>
        <pluginManagement>
            <plugins>
                <!-- 配置Tomcat插件 -->
                <plugin>
                    <groupId>org.apache.tomcat.maven</groupId>
                    <artifactId>tomcat7-maven-plugin</artifactId>
                    <version>2.2</version>
                </plugin>
            </plugins>
        </pluginManagement>
    </build>
</project>
②、应用配置
@Controller
@SpringBootApplication
@Configuration
public class HelloApplication {

    @RequestMapping("hello")
    @ResponseBody
    public String hello(){
        return "hello world!";
    }

    public static void main(String[] args) {
        SpringApplication.run(HelloApplication.class, args);
    }

}
代码说明:
1、@SpringBootApplication:Spring Boot项目的核心注解,主要目的是开启自动配置。;
2、@Configuration:这是一个配置Spring的配置类;
3、@Controller:标明这是一个SpringMVC的Controller控制器;
4、main方法:在main方法中启动一个应用,即:这个应用的入口;
2.1.5. 启动应用
在Spring Boot项目中,启动的方式有两种,一种是直接run Java Application另外一种是通过Spring Boot的Maven插件运行(spring-boot:run)。
测试结果

2.1. Spring Boot的核心
2.1.1. 入口类和@SpringBootApplication
Spring Boot的项目一般都会有*Application的入口类,入口类中会有main方法,这是一个标准的Java应用程序的入口方法。
@SpringBootApplication注解是Spring Boot的核心注解,它其实是一个组合注解:
该注解主要组合了以下注解:
- @SpringBootConfiguration:这是Spring Boot项目的配置注解,这也是一个组合注解:
在Spring Boot项目中推荐使用@ SpringBootConfiguration替代@Configuration
2.@EnableAutoConfiguration:启用自动配置,该注解会使Spring Boot根据项目中依赖的jar包自动配置项目的配置项:
如:我们添加了spring-boot-starter-web的依赖,项目中也就会引入SpringMVC的依赖,Spring Boot就会自动配置tomcat和SpringMVC
3.@ComponentScan:默认扫描@SpringBootApplication所在类的同级目录以及它的子目录。
2.1.2. 关闭自动配置
通过上述,我们得知,Spring Boot会根据项目中的jar包依赖,自动做出配置,Spring Boot支持的自动配置如下(非常多):
如果我们不需要Spring Boot自动配置,想关闭某一项的自动配置,该如何设置呢?
比如:我们不想自动配置Redis,想手动配置。(当然了,其他的配置就类似了。)

2.1.3. 自定义Banner
-
自定义字符 (打开网站:http://patorjk.com/software/taag/#p=display&h=3&v=3&f=4Max&t=itcast%20Spring%20Boot)可设计
-
拷贝生成的字符到一个文本文件中,并且将该文件命名为banner.txt
-
将banner.txt拷贝到项目的resources目录中
如果不想看到任何的banner,也是可以将其关闭的:

2.1.4. 全局配置文件
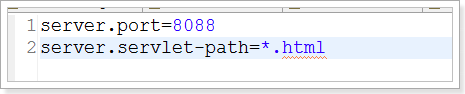
Spring Boot项目使用一个全局的配置文件application.properties或者是application.yml,在resources目录下或者类路径下的/config下,一般我们放到resources下。
例:
- 修改tomcat的端口为8088

2.修改进入DispatcherServlet的规则为:*.html
2.1.5. Starter pom

2.1.6. Xml 配置文件

2.1.7. 日志
Spring Boot对各种日志框架都做了支持,我们可以通过配置来修改默认的日志的配置:
#设置日志级别
logging.level.org.springframework=DEBUG
格式:
logging.level.*= # Log levels severity mapping. For instance `logging.level.org.springframework=DEBUG`

 浙公网安备 33010602011771号