
概述
本项目解决了MySQL读操作频繁给数据库服务器造成的巨大压力,和写操作数据库服务器的高可用性以及数据存储的问题。
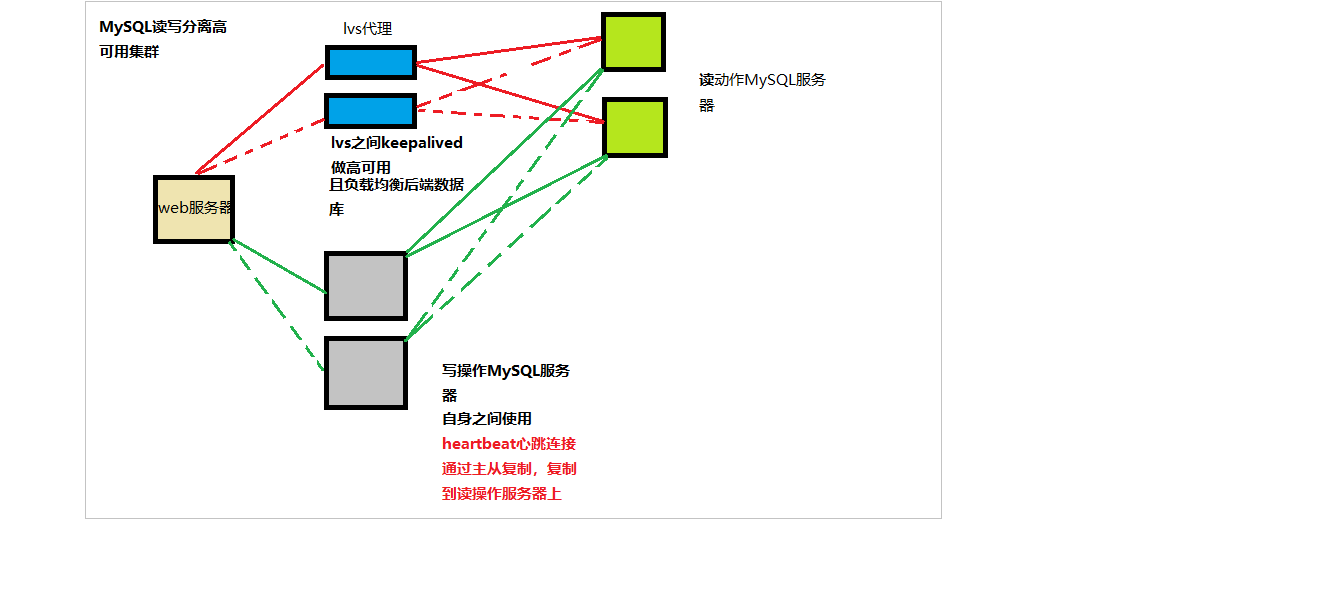
两台写的数据库服务器之间使用heartbeat心跳线,和drdb技术构建网络raid1存储,搭建nfs直接绑定VIP,对客户端来说透明,方便,切换时耗时较短
keepalived和heartbeat对比
网上找了不少资料,简单整理下
- keepalived使用配置很简单
- heartbeat的功能更强大
- 协议不同:keepalived使用VRRP协议通信,heartbeat使用心跳,可以通过以太网络,串口通信。
- 都是要自定义脚本来和业务进行关联
总结下:Keepalived使用的vrrp协议方式,虚拟路由冗余协议 (Virtual Router Redundancy Protocol,简称VRRP);
Heartbeat是基于主机或网络的服务的高可用方式;
keepalived的目的是模拟路由器的双机;
heartbeat的目的是用户service的双机;
lvs的高可用建议用keepavlived;
业务的高可用建议heartbeat
一、环境
全部都是CentOS7.5操作系统,并且已经关闭防火墙和selinux,需要使用配置放行策略
| 主机名 | IP地址 | 担任角色 |
|---|---|---|
| dbmaster | 192.168.111.7 | 写操作服务器master,已经搭建完成了drbd,heartbeat |
| dbbackup | 192.168.111.8 | 写操作服务器backup,已经搭建完成了drbd,heartbeat |
| lvs1 | 192.168.111.3 | lvs代理master,搭建lvs和keepalived |
| lvs2 | 192.168.111.4 | lvs代理backup,搭建lvs和keepalived |
| readMySQL1 | 192.168.111.5 | 读操作服务器 |
| readMySQL2 | 192.168.111.6 | 读操作服务器和readMySQL之间互相负载均衡 |
| web | 192.168.111.9 | web服务器搭建Tomcat进行测试读写分离;为了节省资源amoeba也是在这台机器配置 |
| heartbeatVIP | 192.168.111.100 | |
| keepalivedVIP | 192.168.111.200 |
- 搭建思路
二、部署
部署lvs代理和keepalived
lvs1:
[root@localhost ~]# yum -y install ipvsadm keepalived
[root@localhost ~]# > /etc/keepalived/keepalived.conf
#清空自带的配置

[root@localhost ~]# vim /etc/keepalived/keepalived.conf
! Configuration File for keepalived
global_defs {
router_id lvs_clu_2
#设置lvs的id,在一个网络内应该是唯一的
}
virrp_sync_group Prox {
group {
mail
}
}
vrrp_instance mail {
#vrrp实例定义部分
state MASTER
#设置lvs的状态,MASTER和BACKUP两种,必须大写
interface ens32
#设置对外服务的接口
lvs_sync_daemon_interface ens32
 #负载均衡器之间的监控接口,类似于 HA HeartBeat的心跳线。但它的机制优于 Heartbeat,因为它没有“裂脑”这个问题,它是以优先级这个机制来规避这个麻烦的。在DR 模式中,lvs_sync_daemon_inteface 与服务接口 interface 使用同一个网络接口。
virtual_router_id 50
#设置虚拟路由标示,这个标示是一个数字,同一个vrrp实例使用唯一标示
priority 80
#定义优先级,数字越大优先级越高,在一个vrrp——instance下,master的优先级必须大于backup
advert_int 1
#设定master与backup负载均衡器之间同步检查的时间间隔,单位是秒
authentication {
#设置验证类型和密码
auth_type PASS
#主要有PASS和AH两种
auth_pass 1111
#验证密码,同一个vrrp_instance下MASTER和BACKUP密码必须相同
}
virtual_ipaddress {
192.168.111.200
#设置虚拟Vip地址,可以设置多个,每行一个
}
}
virtual_server 192.168.111.200 3306 {
#设置虚拟VIP服务器,需要指定虚拟ip和服务端口
delay_loop 6
#健康检查时间间隔
lb_algo wrr
 #负载均衡调度算法
lb_kind DR
#负载均衡转发规则
persistence_timeout 0
#设置会话保持时间,对动态网页非常有用
protocol TCP
#指定转发协议类型,有TCP和UDP两种
nat_mask 255.255.255.0
real_server 192.168.111.5 3306 {
#配置服务器节点1,需要指定real server的真实IP地址和端口
weight 1
#设置权重,数字越大权重越高
TCP_CHECK {
#realserver的状态监测设置部分单位秒
connect_timeout 3
#超时时间
nb_get_retry 3
#重试次数
delay_before_retry 3
#重试间隔
connect_port 3306
#监测端口
}
}
real_server 192.168.111.6 3306 {
weight 1
TCP_CHECK {
connect_timeout 3
nb_get_retry 3
delay_before_retry 3
connect_port 3306
}
}
}
lvs2:
[root@localhost ~]# yum -y install ipvsadm keepalived
[root@localhost ~]# > /etc/keepalived/keepalived.conf
[root@localhost ~]# vim /etc/keepalived/keepalived.conf
! Configuration File for keepalived
global_defs {
router_id lvs_clu_1
}
virrp_sync_group Prox {
group {
mail
}
}
vrrp_instance mail {
state BACKUP
interface ens32
lvs_sync_daemon_interface ens32
virtual_router_id 50
priority 70
advert_int 1
authentication {
auth_type PASS
auth_pass 1111
}
virtual_ipaddress {
192.168.111.200
}
}
virtual_server 192.168.111.200 3306 {
delay_loop 6
lb_algo wrr
lb_kind DR
persistence_timeout 0
protocol TCP
nat_mask 255.255.255.0
real_server 192.168.111.5 3306 {
weight 1
TCP_CHECK {
connect_timeout 3
nb_get_retry 3
delay_before_retry 3
connect_port 3306
}
}
real_server 192.168.111.6 3306 {
weight 1
TCP_CHECK {
connect_timeout 3
nb_get_retry 3
delay_before_retry 3
connect_port 3306
}
}
}
注意备机的权重和routeid
配置负载调度器
配置虚拟IP地址(VIP)采用虚拟接口的方式(ens32:0),为网卡ens32绑定VIP址,以便响应群集访问。
[root@localhost ~]# ifconfig ens32:0 192.168.111.200 netmask 255.255.255.0
[root@localhost ~]# ifconfig ens32:0
ens32:0: flags=4163<UP,BROADCAST,RUNNING,MULTICAST> mtu 1500
inet 192.168.111.200 netmask 255.255.255.0 broadcast 192.168.111.255
#两个lvs都需要配置


配置节点服务器
使用 DR 模式时,节点服务器也需要配置 VIP 地址,并调整内核的 ARP响应参数以阻止更新 VIP 的 MAC 地址,避免发生冲突。除此之外,Web 服务的配置与 NAT 方式类似。
在每个节点服务器,同样需要有 VIP 地址 192.168.111.200,但此地址仅用作发送 Web响应数据包的源地址,并不需要监听客户机的访问请求(改由调度器监听并分发)。因此使用虚拟接口 lo:0 来承载 VIP 地址,并为本机添加一条路由记录,将访问 VIP 的数据限制在本地以避免通信紊乱。
[root@localhost ~]# ifconfig lo:0 192.168.111.200 netmask 255.255.255.255
[root@localhost ~]# ifconfig lo:0
lo:0: flags=73<UP,LOOPBACK,RUNNING>  mtu 65536
        inet 192.168.111.200  netmask 255.255.255.255
        loop  txqueuelen 1000  (Local Loopback)

[root@localhost ~]# route add -host 192.168.111.200 dev lo:0
#临时添加了该路由,也可写入配置文件需要重启网卡,两个节点都做


节点服务器调整/proc相应参数

[root@localhost ~]# vim /etc/sysctl.conf
net.ipv4.conf.all.arp_ignore = 1
net.ipv4.conf.all.arp_announce = 2
net.ipv4.conf.default.arp_ignore = 1
net.ipv4.conf.default.arp_announce = 2
net.ipv4.conf.lo.arp_ignore = 1
net.ipv4.conf.lo.arp_announce = 2
#arp_ignore=1,系统只回答目的 IP 为是本地 IP 的包。也就是对广播包不做响应。
#rp_announce=2,系统忽略 IP 包的源地址(source address),而根据目标主机(target host),选择本地地址。
[root@localhost ~]# sysctl -p
MySQL+heartbeat+drbd的部署
基于drbd和heartbeat部署成功的基础和MySQL进行结合
mkdir /mysqlda
#新的MySQL数据存放目录

[root@dbmaster ~]# vim /usr/local/heartbeat/etc/ha.d/haresources
    dbmaster IPaddr::192.168.111.100/24/ens32 drbddisk::r0 Filesystem::/dev/drbd0::/mysqlda::ext4 killmy
#将资源配置修改为如上

[root@dbmaster ~]# vim /usr/local/heartbeat/etc/ha.d/resource.d/killmy
    pkill -9 mariadb; systemctl restart mariadb; exit 0
#编写相应的脚本,heartbeatVIP切换时会执行改脚本

chmod +x /usr/local/heartbeat/etc/ha.d/resource.d/killmy

[root@dbmaster ~]# yum -y install mariadb*
[root@dbmaster ~]# ip a | grep ens32:0
    inet 192.168.111.100/24 brd 192.168.111.255 scope global secondary ens32:0
[root@dbmaster ~]# df | grep drbd
/dev/drbd0               1014612    2568   943288    1% /mysqlda
#可以看到我的VIP和drbd的控制权现在都在dbmaster主机上

systemctl restart heartbeat
#各自重新加载heartbeat,卡住的话直接kill掉再重启

[root@dbmaster ~]# cp -Rp /var/lib/mysql/ /mysqlda/
#旧的数据目录复制到新的数据目录

[root@dbmaster ~]# vim /etc/my.cnf
[mysqld]
datadir=/mysqlda/mysql
#这里更改数据目录
socket=/var/lib/mysql/mysql.sock
# Disabling symbolic-links is recommended to prevent assorted security risks
symbolic-links=0
# Settings user and group are ignored when systemd is used.
# If you need to run mysqld under a different user or group,
# customize your systemd unit file for mariadb according to the
# instructions in http://fedoraproject.org/wiki/Systemd
user=mysql
server-id=1
log-bin
#二进制日志开启
[mysqld_safe]
log-error=/var/log/mariadb/mariadb.log
pid-file=/var/run/mariadb/mariadb.pid

#
# include all files from the config directory
#
!includedir /etc/my.cnf.d
备机配置一样,记得server-id修改为不同的
dbbackup上重启mariadb
- 可能遇到如下报错,但是小弟这里目前没有发现。
[root@dbmaster ~]# systemctl restart mariadb
/usr/libexec/mysqld: Table 'mysql.plugin' doesn't exist
161121 14:45:35 [ERROR] Can't open the mysql.plugin table. Please run mysql_upgrade to create it.
161121 14:45:36 [ERROR] Fatal error: Can't open and lock privilege tables: Table 'mysql.host' doesn't exist
161121 14:45:36 mysqld_safe mysqld from pid file /var/run/mysqld/mysqld.pid ended

因为我之前第一次启动的时候datadir是/var/lib/mysql,更改配置文件后,重新启动时找不到对应 库文件,虽然我已经把/var/lib/mysql/* 复制到了/database/mysql下面

解决方法就是重新执行mysql_install_db来解决问题。

[root@dbmaster ~]# mysql_install_db --user=mysql
- 简单测试
[root@dbmaster mysql]# ls
aria_log.00000001  ibdata1      ib_logfile1         mariadb-bin.index  mysql.sock          test
aria_log_control   ib_logfile0  mariadb-bin.000001  mysql              performance_schema
#跟后面做个对比

[root@dbmaster mysql]# mysql

MariaDB [(none)]> use mysql;
Reading table information for completion of table and column names
You can turn off this feature to get a quicker startup with -A

Database changed
MariaDB [mysql]> update user set password=password('123456') where user='root' and host='localhost';
Query OK, 0 rows affected (0.00 sec)
Rows matched: 1  Changed: 0  Warnings: 0

MariaDB [mysql]> flush privileges;
Query OK, 0 rows affected (0.01 sec)

MariaDB [mysql]> exit
Bye

#这里顺便更改下用户的默认密码

MariaDB [(none)]> create database test1;
Query OK, 1 row affected (0.00 sec)

MariaDB [(none)]> use test1;

MariaDB [test1]> create table t1 (id int,name varchar(20));
Query OK, 0 rows affected (0.01 sec)

[root@dbmaster ~]# ls /mysqlda/mysql/
aria_log.00000001   ibdata1             ib_logfile1         mariadb-bin.index   mysql.sock          test/
aria_log_control    ib_logfile0         mariadb-bin.000001  mysql/              performance_schema/ test1/
[root@dbmaster ~]# ls /mysqlda/mysql/test1/
db.opt  t1.frm
[root@dbmaster ~]# ls /mysqlda/mysql/test1/
db.opt  t1.frm
- 切换VIP看数据
[root@dbmaster mysql]# systemctl stop heartbeat.service
#master上停掉心跳

[root@dbbackup ~]# netstat -anpt | grep mysqld
tcp        0      0 0.0.0.0:3306            0.0.0.0:*               LISTEN      6873/mysqld
#备上查看MySQL,我原来没开,切过来VIP ,heartbeat通过脚本执行的

[root@dbbackup ~]# ls /mysqlda/mysql/
aria_log.00000001   ib_logfile0         mariadb-bin.000002  mariadb-bin.index   performance_schema/
aria_log_control    ib_logfile1         mariadb-bin.000003  mysql/              test/
ibdata1             mariadb-bin.000001  mariadb-bin.000004  mysql.sock          test1/
[root@dbbackup ~]# ls /mysqlda/mysql/test1/
db.opt  t1.frm
#备上查看,暂时准确无误
MySQL主从复制
Mysql的复制是异步复制,即从一个Mysql实例或者端口(成为master)复制到另一个Mysql实例或者端口(成为slave)。复制操作有3个进程实现的,其中两个进程(Sql进程和IO进程)在Slave上,另一个进程在master(binlog dump)上。
- 实现复制前提需要打开log-bin二进制日志功能这是因为整个复制实际上是slave从Master端获取该更新操作的日志,将其传输到本地并写到本地文件中,然后在读取本地内容执行日志中所记录的更新操作。
master操作:
MariaDB [(none)]> grant replication slave on *.* to 'rep'@'192.168.111.%' identified by'123456';
Query OK, 0 rows affected (0.00 sec)
#授权用户权限

show grants for rep@'192.168.111.%'
#查看权限

MariaDB [(none)]> flush privileges;

先采用打包的方式,进行一次完全备份
MariaDB [(none)]> flush tables with read lock;
#锁表
MariaDB [(none)]> reset master
    -> ;
Query OK, 0 rows affected (0.02 sec)
MariaDB [test1]> create table t2 (id int,name varchar(20));
ERROR 1223 (HY000): Can't execute the query because you have a conflicting read lock
#锁表完成了

然后另外打开一个终端操作

[root@dbbackup ~]# cd /mysqlda/mysql/

[root@dbbackup mysql]# tar zcvf mysqlsql`date +%F`.tar.gz ib* mysql* test/ test1/
#将需要的文件打包压缩,也可以选择通过mysqldump导出数据库。

[root@dbbackup mysql]# scp -r mysqlsql2019-05-16.tar.gz root@readMySQL1:/opt/
root@readmysql1's password:
mysqlsql2019-05-16.tar.gz                                                                                         100%  572KB  42.5MB/s   00:00
[root@dbbackup mysql]# scp -r mysqlsql2019-05-16.tar.gz root@readMySQL2:/opt/
root@readmysql2's password:
mysqlsql2019-05-16.tar.gz                                                                                         100%  572KB   3.9MB/s   00:00
#复制到读操作服务器上

MariaDB [(none)]> show master status;
+--------------------+----------+--------------+------------------+
| File               | Position | Binlog_Do_DB | Binlog_Ignore_DB |
+--------------------+----------+--------------+------------------+
| mariadb-bin.000001 |      245 |              |                  |
+--------------------+----------+--------------+------------------+
1 row in set (0.00 sec)
#查看状态,读服务器根据二进制日志备份会需要。
- 读服务器的操作
yum -y install mariadb*

tar zxf /opt/mysqlsql2019-05-16.tar.gz -C /var/lib/mysql/
#解压到指定的数据目录,我这里是默认目录,-C指定路径

[root@localhost ~]# ls /var/lib/mysql/
ibdata1  ib_logfile0  ib_logfile1  mysql  test  test1

[root@localhost ~]# vim /etc/my.cnf
[mysqld]
server-id = 4
#每个id都不同

[root@localhost ~]# systemctl start mariadb

[root@localhost ~]# mysql
Welcome to the MariaDB monitor.  Commands end with ; or \g.
Your MariaDB connection id is 83
Server version: 5.5.60-MariaDB MariaDB Server

Copyright (c) 2000, 2018, Oracle, MariaDB Corporation Ab and others.

Type 'help;' or '\h' for help. Type '\c' to clear the current input statement.

MariaDB [(none)]>
MariaDB [(none)]> use mysql;
Reading table information for completion of table and column names
You can turn off this feature to get a quicker startup with -A

Database changed
MariaDB [mysql]> update user set password=password('123456') where user='root' and host='localhost';
Query OK, 1 row affected (0.00 sec)
Rows matched: 1  Changed: 1  Warnings: 0

MariaDB [mysql]> flush privileges;
Query OK, 0 rows affected (0.00 sec)

MariaDB [mysql]> exit
Bye
#更改下默认密码

[root@localhost ~]# mysql -u root -p123456 -e "change master to master_host='192.168.111.100',master_user='rep',master_password='123456',master_log_file='mariadb-bin.000001',master_log_pos=245;"
[root@localhost ~]# mysql -u root -p123456 -e "start slave;"

[root@localhost ~]# mysql -u root -p123456 -e"show slave status\G;"
*************************** 1. row ***************************
               Slave_IO_State: Waiting for master to send event
                  Master_Host: 192.168.111.100
                  Master_User: rep
                  Master_Port: 3306
                Connect_Retry: 60
              Master_Log_File: mariadb-bin.000001
          Read_Master_Log_Pos: 1585
               Relay_Log_File: mariadb-relay-bin.000002
                Relay_Log_Pos: 531
        Relay_Master_Log_File: mariadb-bin.000001
             Slave_IO_Running: Yes
            Slave_SQL_Running: Yes
              Replicate_Do_DB:
          Replicate_Ignore_DB:
           Replicate_Do_Table:
       Replicate_Ignore_Table:
      Replicate_Wild_Do_Table:
  Replicate_Wild_Ignore_Table:
                   Last_Errno: 0
                   Last_Error:
                 Skip_Counter: 0
          Exec_Master_Log_Pos: 1585
              Relay_Log_Space: 827
              Until_Condition: None
               Until_Log_File:
                Until_Log_Pos: 0
           Master_SSL_Allowed: No
           Master_SSL_CA_File:
           Master_SSL_CA_Path:
              Master_SSL_Cert:
            Master_SSL_Cipher:
               Master_SSL_Key:
        Seconds_Behind_Master: 0
Master_SSL_Verify_Server_Cert: No
                Last_IO_Errno: 0
                Last_IO_Error:
               Last_SQL_Errno: 0
               Last_SQL_Error:
  Replicate_Ignore_Server_Ids:
             Master_Server_Id: 2

重点关注这两项:
Slave_IO_Running: Yes
Slave_SQL_Running: Yes
为yes基本上主从复制算是成功了
- MySQL主从复制及VIP切换测试
VIP所在机器操作如下:
MariaDB [test1]> create table tabletest (id int,name varchar(20));

读操作服务器查看:
MariaDB [(none)]> use test1;
Reading table information for completion of table and column names
You can turn off this feature to get a quicker startup with -A

Database changed
MariaDB [test1]> show tables;
+-----------------+
| Tables_in_test1 |
+-----------------+
| t1              |
| tabletest       |
+-----------------+
2 rows in set (0.00 sec)
VIP切换测试
[root@dbbackup ~]# ip a| grep ens32:0
    inet 192.168.111.100/24 brd 192.168.111.255 scope global secondary ens32:0
[root@dbbackup ~]# systemctl stop heartbeat.service

[root@dbmaster ~]# ip a| grep ens32:
2: ens32: <BROADCAST,MULTICAST,UP,LOWER_UP> mtu 1500 qdisc pfifo_fast state UP group default qlen 1000
    inet 192.168.111.100/24 brd 192.168.111.255 scope global secondary ens32:1
#另一台机器查看VIP是否转移过来

[root@dbmaster ~]# mysql -u root -p123456

MariaDB [(none)]> use test1;

[test1]> create table tabletest2 (id int,name varchar(20));
Query OK, 0 rows affected (0.01 sec)

#创建表进行,主从复制测试

读操作服务器查看:
[root@localhost ~]# mysql -uroot -p123456
Welcome to the MariaDB monitor.  Commands end with ; or \g.
Your MariaDB connection id is 168
Server version: 5.5.60-MariaDB MariaDB Server

Copyright (c) 2000, 2018, Oracle, MariaDB Corporation Ab and others.

Type 'help;' or '\h' for help. Type '\c' to clear the current input statement.

MariaDB [(none)]> use test1;
Reading table information for completion of table and column names
You can turn off this feature to get a quicker startup with -A

Database changed
MariaDB [test1]> show tables;
+-----------------+
| Tables_in_test1 |
+-----------------+
| t1              |
| tabletest       |
| tabletest2      |
+-----------------+
3 rows in set (0.00 sec)
主从复制告一段落
web服务器及amoeba配置
- 这里安装Tomcat做以示范
[root@web ~]# ls
anaconda-ks.cfg  apache-tomcat-8.5.16.tar.gz  initial-setup-ks.cfg  jdk-8u191-linux-x64.tar.gz

安装tar包jdk
[root@web ~]# rm -rf /usr/bin/java
[root@web ~]# tar zxf jdk-8u191-linux-x64.tar.gz
[root@web ~]# mv jdk1.8.0_191/ /usr/local/java8
[root@web ~]# echo "export JAVA_HOME=/usr/local/java8" >> /etc/profile
[root@web ~]# echo "PATH=$PATH:/usr/local/java8/bin" >> /etc/profile
[root@web ~]# source /etc/profile
[root@web ~]# java -version
java version "1.8.0_191"
Java(TM) SE Runtime Environment (build 1.8.0_191-b12)
Java HotSpot(TM) 64-Bit Server VM (build 25.191-b12, mixed mode)

[root@web ~]# /usr/local/tomcat8/bin/startup.sh
Using CATALINA_BASE:   /usr/local/tomcat8
Using CATALINA_HOME:   /usr/local/tomcat8
Using CATALINA_TMPDIR: /usr/local/tomcat8/temp
Using JRE_HOME:        /usr/local/java8
Using CLASSPATH:       /usr/local/tomcat8/bin/bootstrap.jar:/usr/local/tomcat8/bin/tomcat-juli.jar
Tomcat started.
客户端访问 http://192.168.111.9:8080 进行测试
- 安装配置amoeba
常见读写分离方案概述:
- 基于程序代码内部实现
在代码中根据 select,insert进行路由分类,这类方法也是目前生产环境应用最广泛的,优点是性能好,因为在程序代码中实现,不需要曾加额外的设备作为硬件开支,缺点是需要开发人员来实现,运维人员无从下手。 - 基于中间代理层实现
代理一般位于客户端和服务器之间,代理服务器接到客户端请求后通过判断后转发到后端数据库,代表性程序:
(1)mysql-proxy 为 mysql 开发早期开源项目,通过其自带的 lua 脚本进行 SQL 判断,虽然是 mysql 的官方产品,但是 mysql 官方不建议将其应用到生产环境。
(2)Amoeba (变形虫)由陈思儒开发,曾就职与阿里巴巴,该程序由 java 语言进行开发,阿里巴巴将其应用于生成环境,它不支持事物和存储过程。
配置
[root@web ~]# mkdir /usr/local/amoeba
[root@web ~]# tar zxf amoeba-mysql-binary-2.2.0.tar.gz -C /usr/local/amoeba/
[root@web ~]# chmod -R 755 /usr/local/amoeba/
在负责写操作的并且VIP所在服务器上操作如下,目的是进行授权
在两台负责读操作服务器上操作如下,授权:
MariaDB [test1]> grant all on *.* to 'amoetest'@'192.168.111.%' identified by '123456';
Query OK, 0 rows affected (0.00 sec)
MariaDB [test1]> flush privileges;
回到amoeba所在服务器上:
[root@web ~]# vim /usr/local/amoeba/conf/amoeba.xml
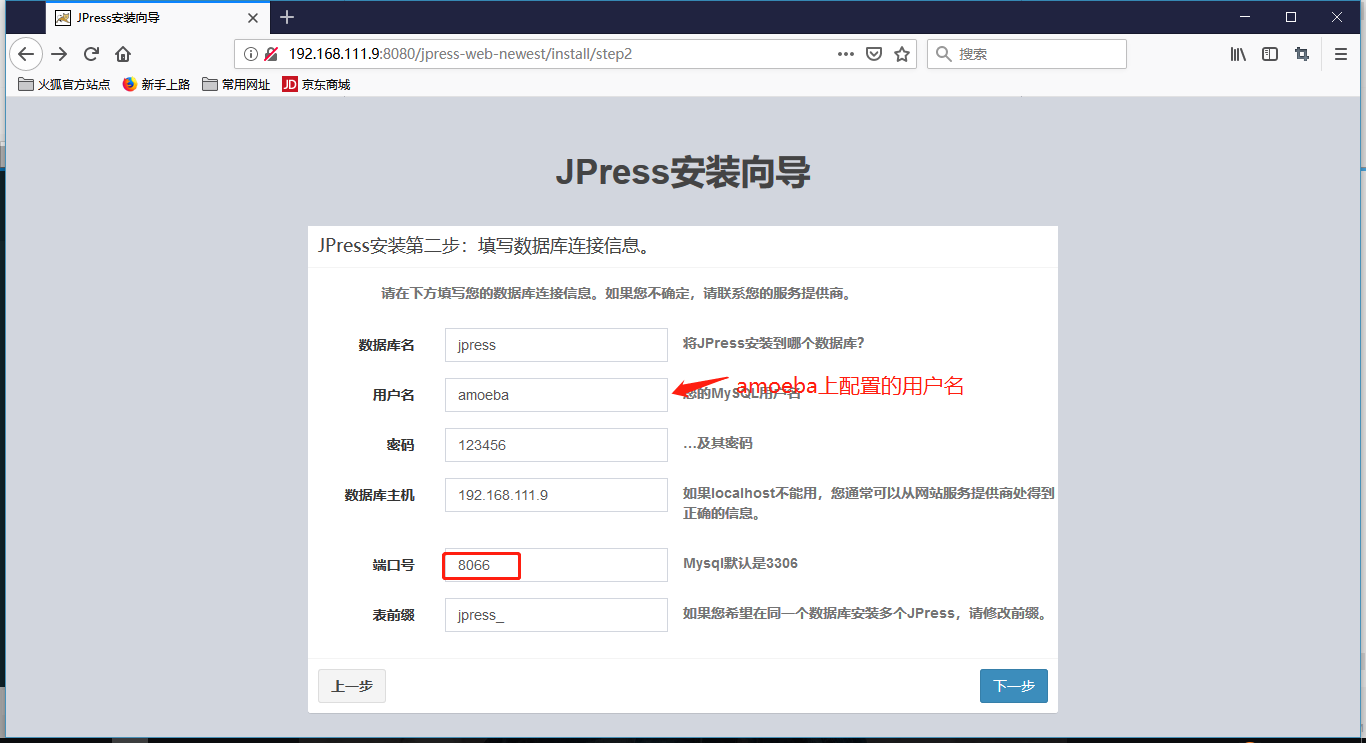
11 <property name="port">8066</property>
#amoeba监听端口
30 <property name="user">amoeba</property>
#给开发人员用的账号,下文是密码
32 <property name="password">123456</property>
116 <property name="defaultPool">master</property>
#配置默认的数据库节点,除了select,update,insert,delete语句都会在defaultpool上执行
119 <property name="writePool">master</property>
#配置写操作数据库
120 <property name="readPool">slaves</property>
#配置读操作数据库
[root@web ~]# vim /usr/local/amoeba/conf/dbServers.xml
20 <property name="port">3306</property>
#mysql端口
23 <property name="schema">test</property>
#amoeba控制的mysql库名,可以多添加几个
26 <property name="user">amoetest</property>
#mysql给授权的用户名
28 <property name="password">123456</property>
#mysql给授权的密码
43 <dbServer name="master" parent="abstractServer">
46 <property name="ipAddress">192.168.111.100</property>
#定义服务器名字和amoeba.xml相对应,下面指定的IP地址指定的是写操作高可用几群的VIP,如下一样
48 </dbServer>
50 <dbServer name="slave" parent="abstractServer">
53 <property name="ipAddress">192.168.111.200</property>
54 </factoryConfig>
55 </dbServer>
另外建议注释以下文件行,本案例中并没有服务器池,对amoeba来说一个集群即为一台服务器
56 <!--
57 <dbServer name="multiPool" virtual="true">
58 <poolConfig class="com.meidusa.amoeba.server.MultipleServerPool">
59 <!-- Load balancing strategy: 1=ROUNDROBIN , 2=WEIGHTBASED , 3=HA-->
60 <property name="loadbalance">1</property>
61
62 <!-- Separated by commas,such as: server1,server2,server1 -->
63 <property name="poolNames">server1,server2</property>
64 </poolConfig>
65 </dbServer>
66 -->
[root@web ~]# nohup /usr/local/amoeba/bin/amoeba start &
#本来到这里就正常启动了,接下来的报错可能有些不会发生
[root@web ~]# cat nohup.out
The stack size specified is too small, Specify at least 228k
Error: Could not create the Java Virtual Machine.
Error: A fatal exception has occurred. Program will exit.
解决
[root@web ~]# vim /usr/local/amoeba/bin/amoeba
58 DEFAULT_OPTS="-server -Xms256m -Xmx256m -Xss256k"
[root@web ~]# nohup /usr/local/amoeba/bin/amoeba start &
#不出意外成功
[root@web ~]# netstat -anpt | grep 8066
tcp6 0 0 :::8066 :::* LISTEN 65920/java
#端口出来的慢比较
[root@web ~]# mysql -h192.168.111.9 -uamoeba -p -P8066
Enter password:
Welcome to the MariaDB monitor. Commands end with ; or \g.
#指向amoeba的地址,用户端口,密码要输入正确.这停留等待时间可能需要点,但如果配置无措,可以连接的
MySQL [(none)]> use test;
No connection. Trying to reconnect...
Connection id: 185788589
Current database: *** NONE ***
Reading table information for completion of table and column names
You can turn off this feature to get a quicker startup with -A
Database changed
MySQL [test]> create table t2 (id int,name varchar(20));
Query OK, 0 rows affected (0.02 sec)
MySQL [test]> show tables;
+----------------+
| Tables_in_test |
+----------------+
| t2 |
+----------------+
#感觉卡,目前不是特别顺
- 配置Tomcat连接mysql(amoeba)
下载 mysql-connector-java
官网下载地址:http://dev.mysql.com/downloads/connector/j/
我用的是mysql-connector-java-3.1.14

[root@web lib]# cp mysql-connector-java-3.1.14-bin.jar /usr/local/tomcat8/lib/
#下载好的放到tomcat目录下的lib目录下
[root@web lib]# /usr/local/tomcat8/bin/shutdown.sh
[root@web lib]# /usr/local/tomcat8/bin/startup.sh

[root@web lib]# vim /usr/local/tomcat8/webapps/test/index.jsp
<%@ page language="java" contentType="text/html; charset=UTF-8"
    pageEncoding="UTF-8"%>
<%@page import="java.sql.DriverManager"%>
<%@page import="java.sql.Connection"%>
<html>
<head>
<meta http-equiv="Content-Type" content="text/html; charset=UTF-8">
<title>Insert title here</title>
</head>
<body>

<%
    try{
        Class.forName("com.mysql.jdbc.Driver");
        String url="jdbc:mysql://192.168.111.9:8066/test";
        String username="amoeba";
        String password="123456";
        Connection conn=DriverManager.getConnection(url,username,password);
        if(conn!=null){
            out.println("mysql数据库连接成功!!!");
        }else{
            out.println("数据库连接失败!!!");
        }
    }catch(ClassNotFoundException e){
        e.printStackTrace();
    }
%>
%%</body>
%%</html>
#以上文件使用的时候更改相应的ip地址,及端口,我这里直接输入的是在amoeba上的端口,以及ip,和账户及密码

#测试:浏览器输入http://192.168.111.9:8080/test/index.jsp
#配置正确的话显示输出信息,连接成功
总测试
- 部署开源站点在Tomcat上跑
jpress 官网:http://jpress.io
下载地址:https://github.com/JpressProjects/jpress
MariaDB [(none)]> create database jpress default character set utf8;
MariaDB [(none)]> grant all on jpress.* to jpress@'192.168.111.%' identified by '123456';
MariaDB [(none)]> flush privileges;
#写操作服务器VIP所在机器上操作

#查看读操作服务器是否同步
[root@localhost ~]# ip a | grep ens32
2: ens32: <BROADCAST,MULTICAST,UP,LOWER_UP> mtu 1500 qdisc pfifo_fast state UP group default qlen 1000
    inet 192.168.111.5/24 brd 192.168.111.255 scope global noprefixroute ens32
MariaDB [(none)]> show databases;
+--------------------+
| Database           |
+--------------------+
| information_schema |
| jpress             |
| mysql              |
| test               |
| test1              |
+--------------------+
5 rows in set (0.00 sec)


[root@localhost ~]# ip a | grep ens32
2: ens32: <BROADCAST,MULTICAST,UP,LOWER_UP> mtu 1500 qdisc pfifo_fast state UP group default qlen 1000
    inet 192.168.111.6/24 brd 192.168.111.255 scope global noprefixroute ens32
[root@localhost ~]# mysql -u root -p123456
Welcome to the MariaDB monitor.  Commands end with ; or \g.
Your MariaDB connection id is 2829
Server version: 5.5.60-MariaDB MariaDB Server
Copyright (c) 2000, 2018, Oracle, MariaDB Corporation Ab and others.
Type 'help;' or '\h' for help. Type '\c' to clear the current input statement.
MariaDB [(none)]> show databases;
+--------------------+
| Database           |
+--------------------+
| information_schema |
| jpress             |
| mysql              |
| test               |
| test1              |
+--------------------+
5 rows in set (0.00 sec)

#也可以在读操作服务器上查看授权信息,也已经同步到本机
- 代码上线
[root@localhost ~]# wget https://github.com/JpressProjects/jpress/archive/0.4.0.tar.gz
[root@localhost ~]# tar xf 0.4.0.tar.gz
[root@localhost ~]# cd jpress-0.4.0/wars/
[root@localhost wars]# mv jpress-web-newest.war /usr/local/tomcat8/webapps/
[root@localhost wars]# /usr/local/tomcat8/bin/shutdown.sh
[root@localhost wars]# /usr/local/tomcat8/bin/startup.sh
[root@web ~]# ls /usr/local/tomcat8/webapps/
docs  examples  host-manager  jpress-web-newest  jpress-web-newest.war
#自动部署war包

[root@web ~]# vim /usr/local/amoeba/conf/dbServers.xml
 23                         <property name="schema">jpress</property>
 24
 25                         <!-- mysql user -->
 26                         <property name="user">jpress</property>
 27
 28                         <property name="password">123456</property>

#改为在数据库新授权的用户
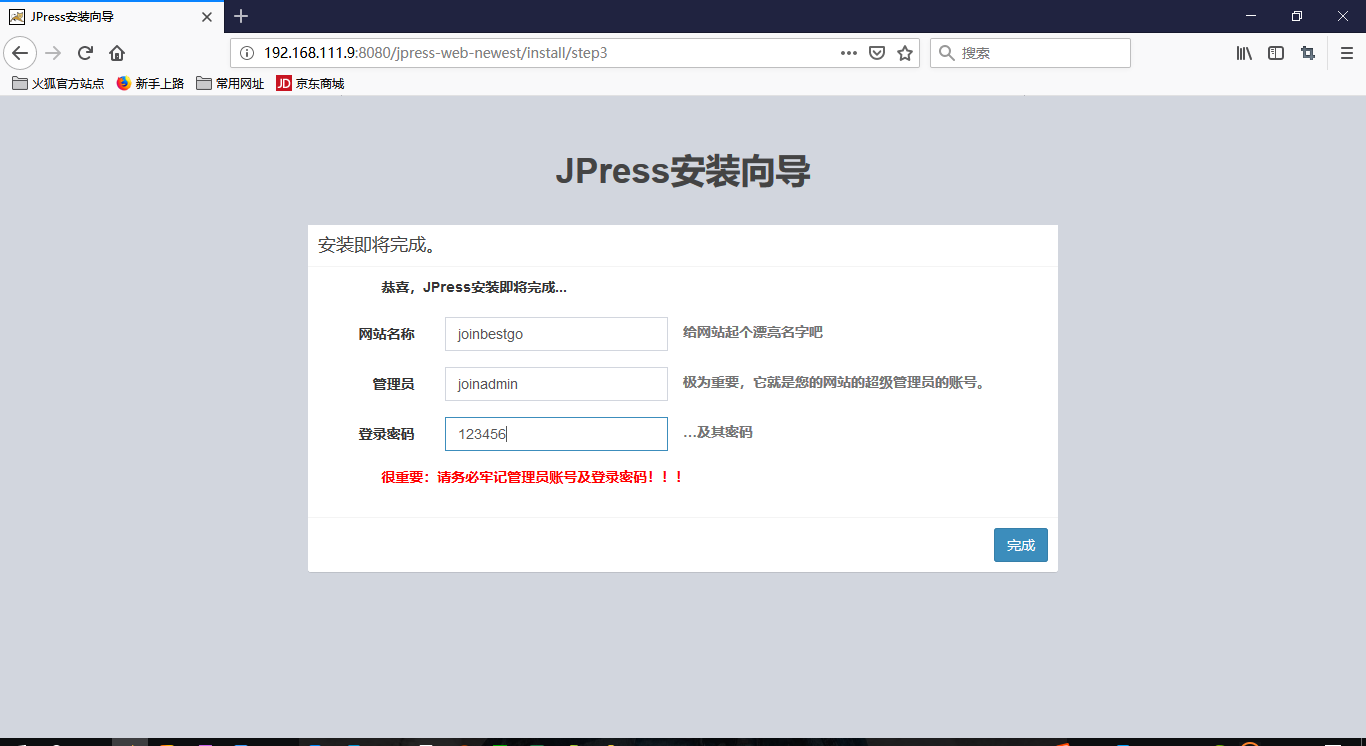
浏览器访问http://192.168.111.9:8080/jpress-web-newest/install

[root@web ~]# /usr/local/tomcat8/bin/shutdown.sh
[root@web ~]# /usr/local/tomcat8/bin/startup.sh

查看数据库数据同步否
[root@dbmaster ~]# ip a | grep ens32
2: ens32: <BROADCAST,MULTICAST,UP,LOWER_UP> mtu 1500 qdisc pfifo_fast state UP group default qlen 1000
    inet 192.168.111.7/24 brd 192.168.111.255 scope global noprefixroute ens32
    inet 192.168.111.100/24 brd 192.168.111.255 scope global secondary ens32:2


[root@dbmaster ~]# mysql -uroot -p123456
Welcome to the MariaDB monitor.  Commands end with ; or \g.
Your MariaDB connection id is 169
Server version: 5.5.60-MariaDB MariaDB Server

Copyright (c) 2000, 2018, Oracle, MariaDB Corporation Ab and others.

Type 'help;' or '\h' for help. Type '\c' to clear the current input statement.

MariaDB [(none)]> use jpress
Reading table information for completion of table and column names
You can turn off this feature to get a quicker startup with -A

Database changed
MariaDB [jpress]> show tables;
+-------------------+
| Tables_in_jpress  |
+-------------------+
| jpress_attachment |
| jpress_comment    |
| jpress_content    |
| jpress_mapping    |
| jpress_metadata   |
| jpress_option     |
| jpress_taxonomy   |
| jpress_user       |
+-------------------+
8 rows in set (0.00 sec)
#正常情况下,MySQL写服务器,读操作的两台数据应该是完全一样的
- heartbeat切换测试
[root@dbmaster ~]# cat /opt/monitor_mysql.sh
#!/bin/bash
while true
do
sleep 2
counter=$(netstat -na|grep "LISTEN"|grep "3306"|wc -l)
	if [ "${counter}" -eq 0 ]; then
	  systemctl stop heartbeat.service
	fi
done
#只是简单测试脚本,不可应用于生产环境下
[root@dbbackup ~]# chmod +x /opt/monitor_mysql.sh
[root@dbmaster ~]# nohup /opt/monitor_mysql.sh &
[1] 26582
[root@dbmaster ~]# nohup: 忽略输入并把输出追加到"nohup.out"
#VIP机器运行此脚本

接下来在VIP所在机器将mariadb关闭

等待几秒,另一台查看,转移成功

[root@web ~]# mysql -h192.168.111.100 -ujpress -p123456
Welcome to the MariaDB monitor.  Commands end with ; or \g.
Your MariaDB connection id is 3
Server version: 5.5.60-MariaDB MariaDB Server

Copyright (c) 2000, 2017, Oracle, MariaDB Corporation Ab and others.

Type 'help;' or '\h' for help. Type '\c' to clear the current input statement.

MariaDB [(none)]>
别的服务器测试也没啥问题
keepalived配置文件详解
! Configuration File for keepalived

global_defs {
    notification_email {
        acassen@firewall.loc     #设置报警邮件地址,可以设置多个,每行一个。
        failover@firewall.loc    #需开启本机的sendmail服务
        sysadmin@firewall.loc
    }
    notification_email_from Alexandre.Cassen@firewall.loc  #设置邮件的发送地址
    smtp_server 127.0.0.1      #设置smtp server地址
    smtp_connect_timeout 30    #设置连接smtp server的超时时间
    router_id LVS_DEVEL        #表示运行keepalived服务器的一个标识。发邮件时显示在邮件主题的信息
}

vrrp_instance VI_1 {
    state MASTER              #指定keepalived的角色,MASTER表示此主机是主服务器,BACKUP表示此主机是备用服务器
    interface enp0s3     #指定HA监测网络的接口
    virtual_router_id 51      #虚拟路由标识,这个标识是一个数字,同一个vrrp实例使用唯一的标识。即同一vrrp_instance下,MASTER和BACKUP必须是一致的
    priority 100              #定义优先级,数字越大,优先级越高,在同一个vrrp_instance下,MASTER的优先级必须大于BACKUP的优先级
    advert_int 1              #设定MASTER与BACKUP负载均衡器之间同步检查的时间间隔,单位是秒
    authentication {          #设置验证类型和密码
        auth_type PASS        #设置验证类型,主要有PASS和AH两种
        auth_pass 1111        #设置验证密码,在同一个vrrp_instance下,MASTER与BACKUP必须使用相同的密码才能正常通信
    }
    virtual_ipaddress {       #设置虚拟IP地址,可以设置多个虚拟IP地址,每行一个
        192.168.137.100
    }
}

virtual_server 192.168.137.100 80 {  #设置虚拟服务器,需要指定虚拟IP地址和服务端口,IP与端口之间用空格隔开
    delay_loop 6              #设置运行情况检查时间,单位是秒
    lb_algo rr                #设置负载调度算法,这里设置为rr,即轮询算法
    lb_kind DR                #设置LVS实现负载均衡的机制,有NAT、TUN、DR三个模式可选
    nat_mask 255.255.255.0
    persistence_timeout 0    #会话保持时间,单位是秒。这个选项对动态网页是非常有用的,为集群系统中的session共享提供了一个很好的解决方案。
                              #有了这个会话保持功能,用户的请求会被一直分发到某个服务节点,直到超过这个会话的保持时间。
                              #需要注意的是,这个会话保持时间是最大无响应超时时间,也就是说,用户在操作动态页面时,如果50秒内没有执行任何操作
                              #那么接下来的操作会被分发到另外的节点,但是如果用户一直在操作动态页面,则不受50秒的时间限制
    protocol TCP              #指定转发协议类型,有TCP和UDP两种

    real_server 192.168.137.5 80 { #配置服务节点1,需要指定real server的真实IP地址和端口,IP与端口之间用空格隔开
        weight 1              #配置服务节点的权值,权值大小用数字表示,数字越大,权值越高,设置权值大小可以为不同性能的服务器
                              #分配不同的负载,可以为性能高的服务器设置较高的权值,而为性能较低的服务器设置相对较低的权值,这样才能合理地利用和分配系统资源
- 还有读操作数据库切换,关闭一台,使用客户端访问测试,这里不再掩饰
暂时完结
总结
- lvs使用dr模式,而且由于我这是测试环境,也没有加多余的网卡,刚开始时没有配置/proc参数,一直出问题,我还以为是amoeba连接慢呢,人家都没连上去,都连接到写操作服务器上了.
- 细节决定成败,历时三天两夜,加油吧
- 总测试没有很好的测出来效果,但也是没什么问题的,数据库毕竟和网站服务器不一样
- 脚本写的非常敷衍

 浙公网安备 33010602011771号