[c++/scl/gcc/nodejs/python] Centos 7.9 安装、升级 gcc 4.8.5 到 gcc11
0 序
背景1: 编译安装 Nodejs 21.7 强制要求安装 Gnu17/Gcc11
- 本文背景:因在centos 7.9 server上安装nodejs21.7.1,编译nodejs时,依赖了gnu17/gcc11。
例如:遇到
Qt requires c++11 support、-std=gnu++17
例如:编译器不支持c++17,就会提示:g++: error: unrecognized command line option ‘-std=c++17’
例如:编译器不支持c++17,就会提示:g++: error: unrecognized command line option ‘-std=gnu++17’
- 然而,centos 7.9 默认的 gcc版本为 4.8.5。因此,需要升级到 gcc11。这种升级场景,在centos7.9中因为nodejs等重要组件,而变得较为频繁、且重要。故记录之。
- 环境信息
- centos : 7.9.2009
- gcc 原版本 : 4.8.5
- 目标升级版本 : 11
背景2: Python3/pip 安装 numpy 时强制要求 gcc 版本 >= 9.3
- Python3/pip 安装 numpy 时强制要求 gcc 版本 >= 9.3
- 此时,所在的 CENTOS Linux 7.9 的 gcc 版本为
4.8.5
gcc (GCC) 4.8.5 20150623 (Red Hat 4.8.5-44)
(base) [root@xxx ~]# pip install numpy=2.3.3
ERROR: Invalid requirement: 'numpy=2.3.3': Expected end or semicolon (after name and no valid version specifier)
    numpy=2.3.3
         ^
Hint: = is not a valid operator. Did you mean == ?
(base) [root@xxx ~]# pip install numpy==2.3.3
Looking in indexes: http://mirrors.cloud.aliyuncs.com/pypi/simple/
Collecting numpy==2.3.3
  Using cached http://mirrors.cloud.aliyuncs.com/pypi/packages/d0/19/95b3d357407220ed24c139018d2518fab0a61a948e68286a25f1a4d049ff/numpy-2.3.3.tar.gz (20.6 MB)
  Installing build dependencies ... done
  Getting requirements to build wheel ... done
  Installing backend dependencies ... done
  Preparing metadata (pyproject.toml) ... error
  error: subprocess-exited-with-error

  × Preparing metadata (pyproject.toml) did not run successfully.
  │ exit code: 1
  ╰─> [19 lines of output]
      + /ext/miniforge3/bin/python3.12 /tmp/pip-install-ygculuca/numpy_d73ece252b1342de9ec4c05d9079e499/vendored-meson/meson/meson.py setup /tmp/pip-install-ygculuca/numpy_d73ece252b1342de9ec4c05d9079e499 /tmp/pip-install-ygculuca/numpy_d73ece252b1342de9ec4c05d9079e499/.mesonpy-yq6cu08x -Dbuildtype=release -Db_ndebug=if-release -Db_vscrt=md --native-file=/tmp/pip-install-ygculuca/numpy_d73ece252b1342de9ec4c05d9079e499/.mesonpy-yq6cu08x/meson-python-native-file.ini
      The Meson build system
      Version: 1.8.3
      Source dir: /tmp/pip-install-ygculuca/numpy_d73ece252b1342de9ec4c05d9079e499
      Build dir: /tmp/pip-install-ygculuca/numpy_d73ece252b1342de9ec4c05d9079e499/.mesonpy-yq6cu08x
      Build type: native build
      Project name: NumPy
      Project version: 2.3.3
      C compiler for the host machine: cc (gcc 4.8.5 "cc (GCC) 4.8.5 20150623 (Red Hat 4.8.5-44)")
      C linker for the host machine: cc ld.bfd 2.27-44
      C++ compiler for the host machine: c++ (gcc 4.8.5 "c++ (GCC) 4.8.5 20150623 (Red Hat 4.8.5-44)")
      C++ linker for the host machine: c++ ld.bfd 2.27-44
      Cython compiler for the host machine: cython (cython 3.1.4)
      Host machine cpu family: x86_64
      Host machine cpu: x86_64

      ../meson.build:28:4: ERROR: Problem encountered: NumPy requires GCC >= 9.3

      A full log can be found at /tmp/pip-install-ygculuca/numpy_d73ece252b1342de9ec4c05d9079e499/.mesonpy-yq6cu08x/meson-logs/meson-log.txt
      [end of output]

  note: This error originates from a subprocess, and is likely not a problem with pip.
error: metadata-generation-failed

× Encountered error while generating package metadata.
╰─> See above for output.

note: This is an issue with the package mentioned above, not pip.
hint: See above for details.
1 基于centos7.9 安装 gcc 4.8.5(默认版本)
- 安装
yum -y update gcc
yum -y install gcc+ gcc-c++
- 查看版本
# g++ --version
g++ (GCC) 4.8.5 20150623 (Red Hat 4.8.5-44)
Copyright (C) 2015 Free Software Foundation, Inc.
This is free software; see the source for copying conditions.  There is NO
warranty; not even for MERCHANTABILITY or FITNESS FOR A PARTICULAR PURPOSE.
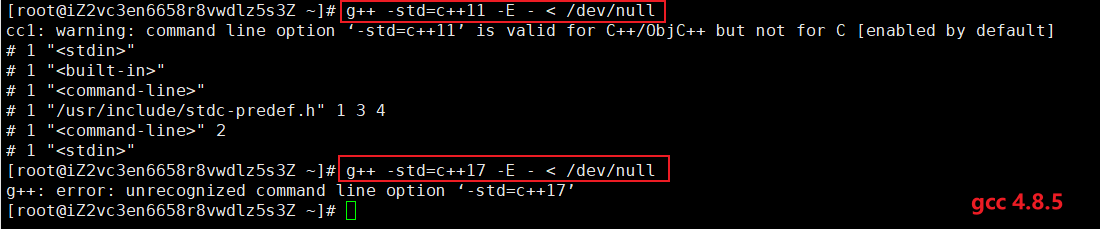
- 检查是否支持 c++11(支持) / c++14(不支持) / c++17(不支持)
(base) [root@xxx ~]# g++ -std=c++11 -E - < /dev/null
cc1: 警告:command line option ‘-std=c++11’ is valid for C++/ObjC++ but not for C [默认启用]
# 1 "<stdin>"
# 1 "<built-in>"
# 1 "<命令行>"
# 1 "/usr/include/stdc-predef.h" 1 3 4
# 1 "<命令行>" 2
# 1 "<stdin>"

(base) [root@xxx ~]# g++ -std=c++14 -E - < /dev/null
g++: 错误:unrecognized command line option ‘-std=c++14’

(base) [root@xxx ~]# g++ -std=c++17 -E - < /dev/null
g++: 错误:unrecognized command line option ‘-std=c++17’
2 升级步骤 : gcc 4.8.5 -> gcc 11
安装 centos-release-scl / devtoolset
- 安装 centos-release-scl
如果出现权限问题使用超级用户(sudo)或者root进行安装
yum -y install centos-release-scl
- 安装 devtoolset
安装devtoolset,如果想安装其他版本,例如 gcc7.* 改为 devtoolset-7-gcc* 即可
yum -y install devtoolset-11-gcc* (gcc 11)

或 yum -y install devtoolset-9-gcc* (gcc 9)

或 yum -y install devtoolset-7-gcc* (gcc 7)
- 若安装异常时的解决方法:
主要原因:
- centos YUM 官方软件仓库源站(
mirror.centos.org) 无法正常连接/下载
[root@xxx ~]# sudo yum install -y http://mirror.centos.org/centos/7/extras/x86_64/Packages/centos-release-scl-rh-2-3.el7.centos.noarch.rpm
已加载插件:fastestmirror

无法打开 http://mirror.centos.org/centos/7/extras/x86_64/Packages/centos-release-scl-rh-2-3.el7.centos.noarch.rpm ,跳过。
错误:无须任何处理

[root@xxx ~]# yum install devtoolset-9-gcc-c++
	没有可用软件包 devtoolset-9-gcc-c++。
解决思路:
- 更换为 阿里巴巴软件仓库源站(
mirrors.aliyun.com)
[root@xxx ~]# yum remove centos-release-scl.noarch centos-release-scl-rh.noarch
已加载插件:fastestmirror
正在解决依赖关系
--> 正在检查事务
---> 软件包 centos-release-scl.noarch.0.2-3.el7.centos 将被 删除
---> 软件包 centos-release-scl-rh.noarch.0.2-3.el7.centos 将被 删除
--> 解决依赖关系完成

依赖关系解决

=====================================================================================================================================
 Package                                 架构                     版本                               源                         大小
=====================================================================================================================================
正在删除:
 centos-release-scl                      noarch                   2-3.el7.centos                     @extras                    20 k
 centos-release-scl-rh                   noarch                   2-3.el7.centos                     @extras                    20 k

事务概要
=====================================================================================================================================
移除  2 软件包

安装大小:39 k
是否继续?[y/N]:y
Downloading packages:
Running transaction check
Running transaction test
Transaction test succeeded
Running transaction
  正在删除    : centos-release-scl-2-3.el7.centos.noarch                                                                         1/2
警告:文件 /etc/yum.repos.d/CentOS-SCLo-scl.repo: 移除失败: 没有那个文件或目录
  正在删除    : centos-release-scl-rh-2-3.el7.centos.noarch                                                                      2/2
警告:文件 /etc/yum.repos.d/CentOS-SCLo-scl-rh.repo: 移除失败: 没有那个文件或目录
  验证中      : centos-release-scl-2-3.el7.centos.noarch                                                                         1/2
  验证中      : centos-release-scl-rh-2-3.el7.centos.noarch                                                                      2/2

删除:
  centos-release-scl.noarch 0:2-3.el7.centos                      centos-release-scl-rh.noarch 0:2-3.el7.centos


[root@iZ2vch0mnibcoiyvvwc5yjZ ~]# yum install devtoolset-9-gcc-c++
已加载插件:fastestmirror
Loading mirror speeds from cached hostfile
Could not retrieve mirrorlist http://mirrorlist.centos.org?arch=x86_64&release=7&repo=sclo-rh error was
14: curl#6 - "Could not resolve host: mirrorlist.centos.org; 未知的错误"


 One of the configured repositories failed (未知),
 and yum doesn't have enough cached data to continue. At this point the only
 safe thing yum can do is fail. There are a few ways to work "fix" this:

     1. Contact the upstream for the repository and get them to fix the problem.

     2. Reconfigure the baseurl/etc. for the repository, to point to a working
        upstream. This is most often useful if you are using a newer
        distribution release than is supported by the repository (and the
        packages for the previous distribution release still work).

     3. Run the command with the repository temporarily disabled
            yum --disablerepo=<repoid> ...

     4. Disable the repository permanently, so yum won't use it by default. Yum
        will then just ignore the repository until you permanently enable it
        again or use --enablerepo for temporary usage:

            yum-config-manager --disable <repoid>
        or
            subscription-manager repos --disable=<repoid>

     5. Configure the failing repository to be skipped, if it is unavailable.
        Note that yum will try to contact the repo. when it runs most commands,
        so will have to try and fail each time (and thus. yum will be be much
        slower). If it is a very temporary problem though, this is often a nice
        compromise:

            yum-config-manager --save --setopt=<repoid>.skip_if_unavailable=true

Cannot find a valid baseurl for repo: centos-sclo-rh/x86_64


[root@xxx ~]# ls /etc/yum.repos.d/
CentOS-Base.repo  CentOS-SCLo-scl.repo  CentOS-SCLo-scl-rh.repo  epel.repo


[root@xxx ~]# vim /etc/yum.repos.d/CentOS-SCLo-scl.repo
	# baseurl=http://mirror.centos.org/centos/7/sclo/$basearch/sclo/
	baseurl=http://mirrors.aliyun.com/centos/7/sclo/$basearch/sclo/
	#mirrorlist=http://mirrorlist.centos.org?arch=$basearch&release=7&repo=sclo-sclo

[root@xxx ~]# vim /etc/yum.repos.d/CentOS-SCLo-scl-rh.repo
	#baseurl=http://mirror.centos.org/centos/7/sclo/$basearch/rh/
	baseurl=http://mirrors.aliyun.com/centos/7/sclo/$basearch/rh/
	#mirrorlist=http://mirrorlist.centos.org?arch=$basearch&release=7&repo=sclo-rh


[root@xxx ~]# sudo yum install devtoolset-9-gcc-c++
	[√] curl 的连接异常消失


//列出 当前系统已安装 、且元数据完整的所有 SCL 集合包
[root@xxx ~]# scl --list
devtoolset-9
启用/切换新版 gcc
注:启用gcc11,devtoolset会安装在/opt/rh目录下
cd /opt/rh/devtoolset-11/
或 cd /opt/rh/devtoolset-9/
- 每个版本下面都会有个enable文件,执行以下命令即可启用
# source ./enable
或者 # source /opt/rh/devtoolset-11/enable
或者 # source /opt/rh/devtoolset-9/enable

或者 # cd /opt/rh/devtoolset-11 && source ./enable
或者 # cd /opt/rh/devtoolset-9 && source ./enable

或者 # scl enable devtoolset-9 bash
如果想要切换到不同的版本时,只要执行命令即可
source /opt/rh/devtoolset-11/enable

source /opt/rh/devtoolset-9/enable
- 直接替换相应软连接
该方法可以避免每次都要进行enable (gcc 11 为例)
mv /usr/bin/gcc /usr/bin/gcc.bak

ln -s /opt/rh/devtoolset-11/root/bin/gcc /usr/bin/gcc

mv /usr/bin/g++ /usr/bin/g++.bak

ln -s /opt/rh/devtoolset-11/root/bin/g++ /usr/bin/g++

mv /usr/bin/c++ /usr/bin/c++.bak

ln -s /opt/rh/devtoolset-11/root/bin/c++ /usr/bin/c++

mv /usr/bin/cpp /usr/bin/cpp.bak

ln -s /opt/rh/devtoolset-11/root/bin/cpp /usr/bin/cpp

mv /usr/bin/cc /usr/bin/cc.bak

ln -s /opt/rh/devtoolset-11/root/bin/cc /usr/bin/cc
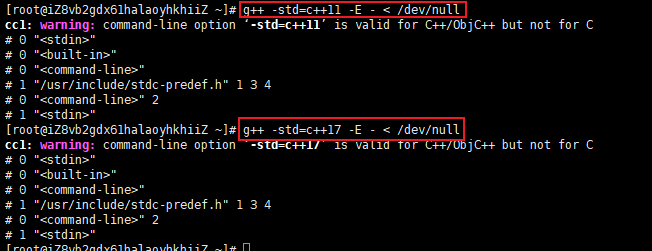
- 查验:gcc版本
# g++ --version
g++ (GCC) 11.2.1 20220127 (Red Hat 11.2.1-9)
Copyright (C) 2021 Free Software Foundation, Inc.
This is free software; see the source for copying conditions.  There is NO
warranty; not even for MERCHANTABILITY or FITNESS FOR A PARTICULAR PURPOSE.

# gcc --version
gcc (GCC) 11.2.1 20220127 (Red Hat 11.2.1-9)
Copyright (C) 2021 Free Software Foundation, Inc.
This is free software; see the source for copying conditions.  There is NO
warranty; not even for MERCHANTABILITY or FITNESS FOR A PARTICULAR PURPOSE.
3 GCC 扩展操作
3.1 查验GCC版本
# g++ --version
g++ (GCC) 11.2.1 20220127 (Red Hat 11.2.1-9)
Copyright (C) 2021 Free Software Foundation, Inc.
This is free software; see the source for copying conditions.  There is NO
warranty; not even for MERCHANTABILITY or FITNESS FOR A PARTICULAR PURPOSE.

# gcc --version
gcc (GCC) 11.2.1 20220127 (Red Hat 11.2.1-9)
Copyright (C) 2021 Free Software Foundation, Inc.
This is free software; see the source for copying conditions.  There is NO
warranty; not even for MERCHANTABILITY or FITNESS FOR A PARTICULAR PURPOSE.
3.2 查看GCC编译器支持的C++版本
- 检查是否支持C++11
g++ -std=c++11 -E - < /dev/null
这行代码是使用g++编译器来编译一段简单的C++代码,以检查您的系统是否支持C++11。
其中,-std=c++11选项告诉编译器使用C++11标准编译代码。
-E选项告诉编译器只进行预处理,而不进行编译和链接步骤。
最后,- < /dev/null表示将标准输入重定向到/dev/null,以便编译器不必读取任何输入。
如果命令行没有输出(或者只输出了警告信息),则说明您的系统支持C++11。如果输出了错误信息,则说明您的系统不支持C++11。

- 检查是否支持C++14
g++ -std=c++14 -E - < /dev/null
- 检查是否支持C++17
g++ -std=c++17 -E - < /dev/null
- 检查是否支持C++20
注意20要写成2a
g++ -std=c++2a -E - < /dev/null
Z FAQ for gcc
Q: 列出当前系统已安装 、且元数据完整的所有 SCL 集合包?
在 Red Hat/CentOS 的 Software Collections (SCL) 里:
# scl --list
或 # scl -l
命令的作用: “列出 当前系统已安装 、且元数据完整的所有 SCL 集合名字。”
- 示例输出
$ scl --list
gcc-toolset-11
llvm-toolset-7
rh-python38
rh-nodejs16
- 要点说明
- 只显示 已安装 的集合;没装的不会列。
- 列出的条目就是
yum list installed | grep sclo能看到的那些包提供的%{scl}名称。
[root@xxx ~]# yum list installed | grep sclo
devtoolset-9-binutils.x86_64    2.32-16.el7                    @centos-sclo-rh
devtoolset-9-gcc.x86_64         9.3.1-2.2.el7                  @centos-sclo-rh
devtoolset-9-gcc-c++.x86_64     9.3.1-2.2.el7                  @centos-sclo-rh
                                9.3.1-2.2.el7                  @centos-sclo-rh
devtoolset-9-runtime.x86_64     9.1-0.el7                      @centos-sclo-rh
- 结果可用于脚本批量启用,例如
for s in $(scl --list); do echo "== $s =="; scl enable $s 'gcc --version'; done
- 如果系统里一个 SCL 都没装,命令返回空,退出码仍为 0。
Q: RetHat/CentOS 的 SCL (Software Collections,软件集合) 作用是什么?
Linux SCL(Software Collections,软件集合)的核心作用一句话概括就是:
“在系统级 RPM 包管理器之外,给你一套可并行安装、随时启停、互不干扰的多版本软件栈。”
它最早由 Red Hat 主导,专门解决 RHEL/CentOS 等“稳态”发行版“系统版本太旧、业务又需要新特性”的矛盾。具体价值体现在以下 5 点:
-
多版本共存
把新版 GCC、Python、Ruby、PHP、Node.js、MySQL、PostgreSQL 等打成一个“集合”,文件安装到/opt/rh/<集合名>/root/下,与系统旧版完全隔离,不会覆盖/usr/bin或/usr/lib的任何文件,因此可以同一台机器上同时存在“系统 Python 3.6 + SCL Python 3.11 + SCL Python 3.12”。 -
即时启停、按需切换
通过scl enable <集合名> bash启动一个子 Shell,仅在该 Shell 的PATH、LD_LIBRARY_PATH、MANPATH等变量里优先指向新版本;exit后即恢复旧环境。CI/CD、自动化脚本里也可以scl enable <集合名> <命令>单次调用。 -
零破坏、零依赖改造
不需要升级 glibc、kernel,也不会动系统 RPM 数据库;老业务继续用旧库,新业务用新库,各自稳定运行。对于“一台服务器跑多个客户/多个项目”的场景尤其友好。 -
官方/社区维护,升级路径清晰
Red Hat 把 Developer Toolset(GCC)、LLVM Toolset、Python/Ruby/PHP 等常用栈都做成 SCL 发布在centos-release-scl或rhel-server-rhscl源里,版本迭代、安全补丁通过yum update即可拿到,比自己手动编译维护省心。 -
开发与打包一体化
SCL 的.spec文件与普通 RPM 共用一套构建系统(rpmbuild、mock、koji),企业可以把自研软件也做成内部 SCL,开发、测试、生产通过“启用不同集合”实现环境一致性,同时保持对外交付的 RPM 格式不变。
- 一句话总结:
SCL 就是 RHEL/CentOS 系的“轻量级多版本虚拟环境”——不依赖容器/虚拟机,只用几条命令就能让【老系统】“原地”拥有新编译器、新语言运行时,而系统【本身的稳定性】丝毫不受影响。
Q:Ubuntu 有类似 SCL 的方案吗?
Ubuntu 没有与 RHEL SCL(Software Collections) 【完全对等】的官方项目,但可以用以下 4 种“原生”或“社区”方案实现“多版本软件并存、随时启停”的同样效果:
-
update-alternatives(系统级多版本切换)
作用:把/usr/bin/gcc、python、java等做成软链,通过sudo update-alternatives --config <name>在已安装的若干版本之间全局切换。
局限:同一时刻系统里只能有一个“默认”版本,无法像 SCL 那样让两个 Shell 各用各的版本并行运行。 -
PPA / Snap / Flatpak(单用户多版本安装)
PPA:例如ppa:ubuntu-toolchain-r/test可并行装gcc-9、gcc-10、gcc-11,包名互不相同,用绝对路径调用即可。
Snap:官方仓库里go、node、python等都有track/channel概念,可同时装go 1.19与go 1.20,用snap switch <pkg> --channel=<ver>实现版本切换。
Flatpak:思路与 Snap 类似,侧重桌面应用多版本。 -
目录级虚拟环境(开发语言专属)
Python:venv、conda、pyenv可做到每个项目一个解释器版本。
Node:nvm可在同账号下装 10/14/18 多个 Node 并即时切换。
Ruby:rbenv/rvm。
这些工具相当于“语言层面的 SCL”,但只对自己生态有效。 -
容器 / 轻量命名空间(系统级完整隔离)
LXD / LXC:一键起“Ubuntu 22.04 容器里跑 gcc-12,宿主机保持 gcc-9”,比 Docker 更接近虚拟机体验,启停秒级。
Docker / Podman:把新工具链做成镜像,开发时docker run --rm -v $PWD:/work gcc:12 make,用完即丢,与宿主机完全隔离。
总结
- 如果你只想“多版本共存 + 临时切换”,PPA + 绝对路径 或 language-specific 版本管理器(conda、nvm、pyenv) 就是 Ubuntu 上最简方案。
- 如果需要“像 SCL 那样一进 Shell 自动换 PATH/LD_LIBRARY_PATH”,可以自己在
.bashrc里写函数,或者起 LXD 容器 / Docker 镜像,登录容器即获得全新工具链,退出又回到老环境。 - 单纯系统级“一次只能一个默认版本”的场景,用
update-alternatives即可。
Q: python numpy(2.3.3) 为什么要求 gcc >= 9.3 ?
NumPy 2.3 起把构建系统从 distutils/setup.py 彻底换成 Meson,因此第一次在 meson.build 里显式写下了编译器版本检查:
# meson.build(节选)
if cc.version().version_compare('<9.3')
    error('NumPy requires GCC >= 9.3')
endif
这条硬性门槛并不是 NumPy 的 C/C++ 源码“一定”编不过老 GCC,而是项目维护者基于下面几方面考虑主动把底线抬到了 GCC 9.3:
- C/C++ 标准基线抬高
- NumPy 2.x 默认用 -std=c11 和 -std=c++17 编译。
老 GCC(如 7.x/8.x)虽然“号称”支持 C++17,但实现不完整,常见 __builtin、<optional>、<variant>、-fstack-***-protection 等警告或错误频繁出现。

GCC 9 系列是 RedHat、Debian 等发行版里第一个把 C++17 支持标为 “complete” 的版本,也是 Python 官方 manylinux_2_28 镜像的默认编译器。
- 避免维护“老编译器适配”负担
过去 NumPy 要在代码里写大量 #if __GNUC__ < 8 … 的兼容分支,测试矩阵也要覆盖 6~8 三个大版本。

直接限定 ≥9.3 后,可以无条件使用 __builtin_cpu_supports、__attribute__((__vector_size__)) 等新 intrinsic,简化代码和 CI。
- 安全/调试选项默认开启
GCC 9 开始 -fstack-***-protection、-fcf-protection 在 x86/aarch64 上可用;
这些开关在 manylinux_2_28 wheel 规范里被列为推荐默认项,NumPy 的二进制 wheel 需要它们。
- 与 SciPy、scikit-learn 等生态同步
SciPy 1.14+、scikit-learn 1.5+ 同样把最低 GCC 提到 9.3,NumPy 作为底层依赖先行一步,可避免用户链式编译时出现“SciPy 要求 9.3,NumPy 却能在 7.3 上编”的混乱。
- 发行版/云镜像生命周期
CentOS 7、Amazon Linux 2 默认带 GCC 7.3,但这些系统都已进入维护尾声;
RedHat 提供 devtoolset-9、Alma/Rocky 8 自带 GCC 9 以上,升级路径明确,维护者认为“升系统或 devtoolset”成本可接受。
因此,“>= 9.3” 并非技术绝对底线,而是 NumPy 团队为减少兼容性债务、统一二进制标准、提前使用现代编译器特性而主动设定的政策门槛。如果确实被困在老系统,只能:
用 devtoolset-9/10 或 conda-forge 的编译器链;
或者把 NumPy 锁在 2.2.x 及更早版本(仍用 setup.py,不做版本检查)。
Y 推荐文献
X 参考文献

本文链接: https://www.cnblogs.com/johnnyzen
关于博文:评论和私信会在第一时间回复,或直接私信我。
版权声明:本博客所有文章除特别声明外,均采用 BY-NC-SA 许可协议。转载请注明出处!
日常交流:大数据与软件开发-QQ交流群: 774386015 【入群二维码】参见左下角。您的支持、鼓励是博主技术写作的重要动力!

 浙公网安备 33010602011771号