[nodejs] NPM 教程
1 NPM
1.1 简介
NPM是随同NodeJS一起安装的包管理工具,能解决NodeJS代码部署上的很多问题,常见的使用场景有以下几种:
- 允许用户从NPM服务器下载别人编写的第三方包到本地使用。
- 允许用户从NPM服务器下载并安装别人编写的命令行程序到本地使用。
- 允许用户将自己编写的包或命令行程序上传到NPM服务器供别人使用。
- npm 的工作原理
npm的工作原理是基于一个庞大的公共仓库。
- 每个包都包含一个package.json文件,其中包含有关包的元数据,如名称、版本、作者和依赖项等。
- npm会自动从公共仓库下载这些包,并将其安装到本地项目的
node_modules目录中。
npm的依赖项解析算法是基于一个叫做"模块系统"的概念。
- 当npm需要安装一个新包时,它会检查该包所依赖的其他包,并递归地安装这些包及其依赖项。
- 这种递归安装的过程保证了项目中所有的包和依赖项都能够被正确地安装和管理。
- nodejs 与 npm
由于新版的
nodejs已经集成了npm,所以之前npm也一并安装好了。同样可以通过输入 "npm -v" 来测试是否成功安装。命令如下,出现版本提示表示安装成功:
(因此,npm 可随 nodejs 一同安装。具体可参见:NodeJs入门教程-2 Node.js 安装配置 - 博客园/千千寰宇 )

$ npm -v
2.3.0
- 如果你安装的是旧版本的 npm,可以很容易得通过 npm 命令来升级,命令如下:
$ sudo npm install npm -g
/usr/local/bin/npm -> /usr/local/lib/node_modules/npm/bin/npm-cli.js
npm@2.14.2 /usr/local/lib/node_modules/npm
如果是 Window 系统使用以下命令即可:
npm install npm -g
使用淘宝镜像的命令:
npm install -g cnpm --registry=https://registry.npmmirror.com
1.2 使用 npm 命令安装模块
- npm 安装 Node.js 模块语法格式:
$ npm install <Module Name>
以下实例,我们使用 npm 命令安装常用的 Node.js web框架模块 : express:
$ npm install express
安装好之后,express 包就放在了工程目录下的
node_modules目录中,因此在代码中只需要通过require('express')的方式就好,无需指定第三方包路径。
var express = require('express');
- 安装指定的包或依赖项,并将其添加到package.json文件中的dependencies对象中
npm install --save <package-name>
- 安装指定的包或依赖项,并将其添加到package.json文件中的devDependencies对象中
npm install --save-dev <package-name>
--save参数: 告诉npm将安装的包添加到package.json文件的dependencies部分,这表示这些包是生产环境所需的依赖,即你的应用或项目在运行时需要这些包。--save-dev参数: 将包添加到package.json文件的devDependencies部分,这表明这些包仅在开发过程中需要,而在项目实际运行时并不需要。
1.3 全局安装与本地安装
npm的包安装分为本地安装(local)、全局安装(global)两种,从敲的命令行来看,差别只是有没有-g而已,比如
npm install express          # 本地安装
npm install express -g   # 全局安装
如果出现以下错误:
npm err! Error: connect ECONNREFUSED 127.0.0.1:8087
解决办法为:
$ npm config set proxy null
nodejs的依赖模块包的加载机制
- 包加载机制
- 从项目的根位置递归搜寻
node_modules目录,直到文件系统根目录的node_modules。- 如果还没有查找到指定模块的话,就会去
NODE_PATH中注册的路径中查找。
- 想要共享全局包的推荐做法
export NODE_PATH=$(npm root -g)
- 更多详情,参见
本地安装
- 将安装包放在 ./node_modules 下(运行 npm 命令时所在的目录),如果没有 node_modules 目录,会在当前执行 npm 命令的目录下生成 node_modules 目录。
- 可以通过 require() 来引入本地安装的包。
全局安装
- 将安装包放在 /usr/local 下或者你 node 的安装目录。
- 可以直接在命令行里使用。
如果你希望具备两者功能,则需要在两个地方安装它或使用 npm link。
接下来我们使用全局方式安装 express
$ npm install express -g
安装过程输出如下内容,第一行输出了模块的版本号及安装位置。
express@4.13.3 node_modules/express
├── escape-html@1.0.2
├── range-parser@1.0.2
├── merge-descriptors@1.0.0
├── array-flatten@1.1.1
├── cookie@0.1.3
├── utils-merge@1.0.0
├── parseurl@1.3.0
├── cookie-signature@1.0.6
├── methods@1.1.1
├── fresh@0.3.0
├── vary@1.0.1
├── path-to-regexp@0.1.7
├── content-type@1.0.1
├── etag@1.7.0
├── serve-static@1.10.0
├── content-disposition@0.5.0
├── depd@1.0.1
├── qs@4.0.0
├── finalhandler@0.4.0 (unpipe@1.0.0)
├── on-finished@2.3.0 (ee-first@1.1.1)
├── proxy-addr@1.0.8 (forwarded@0.1.0, ipaddr.js@1.0.1)
├── debug@2.2.0 (ms@0.7.1)
├── type-is@1.6.8 (media-typer@0.3.0, mime-types@2.1.6)
├── accepts@1.2.12 (negotiator@0.5.3, mime-types@2.1.6)
└── send@0.13.0 (destroy@1.0.3, statuses@1.2.1, ms@0.7.1, mime@1.3.4, http-errors@1.3.1)
1.4 查看安装信息
依赖模块的存放路径
# 查看 npm 依赖模块包的全局存放路径
$ npm root -g
/usr/local/lib/node_modules

# 查看当前工程的 npm 模块包的工程存放路径
$ npm root
/volume1/docker/data/nodejs/demo-app/node_modules
安装信息
你可以使用以下命令来查看所有全局安装的模块:
$ npm list -g

├─┬ cnpm@4.3.2
│ ├── auto-correct@1.0.0
│ ├── bagpipe@0.3.5
│ ├── colors@1.1.2
│ ├─┬ commander@2.9.0
│ │ └── graceful-readlink@1.0.1
│ ├─┬ cross-spawn@0.2.9
│ │ └── lru-cache@2.7.3
……
如果要查看某个模块的版本号,可以使用命令如下:
$ npm list grunt

projectName@projectVersion /path/to/project/folder
└── grunt@0.4.1
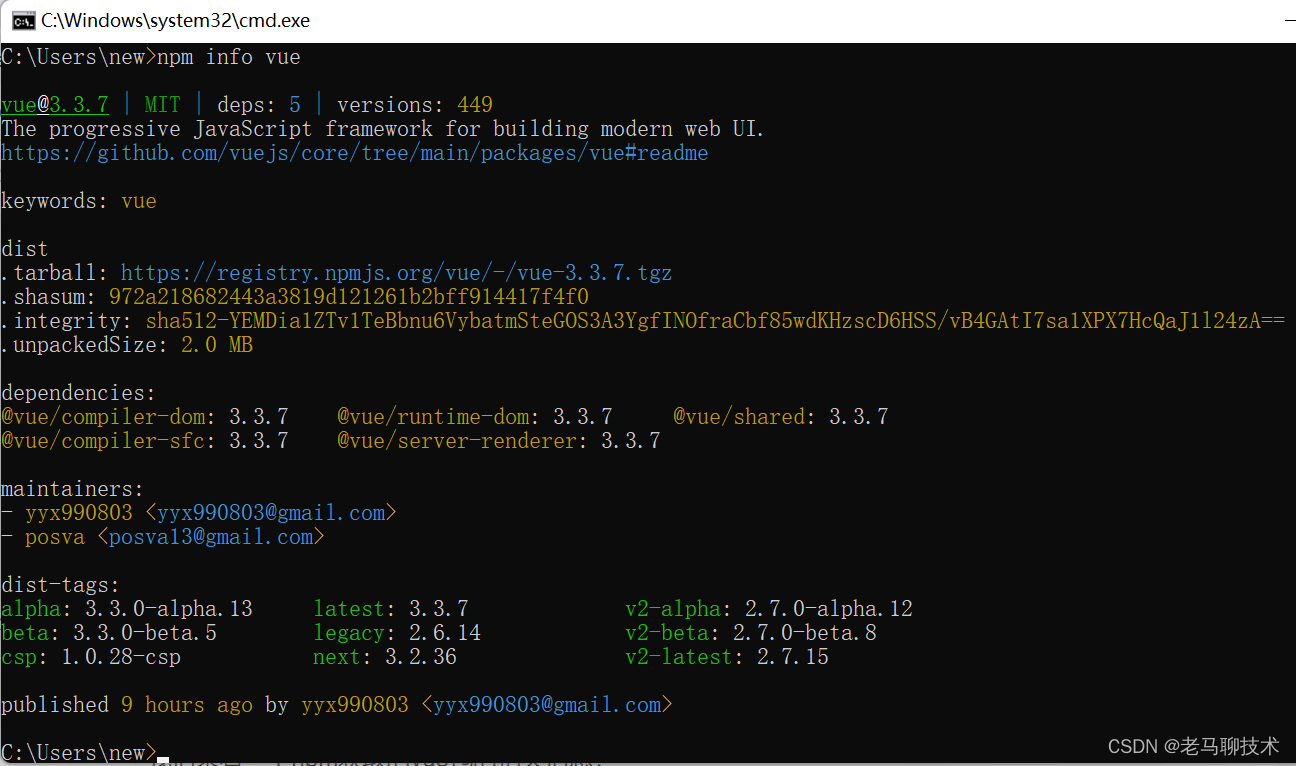
- 获取包信息
npm info vue
1.5 使用 package.json
package.json
package.json 位于模块的目录下,用于定义包的属性。接下来让我们来看下 express 包的 package.json 文件,位于 node_modules/express/package.json 内容:
{
  "name": "express",
  "description": "Fast, unopinionated, minimalist web framework",
  "version": "4.13.3",
  "author": {
    "name": "TJ Holowaychuk",
    "email": "tj@vision-media.ca"
  },
  "contributors": [
    {
      "name": "Aaron Heckmann",
      "email": "aaron.heckmann+github@gmail.com"
    },
    {
      "name": "Ciaran Jessup",
      "email": "ciaranj@gmail.com"
    },
    {
      "name": "Douglas Christopher Wilson",
      "email": "doug@somethingdoug.com"
    },
    {
      "name": "Guillermo Rauch",
      "email": "rauchg@gmail.com"
    },
    {
      "name": "Jonathan Ong",
      "email": "me@jongleberry.com"
    },
    {
      "name": "Roman Shtylman",
      "email": "shtylman+expressjs@gmail.com"
    },
    {
      "name": "Young Jae Sim",
      "email": "hanul@hanul.me"
    }
  ],
  "license": "MIT",
  "repository": {
    "type": "git",
    "url": "git+https://github.com/strongloop/express.git"
  },
  "homepage": "http://expressjs.com/",
  "keywords": [
    "express",
    "framework",
    "sinatra",
    "web",
    "rest",
    "restful",
    "router",
    "app",
    "api"
  ],
  "dependencies": {
    "accepts": "~1.2.12",
    "array-flatten": "1.1.1",
    "content-disposition": "0.5.0",
    "content-type": "~1.0.1",
    "cookie": "0.1.3",
    "cookie-signature": "1.0.6",
    "debug": "~2.2.0",
    "depd": "~1.0.1",
    "escape-html": "1.0.2",
    "etag": "~1.7.0",
    "finalhandler": "0.4.0",
    "fresh": "0.3.0",
    "merge-descriptors": "1.0.0",
    "methods": "~1.1.1",
    "on-finished": "~2.3.0",
    "parseurl": "~1.3.0",
    "path-to-regexp": "0.1.7",
    "proxy-addr": "~1.0.8",
    "qs": "4.0.0",
    "range-parser": "~1.0.2",
    "send": "0.13.0",
    "serve-static": "~1.10.0",
    "type-is": "~1.6.6",
    "utils-merge": "1.0.0",
    "vary": "~1.0.1"
  },
  "devDependencies": {
    "after": "0.8.1",
    "ejs": "2.3.3",
    "istanbul": "0.3.17",
    "marked": "0.3.5",
    "mocha": "2.2.5",
    "should": "7.0.2",
    "supertest": "1.0.1",
    "body-parser": "~1.13.3",
    "connect-redis": "~2.4.1",
    "cookie-parser": "~1.3.5",
    "cookie-session": "~1.2.0",
    "express-session": "~1.11.3",
    "jade": "~1.11.0",
    "method-override": "~2.3.5",
    "morgan": "~1.6.1",
    "multiparty": "~4.1.2",
    "vhost": "~3.0.1"
  },
  "engines": {
    "node": ">= 0.10.0"
  },
  "files": [
    "LICENSE",
    "History.md",
    "Readme.md",
    "index.js",
    "lib/"
  ],
  "scripts": {
    "test": "mocha --require test/support/env --reporter spec --bail --check-leaks test/ test/acceptance/",
    "test-ci": "istanbul cover node_modules/mocha/bin/_mocha --report lcovonly -- --require test/support/env --reporter spec --check-leaks test/ test/acceptance/",
    "test-cov": "istanbul cover node_modules/mocha/bin/_mocha -- --require test/support/env --reporter dot --check-leaks test/ test/acceptance/",
    "test-tap": "mocha --require test/support/env --reporter tap --check-leaks test/ test/acceptance/"
  },
  "gitHead": "ef7ad681b245fba023843ce94f6bcb8e275bbb8e",
  "bugs": {
    "url": "https://github.com/strongloop/express/issues"
  },
  "_id": "express@4.13.3",
  "_shasum": "ddb2f1fb4502bf33598d2b032b037960ca6c80a3",
  "_from": "express@*",
  "_npmVersion": "1.4.28",
  "_npmUser": {
    "name": "dougwilson",
    "email": "doug@somethingdoug.com"
  },
  "maintainers": [
    {
      "name": "tjholowaychuk",
      "email": "tj@vision-media.ca"
    },
    {
      "name": "jongleberry",
      "email": "jonathanrichardong@gmail.com"
    },
    {
      "name": "dougwilson",
      "email": "doug@somethingdoug.com"
    },
    {
      "name": "rfeng",
      "email": "enjoyjava@gmail.com"
    },
    {
      "name": "aredridel",
      "email": "aredridel@dinhe.net"
    },
    {
      "name": "strongloop",
      "email": "callback@strongloop.com"
    },
    {
      "name": "defunctzombie",
      "email": "shtylman@gmail.com"
    }
  ],
  "dist": {
    "shasum": "ddb2f1fb4502bf33598d2b032b037960ca6c80a3",
    "tarball": "http://registry.npmjs.org/express/-/express-4.13.3.tgz"
  },
  "directories": {},
  "_resolved": "https://registry.npmjs.org/express/-/express-4.13.3.tgz",
  "readme": "ERROR: No README data found!"
}
package.json 属性说明
- name - 包名。
- version - 包的版本号。
- description - 包的描述。
- homepage - 包的官网 url 。
- author - 包的作者姓名。
- contributors - 包的其他贡献者姓名。
- dependencies - (生产环境下的)依赖包列表。如果依赖包没有安装,npm 会自动将依赖包安装在 node_module 目录下。
安装项目运行时所依赖的模块。比如jQuery库,等项目上线以后依然是要继续使用的,我们就要安装在生产环境中,如果没有把需要的依赖安装到生产环境中,项目上线运行时就有可能会报错。
使用--save命令安装到 dependencies 下,命令语法:
npm install --save packageName

# 简写
npm i -S packageName
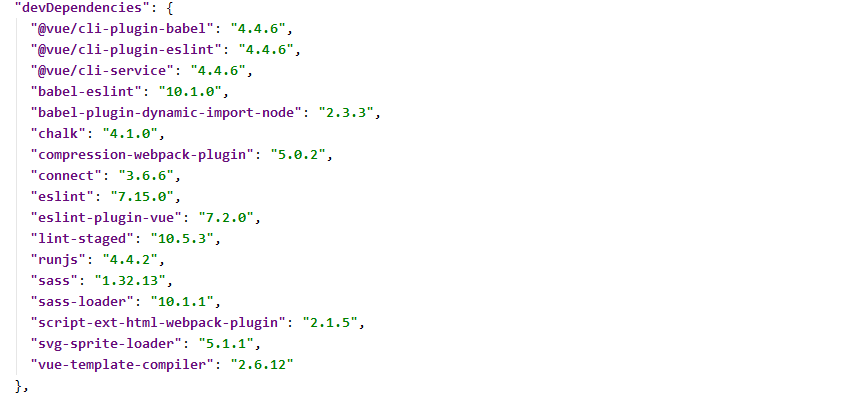
- devDependencies - (开发环境下的)依赖包列表。如果依赖包没有安装,npm 会自动将依赖包安装在 node_module 目录下。
只会在开发环境下依赖的模块,生产环境不会被打入包内
即:安装项目开发时所依赖的模块。比如像webpack/sass等工具,只是用来构建项目和打包,这些都是在开发阶段才使用的,等项目上线后就用不到webpack工具了,那么我们就可以把webpack安装到开发环境中,使用--save-dev命令安装到devdependencies下,命令语法:
npm install --save-dev packageName

# 简写
npm i -D packageName
- peerDependencies - 主要作用是用来做版本检查的
例如 react-router 的 peerDependencies 是 react>=16.8.0,那么就会出现 3 种情况:
- 项目下压根没有安装 react
- 项目下的 react 符合要求,确实 >=16.8.0,比如 17.0.2
- 项目下的 react 不符合版本要求,比如 16.0.0
- repository - 包代码存放的地方的类型,可以是 git 或 svn,git 可在 Github 上。
- main - main 字段指定了程序的主入口文件,require('moduleName') 就会加载这个文件。这个字段的默认值是模块根目录下面的 index.js。
- keywords - 关键字
devDependencies
npm的包查找规则
dependencies、devDependencies、peerDependencies和NPM 包的查找规则密切相关。
这是区分三者的基础知识,如果不搞懂
NPM 包的查找规则,在排查问题的时候也是会一头雾水。
{
  "dependencies": {
    "@remix-run/router": "1.6.2"
  },
  "devDependencies": {
    "react": "^18.2.0"
  },
  "peerDependencies": {
    "react": ">=16.8"
  },
}
我们从上图可以看到它三个类型都有,有 1 个
dependencies、1 个devDependencies和 1 个peerDependencies。
而@remix-run/router自己是 0 依赖,react则有依赖了loose-envify,而loose-envify依赖js-tokens,也就是react -> loose-envify -> js-tokens
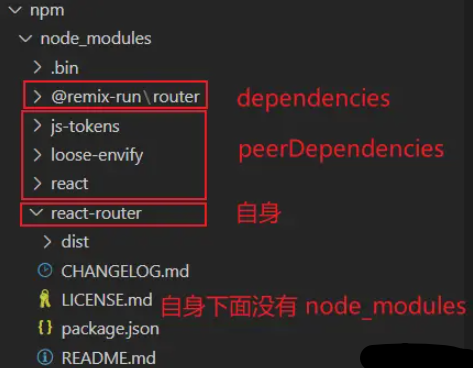
npm 9.5.1
npm 包管理器项目下有 5 个 npm 包,对应我们上面的分析。
把所有的依赖都打平到 node_modules 下面
安装了 peerDependencies
- 按照 官方文档 描述:
如果传递给
require()的模块标识符不是core模块,并且不是以 '/'、'../' 或 './' 开头,则Node.js从当前模块的目录开始,并添加/node_modules,并尝试从中加载模块。
如果在那里找不到它,则它移动到父目录,依此类推,直到到达文件系统的根目录。
- 也就是说: Node.js 首先判断它是不是
Node.js自带的core包,如果不是,则继续判断是否为相对路径或者绝对路径,如果都不是那就只能是第三方的 NPM 包,则:它就会按照如下规则查找:
- 先去项目目录下的
node_modules找,如果能找到就返回- 找不到的话,向上级目录找,直到找到
/node_modules
例如:我在
/home/johnny/demo/index.js里面有下面一段代码:
import { useHistory } from 'react-router-dom'
它的查找规则就是:
- /home/johnny/
demo/node_modules/react-router-dom : 先看看项目下的 node_modules 是否存在- /home/
johnny/node_modules/react-router-dom :再看父级目录的 node_modules 是否存在- /home/
node_modules/react-router-dom :同上- /
node_modules/react-router-dom :同上
- 你可以使用
require.resolve.pathsAPI 查看解析的过程。
例如:
console.log(require.resolve.paths('react-router-dom'))
创建 package.json
- 搭建一个前端项目之前,通常会在项目的根目录下生成一个名为package.json的文件作为NPM包的描述文件,使用该文件来定义项目信息、配置包依赖关系。
- package.json文件可以自己手动创建,也可以使用命令来创建:
npm init
文件中包含了NPM包的基本信息(项目名称、版本号、项目描述、作者)和依赖管理等。
{
    "name": "demo",
    "version": "1.0.0",
    "devDependencies": {
        "webpack": "^4.29.6"
    }
}
npm run <package.json-script>
- 运行package.json文件中定义的脚本
npm run <package.json-script>
换言之:
npm run命令需和项目根目录下的package.json文件配合使用
npm run执行package.json文件的“scripts”属性中定义的命令,如下例:
{
  "name": "my-project",
  "version": "1.0.0",
  "description": "A Vue.js project",
  "author": "zhouguoqing <zhouguoqing@clinbrain.com>",
  "private": true,
  "scripts": {
    "dev": "webpack-dev-server --inline --progress --config build/webpack.dev.conf.js",
    "start": "npm run dev",
    "unit": "jest --config test/unit/jest.conf.js --coverage",
    "e2e": "node test/e2e/runner.js",
    "test": "npm run unit && npm run e2e",
    "lint": "eslint --ext .js,.vue src test/unit test/e2e/specs",
    "build": "node build/build.js"
  }
}
在项目根目录下打开终端(
cmd或power shell),执行npm run build,将执行node命令:node build/build.js
执行
npm run start,将执行npm run dev
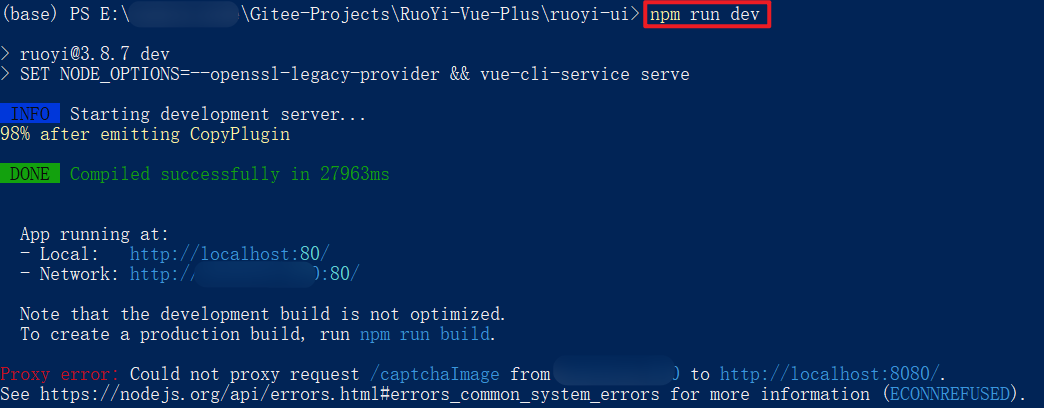
- 以
ruoyi-ui前端框架为例:
node: v20package.json
{
  ...
  "scripts": {
    "dev": "SET NODE_OPTIONS=--openssl-legacy-provider && vue-cli-service serve",
    "build:prod": "SET NODE_OPTIONS=--openssl-legacy-provider && vue-cli-service build",
    "build:stage": "SET NODE_OPTIONS=--openssl-legacy-provider && vue-cli-service build --mode staging",
    "preview": "node build/index.js --preview",
    "lint": "eslint --ext .js,.vue src"
  }
  ...
}
npm run dev
npm run build:prod
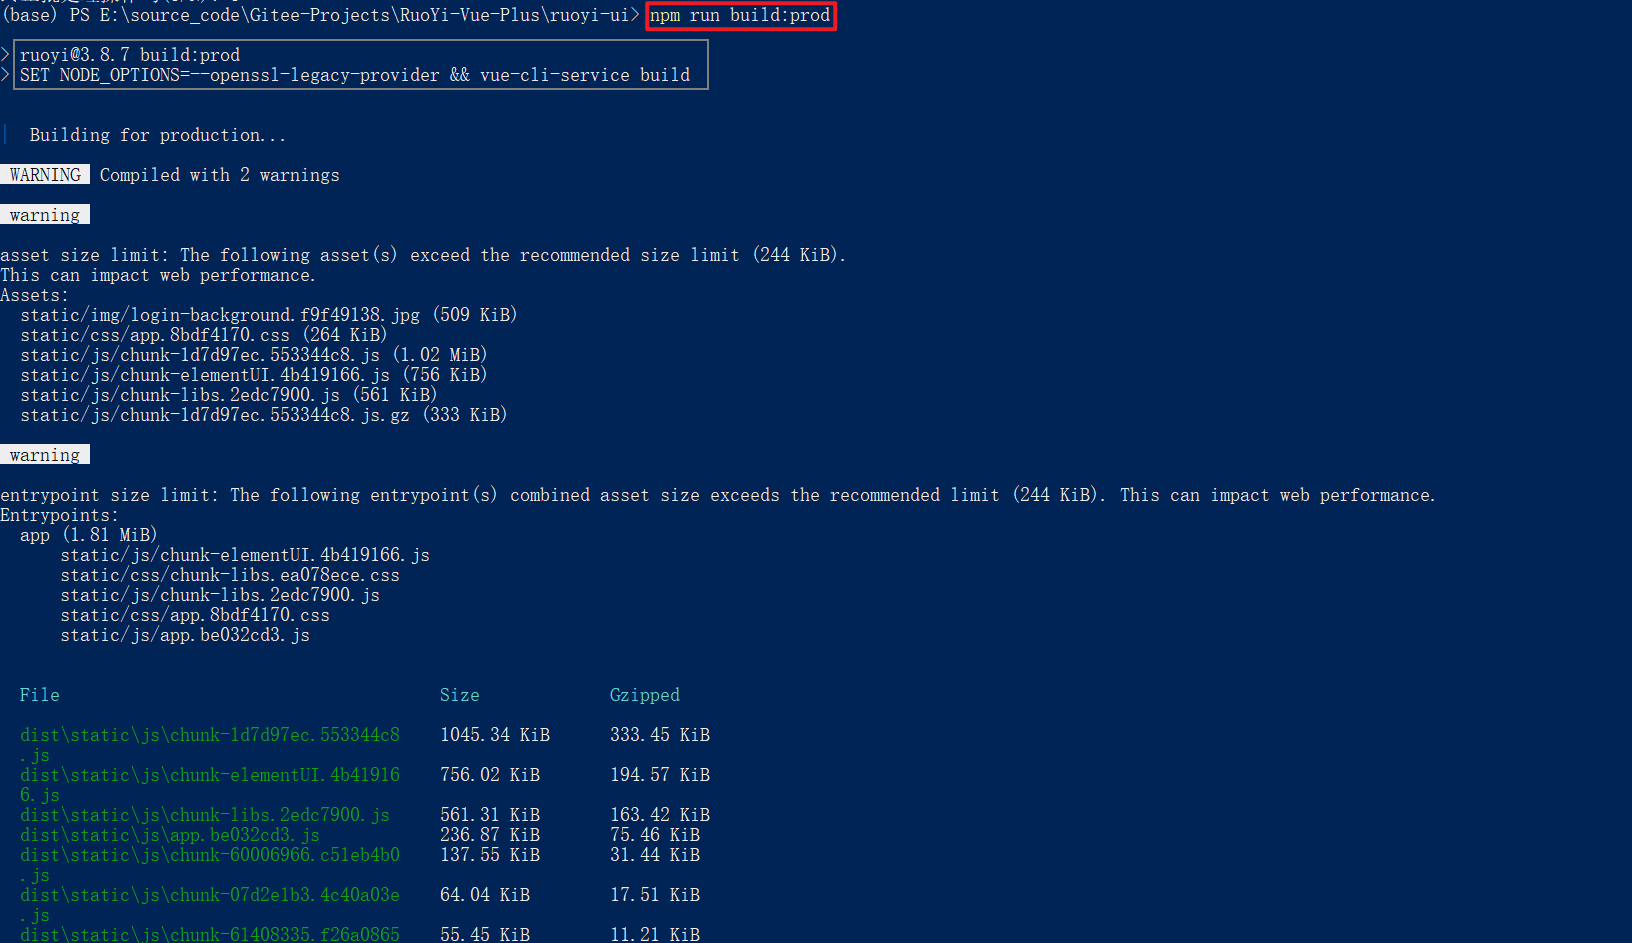
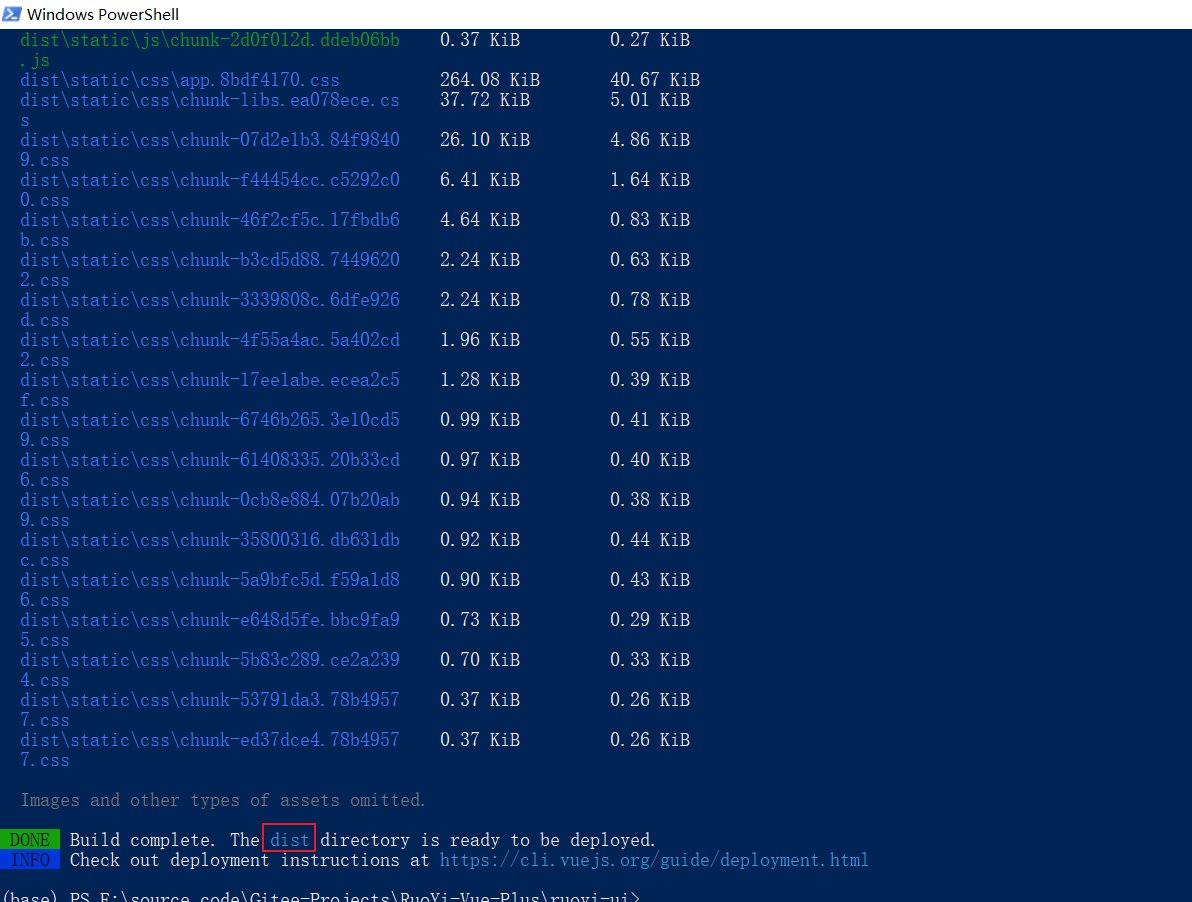

dist即构建成功后的输出目录
1.6 卸载模块
- 我们可以使用以下命令来卸载 Node.js 模块。
$ npm uninstall express
- 卸载后,你可以到 /node_modules/ 目录下查看包是否还存在,或者使用以下命令查看:
$ npm ls

1.7 更新模块
我们可以使用以下命令更新模块:
$ npm update express
1.8 搜索模块
使用以下来搜索模块:
$ npm search express
1.9 创建模块
创建模块,package.json 文件是必不可少的。我们可以使用 NPM 生成 package.json 文件,生成的文件包含了基本的结果。
$ npm init
This utility will walk you through creating a package.json file.
It only covers the most common items, and tries to guess sensible defaults.

See `npm help json` for definitive documentation on these fields
and exactly what they do.

Use `npm install <pkg> --save` afterwards to install a package and
save it as a dependency in the package.json file.

Press ^C at any time to quit.
name: (node_modules) runoob                   # 模块名
version: (1.0.0)
description: Node.js 测试模块(www.runoob.com)  # 描述
entry point: (index.js)
test command: make test
git repository: https://github.com/runoob/runoob.git  # Github 地址
keywords:
author:
license: (ISC)
About to write to ……/node_modules/package.json:      # 生成地址

{
  "name": "runoob",
  "version": "1.0.0",
  "description": "Node.js 测试模块(www.runoob.com)",
  ……
}


Is this ok? (yes) yes
以上的信息,你需要根据你自己的情况输入。在最后输入 "yes" 后会生成 package.json 文件。
- 接下来我们可以使用以下命令在 【npm 资源库】中注册用户(使用邮箱注册):
$ npm adduser
Username: mcmohd
Password:
Email: (this IS public) mcmohd@gmail.com
- 接下来我们就用以下命令来发布模块:
$ npm publish
如果你以上的步骤都操作正确,你就可以跟其他模块一样使用 npm 来安装。
1.10 版本号
-
使用 NPM 下载和发布代码时都会接触到版本号。NPM 使用语义版本号来管理代码,这里简单介绍一下。
-
语义版本号分为
X.Y.Z三位,分别代表主版本号、次版本号和补丁版本号。当代码变更时,版本号按以下原则更新。 -
如果只是修复bug,需要更新Z位。
- 如果是新增了功能,但是向下兼容,需要更新Y位。
- 如果有大变动,向下不兼容,需要更新X位。
- 版本号有了这个保证后,在申明第三方包依赖时,除了可依赖于一个固定版本号外,还可依赖于某个范围的版本号。例如"argv": "0.0.x"表示依赖于0.0.x系列的最新版argv。
NPM支持的所有版本号范围指定方式可以查看官方文档。
1.11 npm config
- 查看npm全局安装保存路径
# npm config get prefix
C:\Useres\new\AppData\Roaming\npm
- 查看npm安装缓存cache路径
# npm config get cache
C:\Useres\new\AppData\Local\npm-cache
安装源/镜像源(registry)
查看的当前安装源
npm config get registry
设置安装源/镜像源
- 更换镜像(淘宝镜像)
# 临时指定淘宝镜像源:
npm --registry https://registry.npm.taobao.org install express

# 永久指定淘宝镜像源:
npm config set registry https://registry.npm.taobao.org

# 安装 cnpm
npm install -g cnpm --registry=https://registry.npm.taobao.org
备注:以上淘宝镜像过期,可以尝试安装淘宝新的镜像,如下:
npm config set registry https://registry.npmmirror.com
检查镜像源是否安装成功
npm config get registry
安装源/镜像源管理工具: nrm
- slogan
nrm can help you easy and fast switch between differentnpm registries, now include: npm, cnpm, taobao, nj(nodejitsu).
nrm即是因此类需求而产生的,它是一个用于快速切换 npm 安装源地址的 nodejs 工具。
- nrm 的安装/常用功能
npm install -g nrm // 安装

# nrm ls // 查看已有的源
  npm ---------- https://registry.npmjs.org/
  yarn --------- https://registry.yarnpkg.com/
  tencent ------ https://mirrors.cloud.tencent.com/npm/
  cnpm --------- https://r.cnpmjs.org/
  taobao ------- https://registry.npmmirror.com/
  npmMirror ---- https://skimdb.npmjs.com/registry/

nrm use <registry> // 切换源
nrm add <registry> <url> // 添加源
nrm del <registry> // 删除源
nrm test [registry] // 测速
可供选择的安装源/镜像源
npm config set registry https://registry.npmmirror.com

# 官方源
https://registry.npmjs.org/

# 淘宝镜像源
http://registry.npm.taobao.org/ 【已废止】
https://registry.npmmirror.com

...

npm ---------- https://registry.npmjs.org/
yarn --------- https://registry.yarnpkg.com/
tencent ------ https://mirrors.cloud.tencent.com/npm/
cnpm --------- https://r.cnpmjs.org/
taobao ------- https://registry.npmmirror.com/
npmMirror ---- https://skimdb.npmjs.com/registry/
配置代理
// 查看代理
npm config get proxy
npm config get https-proxy

// 设置代理
npm config set proxy http://127.0.0.1:8080
npm config set https-proxy http://127.0.0.1:8080

// 删除代理
npm config delete proxy
npm config delete https-proxy
补充:使用第三方镜像源安装指定依赖包
demo
npm install -g cnpm --registry=https://registry.npmmirror.com
补充:淘宝镜像仓库变量汇总
-
一些模块在安装过程中还需要实时下载二进制的资源,这个地址是模块内默认定义的,可不在 registry 可控的范围内。不过一般他们都会提供环境变量配置指定安装来源,而淘宝仓库提供了一些流行模块的镜像源,这使得我们可以较为顺利地安装上这些模块。
-
使用淘宝镜像源地址: (仅供参考)
npm config set registry https://registry.npm.taobao.org
npm config set disturl https://npm.taobao.org/dist
npm config set electron_mirror https://npm.taobao.org/mirrors/electron/
npm config set sass_binary_site https://npm.taobao.org/mirrors/node-sass/
npm config set phantomjs_cdnurl https://npm.taobao.org/mirrors/phantomjs/
推荐文献
1.12 npm的顺序钩子(前置钩子/后置钩子)
npm脚本有pre和post两个钩子。
举例来说,build脚本命令的钩子就是prebuild和postbuild:
{
    "scripts": {
        "prebuild": "echo I run before the build script",
        "build": "webpack",
        "postbuild": "echo I run after the build script"
    }
}
- 用户执行
npm run build的时候,会自动按照下面的顺序执行。
npm run prebuild && npm run build && npm run postbuild(&&代表继发执行,执行完前面再执行后面;&代表并行执行,同时执行)
因此,可以在这两个钩子里面,完成一些准备工作和清理工作。例如:
{
    "scripts": {
        "clean": "rm -rf ./dist && mkdir dist",
        "prebuild": "npm run clean",
        "build": "webpack"
    }
}
-
执行
npm run build时,就会执行:npm run prebuild && npm run build -
npm默认提供下面这些钩子:
prepublish, publish, postpublish :发布模块

preinstall, install, postinstall :安装模块

preuninstall, uninstall, postuninstall :卸载模块

preversion, version, postversion :在使用 npm version 修改版本号的时候执行

pretest, test, posttest :执行 npm test 的时候

prestop, stop, poststop :执行 npm stop 的时候

prestart, start, poststart :执行 npm start 的时候

prerestart, restart, postrestart :执行 npm restart 的时候

preshrinkwrap, shrinkwrap, postshrinkwrap :执行 npm shrinkwrap 的时候
1.Y NPM 常用命令
除了本章介绍的部分外,NPM还提供了很多功能,package.json里也有很多其它有用的字段。
除了可以在 npmjs.org/doc/ 查看官方文档外,这里再介绍一些NPM常用命令。
-
NPM提供了很多命令,例如install和publish,使用
npm help可查看所有命令。 -
查看某条命令的详细帮助
命令格式:
npm help <command>
样例命令:npm help install
-
在
package.json所在目录下使用npm install . -g可先在本地安装【当前命令行程序】,可用于发布前的本地测试。 -
把当前目录下node_modules子目录里边的对应模块更新至最新版本
npm update <package>
- 把【全局安装的对应命令行程序】更新至最新版
npm update <package> -g
- 清空NPM本地缓存,用于对付使用相同版本号发布新版本代码的人
npm cache clear
- 撤销发布自己发布过的某个版本代码
npm unpublish <package>@<version>
- 启动项目 :
npm start
npm的内置命令之一,用于启动项目npm start命令是在一个Node.js项目中执行的一个自定义命令,用于启动该项目。- 该命令是在
package.json文件中定义的,通常被用于启动一个 Web 应用程序或服务。
- 执行过程
当在项目目录下执行npm start命令时,npm将会在该项目的根目录下查找package.json文件,并查找其中的 "scripts" 对象中是否包含了名为 "start" 的属性。如果找到了这个属性,npm将会执行这个属性的值。
- 在大多数情况下,"
start" 属性的值是一个用于启动应用程序的命令。这个命令可以是一个脚本文件,也可以是一个 Node.js 应用程序。一些常见的例子包括:
- 启动一个
Web服务器,如 Express 或 Koa。- 启动一个
React应用程序,如 create-react-app。- 启动一个命令行工具或应用程序。
- 需注意,
npm start命令是可以被自定义的。开发者可以在package.json文件中定义自己的脚本命令,例如 "dev"、"test" 等等,以实现不同的功能。这样,可以更方便地启动不同的应用程序或服务。
- 运行项目:
npm run<package.json-script>`
npm run也是npm的命令,用于运行package.json文件中的自定义脚本。- 语法:
npm run {script_name},其中script_name是在package.json文件中定义的脚本名称。- 与
npm start不同的是,npm run可以运行除了start以外的其他自定义脚本,而且必须显式地指定脚本名称。总之,
npm start是一个特殊的、内置的命令,用于启动项目;而npm run则是一个通用的命令,用于运行自定义脚本。
1.X npm 使用最佳实践
- 始终在项目根目录下创建一个
package.json文件。这个文件包含了项目的元数据和依赖项信息。 - 使用
npm install命令来安装依赖项,而不是手动下载和安装。 - 使用
--save或--save-dev参数来将依赖项添加到package.json文件中的dependencies或devDependencies对象中。 - 避免使用全局安装
npm包,因为这会污染全局环境,也会使项目难以维护。 - 使用
.npmignore文件来忽略不必要的文件或目录,以减小发布的包的大小。 - 使用
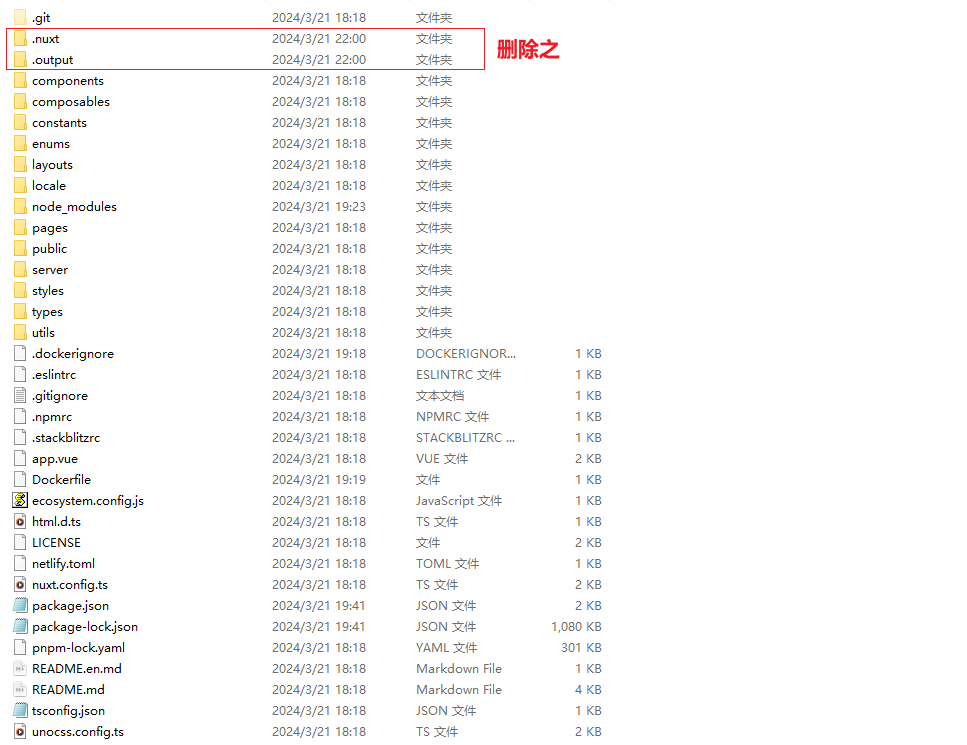
remove-node-modules移除npm项目下的node_modules模块
- step1 安装 :
npm install -g remove-node-modules- step2 使用 : 当前项目根目录下输入
remove-node-modules,即可快速删除node_modules文件夹
2 FAQ for NPM
Q:npm run dev 时,如何让其后台常驻运行?
- 要让
npm run dev在后台常驻运行,有几种常用方法,取决于你的操作系统和需求:
1. 使用 nohup(最简单,Linux/Mac)
nohup npm run dev &
&让进程后台运行nohup确保关闭终端后进程不退出- 输出会保存到
nohup.out文件
2. 使用 pm2(推荐,生产环境)
# 全局安装 pm2
npm install -g pm2

# 启动
pm2 start npm --name "my-dev-server" -- run dev

# 查看状态
pm2 status

# 停止
pm2 stop my-dev-server
优点:支持自动重启、日志管理、监控等。
3. 使用 screen 或 tmux(会话管理)
# screen 方式
screen -S dev
npm run dev
# 按 Ctrl+A 然后按 D 分离会话

# 重新连接
screen -r dev
# tmux 方式
tmux new -s dev
npm run dev
# 按 Ctrl+B 然后按 D 分离会话

# 重新连接
tmux attach -t dev
4. 使用 & + disown(Linux/Mac)
npm run dev & disown
disown将进程从当前 shell 作业列表移除,关闭终端不影响进程
5. Windows 系统
# PowerShell
Start-Process -WindowStyle Hidden -FilePath "npm" -ArgumentList "run dev"

# 或使用 cmd
start /B npm run dev
对比总结
| 方法 | 适用场景 | 特点 |
|---|---|---|
nohup & |
临时后台运行 | 简单,适合快速测试 |
pm2 |
长期运行/生产环境 | 功能最全,推荐 |
screen/tmux |
需要随时查看输出 | 可重新连接会话 |
& disown |
快速后台化 | 轻量,无额外工具 |
推荐:如果是开发服务器长期运行,用 pm2;如果只是临时需要后台,用 nohup 或 screen。
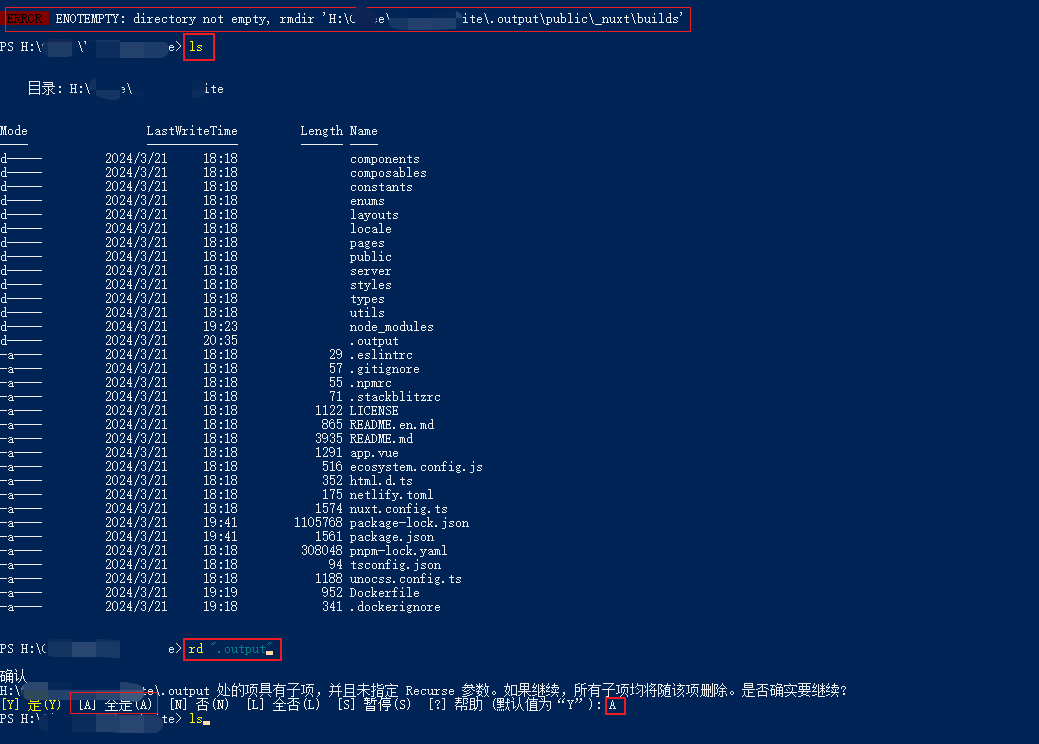
Q : npm run build时报错:Error: ENOTEMPTY: directory not empty, rmdir ...
- 问题描述
例如:Error: ENOTEMPTY: directory not empty, rmdir 'D:/project/vite-react/node_modules/.vite/deps'
- 解决方法:
- windows 系统
{
  "scripts": {
    "predev": "rd /s /q node_modules\\.vite", // rd
    "dev": "vite --host"
  }
}
- macos / linux 系统
{
  "scripts": {
    "predev": "rm -rf ./node_modules/.vite",
    "dev": "vite --host"
  }
}
- 参考文献
Q: npm 安装时报 Invalid response body while trying to fetch https://registry.npmjs.org/express: read ETIMEDOUT
问题描述
在npm install express -g时,报错:
ash-4.4# vi /root/.npm/_logs/2024-08-18T07_53_04_996Z-debug-0.log
0 verbose cli /volume1/@appstore/Node.js_v20/usr/local/bin/node /usr/local/bin/npm
1 info using npm@10.1.0
2 info using node@v20.9.0
3 timing npm:load:whichnode Completed in 2ms
4 timing config:load:defaults Completed in 2ms
5 timing config:load:file:/volume1/@appstore/Node.js_v20/usr/local/lib/node_modules/npm/npmrc Completed in 3ms
6 timing config:load:builtin Completed in 3ms
7 timing config:load:cli Completed in 5ms
8 timing config:load:env Completed in 1ms
9 timing config:load:project Completed in 6ms
10 timing config:load:file:/root/.npmrc Completed in 0ms
11 timing config:load:user Completed in 0ms
12 timing config:load:file:/volume1/@appstore/Node.js_v20/usr/local/etc/npmrc Completed in 2ms
13 timing config:load:global Completed in 3ms
14 timing config:load:setEnvs Completed in 1ms
15 timing config:load Completed in 22ms
16 timing npm:load:configload Completed in 22ms
17 timing config:load:flatten Completed in 4ms
18 timing npm:load:mkdirpcache Completed in 0ms
19 timing npm:load:mkdirplogs Completed in 0ms
20 verbose title npm install express
21 verbose argv "install" "express" "--global"
22 timing npm:load:setTitle Completed in 1ms
23 timing npm:load:display Completed in 1ms
24 verbose logfile logs-max:10 dir:/root/.npm/_logs/2024-08-18T07_53_04_996Z-
25 verbose logfile /root/.npm/_logs/2024-08-18T07_53_04_996Z-debug-0.log
26 timing npm:load:logFile Completed in 11ms
27 timing npm:load:timers Completed in 0ms
28 timing npm:load:configScope Completed in 0ms
29 timing npm:load Completed in 61ms
30 timing config:load:flatten Completed in 1ms
31 timing arborist:ctor Completed in 1ms
32 silly logfile done cleaning log files
33 timing idealTree:init Completed in 9ms
34 timing idealTree:userRequests Completed in 2ms
35 silly idealTree buildDeps
36 silly fetch manifest express@*
37 silly placeDep ROOT express@ OK for:  want: *
38 timing idealTree:#root Completed in 11924ms
39 timing idealTree:node_modules/express Completed in 0ms
40 timing idealTree:buildDeps Completed in 11925ms
41 timing idealTree:fixDepFlags Completed in 1ms
42 timing idealTree Completed in 11940ms
43 timing command:install Completed in 12043ms
44 verbose type system
45 verbose stack FetchError: Invalid response body while trying to fetch https://registry.npmjs.org/express: read ETIMEDOUT
45 verbose stack     at /volume1/@appstore/Node.js_v20/usr/local/lib/node_modules/npm/node_modules/minipass-fetch/lib/body.js:170:15
45 verbose stack     at process.processTicksAndRejections (node:internal/process/task_queues:95:5)
45 verbose stack     at async Response.json (/volume1/@appstore/Node.js_v20/usr/local/lib/node_modules/npm/node_modules/minipass-fetch/lib/body.js:75:17)
45 verbose stack     at async RegistryFetcher.packument (/volume1/@appstore/Node.js_v20/usr/local/lib/node_modules/npm/node_modules/pacote/lib/registry.js:94:25)
45 verbose stack     at async RegistryFetcher.manifest (/volume1/@appstore/Node.js_v20/usr/local/lib/node_modules/npm/node_modules/pacote/lib/registry.js:118:23)
...
问题分析
- 报错信息 "Invalid response body while trying to fetch https://registry.npmjs.org/express" 表示在尝试获取
npm包 "express" 的时候,收到了无效的响应体。 - 这通常是因为网络问题、
npm仓库不可用或者npm配置错误导致的。
解决方法
-
检查网络连接:确保你的设备可以正常访问互联网。
-
检查 npm 仓库状态:
- 访问 https://status.npmjs.org/ 查看 npm 仓库是否有宕机或者维护的通知。
-
清除 npm 缓存:运行 npm cache clean --force 清除 npm 缓存,然后重试。
-
检查 npm 配置:运行 npm config get registry 查看当前配置的仓库地址是否正确。
-
更换 npm 仓库源:如果 npm 官方仓库有问题,可以尝试更换为淘宝的 npm 镜像源,使用命令 npm config set registry https://registry.npm.taobao.org。
-
检查代理设置:如果你使用了代理,确保代理设置正确,或者暂时禁用代理再尝试。
如果以上步骤都不能解决问题,可能需要进一步检查系统的
DNS解析设置或者联系你的网络管理员。
Q:npm install时报错:npm ERR! code CERT_HAS_EXPIRED(TLS/SSL证书过期错误)
- 问题描述
npm install时报错:npm ERR! code CERT_HAS_EXPIRED
D:\Workspace\xxx\MindSearch-0.1.0\frontend\React> npm install
npm WARN cleanup Failed to remove some directories [
npm WARN cleanup   [
npm WARN cleanup     'D:\\Workspace\\CodeRepositories\\MindSearch-0.1.0\\MindSearch-0.1.0\\frontend\\React\\node_modules\\wrap-ansi',
npm WARN cleanup     [Error: EPERM: operation not permitted, rmdir 'D:\Workspace\CodeRepositories\MindSearch-0.1.0\MindSearch-0.1.0\frontend\React\node_modules\wrap-ansi\node_modules'] {
npm WARN cleanup       errno: -4048,
npm WARN cleanup       code: 'EPERM',
npm WARN cleanup       syscall: 'rmdir',
npm WARN cleanup       path: 'D:\\Workspace\\CodeRepositories\\MindSearch-0.1.0\\MindSearch-0.1.0\\frontend\\React\\node_modules\\wrap-ansi\\node_modules'
npm WARN cleanup     }
npm WARN cleanup   ]
npm WARN cleanup ]
npm ERR! code CERT_HAS_EXPIRED
npm ERR! errno CERT_HAS_EXPIRED
npm ERR! request to https://registry.npm.taobao.org/zwitch/-/zwitch-2.0.4.tgz failed, reason: certificate has expired

npm ERR! A complete log of this run can be found in: C:\Users\xxx\AppData\Local\npm-cache\_logs\2025-01-03T15_42_28_170Z-debug-0.log
- 问题分析
npm ERR! code CERT_HAS_EXPIRED这个错误信息在Node.js的包管理器npm中出现时,表示npm在尝试连接到远程服务器(通常是一个npm仓库)时,发现服务器提供的SSL/TLS证书已过期。
SSL/TLS证书是用于加密HTTP连接并验证服务器身份的重要安全组件,确保数据传输的安全性和完整性。
- 为什么报错?
当证书过期时,npm客户端会拒绝与该服务器建立安全连接,因为无法验证服务器的身份和安全性。这种情况的原因可能包括:
- 服务器端的实际问题:即服务器上部署的SSL证书确实已超过有效期,没有及时更新。
- 客户端系统时间不准确:如果本地计算机的系统时间设置不正确,尤其是设置成了一个早于当前日期的时间,可能会导致客户端认为服务器的证书已经过期。
- npm缓存了过期的证书:有时候即使服务器证书已更新,但npm缓存中仍保留着旧的、已过期的证书信息,也会触发此错误。
- 解决方法
- 方法1:更新系统时间以确保准确性
首先,你需要检查你的系统时间是否正确。你可以使用以下命令来查看和设置系统时间:
# 打开命令提示符
Win+R 输入cmd打开命令提示符

# 输入指令查看系统时间
date

# 输入指令设置系统时间
# 请将"YYYY-MM-DD HH:MM:SS"替换为正确的日期和时间。
sudo date -s "YYYY-MM-DD HH:MM:SS"
- 方法2:清除npm缓存
# 运行一下命令清除npm缓存
npm cache clean --force
- 方法3:升级Node.js和npm到最新版本
升级Node.js和npm到最新版本,新版本可能包含更可靠的证书链或更新的CA信任库。
# 执行下面的指令更新npm
npm install -g npm
- 方法4:更换镜像源
如果使用的是镜像源(如淘宝npm镜像),则检查镜像源是否也存在证书过期问题,并联系镜像维护者或者暂时切换回官方源。
查看自己的下载源
npm config get registry
提供几个可用的镜像源
npm config set registry http://registry.cnpmjs.org

npm config set registry https://registry.npmmirror.com

npm config set registry http://registry.npm.taobao.org
- 方法5:临时禁用SSL验证 【终极大法/慎重使用】
在极少数情况下,临时禁用
npm的SSL验证
(不推荐这种方法,因为它会降低安全性)仅作为临时解决方案,直到能够通过安全方式解决问题。
切记!!!安装好后要打开SSL验证。
# 关闭ssl验证
npm config set strict-ssl false

# 打开ssl验证
npm config set strict-ssl true

# 查看配置
npm config get strict-ssl
- 参考文献
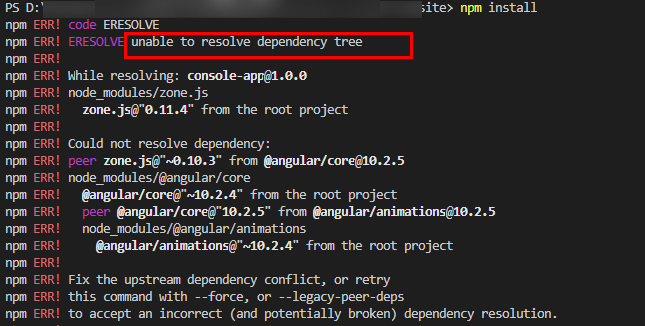
Q:npm install xxxx --legacy-peer-deps命令是什么?为什么可以解决下载时候产生的依赖冲突呢?同级依赖(peerDependency)是什么?(无法解析依赖树/同级依赖问题)
缘起1:create-react-app my-app时,报npm同级依赖(peer dependency)错误:"While resolving: my-app@0.1.0 Found: react@19.0.0 ... Could not resolve dependency: peer react@"^19.0.0 ... " from the root project"
$ create-react-app my-app

Creating a new React app in D:\Workspace\CodeRepositories\react-app\my-app.

Installing packages. This might take a couple of minutes.
Installing react, react-dom, and react-scripts with cra-template...


added 1323 packages in 58s

266 packages are looking for funding
  run `npm fund` for details

Initialized a git repository.

Installing template dependencies using npm...
npm ERR! code ERESOLVE
npm ERR! ERESOLVE unable to resolve dependency tree
npm ERR!
npm ERR! While resolving: my-app@0.1.0
npm ERR! Found: react@19.0.0
npm ERR! node_modules/react
npm ERR!   react@"^19.0.0" from the root project
npm ERR!
npm ERR! Could not resolve dependency:
npm ERR! peer react@"^18.0.0" from @testing-library/react@13.4.0
npm ERR! node_modules/@testing-library/react
npm ERR!   @testing-library/react@"^13.0.0" from the root project
npm ERR!
npm ERR! Fix the upstream dependency conflict, or retry
npm ERR! this command with --force or --legacy-peer-deps
npm ERR! to accept an incorrect (and potentially broken) dependency resolution.
npm ERR!
npm ERR!
npm ERR! For a full report see:
npm ERR! C:\Users\xxx\AppData\Local\npm-cache\_logs\2025-01-04T05_14_33_516Z-eresolve-report.txt

npm ERR! A complete log of this run can be found in: C:\Users\xxx\AppData\Local\npm-cache\_logs\2025-01-04T05_14_33_516Z-debug-0.log
`npm install --no-audit --save @testing-library/jest-dom@^5.14.1 @testing-library/react@^13.0.0 @testing-library/user-event@^13.2.1 web-vitals@^2.1.0` failed
这个错误表明你当前的项目发现
package.json中声明的依赖组件react的版本为19.0.0,但正在尝试安装的@testing-library/react这个库又需要一个特定的同级依赖react@"^18.0.0",导致解析依赖树失败、安装失败。
缘起2:无法解析依赖树/依赖冲突问题
- 在日常使用命令
npm install / npm install XX下载依赖的操作中,我经常会遇到无法解析依赖树的问题(依赖冲突):
- 但每当遇到这种情况的时候,我用命令
npm install --legacy-peer-deps,就可以顺利进行下载操作:
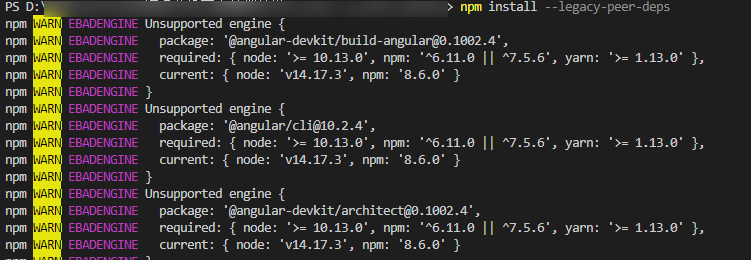
这是为什么呢?带着好奇心,我去研究学习了一番npm install xxxx --legacy-peer-deps命令是什么?为什么可以解决下载时候产生的依赖冲突呢?(注:我本地当前正在使用的npm版本是8.6.0)
本节导航:什么是【peerDependency】?
npm install xxxx --legacy-peer-deps命令是什么?为什么可以解决下载时候产生的依赖冲突呢?
什么是peerDependency?最重要的作用:同一项目的父子工程,只安装一次,避免冗余安装(from npm@v7)
- 我们日常在前端项目开发过程中,见到最多的一定是
package.json文件里的devDependencies(用于在开发环境下依赖的模块)和dependencies(无论开发环境还是生产环境都需要的依赖模块)这两个字段
(感兴趣的小伙伴可以看这篇文章:package.json文件里的dependencies和devDependencies有什么区别吗?)。
- 那么命令
--legacy-peer-dep里的peerDependency是什么依赖呢?根据geeksforgeeks网站里的定义:
Peer Dependencies: In package.json file, there is an object called as peerDependencies and it consists of all the packages that are exactly required in the project or to the person who is downloading and the version numbers should also be the same. That is the reason they were named as peerDependencies. The best example is ‘react’ which is common in every project to run similarly.
在package.json文件中,存在一个叫做peerDependencies(对等依赖关系)的对象,它包含了项目里需要的所有的包或则用户正在下载的版本号相同的所有的包(很绕,但意思就是对等依赖关系指定我们的包与某个特定版本的npm包兼容);
对等依赖关系最好的例子就是React,一个声明式的创建用户界面的JS库。
- 那么,我们为什么需要对等依赖关系呢?
假设我们现在有一个HelloHWCloud工程,已经在其根目录下的package.json文件中的dependencies字段里声明了packageA作为依赖,而其下面有两个项目app_A和app_B,它们也依赖packageA。
如果我们用dependencies而不是peerDepenedencies来声明,那么npm install安装完项目之后的依赖结构如下图所示:
├── HelloHWCloud
│   └── node_modules
│       ├── packageA
│       ├── app_A
│       │   └── nodule_modules
│       │       └── packageA
│       └── app_B
│       │   └── nodule_modules
│       │       └── packageA
从上图可以看出,
packageA依赖包被安装了3次,造成了2次安装冗余。
而如果采用
peerDepenedency来下载,就可以避免这个核心依赖库被重复下载的问题。
还是上面那个场景,我们在项目app_A和app_B的package.json文件里的peerDependencies字段声明一下核心依赖库packageA,然后在根目录的package.json文件里的dependencies字段也声明一下packageA。
接着再执行npm install,生成的依赖结构就会如下所示:
├── HelloHWCloud
│   └── node_modules
│       ├── packageA
│       ├── app_A
│       └── app_B
如上图所示,
packageA就只会被安装一次。因此,npm从版本v7开始,install就默认以peerDependencies的方式去下载了:
如果用户在根目录的
package.json文件里显式依赖了核心库,那么各个子项目里的peerDepenedencies声明就可以忽略。
如果用户没有显式依赖核心库,那么就按照子项目的peerDepenedencies中声明的版本将依赖安装到项目根目录里。
而方式2就会导致一个问题:用户依赖的包版本与各个子项目依赖的包版本相互不兼容,那么就会报错(无法解析依赖树的问题(依赖冲突))让用户自行去修复,因而导致安装过程的中断。
因为是从npm v7引入的,因此npm v3-v6就不会发生这个错误。
npm install xxxx --legacy-peer-deps命令是什么?为什么可以解决下载时候产生的依赖冲突呢?
-
npm install xxxx --legacy-peer-deps命令与其说是告诉npm要去干什么,不如说是告诉npm不要去干什么。 -
legacy的意思:遗产/(软件或硬件)已过时但因使用范围广而难以替代的; -
而
npm install xxxx --legacy-peer-deps命令用于绕过peerDependency里依赖的自动安装;它告诉npm忽略项目中引入的各个依赖模块之间依赖相同但版本不同的问题,以npm v3-v6的传统方式去继续执行安装操作。
所以,其实该命令并没有真的解决冲突,而是忽略了冲突,以“过时的/传统的”(v3-v6)的方式进行下载操作。
解决方法(同级依赖、多个工程中同名依赖但版本不同的、无法解析依赖树的版本冲突问题)
- 方式1:忽略版本冲突,以传统(v3-v6)的同级依赖方式安装2个不同版本的依赖包
npm install {packageName} --legacy-peer-deps
- 方式2:处理版本冲突
- step0 删除
node_modules和package-lock.json
- step1 编辑/修正存在版本冲突的两个工程之一的
package.json的问题依赖包的版本依据版本冲突信息进行针对性调整
- step2 切换到项目文件夹,如:
cd my-app- step3 运行 :
npm install- step4 运行 :
npm install web-vitals --save-dev
--save-dev参数: 将包添加到package.json文件的devDependencies部分,这表明这些包仅在开发过程中需要,而在项目实际运行时并不需要。
- step5 此时,能正常运行
npm run build和npm run start了
参考文献
- npm install xxxx --legacy-peer-deps命令是什么?为什么可以解决下载时候产生的依赖冲突呢? - CSDN 【推荐】
- 处理npm install 因版本问题导致的报错 (npm i --legacy-peer-deps) - 博客园
- npm救赎之道:探索--save与--save--dev的神秘力量! - CSDN
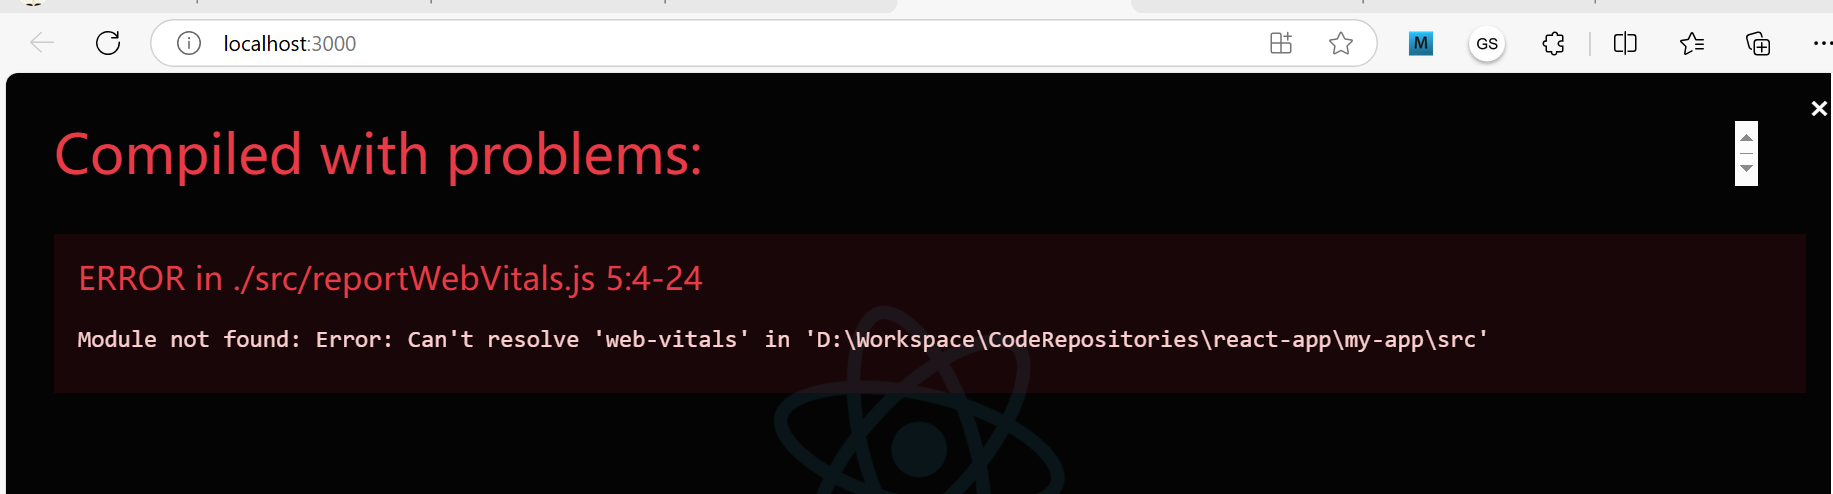
Q: npm run start时报编译错误:Module not found: Error: Can't resolve 'web-vitals' in ...
- 问题描述
npm run start时报编译错误:Module not found: Error: Can't resolve 'web-vitals' in ...
$ npm install
Failed to compile.

Module not found: Error: Can't resolve 'web-vitals' in 'D:\Workspace\xxx\react-app\my-app\src'
ERROR in ./src/reportWebVitals.js 5:4-24
Module not found: Error: Can't resolve 'web-vitals' in 'D:\Workspace\xxx\react-app\my-app\src'

webpack compiled with 1 error
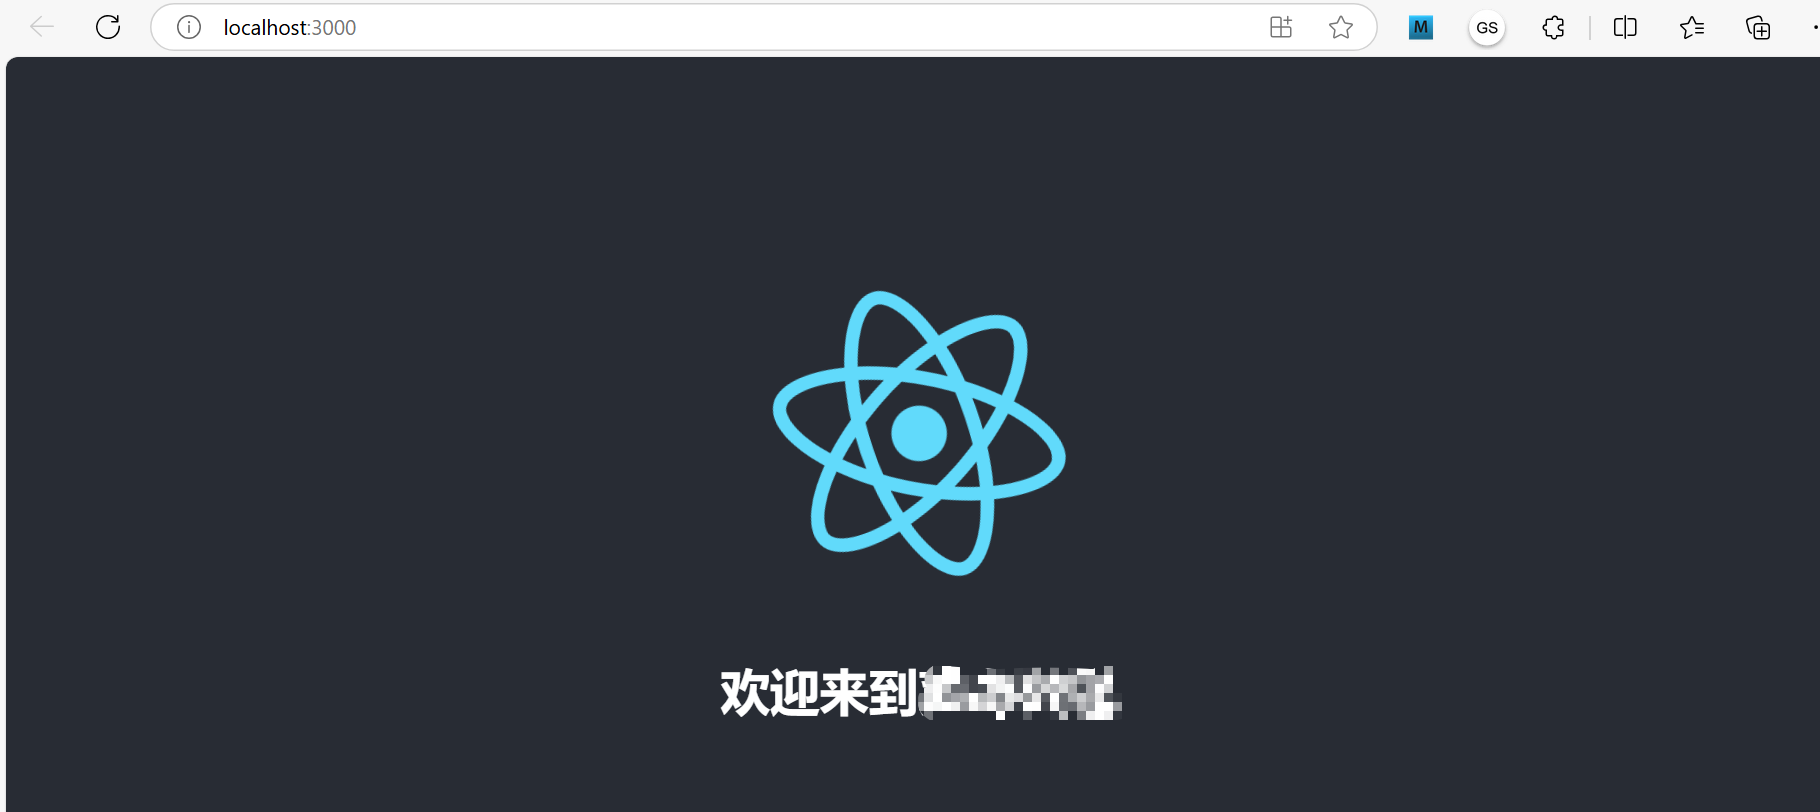
访问浏览器 http://localhost:3000 ,页面内也报此错误:
- 问题分析
- Web Vitals
模块:未安装,导致报Module not found: Error: Can't resolve 'web-vitals'`。Web Vitals模块的作用:Web前端项目的性能指标组件。web-vitals是Google发起的,旨在提供一个良好网站的基本指标(Essential metrics for a healthy site)的各种质量信号的统一指南,我们相信这些质量信号对提供出色的网络用户体验至关重要。其可获取三个关键指标(CLS、FID、LCP)和两个辅助指标(FCP、TTFB)。
- 解决方法
- 方法1:不使用该模块————将
src\index.js的将两行reportWebVitals相关的代码注释掉

import React from 'react';
import ReactDOM from 'react-dom/client';
import './index.css';
import App from './App';
//import reportWebVitals from './reportWebVitals';

const root = ReactDOM.createRoot(document.getElementById('root'));
root.render(
  <React.StrictMode>
    <App />
  </React.StrictMode>
);

// If you want to start measuring performance in your app, pass a function
// to log results (for example: reportWebVitals(console.log))
// or send to an analytics endpoint. Learn more: https://bit.ly/CRA-vitals
//reportWebVitals();
- 方法2:
npm install web-vitals --save-dev
然后,就可以正常
npm run start了。
- 参考文献
X 参考文献
- npmjs 官网
- 其他

本文链接: https://www.cnblogs.com/johnnyzen
关于博文:评论和私信会在第一时间回复,或直接私信我。
版权声明:本博客所有文章除特别声明外,均采用 BY-NC-SA 许可协议。转载请注明出处!
日常交流:大数据与软件开发-QQ交流群: 774386015 【入群二维码】参见左下角。您的支持、鼓励是博主技术写作的重要动力!

 浙公网安备 33010602011771号