无线承载网络无法共享Internet连接的解决方法
当没有无线路由器的时候怎么让Android手机通过家用宽带连接Internet呢?只要有一台笔记本或者是台式机+无线网卡。具体的做法如下:
首先以管理员身份在CMD中运行如下命令:
netsh wlan set hostednetwork mode=allow ssid=xxx key=xxxxxxxxxxxx
该命令启用了无线承载网络并将无线网络的SSID设置为xxx,密码设置为xxxxxxxxxxxxxx,此时会出现一个新的网络连接,我的机器是无线网络连接 2。此命令运行成功后将连接到Internet的网络连接的Internet连接共享到新出现的无线网络连接 2。截图如下:

最后开启该无线承载网络即可,命令如下:
netsh wlan start hostednetwork
此时手机应该已经可以正常连接到此无线网络并正常上网了。
但在共享Internet连接的时候可能会出现如下错误:
An error occurred while Internet Connection Sharing we being enabled.Internet Connection Sharing cannot be enabled. A LAN connection is already configured with the IP address that is required for automatic IP addressing.
此时可以通过如下两条命令修复:
netsh int ip reset D:\resetlog.txt
netsh winsock reset catalog
用管理员权限执行完这两条命令以后重启,应该就可以正常共享Internet连接了。
附件中的批处理文件请右键用管理员身份执行,注意修改ssid和password。
参考信息:http://www.makeuseof.com/answers/share-wireless-internet-connection-windows-7/
三年前我曾經寫過一篇【如何將 NB 的無線網路變成可分享 Wi-Fi 的 AP 模式 (Ad-Hoc)】的文章,這幾天因為到大陸出差,又需要再次利用筆記型電腦 (NB) 分享 Wi-Fi 熱點出來,以便讓我的手機使用飯店提供的網路,這才發現原本的文章已經無法適用於 Windows 8 作業系統了。所以趁機重新研究了一下新的設定方式,並整理成這篇文章。
現有網路環境與網路設備說明:
- 筆記型電腦一台 ( 需內建 Wi-Fi 無線網卡,並且啟用此功能 )
- 實體網路介面 ( Network Adapter ) 必須有兩張,分別是:
- 實體網路介面,介面名稱假設為:區域連線 ( 必須已插上實體網路線,且可以上網 )
- 無線網路介面,介面名稱假設為:Wi-Fi ( 必須是 未連線 狀態 )


註:只要有上述條件,應該就能成功分享網路連線給其他行動裝置使用,且一台 Windows 8 筆電最多可分享給最多 100 個行動裝置使用!
以下是啟用 Windows 8 熱點分享 (Wi-Fi Hotspot) 的標準作業流程:
1. 開啟 命令提示字元 (系統管理員) ,鍵盤快速鍵:Win+X+A
2. 先輸入已下指令,查詢目前該主機的主控網路設定與主控網路狀態
netsh wlan show hostednetwork
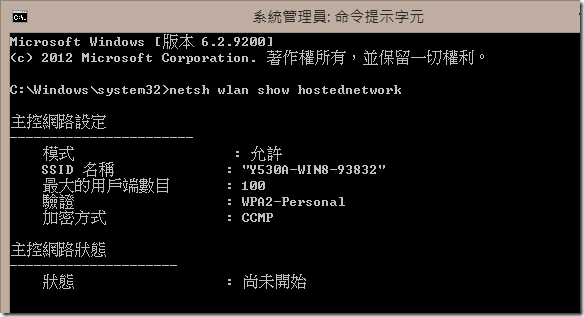
如上圖的各網路設定說明如下:
- 主控網路 (Wireless Hosted Network) 設定
- 模式:設定是否允許使用 Ad-hoc 的方式連接本機網路
- SSID 名稱:就是你的 Wi-Fi 熱點名稱 ( SSID Name )
- 最大用戶端數目:預設上限 100 個用戶端可連接,應該十分夠用了!
- 驗證:Windows 8 預設的 Wi-Fi 驗證方式為 WPA2-Personal
- 加密方式:無線網路傳輸資料的預設加密方式為 CCMP
- 主控網路 (Wireless Hosted Network) 狀態:
- 狀態:若顯示【尚未開始】是正常的,代表目前還沒有提供 Wi-Fi 熱點服務!
3. 重設 Wi-Fi 熱點的連接密碼
netsh wlan set hostednetwork key=PAssw0rd
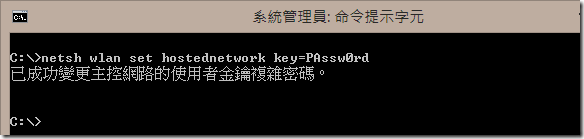
註:Wi-Fi 熱點密碼必須符合複雜度要求,密碼長度至少需 8 個字元以上!
或者,你也可以使用以下指令顯示目前的使用者安全性金鑰:(即連接 Wi-Fi 熱點的密碼):
netsh wlan show hostednetwork setting=security

4. 啟動 Wi-Fi 熱點服務 (主控網路),並查看啟動網路狀態
netsh wlan start hostednetwork
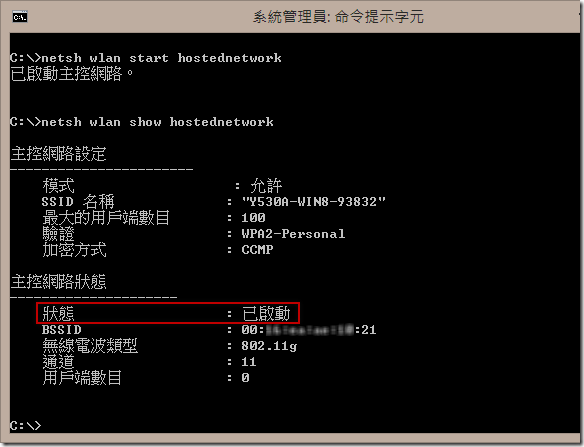
請注意:只要你正式啟動主控網路 (即 Wi-Fi 熱點服務),系統就會新增一張網卡,該網卡的介面名稱預設為【實體網卡名稱】+ 【* 12】,如下圖示:
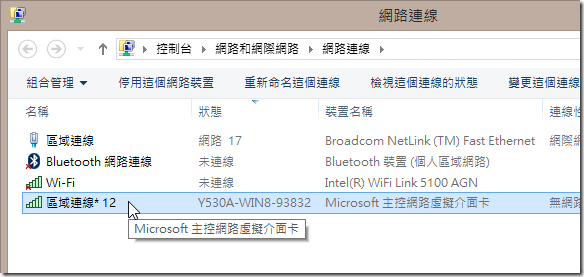
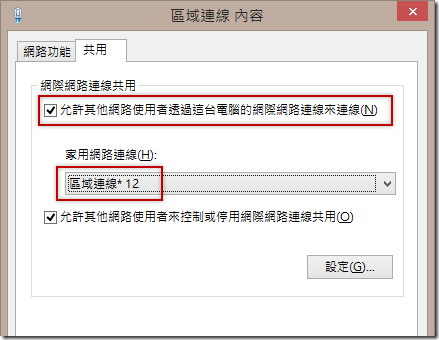
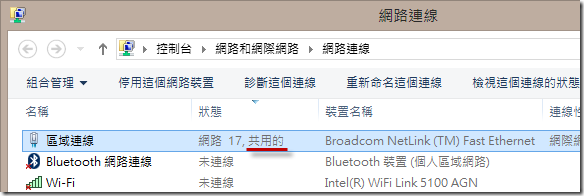
5. 找出你要分享網路的網路介面,以本文為例,我們想將【區域連線】這個介面 (實體網卡介面) 分享給其他行動裝置使用,我們就要在【區域網路】上按下滑鼠右鍵,並選擇內容,切換到共用頁籤。請勾選【允許其他網路使用者透過這台電腦的網際網路連線來連線】並選取【Wi-Fi 熱點】的網路介面名稱。
註:這個步驟非常關鍵,你必須先啟動主控網路才能到這一步驟選到正確的【區域連線* 12】這個介面。
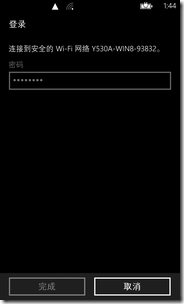
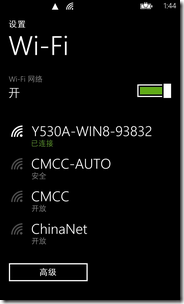
6. 接著,就可以用手機的 Wi-Fi 功能連接到這台 Windows 8 筆電的 Wi-Fi 熱點了。以下是我用 Windows Phone 8 設定 Wi-Fi 連線的設定過程圖示:

重點整理
- 設定順序非常重要,你必須要先啟動主控網路,才能設定連線共用!
常用 netsh 指令
1. 快速設定 (適用於首次設定 Windows 8 電腦,執行完以下指令後需再設定網路共用)
netsh wlan set hostednetwork mode=allow ssid=MyWin8SSID key="122459087"
netsh wlan start hostednetwork
netsh wlan show hostednetwork
2. 顯示主控網路狀態
netsh wlan show hostednetwork
3. 顯示主控網路狀態
netsh wlan show hostednetwork setting=security
4. 停止主控網路服務 ( 即關閉 Wi-Fi 無線熱點服務 )
netsh wlan stop hostednetwork
5. 啟用主控網路服務 ( 只要先前設定過網路共用,直接執行以下指令,即可立刻啟用熱點功能 )
netsh wlan start hostednetwork
6. 重設 Wi-Fi 熱點連接密碼
netsh wlan set hostednetwork key="請設定你的WiFi密碼"
netsh wlan refresh hostednetwork key
7. 更改熱點名稱 ( SSID Name ),請盡量不要用中文命名!
netsh wlan set hostednetwork ssid="你的SSID名稱"
相關連結
- Enable Internet Connection Sharing & Create a Wi-Fi hotspot in Windows 8 natively
- Create a Wireless Hosted Network Windows 7 With Netsh command line
- WIN7系统怎样创建WIFI热点
参考:
http://blog.miniasp.com/post/2013/05/25/Create-a-Wi-Fi-Hotspot-in-Windows-8-using-netsh.aspx
http://gwmwhu.iteye.com/blog/1448954
后面设置fiddler 代理
When working with Windows Azure Mobile Services it is handy to decrypt HTTPS traffic from the Phone Emulator to see what traffic is being passed to your Mobile Service. Here is how to hook Fiddler up and get it to work with the Emulator.
- Install Fiddler and choose the ‘Built for .NET 4” version
- Run Fiddler and choose (from the menu) Tools, Fiddler Options… Check these boxes in the HTTPS tab of the resulting dialog (and hit OK):

- Set these options in the Connections tab and then hit OK:

- In the command windows on the bottom left corner of Fiddler type: prefs set fiddler.network.proxy.registrationhostname HostName where HostName is the name of your desktop computer (in my case jsanderscarbon):

NOTE: To undo the proxy host registration use:
prefs remove fiddler.network.proxy.registrationhostname HostName whereHostName is the name of your desktop computer - Close and restart Fiddler. When Fiddler restarts you may get a firewall warning (in fact you should if this is the first time you have done this) so make sure you let all 3 types of networks through your firewall for Fiddler. Note: you don’t need to capture, you will still see the traffic that is proxied through it from the emulator so you can toggle the capture off by hitting F12. Go back to the dialog in Step 3 and look up and save the ‘Proxy registration address’ (in this dialog it is ‘jsanderscarbon:8888) Note: This will not appear in this dialog until you complete all the previous steps
- CLOSE THE PHONE EMULATOR
- Restart the emulator and open the Internet Explorer Browser, then type in http:// followed by the ‘Proxy registration address’ followed by /FiddlerRoot.cer (in this dialog it is ‘http://jsanderscarbon:8888/FiddlerRoot.cer’) then hit OK (TIP: Hit the PageDown key on your computer keyboard and you can type in text fields of the emulator

- You should connect to Fiddler and get a screen like this, Hit ‘install’ accept any prompts and hit ‘ok’


Now you should be able to capture traffic to and from your Windows Azure Mobile Service in the Windows 8 Phone Emulator!
Important Note: If your machine is joined to a domain, you will need to get an exception from your IT Admin. IPSec prevents incoming connections from non-domain joined machines (the phone emulator) unless there is a policy that allows it.
Windows Phone 8.1 Emulator needs more configuration:
I will update my blog below for WP8.1… But this works
http://stackoverflow.com/questions/23462697/windows-phone-8-1-emulator-not-proxying-through-fiddler
CAPTURING WINDOWS PHONE 8 TRAFFIC USING FIDDLER
December 31, 2013 · by philcurnow · in Windows Phone 8 · Leave a comment
Whenever I need to examine HTTP/HTTPS traffic, I use Fiddler. Fiddler can be a lifesaver when debugging problems, but can also be an extremely useful tool when you want to see what an application sending and receiving.
As I have had some spare time on my hands over the festive break (a rarity these days!!), I wanted to have a look at API calls from some apps on my Windows Phone. Fiddler should fit the bill for this. A few days ago, I upgraded my home machine to run Windows 8.1, so I needed to do a re-install of Fiddler. If you visit http://fiddler2.com/get-fiddler you can download the required build for you operating system. As I have Windows 8.1, I downloaded Fiddler4. Once you have downloaded Fiddler, follow the steps below to set up Fiddler and your phone for traffic capture.
Fiddler Settings
When you have run Fiddler, select the menu option Tools -> Fiddler Options and select theConnections tab. You will see the dialog box that is shown below:

You must now select the checkbox Allow remote computers to connect.
As we want to be able to view HTTPS traffic, we want to be able to decrypt this so we can view it. Click on the HTTPS tab. The tab looks as follows:

Select the checkbox Decrypt HTTPS traffic.
If you haven’t already restart Fiddler. Upon restarting Fiddler, the Windows Firewall warning may pop up.
Windows Phone Settings
We now need to perform some configuration tasks on the phone. Ensure your phone is connected to your WiFi network and perform the following steps.
In order for traffic to be captured by Fiddler, we need to set the WiFi proxy settings for the phones WiFi connection. Long tap on your WiFi connection within the WiFi settings on your phone. An example of this is shown below:

Select the edit option. You will then be presented with the following:

Swipe On to switch on the proxy functionality.
In the Server/URL setting, type in the IP Address of the computer where you installed Fiddler. You then need to specify the Port number. By default, Fiddler will use 8888. If you have changed this within the Fiddler settings, make sure you use this port number. Click the tick to save your settings.
We now need to download the Fiddler root certificate to the phone. Open Internet Explorer on your phone and key in the URL http://<<server>>:8888/fiddlerroot.cer. <<server>> will be the IP Address of the machine where you installed Fiddler. Using the settings from the example screenshots above, you would use http://192.168.1.78:8888/fiddlerroot.cer. Your phone will then show the following in Internet Explorer:

Tap install to install the Fiddler root certificate to your phone.
And that’s it!! As long as Fiddler is running and you have the proxy settings correctly configured on your phone, you should now be able to monitor the HTTP/HTTPS traffic from your Windows Phone.
Remember!
When you have finished monitoring traffic and you have shut down Fiddler, remember to switch of the proxy functionality on your phone. If you don’t do this, you will not be able to use the internet from your WiFi connection, as all traffic will be sent to the proxy, which obviously will not be running.
http://blogs.msdn.com/b/wsdevsol/archive/2013/06/05/configure-the-windows-phone-8-emulator-to-work-with-fiddler.aspx
http://philcurnow.wordpress.com/2013/12/31/capturing-windows-phone-8-traffic-using-fiddler/

 浙公网安备 33010602011771号