
第七周作业
1、ansible常用模块介绍
command: 在被控节点执行命令,不支持 $变量 > & |等符号
shell:同command类似,支持command不支持的符号
script: 远程主机上执行ansible主机上的脚本
copy:将ansible主机上的文件复制到被控节点上
get_url :将http ftp https上的内容下载到被控节点
fetch: 将文件从被控节点提取到ansible主机,不支持目录
file:在被控节点上创建/删除 文件 目录 软链接 ,还可定义/修改属性对文件或者目录
stat: 常用于查看被控节点文件是否存在
unarchive: 一:将ansible主机上的压缩包复制到被控端并解压缩,copy=yes(默认值) 二:将被控端/或联网http的文件解压缩,设置copy=yes----------表明压缩包来源不是从ansible机器
archive: 打包压缩被控端的文件
cron: 计划任务
yum: 在被控端执行yum操作,安装卸载软件
service:管理被控端的服务,开启 重启 关闭 开机自启/关闭
user:管理用户-创建用户,删除用户,更改用户
group:管理组
linefile: 搜索替换匹配到的最后一行:删除匹配到的所有行
replace:替换所有被匹配到的行
selinux:管理selinux,不过修改后要重启才能生效
reboot: 重启
mount: 挂载和卸载
setup:收集被控端的信息,如cpu核数,操作系统版本
debug: 输出信息
2、ansible-playbook实现MySQL的二进制部署
采用角色实现Mysql5.7的二进制部署,项目文件图如下
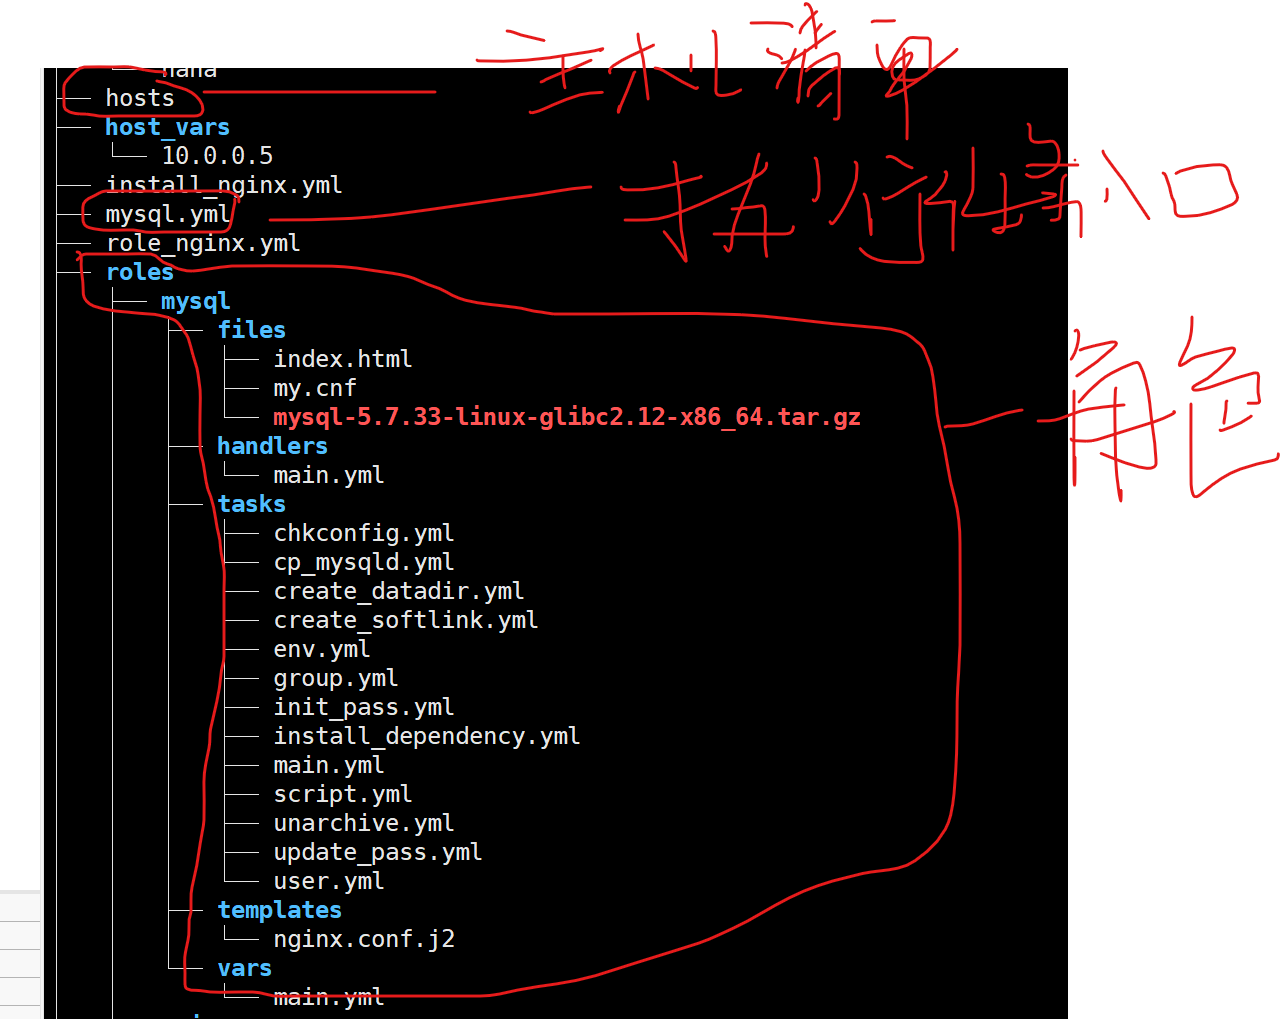
tasks,main.yml
[root@localhost tasks]#cat main.yml
- include: install_dependency.yml
- include: group.yml
- include: user.yml
- include: unarchive.yml
- include: create_softlink.yml
- include: env.yml
- include: cp_mysqld.yml
- include: create_datadir.yml
- include: init_pass.yml
- include: script.yml
- include: chkconfig.yml
- include: update_pass.yml
以下按调用task次序展示过程
install_dependency.yml
[root@localhost tasks]#cat install_dependency.yml
- name: install dependencies
  yum:
   name:
     - libaio
     - numactl-libs
     - ncurses*
group.yml
[root@localhost tasks]#cat group.yml
- name: create mysql group
  group: name=mysql gid=306 system=yes
user.yml
[root@localhost tasks]#cat user.yml
- name: create mysql user
  user: name=mysql uid=306 group=mysql shell=/sbin/nologin system=yes create_home=no home=/data/mysql
unarchive.yml
[root@localhost tasks]#cat unarchive.yml
- name: unarchive mysql erjinzhi
  unarchive: src="{{ mysqlfile }}" dest=/usr/local owner=root group=root
create_softlink.yml
[root@localhost tasks]#cat create_softlink.yml
- name: create mysql soft link
  file: src=/usr/local/{{ mysqlfile_nosuffix }} dest=/usr/local/mysql state=link
env.yml
[root@localhost tasks]#cat env.yml
- name: prepare path
  copy: content='PATH=/usr/local/mysql/bin:$PATH' dest=/etc/profile.d/mysql.sh
cp_mysqld.yml
[root@localhost tasks]#cat cp_mysqld.yml
- name: prepare my.cnf
  copy: src=my.cnf dest=/etc/my.cnf
create_datadir.yml
[root@localhost tasks]#cat create_datadir.yml
- name: create /data dir
  file: path=/data state=directory
init_pass.yml
[root@localhost tasks]#cat init_pass.yml
- name: init pass
  shell: /usr/local/mysql/bin/mysqld --initialize-insecure --user=mysql --datadir=/data/mysql
script.yml
[root@localhost tasks]#cat script.yml
- name: prepare script
  shell: /bin/cp /usr/local/mysql/support-files/mysql.server /etc/init.d/mysqld
chkconfig.yml
[root@localhost tasks]#cat chkconfig.yml
- name: add mysql
  shell: chkconfig --add mysqld;/etc/init.d/mysqld start
[root@localhost tasks]#cat update_pass.yml
- name: update mysql pass
  shell: /usr/local/mysql/bin/mysqladmin  -uroot password "{{password}}"
3、Ansible playbook实现apache批量部署,并对不同主机提供以各自IP地址为内容的index.html
由于apache淡出市场,采用nginx安装替代
此题需要template结合setup中的变量来做
依然采用role角色方式
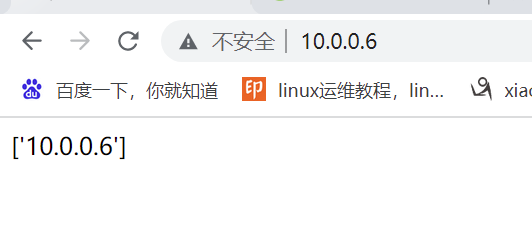
结果成功部署在被管理节点10.0.0.6
看项目图

playbook调用文件
[root@localhost ansible]#cat nginx.yml
- hosts: hehe
  roles:
   - nginx
变量文件
[root@localhost vars]#cat main.yml
centos8_packages: [ make,gcc-c++,libtool,pcre,pcre-devel,zlib,zlib-devel,openssl,openssl-devel,perl-ExtUtils-Embed ]
nginx_gz: nginx-1.22.0.tar.gz
nginx_install_dir: /usr/local/nginx
重点说下模板文件
[root@localhost templates]#cat index.html.j2
{{ ansible_all_ipv4_addresses }}
这里,template调用模板,必须改名,如果不改名,放到管理节点上是原名,.j2后缀无法使用
[root@localhost tasks]#cat prepare_index.yml
- name: prepare index for ip
template: src=index.html.j2 dest=/usr/local/nginx/html/index.html
[root@localhost tasks]#cat main.yml
- include: install_dependency.yml
- include: group.yml
- include: user.yml
- include: unarchive.yml
- include: configure.yml
- include: make_makeinstall.yml
- include: nginx_soflink.yml
- include: init_path.yml
- include: copy_service_file.yml
- include: daemon.yml
- include: config.yml
- include: prepare_index.yml
- include: start_nginx.yml
[root@localhost tasks]#cat install_dependency.yml
- name: install dependency
  yum: name={{ centos8_packages }}
[root@localhost tasks]#cat group.yml
- name: create nginx group
  group: name=nginx system=yes
[root@localhost tasks]#cat user.yml
- name: create nginx user
  user: name=nginx group=nginx system=yes shell=/sbin/nologin
[root@localhost tasks]#cat unarchive.yml
- name: unarchive nginx
unarchive: src={{ nginx_gz }} dest=/usr/local/src
[root@localhost tasks]#cat configure.yml
- name: run configure script
  shell:
   ./configure \
   --prefix={{ nginx_install_dir }} \
    --user=nginx --group=nginx \
    --with-http_ssl_module \
    --with-http_v2_module \
    --with-http_realip_module \
    --with-http_stub_status_module \
    --with-http_gzip_static_module \
    --with-pcre \
    --with-stream \
    --with-stream_ssl_module \
    --with-stream_realip_module
  args:
   chdir: /usr/local/src/nginx-1.22.0
[root@localhost tasks]#cat make_makeinstall.yml
- name: make&&install
  shell:
   make -j {{ ansible_processor_vcpus }} && make install
  args:
   chdir: /usr/local/src/nginx-1.22.0
[root@localhost tasks]#cat nginx_soflink.yml
- name: add profile.d
  copy: content=content=PATH=/usr/local/src/nginx-1.22.0/sbin:{{ ansible_env.PATH }} dest=/etc/profile.d/nginx.sh
[root@localhost tasks]#cat  init_path.yml
- name: add path
  shell: . /etc/profile.d/nginx.sh
[root@localhost tasks]#cat copy_service_file.yml
- name: add service file
  template: src=nginx.service.j2 dest=/usr/lib/systemd/system/nginx.service
[root@localhost tasks]#cat  daemon.yml
- name: add nginx to systemd
  shell: /usr/bin/systemctl daemon-reload
[root@localhost tasks]#cat config.yml
- name: cp nginx.conf
  template: src=nginx.conf.j2 dest=/usr/local/nginx/conf/nginx.conf
[root@localhost tasks]#cat prepare_index.yml
- name: prepare index for ip
template: src=index.html.j2 dest=/usr/local/nginx/html/index.html
[root@localhost tasks]#cat start_nginx.yml
- name: start nginx
  service: name=nginx state=started enabled=yes
4、http的报文结构和状态码总结
请求报文:
GET / HTTP/1.1    方法 【空格】 URL 【空格】 协议

Host    请求头

Useragent  chrome
请求空行
请求体  -GET方法没有
相应报文
 HTTP/1.1 301 Moved Permanently   协议版本 状态码  原义短语-解释状态码
 首部字段
 Server nginx

...
相应空行
响应体
状态码
200: 成功,请求数据通过响应报文的entity-body部分发送;OK
301: 请求的URL指向的资源已经被删除;但在响应报文中通过首部Location指明了资源现在所处的新位
置;Moved Permanently
302: 响应报文Location指明资源临时新位置 Moved Temporarily
304: 客户端发出了条件式请求,但服务器上的资源未曾发生改变,则通过响应此响应状态码通知客户端;
Not Modified
307: 浏览器内部重定向
401: 需要输入账号和密码认证方能访问资源;Unauthorized
403: 请求被禁止;Forbidden
404: 服务器无法找到客户端请求的资源;Not Found
500: 服务器内部错误;Internal Server Error
502: 代理服务器从后端服务器收到了一条伪响应,如无法连接到网关;Bad Gateway
503: 服务不可用,临时服务器维护或过载,服务器无法处理请求
504: 网关超时

 浙公网安备 33010602011771号