
Spring中使用xml配置bean
参考:https://blog.csdn.net/CSDN_GIA/article/details/54730027
https://www.jb51.net/article/117364.htm
https://www.cnblogs.com/soundcode/p/6367412.html
装配Bean(基于xml)
在ApplicationContext.xml文件中使用bean节点配置bean,bean的属性id在IOC容器中必须是唯一的。
|
1
2
3
|
<bean id="helloWorld" class="com.test.spring.beans.HelloWorld"> <property name="name" value="Spring"></property></bean> |
依赖注入有三种方式
- 属性注入
- 构造方法注入
- 工厂方法注入
属性注入
通过 setter 方法注入Bean 的属性值或依赖的对象。属性注入使用 <property>元素, 使用 name 属性指定 Bean 的属性名称,value 属性或 <value> 子节点指定属性值 。属性注入是实际应用中最常用的注入方式。HelloWorld类中的setName()方法,对应上边代码中的name属性,例如:把setName()方法名改为setName2(),property中的name属性值为name时则会报错,需要将name属性改为name2。
l 依赖注入方式:手动装配 和 自动装配
l 手动装配:一般进行配置信息都采用手动
基于xml装配:构造方法、setter方法
基于注解装配:
l 自动装配:struts和spring 整合可以自动装配
byType:按类型装配
byName:按名称装配
constructor构造装配,
auto: 不确定装配。
构造方法
-
<!-- 构造方法注入
-
* <constructor-arg> 用于配置构造方法一个参数argument
-
name :参数的名称
-
value:设置普通数据
-
ref:引用数据,一般是另一个bean id值
-
-
index :参数的索引号,从0开始 。如果只有索引,匹配到了多个构造方法时,默认使用第一个。
-
type :确定参数类型
-
例如:使用名称name
-
<constructor-arg name="username" value="jack"></constructor-arg>
-
<constructor-arg name="age" value="18"></constructor-arg>
构造方法注入Bean 的属性值或依赖的对象,它保证了 Bean 实例在实例化后就可以使用。
构造器注入在 <constructor-arg> 元素里声明属性, <constructor-arg> 中没有 name 属性。使用value属性值或value子节点为属性赋值。可以同时使用索引 index 和type属性对应为哪个属性赋值。index的值表示构造函数中参数的位置。type表示成员属性的类型,例如type="double" 或者type="Java.lang.String"
|
1
2
3
4
5
|
<bean id="car" class="com.test.spring.beans.Car"> <constructor-arg value="Audi" index="0"></constructor-arg> <constructor-arg value="ShangHai" index="1"></constructor-arg> <constructor-arg value="300000" type="double"></constructor-arg></bean> |
如果注入的值有特殊字符如”<>“,使用<![CDATA[]]> 包起来,不包起来的话xml会报错。如:
|
1
2
3
|
<constructor-arg type="java.lang.String"> <value><![CDATA[<shanghai^>]]></value></constructor-arg> |
控制台打印的值为<shanghai^>
在给bean注入属性时,若包含其他bean,可以通过 元素或 ref 属性为 Bean 的属性或构造器参数指定对 Bean 的引用。
也可以在属性或构造器里包含 Bean 的声明, 这样的 Bean 称为内部 Bean,当 Bean 实例仅仅给一个特定的属性使用时, 可以将其声明为内部 Bean. 内部 Bean 声明直接包含在 <property> 或 <constructor-arg> 元素里, 不需要设置任何 id 或 name 属性,内部 Bean 不能使用在任何其他地方。
|
1
2
3
4
5
6
7
8
9
10
11
12
13
14
15
16
17
18
19
20
21
22
23
24
25
26
27
28
29
30
31
32
33
34
35
36
37
38
|
</bean> <!-- 使用构造器注入属性值可以指定参数的位置和参数的类型,以区分重载的构造器 构造器注入在 <constructor-arg> 元素里声明属性 --> <bean id="car2" class="com.test.spring.beans.Car"> <constructor-arg value="Baoma" type="java.lang.String"></constructor-arg> <!-- 如果字面值包含特殊字符,可以使用<![CDATE[]]>包裹起来 --> <!-- 注入属性值也可以使用value子标签 --> <constructor-arg type="java.lang.String"> <value><![CDATA[<shanghai^>]]></value> </constructor-arg> <constructor-arg type="int"> <value>250</value> </constructor-arg> </bean> <bean id="persion" class="com.test.spring.beans.Persion"> <property name="name" value="Tom"></property> <property name="age" value="24"></property> <!-- 可以使用property的ref属性建立bean之间的引用关系 --> <!-- <property name="car" ref="car2"></property> --> <!-- <property name="car" ref="car2"> <ref bean="car2"/> </property> --> <!-- 内部bean,不能被外部引用,只能在内部使用 --> <property name="car"> <bean class="com.test.spring.beans.Car"> <constructor-arg value="Ford"></constructor-arg> <constructor-arg value="Changan"></constructor-arg> <constructor-arg value="200000" type="double"></constructor-arg> </bean> </property> <property name="car.maxSpeed" value="400"></property> </bean> |
可以使用专用的 <null/> 元素标签为 Bean 的字符串或其它对象类型的属性注入 null 值。
和 Struts、Hiberante 等框架一样,Spring 支持级联属性的配置。但属性需要先初始化。例如代码中需要配置car对象的bean
|
1
2
3
4
5
6
7
8
9
10
11
12
13
14
|
<bean id="persion2" class="com.test.spring.beans.Persion"> <constructor-arg value="Jerry"></constructor-arg> <constructor-arg value="25"></constructor-arg> <!-- <constructor-arg ref="car"></constructor-arg> --> <!-- 测试赋值null --> <!-- <constructor-arg><null/></constructor-arg> --> <constructor-arg ref="car"></constructor-arg> <!-- 为级联属性赋值 ,注意属性需要先初始化后在可以为级联属性赋值,否则会有异常,和struts2不同。--> <property name="car.maxSpeed" value="300"></property> </bean> |
集合属性
当注入的属性是集合时,Spring也提供了通过一组内置的 xml 标签(例如: <list>, <set> 或 <map>) 来配置集合属性。
配置 java.util.List 类型的属性, 需要指定 <list> 标签, 在标签里包含一些元素. 这些标签可以通过 <value> 指定简单的常量值, 通过 指定对其他 Bean 的引用. 通过<bean> 指定内置 Bean 定义. 通过 指定空元素. 甚至可以内嵌其他集合.
数组的定义和 List 一样, 都使用 <list>配置 java.util.Set 需要使用 <set> 标签, 定义元素的方法与 List 一样。
|
1
2
3
4
5
6
7
8
9
10
11
12
|
<!-- 测试如何配置集合属性 --><bean id="persion3" class="com.test.spring.beans.collection.Persion"> <property name="name" value="Mike"></property> <property name="age" value="27"></property> <property name="cars"> <!-- 使用list节点为list类型的属性赋值 --> <list> <ref bean="car"/> <ref bean="car2"/> </list> </property></bean> |
Java.util.Map 通过 <map> 标签定义, <map> 标签里可以使用多个 <entry> 作为子标签. 每个条目包含一个键和一个值。必须在 <key> 标签里定义键,因为键和值的类型没有限制, 所以可以自由地为它们指定 <value>, <ref>, <bean> 或 <null> 元素.
可以将 Map 的键和值作为 <entry> 的属性定义: 简单常量使用 key 和 value 来定义; Bean 引用通过 key-ref 和 value-ref 属性定义。
使用 <props> 定义 java.util.Properties, 该标签使用多个 <prop> 作为子标签. 每个 <prop> 标签必须定义 key 属性.
|
1
2
3
4
5
6
7
8
9
10
11
12
13
14
15
16
17
18
19
20
21
22
23
24
25
|
<!-- 配置Map 属性值 --> <bean id="newPersion" class="com.test.spring.beans.collection.NewPersion"> <property name="name" value="Rose"></property> <property name="age" value="28"></property> <property name="cars"> <!-- 使用 map 节点及 map 的 entry子节点配置Map类型的成员变量 --> <map> <entry key="AA" value-ref="car"></entry> <entry key="BB" value-ref="car2"></entry> </map> </property> </bean> <!-- 配置Properties属性值 --> <bean id="dataSource" class="com.test.spring.beans.collection.DataSource"> <property name="properties"> <!-- 使用 props 和 prop 子节点来为Properties赋值 --> <props> <prop key="user">root</prop> <prop key="password">123456</prop> <prop key="driverClass">com.mysql.jdbc.Driver</prop> </props> </property> </bean> |
使用基本的集合标签定义集合时, 不能将集合作为独立的 Bean 定义, 导致其他 Bean 无法引用该集合, 所以无法在不同 Bean 之间共享集合.
可以使用 util schema 里的集合标签定义独立的集合 Bean. 需要注意的是, 必须在 <beans> 根元素里添加 util schema 定义。
|
1
2
3
4
5
6
7
8
9
10
11
|
<!-- 配置独立的集合Bean,以供多个bean 进行引用,需要导入util命名空间--><util:list id="cars"> <ref bean="car"/> <ref bean="car2"/></util:list><bean id="persion4" class="com.test.spring.beans.collection.Persion"> <property name="name" value="Jack"></property> <property name="age" value="29"></property> <property name="cars" ref="cars"></property></bean> |
工厂方法注入
静态工厂
l 常用与spring整合其他框架(工具)
l 静态工厂:用于生产实例对象,所有的方法必须是static
<bean id="" class="工厂全限定类名" factory-method="静态方法">-
package com.itheima.c_inject.b_static_factory;
-
-
public interface UserService {
-
-
public void addUser();
-
-
}
-
package com.itheima.c_inject.b_static_factory;
-
-
public class UserServiceImpl implements UserService {
-
-
-
public void addUser() {
-
System.out.println("b_static_factory add user");
-
}
-
-
}
-
-
<beans xmlns="http://www.springframework.org/schema/beans"
-
xmlns:xsi="http://www.w3.org/2001/XMLSchema-instance"
-
xsi:schemaLocation="http://www.springframework.org/schema/beans
-
http://www.springframework.org/schema/beans/spring-beans.xsd">
-
<!-- 将静态工厂创建的实例交予spring
-
class 确定静态工厂全限定类名
-
factory-method 确定静态方法名
-
-->
-
<bean id="userServiceId" class="com.itheima.c_inject.b_static_factory.MyBeanFactory" factory-method="createService"></bean>
-
-
</beans>
-
package com.itheima.c_inject.b_static_factory;
-
-
public class MyBeanFactory {
-
-
/**
-
* 创建实例
-
* @return
-
*/
-
public static UserService createService(){
-
return new UserServiceImpl();
-
}
-
-
}
-
package com.itheima.c_inject.b_static_factory;
-
-
import org.junit.Test;
-
import org.springframework.context.ApplicationContext;
-
import org.springframework.context.support.ClassPathXmlApplicationContext;
-
-
/**
-
* 静态工厂
-
*
-
*/
-
public class TestStaticFactory {
-
-
-
public void demo01(){
-
//自定义工厂
-
UserService userService = MyBeanFactory.createService();
-
userService.addUser();
-
}
-
-
public void demo02(){
-
//spring 工厂
-
String xmlPath = "com/itheima/c_inject/b_static_factory/beans.xml";
-
ApplicationContext applicationContext = new ClassPathXmlApplicationContext(xmlPath);
-
UserService userService = applicationContext.getBean("userServiceId" ,UserService.class);
-
userService.addUser();
-
}
-
-
}
实例工厂
l 实例工厂:必须先有工厂实例对象,通过实例对象创建对象。提供所有的方法都是“非静态”的。
-
package com.itheima.c_inject.c_factory;
-
public interface UserService {
-
-
public void addUser();
-
-
}
-
package com.itheima.c_inject.c_factory;
-
-
public class UserServiceImpl implements UserService {
-
-
-
public void addUser() {
-
System.out.println("c_factory add user");
-
}
-
-
}
-
package com.itheima.c_inject.c_factory;
-
-
/**
-
* 实例工厂,所有方法非静态
-
*
-
*/
-
public class MyBeanFactory {
-
-
/**
-
* 创建实例
-
* @return
-
*/
-
public UserService createService(){
-
return new UserServiceImpl();
-
}
-
-
}
-
-
<beans xmlns="http://www.springframework.org/schema/beans"
-
xmlns:xsi="http://www.w3.org/2001/XMLSchema-instance"
-
xsi:schemaLocation="http://www.springframework.org/schema/beans
-
http://www.springframework.org/schema/beans/spring-beans.xsd">
-
<!-- 创建工厂实例 -->
-
<bean id="myBeanFactoryId" class="com.itheima.c_inject.c_factory.MyBeanFactory"></bean>
-
<!-- 获得userservice
-
* factory-bean 确定工厂实例
-
* factory-method 确定普通方法
-
-->
-
<bean id="userServiceId" factory-bean="myBeanFactoryId" factory-method="createService"></bean>
-
-
</beans>

-
package com.itheima.c_inject.c_factory;
-
-
import org.junit.Test;
-
import org.springframework.context.ApplicationContext;
-
import org.springframework.context.support.ClassPathXmlApplicationContext;
-
-
public class TestFactory {
-
-
-
public void demo01(){
-
//自定义实例工厂
-
//1 创建工厂
-
MyBeanFactory myBeanFactory = new MyBeanFactory();
-
//2 通过工厂实例,获得对象
-
UserService userService = myBeanFactory.createService();
-
-
userService.addUser();
-
}
-
-
public void demo02(){
-
//spring 工厂
-
String xmlPath = "com/itheima/c_inject/c_factory/beans.xml";
-
ApplicationContext applicationContext = new ClassPathXmlApplicationContext(xmlPath);
-
UserService userService = applicationContext.getBean("userServiceId" ,UserService.class);
-
userService.addUser();
-
}
-
-
}
bean种类
l 普通bean:
之前操作的都是普通bean。<bean id="" class="A"> ,spring直接创建A实例,并返回
l FactoryBean:
是一个特殊的bean,具有工厂生成对象能力,只能生成特定的对象。
bean必须使用 FactoryBean接口,此接口提供方法 getObject() 用于获得特定bean。
<bean id="" class="FB"> 先创建FB实例,使用调用getObject()方法,并返回方法的返回值
FB fb = new FB();
return fb.getObject();
l BeanFactory 和 FactoryBean 对比?
BeanFactory:工厂,用于生成任意bean。
FactoryBean:特殊bean,用于生成另一个特定的bean。例如:ProxyFactoryBean ,此工厂bean用于生产代理。
<bean id=""class="....ProxyFactoryBean"> 获得代理对象实例。AOP使用
作用域
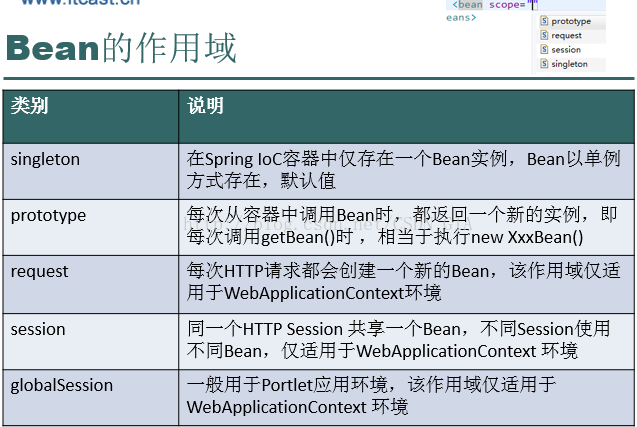
l 作用域:用于确定spring创建bean实例个数
l 取值:
singleton 单例,默认值。
prototype 多例,每执行一次getBean将获得一个实例。例如:struts整合spring,配置action多例。
l 配置信息
<bean id="" class="" scope="">
<beanid="userServiceId"class="com.itheima.d_scope.UserServiceImpl" scope="prototype"></bean>
UserService:
-
package com.itheima.d_scope;
-
-
public interface UserService {
-
-
public void addUser();
-
-
}
UserServiceImpl:
-
package com.itheima.d_scope;
-
-
public class UserServiceImpl implements UserService {
-
-
-
public void addUser() {
-
System.out.println("d_scope add user");
-
}
-
-
}
beans.xml:
-
-
<beans xmlns="http://www.springframework.org/schema/beans"
-
xmlns:xsi="http://www.w3.org/2001/XMLSchema-instance"
-
xsi:schemaLocation="http://www.springframework.org/schema/beans
-
http://www.springframework.org/schema/beans/spring-beans.xsd">
-
-
<bean id="userServiceId" class="com.itheima.d_scope.UserServiceImpl"
-
scope="prototype" ></bean>
-
-
</beans>
TestScope:
-
package scope;
-
-
import org.junit.Test;
-
import org.springframework.context.ApplicationContext;
-
import org.springframework.context.support.ClassPathXmlApplicationContext;
-
-
public class TestScope {
-
-
-
public void demo01(){
-
-
String xmlPath = "scope/beans.xml";
-
ApplicationContext applicationContext = new ClassPathXmlApplicationContext(xmlPath);
-
-
UserService userService1 = applicationContext.getBean("userServiceId", UserService.class);
-
UserService userService2 = applicationContext.getBean("userServiceId", UserService.class);
-
-
System.out.println(userService1);
-
System.out.println(userService2);
-
-
}
-
-
}
生命周期
1、初始化和销毁
在Spring中,可以使用 init-method 和 destroy-method 在bean 配置文件属性用于在bean初始化和销毁某些动作时。这是用来替代 InitializingBean和DisposableBean接口。
|
<bean id="" class="" init-method="初始化方法名称" destroy-method="销毁的方法名称"> |
package com.yiibai.customer.services;

public class CustomerService
{
	String message;

	public String getMessage() {
	  return message;
	}

	public void setMessage(String message) {
	  this.message = message;
	}

	public void initIt() throws Exception {
	  System.out.println("Init method after properties are set : " + message);
	}

	public void cleanUp() throws Exception {
	  System.out.println("Spring Container is destroy! Customer clean up");
	}

}
File : applicationContext.xml, 在bean中定义了init-method和destroy-method属性。
<beans xmlns="http://www.springframework.org/schema/beans"
	xmlns:xsi="http://www.w3.org/2001/XMLSchema-instance"
	xsi:schemaLocation="http://www.springframework.org/schema/beans
	http://www.springframework.org/schema/beans/spring-beans-2.5.xsd">

	<bean id="customerService" class="com.yiibai.customer.services.CustomerService"
		init-method="initIt" destroy-method="cleanUp">

		<property name="message" value="i'm property message" />
	</bean>

</beans>
执行下面的程序代码:
package com.yiibai.common;

import org.springframework.context.ConfigurableApplicationContext;
import org.springframework.context.support.ClassPathXmlApplicationContext;

import com.yiibai.customer.services.CustomerService;

public class App
{
    public static void main( String[] args )
    {
    	ConfigurableApplicationContext context =
		new ClassPathXmlApplicationContext(new String[] {"applicationContext.xml"});

    	CustomerService cust = (CustomerService)context.getBean("customerService");

    	System.out.println(cust);

    	context.close();
    }
}
输出
Init method after properties are set : I'm property message
com.yiibai.customer.services.CustomerService@5f49d886
Spring Container is destroy! Customer clean up
P命令空间
l 对“setter方法注入”进行简化,替换<property name="属性名">,而是在
<beanp:属性名="普通值" p:属性名-ref="引用值">
l p命名空间使用前提,必须添加命名空间

-
-
<beans xmlns="http://www.springframework.org/schema/beans"
-
xmlns:xsi="http://www.w3.org/2001/XMLSchema-instance"
-
xmlns:p="http://www.springframework.org/schema/p"
-
xsi:schemaLocation="http://www.springframework.org/schema/beans
-
http://www.springframework.org/schema/beans/spring-beans.xsd"
-
<bean id="personId" class="com.itheima.f_xml.c_p.Person"
-
p:pname="禹太璞" p:age="22"
-
p:homeAddr-ref="homeAddrId" p:companyAddr-ref="companyAddrId">
-
</bean>
-
-
<bean id="homeAddrId" class="com.itheima.f_xml.c_p.Address"
-
p:addr="DG" p:tel="东莞">
-
</bean>
-
<bean id="companyAddrId" class="com.itheima.f_xml.c_p.Address"
-
p:addr="DG" p:tel="岛国">
-
</bean>
-
-
</beans>
SpEL
l 对<property>进行统一编程,所有的内容都使用value
<propertyname="" value="#{表达式}">
#{123}、#{'jack'} : 数字、字符串
#{beanId} :另一个bean引用
#{beanId.propName} :操作数据
#{beanId.toString()} :执行方法
#{T(类).字段|方法} :静态方法或字段
-
package com.itheima.f_xml.d_spel;
-
-
public class Customer {
-
-
private String cname = "jack";
-
private Double pi ;// = Math.PI;
-
public String getCname() {
-
return cname;
-
}
-
public void setCname(String cname) {
-
this.cname = cname;
-
}
-
public Double getPi() {
-
return pi;
-
}
-
public void setPi(Double pi) {
-
this.pi = pi;
-
}
-
-
public String toString() {
-
return "Customer [cname=" + cname + ", pi=" + pi + "]";
-
}
-
-
-
}
-
-
<beans xmlns="http://www.springframework.org/schema/beans"
-
xmlns:xsi="http://www.w3.org/2001/XMLSchema-instance"
-
xsi:schemaLocation="http://www.springframework.org/schema/beans
-
http://www.springframework.org/schema/beans/spring-beans.xsd">
-
-
<!--
-
<property name="cname" value="#{'jack'}"></property>
-
<property name="cname" value="#{customerId.cname.toUpperCase()}"></property>
-
通过另一个bean,获得属性,调用的方法
-
<property name="cname" value="#{customerId.cname?.toUpperCase()}"></property>
-
?. 如果对象不为null,将调用方法
-
-->
-
<bean id="customerId" class="com.itheima.f_xml.d_spel.Customer" >
-
<property name="cname" value="#{customerId.cname?.toUpperCase()}"></property>
-
<property name="pi" value="#{T(java.lang.Math).PI}"></property>
-
</bean>
-
</beans>
-
package com.itheima.f_xml.d_spel;
-
-
import org.junit.Test;
-
import org.springframework.context.ApplicationContext;
-
import org.springframework.context.support.ClassPathXmlApplicationContext;
-
-
public class TestSpEL {
-
-
-
public void demo02() throws Exception{
-
//spring 工厂
-
String xmlPath = "com/itheima/f_xml/d_spel/beans.xml";
-
ApplicationContext applicationContext = new ClassPathXmlApplicationContext(xmlPath);
-
Customer customer = (Customer) applicationContext.getBean("customerId");
-
System.out.println(customer);
-
}
-
-
}

 浙公网安备 33010602011771号