SSM(spring+springMVC+myBatis)框架搭建
本文是基于注解的SSM框架配置
配置spring和springMVC
一.web.xml的配置
<?xml version="1.0" encoding="UTF-8"?>
<web-app xmlns:xsi="http://www.w3.org/2001/XMLSchema-instance"
     xmlns="http://java.sun.com/xml/ns/javaee"
     xsi:schemaLocation="http://java.sun.com/xml/ns/javaee
     http://java.sun.com/xml/ns/javaee/web-app_4_0.xsd" id="WebApp_ID" version="4.0">
  <display-name>Archetype Created Web Application</display-name>
  <!-- 设置要加载的spring配置文件的路径(springMVC配置文件在前端控制器中加载,这里不要写上springMVC的配置文件路径) -->
  <context-param>
    <param-name>contextConfigLocation</param-name>
    <param-value>
    	classpath:spring-*.xml
    </param-value>
  </context-param>
  <!-- 使用监听器,在启动容器时按照上边配置的路径,加载spring配置文件 -->
  <listener>
    <listener-class>org.springframework.web.context.ContextLoaderListener</listener-class>
  </listener>

  <!-- 配置前端控制器,加载springmvc配置文件 -->
  <servlet>
  	<servlet-name>springMVC</servlet-name>
  	<servlet-class>org.springframework.web.servlet.DispatcherServlet</servlet-class>
  	<init-param>
  		<param-name>contextConfigLocation</param-name>
  		<param-value>classpath:springMVC.xml</param-value>
  	</init-param>
  </servlet>

  <servlet-mapping>
  	<servlet-name>springMVC</servlet-name>
  	<url-pattern>/</url-pattern>
  </servlet-mapping>
</web-app>
classpath: 是指部署到服务器的项目下的WEB-INF/classes目录
这样配置过web.xml后,就可以在resources目录下创建spring和springMVC的配置文件了,
根据web.xml的配置,spring配置文件的名称为spring-XXX.xml, springMVC的配置文件名称为springMVC.xml
二.spring和springMVC配置文件的书写格式
<?xml version="1.0" encoding="UTF-8"?>
<beans xmlns="http://www.springframework.org/schema/beans"
       xmlns:xsi="http://www.w3.org/2001/XMLSchema-instance"
       xmlns:mvc="http://www.springframework.org/schema/mvc"
       xmlns:context="http://www.springframework.org/schema/context"
       xmlns:aop="http://www.springframework.org/schema/aop"
       xmlns:tx="http://www.springframework.org/schema/tx"
       xsi:schemaLocation="http://www.springframework.org/schema/beans
        http://www.springframework.org/schema/beans/spring-beans-4.2.xsd
        http://www.springframework.org/schema/mvc
        http://www.springframework.org/schema/mvc/spring-mvc-4.2.xsd
        http://www.springframework.org/schema/context
        http://www.springframework.org/schema/context/spring-context.xsd
        http://www.springframework.org/schema/aop
        http://www.springframework.org/schema/aop/spring-aop-4.2.xsd
        http://www.springframework.org/schema/tx
        http://www.springframework.org/schema/tx/spring-tx.xsd">

<!-- spring和springMVC的配置内容都写在beans标签体内 -->
<!-- 上边的xmlns:XX是命名空间,声明过命名空间后 -->
<!-- 就可以在beans标签体内使用该命名空间了 -->
<!-- 比如: <mvc:default-servlet-handler />-->
<!-- 配置文件中没有用到的命名空间,可以删掉声明语句和对应的schema -->

</beans>
注意 : 为了方便阅读,下面的示例配置文件将不显示<beans>标签体,只写<beans>标签体内的配置内容,自己练习时,不要忘记加上<beans>标签体,<beans>内的命名空间声明,请自行增减
三.配置springMVC.xml
	<!-- 注解扫描,扫描controller包下的@Controller注解 -->
	<context:component-scan base-package="com.jy.controller">
		<context:include-filter type="annotation" expression="org.springframework.stereotype.Controller"/>
	</context:component-scan>
	<!-- 注解驱动器,包含处理器映射器,处理器适配器和json转换解析器等等 -->
	<mvc:annotation-driven></mvc:annotation-driven>

	<!-- 视图解析器 -->
	<bean class="org.springframework.web.servlet.view.InternalResourceViewResolver">
		<property name="prefix" value="/WEB-INF/view/"></property>
		<property name="suffix" value=".jsp"></property>
	</bean>

	<!-- 放行静态资源(使用默认的servlet) -->
	<mvc:default-servlet-handler />

	<!-- 配置拦截器,如果没有使用拦截器,则无需配置  -->
	<mvc:interceptors>
		<mvc:interceptor>
			<mvc:mapping path="/login"/>
			<bean class="com.jy.interceptors.LoginInterceptor"></bean>
		</mvc:interceptor>
	</mvc:interceptors>
四.配置spring-applicationContext.xml
	<!-- spring注解扫描,不扫描@Controller注解 -->
	<context:component-scan base-package="com.jy">
		<context:exclude-filter type="annotation" expression="org.springframework.stereotype.Controller" />
	</context:component-scan>
        <!-- 导入jdbc配置文件 -->
	<context:property-placeholder location="classpath:properties/jdbc.properties" file-encoding="utf-8"/>

	<!-- 配置数据源 -->
	<bean id="dataSource" class="org.apache.commons.dbcp.BasicDataSource">
		<property name="driverClassName" value="${jdbc.driver}"/>
        <property name="url" value="${jdbc.url}"/>
        <property name="username" value="${jdbc.username}"/>
        <property name="password" value="${jdbc.password}"/>
        <!-- maxActive连接池的最大数据库连接数。设为0表示无限制。 -->
        <property name="maxActive"  value="100"/>
        <!-- *maxIdle:最大等待连接中的数量,设 0 为没有限制-->
        <property name="maxIdle"  value="5"/>
        <property name="minIdle"  value="1"/>
	</bean>

	<!--创建事务管理器-->
    <bean id="transactionManager"  class="org.springframework.jdbc.datasource.DataSourceTransactionManager">
        <property name="dataSource" ref="dataSource"></property>  <!--设置数据源-->
    </bean>

    <!-- 配置通知 -->
    <!-- transaction-manager="transactionManager" 可以省略  自动找名为transactionManager的bean -->
    <tx:advice  id="myAdvice"   transaction-manager="transactionManager">
        <!-- 配置事务传播特性 -->
        <tx:attributes>
            <!-- 针对以query开头的方法不添加事务管理,仅用于查询 -->
            <tx:method name="query*"  propagation="NOT_SUPPORTED"   read-only="true"/>
            <!--默认只对运行时异常进行处理,可以通过rollback-for="java.lang.Exception"设置 对所有异常进行处理    -->
            <tx:method name="*"  propagation="REQUIRED"  rollback-for="java.lang.Exception" />
        </tx:attributes>
    </tx:advice>

	<!--配置切面-->
    <aop:config>
    	<!-- 配置切入点 -->
        <aop:pointcut expression="execution( * com..*.*(..))"  id="mypoint"/>
        <!-- 整合通知和切入点 -->
        <aop:advisor advice-ref="myAdvice"   pointcut-ref="mypoint"/>
    </aop:config>
什么是切面和通知,自行查阅spring的AOP
配置过事务管理器,通知和切面后,会自动为指定的方法添加事务管理
整合spring和myBatis
一.spring-myBatis.xml
	<!-- 配置SqlSessionFactory -->
	<bean id="sqlSessionFactory" class="org.mybatis.spring.SqlSessionFactoryBean">
		<property name="configLocation" value="classpath:mybatis-config.xml"></property>
		<property name="mapperLocations" value="classpath:com/jy/mapper/*.xml"></property>
		<property name="dataSource" ref="dataSource"></property>
	</bean>

	<!-- 扫描mapper接口(即dao) -->
	<bean class="org.mybatis.spring.mapper.MapperScannerConfigurer">
		<property name="basePackage" value="com.jy.dao"></property>
		<property name="sqlSessionFactoryBeanName" value="sqlSessionFactory"></property>
	</bean>
在sqlSessionFactory配置中,设置了mybatis配置文件的路径和mapper映射文件的路径
MapperScannerConfigurer设置了扫描dao接口的路径
二.mybatis-config.xml
<!DOCTYPE configuration
        PUBLIC "-//mybatis.org//DTD Config 3.0//EN"
        "http://mybatis.org/dtd/mybatis-3-config.dtd">

<configuration>
    <settings>
    	<!--解决查询结果含null时,对应字段不显示的问题-->
        <setting name="callSettersOnNulls" value="true"/>
        <!-- 开启二级缓存 -->
        <setting name="cacheEnabled" value="true"/>
        <!-- <setting name="logImpl" value="LOG4J" /> -->
    </settings>

    <!--给整个包的entity设置别名-->
    <typeAliases>
        <package name="com/jy/entity"/>
    </typeAliases>
    <!--settings 必须在 typeAliases 标签前边,这是固定顺序-->
</configuration>

<!-- 这是mybatis的配置文件,所以没有beans标签体 -->
其他
附上mapper映射文件的写法
<?xml version="1.0" encoding="UTF-8"?>
<!DOCTYPE mapper
  PUBLIC "-//mybatis.org//DTD Mapper 3.0//EN"
  "http://mybatis.org/dtd/mybatis-3-mapper.dtd">
<!-- namespace指映射的dao接口文件路径 -->
<mapper namespace="com.jy.dao.TestDao">
     <!-- id的值和对应dao接口的方法名一致 -->
	<select id="getRealName" resultType="user">
		SELECT realname FROM users WHERE username=#{username}
	</select>

</mapper>
更多mybatis的用法请查阅其他教程
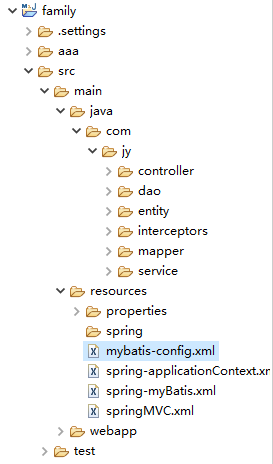
这样就配置完成了,附上目录图片
f

 浙公网安备 33010602011771号