
EF6学习笔记四:一对多、多对多、一对一关系配置(Fluent API)
要专业系统地学习EF前往《你必须掌握的Entity Framework 6.x与Core 2.0》这本书的作者(汪鹏,Jeffcky)的博客:https://www.cnblogs.com/CreateMyself/
现在就来到了重中之重的配置了:一对多、多对多、一对一关系的配置,我这里全部使用Fulent API 的方式来
一对多
一对多最简单了,写好你的数据模型,什么配置都不用做,生成的表结构就是你想要的
来个简单基类


public class BaseEntity
    {
        public BaseEntity() {
            this.Id = Guid.NewGuid().ToString();
            this.AddTime = DateTime.Now;
        }

        public string Id { get; set; }
        public DateTime AddTime { get; set; }
    }
来个简单图书馆类
public class Library:BaseEntity
    {
        public string Name { get; set; }
        public virtual ICollection<Book> Books { get; set; }
    }
来个简单Book类
public class Book:BaseEntity
    {
        public string Name { get; set; }
        public virtual  Library Library { get; set; }
    }
为他们公开DbSet属性
public DbSet<Library> Librarys { get; set; }
        public DbSet<Book> Books { get; set; }
然后生成的表就是这样的
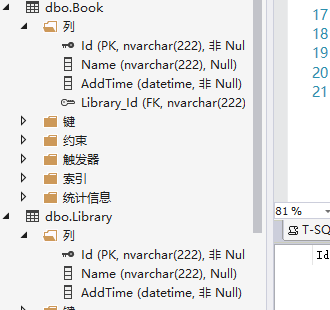
在Book中有一个Library的外键,这是默认给生成的,你可能觉得这个外键名呢想以“FK_”开头,还有表名你也不满意,那行啊,来配置啊
咱们现在的配置就来专业一点,我们把对每一个model的配置单独用一个类,最后通过反射的方式,把配置添加到上下文的OnModelCreating方法中
你的OnModelCreating中只需要这样写,就行了,上一篇我弄错了
protected override void OnModelCreating(DbModelBuilder modelBuilder)
        {
            modelBuilder.Conventions.Remove<PluralizingTableNameConvention>();
            var typeToRegister = Assembly.GetExecutingAssembly().GetTypes()
                .Where(x => !string.IsNullOrEmpty(x.Namespace))
                .Where(x => x.BaseType != null && x.BaseType.IsGenericType
                && x.BaseType.GetGenericTypeDefinition() == typeof(EntityTypeConfiguration<>));
            foreach (var type in typeToRegister)
            {
                dynamic configurationInstance = Activator.CreateInstance(type);
                modelBuilder.Configurations.Add(configurationInstance);
            }
            base.OnModelCreating(modelBuilder);
        }
你的配置代码写在哪里呢?请看我的项目文件结构
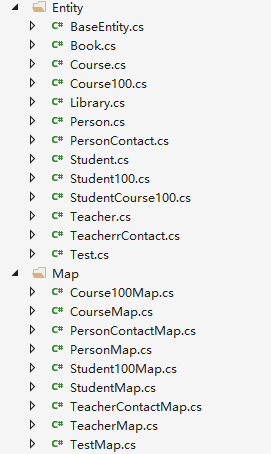
实体和配置分开放,便于管理,上下文里面你已经不用去管了
来看具体的配置
public class LibraryMap:EntityTypeConfiguration<Library>
    {
        public LibraryMap()
        {
            ToTable("tb_Librarys");   //   表名
            HasKey(x => x.Id);  //  主键
            Property(x => x.Name);
            HasMany(x => x.Books).WithRequired(x => x.Library).HasForeignKey(x => x.FK_Library_Id);
            //  从图书馆的角度配置,一个图书馆有多本书,一本书必须属于某一个图书馆,也可以从图书的角度去配置
        }
    }
public class BookMap:EntityTypeConfiguration<Book>
    {
        public BookMap()
        {
            ToTable("tb_Books");
            HasKey(x => x.Id);
            //  从图书的角度来配置是这样的
            //  HasRequired(x => x.Library).WithMany(x => x.Books).HasForeignKey(x => x.FK_Library_Id);
        }
    }
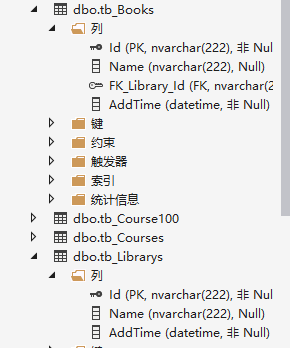
现在生成的表就是我们想要的了
多对多
多对多也简单,用学生和课程来举例,一个学生可以学习多门课程,一门课程也可以供多名学生来学习
多对多的关系,在数据库中我们需要建立第三张表专门维护两者的关系。其中有两种方法,通过配置 ,自动创建第三张表;或者你显示的创建第三model
public class Student500:BaseEntity
    {
        public string Name { get; set; }
        public virtual ICollection<Course500> Courses500 { get; set; }
    }
public class Course500:BaseEntity
    {
        public string Name { get; set; }
        public virtual ICollection<Student500> Students500 { get; set; }
    }
public class Stduent500Map:EntityTypeConfiguration<Student500>
    {
        public Stduent500Map()
        {
            ToTable("tb_Students500");
            HasKey(x => x.Id);
            HasMany(x => x.Courses500).WithMany(x => x.Students500)
                .Map(x => x.ToTable("tb_StudentCourses500")
                .MapLeftKey("Stduent500Id")
                .MapRightKey("Course500Id"));
        }
    }
public class Course500Map:EntityTypeConfiguration<Course500>
    {
        public Course500Map()
        {
            ToTable("tb_Courses500");
            HasKey(x =>x.Id);
            Property(x => x.Name);
        }
    }
生成的表结构是这样的
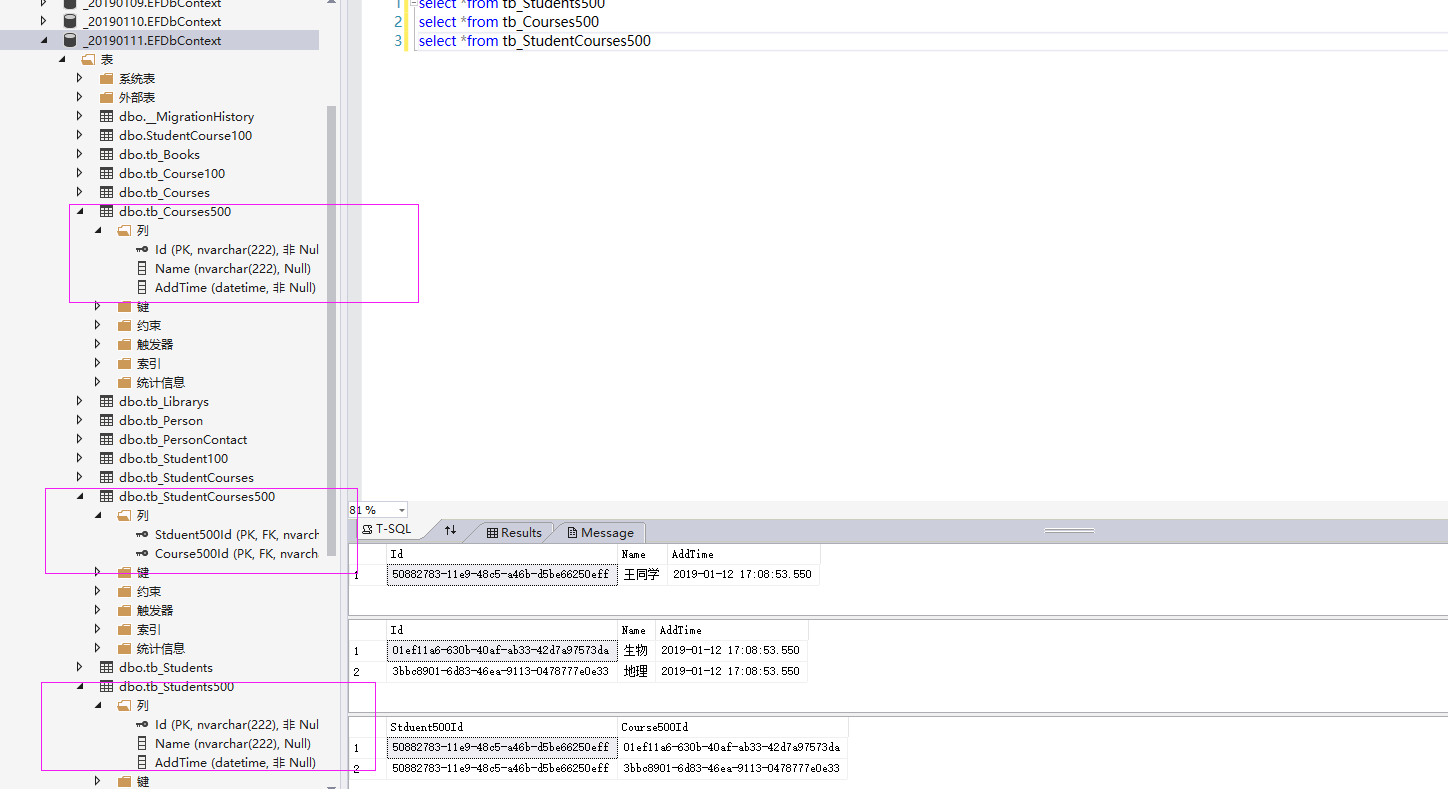
这应该是比较符合我们得期望了,我们来看一下显示地创建第三个model,怎么弄。上面生成的StudentCourses500,他没有自己的Id和AddTime,那么我们现在这样做就行了
显示定义第三个表来维护student和course的关系
public class Student100:BaseEntity
    {
        public string Name { get; set; }
        public byte Age { get; set; }
        public virtual ICollection<StudentCourse100> StudentCourse { get; set; }
    }
public class Course100:BaseEntity
    {
        public string Name { get; set; }
        public int ManimumStrength { get; set; }
        public virtual ICollection<StudentCourse100> StudentCourse { get; set; }
    }
public class StudentCourse100:BaseEntity
    {
        public string Student100Id { get; set; }
        public virtual Student100 Student100 { get; set; }
        public string Courses100Id { get; set; }
        public virtual Course100 Course100 { get; set; }
    }
public class Student100Map:EntityTypeConfiguration<Student100>
    {
        public Student100Map()
        {
            ToTable("tb_Student100");

            HasKey(x => x.Id);

            HasMany(x => x.StudentCourse)
                .WithRequired(x => x.Student100)
                .HasForeignKey(x => x.Student100Id);
        }
    }
public class Course100Map:EntityTypeConfiguration<Course100>
    {
        public Course100Map()
        {
            ToTable("tb_Course100");
            HasKey(x => x.Id);

            HasMany(x => x.StudentCourse)
                .WithRequired(x => x.Course100)
                .HasForeignKey(x => x.Courses100Id);
        }
    }
表结构如下

显示定义第三张表,我们对这张表就有了更多的设置,只不过,添加数据时会有点绕
                db.Students100.Add(new Student100
                {
                    Name = "王五",
                    Age = 44,
                    StudentCourse = new List<StudentCourse100> {
                        new StudentCourse100{ Course100 = new Course100{ Name="生物",ManimumStrength=45} },
                        new StudentCourse100{ Course100 = new Course100{ Name="化学",ManimumStrength=45} },
                        new StudentCourse100{ Course100 = new Course100{ Name="历史",ManimumStrength=45} }
                    }
                });
                db.SaveChanges();
一对一
弄这个之前我来引用一段《你必须知道的.Net Framework 6.x 与 Core 2.0》作者的原话:“正常情况下,首先应该探讨一对一关系。但是如果使用过一对一关系,就会发现并不是那么简单,换句话说,一对一关系最为复杂,设计如何使用HasOptional 与 WithRequired 、WithOptionalPrincipal 、
WithOptionalDependent”
来用人和联系方式来举例配置一对一关系
public class Person : BaseEntity
    {
        public string Name { get; set; }
        public virtual PersonContact PersonContact { get; set; }
    }
public class PersonContact : BaseEntity
    {
        public string Email { get; set; }
        public virtual Person Person { get; set; }
    }
public class PersonMap:EntityTypeConfiguration<Person>
    {
        public PersonMap() {
            ToTable("tb_Person");
            HasKey(x => x.Id);
            HasOptional(x => x.PersonContact)
                .WithOptionalPrincipal(x => x.Person).Map(x => x.MapKey("FK_Person_Id"));
        }
    }
public class PersonContactMap:EntityTypeConfiguration<PersonContact>
    {
        public PersonContactMap()
        {
            ToTable("tb_PersonContact");
            HasKey(x => x.Id);
        }
    }
表结构如下

上面我使用的是HasOptional、WithOptionalPrincipal来配置的,外键建立在PersonContact表上
principal主要的,dependent从属的 那使用dependent 外键就会被建立在Person表上
当然还有其他的配置,这一点我就不说了,免得乱了,各位可以自己去研究。

 浙公网安备 33010602011771号