

SpringCloud学习之五:服务配置中心
服务配置中心
1. 简介
每个微服务都有自己的配置文件,随着服务越来越多,配置文件的维护也越来越麻烦。所以对于微服务的配置管理我们需要如下功能:
- 集中管理配置。如通过git、svn等统一管理配置,不需要一个一个切换服务器去修改配置
- 不同环境不同配置。如开发、测试、生产等不同环境配置不同
- 运行期间可动态调整。如根据负载情况动态调整数据源连接池大小或熔断阈值,并在调整配置时不停止微服务
- 配置修改后可自动更新。如配置内容发生变化,微服务能自动更新配置
Spring Cloud Config为分布式系统外部化配置提供了服务器端和客户端的支持。
2. 服务配置中心
-
创建一个Git仓库,在仓库中创建一个配置文件scl-eureka-client-consumer-prod.yml,内容如下
配置命名规则:{name}-{profile}.yml/properties
profile: production-1.0 -
创建一个Spring Boot项目,引入
spring-cloud-config-server依赖<dependency> <groupId>org.springframework.cloud</groupId> <artifactId>spring-cloud-config-server</artifactId> </dependency> -
在启动类中添加
@EnableConfigServer注解@EnableConfigServer @SpringBootApplication public class SclConfigServerApplication { public static void main(String[] args) { SpringApplication.run(SclConfigServerApplication.class, args); } } -
在配置文件applicatioin.yml中添加如下内容
server: port: 8600 spring: application: name: scl-config-server cloud: config: server: git: uri: https://github.com/TabooNight/Spring-Cloud-Learning # Git仓库地址 username: username # 用户名 password: username # 密码 search-paths: scl-spring-cloud-config-repo # 搜索目录,若配置文件在仓库根目录下则不需要该配置项 -
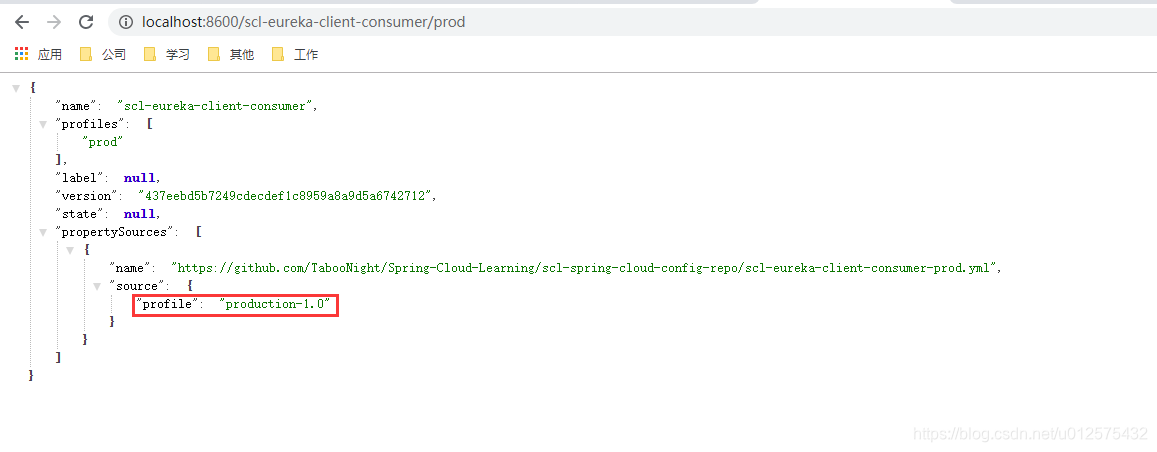
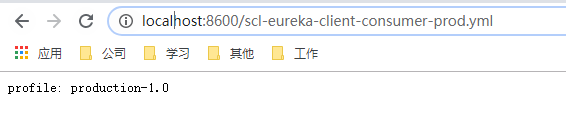
启动项目,并访问http://localhost:8600/{name}/{profile}或者http://localhost:8600/{name}-{profile}.yml/properties,即可查看Git仓库对应配置文件的内容
![在这里插入图片描述]()
![在这里插入图片描述]()
3. 客户端配置
-
在服务消费者scl-eureka-client-consumer中添加
spring-cloud-starter-config依赖<dependency> <groupId>org.springframework.cloud</groupId> <artifactId>spring-cloud-starter-config</artifactId> </dependency> -
创建配置文件bootstrap.yml,并添加如下内容
PS:如下内容不能配置在application.yml中
spring: cloud: config: uri: http://localhost:8600 # 配置中心地址 profile: prod # 对应Git仓库配置文件名中的profile,配置文件名中的name对应application.yml里的spring.application.name的值 label: master # 指定Git仓库的分支 -
在Controller中添加获取配置的接口
@RestController @RequestMapping("/consumer") public class TestController { private final TestFeign feign; @Value("${profile}") private String profile; @Autowired public TestController(TestFeign feign) { this.feign = feign; } @GetMapping("/info") public Map<String, String> get() { return this.feign.getTest(); } @GetMapping("/config") public Map<String, String> getConfig() { Map<String, String> map = new HashMap<>(); map.put("profile", this.profile); return map; } } -
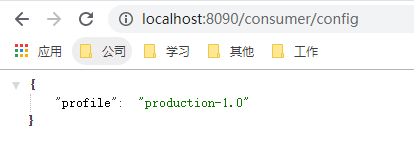
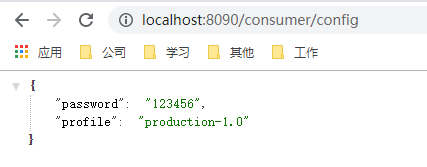
重启项目,访问http://localhost:8090/consumer/config,即可获取配置中心里profile的值
![在这里插入图片描述]()
4. 配置中心健康检查
Config Server自带了一个健康检查。对于Git,默认情况下{name}是app,{label}是master,{profile}是default。也就是默认情况下会监控仓库里master分支下app-default.yml/properties文件,对于我们自定义的文件需要自定义健康检查
-
在配置文件application.yml添加如下内容
spring: cloud: config: server: health: repositories: all-health: label: master name: scl-eureka-client-consumer profiles: prod management: endpoint: health: show-details: always -
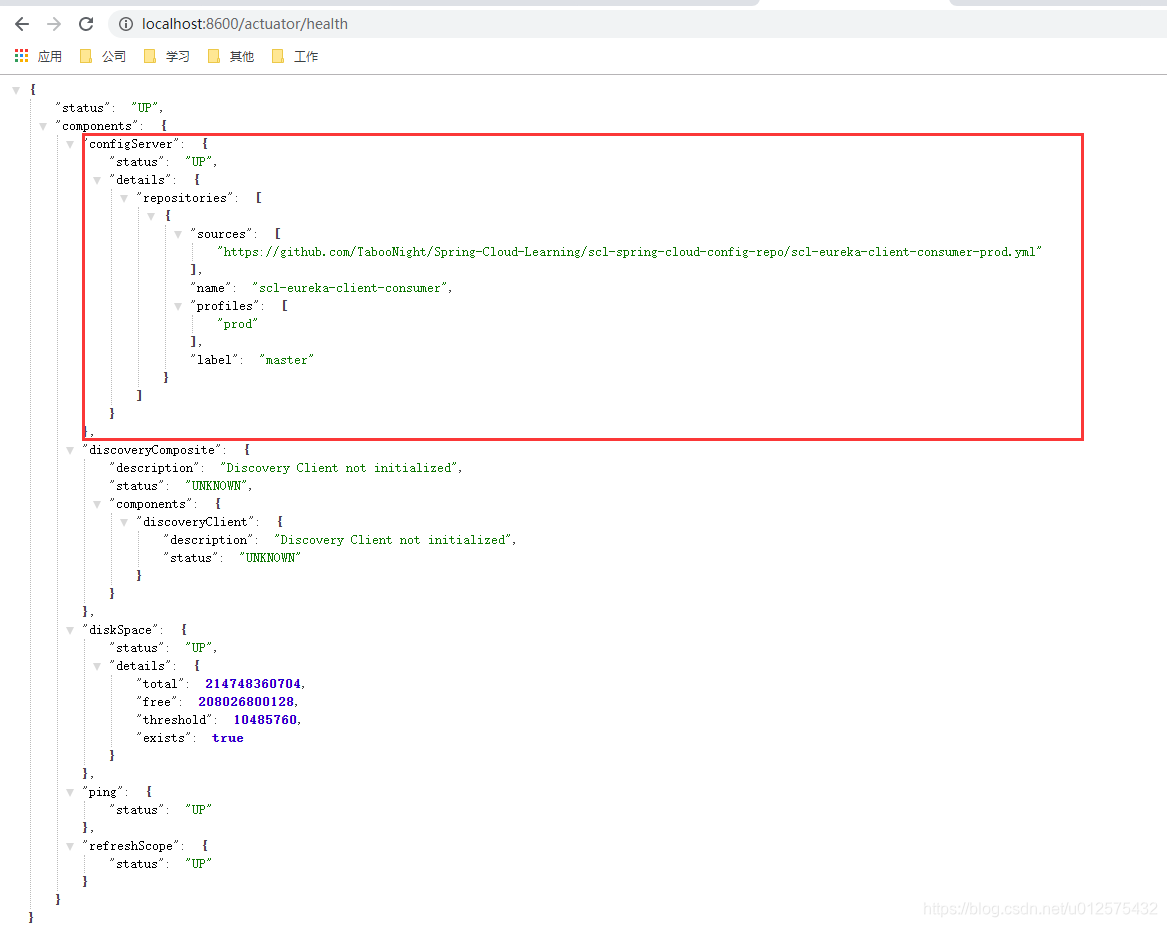
重启项目,访问http://localhost:8600/actuator/health
![在这里插入图片描述]()
5. 配置内容的加解密
对于一些敏感的内容(如数据库密码)等,应当加密存储
Config Server为配置内容的加解密提供了支持。但其依赖JCE,所以需下载JCE并解压,然后将里面的两个jar包替换到本地JAVA安装目录的jre/lib/security目录中即可。
5.1 对称加密
-
在刚实现的配置中心中新增配置文件bootstrap.yml,添加如下内容
encrypt: key: test # 密钥 -
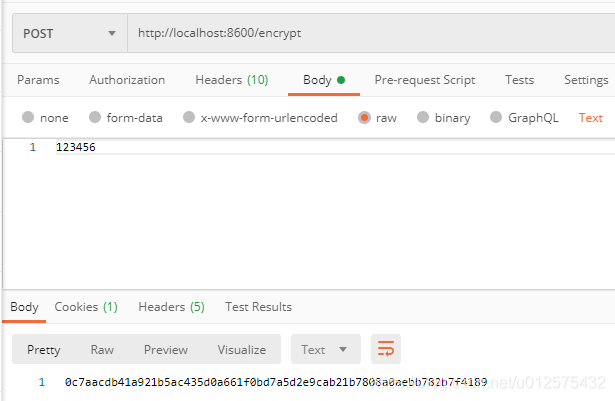
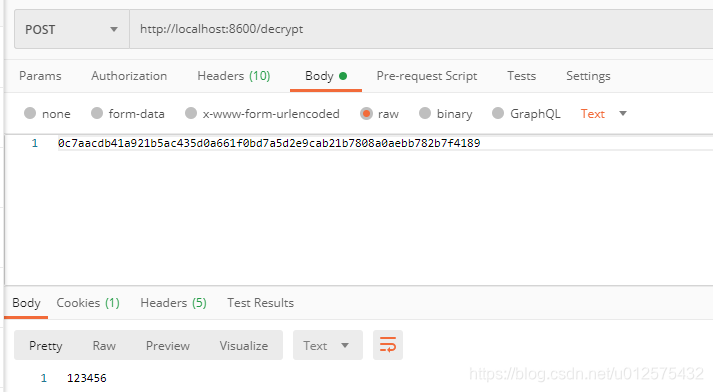
重启项目后,http://localhost:8600/encrypt为加密端点,http://localhost:8600/decrypt为解密端点,请求方式都为POST
![在这里插入图片描述]()
![在这里插入图片描述]()
-
由上图可知,加解密都没有问题。然后将加密后的内容添加到Git仓库的配置文件中并提交
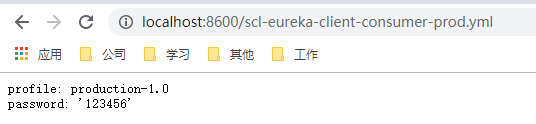
profile: production-1.0
password: '{cipher}0c7aacdb41a921b5ac435d0a661f0bd7a5d2e9cab21b7808a0aebb782b7f4189'
PS:password上的单引号不能少。若使用properties格式管理配置,则不能使用单引号
-
访问http://localhost:8600/scl-eureka-client-consumer-prod.yml,可知正确读取配置文件,且自动解密了
![在这里插入图片描述]()
-
若想让Config Server直接返回密文,由客户端自行进行解密,在bootstrap.yml中添加如下内容即可
spring: cloud: config: server: encrypt: enabled: false -
此时重新访问http://localhost:8600/scl-eureka-client-consumer-prod.yml
![在这里插入图片描述]()
-
修改客户端Controller代码,获取password值。若需客户端自行解密,则需在bootstrap.yml中配置
encrypt.key,与服务端保持一致即可。@RestController @RequestMapping("/consumer") public class TestController { private final TestFeign feign; @Value("${profile}") private String profile; @Value("${password}") private String password; @Autowired public TestController(TestFeign feign) { this.feign = feign; } @GetMapping("/info") public Map<String, String> get() { return this.feign.getTest(); } @GetMapping("/config") public Map<String, String> getConfig() { Map<String, String> map = new HashMap<>(); map.put("profile", this.profile); map.put("password", password); return map; } }encrypt: key: test

5.2 非对称加密
-
先借助keytool工具,生成Key Store文件
keytool -genkeypair -alias configKey -keyalg RSA -dname "CN=Config Server,OU=Unit,O=Organization,L=City,S=State,C=US" -keypass 123456 -keystore "E:/Spring Cloud/encry/server.jks" -storepass 123456 -
将配置中心和客户端配置文件bootstrap.yml中的
encrypt.key修改为如下配置encrypt: #key: test key-store: location: 'file:///E:/Spring Cloud/encry/server.jks' password: 123456 # storepass alias: configKey # alias secret: 123456 # keypass -
测试过程与对称加密一样
6. 使用/refresh端点手动刷新配置
上述测试可以发现,当Git仓库里的配置文件修改后客户端必须重启才可以读取到最新的内容,我们想要实现的是配置文件发生修改后,客户端可不重启就更新配置内容,步骤如下
-
在客户端内添加
spring-boot-starter-actuator依赖,之前已经添加过,就不重复添加了 -
在Controller上添加注解
@RefreshScope注意是在Controller而不是启动类
-
在配置文件application.yml中,将refresh加入actuator的暴露端点
management: endpoints: web: exposure: include: info,health,hystrix-stream,refresh # actuator暴露端点 -
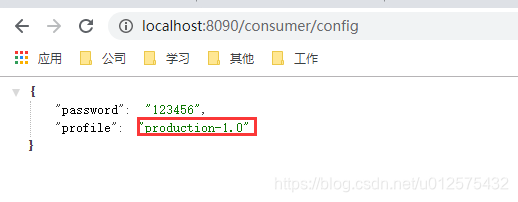
重启项目,然后访问http://localhost:8090/customer/config,此时profile值为production-1.0
![在这里插入图片描述]()
-
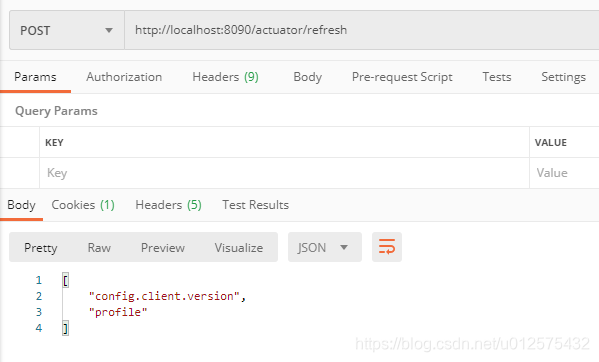
修改profile值为production-1.1,然后提交到Git仓库
-
使用POST请求访问http://localhost:8090/actuator/refresh
![在这里插入图片描述]()
-
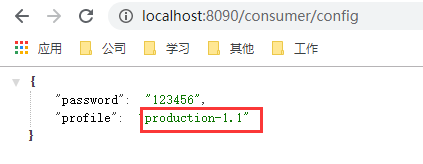
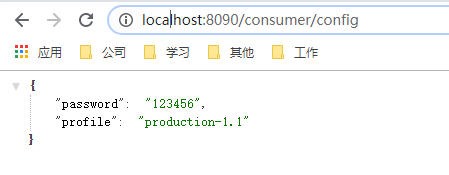
重新访问http://localhost:8090/customer/config,此时profile值为production-1.1
![在这里插入图片描述]()
7. 配置中心安全认证
-
在配置中心引入
spring-boot-starter-security依赖<dependency> <groupId>org.springframework.boot</groupId> <artifactId>spring-boot-starter-security</artifactId> </dependency> -
在配置中心的application.yml中添加如下用户认证信息
spring: security: user: name: root password: 123456 -
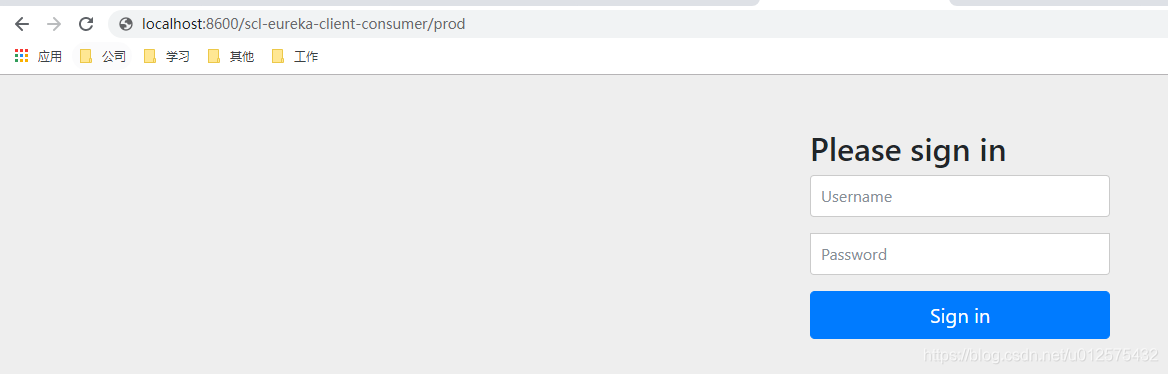
访问http://localhost:8600/scl-eureka-client-consumer/prod,被拦截到登录界面,说明用户认证配置成功
![在这里插入图片描述]()
-
在客户端的bootstrap.yml中添加认证信息
spring: cloud: config: username: root password: 123456 -
访问http://localhost:8090/consumer/config,可正常获取配置信息,说明认证成功
![在这里插入图片描述]()

 浙公网安备 33010602011771号