

python相关
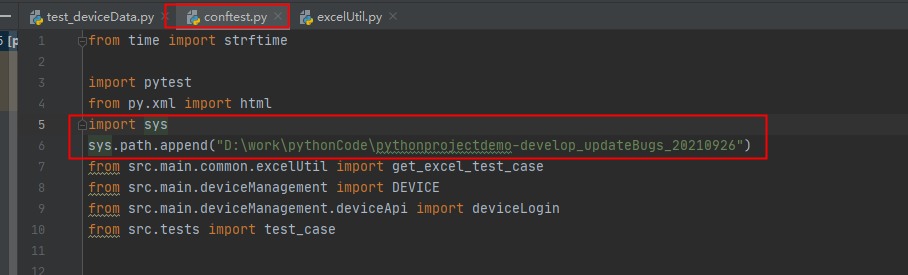
在terminal窗口执行测试用例时,报找不到src模块错误

解决办法:
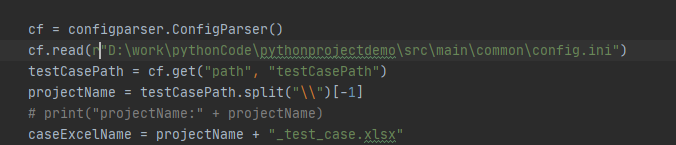
在读取config文件时报错:

解决办法:在读取配置文件的路径前加r
文件路径相关:
根据文件名获取文件路径:os.path.abspath(文件名)
返回当前文件路径的上一级:os.path.abspath(os.path.join(os.getcwd(), ".."))
返回当前文件路径的上两级:os.path.abspath(os.path.join(os.getcwd(), "../.."))
根据\对路径进行分割:filePath.split("\\")[6]
def pytest_collection_modifyitems(session, items):
    #获取文件名称:channelTest.py
    testCaseName=session.config.args[0:][-1]
    print("testCaseName:" + testCaseName)
    #根据文件名称获取该文件的绝对路径
    print("test_getFilePath():" + os.path.abspath(testCaseName))
    #返回当前文件的上一级
    filePath = os.path.abspath(os.path.join(os.getcwd(), ".."))
    name = filePath.split("\\")[6]
    print("name:" + name)
    caseName=name+"_test_case.xlsx"
    print("caseName:" + caseName)
文件路径拼接:case_path = testCasePath + os.sep + filename
Python:读取xlsx文件时报错xlrd.biffh.XLRDError
解决办法:pycharm菜单settings-->Project-->project interpreter点击”+“搜索xlrd选择安装1.2.0版本
hashlib.md5摘要算法 https://blog.csdn.net/geerniya/article/details/77531626
登录网站的用户名密码数据库是不会以明文密码进行存储的,简单的,可以通过摘要算法得到一个长度固定的数据块。
import hashlib #导入hashlib模块
#计算密码的md5值
def get_md5(s):
md = hashlib.md5()
md.update(s.encode('utf-8'))
return md.hexdigest()
datetime 格式化字符串:strftime():https://blog.csdn.net/shomy_liu/article/details/44141483
datetime.day,datetime.month,datetime.year 分别表示一个datetime对象的日,月,年;如下
from datetime import datetime
dt=datetime.now() #创建一个datetime类对象
print dt.year,dt.month,dt.day
strftime() 用来格式化datetime 对象
from datetime import datetime
dt = datetime.now()
print '时间:(%Y-%m-%d %H:%M:%S %f): ' , dt.strftime( '%Y-%m-%d %H:%M:%S %f' )
print '时间:(%Y-%m-%d %H:%M:%S %p): ' , dt.strftime( '%y-%m-%d %I:%M:%S %p' )
split()方法:
Python split() 通过指定分隔符对字符串进行切片,如果参数 num 有指定值,则分隔 num+1 个子字符串
实例1:
str = "Line1-abcdef \nLine2-abc \nLine4-abcd";
print str.split( ); # 以空格为分隔符,包含 \n
print str.split(' ', 1 ); # 以空格为分隔符,分隔成两个
以上实例输出结果如下:
['Line1-abcdef', 'Line2-abc', 'Line4-abcd']
['Line1-abcdef', '\nLine2-abc \nLine4-abcd']
实例2:
txt = "Google#Runoob#Taobao#Facebook"
# 第二个参数为 1,返回两个参数列表
x = txt.split("#", 1)
print x
以上实例输出结果如下:
['Google', 'Runoob#Taobao#Facebook']
join()方法:https://www.runoob.com/python/att-string-join.html
Python join() 方法用于将序列中的元素以指定的字符连接生成一个新的字符串
str = "-";
seq = ("a", "b", "c"); # 字符串序列
print str.join( seq );
Python3基础:String模块ascii_letters和digits:https://blog.csdn.net/killmice/article/details/53118884
Python3中String模块ascii_letters和digits方法,其中ascii_letters是生成所有字母,从a-z和A-Z,digits是生成所有数字0-9.
>>> chars = string.ascii_letters + string.digits
>>> print(chars)
abcdefghijklmnopqrstuvwxyzABCDEFGHIJKLMNOPQRSTUVWXYZ0123456789
random 模块有大量的函数用来产生随机数和随机选择元素:https://python3-cookbook.readthedocs.io/zh_CN/latest/c03/p11_pick_things_at_random.html
比如,要想从一个序列中随机的抽取一个元素,可以使用 random.choice() :
>>> import random
>>> values = [1, 2, 3, 4, 5, 6]
>>> random.choice(values)
2
为了提取出N个不同元素的样本用来做进一步的操作,可以使用 random.sample() :
>>> random.sample(values, 2)
[6, 2]
>>> random.sample(values, 3)
[4, 3, 1]
如果你仅仅只是想打乱序列中元素的顺序,可以使用 random.shuffle() :
>>> random.shuffle(values)
>>> values
[2, 4, 6, 5, 3, 1]
生成随机整数,请使用 random.randint() :
>>> random.randint(0,10)
2
为了生成0到1范围内均匀分布的浮点数,使用 random.random() :
>>> random.random()
0.9406677561675867
Python time time()方法:https://www.runoob.com/python/att-time-time.html
Python time time() 返回当前时间的时间戳
Python round() 函数
round() 方法返回浮点数x的四舍五入值。
print "round(80.23456, 2) : ", round(80.23456, 2)
以上实例运行后输出结果为:
round(80.23456, 2) : 80.23
python读取excel(xlrd):https://www.cnblogs.com/puresoul/p/7520198.html
1、导入模块:import xlrd
2、打开文件:x1 = xlrd.open_workbook("data.xlsx")
3、获取sheet:
获取所有sheet名字:x1.sheet_names()
获取sheet数量:x1.nsheets
获取所有sheet对象:x1.sheets()
通过sheet名查找:x1.sheet_by_name("test”)
通过索引查找:x1.sheet_by_index(3)
4.特定单元格读取:
a)获取单元格值:
sheet1.cell_value(1, 2)
sheet1.cell(1, 2).value 获取第一行第二列的值
sheet1.row(1)[2].value
b) 获取单元格类型:
sheet1.cell(1, 2).ctype
sheet1.cell_type(1, 2)
sheet1.row(1)[2].ctype
Python endswith()方法:
Python endswith() 方法用于判断字符串是否以指定后缀结尾,如果以指定后缀结尾返回True,否则返回False。可选参数"start"与"end"为检索字符串的开始与结束位置
Python strip()方法:https://www.runoob.com/python/att-string-strip.html
Python strip() 方法用于移除字符串头尾指定的字符(默认为空格或换行符)或字符序列
str = "00000003210Runoob01230000000";
print str.strip( '0' ); # 去除首尾字符 0
str2 = " Runoob "; # 去除首尾空格
print str2.strip();
以上实例输出结果如下:
3210Runoob0123
Runoob
Python 字典(Dictionary) update()方法:https://www.runoob.com/python/att-dictionary-update.html
update() 函数把字典dict2的键/值对更新到dict里
update()方法语法:dict.update(dict2)
#!/usr/bin/python
dict = {'Name': 'Zara', 'Age': 7}
dict2 = {'Sex': 'female' }
dict.update(dict2)
print "Value : %s" % dict
以上实例输出结果为:
Value : {'Age': 7, 'Name': 'Zara', 'Sex': 'female'}
python的logging库来将日志打印到文件中
#!/usr/bin/python
# -*- coding:utf-8 -*-
from common.log import Log
log = Log().getlog()
log.info("I am a.py")
from common.log import Log
log = Log(__name__).getlog()
log.info("I am a.py")
Python os.path() 模块:https://www.runoob.com/python/python-os-path.html
os.path.abspath(path) 返回绝对路径
os.path.abspath('.') 返回当前路径
os.path.dirname(path) 返回文件路径
python中的join( ),os.sep , os.path.join()函数:https://blog.csdn.net/LittleStudent12/article/details/81020633
python是跨平台的。在Windows上,文件的路径分隔符是'\',在Linux上是'/'。
为了让代码在不同的平台上都能运行,那么路径应该写'\'还是'/'呢?
使用os.sep的话,就不用考虑这个了,os.sep根据你所处的平台,自动采用相应的分隔符号。
举例
Linux下一个路径,/usr/share/python,那么上面的os.sep就是‘/’
windows下一个路径,C:\Users\Public\Desktop,那么上面的os.sep就是‘\’.
data_dir = os.sep.join(['hello', 'world'])
python标准库 configparser读取config或ini配置文件:https://zhuanlan.zhihu.com/p/33218385
1、config 或ini文件格式
config 配置文件由两部分组成sections与items 。
sections 用来区分不同的配置块
items 是sections下面的键值
格式如下:应用有多种语言环境,不同的语言采用不同的配置
# zh_cn.config(UTF-8)
[lang]
name=中文简体
[message]
applyLangTip = 重启程序来应用更改。
runCommands = 执行命令
[menu]
id = 96
service = 服务
help = 帮助
officialSite = 官网
officialHelp = 帮助文档
[UI]
title = 集成运行环境
stop = 停止
startZentao = 启动
account = 账号
password = 密码
中括号([])中的为sections ,每个sections 可以有多个items。
2.configparser基础,python 对于配置文件的读取已经标准化,标准库为configparser
引入包
from configparser import ConfigParser
实例化
config = ConfigParser()
3、读取config文件数据
常用方法:
config.read(filename,encoding) 直接读取ini文件内容,finlename 文件地址,encoding 文件编码格式
config.sections() 得到所有的section,并以列表的形式返回
config.options(section) 得到该section的所有option
config.items(section) 得到该section的所有键值对
config[section][option] 读取section中的option的值
config.get(section,option) 得到section中option的值,返回为string类型
config.getint(section,option) 得到section中option的值,返回为int类型
config.getboolean(section,option) 得到section中option的值,返回为bool类型
config.getfloat(section,option) 得到section中option的值,返回为float类型
Python JSON:使用 Python 语言来编码和解码 JSON 对象:https://www.runoob.com/python/python-json.html
json.dumps 将 Python 对象编码成 JSON 字符串
json.loads 将已编码的 JSON 字符串解码为 Python 对象
实例:
import json
data = [ { 'a' : 1, 'b' : 2, 'c' : 3, 'd' : 4, 'e' : 5 } ]
json = json.dumps(data)
print json
一个http请求包括三个部分,为别为请求行,请求报头,消息主体,类似以下这样::https://blog.csdn.net/junli_chen/article/details/53670887
请求行
请求报头
消息主体
HTTP协议规定post提交的数据必须放在消息主体中,但是协议并没有规定必须使用什么编码方式。服务端通过是根据请求头中的Content-Type字段来获知请求中的消息主体是用何种方式进行编码,再对消息主体进行解析。具体的编码方式包括:
application/x-www-form-urlencoded
最常见post提交数据的方式,以form表单形式提交数据。
application/json
以json串提交数据。
multipart/form-data
一般使用来上传文件。
1.以form形式发送post请求:
Reqeusts支持以form表单形式发送post请求,只需要将请求的参数构造成一个字典,然后传给requests.post()的data参数即可
url = 'http://httpbin.org/post'
d = {'key1': 'value1', 'key2': 'value2'}
r = requests.post(url, data=d)
print r.text
2.以json形式发送post请求
可以将一json串传给requests.post()的data参数
url = 'http://httpbin.org/post'
s = json.dumps({'key1': 'value1', 'key2': 'value2'})
r = requests.post(url, data=s)
print r.text
3.以multipart形式发送post请求
Requests也支持以multipart形式发送post请求,只需将一文件传给requests.post()的files参数即可
url = 'http://httpbin.org/post'
files = {'file': open('report.txt', 'rb')}
r = requests.post(url, files=files)
print r.text
Python unittest单元测试框架 断言assert:https://zhuanlan.zhihu.com/p/32363704
python的unittest单元测试框架断言整理汇总:https://blog.csdn.net/qq1124794084/article/details/51668672
assertIsNotNone(x,[msg]):断言x是否None,不是None则测试用例通过
assertEqual(a, b) 判断a==b
Python中 __init__:https://blog.csdn.net/LY_ysys629/article/details/54893185
1)class类包含:
类的属性:类中所涉及的变量
类的方法:类中函数
2)_init_函数(方法)
1.首先说一下,带有两个下划线开头的函数是声明该属性为私有,不能在类地外部被使用或直接访问。
2.init函数(方法)支持带参数的类的初始化 ,也可为声明该类的属性
3.init函数(方法)的第一个参数必须是 self(self为习惯用法,也可以用别的名字),后续参数则可 以自由指定,和定义函数没有任何区别。
3)函数定义
Python编程中对于某些需要重复调用的程序,可以使用函数进行定义,基本形式为:
def 函数名(参数1, 参数2, ……, 参数N): 其代码形式如下面所示:
def function_name (parameters):
block
return value
注意在类的内部,使用def关键字可以为类定义一个函数(方法),与一般函数定义不同,类方法必须包含参数self,且为第一个参数!
pycharm快捷键:
调整格式:alt+shift+enter
查找替换:ctrl+R 再点replace all
加段注释:ctrl+/
python环境搭建:需要安装pycharm和python
PyCharm 安装教程:https://www.runoob.com/w3cnote/pycharm-windows-install.html
python的配置:
python下载地址://www.python.org/
下载的安装包如:python-3.7.2-amd64.exe到本地
点击python-3.7.2-amd64.exe进行安装,在本地新建一个文件夹,名称为python3.7.2,路径:D:\python3.7.2\
安装完成后配置环境变量:
我的电脑,鼠标右击--属性--高级系统设置--环境变量--系统变量--Path--编辑--新建
D:\python3.7.2\
D:\python3.7.2\Scripts\
在cmd窗口输入python查看是否安装成功,输入pip命令查看是否可使用pip命令
pycharm中配置pytest:
pycharm菜单栏--File--settings--Project--Progect Interpreter--点击右侧"+"按钮--搜索pytest--点击Install Package
选中工程名--新建Python Package--创建完包名后新建python File即可开始用例编写
pycharm设置文件模板:
菜单栏Settings-Editor-File and Code Templates,选择 Python Script
"""
@author:${USER}
@Description:描述
@file:${NAME}.py
@time:${YEAR}/${MONTH}/${DAY}
"""
if __name__ == 'main':
pass
pyTest接口自动化测试应用:https://blog.csdn.net/wshlp123456/article/details/89194095
引入request库(pycharm菜单栏--File--settings--Project--Progect Interpreter--点击右侧"+"按钮--搜索request--点击Install Package)
登录接口实例:
import requests
import json
from jsonpath import jsonpath
url = "https://mi-api-test.sunvalleycloud.com/oauth/login?&timeStamp=20201010112513&lang=en"
params = {
"auth_type": "email_password",
"auto": False,
"client_id": "0778a347853545c08d496566e0d0180c",
"client_secret": "a0b5ca0e003a398fc4793514b0b3f754",
"device_name": "HUAWEI EVA-AL10",
"email": "100020@hyhpzengweifang.com.cn",
"grant_type": "password",
"imei": "a000006d937c5f",
"password": "2868fc65d8ee171b213488ab47a5b36e",
"product_line_id": "4f975dc1a43d4117a6f3eb83b2cbc778",
"scope": "all"
}
headers = {'content-type':"application/json"}
r = requests.post(url,data=json.dumps(params),headers=headers)
d = json.loads(r.text)
print(r.json())
print(r.json()["data"]["access_token"])
dict_type = r.json()
print(type(dict_type))
access_token = jsonpath(dict_type, '$..access_token')
print(access_token[0])
jsonpath:取出响应数据的值
python获取excle表中的值:https://blog.csdn.net/chengxuyuanyonghu/article/details/54951399

 浙公网安备 33010602011771号