Hive(9) hive的分区表、外部分区表、分桶表
hive的分区表
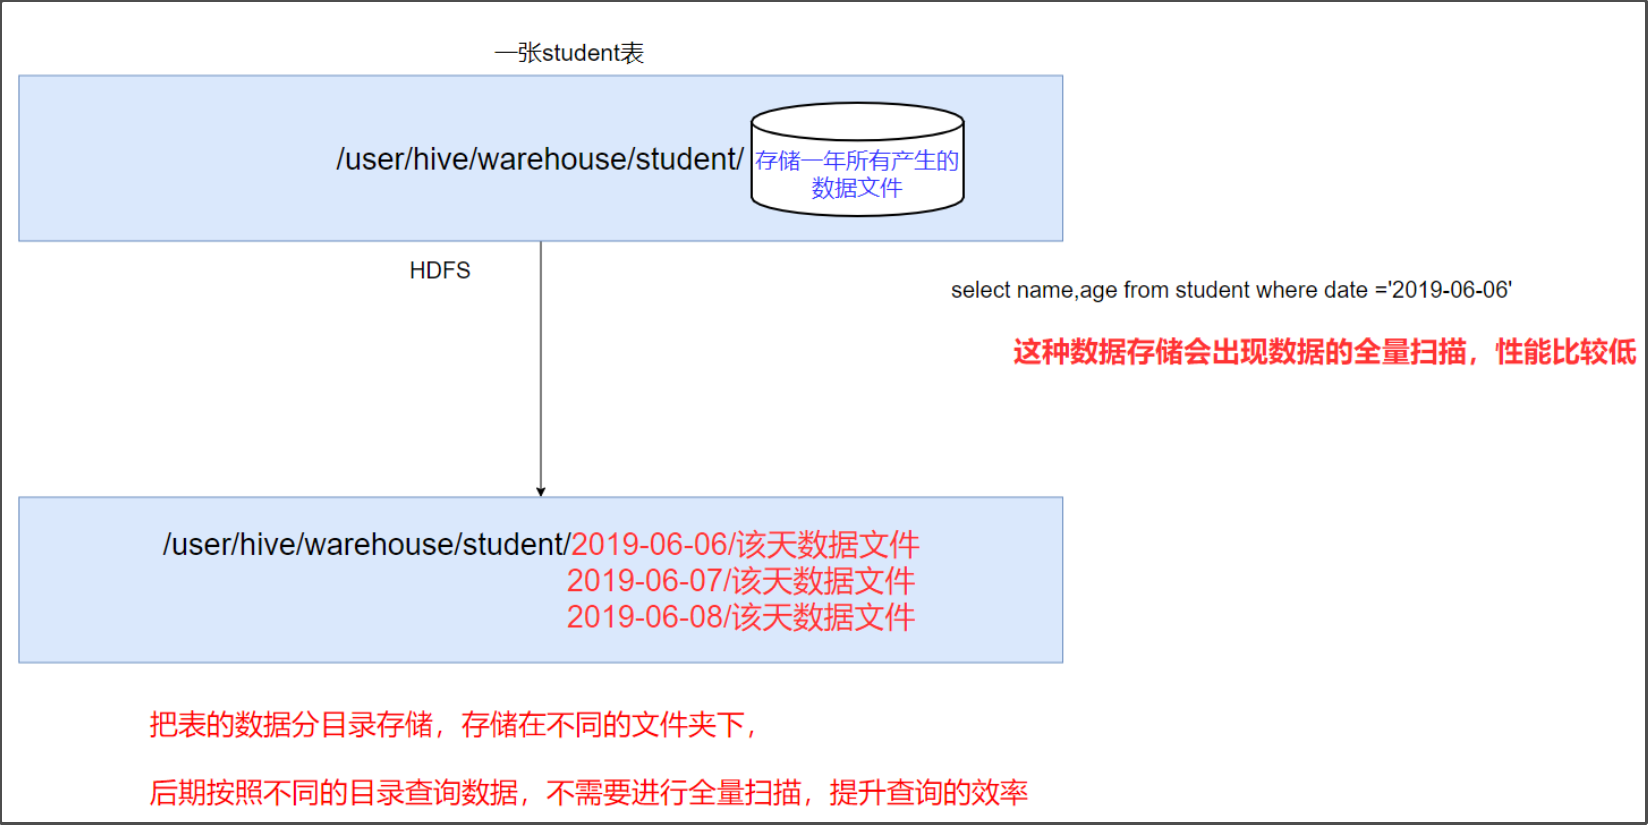
分区表的理解
- 如果
hive当中所有的数据都存入到一个文件夹下面,那么在使用MR计算程序的时候,读取一整个目录下面的所有文件来进行计算(全表扫描),就会变得特别慢,因为数据量太大了 - 实际工作当中一般都是计算前一天的数据,所以我们只需要将前一天的数据挑出来放到一个文件夹下面即可,专门去计算前一天的数据。
- 这样就可以使用
hive当中的分区表,通过分文件夹的形式,将每一天的数据都分成为一个文件夹,然后我们计算数据的时候,通过指定前一天的文件夹即可只计算前一天的数据。 - 在大数据中,最常用的一种思想就是分治,我们可以把大的文件切割划分成一个个的小的文件,这样每次操作一个小的文件就会很容易了,同样的道理,在
hive当中也是支持这种思想的,就是我们可以把大的数据,按照每天,或者每小时进行切分成一个个的小的文件,这样去操作小的文件就会容易得多了。 - 在文件系统上建立文件夹,把表的数据放在不同文件夹下面,加快查询速度。示意图如下:
创建分区表语法
create table score(s_id string, c_id string, s_score int) partitioned by (month string) row format delimited fields terminated by '\t';
创建一个表带多个分区
create table score2 (s_id string,c_id string, s_score int) partitioned by (year string, month string, day string) row format delimited fields terminated by '\t';
加载数据到分区表特定的分区当中去
load data local inpath '/kkb/install/hivedatas/score.csv' into table score partition (month='201806');
score.csv文件内容如下。
01	01	80
01	02	90
01	03	99
02	01	70
02	02	60
02	03	80
03	01	80
03	02	80
03	03	80
04	01	50
04	02	30
04	03	20
05	01	76
05	02	87
06	01	31
06	03	34
07	02	89
07	03	98
加载数据到多分区表当中去
load data local inpath '/kkb/install/hivedatas/score.csv' into table score2 partition(year='2018', month='06', day='01');
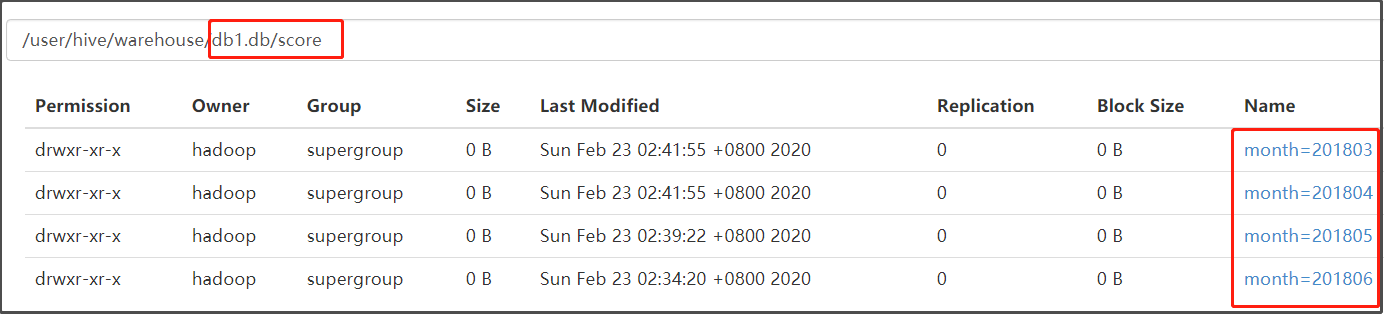
查看表的分区
0: jdbc:hive2://node03:10000> show partitions score;
+---------------+--+
|   partition   |
+---------------+--+
| month=201806  |
+---------------+--+
1 row selected (0.096 seconds)

0: jdbc:hive2://node03:10000> show partitions score2;
+----------------------------+--+
|         partition          |
+----------------------------+--+
| year=2018/month=06/day=01  |
+----------------------------+--+
1 row selected (0.074 seconds)
添加一个分区
使用add partition(xxx='xxx')关键字添加分区
0: jdbc:hive2://node03:10000> alter table score add partition (month='201805');
No rows affected (0.123 seconds)
0: jdbc:hive2://node03:10000> show partitions score;
+---------------+--+
|   partition   |
+---------------+--+
| month=201805  |
| month=201806  |
+---------------+--+
2 rows selected (0.084 seconds)
同时添加多个分区
alter table score add partition(month='201804') partition(month = '201803');
注意:添加分区之后就可以在hdfs文件系统当中看到表下面多了一个文件夹

删除分区
alter table score drop partition(month = '201806');
外部分区表综合练习
需求描述:
- 现在有一个文件
score.csv文件,里面有三个字段,分别是s_id string, c_id string, s_score int - 字段都是使用
\t进行分割 - 存放在
hdfs集群的这个目录下/scoredatas/day=20180607,这个文件每天都会生成,存放到对应的日期文件夹下面去 - 文件别人也需要公用,不能移动
- 请创建
hive对应的表,并将数据加载到表中,进行数据统计分析,且删除表之后,数据不能删除
需求实现:
-
node03执行以下命令,将数据上传到hdfs上面去将我们的
score.csv上传到node03服务器的/kkb/install/hivedatas目录下,然后将score.csv文件上传到HDFS的/scoredatas/day=20180607目录上
cd /kkb/install/hivedatas/
hdfs dfs -mkdir -p /scoredatas/day=20180607
hdfs dfs -put score.csv /scoredatas/day=20180607/
# 这里切记切记!!!!!!!,不要写成/scoredatas/20180607,否则表的修复那一步会出错
# 因为下面建立外部分区表的时候,指定通过day string 来进行分区
- 创建外部分区表,并指定文件数据存放目录
create external table score5(s_id string, c_id string, s_score int) partitioned by (day string) row format delimited fields terminated by '\t' location '/scoredatas';
- 进行表的修复,说白了就是建立我们表与我们数据文件之间的一个关系映射,之前因为是用
load来加载数据的,所有没有这一步。修复成功之后即可看到数据已经全部加载到表当中去了。
0: jdbc:hive2://node03:10000> msck repair table score5;
No rows affected (0.11 seconds)
0: jdbc:hive2://node03:10000> select * from score5;
+--------------+--------------+-----------------+-------------+--+
| score5.s_id  | score5.c_id  | score5.s_score  | score5.day  |
+--------------+--------------+-----------------+-------------+--+
| 01           | 01           | 80              | 20180607    |
| 01           | 02           | 90              | 20180607    |
| 01           | 03           | 99              | 20180607    |
| 02           | 01           | 70              | 20180607    |
| 02           | 02           | 60              | 20180607    |
| 02           | 03           | 80              | 20180607    |
| 03           | 01           | 80              | 20180607    |
| 03           | 02           | 80              | 20180607    |
| 03           | 03           | 80              | 20180607    |
| 04           | 01           | 50              | 20180607    |
| 04           | 02           | 30              | 20180607    |
| 04           | 03           | 20              | 20180607    |
| 05           | 01           | 76              | 20180607    |
| 05           | 02           | 87              | 20180607    |
| 06           | 01           | 31              | 20180607    |
| 06           | 03           | 34              | 20180607    |
| 07           | 02           | 89              | 20180607    |
| 07           | 03           | 98              | 20180607    |
+--------------+--------------+-----------------+-------------+--+
18 rows selected (0.165 seconds)
Hive的分桶表
分桶表介绍
分区表是为了减少扫描量,提高效率,那分桶表是干嘛的?分桶表的作用也是一样,只不过会进一步会细化而已。
分桶将整个数据内容按照某列属性值去hash值进行区分,具有相同的hash值的结果的数据进入到同一个文件中。
形象比喻:
select * from t1 where id % 4 =0;select * from t1 where id % 4 =1;select * from t1 where id % 4 =2;select * from t1 where id % 4 =3;

分桶表原理
-
分桶是相对分区进行更细粒度的划分
-
Hive表或分区表可进一步的分桶 -
分桶将整个数据内容按照某列取
hash值,对桶的个数取模的方式决定该条记录(行)存放在哪个桶当中;具有相同hash值的数据进入到同一个文件中。 -
比如按照
name属性分为3个桶,就是对name属性值的hash值对3取摸,按照取模结果对数据分桶。- 取模结果为 0 的数据记录存放到一个文件
- 取模结果为 1 的数据记录存放到一个文件
- 取模结果为 2 的数据记录存放到一个文件
-
-
如果一个表既分区又分桶,则必须先分区再分桶。如下:
CREATE TABLE user_info_bucketed(user_id BIGINT, firstname STRING, lastname STRING)
COMMENT 'A bucketed copy of user_info'
PARTITIONED BY(ds STRING)
CLUSTERED BY(user_id) INTO 256 BUCKETS;
COMMENT是注释的意思,对表的注释
#### 分桶表作用
- 1、取样`sampling`更高效。没有分区的话需要扫描整个数据集。
- 2、提升某些查询操作效率,例如`map side join`
# 案例演示:创建分桶表
- 在创建分桶表之前要执行的命令
- <font color='orang'>`set hive.enforce.bucketing=true;` </font>开启对分桶表的支持
- <font color='orang'>`set mapreduce.job.reduces=4; ` </font> 设置与桶相同的`reduce`个数(默认只有一个`reduce`)
- 进入`hive`客户端然后执行以下命令
```sql
use db1;
set hive.enforce.bucketing=true; #千万不要写成set db1.enforce.bucketing=true;
set mapreduce.job.reduces=4;
-- 创建分桶表
create table user_buckets_demo3(id int, name string)
clustered by(id) into 4 buckets
row format delimited fields terminated by '\t';
-- 创建普通表
create table user_demo(id int, name string)
row format delimited fields terminated by '\t';
- 准备数据文件
buckets.txt
#在linux当中执行以下命令
cd /kkb/install/hivedatas/
vim user_bucket.txt

1	anzhulababy1
2	anzhulababy2
3	anzhulababy3
4	anzhulababy4
5	anzhulababy5
6	anzhulababy6
7	anzhulababy7
8	anzhulababy8
9	anzhulababy9
10	anzhulababy10
- 加载数据到普通表 user_demo 中
load data local inpath '/kkb/install/hivedatas/user_bucket.txt' overwrite into table user_demo;
- 加载数据到桶表user_buckets_demo中。无法通过load将数据加载到分桶表里。
insert into table user_buckets_demo select * from user_demo;
--或者:
insert overwrite table user_buckets_demo select * from user_demo;
- hdfs上查看表的数据目录

- 下载表的数据文件,查看分桶情况:
#经查看,表的数据文件的内容如下:

#000000_0文件内容:即第1个桶的内容
8	anzhulababy8
4	anzhulababy4

#000000_1文件内容:即第2个桶的内容
9	anzhulababy9
5	anzhulababy5
1	anzhulababy1

#000000_2文件内容:即第3个桶的内容
10	anzhulababy10
6	anzhulababy6
2	anzhulababy2

#000000_3文件内容:即第4个桶的内容
7	anzhulababy7
3	anzhulabab
-
抽样查询分桶表的数据
tablesample抽样语句语法:tablesample(bucket x out of y)
- x表示从第几个桶开始取数据(1,2,3,4....)
- y与进行采样的桶数的个数、每个采样桶的采样比例有关;
- 比如说表的总共记录数 (行数) 有
10个,x=2,y=5,那么要抽取的桶数为总记录数为10*(2/5)=4,并且先从第二个桶(x=2)开始抽取。
-- tablesample(bucket 1 out of 2);
-- 需要采样的记录数为10*(1/2)=5
-- 先从第1个桶中取出数据
0: jdbc:hive2://node03:10000> select * from user_buckets_demo3 tablesample(bucket 1 out of 2);
+------------------------+--------------------------+--+
| user_buckets_demo3.id  | user_buckets_demo3.name  |
+------------------------+--------------------------+--+
| 8                      | anzhulababy8             |
| 4                      | anzhulababy4             |
| 10                     | anzhulababy10            |
| 6                      | anzhulababy6             |
| 2                      | anzhulababy2             |
+------------------------+--------------------------+--+
5 rows selected (0.059 seconds)


-- tablesample(bucket 1 out of 3);
-- 需要采样的记录数为10*(1/3)=3.3=3
-- 先从第1个桶中取出数据
0: jdbc:hive2://node03:10000> select * from user_buckets_demo3 tablesample(bucket 1 out of 3);
+------------------------+--------------------------+--+
| user_buckets_demo3.id  | user_buckets_demo3.name  |
+------------------------+--------------------------+--+
| 9                      | anzhulababy9             |
| 6                      | anzhulababy6             |
| 3                      | anzhulababy3             |
+------------------------+--------------------------+--+
3 rows selected (0.1 seconds)

 浙公网安备 33010602011771号